Ultra PDF Tool Tutorial - SkySof Software - PDF … Select file C:\Program Files\Ultra PDF...
16
Ultra PDF Tool Tutorial By SkySof Software Inc. http://www.skysof.com Email: [email protected] Download: http://www.getfilez.com/updf.zip Ultra PDF Tool is a powerful FREE utility program for creating/editing/manipulating many PDF files with ease. Features include: drawing barcodes, populating form fields from a database, creating PDF files from many file types, combining PDF files, attaching files to PDFs, printing PDFs, setting meta data, setting passwords, extracting text, saving PDF pages as images, rotating pages, deleting pages, appending pages, moving pages, adding blank pages, adding page numbers, etc. We also have another FREE utility for easily creating bookmarks in PDF files without Acrobat at http://www.getfilez.com/pdfbm.zip This document shows you step-by-step how to use each feature of Ultra PDF Tool. Add barcodes 1) On the Operation Tab select “Add barcodes” 2) Select the PDFs Tab and click the Add File button
Transcript of Ultra PDF Tool Tutorial - SkySof Software - PDF … Select file C:\Program Files\Ultra PDF...

Ultra PDF Tool Tutorial
By SkySof Software Inc. http://www.skysof.com
Email: [email protected]
Download: http://www.getfilez.com/updf.zip
Ultra PDF Tool is a powerful FREE utility program for creating/editing/manipulating many PDF files with ease.
Features include: drawing barcodes, populating form fields from a database, creating PDF files from many file
types, combining PDF files, attaching files to PDFs, printing PDFs, setting meta data, setting passwords,
extracting text, saving PDF pages as images, rotating pages, deleting pages, appending pages, moving pages,
adding blank pages, adding page numbers, etc. We also have another FREE utility for easily creating bookmarks
in PDF files without Acrobat at http://www.getfilez.com/pdfbm.zip
This document shows you step-by-step how to use each feature of Ultra PDF Tool.
Add barcodes
1) On the Operation Tab select “Add barcodes”
2) Select the PDFs Tab and click the Add File button
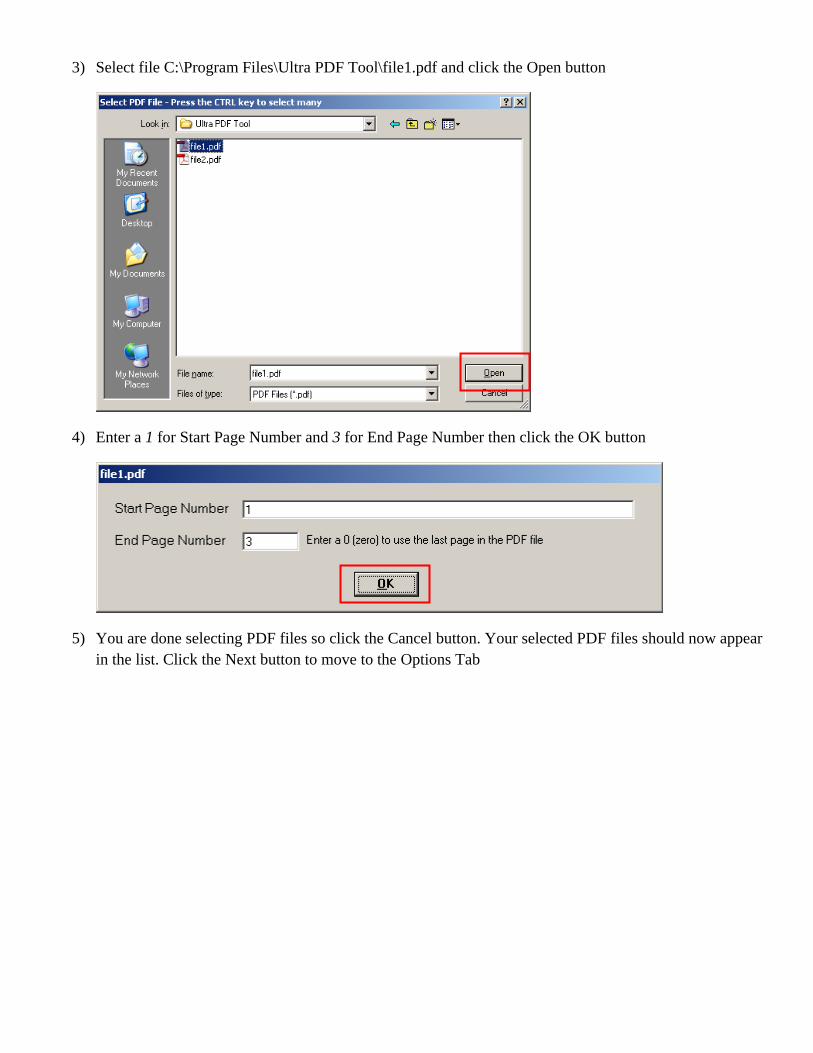
3) Select file C:\Program Files\Ultra PDF Tool\file1.pdf and click the Open button
4) Enter a 1 for Start Page Number and 3 for End Page Number then click the OK button
5) You are done selecting PDF files so click the Cancel button. Your selected PDF files should now appear
in the list. Click the Next button to move to the Options Tab

6) Enter Barcode as BarCode Data, Code128 as Barcode Type, 20 as Height, 60 as Width, 100 as X
Coordinate, and 700 as Y Coordinate. Click the Process button to add the barcode to the PDF file.
7) Open file C:\Program Files\Ultra PDF Tool\file1.pdf and confirm that the barcode was added to pages 1
through 3
Create PDFs from image files
1) On the Operation Tab select “Create PDFs from image files”
2) Select the PDFs Tab and click the Add File button (Click the Remove All button to remove any files
already in the list)
3) Add file C:\Program Files\Ultra PDF Tool\image1.jpg then click the Cancel button
4) Click the Next button to move to the Options Tab
5) Click the Process button to create the PDF file from the image file
6) Confirm that file C:\Program Files\Ultra PDF Tool\image1_1.pdf was created. Note that an underscore
character _ and a unique number are appended to the file name
Populate form field values – Demo1 (No field mapping file used)
1) On the Operation Tab select “Populate form field values”
2) Select the Options Tab
3) Select Access from the dropdown list of Database Types
4) For File enter CustID
5) For Database Connection String enter Provider=Microsoft.Jet.OLEDB.4.0;Data Source=C:\Program
Files\Ultra PDF Tool\author.mdb;Jet OLEDB:Database Password=;
6) For SQL Select Statement enter SELECT * FROM Customers
7) For Directory enter C:\Program Files\Ultra PDF Tool
8) For File enter C:\Program Files\Ultra PDF Tool\form.pdf
9) Click the Process button to generate PDF files and set form field values from values in a database table.
The PDF files will be named from values in the CustID field (see #4 above). The PDF files created will be
CUS01.PDF, CUS02.PDF, and CUS03.PDF. Open each PDF to verify that fields were updated with
values.
10) If the fields in the table are not named identically to the fields in the PDF file then a field mapping text file
must be used. For example, if the name of the table field is CityName and the name of the form field is
City then an entry of CityName:City must be added to the map file. Note that the field names are case-
sensitive. If you wish to use a map file it must exist in the same folder as the template PDF file. It must
also have the same name as the PDF file but with a TXT extension. For example, if the PDF template file
is C:\Program Files\Ultra PDF Tool\form.pdf then the map file must be named C:\Program Files\Ultra
PDF Tool\form.txt. See sample map file C:\Program Files\Ultra PDF Tool\form2.txt for more details –
this file is used to map to table Authors.
Populate form field values – Demo2 (Using a field mapping file)
1) On the Operation Tab select “Populate form field values”
2) Select the Options Tab
3) Select Access from the dropdown list of Database Types
4) For File enter AuthorID
5) For Database Connection String enter Provider=Microsoft.Jet.OLEDB.4.0;Data Source=C:\Program
Files\Ultra PDF Tool\author.mdb;Jet OLEDB:Database Password=;
6) For SQL Select Statement enter SELECT * FROM Authors
7) For Directory enter C:\Program Files\Ultra PDF Tool
8) For File enter C:\Program Files\Ultra PDF Tool\form.pdf
9) Rename file C:\Program Files\Ultra PDF Tool\form2.txt to C:\Program Files\Ultra PDF Tool\form.txt
10) Click the Process button to generate PDF files and set form field values from values in a database table.
The PDF files will be named from values in the AuthorID field (see #4 above). The PDF files created will
be ATH01.PDF, ATH02.PDF, and ATH03.PDF. Open each PDF to verify that fields were updated with
values. Note that the field mapping file C:\Program Files\Ultra PDF Tool\form.txt was used in this demo.
Set form field values
1) On the Operation Tab select “Set form field values”
2) Select the PDFs Tab and click the Add File button (Click the Remove All button to remove any files
already in the list)
3) Add file C:\Program Files\Ultra PDF Tool\setform.pdf then click the Cancel button
4) Click the Next button to move to the Options Tab
5) For Name enter City^Email Id^Yes1, for Value enter Raleigh^[email protected]^On
6) Click the Process button to set the value of the form fields
Set form field default values
7) On the Operation Tab select “Set form field default values”
8) Select the PDFs Tab and click the Add File button (Click the Remove All button to remove any files
already in the list)
9) Add file C:\Program Files\Ultra PDF Tool\form.pdf then click the Cancel button
10) Click the Next button to move to the Options Tab
11) For Name enter City^Email Id, for Value enter Default^Default
12) Click the Process button to set the default value of the form field
Combine PDFs
1) On the Operation Tab select “Combine PDFs”
2) Select the PDFs Tab and click the Add File button (Click the Remove All button to remove any files
already in the list)
3) Add files C:\Program Files\Ultra PDF Tool\file1.pdf and C:\Program Files\Ultra PDF Tool\file2.pdf then
click the Cancel button
4) Click the Next button to move to the Options Tab
5) For Directory enter C:\Program Files\Ultra PDF Tool, for File enter combined
6) Click the Process button to combine the two PDFs into a single PDF file
7) Confirm that file C:\Program Files\Ultra PDF Tool\combined.pdf was created
Attach files
1) On the Operation Tab select “Attach files”
2) Select the PDFs Tab and click the Add File button (Click the Remove All button to remove any files
already in the list)

3) Add file C:\Program Files\Ultra PDF Tool\file1.pdf then click the Cancel button
4) Click the Next button to move to the Options Tab
5) Click the Add button and select file C:\Program Files\Ultra PDF Tool\image1.jpg
6) Click the Cancel button
7) Click the Process button to attach file C:\Program Files\Ultra PDF Tool\image1.jpg to C:\Program
Files\Ultra PDF Tool\file1.pdf
8) Open file C:\Program Files\Ultra PDF Tool\file1.pdf and confirm that the file is attached
1) On the Operation Tab select “Print”
2) Select the PDFs Tab and click the Add File button (Click the Remove All button to remove any files
already in the list)
3) Add file C:\Program Files\Ultra PDF Tool\file1.pdf, enter 1 for Start Page Number and 0 for End Page
Number then click the Cancel button
4) Click the Next button to move to the Options Tab
5) Select a printer. Your default printer should already be selected
6) Click the Process button to print the selected pages of file C:\Program Files\Ultra PDF Tool\file1.pdf
Save as image file
1) On the Operation Tab select “Save as image file”
2) Select the PDFs Tab and click the Add File button (Click the Remove All button to remove any files
already in the list)
3) Add file C:\Program Files\Ultra PDF Tool\file1.pdf, enter 1 for Start Page Number and 1 for End Page
Number then click the Cancel button
4) Click the Next button to move to the Options Tab
5) Enter JPG for Image Type and 300 for Dots Per Inch
6) Click the Process button to create an image file from file C:\Program Files\Ultra PDF Tool\file1.pdf
7) Confirm that file C:\Program Files\Ultra PDF Tool\file1_1.jpg was created. Note that an underscore
character _ and a unique number are appended to the file name
Save as text file
1) On the Operation Tab select “Save as text file”

2) Select the PDFs Tab and click the Add File button (Click the Remove All button to remove any files
already in the list)
3) Add file C:\Program Files\Ultra PDF Tool\file1.pdf, enter 1 for Start Page Number and 0 for End Page
Number then click the Cancel button
4) Click the Next button to move to the Options Tab
5) Click the Process button to create a text file from file C:\Program Files\Ultra PDF Tool\file1.pdf
6) Confirm that file C:\Program Files\Ultra PDF Tool\file1.txt was created
Reduce file size
1) On the Operation Tab select “Reduce file size”
2) Select the PDFs Tab and click the Add File button (Click the Remove All button to remove any files
already in the list)
3) Add file C:\Program Files\Ultra PDF Tool\file1.pdf then click the Cancel button
4) Click the Next button to move to the Options Tab
5) Click the Process button to reduce the file size of file C:\Program Files\Ultra PDF Tool\file1.pdf
Save as different version
1) On the Operation Tab select “Save as different version”
2) Select the PDFs Tab and click the Add File button (Click the Remove All button to remove any files
already in the list)
3) Add file C:\Program Files\Ultra PDF Tool\file1.pdf then click the Cancel button
4) Click the Next button to move to the Options Tab
5) Currently the version of the selected file is 1.6 (Adobe Acrobat 7). Select PDF Version 4 (1.3)
6) Click the Process button to set the PDF version of file C:\Program Files\Ultra PDF Tool\file1.pdf
7) Verify the new setting by opening C:\Program Files\Ultra PDF Tool\file1.pdf with Adobe Reader then
from the File Menu select “Properties…” and look for “PDF Version:” on the Description Tab
Set meta data
1) On the Operation Tab select “Set meta data”
2) Select the PDFs Tab and click the Add File button (Click the Remove All button to remove any files
already in the list)
3) Add file C:\Program Files\Ultra PDF Tool\file1.pdf then click the Cancel button
4) Click the Next button to move to the Options Tab

5) For Title enter My PDF File, for Author enter John Doe, for Subject enter Set meta data test, and for
Keywords enter apples, oranges
6) Click the Process button to set the meta data of file C:\Program Files\Ultra PDF Tool\file1.pdf
7) Verify the new setting by opening C:\Program Files\Ultra PDF Tool\file1.pdf with Adobe Reader then
from the File Menu select “Properties…” and look for meta data on the Description Tab
Set base URL
1) On the Operation Tab select “Set base URL”
2) Select the PDFs Tab and click the Add File button (Click the Remove All button to remove any files
already in the list)
3) Add file C:\Program Files\Ultra PDF Tool\file1.pdf then click the Cancel button
4) Click the Next button to move to the Options Tab
5) For URL enter http://www.bing.com
6) Click the Process button to set the base URL of file C:\Program Files\Ultra PDF Tool\file1.pdf
7) Verify the new setting by opening C:\Program Files\Ultra PDF Tool\file1.pdf with Adobe Reader then
from the File Menu select “Properties…” and look for base URL on the Advanced Tab
Add image file
1) On the Operation Tab select “Add image file”
2) Select the PDFs Tab and click the Add File button (Click the Remove All button to remove any files
already in the list)
3) Add file C:\Program Files\Ultra PDF Tool\file1.pdf, enter 1 for Start Page Number and 1 for End Page
Number then click the Cancel button
4) Click the Next button to move to the Options Tab
5) For File enter C:\Program Files\Ultra PDF Tool\image1.jpg, for Scale Size enter 0.50, for Transparency
enter 50, for X Coordinate enter 100, and for Y Coordinate enter 700
6) Click the Process button to add the image file to page 1 of file C:\Program Files\Ultra PDF Tool\file1.pdf.
Note: This feature can also be used for adding watermark images to PDF file pages.
Add text
1) On the Operation Tab select “Add text”
2) Select the PDFs Tab and click the Add File button (Click the Remove All button to remove any files
already in the list)
3) Add file C:\Program Files\Ultra PDF Tool\file1.pdf, enter 1 for Start Page Number and 0 for End Page
Number then click the Cancel button
4) Click the Next button to move to the Options Tab
5) For Text enter This is a page heading for Page {FirstPageNo:1}, for Text Size enter 12, for Rotation
Degrees enter 0, for Transparency enter 0, for X Coordinate enter 100, for Y Coordinate enter 750, for
Font Name select Helvetica, and for Color select Red
6) Click the Process button to add page headings to pages 2 to the end of the document for file C:\Program
Files\Ultra PDF Tool\file1.pdf. Note: This feature can also be used for adding watermark text to PDF file
pages
Delete pages
1) On the Operation Tab select “Delete pages”
2) Select the PDFs Tab and click the Add File button (Click the Remove All button to remove any files
already in the list)
3) Add file C:\Program Files\Ultra PDF Tool\file1.pdf, enter 1 for Start Page Number and 1 for Page Count
then click the Cancel button
4) Click the Next button to move to the Options Tab
5) Click the Process button to delete the first page in file C:\Program Files\Ultra PDF Tool\file1.pdf
Set catalog information
1) On the Operation Tab select “Set catalog information”
2) Select the PDFs Tab and click the Add File button (Click the Remove All button to remove any files
already in the list)
3) Add file C:\Program Files\Ultra PDF Tool\file1.pdf then click the Cancel button
4) Click the Next button to move to the Options Tab
5) For the Key values enter Key1^Key2^Key3, for Value enter Value1^Value2^Value3
6) Click the Process button to add the information to the Document Catalog in file C:\Program Files\Ultra
PDF Tool\file1.pdf
Set custom information
1) On the Operation Tab select “Set custom information”
2) Select the PDFs Tab and click the Add File button (Click the Remove All button to remove any files
already in the list)

3) Add file C:\Program Files\Ultra PDF Tool\file1.pdf then click the Cancel button
4) Click the Next button to move to the Options Tab
5) For the Key values enter Key1^Key2^Key3, for Value enter Value1^Value2^Value3
6) Click the Process button to add the information to the Document Information Dictionary in file
C:\Program Files\Ultra PDF Tool\file1.pdf
Append pages
1) On the Operation Tab select “Append pages”
2) Select the PDFs Tab and click the Add File button (Click the Remove All button to remove any files
already in the list)
3) Add file C:\Program Files\Ultra PDF Tool\file1.pdf, enter 1,3-5 for Pages then click the Cancel button
4) Click the Next button to move to the Options Tab
5) For File enter C:\Program Files\Ultra PDF Tool\file2.pdf
6) Click the Process button to add the selected pages to the end of file C:\Program Files\Ultra PDF
Tool\file1.pdf
Move page
1) On the Operation Tab select “Move page”
2) Select the PDFs Tab and click the Add File button (Click the Remove All button to remove any files
already in the list)
3) Add file C:\Program Files\Ultra PDF Tool\file1.pdf, enter 12 for Page to Move, enter 1 for Move
Before/After then click the Cancel button
4) Click the Next button to move to the Options Tab
5) Uncheck checkbox “Move After”
6) Click the Process button to move the selected page in file C:\Program Files\Ultra PDF Tool\file1.pdf
Add pages
1) On the Operation Tab select “Add pages”
2) Select the PDFs Tab and click the Add File button (Click the Remove All button to remove any files
already in the list)
3) Add file C:\Program Files\Ultra PDF Tool\file1.pdf, enter 2 for Start Page Number, enter 1 for Page Count
then click the Cancel button

4) Click the Next button to move to the Options Tab
5) Click the Process button to add a blank page at page 2 in file C:\Program Files\Ultra PDF Tool\file1.pdf
Extract pages
1) On the Operation Tab select “Extract pages”
2) Select the PDFs Tab and click the Add File button (Click the Remove All button to remove any files
already in the list)
3) Add file C:\Program Files\Ultra PDF Tool\file1.pdf and enter 1,3-5 for Pages then click the Cancel button
4) Click the Next button to move to the Options Tab
5) For Directory enter C:\Program Files\Ultra PDF Tool
6) Click the Process button to extract selected pages from file C:\Program Files\Ultra PDF Tool\file1.pdf.
Note: the extract file name begins with “Extract” and a unique number then an underscore and the name of
the source file. The name of the extract file for this example is Extract1_file1.pdf
Rotate pages
1) On the Operation Tab select “Rotate pages”
2) Select the PDFs Tab and click the Add File button (Click the Remove All button to remove any files
already in the list)
3) Add file C:\Program Files\Ultra PDF Tool\file1.pdf, enter 1 for Start Page Number, enter 1 for End Page
Number then click the Cancel button
4) Click the Next button to move to the Options Tab
5) Select 90 for Rotation Degrees
6) Click the Process button to rotate page 1 exactly 90 degrees for file C:\Program Files\Ultra PDF
Tool\file1.pdf. Note: to rotate the page back to its original position select 0 Rotation Degrees
Add Comment
1) On the Operation Tab select “Add comment”
2) Select the PDFs Tab and click the Add File button (Click the Remove All button to remove any files
already in the list)
3) Add file C:\Program Files\Ultra PDF Tool\file1.pdf, enter 1 for Start Page Number, enter 1 for End Page
Number then click the Cancel button
4) Click the Next button to move to the Options Tab
5) For Title enter My Comment, for Comment enter Hello World!, for Annotation Type select Comment, for
X Coordinate type 100, for Y Coordinate type 700, for Common Colors select Blue
6) Click the Process button to add a comment to page 1 in file C:\Program Files\Ultra PDF Tool\file1.pdf
Add document JavaScript
1) On the Operation Tab select “Add document JavaScript”
2) Select the PDFs Tab and click the Add File button (Click the Remove All button to remove any files
already in the list)
3) Add file C:\Program Files\Ultra PDF Tool\file1.pdf then click the Cancel button
4) Click the Next button to move to the Options Tab
5) For JavaScript type in app.alert(‘Hello World!’);
6) Click the Process button to add a document-level JavaScript code to file C:\Program Files\Ultra PDF
Tool\file1.pdf. Note: the JavaScript executes when the PDF file is opened
Add page JavaScript
1) On the Operation Tab select “Add page JavaScript”
2) Select the PDFs Tab and click the Add File button (Click the Remove All button to remove any files
already in the list)
3) Add file C:\Program Files\Ultra PDF Tool\file1.pdf, for Start Page Number enter 2, for End Page Number
enter 2 then click the Cancel button
4) Click the Next button to move to the Options Tab
5) For JavaScript type in app.alert(‘This is page two’);
6) Click the Process button to add a page-level JavaScript code to file C:\Program Files\Ultra PDF
Tool\file1.pdf. Note: the JavaScript executes when page two is selected
Set initial view
1) On the Operation Tab select “Set initial view”
2) Select the PDFs Tab and click the Add File button (Click the Remove All button to remove any files
already in the list)
3) Add file C:\Program Files\Ultra PDF Tool\file1.pdf then click the Cancel button
4) Click the Next button to move to the Options Tab
5) Select Initial View View Thumbnails
6) Click the Process button to set the initial view of file C:\Program Files\Ultra PDF Tool\file1.pdf

Set page layout
1) On the Operation Tab select “Set page layout”
2) Select the PDFs Tab and click the Add File button (Click the Remove All button to remove any files
already in the list)
3) Add file C:\Program Files\Ultra PDF Tool\file1.pdf then click the Cancel button
4) Click the Next button to move to the Options Tab
5) Select Page Layout One Column
6) Click the Process button to set the page layout of file C:\Program Files\Ultra PDF Tool\file1.pdf
Set password
1) On the Operation Tab select “Set password”
2) Select the PDFs Tab and click the Add File button (Click the Remove All button to remove any files
already in the list)
3) Add file C:\Program Files\Ultra PDF Tool\file1.pdf then click the Cancel button
4) Click the Next button to move to the Options Tab
5) For User Password enter user, for Owner Password enter owner
6) Click the Process button to set passwords for file C:\Program Files\Ultra PDF Tool\file1.pdf. Open the file
with Adobe Reader with password user to verify that the password has been added. Note: passwords are
case-sensitive
Remove password
1) On the Operation Tab select “Remove password”
2) Select the PDFs Tab and click the Add File button (Click the Remove All button to remove any files
already in the list)
3) Add file C:\Program Files\Ultra PDF Tool\file1.pdf then click the Cancel button
4) Click the Next button to move to the Options Tab
5) For User Password enter user
6) Click the Process button to remove passwords for file C:\Program Files\Ultra PDF Tool\file1.pdf. Open
the file with Adobe Reader with password user to verify that the password has been removed
Saving Operations in Script Files
Each operation of Ultra PDF Tool may be saved in a script (SCR) file for future use. To save a script file click the
Save Script button located in the Options Tab. To load a script file go to the Scripts Tab and click the button
located at the upper right of the screen to the left of “Script File”. Multiple script files can be saved in project
(PRJ) files. Use the Add Script to List button to add scripts to the project and use the Save Project button to save
to a project file. To run the project click the Process button located next to the Save Project button.
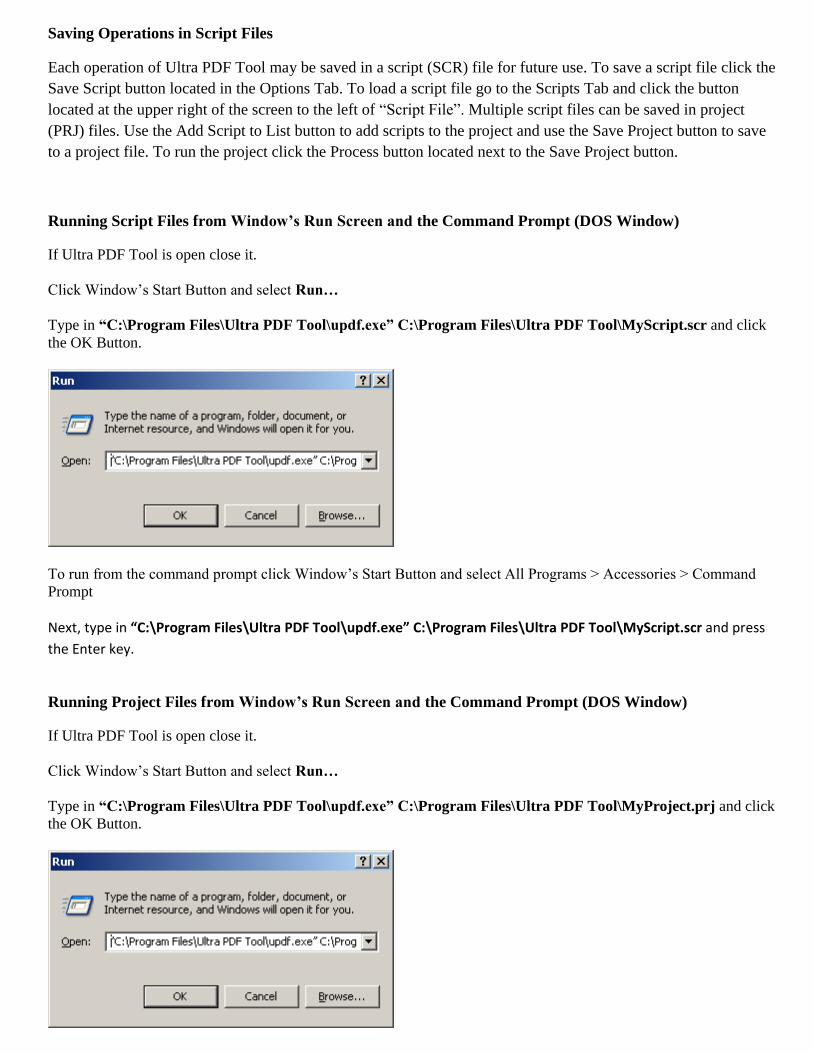
Running Script Files from Window’s Run Screen and the Command Prompt (DOS Window)
If Ultra PDF Tool is open close it.
Click Window’s Start Button and select Run…
Type in “C:\Program Files\Ultra PDF Tool\updf.exe” C:\Program Files\Ultra PDF Tool\MyScript.scr and click
the OK Button.
To run from the command prompt click Window’s Start Button and select All Programs > Accessories > Command
Prompt
Next, type in “C:\Program Files\Ultra PDF Tool\updf.exe” C:\Program Files\Ultra PDF Tool\MyScript.scr and press
the Enter key.
Running Project Files from Window’s Run Screen and the Command Prompt (DOS Window)
If Ultra PDF Tool is open close it.
Click Window’s Start Button and select Run…
Type in “C:\Program Files\Ultra PDF Tool\updf.exe” C:\Program Files\Ultra PDF Tool\MyProject.prj and click
the OK Button.

To run from the command prompt click Window’s Start Button and select All Programs > Accessories > Command
Prompt
Next, type in “C:\Program Files\Ultra PDF Tool\updf.exe” C:\Program Files\Ultra PDF Tool\MyProject.prj and
press the Enter key.
Note: Scripts and projects can be run from within batch (BAT) files.