
Ultima VI Reference Guide - Abandonia · Each time you begin a new Ultima VI adventure, you must...
8
Ultima VI Reference Guide IBM-PC/Tandy and 100% Compatibles by Lord British tkjalseipropta: P.O. Box 161750 • Austin, Texas 78716 IBM, Tandy, are registered trademarks of International Business Machines, Inc., and Tandy Corp. ULTIMA VI is a registered trademark of Richard Garriott © 1990 ORIGIN SYSTEMS, INC.
Transcript of Ultima VI Reference Guide - Abandonia · Each time you begin a new Ultima VI adventure, you must...
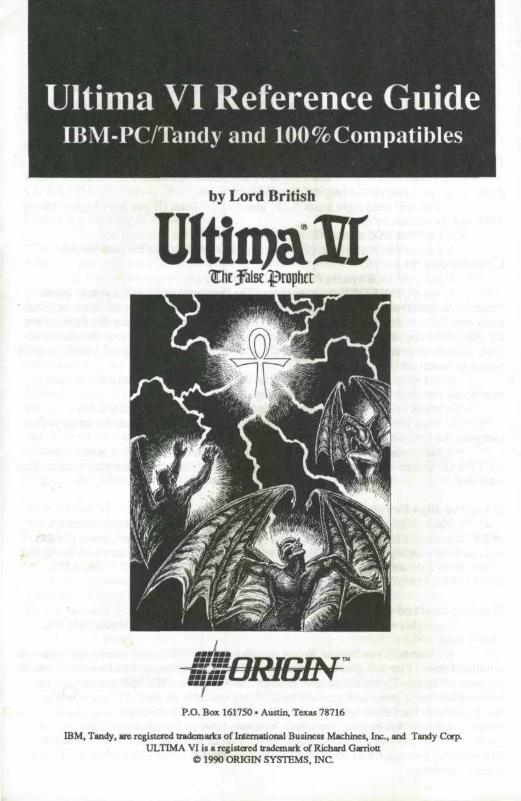
Ultima VI Reference GuideIBM-PC/Tandy and 100% Compatibles
by Lord British
tkjalseipropta:
P.O. Box 161750 • Austin, Texas 78716
IBM, Tandy, are registered trademarks of International Business Machines, Inc., and Tandy Corp.ULTIMA VI is a registered trademark of Richard Garriott
© 1990 ORIGIN SYSTEMS, INC.
Ultima VI Reference GuideIBM-PC/Tandy and 100% Compatibles
by Lord British
Getting Started — Floppy Drive Systems (No Hard Drive)Each time you begin a new Ultima VI adventure, you must create a set of "play
disks" (you can't play on the original disks). Here's how:1. You will need eight blank 5.25" low-density disks. (If you have higher density
disks, see the section below.)2. Put your DOS system disk in Drive A.3. Format one blank disk. (Refer to your DOS manual for the procedure.)
Label this disk "PLAYER."4. Put your DOS system disk back in Drive A.5. Type DISKCOPY A: A:<enter>. The computer will prompt you to insert
"source" (original) and "target" (blank) disks. One disk at a time, copy the seven originaldisks onto the remaining seven blank disks. The computer will automatically format themfor you before copying. After each disk has been copied, you will be given the chance tocopy another. Repeat this procedure until all seven disks have been copied. Label the sevencopies to match the originals.
6. Put all of the original disks back in the box and use them only if you want tostart a new adventure from the beginning. Play only on copied disks.
7. Insert your copy of the disk entitled "ENDGAME" into Drive A.8. Type INSTALL<enter>. Follow the directions on the screen to set up your
computer for optimal play.9. Insert your copy of the disk entitled "PROGRAM" into Drive A and type
ULTIMA6<enter> to begin play. (Do this any time you want to begin a play session fromnow on.)
If You Use High Density Floppy DisksUltima VI comes on low density, 360K disks. If you have a higher density 5 1/4"
or 3.5" drive and a low density floppy drive, you can copy two original Ultima VI disksonto each of your high-density disks. This will allow you to play the game with fewer disk-swaps. Here's the most efficient combination of disks: PROGRAM/INTRO, GAME/ENDGAME, MAP/PLAYER, POPULACE A/POPULACE B.
Getting Started — Hard Drive SystemsWe highly recommend playing Ultima VI off of a hard drive if you have one.
Here's how:1. Make sure you have at least 4 megabytes (4194304 bytes) of free disk space on
your hard drive. You will also need at least 530K (542720 bytes) of free memory availablefor your computer. To see if you have enough memory, type CHKDSK<enter>. In theinformation that is presented, you will find "Bytes available on disk" (telling you howmuch available hard drive space you have) and "Bytes free" (telling you how muchmemory you have left in your computer). You may have to free-up some disk space ormemory before you can proceed further. (Refer to your DOS manual for the procedure.)Booting your computer with an "MS-DOS System Master" floppy disk often solves thismemory problem.

2. Insert the disk entitled "ENDGAME" into floppy Drive A.3. Type A:<enter>.4. If your hard drive is device C, type COPYU6 A: C:<enter>.
If your hard drive is device D, type COPYU6 A: D:<enter>.5. Follow the directions on screen until all disks have been copied. This will
create a subdirectory entitled "ULTIMA6" on your hard drive and copy all of theUltima VI disks to that subdirectory.
6. You will automatically be taken to the INSTALL program. Follow thedirections on the screen to set up your computer for optimal play.
7. After installation is complete, type ULTIMA6<enter> to begin play. Thenext time you want to start a play session, enter the ULTTMA6 subdirectory by typingCD\ULTIMA6<enter>. Then type ULTIMA6<enter> to begin play.
Creating Multiple CharactersThe first time you play Ultima VI, you will have to create a character (see
"The Main Menu," below). After you've played with that character for a while,however, you may want to create a new one with a different name and characteristics.
If you're playing on floppy disks, this is simple. Run the INSTALL programagain (by typing INSTALL, as above). After you answer all of the questions about yourcomputer system, you will be given three options. To create a new character whilepreserving your old one (along with your old character's last saved game position),insert a new Player disk in your floppy drive and select option 1. (If you use your oldPlayer disk at this point, your old character and saved game will be lost). Goimmediately to the main menu and select Create a Character (see below).
Hard drive owners can save alternate characters by renaming their existingUltima6 directory (using any of a number of commercially available utility programs)and using the COPYU6 command to recopy the game. If your hard drive has multiplepartitions (in other words, if it has both a C and a D drive), you can install the game onone drive when you begin and on another if you want to try a different characterwithout erasing your original character and saved game. If you don't mind erasing yourcharacter and saved game, you can always begin again by running the INSTALLprogram and, when you reach the main menu, selecting Create a Character (see below).
The Main MenuWhen you type "Ultima6," an introductory sequence will begin. Read all text
messages that appear and press any key or click in the message box to move on to the nextmessage or screen. (Press <escape> if you want to bypass this sequence altogether.)
When this is over, the main menu will appear, listing five options — Introduction,Create a Character, Transfer a Character, Acknowledgements, and Journey Onward. Toselect one of these options, click on it with the mouse. From the keyboard, use the arrowkeys or numeric keypad to highlight the one you want then press return, or type the firstletter of the option's name.
The first time you play, you will want to go directly to Create a Character. Here,you can type in your character's name and select his or her Sex and Portrait. Go on to thenext portion of the character creation system by clicking on the Continue box (or by typing"C"). This will take you to a series of questions. Answer by selecting the A or B responseto each question. The way in which you answer determines the kind of character you get.
When your character is complete, you will automatically be taken to theIntroduction. This will tell you what the game is about. If you want to watch this againlater, select Introduction from the menu.
If you've played Ultima IV or Ultima V, you may want to bring your character fromone of those games over to Ultima VI. Transfer a Character allows you to do that.Select this option and follow the directions on the screen, then click on the Transferbutton and you're ready to use your old character in your new game.
Acknowledgements tells you who did what in the creation of Ultima VI.Journey Onward takes you directly into the Ultima VI game. Select this option
when you're ready to play.
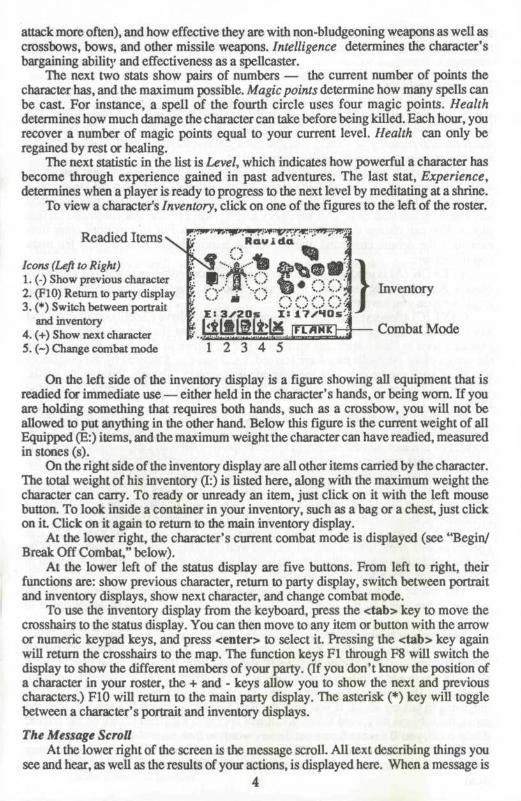
Screen LayoutThe game screen is divided into four regions — the map, the status display, the
message scroll, and the command icons.
CommandIcons
Message Scroll
/ / / i i i i \ \ \A C T L G D M U R B
The MapThe largest region, in the upper left, is the map. This shows the world you are
moving through, with the view centered on you (or another member of your party if it'stheir turn).
With a mouse, move your characters around by positioning the pointer over the mapuntil it becomes an arrow pointing in the direction you wish to move. Then click the leftbutton. Some actions ask you for a target location. (You may have to say where you wantto drop an item, for example). To select a location, click on it with the left mouse button.
If you want to use the keyboard, move by pressing one of the arrow keys, or one ofthe eight keys around the 5 on the numeric keypad. These keys are also used to selecttarget locations — move the crosshairs on the screen to the desired location and press<enter> to initiate the action.
You can pass your turn and do nothing by positioning the mouse pointer over yourcharacter and clicking the left mouse button or by pressing the space bar.
The Status DisplayIn the upper right-hand corner of the screen is the status display. At the top of the
display, the current position of Britannia's sun and the positions and phases of the twomoons in the sky are shown.
Beneath this is a roster of all the members of your party, along with each character'sfigure and current hit points. A character whose hit points are printed in red is hurt badly;one whose hit points are green is poisoned. (CGA and Hercules cards will differ slightly.)
When a party has more than five characters, arrows appear at the top and bottom ofthis part of the screen. Click on these arrows to scroll up and down through the list ofparty members. The + and - keys can also be used.
If you click on a character's name, or press a function key (F1-F8), you will beshown their portrait and statistics. The higher a stat, the better. Strength determines howmuch a character can carry, and how effectively they can strike with bludgeoningweapons. Dexterity determines how quick they are (faster characters get to move and/or
attack more often), and how effective they are with non-bludgeoning weapons as well ascrossbows, bows, and other missile weapons. Intelligence determines the character'sbargaining ability and effectiveness as a spellcaster.
The next two stats show pairs of numbers — the current number of points thecharacter has, and the maximum possible. Magic points determine how many spells canbe cast. For instance, a spell of the fourth circle uses four magic points. Healthdetermines how much damage the character can take before being killed. Each hour, yourecover a number of magic points equal to your current level. Health can only beregained by rest or healing.
The next statistic in the list is Level, which indicates how powerful a character hasbecome through experience gained in past adventures. The last stat, Experience,determines when a player is ready to progress to the next level by meditating at a shrine.
To view a character's Inventory, click on one of the figures to the left of the roster.
Readied Items
Icons (Left to Right)1. (-) Show previous character2. (F10) Return to party display3. (*) Switch between portrait
and inventory4. (+) Show next character5. (~) Change combat mode
Inventory
Combat Mode
1 2 3 4 5
On the left side of the inventory display is a figure showing all equipment that isreadied for immediate use — either held in the character's hands, or being worn. If youare holding something that requires both hands, such as a crossbow, you will not beallowed to put anything in the other hand. Below this figure is the current weight of allEquipped (E:) items, and the maximum weight the character can have readied, measuredin stones (s).
On the right side of the inventory display are all other items carried by the character.The total weight of his inventory (I:) is listed here, along with the maximum weight thecharacter can carry. To ready or unready an item, just click on it with the left mousebutton. To look inside a container in your inventory, such as a bag or a chest, just clickon it Click on it again to return to the main inventory display.
At the lower right, the character's current combat mode is displayed (see "Begin/Break Off Combat," below).
At the lower left of the status display are five buttons. From left to right, theirfunctions are: show previous character, return to party display, switch between portraitand inventory displays, show next character, and change combat mode.
To use the inventory display from the keyboard, press the <tab> key to move thecrosshairs to the status display. You can then move to any item or button with the arrowor numeric keypad keys, and press <enter> to select it. Pressing the <tab> key againwill return the crosshairs to the map. The function keys Fl through F8 will switch thedisplay to show the different members of your party. (If you don't know the position ofa character in your roster, the + and - keys allow you to show the next and previouscharacters.) F10 will return to the main party display. The asterisk (*) key will togglebetween a character's portrait and inventory displays.
The Message ScrollAt the lower right of the screen is the message scroll. All text describing things you
see and hear, as well as the results of your actions, is displayed here. When a message is4
too long to fit on the scroll, a flashing, downward-pointing arrow appears at the bottomof the scroll. Press the space bar or click in the message scroll to view the rest of themessage.
The Command IconsUnderneath the map are ten command buttons. The main commands in Ultima VI
can be selected either with the mouse or the keyboard. To use a command from thekeyboard, simply press the first letter of its name. With the mouse, move the pointer tothe command button you want to use and click the left mouse button. Then select theobject or person you want to use the command on.
For frequently used commands, such as Get, Look, Attack or Move, you can set upa default command for use with the right mouse button. Click the right button on acommand, and a blue line will appear under it. From then on, clicking the right button onany shape on the map or in your inventory display will execute that command on thatobject. You can change the default command at any time. For all functions other thanexecuting the default command, the left mouse button should be used. The ten maincommands are:
ATTACK (A) is used to fight monsters, animals, or people, or to attempt to destroyobjects. After choosing the Attack command, choose a target on the map that is in rangeof the weapon you have readied.
CAST (C) allows you to cast magic spells. You must have a spellbook readied, andhave enough magic points and reagents available to cast the desired spell. When acharacter tries to Cast a spell, the spellbook will be shown in the status display, listingthe names of all the spells they have learned. Each name is followed by the number oftimes that spell can be cast with the reagents in inventory. To page through the spells,click on the blue arrow buttons below the list or use the left and right arrow keys on thekeyboard.
You cast a spell by clicking on its name, or by selecting it with the up and downarrows and pressing <enter>. Typing the first letter of each syllable of the spell alsoworks. For instance, to cast the Repel Undead spell — An Xen Corp — you could typeAXC and press <enter>. Some spells require you to specify whom or what you arecasting them on. Simply select a target on the map or in your inventory.
There is one special spell, the Help spell, which requires no reagents. This willreturn you instantly to Lord British's Castle. It should only be used in the most desperateof situations, however, as it will usually cost your party many experience points.
TALK (T) lets you converse with the people you encounter in the game. You canalso speak with some shrines and statues, and with the other members of your party. Youmust select the character on the map you wish to speak with. Their portrait will appear inthe status display while they are speaking.
You talk by typing single words on the keyboard and pressing <enter>. All wordsmay be abbreviated to the first four letters (e.g., "elephant" may be abbreviated to"elep").
Most people will respond to the words "name," "job," and "bye." (The "bye"command ends a conversation. You can accomplish the same thing by pressing <enter>without typing anything.) Some people will also respond to the words "join" and "leave,"allowing you to add members to your party (up to a maximum of eight) or remove them.
During the course of conversation, people give you an idea of what they'reinterested in talking about. If you have the help function on, as it is when you start thegame, the subjects they want to talk about will appear in a different color on the screen;if help is off, you'll have to figure out the key words in their conversations. (Note that thehelp function is not available on CGA cards.)You can turn help on or off by pressingcontrol-H. However, be aware that some people will respond to other subjects, if you askthem. 5
LOOK (L) allows you to identify anyone or anything in the location you select, onthe map or in your inventory. This command can be used to read books, signs, andgravestones, or to examine paintings. It will also give information on the effectiveness ofweapons and armor. When you use the Look command on an object you are adjacent to,you will search it. This will reveal the contents of chests, bags, crates, barrels, etc. It willalso let you find hidden items or secret doors.
GET (G) lets you pick up an object on the map. You must be standing next to it. Ifit isn't too heavy, it will be put into your inventory.
DROP (D) can be used to lighten your load by getting rid of items you no longerneed. First select the item in your inventory, then choose a spot on the map to place it.
MOVE (M) is used to push an item or to move it between characters in the party.If you select an item on the map, you can sometimes push it to an adjacent square to
get it out of your way. If it's something alive, though, it may not always let you! Movingan item into a square with a chest, barrel, or crate will place the item inside it.
This command can also be used to move things in and out of containers or from onecharacter to another. To move an item to another character, click on them on the map.When you buy a new spell, you must move it into your spellbook before you can cast it.
USE (U) operates any object that has some function. Among other things, it will letyou open and close doors and chests, enter or exit ships, climb ladders, milk cows, mounthorses, light or extinguish fires, look into telescopes or crystal balls, ring bells, eat ordrink food and beverages, or play musical instruments. When using a musical instrument,you play it with the numbers 0 through 9, and press <enter> when finished.
REST (R) lets your party set up a camp and recover health and magic points. Youwill be asked how many hours you wish to rest, from 1 to 9, and who will stand guard.Select a character on the map display, or press <escape> to have no guard. A characterwill not regain hit points if they are out of food, or if they stand guard. If you areambushed while resting, however, your party will not be awakened unless you havesomeone on guard! You can only rest on land. At sea, this command repairs your frigate.Multiple "Rests" may be required to repair a ship completely.
BEGIN/BREAK OFF COMBAT (B) switches back and forth between party modeand combat mode. In party mode, the members of your party automatically follow youaround. In combat, each character will behave according to the combat mode you haveselected for them on their inventory display. Characters in Front, Rear, or Flank modeswill position themselves in a formation centered around you. Characters in Assault modewill attack the nearest enemy, while those in Retreat mode will avoid combat. Charactersin Berserk mode will charge and attack the strongest foe. Lastly, if you select Commandmode for a character, you can control their actions each turn, just as you do for your owncharacter. You can change a character's combat mode at any time, even in the middle ofa battle.
Keyboard Commands• Control-S saves the game. You will be asked if you really want to save the game. Type " Y" (Yes) to
save or "N" (No) to cancel the command and keep playing.• Control-R restores the game to the last saved position. As in the case of the Save command, you will
be asked to reply "Y" or "N."• Con trol-Q quits the game and exits to DOS. Make sure you have saved the game first if you want to
return to the same position later!• Control-H toggles help mode on/off.• Control-Z toggles sound and music on/off.• 1 through 8 place a member of the party in solo mode. In this mode, you can move that character
around and perform whatever actions you wish, while the rest of the party remains motionless. Notethat you can't talk to people or use ladders, dungeon entrances, or moongates in solo mode — youmust be in party mode.
• 0 (zero) exits solo mode and returns to party mode.
• Escape aborts most functions.
Spell ListAll known spells of the Eight Circles of Magic are listed below. The first column gives each
spell's English language name/effect. The second column lists the magical syllables that form thespell's incantation. (Remember, you can cast a spell by typing the first letter of each syllable.) Thelast column tells you which reagents are necessary to cast the spell. These are abbreviated asfollows:
AsGaGiMa
The 1st CircleCreate Food In Mani YlemDetect MagicDetect TrapDispel MagicDouseHarmHealHelpIgniteLight
WisOrtWisJuxAn Jux OrtAn FlamAn ManiIn ManiKal LorIn FlamIn Lor
Sulfurous Ash MoGarlic NiGinseng PeMandrake Root Si
Ga.Gi.MaNi,AsNi,AsGa,GiGa,PeNi,SiGi,Si<none>As,PeAs
The 2nd CircleInfra visionMagic ArrowPoisonReappearSleepTelekinesisTrapUnlock MagicUntrapVanish
Quas LorOrtJuxIn Nox ForIn YlemInZuOrt For YlemIn JuxEx PorAn JuxAn Ylem
Ni,AsAs,PeNi.Mo.PeSi,Mo,PeNi,Si,PeMo,Ma,PeSi,NiAsJVIoAS.MOGa,Mo,Pe
The 3rd CircleCurseDispel FieldFireballGreat LightMagic LockMass AwakenMass SleepPeerProtectionRepel Undead
An SanctAn GravFor FlamVas LorAn ForAn Vas ZuVasZuVas Wis YlemIn SanctAn Xen Corp
As.Ni.GaPe,AsAs,PeAs,MaAs.Mo.GaGi,GaGi,Ni,SiNi,MaAs.Gi.GaGa,As
The 4th CircleAnimateConjureDisableFire FieldGreat HealLocateMass DispelPoison FieldSleep FieldWind Change
Ort YlemKalXenAn Vas ManiIn Flam GravVas ManiIn WisVas An Jux ArtIn Nox GravIn Zu GravRel Hur
As.Ma.MoSi,MaNi,Si,MaPe.As.SiGi,Si,MaNiGas,Gi,NiNi,Si,PeGi,Si,PeAs,Mo
The 5th CircleEnergy FieldExplosionInsect SwarmInvisibilityLightningParalyzePickpocketRevealSeanceX-ray
The 6th CircleCharmCloneConfuseFlame WindHailstormMass ProtectNegate MagicPoison WindReplicateWeb
The 7th CircleChain BoltEnchantEnergy WindFearGate TravelKillMass CurseMass Invis.Wing StrikeWizard Eye
The 8th CircleDeath WindEclipseMass CharmMass KMResurrectSlimeSummonTime StopTremor
Blood MossNightshadeBlack PearlSpider's Silk
In Sanct GravVas For HamKalBetXenSanct LorOrt GravAn Xen PorFor YlemAn Sanct LOTKal Mani CorpWis Ylem
An Xen ExIn Quas XenVas QuasFlamHurKal Des YlemVas In SanctAn OrtNox HurIn Quas YlemIn Des POT
Vas Ort GravIn Ort YlemGrav HurQuas CorpVas Rel PorIn CorpVas An SanctVas Sanct LorKal Ort XenPOT Ort Wis
Corp HurVas An LorVas An Xen ExVas CorpIn Mani CorpVas Rel XenKal Xen CorpAnTymVas POT Ylem
Ma,Si,PeMa,As,Pe,MoMo,Si,AsNi,MoPe,Ma,As'Si.As.Ni.PeMo.Si.NiSi.Ni.MaMo,Ma,Ni.Si,AsMa,As
Pe,Ni,SiAs,Si,Mo,Gi,Ni,MaMa,NiAs.Mo.MaMo.Pe.MaAs.Gi.Ga.MaGa.Ma.AsNi.As.MoAs,Si,Mo.Gi,NiSi
Pe,Ma,As,MoSi.Ma.AsMa,Ni,As,MoNi.Ma.GaAs.Pe.MaPe.Ni.AsAs.Ni.Ga.MaMa,Ni,Mo,PeMo,Si.Ma,AsMo,Ni,Ma,As,Pe,Si
Ma.Ni.As.MoMa,As,Ni,Ga,MoPe.Ni.Si.MaPe,Ni,Ma,AsGa,Gi,Si,As,Mo,MaMo.Ni.MaMa,Ga,Mo,SiMa.Ga.MoMo.As.Ma
ORI-3289-B


![ULTIMA XL series / ULTIMA XT series - Heating and Process · PDF fileULTIMA XL® Series ULTIMA XT® Series Gas Monitors ... 5.2 ULTIMA XIR Cleaning Procedure ... General-purpose [GP]](https://static.fdocuments.in/doc/165x107/5aba02e37f8b9ab62f8e8c99/ultima-xl-series-ultima-xt-series-heating-and-process-xl-series-ultima-xt-series.jpg)