
Ultherapy hifu beauty machine user manual · MARKING Creating the facial map is a critical...
16
Ultherapy hifu beauty machine user manual
Transcript of Ultherapy hifu beauty machine user manual · MARKING Creating the facial map is a critical...

Ultherapy hifu beauty machine user manual
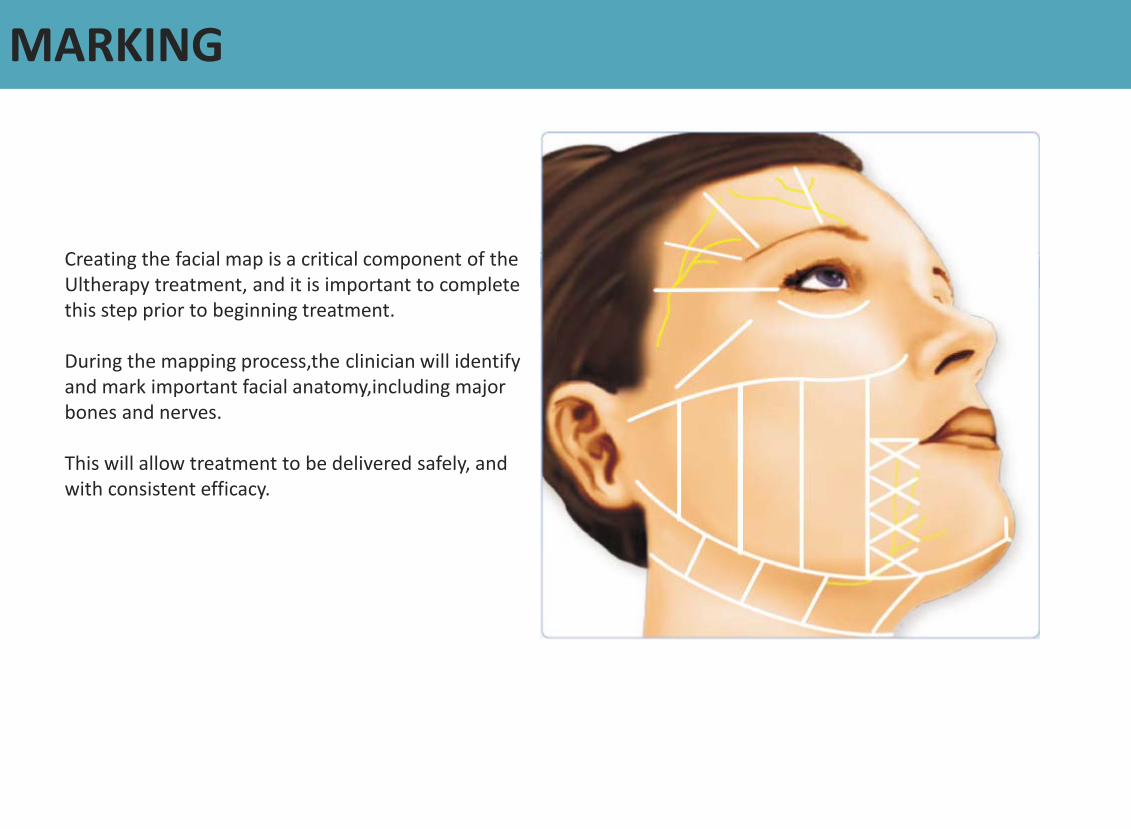
MARKING
Creating the facial map is a critical component of the Ultherapy treatment, and it is important to complete this step prior to beginning treatment. During the mapping process,the clinician will identify and mark important facial anatomy,including major bones and nerves. This will allow treatment to be delivered safely, and with consistent efficacy.

Making: Upper Face A.INFRAORBITAL RIM 1. Palpate the bone below the eye (infraorbital rim) and mark along the edge of it. B.LATERAL ORBIT 1. Mark a horizontal line from the outside corner of the eye to the hairline. 2. Place the treatment card perpendicular to the line and mark 5 lines below and 5 lines above 3. Draw a line that angles upward from the top mark. 4. Draw a line that angles downward from the bottom mark.The lines in steps 3 and 4 should create a fan shape that points to the eye. C. BROW 1. Have the patient look straight up and mark the position of the midpupil, from the brow to the hairline. 2. Place the treatment card perpendicular to the mid-pupil line, along the eyebrow. Count 10 lines towards the ear and draw a vertical line to the hairline.10-1.5 7-3.0

MARKING: Lower Face D. UPPER NECK / SUBMENTAL 1. Palpate the thyroid cartilage and draw a line from the top of the thyroid cartilage to the bottom of each ear. 2. Mark the middle of the chin with a dot. 3. Mark along the border of the jaw bone (mandible), and follow the curvature of the jaw bone up to each ear. 4. Place the treatment card over the midline dot on the chin and mark down each side of the card to the line at the thyroid cartilage. 5. Place the edge of the treatment card over the line just created and mark down the outside edge. Repeat the process 2-3 times on both sides to create the 5 - 7 segments for the upper neck. Note: When marking new treatment columns, overlap each column by 1-2 dots on the treatment card, to ensure proper density.

MARKING: Lower Face E. CHEEKS 1. Draw a line from the top edge of the middle of the ear to the bottom of the cheek bone and towards the outside of the nose. 2. Place the card vertically against the corner of the mouth and draw a line on the outside of the card (the side closest to the ear), from the cheek to the jaw. 3. Line the card up horizontally with the corner of the mouth and draw a line along the top edge of the card. 4. Fill the area by the mouth with X’s to clearly indicate not to treat in this area. This is the location of the marginal mandibular nerve. 5. Use the treatment card to draw 2-3 columns, starting at the outside edge (closest to the ear) of the area you marked with X’s. Note: When marking new treatment columns, overlap each column by 1-2 dots on the treatment card, to ensure proper density.

COMPLETED PATIENT MARKING
Face important nerves approximate location

Ultherapy treatment guidelines were developed to provide a consistently high level of safety, efficacy and comfort for your patients. It is important to perform a patient assessment prior to treatment,and consider factors such as the amount of laxity,volume, skin quality, age, and overall health of the individual. The treatment plan should also address the areas of greatest concern for the patient, and set realistic expectations for their anticipated outcome.
TREATMENT

NOTES: 4.5mm Treatment Guideline UPPER NECK Treat the upper neck, making multiple passes and moving between columns as necessary, based on the patient’s response. - Deliver the first line of energy in each column as close to the jaw bone (mandible) as possible, without hitting it. Align the transducer with the mandible, then slide it back and forth so the mandible “flashes” across the screen. Deliver energy when the mandible is not in the treatment window. - Do not deliver energy below the line above the thyroid cartilage. - Treating directly over the mandible or facial nerves may increase discomfort and the likelihood of potential side effects. CHEEK 1. Treat the cheek region, making multiple passes and moving between columns as necessary, based on the patient’s response. - Do not treat directly into the cheek bone or into the mandible. - Ensure that the columns of treatment touch each other without overlapping, to ensure proper density. - Treating directly over the mandible or facial nerves may increase discomfort and the likelihood of potential side effects.
LATERAL ORBIT Align the transducer with the outside corner of the eye(closest to the ear),positioning the handpiece so the cord is towards the patient’s eye. Deliver an equal number of lines above and below the marked line at the outside corner of the eye - When treating, the end of the transducer closest to the ear will move more than the opposite side, creating a Fanning pattern. - Reposition the transducer after delivering each line, instead of just pivoting on a point, to prevent retreating the same tissue. BROW 1. Place the treat line of the transducer on the brow region, positioning the handpiece so the cord is towards the patient’s eye. Deliver the determined number of lines spread evenly in the region. - Shorten the treatment line if the frontal bone is visible above the green line, if the shape of the frontal bone prevents good coupling or if the patient’s sensory response is significant. GENERAL NOTES: - Do not treat over the eye, in a location or with a technique,where the
ultrasound energy may reach the eye. - Do not deliver energy if bone is visible at or above the treatment line. - Frequently verify proper coupling between the transducer and the skin (see REFERENCE section).

NOTES: 4.5mm Treatment Guideline
Mandibular limbic region, do not treat
Face important nerves approximate location

NOTES: 3.0mm Treatment Guideline UPPER NECK 1. Treat the upper neck, making multiple passes and moving between columns as necessary, based on the patient’s response. - Deliver the first line of energy in each column as close to the jaw bone (mandible) as possible, without hitting it. Align the transducer with the mandible, then slide it back and forth so the mandible “flashes” acros the screen. Deliver energy when the mandible is not in the treatment window. - Treating directly over the mandible or facial nerves may increase discomfort and the likelihood of potential side effects. CHEEK 1. Treat the cheek region, making multiple passes and moving between columns as necessary, based on the patient’s response. - Do not treat directly into the cheek bone or into the mandible.
- Ensure that the columns of treatment touch each other without overlapping, to ensure proper density.
- Treating directly over the mandible or facial nerves may increase discomfort and the likelihood of potential side effects.
LATERAL ORBIT 1. Align the transducer with the outside corner of the eye (closest to the ear),positioning the handpiece so the cord is towards the patient’s eye. 2. Deliver an equal number of lines above and below the marked line at the outside corner of the eye. - When treating, the end of the transducer closest to the ear will move more than the opposite side, creating a fanning pattern. - Reposition the transducer after delivering each line, instead BROW 1. Place the treat line of the transducer on the brow region, positioning the handpiece so the cord is towards the patient’s eye. Deliver the determined number of lines spread evenly in the region. - Shorten the treatment line if the frontal bone is visible above the green line, if the shape of the frontal bone prevents good coupling or if the patient’s sensory response is significant. INFRAORBITAL 1 . Align the transducer on the mark below the eye , while gently pulling the infraorbital skin in a downward direction ( towards the feet ). 2. Deliver the first row of energy at the mark and then deliver each additional row below the last row delivered .Never tilt the transducer towards the orbit .
GENERAL NOTES: - Do not treat over the eye, in a location or with a technique,where the ultrasound energy may reach the eye. - Do not deliver energy if bone is visible at or above the treatment line.

NOTES: 3.0mm Treatment Guideline
Face important nerves approximate location
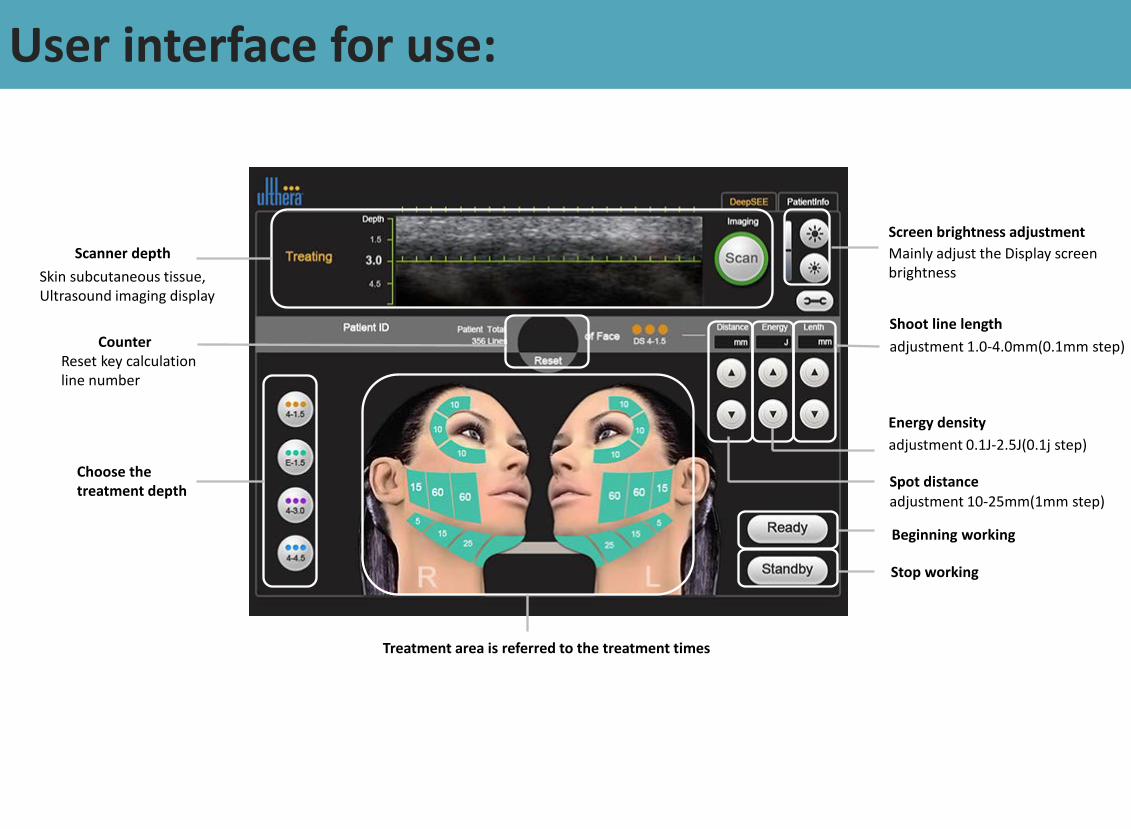
User interface for use:
Scanner depth Skin subcutaneous tissue, Ultrasound imaging display
Screen brightness adjustment Mainly adjust the Display screen brightness
Counter Reset key calculation line number
Energy density adjustment 0.1J-2.5J(0.1j step)
Shoot line length adjustment 1.0-4.0mm(0.1mm step)
Spot distance adjustment 10-25mm(1mm step)
Beginning working
Stop working
Choose the treatment depth
Treatment area is referred to the treatment times

Treatment operation: Open system: 1.Determine the power cord on the back of the machine has been plugged in 2. Determine the rear of the machine main power switch is turned "ON“ 3. Insert the key into the front of the instrument's USB connector Before treatment: 1. Add patient's name and ID number in the system 2. Clean transducer 3. Click "Start Treatment" button Start treatment: 1. Install the transducer on the handle 2. Applying gel on the transducer face then put transducer on the clean skin 3. Click "Start Treatment" button Machine instruction and use instruction : 1. The software on the screen has the function of Identify transducer automatically . when you don’t install the transducer , the screen don’t have touch function . at the same time the hand holder S1 guiding light will twinkle . when you install the transducer , The software can identify transducer specification automatically and it will show on the relative area on the screen (including treatment depth and shot times and so on). S1 guiding light will twinkle slowly .
2 . After finish first step , under “ standby ” station , you can adjust the specification according to specific situation .Including “ Spacing (1.0mm - 4.0mm)” , “ energy (0.1 J-2.5J) ” “ Length (10mm- 25mm)” . we suggest you can set spacing as 1 . 5mm , energy as 1.0J , length as 15mm,then you can press“ standby ” and enter into “ Ready ” station . If you want to alter the specification setting , please press “ Ready ” and enter into “ standby ” station . then adjust the specification again .Must be attention you can ’ t set specification Under “ Ready ”station . The screen software has function of store specification . But in order to safe , we suggest not to store specification . The default value 5ms . you can set specification when you make the treatment every time . 3 . When the parameters are set , click the Standby button , enter the Ready state ; For Easy to operate , you can often by hand with the S1 button , enter the Ready state , while the hand S1 enters lit with lights , tips ready . Then hands with the S2 button , enter Into a working state , S2 indicator light , while the interface displays Cure , when a single job is completed , Light is off , repeated operation . At the time of treatment , you can not exit , must be single Once treatment is completed , we can quit . Operating Notice: 1. The operation person must be specially trained , should know well of the Human Face Structure ,and is proficient in the equipment operation . 2. Dividing the treatment area as well as avoiding the nerve sensitive areas.

The pre-treatment Guide of Ulthera program established in clinical trials. The menu images shows guidelines details, as they appeared on the screen. Two pre-programmed treatment guide: Note: Operation is according to the below flow chart. Note: After finishing the treatment , please restore defaults engergy settings from the same and different operations screen guide 3. According to the characteristics of the treatment of people, the reasonable choice for the treatment of head focus depth, energy, and point spacing length.General rule is focused on small spacing-energy small;The focused on big spacinghigh energy.Due to the everyone's different characteristics, it is suggested that increased from low energy up. 4.When treating, you need coated cooling gel in the treatment area, and the treatment handle should vertical contact the skin completely (Prohibit tilt with skin, vacant, also a high one low is not allowed.) 5.The times of treatment area can not exceed the number of standard interface prompts.Please refer to Picture 1.
Treatment operation:
Picture 1.
6.After the treatment is completed,the facial is forbidden esides,Please remember not eating hot and cold food.You must avoid stimulating the facial nerve system.

Treatment operation: Ultherapy body treatment guide: when you make body treatments,after you plug 8mm/13mm tranducer into handpiece,the software will enter into body treatment interface automatically

Ultherapy SEE THE BEAUTY OF SOUND
美丽极线 亲眼见证
The Ulthera System is indicated for use as a non-invasive dermatological aesthetic trestment to lift the eyebrow and lift
laxsubmental(beneath the chin)and neck tissue.


