UG PAN7206 PANTV1512 EN V3.0 11-19-08static.highspeedbackbone.net/pdf/...PANTV1512_User... ·...
68
User Guide ®
Transcript of UG PAN7206 PANTV1512 EN V3.0 11-19-08static.highspeedbackbone.net/pdf/...PANTV1512_User... ·...

User Guide
®

2
PANTV1512_EN_V3.0_11-08
3
Table of Contents
INTRODUCTION .............................................................................................................................. 7 Important Safety Precautions & Instructions .............................................................................. 7
Cleaning the KTC ....................................................................................................................... 9 The KTC’s Key Features ................................................................................................................ 9 System Requirements .................................................................................................................. 10 What’s in the Box.......................................................................................................................... 10 INSTALLATION ............................................................................................................................. 10
Countertop, Under Cabinet, or Wall Mounting ......................................................................... 10 Attach the Countertop Stand ............................................................................................. 11 Wall or Under Cabinet Mounting ....................................................................................... 12
Adjust the Monitor Angle .......................................................................................................... 12 Change the Decorative Faceplates .......................................................................................... 12 Back Panel Input Connectors .................................................................................................. 13 Connecting Speakers to the KTC ............................................................................................ 14
The Left Side Panel Media Slots ................................................................................................. 14 The Right Side Panel Control Buttons ....................................................................................... 14 The KTC Remote Control ............................................................................................................. 15
Installing Batteries in the Remote Control................................................................................ 16 Power On the KTC ........................................................................................................................ 16 TELEVISION SECTION ................................................................................................................. 18 TV Connection Options ................................................................................................................ 18
Connecting Digital Cable with or without Cable Box ................................................................ 18 Connecting DVD Player with Component YPbPr .................................................................... 18 Connecting DVD player with S-Video ...................................................................................... 19 Connecting DVD player with Composite .................................................................................. 20 Connect to Cable or Satellite Boxes with High-Definition Multimedia Interface (HDMI) .......... 20 Connecting to a PC with VGA and 3.5 mm minijack ................................................................ 21
Ready to Watch TV? ..................................................................................................................... 22 ‘No Database’ Message ........................................................................................................... 22 Initial Tuner Setup .................................................................................................................... 22
On Screen Display (OSD) Menu .................................................................................................. 23 OSD Menu Options Overview .................................................................................................. 23 VIDEO Option .......................................................................................................................... 24 AUDIO Option .......................................................................................................................... 25 TIME Option ............................................................................................................................. 26 SET UP Option ......................................................................................................................... 26 LOCK Option ............................................................................................................................ 28 TV Option ................................................................................................................................. 29 Aspect Ratio ............................................................................................................................. 30
Program Ratings ........................................................................................................................... 31 USTV Ratings .......................................................................................................................... 31 MPAA Ratings .......................................................................................................................... 32
Browsing Channels ...................................................................................................................... 32 Favorites List ............................................................................................................................ 32
Add & Remove Channels .................................................................................................. 32 Browse Channels from the Favorite List ........................................................................... 32
4
Channel Skip ............................................................................................................................ 33 Add & Remove Channels to the Skip List ......................................................................... 33
Display Channel Information using Remote Control Buttons................................................... 33 Display Current Channel Information (DISPLAY Button) .................................................. 33 Electronic Program Guide (EPG Button) ........................................................................... 33 Picture Mode (P.MODE Button) ........................................................................................ 33 Sound Mode (S.MODE Button) ......................................................................................... 33
DIGITAL PHOTO FRAME (DPF) SECTION .................................................................................. 34 The PanTouch Interface ............................................................................................................... 34
Use the PanTouch Interface .................................................................................................... 34 The KTC’s Menu Screens ............................................................................................................ 35
The HOME Screen ................................................................................................................... 35 PanTouch Setup Menu Overview ................................................................................................ 36 Remote Control Setup Menu Overview ...................................................................................... 36 Select Media (Memory Source) ................................................................................................... 37 PHOTOS ......................................................................................................................................... 38
Display Image Size .................................................................................................................. 38 Set Image Size Mode ........................................................................................................ 38
View All Photos (Thumbnails) .................................................................................................. 39 View an Individual Photo .......................................................................................................... 39 Rotate a Photo ......................................................................................................................... 40 Zoom a Photo ........................................................................................................................... 40 Photo Date/Time Stamp ........................................................................................................... 40 Enable Clock Display ............................................................................................................... 40 Photo Copy Methods ................................................................................................................ 41
Set the Photo Copy Method .............................................................................................. 41 Copy Photos from Memory Card into Internal Memory ........................................................... 41
Copy All Photos ................................................................................................................. 41 Copy Selected Individual Photos ....................................................................................... 41
Delete Photos from the Internal Memory ................................................................................. 42 Delete All Photos ............................................................................................................... 42 Delete Selected Individual Photos ..................................................................................... 42
SLIDESHOWS ................................................................................................................................ 42 All Photos Slideshow ................................................................................................................ 42 Custom Category Slideshows .................................................................................................. 43
Assign Photos to Category Folders ................................................................................... 43 Play Slideshow from Category Folders ............................................................................. 43 Un-assign or Re-assign Photos in Category Folders ........................................................ 43
Play Temporary Custom Slideshow ......................................................................................... 44 Play Music with a Slideshow .................................................................................................... 44 Set Slideshow Transition.......................................................................................................... 45 Set Slideshow Speed ............................................................................................................... 45 Set Slideshow Music Mode ...................................................................................................... 45 Set Slideshow Shuffle .............................................................................................................. 46
RECIPES ........................................................................................................................................ 46 Access the Cookbooks ............................................................................................................. 46 Copy Recipes to Categories .................................................................................................... 47 Move Recipes to Categories .................................................................................................... 48

5
Delete Recipes from Categories .............................................................................................. 48 MUSIC ............................................................................................................................................ 48
Play Music with a Slideshow .................................................................................................... 48 Play MP3 files at any Time ...................................................................................................... 49 Audio Playback Mode .............................................................................................................. 49
Set Audio Playback Mode ................................................................................................. 49 VIDEO ............................................................................................................................................. 49
Watch a Video .......................................................................................................................... 49 Video Playback Mode .............................................................................................................. 50
Set Video Playback Mode ................................................................................................. 50 FILE ................................................................................................................................................ 50
View Contents of Selected Memory Source ............................................................................ 50 Copy Files to Internal Memory ................................................................................................. 50
Copy All Files ..................................................................................................................... 51 Copy Selected Individual Files .......................................................................................... 51
CLOCK ........................................................................................................................................... 51 Display the CLOCK/CALENDAR screen ................................................................................. 51 Set the Clock and Date ............................................................................................................ 52 Set the Alarm ........................................................................................................................... 52
Turn Alarm Off ................................................................................................................... 53 Clock Slideshow Photos........................................................................................................... 53
Select the Clock/Calendar Photo Source .......................................................................... 53 INTERNET ...................................................................................................................................... 54
Accessing Google PicasaTM or Windows Live FrameIt Sites ................................................... 54 Establish accounts with Google PicasaTM and FrameIt ..................................................... 54 Set up your Wireless Network on the KTC ........................................................................ 54 Connect the KTC with Google PicasaTM ............................................................................ 55 Viewing Photos Stored on Google PicasaTM ..................................................................... 55 Connect with Windows Live FrameIt ................................................................................. 56
Connect KTC to Windows Computer via USB Cable ................................................................ 56 Disconnect the KTC from the Computer .................................................................................. 58
Wireless Connection between the KTC and Windows Computer ........................................... 58 Download and Install the Yahoo Widget on your PC ............................................................... 58 Download and Install the DPF Manager Widget on your PC ................................................... 58
‘Can Not Connect Successfully’ Message ......................................................................... 60 Set DPF Manager Window Preferences ........................................................................... 61
Connect USB Flash Drive to KTC ............................................................................................... 62
Bluetooth Connection .............................................................................................................. 62 Insert USB Bluetooth Adapter into KTC ................................................................................... 62 Connect Bluetooth Device to the KTC ..................................................................................... 62
Frequently Asked Questions ....................................................................................................... 63 KTC Specifications ....................................................................................................................... 64 Troubleshooting the TV ............................................................................................................... 66 Limited Warranty .......................................................................................................................... 67 FCC Statement .............................................................................................................................. 68

6

7
INTRODUCTION Congratulations on the purchase of your new Kitchen Technology Center (KTC) High Definition LCD Television and Digital Photo Frame (DPF). Now you can watch your favorite TV shows, view your personal photos/images individually or as slideshows with background music, use popular pre-loaded recipes from recognized publishers (i.e., bon appétit) listen to your favorite music, view videos, and access online streaming information from the Internet. No computer is necessary.
We recommend you mail your enclosed registration card to register your KTC. For peace of mind and to protect your investment beyond the standard warranty, we offer a two year extended warranty service for your KTC. This plan gives additional coverage once your standard warranty period runs out. Please call our Customer Support to purchase the extended warranty at 1-800-715-5354.
To ensure safety and many years of trouble free operation, please read this User Guide carefully before making any adjustments, and keep it in a safe place for future reference. We hope you enjoy your new KTC for many years.
Important Safety Precautions & Instructions This product is designed and manufactured to operate within defined design limits, and misuse may result in electric shock or fire. To prevent the product from being damaged, the following rules should be observed for the installation, use and maintenance of the product. Read the following safety instructions before operating the display. Keep these instructions in a safe place for future reference.
In order to prevent potential danger, always observe these basic safety precautions and instructions when installing, operating, and cleaning your KTC. This product has been engineered and manufactured with the highest priority on safety. However, improper use can result in electric shock and / or fire.
To ensure your safety and prolong the service life of your Liquid Crystal Television, please read the following precautions carefully before using the product.
WARNING: Do not expose this product to rain or moisture.
Do not remove the cover. Refer all servicing to qualified service personnel. Servicing is required when the KTC has been damaged in any way, such as power-supply cord or plug is damaged, liquid has been spilled or objects have fallen into the unit, it has been exposed to rain or moisture, does not operate normally, or has been dropped.
The KTC is for indoor use only. Unplug the KTC before performing care and
maintenance. Do not block the ventilation holes on the back of the
KTC at any time. Keep your Multimedia KTC out of direct sunlight and
heat sources. Electricity is used to perform many useful functions,
but it can also cause personal injuries and property damage if improperly handled. To avoid the risk of electric shock or component damage, power off the KTC before connecting other components (PANTV1512).
Unplug the power cord before cleaning the KTC. Only use the included custom bezel cleaning cloth for cleaning the KTC bezel. Do not use a liquid, spray, or abrasive cleaners for cleaning the product.
Always use the accessories recommended by the manufacturer to insure compatibility.
Only use the AC adapter included with the KTC. Using any other power adapter could damage the unit and will void your warranty.
When moving the KTC from an area of low temperature to an area of high temperature, condensation may form on the housing. Do not turn on the KTC immediately after the move to avoid causing fire, electric shock or component damage.
Do not place the KTC on an unstable cart, stand, or table. If the KTC falls, it can injure a person and cause serious damage to the appliance. Use only a cart or stand recommended by the manufacturer or sold with the KTC.
Do not install the product in an area with heavy dust or high humidity which may cause fire or electric shock.

8
Protect the power cord. Route power cords so that
they are not likely to be walked on or pinched by items placed on or against them. Pay particular attention to the plug where the cord attaches to the KTC, convenience receptacles, and the point where they exit from the apparatus.
The KTC should be operated only from the type of power source indicated on the label. If you are not sure of the type of power supplied to your home, consult your dealer or local power company.
The power cable must be replaced when using different voltage from that specified in this User Guide. For more information, contact your dealer.
The KTC is equipped with a three-pronged grounded plug, a plug with a third (grounding) pin. This plug will fit only into a grounded power outlet as a safety feature. If your outlet does not accommodate the three-wire plug, have an electrician install the correct outlet, or use an adapter to ground the appliance safely. Do not defeat the safety purpose of the grounded plug.
Do not overload power strips and extension cords. Overloading can result in fire or electric shock.
The wall outlet should be installed near the equipment and should be easily accessible.
Do not touch the power cord during thunderstorms. To avoid electric shock, avoid handling the power cord during electrical storms.
Unplug the unit during a lightning storm to protect the KTC from damage due to power surges.
Unplug the power cord from the outlet when the unit is not in use or when it will not be used for a long period of time.
Do not attempt to repair or service the product yourself. Opening or removing the back cover may expose you to high voltages, the risk of electric shock, and other hazards. If repair is required, please contact your dealer and refer all servicing to qualified service personnel.
Never push any object into the ventilation slots of the KTC. Do not place any objects on the top of the Product. It could short circuit parts causing a fire or electric shock. Never spill liquids on the KTC.
If any of the following occurs, please contact the dealer: o The power connector fails or frays.
o Liquid sprays or any object drops into the KTC.
o The Display is exposed to rain or other moisture.
o The Display is dropped or damaged in any way.
o The performance of the Display changes substantially.
Do not use the KTC in a portrait format (by
rotating 90 degrees) under high temperature environment (25°C or higher), since this would retard heat dissipation and would eventually damage the KTC.
Any heat source should maintain a distance of at least 5 feet away from the KTC, i.e. radiator, heater, oven, amplifier etc. Do not install the product too close to anything that produces smoke or moisture. Operating the product close to smoke or moisture may cause fire or electric shock.
Do not use the product if any abnormality occurs. If any smoke or odor becomes apparent, unplug the power cord and contact your dealer immediately. Do not try to repair the product yourself.
Avoid using dropped or damaged appliances. If the product is dropped and the housing is damaged, the internal components may function abnormally. Unplug the power cord immediately and contact your dealer for repair. Continued use of the product may cause fire or electric shock.
Hold the power connector when removing the power cable. Pulling the power cable itself may damage the wires inside the cable and cause fire or electric shocks.
To avoid risk of electric shock, do not touch the power cord connector with wet hands.
Insert the remote control batteries in accordance with instructions. Incorrect polarities may cause damage and leakage of the batteries, operator injury and contamination of the remote control.
Keep the product away from moisture. Do not expose this appliance to rain or moisture. If water penetrates into the product, unplug the power cord and contact your dealer. Continuous use in this case may result in fire or electric shock.
Slots and openings in the back and bottom of the cabinet are provided for ventilation. To ensure reliable operation of the KTC and to protect it from overheating, be sure these openings are not blocked or covered. Do not place the KTC in a bookcase or cabinet unless proper ventilation is provided.
Operating environment: Temperature: 5°C ~ 35°C, Humidity: 10% to 90% non-condensing Altitude: 0~10,000 ft
9
Cleaning the KTC
1. Unplug the power cable from the electrical wall outlet before cleaning the KTC.
2. Do not use volatile solvent (alcohol, rosin, and toluene) to clean the KTC. These types of chemicals may damage the housing and the LCD glass.
Cleaning the Screen
Treat the screen gently, it is made of glass and can break easily. To clean fingerprints or dust from the LCD screen, we recommend using a soft, non-abrasive cloth such as a camera lens cloth to clean. If you use a commercial LCD Cleaning Kit, do not apply the cleaning liquid directly to the LCD screen; use a cloth moistened with the liquid.
Cleaning the Bezel and Remote Control
1. Use a 100% cotton cloth or micro-fiber cloth for cleaning.
2. If the remote control or bezel is so dirty that you cannot simply dry wipe it, lightly dampen the wiping material with clean water and wipe again. Wipe the display with a dry micro-fiber cloth or 100% cotton cloth afterwards.
CAUTION: Wring the water tightly out of the cloth before cleaning the bezel or remote in order to prevent water from penetrating into the electronics.
The KTC’s Key Features Displays High Definition TV, Videos from your DVD player, Satellite Set-top box, or Cable box with HDTV
tuner. Displays digital recipe collections (pre-loaded in KTC) Displays digital photos individually or as slideshows with background music
Supported photo file types: ™JPEG images (up to 16 Mega Pixels). Plays digital MP3 music files Plays digital Motion Jpeg (AVI) video files Does not require a computer Computer VGA monitor display can optionally be connected to your KTC Compatible with all popular memory cards: Secure Digital™, MultiMedia Card™, xD Card, Compact
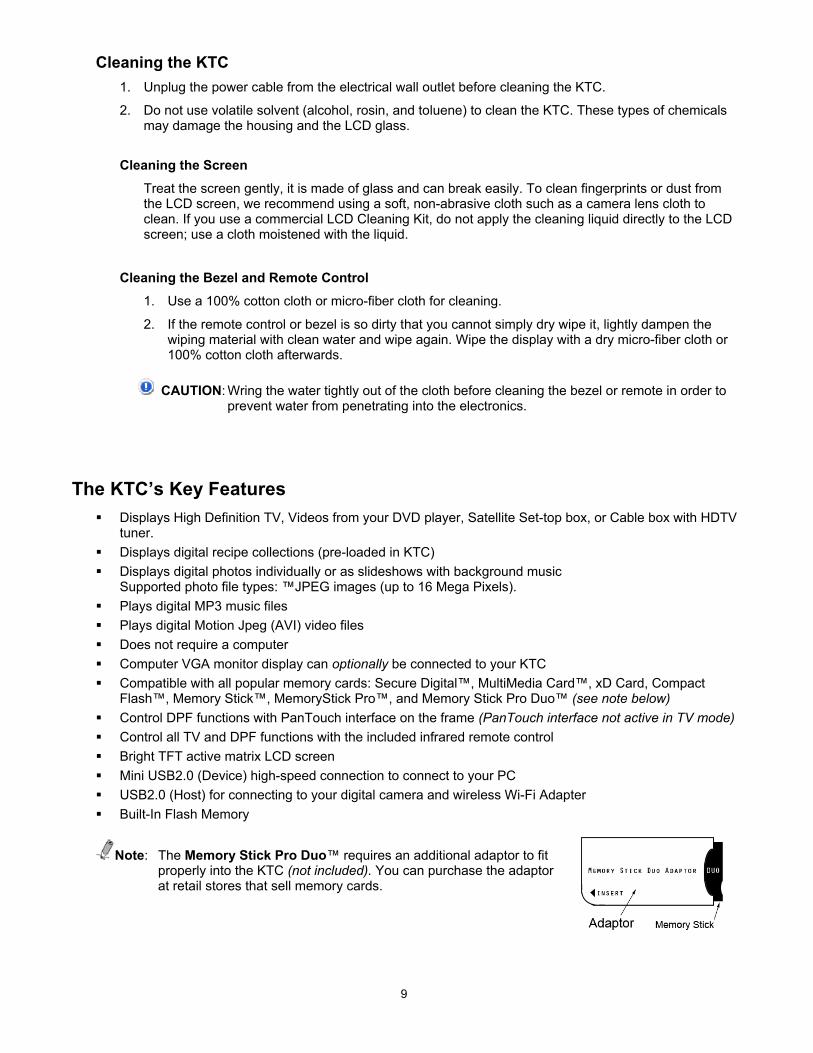
Flash™, Memory Stick™, MemoryStick Pro™, and Memory Stick Pro Duo™ (see note below) Control DPF functions with PanTouch interface on the frame (PanTouch interface not active in TV mode) Control all TV and DPF functions with the included infrared remote control Bright TFT active matrix LCD screen Mini USB2.0 (Device) high-speed connection to connect to your PC USB2.0 (Host) for connecting to your digital camera and wireless Wi-Fi Adapter Built-In Flash Memory
Note: The Memory Stick Pro Duo™ requires an additional adaptor to fit properly into the KTC (not included). You can purchase the adaptor at retail stores that sell memory cards.
10
System Requirements Operating Systems: Windows XP (with Service Pack 2) or Windows Vista CPU: Pentium 4 2.4GHz Single core processor RAM: 512MB Video Card: Direct X8.0 compliant video card Hard Disk space: 10MB free space USB 2.0 port
What’s in the Box Check your box to ensure you have received the following items:
Kitchen Technology Center (LCD Monitor) KTC Stand (Phillips head screw driver required to attach stand) AC Power Cord and Adapter User’s Guide, Quick Start Guide, and Warranty/Registration Card Remote Control and two AAA batteries (included, separate from remote) Pandigital Wireless Wi-Fi Adapter with complimentary Google PicasaTM software on Installation CD Video Cable (Red, White and Yellow Connectors) Wall and Under Cabinet Mounting Kit with separate ‘Flat Panel TV Mounting’s Installation and
Assembly’ instructions Decorative colored faceplates (white, black, and silver [on unit])
INSTALLATION Please read the installation instructions carefully before performing the installation.
The power consumption of the display is approximately 50 watts. Always use the power cord designated for the product. When an extension cord is required, use one with the correct power rating. The cord must be grounded and the grounding feature must not be defeated.
The product should be installed on a flat surface to avoid tipping. Space should be maintained between the back of the product and the wall for proper ventilation. If you would like to mount the KTC onto the wall or under a cabinet, refer to page 12 for mounting instructions.
CAUTION: Always install the product with the screen in landscape orientation. Any 90° clockwise or counterclockwise installation may induce poor ventilation and successive component damage.
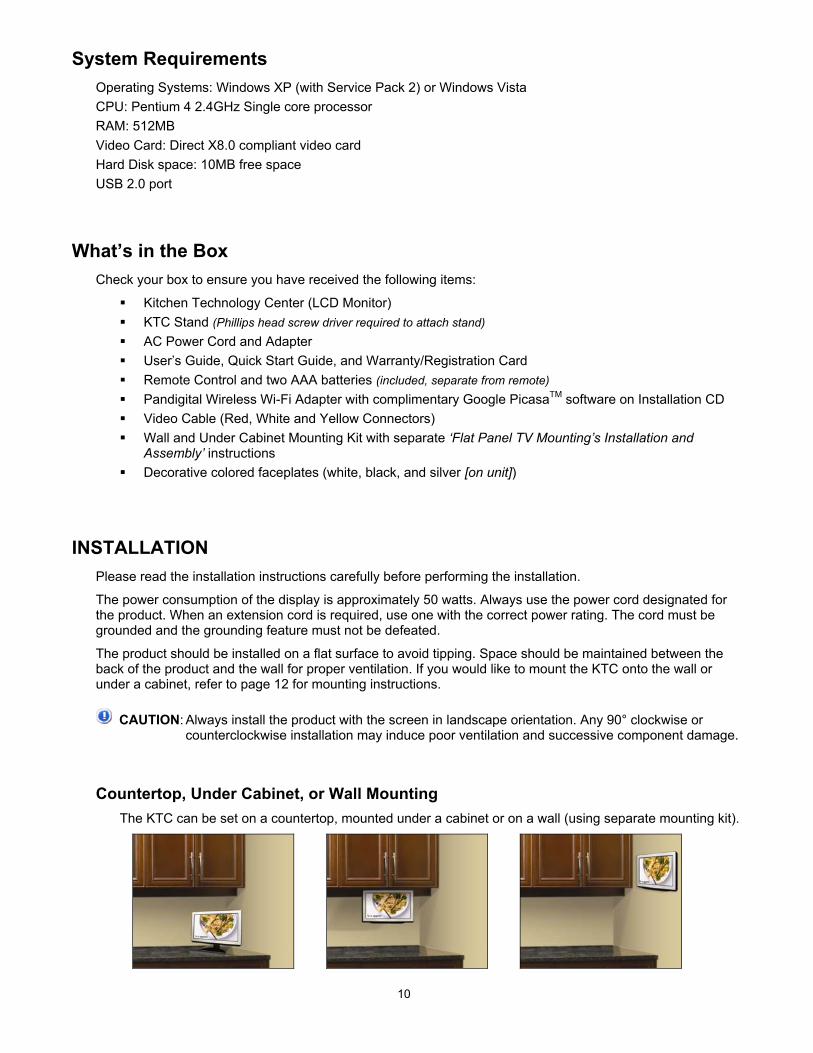
Countertop, Under Cabinet, or Wall Mounting The KTC can be set on a countertop, mounted under a cabinet or on a wall (using separate mounting kit).
11
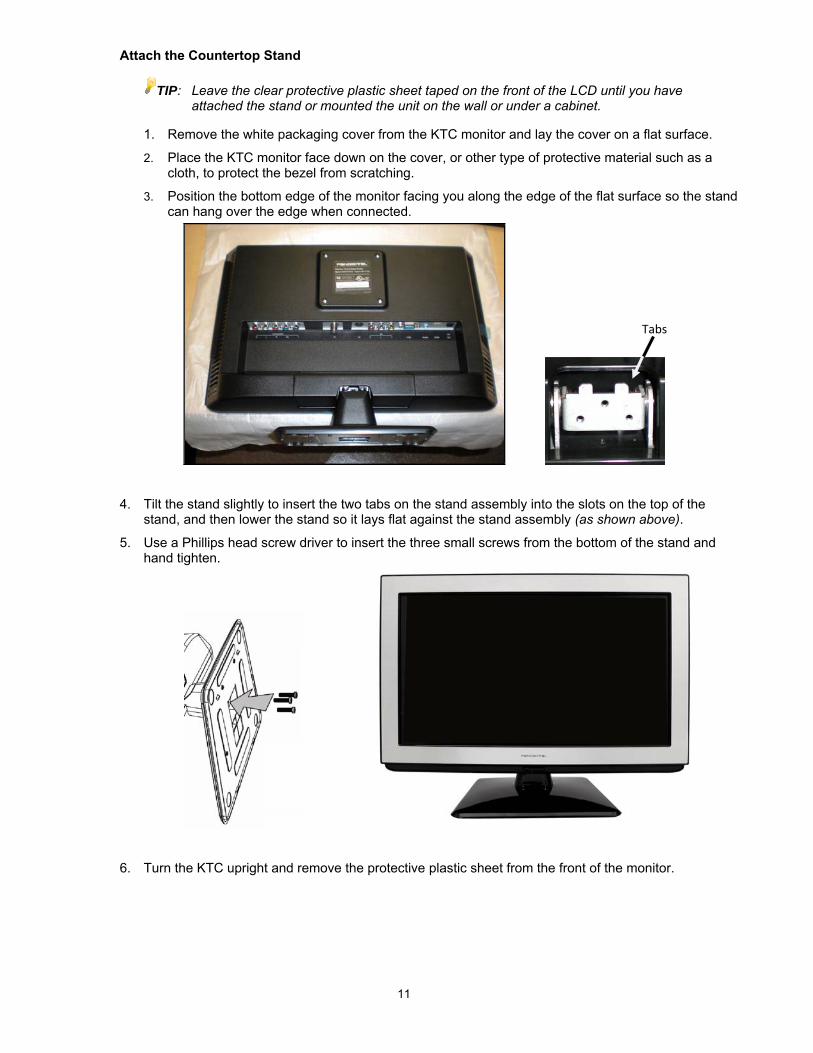
Attach the Countertop Stand
TIP: Leave the clear protective plastic sheet taped on the front of the LCD until you have attached the stand or mounted the unit on the wall or under a cabinet.
1. Remove the white packaging cover from the KTC monitor and lay the cover on a flat surface.
2. Place the KTC monitor face down on the cover, or other type of protective material such as a cloth, to protect the bezel from scratching.
3. Position the bottom edge of the monitor facing you along the edge of the flat surface so the stand can hang over the edge when connected.
4. Tilt the stand slightly to insert the two tabs on the stand assembly into the slots on the top of the stand, and then lower the stand so it lays flat against the stand assembly (as shown above).
5. Use a Phillips head screw driver to insert the three small screws from the bottom of the stand and hand tighten.
6. Turn the KTC upright and remove the protective plastic sheet from the front of the monitor.
Tabs
12
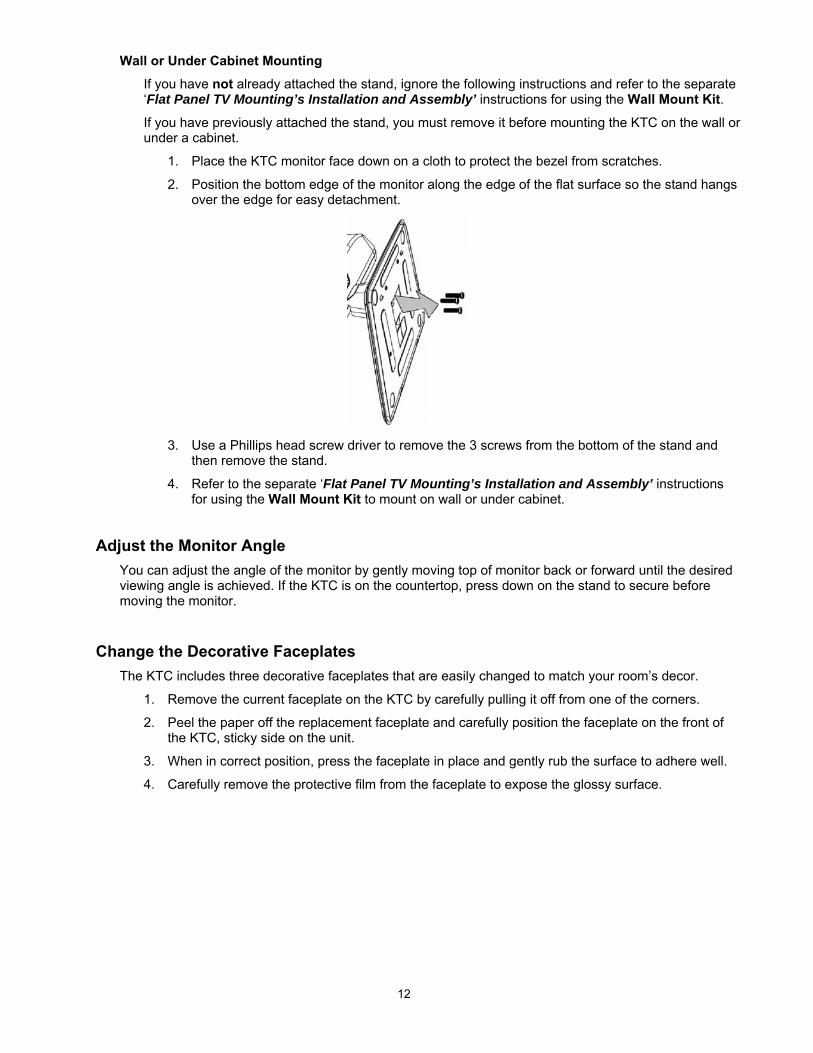
Wall or Under Cabinet Mounting
If you have not already attached the stand, ignore the following instructions and refer to the separate ‘Flat Panel TV Mounting’s Installation and Assembly’ instructions for using the Wall Mount Kit.
If you have previously attached the stand, you must remove it before mounting the KTC on the wall or under a cabinet.
1. Place the KTC monitor face down on a cloth to protect the bezel from scratches.
2. Position the bottom edge of the monitor along the edge of the flat surface so the stand hangs over the edge for easy detachment.
3. Use a Phillips head screw driver to remove the 3 screws from the bottom of the stand and
then remove the stand.
4. Refer to the separate ‘Flat Panel TV Mounting’s Installation and Assembly’ instructions for using the Wall Mount Kit to mount on wall or under cabinet.
Adjust the Monitor Angle You can adjust the angle of the monitor by gently moving top of monitor back or forward until the desired viewing angle is achieved. If the KTC is on the countertop, press down on the stand to secure before moving the monitor.
Change the Decorative Faceplates The KTC includes three decorative faceplates that are easily changed to match your room’s decor.
1. Remove the current faceplate on the KTC by carefully pulling it off from one of the corners.
2. Peel the paper off the replacement faceplate and carefully position the faceplate on the front of the KTC, sticky side on the unit.
3. When in correct position, press the faceplate in place and gently rub the surface to adhere well.
4. Carefully remove the protective film from the faceplate to expose the glossy surface.

13
Back Panel Input Connectors
The following descriptions are for connections from left to right.
1. RLPrPbY – Connection ports for DVD players, or satellite / cable set-top boxes that use component cables. From right to left, connect green, blue, and red for video, and then connect white for left channel audio, and red for right channel audio.
2. TV – Connection for digital or analog cable without the cable box or over-the-airwave antennas. The tuner is a hybrid tuner that tunes to both analog and digital channels. This connection uses coaxial RF cable. For over-the airwave digital stations check the following website: http://www.antennaweb.org.
3. SV and AV – Connect devices that use composite video cables such as VCR or camcorder or video game consoles. The S-Video connector is associated with AV’s video. Connect the video portion with either the yellow connector or the S-Video connector. Do NOT connect both video connectors at the same time, because the audio connection is shared.
4. VGA – Connects to a PC for video using VGA cable. Connect your audio cable to the VGA Stereo input if you want sound out of the VGA video source.
5. Audio (VGA STEREO INPUT) – Connect a 3.5mm mini-jack audio cable if you want to provide audio to the TV when using a PC.
6. HDMI – Connect to devices that use HDMI cables, such as Blu-ray or HD DVD player, or HD cable / satellite set-top box. This connection port receives pure digital audio and high definition signal through one single cable. This port also can accept a HDCP video device for video.
7. 12V DC – Power connector for providing electricity to the KTC. Connects to the AC power adapter which connects to the AC power source (wall outlet). (It is very important to use only the AC adapter included with the KTC.)
Note: When in TV mode, if left idle on a channel connection with very weak or no signal for 5 minutes, the KTC will automatically switch from TV mode to DPF mode and begin playing a photo slideshow. This feature is present on all channel connections.
14
Connecting Speakers to the KTC The KTC has built-in speakers, however, (depending on the model) your KTC may also include an audio-out jack that you can use to connect external speakers, an external amplifier, or headphones (not included.) If this audio-out jack is present, it is located on the side of the KTC under the memory card slots.
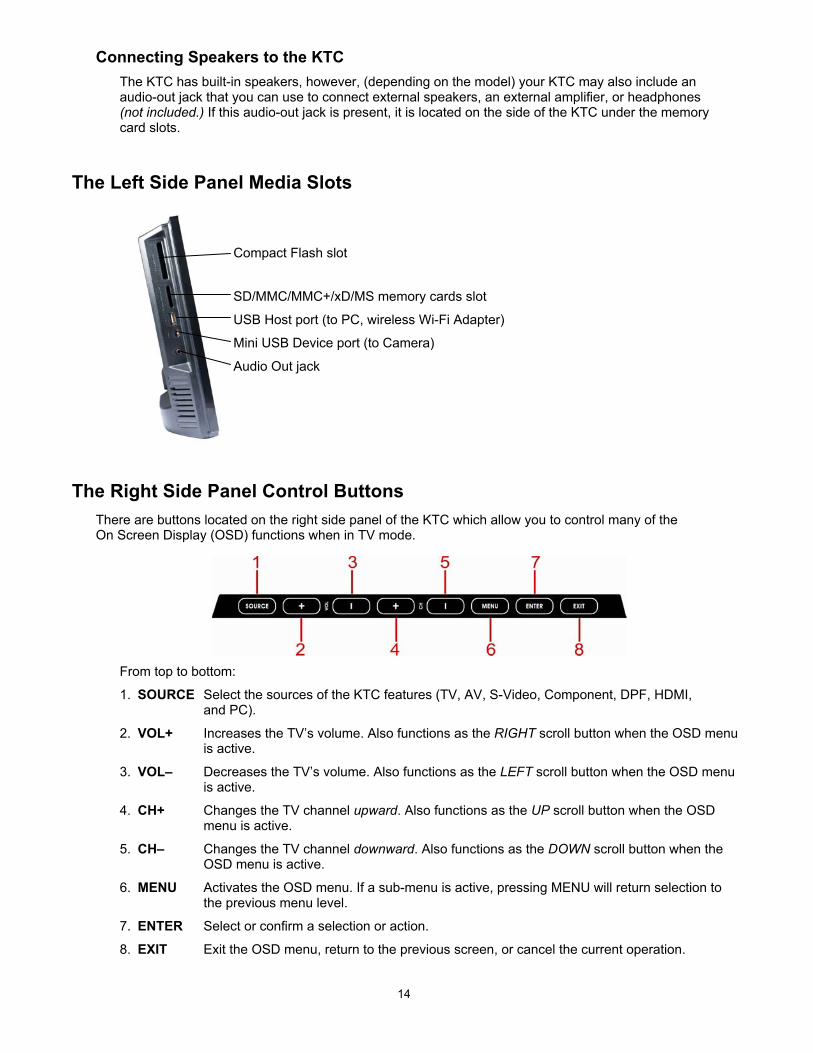
The Left Side Panel Media Slots
The Right Side Panel Control Buttons There are buttons located on the right side panel of the KTC which allow you to control many of the On Screen Display (OSD) functions when in TV mode.
From top to bottom:
1. SOURCE Select the sources of the KTC features (TV, AV, S-Video, Component, DPF, HDMI, and PC).
2. VOL+ Increases the TV’s volume. Also functions as the RIGHT scroll button when the OSD menu is active.
3. VOL– Decreases the TV’s volume. Also functions as the LEFT scroll button when the OSD menu is active.
4. CH+ Changes the TV channel upward. Also functions as the UP scroll button when the OSD menu is active.
5. CH– Changes the TV channel downward. Also functions as the DOWN scroll button when the OSD menu is active.
6. MENU Activates the OSD menu. If a sub-menu is active, pressing MENU will return selection to the previous menu level.
7. ENTER Select or confirm a selection or action.
8. EXIT Exit the OSD menu, return to the previous screen, or cancel the current operation.
Compact Flash slot
SD/MMC/MMC+/xD/MS memory cards slot
USB Host port (to PC, wireless Wi-Fi Adapter)
Mini USB Device port (to Camera)
Audio Out jack

15
The KTC Remote Control You can access all the KTC’s features in both TV and DPF mode by using the remote control. (Install the two AAA batteries before attempting to use the Remote control; refer to page 16.)
TIP: Throughout this User Guide, (RC) is noted next to instructions referencing specific use of the remote control.
1. POWER – Turns the KTC on or off.
2. 0~9 – (TV) Sets the channels.
3. Dash (-) – (TV) Inserts the dash for selecting digital channels directly.
4. MUTE – (TV) Mutes the TV’s audio.
5. CH(+) / CH(-) – (TV) Channel up and down. Also Scroll Up/Down through Menu option settings. (DPF) Functions as Photo Select and Unselect. VOL(-) / VOL(+) – (TV and DPF) Volume up and down. Also Scroll Left/Right through Menu options.
6. EXIT – (TV) Exits the menu, returns to the previous screen, or cancels the current operation.
7. EXIT – (DPF) Exits the menu, returns to the previous screen, or cancels the operation.
8. ▲/▼/◄/► – (DPF) Moves the item or menu highlight up, down, to the left or to the right.
9. ZOOM – (DPF) Zoom the current view of the photo. In the zooming state, left/right and up/down buttons are used for panning and tilting of the photo.
10. ROTATE – (DPF) Rotate picture by 90 degrees.
11. SLEEP – Reserved (Not currently used)
12. FAV.CH – (TV) Display your favorite channel list and select channel to view. (Refer to page 32 for Favorite list setup instructions.)
13. CC – (TV) Cycles between the Closed Captioning modes while watching TV.
14. MTS – (TV) Selects stereo, mono, or second audio programming.
15. SOURCE – Select the sources of the KTC (TV, AV, S-Video, Component, DPF, HDMI, and PC)
16. RETURN – (TV) Returns to the previously watched channel.
17. MENU – (TV) Activates the OSD menu. If a sub-menu is active, pressing this button will return selection to the previous menu level.
18. ENTER – (TV) Changes channels in conjunction with number pad. Also functions as the ENTER button for selecting options on OSD.
19. DISPLAY – (TV) View the current channel information. (Refer to page 33 for more information.)
20. SETUP – (DPF) Display the on-screen setup menus.
21. ENTER – (DPF) Select or confirm an action.
22. SLIDE SHOW – (DPF) Play slideshow of photos on selected memory source.
23. FUNCTION KEY. F1 / F2 / F3 – Reserved (Not currently used)
24. S.MODE – (TV) Cycles through sound modes (Standard, Music, Movie, Speech, Custom)
25. P.MODE – (TV) Cycles through picture effect modes (Standard, Vivid, Mild, Custom)
26. EPG – (TV) Display Electronic Program Guide
27. ASPECT – Selects different screen size
Use for
TV functions
Use for
DPF functions
Use for
TV functions
16
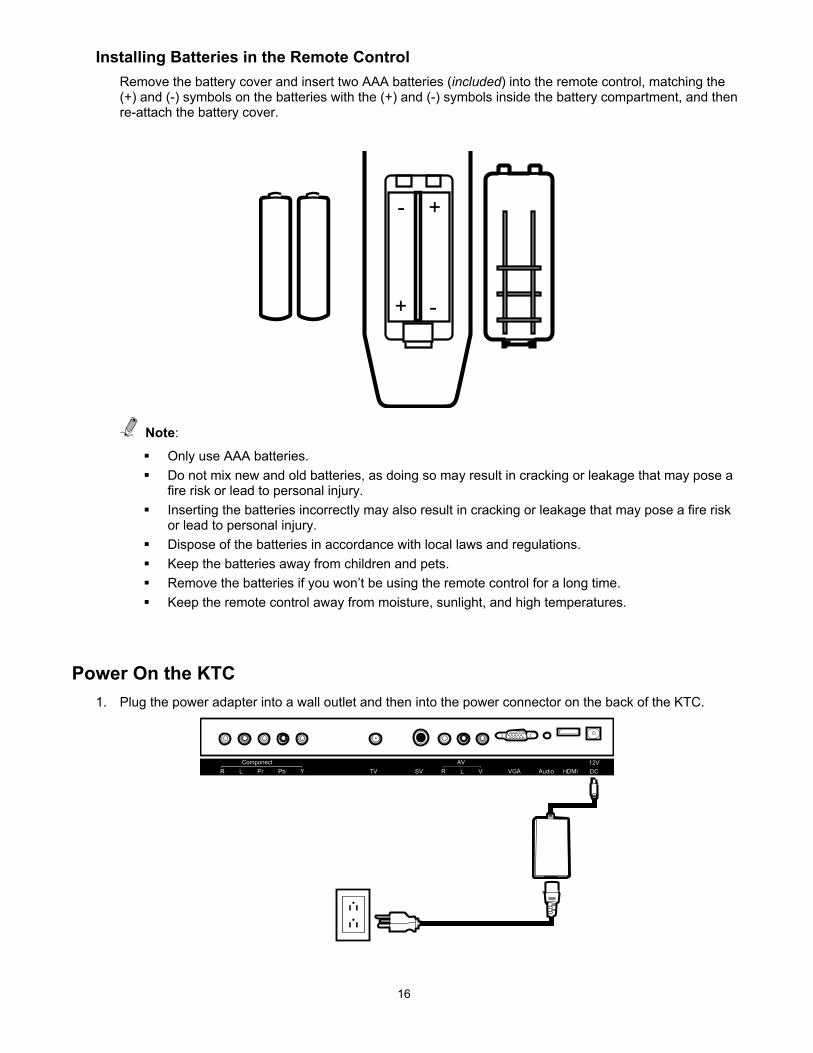
Installing Batteries in the Remote Control Remove the battery cover and insert two AAA batteries (included) into the remote control, matching the (+) and (-) symbols on the batteries with the (+) and (-) symbols inside the battery compartment, and then re-attach the battery cover.
Note:
Only use AAA batteries. Do not mix new and old batteries, as doing so may result in cracking or leakage that may pose a
fire risk or lead to personal injury. Inserting the batteries incorrectly may also result in cracking or leakage that may pose a fire risk
or lead to personal injury. Dispose of the batteries in accordance with local laws and regulations. Keep the batteries away from children and pets. Remove the batteries if you won’t be using the remote control for a long time. Keep the remote control away from moisture, sunlight, and high temperatures.
Power On the KTC 1. Plug the power adapter into a wall outlet and then into the power connector on the back of the KTC.
+
+ -
-

17
2. Press the POWER button on the remote control or the power button on the KTC located in the middle of the speaker bar on the bottom of the screen.
The power button on the KTC has an indicator light that is red when the KTC is off and blue when on. The remote control sensor is also located in the KTC’s power button. When using the remote control, point directly towards the sensor for best response.
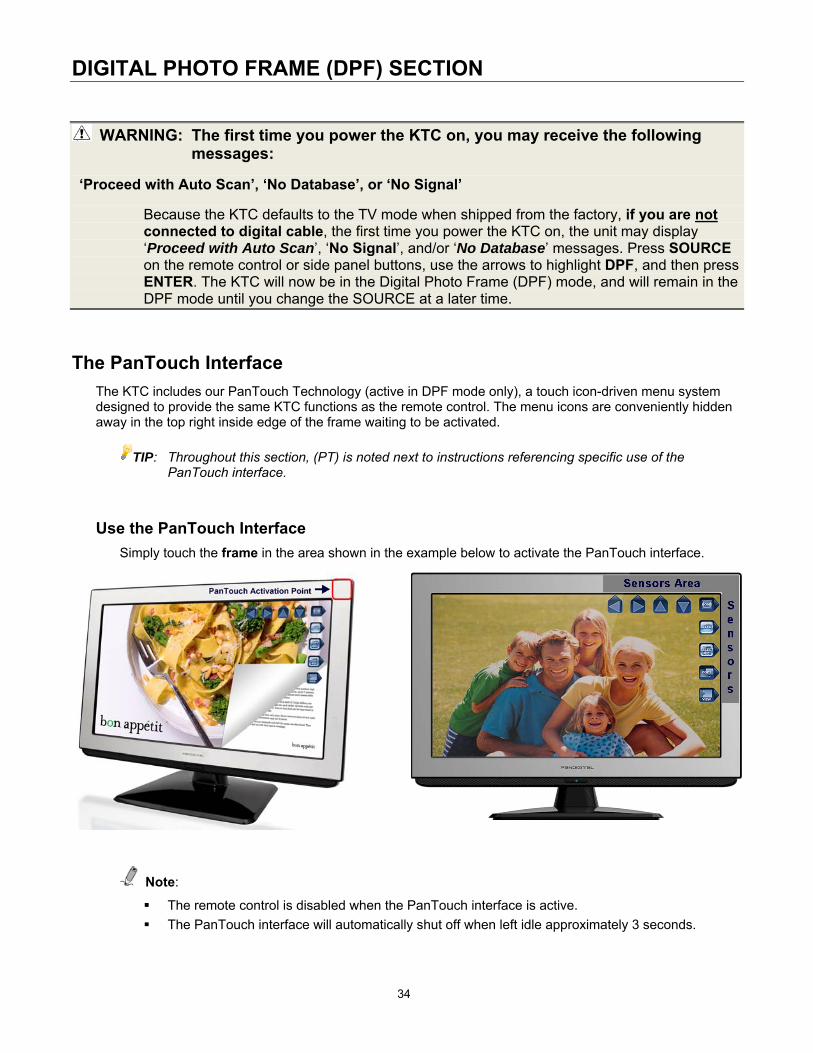
WARNING: The first time you power the KTC on, you may receive the following messages:
‘Proceed with Auto Scan’ or ‘No Signal’
Because the KTC defaults to the TV mode when shipped from the factory, if you are not connected to digital cable, the first time you power the KTC on, the unit may display ‘Proceed with Auto Scan’, ‘No Signal’, and/or ‘No Database’ messages. Press SOURCE on the remote control or side panel buttons, use the arrows to highlight DPF, and then press ENTER. The KTC will now be in the Digital Photo Frame (DPF) mode, and will remain in the DPF mode until you change the SOURCE at a later time.
‘No Database’
If you are connected to digital cable, and the message ‘No Database’ appears, the KTC may not be receiving a strong enough signal for the current channel to be displayed. Follow the Initial Tuner Setup instructions on page 22 to perform the necessary auto channel scan.
To use your KTC as a television, proceed to the TELEVISION SECTION on page 18. To use the Digital Photo Frame (DPF) features on your KTC, proceed to the DPF SECTION on page 34.
18
TELEVISION SECTION
TV Connection Options
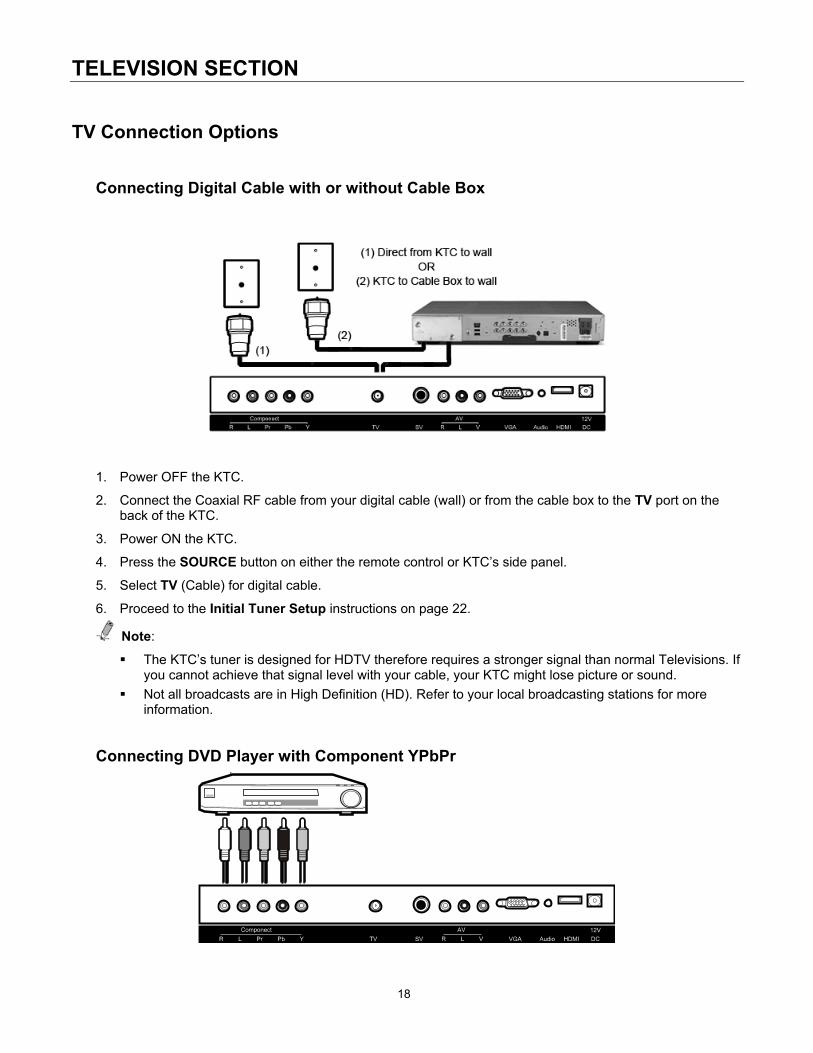
Connecting Digital Cable with or without Cable Box
1. Power OFF the KTC.
2. Connect the Coaxial RF cable from your digital cable (wall) or from the cable box to the TV port on the back of the KTC.
3. Power ON the KTC.
4. Press the SOURCE button on either the remote control or KTC’s side panel.
5. Select TV (Cable) for digital cable.
6. Proceed to the Initial Tuner Setup instructions on page 22.
Note:
The KTC’s tuner is designed for HDTV therefore requires a stronger signal than normal Televisions. If you cannot achieve that signal level with your cable, your KTC might lose picture or sound.
Not all broadcasts are in High Definition (HD). Refer to your local broadcasting stations for more information.
Connecting DVD Player with Component YPbPr
19
1. Power OFF the KTC and DVD player.
2. Connect your component cable: > Green connector to both your DVD player and YPbPr’s green port on the back of your KTC > Blue connector to both your DVD player and YPbPr’s blue port on the back of your KTC > Red connector to both your DVD player and YPbPr’s red port on the back of your KTC
3. Connect the RCA Audio Cable: > White connector to both your DVD player and YPbPr’s white port on the back of your KTC > Red connector to both your DVD player and YPbPr’s red port on the back of your KTC
4. Power ON the KTC and your DVD player.
5. Press the SOURCE button on either the remote control or KTC’s side panel.
6. Select Component.
Note: Refer to the DVD player’s user guide to make sure the DVD player is configured to output correctly to the KTC.
Connecting DVD player with S-Video
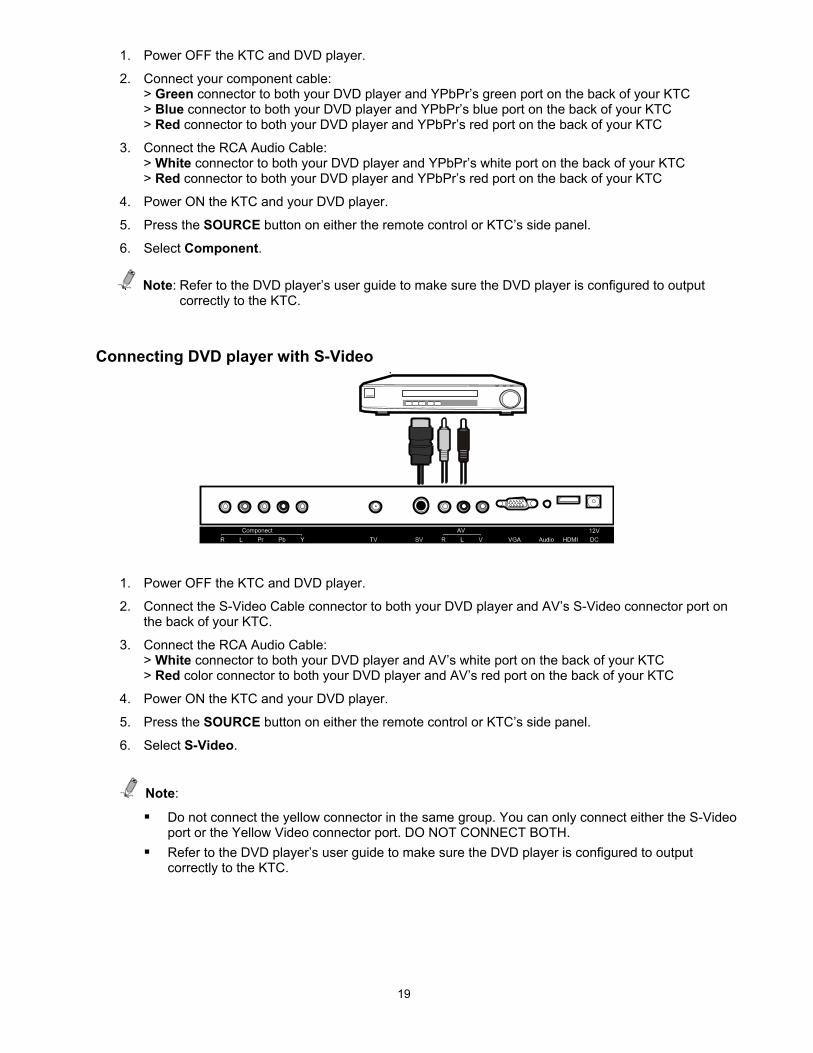
1. Power OFF the KTC and DVD player.
2. Connect the S-Video Cable connector to both your DVD player and AV’s S-Video connector port on the back of your KTC.
3. Connect the RCA Audio Cable: > White connector to both your DVD player and AV’s white port on the back of your KTC > Red color connector to both your DVD player and AV’s red port on the back of your KTC
4. Power ON the KTC and your DVD player.
5. Press the SOURCE button on either the remote control or KTC’s side panel.
6. Select S-Video.
Note:
Do not connect the yellow connector in the same group. You can only connect either the S-Video port or the Yellow Video connector port. DO NOT CONNECT BOTH.
Refer to the DVD player’s user guide to make sure the DVD player is configured to output correctly to the KTC.

20
Connecting DVD player with Composite
1. Power OFF the KTC and DVD player.
2. Connect the Yellow Video Cable: > Yellow connector to both your DVD player and AV’s Yellow Video port on the back of your KTC
3. Connect a RCA Audio Cable: > White connector to both your DVD player and AV’s white port on the back of your KTC > Red connector to both your DVD player and AV’s red port on the back of your KTC
4. Power ON the KTC and your DVD player.
5. Press the SOURCE button on either the remote control or KTC’s side panel.
6. Select AV.
Note:
Do not connect the yellow connector in the same group. You can only connect either the S-Video port or the Yellow Connector port. DO NOT CONNECT BOTH.
Refer to the DVD player’s user guide to make sure the DVD player is configured to output correctly to the KTC.
Connect to Cable or Satellite Boxes with High-Definition Multimedia Interface (HDMI)
1. Power OFF the KTC and your set-top box.
2. Connect a HDMI cable to the HDMI output of your set-top box and the other end to the HDMI port on the back of your KTC.
3. Power ON the KTC and your set-top box.
4. Press the SOURCE button on either the remote control or KTC’s side panel.
5. Select HDMI.
21
Note: Refer to the set-top box user guide to make sure the set-top box is configured to output correctly to the KTC.
Connecting to a PC with VGA and 3.5 mm minijack
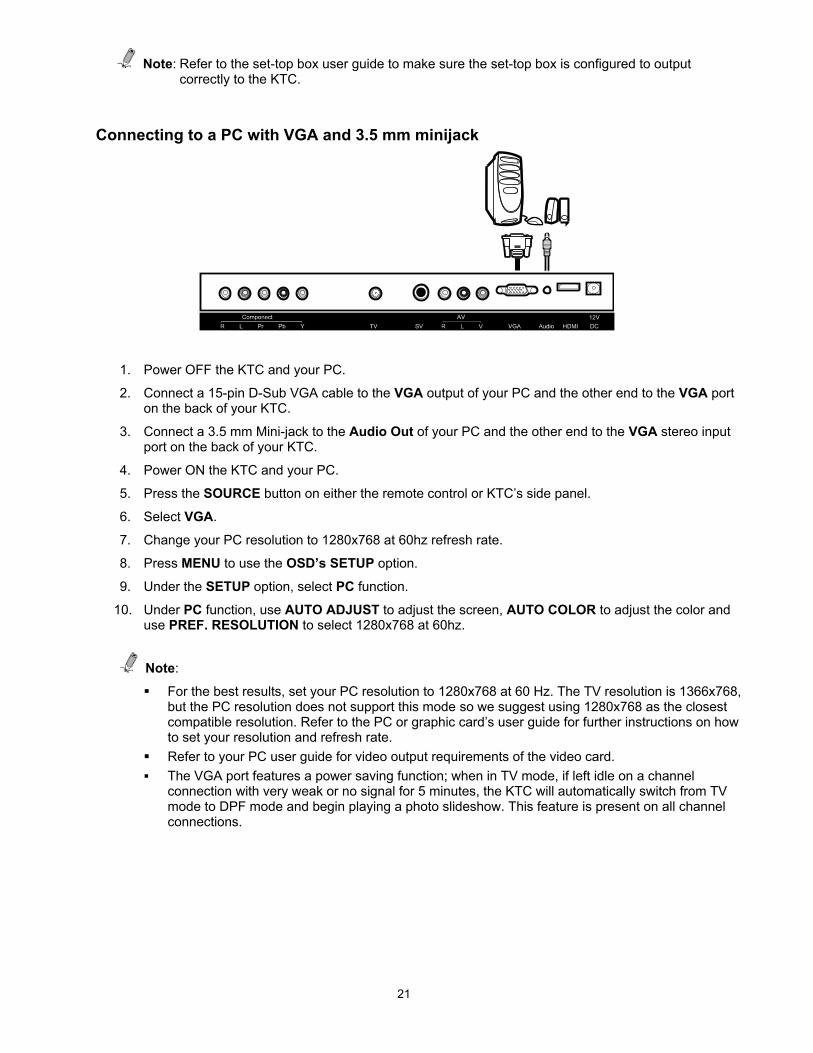
1. Power OFF the KTC and your PC.
2. Connect a 15-pin D-Sub VGA cable to the VGA output of your PC and the other end to the VGA port on the back of your KTC.
3. Connect a 3.5 mm Mini-jack to the Audio Out of your PC and the other end to the VGA stereo input port on the back of your KTC.
4. Power ON the KTC and your PC.
5. Press the SOURCE button on either the remote control or KTC’s side panel.
6. Select VGA.
7. Change your PC resolution to 1280x768 at 60hz refresh rate.
8. Press MENU to use the OSD’s SETUP option.
9. Under the SETUP option, select PC function.
10. Under PC function, use AUTO ADJUST to adjust the screen, AUTO COLOR to adjust the color and use PREF. RESOLUTION to select 1280x768 at 60hz.
Note:
For the best results, set your PC resolution to 1280x768 at 60 Hz. The TV resolution is 1366x768, but the PC resolution does not support this mode so we suggest using 1280x768 as the closest compatible resolution. Refer to the PC or graphic card’s user guide for further instructions on how to set your resolution and refresh rate.
Refer to your PC user guide for video output requirements of the video card. The VGA port features a power saving function; when in TV mode, if left idle on a channel
connection with very weak or no signal for 5 minutes, the KTC will automatically switch from TV mode to DPF mode and begin playing a photo slideshow. This feature is present on all channel connections.

22
Ready to Watch TV?
1. Power on your KTC and other AV devices if necessary.
2. If the TV does not display promptly, press SOURCE to verify that TV is selected as your source (or a different source according to the connection method you used in the Connection Suggestions pages beginning on page 18.)
‘No Database’ Message If the message “No Database’ appears when you are connected to digital cable, and TV is selected as your source, the KTC may not be receiving a strong enough signal for the current channel to be displayed. Perform the Initial Tuner Setup per the following instructions.
Initial Tuner Setup The first time you power on the KTC after connecting a digital Coaxial RF cable, perform the following initial setup and then your TV will be ready for viewing.
Note: Use the remote control to perform the initial tuner setup functions.
1. Press MENU to display the OSD menu.
2. Press VOL+ or VOL- to highlight the TV option.
3. Press CH- to highlight TUNER MODE and press VOL+ to select Cable or Air (antennae).
4. Press CH- to highlight AUTO SCAN. If you have Cable selected, set Cable System to AUTO.
5. Press VOL+ to highlight START TO SCAN and then VOL+ again to start the scan.

23
The scan is searching for channel signals within range or channels that are available through your cable connection. When the scan is complete, a list is created of channels with signals strong enough to recognize. However, some channels that are added to the list still may not have signals strong enough for clear viewing.
When you use the CH+ and CH- buttons to scroll through the channels, the only the channels that will be displayed are those on the scan list. If you want to view a channel that is not on the scan list, you can use the number pad and manually enter the channel number you want to view. (Refer to Browsing Shortcuts on page 32 for more information.)
When the scan finishes you can begin to watch TV.
Note: The KTC’s tuner is designed for HDTV therefore requires a stronger signal than normal TVs. If you cannot achieve that signal level with your digital cable, your KTC might lose picture or sound. Not all broadcasts are in High Definition (HD). Refer to your local broadcasting stations for more information.
On Screen Display (OSD) Menu You can adjust many of the OSD menu options by using either the remote control or the side panel buttons on your KTC, although in most cases the remote control is recommended for ease of use.
Press MENU to display the OSD menu.
OSD Menu Options Overview
VIDEO Change the screen picture settings for all ports: Tint, Contrast, Sharpness, Brightness,
Saturation, and Color Temperature
AUDIO Change sound settings for all ports: Treble, Bass, and Balance
24
TIME Set time related functions: Sleep Timer, and Time Zone
SETUP OSD language settings: Closed Caption, PC Setup, Aspect and Transparency
LOCK Only for composite and TV port – ability to block TV programs deemed inappropriate for children
TV For the tuner port settings: Tuner mode, Auto scan, Favorite, Channel Skip, and DTV Signal
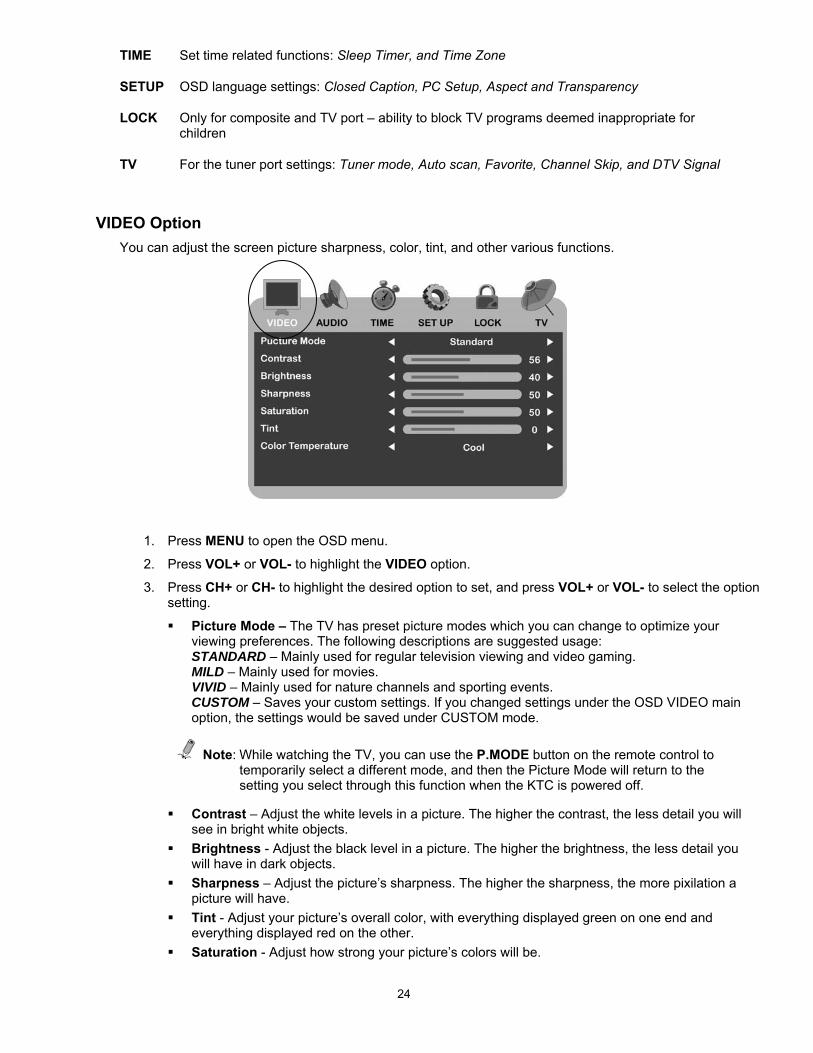
VIDEO Option You can adjust the screen picture sharpness, color, tint, and other various functions.
1. Press MENU to open the OSD menu.
2. Press VOL+ or VOL- to highlight the VIDEO option.
3. Press CH+ or CH- to highlight the desired option to set, and press VOL+ or VOL- to select the option setting.
Picture Mode – The TV has preset picture modes which you can change to optimize your viewing preferences. The following descriptions are suggested usage: STANDARD – Mainly used for regular television viewing and video gaming. MILD – Mainly used for movies. VIVID – Mainly used for nature channels and sporting events. CUSTOM – Saves your custom settings. If you changed settings under the OSD VIDEO main option, the settings would be saved under CUSTOM mode.
Note: While watching the TV, you can use the P.MODE button on the remote control to temporarily select a different mode, and then the Picture Mode will return to the setting you select through this function when the KTC is powered off.
Contrast – Adjust the white levels in a picture. The higher the contrast, the less detail you will see in bright white objects.
Brightness - Adjust the black level in a picture. The higher the brightness, the less detail you will have in dark objects.
Sharpness – Adjust the picture’s sharpness. The higher the sharpness, the more pixilation a picture will have.
Tint - Adjust your picture’s overall color, with everything displayed green on one end and everything displayed red on the other.
Saturation - Adjust how strong your picture’s colors will be.
25
Color Temperature - Adjust the white color’s overall balance of white colors in a picture. The function changes the white color’s overall balance in large increments: o Normal – Produces a picture with normal white color. o Cool – Produces a picture with overall bluish color. o Warm – Produces a picture with overall reddish color.
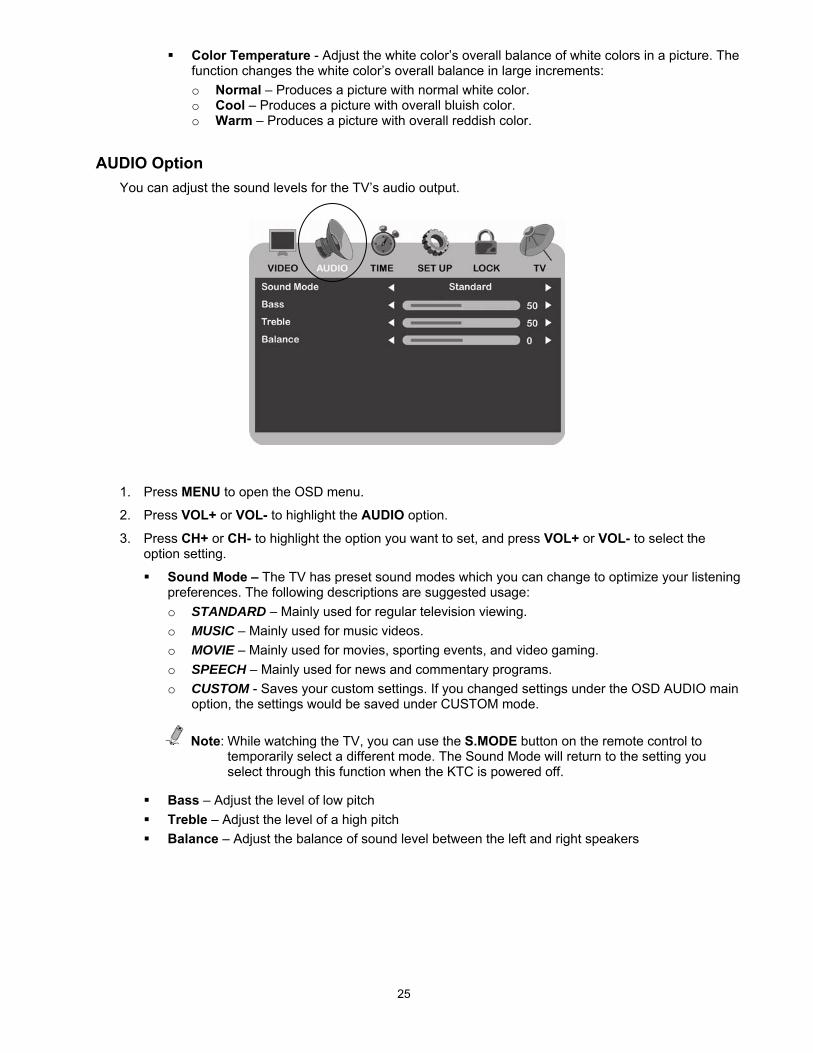
AUDIO Option You can adjust the sound levels for the TV’s audio output.
1. Press MENU to open the OSD menu.
2. Press VOL+ or VOL- to highlight the AUDIO option.
3. Press CH+ or CH- to highlight the option you want to set, and press VOL+ or VOL- to select the option setting.
Sound Mode – The TV has preset sound modes which you can change to optimize your listening preferences. The following descriptions are suggested usage: o STANDARD – Mainly used for regular television viewing. o MUSIC – Mainly used for music videos. o MOVIE – Mainly used for movies, sporting events, and video gaming. o SPEECH – Mainly used for news and commentary programs. o CUSTOM - Saves your custom settings. If you changed settings under the OSD AUDIO main
option, the settings would be saved under CUSTOM mode.
Note: While watching the TV, you can use the S.MODE button on the remote control to temporarily select a different mode. The Sound Mode will return to the setting you select through this function when the KTC is powered off.
Bass – Adjust the level of low pitch Treble – Adjust the level of a high pitch Balance – Adjust the balance of sound level between the left and right speakers

26
TIME Option You can adjust the time functions, including a Sleep Timer, the Time Zone, and Daylight Savings Time.
1. Press MENU to open the OSD menu.
2. Press VOL+ or VOL- to highlight the TIME option.
3. Press CH+ or CH- to highlight the option you want to set, and press VOL+ or VOL- to select the option setting.
Sleep Timer – Set the time between 15 and 240 minutes that you want the TV to remain on before automatically shutting off.
Time Zone – Set the time zone for your location. Daylight Saving Time – Set daylight savings time ON or OFF.
SET UP Option You can adjust various options such as OSD language, PC setup, or Closed Captioning.
1. Press MENU to open the OSD menu.
2. Press VOL+ or VOL- to highlight the SET UP option.
27
3. Press CH+ or CH- to highlight the option you want to set, and press VOL+ or VOL- to select the option setting.
Menu Language – Adjust the language of the OSD menu. Transparency – Adjust the transparency of the OSD menu. Aspect – Adjust the video format of the TV. (Refer to Aspect Ratio page 30 for description
of Aspect Ratio options.) PC Setup – Open signal synchronization options with the PC.
o H-POS – Move the PC image left or right. o V-POS – Move the PC image up or down. o CLOCK – Adjust the quality of the image in large increments. o PHASE – Adjust the quality of the image in small increments. o AUTO ADJUST – Adjust the image quality and position.
Closed Caption – Adjusts display of supplied closed captioning o CC MODE – Set closed captioning ON or OFF. There is also an extra CC on mute option
which allows closed captioning to be displayed when you mute the TV’s volume. o BASIC SELECTION – Select between various CC services and text boxes. CC1 is the
standard for North America broadcasts. If you have TEXT1 ~ TEXT4 turned on, there will be a black box blocking the TV’s video.
o ADVANCED SELECTION – Select between various digital closed caption services. North America broadcast usually uses service 1.
o OPTION – Adjustments for the type of digital caption style you want. MODE – Either locks or opens the adjustments of the closed captioning. FONT STYLE – Select different font styles.
FONT SIZE – Select the size of the captioning.
FONT EDGE STYLE – Add 3D effects to the font.
FONT EDGE COLOR – Add color to the edge style.
FG COLOR – Add color to the foreground of the captioning.
BG COLOR – Add color to the background of the captioning.
FG OPACITY – Adjust the transparency level of the foreground.
BG OPACITY – Adjust the transparency level of the background.
Restore Default – Resets all options under SETUP.
Note: The TV’s native resolution is 1366x768, but use 1280x768 to give you the clearest PC screen. Use auto adjust to sync to the PC’s signal after connecting the TV to the PC. All adjustments under option are only for digital channel closed captioning; under analog channels these adjustments are not available.

28
LOCK Option If desired, you can assign filters to block TV programs determined to be inappropriate for children.
1. Press MENU to open the OSD menu.
2. Press VOL+ or VOL- to highlight the LOCK option.
3. Use the number keys to enter the password, and then the LOCK functions will be available. (Default password is “0000”)
4. Press CH+ or CH- to highlight the option you want to set, and press VOL+ or VOL- to select the option setting.
Change Password – Change the password. (If you forget your new password, contact customer support for a master password which will allow you to reset the password again.)
System Lock – Enable/Disable the TV blocking options. Unrated Lock – Lock or unlock TV shows or movies that are unrated.
US – Enter the ratings systems for both movies and TV shows. (Refer to Program Ratings on page 31 for the defined Ratings.) o TV – Blocks TV shows; you can select the level you want to block by TV rating or by
content. o MPAA – Blocks movies; you can select the level you want to block by the movie ratings
you want to block. RRT Setting – Set the rating region table that defines the rating standard for a particular
geographic region and/or country. The menu may vary depending on the local broadcasting system.
Note: If RRT setting is grayed out, your country / area does not support that type of setting.
Reset – Reset all LOCK options to default settings.

29
TV Option You can set various cable functions after the initial tuner setup has been completed. (If you haven’t performed the initial tuner set up, refer to page 22).
1. Press MENU to open the OSD menu.
2. Press VOL+ or VOL- to highlight the TV option.
3. Press CH+ or CH- to highlight the option you want to set, and press VOL+ or VOL- to select the option setting.
Tuner Mode – Select the tuner source for the TV input: Air (antenna) or Cable.
Auto Scan - Scans the TV channels and also allows you to choose your desired cable system. The scan searches for channel signals within range or those available through cable, and when the scan is complete a list is created of channels with signals strong enough to recognize. Some channels that are added to the list still may not have signals strong enough for clear viewing.
Channel Skip – Skip channels you do not want to watch so they don’t display when you use the CH+ and CH- buttons on the remote control to scroll through channels. The channel choices are those on the scanned list; therefore this function is only available after you perform an Auto Scan. (Refer to Browsing Shortcuts on page 32 for more information.)
Favorite – Select channels that you want to watch frequently so they will be displayed when you use the FAV CH button on the remote control. The channel choices are those on the scanned list; therefore this function is only available after you perform an Auto Scan. (Refer to Browsing Shortcuts on page 32 for more information.)
DTV Signal – Measures a digital TV channel’s broadcasting strength. Audio Language – Select your language preference in a program. This is dependent on the
TV channel’s support. If you do not get the language of your choice, it is because that particular channel does not support that language.
Note: The cable system should be left at AUTO unless you know which cable system your local cable company uses.
30
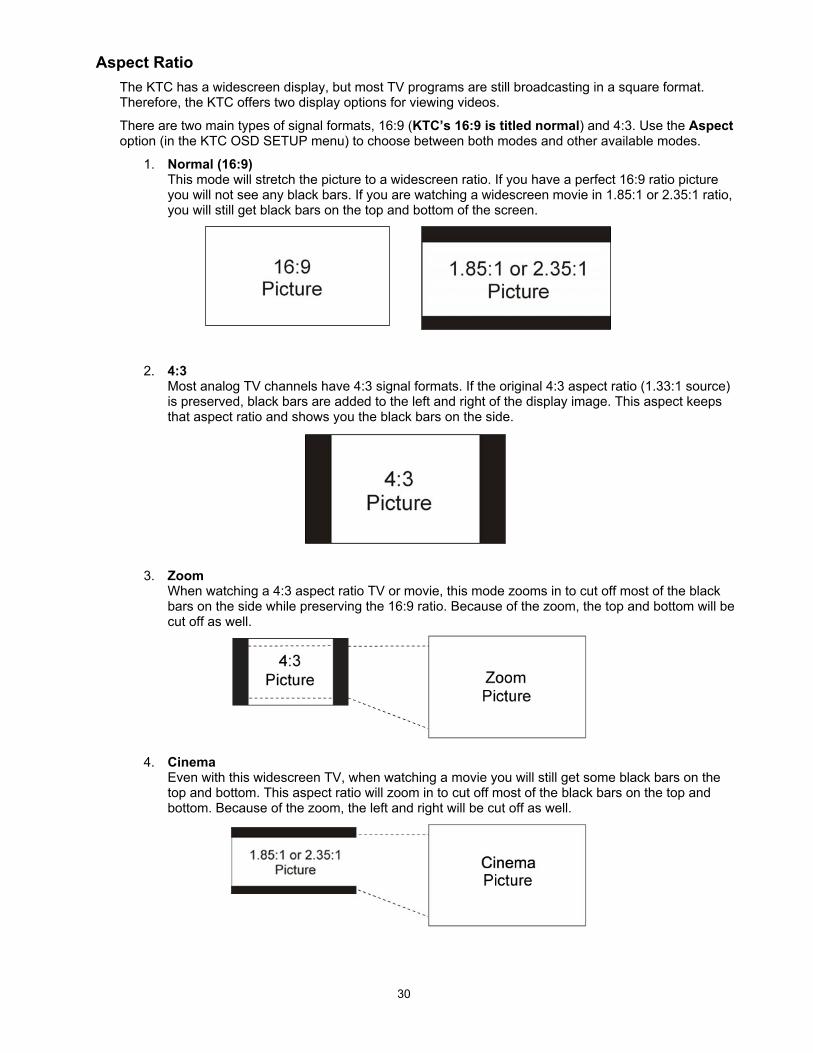
Aspect Ratio The KTC has a widescreen display, but most TV programs are still broadcasting in a square format. Therefore, the KTC offers two display options for viewing videos.
There are two main types of signal formats, 16:9 (KTC’s 16:9 is titled normal) and 4:3. Use the Aspect option (in the KTC OSD SETUP menu) to choose between both modes and other available modes.
1. Normal (16:9) This mode will stretch the picture to a widescreen ratio. If you have a perfect 16:9 ratio picture you will not see any black bars. If you are watching a widescreen movie in 1.85:1 or 2.35:1 ratio, you will still get black bars on the top and bottom of the screen.
2. 4:3 Most analog TV channels have 4:3 signal formats. If the original 4:3 aspect ratio (1.33:1 source) is preserved, black bars are added to the left and right of the display image. This aspect keeps that aspect ratio and shows you the black bars on the side.
3. Zoom When watching a 4:3 aspect ratio TV or movie, this mode zooms in to cut off most of the black bars on the side while preserving the 16:9 ratio. Because of the zoom, the top and bottom will be cut off as well.
4. Cinema Even with this widescreen TV, when watching a movie you will still get some black bars on the top and bottom. This aspect ratio will zoom in to cut off most of the black bars on the top and bottom. Because of the zoom, the left and right will be cut off as well.

31
Program Ratings To block channels you don’t want your children to watch, you can filter them with the ratings functions under the OSD LOCK option. MPAA allows you to control ratings for movies. For regular TV programs you can use USTV settings, which allow you to filter what content you want at each age level, TV-Y, to TV-MA. Below are descriptions for each setting.
USTV Ratings TV-Y (USTV) – For All Children
For programs designed to be appropriate for all children. Whether animated or live-action, the themes and elements in this program are specifically designed for a very young audience, including children from ages 2-6. This program is not expected to frighten younger children.
TV-Y7 (USTV) – Directed to Older Children
For programs designed for children age 7 and above. It may be more appropriate for children who have acquired the developmental skills needed to distinguish between make-believe and reality. Themes and elements in this program may include mild fantasy violence or comedic violence, or may frighten children under the age of 7. Therefore, parents may want to consider the suitability of this program for their very young children. Note: For those programs where fantasy violence may be more intense or more combative than other programs in this category, such programs will be designated TV-Y7-FV.
TV-G (USTV) – General Audience
Most parents would find these programs suitable for all ages. Although this rating does not signify a program designed specifically for children, most parents may let younger children watch this program unattended. It contains little or no violence, no strong language and little or no sexual dialogue or situations.
TV-PG (USTV) – Parental Guidance Suggested
For programs that contain material that parents may find unsuitable for younger children. Many parents may want to watch it with their younger children. The theme itself may call for parental guidance and/or the program contains one or more of the following: moderate violence (V), some sexual situations (S), infrequent coarse language (L), or some suggestive dialogue (D).
TV-14 (USTV) – Parents Strongly Cautioned
For programs that contain some material that many parents would find unsuitable for children less than 14 years of age. Parents are strongly urged to exercise greater care in monitoring this program and are cautioned against letting children under the age of 14 watches unattended. This program contains one or more of the following: intense violence (V), intense sexual situations (S), strong coarse language (L), or intensely suggestive dialogue (D).
TV-MA (USTV) – Mature Audience Only
For programs specifically designed to be viewed by adults and therefore may be unsuitable for children under 17. This program contains one or more of the following: graphic violence (V), explicit sexual activity (S), or crude indecent language (L).
TV program description
FV - Fantasy Violence V - Violence S - Sexual Situations L - Adult Language D - Sexually Suggestive Dialog
32
MPAA Ratings G (MPAA)
General audiences; all ages admitted.
PG (MPAA)
Parental guidance suggested. Some material may not be suitable for children.
PG-13 (MPAA)
Parents strongly cautioned. Some material may be inappropriate for children under 13.
R (MPAA)
Restricted. Under 17 requires accompanying parent or adult guardian (age varies in some jurisdictions).
NC-17 (MPAA)
No one 17 and under admitted.
X (MPAA)
X is an older rating that is unified with NC-17 but may be encoded in the data of older movies.
Browsing Channels Press CH+ and CH- to scroll through the channels; the only channels that will be displayed are those on the scanned list that was created during the Initial Turner Setup procedure.
Browsing through the entire channel list can be tedious, so the KTC has two ‘shortcut’ methods for avoiding the need to scroll through all the channels to find the ones you want to watch: Favorites List and Channel Skip.
Note: The available channel choices for both the Favorites List and Channel Skip options are those on the scanned list; therefore these functions are only available after you perform an Auto Scan.
Favorites List Allows you to quickly scroll through only those channels you may frequently watch. You can add or remove channels to your Favorites list when desired.
Add & Remove Channels
1. Press MENU to open the OSD menu.
2. Press VOL+ or VOL- to highlight TV.
3. Press CH- to highlight Favorite, and then press ENTER.
4. Press CH+ or CH- to scroll through the list of channels and press ENTER on the channels you want to add to the Favorite list. A check mark will be displayed on all channels you have selected.
To Remove channels, simply follow steps 1-3 above, highlight any of the channels that already have check marks and press ENTER. The check mark will be removed but the channel will remain in the scanned list.
Browse Channels from the Favorite List
Note: You must use the KTC remote control for this feature.
33
1. Press FAV CH. Only the channels you added to the Favorites list will be displayed.
2. Press CH+ or CH- to highlight the channel you want to view and then press ENTER.
Channel Skip The Channel Skip feature allows you to select channels that you don’t want displayed when you use the CH+ or CH- buttons to browse channels. For instance, some channels with limited signals won’t display clear, or some channels have content that you won’t ever want to view. By designating them as ‘skipped’, those channels won’t be displayed while you browse channels.
Add & Remove Channels to the Skip List
1. Press MENU to open the OSD menu.
2. Press VOL+ or VOL- to highlight TV.
3. Press CH- to highlight Channel Skip, and then press ENTER.
4. Press CH+ or CH- to scroll through the list of channels and press ENTER on the channels you want to add to the Skip list. A check mark will be displayed on all channels you have selected.
To Remove channels, simply follow steps 1-3 above, highlight any of the channels that already have check marks and press ENTER. The check mark will be removed but the channel will remain in the scanned list.
Display Channel Information using Remote Control Buttons While watching a TV program, you can view various channel information by using the DISPLAY and EPG buttons.
Note: You must use the KTC remote control for these features.
Display Current Channel Information (DISPLAY Button)
1. While watching a TV program while using the Antenna, press DISPLAY once to display the current channel number, call sign, time of program, current Closed Captioning mode setting, program rating, and channel’s broadcasting resolution (i.e., Good, Poor, etc.)
2. Press DISPLAY again to display the current program’s ‘plot’ descriptive overview.
3. Press EXIT to close information window.
Electronic Program Guide (EPG Button)
1. While watching a TV program while using the Antenna, press EPG to display the current program’s title, ‘plot’ descriptive overview, and time duration.
2. Use CH+ or CH- to display the upcoming programs and time durations.
3. Press EXIT to close the information window.
Picture Mode (P.MODE Button)
While watching a TV program, press P.MODE to cycle through the Picture modes, and temporarily select a different Picture Mode than the one set as the default. (Refer to VIDEO Option on page 24 for setting the default Picture Mode.)
Sound Mode (S.MODE Button)
While watching a TV program, press S.MODE to cycle through the Sound modes, and temporarily select a different Sound Mode than the one set as the default. (Refer to AUDIO Option on page 25 for setting the default Sound Mode.)
34
DIGITAL PHOTO FRAME (DPF) SECTION
WARNING: The first time you power the KTC on, you may receive the following messages:
‘Proceed with Auto Scan’, ‘No Database’, or ‘No Signal’
Because the KTC defaults to the TV mode when shipped from the factory, if you are not connected to digital cable, the first time you power the KTC on, the unit may display ‘Proceed with Auto Scan’, ‘No Signal’, and/or ‘No Database’ messages. Press SOURCE on the remote control or side panel buttons, use the arrows to highlight DPF, and then press ENTER. The KTC will now be in the Digital Photo Frame (DPF) mode, and will remain in the DPF mode until you change the SOURCE at a later time.
The PanTouch Interface The KTC includes our PanTouch Technology (active in DPF mode only), a touch icon-driven menu system designed to provide the same KTC functions as the remote control. The menu icons are conveniently hidden away in the top right inside edge of the frame waiting to be activated.
TIP: Throughout this section, (PT) is noted next to instructions referencing specific use of the PanTouch interface.
Use the PanTouch Interface Simply touch the frame in the area shown in the example below to activate the PanTouch interface.
Note:
The remote control is disabled when the PanTouch interface is active. The PanTouch interface will automatically shut off when left idle approximately 3 seconds.

35
The KTC’s Menu Screens You control the Digital Photo Frame (DPF) features through the menu screens, and you can navigate the menus by using either the PanTouch interface or the remote control.
Functionality differences between the Remote Control and PanTouch interface are noted by (PT) and (RC) throughout the DPF documentation that follows.
The HOME Screen The main DPF features are available through the HOME screen. To access the HOME screen from any other screen or while slideshow is playing, (PT) touch BACK and HOME or (RC) press EXIT until the HOME screen is displayed.
PHOTO Display your photos (.jpg or .jpeg) individually or as slideshows, and set viewing parameters. Full functionality is described under PHOTO on page 38.
MUSIC List and play your MP3 music files. Full functionality is described under MUSIC on page 48.
VIDEO List and play your Video files. Full functionality is described under VIDEO on page 49.
FILE View all files on each present memory source. Full functionality is described under FILE on page 50.
CLOCK Set the calendar, date and time, and schedule the alarm and slideshow. Full functionality is described under CLOCK on page 51.
INTERNET With the Pandigital Wireless Wi-Fi adapter (included), you can connect to the internet for access to Google PicasaTM’s Web album or Windows Live FrameIt. Full functionality is described under INTERNET on page 54.
36
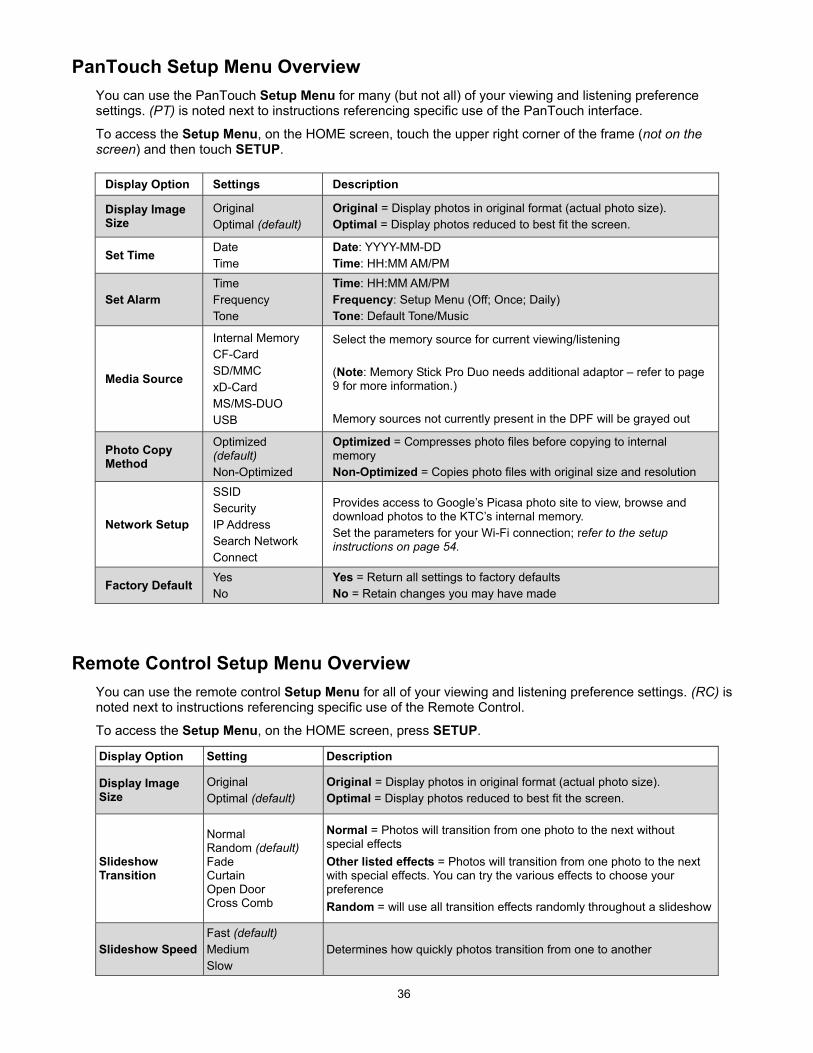
PanTouch Setup Menu Overview You can use the PanTouch Setup Menu for many (but not all) of your viewing and listening preference settings. (PT) is noted next to instructions referencing specific use of the PanTouch interface.
To access the Setup Menu, on the HOME screen, touch the upper right corner of the frame (not on the screen) and then touch SETUP.
Remote Control Setup Menu Overview You can use the remote control Setup Menu for all of your viewing and listening preference settings. (RC) is noted next to instructions referencing specific use of the Remote Control.
To access the Setup Menu, on the HOME screen, press SETUP.
Display Option Setting Description
Display Image Size
Original Optimal (default)
Original = Display photos in original format (actual photo size). Optimal = Display photos reduced to best fit the screen.
Slideshow Transition
Normal Random (default) Fade Curtain Open Door Cross Comb
Normal = Photos will transition from one photo to the next without special effects Other listed effects = Photos will transition from one photo to the next with special effects. You can try the various effects to choose your preference Random = will use all transition effects randomly throughout a slideshow
Slideshow Speed Fast (default) Medium Slow
Determines how quickly photos transition from one to another
Display Option Settings Description
Display Image Size
Original Optimal (default)
Original = Display photos in original format (actual photo size). Optimal = Display photos reduced to best fit the screen.
Set Time Date Time
Date: YYYY-MM-DD Time: HH:MM AM/PM
Set Alarm Time Frequency Tone
Time: HH:MM AM/PM Frequency: Setup Menu (Off; Once; Daily) Tone: Default Tone/Music
Media Source
Internal Memory CF-Card SD/MMC xD-Card MS/MS-DUO USB
Select the memory source for current viewing/listening (Note: Memory Stick Pro Duo needs additional adaptor – refer to page 9 for more information.) Memory sources not currently present in the DPF will be grayed out
Photo Copy Method
Optimized (default) Non-Optimized
Optimized = Compresses photo files before copying to internal memory Non-Optimized = Copies photo files with original size and resolution
Network Setup
SSID Security IP Address Search Network Connect
Provides access to Google’s Picasa photo site to view, browse and download photos to the KTC’s internal memory. Set the parameters for your Wi-Fi connection; refer to the setup instructions on page 54.
Factory Default Yes No
Yes = Return all settings to factory defaults No = Retain changes you may have made

37
Display Option Setting Description
Slideshow Music ON (default) OFF
ON = Plays background music with your photo slideshows. OFF = Even though music files are present on the memory source, music will not play with your photo slideshows.
Slideshow Shuffle
ON (default) OFF
ON = Displays photos randomly OFF = Displays photos in order found on selected memory source
Video Playback Repeat
Repeat Single Repeat All (default) No Repeat
Repeat Single = Selected video will continuously play until you stop it Repeat All = All videos found on the selected memory source will continuously play until you stop the loop No Repeat = Selected video will only play once and automatically stop
Audio Playback Repeat
Repeat Single Repeat All (default) No Repeat
Repeat Single = Selected audio file will continuously play until you stop it Repeat All = All audio files found on the selected memory source will continuously play until you stop the loop No Repeat = Selected audio will only play once and automatically stop
Select Media
Internal Memory SD/MMC xD-Card MS/MS-DUO USB CF
Select the memory source for current viewing/listening (Note: MemoryStick Pro Duo needs additional adaptor – refer to page 9 for more information.) Memory sources not currently present in the DPF will be grayed out
Photo Copy Method
Optimized (default) Non-Optimized
Optimized = Compresses photo files before copying to internal memory Non-Optimized = Copies photo files with original size and resolution
View Folder
Family Friends Vacation Events Others
Photos can be copied into these five category folders for custom group viewing
Network Setup
SSID Security IP Address Search Network Connect
Provides access to Google’s Picasa photo site to view, browse and download photos to the KTC’s internal memory. Set the parameters for your Wi-Fi connection; refer to the setup instructions on page 54
Factory Default Yes No
Yes = Return all settings to factory defaults No = Retain changes you may have made
Select Media (Memory Source) The KTC has an internal memory for storing your photo, music, and video files. You can also use one or more memory cards and/or USB Flash Drive, giving you more flexibility for your viewing preferences.
Because there are multiple memory source options, you will use the Select Media function to select your desired memory source when you want to view your photos or videos, and listen to music.
Note: If you have not inserted one of the external memory sources, the KTC will default to the internal memory. Sources not present will be grayed out.
IMPORTANT: MemoryStick Pro Duo requires additional adaptor – refer to page 9 for more information.
1. Insert a memory card or USB Flash Drive into the KTC.
2. With the HOME screen displayed, touch or press SETUP.

38
3. (PT) Use the arrows to highlight Media Source, and then touch SELECT. (RC) Use the arrows to highlight Select Media and then press ENTER.
4. Use the arrows to highlight the desired memory source, and then touch SELECT or press ENTER.
5. Touch BACK or press EXIT to return to the HOME screen.
TIP: While the memory source is loading, the PanTouch interface and remote control buttons will not respond. (The number of files on the memory source will affect the actual load time.) When the memory source is completely loaded, a small icon appears at the top of the screen indicating the currently selected memory source.
PHOTOS You can view your photos individually or as slideshows, with or without background music.
Display Image Size There are two modes for displaying your photos on the DPF:
Original = Displays photos in actual photo size, which may result in part of a photo not being visible on the screen
Optimal (default) = Reduces the size and resolution to best fit the screen
Set Image Size Mode
1. With the HOME screen displayed, touch or press SETUP.
2. Use the arrows to highlight Display Image Size, and then touch SELECT or press ENTER.
3. Use the arrows to highlight your preference, and then touch SELECT or press ENTER.
4. Touch BACK or press EXIT to return to the HOME screen.

39
View All Photos (Thumbnails) 1. With the HOME screen displayed, use the arrows to highlight PHOTOS, and then touch or press
ENTER. The photo thumbnails screen appears.
2. Use the arrows to scroll through the photos. The photo’s filename will be displayed at the top of the screen.
3. Touch BACK or press EXIT to return to the HOME screen.
View an Individual Photo 1. With the photo thumbnail screen displayed, use the arrows to highlight the photo you want to view.
The photo file name will be displayed above the photos, and the page number/total page numbers indicates which thumbnail page you are viewing and the total number of pages in the current memory source.
2. To view the highlighted photo, touch VIEW or press ENTER.
3. (PT only) When a photo is displayed, you can scroll through the remaining photos on the memory source by touching ‘BACK’ and ‘FWD’ on the Slider Bar.
4. Touch BACK or press EXIT to return to the photo thumbnails screen.

40
Rotate a Photo (RC only)
1. With a photo individually displayed, rotate it by pressing ROTATE. The photo will be rotated by 90 degrees clockwise with each press of the ROTATE button.
2. Press EXIT to return to the photo thumbnail screen.
3. The photo will remain rotated even after the KTC is powered off.
Zoom a Photo 1. With a photo individually displayed, magnify it by touching or pressing ZOOM. The photo is magnified
in size each time you touch or press ZOOM, until it returns to its normal size.
TIP: With the Remote Control, you can also pan around the photo by using ▲ / ▼ or ◄ / ► to view portions of the photo that are not currently visible.
2. Touch BACK or press EXIT to return to return to the thumbnail screen.
Photo Date/Time Stamp When photos are taken, most digital cameras automatically add date/time stamps the image files. If desired, you can have the photo date and time stamps displayed with the photos.
This date/time stamp will only display if your photo files include this information. If your photos have been obtained from sources other than directly from the digital camera, i.e., scanned photos, there will be no date/time stamp to display.
(RC only)
1. While a slideshow is playing, press SETUP.
2. Use the arrows to highlight Photo Date/time Stamp, and then press ENTER.
3. Use the arrows to highlight your preference, and then press ENTER.
4. Press EXIT to close the options, and then press ENTER to resume your slideshow.
Enable Clock Display You can have the current time displayed with your slideshows or with individual photos when desired.
(RC only)
1. While a slideshow is playing, press SETUP.
2. Use the arrows to highlight Enable Clock Display, and then press ENTER.
3. Use the arrows to highlight your preference, and then press ENTER.
5. Press EXIT to close the options, and then press ENTER to resume your slideshow.
TIP: If your clock is not displaying the correct time, refer to the CLOCK section on page 51 for instructions on setting the clock.
41
Photo Copy Methods When you copy photos into the internal memory, you can choose to have them Optimized or Non-optimized.
Optimized (default) = The original photo file is downscaled in size and compressed into a smaller sized JPEG, allowing more photos to be stored in the internal memory.
Non-optimized = The original photo file is stored in the internal memory, keeping its original size and resolution.
Set the Photo Copy Method
1. With the HOME screen displayed, touch or press SETUP.
2. Use the arrows to highlight Photo Copy Method, and then touch SELECT or press ENTER.
3. Use the arrows to highlight the preferred method, and then touch SELECT or press ENTER.
4. Touch BACK or press EXIT to return to the HOME screen.
Copy Photos from Memory Card into Internal Memory You can copy all or individual selected photos from your memory card into the KTC’s internal memory.
Copy All Photos
1. With the HOME screen displayed, use the arrows to highlight PHOTOS and then touch or press ENTER.
2. (PT) With the photo thumbnails screen displayed, touch COPY ALL. (RC) With the photo thumbnails screen displayed, press SETUP. Use the arrows to highlight Copy Photo and Copy All, and then press ENTER.
CAUTION: The photos will be copied without a confirmation message. If any of the file names already exist in the internal memory, they will be overwritten without notice.
3. Touch HOME or press EXIT to return to the HOME screen.
Copy Selected Individual Photos
1. With the HOME screen displayed, use the arrows to highlight PHOTOS and then touch or press ENTER.
2. With the photo thumbnails screen displayed, use the arrows to scroll through your photos.
3. (PT) Touch SELECT on each photo you want to copy, (a check mark appears when selected), then touch COPY SEL. (RC) Press “CH+” on each photo you want to copy, (a check mark appears when selected), then press SETUP. Use the arrows to highlight Copy Photo and Copy Selected, and then press ENTER. (Use ‘CH-‘ to de-select if needed.)
CAUTION: The photos will be copied without a confirmation message. If any of the file names already exist in the internal memory, they will be overwritten without notice.
4. Touch HOME or press EXIT to return to the HOME screen.
42
Delete Photos from the Internal Memory You can delete photos from the KTC’s internal memory, but not from your memory cards. Refer to your camera’s user guide for instructions on deleting photos from your memory card.
TIP: It’s a good idea to make backup copies of the photos before you delete them from your KTC.
Delete All Photos
1. With the HOME screen displayed, use the arrows to highlight PHOTOS and then touch or press ENTER.
2. (PT) With the photo thumbnails screen displayed, touch DEL ALL. A confirmation message ‘Are you sure you want to delete all the photos?’ appears. Touch YES to delete, or NO to cancel.
3. (RC) With the photo thumbnails screen displayed, press SETUP. Use the arrows to highlight Delete Photo and Delete All, and then press ENTER.
WARNING: No confirmation message appears when using the remote control; the photos will be deleted immediately.
4. Touch HOME or press EXIT to return to the HOME screen.
Delete Selected Individual Photos
1. With the HOME screen displayed, use the arrows to highlight PHOTOS and then touch or press ENTER.
2. With the photo thumbnails screen displayed, use the arrows to scroll through your photos.
3. (PT) Touch SELECT on each photo you want to delete, (a check mark appears when selected), then touch DEL SEL. A confirmation message ‘Are you sure you want to delete the selected photos?’ appears. Touch YES to delete, or NO to cancel. (RC) Press “CH+” on each photo you want to delete, (a check mark appears when selected), then press SETUP. Use the arrows to highlight Delete Photo and Delete Selected, and then press ENTER. (Use ‘CH-‘ to de-select if needed.)
WARNING: No confirmation message appears when using the remote control; the photos will be deleted immediately.
4. Touch HOME or press EXIT to return to the HOME screen.
SLIDESHOWS The KTC can display all of the photos on the selected memory source as a slideshow, or you can select specific photos for a custom slideshow. You can also add background music to your slideshows.
All Photos Slideshow To play a slideshow of all photos on the selected memory source:
(PT)
1. With the PHOTO screen displayed, touch VIEW and then PLAY.
2. Touch BACK to pause, VIEW to resume.
3. Touch BACK twice to stop the slideshow.
43
(RC)
1. With the HOME or photo thumbnails screen displayed, press SLIDE SHOW.
2. Press EXIT to pause, SLIDE SHOW to resume
3. Press EXIT again to stop the slideshow.
Custom Category Slideshows There are five category folders in the internal memory into which you can copy photo files for custom slideshows: Family – Friends – Vacation – Events – Others (these folder names cannot be changed)
Only photos stored in the internal memory can be assigned to the category folders; this feature is not available for external memory sources.
Assign Photos to Category Folders
(RC only)
1. With the HOME screen displayed, use the arrows to highlight PHOTOS, and then press ENTER.
2. With the photo thumbnails screen displayed, use the arrows to scroll through your photos.
3. Use the arrows to scroll through the photos. Press “CH+” to select photos, or “CH-” to un-select them.
4. A check mark is displayed on each selected photo. Continue until you have selected all desired photos.
5. Press SETUP.
6. Use the arrows to highlight Assign Selected Photos To, and then press ENTER.
7. Use the arrows to highlight the desired folder, and then press ENTER to assign the selected photos to that folder.
Note: The photos are assigned to the folder, not copied. If you delete the photo file from internal memory later, the link to the photo will also be deleted.
TIP: You can also assign photos to folders while viewing individual photos or slideshows by pressing SETUP. Select Assign Photo To, and then select a folder as described in steps 5-6 above.
Play Slideshow from Category Folders
(RC only)
1. With the photo thumbnail screen displayed, press SETUP.
2. Use the arrows to highlight Start Slideshow, and then press ENTER.
3. Select the folder you want to view, and then press ENTER.
Un-assign or Re-assign Photos in Category Folders
(RC only)
1. With the HOME screen displayed, press SETUP.
2. Use the arrows to highlight View Folder, and then press ENTER.

44
3. Use the arrows to highlight the desired folder from which you will un-assign photos, and then press ENTER.
4. Use the arrows to highlight the photo to be un-assigned or re-assigned, and then press SETUP.
5. To Un-assign, use the arrows to highlight Un-assign Photos from This Folder and press ENTER. Use the arrows to highlight Selected Photos or All, and then press ENTER.
6. To Re-assign, use the arrows to highlight Un-assign Photos from This Folder press ENTER. Use the arrows to highlight the desired category into which you want to assign the photo.
Note: Un-assigning photos from a folder will not delete them from the internal memory.
Play Temporary Custom Slideshow A temporary custom slideshow is comprised of individual photos you select and display immediately without saving them in a category folder.
(RC only)
1. With the HOME screen displayed, use the arrows to highlight PHOTOS, and then press ENTER.
2. Use the arrows to scroll through the photos. Press “CH+” to select photos or “CH-” to un-select them.
3. A check mark is displayed on each selected photo. Continue until you have selected all desired photos.
4. Press SETUP.
5. Use the arrows to highlight Start Slideshow, press ENTER.
6. Use the arrows to highlight Slideshow Selected, and then press ENTER.
7. The slideshow will display only those photos you selected.
8. Press EXIT twice to return to the thumbnails screen.
9. Press EXIT again to return to the HOME screen.
Play Music with a Slideshow
Note: Music files must be standard MP3 format and not licensed music from download services.
To play background music during a slideshow, copy at least one music MP3 file onto the same memory source as your photos. The music will automatically play as the slideshow runs.
If you have multiple MP3 files on your memory source, each music file will play in succession until all have been played. (Refer to Audio Playback Mode on page 49 to set the music files to play only once, continuously, or not at all.)
Adjust the Volume Use “CH+” and “CH-” on the remote control to adjust the volume.

45
Set Slideshow Transition When images change from one to another in a slide show, you can set the transition effects as photos transition from one to another during a slideshow.
Normal = Photos transition from one photo to the next without special effects
Random (default) = Photos will transition using all special effects randomly throughout a slideshow
Remaining effects (Fade, Curtain, Open_Door, Cross_Comb) = Specific transition effect (select as desired)
(PT)
1. While a slideshow is playing, touch SLIDE SET UP, and then SLIDESHOW TRANSITIONS.
2. Use the arrows to highlight the preferred effect, and then touch SELECT. (A small white square depicts the selected effect.)
3. The slideshow will resume after approximately 3 seconds. (RC)
1. With the HOME screen displayed, press SETUP.
2. Use the arrows to highlight Slideshow Transition, and then press ENTER.
3. Use the arrows to highlight the preferred effect, and then press ENTER. (A small white square depicts the selected effect.)
4. Press EXIT to return to the HOME screen.
Set Slideshow Speed You can set the speed at which the slideshow photos transition from one to another, Fast (default) – Medium - Slow.
(PT)
1. While a slideshow is playing, touch SLIDE SET UP, and then SLIDESHOW SPEED.
2. Use the arrows to highlight the preferred speed, and then press SELECT.
3. The slideshow will resume after approximately 3 seconds. (RC)
1. With the HOME screen displayed, press SETUP.
2. Use the arrows to highlight Slideshow Speed, and then press ENTER.
3. Use the arrows to highlight the preferred speed, and then press ENTER. (A small white square depicts the selected speed.)
4. Press EXIT to return to the HOME screen.
Set Slideshow Music Mode You can choose to have slideshow background music playing or not, even if music files are present on the memory source.
Note: Refer to the MUSIC section beginning on page 48 for more information on playing music files.
ON (default) = Play background music with slideshow
OFF = Do not play music with slideshow
(PT)
1. While a slideshow is playing, touch SLIDE SET UP, and then either MUSIC ON or MUSIC OFF, depending on the current setting.

46
2. The slideshow will resume after approximately 3 seconds. (RC)
1. With the HOME screen displayed, press SETUP.
2. Use the arrows to highlight Slideshow Music, and then press ENTER.
3. Use the arrows to highlight the preferred mode, and then press ENTER. (A small white square depicts the selected mode.)
4. Press EXIT to return to the HOME screen.
Set Slideshow Shuffle You can set the slideshow to display your photos in a random ‘shuffle’ order or display them in the order they are found on the selected memory source.
ON (default) = Displays photos randomly.
OFF = Displays photos in order found on selected memory source.
(PT)
1. While a slideshow is playing, touch SLIDE SET UP, and then either SHUFFLE ON or SHUFFLE OFF, depending on the current setting.
2. The slideshow will resume after approximately 3 seconds. (RC)
1. With the HOME screen displayed, press SETUP.
2. Use the arrows to highlight Slideshow Shuffle, and then press ENTER.
3. Use the arrows to highlight the preferred mode, and then press ENTER. (A small white square depicts the selected mode.)
4. Press EXIT to return to the HOME screen.
RECIPES The KTC includes pre-loaded cookbooks that contain a collection of popular recipes from well-known publishers (i.e., bon appétit).
TIP: Additional seasonal cookbooks are available and can be added to your KTC. Go to our website at http://www.pandigital.net to purchase.
There are six food group categories into which you can copy the recipes from the main cookbooks: Hors d’oeuvres, Soups, Salads, Entrées, Desserts and Others. (The category names are not changeable).
Note: The RECIPES feature is only available when the Internal Memory is the selected memory source.
Access the Cookbooks 1. With the HOME screen displayed, use the arrows to highlight RECIPE and then touch or press
ENTER.
2. Use the arrows to highlight the desired cookbook or food group category, and then touch VIEW or press ENTER.
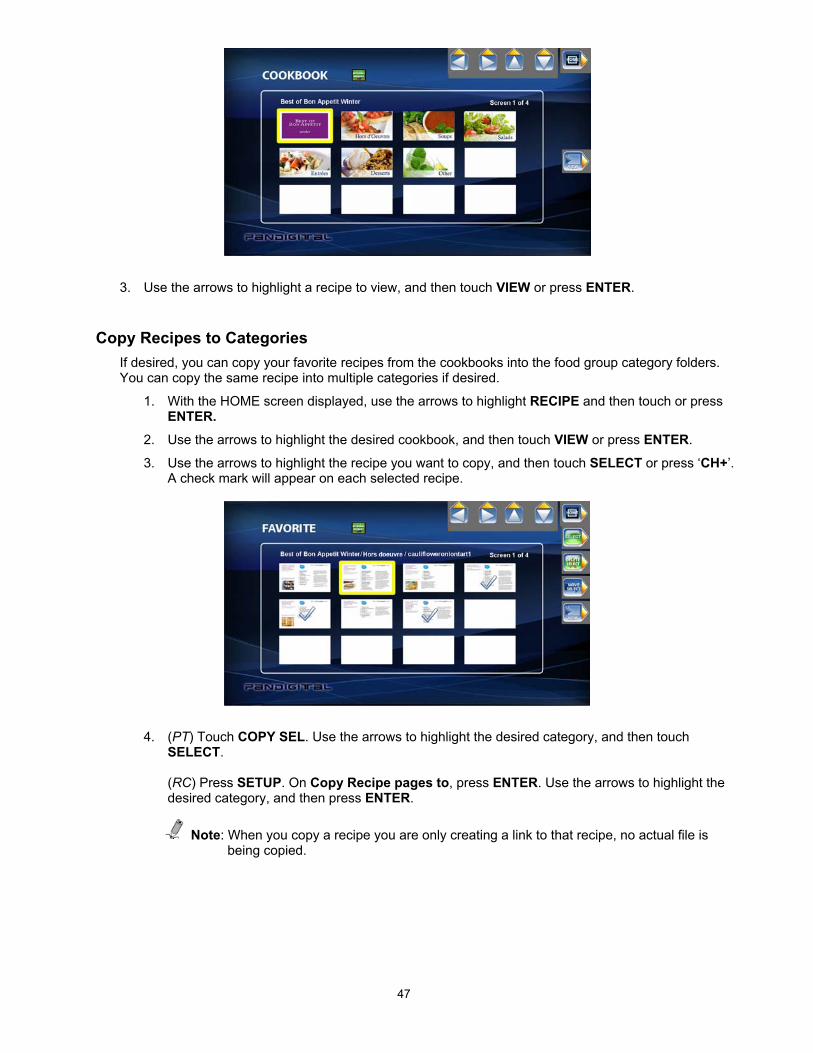
47
3. Use the arrows to highlight a recipe to view, and then touch VIEW or press ENTER.
Copy Recipes to Categories If desired, you can copy your favorite recipes from the cookbooks into the food group category folders. You can copy the same recipe into multiple categories if desired.
1. With the HOME screen displayed, use the arrows to highlight RECIPE and then touch or press ENTER.
2. Use the arrows to highlight the desired cookbook, and then touch VIEW or press ENTER.
3. Use the arrows to highlight the recipe you want to copy, and then touch SELECT or press ‘CH+’. A check mark will appear on each selected recipe.
4. (PT) Touch COPY SEL. Use the arrows to highlight the desired category, and then touch SELECT. (RC) Press SETUP. On Copy Recipe pages to, press ENTER. Use the arrows to highlight the desired category, and then press ENTER.
Note: When you copy a recipe you are only creating a link to that recipe, no actual file is being copied.

48
Move Recipes to Categories After you have copied recipes into the categories, you can easily move recipes from one category to another.
1. With the HOME screen displayed, use the arrows to highlight RECIPE and then touch or press ENTER.
2. Use the arrows to highlight the any of the six food group categories, and then touch VIEW or press ENTER.
3. Use the arrows to highlight the recipe you want to move, and then touch SELECT or press ‘CH+’. A check mark will appear on each selected recipe.
4. (PT) Touch MOVE SEL. Use the arrows to highlight the desired category, and then touch SELECT. (RC) Press SETUP. On Move Recipe pages to, press ENTER. Use the arrows to highlight the desired category, and then press ENTER.
Note: When you move a recipe you are only creating a link to that recipe, no actual file is being copied or moved.
Delete Recipes from Categories You can delete recipes from categories when desired. When you delete a recipe from a category, you are only deleting the link to the recipe. The recipe will still be in the main cookbook.
Note: You cannot delete recipes from the main Cookbooks.
1. With the HOME screen displayed, use the arrows to highlight RECIPE and then touch or press ENTER.
2. Use the arrows to highlight the any of the six food group categories, and then touch VIEW or press ENTER.
3. Use the arrows to highlight the recipe you want to delete, and then touch SELECT or press ‘CH+’. A check mark will appear on each selected recipe.
4. (PT) Touch DELETE SEL and then touch YES to delete the selected recipe(s).
5. (RC) Press SETUP. On Delete Recipe Pages, press ENTER. Use the arrows to highlight Delete Selected, and then press ENTER.
Note: When using the remote control, the recipe(s) will be deleted without a chance to confirm.
MUSIC
Note: Music files must be standard MP3 format and not from licensed music from download services.
Play Music with a Slideshow To play background music during a slideshow, copy at least one music MP3 file onto the same memory source as your photos. The music will automatically play as the slideshow runs.
If you have multiple MP3 files on your memory source, each music file will play in succession until all have been played.
49
Play MP3 files at any Time You can play music MP3 files located on your memory source without a slideshow being displayed at any time. This allows you to use your KTC as a personal MP3 player.
1. With the HOME screen displayed, use the arrows to highlight MUSIC, and then touch or press ENTER. A list of all MP3 files found on the memory source is displayed.
2. Use the arrows to highlight the MP3 file you want to listen to, and then touch PLAY or press ENTER.
3. The music will play and will continue to play all MP3 files listed after the one you selected until all files are played. Use “VOL+” and “VOL-” to adjust the volume.
4. Touch BACK or press EXIT to stop the music.
Audio Playback Mode There are three audio playback modes that you can set in the KTC:
• No Repeat – play a selected music file only once. • Repeat Single – play a selected music file continuously until you stop it. • Repeat All – play all music files on the memory source continuously until you stop them.
Set Audio Playback Mode
(RC only)
1. With the HOME screen displayed, use the arrows to highlight MUSIC, and then press ENTER. A list of all music files found on the memory source is displayed.
2. Press SETUP.
3. Use the arrows to highlight Audio Playback Repeat and then press ENTER.
4. Use the arrows to highlight your desired mode and then press ENTER.
5. Press EXIT to return to the music file list.
6. To listen to a music file now, use the arrows to highlight the music file and then press ENTER.
VIDEO The KTC supports AVI video files with Motion JPEG. If your movie file is not in AVI format, you may have to convert the file by using a video converter software which is easily found for purchase on the internet.
Watch a Video 1. Insert a memory source containing video files into the KTC.
2. With the HOME screen displayed, use the arrows to highlight VIDEO, and then touch or press ENTER. A list of all video files found on the memory source is displayed.
3. Use the arrows to highlight the video you want to view, and then touch PLAY or press ENTER.
4. The video will begin to play. Use “CH+” and “CH-” on the remote control to adjust the volume.
5. Touch BACK or press EXIT to stop viewing the video and return to the file list. To play another video, repeat step 3.

50
Video Playback Mode There are three video playback modes that you can set in the KTC:
• No Repeat – play a selected video file only once. • Repeat Single – play a selected video file continuously until you stop it. • Repeat All – play all video files on the memory source continuously until you stop them.
Set Video Playback Mode
(RC only)
1. With the HOME screen displayed, use the arrows to highlight VIDEO, and then press ENTER. A list of all video files found on the memory source is displayed.
2. Press SETUP.
3. Use the arrows to highlight Video Playback Repeat and then press ENTER.
4. Use the arrows to highlight your desired mode and then press ENTER.
5. Press EXIT to return to the music file list.
6. To view a video now, use the arrows to highlight the video file and then press ENTER.
FILE This feature offers a quick method for listing all folders and files located on the selected memory source, whether they are photo, audio, or video files. You can also quickly select a photo, audio, or video files for immediate viewing or listening.
View Contents of Selected Memory Source 1. With the HOME screen displayed, use the arrows to highlight FILE, and then touch or press ENTER.
The contents of the selected memory source will be displayed.
2. Touch VIEW/PLAY or press ENTER on an individual file name to activate the file, i.e., view photo/video, or play music.
Note: If your memory source contains folders, touch VIEW/PLAY or press ENTER to view contents of folder, select the desired file, and then touch VIEW/PLAY or press ENTER to activate the file.
3. Touch BACK or press EXIT to return to the HOME screen.
Copy Files to Internal Memory You can copy all or individual selected files from an external memory source into the KTC’s internal memory.
TIP: Be sure to have an external memory source as your currently selected memory source.
51
Copy All Files
(PT)
1. With the contents of the FILE screen displayed, touch COPY ALL.
2. The files will be copied immediately. Press BACK to return to the HOME screen.
(RC)
1. With the contents of the FILE screen displayed, press SETUP.
2. Use the arrows to highlight COPY FILE, and then press ENTER.
3. The files will be copied immediately. Press EXIT to return to the HOME screen.
Copy Selected Individual Files
(PT)
1. With the contents of the FILE screen displayed, use the arrows to scroll through the file names.
2. Touch SELECT on each file you want to copy. A check mark will appear at the end of the file name.
3. Continue until you have all the desired files selected, and then touch COPY SEL.
4. The files will be copied immediately. Touch BACK to return to the HOME screen.
(RC)
1. With the contents of the FILE screen displayed, use the arrows to scroll through the file names.
2. Use the arrows to select files you want to copy. A check mark will appear at the end of the file name.
3. Continue selecting until you have all the desired files selected, and then press SETUP.
4. Use the arrows to highlight Copy File and then press ENTER.
5. The selected files will be copied immediately. Press EXIT to return to the HOME screen.
CLOCK You can use your KTC as a personal desk calendar and real-time clock which also displays a continuous slideshow.
Display the CLOCK/CALENDAR screen With the HOME screen displayed, use the arrows to highlight CLOCK, and then touch or press ENTER.
The CLOCK/CALENDAR screen will look similar to the one shown below. The slideshow displays photos from the currently selected memory source, and if the alarm is set, an alarm icon appears under the slideshow window.

52
Set the Clock and Date (PT)
1. With the HOME screen displayed, touch SETUP.
2. Use the arrows to highlight Set Time, and then touch SELECT.
3. Use the arrows to change the field value, and touch NEXT to scroll through the fields.
4. When all fields are correct, touch SET.
5. Touch BACK to return to the HOME screen. (RC)
1. With the CLOCK/CALENDAR screen displayed, press SETUP.
2. Use the arrows to highlight Set Clock and then press ENTER.
3. Use ◄ / ► to move between the Time and Date fields, and use ▲ / ▼ to change the value in the selected field.
4. When the date and time are correct, press ENTER to save and return to the normal CLOCK/CALENDAR screen.
Set the Alarm You can use your KTC as an alarm clock, and you can set the alert as either a built-in tone or music. You can also set the alarm to alert only once or daily.
CAUTION: After setting the alarm, the CLOCK/CALENDAR screen must be displayed for the alarm feature to activate. If any other screen is displayed during the ‘alarm set’ time, the alarm will not activate.
(PT)
1. With the HOME screen displayed, touch SETUP.
2. Use the arrows to highlight Set Alarm, and then touch SELECT.
3. Use the arrows to change the field value, and touch NEXT to scroll through the fields.
4. When the alarm is set as desired, touch SET to save.
53
5. Touch BACK to return to the HOME screen.
6. Use the arrows to highlight CLOCK, and then touch ENTER to display the CLOCK/CALENDAR screen.
(RC)
1. With the CLOCK/CALENDAR screen displayed, press SETUP.
2. Use ▲ / ▼ to highlight Set Alarm and then press ENTER.
3. Use ◄ / ► to scroll between the fields, and use ▲ / ▼ to change the value in the selected field.
4. When the alarm is set as desired, press ENTER to save.
5. Press EXIT to return to the normal CLOCK/CALENDAR screen.
A small alarm clock will be displayed in the lower right corner. Depending on the alert tone you selected, a small speaker symbol (default tone) or a music note symbol will also be displayed next to the little clock.
Note: At least one MP3 music file must be present in the internal memory for the alert to play music. If you set the alert to play Music and there is no MP3 music file present on the selected memory source, the default tone will sound instead.
TIP: Be sure to have the CLOCK/CALENDAR screen displayed and the KTC’s volume turned up when you want to use the Alarm Clock.
Turn Alarm Off
When the alarm sounds, touch the PanTouch Interface or press any button on the remote control to stop it and return to the CLOCK/CALENDAR screen.
To cancel the alarm before its scheduled time, follow the previous instructions for setting the alarm and set the schedule to OFF.
Clock Slideshow Photos You can set your clock slideshow to display all photos, photos within category folders, or a round clock rather than photos.
Select the Clock/Calendar Photo Source
(RC only)
1. With the CLOCK/CALENDAR screen displayed, press SETUP.
2. Use the arrows to highlight Slideshow Photo, and then press ENTER.
3. Use the arrows to highlight the desired photo source, and then press ENTER.
4. Press EXIT to return to the CLOCK/CALENDAR screen.
Note: If you select a folder that does not contain photo files, the round clock will be displayed instead. If you select a folder that does contain photo files, the time will be displayed under the photo slideshow.

54
INTERNET The Internet feature allows you to connect to the Internet for access to the Google PicasaTM online photo site to view, browse and stream images to the KTC, and access the Windows Live FrameIt website to receive streaming news, weather, Sports, and other content feeds directly to the KTC.
Note: You must have an active wireless network within range of the KTC, and the Pandigital wireless Wi-Fi USB Adapter must be connected to the KTC for the INTERNET feature to work.
Accessing Google PicasaTM or Windows Live FrameIt Sites Setting up your KTC to connect with either Picasa or FrameIt requires 3 steps:
A. Establish accounts with Picasa and/or FrameIt, and upload your photos to the web site(s).
B. Set up your Wireless Network on the KTC.
C. Connect the KTC with Picasa and/or FrameIt.
Establish accounts with Google PicasaTM and FrameIt
Visit http://picasaweb.google.com to set up an account, create folders, and upload your photos.
Visit http://www.frameit.live.com to set up an account, create folders, and assign desired RSS feed content.
Set up your Wireless Network on the KTC
(RC only)
1. Insert the Pandigital wireless USB adapter (included) to the USB host port.
2. With the HOME screen displayed, press SETUP.
3. Use the arrows to highlight Network Setup, and then press ENTER.
4. Use the arrows to highlight Search for Network, and then press ENTER.
5. Use the arrows to highlight the desired Wireless Network to which you want to connect, and then press ENTER.
6. Enter your wireless or DSL network Password; use the arrows to navigate the virtual keyboard and press ENTER to select highlighted characters.
TIPS: The ROTATION button on the remote control can be used to backspace. The password is case sensitive; use the ‘Shift’ key when uppercase characters are required.
7. Highlight Done and press ENTER.
8. When you are connected successfully, the MAC and IP addresses are listed. Press EXIT until you return to the HOME screen.
9. Use the arrows to highlight INTERNET. The network to which you are connected should be displayed at the bottom of the menu options.
55
Connect the KTC with Google PicasaTM
IMPORTANT: This step assumes that you have already established an account at http://Picasaweb.Google.com and have successfully uploaded photos to that account. You will need your Picasa User ID and Password for this step.
1. With the HOME screen displayed, use the arrows to highlight INTERNET, and then press ENTER.
2. Highlight Picasa and press SETUP to get to the Picasa User Setup screen.
3. Press ENTER on User ID.
4. Use the arrows to navigate on the virtual keyboard to enter your Picasa User ID. To select highlighted characters, press ENTER.
TIP: The ROTATION button can be used to backspace.
5. Highlight Done and press ENTER.
6. Use same method to enter your Picasa Password.
7. Highlight Connect and press ENTER.
TIP: The ID and password are case sensitive; if the ‘Connected failed, please check ID and Password’ message appears, you may need to re-enter them being careful to use the appropriate upper/lower case characters.
8. Highlight Picasa Web Albums, and then press ENTER.
9. When you are successfully connected, the folders you created in Picasa will be displayed.
10. Use the arrows to highlight the folder you want to view, and then press ENTER to view the photos you previously uploaded.
Viewing Photos Stored on Google PicasaTM
1. With the HOME screen displayed, use the arrows to highlight INTERNET, and then touch or press ENTER.
2. Use the arrows to highlight Picasa Web Albums, and then touch SELECT or press ENTER.
3. Use the arrows to select the folder you want to view, and then touch VIEW or press ENTER; thumbnails of all the photos in that folder will be displayed.
4. Use the arrows to highlight a photo, and then touch VIEW or press ENTER to display the selected photo individually.
5. To view a slideshow of all photos in the selected folder, touch VIEW again or press SLIDESHOW.
6. Touch BACK or press EXIT to return to the photo thumbnail screen.
Note: Functions like zoom, rotate, and copy are all available and behave in the same manner as described under the PHOTOS section, beginning on page 38.

56
Connect with Windows Live FrameIt
IMPORTANT: This step assumes you have already established an account at http://frameit.live.com; you must have this completed before you can receive content feeds through your KTC.
1. With the HOME screen displayed, use the arrows to highlight INTERNET, and then touch or press ENTER.
2. Use the arrows to highlight FRAMEIt, and then press SETUP.
3. Get a New Claim Number from FrameIt Server should be highlighted; touch SELECT or press ENTER to get your new claim number. Make a note of it as you will need it for step #5.
4. Go to http://frameit.live.com/ and sign in with your account information.
5. From Your PC, go to http://frameit.live.com/device/Claim.aspx to enter the Claim number (from step 3). A message “You have now entered this device. Select ‘Continue’ on the frame to finish the configuration” will appear.
6. Press EXIT to return to the INTERNET screen.
7. Select FRAMEIt and press ENTER to connect to FrameIt.
8. The feed folders that you selected on frameit.live.com will be displayed, and as you highlight the folders the titles will appear.
9. Use the arrows to highlight a desired folder, and then press ENTER to view the contents of the feed as a slideshow. If you have slideshow music enabled, the music will also automatically begin to play as contents are displayed.
TIP: While viewing a page, press EXIT once to pause and ENTER to resume. Press EXIT multiple times to exit and return to the previous screens.
Connect KTC to Windows Computer via USB Cable You can connect the KTC to a Windows PC or Macintosh computer via the USB cable included with your KTC (or any standard USB cable) to copy files between the computer and the KTC’s internal memory. If you have memory cards inserted in the DPF, you can also copy between the PC, internal memory, and your memory cards.
To copy files between your computer and the KTC:
1. Power on the KTC.
2. Connect the small end of the USB cable to the Mini USB port on the KTC. Connect the larger end of the USB cable to a USB port to your computer.
Note: The DPF functions will temporarily be disabled while you are connected with your PC.
3. (Windows XP) Double-click ‘My Computer’ on your PC Desktop. (Windows Vista) Click Start >Computer.

57
A window opens listing all drives connected to your computer. (It will look similar to the screen shown below.)
4. Each memory card inserted in the KTC and the internal memory is associated with one disk drive on your computer.
5. Double-click the desired drive to display the files on the card. The example below shows a card with several JPG images on it.
7. To copy files from the memory card into your PC, select and drag them to the desired location on your computer.
8. To copy photos from your computer into the KTC’s internal memory, select the files you wish to copy, click Edit > Copy.
TIP: Most cameras and graphic programs store photos in the Windows “My Pictures” folder. If you didn’t save them in a different location, they may be found in the “My Pictures” folder.
9. Position your cursor back to the disk drive in the open window for the internal memory, click anywhere within the window and then click Edit> Paste.

58
10. Similarly, to copy photos from your computer to your memory card, copy and paste to the disk drive corresponding to the memory card. IMPORTANT: If your PC is connected to Local Area Network drives, or if you have multiple drive
letters already assigned to peripheral devices, you will need to manage your drive settings in Windows to free up the four drive letters immediately following your CD-ROM drive so the KTC can assign them to memory card slots properly.
Disconnect the KTC from the Computer It is important to always perform a PC ‘release’ before disconnecting the KTC USB cable from the PC.
WARNING: Do not unplug or switch off the KTC when files are being transferred between the PC and KTC, as that can seriously damage the memory.
1. In Windows XP, left-click on the icon and click ‘Remove Hardware Safely’.
2. Select the storage device corresponding with the KTC, and then click Stop to disconnect. A final dialog box opens.
3. Click Close. When the message “It is now Safe to Disconnect Hardware” appears, you can disconnect the USB cable from your computer.
Wireless Connection between the KTC and Windows Computer The Pandigital DPF Manager Widget allows you to communicate wirelessly with the KTC and other Pandigital DPFs to transfer photos between the PC and the internal memory in Pandigital units.
IMPORTANT: This step assumes your PC is already connected to an active wireless network and that the KTC is located within a close enough range to make a successful connection to the network.
Setting up the Pandigital DPF Manager Widget to transfer photos from your PC to the KTC requires 3 steps:
A. Set up your Wireless Network User ID and Password on the KTC. (Refer to instructions on page 54)
B. Download and install the Yahoo Widget Engine (Starter Pack) on your PC.
C. Download and install the Pandigital DPF Manager Widget on your PC (System requirements: Apple MAC or PC with Windows XP or Vista, USB2.0 ports)
Download and Install the Yahoo Widget on your PC 1. Download the Yahoo Widget Engine to your PC; go to http://widgets.yahoo.com, click the ‘Get Started
Now’ link, and then download the Starter Pack.
2. Double-click the downloaded setup file to begin installation, then follow the on-screen prompts to complete the installation.
Download and Install the DPF Manager Widget on your PC You will need the wireless network IP address later in this installation, so begin by retrieving it by following these steps: a) With the KTC in DPF mode and the HOME screen displayed, press SETUP. b) Use the arrows to highlight NETWORK SETUP, and then press ENTER. c) Make note of the IP address.

59
1. Download and install the Pandigital DPF Manager Widget from http://pandigital.net. Go to the Support page and then the Downloads tab.
2. After you have downloaded and installed both widgets, click on the Yahoo Widget Engine setup icon.
3. Select Open Widget….
4. Select the downloaded Pandigital DPF Manager Widget file and click OPEN.
5. Click Use Widget.
6. If the installation is successful, the DPF Manager Dock will appear on your desktop.
7. Right-click in the DPF Manager box to show the application menu; select Add DPF to add a unit.
8. Enter a Name for the unit (you choose any name as desired), and the wireless network IP address, and then click Add.
Note: If you have multiple Pandigital units to add, repeat steps 7&8 for each device.
9. Click on the name of a unit listed in the DPF Manager window to connect with your PC. The thumbnails of the images stored in the internal memory will be displayed.
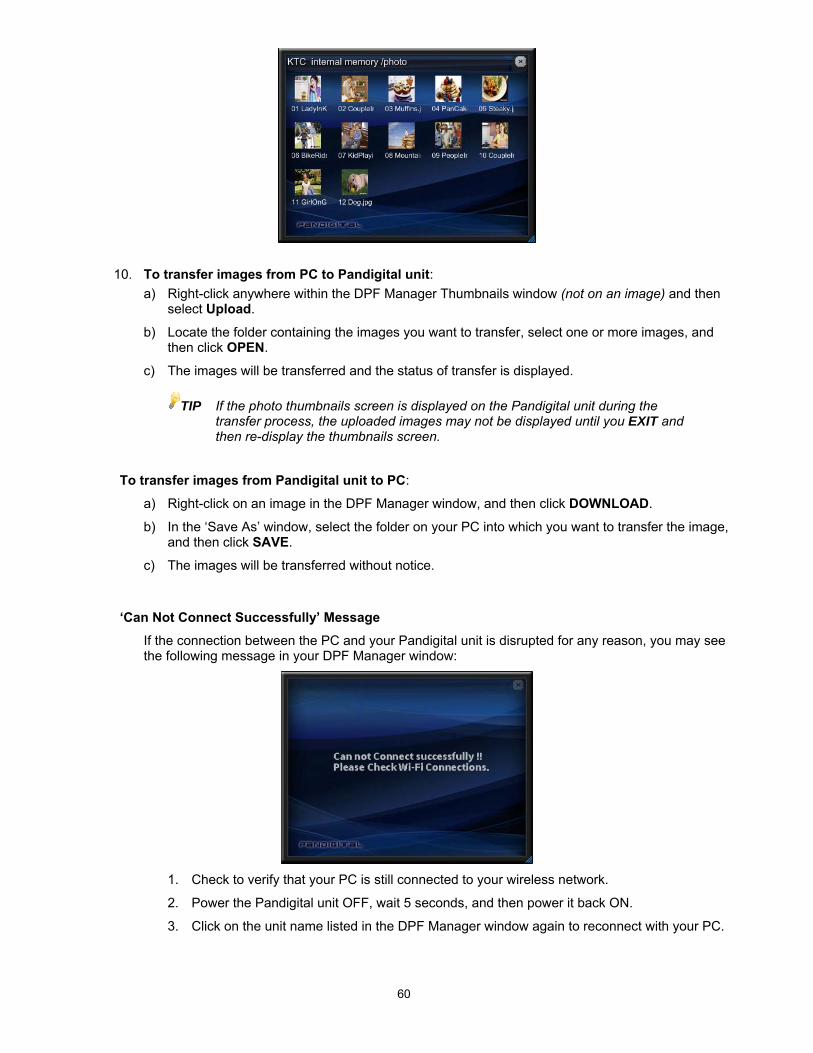
60
10. To transfer images from PC to Pandigital unit: a) Right-click anywhere within the DPF Manager Thumbnails window (not on an image) and then
select Upload.
b) Locate the folder containing the images you want to transfer, select one or more images, and then click OPEN.
c) The images will be transferred and the status of transfer is displayed.
TIP If the photo thumbnails screen is displayed on the Pandigital unit during the transfer process, the uploaded images may not be displayed until you EXIT and then re-display the thumbnails screen.
To transfer images from Pandigital unit to PC:
a) Right-click on an image in the DPF Manager window, and then click DOWNLOAD.
b) In the ‘Save As’ window, select the folder on your PC into which you want to transfer the image, and then click SAVE.
c) The images will be transferred without notice.
‘Can Not Connect Successfully’ Message
If the connection between the PC and your Pandigital unit is disrupted for any reason, you may see the following message in your DPF Manager window:
1. Check to verify that your PC is still connected to your wireless network.
2. Power the Pandigital unit OFF, wait 5 seconds, and then power it back ON.
3. Click on the unit name listed in the DPF Manager window again to reconnect with your PC.

61
Set DPF Manager Window Preferences
There are several settings for customizing your DPF Manager window as desired. Right-click anywhere within the DPF Manager thumbnails window (not on an image) and then select Widget Preferences….
The DPF Manager Options window will open with the following setting choices:
Scan
Interval – Number of seconds allowed for a successful connection with a Pandigital unit. If the PC and Pandigital unit do not successfully connect within the allotted number of seconds, the DPF Manager will timeout.
Number – The number of automatic connect attempts with a Pandigital unit; if connection is not made within the allotted number of attempts, the PC will not re-try to connect until you click the unit name in the Dock window again.
Display
Icon Size – Choose your preferred size of the unit icon in the Dock window:
Highlight Colour – Choose the desired color for the highlighter when you position the cursor over a unit name in the Dock window.
View Type – Choose how the unit name will be displayed in the Dock window: Test only – Icon & Text – Icon only
Dock
Dock Location – Choose the desired location for the Dock window to be displayed: Left – Top - Right
Window Width and Height – Use the sliding size indicators to adjust the width and height of the Dock window.
Dock Sensitivity – Use the sliding scale indicator to adjust the sensitivity of the dock/undock actions.
Reset doc position – Select to reset the default position of the widget (left, middle)
Font
Name and Colour – Choose the desired font type and color for the unit name(s) when displayed in the Dock window
Shadow Effect – Select if you prefer the unit name(s) displayed with a shadow effect
Shadow Colour – If you select Shadow Effect, you can also select the desired shadow color
Window
Window Level – Choose the desired window layering position of the Dock window: Keep on top of all other windows – Normal – Keep below all other windows
62
Ignore Mouse – If selected, the Dock window will not respond to any mouse events. You can, however, perform all mouse events in the window if you’re in Heads Up Display mode*.
Prevent Dragging – Select if you want to lock the position of the Dock window so it cannot be re-positioned unless you press Ctrl and click-and-drag it on the screen, or enter Heads Up Display mode*.
Opacity – Use the sliding scale to set the transparency of the Dock and DPF Manager window when displayed on the screen, 20% being the most transparent and hardly visible on the screen.
* To enter and exit Heads Up Display mode, click on the Yahoo Widget Manager.
Connect USB Flash Drive to KTC Your KTC will recognize a USB Flash Drive the same way it recognizes external memory cards. When you insert the flash drive, the KTC automatically recognizes photo, music, and video files contained on it. To copy files from your Flash Drive to the KTC’s internal memory, follow the instructions under FILE on page 50.
Bluetooth Connection The Bluetooth feature allows you to download photos from popular Bluetooth-capable mobile phones (i.e., BlackBerry, Motorola, Nokia, SonyEricssson, and others) directly into your KTC.
A Bluetooth USB Adapter is required (not included with KTC).
Note: Phone models vary and not all phones support transmitting photos to devices like a DPF. Check to be sure your phone supports transmitting photos to external devices like KTC.
Insert USB Bluetooth Adapter into KTC 1. Insert your Bluetooth adapter into the USB host port, and then turn on the DPF.
2. On the HOME screen, BT should appear in the upper right corner indicating the Bluetooth feature is active.
Connect Bluetooth Device to the KTC 1. From your Bluetooth device, search for available connection devices; select “Pandigital” or
“PAN-KTC” (the default authentication code is “1234”).
2. Select the desired photo(s) to download, and then send them to the KTC.
Note: The actual procedure for sending photos to the KTC varies by mobile device manufacturer/model. Refer to your mobile device User Guide for instructions.
3. During the photo transmission, “Photo Transmitting” appears in the middle of the KTC screen. When completed, the photo(s) will automatically be displayed in single photo mode.

63
Frequently Asked Questions Q: How do I set up my KTC?
A: It is very simple to get your KTC out of the box and running in just a few minutes. Simply attach the stand, plug the power adapter into the KTC and into a standard wall outlet, and power it on. Your first slide show will automatically start to play. (Optionally, insert a memory card into the appropriate card slot on the side of the KTC before powering on; the slideshow will display your personal photos rather than the photos pre-loaded in the internal memory.)
Q: What memory cards can are compatible with the KTC?
A: Compatible memory cards include Secure Digital, MultiMedia Card, Compact Flash™, xD card, Memory Stick, MemoryStick Pro, Memory Stick Duo, and Memory Stick Pro Duo (note: the Memory Stick Pro Duo requires a SD adapter to fit properly in the KTC).
Q: I set up the KTC; why won’t it turn on?
A: Verify that the Adapter is securely connected to the KTC and plugged into a wall outlet. Verify that the Power Switch, located in the middle of the speaker bar on the bottom of the screen, is ON with blue light glowing.
Q: Why are the DPF screens displaying very large and sometimes part of the screen is cut off?
A: Check your Aspect Ratio setting in the TV option of the On Screen Display (OSD) menu. Be sure the Aspect Ratio is set as Normal for proper DPF viewing. (Refer to Aspect Ratio on page 30 for more information.)
Q: I have a memory card in the KTC; why can’t I view my photos?
A: Verify that your memory card is one of the KTC’s supported formats, and that the files on the card are JPEG image files. Verify that the memory card is inserted all the way into the card slot and is facing the right direction. Follow the instructions for starting the KTC in DPF mode again. If the photos on your card still do not display, you may want to try another card.
Note: Some digital cameras save images in other formats. Refer to your camera’s user guide if your photos are not JPEG files.
Q: Can I upload my own recipes into the KTC and view them through the Recipe feature?
A: No. At this time you can only use the pre-loaded recipes (i.e., bon appétit) and the additional recipe series that can be purchased from Pandigital.
Q: Why is the picture display slower with some pictures and faster with others?
A: Higher resolution pictures load more slowly. Try using lower resolution pictures or down sampling your images. Refer to your camera’s user guide for details on down sampling your photos.
Q: Can I insert multiple memory cards?
A: Yes, you can insert multiple cards and a USB Flash Drive at the same time. Use the Select Media to select the desired memory source for immediate viewing/listening.
Q: Why doesn’t the PanTouch Interface work when I’m in TV mode?
A: The PanTouch interface is only active when the KTC is in DPF mode. Use the remote control to access all TV mode features and functions.
Q: Does the KTC have built-in memory?
A: Yes, it has built-in (internal) memory; the memory size depends on your model.
Q: Does the KTC support all JPEG and Motion JPEG files?
A: No, it supports JPEG and Motion JPEG (AVI) files taken from a digital camera. The KTC may not read all image files downloaded from the Internet or from other software graphic applications.
64
Q: Which wireless Wi-Fi adapter can I use with my KTC, and where can I obtain one?
A: The Pandigital brand Wi-Fi adapter is the only one supported, and is included with the KTC. If you have lost it or need to replace it for any reason, purchase only a Pandigital Wi-Fi adapter through our website at: http://www.pandigital.net.
Q: Where do I obtain a Bluetooth adapter to use with my DPF?
A: You can purchase any brand of Bluetooth adapter from any retail outlet that sells them.
Q: I have the Pandigital wireless Wi-Fi adapter inserted, why can’t I connect to the Internet and access Picasa?
A: The initial Wi-Fi setup requires 3 steps: 1) Establish an account with Picasa, 2) Set up your Wireless Network User ID and Password on the DPF, and 3) set up your Picasa User ID and password on the DPF. Refer to the initial Wi-Fi setup instructions under INTERNET on page 54.
Q: I followed the steps to connect to Windows FrameIt, but only the default feed folders are displayed. How do I get my personal feed folders to display?
A: A setting in one of the system files may need to be reset. Please contact Customer Support for help.
KTC Specifications
Display panel
Item Illustration
Active Area / Screen Size Diagonal 15.6 inches
Aspect Ratio Widescreen 16:9
Pixel Pitch 0.252 (H) x RGB x 0.252 (V)mm
Max. of Pixels (Resolution) HD (1366 x 768 pixels) resolution
Brightness 250 nits (Typical)
Contrast 500 :1 (Typical)
Response Time 8ms (gray to gray)
Viewing Angle Typical 110 / 85 Degree (Horizontal/Vertical)
Lamp Life of Backlight > 50,000hrs
TV DISPLAY
Dimension 15.73x10.19x2.64 inch without Base 15.73x11.73x6.69 inch with Base
Weight 6.61 lbs with Base
Power input DC 12V 4A,48W
Function
(1)Video
De-interlace 2D Frame recover 3:2 Noise reducing core technology 2D

65
Aspect ratio Normal / 4:3 / Zoom / Cinema Gamma Fixed Gamma Picture mode Custom / Standard / Mild / Vivid / Video adjust Contrast / Brightness / Sharpness / Saturation / Tint 3 levels of color temp for VGA Cool / Normal / Warm
(2)Audio Sound Mode Custom / Standard / Movies / Music / Speech Tone Bass / Treble / Balance
Speakers 3 watt per channel
(3) General Hybrid TV Tuner NTSC / ATSC / QAM (Digital Cable Ready) Channel auto scan Yes Sleep timer Off /15 mins ~ 240 mins Standby power Under 5W Timing support-Video 480i / 480p / 720p / 1080i scaled / 1080p scaled under HDMI only
PC timing
1280*768@60Hz, 75Hz 1024*768@60Hz, 75Hz 800*600@60Hz, 75Hz 640*480@60Hz, 75Hz
(4)NTSC/ATSC
NTSC
Sound: Mono / Stereo / SAP Favorite Channel V-chip Closed caption (CC1-CC4, Text 1-Text 4)
ATSC
Sound: Mono / Stereo / SAP Favorite Channel V-chip
Video input format: 1080i, 720p, 480p, 480i
ATSC (continued)
Analog closed caption: (CC1-CC4, Text 1-Text 4) Digital closed caption: (Service 1-Service 6)
(5)I/O
TV Tuner (NTSC/ATSC), AV, S-Video (Audio Shared with AV), YPbPr, HDMI/HDCP (optional, HDCP audio shared with VGA Audio In), VGA, VGA Audio In
Note: The product’s specifications may change without notice or obligation.
Note: This user guide’s pictures and words are for references only and are subject to change without notice or obligation. Pandigital is not liable for the misuse or misinterpretation of this user guide.

66
Troubleshooting the TV
The following table contains the common problems and the recommended solutions when using the KTC’s TV features. Please check this list before you contact our Customer Support.
Problems Solutions
NO PICTURE
Be sure power cord is connected correctly.
Power on.
Be sure video cable is connected correctly.
Select the input signal source with proper cable connection with the source button.
ABNORMAL COLORS Match the colors on the cables to the ports off the back of the KTC, i.e., red cable to red port.
PICTURE IS TOO DARK Adjust your contrast, brightness and lamp settings from the OSD Menu.
AUDIO ONLY NO PICTURE
Make sure you have connected both your video and audio cables.
The KTC’s tuner signal must not be lower than 65 %.
PICTURE ONLY NO AUDIO
Make sure the audio cable is connected correctly.
Readjust your volume via the remote control.
The KTC’s tuner signal must not be lower than 65 %.
REMOTE CONTROL DOES NOT WORK
Turn off the KTC and unplug it from the wall outlet. Remove the batteries from the remote for 30 minutes. Press the remote buttons and the power button randomly for approximately 2 seconds, and then reinstall the batteries.
The KTC’s remote sensor is also housed in the same place as the power indicator light. Make sure there is line of sight from the remote control’s front sensor to the remote sensor of the KTC.
CANNOT RECEIVE SUFFICIENT CHANNELS THROUGH THE ATSC/NTSC TUNER
The KTC’s tuner signal must not be lower than 65 %. If you have digital cable, contact your cable company and ask about signal strength of your local cable.
NO COLOR Adjust your picture setup and make sure the saturation and the RGB are not turned all the way down.
The TV’s tuner signal must not be lower than 65 %. Check your signal.
WEAK SIGNAL OR NO PROGRAM SYMBOL ON SCREEN
The TV’s tuner signal must not be lower than 65 %. If you have digital cable, contact your cable company and ask about signal strength of your local cable.
TV’S UNIVERSAL REMOTE CODE
This television follows SONY’s universal remote code. To find the actual code you must read through your own universal remote’s guide book.
TV CHANNELS ARE BLOCKED
Check your auto lock function’s settings inside the OSD. You may have forgotten about channels you have locked.
UNIVERSAL REMOTE CODE
The KTC follows SONY’s universal remote code. Check your hand book for SONY’s codes then apply them.
THE TV TURNS ON OR OFF SLOWLY AND THE SCREEN SHOWS UP SLOWLY
This KTC is a High Definition liquid crystal display panel TV. It requires a few more seconds than normal TVs to power up and show the picture.
NO SOUND ON PC Make sure you have a 3.5 mm mini-jack cable connected from your pc’s sound output to the TV’s VGA STEREO INPUT.
HDCP VIDEO SAYS NO HDCP SUPPORT
Reboot your HDCP video device but turning them off and unplugging the power cord. Wait up to 8 minutes to plug the power back in.
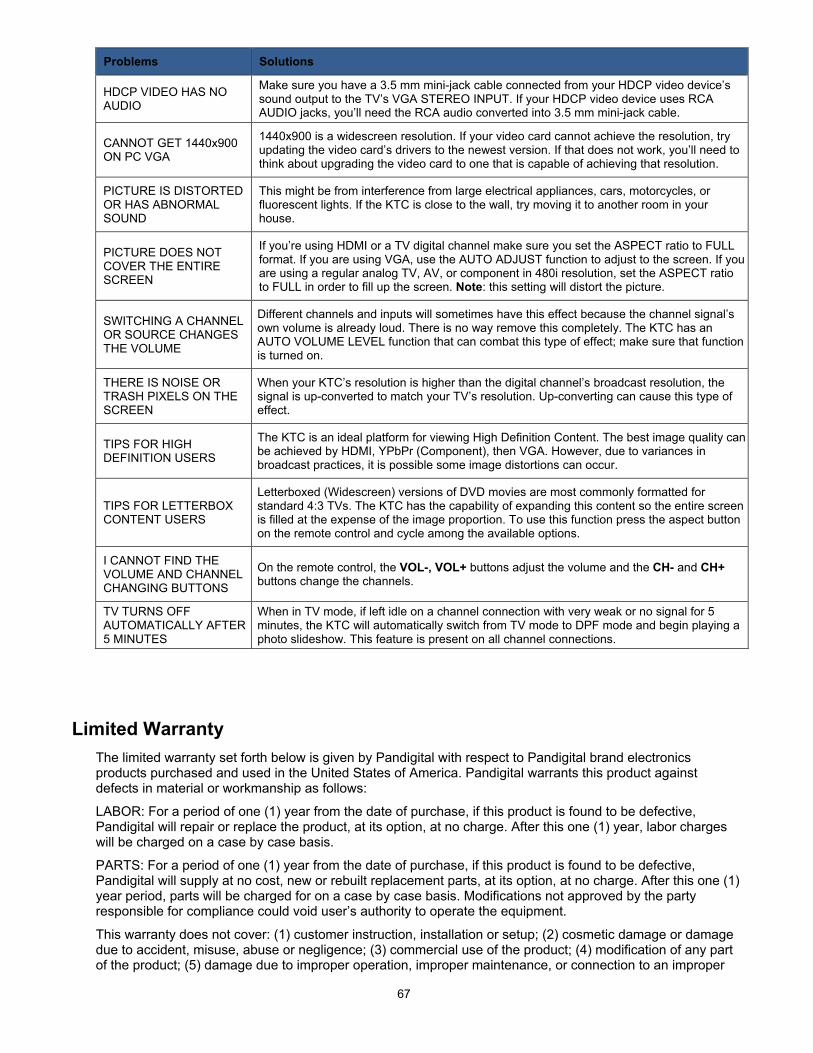
67
Problems Solutions
HDCP VIDEO HAS NO AUDIO
Make sure you have a 3.5 mm mini-jack cable connected from your HDCP video device’s sound output to the TV’s VGA STEREO INPUT. If your HDCP video device uses RCA AUDIO jacks, you’ll need the RCA audio converted into 3.5 mm mini-jack cable.
CANNOT GET 1440x900 ON PC VGA
1440x900 is a widescreen resolution. If your video card cannot achieve the resolution, try updating the video card’s drivers to the newest version. If that does not work, you’ll need to think about upgrading the video card to one that is capable of achieving that resolution.
PICTURE IS DISTORTED OR HAS ABNORMAL SOUND
This might be from interference from large electrical appliances, cars, motorcycles, or fluorescent lights. If the KTC is close to the wall, try moving it to another room in your house.
PICTURE DOES NOT COVER THE ENTIRE SCREEN
If you’re using HDMI or a TV digital channel make sure you set the ASPECT ratio to FULL format. If you are using VGA, use the AUTO ADJUST function to adjust to the screen. If you are using a regular analog TV, AV, or component in 480i resolution, set the ASPECT ratio to FULL in order to fill up the screen. Note: this setting will distort the picture.
SWITCHING A CHANNEL OR SOURCE CHANGES THE VOLUME
Different channels and inputs will sometimes have this effect because the channel signal’s own volume is already loud. There is no way remove this completely. The KTC has an AUTO VOLUME LEVEL function that can combat this type of effect; make sure that function is turned on.
THERE IS NOISE OR TRASH PIXELS ON THE SCREEN
When your KTC’s resolution is higher than the digital channel’s broadcast resolution, the signal is up-converted to match your TV’s resolution. Up-converting can cause this type of effect.
TIPS FOR HIGH DEFINITION USERS
The KTC is an ideal platform for viewing High Definition Content. The best image quality can be achieved by HDMI, YPbPr (Component), then VGA. However, due to variances in broadcast practices, it is possible some image distortions can occur.
TIPS FOR LETTERBOX CONTENT USERS
Letterboxed (Widescreen) versions of DVD movies are most commonly formatted for standard 4:3 TVs. The KTC has the capability of expanding this content so the entire screen is filled at the expense of the image proportion. To use this function press the aspect button on the remote control and cycle among the available options.
I CANNOT FIND THE VOLUME AND CHANNEL CHANGING BUTTONS
On the remote control, the VOL-, VOL+ buttons adjust the volume and the CH- and CH+ buttons change the channels.
TV TURNS OFF AUTOMATICALLY AFTER 5 MINUTES
When in TV mode, if left idle on a channel connection with very weak or no signal for 5 minutes, the KTC will automatically switch from TV mode to DPF mode and begin playing a photo slideshow. This feature is present on all channel connections.
Limited Warranty The limited warranty set forth below is given by Pandigital with respect to Pandigital brand electronics products purchased and used in the United States of America. Pandigital warrants this product against defects in material or workmanship as follows:
LABOR: For a period of one (1) year from the date of purchase, if this product is found to be defective, Pandigital will repair or replace the product, at its option, at no charge. After this one (1) year, labor charges will be charged on a case by case basis.
PARTS: For a period of one (1) year from the date of purchase, if this product is found to be defective, Pandigital will supply at no cost, new or rebuilt replacement parts, at its option, at no charge. After this one (1) year period, parts will be charged for on a case by case basis. Modifications not approved by the party responsible for compliance could void user’s authority to operate the equipment.
This warranty does not cover: (1) customer instruction, installation or setup; (2) cosmetic damage or damage due to accident, misuse, abuse or negligence; (3) commercial use of the product; (4) modification of any part of the product; (5) damage due to improper operation, improper maintenance, or connection to an improper

68
power supply; (6) loss of data, regardless of value or format, that may result through proper and/or improper use of the product; (7) damage due to an attempted repair of the product by anyone other than a facility authorized by Pandigital to service the product; (8) consumables (such as fuses and batteries). This warranty is valid only in the United States.
The product must be accompanied by a copy of the original retail purchase receipt. If no proof of purchase is attached, the warranty will not be honored and repair costs will be charged. This warranty is only valid with written documentation detailing the complaint attached to the outside or inside of the carton. This warranty is invalid if the factory applied serial number has been altered and or removed from the product. This warranty does not provide protection for the loss of data, regardless of format. Pandigital reserves the right to modify and design this product without prior notice, written or otherwise.
To obtain warranty service, you must deliver the product freight prepaid in either its original packaging or packaging affording an equal degree of protection, plus proof of purchase.
Technical support telephone number: 1-800-715-5354.
Repair or replacement as provided under this warranty is the exclusive remedy of the consumer. Pandigital, its parent company, affiliates or subsidiaries, shall not be liable for any incidental or consequential damages for breach of any expressed or implied warranty on this product. Except to the extent prohibited by applicable law, any implied warranty of merchantability or fitness for a particular purpose on this product is limited in duration to the duration of this warranty.
Some states do not allow the exclusion or limitation of incidental or consequential damages, or allow limitation on how long an implied warranty lasts, so the above limitations or exclusions may not apply. This warranty gives you specific legal rights, and you may have other rights, which vary from state to state.
All content included on the Pandigital website as well as Pandigital products, including preloaded demonstration images, digital media, digital cookbooks, text, graphics, logos, designs, photographs, button icons, images, audio/video clips, digital downloads, data compilations, and software, is the property of Pandigital or its suppliers and is protected by United States and international copyright laws or other intellectual property laws and treaties. Said content shall not be reproduced or used without express written permission from Pandigital and its suppliers respectively.
Use of this product constitutes acceptance of these terms and conditions of warranty.
FCC Statement FCC Part 15 Information
This equipment has been tested and found to comply with the limits for a Class B digital device, pursuant to Part 15 of the Federal Communication Commission (FCC) Rules. These limits are designed to provide reasonable protection against harmful interference in a residential installation.
This equipment generates, uses, and can radiate radio frequency energy and if not installed and used in accordance with the instructions, may cause harmful interference to radio communications. However, there is no guarantee that interference will not occur in a particular installation. If this equipment does cause harmful interference to radio or television reception, which can be determined by turning the equipment off and on, the user is encouraged to try to correct the interference by one or more of the following measures:
Reorient or relocate the receiving antenna. Increase the separation between the equipment and receiver. Connect the equipment to an outlet on a circuit different from that to which the receiver is connected. Consult the dealer or an experienced radio/TV technician for help.
WARNING: Changes or modification to this unit not expressly approved by the party responsible for compliance could void the user’s authority to operate the equipment”.