Typescript 2typescript.org/ts_user_guide.pdf · Installing Typescript locally? Installing...
58
Typescript 2.0 User Guide Contents About Typescript What is Typescript and who is it for? . . . . . . . . . . 2 Copyright / credits . . . . . . . . . . . . . . . . . . . . . . . . 3 Installation What do I need to run this Typescript? . . . . . . . . . 4 Installing Typescript locally . . . . . . . . . . . . . . . . . . 5 Putting your Typescript site onto the Web . . . . . . 6 Changing the default user name and password . . 7 Editing Web Pages using the Rich Text Editor . . . . 8 The Administration Area Logging in to the administration area . . . . . . . . . . 19 Managing sections and pages . . . . . . . . . . . . . . . 20 Uploading files . . . . . . . . . . . . . . . . . . . . . . . . . . . 24 Editing page styles . . . . . . . . . . . . . . . . . . . . . . . 29 Editing your site's titles . . . . . . . . . . . . . . . . . . . . 31 Managing themes . . . . . . . . . . . . . . . . . . . . . . . . 32 Using the file editor . . . . . . . . . . . . . . . . . . . . . . . 36 Setting up user accounts . . . . . . . . . . . . . . . . . . . 37 Writing your own Page Templates Template files . . . . . . . . . . . . . . . . . . . . . . . . . . . 40 Page content headers, footers and edit links . . . . 41 Menu structures . . . . . . . . . . . . . . . . . . . . . . . . . . 42 Importing one 'page' into another . . . . . . . . . . . . . 47 Adding a search field . . . . . . . . . . . . . . . . . . . . . 48 Constants available to template files . . . . . . . . . . 49 Typescript's 'corefiles' . . . . . . . . . . . . . . . . . . . . . . . . 50 Images with Captions . . . . . . . . . . . . . . . . . . . . . . . . . 53 More Options A Choice of Web Page Editors . . . . . . . . . . . . . . . 54 Tidy URLs . . . . . . . . . . . . . . . . . . . . . . . . . . . . . . 56 Using MySQL (instead of SQLite) . . . . . . . . . . . . 57 Other changes to the Settings File . . . . . . . . . . . . 58
-
Upload
truongthien -
Category
Documents
-
view
285 -
download
3
Transcript of Typescript 2typescript.org/ts_user_guide.pdf · Installing Typescript locally? Installing...

Typescript 2.0 User Guide
Contents About Typescript
What is Typescript and who is it for? . . . . . . . . . . 2Copyright / credits . . . . . . . . . . . . . . . . . . . . . . . . 3
InstallationWhat do I need to run this Typescript? . . . . . . . . . 4Installing Typescript locally . . . . . . . . . . . . . . . . . . 5Putting your Typescript site onto the Web . . . . . . 6Changing the default user name and password . . 7
Editing Web Pages using the Rich Text Editor . . . . 8
The Administration AreaLogging in to the administration area . . . . . . . . . . 19Managing sections and pages . . . . . . . . . . . . . . . 20Uploading files . . . . . . . . . . . . . . . . . . . . . . . . . . . 24Editing page styles . . . . . . . . . . . . . . . . . . . . . . . 29Editing your site's titles . . . . . . . . . . . . . . . . . . . . 31Managing themes . . . . . . . . . . . . . . . . . . . . . . . . 32Using the file editor . . . . . . . . . . . . . . . . . . . . . . . 36Setting up user accounts . . . . . . . . . . . . . . . . . . . 37
Writing your own Page Templates
Template files . . . . . . . . . . . . . . . . . . . . . . . . . . . 40Page content headers, footers and edit links . . . . 41Menu structures . . . . . . . . . . . . . . . . . . . . . . . . . . 42Importing one 'page' into another . . . . . . . . . . . . . 47Adding a search field . . . . . . . . . . . . . . . . . . . . . 48Constants available to template files . . . . . . . . . . 49
Typescript's 'corefiles' . . . . . . . . . . . . . . . . . . . . . . . . 50
Images with Captions . . . . . . . . . . . . . . . . . . . . . . . . . 53
More Options A Choice of Web Page Editors . . . . . . . . . . . . . . . 54Tidy URLs . . . . . . . . . . . . . . . . . . . . . . . . . . . . . . 56Using MySQL (instead of SQLite) . . . . . . . . . . . . 57Other changes to the Settings File . . . . . . . . . . . . 58

What is Typescript?What is Typescript?
Typescript is a completely free content management system for publishing content on the World Wide Web or an intranet. Typescript is written in PHP and stores its data in a SQLite (or optionally MySQL) database.
Features include:Simple section/page creation and automatically generated navigationDrag-and-drop page and section re-orderingVersatile page layout and content possibilities using an editable template systemChoice of WYSIWYG or pure text through-the-web editorsStraightforward insertion of media (images, sound, video)Built in CSS editingFully editable and switchable themesSimple user management, allowing three levels of access
Who is it for?Who is it for?
2
Typescript is for anyone wanting to install a website into their own webspace.
It was originally built for a not-for-profit organisation but there are no restrictions on use. Use it to build and maintain anything from a simple personal or family website to larger, more complex sites needed by community groups, churches, clubs and bands.
Once Typescript has been set up, it is easy for users to create and update content through their web browser by using the intuitive, on-line editor.

Licence informationLicence informationLicence information
Typescript 2.0 is Copyright 2005 - 2010, Ray Middleton and Ben Briggs
Typescript is provided free of charge for you to use at your own risk.A lot of care has gone into writing and testing this software but no warranty is given as to its suitability for any purpose whatsoever. The authors will take no responsibility for any loss, inconvenience, damage or injury of any kind caused as a direct or indirect consequence of using any of these programs
Typescript CMS is free software: you can redistribute it and/or modify it under the terms of the GNU General Public License as published by the Free Software Foundation, either version 3 of the License, or (at your option) any later version.
You should have received a copy of the GNU General Public License along with the program.If not, see http://www.gnu.org/licenses/
Third party software included in the Typescript distribution
Typescript incorporates the following software technologies, issued under free software licences:
Sam Stephenson's Prototype JavaScript Framework http://www.prototypejs.org/The 'effects' and 'dragdrop' scripts from Thomas Fuchs' Script.aculo.us http://script.aculo.us/Media players: FLV Player Maxi http://flv-player.net/ and MP3 Player Maxi http://flash-mp3-player.net/
3

What do I need to run Typescript?What do I need to run Typescript?
Before using Typescript make sure you have a web server which meets these minimum requirements:
To run Typescript “out of the box” (with a SQLite 3 database - recommended) ..
An Apache 1.3 or Apache 2.x web server hosted on UNIX/Linux, OS X, or Windows.
PHP 5.1 or newer – with PDO and the PDO-SQLite driver enabled.
To run Typescript with a MySQL database (optional) ..
An Apache 1.3 or Apache 2.x web server hosted on UNIX/Linux, OS X, or Windows.
MySQL 3.x, 4.x or 5.x database
PHP 5.1 or newer – with PDO and the PDO-MySQL driver enabled.
If you want to use “pretty URLs” (optional) ..
Your Apache server should have the Rewrite Module (mod_rewrite) enabled
If you have web space with PHP 5.1+ you will almost certainly have all this already enabled by default.
4

Installing Typescript locally?Installing Typescript locally?Installing Typescript on your own computer
Running Typescript locally helps you become familiar with the software and allows you to develop a website on your own computer before committing it to the Web.
The simplicity of XAMPP
Typescript needs an Apache web server containing PHP (with SQLite 3 or perhaps MySQL).Many users will prefer to download, install and configure Apache and PHP (and possibly MySQL) separately, but to save yourself the frustration you can obtain Apache, PHP (and MySQL) all nicely nicely set up on your home computer by using XAMPP from Apache Friends. It is completely free and contains all of the components you need, already set up and configured, in a single package. There are XAMPP versions for Linux, Mac and Windows. We recommend using the latest version (1.7.3 at the time of writing).
Installing XAMPP on Windows
Download XAMPP for Windows from www.apachefriends.org and install the package, accepting all of its default settings. Open the XAMPP Control Panel and start Apache...
Tell your firewall, if necessary, not to block any of the components of XAMPP.Test your installation by opening an internet browser and typing http://localhost/ into the address bar - you should now see the XAMPP welcome screen.
Download the file typescript-2.0.zip from www.typescript.org and extract it to XAMPP's htdocs folder (typically C:\xampp\htdocs).
Check your installation by typing http://localhost/typescript - you should see Typescript's welcome page.
5

Putting your site onto the WebPutting your site onto the WebUploading Typescript to your web host
● Download the file typescript-2.0.zip from www.typescript.org.● Unzip the downloaded package to a folder on your PC● You'll now need an FTP-program (such as FileZilla).
Connect yourself to your webspace using your FTP-Program.and upload the files.● Navigate your web browser to your web space to check that it all works.
It is now vital that you change the default username and password (see page 7). If you find that you cannot edit your site you may have to alter some file permissions...
Making sure your files have the correct permissions
Depending upon how you web space has been set up by your ISP, you may find that you need to change some access rights or "file permissons" for some of the folders and files in your installation on your web space.
It is essential that Typescript can read and write to your SQLite database file which is in the 'nucleus' folder.
Use your FTP-program to achieve this.If you're using FileZilla, right-click on the 'nucleus' folder and choose "File Permissions...". In the field for "numerical values" enter '777' and then click "OK".
Apart from the all-important database file, Typescript will tell you if it hasn't got enough permission to write to any of the theme or 'script' files:
For example, if you get such a message when trying to edit a Theme you will need to change permissions on everything in the 'themes' folder.
The file 'pagestyles.css', in Typescript's root directory should also be editable if you want to make use of the Pagestyles utility.
6
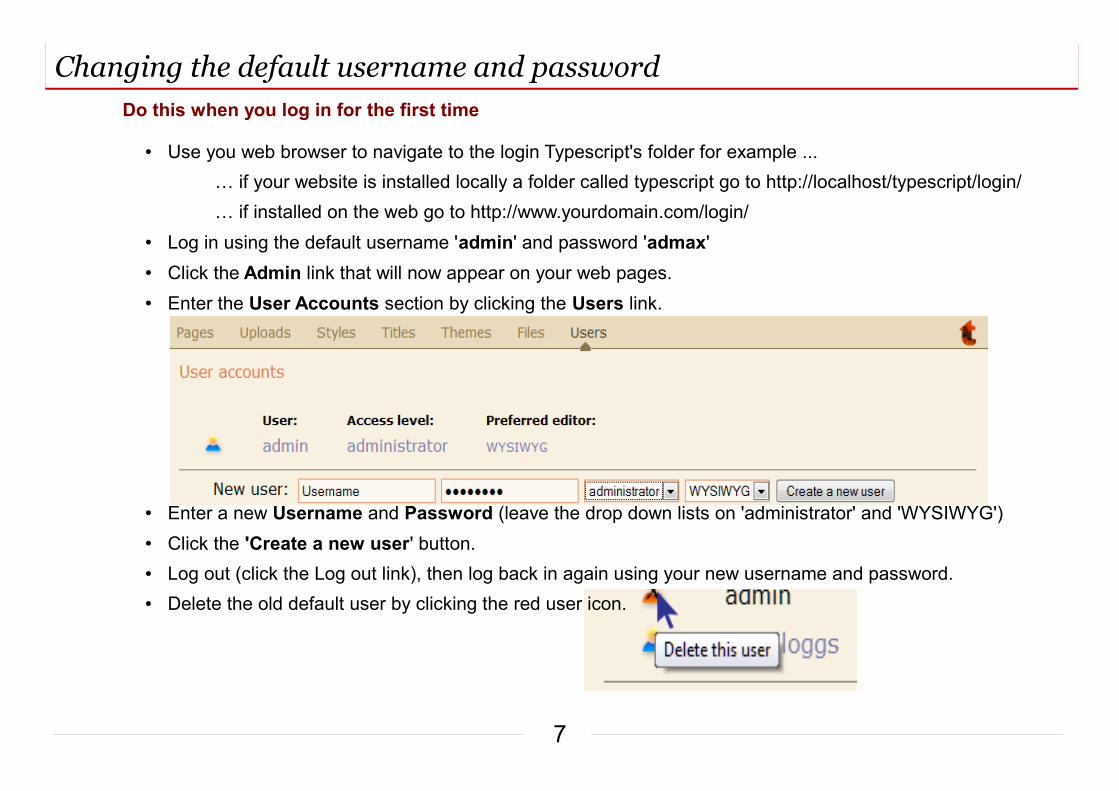
Changing the default username and passwordChanging the default username and passwordDo this when you log in for the first time
● Use you web browser to navigate to the login Typescript's folder for example ...
… if your website is installed locally a folder called typescript go to http://localhost/typescript/login/
… if installed on the web go to http://www.yourdomain.com/login/
● Log in using the default username 'admin' and password 'admax'
● Click the Admin link that will now appear on your web pages.
● Enter the User Accounts section by clicking the Users link.
● Enter a new Username and Password (leave the drop down lists on 'administrator' and 'WYSIWYG')
● Click the 'Create a new user' button.
● Log out (click the Log out link), then log back in again using your new username and password.
● Delete the old default user by clicking the red user icon.
7

Editing Web Pages – accessing the rich text editor Editing Web Pages – accessing the rich text editor
8
How do I edit a web page?
1) Type this URL into your browser: http://www.yourdomainname.com/login/
2) Log in using your Username and Password
3) Navigate to the page you want to edit and click the 'Edit this page' link
Alternative method
Alternatively click 'Admin' to enter the Page Management section, select the page you want from the list, then click the Edit button. …
Click here to edit the page Demonstration/Image captions

The Rich Text Editor – previewing pages and viewing the HTML The Rich Text Editor – previewing pages and viewing the HTML
9
Typescript's rich text editor has a familiar and intuitive feel; it allows you to arrange and style each of your web pages with almost the ease of a word processor.
Previewing a web page before saving
The page preview icon looks like a computer monitor; it generates a view of how the page would appear in the site if it was saved.
Viewing the underlying HTML
Use this button to toggle between rich text and html views...

The Rich Text Editor – saving your web page and applying text styles The Rich Text Editor – saving your web page and applying text styles
10
Saving your web page
Click the 'floppy disk' icon to save your work.
An asterisk after the page nameshows that your work has not yetbeen saved ..
Using the Text Styles drop down menu
This applies styles to the selected text.
The actual effect of applying any particular style depends, of course, upon the definitions set in your site's stylesheets.
You can preview all of these styles using the Styles viewer (see below).
Applying a style encloses the selected text within appropriate HTML tags; e.g. choosing 'p.indented' would make the following change to the underlying HTML:
<p class=”indented”>..selected text..</p>
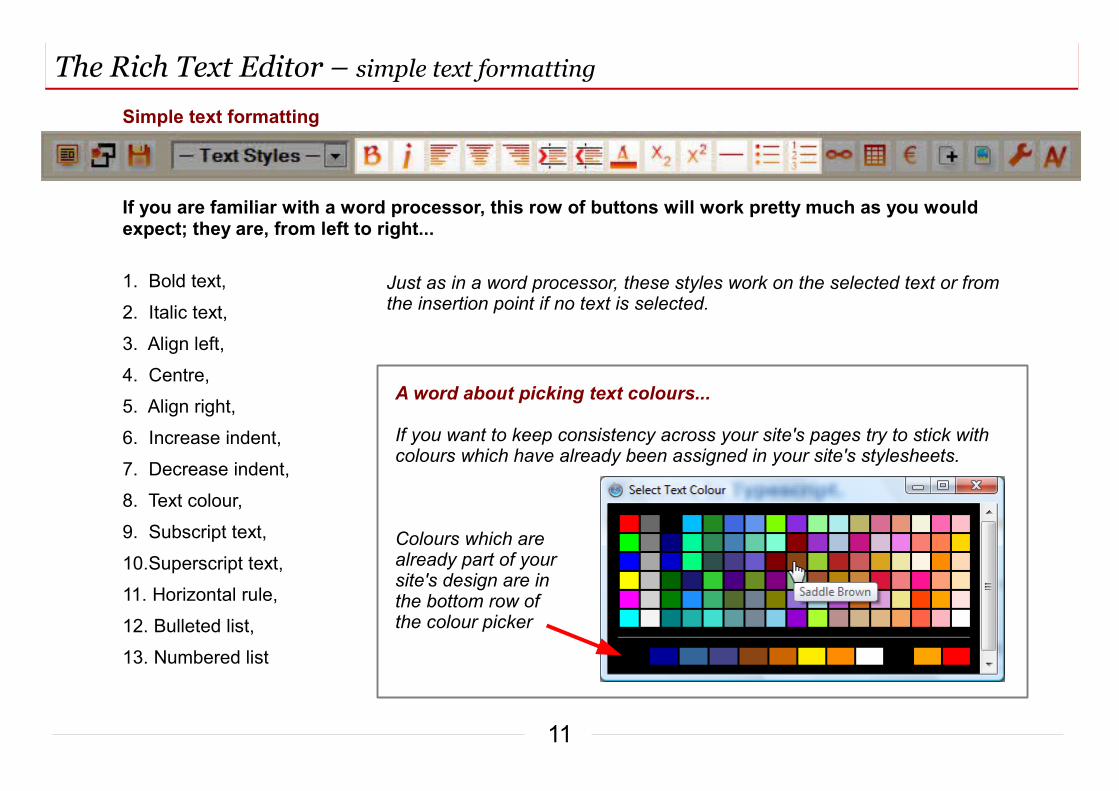
The Rich Text Editor – simple text formatting The Rich Text Editor – simple text formatting
11
Simple text formatting
If you are familiar with a word processor, this row of buttons will work pretty much as you would expect; they are, from left to right...
1. Bold text,
2. Italic text,
3. Align left,
4. Centre,
5. Align right,
6. Increase indent,
7. Decrease indent,
8. Text colour,
9. Subscript text,
10.Superscript text,
11. Horizontal rule,
12. Bulleted list,
13. Numbered list
Just as in a word processor, these styles work on the selected text or from the insertion point if no text is selected.
A word about picking text colours...
If you want to keep consistency across your site's pages try to stick with colours which have already been assigned in your site's stylesheets.
Colours which are already part of your site's design are in the bottom row of the colour picker

The Rich Text Editor – inserting hyperlinks The Rich Text Editor – inserting hyperlinks
12
Inserting links
The 'insert link' button opens a dialogue box...
Making a link to a page in your own website...
1. Select the text or image you want to use as a link
2. Open this dialogue box
3. Choose a page or resource file from the
'Link to a page in this website' menu
4. Click the 'Insert local link' button.
Making a link to a page on another site...
1.Select the text you want to use as a link and open the above dialogue box
2.Type the page URL (web address) into the text box
3.Click the 'Insert external link' button
The Rich Text Editor – making tables The Rich Text Editor – making tables
13
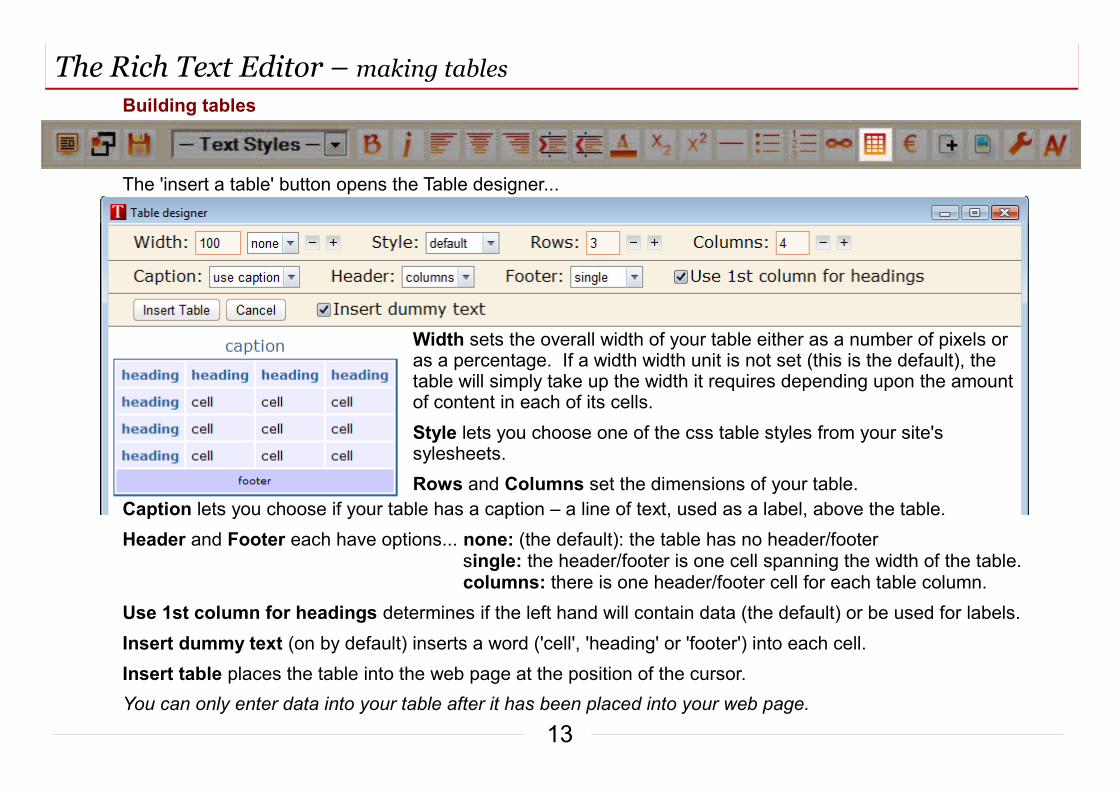
Building tables
The 'insert a table' button opens the Table designer...
Width sets the overall width of your table either as a number of pixels or as a percentage. If a width width unit is not set (this is the default), the table will simply take up the width it requires depending upon the amount of content in each of its cells.
Style lets you choose one of the css table styles from your site's sylesheets.
Rows and Columns set the dimensions of your table.Caption lets you choose if your table has a caption – a line of text, used as a label, above the table.
Header and Footer each have options... none: (the default): the table has no header/footer single: the header/footer is one cell spanning the width of the table. columns: there is one header/footer cell for each table column.
Use 1st column for headings determines if the left hand will contain data (the default) or be used for labels.
Insert dummy text (on by default) inserts a word ('cell', 'heading' or 'footer') into each cell.
Insert table places the table into the web page at the position of the cursor.
You can only enter data into your table after it has been placed into your web page.
The Rich Text Editor – inserting special characters and 'scripts' The Rich Text Editor – inserting special characters and 'scripts'
14
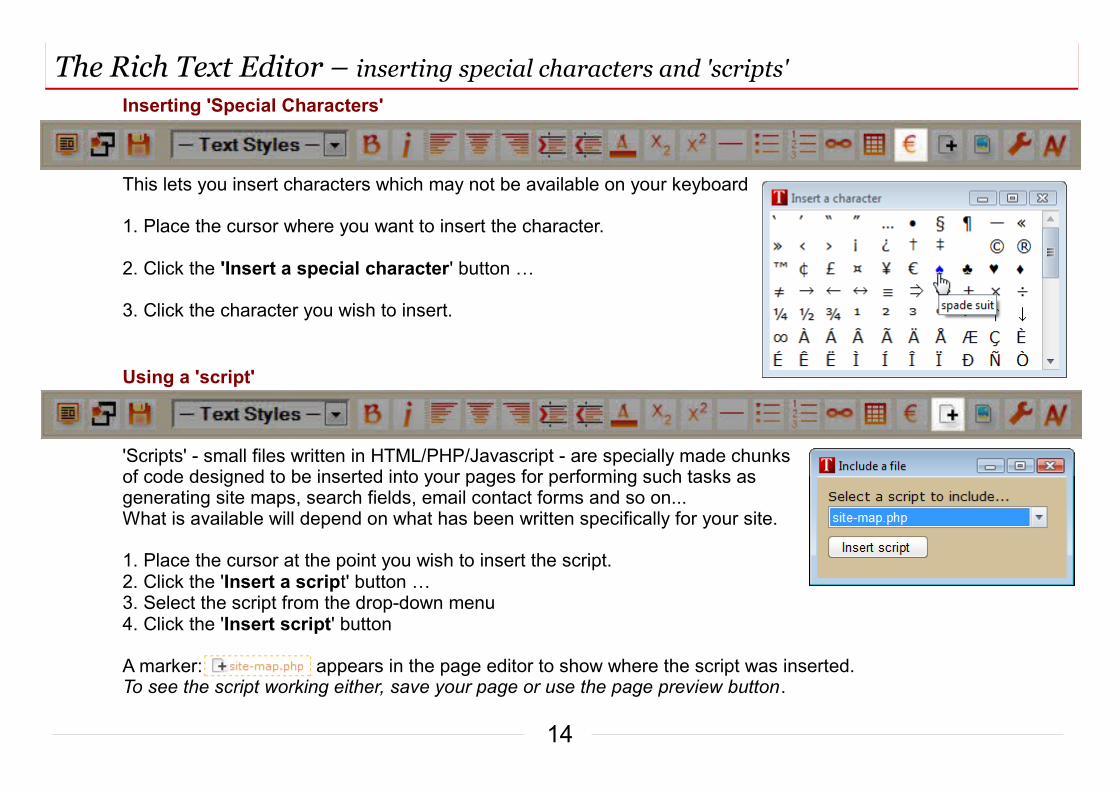
Inserting 'Special Characters'
This lets you insert characters which may not be available on your keyboard 1. Place the cursor where you want to insert the character.
2. Click the 'Insert a special character' button …
3. Click the character you wish to insert.
Using a 'script'
'Scripts' - small files written in HTML/PHP/Javascript - are specially made chunks of code designed to be inserted into your pages for performing such tasks as generating site maps, search fields, email contact forms and so on... What is available will depend on what has been written specifically for your site. 1. Place the cursor at the point you wish to insert the script.2. Click the 'Insert a script' button …3. Select the script from the drop-down menu4. Click the 'Insert script' button A marker: appears in the page editor to show where the script was inserted. To see the script working either, save your page or use the page preview button.

The Rich Text Editor – using images The Rich Text Editor – using images
15
Putting images into a web page
This button opens the 'Insert an image' dialogue box... For an image that is already uploaded Place the cursor where you wish to insert the image then open this dialogue box...
1) Choose the folder which contains the image (if applicable).
2) Select the image by file name – you will see it displayed (as shown on the right).
3) Choose a style (if any) for your image.
4) Unless the image is purely decorative type in a title or short description. This will appear as a 'tool tip' when anyone places their mouse pointer over the image and, more importantly, provide alternative content in the event that the user can’t view the image.
5) Click the 'Insert this image' button.

The Rich Text Editor – uploading and inserting images from your computer The Rich Text Editor – uploading and inserting images from your computer
16
Inserting an image that is still on your computer
This is how to insert an image that hasn't yet been uploaded to your web server
1) Place the cursor where you wish to insert the image then …
2) Open the 'Insert an image' dialogue box ...
3) Select 'Upload an image from my computer'
4) Click the 'Browse..' button to locate the image on your computer.
5) Once you can see that the image has uploaded insert it as previously (steps 3, 4 and 5 above on the previous page).
You can only upload png, jpeg and gif images. Other types of image are not suitable for use on the web.

The Rich Text Editor – the styles viewer The Rich Text Editor – the styles viewer
17
Opening the 'styles viewer'
Click the Show/Hide tools button to reveal the Styles viewer menu …
Use this to examine the various styles that can be applied through the Text Styles menu and the style selectors of the table designer and image dialogue boxes. …
Leave the styles viewer menu visible in the rich text editor and it will remain when you switch to HTML mode.
The Rich Text Editor – using audio and video The Rich Text Editor – using audio and video
18
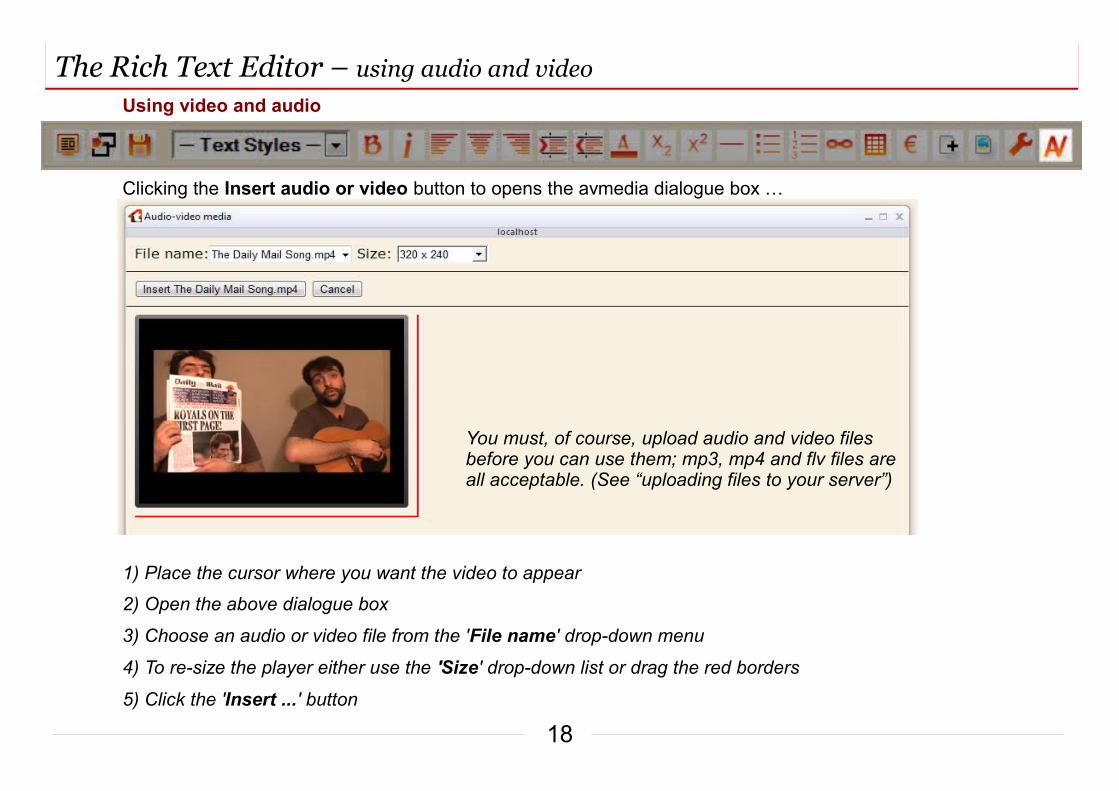
Clicking the Insert audio or video button to opens the avmedia dialogue box …
Using video and audio
1) Place the cursor where you want the video to appear
2) Open the above dialogue box
3) Choose an audio or video file from the 'File name' drop-down menu
4) To re-size the player either use the 'Size' drop-down list or drag the red borders
5) Click the 'Insert ...' button
You must, of course, upload audio and video files before you can use them; mp3, mp4 and flv files are all acceptable. (See “uploading files to your server”)

Logging in to the administration areaLogging in to the administration areaHow to log into the Administrative area
Once you have your Typescript installed, you'll need log in so you can go to the administration area. From here you can manage your site, edit the content of your pages, change themes, etc.
1) Type this URL into your browser: http://www.yourdomainname.com/login/
2) Log in with your username and password.
3) Click the Admin link which now appears on each of your web pages.
You'll see that the Administration area contains the following sections:
Pages: The Page Management area lets you add, remove and reorder sections and pages
Uploads: File Uploads is where you can upload or delete images and other resources
Styles: The Page Styles area lets you edit and create extra css styles for your site
Titles: For editing your Site Title, Page Header & Page Footer
Themes: Where you can apply a new theme to your site.
Files: For editing 'scripts', themes and some of Typescripts 'corefiles'
Users: The User Accounts section is for adding and deleting users
19

Managing pages and sections – listing and repositioning pagesManaging pages and sections – listing and repositioning pages
20
The Page Management section lets you add, delete, rename and reorder Sections and Pages
How to list all of the pages in a section Click the folder icon next to the section name ...
How to reposition pages or sections Place the mouse pointer over a section or page name and drag it to a new position … This position of pages and sections reflects where they will appear in your site's menus.
You can only move a page within its own section. You cannot drag a page into a different section.
None of the changes that you make will come into effect until you click the “Save changes” button.

Managing pages and sections – renaming pages & sections – hiding pages & sectionsManaging pages and sections – renaming pages & sections – hiding pages & sections
21
How to rename a page or section
1) Select the section or page by clicking the icon next to its name.
2) Click the section (or page) 'Rename' button.
Hiding pages and sections from Typescript's menus Sometimes you don't want a page to be listed in Typescript's automatically generated menus. To prevent an entire section or just a single page from appearing in the menus simply begin its name with an underscore. If all the pages in a section have names beginning with underscores, that section name will not appear in your site's main menus.
Restrictions to page and section names
Only use letters, digits, spaces or underscores in section or page names.Excessively long section and page names can spoil the layout of menus. For this reason you are limited, by default, to no more than 20 characters (a value which can be changed in the 'settings' file).

Managing pages and sections – creating new sections & pagesManaging pages and sections – creating new sections & pages
22
Making a new section
1) Click the 'New Section' button.
2) Enter the name for your section.
3) Reposition your section if necessary.
4) Add at least one page to your new section (see note below).
Note: Typescript will add a page (called 'new page') to your new section if you leave it empty...
Making a new page 1) Open the section in which you want to add a new page.
2) Click the 'New Page' button.
3) Enter a name for your new page when prompted.

Managing pages and sections – deleting sections & pages – sending pages to the editorManaging pages and sections – deleting sections & pages – sending pages to the editor
23
Deleting pages and sections
1) Select the page or section by clicking the icon next to its name...
2) Click the appropriate page or section 'Delete' button.
Sending a page to the page editor
1) Select the page you want to edit.
2) Click the 'Edit' button.
Note: As with other changes, the Delete button only marks a page or section for deletion.
No changes actually occur until the 'Save changes' button is clicked.
Deleting a section removes every page within that section!
Note: The Edit button will not be available if you have any unsaved changes.

Uploading files – uploading files to your serverUploading files – uploading files to your server
24
This part of the Administrative Area lets you upload or delete images and other files
How to upload files to your server
1) Click the 'Browse ...' icon
2) Browse for the file to upload
3) Click the browse button again if you want to upload more than one file...
4) Click the 'Upload' button to send your file(s) to the server
Images are automatically sent to Typescript's 'images' folder. All other files are delivered to the 'resources' folder.

Uploading files – listing and viewing uploaded filesUploading files – listing and viewing uploaded files
25
How to list and view the files which have been uploaded
Click either the 'images' or 'resources'
folder icons to see the uploaded files...
Most of the file names are links; so you can
load many of the items into your browser
simply by clicking its name in the list.
Names of potentially inappropriate items
to display (e.g. php files) are not links.

Uploading files – deleting uploaded filesUploading files – deleting uploaded files
26
How to delete uploaded files
Select the file(s) you want to remove by
clicking the icon next to the file name...
Selected files are marked with a cross.
Click the 'Delete selected files' button.

Uploading files – image subfoldersUploading files – image subfolders
27
Making new image subfolders If you have a lot of images on your site you may like to arrange them into different folders.
1) Display the list of files in the 'images' folder,
then click the new image folder icon...
2) Enter a name for your new folder and click
the 'Create Folder' button …
Naming image subfoldersBegin your folder names with a letter followed by any combination of letters, numbers and underscores.
Don't include spaces.

Uploading files – uploading images to subfoldersUploading files – uploading images to subfolders
28
Uploading images to your new subfolder If you have a lot of images on your site you may like to arrange them into different folders.
1) Click the browse button and choose one or more images from your computer.
2) Select your image folder from the 'radio buttons' ...
Use subfolders to organise your images into meaningful groups.

Editing page styles – the page style editorEditing page styles – the page style editor
29

Editing page styles – making styles available to the Page Editor Editing page styles – making styles available to the Page Editor
30
The Styles editor lets you write CSS styles as you need them. Only an 'administrator' can alter the css styles that are built into your site's 'Theme', but this Styles section of the Adminstration Area allows even a user with the access level of 'editor' to add extra styles without disturbing the Theme stylesheets.
Users should, of course, only use this facility if you understand enough css to achieve what they want to do!
Writing styles so that they will be available in the menus of the Page Editor
The Page Editors have drop-down style menus for text, images and tables.To be include in these menus a CSS class definition must be written in the form tag.class where 'tag' must be in lower case. So, for example 'span.highlighted' will appear in the Page Editor'sMenus but '.serif' (no specific tag name) will not.
This works for headings (h1 – h6), paragraphs (p), div, span, image (img) and table tags.
All of the class definitions in the above illustration (previous page) will be available in Typescript's Page Editor menus except '.serif'.
Disabling the Styles section
If you have no use for the Styles section you can disable it in Typescript's settings file.

Editing your site's titles – page titles, headers and footers Editing your site's titles – page titles, headers and footers
31
Site title, which should be plain text, is placed in your site's <title> tag.What actually appears between the <title> tags is the contents of this field followed, by the current section and page names. e.g <title>Typescript 2.0 - Introduction - Welcome</title>
Page Header & Page Footer contain the text or HTML of your page's headers and footers.The site's theme designer may have decided to use these fields in another way, or simply ignore them altogether. (See the section on page templates & scripts)

Themes – viewing the available themes Themes – viewing the available themes
32
How to look through the installed themesOpen the drop-down menu for a list showing the names of all the currently installed themes.Select a theme to display its image and a description.

Themes – managing themes Themes – managing themes
33
How to apply a new theme to your site1. Use the 'Themes ...' menu to view the theme you want to use.
2. Click the 'Apply' button...
Themes can be useful for giving your site a temporary appearance to go go with a special occasion or season; for example a Christmas theme.
How to delete a theme
1. Use the 'Themes …' menu to view the theme you want to delete.2. Click the 'Delete' button.
Be careful: there is no undelete button!
How to copy a theme
This is how to make an exact copy of an existing theme; usually the first step in building a new theme.
1. Use the 'Themes …' menu, if necessary, to view the theme you want to copy.2. Type a name for the new theme in the field to the right of the 'Copy as..' button.3. Click the 'Copy as..' button.

Themes – listing the files in a theme Themes – listing the files in a theme
34
How to list, upload and delete the files that make up a 'theme'
Each theme has its own folder in Typescript's themes directory. So themes are stored as a collection of files not as tables in the database.
To list the files in the current theme's folder click the 'Manage files' button …
This brings up a screen (shown on the right) which allows you to delete some files or upload new ones:
There are some 'essential files' you cannot delete.(see the next page)
You can edit the contents of a theme's files in the 'Files' section of the Administration area.

Themes – theme files Themes – theme files
35
Each theme can contain any number of image, javascript, css, php or other files but, as a minimum, it should contain at least the following:
template.php
Responsible for laying out everything between the <body> tags of your site's pages.See the section called 'page templates and scripts'.
theme.inc.php
Contains anything specific to the theme, which should be included in the <head> section of each page, such as a link to a css file for handheld devices or some javascript to assist the working of your site's menus.
themestyles.css
The main css file for your theme.
printstyles.css
The style sheet that's applied when one of your pages is printed.
notes.txt
The file containing the description of the theme which you see when you view the installed themes.
ts_theme.png
The screen grab of your theme which you see when you view the installed themes.This image should be (roughly) 500px wide.
The File Editor The File Editor
36
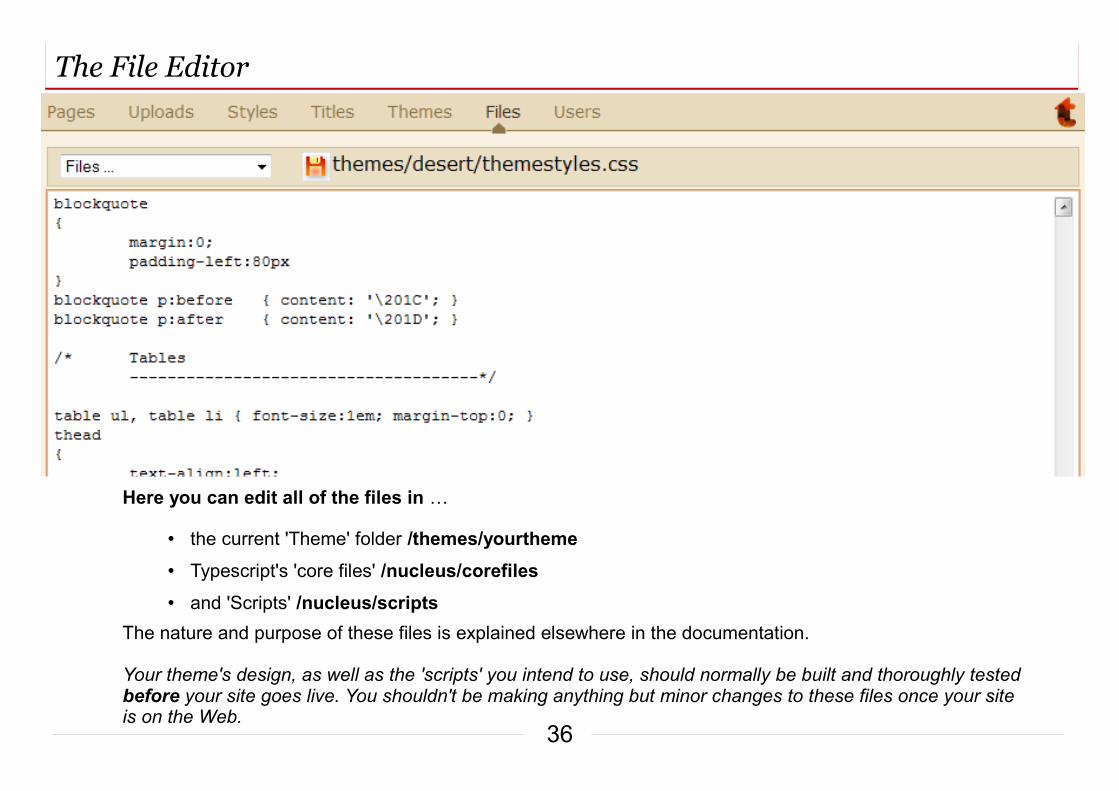
Here you can edit all of the files in …
● the current 'Theme' folder /themes/yourtheme● Typescript's 'core files' /nucleus/corefiles● and 'Scripts' /nucleus/scripts
The nature and purpose of these files is explained elsewhere in the documentation.
Your theme's design, as well as the 'scripts' you intend to use, should normally be built and thoroughly tested before your site goes live. You shouldn't be making anything but minor changes to these files once your site is on the Web.
Setting up user accounts – levels of accessSetting up user accounts – levels of access
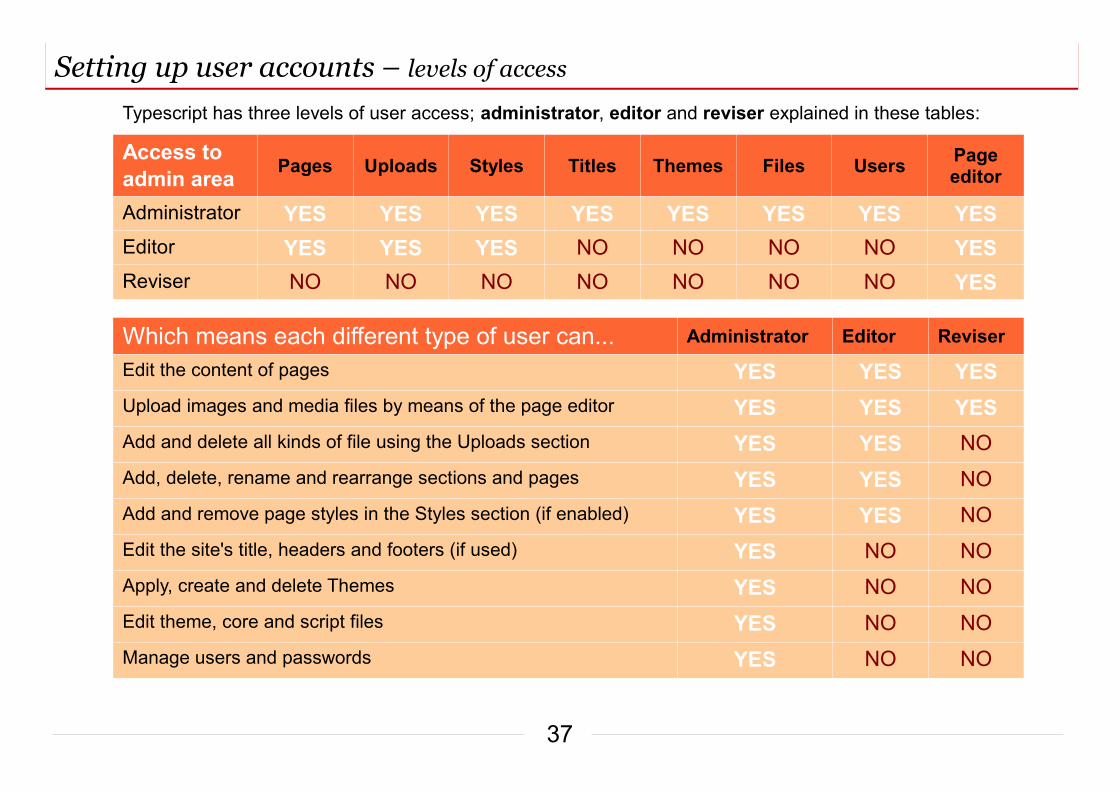
Typescript has three levels of user access; administrator, editor and reviser explained in these tables:
37
Access to admin area Pages Uploads Styles Titles Themes Files Users Page
editor
Administrator YES YES YES YES YES YES YES YESEditor YES YES YES NO NO NO NO YESReviser NO NO NO NO NO NO NO YES
Which means each different type of user can... Administrator Editor Reviser
Edit the content of pages YES YES YESUpload images and media files by means of the page editor YES YES YESAdd and delete all kinds of file using the Uploads section YES YES NOAdd, delete, rename and rearrange sections and pages YES YES NOAdd and remove page styles in the Styles section (if enabled) YES YES NOEdit the site's title, headers and footers (if used) YES NO NOApply, create and delete Themes YES NO NOEdit theme, core and script files YES NO NOManage users and passwords YES NO NO

Setting up user accounts – adding a new userSetting up user accounts – adding a new user
38
How to add a new user1) Enter a username [case-insensitive, only alphanumeric characters and (optionally) a single full stop.]
2) Enter a password [case sensitive and must contain at least five alphanumeric characters]
3) Choose a user access level from the drop down list
4) Choose the preferred page editor for this user either 'WYSIWYG' or 'HTML'
5) Click the 'Create a new user' button
There is no limit to the number users of each type that your site can have.The current user (you!) is identified in the list by a blue icon

Setting up user accounts – deleting a userSetting up user accounts – deleting a user
39
Deleting a user
To remove a user simply click the icon next to the username...
Don't worry, you are given a chance to cancel this action...
Changing a user's password or access level
It is simply not possible to retrieve a forgotten password.
The only way to change a user's password or access level is to delete the user and then recreate the account using a fresh password or user level.

Writing Page Templates – the page template file, “template.php”Writing Page Templates – the page template file, “template.php”
40
template.php The file template.php writes everything between the <body> tags of your site's pages. Administrators can edit this file in the Files section of the Site Editor. Each Theme folder has its own version of this file.
A typical template file will look something like this:
<?php //template for the 'Example' theme ?>
<div id="pagecontainer">
<div id="header"><?php $template->header(); ?></div>
<div id="menucontainer"><?php $template->menu(2); ?></div>
<?php $template->content(); ?>
<div id="footer"><?php $template->footer(); $template->editLink(); ?></div> </div>
Use any mixture of HTML and PHP code that will be valid between the <body> tags of your web pages.
Notice that the file makes extensive use of Typescript's $template object, the most useful methods of which are described in the next few pages.

Writing Page Templates – $template->content, header, footer and editLinkWriting Page Templates – $template->content, header, footer and editLink
41
$template->content()
Use this to place the main content in your page template file.
Typescript always encloses the contents within a <div> having an id of “ts-content” ...
$template->header() and $template->footer()
The header and footer fields are given values in the Titles section of the Administration Area.
The intended purpose of the header and footer fields is, of course, to provide headers and footers which are repeated on every page, but if you don't need headers and footers don't use them. You can of course adapt these fields for any other purpose which requires some repeated but editable content on each page.
The constants 'TS_HEADER' and 'TS_FOOTER' also hold the content of these fields.
$template->editLink()
Use this to place the links used for site and page editing (which only appear when a user is logged in).
The result is an unordered list of linkshaving an id of “ts-editlinks” ...
<div id=”ts-content”> ---- page contents ----</div>
<div id=”ts-content”> ---- page contents ----</div>
<ul id="ts-editlinks"> <li><a href="editor/pages.php">Site Editor</a></li> <li><a href="editor/editor.php?section=sample pages&page=page2">Edit this page</a></li> <li><a href="index.php?ts_logout">Log Out</a></li></ul>
<ul id="ts-editlinks"> <li><a href="editor/pages.php">Site Editor</a></li> <li><a href="editor/editor.php?section=sample pages&page=page2">Edit this page</a></li> <li><a href="index.php?ts_logout">Log Out</a></li></ul>
Writing Page Templates – $template->menuWriting Page Templates – $template->menu
42
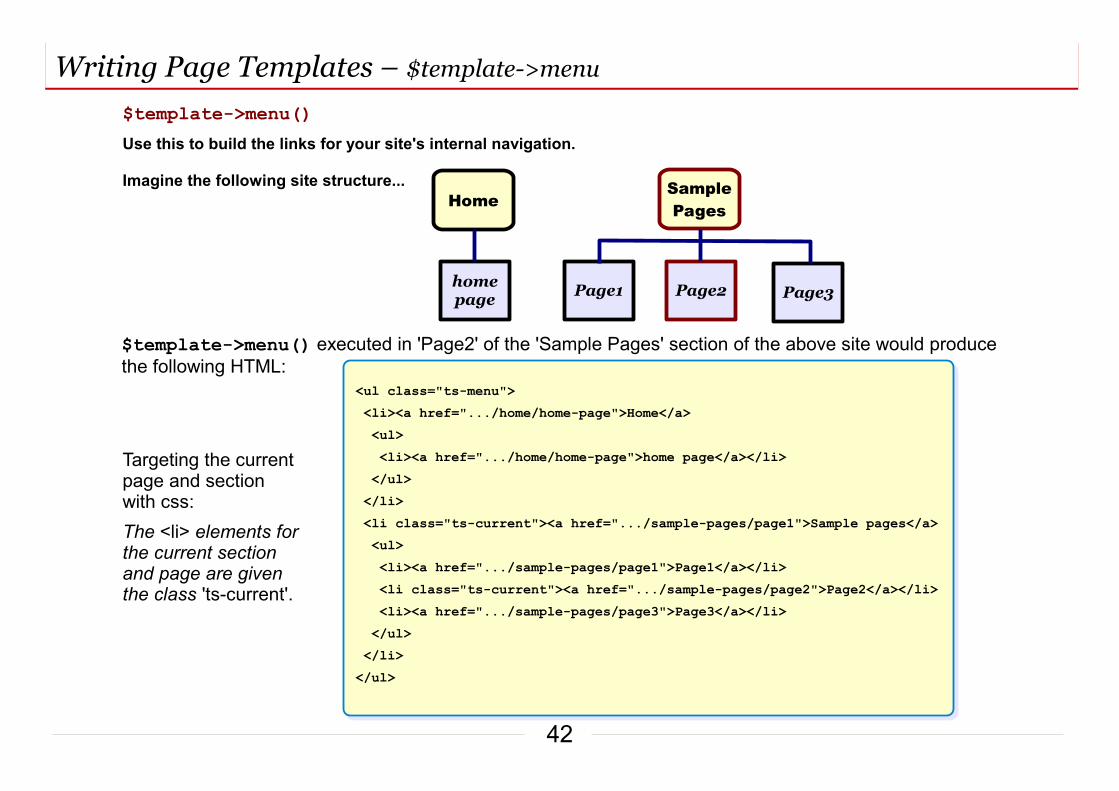
$template->menu()
Use this to build the links for your site's internal navigation.
Imagine the following site structure...Home
SamplePages
homepage Page1 Page3Page2
$template->menu() executed in 'Page2' of the 'Sample Pages' section of the above site would produce the following HTML:
<ul class="ts-menu"> <li><a href=".../home/home-page">Home</a> <ul> <li><a href=".../home/home-page">home page</a></li> </ul> </li> <li class="ts-current"><a href=".../sample-pages/page1">Sample pages</a> <ul> <li><a href=".../sample-pages/page1">Page1</a></li> <li class="ts-current"><a href=".../sample-pages/page2">Page2</a></li> <li><a href=".../sample-pages/page3">Page3</a></li> </ul> </li></ul>
<ul class="ts-menu"> <li><a href=".../home/home-page">Home</a> <ul> <li><a href=".../home/home-page">home page</a></li> </ul> </li> <li class="ts-current"><a href=".../sample-pages/page1">Sample pages</a> <ul> <li><a href=".../sample-pages/page1">Page1</a></li> <li class="ts-current"><a href=".../sample-pages/page2">Page2</a></li> <li><a href=".../sample-pages/page3">Page3</a></li> </ul> </li></ul>
Targeting the current page and section with css:
The <li> elements for the current section and page are given the class 'ts-current'.

Writing Page Templates – variant menu structuresWriting Page Templates – variant menu structures
43
$template->menu() parameters (part 1)Variations on this menu structure are depend upon supplying a parameter to $template->menu() – as outlined in this table...
Code Resulting menu$template->menu(0); Makes a list of links to all sections(A link to a section is a link to the first page in the section.)
• Home• Sample Pages
$template->menu(); or$template->menu(1);Makes a list of links to all sections and pages.
• Home ◦ home page
• Sample Pages ◦ Page1
◦ Page2
◦ Page3
$template->menu(2);As above but omits the page link when a section contains only one page.
• Home• Sample Pages ◦ Page1
◦ Page2
◦ Page3
Table continued...

Writing Page Templates – variant menu structuresWriting Page Templates – variant menu structures
44
$template->menu() parameters (part 2)Continued from the previous page...
Code Resulting menu
$template->menu(3); Makes a list of all sections and pages but only the pages are links.
• Home ◦ home page
• Sample Pages ◦ Page1
◦ Page2
◦ Page3
$template->menu(4);Makes a list of links to all pages within the current section.
• Page1
• Page2
• Page3
$template->menu(5);As above but with first page in the section omitted.
• Page2
• Page3
Table continued...

Writing Page Templates – variant menu structuresWriting Page Templates – variant menu structures
45
$template->menu() parameters (part 3)Continued from the previous page...
Code Resulting menu$template->menu(6,'prv','nxt');
The strings prv and nxt contain the character(s) used for the previous and next links.
e.g. $template->menu(6, '«', '»');This makes numbered page links to all the pages within the current section.
In this case the list has a class “ts-pagination” ...
<ul class="ts-pagination"> <li class="ts-previous"> <a title="Page1" href="...">«</a></li> <li> <a title="Page1" href="...">1</a></li> <li class="ts-current"> <a title="Page2" href="...">2</a></li> <li> <a title="Page3" href="...">3</a></li> <li class="ts-next"> <a title="Page3" href="...">»</a></li></ul>
• « • 1• 2• 3 • »
Typically you might use CSS to render
this as..
« 1 2 3 »
Table continued...

Writing Page Templates – variant menu structuresWriting Page Templates – variant menu structures
46
$template->menu() parameters (part 4)Continued from the previous page...
Code Resulting menu
$template->menu(7,'prv','nxt'); Produces previous and next page links. Similar to the above, but without the pagination.
e.g. $template->menu(7, 'Previous', 'Next');
• Previous • Next
$template->menu(string);Makes a 'breadcrumb trail'.The string contains the separator character(s).
e.g. $template->menu('»');
• Home • >> Sample pages• >> Page2
Which, after styling, might typically appear as...
Home » Sample pages » Page2

Writing Page Templates – importing one page into anotherWriting Page Templates – importing one page into another
47
$template->include() and $template->importPage()Use these when you want to include content from another page. For example you want editable content in a sidebar.
Imagine this site structure...
Home
homepage
SamplePages
Page1 Page3Page2
_sidebar
Page2default
$template->include(section,page) writes the contents of section/page into the current page
For example to use the content of _sidebar/default as a sidebar on every page you might place the following in your template file...
<div id=”mysidebar”><?php $template->include('_sidebar','default'); ?></div>
The leading underscore in the name of the _sidebar section hides its pages from the menus.
$template->importPage([section]) is a more intelligent adaptation of $template->include().The section from which you want to import content should have a page called 'default' and, optionally, pages whose names match those of other pages in your site. The content of the default page will always be included except on a page with a name match. <div id=”mysidebar”>
<?php $template->importPage('_sidebar'); ?></div>
For example if this code was in your template file Sample pages/Page2 imports _sidebar/Page2, but every other page imports content from _sidebar/default.
Use this when you want some additional content, such as a sidebar, repeated across the pages of your site but with the option of individualisation. Note: The section name, if omitted, defaults to '_imports'.
Writing Page Templates – adding a search fieldWriting Page Templates – adding a search field
48
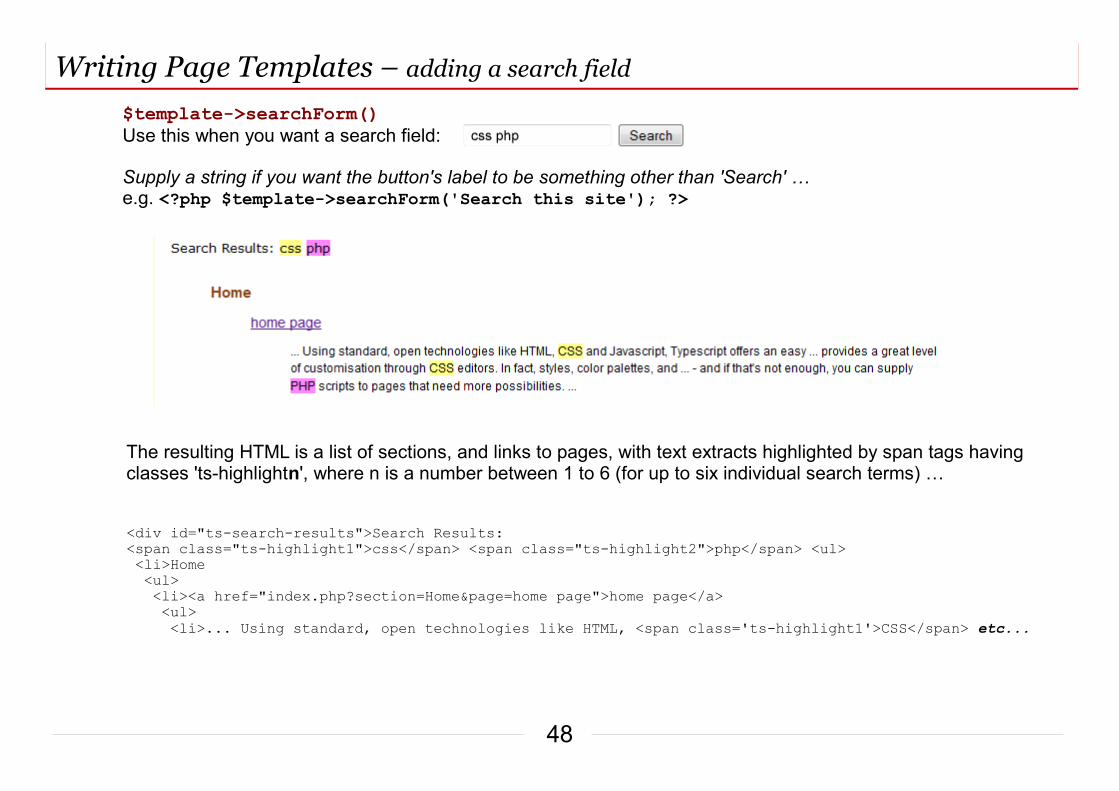
$template->searchForm()Use this when you want a search field:
Supply a string if you want the button's label to be something other than 'Search' …e.g. <?php $template->searchForm('Search this site'); ?>
The resulting HTML is a list of sections, and links to pages, with text extracts highlighted by span tags having classes 'ts-highlightn', where n is a number between 1 to 6 (for up to six individual search terms) …
<div id="ts-search-results">Search Results:<span class="ts-highlight1">css</span> <span class="ts-highlight2">php</span> <ul> <li>Home <ul> <li><a href="index.php?section=Home&page=home page">home page</a> <ul> <li>... Using standard, open technologies like HTML, <span class='ts-highlight1'>CSS</span> etc...
Writing Page Templates – constants available to template files Writing Page Templates – constants available to template files
49
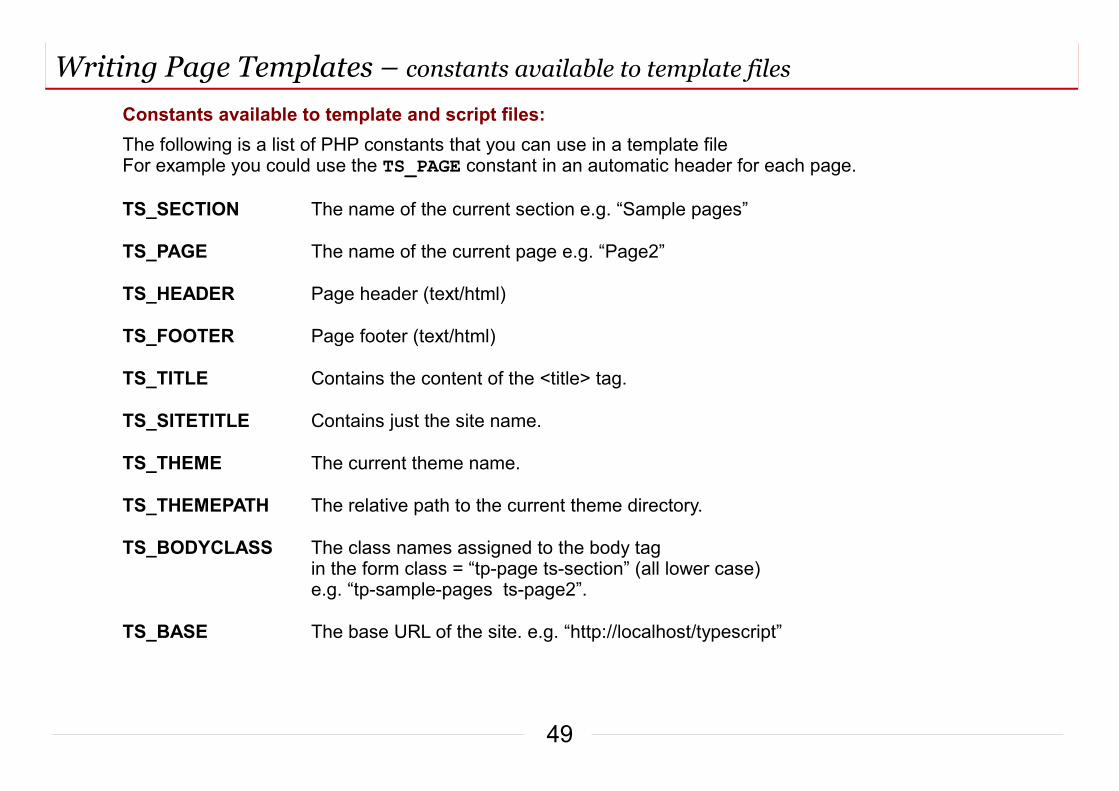
Constants available to template and script files:
The following is a list of PHP constants that you can use in a template file For example you could use the TS_PAGE constant in an automatic header for each page.
TS_SECTION The name of the current section e.g. “Sample pages”
TS_PAGE The name of the current page e.g. “Page2”
TS_HEADER Page header (text/html)
TS_FOOTER Page footer (text/html)
TS_TITLE Contains the content of the <title> tag.
TS_SITETITLE Contains just the site name.
TS_THEME The current theme name.
TS_THEMEPATH The relative path to the current theme directory.
TS_BODYCLASS The class names assigned to the body tagin the form class = “tp-page ts-section” (all lower case)e.g. “tp-sample-pages ts-page2”.
TS_BASE The base URL of the site. e.g. “http://localhost/typescript”

Typescript's “corefiles” - introduction, access.log Typescript's “corefiles” - introduction, access.log
50
Corefiles (part 1)
Corefiles, for want of a better name, is a group of files which can be found in the /nucleus/corefiles folder. By default, they are...
access.log A record of users who have logged into edit the site
colours.txt Contains the palette of text colours for the page editor
head.inc For making additions to the <head> section of each page
readme.txt For the latest information about your Typescript build
unicode.txt Contains the list used by page editor as 'special characters'
All of these files are editable in the Files section of the Administration Area.When customising Typescript you may also add your own files to the corefiles folder.
access.logA list of all attempts (successful or not) to log in to Typescript's site editor.The file contains username : date & time : IP address …
You will probably want to empty this file periodically. Note: If this facility is not required simply delete this file.
- fred : Wednesday 13th October 2010 07.07 AM : 207.46.197.32- admin : Wednesday 13th October 2010 05.18 PM : 82.165.120.188- sid : Tuesday 19th October 2010 07.32 PM : 74.125.53.100! FAILED : cracker: Thursday 20th October 2010 04.29 PM : 216.8.179.24- admin : Saturday 21st October 2010 11.30 AM : 82.165.120.188
- fred : Wednesday 13th October 2010 07.07 AM : 207.46.197.32- admin : Wednesday 13th October 2010 05.18 PM : 82.165.120.188- sid : Tuesday 19th October 2010 07.32 PM : 74.125.53.100! FAILED : cracker: Thursday 20th October 2010 04.29 PM : 216.8.179.24- admin : Saturday 21st October 2010 11.30 AM : 82.165.120.188

Typescript's “corefiles” - colours.txt, head.inc Typescript's “corefiles” - colours.txt, head.inc
51
Corefiles (part 2)
colours.txtInitially this contains the set of X11 colours as colour-value;descriptive-name …
This file holds the colour list used by the page editor's 'text colour' facility.
You can edit it to suit your own requirements but do not delete or rename it!
Lines not beginning with '#' are ignored and can be used for making comments.
head.incThis file initially just contains links to your site's 'favicons' …
<link rel="shortcut icon" href="favicon.ico" /><link rel="icon" type="image/png" href="icon.png" />
but can be used to make your own additions (e.g. linking extra style sheets, adding meta tags or javascript) to the <head> section of each html page.
The content of this file is inserted immediately after the <title> tag.
If you don't need this file, simply ignore or delete it.
#FF0000;Red#00FF00;Lime#0000FF;Blue#FFFF00;Yellow#FF00FF;Magenta etc...
#FF0000;Red#00FF00;Lime#0000FF;Blue#FFFF00;Yellow#FF00FF;Magenta etc...
Typescript's “corefiles” - readme.txt, unicode.txt Typescript's “corefiles” - readme.txt, unicode.txt
52
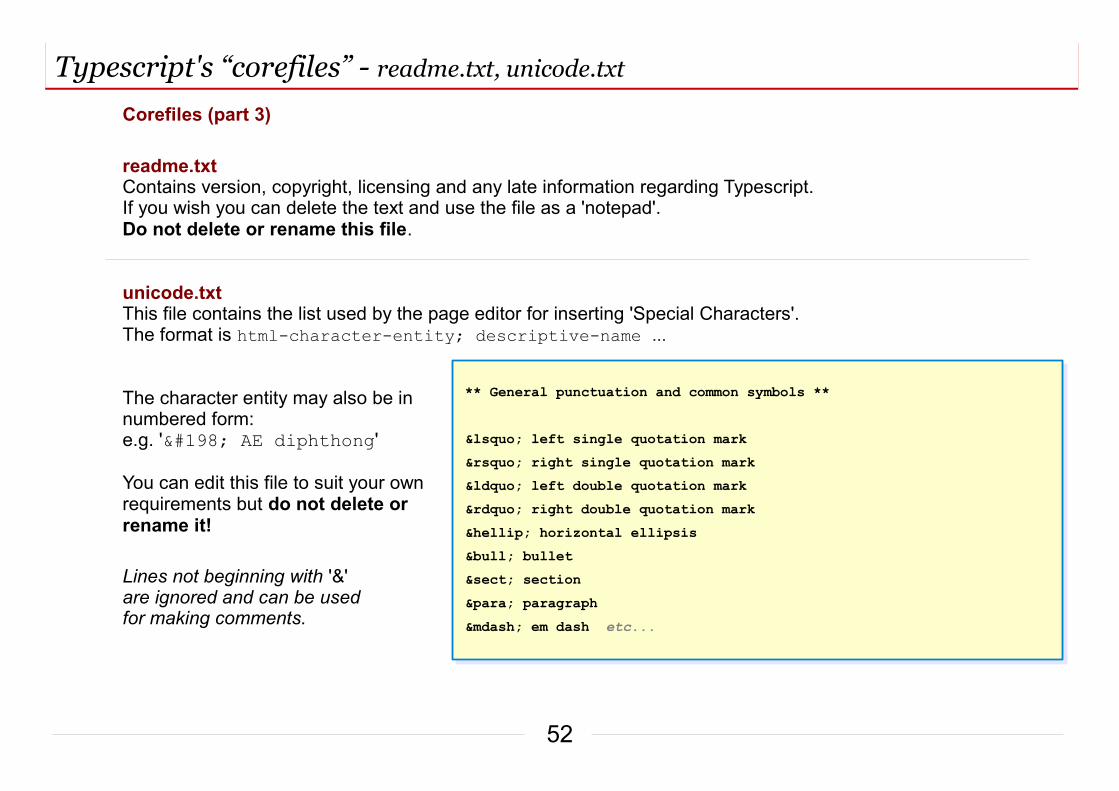
Corefiles (part 3)
readme.txtContains version, copyright, licensing and any late information regarding Typescript.If you wish you can delete the text and use the file as a 'notepad'. Do not delete or rename this file.
unicode.txtThis file contains the list used by the page editor for inserting 'Special Characters'.The format is html-character-entity; descriptive-name ...
The character entity may also be in numbered form: e.g. 'Æ AE diphthong'
You can edit this file to suit your own requirements but do not delete or rename it!
Lines not beginning with '&' are ignored and can be used for making comments.
** General punctuation and common symbols **
‘ left single quotation mark’ right single quotation mark“ left double quotation mark” right double quotation mark… horizontal ellipsis• bullet§ section¶ paragraph— em dash etc...
** General punctuation and common symbols **
‘ left single quotation mark’ right single quotation mark“ left double quotation mark” right double quotation mark… horizontal ellipsis• bullet§ section¶ paragraph— em dash etc...

Images with captions Images with captions
53
Images with captions
If you declare an image class beginning with 'cp-' (cp followed by a hyphen) Typescript will treat it in a special way and generate an image with a caption if the image is inserted using the rich text editor …
img.cp-photo {
display:block;border:1px solid gray;
} span.cp-photo {
border:1px solid gray;background-color:white;float:left;padding:0.2em;margin-right:0.5em;
} .cp-photo span {
text-align:center;font-weight:normal;font-size:0.9em;color:#448;display:block;
}
img.cp-photo {
display:block;border:1px solid gray;
} span.cp-photo {
border:1px solid gray;background-color:white;float:left;padding:0.2em;margin-right:0.5em;
} .cp-photo span {
text-align:center;font-weight:normal;font-size:0.9em;color:#448;display:block;
}
Instead of making an <img> with the class of 'cp-photo', Typescript's page editor generates a <span> with class 'cp-photo' holding a classless <img> tag and another <span> for the caption. See box below:
Typical css to generate the result for the image shown, is in the panel on the left.
<span class="cp-photo"><img src="images/my_pictures/soller.jpg" class= “cp-photo” alt="The Soller Railway" title="The Soller Railway" width="300" height="300" /><span>The Soller Railway</span>
</span>
<span class="cp-photo"><img src="images/my_pictures/soller.jpg" class= “cp-photo” alt="The Soller Railway" title="The Soller Railway" width="300" height="300" /><span>The Soller Railway</span>
</span>
A Choice of Page Editors – the choice is between rich-text or plain-text editing A Choice of Page Editors – the choice is between rich-text or plain-text editing
54
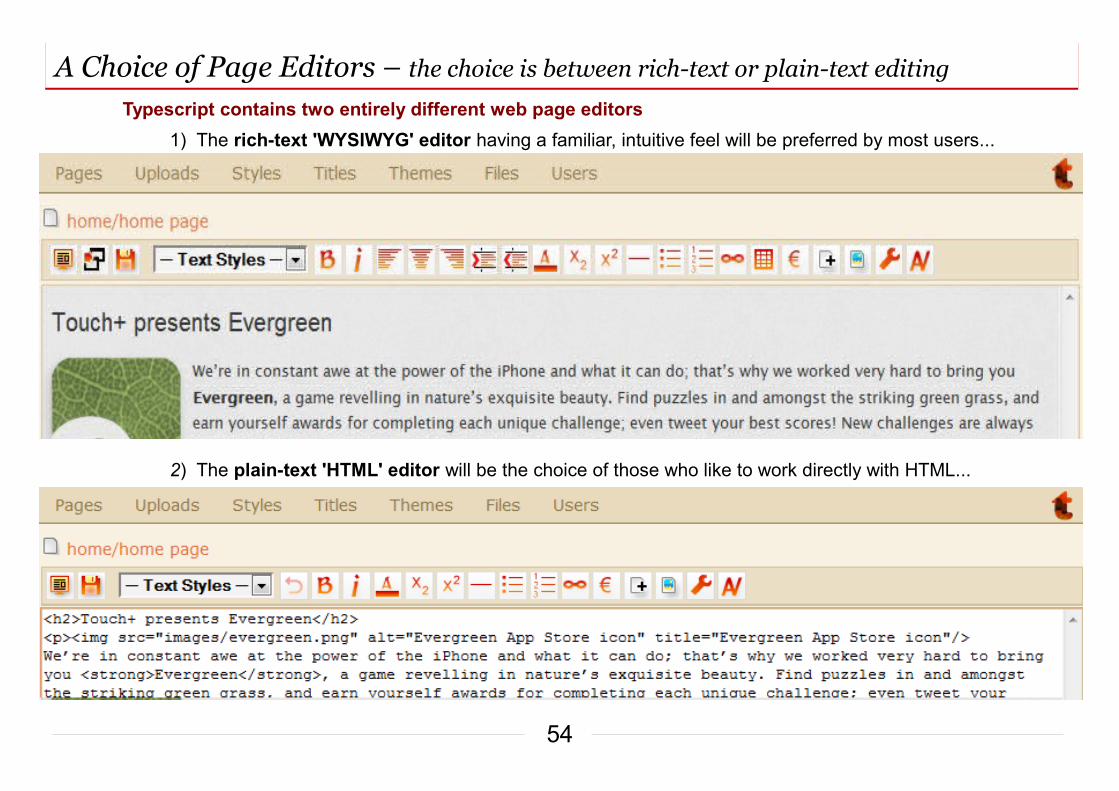
Typescript contains two entirely different web page editors
1) The rich-text 'WYSIWYG' editor having a familiar, intuitive feel will be preferred by most users...
2) The plain-text 'HTML' editor will be the choice of those who like to work directly with HTML...

A Choice of Page Editors – switching editors A Choice of Page Editors – switching editors
55
What's the difference between the two editors?
The rich text editor provides you with a word processor style interface and requires no HTML skills. So basically anyone can use it. Although there is a button for viewing and edit the underlying HTML (with tags colour coded in blue), this 'code view' is not a pure plain text editor – if you type in poor HTML it will often attempt to correct it.
Competent HTML coders will prefer the plain text editor. Although it has several buttons having the same function as the rich text editor all you ever see is the HTML as pure text and it always leaves your code untouched.
What if I want to choose which page editor I use?
An editor (either WYSIWYG or HTML) is assigned to each user when their account is created. This is the editor you will get whenever you edit a web page.
If you really want to try the alternative editor, instead of clicking the 'Edit this page' link or the 'Edit' button in Page Management button use the 'E' access key as follows...
Web browser Alternative editor Access Keys Firefox Hold down the SHIFT key and the ALT key, then press E
Safari (Windows) Hold down the ALT, then press E
Safari (Mac) Hold down CTRL, then press E
Opera Hold down SHIFT and ESC, a list appears, then press E
Chrome Hold down the SHIFT and ALT, then press E
Internet Explorer Hold down ALT, then press E, release both keys then press Enter
Using Tidy URLs – giving your pages a pretty web addressUsing Tidy URLs – giving your pages a pretty web address
56
What are Tidy URLs?
If, as is usually the case, your Apache web server has the Rewrite Module enabled you can remove excess cruft from your URLs and make life a bit easier for your visitors and for search engines.
By default Typescript will use an address like .. .
http://www.example.com/index.php?section=introduction&page=welcome
...to access the page 'welcome' in the section 'introduction'.
With Tidy URLs enabled the same address will be …
http://www.example.com/introduction/welcome
Enabling Tidy URLs
Look in the nucleus folder for the file ts_settings.php and open it in your text editor.
Find the line ...
define('TS_TIDYURL',false);
… and change 'false' to 'true'.
This will not work if you're unlucky and your server is not set up to allow rewriting of URLs in this way. .

Using MySQL – switching from SQLite to MySQLUsing MySQL – switching from SQLite to MySQL
57
What is SQLite?
SQLite is simple, fast and very reliable. It works just great! All of Typescript's data is stored in a single SQLite database i.e in a single file (usually nucleus/typescript.sqlite) which is part of the program instead of being on a separate database server. If you relocate the program, the database simply moves with it!
This makes backing up your database as simple as making a copy of the sqlite file.
For more about SQLite see http://www.sqlite.org/whentouse.html
Switching to MySQL
Open the file 'nucleus/ts_settings.php' in a text editor.
Now make these changes ...define('TS_DBTYPE', 'sqlite'); change 'sqlite' to 'mysql' define('TS_DBNAME', 'typescript'); replace 'typescript' with the name of your database define('TS_DBUSER', 'root'); replace 'root' with your MySQL usernamedefine('TS_DBPASSWORD', ''); insert your MySQL password define('TS_DBHOST', 'localhost');if necessary replace with the host name of the MySQL serverdefine('TS_DBPREFIX', 'TS_'); This lets you add a prefix (e.g. "TS_") to each table name if
you're 'piggy backing' on an existing database and need to avoid clashes with existing table names.Replace 'TS_' with an empty string if you are setting up on a new blank database.
Now enable (remove the '#' from) the line …# include 'ts_install.php';
Now enter (or refresh) your site. The MySQL tables will be built. You will now have a very basic site with the default 'admin' and 'admax' user account. Your SQLite database is not copied across to MySQL.
Once your MySQL database is working comment out (replace the '#' in ) the line … # include 'ts_install.php';

Other Changes to the Settings File – a few customisationsOther Changes to the Settings File – a few customisations
58
Other changes you can make to your site's settings
You'll find comments to help you with all these 'tweaks' in the file 'nucleus/ts_settings.php'
Time zoneApart from the access log and displaying the time when files were uploaded, Typescript doesn't make much use of time, but there's nothing to stop you writing page templates or scripts that display or make use of time.
If your local time differs from UTC, and it matters, modify the line: date_default_timezone_set('UTC');
Length of Section and Page namesPage and Section names have, by default, a maximum length of 20 characters. This is because these names are displayed on your site in the automatically generated menus and very long names could break the formatting of your site's menus. Whether this happens depends upon how you have designed your menus.
To alter the maximum length of page and section names modify the line: define('TS_MENUCHARS',20);Removing 'Pagestyles' from the Administration AreaIf you have no use for the stylesheet 'pagestyles.css' and do not want to allow users who are not administrators to add or modify the css for your site, modify the line: define('TS_PAGESTYLES',true);
Renaming your SQLite database fileIf you wish you can rename your SQLite database file to something more obscure.
1. Rename the file 'nucleus/typescript.sqlite' keeping it in the 'nucleus' folder where it is protected.
2. Modify the line: define('TS_DBSQLITE', 'typescript.sqlite');