Tutorial: Exploring Game Development in the .NET Platform...
40
Tutorial: Exploring Game Development in the .NET Platform with Managed DirectX, GDI+ and Mobile Devices André W. B. Furtado, André L. de M. Santos Recife XML Technology Center / Informatics Center (CIn) - UFPE Rua do Apolo, 181, CEP 50030-220, Recife/PE/Brazil {awbf,alms}@cin.ufpe.br Abstract. This tutorial explores current game development possibilities for the .NET Platform. The creation of a simple 2D game engine is used to illustrate many aspects of Managed DirectX computer game development, while concepts such as graphics manipulation, input handling and sound support are also discussed considering the GDI+ API and game development for mobile devices. The final purpose is to empower game developers to the productive creation of computer games through Microsoft’s recent technologies, services and tools. Keywords: .NET, DirectX, managed code, C#, GDI+, mobile devices 1. Introduction The .NET Platform [1] is one of Microsoft’s most recent approaches for the creation of technologies to build distributed web, mobile and windows applications, such as computer games. It is composed by a series of technologies, services and tools. A .NET compliant version of Microsoft DirectX [2], a rich multimedia API that contains a set of interfaces for creating games and other high-performance multimedia applications, was released recently. This was an important milestone in the DirectX roadmap, since the API was chiefly accessible only to C/C++ programmers for almost 10 years. One of the purposes of this tutorial, therefore, is to enrich game developer experience by presenting some of the most important DirectX features related to game development, as well as by providing familiarity with the Microsoft integrated programming environment (Visual Studio .NET) and the C# language. Additionally, the tutorial is not limited to DirectX technologies; major aspects of computer game development, such as graphics manipulation, input handling and sound support are also discussed considering the GDI+ API and game development for mobile devices. Game developers will be instructed on when to choose between DirectX and GDI+, as well as be introduced to concerns related to porting desktop PC games developed in .NET to mobile devices. It should be noticed, however, that the purpose of this tutorial is to provide an overview of game development in the .NET Platform. It is not designed to detail all aspects of .NET, C#, DirectX, GDI+, Visual Studio .NET or mobile devices. The following sections of this tutorial are organized as follows: Section 2 presents the main concepts related to the .NET Platform, the .NET Framework, the C# language and the tools which will be used throughout this tutorial. Section 3 establishes
Transcript of Tutorial: Exploring Game Development in the .NET Platform...

Tutorial: Exploring Game Development in the .NET
Platform with Managed DirectX, GDI+ and Mobile Devices
André W. B. Furtado, André L. de M. Santos
Recife XML Technology Center / Informatics Center (CIn) - UFPE
Rua do Apolo, 181, CEP 50030-220, Recife/PE/Brazil
{awbf,alms}@cin.ufpe.br
Abstract. This tutorial explores current game development possibilities for the
.NET Platform. The creation of a simple 2D game engine is used to illustrate
many aspects of Managed DirectX computer game development, while
concepts such as graphics manipulation, input handling and sound support
are also discussed considering the GDI+ API and game development for
mobile devices. The final purpose is to empower game developers to the
productive creation of computer games through Microsoft’s recent
technologies, services and tools.
Keywords: .NET, DirectX, managed code, C#, GDI+, mobile devices
1. Introduction
The .NET Platform [1] is one of Microsoft’s most recent approaches for the creation of
technologies to build distributed web, mobile and windows applications, such as
computer games. It is composed by a series of technologies, services and tools.
A .NET compliant version of Microsoft DirectX [2], a rich multimedia API that
contains a set of interfaces for creating games and other high-performance multimedia
applications, was released recently. This was an important milestone in the DirectX
roadmap, since the API was chiefly accessible only to C/C++ programmers for almost
10 years.
One of the purposes of this tutorial, therefore, is to enrich game developer
experience by presenting some of the most important DirectX features related to game
development, as well as by providing familiarity with the Microsoft integrated
programming environment (Visual Studio .NET) and the C# language. Additionally, the
tutorial is not limited to DirectX technologies; major aspects of computer game
development, such as graphics manipulation, input handling and sound support are also
discussed considering the GDI+ API and game development for mobile devices. Game
developers will be instructed on when to choose between DirectX and GDI+, as well as
be introduced to concerns related to porting desktop PC games developed in .NET to
mobile devices. It should be noticed, however, that the purpose of this tutorial is to
provide an overview of game development in the .NET Platform. It is not designed to
detail all aspects of .NET, C#, DirectX, GDI+, Visual Studio .NET or mobile devices.
The following sections of this tutorial are organized as follows: Section 2
presents the main concepts related to the .NET Platform, the .NET Framework, the C#
language and the tools which will be used throughout this tutorial. Section 3 establishes

a common terminology for some game development concepts. Section 4 details many
aspects of game development with DirectX 9. Section 5 provides an overview of game
development with the GDI+ API, while Section 6 introduces game development for
mobile devices in .NET. Section 7, finally, provides some conclusions about the
presented work.
2. The .NET Platform
The .NET Platform is the most important update in the Microsoft development platform
since the release of the Win32 API, in 1993. It brings fundamental changes to tools and
techniques used by developers, by providing new technologies to build distributed web,
mobile and windows applications, such as computer games.
The .NET Platform is composed by several core technologies, such as the .NET
Framework, the Visual Studio .NET IDE (Integrated Development Environment), the
.NET My Services (user-centric XML Web Services, such as the .NET Passport
authentication) and the .NET Enterprise Services (SQL Server, BizTalk Server, etc.).
The .NET Framework and one of its programming languages, named C#, as well as the
Visual Studio .NET, are very relevant to this tutorial and will be briefly introduced in
the following subsections. More information on .NET can be found at [1].
2.1. The .NET Framework
The .NET Framework provides the necessary compile-time and run-time foundation to
build and run .NET-based applications. Figure 1 provides an overview of its main
components.
Figure 1 – The .NET Framework
Exploring Figure 1 from bottom to top, it can be noticed that the .NET
Framework must run on an operating system. Originally, it was built to run on
Microsoft Win32 operating systems, but alternative implementations of the Framework,
such as the Mono project [3], make it possible to run .NET applications in other
operating systems.

The .NET Framework is based on a common language runtime (CLR). The CLR
simplifies application development, provides a robust and secure execution
environment, supports multiple languages and aids application deployment and
management. The CLR is also referred to as a managed environment, in which
common services, such as garbage collection and security, are automatically provided.
The .NET Framework class library exposes features of the runtime and provides
other services to help developers. It contains classes with different purposes, such as
data and XML manipulation, web applications, web services and user interface.
Developers can extend them by creating their own libraries of classes.
Finally, any language that conforms to the .NET Common Language
Specification (CLS) [4] can be used to program .NET applications and run on the
common language runtime, which grants the interoperability between its languages.
Therefore, it is possible for different parts of a same application to be created with
different .NET programming languages. Microsoft already provides, with the .NET
Framework, languages such as Visual Basic, Visual C++ and Visual C# (this last one is
the programming language adopted by this tutorial). Third parties can provide additional
languages. Lua [5] and Cobol [6], for instance, were already ported to the .NET
Framework.
Three versions of the .NET Framework have been released so far: 1.0 in 2002,
1.1 in 2003 and, finally, the 2.0 version in 2005. This tutorial is focused on the latest
.NET Framework version (2.0), but the code presented here can be easily ported to
previous versions with slight changes.
2.2. The C# language
Visual C# is a new language created specially for the .NET Platform. Since it is object-
oriented and has C-style syntax, it is not a big challenge for Java and C++ programmers
to understand C#. As a matter of fact, many people consider C# as a natural, managed
evolution of C++.
A question that commonly arises is if C++ games are faster than their C#
counterparts. Games developed in C++ have a better performance indeed, but the reason
for that is not the language, but the runtime environment. C++ code does not run in a
managed environment and, therefore, trades code security and abstraction for speed and
a higher memory control. However, unless the performance level demanded by your
game is extremely critical, such as in first-person shooters like HALO 2 [7] or Half-Life
2 [8], for example, C# will provide very satisfactory results. On the other hand, C# can
provide a more productive development process, since the developer does not need to
directly deal with many error-prone programming tasks, such as garbage collection, for
example. Writing in managed code makes the developers more efficient and thus write
more code and produce safer code [9].
This tutorial assumes that the reader already knows object-oriented
programming fundamentals. Some specific C# remarks and features used in this tutorial,
however, are introduced in this subsection, especially those not usual to C++ and/or
Java programmers. More information on the C# programming language can be found at
[10].

2.2.1. Classes and the layout of a C# program
A C# application is a collection of classes, structures and types. As expected, a class is a
set of data and methods, but differently from C++, C# does not distinguish between the
definition and implementation of a class. There is no concept of a definition (.hpp) file.
All code for the class is written in one file1. Besides that, differently from Java, the
name of the application file does not need to be the same as the name of the class.
C# is case sensitive, and the Main method is the entry point of a C# application.
The following code presents a typical “Hello, Word!” C# application:
using System;
class Hello {
public static void Main(string[] args) {
Console.WriteLine("Hello, World!");
}
}
2.2.2. Namespaces and the using keyword
Namespaces are used to organize the elements of an application (classes, interfaces,
structures, etc.), in order to avoid name clashing (collision) between them. Nevertheless,
namespaces are not strictly required. The syntax used for namespaces follows below:
namespace MyGame {
class MyGameEntity {...}
/* other type definitions... */
}
Namespaces can be used to fully qualify the name of a type. For example, the
full qualified name of the class above is MyGame.MyGameEntity. It is possible to
define a namespace inside another namespace, in order to organize them hierarchically
(for example, “Microsoft.DirectX” means that the namespace DirectX is declared
inside the namespace Microsoft). It is worth noticing, however, that there is no
mandatory mapping between namespaces and file system directories (as required by
Java packages, a concept similar to namespaces).
In order to import the types defined in a namespace, the using keyword must be
used, as shown in the example below. Notice that the .NET Framework class library and
other APIs (such as DirectX) already contain many pre-defined namespaces, in order to
organize their own classes, structures and types, as well as to help developers to find
and use them.
using System;
using Microsoft.DirectX.DirectInput;
using MyGame;
1 Actually, the concept of partial classes introduced in C# 2.0 makes it possible to split a single class in
two files. But this is generally not a good programming practice and is beyond the scope of this tutorial.

2.2.3. Structs
A struct is a type consisting of a sequence of named members of various types. Structs
are lightweight versions of classes. They should be used to model simple structures,
such as a screen point coordinate, and do not support more advanced object-oriented
concepts, such as inheritance, for example. The code below illustrates the definition of a
struct type name Point:
struct Point {
int x;
int y;
}
2.2.4. Properties
Properties are a useful way to encapsulate data within a class or struct, providing
accessors to a field without the need of get_XXX() and set_XXX() methods
(commonly used in Java). An example of a property definition and usage follows below:
class GameEntity {
private Point m_position; // a field
public Point Position { // a property to encapsulate the field
get {return m_position;}
set {m_position = value;} // 'value' is the received value
}
public void IncreasePosition(Point inc) {
Point currentPos = this.Position; // 'get' is called
this.Position = currentPos + inc; // 'set' is called. The right
// side (currentPos + inc)
// will be the 'value'
}
}
2.2.5. Enumerations
An enumeration is a distinct type consisting of a set of constants, called the enumerator
list. The enum keyword is used to declare an enumeration, as shown in the code below:
enum Planet {
Earth,
Mars,
Saturn
};
After an enumeration is declared, it is possible to declare variables (or class
fields) of the type of the enumeration. Literal values of the enumeration are always
qualified by the name of the enumeration.

public static void Main() {
Planet p;
p = Planet.Earth;
}
2.2.6. Inheritance
Inheritance is denoted in C# by the “:” symbol, such as in C++. Unless a method is
declared as virtual in a base class, it will not be possible to override it in a child
class. The override method in the child class, on the other hand, should be declared
using the keyword override, as shown in the following code.
class Sprite {
public virtual void Draw() {...}
}
class Explosion : Sprite {
public override void Draw() {...}
}
Differently from C++, C# does not support multiple inheritance, but a class can
implement multiple interfaces, as in Java (the “:” symbol is also used to implement an
interface). Classes declared as sealed cannot be derived from, while classes declared
as abstract cannot be instantiated and can contain abstract methods, which are virtual
methods with no base implementation at all:
abstract class GenericGameEngine {
public abstract bool InitializeResources();
}
2.2.7. The foreach statement
Generally, multiple statements are required by the for statement to iterate through a
collection, as shown in the code below:
for (int i = 0; i < numbers.Count; i++) {
int number = (int) numbers[i];
Console.WriteLine(number);
}
In C#, rather than explicitly extracting each element from a collection by using
syntax specific to the particular collection, the foreach statement can be used to
approach the problem in the opposite way: the collection is instructed to present its
elements one at a time. Instead of taking the embedded statement to the collection, the
collection is taken to the embedded statement, as illustrated by the code below:
foreach (int number in numbers) {
Console.WriteLine(number);
}

2.2.8. Generics
Generics are a concept very similar to C++ templates. The idea is that you can
parameterize classes, methods and other elements with types. The following code
presents a generic Stack class:
public class Stack<T> {
T[] items;
int count;
public void Push(T item) {...}
public T Pop() {...}
}
In the above example, T is a type parameter, i. e., a placeholder which allows the
type of the elements of the stack to be defined only when the Stack<T> class is in fact
used. An example of such use follows below, revealing that the T type parameter must
be changed by a real type. It is worth noticing that there is no need to perform casts
(explicit type conversions) after calling the Pop method, since type checking is done in
compile time with generics.
Stack<int> stack = new Stack<int>();
stack.Push(3);
int x = stack.Pop();
The .NET Framework already contains some pre-defined generic types. A
popular example of a generic class is the List<T> class, which implements the generic
IList<T> interface using an array whose size is dynamically increased as required.
More information about generics can be found at [11].
2.3. Tools
The IDE (Integrated Development Environment) used by this tutorial is the Microsoft
Visual Studio .NET 2005 [12] (VS.NET), the third version of the standard Microsoft
IDE for .NET Framework-based applications. Readers are also encouraged, however, to
follow this tutorial by using Visual C# Express [13], a streamlined and simplified
version of VS.NET, focused on novice, hobbyist, or student C# developers. Visual C#
Express is one of the Visual Studio Express Edition family tools, which provide most of
the functionality of their more advanced counterparts, but are lightweight and have a
lesser cost. To the development of mobile applications, however, VS.NET is preferred.
VS.NET and VC# Express already come with the .NET Framework runtime and
software development kit, which includes GDI+ application program interfaces (APIs).
It is necessary, however, to install the latest version of DirectX SDK [2] (not only its
runtime), which is not part of the .NET Framework. The DirectX SDK also includes
samples and other utilities that are extremely useful when developing with DirectX.
3. Defining a common terminology
Wiegers [14] points out that “one problem with the software industry is the lack of
common definitions for terms we use to describe aspects of our work”. Church [15]
enforces that computer game development is not an exception to this rule. He states that

game design, an activity which includes the definition and use of a common vocabulary,
is the least understood aspect of computer game creation, and that the primary inhibitor
of design evolution is the lack of a common design vocabulary, despite the fact that
understanding requires that designers be able to communicate precisely and effectively
with one another. In short, Church says, “we need a shared language of game design”.
This section, therefore, provides some definitions for computer game terms that
will be used throughout the tutorial. You may disagree with some of the definitions
presented here, but the idea is just to establish a consistent terminology.
• Entity: a game entity is the base unit of a design. It is any game object that can
react with anything else in any way. For instance, in an adventure game, every
inventory object, every item that the player can interact with, every non-player
character and the player himself are all entities. In a first-person hooter, any
missile fired is an entity, as is an exploding dustbin.
• Sprite: a sprite represents an animation that can be assigned to entities. It
contains information such as whether the animation will loop after finishing or
will just stop. Entities can have many different sprites. For example, the main
character entity may have a running sprite, a jumping sprite, and so on.
• Frame: the base unit for creating sprites, which are also defined as a “sequence
of frames”. Each frame contains information such as the image to be displayed
as well as the amount of time during which the frame will be displayed.
• Game loop: a game execution cycle, which is executed continuously during the
game flow. In each game cycle, input events are handled, game logic (such as
artificial intelligence, entity movement, etc.) is calculated and game graphics are
rendered.
• Text: in a narrower context, a “text” in a game is any textual information that
may be displayed and updated on the screen, such as the game score, for
example. A game text contains information about position, color, font to be used
and so on.
• Coordinate system: a convention for defining how the three axes (X, Y and Z)
of a game world behave, in order to define each point unambiguously in the
world. In this tutorial, as usual, X axis value increase from left to right and the Y
axis value increase from top to bottom. Z axis value is always considered to be
zero, for simplicity purposes.
4. Managed DirectX game development
4.1. DirectX overview
DirectX is a multimedia API that provides a standard interface to interact with graphics
and sound cards, input devices and more [9]. It contains a set of interfaces for creating
games and other high-performance multimedia applications, supporting two-
dimensional (2D) and three-dimensional (3D) graphics, sound effects and music, input
devices, and networked applications. Without this standard set of APIs you would have
to write different code for each combination of graphics and sound cards and for each
type of keyboard, mouse and joystick. DirectX abstracts us from the specific hardware
and translates a common set of instructions into the hardware specific commands.

Almost for 10 years, DirectX was only accessible to C/C++ programmers. It was
first introduced in Windows 95, setting a new standard API to allow game developers to
make the best games on Windows [16], without requiring them to switch out of
Windows and into DOS mode. It was called, therefore, the “Game SDK”. Subsequent
versions gradually enriched the DirectX feature set, adding support do 3D graphics,
force feedback, MMX, interactive and 3D audio, multi-texture, hardware accelerated
graphics (including transform & lighting), vertex and pixel shaders, and so on.
Nevertheless, only with the release of the first managed version (9.0, also called
“MDX”) of the API, in December 2002, it has been possible to use C# or VB.NET with
DirectX, as well as any other CLS compliant language. Today, DirectX 9 updates are
published as regularly (bi-monthly) releases for developers.
DirectX does require you to understand some specific terms and notations
(besides having a mathematics fundamentals background). The first of these terms that
you need to know are the DirectX namespaces.
After installing DirectX SDK from [2], browse to the folder
C:\WINDOWS\Microsoft.NET. You will find the Framework subfolder, which contains
assemblies2 corresponding to the .NET Framework class libraries, as well as a subfolder
named DirectX for Managed Code. Inside this last subfolder, you will find other
subfolders for each DirectX SDK version installed in your computer. Inside each
version subfolder, you will find .NET assemblies (DLLs) where DirectX types are
declared. The most important namespaces defined in such DLLs are presented below:
• Microsoft.DirectX: top-level DirectX namespace, containing common
classes as well as mathematical constructs such as vectors and matrices;
• Microsoft.DirectX.Direct3D: the most commonly used library,
containing classes and structures designed to help the creation and rendering
of 3D and 2D graphics;
• Microsoft.DirectX.Direct3DX: a set of “helper libraries”, with many
common functions used to create Direct3D applications;
• Microsoft.DirectX.DirectDraw: legacy namespace, which exists
mostly for backward-compatibility with older versions of DirectX (the
Direct3D namespace now contains the functionality previously exposed in
the DirectDraw namespace);
• Microsoft.DirectX.DirectInput: namespace where all input devices
(such as mouse and keyboard) are controlled and managed, including
support for force-feedback joysticks;
• Microsoft.DirectX.DirectPlay: networking API for multiplayer
games, also containing sub-namespaces with classes that support client-
server topology and voice communication features;
• Microsoft.DirectX.DirectSound: provides sound support, including
the ability to simulate 3D sound and effects, such as echo and reverb;
2 A .NET assembly is a DLL or executable file which contains compiled CLS-compliant language code.
Assemblies are ready to run under the common language runtime.

• Microsoft.DirectX.AudioVideoPlayback: provides support for
controlling audio and video playback, such as the playback of a DVD;
• Microsoft.DirectX.Diagnostics: used to programmatically
investigate the features of your environment, generally for troubleshooting;
• Microsoft.DirectX.Security: used for access security, providing
secure control over all input and output components of DirectX. Also
contains a Permission sub-namespace which lets the establishment of
security actions and policies.
4.2. Game engine development proposal
Instead of developing a game from scratch by using Managed DirectX, this tutorial will
go a step beyond and lead you through the creation of a simple game engine, which will
explore some of the most important DirectX namespaces. Simultaneously, this game
engine will be used to create a 2D top-down scrolling game, through which Managed
DirectX features will finally be seen on action.
The game engine that will be created throughout this tutorial is mostly based on
already existing, public available code [17], developed by the DigiPen Institute of
Technology. A complete series of webcasts that explain the creation of a game that
consumes the game engine was also created by DigiPen [18]. Therefore, you also can
refer to those resources for additional information.
The features to be supported by the game engine include:
• Creation and dynamic manipulation of game entities, including the
assignment of sprites and movement;
• Keyboard interaction;
• Sound effects support;
• Text manipulation.
It is beyond the scope of this tutorial to explain every line of code of the game
engine and the developed game, since we are focused on specific DirectX, C# and
VS.NET issues. However, the source code of this tutorial and other resources are
available on the web [19].
Roughly speaking, the game engine will consist of a parameterizable .NET
windows forms application. Nevertheless, it is worth noticing that there are many
differences between developing a regular windows application and a computer game
with DirectX. For example, in regular windows applications, Windows Forms API
controls such as textboxes and buttons would be added to the form. On the other hand,
the DirectX API is used to draw every element of games, rather than the Windows Form
API.
Regular windows applications are idle in the most of the time (unless a timer or
threads other than the main thread are active). Games, however, are always executing a
rendering loop to update the screen, usually many times per second (30 FPS, or frames
per second, are considered to be the lowest acceptable rate for games, otherwise
animation and entity movements will not be smooth). During the game loop, not only
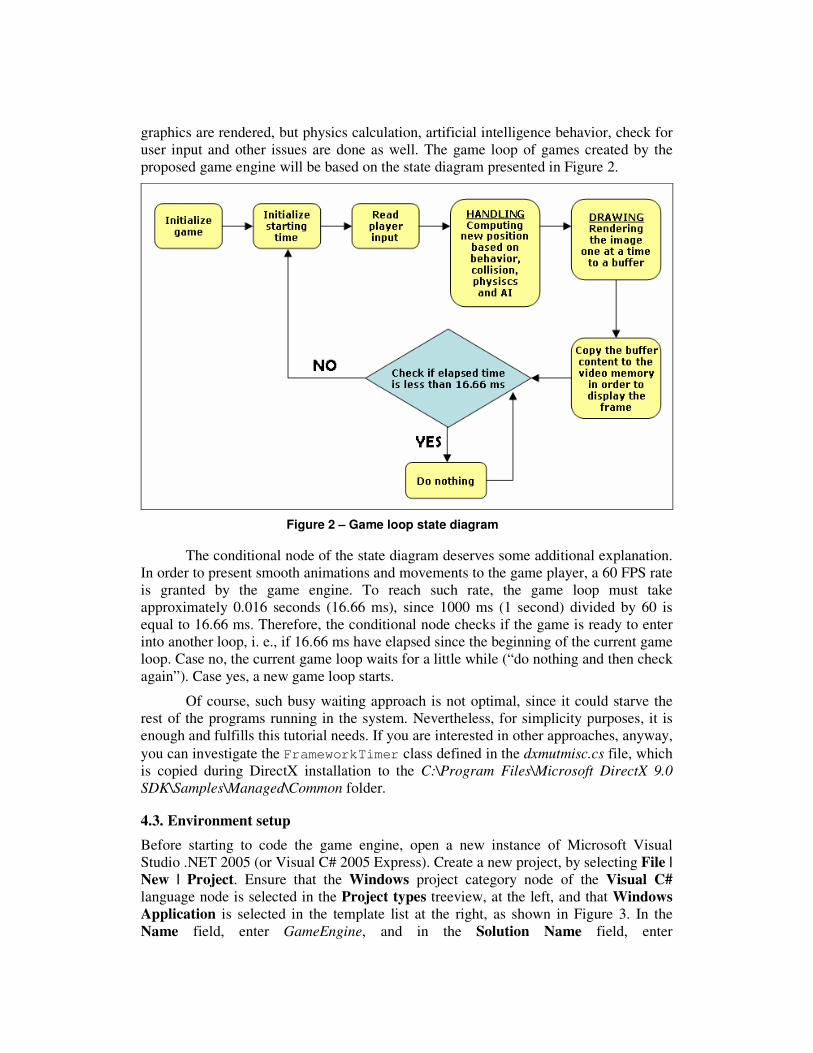
graphics are rendered, but physics calculation, artificial intelligence behavior, check for
user input and other issues are done as well. The game loop of games created by the
proposed game engine will be based on the state diagram presented in Figure 2.
Figure 2 – Game loop state diagram
The conditional node of the state diagram deserves some additional explanation.
In order to present smooth animations and movements to the game player, a 60 FPS rate
is granted by the game engine. To reach such rate, the game loop must take
approximately 0.016 seconds (16.66 ms), since 1000 ms (1 second) divided by 60 is
equal to 16.66 ms. Therefore, the conditional node checks if the game is ready to enter
into another loop, i. e., if 16.66 ms have elapsed since the beginning of the current game
loop. Case no, the current game loop waits for a little while (“do nothing and then check
again”). Case yes, a new game loop starts.
Of course, such busy waiting approach is not optimal, since it could starve the
rest of the programs running in the system. Nevertheless, for simplicity purposes, it is
enough and fulfills this tutorial needs. If you are interested in other approaches, anyway,
you can investigate the FrameworkTimer class defined in the dxmutmisc.cs file, which
is copied during DirectX installation to the C:\Program Files\Microsoft DirectX 9.0
SDK\Samples\Managed\Common folder.
4.3. Environment setup
Before starting to code the game engine, open a new instance of Microsoft Visual
Studio .NET 2005 (or Visual C# 2005 Express). Create a new project, by selecting File |
New | Project. Ensure that the Windows project category node of the Visual C#
language node is selected in the Project types treeview, at the left, and that Windows
Application is selected in the template list at the right, as shown in Figure 3. In the
Name field, enter GameEngine, and in the Solution Name field, enter

SBGamesTutorial. You can additionally specify a location for your new solution, in the
Location field. When you are done, press OK.
Figure 3 – Creating a new Windows Application project
Both solutions and projects are containers of items needed to develop
applications in VS.NET, such as files, folders, data connections and references, for
example. The difference between them is that the items contained in a solution are the
projects themselves, as well as items that are common to all projects, while a project
contains source-files (classes, forms, etc.) and knows how to compile them in order to
create an output, such as a dynamic library (DLL) or an executable file (EXE).
Since you have selected Windows Application for the project template type,
VS.NET creates a new Windows Application project, containing a single default form.
The created project (GameEngine), its default form (Form1.cs) and its encompassing
solution (SBGamesTutorial) can be seen in a tool window at the right, named Solution
Explorer, as shown in Figure 4.
Figure 4 – The Solution Explorer

The output type of a Windows Application project is an executable file, which
launches the main project form. Notice that GameEngine project is ready to be compiled
and run: just select the menu item Debug | Start Without Debugging or press CTRL-
F5. Nevertheless, nothing interesting happens: the empty, default form, pops up.
It is time for you to add some interesting, Managed DirectX code. But just
before that, one last environment configuration step is required, in order to make
DirectX namespaces available. Right-click in the References node in the Solution
Explorer, and then select Add Reference. A new dialog pops up, asking you which
.NET assemblies would you like to make available for your project. Select all DirectX
related assemblies, as shown in Figure 5, and click in OK. If you expand the
References node in the Solution Explorer, you will notice that the DirectX assemblies
are now referenced.
Figure 5 – Adding references to a project
It is worth noticing that assemblies and namespaces are not the same thing: one
.NET assembly can contain code belonging to many namespaces, and one namespace
can be defined in multiple .NET assemblies. Therefore, remember that the brand new
referenced assemblies are not exactly DirectX namespaces, but contain such
namespaces defined inside them. The namespaces still need to be imported, through the
using keyword, in order for you to be able to use the classes and other types defined
inside them. You will be instructed to do this later.
4.4. Graphics fundamentals
As previously mentioned, the game engine under development is a parameterizable
.NET windows application. It will contain only one form, but this form will be slightly
different from the default form provided by VS.NET (Form1.cs). In this subsection, you
will make some adjustments to the default form.
Select the Form1.cs form in the Solution Explorer then press F2 to rename it.
Enter GameWindow.cs as its new name. VS.NET will ask if you would like also to

perform a rename of all references to the code element Form1 to the new name. Select
Yes. All Form1 references in code, as well as the file name, are updated.
Now you should add a class named Game to your project. It will be the heart of
your game engine (by creating classes that inherit from the Game class, game
programmers will be able to specify a complete game). Right-click the GameEngine
project node in Solution Explorer and then in Add | Class. Write Game in the Name
field and then click in OK. The Solution Explorer is updated to reflect the addition of
the new class. Double click in the new Game node item in the treeview to see its code.
The first thing you should to with the Game class is to provide a public access to
it. Otherwise, it may be impossible for other classes, especially those belonging to other
projects, to inherit from it. Hence, add the public access modifier before the class
declaration. Besides that, since the Game class will allocate a lot of resources (such as
sound and sprites), it is interesting to make it implement the IDisposable interface,
which defines a Dispose method where you can provide code for properly cleaning up
such resources. The following code shows how your Game class should look like so far:
namespace GameEngine : IDisposable {
public class Game {
public void Dispose() {
// clean up code goes here in the future!
}
}
}
The Game class will take care of game graphics initialization and manipulation,
among other responsibilities. Hence, it must contain a reference to the window where
the game will be played. You can do this by adding the following static field to the
Game class:
static GameWindow m_GameWindow;
The Game class should also know the screen resolution, which can be specified
by using the System.Drawing.Size struct:
static Size m_Resolution = new Size(640, 480);
You should not forget to import the System.Drawing namespace at the
beginning of the Game.cs file, otherwise you will get compiling errors when referring to
the Size struct:
using System.Drawing;
The next step is to understand the concept of DirectX adapters and devices.
Each graphics card in a computer has an adapter. You can think of this as the physical
video card in your computer. In DirectX, each adapter has an identifier (0 for the default
adapter, 1 for the second one and so on). Notice that since you can have multiple
monitors connected in your computer, you can deal with many adapters in the same
DirectX application.

A graphics device represents a connection to a specific adapter. Each adapter
can have multiple devices, and each device is one of three different types: Hardware,
Software or Reference. In this tutorial and in the majority of cases, we will only be
interested in the Hardware device type, since it provides direct access to hardware
acceleration features and the resultant increase of speed, although it requires a 3D
acceleration board.
Graphics devices in DirectX are implemented by the Device class of the
Direct3D namespace. Therefore, you need firstly to import the Direct3D namespace
in order to add a new graphics device to your Game class. One remark here is that since
the DirectInput and DirectSound namespaces also contain their own Device
classes, it is interesting to use an alias for the Direct3D.Device class, in order to
avoid future name clashing. The using keyword can also be used to create aliases, as
shown below:
using Microsoft.DirectX.Direct3D;
using DGDevice = Microsoft.DirectX.Direct3D.Device;
Now you can add the declaration of a static DGDevice (the created alias for
Direct3D.Device) field in your Game class:
static DGDevice dGDevice;
You may have noticed that the declaration of a device does not indicate the type
of the device (Hardware, Software or Reference). In fact, this is done when the device is
instantiated. Add the following method to the Game class, in order to do this as well as
to perform additional graphics configuration:
static void InitializeGraphics() {
PresentParameters presentParams = new PresentParameters();
presentParams.Windowed = true;
presentParams.SwapEffect = SwapEffect.Discard;
dGDevice = new DGDevice(0,DeviceType.Hardware,
m_GameWindow, CreateFlags.SoftwareVertexProcessing,
presentParams);
}
The PresentParams class is a Direct3D class used to specify presentation
parameters for the device, through which the programmer can define many low-level
details about the device being created. In the above code, for example, we are
specifying that the application will run in a window and that the back buffers content is
not preserved in the buffer swap operation. Finally, the graphics device is instantiated,
receiving as parameter the adapter number (0 in our case, since we are dealing with the
default adapter), its type (Hardware), the window to be rendered, some behavior flags
(which in our case tells DirectX that all vertex calculations will be made by software,
which is a slowest but always available option) and the presentation parameters.
The next step is to create an initialization function in the Game class, which will
instantiate the game window, provide some initial configuration to it and initialize the
game graphics:

static void Initialize() {
m_GameWindow = new GameWindow();
m_GameWindow.ClientSize = m_Resolution;
InitializeGraphics();
m_GameWindow.Show();
}
We are almost ready to see how these changes will reflect in the game window.
Just before that, it is necessary to implement the game loop logic, as presented in Figure
2. You may notice that the fifth step in our game loop renders the game images,
including entities and the background. You should, therefore, create this rendering
method, that will called by the game loop. However, since we still do not have anything
to render at all, we will only request our graphics device to paint the background with
the black color and then we are done.
public static void Render() {
dGDevice.Clear(ClearFlags.Target, Color.Black, 1.0f, 0);
dGDevice.Present();
}
The second parameter of the Direct3D.Device.Clear method refers to the
color to be used (Color is a struct defined in the System.Drawing namespace, which
contains the Black property that can be called to retrieve the black color). The first and
the last two parameters are related to drawing buffers (depth, stencil and target buffers)
and can be ignored by now. The Present method is used to effectively show what was
drawn by the device.
The initial version of the game loop is ready to be implemented. It can be
defined in the Run method of the Game class, as shown below:
public void Run() {
Initialize();
while (true) { // game loop starts
Application.DoEvents();
Render();
// while elapsed time is less than 16.66 ms, do nothing
} // game loop ends
}
The previous code is a typical implementation of the game flow: after some
game initialization is performed, the game loop starts. It requests the game graphics to
be rendered, and calls the Application.DoEvents method, which will require you to
import the System.Windows.Forms namespace. Calling this method is necessary to
process all Windows messages (minimize, maximize, mouse hover, etc.) currently in the
message queue. If it is not included in the game loop, your game will become unstable,
since the game loop will never give a chance for the game to process Windows
messages. Finally, until the elapsed time of the current game loop is higher than 16.66

milliseconds, the game loop busy waits. You can implement this time check in many
different ways, such as by using the System.Diagnostics.Stopwatch class, which
contains methods and properties that you can use to accurately measure elapsed time.
If you compile and run your code right now, you will notice that nothing
different than the first execution will happen: the same empty gray form will be
displayed. This happens because there is no code calling the game execution flow! So it
is time for you to create a game that will consume the game engine developed so far,
(although the game engine does not offer any feature other than a blank screen).
Following DigiPen Institute’s suggestion, this game will be called “Star Trooper”.
Add a new Windows Application project named StarTrooperGame, by right-
clicking the SBGamesTutorial item in the Solution Explorer and then in Add | New
Project. By using the Solution Explorer, delete the Form1.cs form from the
StarTrooperGame project (you will not need it). Then, add a reference to the
GameEngine project, by right-clicking the References node item just below the
StarTrooperGame project node item in the Solution Explorer and then in Add
References. In the Add Reference dialog, select the Projects tab and the GameEngine
project, as shown in Figure 6. Press OK and the reference will be added.
Figure 6 – Adding a project reference
Now add a new class to the StarTrooperGame project (the class will also be
named StarTrooperGame). Make it inherits from the Game class (you will need to
import the GameEngine namespace). The resulting modifications in the
StarTrooperGame class code are shown below:
using GameEngine;
namespace StarTrooperGame {
class StarTrooperGame : Game {
}
}

Finally, modify the Main method of the Program class in order to create a new
instance of the StarTrooperGame and run it. Your code should look like similar the
following one:
static void Main() {
using (StarTrooperGame game = new StarTrooperGame()) {
game.Run();
}
}
In the above code, the using keyword is not used to import namespaces, but to
define a block where an object that implements the IDisposable interface is
initialized (game, in the example) and, when the block ends, the Dispose method is
called on such object. The using block is, in fact, a shortcut to properly allocate and
release objects that complies with the IDisposable interface.
Set the StarTrooperGame project as the startup project of the SBGamesTutorial
solution, by right-clicking it in the Solution Explorer and selecting Set as StartUp
Project. The name of the project item in the Solution Explorer will now become bold,
and when you request the solution to run (CTRL+F5), the output of this project will be
the one executed. Then you will be able to finally see your first DirectX game running
(if a blank screen can be called a “game” at all), as shown in Figure 7. While this is not
very impressive and it seems like a lot of code to get a simple blank screen, it shows
that we have successfully integrated DirectX into our game engine.
Figure 7 – Hello World game: a blank screen
If you close the game window, you will notice that an uncaught exception is
raised to the game player. This happens because even after the window is closed, the
game loop is still running, but some resources requested by it were already killed when
the game window was closed.
A solution to make your game exit gracefully consists of not letting the window
to be closed instantaneously. The game must exit from the game loop before, naturally
ending the game execution flow and finishing the application. To achieve this, three
steps are required. First of all, add a bool static field to the Game class, which will
control the game loop:
static bool m_Running = true;
Now change the game loop condition: instead of always being true, the
condition now is based on the newly created boolean field.
public void Run() {
Initialize();
while (m_Running) {...}
}
}
The next step is to add a Quit method to the Game class, which will just set the
boolean game loop condition variable to false:
public static void Quit() {
m_Running = false;
}
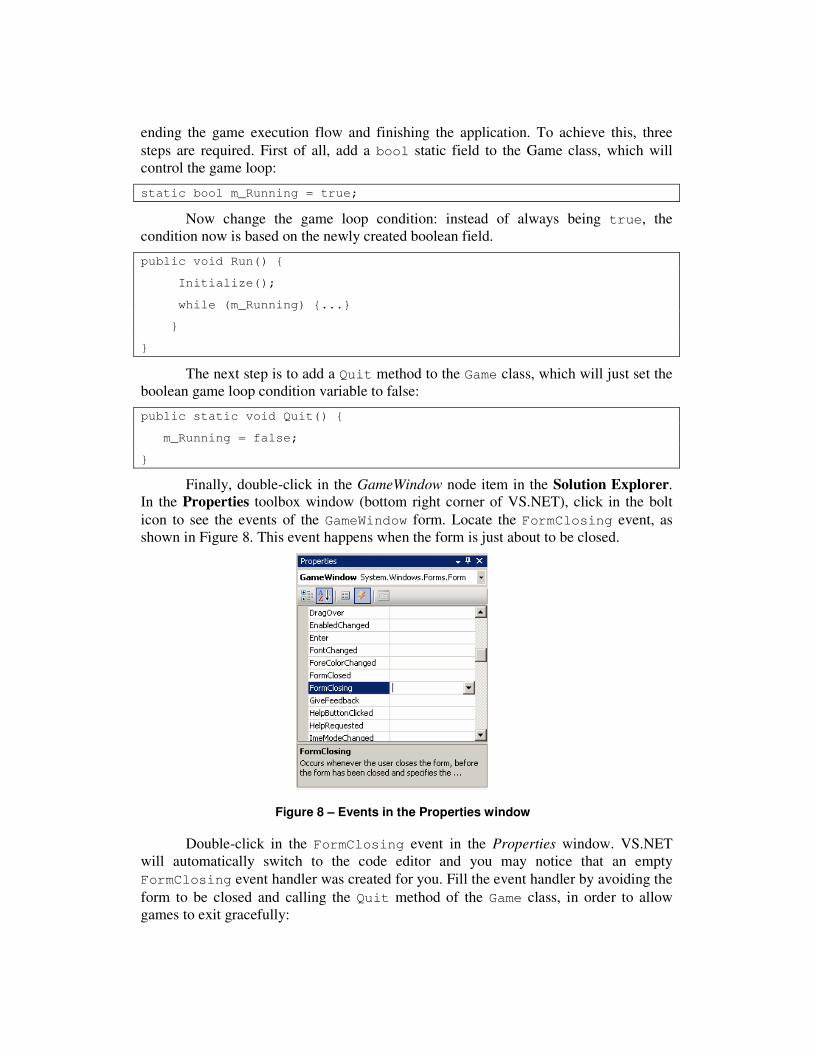
Finally, double-click in the GameWindow node item in the Solution Explorer.
In the Properties toolbox window (bottom right corner of VS.NET), click in the bolt
icon to see the events of the GameWindow form. Locate the FormClosing event, as
shown in Figure 8. This event happens when the form is just about to be closed.
Figure 8 – Events in the Properties window
Double-click in the FormClosing event in the Properties window. VS.NET
will automatically switch to the code editor and you may notice that an empty
FormClosing event handler was created for you. Fill the event handler by avoiding the
form to be closed and calling the Quit method of the Game class, in order to allow
games to exit gracefully:

private void GameWindow_FormClosing (object sender,
FormClosingEventArgs e) {
e.Cancel = true;
Game.Quit();
}
4.5. Sprites and entities
In order to create game entities and animated sprites for them, you should add a static
string field to the Game class first, corresponding to the file system path where picture
resources will be stored, as shown in the code below. The
Application.StartupPath property retrieves the path for the executable file that
started the application, not including the executable name.
static string m_PicturesPath = Application.StartupPath;
You can create get/set accessors for this field, by right-clicking in the
m_PicturesPath declaration and selecting Refactor | Encapsulate Field. In the
Encapsulate Field dialog, specify PicturesPath in the Property name field, as shown
in Figure 9.
Figure 9 – Encapsulating a field
Press OK and VS.NET will automatically generate the accessors for you, as
shown below. Following the same procedure, encapsulate the dGDevice field with a
property called DGDevice.
public static string PicturesPath {
get { return Game.m_PicturesPath; }
set { Game.m_PicturesPath = value; }
}
Now add to the GameEngine project a class named Picture, which will
represent an image. This class should contain information about the width and height of
the picture, as well as a Direct3D.Texture field. A texture is simply a 2D bitmap
that can be applied to a 2D or 3D object to provide it with some type of look (texture)
such as grass, concrete, etc. The code for the Picture class is partially shown below:

public class Picture: IDisposable {
private Texture m_Texture;
private int m_Width;
private int m_Height;
public Picture(string fileName, Color colorKey) {
ImageInformation imageInformation =
TextureLoader.ImageInformationFromFile(Game.PicturesPath
+ fileName);
m_Width = imageInformation.Width;
m_Height = imageInformation.Height;
m_Texture = TextureLoader.FromFile(Game.DGDevice,
Game.PicturesPath + filename, 0, 0, 1,
Usage.None, Format.Unknown, Pool.Managed,
Filter.None, Filter.None, colorKey.ToArgb());
}
// dispose code and properties to encapsulate fields
}
A Picture object is built by receiving an image file name and a transparent
color as parameters. The Direct3D.ImageInformation class contains a description
of the original contents of an image file and is used to find the width and height of the
picture. Finally, the Direct3D.TextureLoader class contains methods to load and
save textures.
Once the Picture class is defined, you should now implement the
programming logic for sprites and sprite frames. Add a new class named Sprite to the
GameEngine project. Just before the definition of the Sprite class, define the Frame
struct, which will contain only two fields: its picture and the amount of time during
which it will be displayed (also called “delay”):
public struct Frame {
Picture m_Picture;
int m_Delay;
public Frame(Picture picture, int delay) {
m_Picture = picture;
m_Delay = delay;
}
}
Now you are ready to implement the Sprite class, which will contain a list of
frames (List<Frames>). It will also contain boolean fields to identify if the animation
is playing, has stopped or paused, as well as another boolean field to determine if the
animation will loop, i. e., start over again after it has finished.

Since the implementation of the Sprite class does not require any special
DirectX or C# skills, it will not be presented in this tutorial. Basically, you will only
need to use programming logic to implement an Update method that will subtract the
delay counter of the current displayed frame and change to the next frame if the counter
reaches zero. The Update method of a sprite will be called by the game engine in every
game loop. Therefore, the Play method of the Sprite class actually does not really
animate anything. Together with the Pause and Stop methods, the Play method is
responsible for setting the appropriate boolean variables which indicate the animation
state and are tested by the Update method.
The next step is to add an Entity class to the game engine. It will be used to
model game objects, which have specific behavior and interact one with each other. The
Entity class will contain a list of sprites, as well as a System.Drawing.PointF
corresponding to its position on the screen and an index to tell which sprite from the
sprite collection is in use (initially, the first one of the list, which has index zero).
List<Sprite> m_Sprites = new List<Sprite>();
PointF m_Position;
int m_CurrentSpriteIndex = 0;
Now you should implement a method that will render the current frame of the
current entity sprite on the screen. The Direct3D.Sprite class can be used to help
you in this task. Since Sprite is a name already used by our game engine, create an
alias for the Direct3D.Sprite class in the Game class, as shown below:
using D3DSprite = Microsoft.DirectX.Direct3D.Sprite;
Declare a new D3DSprite field in the Game class and encapsulate it by using a
property also named D3DSprite:
static D3DSprite DXSprite;
public static D3DSprite D3DSprite {
get { return DXSprite; }
}
In the last line of the InitializeGraphics method of the Game class,
instantiate the Direct3D.Sprite field, by passing the game graphics device as
parameter:
DXSprite = new D3DSprite(Game.DGDevice);
The Direct3D.Sprite method in which we will be most interested is the
Draw2D method, which draws a texture in a specified screen position, rotation angle and
rotation center. However, instead of calculating where every point of a texture or a
primitive (such as a triangle shape) should go after a rotation, translation or scaling, you
can use transformation matrices to let DirectX do the hard job for you.
In a nutshell, matrices are mathematical structures which contain some
properties that help the manipulation of points in the 2D and 3D space, by converting
the world coordinates to screen coordinates. Instead of calculating the position of every
point to perform a rotation, translation or scaling operation, you can use the
Microsoft.DirectX.Matrix class methods (such as Translation, Scaling, etc.)
to create a transformation matrix and assign it to the world matrix of you graphics
device (which can be retrieved through Game.DGDevice.Transform.World). After
that, you will be able to draw every texture or primitive on the screen as if you were on
the coordinate system origin, but, in fact, the already transformed world matrix will
make rotated/scaled/translated results to be presented. By using transformation matrices,
for example, you can turn the screen upside down with a single line of code [20],
exactly as happens in the game Prince of Persia when the main character drinks a
special potion.
To start dealing with matrices, add a new Matrix field to the Entity class and
initialize it (by setting it to the identity matrix):
Matrix m_LocalMatrix = Matrix.Identity;
Now create a new method named InternalUpdate, which will perform a
translation operation on the previously defined matrix according to the entity position:
public void InternalUpdate() {
Matrix trans = Matrix.Translation(m_Position.X, m_Position.Y, 0);
m_LocalMatrix = trans;
}
Additionally, add an empty virtual Update method, in order to allow game
developers to provide their own entity behavior by overriding this method later. We will
check in a while how the game engine will call this method for each game entity.
Finally, implement the Render method, which will use the Draw2D method of the
Direct3D.Sprite class.
public void Render() {
Game.D3DSprite.Begin(SpriteFlags.AlphaBlend);
Game.DGDevice.Transform.World = m_LocalMatrix;
Game.D3DSprite.Draw2D(
m_sprites[m_CurrentSpriteIndex].CurrentPicture.Texture,
new Point(0, 0), 0, new Point(0, 0),
Color.FromArgb(255, 255, 255, 255));
Game.D3DSprite.End();
}
All drawing must be done between the Begin and End methods of the
Direct3D.Sprite class. The SpriteFlags.AlphaBlend parameter received by
the Begin method is used to ensure that transparent colors will be handled properly.
Finally, notice that the world matrix of our graphics device is just updated before the
drawing.
A few adjustments need to be done in the Game class before we can finally add
and test an entity in the StarTrooper game. Similarly to the Entity class, add an empty
virtual method named Update, as well as another empty virtual method named
InitializeResources, which developers will be able to override later. Next, you

should add a list of entities to the Game class, as well as methods to add and remove
entities from the game. You should also create a InternalUpdate method for the
Game class as well, which will call the InternalUpdate and Update methods of each
one of the game entities, as well as the Update method of the Game class (which is
currently empty but can be overridden by a game programmer). Finally, change the
Render code of the Game class in order to render each one of the sprites, noticing that
every drawing must happen inside the BeginScene and EndScene methods of the
graphics device:
public static void Render() {
dGDevice.Clear(ClearFlags.Target, Color.Black, 1.0f, 0);
dGDevice.BeginScene();
foreach (Entity e in m_Entities) {
e.Render();
}
dGDevice.EndScene();
dGDevice.Present();
}
One last step is to change the Run method of the Game class in order to call the
InitializeResources method (which is currently empty but can be overridden by a
game programmer) just after the Initialize method call. A call to the
InternalUpdate method must also be included inside the game loop, just before the
call to the Render method.
Now it is time to test all of the game engine code developed in this subsection.
Add to the StarTrooperGame project a new class named Trooper. This class represents
the main character of the game. It should inherit from the Entity class.
Back to the StarTrooperGame class, override the InitializeResources
method. In this method, you should instantiate pictures, frames, sprites and, finally, the
trooper entity, as exemplified by the following code:
public override void InitializeResources() {
Picture trooper01 = new Picture("trooper01.bmp",
Color.FromArgb(0, 255, 0));
Picture trooper02 = new Picture("trooper02.bmp",
Color.FromArgb(0, 255, 0));
Frame afTrooper01 = new Frame(trooper01, 5);
Frame afTrooper02 = new Frame(trooper02, 5);
Sprite trooperSprite = new Sprite();
trooperSprite.Add(afTrooper01);
trooperSprite.Add(afTrooper02);
Trooper trooper = new Trooper();
trooper.Add(trooperSprite);

trooper.Position = new Point(320, 400);
Game.Add(trooper);
}
The code uses the green color (0, 255, 0) as the transparent color of the trooper
pictures. Image samples are illustrated in Figure 10.
Figure 10 – Trooper bitmaps
Although the background of a game is a concept different from game entities, it
is possible to use the code implemented so far to add a scrolling background to the
StarTrooper game. You will only need to add a new class named Background to your
StarTrooperGame project, make it inherits from the Entity class and add similar
initialization code as you did for the trooper. However, you will have to deal with some
additional concerns: two instances of the background class must be added to the game:
while one is leaving the screen, the other is entering. Besides that, you must override the
Update function in the Background class to increment the Y coordinate of the
background, in order to make it scroll each game turn, and reset its position after it is
not visible anymore. The final result is illustrated in Figure 11.
public override void Update() {
PointF position = Position;
position.Y++;
if (position.Y == 480)
position.Y = -480; // picture bottom is now on top of screen
Position = position;
}
4.6. Input handling
Once the trooper is displayed on the screen, you will now implement some code to
control it by using the keyboard. You will use the classes and other types defined in the
Microsoft.DirectX.DirectInput namespace to accomplish this task.
First of all, you will need to declare and initialize a DirectInput.Device in
the Game class. Start by importing the DirectInput namespace and creating an alias
to the DirectInput.Device class, named DIDevice, similarly as you did with the
Direct3D.Device class.
using Microsoft.DirectX.DirectInput;
using DIDevice = Microsoft.DirectX.DirectInput.Device;

Figure 11 – Entity and rolling background
The next step is to declare a DIDevice static field to the game class and
encapsulate it, thus generating the following code:
static DIDevice dIDevice;
public static DIDevice DIDevice {
get { return dIDevice; }
}
The same way you created an InitializeGraphics method to initialize the
graphics of your application, you will need to create a similar function to initialize the
input, as shown below. Do not forget to add a call to this function in the Initialize
method of the Game class.
static void InitializeInput() {
dIDevice = new DIDevice(SystemGuid.Keyboard);
dIDevice.SetCooperativeLevel(m_GameWindow,
CooperativeLevelFlags.Background |
CooperativeLevelFlags.NonExclusive);
dIDevice.Acquire();
}
To make your DirectInput device connect to a keyboard, you should pass the
SystemGuid.Keyboard enumeration value to the constructor of your device. Then
you will need to set the cooperation level of the device regarding a specific window.
This is done through the CooperativeLevelFlags enumeration. By combining the
Background and NonExclusive values, we allow other applications maximum

control over the keyboard device. Finally, the last step is to actually acquire the device.
You can think of this like opening a communications channel to it.
Add now a Keyboard class to the GameEngine project. This class will contain
functionality to help game programmers to define entity and overall game behavior
according to the keyboard input. Inside this class, define a KeyState structure,
containing three possible keyboard states (Pressed, Released and StillDown). Add
also an array of KeyStates to the Keyboard class, which will store state information
for each one of the 256 keyboard keys.
struct KeyState {
public bool StillDown;
public bool Pressed;
public bool Released;
};
static KeyState[] m_KeyStates = new KeyState[256];
Finally, you need to implement the programming logic that will set the correct
key state for each keyboard key. DirectX helps you by providing the GetPressedKeys
method of the DirectInput.Device class, which returns a collection of
DirectInput.Key objects containing all keys that are in fact down (pressed or
“remaining pressed” by the user). The complete code for this programming logic,
implemented in the Update method, is shown below. Do not forget to add a call for
such method in the game loop (Run method of the Game class).
public static void Update() {
for(int i = 0; i < 256; i++)
m_KeyStates[i].StillDown = false;
foreach(Key key in Game.DIDevice.GetPressedKeys())
m_KeyStates[(int)key].StillDown = true;
for (int i = 0; i < 256; i++) {
if (m_KeyStates[i].StillDown) {
if (m_KeyStates[i].Released)
m_KeyStates[i].Pressed = false;
else {
m_KeyStates[i].Released = true;
m_KeyStates[i].Pressed = true;
}
} else {
m_KeyStates[i].Released = false;
m_KeyStates[i].Pressed = false;
}
}
}

Now it is time to test the game engine keyboard input support. By moving the
arrow keys, we will allow the player to control the speed and direction of our trooper.
Therefore, you should add a field to the Entity class in order to represent its vertical
and horizontal speed (the DirectX.Vector2 class is a good choice) and encapsulate it
with a property named Velicity. Then, perform some position updating code in the
InternalUpdate method, as illustrated by the code bellow:
m_Position.X += m_Velocity.X;
m_Position.Y += m_Velocity.Y;
Back to the Trooper class, override the Update method to provide some
keyboard input handling, such as shown below. Then compile and run the application;
you will be able to control the trooper by using the arrow keys of your keyboard.
public override void Update() {
int vx = 0, vy = 0;
if (GameEngine.Keyboard.IsStillDown(Key.UpArrow))
vy = -2;
if (GameEngine.Keyboard.IsStillDown(Key.DownArrow))
vy = 2;
if (GameEngine.Keyboard.IsStillDown(Key.LeftArrow))
vx = -2;
if (GameEngine.Keyboard.IsStillDown(Key.RightArrow))
vx = 2;
this.Velocity = new Vector2(vx, vy);
}
An interesting next step to consolidate the skills acquired by implementing
graphics and input support is the task of adding a new FireBall entity to the
StarTrooperGame project, and also implement code that adds an instance of such entity
to the game each time the spacebar is pressed. Since all required knowledge to
implement such task was already covered by this tutorial, and also due to space
constraints, the task will be left as an exercise to the reader.
4.7. Sound effects
To enable sound effects in the game engine, you should use the classes and other types
defined in the DirectX.DirectSound namespace. As usual, this namespace also
contains the definition of a Device class, which is used to connect to audio devices.
Therefore, import this namespace in the Game class and create an alias for the
DirectSound.Device class, named DSDevice:
using Microsoft.DirectX.DirectSound;
using DSDevice = Microsoft.DirectX.DirectSound.Device;
The next step is to declare a DSDevice static field to the game class and
encapsulate it, thus generating the following code:
static DSDevice dsDevice;
public static DSDevice DSDevice {
get { return dsDevice; }
}
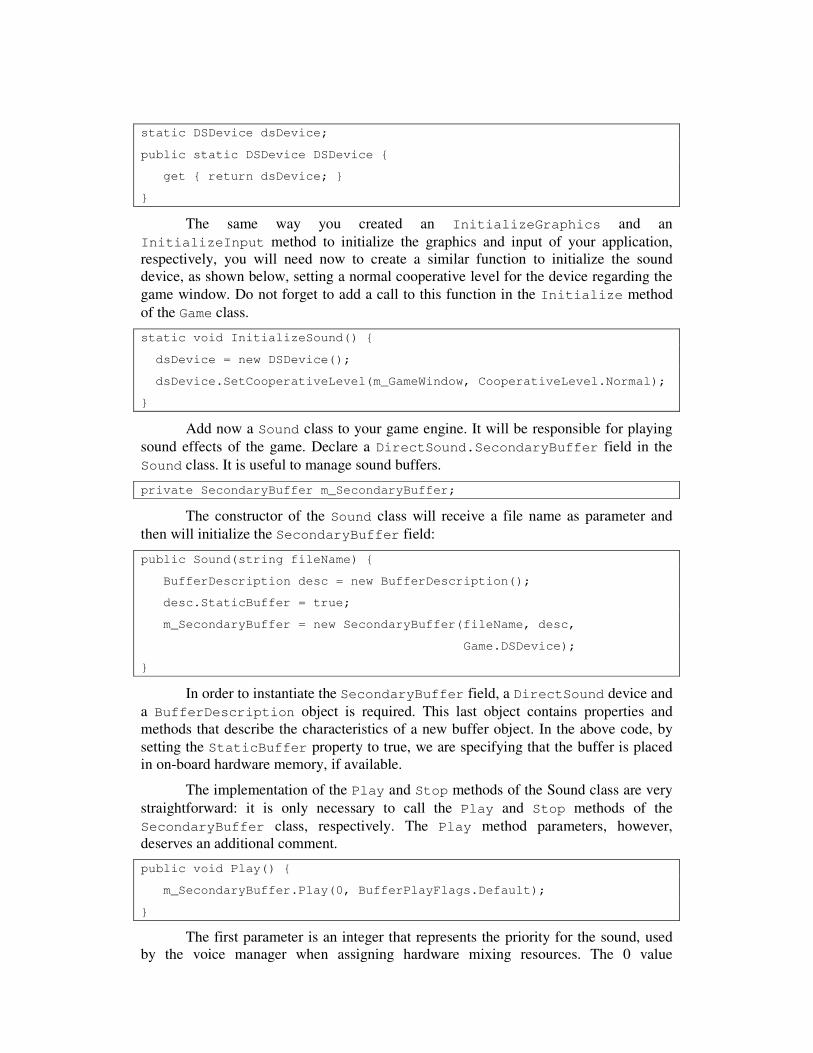
The same way you created an InitializeGraphics and an
InitializeInput method to initialize the graphics and input of your application,
respectively, you will need now to create a similar function to initialize the sound
device, as shown below, setting a normal cooperative level for the device regarding the
game window. Do not forget to add a call to this function in the Initialize method
of the Game class.
static void InitializeSound() {
dsDevice = new DSDevice();
dsDevice.SetCooperativeLevel(m_GameWindow, CooperativeLevel.Normal);
}
Add now a Sound class to your game engine. It will be responsible for playing
sound effects of the game. Declare a DirectSound.SecondaryBuffer field in the
Sound class. It is useful to manage sound buffers.
private SecondaryBuffer m_SecondaryBuffer;
The constructor of the Sound class will receive a file name as parameter and
then will initialize the SecondaryBuffer field:
public Sound(string fileName) {
BufferDescription desc = new BufferDescription();
desc.StaticBuffer = true;
m_SecondaryBuffer = new SecondaryBuffer(fileName, desc,
Game.DSDevice);
}
In order to instantiate the SecondaryBuffer field, a DirectSound device and
a BufferDescription object is required. This last object contains properties and
methods that describe the characteristics of a new buffer object. In the above code, by
setting the StaticBuffer property to true, we are specifying that the buffer is placed
in on-board hardware memory, if available.
The implementation of the Play and Stop methods of the Sound class are very
straightforward: it is only necessary to call the Play and Stop methods of the
SecondaryBuffer class, respectively. The Play method parameters, however,
deserves an additional comment.
public void Play() {
m_SecondaryBuffer.Play(0, BufferPlayFlags.Default);
}
The first parameter is an integer that represents the priority for the sound, used
by the voice manager when assigning hardware mixing resources. The 0 value

corresponds to the lowest priority. The second parameter, a BufferPlayFlags
enumeration value, is used to provide additional settings to the sound which will be
played, such as if the sound execution will loop. In the above code, the default DirectX
settings are used.
To test sound support, the first step is to add a Sound field to the
StarTrooperGame class:
public static Sound Shoot = new Sound("c:\\temp\\Shoot.wav");
Then instantiate it in the InitializeResources of the StarTrooperGame
class, passing the path for a sound file as parameter.
Shoot = new Sound("c:\\temp\\Shoot.wav");
Finally, write code to play the sound when the spacebar is pressed, as illustrated
by the following piece of code (which belongs to the Update method of the Trooper
class):
if (GameEngine.Keyboard.IsPressed(Key.Space)) {
// code to create a fire ball
StarTrooperGame.Shoot.Play();
}
Compile and run your application. Now you will hear sound when the spacebar
is pressed.
4.8. Text support
Since you are using DirectX to render your window, it is not possible for you to use the
Windows Forms API to design the user interface. Therefore, you should use an API
compliant to DirectX or to create your own interface.
Writing text in games is a basic, but essential task to create enriched user
interface elements (such as the game score, for example). In our game, we will create
code to write the number of times the spacebar was pressed.
You must add two classes to the GameEngine project in order to provide text
support. The first one will be the Font class, which will contain a Direct3D.Font
field. You may ask why are we implementing our own Font class, since DirectX
already has its own Font class definition. The idea here is to make things simpler to the
game programmer, avoiding him to have to deal with graphics devices and other
DirectX stuff.
In order to create a Direct3D.Font object, it is necessary to specify a
System.Drawing.Font. With so many Font classes being used, we would better
avoid name clashing by creating aliases for each class:
using D3DFont = Microsoft.DirectX.Direct3D.Font;
using GDIFont = System.Drawing.Font;
Our font class will receive a font name (or “face”), a font size and a font style
(italic, bold, regular, etc.) as parameters for its constructor, then it will instantiate its

Direct3D.Font field by using a System.Drawing.Font object and the graphics
device:
public Font(string face, float size, FontStyle fontStyle) {
GDIFont gdiFont = new GDIFont(typeFace, size, fontStyle);
m_Font = new D3DFont(Game.DGDevice, gdiFont);
}
}
To draw some text on the screen, our Font class will call the DrawText method
of the Direct3D.Font object. The first parameter is a Direct3D.Sprite object,
which can be null (DirectX will use its default sprite object to draw the text). The other
parameters refer to the position where the text will be drawn and the color to be used.
public void Draw(string text, int x, int y, Color color) {
m_Font.DrawText(null, text, x, y, color);
}
Now add a class called Text2D to the GameEngine project. This class
represents “textual entities” of the game. It will contain a Font object as a field, as well
as information regarding the text to be drawn (a string), its color, position and
visibility. Its Render method will call the Draw method of the Font class defined
above.
public void Render() {
if(m_Visible)
m_Font.Draw(m_Text, m_Position.X, m_Position.Y, m_Color);
}
Since a Text2D object can be updated during the game execution (new text,
position or color, for example), you should create a virtual Update method to allow the
game programmer to define the updating behavior.
The last step for providing text support is to create a method, in the Game class,
to allow programmers to add Text2D objects to the game. Finally, you should add a call
to the Render and Update methods of each Text2D game objects, in the Render and
InternalUpdate methods of the Game class, respectively.
To test the game engine text support, go back to the InitializeResources
method of the StarTrooper class and add the following code:
GameEngine.Font font =
new GameEngine.Font("Arial", 32.0f, FontStyle.Regular);
Text2D Shots = new Text2D(font);
Shots.Text = "Shots: 0";
Shots.Position = new Point(0, 0);
Shots.Color = Color.Red;
Game.Add(Shots);

If you compile and run the application, the game will show to you the newly
added text, as illustrated in Figure 12. It is up to you now to update the text according to
the number of times that the space bar is pressed, by changing the Update method of
the Trooper class.
Figure 12 – Text added to the top left corner of the game
4.9. Enhancing your game
There are many different ways in which you can enhance your game from here. You can
add some enemies that periodically fall from the top to search the trooper, as well as
implement collision detection to make them explode when reached by a fireball. You
could also add a score Text2D object to your game, and increment it after enemies are
hit (or decrement if the trooper is hit). Finally, you could use the .NET Framework class
library together with VS.NET to embed picture and sound resources into your
application, in order to avoid the dependence of paths in the file system. None of these
tasks require C# or DirectX programming skills other than the ones presented so far.
On the other hand, other improvements do require more DirectX background.
You could use DirectPlay to add network connectivity support to the game engine, for
example. Or you could be more ambitious and provide 3D support as well, by using
more advanced Direct3D features, such as meshes, lighting, shaders and so on.
Nevertheless, these more advanced concepts are beyond the scope of this tutorial.
5. GDI+ Game Development
Of course, DirectX is not the unique choice for creating games in the .NET Platform. If
you need to develop very simple games, such as board games that do not require
complex animations, or perhaps only to validate a game idea, you can use GDI+, the
.NET Framework class-based API for 2D graphics, imaging and typography. Keep in
mind, however, that GDI+ is definitively not a choice for creating professional games,
not only because of it limited features when compared to DirectX, but also due to its
limited performance.

GDI stands for Graphic Device Interface. It is a Windows standard for
representing graphical objects and transmitting them to output devices, such as monitors
and printers [22]. GDI+ is the evolution of GDI, presenting some substantial
improvements over the old API. Some of its advantages over DirectX are its simplicity
and the possibility to use it in conjunction with the Windows Forms API to draw the
user interface. GDI+ resides in System.Drawing.dll assembly. All GDI+ classes are
reside in the System.Drawing, System.Text, System.Printing,
System.Internal, System.Imaging, System.Drawing2D and System.Design
namespaces.
When using GDI+, the very first step is always to create (or obtain) a Graphics
object. The Graphics class helps programmers to perform graphics operations, by
providing methods for drawing in a specific device context. You can attain a Graphics
object in different ways, according to your needs. In this tutorial, we are going to obtain
a Graphics object from the arguments of the Paint event of a form, but keep in mind
that you can also create a Graphics object from a window handle, an image or from a
specific handle to a device context.
Due to space constraints, this tutorial is not going to use GDI+ to create a game
engine, neither a subset of a complete game as done with DirectX. It will be restricted to
show some basic, but enlightening GDI+ applications.
Add a new Windows Application project named GDIPlus to your
SBGamesTutorial solution in VS.NET and make it the startup project. Click once in the
default form created by VS.NET and, in the Properties toolbox window (Figure 8),
double click the Paint event. VS.NET will switch to the code editor and will create an
empty method for you to handle the Paint event.
You may notice that the second argument of the created method, named e, is of
type PaintEventArgs. It contains a property named Graphics, which will retrieve
the Graphics object used to paint the form. Declare a Graphics variable named g and
assign to it the form Graphics object.
private void Form1_Paint(object sender, PaintEventArgs e) {
Graphics g = e.Graphics;
}
Once you have a Graphics object, you can draw graphical elements in the
window, such as lines, for example. But before that, you generally need to create a Pen
object, which will define how the item will be drawn. Creating a Pen can be as simple
as only specifying a color for it. However, if you want a more complex behavior, you
can use a Brush object to create a Pen. The simplest brush is the SolidBrush, which
is used to draw a solid color. A HatchBrush can be used to draw with a hatch style, i.
e., by using patterned lines (which can be vertical, horizontal, diagonal, etc.). An
example of a HatchBrush will be shown in a while. Other brush types are the
GradientBrush (used to blend two colors together) and the TextureBrush (where
an image is used as the brush).
The following code uses a HatchBrush, with a DashedVertical line pattern,
to create a Pen object with the width of 10 pixels. Then the Graphics object is used to

draw a line from the point (50,50) to the point (150,150) of the form. Notice that it will
be necessary to import the System.Drawing.Drawing2D namespace. If you compile
and run your application, you shall see something similar to Figure 13.
Brush brush =
new HatchBrush(HatchStyle.DashedVertical,Color.Red,Color.Yellow);
Pen p = new Pen(brush,20);
g.DrawLine(p, 50, 50, 150, 150);
Figure 13 – Drawing graphical elements with GDI+
Besides drawing lines, you can use the Graphics object to draw arcs, Bezier
curves, ellipses, polygons, text, rectangles and even images, by using the DrawXXX
methods. You can also use the Graphics object to fill shapes, such as rectangles,
ellipses, polygons and so on, by using the FillXXX methods.
The following piece of code, for example, retrieves an image from a bitmap file
and draws it on the form. The result can be seen in Figure 14.
Image img = Image.FromFile("c:\\temp\\trooper.bmp");
g.DrawImage(img, 150, 150);
Figure 14 – Drawing images with GDI+

One question that may arise is how to handle input in games developed with
GDI+, since it may not make sense to use the DirectX.DirectInput namespace
anymore. The answer for this question is the Windows Forms API itself. By handling
the different mouse and keyboard events of the form, you can specify game behavior
according to the user input. The following code, for example, handles the KeyDown
Windows Forms event by updating fields corresponding to the vertical and horizontal
position of a fictitious entity. The Invalidate method call causes the form to be
repainted.
private void Form1_KeyDown(object sender, KeyEventArgs e) {
if (e.KeyData == Keys.Left)
posX--;
if (e.KeyData == Keys.Right)
posX++;
if (e.KeyData == Keys.Up)
posY--;
if (e.KeyData == Keys.Down)
posY++;
this.Invalidate();
}
If you modify the DrawImage call in the Paint event handler as shown below,
you will actually be able to control the trooper image by using the keyboard, after
compiling and running the application.
g.DrawImage(img, posX, posY);
A final remark about the Windows Forms input handling approach, however, is
that you won’t be able to handle input from more sophisticated devices, such as
joysticks.
In relation to sound support, a nice approach in GDI+ games is to use the
SoundPlayer class, defined in the System.Media namespace. Instantiate a
SoundPlayer class by passing the sound file path as parameter, use the Play method
and then you are done.
SoundPlayer sp = new SoundPlayer("c:\\temp\\shoot.wav");
sp.Play();
As it can be observed, the implementation of game engine features (graphics
drawing, input handling and sound effects, for example) is very straightforward with
GDI+ and the built-in .NET Framrwork class library, specially when compared to some
complex settings that must performed in DirectX-based games. However, such
simplicity has a price, especially in terms of performance and feature set power, as
mentioned before. That is exactly one of the main challenges of DirectX: you have to
create a good, sometimes complex foundation at the beginning, in order to allow more
advanced ideas make sense later on.

6. Mobile Device Game Development
Mobile devices, such as Pocket PCs and smart phones, are settling a new stage for
application development, including games. The .NET Platform aids mobile game
developers by providing a unified and integrated set of tools and technologies targeted
at mobile programming.
Since .NET Framework applications are abstracted from the target platform by
the common language runtime, it is no surprise that a desktop PC game can run in a
mobile device with only a few adjustments or no adjustments at all (apart from, of
course, a new compilation and the replacement of interface controls with the
corresponding ones for the mobile device). However, the higher the number of external
APIs used in an application, the lesser the application portability.
The .NET Compact Framework (the .NET Framework version for mobile
devices) provides two namespaces for developing managed DirectX and Direct3D
applications for devices: Microsoft.WindowsMobile.DirectX and
Microsoft.WindowsMobile.DirectX.Direct3D [23]. These namespaces are
mostly a subset of the DirectX 9 managed classes that target personal computer
(desktop) applications. However, the mobile functionality more closely matches what
was available in DirectX 8. The differences involve lack of support for pixel and vertex
shaders because mobile devices do not currently provide this capability. Other DirectX
libraries, such as DirectInput, are also available for mobile developers, but there is no
Managed DirectX interface for them, therefore you will need to access them directly, by
using C++ for mobile devices.
Developers should keep in mind the capabilities and limitations of mobile
devices. DirectX implementations running over them tend to be pared down from the
desktop offerings [20]. For instance, an important remark is the much lower processing
power and RAM available under mobile development, obligating developers to plan
resource usage accordingly [24]. Files and loaded resources for content are likely stored
in RAM, not on a hard drive or in dedicated video memory. Thus a similar amount of
content can occupy far more RAM on a mobile device than it would on a desktop
computer.
As for GDI+, it is not completely present in mobile devices, of course, but many
of its functions are there and use the same interface, making it simple to port desktop
PC graphical applications.
VS.NET has built-in support for mobile devices. If you check carefully the Add
New Project window, you will notice that VS.NET supports different project templates
for different types of mobile device platforms (Pocket PC 2003, Smartphone 2003,
Windows CE 5.0, etc.).
Add a new Pocket PC 2003 Device Application named PocketPCGame to the
SBGamesTutorial solution, as shown in Figure 15, and make it the startup project. Even
if you do not have a mobile device, you can still compile and run a mobile device
application in VS.NET, since the IDE provides device emulators. To deploy your game
to the emulator, rather than the real physical device, simply select the Pocket PC 2003
SE Emulator from the Target Device drop-down list, as shown in Figure 16.

Figure 15 – Creating a new mobile device project for the Pocket PC 2003 platform
Figure 16 – Selecting the target device to deploy your mobile game
Click in the default Pocket PC form and then double-click in the Paint event of
the Properties toolbox window. Import the System.Drawing.Drawing2D
namespace in the Form1.cs file. If you copy the same code of the Paint event handler
of the Form1 class of the GDIPlus project and paste it into the empty event handler, you
will notice that your mobile application will not compile anymore. In fact, hatch brushes
are not available in the .NET Compact Framework GDI+ API. Delete the brush
initialization code and create the Pen object by passing a Color object as reference, as
shown by the following code:
private void Form1_Paint(object sender, PaintEventArgs e) {
Graphics g = e.Graphics;
Pen p = new Pen(Color.Blue,20);
g.DrawLine(p, 50, 50, 150, 150);
}
If you compile and run you mobile application, the emulator will pop up and you
will have a result similar to the one shown in Figure 17. In fact, you have just finished a
migration from a desktop PC application to a mobile device. In our example, a few
adjustments had to be done in order to correct compilation errors due to missing types in
the mobile platform programming interface. However, you may face other different
errors when performing such migrations [20]:

• Compilation errors due to modifications of types in the mobile device
programming interface;
• Runtime errors due to differences in the behavior of compatible functions or
object initialization;
• Program malfunctioning in which there are no visible errors, but the program
does not work as expected due to slightly different behaviors in compatible
types.
Handling user input in mobile device games can follow an approach already
presented in the previous section: by handling Windows Forms API events. However, in
many devices, such as Pocket PCs, the majority of the interaction is done through clicks
(or “taps”) in the device screen. Therefore, input event handling in mobile games should
have a special care with specific interface controls (such as buttons and links).
In order to provide sound support in games for mobile devices, you will need to
rely on external APIs, such as the OpenNETCF Smart Device Framework [24]. Other
option is to use the .NET interoperability services to import operating system DLLs that
deal with sound.
One last remark about mobile game development in the .NET Platform is that if
the code used to program the mobile device game does not refer to any external API, it
will be possible to migrate the code back to the desktop. The compatibility is granted,
since the .NET Compact Framework is a subset of the .NET Framework.
Figure 17 – Application running in the mobile device (emulator)
7. Conclusions
This tutorial explored the use of the .NET Platform, specially the new Managed DirectX
API, to empower software developers to the productive creation of computer games.
While many aspects of game development were left behind due to the introductory
nature of this tutorial and space constraints, some of the most important ones, such as
graphics manipulation, input handling and sound support where discussed and

illustrated, approaching different contexts such as DirectX 9 game development, GDI+
game development and game development for mobile devices.
Web game developers are encouraged to check the ASP.NET API [25], which is
also part of the .NET Framework class library and contains some powerful resources to
the creation of games intended to be run on the World Wide Web. The Web Services
technology [26] also deserves attention not only from Web game developers, but to the
creation of any kind of game that requires a simple, HTTP-based distributed technology.
Finally, since DirectX has a bi-monthly release schedule and the .NET Framework itself
keeps evolving (for instance, C# 3.0 is just around the corner), it is essential that .NET
Framework game developers keep updated in order to full exploit the Platform
resources.
We would like to conclude remembering that while much has changed in terms
of hardware capabilities and available APIs, the properties of a great game have not. No
technological resource will save a game which lacks a good game design. The
underlying game idea, playability, balanced difficulty level and replay value, for
instance, still play a major role in computer games outcome. Therefore, the success of
game programmers cannot be measured by the power of the tools and technologies used
by them, but by how well these tools and technologies are headed to satisfy end-users.
We hope the work presented in this tutorial and the potential of the .NET Platform are
used to stimulate the accomplishment of such task.
8. References
1. Microsoft.com, Microsoft .NET Homepage, http://www.microsoft.com/net (last visited in
October 12, 2005);
2. Microsoft.com, Microsoft DirectX, http://www.microsoft.com/windows/directx/ (last
visited in October 07, 2005);
3. Mono Project, http://www.mono-project.com/ (last visited in October 12, 2005);
4. Microsoft Developer Network (MSDN), What is the Common Language Specification?,
http://msdn.microsoft.com/library/default.asp?url=/library/en-
us/cpguide/html/cpconwhatiscommonlanguagespecification.asp (last visited in October 12,
2005);
5. Mascarenhas F., Ierusalimschy R., LuaInterface: Scripting the .NET CLR with Lua,
Journal of Universal Computer Science, 10(7):892-908, July 2004;
6. C# Corner.com, COBOL .NET Programming, http://www.c-
sharpcorner.com/cobolnet/code.asp (last visited in October 12, 2005);
7. Xbox.com, Halo 2 Game Detail Page, http://www.xbox.com/en-US/halo2/ (last visited in
October 13, 2005);
8. Half-Life2.com, Half-Life 2 Official Site, http://www.half-life2.com/ (last visited in
October 13, 2005);
9. Pierson D., Beginning Game Development, Part II: Introduction to DirectX,
http://msdn.microsoft.com/coding4fun/gamedevelopment/beginning2/default.aspx (last
visited in October 12, 2005);
10. Microsoft.com, C# Developer Center, http://msdn.microsoft.com/vcsharp/ (last visited in
October 07, 2005);

11. Microsoft Visual C# Developer Center, Generics,
http://msdn.microsoft.com/vcsharp/2005/overview/language/generics/ (last visited in
October 12, 2005);
12. Microsoft Developer Network (MSDN), Visual Studio 2005 Developer Center,
http://lab.msdn.microsoft.com/vs2005/ (last visited in October 13, 2005);
13. Microsoft Developer Network (MSDN), Microsoft Visual C# 2005 Express Edition,
http://lab.msdn.microsoft.com/express/vcsharp/default.aspx (last visited in October 13,
2005);
14. Wiegers K. E., Software Requirements, Microsoft Press, 1999;
15. Church D., Formal Abstract Design Tools, 1999,
http://www.gamasutra.com/features/19990716/design_tools_01.htm (last visited in March
12, 2005);
16. Aronson D., DirectX SDK Roadmap, Microsoft Meltdown 2005 Game Developer
Conference;
17. DigiPen.edu, MSDN Webcast Archive - Video Game Development: Learn to Write C# the
Fun Way, http://www.digipen.edu/webcast/ (last visited in October 12, 2005);
18. Microsoft Events and Webcasts, Video Game Development: Learn to write C# the fun
way, http://www.microsoft.com/events/series/msdnvideodev.mspx (last visited in October
12, 2005);
19. Furtado A. W .B., Santos A. L. M., Exploring Game Development in the .NET Platform
with Managed DirectX – Tutorial Resources, http://www.cin.ufpe.br/~awbf/sbgames2005
(last visited in October 15, 2005);
20. Weller D., Lobão A. S., Hatton E., Beginning NET Programming in C#, Apress, 2004;
21. Pierson D., Beginning Game Development, Part I: Introduction,
http://msdn.microsoft.com/coding4fun/gamedevelopment/beginning/default.aspx (last
visited in October 07, 2005);
22. Webopedia.com, What is GDI?, http://www.webopedia.com/TERM/G/GDI.html (last
visited in October 15, 2005);
23. Microsoft Developer Network (MSDN), Windows Mobile DirectX and Direct3D,
http://msdn2.microsoft.com/en-us/library/ms172504 (last visited in October 15, 2005);
24. OpenNETCF.org, Smart Device Framework v1.4,
http://www.opennetcf.org/PermaLink.aspx?guid=3a013afd-791e-45ef-802a-4c1dbe1cfef9
(last visited in October 15, 2005);
25. ASP.NET Web, The Official Microsoft ASP.NET Site, http://www.asp.net (last visited in
October 15, 2005);
26. Microsoft Developer Network (MSDN), Web Services and Other Distributed Technologies
Developer Center, http://msdn.microsoft.com/webservices/ (last visited in October 16,
2005).