TURKISH GUIDELINE FOR STERILIZATION AND DISINFECTION … · turkish guideline for sterilization and...
73
TURKISH GUIDELINE FOR STERILIZATION AND DISINFECTION IN HEALTH CARE SETTINGS Prepared by Turkish Society for Disinfection, Antisepsis, and Sterilization www.das.org.tr
Transcript of TURKISH GUIDELINE FOR STERILIZATION AND DISINFECTION … · turkish guideline for sterilization and...

TURKISH GUIDELINE FOR STERILIZATION AND DISINFECTION
IN HEALTH CARE SETTINGS
Prepared by
Turkish Society for Disinfection, Antisepsis, and Sterilization
www.das.org.tr

2
MEMBERS OF GUIDELINE COMMITTEE
Faruk Aydin Karadeniz Technical University Faculty of Medicine, Department of Microbiology and Clinical Microbiology, Trabzon
Saban Esen
(Treasurer of DAS)
Ondokuz Mayis University Faculty of Medicine, Department of Infectious Diseases, Samsun
Murat Gunaydin
(Honorary Secretary of DAS)
Ondokuz Mayis University Faculty of Medicine, Department of Microbiology and Clinical Microbiology, Samsun
Bulent Gurler
(President of DAS)
Istanbul University Istanbul Faculty of Medicine, Department of Microbiology and Clinical Microbiology, Istanbul
Recep Ozturk
(Executive board member of DAS)
Istanbul University Cerrahpasa Faculty of Medicine, Department of Infectious Diseases, Istanbul
Mustafa Ozyurt GATA Haydarpasa Education Hospital, Medical Microbiology Clinic, Istanbul
Duygu Percin
(Vice-president of DAS)
Erciyes University Faculty of Medicine, Department of Microbiology and Clinical Microbiology, Kayseri
Mustafa Samasti Istanbul University Cerrahpasa Faculty of Medicine, Department of Microbiology and Clinical Microbiology, Istanbul
Ahmet Sanic Qafqaz University, Baku / Azerbaijan [email protected]
Yesim Cetinkaya Sardan
Hacettepe University Faculty of Medicine, Department of Internal Diseases, Ankara
Dilek Zenciroglu
(Executive board member of DAS)
Educator (nurse), Istanbul [email protected]
Note: Names are in alphabetical order.

3
OTHER CONTRIBUTING INSTITUTIONS AND PERSONS
Dilek Arman Gazi University Faculty of Medicine, Department of Clinical Microbiology and Infectious Diseases, Ankara
Turan Aslan Vakif Gureba Training and Research Hospital, Istanbul
Kemalettin Aydin Karadeniz Technical University Faculty of Medicine, Department of Clinical Microbiology and Infectious Diseases, Trabzon
Guner Dagli GATA Haydarpasa Training Hospital, Anesthesia and Reanimation Clinic, Istanbul
Tulay Konac TAEK Ankara Nuclear Agriculture and Stockbreeding Research Center, Ankara
A. Yekta Ozer Hacettepe University Faculty of Pharmacy, Department of Radiopharmacy, Ankara
Mehmet Ali Ozinel Ege University Faculty of Medicine, Department of Microbiology and Clinical Microbiology, Izmir
Refik Saydam National Hygiene Center
Ankara http://www.rshm.saglik.gov.tr
Note: Names are in alphabetical order.

4
INTRODUCTION
Decontamination, disinfection and sterilization are the basics for an infection control program.
Procedures should be performed to prevent cross-infection in diagnostic and therapeutic instruments and equipment.
Sterilization is not a simple procedure; it is a process of producing convenient instruments and equipment for medical purposes.
The transfer of equipment from the site of use, pre-cleaning and decontamination, transport to the site of preparation, and counting, care and control, packaging, sterilization, and storing as
sterile until time of use are the stages of the procedure.
Following the defined rules, supervision and recording in each stage are the essentials of sterilization.
D E V I C E S C A N N E V E R B E S T E R I L I Z E D W I T H O U T C L E A N I N G A N D D E C O N T A M I N A T I O N .
Presence of written procedures on practices and continuous training of the workers are essential conditions.
Procedures and protocols should be periodically reviewed, supervised and re-organized if required.

5
CONTENT
1. DEFINITIONS AND ABBREVIATIONS 2. CENTRAL STERILE SUPPLY DEPARTMENT (CSSD) AND IN-SERVICE
TRAINING 3. CSSD TEAM, CLOTHES AND PERIODIC HEALTH CONTROLS
3.1. CSSD Team 3.2. Clothes 3.3. Periodic health examinations
4. CSSD AREAS 4.1. Dirty area 4.2. Clean area 4.3. Sterile area 4.4. Support area
4.4.1. Textile preparation area 4.4.2. Hand washing sinks
5. TECHNICAL AND ARTHITECTURAL STRUCTURE OF CSSD 5.1. Floors and walls 5.2. Ceilings 5.3. Air conditioning 5.4. Temperature and humidity 5.5. Lighting 5.6. Water qualification for sterilization and disinfection
6. CSSD CLEANING 6.1. Cleaning of dirty areas 6.2. Cleaning of sterile, clean and support areas
7. TRANSPORT OF CONTAMINATED INSTRUMENTS TO CSSD 8. DISINFECTION, CHEMICAL SOLUTIONS AND DISINFECTION PRACTICES
8.1. Spaulding classification 8.1.1. Concerns about Spaulding classification 8.1.2. Classification for risk of infection and the preferred methods for medical devices
and items
8.1.3. Medical device reprocessing according to the Robert Koch Institute (RKI) recommendations
8.2. Specifications of an ideal disinfectant 8.3. Chemical solutions
8.3.1. Glutaraldehyde 8.3.2. Ortho-phthalaldehyde 8.3.3. Formaldehyde 8.3.4. Chlorine and chlorine compounds 8.3.5. Superoxide water 8.3.6. Hydrogen peroxide 8.3.7. Peracetic acid 8.3.8. Peracetic acid and hydrogen peroxide 8.3.9. Phenolics 8.3.10. Quaternary ammonium compounds 8.3.11. Iodophors 8.3.12. Alcohol
8.4. Advantages and disadvantages of high and intermediate level disinfectants 8.5. Disinfectant test stripes
6
8.6. Factors affecting disinfection 8.7. Disinfection practices according to the medical device
8.7.1. Endoscopes 8.7.2. Laparoscopes, arthroscopes and cystoscopes 8.7.3. Dental instruments 8.7.4. Bone decontamination 8.7.5. Processing patient-care equipment contaminated with bloodborne pathogens;
HBV, HCV, HIV or tuberculosis 8.7.6. Hemodialysis unit 8.7.7. Tonometers, cryosurgical instruments, endocavitary probes
9. DECONTAMINATION 9.1. Equipment used in decontamination 9.2. Manual decontamination
9.2.1. Decontamination practices for instruments and equipment 9.3. Washing / decontamination with washer-disinfectors
9.3.1. Cautions for washer-disinfector use 9.3.2. Monitorization of washer-disinfectors 9.3.3. Cleaning of washer-disinfectors
9.4. Ultrasonic washing machines 9.4.1. Cautions for ultrasonic cleaning 9.4.2. Cleaning ultrasonic washing machines
10. INSTRUMENT DRYING AND MAINTANENCE 11. PACKAGING
11.1. Packaging materials and their qualifications 11.1.1. Textile 11.1.2. Medical paper 11.1.3. Paper sterilization bags 11.1.4. Non-woven 11.1.5. Paper-plastic bags 11.1.6. Container systems 11.1.7. Transparent plastic clothes with sustained sterility
11.2. Standards for packed instruments 11.3. Principles of packaging 11.4. Wrapping techniques
11.4.1. Envelope method 11.4.2. Rectangular method 11.4.3. Method of packaging with a bag (paper/plastic)
11.5. Packaging practices convenient with materials 11.6. Choosing a packaging material according to the sterilization method 11.7. Sealer
12. STERILIZATION METHODS 12.1. Dry heat sterilization method 12.2. Steam sterilization method
12.2.1. Principles for loading steam sterilizer 12.2.2. Assessment of the packs for humidity 12.2.3. Prion decontamination
12.3. Low-temperature sterilization techniques 12.3.1. Ethylene oxide
12.3.1.1. Cautions for loading 12.3.1.2. Aeration time 12.3.1.3. Protective clothes 12.3.1.4. Precautions for safety at work 12.3.1.5. Systems with cartridge

7
12.3.1.6. Systems with tubes 12.3.1.7. CSSD evacuation in case of emergency 12.3.1.8. What to do in case of exposure
12.3.2. Low temperature steam formaldehyde 12.3.3. Gas plasma sterilization 12.3.4. Peracetic acid sterilization 12.3.5. Sterilization with gamma radiation
12.4. Advantages and disadvantages of sterilization methods 12.5. Cleaning sterilizers
13. MONITORIZATION OF STERILIZATION 13.1. Physical control
13.1.1. Electronic control devices 13.1.2. Vacuum-leak test
13.2. Chemical control 13.2.1. Class I – Process indicators 13.2.2. Class II indicators (Bowie & Dick test) 13.2.3. Class III single-parameter indicators 13.2.4. Class IV multi-parameter indicators 13.2.5. Class V integrators 13.2.6. Class VI emulation indicators 13.2.7. Process challenge device (PCD)
13.2.7.1 PCD for AAMI 13.2.7.2 PCD for EN 13.2.7.3 PCD for instruments with lumen
13.3. Biological control 14. DOCUMENTATION 15. VALIDATION 16. STORAGE AND SHELF LIFE OF STERILE EQUIPMENT 17. PRECAUTIONS FOR EXTRAORDINARY CASES IN CSSD 18. CONCRETE SUGGESTIONS
18.1 Cleaning patient care devices 18.2 High level disinfection of endoscopes 18.3 Flash sterilization 18.4 Sterilization methods 18.5 Packaging 18.6 Monitorization 18.7 Loading 18.8 Storage
8
1. DEFINITIONS AND ABBREVIATIONS
Antisepsis: Prevention or arrest of the growth or action of microorganisms in or on a living tissue.
Antiseptic: Substance that prevents or arrests the growth or action of microorganisms in or on a living tissue.
Asepsis: Prevention of a protected area from contact with microorganisms and sustainability of this status. The whole procedure for this purpose is called aseptic technique.
Bacterial spore: A special structure formed by some bacteria, which is resistant to physical and chemical environmental factors.
Bactericide: Agent that kills bacteria
Bioburden: Number and types of viable microorganisms by which an item is contaminated
Biological indicator: A test material consisting of a standardized viable population of bacterial spores known to be resistant to the sterilization; this indicator is intended to demonstrate whether conditions were adequate to achieve sterilization.
CE emblem: A sign showing the consistency to the Medical Device Directive (MDD) of the European Union standards (abbreviation for Conformite Europienne)
Chemical indicator: Test materials including paper stripes or others with chemical substances showing characteristic changes under sterilization conditions (example: color change, etc)
Cleaning: Procedure of removing dirt and organic substances by a mechanical process.
Decontamination: To remove organic substances and pathogens on a surface or item to ensure that it is safe before disinfection / sterilization using physical and / or chemical methods.
Disinfection: Destruction of microorganisms or inhibition of their multiplication on non-viable substances and surfaces (except bacterial spores), classified as high, intermediate and low level disinfectants according to the degree of effect on bacterial spores and mycobacteria.
A)High level disinfection: This is a type of disinfection that inactivates all microorganisms except for some bacterial spores by implementing a shorter period of time (5-20 minutes) compared to sterilization with sporicide chemicals (≥3 hours)
B)Intermediate level disinfection: This is a type of disinfection that destroys all vegetative bacteria including mycobacteria and other microorganisms, but not the bacterial spores (usually ≤15 minutes)
C)Low level disinfection: This is disinfection that destroys some vegetative microorganisms and large enveloped viruses (usually ≤10 minutes), but not the bacterial spores, mycobacteria and unenveloped viruses.

9
Electronic test systems: Systems which can detect the performance and malfunction of steam sterilizators, which can electronically test one or more physical parameters such as vacuum leak and Bowie & Dick, which can enable data storage in the computer.
Epoxy: This is a thermosetting polymer formed from the reaction of an epoxide "resin" with a polyamine "hardener". Epoxy has a wide range of applications, including fiber-reinforced plastic materials and general purpose adhesives. The applications for epoxy-based materials are extensive and include coatings, adhesives and composite materials such as those using carbon fiber and fiberglass reinforcements. Epoxies are known for their excellent adhesion, chemical and heat resistance, good-to-excellent mechanical properties and very good electrical insulating properties.
Flash sterilization: A process designed for (short period) steam sterilization of washed, decontaminated, dried but unpacked items for immediate use
HEPA filter: (High Efficiency Particulate Air Filter): A highly effiecient air filter that collects particles (with 99.97% efficiency >0.3µ size)
Prions: Pathogenic infectious particles with protein but without nucleic acid. They are resistant to normal sterilization and disinfection methods.
Process Challenge Device: (PCD) A test system designed to form a defined challenge resistance against sterilization procedure in sterilizers to understand whether the procedure is effective or not.
Sterility Assurance Level: (SAL) is the probability of a viable microorganism being present on a product unit after sterilization. It is usually expressed as 10-6 meaning that there would be a ≤1 per million chance that a single viable microorganism is present on a sterilized item.
Sterilization: Process used to render a product free of all forms of viable microorganisms (including spores)
Validation:Validation is the proof that sterilization system and procedures meet the predetermined conditions continuously.

10
ABBREVIATIONS:
AAMI : Association for Development of Medical Instrumentation
ISO : International Standards Organization
MDD : Medical Device Directive
CSSD : Central Sterile Supply Department
NIOSH : The National Institute for Occupational Safety and Health
OSHA : Occupational Safety & Health Administration
TS EN European Standards of Turkish Institute of Standards

11
2. CENTRAL STERILIZATION UNITS (CSSD) AND IN-SERVICE TRAININGS
Central Sterile Supply Departments are dynamic indispensible centers for a hospital. They provide services for 365 days and 24 hours a day. They are responsible for ensuring the safety of sterilization and prevention of infection. They collect contaminated equipments from various sites of the hospital, reprocess and redistribute them.
The center should be located at the nearest point to the operating theatre. The team for the ideal configuration of CSSD should include technical staff such as experienced architects and engineers and those following scientific and technological developments, providing advice to the technical team, such as hospital directors, physicians, and nurses.
CSSD is the place for cleaning-decontamination-disinfection-drying, caring and repairing, packing, sterilization, storage and distribution of sterile equipments. Sterilization is a procedure with some qualifications deserving care. For sterilization to be successful, all procedures including the cleaning of contaminated equipment and distribution of sterile products should be excellent. The staff should be trained and disciplined.
They should be periodically trained for the below topics. They should update the theoretical and practical issues.
Topics:
• Essentials of microbiology • Infection transmission routes, infection prevention measures and immunization • Hand hygiene • CSSD management and operation rules • Asepsis, cleaning, disinfection, sterilization rules • Technical and architectural hardware • CSSD areas, clothes and periodic health controls • Surgical instruments and classification • Transferring contaminated and clean equipment • Disinfection practices • Disinfectant solutions, enzymatic detergents, and products for instrument care • Cleaning, decontamination , drying, and caring • Packing materials, techniques and loading principles • Sterilization methods • Sterilization steps and monitoring • Factors affecting sterilization (air evacuation, steam, and water quality) • Storage and shelf life • Problems caused by sterilization materials • Safety regulations • Validation • Performance tests and recording
Task descriptions of the team members should be designated and written protocols based on the policies of the institution should be prepared for all procedures.

12
3. CENTRAL STERILIZATION UNIT (CSSD), TEAM, CLOTHING, AND HEALTH CONTROLS
3.1 CSSD team • The CSSD team is composed of a director, nurse, technician, and support staff. It is
recommended to have a biomedical technician to solve the problems of instruments and complicated devices.
• The number of staff is determined according to the number of hospital beds, number of patients presenting to the outpatient clinic, number of operating rooms, number of operations per day, workload of units, and the period of service provision.
3.2 Clothes • CSSD personnel clothes are uniforms made of a shirt and trousers that could easily be
put on and off, comfortable, and with short sleeves. • All staff should wear disposable caps covering hair. • Long sleeves are recommended for the packing stage to prevent skin shedding. • Staff working in the decontamination room should wear protective eye-glasses and
masks (or brim protecting the whole face) and protective fluid-resistant apron and gloves to prevent dispersing and springing.
• Shoes or closed slippers should be washable, comfortable, supporting and protecting the foot.
• Earphones should be worn to provide noise isolation as the CSSD is loud. • CSSD clothes should be changed on alternate days or immediately when it gets dirty.
3.3 Periodic health examinations • New employees should undergo a general physical examination, complete blood count,
biochemical tests, and hearing test. Hepatitis B and tetanus immunizations should be performed if required. Periodic health examinations are performed annually.
• Staff working in gas sterilization should undergo annual examinations for exposure to the skin, eye, respiratory, reproductive, hematopoietic, and neurological systems (Appendix 1- Form for Health Examination of Workers of EO and Formaldehyde)
• Staff should be monitored for injuries with sharp instruments.
4. CSSD AREAS
Areas should be classified as dirty, clean, sterile, and support areas. Emergency exit signs should be placed in addition to directory signs in the CSSD.
4.1 Dirty area This is the place where unsterile equipments are accepted, classified, cleaned, and decontaminated. As the microbe- and particle- originated contamination is probably at high-level in the decontamination area, environmental contaminants should be controlled and cleaned/disinfected periodically. In addition, the decontamination area should be separated from other procedure areas and should have a separate entrance from another hall.
• Sink for hand washing • Table for receiving the equipment and control • Automated washing machine with two doors

13
• Ultrasonic washing machine • Air and water gun system • Storage room for keeping the equipment and solutions in the contaminated area
should be found in the decontamination area.
4.2 Clean area This is the place where decontaminated clean equipments and materials are checked, cared for, packed for sterilization, and stored. In addition to the area for keeping, loading, and lining-up of equipment and materials to be sterilized, steam sterilizers and ethylene oxide sterilizers are placed in a separate section in this area. Ethylene oxide sterilizers should be placed in a separate location (glass is recommended), with private aeration, gas control detectors and detectors for probable leaks convenient for emergency interventions. Director’s office, meeting and living rooms for the personnel lounges should be in the clean or support area.
4.3 Sterile area This is the area where sterile and clean equipment are stored before delivery to the user. The size of the area may vary depending on the work load and circulation.
Keeping sterile material sterile until the point of use is important. Care should be taken for these materials so as not to be contaminated in the storage.
• Sterile storage areas should preferably be in a separate and closed section with a private entrance. It should be next to the sterilization areas and it has to have only one function which is storing the sterile materials.
• The aeration system should be designed so that air could flow from the sterile storage area to the outside with positive pressure.
• The shelves should be placed 20-30 cm above the floor and 15cm below the ceiling and 5cm from the wall in the sterile storage area for air circulation.
• Fire extinguishers should be located at an accessible and available distance for fire safety.
• Storage should be organized according to the packing systems, materials, instrument type, and method of transport in the health facility (e.g., open wire shelves, open one-piece shelf) (Figure 1).
Figure 1. Sterile storage area

14
4.4 Support area
It should have storage, compressors, uninterrupted power supply (UPS), distilled water room, eradication and waste area, bathrooms, locker rooms, restrooms, and showers.
4.4.1 Textile preparation area • Textile procedure areas are accepted as clean area where re-useable textile
materials are examined, folded, and packed. • Air flow should be of downdraft type and the number of air change per hour (10
air change/hour) should be adequate to minimize the level of fiber particles in the air.
• There should be adequate space and shelves for storing clean clothes and a well-illuminated table for checking (Figure 2).
Figure 2. Illuminated table for checking
4.4.2 Hand washing sinks
• Hand washing sinks should be placed at the transition points between contaminated, clean, and sterile areas.
• Accessories for liquid soap disinfectant and paper tissues should be placed in the sinks.
• Hand washing sinks should be placed also in support areas such as lounges. • In order to prevent the risk of contamination, the taps should be either of surgical
type or with photoelectricity.
5. TECHNICAL AND ARCHITECTURAL STRUCTURE OF CSSD
5.1 Floors and walls
• Floors and walls should be made of durable materials that could be vacuumed and washed in order to clean periodically.
• If ceramic is used, the joint sealant should be cement; however, ceramic is not recommended if possible.
• Wall paint should be smooth, neat, antistatic, and epoxy in order to prevent colonization of microorganisms.
• Materials should not be negatively affected by chemical substances used for cleaning. • Floor material should be easily cleaned and resistant to wear and tear. • The floor color should be in a color to easily show the items on the floor. • The floor and wall intersections should be monolithic and the corners should be rounded.

15
5.2 Ceilings
• Ceilings should be constructed with embedded and closed armatures to form a smooth surface and to minimize condensation, dust accumulation and possible sources of contamination.
• Pipes and other armatures should be covered. • Materials shedding particles or fiber should not be used in ceilings. • Washable materials should be used.
5.3 Air conditioning
• Aeration of CSSD should enable at least 10 air circulations per hour. No instruments causing air turbulance should be used.
• Air circulation system should be downdraft and should provide air flow from clean areas to dirty ones.
5.4 Temperature and humidity
The temperature should be 18-22oC, to ensure that personnel comfort is maintained and microorganism growth is inhibited. The humidity should be 35-60%. The temperature and humidity should be calculated taking into consideration the extra heat and humidity caused by instruments.
5.5 Lighting
Choosing the lights for all areas of the CSSD including decontamination, preparation and packing, sterilization, processing, sterile storage and distribution is important.
General examination 50 - 100 watt
Detailed examination 100 - 200 watt
Sinks 50 - 100 watt
General working areas 20 - 50 watt
Sterile depots 20 - 50 watt
5.6 Water qualification for sterilization and disinfection
The hardness of water to be used in production of steam for sterilization should be less than 4 dH German hardness.
To soften the water, hospitals usually use ion changers called water softening devices. These devices remove Ca and Mg ions from water.
Silisium (SiO2) content <1mg/l
Chloride <2 mg/l
pH 5-7

16
The table below demonstrates the maximum values for the water that is used to form steam according to EN 285.
SiO2 0,01mg/kg
Ferrum 0,1mg/kg
Cadmium 0,005 mg/kg
Lead 0,05 mg/kg
Other heavy metals 0,1 mg/kg
Chloride 0,1mg/kg
Phosphate 0,1mg/kg
6. CSSD CLEANING
Cleaning should be performed following the aseptic technique regulations and from clean to dirty, from top to bottom. The solution to be used during cleaning should be decided upon following the recommendations of Infection Control Committee.
6.1 Cleaning the dirty area • Accepted as a critical area, the decontamination room should be cleaned. • It should be cleaned with a disinfectant solution that could be used in cleaning the
critical area. If any spills or drops are found on the floor or if the floor is dirty, it should be immediately cleaned.
• If the disinfectant solution is dirty, it should be changed before 24 hours and a new one should be prepared.
• The cleaning equipment used in the cleaning of CSSD decontamination areas should not be used in the cleaning of another area.
• Sinks, counters and walls having a risk of decontamination should be cleaned daily with a disinfectant solution.
• Floors should be cleaned at last.
6.2 Cleaning sterile, clean and support areas • Cleaning should begin in the sterile area and include clean and support areas. • The cleaning time should be the time when there is the least amount of material in the
sterile depot. • Instrument preparation counters should be wiped with a cloth soaked with disinfectant
every morning.

17
7. TRANSPORT OF CONTAMINATED INSTRUMENTS TO CSSD
• Carrying the used instruments without covering them has the risk of cross-contamination.
• The contaminated instruments and materials should be carried with a dirty elevator or closed transfer car between operating theater and the CSSD decontamination area.
• Brand-new medical devices should be cleaned from stickers and protective material and sterilized after washed.
• Even if not used, opened sets and equipment are considered contaminated after having been opened.
• Surgical instruments are delivered to CSSD immediately after any procedures. • Each set has a list of existing instruments. • The list is completed by the person who counts the instruments. • Used instruments should first be decontaminated using a convenient detergent-
disinfectant after being delivered to the CSSD and should then be counted. • The overlapping tips of the instruments are located apart. If the blade is on the
instrument, it is removed with the help of another instrument and is thrown into the bucket of sharp instruments. The scalpel is placed in the basket of washer-disinfector.
• If the washer desenfectors will not be used, the instruments contaminated with blood and other body fluids are first decontaminated with detergent-disinfectant/enzymatic solution and are then cleaned.
• CSSD acceptance forms should be used to record the instruments delivered, the number of instruments, from which clinic they were delivered, the time of arrival, the person doing the delivery, the person accepting them, and the time when they will be delivered back. (Appendix 2- Instrument Delivery Form)
8. DISINFECTION, CHEMICAL SOLUTIONS AND DISINFECTION PRACTICES
8.1 Spaulding classification
Items for patient care are categorized as critical, semi-critical, and non-critical:
• Critical items Objects that enter sterile tissue, sterile body cavities or the vascular system are classified as “critical” items. They (surgical instruments, cardiac and urinary catheters, implants, etc.) must be sterile.
• Semi-critical items Items coming into contact with mucous membranes or non-intact skin are classified as “semi-critical”. This category includes respiratory therapy and anesthesia equipment, some endoscopes, laryngoscope blades, esophageal manometer probes, anorectal manometer catheters, etc. These medical devices require high-level disinfection; they do not need to be sterile. Some items that may come into contact with non-intact skin for a brief period of time (thermometer, hydrotherapy tanks) are usually considered “non-critical” surfaces and are disinfected with intermediate-level disinfectants (i.e., phenols, iodophores, alcohol, etc.).
18
• Non-critical items
“Non-critical” items are those that come into contact with intact skin but not mucous membranes. Examples of non-critical patient-care items are bedpans, bedrails, blood pressure cuffs, crutches and bedside tables, patient furniture and floors. It is adequate for these items to be clean. If they are contaminated only with body fluids/secretions, they should be disinfected using low-level disinfectants.
8.1.1 Concerns about Spaulding classification
• One problem with implementing the scheme is oversimplification. For example, the scheme does not consider problems with reprocessing of complicated medical equipment that often is heat-sensitive or problems of inactivating certain types of infectious agents (e.g., prions such as Creutzfeldt-Jakob disease (CJD) agent).
• A few expensive medical devices (e.g., arthroscopes, laparoscopes) in the critical category are heat-sensitive; furthermore, sterilization using ethylene oxide (EO) can be very time-consuming for routine use between patients.
• There is lack of evidence that sterilization of these items improves patient care by reducing the infection risk. Therefore, many hospitals use these devices (arthroscopes, laparoscopes and biopsy forceps) with high-level disinfection.
• Another problem with implementing this scheme is processing of an instrument in the semi-critical category (e.g., endoscope) that would be used in conjunction with a critical instrument that gets into contact with sterile body tissues. For example, is an endoscope used for upper gastrointestinal tract investigation still a semi-critical item when used with sterile biopsy forceps or in a patient who is bleeding heavily from esophageal varices? The endoscope should remain in the semi-critical category.
• An additional problem with the disinfection of the items used in patient care is that the optimal contact time for high-level disinfection has not been defined, resulting in different strategies for disinfecting the different types of semi-critical items (e.g., endoscopes, tonometers, endocavitary probes, cryosurgical instruments, etc.). However, until more effective alternatives are identified for device disinfection in the clinical setting, following this guideline is recommended.

19
8.1.2 Classification for risk of infection and the preferred methods for medical devices and items
Items Spaulding
classification Risk of
infection Method
Sterilization -
Steam, Plasma, EO
Surgical devices, cardiac and urinary catheters, implants, drains, syringe
needles, acupuncture needles, biopsy forceps, transfer forceps, laparoscope, arthroscope, bronchoscope, cystoscope
Critical items
(will enter sterile tissue or vascular
system)
High
Liquid sporicidal chemical;
long term exposure (≥ 3 hours)
Humid heat
High-level disinfection (exposure to high-level
disinfectant for 5-20 minutes)
Flexible endoscopes, laryngoscopes,
vaginal-rectal ultrasonography probes, transesophageal Echo probe,
endotracheal tubes, nasal cannulae, ventilator connecting pipes, nebulizers
and filters, nebulizer containers, aspiration tubes, feeding tubes,
laryngoscope blades, laryngeal tubes, fiberoptic bronchoscope, airway, some
ophtalmic devices, ear syringe tube, amalgam condenser
Semi-critical
items (will come into
contact with mucous
membranes)
Intermediate
Intermediate disinfection
(exposure for ≤ 10 minutes)
Facial masks, non-invasive ventilation
masks, oxygen masks, stethoscope, blood pressure measurement cuff, ECG
electrodes, BIS electrodes, pulse oxymeter, ear speculum, fixation items, incubator, patient bed and
clothes, meal dishes, bedpans, etc.
Noncritical
items (will come into contact with intact
skin, will not come into
contact with mucous
membranes)
Low
Low-level disinfection (exposure for ≤ 10
minutes)
20
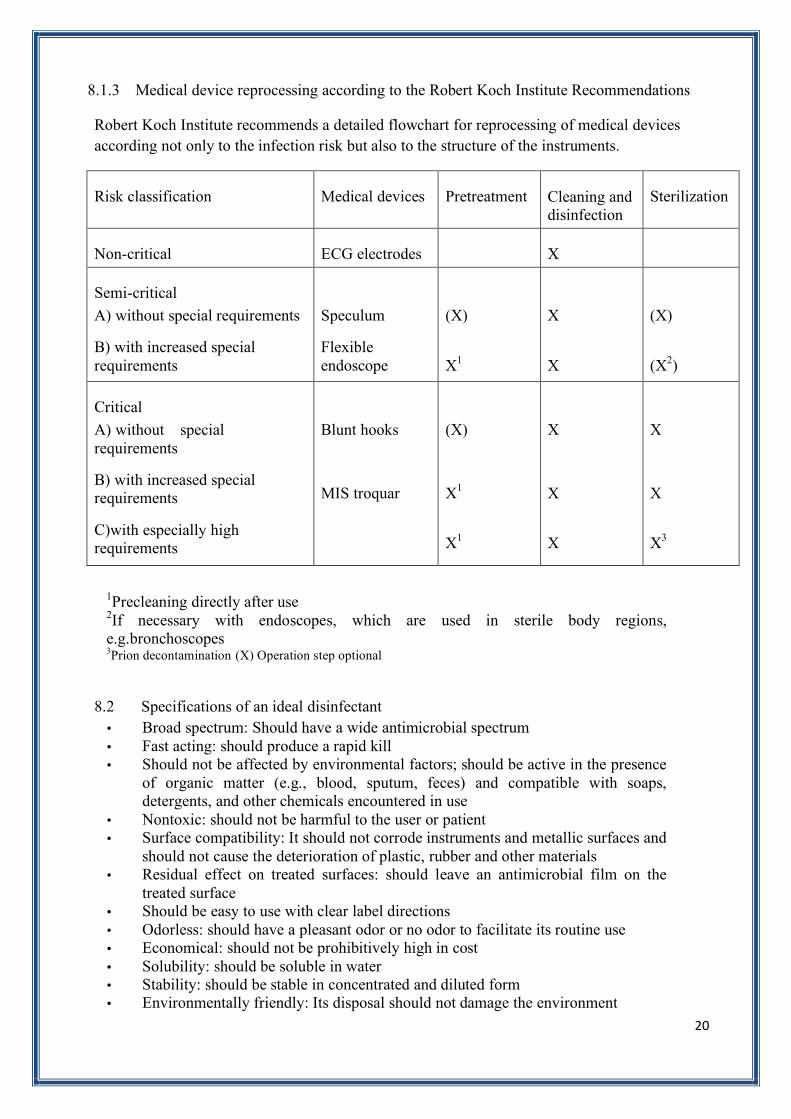
8.1.3 Medical device reprocessing according to the Robert Koch Institute Recommendations
Robert Koch Institute recommends a detailed flowchart for reprocessing of medical devices according not only to the infection risk but also to the structure of the instruments.
Risk classification Medical devices Pretreatment Cleaning and disinfection
Sterilization
Non-critical ECG electrodes X
Semi-critical
A) without special requirements
B) with increased special requirements
Speculum
Flexible endoscope
(X)
X1
X
X
(X)
(X2)
Critical
A) without special requirements
B) with increased special requirements
C)with especially high requirements
Blunt hooks
MIS troquar
(X)
X1
X1
X
X
X
X
X
X3
1Precleaning directly after use 2If necessary with endoscopes, which are used in sterile body regions, e.g.bronchoscopes 3Prion decontamination (X) Operation step optional
8.2 Specifications of an ideal disinfectant • Broad spectrum: Should have a wide antimicrobial spectrum • Fast acting: should produce a rapid kill • Should not be affected by environmental factors; should be active in the presence
of organic matter (e.g., blood, sputum, feces) and compatible with soaps, detergents, and other chemicals encountered in use
• Nontoxic: should not be harmful to the user or patient • Surface compatibility: It should not corrode instruments and metallic surfaces and
should not cause the deterioration of plastic, rubber and other materials • Residual effect on treated surfaces: should leave an antimicrobial film on the
treated surface • Should be easy to use with clear label directions • Odorless: should have a pleasant odor or no odor to facilitate its routine use • Economical: should not be prohibitively high in cost • Solubility: should be soluble in water • Stability: should be stable in concentrated and diluted form • Environmentally friendly: Its disposal should not damage the environment

21
8.3 Chemical solutions
8.3.1 Glutaraldehyde
• Glutaraldehyde is a saturated dialdehyde that has gained wide acceptance as a high-level disinfectant and chemical sterilant. Aqueous solutions of glutaraldehyde are acidic and in this state, are generally not sporicidal.
• Only when the solution is “activated” by use of alkalinizing agents to pH 7.5-8.5 the solution becomes sporicidal.
• Once activated, these solutions have a shelf-life of a minimal of 14 days. • Novel glutaraldehyde formulations (e.g., glutaraldehyde-phenol-sodium phenate,
potentiated acid glutaraldehyde, stabilized alkaline glutaraldehyde, glutaraldehyde-phenylphenol-amylphenol) have extended the shell life to 28-30 days.
• ≥2% glutaraldehyde solution is effective against M. tuberculosis, fungi, and viruses for a minimum of 20 minutes at room temperature, and spores of Bacillus and Clostridium species for three hours.
• It is non-corrosive to metal and does not damage lensed instruments, rubber, or plastics. • Glutaraldehyde should not be used for cleaning noncritical surfaces because it is too
toxic and expensive. • Colitis caused by glutaraldehyde exposure from residual disinfecting solution in
endoscope solution channels has been reported and is preventable by careful endoscope rinsing. Similarly, keratopathy and corneal decompensation have been caused by ophthalmic instruments that are inadequately rinsed after having been soaked in 2% glutaraldehyde.
• Healthcare personnel can be exposed to elevated levels of glutaraldehyde vapor when equipment is processed in poorly ventilated rooms, when spills occur, when glutaraldehyde solutions are activated or changed, or when open immersion baths are used. Acute or chronic exposure can result in skin irritation or dermatitis, mucous membrane irritation (eye, nose, mouth), or pulmonary symptoms.
• Glutaraldehyde should be used in air systems that provide 7-15 air exchanges per hour, tight-fitting lids on immersion baths, personal protection (e.g., gloves, mask).
• The glutaraldehyde exposure limit is 0.05 ppm; this level significantly irritates the eyes, throat, and nose.
• If glutaraldehyde disposal through the sanitary sewer system is restricted, sodium bisulfate can be used to neutralize the glutaraldehyde and make it safe for disposal.
8.3.2 Ortho-phthalaldehyde
• Ortho-phthalaldehyde (OPA) is a high-level disinfectant that has received FDA clearance.
• It contains 0,55% 1,2-benzenedicarboxaldehyde (OPA). OPA solution is a clear, pale-blue liquid with a pH of 7.5.
• OPA has excellent stability over a wide range (pH 3-9). • It is not a known irritant to the eyes and the nasal passages, does not require exposure
monitoring, has a barely perceptible odor, and requires no activation. A potential disadvantage of OPA is that it stains proteins gray. OPA residues remaining on inadequately water-rinsed instruments cause discoloration.
• Personal protective equipment should be worn during contact. In addition, equipment must be thoroughly rinsed to prevent discoloration of a patient’s skin or mucous membrane.
• OPA is effective over a 14-day use cycle. • If OPA disposal through the sanitary sewer system is restricted, glycine (25
grams/gallon) can be used to neutralize the OPA and make it safe for disposal.

22
• Exposure time for OPA differs from one country to other (e.g., 5 minutes in Europe, Asia, and Latin America; 10 minutes in Canada and Australia; and 12 minutes in the United States).
8.3.3 Formaldehyde
• Formaldehyde is used as a disinfectant and sterilant in both its liquid and gaseous states.
• Ingestion of formaldehyde can be fatal, and long-term exposure to low levels in the air or on the skin can cause asthma-like respiratory problems and skin irritation. These considerations and others, such as its role as a suspected human carcinogen, limit its role in sterilization and disinfection processes.
• OSHA has indicated that formaldehyde should be handled in the workplace as a potential carcinogen and that an employee exposure standard should be set for formaldehyde that limits an 8-hour time-weighted average exposure concentration of 0.75 ppm. For these reasons, employees should have limited direct contact with formaldehyde, and these considerations limit its role in sterilization and disinfection processes.
8.3.4 Chlorine and Chlorine Compounds
• Despite their different structures, chlorine and chlorine compounds are highly oxidizing agents and have similar chemical reactions.
• They provide high, intermediate or low level disinfection depending on the concentration and exposure time.
• The effective amount is >1000 ppm for prion decontamination. They could be used as an alternative to 1 N NaOH solution for this purpose.
• The most important sources of chlorine are chlorine gas and hypochlorite. • Chlorine compounds include chloramines, sodium dichloroisocyanurate and chlorine
dioxide. The main product of superoxidized water is chlorine. • Chlorine has long been used as the disinfectant in water treatment. It is highly
irritating and corrosive. • The disinfecting efficacy of chlorine decreases with an increase in pH. • Sodium hypochlorite at the concentration used in household bleach (5.25-6.15%) can
produce ocular irritation or oropharyngeal, esophageal, and gastric irritation. It should have 50.000 ppm sodium hypochlorite (NaOCl).
• It should be free from metal acids such as ferrum and copper ions. • They are considerably affected by organic substances and proteins. • Hypochlorite is destroyed by light. Thus, they should be kept in non-light-absorbing
plastic containers. • Hypochlorite is widely used for surface disinfection, and disinfection of hydrotherapy
tanks, haemodialysis machines, and water systems. • The recommended time of contact is important, as it is for all disinfectants. • A 1:10-1:100 dilution of 5.25% (50.000 ppm) sodium hypochlorite has been
recommended for decontaminating blood spills. For small spills of blood (i.e., drops of blood) on non-critical surfaces, the area can be disinfected with a 1:100 dilution of 5.25%-6.15% sodium hypochlorite (500 ppm). Since hypochlorite and other germicides are substantially inactivated in the presence of blood, large spills of blood require that the surface be cleaned before a 1:10 (5000 ppm) (final concentration) solution of household bleach is applied.
• Hypochlorite solutions should be prepared with tap water daily. There will be loss of activity in kept solutions.
• New solutions should be prepared if contaminated.

23
• Bleach should never be used with acids such as hydrochloric acid and ammonia as they cause formation of toxic chemical compounds.
• One problem with chlorine-releasing granules is that they can generate chlorine fumes when applied to urine. The surfaces should be disinfected with bleach after cleaning and rinsing.
• Sodium dichloroisocyanurate (NaDCC) which is a chlorine compound is more effective and durable compared to hypochlorite.
• Sodium dichloroisocyanurate is presented as water-soluble powder, granule and tablet. The toxicity and irritation is less than those of hypochlorite.
• Chlorine dioxide (ClO2) is a water soluble gas. • It has activity in a wide range of pH (pH 6-10). • Like other chlorine compounds, it is affected by organic substances and light. • They are corrosive and irritating. They are harmful for some metals (such as brass,
copper) and plastics (such as polycarbonate, polyurethane). • Liquid chlorine dioxide is high-level disinfection activity. • It may cause corruption in some metal and polymer parts of endoscopes. It may cause
discoloration in external coating. • The corrosive effect increases as the density and time of contact increase. Therefore,
the least active concentration and the shortest time of contact are preferred for instrument disinfection.
• The gas form of chlorine dioxide is more effective than the liquid form. • It may leave a white dust on the surfaces after application.
8.3.5 Superoxide water
• Superoxide (electrolyzed) water is used for disinfection of heat-sensitive instruments, endoscopes, hard surfaces and water systems.
• As it is an endurable product, it is usually produced at the site of application and is used once.
• The activity should be monitored with pH (5-6.5) and oxide reduction potential (950 mvolt).
• Biocidal activity of this disinfectant decreased substantially in the presence of organic material.
• It is corrosive and may harm endoscope coating. • The material compatibility may be increased by corrosion preventatives and pH
adjustments. • Electrolyzed water system is effective in prevention of biofilm formation and
disintegration of the existing biofilm layer. Therefore, it is used in disinfection of water systems of dentistry units and filters.
8.3.6. Hydrogen peroxide
• Published reports ascribe good germicidal activity to hydrogen peroxide and attest its bactericidal, virucidal, sporicidal, and fungicidal properties.
• Commercially available 3% hydrogen peroxide is a stable and effective disinfectant when used on inanimate surfaces.
• It has been used in concentrations ranging from 3% to 6% for disinfecting soft contact lenses, tonometer biprisms, ventilators, and endoscopes.
• Corneal damage due to hydrogen peroxide-soaked tonometer tip that was not properly rinsed has been reported.
• As with other chemical sterilants, dilution of the hydrogen peroxide must be monitored by regularly testing the minimum effective concentration.

24
8.3.7 Peracetic acid
• Peracetic acid or peroxyacetic acid (PA) is characterized by rapid effect on all microorganisms.
• No harmful by-products are formed after use (acetic acid, water, oxygen, hydrogen peroxide) and there is no residue.
• It preserves activity in the presence of organic material and has sporicidal effect at low temperatures.
• It is corrosive on copper, brass, bronze, stainless steel and galvanized iron surfaces. • Peracetic acid solution is harmful for metal parts of endoscopes and should be changed
in 24 hours as it is not stable.
8.3.8 Peracetic acid and hydrogen peroxide
• FDA has cleared a newer chemical sterilant with 0.23% peracetic acid and 7.35% hydrogen peroxide.
• The bactericidal properties of peracetic acid and hydrogen peroxide have been demonstrated.
• The combination of peracetic acid and hydrogen peroxide inactivated all microorganisms within 20 minutes, except for bacterial spores.
• The combination of peracetic acid and hydrogen peroxide has been used for disinfecting hemodialyzers.
8.3.9 Phenolics
• Two phenol derivatives commonly found as constituents of hospital disinfectants are ortho-phenylphenol and ortho-benzyl-para-chlorophenol.
• Phenolics are absorbed by porous materials, and the residual disinfectant can irritate tissue.
• Phenolics should not be used to clean infant bassinets and incubators.
8.3.10 Quaternary Ammonium Compounds
• Quaternary ammonium compounds are low level disinfectants. Quaternary ammonium compounds are widely used as low level disinfectants. They should not be used as antiseptics.
• The quaternaries are good cleaning agents, but high degree of water hardness and materials such as that in cotton and gauze pads can make them less microbicidal because the insoluble precipitates or cotton or gauze pads absorb the active ingredients.
• Some of the examples of quaternary ammonium compounds used in healthcare are alkyl dimethyl ammonium chloride, alkyl didecyl dimethyl ammonium chloride, and dialkyl dimethyl ammonium chloride.
• The newer quaternary ammonium compounds (i.e., fourth generation), referred to as twin-chain or dialkyl quaternaries (e.g. didecyl dimethyl ammonium bromide and dioctyl dimethyl ammonium bromide), purportedly remain active in hard water and are tolerant to anionic residues.
• The quaternaries are commonly used in ordinary environmental sanitation of non-critical surfaces, such as floors, furniture and walls.

25
8.3.11 Iodophors • Iodophors have been used both as antiseptics and disinfectants. • Iodophors are intermediate-low level disinfectants depending on concentration and
contact time. • Dilutions of iodophor demonstrate more rapid bactericidal action than does a full-
strength povidone-iodine solution. Therefore, iodophor must be diluted according to the manufacturers’ directions to achieve antimicrobial activity.
• Iodophors formulated as antiseptics contain less free iodine than those formulated as disinfectants.
• Iodine or iodine-based antiseptics should not be used on silicone catheters because they can adversely affect the silicone tubing.
• Antiseptic iodophor is not suitable for use as hard-surface disinfectants.
8.3.12 Alcohol
• They are intermediate-low level disinfectants. • They are rapidly bactericidal rather than bacteriostatic against vegetative forms of bacteria;
they also are tuberculocidal, fungicidal, and virucidal, but do not destroy bacterial spores. • Alcohols are colorless, volatile compounds and they leave neither stain nor residues on the
surfaces, and they do not need rinsing. • They are not toxic. • Alcohols are flammable and must consequently be stored in a cool, well-ventilated area. • In the healthcare setting, “alcohol” refers to water-soluble chemical compounds-ethyl
alcohol (ethanol), isopropyl alcohol (isopropanol), and n-propyl alcohol (n-propanol). • Alcohol concentration is important for its antimicrobial effect. Ethyl alcohol has an
adequate effect with a concentration of over 60%, isopropyl alcohol with a concentration of 50%, and n-propyl alcohol with a concentration of 40%.
• Alcohols may cause skin dryness and irritation if used for long time. These effects can be prevented by skin protective additives.
• The optimum bactericidal concentration is 60%-95% solution in water (volume/volume). For skin antisepsis, a concentration of 70% (vol/vol) is optimal. However, it loses activity in concentrations of <50%.
• The most feasible explanation for the antimicrobial action of alcohol is denaturation of proteins and liquefying lipids. As protein denaturation requires some amount of water, absolute (96%) alcohol has a weak antimicrobial effect.
• Encapsulated viruses are rapidly inactivated, but higher concentrations and longer durations are required for non-encapsulated viruses.
• Adding iodine, povidone iodine, and chlorine hexidine to alcohol will provide stronger and longer efficacy.
• If used without proper cleaning, alcohols fix organic dirt as they have fixating properties. • Alcohols have been used effectively to disinfect oral and rectal thermometers, hard and
clean surfaces, tonometers, and fiberoptic endoscopes. • Unless wide, hard and smooth surfaces may be disinfected by wiping with alcohol. • As they are rapidly evaporated, medical instruments and materials can be disinfected
effectively by soaking in alcohol for 10 minutes. • They tend to swell and harden rubber and certain plastic tubings after prolonged and
repeated use, and they bleach rubber and plastic tiles and damage the shellac mountings of lensed instruments.
• Passing alcohol through the channels of the endoscope is an effective method of drying after the procedure for endoscope preparation to ensure that there is no humidity inside.

26
8.4 Advantages and disadvantages of high and intermediate level disinfectants
Disinfectant
Advantages
Disadvantages
* No activation required
*
Material compatibility concerns (lead, brass, copper, zinc), both cosmetic and functional
Peracetic acid / Hydrogen peroxide
* No significant odor or irritation
Limited clinical experience Potential for eye and skin damage
* *
Respiratory irritation from glutaraldehyde vapor
* Pungent and irritating odor
*
Relatively slow mycobactericidal activity
*
Coagulates blood and fixes tissue to surfaces
Glutaraldehyde
Excellent material compatibility
* No activation required
*
Material compatibility concerns (brass, zinc, copper, and nickel/silver plating), both cosmetic and functional
* May enhance removal of organic matter and organisms
* No disposal issues
* No odor or irritation issues * Good material compatibility
* Does not coagulate blood or fix tissues to surfaces
* Inhibits formation of biofilm
Hydrogen peroxide
* Inactivates Cryptosporidium
* Fast acting high-level disinfectant *
Stains skin, clothing, and environmental surfaces
* No activation required * No significant odor
Ortho-phthalaldehyde
* Excellent material compatibility claimed
* Rapid sterilization cycle time (30-45 minutes) * Used for immersible instruments only.
* Environmental friendly by-products *
Potential material incompatibility (e.g., aluminum anodized coating becomes distorted)
* Fully-automated
* Standardized cycle *
Biological indicator may not be suitable for routine monitoring
* No adverse health effects to operators *
One scope or a small number of instruments can be processed in a cycle
Peracetic acid
* Compatible with many materials and instruments

27
* Does not coagulate blood or fix tissues to surfaces * Serious eye and skin damage
* Rapidly sporicidal * Point-of-use system, no sterile storage
* Wide spectrum * Affected by organic materials * Rapid effect * Causes corrosion * Less toxicity * Irritates skin * Environment-friendly * Bleaches textile products
* Effective on biofilm layer *
Endurable, becomes distorted by light and heat
Hypochlorite
* Is not affected by hardness of water *
Forms toxic chlorine gas with ammonium and acids
* Rapid and strong effect *
It is produced during use due to its indurability
* Wide spectrum *
Affected by organic materials and light
* Preferred more than chlorine in water disinfection as it has no bad taste and odor *
Corrosive, harmful for some metals (copper, brass) and
Plastic *
Low toxicity * It can cause discoloration in some
surface material *
No carcinogenic or mutagenic effect
* It causes respiratory, eye and mucous irritation over concentrations of safety (0,1 ppm)
* Harmful concentration can be measured in gas form (>0.1 ppm)
* Can explode in the air with 7-8% concentration
Chlorine dioxide CIO2
* Degraded into non-toxic compounds
* Rapid effect, wide spectrum * Not sporicidal * Colorless, volatile, no residues * Flammable, explosive * No bad odor or stain * May cause skin dryness and irritation * Not toxic * Fixative * No requirement for rinsing or
drying *
Ineffective in dirty media * Good material compatibility * Hardens rubber and plastic materials * Durable * Harmful for assemled material of lenses
Alcohol
* Synergetic effect with other antiseptics
* No clarification of the applied area as it is colorless
8.5 Disinfectant test strips • Used for assessment of minimal effective concentration (MEC) of disinfectant solution • Should be specific for product. pH meters should not be used for this purpose. • The frequency of this test is determined by the frequency of use for the solution.
For example:
o One test daily before using the solution o One test daily after each 10 applications o One test after each 10 applications for 30 daily applications o One test before use for weekly use

28
• Test strips cannot be used to extend the expiration date of the solution. • Test strips should be assessed following the recommendations of the supplier. If the test
result is negative, that solution should not be used or added, and a new solution should be prepared.
• As the chemical substance on the strip will be disrupted in time, the box should have an expiration date on it.
• When the box of test strips is opened, the date and the period for use should be written on the box (e.g., 120 days).
• Test results should be recorded.
8.6 Factors affecting the efficacy of disinfection
• Anaerobic microorganisms are more resistant to disinfectants compared to aerobes.
• Gas sterilants like EO cannot penetrate into crystal. In the presence of organic substance on the surface, as there will be crystallization, this surface will not be sterilized with ethylene oxide.
• The disinfectant should be used with the concentration recommended by the producing company.
• As the number of microorganisms increases, the effect of the disinfectant decreases.
• The effect of disinfectant increases as the temperature of the media increases. The recommendations of the producing company on temperature should be followed in disinfectants, the effects of which are heat-dependent.
• The disinfectant activity is affected by the pH of the media. Thus, pH values recommended by the producer should be preferred.
• Organic materials and lipid in the media have negative effect on disinfection.
• Surface active materials or metal ions may produce a positive or a negative effect depending on the type of the disinfectant.
• Microorganism type is important in the disinfection procedure. Enveloped viruses are the most sensitive and prions are the most resistant pathogens, and microorganisms in biofilm are more resistant to disinfection.
8.7 Disinfection practices according to medical device
8.7.1 Endoscopes
• Some oxidizing chemicals (hydrogen peroxide and peracetic acid) reportedly have caused cosmetic and functional damage to endoscopes.
• Ethylene oxide sterilization of flexible endoscopes is uncommon, because it requires a lengthy process and aeration time.
• Glutaraldehyde solutions that do not contain surfactants are recommended, because the soapy residues of surfactants are difficult to remove during rinsing.
• Disinfectants that are not FDA-cleared that should not be used for reprocessing endoscopes include iodophor, alcohols, quaternary ammonium compounds and phenolics.
29
• Automated endoscope reprocessors (AER) automate and standardize several important reprocessing steps, reduce the likelihood of skipping an essential reprocessing step, and reduce personnel exposure to high-level disinfectants or chemical sterilants. Some endoscopes such as duodenoscopes and endoscopes used in endoscopic retrograde cholangiopancreatography [ERCP] and elevator-wire channel endoscopes, contain features that require a flushing pressure that is not achieved by most AERs and must be reprocessed manually using a 2- to 5-mL syringe.
• In general, endoscope disinfection or sterilization with a liquid chemical sterilant involves five steps:
1. Clean: mechanically clean the internal and external surfaces, including brushing the internal channels and flushing each internal channel with water and a detergent or enzymatic cleaners.
2. Disinfect: immerse endoscope in high-level disinfectant and perfuse the disinfectant into all accessible channels.
3. Rinse: rinse the endoscope and all channels with sterile water, filtered water or tap water.
4. Dry: rinse the insertion tube and inner channels with alcohol, and dry with forced air.
5. Store: store the endoscope in a way that prevents recontamination and promotes drying (e.g., hang vertically).
Infection-control professionals should ensure that institutional policies are consistent with national and international guidelines and conduct infection-control rounds periodically in areas where endoscopes are reprocessed to ensure policy compliance.
8.7.2 Laparoscopes, arthroscopes and cystoscopes
• Laparoscopes, arthroscopes and cystoscopes ideally should be sterilized before use. If this is not feasible, they should receive at least high-level disinfection followed by rinsing with sterile water. High-level disinfectant equipment cannot be stored.
8.7.3 Dental instruments
• Dental instruments that penetrate the soft tissue or bone are classified as critical and should be sterilized after each use or discarded.
• Dental instruments that are not intended to penetrate oral soft tissue or bone (e.g., amalgam condensers, air-water syringes), but that may come into contact with oral tissues are classified as semi-critical and should be sterilized after each use.
• Instruments that are not heat-resistant and are not sterilized with heat should not be used.
• Chemical disinfection should not be preferred for critical and semi-critical instruments.
• Open surfaces such as patient chair and lamp handle should be disinfected with an intermediate or low-level disinfectant between treatment of each patient.
• If water-resistant clothes are used to prevent surface contamination, they should be changed between patients. There is no need for protected surfaces to be disinfected between patients, but they should be disinfected at the end of the day.

30
8.7.4 Bone decontamination
• Bone is the second most transplanted organ following blood. Obtaining, storing and bacteriological control are important for infection control. These tissues should be sterilized in a way that is not harmful for the recipient and tissue.
• None of the sterilization methods is ideal for tissues such as tendon or ligament. The usual methods may be harmful for the quality of biological graft, may increase toxicity, or may not be adequate to eradicate microorganisms.
• If the tissue is contaminated during the operation, the most effective method is irrigation with 2%-4% chlorine hexidine solution and bathing with antibiotics consisting of three antibiotics and 4% chlorine hexidine for 10-12 minutes. However, this method should not be used as a routine decontamination method.
8.7.5 Processing patient-care equipment contaminated with bloodborne pathogens; HBV, HCV, HIV or tuberculosis
• All patients are potentially infected with bloodborne pathogens and therefore standard precautions should be taken. There is no requirement for extra precautions.
• High-level disinfection is adequate for semi-critical instruments contaminated with these microorganisms.
• EO sterilization is not routinely recommended for the sterilization of endoscopes due to the long duration of the procedure.
• As chlorine compounds are inactivated in the presence of organic material, they should not be used for endoscope disinfection.
8.7.6 Hemodialysis unit
• Hemodialysis systems (haemodialysis machines, water supply, water-treatment systems, and distribution systems) may render patients to acquire bloodborne viruses and pathogenic bacteria.
• Cleaning and disinfection are important components of infection control in a haemodialysis center.
• Non-critical surfaces and equipment should receive low-level disinfection, semi-critical equipment should receive high-level disinfection, and critical equipment should be sterilized.
• Low-level disinfectants are adequate for non-critical surfaces including dialysis beds or chairs, and external surfaces of dialysis machines. However, if the item is visibly contaminated with blood, a tuberculocidal agent should be used.
• Hemodialysis systems are disinfected by peracetic acid, aqueous formaldehyde, glutaraldehyde, chlorine-based disinfectants (e.g., sodium hypochlorite), and hydrogen peroxide. All products must be used according to the manufacturers’ recommendations.
• Some dialysis systems use hot-water disinfection to control microbial contamination.

31
8.7.7 Tonometers, Cryosurgical Instruments, and Endocavitary Probes
• In view of the potential for transmission of viruses by tonometer tips, CDC has recommended that the tonometer tips be wiped clean and disinfected for 5-10 minutes with either 3% hydrogen peroxide, 5000 ppm chlorine, 70% ethyl alcohol, or 70% isopropyl alcohol.
• After disinfection, the tonometer should be thoroughly rinsed in tap water and air dried before use.
• Vaginal probes are used in sonographic scanning. A vaginal probe and all endocavitary probes without a probe cover are semi-critical devices, because they have direct contact with mucous membranes.
• This guideline proposes the use of a new condom/probe cover for the probe used on each patient, and because condoms/probe covers can fail, the probe should also undergo high-level disinfection.
• The relevance of this recommendation is reinforced with the findings that sterile transvaginal ultrasound probe covers have a very high rate of perforation even before use (0%, 25%, and 65% perforations from three suppliers).
• Although most ultrasound manufacturers recommend the use of 2% glutaraldehyde for high-level disinfection of contaminated transvaginal transducers, this agent has been questioned because it may shorten the life of the transducer and may produce toxic effects on the gametes and embryos.
• An alternative procedure for disinfecting the vaginal transducer involves the mechanical removal of the gel from the transducer, cleaning the transducer in soap and water, wiping the transducer with 70% alcohol or soaking it for 2 minutes in 500 ppm chlorine, and rinsing with tap water and air drying.
• High-level disinfection with a product (e.g., hydrogen peroxide) that is not toxic to staff, patients, probes, and retrieved cells should be used until the effectiveness of alternative procedures against microbes of importance at the cavitary site is demonstrated by well-designed experimental scientific studies. Other probes such as rectal, cryosurgical, and transesophageal probes or devices should also undergo high-level disinfection between patients.
• Some cryosurgical probes are not fully immersible. During the reprocessing, the tip of the probe should be immersed in a high-level disinfectant for an appropriate duration; any other portion of the probe that could have mucous membrane contact can be disinfected by immersion or by wrapping with a cloth soaked in a high-level disinfectant to allow the recommended period of contact. After disinfection, the probe should be rinsed with tap water and dried before use. Healthcare facilities that use non-immersible probes should replace them as soon as possible with fully immersible probes.
• As with other high-level disinfection procedures, proper cleaning of probes is necessary to ensure the success of subsequent disinfection.
• No information is available about either the level of contamination of such probes by potential viral pathogens such as HBV and HPV, or their removal by cleaning (such as with a towel). Since these pathogens may be present in vaginal and rectal secretions and contaminate probes during use, high-level disinfection of the probes after such use is recommended.

32
9. DECONTAMINATION
9.1 Equipment used in decontamination (Figure 3).
• Brushes, soft cloth, sponge • Water gun with pressure (lavage syringe) • Air gun with pressure (lavage syringe) • Ultrasonic cleaner • Washer/ Disinfector • Instrument drying cabinets • Detergent-disinfectant / enzymatic solution
Figure 3. Equipment used for decontamination
9.2 Manual decontamination
• Instruments are washed with tap water in wire baskets if required. • They are placed in detergent-disinfectant or enzymatic solution, and kept for an
adequate period recommended by the product company. It is important to change the enzymatic solutions frequently as they provide a rich media for bacterial growth.
• All dirt and organic residues are washed with a soft cloth or sponge; instrument lumens are washed with a special brush and cleaned with an air gun with pressure.
• Instruments are rinsed with tap water (Rinsing with distilled water in the end will extend the instrument life).
• They are dried with pressured air.
9.2.1 Decontamination of instruments and equipment
Surgical motors
• They are switched off. • Motors with cable or air are washed and disinfected without removing the cables. If
there is a battery, it is removed. • All pieces are separated if possible. • The motor part is not soaked in water and is not washed in ultrasonic washing machine;
it is wiped with a cloth soaked in disinfectant. • The recommendations of the producing company are followed for cleaning the
accessories of the surgical motor.

33
Laparoscopic instruments
• All pieces are separated if possible. • Cannules are cleaned with pressured water and air, checked again, and the procedure is
repeated if not cleaned. Brush is used if needed.
Microsurgical instruments
• Care should be taken as to not harm the sharp tips as they are sensitive and may cause injury during washing.
Cautery cords
• The bipolar tips are removed from the cords; care is taken for the tips of forceps and for the cables not to break.
• Pressured air is used inside the cauterizing tips of the unipolar tips.
Optic and cords
• The ultrasonic washing machine is not used. • All the optic is separated from the adaptors. • Dried with pressured air and adaptors are cleaned with cotton buds if needed. • Adaptors are placed and checked. • If there is stain or residues on the tip, the optical or the light carrying parts, they are
cleaned with a special optic cleaning cream. If not cleaned, it is washed, rinsed and dried again.
• All procedures are performed on the counter in order to prevent dropping of the instruments.
9.3 Cleaning with washer disinfectors (Figure 4)
Washing-disinfector machines are used for cleaning and disinfection. With the use of washing-disinfector machines, material can be safely touched by naked hand. The principles of working are presented below:

34
• Pre-washing; is performed by cold tap water to remove blood, organic residues and
rough dirt. • Cleaning; is performed at 40-55oC. Alkaline detergents or neutral detergents with or
without enzyme are used as the cleaning substance. If chemical cleaning substances are used, the concentration, heat and time of contact should be consistent with the manufacturer’s recommendations. If the machine has an automated dosing system, it should be under control.
If chloride concentration is over the normal limit, it may cause corrosion on metals. This danger can be cleared by using alkaline cleaning products and polishers during washing and using demineralized water in the last rinsing stage. For medical devices which are heat-sensitive, chemothermal washing-disinfection procedures are preferred and the last rinsing stage is performed at low temperature.
• Rinsing; There is no additional benefit in rinsing with warm or cold water. The added acidic neutralizing substances enhance the removal of alkaline detergent residues.
• Thermal disinfection/last rinsing; A0=600 conditions should be maintained for critical items that would be sterilized after thermal disinfection and A0=3000 conditions for semi-critical items that would not be sterilized.
- A0=600: 10 minutes at 80oC or 1 minute at 90oC - A0=3000: 5 minutes at 90oC
Demineralized water is used in the last rinse to avoid corrosion and stains.
• Drying; If there is no separate drying program in the washing-disinfecting machine, drying is performed by forced air or in drying cabinets.
9.3.1 Cautions for washer-disinfector use • Do not overload. • Open the connections and lids of the medical device to let water in. • If a large device is placed, check if it prevents the washing of other devices. • Place instruments with lumens in the appropriate position. • Place fragile devices in the appropriate position. • Place microsurgical devices with care. Place probes (tips) and other easily broken pieces
in the machine using special apparatus. • Replace washed devices immediately. • If the device is not dried adequately, then re-dry.
9.3.2 Monitorization of washer/disinfectors: • Chemical indicators showing whether or not mechanical cleaning is performed adequately are monitored at each cycle. • Ninhydrin equivalant tests to detect protein are used once weekly. • Electronic control systems showing temperature and time parameters are monitored at each cycle (EN ISO 15883).
9.3.3 Cleaning of washer-disinfectors
• Remove the rack in the cabin and check the holes of the water propellers. Clean with forced water and air if needed.
• Clean the inside of the lid, environment and external surfaces with disinfectant. • Clean detergent and solution drawers with water and dry them. • Fill, if the level of detergent / solution is low and record the date of solution change.

35
• Wipe the cars used for cleaning-disinfectors with a cloth soaked in disinfectant solution. • Clean the devices following the recommendations of the manufacturers. • Polish once weekly and clean daily after completion of procedures.
9.4 Ultrasonic washing machines
These are devices using ultrasonicwaves that resolve and removeblood, protein and otherorganicsubstances,especiallyondeviceswithlumensanddevicesandmaterialsthatarehard
tocleanatacertaintemperature(40‐500C).
9.4.1 Cautions for ultrasonic cleaning
• Fill bath according to instructions of the manufacturer. • Use a cleaning agent or combined cleaning/disinfection agent in concentrations and
temperatures recommended by the manufacturer. • Make sure the bath is degassed. Any gas in the water reduces the cavitation and thus the
cleaning effect. Therefore, use warm water, preferably up to 40°C. This will stimulate degassing, thus improving the cleaning results.
• Make sure that all items to be treated are fully immersed. • Hinged instruments should be opened. • Use wire trays not to inhibit the ultrasonic vibrations. • Do not overload trays. • Big devices with large surfaces may inhibit ultrasonic waves to reach other devices.
Therefore, these devices are not placed vertically or on top of small devices. • Renew the ultrasonic bath at least twice a day, and if necessary, more frequently,
depending on the conditions of use.
9.4.2 Cleaning ultrasonic washing machines
• Ultrasonic washing solution is changed each morning or whenever the solution is dirty.
• When the tank is emptied to prepare a new solution, the inner part of the tank is cleaned with a cloth soaked in intermediate level disinfectant solution (such as alcohol).
• Ultrasonic washing machines should be cleaned following the manufacturers’ recommendations.
10. INSTRUMENT DRYING AND MAINTANENCE
• Instruments and materials should not be packed without drying. • Drying should be performed using air gun or drying cabinets. • Ensure that devices are clean, dry and working. • Joint sites should be lubricated with water-soluble oils. • Instruments which are worn-out, have corrosion, deformation or any other damage,
should be discarded.

36
11. PACKAGING 11.1. Packing materials and Qualifications (Figure 5)
Awiderangeofmaterialsusedforpackingofsterilesuppliesareavailable.
Traditionally, packing materials for sterile supplies used to be re-usable, such as sterilizing drums and cotton ware. Due to their inadequate microbial barrier, most of these traditional materials do not meet the requirements of primary sterile packing anymore. They may still play a role as mechanical protection or an additional dust protection layer. Today, non-woven, laminated polypropylene bags, paper bags and containers are used as primary packing materials. The following is an overview of packing materials in use in sterile supply:
11.1.1.Textile
Use: Inner wrapping of instrument sets or external dust protection
• Textile alone is not suitable for primary packing! • Textile packing material should be washed before use. • It should be of 180 filament /cm2-four-layer thickness, or 280 filament/cm2 -two-layer
thickness.
Cotton sheets have long been the standard packing material for sterile goods. It has some advantages
• Textile has always been a very common and well known hospital commodity • Strong • Well drapable and convenient for use • Can be re-used.
The openings between the threads however, are larger then most micro-organisms and thus the fabric does not provide an adequate microbial barrier. It therefore does not meet the requirements anymore as primary packing for sterile goods. They are, however, still often used as an inner wrapping for protection or as an external dust cover. Whenever textile is used, it should contain its natural humidity (it should be conditioned). If textile is too dry, it may cause overheating of the steam and thus lead to a failed sterilization.
11.1.2.Medical paper
Use: Primary packing for wrapping of textile packs and instrument sets in trays. Also used as inner packing in containers.

37
Paper was the first alternative that replaced textile. It has a smaller pore size than textile, and thus can be used for primary packing. Smooth papers are used for inner packing, whereas crepe paper is stronger and rough. Crepe paper can be used for inner and outer packing.
During sterilization, steam penetrates through the packing. When paper is wet, it loses much of its original strength. Therefore, stress in the paper should be prevented. Wrapping should not be too tight, but not too loose, either. Adequate drying is essential.
Paper sheets are for single use only.
11.1.3.Paper sterilization bags
Use: For packing of individual instruments or small sets used in nursing stations and wards.
Closing is usually done in a sealing device.
Disadvantages:
• They are not very strong • Opening is not convenient: tearing or cutting • They do not facilitate an aseptic opening. • You cannot see what is inside
Aseptic presentation can be improved by putting instruments in the bag with the handle at the opening end. Removal of instruments from the bag is not convenient. Its use has decreased with the introduction of laminated film bags.
Paper sterilization bags are for single use only
11.1.4.Non-woven
Use: Primary packing for wrapping of textile packs and instrument sets in trays. Also used as inner packing in containers
Non-woven sheets contain a certain amount of synthetic fibers. These may be inorganic, textile, cellulose or other kind of synthetic fibers. These fibers of different materials are joined together by, for example, pressing and heating. This means that the fibers are not woven together, but sealed together. For sterilization, special non-woven sheets have been developed to meet the requirements of primary packing of sterile goods. They combine the good characteristics of other packing materials:
• Very strong • Well drapable • Allow air removal and penetration of the sterilizing agent • Very small pores, thus an efficient microbial barrier • Virtually lint-free; free of particles and loose fibers • They repel liquids (hydrophobic). Fluids are not absorbed into the fabric. • Various non-woven materials are available for a range of applications in the sterilization
department: extra soft, extra strong, etc.
Non-woven sheets are for single use only

38
11.1.5.Paper-plastic bags
Use: Primary packing of individual instruments or small instrument sets.
They are disposable bags with one side as paper and one side which is transparent, and sealed with heat. They were the follow-up of paper sterilization bags. The bags consist of a sheet of paper or non-woven and a sheet of laminated transparent plastic, which are sealed together. Plastic film should have two or more layers. The connection between the plastic layers should not be separated and the transparency of the plastic should not be destroyed. The film cannot be penetrated by steam or air. Removal of air and penetration of steam is through the paper/non-woven. The bag is opened by peeling back the laminated sheet from the paper sheets.
These bags are available in many sizes. The open end of the bag is closed with a sealing device. It is essential that the sealing temperature and pressure are adjusted well in order to get an adequate seal.
Furthermore, laminated film packing is available on a roller. The user can cut the bags to any size needed. In that case, both sides need to be sealed by the user.
Remarks
• The peel-open system assures dust-free aseptic opening of a presentation. • The bag should be in such a way that when peeling and opening, neither the paper nor
the laminate will tear. It should open neatly along the seals. • It should not release fibers or fluff. • The content is clearly visible. • It should not possible to reseal the bag, when having been opened by mistake. • A process indicator should be on the bag indicating whether a product has been
processed or not. • The content should not be tightly surrounded by the packing material; it should be able
to move freely inside the bag. • Sterilization bags should be placed upright in a grid basket or container and not too tight
together, in such a way that a hand can slide in between them. • Laminated film bags are for single use only. • When packing in dual laminated bags, make sure that the paper of both packs are on the
same side. The inner bag should fit freely in the outer bag! • If textile packing materials should be used, they should be washed before use. • The integrity of the pack should not be destroyed. • It should be resistant to tearing and piercing. • It should be compatible with the sterilization method. • The content of the pack should be protected from any harm. • An effective barrier should be used to protect the medical material that will be sterilized
from contamination. • It should not be toxic. • It should not release fibers or fluff. • It should allow easy release of air. • It should be used following the manufacturer’s recommendations.

39
11.1.6. Container systems
• Metal or plastic, filtered boxes. • Resistant to humidity. • Should be constructed so that there is no vapor accumulation in it. • Should have filtered sections to provide penetration of the sterilizant into the container. • Filters should be changed following the manufacturer’s recommendations.
11.1.7. Transparent plastic clothes sustaining sterility
• Made of transparent plastic bag that avoids contact of dust with the pack • Used after sterilization • Maintains and protects sustainability of material sterility
11.2 Normative references about packaging(European)
Packing materials should meet the minimum requirements that have been formulated by the CEN (European Standards Commission):
TS EN 868-1 Packing materials and systems for medical devices which are to be sterilized. General requirements and test methods
TS EN 868-2 Packing materials and systems for medical devices which are to be sterilized - Part 2: Sterilization wrap – Requirements and test methods
TS EN 868-3 Packing materials and systems for medical devices which are to be sterilized - Part 3: Paper for use in the manufacture of paper bags (specified in Part 4 of this standard) and in the manufacture of bags and reels (specified in Part 5 of this standard) - Requirements and test methods
TS EN 868-4 Packing materials and systems for medical devices which are to be sterilized - Part 4: Paper bags - Requirements and test methods.
TS EN 868-5 Packing materials and systems for medical devices which are to be sterilized - Part 5: Heat sealable bags and reels of material manufactured from paper and plastic – Requirements and test methods,
TS EN 868-6 Packing materials and systems for medical devices which are to be sterilized - Part 6: Paper for the manufacture of packs for medical use for sterilization by ethylene oxide or irradiation - Requirements and test methods.
TS EN 868-7 Packing materials and systems for medical devices which are to be sterilized - Part 7: Adhesive coated paper for the manufacture of heat sealable packs for medical use for sterilization by ethylene oxide or irradiation - Requirements and test methods.
TS EN 868-8 Packing materials and systems for medical devices which are to be sterilized - Part 8: Re-usable containers for steam sterilizers conforming to EN 285 - Requirements and test methods
TS EN 868-9 Packing materials and systems for medical devices which are to be sterilized - Part 9: polyolefin material which is not uncoated fabric and which is used in production of heat-sealable bags, reels and lids- Requirements and test methods.
TS EN 868-10 Packing materials and systems for medical devices which are to be sterilized – Part 10: Nonwoven, adhesive coated polyolefin material that used in production of heat-sealable bags, reels and lids- Requirements and test methods.

40
11.3 Principles of packing
When opening a pack containing sterile materials, it is essential that the content does not become contaminated due to the act of opening. Wrapping techniques for packs and sets have been developed which assures this aseptic opening. The most common wrapping techniques that are applied for packing of textile packs and instrument sets are the envelope fold and the parcel fold. The unfolded wrapper covers the instrument table and thus provides a sterile field. These techniques can be used for sheets of textile, paper and non-woven sheets.
• The pack size and weight for steam sterilizer should not exceed 30x30x50 cm and 5,5 kg, respectively.
• Packing is performed by envelope fold or parcel fold using double packing material. • Each layer is packed separately. • Date of sterilization, pack content, initials of the person and loading number are
recorded on the badge /indicator tape. • In the sterilization bags, the date of sterilization, pack content, initials of the person and
loading number are recorded on the top external heat-sealable part of the bag. • A chemical indicator is placed in every pack. • The weight of the packed instrument set (tray, instruments and wrap in total) should not
exceed 7 kg. • Instruments and materials to be packed should be clean and dry.. • Sterilization trays with holes that permit passage of steam preferred. • Surgical instruments are locked onto a single clamp. • If the basin should be placed one in another, towels are placed between. • Cotton or linen towel is placed at the bottom of the tray as a single layer and as
completely opened. • The towel slop-over from tray is folded onto the instruments.
11.4 Wrapping techniques can be classified as;
• Envelope fold, • Parcel fold • Folding with paper / plastic bags

41
Envelope method (Figure 6)
• Double fold two textile wrap/ medical packing paper or one medical paper on one nonwoven shhet is placed on the table.
• Instrument set is placed in a diamond shape in the middle. • The edge on the large side is folded on the instrument set and the tip is folded back to
provide easy opening. • Right- and left- edged tips are folded back and placed on the material to be packed. • Finally, the other large side is folded onto the material. The tip is squeezed in a way that
it can be pulled out. The second cloth is closed and taped in the same way.
11.4.1 Rectangular fold (Figure 7)

42
• Double folded two woven wrap / medical packing paper / or one medical paper on one
nonwoven sheet is spread on the table. • Material is placed parallel to the edges. • First, the wide side is folded onto the material; some is turned backwards. • The other wide side is folded on it. • The right and the left sides are folded in a similar way. • The second layer cloth is closed with the same method.
11.4.2 Packaging with paper /plastic bag (Figure 8)
• A paper/plastic bag with a convenient size is selected for the material to be packed. • Using the machine, first, one side and then the other side of paper is pasted. • If the pack is heavy or if more than one pack should be packed, double packing is used. • In double-fold packing, one side of the inner pack is closed; the other side is then folded
towards the transparent part. The specifications of the packed material should not be blocked.
• While preparing the upper pack, care should be taken for the open part of the inner pack to be on the opening part of the pack.
• It should be checked if it is well-pasted. • The date is recorded on the outer side of the pack which is heat-sealed. There should be
no writing directly on the pack. • Barcodes and stickers should not be placed on the paper, but on the bag part. • Air is evacuated before it is heat-sealed, as it may cause tearing due to expansion.
11.5 Packaging practices convenient with materials
Surgical instrument set:
• Instruments which were dissected are mounted. • Lubricated with medical oil if required. Excess oil is cleaned with a soft cloth without
fiber. • Spray is used for instruments attachment sites that are hardened in consistency. • Instruments are checked according to the list. Non-operating instruments are discarded. • The name of the set and the missing instruments are recorded on the pack tape or
documentation sticker. • A wire basket of convenient size is used for the instruments. • The base of the basket is covered with a cloth large enough to cover the instruments
(paper or nonwoven sheet or textile). • The contents of the set are checked according to the “prepared set list” and placed in this
basket. • The date and the name are written on the set list and placed on the basket. • Instruments with locks are locked; forceps are not locked. • Instruments are placed parallel to each other. • They are packed using envelope fold.

43
Optic:
• Adaptors are mounted. • The display is checked if clear or not. • It is placed in its special box or sheath with care. • Optic and cold light cords are packed to be sterilized in EO, formaldehyde and plasma
sterilizer (cords are rounded and placed in 25-30 cm sterilization bag).
Sponges and laparotomy pads:
• They are counted one by one (e.g., packs with 5 or 10). • If they are radio-opaque, they are prepared is standard numbers according to the place of
use and with radio-opaque lines in the same direction (The sponge that will be used in body cavities should have radio-opaque lines and the line should be braided).
• They are placed in paper/pouch packs with three sides closed (if radio-opaque, in a way that radio-opaque line is visible). The other side is also pasted and checked if well-pasted.
Surgical motor and accessories:
• Lubrication is performed following the manufacturer recommendations. • The ones in a set are packed using the envelope fold and single ones are packed with
paper plastic bags.
Liquid containers:
• Dry if wet. • Use towels to separate large ones from each other. • A towel is placed inside the large one to cover the whole of the interior. • The second one is placed on top of the larger one, with the bottom parallel to other one. • The chemical indicator is placed in the pack without contact to metal parts. • Folding is performed with the parcel or the envelope method. • The pack is closed with a steam process indicator tape. • The small single liquid container is packed with paper/plastic medical bags. • It is placed in a bag. The part with the liquid should be on the same side with the paper
part. Both sides of the sterilization bag are pasted with the packing machine
Drapes:
• Washed and clean drapes are grouped. • They are checked for holes, tears, etc, on a well-illuminated table. The intact ones are
folded in a way that they can be easily opened. • The residues such as string, tape, etc are removed. If required, washed again if there is
any residues of adhesive substance. • For the drape set, the ones that would be last used is placed at the bottom, parallel to
each other. Parcel folding is used. • The pack should not be too tight or too loose.

44
11.6.Choosing a packing material according to the sterilization method
Packing material
Steam
Ethylene oxide
Gas plasma
Formaldehyde
Radiation
Dry heat
Textile + - - - + -
Nonwoven + + - + + -
Polypropylene (Tyvek)
+ + + + +* -
Paper + plastic bag
+ + - + + -
Metal container + + - + - +
Plastic container
+*** + + + +** -
(*) Polypropylene with preservative to increase radiation resistance
(* *) Plastic container resistant to radiation
(* * *) Plastic container resistant to heat
11.7 Sealer
Sterilization bags should be sealed using sealers that have the specification of sealing with heat.
• The initials of the personnel who does the packing and the date should be recorded. • The manufacturer’s recommendations should be used to apply the sealing temperature. • The sealing temperature should be 180OC for paper and plastic bags, and 120OC for
polypropylene bags. • The machine should be checked once a week with seal check. • The recording of the content should be written on the outer and upper part of the sealed
bag. • Pens should be non-volatile and non-toxic.

45
12. STERILIZATION METHODS
12.1 Dry-heat Sterilizers (Pasteur oven)
The primary lethal process is slow and is considered to be the coagulation of cellular proteins by oxidation of cell constituents. Control parameters are not reliable. It is hard to control the homogenous distribution of heat in dry heat sterilizers. Heat penetration and microbial killing are slow and time-consuming. High temperatures are not suitable for most materials. Dry heat sterilizers should not be used for instrument sterilization in CSSDs.
The most common time-temperature relationships for sterilization with hot air sterilizers:
170°C for 60 minutes (1 hour)
160°C for 120 minutes (2 hours)
150°C for 150 minutes (2.5 hours)
The duration begins after the required temperature is achieved. Time required for penetration of heat into the packed material and time required for the decrease in the temperature to room temperature at the end of procedure are not included in these.
Advantages of dry heat include the following:
• It is non-toxic • It does not harm the environment; • Suitable for powder, petroleum oil, and glycerin
Disadvantages of dry heat are: • the slow rate of heat penetration and microbial killing makes this a time-consuming
method. • the high temperatures are not suitable for most materials
12.2 Steam sterilization method
Of all the methods available for sterilization, moist heat in the form of saturated steam under pressure is the most widely used. Steam sterilization is non-toxic, inexpensive, rapidly microbicidal, sporicidal, and rapidly heats and penetrates fabrics. Saturated steam at a certain temperature condenses on the material when it comes into contact with a cooler material. During condensation, it provides heat to pass to material and the material rapidly reaches the heat of steam. Meanwhile, the thin water layer formed on the material is fatal for microorganisms.
Thus, there are four parameters of steam sterilization: steam, pressure, temperature, and time.
According to EN 13060 standards, sterilizers in which a 30 x 30 x 60 cm box does not fit and has a capacity <60 liters are small sterilizers.
46
According to EN 285 standards, sterilizators in which a box with at least 30 x 30 x 60 cm dimension fits are big sterilizers.
The most common time-temperature relationships for sterilization with steam sterilizers:
134°C for 3 - 3,5 minutes (in pre-vacuum autoclaves)
121°C for 15 minutes (in pre-vacuum autoclaves)
121°C for 30-45 minutes (in autoclaves without vacuum)
The two basic types of steam sterilizers (autoclaves) are the gravity displacement autoclave and the pre-vacuum autoclaves.
Gravity autoclaves
• Steam is introduced at the top or the sides of the sterilizing chamber and because the steam is lighter than air, it forces air out to the bottom of the chamber through the drain vent. These autoclaves are primarily used to process laboratory media, water, pharmaceutical products, regulated medical waste, and non-porous articles, the surfaces of which have direct steam contact. For gravity displacement sterilizers, the penetration time into the porous items is prolonged because of incomplete air elimination. This point is illustrated with the decontamination of 10 lbs of microbiological waste, which requires at least 45 minutes at 121°C, because the entrapped air remaining in a load of waste greatly retards the steam permeation and heating efficiency.
• Suitable for materials without lumen • Can be used for sterilization of liquids • Cannot be used in CSSD for sterilization of surgical instruments • The Bowie and Dick test cannot be utilized
Pre-vacuum autoclaves
The pre-vacuum sterilizers are similar to the gravity displacement sterilizers, except for the fact that they are fitted with a vacuum pump (or ejector) to ensure air removal from the sterilizing chamber and load before the steam is introduced. The advantage of using a vacuum pump is that there is nearly instantaneous steam penetration, even into porous loads.
Advantages: • Non-toxic, • The cycle is easy to control and monitor • Inexpensive • Rapidly microbicidal • Least affected by organic/inorganic soils • Rapid cycle time • Penetrates medical packing, device lumens
Disadvantages • Deleterious toheat labile instruments • Potential for burns

47
Flash Sterilization
• “Flash” steam sterilization is sterilization of an unwrapped object of few numbers at 132°C for 3 minutes at 27-28 lbs. of pressure in a gravity displacement sterilizer.
• It also is used when there is insufficient time to sterilize an item by the preferred packing method. Flash sterilization should not be used for reasons of convenience, as an alternative to purchasing additional instrument sets, or to save time.
• It is not recommended as a routine sterilization method. Instrument sets and drapes should not be sterilized this way.
• Because of the potential for serious infections, flash sterilization is not recommended for implantable devices (i.e., devices implanted into a surgically or naturally formed cavity of the human body).
• If it is obligatory to use the flash program, countertop steam autoclave should be ready to use in the operating theatre within the responsibility of CSSD.
• Sterilized equipment should be transferred to the operating rooms to facilitate aseptic delivery to the point of use.
• Staff should follow precautions to prevent burns with potentially hot instruments (e.g., transport tray using heat-protective gloves). Patient burns may be prevented by either air-cooling the instruments or immersion in sterile liquid (e.g., saline).
• Recordkeeping (i.e., load identification, patient’s name/hospital identifier, and biological indicator result) is essential for epidemiological tracking (e.g. of surgical site infection, tracing results of biological indicators to patients who received the item to document sterility), and for an assessment of the reliability of the sterilization process (e.g. evaluation of biological monitoring records and sterilization maintenance records noting preventive maintenance and repairs with dates.
12.2.1 Principles for loading steam sterilizer
• Fabric and big packs are placed on the bottom shelf, and small packs are placed on the upper shelf.
• Paper to paper, plastic to plastic. • Packs should not be squeezed. • Drapes should be vertical/leaning position; instrument trays should be placed on the
bottom shelf horizontally. • If the instrument tray is to be placed horizontally in the sterilizer, two sets can be put
together if the pack to be sterilized should allow steam passage by wire baskets • There should be spaces between the wraps and at a 5-10 cm distance to the sterilizer
wall. • 70% of the chamber volume should be filled at the most. • Fabric sets which are concave should be placed next to each other, slightly looking
downwards. (Figure 9)

48
Advantages
• Economic • Short procedure time • Non-toxic • Environment friendly Disadvantages
• Electrical instruments, liquids, oily material such as petroleum gel, material that is heat- and humidity- sensitive cannot be sterilized.
12.2.2 Assessment of the packs for humidity
Causes for humidity in packs Causes related to the CSSD team • The pack size exceeds the normal size • The drapes are located too close to each other and squeezed • Metal material concentration is too high • The materials that were wrapped are wet • Metal materials are not cooled at room temperature • Water accumulates at the edges of surgical container.
Causes related to CSSD sterilization device • Low quality steam • Inadequate steam amount • Non-functioning drain valve • Filter is obstructed • There is water in the steam jacket • Drying time is inadequate • Vacuum drying system is out of order • Wet wraps should not be used
12.2.3 Prion Decontamination
• Prions are resistant to normal disinfection and sterilization methods.
Infection risk in human tissue, organ, and body fluids with suspect of spongiform encephalopathy
Infection risk Tissue, organ, and body fluids
High Brain (including dura mater), spinal cord, eye
Low CSF, liver, lymph nodes, kidney, lung, spleen
No risk at all Peripheral nerves, intestines, bone marrow, the whole blood, leukocytes, serum, thyroid, adrenal glands, the heart, skeletal muscles, adipose tissue, gingiva, prostate, testis, placenta, eyelids, nasal mucosa, saliva, sputum, urine, feces, semen, vaginal secretion, milk

49
Efficacy of sterilization methods for prion inactivation
Recommendations for instruments in contact with risky tissues of patients with suspect or diagnosis of prion:
• Disposable instruments should be preferred. • Pre-cleaning is the most effective and practical way of prion reduction. • Medical material contaminated with prion and those impossible to clean should be
discarded as medical waste after keeping in stiff bleach (5,25% sodium hypochlorite) (50.000 ppm free chlorur) for one hour.
• Flash sterilization should not be used. • Non-critical environmental surfaces (laboratory surfaces) contaminated with high risk
tissues are cleaned with 1/10 sodium hypochlorite. • For instruments used in intermediate-low risk tissues of high risk patients, standard
sterilization or high level disinfection is performed. • Standard disinfection methods are adequate for environmental surfaces contaminated
with intermediate-low risk tissues.
12. 3 Low-Temperature Sterilization Technologies
12.3.1 Ethylene Oxide
• ETO is a colorless gas that is heavier than air, flammable, explosive, and toxic. The microbicidal activity of ETO is considered to be the result of alkylation of protein, DNA, and RNA. Alkylation, or the replacement of a hydrogen atom with an alkyl group within cells prevents the normal cellular metabolism and replication
• It is compatible with many medical materials and is preferred for heat-sensitive materials.
• EO sterilization is performed by using moisture and EO gas at low temperatures. • The four essential parameters are: gas concentration (450 to 1200 mg/l); temperature (37
to 55°C); relative humidity (40 to 60%)(water molecules carry ETO to reactive sites); and exposure time (1 to 6 hours). These influence the effectiveness of ETO sterilization.
• ETO is absorbed by many materials. For this reason, following sterilization, the item must undergo aeration to remove residual ETO.
• OSHA has established a PEL of 1 ppm airborne ETO in the workplace for an 8-hour working period and the short-term excursion limit is 5 ppm, expressed as a 15-minute TWA according to OSHA standards.
• The perceivable ratio is approximately 500-750 ppm. • The EO concentration should be 300-1200mg/L according to EN 550 standards.

50
Advantages
• It can sterilize heat- or moisture- sensitive medical equipment without deleterious effects on the material used in the medical devices.
• No limitation for the lumen Disadvantages
The main disadvantages associated with ETO are;
• the lengthy cycle time • the cost • its potential hazards to patients and staff (toxic, carcinogenic, flammable, explosive) • harmful for the environment • liquids cannot be sterilized this way.
12.3.1.1 Precautions for loading
• The packs are placed in the basket vertically and parallel to each other. The plastic surface should be on the paper surface.
• The instrument tray is placed horizontally. • If the pack needs to be placed straight, the paper part should be facing the bottom. • The load in baskets should not be squeezed. • There should be a space between the material basket and the sterilizer, and the packing
should not touch the inner circle. • The maximum loading capacity is 70% of the chamber volume.
12.3.1.2 Aeration time
• The procedure time for EO sterilizer is at least two hours. • After sterilization, the device has a minimum 8-10 hours of aeration within the chamber. • It should be additionally aerated for 12 hours to two weeks taking into consideration the
criteria including the purpose of using the sterilized material, lumen thickness and length, and if it will be left in the body or not.
12.3.1.3 Protective equipment
• Gloves • Mask with an eye-protective part • Shirt with long sleeves • Cap
12.3.1.4 Precautions for safety at work
• Danger warning signs are placed. • Only authorized personnel in the EO area • In-service training for the related personnel on EO dangers and using with safety (device
care, emergency, potential harms, etc.) • EO gas residue is evacuated after being neutralized with a catalyzer. • Sound alarm systems or manual detectors are used for the gas level in the EO room

51
12.3.1.5 Systems with cartridge
• They are aluminum containers consisting of 100% EO in amounts varying according to the capacity of the device.
• The device and the cartridge should be compatible. • Cartridges should be kept in the container or tank to decrease the risk of fire/explosion
(Figure 10).
12.3.1.6 Systems with tube
• Tubes with the least possible amount are used and labeled. • Tube indicators are checked regularly.
12.3.1.7 CSSD evacuation in emergency
• If there is an alarm in the gas detector, do not open the room doors. • Activate the EO room aeration • Remove cartridges or tubes in case of fire, electrical leakage, etc. • Evacuate all personnel. • Wait for the alarm to stop before entering the room and enter wearing long sleeve shirt,
gloves and gas mask. 12.3.1.8 In case of exposure;
• Remove the source of contamination if possible and carry the exposed person outside. • Call for medical help. • If skin is contaminated with EO, wash with slow pouring warm water for five minutes or
until the chemical substance is removed. • Provide general support (warming, resting, assuring). • Visit the nearest physician or toxicology center in all intoxications.

52
12.3.2 LTSF (Low temperature steam formaldehyde)
• Pure formaldehyde is a water-soluble gas with a boiling point of 19oC. It is colorless, flammable and toxic.
• Reliable sterilization using formaldehyde is achieved when performed with a high concentration of gas, at a temperature between 50° and 80°C and with a relative humidity of 60 to 80%.
• As with EO, personnel using formaldehyde sterilizers should undergo periodic health examinations.
• The permissible exposure limit for formaldehyde in work areas is 0.75 ppm measured as an 8-hour TWA. The OSHA standard includes a 2 ppm STEL (i.e., maximum exposure allowed during a 15-minute period).
Advantages • Preferred for heat-sensitive materials • No need to aerate after sterilization (EN14180)
Disadvantages • Toxic • Carcinogenic • Liquids cannot be sterilized this way
12.3.3 Gas Plasma Sterilization
• Gas plasma is generated in an enclosed chamber under deep vacuum using radio frequency or microwave energy to excite the gas molecules and produce charged particles, many of which are in the form of free radicals. The proposed mechanism of action of this device is the production of free radicals within a plasma field that are capable of interacting with essential cell components and thereby disrupt the metabolism of microorganisms.
• The process operates in the range of 37-44°C and has a cycle time of 75 minutes. • Non-cellulose containing synthetic materials such as polypropylene or tyveck is used for
packing. • The manufacturer’s recommendations are followed for lumen diameter and length.
Advantages • Materials and devices that cannot tolerate high temperatures and humidity, such as some
plastics, electrical devices, and corrosion-susceptible metal alloys, can be sterilized by hydrogen peroxide gas plasma. This method has been compatible with most (>95%) medical devices and materials tested.
• Short time of operation • No need for aeration • Not harmful for the environment
Disadvantages • Liquids cannot be sterilized with this method. • Packing material without cellulose is required. • There is limitation for the lumen.

53
12.3.4 Peracetic acid sterilization (automated peracetic acid sterilizer):
• This method was introduced for endoscope sterilization. • As it is a non-packing sterilization method, it is not possible to wrap and store
instruments before use. • It should not be used, except for the automated sterilizers for chemical sterilization
purposes. • Peracetic acid is a highly biocidal oxidizer that maintains its efficacy in the presence of
organic soil. • It is a desktop system • Peracetic acid removes surface contaminants (primarily protein) on endoscopic tubing • The sterilization cabinet contains trays and containers. • Sterilization is maintained at 50-56°C for 12 minutes of exposure. • Not harmful for the environment or the personnel
12.3.5 Sterilization with Gamma Radiation There are two types of radiation effective for microorganisms; ionizing and non-ionizing. Gamma rays, high energy electrons (electron beams) and X-rays are in the ionizing radiation group (<1 nm wave length). UV-radiation (240- 280 nm) is non-ionizing radiation. Ionizing radiation is used for sterilization, and UV-radiation is used for disinfection due to its long wave length and thus low energy level.
Radiation has two effects on microorganisms; direct and indirect. The first is direct DNA injury and the other is free radical formation with secondary reactions and inactivation of microorganisms by these radicals.
Gamma rays are extremely penetrative and are commonly used for sterilization of disposable medical equipment. The origin of gamma rays is the imbalance between the numbers of proton-neutron in the nucleus of an atom. A nucleus with excess energy releases electromagnetic radiation which is referred to as gamma rays. Ionizing is caused by the interaction between substance and radiation.
Gamma rays enable the sterilization of end products as they have the ability to penetrate packed material. It is also a rapid, effective and reliable method that can be easily used for heat-sensitive products that cannot be sterilized with conventional techniques such as steam sterilization.

54
12.4 Advantages and disadvantages of sterilization methods
STERILIZATION METHOD
ADVANTAGES DISADVANTAGES
Steam • Not harmful for the worker, the patient or the environment
• Easy to control and monitor
• Rapid microbiocidal effect
• Short cycle time
• Penetrates medical packs and instruments with lumen
Not suitable for heat-sensitive materials
Hydrogen peroxide
Gas plasma
• Not harmful for the health worker or the environment
• No toxic residues
• Short cycle time
• Suitable for heat-sensitive and steam-sensitive materials
• Easy to use
• Compatible with many medical materials
• Not suitable for cellulose, silk and liquids
• Limitation for 40 cm length and 3 mm lumen diameter
• Need for polypropylene packing
• Need for specific container
100% Ethylene oxide (ETO)
• Penetrates into packing and devices with lumen
• One dose cartridge
• Minimal gas leak in a negative pressure environment
• Easy to use
• Compatible with many medical materials
• Aeration need
• Toxic, carcinogen
• Flammable, explosive
• Long time necessary for aeration
ETO mixtures
12% ETO, 88% CFC
8,6% ETO, 91% 4HCFC
10% ETO, 90% HCFC
8,5% ETO, 91,5% C02
• Penetrates into packing and devices with lumen
• Easy to use
• Compatible with many medical materials
• Relatively short sterilization cycle
• Toxic, carcinogenic
• Flammable, explosive
• Long aeration time
• CFC was banned in 1995
Low temperature steam formaldehyde
• Penetrates into packing and devices with lumen
• Easy to use
• Compatible with many medical materials
• Toxic
• Carcinogenic

55
12.5 Cleaning of sterilizers
• Cleaning is performed according to the manufacturer’s recommendations. • Turn off the steam sterilizer using “control” switch. • When cooled, the basket track and filter that are found at the bottom of the
chamber are removed. • The inner chamber, door edges, and areas adjacent of EO, formaldehyde, and
hydrogen peroxide sterilizer are wiped with a soft cloth without fiber, soaked in water with a convenient detergent.
• It is rinsed and dried until all detergent residues are cleaned. • Door seals are kept away from the detergent. • Clean tray holder and trays with detergent, or a non-abrasive stainless steel
cleaner and water, using a cloth or sponge. DO NOT use steel wool, a steel brush or bleach. The inner circle, the basket ray, the filter, the loading cars, and the internal facet of the door are wiped with a soft cloth soaked in warm water with detergent, rinsed, and dried.
• The control panel is wiped with a wet cloth without rubbing. • Clean the exterior of the unit with a soft cloth and steel polisher recommended by
the manufacturer.
13. MONITORIZATION OF STERILIZATION
• To control sterilization, ensure that each step is performed correctly • Record each step • Use and document the physical, chemical, and biological tests as an evidence of
effective sterilization
13.1 Physical control
• The program cycle consists of chart recorders-computer printouts, heat and pressure measurement devices, humidity measurement indicators.
• They provide information on the physical conditions of the sterilization cycle. • Data from electronic and mechanical sensors are analyzed. • Printouts are checked and used as a part of the recording system. The device should be continuously calibrated as it loses sensitivity and is worn out in time.
13.1.1 Electronic control devices
Electronic test systems that can test parameters including steam penetration (Bowie&Dick), vacuum leak, air residue, temperature, time and pressure, can record physical parameters in the sterilization cycle.
13.1.2 Vacuum leak test
The limit for the vacuum leak test is 1.3 mbar/minute. In case when there is <1.3 milibar/minute, the device should be stopped and the malfunction should be notified. The device should not be loaded before repair. The frequency of the vacuum leak test should be determined according to the leak rate. If the vacuum leak is <1 mbar/minute, it should be performed once a week and the graphic should be kept. If it is >1 mbar/minute it should be performed daily and the graphs should be kept in the records.

56
13.2 Chemical Control
Indicator classification according to EN ISO 11140
Class I- Process Indicators: Process indicators are intended for use with individual units, (e.g., packs, containers) to indicate that the unit has been directly exposed to the sterilization process and to distinguish between the processed and the unprocessed units. They shall be designed to react to one or more of the critical process variables. Indicator tapes, indicator labels, and load cards are examples of externally visible Chemical Indicators that are Process Indicators used for exposure control. Class II- Indicators for use in Specific Tests: Bowie-Dick type tests are specific tests used for equipment control to evaluate the sterilizer performance. Class III- Single Variable Indicators: A single variable indicator shall be designed to react to one of the critical variables and is intended to indicate exposure to a sterilization process at a stated value (SV) of the chosen variable. Class IV- Multi-variable Indicators: A multi-variable indicator shall be designed to react to two or more of the critical variables and is intended to indicate exposure to a sterilization cycle at SVs of the chosen variable. Class V- Integrating Indicators: Integrating indicators shall be designed to react to all critical variables. Class VI- Emulating Indicators: Indicators giving results at specific temperature and time intervals.
13.2.1 Class I- Process Indicators Indicator tapes-stickers
• They do not provide information on the efficacy of the sterilization procedure. • They only show whether the wrap is sterilized or not. • They are also used to close the wrap and fix. • They prevent non-sterilized material to mix with sterilized ones.
13.2.2 Class II- Indicators for use in Specific Tests (Bowie & Dick test)
This is a diagnostic test of a sterilizer’s ability to remove air from the chamber of a pre-vacuum steam sterilizer. The air-removal or the Bowie-Dick test is not a test for sterilization.This real-time information is obtained using the Bowie&Dick chemical indicators in pre-vacuum devices (EN 867-1, EN 867-4). For efficient steam sterilization, steam should reach all surfaces to be sterilized in the form of saturated steam and should sustain its effect in an appropriate temperature and time. • The Bowie&Dick test pack is placed on the shelf at the bottom, at the nearest point to
the air evacuation valve or vacuum pump when the sterilizer is empty. • When the program finishes, the test sheet is checked and if there is no problem, all lines
return to the reference color homogenously. • According to EN 285, the vacuum leak test is performed at the same time each day with
the Bowie&Dick once before procedures if the device is working without, turning it off. • The records should be kept as indicators of the device. Appendix 3- (Steam Sterilizer
Check Form)
Non-homogenous color change on the Bowie&Dick Test Card • Inadequate vacuum function; air in the device • Potential leak in the autoclave • Overheated steam or steam with water droplets • Steam not condensating

57
If the test kit is processed at 134°C for a period longer than 3,5-4 minutes, incorrect results can be achieved.
13.2.3 Class III- Single Parameter Indicators:
The color changes in case of materialization of one parameter which is most commonly the temperature.
13.2.4 Class IV- Multi-parameter Indicators: They test at least two parameters.
Single-variable and multi-variable indicators
The classification is defined according to the indicator performance. The classification has no hierarchical significance. It is important to understand the classes of chemical indicators, so that you can choose the correct chemical indicator for the sterilization process being monitored.
The reaction occurs by the effect of one or more important parameters. The aims of using chemical indicators are to detect incorrect packing, incorrect sterilizer loading or probable sterilizer faults that may be caused by sterilizer malfunction. Chemical test results cannot be perceived as indicators of microbiological sterility, but are accepted as an indicator of desired parameters of the sterilization procedure to be applied completely.
Failure of Color Change in Single-parameter or multi-parameter indicators (Chemical Indicators)
• Malfunction of the sterilizer • Inappropriate packing and loading • Packing material not being permeable. • Inadequate penetration of steam, EO, formaldehyde, H2O2 • Inadequate temperature and/or time
If there is no color change, the load should be re-processed from the beginnning.
13.2.5 Class V- Integrators: They are indicators that can test the critical parameters related to biological inactivation. They can immediately control all the critical variables taking biological death as reference as indicated in ISO 11138. This is the evidence that the three parameters have been present long enough.
13.2.6 Class VI- Emulation Indicators: They are indicators providing results at specific temperatures and time intervals. They prove the presence of critical variables determined at a specific temperature and time interval in a procedure.
13.2.7 Process Challenge Device (PCD ) A process challenge device is the test kit designed to simulate the product to be sterilized and to constitute a defined challenge to the sterilization process, and used to assess the effective performance of the process. Disposable commercial PCD packs should be manufactured consistent with the 32 towel principle and conditions in items 4.5 and 4.6 of EN 867-5 standard for the simulation of sterilization of hollow instruments.
13.2.7.1 Creating a challenge test kit according to AAMI Standards Process Challenge Device (PCD) (Biological indicator, class V integrating chemical or enzymatic indicators)

58
• It should be formed with clean reusable absorbant towels. • The size of the towels should be 41 cm X 66 cm; each towel should be folded three
times longitudinally and once latitudinally. • Towels are placed on top of each other after folding, with the folded parts at the bottom,
forming a pack of 23 cm x 23 cm x 15 cm size. • The biological indicator is placed in the middle and between the 8th and the 9th towels
with class V integrating chemical indicator. • It is taped at a height of 15 cm; this should be at a weight of 1350 gr. • Towels should not be wrapped with extra pack. • They should not be placed horizontally. • They should be placed at the point in which sterilization is expected to be most difficult. • The manufacturer should define this point. • It is usually in the front and the bottom part, at the nearest point of drainage. • It is processed with the pack load in the sterilizer and incubated at a convenient
temperature after the sterilization cycle. • PCD with 16 towels is a challenge for air evacuation and steam penetration.
13.2.7.2 Creating a resistant PCD test pack (using B&D test sheet) for textile sterilization
according to EN
• It is made of white cotton textile of 45 cm X 30 cm size, with edges not folded but brimmed.
• The number of warps in 10 mm should be 30±6, the number of wefts should be 27±5, and the weight should be 185±5 g/m2.
• Textiles should be washed when new or dirty. • They should be dried and aerated, but not ironed. • Stored textiles should be opened and kept aside for one hour before use at 20-30oC and
40%-70% humidity, and then folded open. • After aeration, textiles are wrapped at a size of 11 cm X 15 cm, at a total height of 12
cm, packed with same textile and closed using the indicator tape. • The total weight of the pack should not exceed 900±30 g. • The folding sites of the textiles should be at a different edge at every fold. • The Bowie&Dick test sheet is placed between the sixteenth and the seventeenth towel
and approximately in the center. • The Bowie&Dick test pack is placed on the bottom shelf, at the nearest site to the air
evacuation or vacuum pump when the sterilizer is empty. • At the end of the program, the test sheet is checked and if there is no problem, it is
expected that all lines will change homogenously to the reference color.
13.2.7.3 Process Challenge Device-PCD for instruments with lumen
It is a system designed to form a defined resistance against the sterilization procedure in order to see whether sterilization is effective or not.
The types are EO, steam, and formaldehyde. A lumen with 2 mm diameter, 1,5 m length, and 0,5 mm wall thickness is produced from polytetraflouroethylene and a capsule with a screw cap is placed on the tip and an indicator placed in the capsule.
It provides biological or chemical control according to the indicator in the capsule.
It is placed on the device (on the evacuation valve). The regulations for indicator systems and their use in validation are given in the European Standard EN 867-5.

59
13.3. Biological Control Methods
All sections of EN ISO 11138: 2006 Standard were published.
Chapter 1 General Requirements
Chapter 2 BIs for EO
Chapter 3 BIs for steam
Chapter 4 BIs for dry heat
Chapter 5 BIs for LTSF
Biological Control: provides direct information on sterilization and shows whether sterilization is adequate for biological death or not.
Among the biological indicators, bacterial spores which are known to be the most resistant to sterilization are used.
Biological indicators are obtained by drying standard bacterial spores in water-culture media in suspension or in plastic, paper, aluminum carriers. They are used to check sterilization performed by heat, chemical sterilization, and radiation.
BIOLOGICAL INDICATOR AND APPLICATION FREQUENCY ACCORDING TO STERILIZATION METHOD
STERILIZATION METHOD
BIOLOGICAL INDICATOR APPLICATION FREQUENCY
EO Bacillus atrophaeus (B.subtilis) Each cycle
Steam Geobacillus stearothermophilus
At least once a week,
Every day if possible. At every load that includes an implant.
Formaldehyde Geobacillus stearothermophilus
Once a week,
Every day if possible. At every load that includes an implant
Dry heat Bacillus atrophaeus (B.subtilis) Once a week
H2O2 Geobacillus stearothermophilus Every day at first use

60
• Biological indicators are placed in a separate pack or wrap and placed in the
sterilizer at a point which is thought to be very difficult for the sterilization procedure to reach, such as lids, corners, and vacuum exits.
• At the end of the cycle, at the end of time defined by the recommendations of the manufacturer, the presence of growth is assessed and it is decided whether sterilization provides biological death or not.
The manufacturer’s recommendations should be followed for biological indicators as it is in chemical indicators, about storage, use, being subject to microbiological tests of the product.
The most important problem with biological indicators is the necessity of the incubation period for results. Beside the indicators that provide result in 48 hours, there are rapid methods which result in one to five hours according to the reaction method and sterilization method used.
The biological indicator placed in the sterilizer is processed with the load and is incubated at a convenient temperature after the sterilization cycle.
Records should be kept for biological control. Appendix 4- (Document for Biological Indicator Results)
Biological indicators are recommended to be used:
• During the first cycle assemby of steam sterilizers; • After any malfunction of the sterilizer that requires repair; • At least once a week routinely, every day ideally; • For sterilization of instruments that include implant, at each load.
Causes of positive biological indicator result:
In steam sterilizers:
• Inadequate air evacuation • Inconvenient steam quality • Inadequate temperature and time for sterilization • Inconvenient packing material • Packing and/or loading faults
In EO sterilizers
• Humidity is not convenient • EO gas concentration is not adequate • Sterilization temperature and time are not adequate • Packing material is not convenient • Packing and/or loading faults

61
In case of positive results in the biological control; • Sterilizer is accepted as out-of-order. Maintenance and controls are performed by the
manufacturer or biomedical personnel. • The tests are repeated. The device can be used again after three consecutive negative
biological control results. • Sterilized material of a particular cycle in a particular sterilizer in which growth was
recorded are collected, and packs are opened and processed as dirty material. The material is delivered to wards and operating theatres are recalled, and recall reports are recorded.
• If any material or instrument with a positive biological indicator result is used for a patient, the patient is followed-up by the infection control committee.
14. DOCUMENTATION
The recording system should have:
• Proofs of procedures and tests performed • Biological, chemical, and physical performance tests • Performance test that shows efficacy of the decontamination procedure • Reports of malfunction, repair, maintenance and validation • Changes in products or packs • Recall records
The recording system enables recall for all steps.
• Record cards and stickers, • Record-keeping files and documentation tools can be used. Sterilization indicators that are used for material monitoring should be recorded and kept; B&D test papers should be kept as part of the record system, and all results should be checked by experienced personnel. Record books or forms can be used for these procedures. The records should be kept for five years.
Appendix 5- (Steam Sterilizer Loading Form)
15. VALIDATION
A documented program which provides a high degree of assurance that a specific process will consistently produce a product that meets its predetermined specifications and quality attributes. Proving that pre-determined conditions of the sterilization system and procedures are continuously maintained. With the new ISO 14937, the “Sterilization of Health Services Products–general characteristics of sterilizer agent and improvement of sterilization procedure, validation (proving and approving validity) and routine control” guideline was entered into force, and assessing the setup, operation and performance have become obligatory. Validation of sterilization is evidence that the targeted aim is achieved.
Validation of sterilization is general for all sterilization methods. The procedure steps of validation are obtaining, recording, and interpreting the specific test results. These tests will show that all required conditions are maintained to have a sterile product.

62
Steps of Validation
• Installation Qualification: This will ensure that the device is correctly mounted, connected to air, steam, and water and that these sources are functioning properly. There should not be any interactions with other devices.
• Operational Qualification: This will ensure that the device is operating as predicted in the specifications. It consists of tests shown in EN 285. These tests are performed by an independent, preferably accredited institution.
• Performance Qualification: These tests are performed by the user during routine use. They show that the sterilizer sterilizes adequately.
16. STORAGE AND SHELF LIFE OF STERILE EQUIPMENT Sterile supplies should be stored at a sufficient distance from the floor (20 to 30 cm), and from the ceiling (15 cm unless near a sprinkler head and the outside walls (5 cm), to allow adequate air circulation, ease of cleaning, and compliance with local fire codes (e.g. supplies must be at least at a distance of 45 cm from sprinkler heads).
Medical and surgical supplies should not be stored under sinks or in other locations where they can become wet.
Sterile items that become wet are considered contaminated because moisture brings with it microorganisms from the air and surfaces.
Any package that has fallen or been dropped on the floor must be inspected for damage to the packing and contents.
If the package is heat-sealed in impervious plastic and the seal is still intact, the package should be considered uncontaminated. If undamaged, items packed in plastic need not be reprocessed.
Sterilized items should have a load number that indicates the sterilizer used, the cycle or load number, the date of sterilization, and, if applicable, the expiry date. The product should remain sterile until some event causes the item to become contaminated (ie. tear in the packing, packing becomes wet, seal is broken). Event-related factors that contribute to the contamination of a product include bioburden (i.e. the amount of contamination in the environment), air movement, traffic, location, humidity, insects, vermin, flooding, storage area space, open/closed shelving, temperature, and the properties of the wrap material. There are data that support the event-related shelf-life practice
• Precautions should be taken to avoid rodents or insects in the sterile storage area. If pesticides are used, care should be taken for sterile material not to be exposed to the pesticides. Areas with insects or rodents should not be used as sterile storage areas.
• Evaluate the packs before use for loss of integrity (ie. torn, wet, and punctured). The pack can be used unless the integrity of the packing is compromised. If the integrity of the packing is compromised (ie. torn, wet, or punctured), repack and reprocess the pack before use.
• If time-related storage of sterile items is used, label the pack at the time of sterilization with an expiration date. Once this date expires, reprocess the pack.
• The first sterilized and stored material should be used first. • If the expiry date of sterile disposable material is over, it should not be re-sterilized.

63
Factors affecting shelf life
• Qualifications of packing material • Number of pack folds • Use of dust cloth • Human traffic at the storage area • Air movement • Humidity and temperature • Wet • Volume of storage area • Open and closed shelves • Transfer conditions
Storage time under convenient storage conditions
• Material packed with polypropylene tyveck bag 1 year • Material packed with sterilization bags 6 months • Material packed with double-fold textile 30 days • Material packed with double-fold nonwoven or medical paper 30 days
17. PRECAUTIONS FOR EXTRAORDINARY CASES IN CSSD
• Fire extinguishers (tubes and pipes) should be ready for extraordinary cases and training should be provided.
• No equipment in aisles and exits to block emergency evacuation. • No flammables (carton, sawdust, etc) in areas where EO is in use. No smoking. • Explosive EO cartridges are stored in metal containers with a lid in order to avoid falls
during earthquakes. • An extraordinary action plan and equipment should be kept ready in case of gas leak or
other extraordinary states. • Monitors with visual, sound and light warnings approved by OSHA are used for gas
leaks.
18. CONCRETE SUGGESTIONS
18.1 Cleaning of Patient-Care Devices
• Hospitals should implement most of the cleaning, disinfection, and sterilization of patient-care devices in a central processing department in order to control the quality more easily.
• Clean the patient-care items meticulously with water and detergent, or with water and enzymatic cleaners before high-level disinfection or sterilization procedures.
• Remove visible organic residue (ie. residue of blood and tissue) and inorganic salts by cleaning. Use cleaning agents that are capable of removing visible organic and inorganic residues.
• Clean the medical devices as soon as possible after use, because soiled materials dry up on the instruments.

64
• Ensure that the selected detergents or enzymatic cleaners are compatible with metals and other materials used in medical instruments.
• Inspect equipment surfaces for breaks in integrity that would impair either cleaning or disinfection/sterilization. Discard or repair equipment that no longer function as intended or cannot be properly cleaned, disinfected or sterilized
18.2 High-Level Disinfection of Endoscopes
• Immediately after use, clean the endoscope meticulously with an enzymatic cleaner that is compatible with the endoscope.
• Disconnect and disassemble endoscopic components (ie. suction valves) as completely as possible and completely immerse all components into the enzymatic cleaner.
• Flush and brush all accessible channels to remove all organic (ie. blood, tissue) and other residue.
• Discard enzymatic cleaners (or detergents) regularly, because they are not microbicidal and, therefore, will not retard microbial growth.
• Process the endoscopes (ie. arthroscopes, cystoscope, laparoscopes) that pass through normally sterile tissues using a sterilization procedure before each use; if this is not feasible, provide at least high-level disinfection. High-level disinfection of arthroscopes, laparoscopes, and cytoscopes should be followed by a sterile water rinse.
• Mechanically clean the re-usable accessories inserted into endoscopes (ie. biopsy forceps or other cutting instruments) that break the mucosal barrier (ie. ultrasonically clean the biopsy forceps) and then sterilize these items between use on each patient.
• Process the endoscopes and accessories that come into contact with mucous membranes as semi-critical items, and use at least high-level disinfection after use on each patient.
• After cleaning, use formulations containing glutaraldehyde, glutaraldehyde with phenol/phenate, ortho-phthalaldehyde, hydrogen peroxide, and the combination of hydrogen peroxide and peracetic acid to achieve high-level disinfection followed by rinsing and drying.
• Select a disinfectant or chemical sterilant that is compatible with the device that is being reprocessed (chlorine causes corrosion on metals). Avoid using reprocessing chemicals on an endoscope if the endoscope manufacturer warns against using these chemicals because of functional damage.
• Completely immerse the endoscope in the high-level disinfectant, and ensure all channels are perfused. As soon as this is feasible, phase out the non-immersible endoscopes.
• After high-level disinfection, rinse the endoscopes and flush channels with sterile water, filtered water, or tap water. Follow this water rinse with a rinse with 70% - 90% ethyl or isopropyl alcohol.
• After flushing all channels with alcohol, purge the channels using forced air to reduce the likelihood of contamination of the endoscope by waterborne pathogens, and facilitate drying.
• Hang endoscopes in a vertical position to facilitate drying.
• Store endoscopes in a manner that will protect them from damage or contamination.

65
• Sterilize or disinfect at high-level, both the water bottle used to provide intra-procedural flush solution and its connecting tube at least once daily. After sterilizing or high-level disinfecting the water bottle, fill it with sterile water.
• Maintain a log for each procedure and record the following: patient’s name and medical record number, procedure, date, endoscopist, and serial number or other identifier of the endoscope used.
• Design facilities where endoscopes are used and disinfected to provide a safe environment for healthcare workers and patients. Use air-exchange equipment to minimize exposure of all persons to potentially toxic vapors.
• Routinely test the liquid sterilant/high-level disinfectant to ensure the minimal effective concentration of the active ingredient. Check the solution on each day of use (or more frequently) using the appropriate chemical indicator. Discard the solution if the chemical indicator shows that the concentration is less than the minimum effective concentration.
• Provide personnel assigned to reprocess endoscopes with device-specific reprocessing written instructions to ensure proper cleaning and high-level disinfection or sterilization. On a regular basis, require competency testing of all personnel who reprocess endoscopes.
• Educate all personnel who use chemicals about the possible biological, chemical, and environmental hazards of performing procedures that require disinfectants.
• Make personal protective equipment (ie. gloves, gowns, eyewear, face mask or shields, respiratory protection devices) available, and use these items appropriately to protect workers from exposure to both chemicals and microorganisms.
• Develop protocols to ensure that users can readily identify an endoscope that has been properly processed and is ready for patient use.
18.3 Flash Sterilization
• When necessary, use flash sterilization for patient-care items that would be used immediately (ie. to reprocess an inadvertently dropped instrument).
• Do not flash sterilize implanted surgical devices.
• When using flash sterilization, make sure the following parameters are met: 1) clean the item before placing it in the sterilizing container or tray; 2) prevent exogenous contamination of the item during transport from the sterilizer to the patient; and 3) monitor sterilizer function with mechanical, chemical, and biological monitors.
• Do not use packing materials and containers in flash sterilization cycles unless the sterilizer and the packing material/container are designed for this use.
• When necessary, use flash sterilization for processing patient-care items that cannot be packed, sterilized, and stored before use.
• Do not use flash sterilization for convenience, as an alternative to purchasing additional instrument sets, or to save time.
66
18.4 Sterilization methods
• Steam is the preferred method for sterilizing critical medical and surgical instruments that are not damaged by heat, steam, pressure, or moisture.
• Cool the steam- or heat-sterilized items before they are handled or used in the operative setting.
• Follow the sterilization times, temperatures, and other operating parameters (ie. gas concentration, humidity) recommended by the manufacturers of the instruments, the sterilizer, and the container or wrap used, and that are consistent with guidelines published by government agencies and professional organizations.
• Use low-temperature sterilization technologies (ie. EtO, hydrogen peroxide gas plasma) for reprocessing critical patient-care equipment that is heat- or moisture- sensitive.
• Completely aerate surgical and medical items that have been sterilized in the EtO sterilizer (ie. polyvinylchloride tubing requires 12 hours at 50°C, 8 hours at 60°C) before using these items in patient care.
• Sterilization using the peracetic acid immersion system can be used to sterilize heat-sensitive immersible medical and surgical items.
• Critical items that have been sterilized by the peracetic acid immersion process must be used immediately.
• Dry-heat sterilization (ie. At 170°C for 60 minutes) can be used to sterilize items (e.g. powders, oils) that can sustain high temperatures.
• Comply with the sterilizer manufacturer’s instructions regarding the sterilizer cycle parameters (e.g. time, temperature, concentration).
• Since narrow-lumened devices provide a challenge to all low-temperature sterilization technologies and direct contact is necessary for the sterilant to be effective, ensure that the sterilant has direct contact with contaminated surfaces.
18.5 Packing
• Ensure that the packing materials are compatible with the sterilization process.
• Ensure that the packing is sufficiently strong to resist punctures and tears to provide a barrier to microorganisms and moisture.
18.6 Monitorization of Sterilizers
• Use mechanical, chemical, and biological monitors to ensure the effectiveness of the sterilization process.
• Monitor each load with mechanical (ie. time, temperature, pressure) and chemical (internal and external) indicators.
• Do not use processed items if the mechanical (ie. time, temperature, and pressure) or chemical (internal and/or external) indicators suggest inadequate processing.
• If additional spore tests remain positive, consider the items non-sterile and recall and reprocess the items from the implicated load(s).
• Use biological indicators for every load containing implantable items and quarantine items, whenever possible, until the biological indicator is negative

67
18.7 Loading
Place items correctly and loosely onto the basket, shelf, or cart of the sterilizer, so as not to impede the penetration of the sterilant.
18.8 Storage
• Ensure that the sterile storage area is a well-ventilated area that provides protection against dust, moisture, insects, and temperature and humidity extremes.
• Store sterile items so that the packing is not compromised (e.g., punctured, bent).
• Label sterilized items with a load number that indicates the sterilizer used, the cycle or load number, the date of sterilization, and if applicable, the expiration date.
• The shelf life of a packed sterile item depends on the quality of the wrapper, the storage conditions, and the conditions during transport, the amount of handling, and other events (moisture) that compromise the integrity of the pack.
• Evaluate packs before use for loss of integrity (ie. torn, wet, punctured). The pack can be used unless the integrity of the packing is compromised.
• If the integrity of the packing is compromised (ie. torn, wet, or punctured), repack and reprocess the pack before use.
• If time-related storage of the sterile items is used, label the pack at the time of sterilization with an expiration date.

68
References
1. ANSI/AAMI ST:41:1999/R-2005. Ethylene oxide sterilization in health care fascilities:safety and effectiveness
2. ANSI/AAMI ST:79: 2006. Comprehensive guide to steam sterilization and sterility assurance in health care fascilities.
3. Antisepsis, Disinfection and Sterilization. McDonnell GE (editor). ASM Press, American Society for Microbiology, Washington DC, USA (2007).
4. Huys J. Sterilization of Medical Supplies by Steam. Vol 1-General Theory.2nd ed. Germany: Vier-Turme GmbH, Benedict Press; 2004.
5. Instrument Preparation Working Group. Proper Maintenance of Instruments. 8th revised ed. Germany: Instrument Preparation Working Group; 2005.
6. Perkins JJ. Growth and death of microorganisms. In: Perkins JJ, ed. Principles and Methods of Sterilization in Health Sciences. 2nd ed. Illinois: Charles C Thomas; 1969: 56-62.
7. Recommendations by the Commission for Hospital Hygiene and Infection Prevention at the Robert Koch Institute and the Federal German Institute for medical drugs and medical products concerning the “Hygienic requirements for processing of medical devices”.
8. Rosenberg U. Thermal disinfection-The Ao concept and the biological background. Central Service 2003; 11: 118-120.
9. Russell, Hugo and Ayliffe’s Principles and Practice of Disinfection, Preservation and Sterilization. Fraise AP, Lambert PA, Maillard J (eds). 4th edition, Blackwell Publishing, USA (2004).
10. William A. Rutala, David J. Weber, and the Healthcare Infection Control Practices Advisory Committee (HICPAC) Guideline for Disinfection and Sterilization in Healthcare Facilities, 2008

69
Appendix 1- Form for Health Examination of Workers of EO and Formaldehyde

70
Appendix 2- Instrument Delivery Form

71
Appendix 3- Steam sterilizer check form
STEAM STERILIZER CHECK FORM Date : ……………………… Flash Program : ……………………… Leak Test : ……………………… Sterilizer no : ……………………… Control panel : ……………………… Printer : ……………………… Printer paper : ……………………… Bowie-Dick result : Print-out : Name of Staff : ………………………

App
endi
x 4.
Doc
umen
t fo
r re
cord
ing
biol
ogic
al in
dica
tor
resu
lts
DO
CU
ME
NT
FO
R R
EC
OR
DIN
G B
IOL
OG
ICA
L I
ND
ICA
TO
R R
ESU
LT
S
Ster
ilize
r no
B
arco
de o
f In
dica
tor
Cyc
le n
o St
arti
ng d
ate
of
Incu
bati
on
Hou
r St
aff
Dat
e of
Rea
din
g R
esu
lt
Hou
r St
aff
RE
SUL
T

Appendix 5 – STEAM STERILIZER LOADING FORM
STEAM STERILIZER LOADING FORM
DATE :…………………………… STERILIZER NO :………………………………… PROGRAM NO :………………………………….
LOADING STAFF :………..…………………………
LOAD :
CHEMICAL INDICATOR :
PRINT-OUT UNLOADING STAFF :……………………………………………..