Tuneup Utilities 2011 En
151
TuneUp Utilities User Manual
-
Upload
towhid-alam -
Category
Documents
-
view
1.068 -
download
4
Transcript of Tuneup Utilities 2011 En

TuneUp UtilitiesUser Manual

Microsoft, Windows, Windows XP, Windows Vista, Windows 7, Office, Outlook, Windows Logo, MSN, WindowsMessenger and Internet Explorer are products,
registered trademarks or protected names of Microsoft Corporation in the USA and/or in other countries. Firefox is a product and registered trademark of
the Mozilla Foundation in the USA and/or other countries. Safari is a product and registered trademark of Apple Inc. in the USA and/or other countries.
Opera is a product and a trademark of Opera Software ASA. Other products and brand names can be products and/or brands of their respective owners.
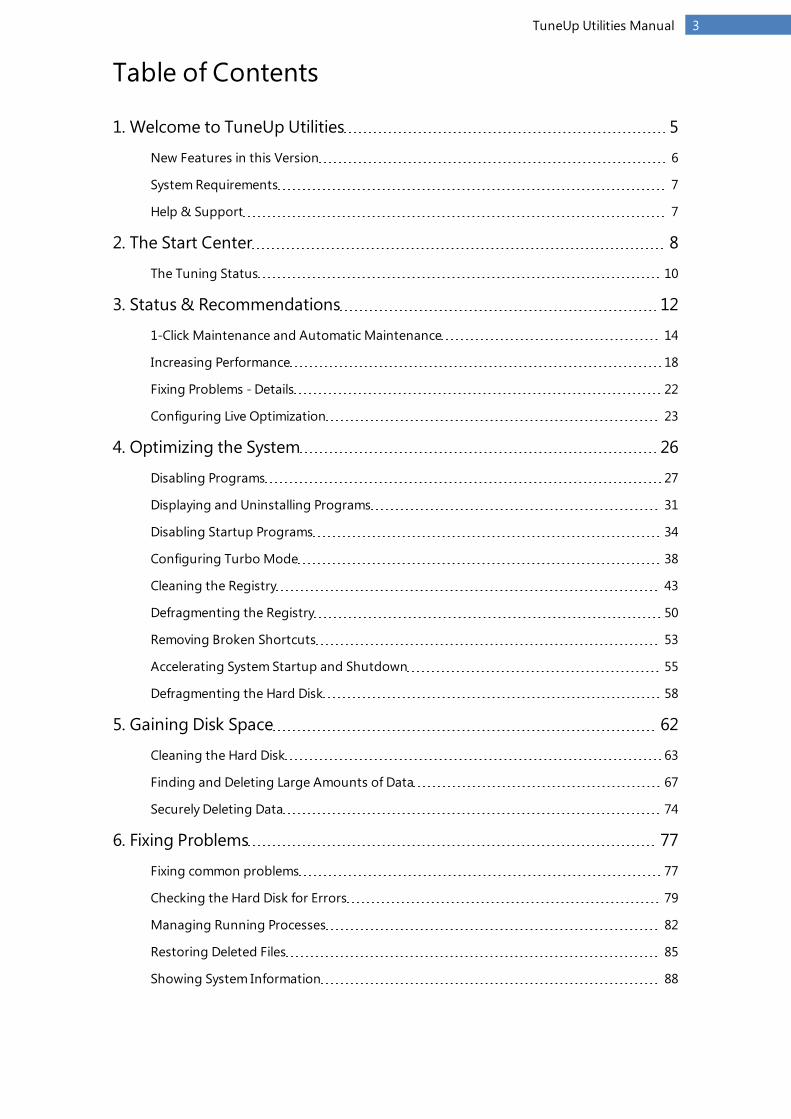
Table of Contents
1. Welcome to TuneUp Utilities 5
New Features in this Version 6
System Requirements 7
Help & Support 7
2. The Start Center 8
The Tuning Status 10
3. Status & Recommendations 12
1-Click Maintenance and Automatic Maintenance 14
Increasing Performance 18
Fixing Problems - Details 22
Configuring Live Optimization 23
4. Optimizing the System 26
Disabling Programs 27
Displaying and Uninstalling Programs 31
Disabling Startup Programs 34
Configuring Turbo Mode 38
Cleaning the Registry 43
Defragmenting the Registry 50
Removing Broken Shortcuts 53
Accelerating System Startup and Shutdown 55
Defragmenting the Hard Disk 58
5. Gaining Disk Space 62
Cleaning the Hard Disk 63
Finding and Deleting Large Amounts of Data 67
Securely Deleting Data 74
6. Fixing Problems 77
Fixing common problems 77
Checking the Hard Disk for Errors 79
Managing Running Processes 82
Restoring Deleted Files 85
Showing System Information 88
TuneUp Utilities Manual 3

7. Customizing Windows 90
Changing Windows Appearance 91
Modifying Windows Settings 109
8. Overview of All Functions 132
Editing the Registry 136
Undoing Changes 138
Checking for Updates 141
Displaying the TuneUp Optimization Report 143
9. Rating Function for Programs 144
10. The TuneUp Utilities Gadget 146
11. TuneUp Utilities in taskbar notification area 148
12. Index 149
TuneUp Utilities Manual 4

1. Welcome to TuneUp Utilities
Congratulations on choosing TuneUp Utilities! You have just acquired a comprehensive collection of over30 different tools to optimize your PC. Use this software to revitalize PCs, notebooks or netbooks with a mini-mum of effort!
With TuneUp Utilities can also automatically run important maintenance tasks, such as cleaning up yourhard disk and registry, for you, or you can run them yourself manually. A slow and untidy computer is now athing of the past for you. TuneUp Utilities recognizes whether there are any problems on your system andoffers simple solutions. You can also use TuneUp Utilities to customize the appearance of your Windowssystem to your personal requirements.
This version's new feature is the TuneUp Program Deactivator™. You can use the brand new TuneUp Pro-grams-on-Demand Technology™ to fully disable programs and thereby reduce system load, without hav-ing to uninstall them completely.
We hope you enjoy using TuneUp Utilities and your new, revitalized PC!
The TuneUp Team
TuneUp Utilities Manual 5
New Features in this VersionWith TuneUp Utilities you can make sure your PC, notebook or netbook is in the best of health – all withoutany expensive upgrades! Below is an overview of the most important new features in this version:
TuneUp Program Deactivator with TuneUp Programs-on-Demand Technology™Now, for the first time, you can completely disable programs and reduce their load on your PC: the services,startup programs, background processes or planned tasks of a disabled program are inactive until you needthem again. This prevents a loss of performance following numerous program installations.
Improved TuneUp Turbo ModeThe TuneUp TurboMode now gives you an even greater performance boost whenever you need it. It nowshuts off nearly 80 hindering factors in the background to provide greater performance for your work, morefluid gameplay and full control over the hindering background activities.
The New TuneUp Tuning StatusThanks to the clear graphs, the TuneUp Tuning Status shows you at a glance how well you are usingTuneUp Utilities to optimize your PC. You are shown any remaining potential here by the relevant noti-fications.
The New Rating Function for ProgramsTuneUp Utilities now gives you the option of rating the usefulness of programs and seeing the ratings ofother TuneUp Utilities users. This may help you to decide which programs you really need. So that you canapply this new-found knowledge immediately, the Rating function for programs is directly integrated inthe TuneUp Program Deactivator, TuneUp StartUpManager and TuneUp Uninstall Manager modules.
The New-Look Start CenterTuneUp Utilities gives you full control of and access to the most important tuning steps, as well as a clearoverview. The new Start Center is now even more intuitive to operate. Thanks to the arrangement into cat-egories, you will find the function you are looking for more easily and can check on the current status ofyour PC at any time.
The New Overview of all FunctionsTuneUp Utilities now has an Overview of all functions on the Start Center which gives you an overviewsorted by application area and quick access to all functions and settings.
TuneUp Utilities Manual 6

System Requirementsl Windows XP (Service Pack 2 or higher), Windows Vista or Windows 7 (all 32-bit or 64-bit versions)l Min. 300MHz processorl 256MB RAMl Screen resolution at least 1024x600 pixelsl Online version: at least 80 MB of free disk spacel CD version: at least 300MB of free disk space (and CD-ROM or DVD drive)l Internet Explorer 6 or higher
If you have bought the CD version of TuneUp Utilities, but your netbook doesn't have a CD-ROM drive, youcan download our trial version fromwww.tuneup-software.co.uk and activate it using the product keygiven on the CD case.
Help & SupportTuneUp Utilities has been designed to be as user-friendly and intuitive as possible. This manual providesyou with an overview of TuneUp Utilities. Taking the layout of the Start Center as a guide, it explains whatthe many different functions do and how to access and use them.
Online at www.tuneup-software.co.uk, you will find more information, tips & tricks, the Program Help inPDF format with lots of additional pictures, frequently asked questions about TuneUp Utilities and TuneUpSupport.
You can reach TuneUp Support by calling +49 6151 4938610 (Mon - Fri, 8 am - 6 pm, GMT) or via theTuneUp Support Website www.tuneup-software.co.uk/support. It will help support staff greatly if youknow your TuneUp Utilities version number. You can find this by going to the Help & Support menu in theStart Center and selecting About.
TuneUp Utilities Manual 7

2. The Start Center
The TuneUp Utilities Start Center has been completely redesigned and is now even more user-friendly, pro-viding central access to all functions.
The five categoriesThe main area in the TuneUp Utilities Start Center comprises five categories, giving you fast access to thekey features of TuneUp Utilities sorted by topic.
Status & RecommendationsThe Status & recommendations category shows you an overview of the current condition of your systemand gives you recommendations on how you can improve the system's health. To the far right of the cat-egories, you can see the status of your TuneUp Live Optimization and can adjust it to suit your needssimply by clicking Configure Live Optimization.
(For more information, see Status & Recommendations, p. 12.)
Optimizing the SystemUnder Optimize system, you can disable or uninstall unwanted programs and clean up your system andyour data.
(For more information, see Optimizing the System, p. 26.)
Gain disk spaceUnder Gain disk space, you can delete unnecessary data systematically from your system.
(For more information, see Gaining Disk Space, p. 62.)
Fixing ProblemsUnder Fix problems, you will find simple solutions to any problems that might occur.
(For more information, see Fixing Problems, p. 77.)
Customizing WindowsUnder CustomizeWindows, you have many opportunities to customize your working environment to suityou.
(For more information, see Customizing Windows, p. 90.)
TuneUp Utilities Manual 8

Overview of All FunctionsTo the right of the categories, you will see the Overview of all functions. This lists all the functions that areavailable in TuneUp Utilities - clearly sorted by application area.
Turbo ModeThe improved version of TuneUp TurboMode, which is now even more powerful, provides an immediateperformance boost whenever you need it. When you put your computer into Turbo Mode, an analysis is per-formed to see which of those programs and functions currently running in the background are not strictlynecessary. These programs are stopped or slowed down, allowing the additional processing power gainedto be used exclusively by the programs you are actually running.
Tuning StatusThe TuneUp Tuning Status is your personal indicator of optimization progress, i.e. it shows you how wellyou are already using TuneUp Utilities and where there is still potential to optimize your system further. TheTuning Status shows you details of both the Completed optimizations and the potential you haveexploited. The Tuning Status also helps you to recognize the remaining Unused potential and make use ofit.
The Menu Bar
The menu bar gives you access to TuneUp Utilities configuration dialogs and information on the program.
The "Settings" MenuUse the Settingsmenu to go to the most important TuneUp Utilities configuration dialogs. Here you cancustomize the program to suit your needs, apply maintenance settings, and configure TuneUp Live Opti-mization, TuneUp TurboMode and the update check.
The "Help & Support" MenuTheHelp & Support menu provides you with access to the extensive program help with detailed instruc-tions and program information. You can also click the link there and go to the TuneUp website directly(www.tune-up.com). Clicking on Check for updates starts the TuneUp UpdateWizardmodule, whichchecks whether there are any new updates for your TuneUp Utilities.
If you are using a trial version of TuneUp Utilities and already have a product key, click here on Activateproduct and enter your product key. If you do not yet have a product key, you can click Buy product to godirectly to the TuneUp Shop website and buy a full version.
If you want to register your product, click Register product after you have successfully activated it. Enteryour name and your e-mail address.
The FooterClicking on the Undo changes button in the footer takes you to the TuneUp Rescue Center module, whichyou can use to monitor and undo changes that you have made to your system with TuneUp Utilities. Youcan also manage restore points and thereby undo system changes that you did not make using TuneUp Util-ities.
TuneUp Utilities Manual 9

The Tuning StatusThe Tuning Status uses a graph and associated notifications to show you how extensively you are alreadyusing the options of TuneUp Utilities to increase performance and maintain the system and what potentialfor optimization still remains.
You can find the TuneUp Tuning Status on the TuneUp Utilities Start Center beside TurboMode. The Tun-ing Status is your personal indicator of optimization progress, i.e. it shows you how well you are alreadyusing TuneUp Utilities and where there is still potential to optimize your system further.
The GraphIn the graph, the blue sections on the left represent the modules you have used to make your optimizationprogress so far, and the dark gray area on the right represents open optimization options. Each section ofthe graph has a message assigned to it: the letters in white boxes above the graph represent messages aboutoptimizations completed, the dark gray under the graph represents messages about untapped potential.
The TurboMode segment to the right of the graph shows you how many TurboMode options you haveturned on. If you have not yet configured Turbo Mode, this segment is empty. If the segment lights upgreen, TurboMode is on.
MessagesTo the right of the graph, you will see the current messages about optimizations already completed andabout untapped potential. If you click on the blue underlined text in the messages under Unused potential,this opens the precise TuneUp Utilitiesmodule that you can use to achieve the unused potential.
Use the arrow to click through the individual messages. If you click on the blue underlined text between thearrows, a window opens with an overview of all Tuning Status messages. This displays a complete overviewwith all of the current messages on both the Completed optimizations and Unused potential areastogether with the corresponding graph sections and letters.
Even if your system is perfectly optimized today, anything could change tomorrow that couldpresent areas for optimization, e.g. the installation of new programs or a change to system settings.Pay attention to the messages on unused potential in order to keep your system optimized for thelong term and therefore maintain a good Tuning Status.
TuneUp Utilities Manual 10

What is Used to Calculate the Tuning Status?TuneUp Utilities performs an analysis to see which optimizations it can perform on your system. This poten-tial is displayed in a graph showing you how close your system is to having 100% optimization. You willachieve 100% – the perfect Tuning Status and therefore a fully filled out graph – when you implement therecommended optimization potential for your system as much as possible.
The graph is made of different sections. The sections on the left-hand side represent optimizations com-pleted and the sections on the right-hand side show optimization potential still remaining. The TuningStatus is calculated based on the analysis results of the following sections:
Automatic Maintenance, 1-Click Maintenance and Manual MaintenanceFor this section to be considered as optimized, one of the following conditions must be fulfilled:
l Automatic Maintenancemust be activated with all the necessary maintenance tasks enabled orl TuneUp 1-Click Maintenance is carried out within 14 days of use with all the necessary maintenancetasks or
l TuneUp Registry Cleaner and TuneUp Shortcut Cleaner are run within 14 days and Temporary filesare deleted within 14 days of use.
To delete Temporary files, open the Gain disk space category in the Start Center. Click on Unnecessary filesunder Clean hard disk and check the Temporary files box.
Live OptimizationFor this section to be considered as optimized, the two Live Optimization options should be enabled. Thesetwo options have the same weighting.
Increasing Performance - DetailsPlease note that you must answer the questions on your profile in order to receive appropriate rec-ommendations for your system.
For this section to be considered as optimized, the following condition must be fulfilled:
l You have either accepted or hidden all recommendations.
Recommendations that you have hidden for 30 days will cause the status to be reclassified when this periodexpires and the recommendation will be displayed again.
Fixing Problems - DetailsFor this section to be considered as optimized, the following condition must be fulfilled:
l You have either fixed or hidden all problems.
Problems that you have hidden for 30 days will cause the status to be reclassified when this period expiresand the problem will be displayed again.
Program Deactivator and StartUp ManagerThe Tuning Status analyzes how many of your existing programs are using up your system's resources andrecommends that you optimize these through TuneUp Program Deactivator or TuneUp StartUpManager.In doing so, the Tuning Status takes into account the fact that you have classified some of your programsas important despite their system load and that they should remain active. Therefore this section of thegraph is considered as optimized after a certain number of programs have been disabled.
Temporary Performance Boost from Turbo ModeThe TurboMode is not considered when the current Tuning Status is calculated. The TurboMode segmentto the right of the graph shows you the current status of TurboMode. When TurboMode is on, the seg-ment is green.
TuneUp Utilities Manual 11

3. Status & Recommendations
The Status & recommendations category shows the current status for the three key functional areas thatTuneUp Utilities has to offer. In the event of warnings or recommendations, you can use the Show detailslink to immediately address the problem behind the warning or view the recommendations.
"Maintain System" AreaThe status in theMaintain System area shows how often your computer is maintained.This takes into account whether Automatic Maintenance is carried out regularly withthe most important maintenance tasks or whether you have manually run 1-Click Main-tenance recently.
Beneath the status display, you will see two options: Changemaintenance settingsand 1-Click Maintenance.
If you click on Changemaintenance settings, a window opens in which you can spec-ify maintenance tasks that must be carried out by Automatic Maintenance and 1-Click Maintenance. ForAutomatic maintenance you can specify when it should be carried out.
If you click on Start 1-Click Maintenance, 1-Click Maintenancewill be carried out with the default TuneUpUtilities settings or the changes to the maintenance settings made by you.
"Increase Performance" AreaThe status field in the Increase performance area shows whether TuneUp Utilities hasdetermined opportunities for increasing your computer's performance. For example,you may receive recommendations for increasing the speed of your Internet con-nection, uninstalling programs that haven't been used for a while or upgrading yourhardware.
However, in order to get the most out of performance recommendations that are per-sonalized to your requirements, you must first answer some questions regarding yourusage profile. Click Create profile.
If there are recommendations, you can view these by clicking Show details or the link to the rec-ommendations. Each recommendation has a detailed description and you can apply most recommendationswith just a click of the mouse. You can also hide individual recommendations. Once all recommendationshave been applied or hidden, the status for this area reverts to green.
TuneUp Utilities Manual 12

"Fix Problems" AreaThe status in the Fix problems area shows whether everything is working fine on yourcomputer or whether critical problems have been detected which may affect the sys-tem's health. For example, a check can be carried out to see if key Windows settingshave been configured correctly, if there is enough free space on your system drive orwhether important security programs have been installed.
If problems have been found, click Show details. For each problem, you will receive adescription and can choose if you want to solve it now or hide it until later. Once all
problems have been solved or hidden, the status of this area reverts to green.
Configuring Live OptimizationOn the far right in the category, you will see the status of your TuneUp Live Optimization. Simply click Con-figure Live Optimization to customize the feature to suit you.
TuneUp Utilities Manual 13

1-Click Maintenance and Automatic Maintenance
All modifications to your system will be monitored by TuneUp Rescue Center and can be undone ifnecessary.
Maintenance Tasks1-Click Maintenance and Automatic Maintenancemake sure that your computer is always kept clean, sothat the system runs quickly and reliably.
As its name suggests, Automatic Maintenance regularly and automatically performs the most importantmaintenance work on your system to ensure that Windows remains fast and stable. 1-Click Maintenancedoes the same - except that just one click is necessary: The link for starting 1-Click Maintenance can befound in the status field of theMaintain system category in the Start Center.
The Automatic Maintenance is particularly useful for all users who would rather sit back or do other thingsthan worry about the maintenance of their computer.
1-Click Maintenance is particularly suited to those users who would rather set the time for maintenancethemselves and wish to monitor its progress. After maintenance has been performed by 1-Click Main-tenance, further details on any problems found are also displayed.
By default, 1-Click Maintenance performs the following tasks for you:
TuneUp Utilities Manual 14
1-Click Maintenance ...... cleans your registryOver time, the central Windows registry becomes filled with hundreds of superfluous entries. These includereferences to non-existent files, backlogs of programs deleted long ago and faulty entries. Your registry iscleaned, making your Windows system fast and problem-free. For more information, see Cleaning the Reg-istry, p. 43.
... defragments your registryEven after the registry has been cleaned as described above, it is not automatically smaller because the diskspace that is freed up is not released. This feature compresses the registry by deleting these gaps. For moreinformation, see Defragmenting the Registry, p. 50.
... removes broken shortcuts1-Click Maintenance checks whether there are any broken shortcuts on your desktop or in the Start menuor Quick Launch taskbar and then automatically deletes them. At the same time, a search is also made forfaulty entries in the history lists of various programs such as Windows Media Player or Microsoft Office. Formore information, see Removing Broken Shortcuts, p. 53.
... gains disk space by deleting unnecessary filesSo-called "temporary" files are something of a nuisance. Windows and programs create temporary files onthe hard disk, in order to temporarily store certain settings or data. If the program in question is closed,these files should really be deleted from the program. However, the program in question often "forgets" toclean up after itself so that over time your hard disk can be filled with a lot of unnecessary data. 1-ClickMaintenance reliably deletes all temporary files and folders from your hard disk. For more information, seeCleaning the Hard Disk, p. 63.
... optimizes system startup and shutdownSome programs that are run each time you start your system slow down the startup process to an unnec-essary extent. Such known programs that are definitely not required are turned off here. For more infor-mation, see Accelerating System Startup and Shutdown, p. 55.
... defragments your hard diskIn the background, TuneUp Utilities changes the arrangement of files and folders so that they can be readmore quickly. Regular defragmentation is paramount - especially if the data structure of your hard diskchanges frequently, for example because you move or delete files or install new programs. Defragmentationis, however, only carried out when necessary. And you can even choose whether - if it was determined thatdefragmentation was necessary - a thorough or a quick defragmentation should take place, or whether thisshould depend on the result of the analysis. For more information, see Defragmenting the Hard Disk, p. 58.
The Automatic Maintenance function is also configured so that it performs all these maintenance tasks.However, it is run in the background and only the notifications tell you when it was carried out.
TuneUp Utilities Manual 15

How to Make Maintenance SettingsIn the Start Center, click on the Changemaintenance settings link in theMaintain system area of the Status& recommendations category. A configuration dialog opens containing one tab for Automatic Main-tenance and one for 1-Click Maintenance respectively. Configure your settings here.
Alternatively, you can open the maintenance settings window by going to Overview of all functions in theStart Center and selecting the Configuremaintenance entry under TuneUp settings.
Performing MaintenanceYou can specify whether and when Automatic Maintenance should run automatically in the background.You can even have automatic maintenance run only in idle mode, i.e. it only starts when you are not cur-rently working on your computer and no programs are required in the background. This way AutomaticMaintenancewill never interrupt your work. If you select this option, following the number of days spec-ified by you, maintenance will be attempted as soon as your computer is in idle mode. Three days is selectedby default.
If, after a period of a week, it was not possible to perform full maintenance because your computer was notin idle mode for long enough then - if you enable this option - maintenance will be carried out anyway. Thisprevents your computer from not being maintained over a long period of time.
If you choose scheduled maintenance, the procedure is similar: If your computer is not switched on at thetime of scheduled maintenance, Automatic Maintenance is performed 5minutes after you next start yourPC. This option can also be disabled.
TuneUp Utilities Manual 16

Maintenance TasksBecause TuneUp Utilities preferably wants to provide comprehensive maintenance for your computer, allmaintenance tasks are activated by default for both Automatic Maintenance and 1-Click Maintenance.However, if you do not want certain maintenance tasks to be performed, you can exclude them frommain-tenance. For example, if you would rather defragment your hard disk manually, simply clear the Defrag-ment hard disks checkbox.
ToolsIf the notification that appears after maintenance disturbs you, you can switch it off here. Simply uncheckthe Show maintenance report as notification checkbox.
If you work with a portable computer, you can also specify - in addition to the other options - that youdon't want maintenance to be performed when the computer is running off the battery, so as not to reducethe battery life unnecessarily. This option is enabled by default.
TuneUp Utilities Manual 17

Increasing PerformanceIn the following chapters, you will find out why it is important to do so and how you can use Increase per-formance to increase the performance of your system, by turning off unnecessary tasks and services.
All modifications to your system will be monitored by TuneUp Rescue Center and can be undone ifnecessary.
Increasing Performance - IntroductionYou can improve your system performance by turning off tasks and services that run in the backgroundand that you rarely, if ever, need for your day-to-day work. For tablet PC compatibility (i.e. the option ofoperating the computer by moving a stylus across the screen) or network server technologies. You can alsoincrease the performance of your computer by uninstalling programs. A search is therefore run for programsthat have not been used for a long time - programs that you may not even remember you had and whichslow down your system unnecessarily. TuneUp Utilities also recognizes when your computer hardware isnot powerful enough.
Your Internet settings can prevent Windows from using the bandwidth of your Internet connection opti-mally. Downloading two files at once or downloading data from websites can be slowed down by Windowsdefault settings. You will also be shown the potential for optimization here too.
Should your computer be slowed down by superfluous visual effects, this will be identified.
TuneUp Utilities checks your computer for such performance-sapping visual effects and provides rec-ommendations for increasing performance.
To enable TuneUp Utilities to provide you with comprehensive recommendations, you must complete theprofile before running the software for the first time. The way is then clear to a rapid and simple per-formance boost.
All modifications to your system will be monitored by TuneUp Rescue Center and can be undone ifnecessary.
TuneUp Utilities Manual 18

How to Increase the Performance of Your ComputerYou can find out if you have any recommendations by going to the Status & recommendations categoryin the Start Center and looking at the status fields of the Increase performance area. If you have hiddensome recommendations, these do not impact the status any more. Open the details window by clicking onthe Show details link.
When you open this window for the first time, you must answer the short questions from the profile wizard,so that the optimization can be precisely tailored to your situation and needs (see Increase performance -Profile, p. 19).
OverviewThe details window opens on the Overview tab, where you can find out whether there is any potential forincreasing performance. In the areas Internet settings and Visual effects, you can perform all the opti-mization recommendations found by clicking Optimize all. This will not restrict any of your important func-tions.
The recommendations in the Hardware and software area on the other hand depend heavily on your usagebehavior. This is why you can only apply them one at a time.
Switching tabsClick on a recommendation or on the Details button to move to the other tabs, where you can view thedetails of each recommendation. Alternatively, you can click on the name of the tab you want.
Applying RecommendationsIn the Internet settings and Visual effects tabs you can perform all the optimization recommendationsfound by clicking Optimize all. Alternatively, you can click on a recommendation in the left column. In theright-hand area of the window, a detailed description will appear and you can apply the recommendationby clicking on the button on the bottom right.
In theHardware and software tab you must answer a few simple questions on each recommendation inorder to receive suitable options to continue. If you can't answer a question or want to postpone the deci-sion, you can hide the recommendation by clicking on Hide recommendation on the bottom right.
Please note that you cannot of course simply accept the recommendations concerning your hardware, butcan only hide them.
Hiding and Showing RecommendationsIf you do not want to accept a recommendation, click Hide recommendation. Now you can select whetheryou want to hide it permanently or only for 30 days. The number of hidden recommendations is always dis-played in the taskbar on the right. By clicking on the number displayed, you can easily show these rec-ommendations again.
Changing a profileSelecting Change profile on the top right takes you to the profile, which shows the basis for your opti-mization recommendations (see Increase performance - Profile, p. 19).
Increase performance - ProfileThe first time you use TuneUp Utilities, you are prompted to complete a profile, so that it can provide youwith tailored recommendations for increasing performance. This profile contains the following questions:
TuneUp Utilities Manual 19

How is your computer usually connected to the Internet?Select the type of connection from the list so that your network, Internet and browser settings (for examplepacket sizes) can be adapted as best as possible to your Internet connection.
What criteria should be used to optimize visual effects?If you selectMaximum performance (irrespective of display quality), all effects and the colorful Lunatheme are turned off. This is highly recommended, especially for slower computers, because the display ofthese sophisticated interfaces really eats up resources.
If you selectMaximum performance (irrespective of display quality), all effects including the Aero glasstheme are turned off. This is highly recommended, especially for slower computers, because the display ofthese sophisticated interfaces really eats up resources.
If the interface on your computer flickers and it takes a while for windows to open, choose the option A bal-ance between performance and display quality. The attractive interfaces are retained but the performance-sapping effects are switched off.
If you have a high-performance graphics card, your system performance will not be improved byturning off the Windows Vista Aero desktop experience.
How Many Days Should a Program Remain Unused Before We RecommendRemoving it?Your computer is checked for programs that have not been used for a long time. These are then displayedwith the recommendation that they are removed so that they do not slow down your computer unnec-essarily. Based on your user behavior, you specify here after how many days a program that has not beenused is considered to be potentially unnecessary and displayed with the recommendation that it is removed.
TuneUp Utilities Manual 20

Changing a ProfileYou can change your profile settings at any time later by going to the Start Center and selecting Change pro-file under Increase performance in the Status & recommendations category.
Alternatively, you can click on the Change profile button at the top left of the Increase performance -details window.
Note that you cannot confirm your profile until you have entered all the necessary information.
TuneUp Utilities Manual 21

Fixing Problems - DetailsIn the following section you will find out how to use the Fix problems – Details feature and why it is impor-tant to do so to remove problems that are negatively affecting your system's health.
All modifications to your system will be monitored by TuneUp Rescue Center and can be undone ifnecessary.
How to Fix ProblemsTo find out whether there are problems affecting your system's health, go to the Start Center in the Status &recommendations category and look at the Fix problems status field.
For example, checks are made to see if key settings have been set correctly in Windows, if there is enoughfree memory on your system drive, if important security programs are installed and if there are any new Win-dows updates. If you have hidden some problems, these do not impact the status any more. Open thedetails window by clicking on Show details.
OverviewThe details window lists the problems found. When you select a problem from the list, the detail panel givesyou a short description of the problem and a suggestion for a solution.
Fixing ProblemsFor each problem, you can decide whether you want to solve it straightaway or hide it. The easiest way is tofix problems by clicking on the link for the suggested solution.
Hiding ProblemsIf you don't want to fix a problem immediately, click Hide problem. Now you can select whether you wantto hide it permanently or only for 30 days.
TuneUp Utilities Manual 22

Configuring Live OptimizationIn the following chapters, you will find out how and why you can increase the performance of your com-puter by turning on TuneUp Live Optimization.
IntroductionTuneUp Live Optimization consists of two intelligent optimization methods that monitor the load your com-puter is under in real time and can thereby intervene if necessary to avoid sudden drops in performance.Both optimization methods work to accelerate performance - one increases the computer's response rate,the other the speed at which programs start up - but only when necessary.
This is done by intelligently prioritizing the programs that are running. If your computer is already workingat near full capacity and you start a program, this program will start more rapidly if it is briefly assigned ahigher priority. And if a background program suddenly gets carried away and requires a particularly highamount of computing power, it will be assigned a lower priority so that the programs you are currentlyusing will run more smoothly. This enables work to be carried out quickly, even at high capacity.
TuneUp Utilities Manual 23

How to Configure Live OptimizationStart the TuneUp Live Optimizationmodule by going to the Start Center and clicking on the Configure LiveOptimization entry on the right-hand side of the Status & recommendations category.
Alternatively, you can open the module by going to Overview of all functions in the Start Center and select-ing the Configure Live Optimization entry under TuneUp settings.
Here you can select the two optimization methods. Since both of these are intelligent optimizations in realtime, they do not always take effect immediately. Rather you specify here that from now on the load underwhich the computer operates is to be monitored so that both optimizations can apply if the need arises.
Select here the optimization methods to be carried out where necessary:
Increasing the Response RateThis optimization method monitors all background processes and gives them lower priority if they take uptoo much computer power. This ensures an optimal response rate and prevents juddering by windows orprograms. This intelligent optimization identifies need and ensures that the computer's response rate isalways optimum.
The following pictures represent the inside of your computer before and after the Increase response rateoption is enabled. Here you can see how the load on your PC is reduced:
TuneUp Utilities Manual 24

In addition to those programs that you are currently using (green), many others are also running in the back-ground that are really not that important for your work (blue). If such background processes suddenly startto require a great deal of processing power, they are assigned a lower priority so that your other programscan continue to run smoothly.
Speed up the startup of my programsThis optimization method intervenes if you start up a programmanually when the computer is already underheavy load. For a short period immediately after the program has started, processing power is temporarilyredistributed, giving the program in question a separate performance boost. This boost is achieved by tem-porarily prioritizing the program in question.
The following pictures represent the inside of your computer before and after the Accelerate program start-ups option is enabled. Here you can see how a newly started program receives a particular performanceboost:
For a short period immediately after the program is started (orange) the processing power of the computeris temporarily redistributed, giving the program in question a separate performance boost. This boost isachieved by temporarily prioritizing the program in question. No other programs (green and blue) areaffected.
How do I know when Live Optimization was enabled?The great thing about Live Optimization is that it works intelligently in the background. Whenever one ofthese two optimization methods is improving the performance of your PC in the background, this is alsoindicated by the icon in the notification area of the taskbar.
TuneUp Utilities Manual 25

4. Optimizing the System
Your computer does not always work quite how you would like it to. Often it seems to take an eternity tocall up individual programs or to save files and you start to doubt the performance capabilities of your com-puter. But in many cases this has nothing to do with the hardware. The problem is caused by the programsthat are started, without you being aware of them, or remnants of programs that were not completelyremoved from your computer during an uninstallation process.
Reducing System LoadThe Reduce system load area is devoted to dealing with your installed programs and services. Its functionsextend from disabling startup programs that have no impact whatsoever on the actual program, and man-ually uninstalling individual programs, to automatically turning off entire function areas. But that is not all!In this area, you will also find a link to an unprecedented function. Have you ever had an intelligent alter-native to uninstallation? Now you do – TuneUp Program Deactivator, the unique module that uses our pat-ented TuneUp Programs-on-Demand Technology™, p. 27.
Manually Running Maintenance TasksBeing able to disable or uninstall programs is an important criterion for optimizing system performance. Butthis may not achieve a great deal if your Windows system is still full of "relics", i.e. remnants of programsthat were uninstalled long ago but were not fully removed. You can use our cleanup program to only keepentries on the computer that really belong there - then complete your tidying with a more intelligentarrangement of the system entries and data to ensure a quicker startup of programs and files.
TuneUp Utilities Manual 26

Disabling ProgramsIn the following chapters, you will find out how you can use the TuneUp Program Deactivator module todisable programs that place a load on your system at various times (at system startup, during operation andat shutdown) and why it is useful to do so.
All modifications to your system will be monitored by TuneUp Rescue Center and can be undone ifnecessary.
IntroductionUntil now, users only had two options for dealing with unnecessary programs: They could either removethem from the system completely or accept that their background programs would continue to slow itdown. After a program is uninstalled, there is always the risk that files that were dependent on it will nolonger be able to be started. If the program is left on the computer, it is always available if it is needed, butcontinues to impair system performance.
TuneUp Program Deactivator not only reduces the load of programs at system startup, but also during nor-mal operation and at shutdown, where the load is a result of services and tasks belonging to one program.
TuneUp Programs-on-Demand Technology™Thanks to the TuneUp Programs-on-Demand Technology™ there is now a third option: Disable programsthat are no longer required first and see if you can continue to work without them. If you notice that youneed a program again, it is no longer a problem. You can start the program as usual - the TuneUp Pro-grams-on-Demand Technology™ reactivates the program in the background, as if you had never disabledit.
Design of TuneUp Program DeactivatorTuneUp Program Deactivator is divided into three areas: the All installed programs area, the Load frominstalled programs area and the Details area.
All installed programsIn the All installed programs area, you can see an overview list of all the programs installed on your systemtogether with their load status. In theName column, the programs are sorted according to their load: high,medium or low. Programs that do not place any load on the system have the status "none" and are notlisted by name. The value for the load is always the highest value for startup, operation or shutdown. In theStatus column, you can see the current status of the programs.
Load from installed programsIn the Load from installed programs area, you will find three graphs that are designed to give you a visualoverview of the load on your system: The left-hand graph shows you the load on system startup, the centreone the load during normal operation of your PC and the right-hand one the load when shutting down. Alegend with explanations is provided underneath the graphs. If a program is selected in the list, this isshown by a program icon next to the graph.
DetailsIn the Details area, you can see the name of the selected program, its current status and the load on the sys-tem from that program. You can use the switch to enable or disable the program. If no program is selected,you will see an overview here showing how many programs are enabled/disabled or relevant to the system.If several programs are selected, the details area shows the number of programs with the various statuses.The status shown next to the switch is the predominant status.
TuneUp Utilities Manual 27

Possible Statuses of ProgramsIn TuneUp Program Deactivator, there are five different statuses for programs:
l Enabled: The program is fully functional.l Disabled: The services of the program that run continuously in the background have been turned off.l System-relevant: This is a program that TuneUp Utilities has classified as relevant for the security orproper operation of your system and the disabling of which could have serious consequences.
l Disabling pending: The program cannot be turned off during normal operation; TuneUp Utilities willdisable it automatically the next time the system is restarted.
l No impact: The program cannot be disabled because it does not have a negative impact on your sys-tem.
TuneUp Utilities Manual 28

How to Disable ProgramsLaunch the TuneUp Program Deactivator module by going to the Optimize System category in the StartCenter and selecting Disable programs under Reduce system load.
Alternatively, you can start the module by going to Overview of all functions in the Start Center and select-ing the Disable entry under Installed programs.
Before the program starts, the startup screen may appear for the Rating function for programs.Here you can decide whether to enable this feature and click OK (read more about this under Howto Turn On the Rating Function, p. 145).
The TuneUp Program Deactivator module uses TuneUp Programs-on-Demand Technology™, p. 27, whichreduces the load on your system and thereby increases system performance.
How to Disable Programs1. Select a program in the list that has the status Enabled.
2. Disable the program using the switch in the status column or in the details area or click on the Disablebutton in the toolbar.
How to Enable Programs1. Select a program in the list that has the status Disabled.
2. Enable the program using the switch in the status column or in the details area or click on the Enablebutton in the toolbar.
How to Enable or Disable More than One ProgramIf you select more than one program at the same time, the possible action depends on the predominantstatus. For example, if two selected programs are disabled and one is enabled, you can only enable the pro-grams. However, with two enabled and one disabled program, you can only disable the programs.
Following the action, a window is shown in the display area to the left informing you of the result of youraction.
TuneUp Utilities Manual 29

Load Points - What Are They and How Are They Calculated?The TuneUp Programs-on-Demand Technology™ calculates the load on your system based on an internalpoints system. For this, TuneUp Utilities determines the background programs associated with each pro-gram, i.e. the programs or services that were installed together with the actual program and are then con-tinually run without the user's knowledge, "stealing" processing power. The more background programsthere are for a program, the more this program burdens the computer. The TuneUp Programs-on-DemandTechnology™ The display in the Load column takes the highest of these three values.
TuneUp Utilities Manual 30

Displaying and Uninstalling ProgramsIn the following chapters, you will find out how you can use TuneUp Uninstall Manager to display the pro-grams installed on your computer, why you might want to uninstall them and how to do so.
IntroductionOver time, you accumulate a large number of programs on your computer, many of which you probably donot even use. So that your Windows system can run quickly and smoothly, you should regularly removeunused or unnecessary programs.
Each time you install a program on your computer, it becomes deeply anchored in the Windows systemwhere it remains until you uninstall it completely. If you no longer require a program, it is not enough just todelete the program folder or the desktop icon that you use to open it.
Most programs distribute their files across several locations on your hard disk and also make entries in theWindows registry.
TuneUp Uninstall Manager lets you rapidly determine what programs you rarely use or which take up anespecially large amount of space. You can show all installed programs sorted according to different aspectsand then, using the useful additional information about when you installed the program and how often youuse it, decide whether you still need it or should uninstall it.
TuneUp Utilities Manual 31

How to Uninstall Programs
1. Launch the TuneUp Uninstall Manager module by going to the Optimize System category in theStart Center and selecting Uninstall unneeded programs in the Reduce system load area.
Alternatively, you can start the module by going to Overview of all functions in the Start Center andselecting the Uninstall entry under Installed programs.
Before the program starts, the startup screen may appear for the Rating function for pro-grams. Here you can decide whether to enable this feature and click OK (read more aboutthis under How to Turn On the Rating Function, p. 145).
TuneUp Uninstall Manager shows you a list of all installed programs. In the menu bar, click Organizeto sort the table by column or select a filter under View to display only selected programs. This willhelp you quickly identify what programs you no longer use or which take up the most space.
2. If you select an entry from the list, additional information on the program is displayed in the Detailsarea on the right.
You will see details of the manufacturer, installation date, date of last use, size of program files onyour hard disk, system usage and rating of the program.
If, despite the statistical data that TuneUp Uninstall Manager shows you, you are not sure whetheryou wish to uninstall a program because you do not know what it contains, click on Online search inthe toolbar. A web page opens displaying the results of the search for the program selected in the list.This page provides detailed information on the program. This information will also help you to decidewhether you should uninstall a program or not.
The Rating column is also helpful for your decision-making process. This provides you with infor-mation on how useful you and/or other users of TuneUp Utilities found the program. If you have notyet provided a rating, you can rate it now. The ratings of other users are called up by TuneUp Utilitiesfrom a serverdatabase and displayed. These ratings are automatically updated regularly.
3. Click Uninstall to remove a program.
To remove a program correctly from your computer, highlight the entry and click Uninstall. You canalso double-click on the entry.
TuneUp Utilities Manual 32

The uninstall routine that is now called varies from program to program. None of these programsmerely deletes the files from the hard disk - they also remove all desktop icons, the entries in the StartMenu and the entries in the registry. Follow the instructions for the uninstallation procedure to com-plete the process.
If you do not want to uninstall a program and you wish to be sure that it does not appear in this list inthe future, select Remove entry from the context menu of an entry. You will then no longer be ableto uninstall the program using TuneUp Uninstall Manager. Note that this does not uninstall the pro-gram.
TuneUp Utilities Manual 33

Disabling Startup ProgramsIn the following chapters, you will find out how you can use the TuneUp StartUpManager module tospeed up the startup and working speed of your computer and why it is important to do so.
All modifications to your system will be monitored by TuneUp Rescue Center and can be undone ifnecessary.
IntroductionMany programs start automatically in the background when you turn on your computer. This makes perfectsense for important functions and services like the virus scanner or the configuration console of your soundcard.
However, programs often start automatically in the background that you require only very occasionally ornever.
Every time a program starts automatically not only does it slow down the Windows system startup but theindividual program parts that are always running in the background also slow down your computer. Someof these programs can also irritate you by displaying advertising messages.
More Information About Startup ProgramsWhen installed, some startup programs are entered in the Start Menu from where they can be easilyremoved. However, most startup programs enter themselves directly in the registry and are not to be foundin the startup folder. Often during system startup and user logon, scheduled tasks are used to start pro-grams automatically.
TuneUp StartUpManager finds all startup programs, regardless of how well hidden their start command is.For every startup program it also supplies a detailed description and an evaluation of the necessity of start-ing this program automatically.
TuneUp StartUpManager does not just allow you to enable or disable startup programs, it also tells youabout the individual programs and provides recommendations for every startup entry.
Note that disabling startup does not remove the program itself. It only disables the startup andtherefore speeds up system startup and the speed of your computer.
TuneUp Utilities Manual 34

How to Configure Your System StartupStart the TuneUp StartUpManager module by going to the Start Center in the Optimize system categoryand selecting Disable startup programs in the Reduce system load area.
Alternatively, you can start the module by going to Overview of all functions in the Start Center and select-ing the Disable startup programs entry under Installed programs.
Before the program starts, the startup screen may appear for the Rating function for programs.Here you can decide whether to enable this feature and click OK (read more about this under Howto Turn On the Rating Function, p. 145).
When TuneUp StartUpManager starts up a list of all Startup programs opens. When you use the modulefor the first time, all entries are enabled. This means that these programs will automatically start in the back-ground every time the system is started.
In TuneUp StartUpManager you can choose from the following functions:
Disabling Automatic Program StartupThis prevents the program from starting automatically in the background when you next start up the sys-tem. The entry remains in the list however, meaning that you can turn automatic startup back on at anytime.
1. Select a startup program from the list.
2. Disable it using the button or from the toolbar.
If, despite our Tips for Optimizing System Startup, p. 36 you are not sure whether or not you should disablestartup, we recommend that you disable one startup program only, restart your computer and start the pro-grams you use in the usual way. This helps you find out whether the automatic startup really is unnecessary.If something doesn't work properly the next time you start Windows, select the check box again. If every-thing is working as it should, you can disable the next startup program.
Enabling Automatic Program StartupThis starts the program automatically in the background when you next start the system.Afterwards, youcan disable automatic startup at any time again.
1. Select a startup entry from the list.
2. Disable it using the button or from the toolbar.
TuneUp Utilities Manual 35

Adding a startup programTo have the system automatically run additional programs on system startup, simply add them to the list.
1. On the toolbar select the Add button. Alternatively you can right-click to open the context menu andselect the Add program entry.
2. From the list, select the program that is to start automatically each time the system is started. If this doesnot happen, click Browse and select the program you want from the list that opens.
Removing a startup program from the listIf you are sure that you do not want a program to be started automatically, you can remove it from the list.You can add it back to the list at a later stage by clicking Add or using TuneUp Rescue Center.
1. Select a startup program from the list.
2. On the toolbar, select the Delete button. Alternatively you can right-click to open the context menuand select Delete.
Tips for Optimizing System StartupAs the name suggests, a startup program is one that automatically starts up every time you start up yourcomputer. For this reason, it is always active in the background and occupies your system's resources, evenif you never use the program. This makes perfect sense with a virus scanner, for example. On the other hand,some other startup programs could place an unnecessary load on your system.
The fewer the programs that start up automatically in the background, the faster your system will start up. Inaddition, your computer will run faster if there are no unnecessary programs active in the background.
What Guidance Does TuneUp StartUp Manager Offer?For each program, decide based on the following information whether it should start automatically in thebackground on startup.
EvaluationFor most startup programs, TuneUp StartUpManager provides an evaluation showing you whether anautomatic startup of the program is necessary, unnecessary or optional. Thanks to a database maintainedby the TuneUp team, all security-related programs, for example, will be classified as necessary. Well-knownunnecessary startup programs will be classified as unnecessary. Other programs that appear incorrectly inthe list will also be considered as unnecessary. This is the case, for example, if an entry in the list refers to aprogram that has already been uninstalled.
This classification can result in many programs being classified as optional. In this case, the decision isbased on your usage behavior. The description, online search or the Rating function for programs willhelp you further with this.
Read more here about how the Rating function for programs can help you make the decision:
l Rating Function for Programs, p. 144
DescriptionIf you select a startup program in the list, the database will supply a description of the program to make thedecision easier for you.
In the case of very unusual programs, TuneUp StartUpManager might not recognize a program. If so, youcan obtain information on this program by searching online via a link.
In addition, you can also help ensure that a description of this program appears here in future, by providingTuneUp with information on this program via the Report program link.
TuneUp Utilities Manual 36

RatingThe Usefulness column provides you with information on how useful you and/or other users of TuneUp Util-ities found the program. If you have not yet provided a rating, you can rate it now. The ratings of other usersare called up by TuneUp Utilities from a serverdatabase and displayed. These ratings are automaticallyupdated regularly.
If you are still unsure, despite our guidance, whether you should disable a startup program, we recommendthat you disable just one startup program, reboot the computer and start up the programs you use in theusual way.If something does not work properly following the restart, all you have to do is select the checkbox again. Ifeverything is fine, you can disable the next entry and enjoy a faster system startup.
TuneUp Utilities Manual 37

Configuring Turbo ModeIn the following chapters, you will find out when it can be useful to do so and what exactly happens whenyou turn on the TuneUp TurboMode. On top of that, you will receive instructions on how to switch onand configure TuneUp TurboMode.
IntroductionTuneUp TurboMode provides an immediate performance boost whenever you need it. When you put yourcomputer into Turbo Mode, an analysis is performed to see which of those programs and functions cur-rently running in the background are not strictly necessary. These programs are stopped or slowed down,allowing the additional processing power gained to be used exclusively by the programs you are actuallyrunning.
When should I switch on Turbo Mode?Turbo Mode can speed up computer games, improve work with demand-ing programs or prevent shuddering when playing videos. Note howeverthat when you enable Turbo Mode you also switch off some func-tionalities that will not be available again until you switch off TurboMode.
How does Turbo Mode work?The following graphics illustrate the internal workings of your PC with
the programs that you are currently using (green) and those running in the background (blue). Here youcan see how your PC is assisted as soon as you enable Turbo Mode:
The green circles represent those programs that you wish to accelerate using the Turbo Mode. The blue dia-monds on the other hand are all those programs and functions that you do not need at all when TurboMode is enabled (see How to Configure Your Own TuneUp Turbo Mode, p. 39). These are therefore turnedoff so that all of the PC's processing power is available to the required programs.
In addition to those programs that you are currently using (green), many others are also running in the back-ground that are really not that important for your work (blue). If such background processes suddenly startto require a great deal of processing power, they are assigned a lower priority so that your other programscan continue to run smoothly.
TuneUp Utilities Manual 38

How to Switch on Turbo ModeTuneUp Utilities provides you with several options for switching on Turbo Mode and giving your Windowsan immediate performance boost.
In order to provide you with an easy option of speeding up your Windows with Turbo Mode, the TuneUpUtilities Start Center also provides you with a TurboMode switch. This is located on the bottom left in theStart Center. Once you click on this switch, the computer is put into Turbo Mode.
Alternatively, you can start TurboMode by going to Overview of all functions in the Start Center andselecting the Turn on TurboMode entry underWindows.
When you start Turbo Mode for the first time, a wizard will appear to help you create your own customizedTurbo Mode.
Another alternative way of switching on Turbo Mode can be found in the Turbo Mode switch in theTuneUp Utilities Gadget.
l TuneUp Utilities Gadget - Introduction, p. 146
How to find out if Turbo Mode is switched on:If Turbo Mode is switched on, a TuneUp Utilities icon appears in the taskbar notification area (in the bot-tom right-hand corner beside the time), which tells you that Turbo Mode is switched on.
How to Configure Your Own TuneUp Turbo ModeStart the TuneUp TurboMode configuration wizard by going to the Tuning area of the Start Center andclicking on the small wrench icon next to the TurboMode switch. Alternatively, in the Start Center, click inthe Settingsmenu on the TurboMode entry.
Alternatively, you can start the wizard by going to Overview of all functions in the Start Center and select-ing the Configure TurboMode entry under TuneUp settings.
Set up your own Turbo Mode in six easy steps - simply select which tasks, programs and functions can bedisabled temporarily to give a performance boost while Turbo Mode is enabled. The more you allow to beswitched off, the better the gain in performance will be. You can always temporarily turn off all functionsand tasks suggested here. None of your software features for Internet security or virus protection will beturned off.
TuneUp Utilities Manual 39

More about your settings optionsStep 1: Postpone automatic maintenance tasks until laterMaintenance measures that start automatically in the background are important for the maintenance ofyour computer, but are not usually urgent. They can be carried out at a later date to free up the resourcesneeded for your programs.
In this step, you can configure the following settings:
Postpone scheduled defragmentation: This will prevent the scheduled hard disk defragmentation by Micro-soft or other well-known manufacturers from starting when Turbo Mode is on.
Postpone scheduledmaintenance tasks: This will prevent automatic maintenance tasks and scheduledtasks for Microsoft and other manufacturers from being carried out when Turbo Mode is on. This includesTuneUp Automatic Maintenance and the automatic creation of backups.
Postpone automatic updates: If you select this option, you will be notified that program updates are avail-able but these will not be automatically downloaded or installed while Turbo Mode is on.
Step 2: Limit connection with external devicesEvery computer has many services running in the background that detect connected devices and provideyou with the necessary functions to use these devices. You can limit this support and have more resourcesavailable for your programs.
In this step, you can configure the following settings:
Turn off synchronization with mobile devices: This setting will prevent synchronization of addresses, e-mails, music files, etc. with your cell phone or portable media player and the related program will not startautomatically when the device is connected while Turbo Mode is on.
Limit support for digital cameras and scanners:When Turbo Mode is on, you cannot import images fromyour digital camera or scan images.
Step 3: Reduce visual effectsVisual effects provide a graphical display of Windows but take up valuable space in the memory. Particularlywith a low performance graphics card you can increase the computer's performance by turning off visualeffects.
Tip: This is a popular way of increasing the performance of netbooks on a sustained basis.
In this step, you can configure the following settings:
Disable the use of Aero designs for older programs: This setting prevents the appearance of older pro-grams from being converted into the new style of Windows Vista and Windows 7 when Turbo Mode is on.
Switch to classic window design: This setting uses the classic Windows design for the appearance of win-dows, menus and buttons when Turbo Mode is on, and transparency effects and thumbnails of windows inthe taskbar are disabled.
Switch to classic window design: This setting uses the classic Windows design for the appearance of win-dows, menus and buttons when Turbo Mode is on, and the colorful Windows XP interface is disabled.
TuneUp Utilities Manual 40

Step 4: Configure computer resources for optimal performanceYour computer's resources are in demand. A clever sharing solution for the resources will help increase yourcomputer's performance enormously.
Tip: Since this does not limit any functions, this setting is also highly recommended for the long term.
Ensure optimum performance regardless of energy use: This setting uses the "high performance" Win-dows energy-saving plan when Turbo Mode is on. This ensures maximum performance regardless of theamount of energy used.
Step 5: Disable background functionsThe operating system performs many more tasks than most users are aware of. Many programs and servicesrun permanently in the background, although they are not strictly necessary and use valuable resources. Ifyou never use some of these functions you can disable them and permanently increase your computer's per-formance.
Disablemedia library share in local network: This setting ensures that other network devices cannot accessyour images, videos or music in the media library when Turbo Mode is on. However, Turbo Mode does notaffect the share of folders in the network.
DisableWindows search indexing function: This setting ensures Windows does not create any indexes ofyour files or e-mails when Turbo Mode is on.
Turn off error reporting: This setting ensures that no data will be gathered regarding errors and there willbe no communication with Microsoft about crashed programs or other errors when Turbo Mode is on.
Turn off support for virtual machines: (This option is only available if your computer has software for vir-tual machines installed on it.)This setting turns off background functions for the use of virtual machineswhen Turbo Mode is on.
Step 6: Additional performance boostEvery time Windows starts up, it starts up services that are used rarely or never. These services can occupy alarge amount of the system's resources and slow down your PC. To prevent these services from not workingwhen you need them, you should only turn them off temporarily for an added performance boost.
Turn off rarely used services: This setting turns off services that are only needed in specific circumstances(e.g. company networks) or situations (e.g. installation of new programs) when Turbo Mode is on.
Turn off special encryption services: When Turbo Mode is on, this setting turns off services for loggingonto a domain.
Turn off network communication services: When Turbo Mode is on, this setting turns off network com-munication services that are rarely used, e.g. fax or peer-to-peer services.
TuneUp Utilities Manual 41

How long should Turbo Mode stay switched on?The Turbo Mode can either be switched off automatically when the computer is shut down, or stay on untilyou switch it off manually. If you leave Turbo Mode on constantly, this can also speed up the startup proc-ess.
However, please note that for the system performance increase, the features that you selected in the con-figuration wizard must be switched off. If, when Turbo Mode is on, you are missing a required feature, turnTurbo Mode off and modify your settings so that when you restart Turbo Mode, this feature is availableagain.
Click Finish to close this wizard.
TuneUp Utilities Manual 42

Cleaning the RegistryIn the following chapters, you will find out how you can use the TuneUp Registry Cleaner module to cleanthe registry and why it is important to do so.
All modifications to your system will be monitored by TuneUp Rescue Center and can be undone ifnecessary.
IntroductionThe registry is the heart of a Windows system. It is where Windows continuously stores entries (values andkeys). In addition, each newly installed program and every newly connected hardware item is entered in theregistry where it records keys and values. When you start up a program, Windows does not call up this pro-gram directly. Instead it opens the program using a key in the registry, which was created there when theprogram was installed. This entry must also be deleted from the registry when the program is uninstalledsince it is no longer required. It is often the case, however, that Windows does not delete these entries prop-erly, which is why a great many invalid entries build up over time.
These entries are not just created when programs are installed, but also during many other tasks. For exam-ple, the history list of recently used documents in the Start menu works using the entries in the registry.These references become invalid when you move or delete a document. Since Windows does not clean theregistry regularly, we recommend you do it yourself with TuneUp Registry Cleaner.
By cleaning Your registry regularly your whole system and all your programs will be more stable. This is whythis is one of the functions that TuneUp Utilities can also run regularly as part of the Automatic Main-tenance.
TuneUp Utilities Manual 43

How to Clean the Registry1. Start the TuneUp Registry Cleaner module by going to the Optimize system category in the Start
Center and selecting Clean registry from theManually run maintenance area.
Alternatively, you can start the module by going to Overview of all functions in the Start Center andselecting the Clean entry under Registry.
2. First, your registry must be checked for problems. Select one of the two types of scan:
Full ScanWe recommend the complete scan because this checks the whole registry for problems.For information on what exactly is checked can be found under: What is Checked?, p. 46
Custom scanFor more information about what areas you can select for this can be found under: What is Checked?,p. 46
Scanning the registry can take several minutes. While the scan is in process, you can monitor its prog-ress.
3. If problems are found, you have two options:
Show ProblemsClick Show problems to display detailed descriptions and exclude any individual problems from thecleanup (see Additional Functions in TuneUp Registry Cleaner Main Menu, p. 48).
TuneUp Utilities Manual 44

Fix Problems ImmediatelySelect Fix problems immediately and click Next to fix all detected problems immediately. Your reg-istry is now free from all unnecessary ballast and your system is more stable.
If after the cleanup has finished, the Check Again button appears, find out more information here:
Check AgainSometimes, the Check Again button appears and the wizard recommends that you check your systemagain. This always happens if new entries in the registry have been made invalid by the cleanup. Thisis not an error in the module, but a chain reaction that can occur in the Program components andFile types areas.
Example:In the registry, entry A points to entry B, which in turn points to the missing file X. In the first scan,TuneUp Registry Cleaner determines that entry B is invalid because file X cannot be found. Entry B isdeleted during cleanup. This in turn makes entry A invalid, as it points to the now deleted entry B.
1. Click Check Again.
These two categories alone will be analyzed again.
2. Click Finish to close the wizard.
Repeat the cleanup as often as required. As soon as no new problems are found, you can exit themodule - with the confidence that you have removed a great deal of junk from your system.
If no problems have been found, click Finish. This takes you to the TuneUp Registry Cleaner main win-dow.
TuneUp Utilities Manual 45

What is Checked?The following table shows you what areas of the registry TuneUp Registry Cleaner checks during the fullscan. You can select from these during the user-defined scan.
Area Description
Audible Sig-nals
For certain system or program events such as error messages, sound files are played. Theseare played by accessing the corresponding entries in the registry; however these entries areinvalid once the sound files no longer exist.
Startup Pro-grams
Many programs start automatically together with Windows (e.g. virus scanner). This takesplace via entries in the startup section of the registry. When such programs are uninstalled,these entries are often not deleted.
File TypesEntries in this area of the registry link one or more file extensions (e.g. .txt or .doc) with var-ious information (such as the program that should be used to open them). Such entries canbecome invalid through the uninstallation of programs, for example.
DatabaseDrivers
During installation, some programs store entries on database drivers and data sources in theregistry. These entries can become invalid through the uninstallation of these programs orthe moving or deletion of individual data sources. Often, invalid entries are created duringinstallation itself.
CommonFiles
This part of the registry contains references to files and program libraries (DLLs), to whichseveral programs normally require access. When such programs are uninstalled, theseentries are often not deleted.
Help FilesMany programs record in the registry the location of their help files. When such programsare uninstalled, these entries are often not deleted.
Installed Pro-grams
Every program leaves behind an entry in this area of the registry. The list of all programs inthe Control Panel is compiled from these entries. When programs are uninstalled, theseentries are often not deleted and inconsistencies arise in this list.
Program Set-tings
Each program installed on the computer can create entries with program-specific infor-mation in the registry (e.g. data or program paths). When programs are uninstalled, theseentries are often not deleted.
ProgramExtensions
This area of the registry contains references to extensions such as audio and video codecsor Internet Explorer add-ons that enhance the functionality of individual programs (e.g.with new menu entries or new toolbar entries). If these programs or extensions are unin-stalled, these entries are often not deleted.
ProgramComponents
Many Windows programs access ActiveX and COM components using entries in this area ofthe registry. These entries are created when programs like this are installed, but are oftennot deleted during uninstallation. Some programs even create invalid entries during instal-lation.
ProgramPaths
The installation folders of some programs are stored in the registry to allow these pro-grams to be run directly via "Start -> Run". When such programs are uninstalled, theseentries are often not deleted.
FontsWindows stores entries in this area of the registry for all fonts installed on your computer.Since these entries are often not deleted when fonts are uninstalled, Windows tries in vain toload these fonts every time the system starts up.
History ListsWindows and many programs have history lists, which log, for example, which files youwere last working on. These are stored in the registry as references. By deleting or movingthe files, these entries become invalid.
WindowsFirewall
The Windows firewall saves the programs that may accept incoming network connectionsand stores an entry for each one in the registry. These entries can become incorrect orinvalid if, for example, one of these programs is uninstalled.
TuneUp Utilities Manual 46

It should be clear therefore that deleted files can leave behind a lot of "ghosts" in the registry. TuneUp Reg-istry Cleaner finds all of these orphaned entries and can delete them in a targeted fashion. We therefore rec-ommend that you perform the full scan.
TuneUp Utilities Manual 47

Additional Functions in TuneUp Registry Cleaner Main Menu
Displaying Details and Excluding Problems from the CleanupIf you click through the various areas in the left column, you will see a detailed Explanation in the top partof the window, describing how problems can occur in the area in question.
If problems are found in an area, a list of the individual problems also appears with further information.Select an entry in the list in order to display a more extensive analysis of the problem.
Here you can also exclude certain problems from the cleanup by unchecking the relevant checkboxes.
If the problem descriptions do not appear, click on Details.
Running the cleanupTo start cleanup from the TuneUp Registry Cleaner main window, click Start cleaning. If you have excludedproblems from the cleanup, these will not be fixed.
If after the cleanup has finished, the Check Again button appears, find out more information here:
TuneUp Utilities Manual 48
Check AgainSometimes, the Check Again button appears and the wizard recommends that you check your system again.This always happens if new entries in the registry have been made invalid by the cleanup. This is not an errorin the module, but a chain reaction that can occur in the Program components and File types areas.
Example:In the registry, entry A points to entry B, which in turn points to the missing file X. In the first scan, TuneUpRegistry Cleaner determines that entry B is invalid because file X cannot be found. Entry B is deleted duringcleanup. This in turn makes entry A invalid, as it points to the now deleted entry B.
1. Click Check Again.
These two categories alone will be analyzed again.
2. Click Finish to close the wizard.
Repeat the cleanup as often as required. As soon as no new problems are found, you can exit the mod-ule - with the confidence that you have removed a great deal of junk from your system.
Functions for advanced usersIf you are sure that you want to exclude individual areas from cleanup, or want to look at the entries in theregistry or even edit them, you will find the following functions useful:
Ignore ProblemsYou can remove individual problems from the list so that they are not found by the analysis.
Just proceed as follows:
1. Select a problem from the list of corresponding areas.
2. In the Edit menu, select Ignore problem.
You can also get to this function using the list entry context menu.
Include ignored problems againIf you no longer wish to ignore a problem, you can add it back to the analysis.
Just proceed as follows:
1. In the Filemenu, select Ignored problems.
2. Highlight it in the list and click Remove.
Show entries in the registryFrom the detailed problem list for an area, you can go straight to the relevant entry in the registry for everyproblem.
Just proceed as follows:
1. Select a problem from the list.
2. In the Edit menu, select Problem details and Go to key.
You can also get to this function using the list entry context menu.
Edit the registryIn the toolbar, click Registry Editor to directly call up the TuneUp Utilitiesmodule for editing the registry.
TuneUp Utilities Manual 49

Defragmenting the RegistryIn the following chapters, you will find out how you can use the TuneUp Registry Defragmodule to reducethe size of the registry by defragmenting it and why it is important to do so.
IntroductionThe registry is the heart of a Windows system. It is where Windows continuously stores entries (values andkeys). In addition, each newly installed program and every newly connected hardware is entered in the reg-istry where it records keys and values.
This causes the registry to get bigger and bigger. However, the bigger the registry, the longer the systemneeds to find certain information requested at any given moment by a program - Windows then becomesslower. When a program is uninstalled or when the registry is cleaned up, these keys and values are usuallydeleted, but despite this the registry does not get any smaller. Why is this? The space previously taken up bya deleted key continues to exist in the registry - even if it is no longer used. At some point your registry thenlooks like a piece of Swiss cheese - full of holes.
This is a real waste of space at the expense of system performance - not just on the hard disk but also in thememory. TuneUp Registry Defrag is able to compress the registry so that it becomes much smaller. Thisfunction increases the stability of your Windows system.
TuneUp Registry Defrag analyzes the registry and creates a completely new version of it containing onlythe intact data, in the correct order. The old registry is deleted following this step and automaticallyreplaced with the new version when the computer is restarted.
TuneUp Utilities Manual 50

How to Defragment the Registry1. Start the TuneUp Registry Defragmodule by going to the Optimize system category in the Start
Center and selecting Defragment registry in theManually run maintenance tasks area.
Alternatively, you can start the module by going to Overview of all functions in the Start Center andselecting the Defragment entry under Registry.
An introductory screen is displayed.
2. Click Next to start the analysis.
TuneUp Registry Defrag determines how heavily fragmented the registry is and whether an opti-mization is necessary.
3. Before the analysis, a message appears advising you to close all other programs. During the analysis,TuneUp Registry Defrag turns the screen gray and displays a wait dialog. A small clock flashes in theupper left corner of this window showing you that the module is still working. A progress bar is alsoshown to inform you of the progress of the analysis. There is no need to worry if the progress bar doesnot move for several minutes.
4. Choose when you want to perform the optimization.
The module shows you the analysis results. If there is potential for optimization, you can find out hereby how many percent and how many kilobytes the size of the registry can be reduced.
TuneUp Utilities Manual 51

TuneUp Registry Defrag cannot rewrite the registry when it is running, but only immediately afterWindows has started up. Now choose whether you would like to restart the computer now orwhether you would prefer to allow the optimization to run automatically next timeWindows startsup. Please note that optimization can take several minutes.
If you immediately decide against the optimization or were only interested in the analysis results fromthe outset, you can exit the program by clicking Cancel.
TuneUp Utilities Manual 52

Removing Broken ShortcutsIn the following chapters, you will find out why it is important to do so and how you can use the TuneUpShortcut Cleaner module to clean up your system by removing invalid shortcuts and references.
All modifications to your system will be monitored by TuneUp Rescue Center and can be undone ifnecessary.
IntroductionThe TuneUp Shortcut Cleaner module helps you quickly and easily to "restore order" to your computer. Themodule checks all shortcuts on your Desktop, in the start menu and in the Quick Launch bar. If a shortcutreferences a program that no longer exists or a deleted file, you can easily remove it. Empty folders in theStart menu are also identified, which mostly arise after you have rearranged the Start menu manually.
In addition, TuneUp Shortcut Cleaner analyses the file history lists fromMicrosoft Office programs, Ope-nOffice©, Windows Media Player and Nero©. These lists contain references to the files most recentlyaccessed in the programs. These entries will also be checked here. If some point to files that no longer existor which have been moved, you can delete them.
This means that your system is free from unnecessary ballast; it also means that you no longer have to wastetime trying to call up broken links.
TuneUp Utilities Manual 53

How to Remove Broken Shortcuts1. Start the TuneUp Shortcut Cleaner module by going to the Optimize system category in the Start
Center and selecting Remove broken shortcuts from theManually run maintenance tasks area.
Alternatively, you can start the module by going to Overview of all functions in the Start Center andselecting the Remove broken shortcuts entry underWindows.
Your interface (Desktop, Start Menu, Quick Launch bar) and the history lists of some programs arechecked for broken shortcuts and entries. This analysis can last several minutes.
After the analysis TuneUp Shortcut Cleaner shows you a list of all broken shortcuts and references.
If no broken entries have been found, you will only receive a list of the places that were searched. Inthis case, click Close to exit this function.
2. You decide whether to delete all broken shortcuts or not.
Clear the checkboxes of those invalid references that you do not want to delete. The standard settingis for all invalid references to be deleted.
3. Click Cleanup.
The cleanup process normally lasts just a few seconds. Afterwards you receive a short status report onthe number of references and shortcuts removed.
4. Click Finish to exit TuneUp Shortcut Cleaner.
TuneUp Utilities Manual 54

Accelerating System Startup and ShutdownIn the following chapters, you will find out how to accelerate the startup and shutdown of your computer innext to no time.
All modifications to your system will be monitored by TuneUp Rescue Center and can be undone ifnecessary.
IntroductionHere you receive recommendations for disabling unnecessary startup programs. These recommendationshelp to accelerate system startup and shutdown.
For example, common startup services that are not needed immediately after system startup are simplyscheduled to start up at a later time. This still ensures that you will not lose these functions, but they nolonger delay system startup unnecessarily. The waiting time for services to shut down is also reduced. Serv-ices will therefore close faster when shutting down and the shutdown procedure itself will be faster.
You can either apply all of these recommendations immediately, or look at the detailed descriptions first andthen decide one by one.
TuneUp Utilities Manual 55

How to Accelerate System Startup and ShutdownLaunch the TuneUp StartUp Optimizer tool by going to the Optimize system category in the Start Centerand selecting Accelerate system startup and shutdown from the Runmaintenance tasks manually area.The TuneUp StartUp Optimizer window is displayed.
Alternatively, you can start the module by going to Overview of all functions in the Start Center and select-ing the Accelerate system startup and shutdown entry under Recommendations.
You may first have to enter information for your profile at this point in order to obtain tailored rec-ommendations.
Which services and devices do you use on this computer?Here you can switch off functions that you do not use. It identifies which functions and services you havealready set up and only recommends those that are not being used.
For example, if you never use a printer, you can turn off all background programs that are related to printcontrol. Simply specify this here.
If you never need to access a company network or domain, you can turn off all related background pro-grams and services. Simply select the applicable answer from the list.
The more unnecessary features you disable here, the quicker your computer will start up and work, because- after this optimization - Windows will no longer run these background programs that start up auto-matically and are constantly active.
You can change the setting you make here at any time by clicking on "Change profile" at the top right ofTuneUp StartUp Optimizer.
OverviewThis view provides you with an overview of any optimization recommendations found. You can apply themall by clicking once on Optimize all.
TuneUp Utilities Manual 56

DetailsClick on a recommendation or on the Details link to see detailed descriptions of the individual rec-ommendations. Alternatively, switch to the Details tab. Here you can apply all recommendations by clickingonce on Optimize all.
Click on a recommendation in the "Optimization recommendations" column. A description of the programand the recommendation are displayed in the right-hand area of the window. If you wish to allow the opti-mization, click on Apply recommendation at the bottom right.
Hiding and Showing RecommendationsIf you do not want to accept a recommendation, click Hide recommendation. Now you can select whetheryou want to hide it permanently or only for 30 days. The number of hidden recommendations is always dis-played in the taskbar on the right. By clicking on the number displayed, you can easily show these rec-ommendations again.
TuneUp Utilities Manual 57

Defragmenting the Hard DiskIn the following chapters, you will find out why it is important to do so and how you can use the TuneUpDrive Defragmodule to defragment your hard disks.
IntroductionThere are many reasons why a computer may become noticeably slower over time. One of them is the grad-ual fragmentation of the hard disk. This can be described as follows:
New files are first saved as a block to an empty hard disk one after the other. If you then, for example,deleted a file in the middle, there would be a gap in the hard disk. Windows uses this gap later to store thenext file that you save to the hard disk. If this gap is not big enough, Windows then splits the file and storesthe second half at another location. Over time, more and more gaps are created and more and more files arefragmented into pieces (fragments), i.e. the degree of fragmentation increases.
This really slows down the performance of your computer: Every time you call up a file, this has to be readfrom the hard disk, which would of course happen faster if the file was stored in one place. In technicalterms: If fragmentation is high, the hard disk reading heads must always be realigned in order that they canload the individual fragments of a file.
A simple way to speed up your system is therefore to defragment the hard disk. As the conventional defrag-mentation often takes a long time, TuneUp Drive Defrag offers you two different modes. You either decidefor yourself how defragmentation should take place, or allow TuneUp Drive Defrag to make the decisionfor you.
Find out below what exactly happens during the two defragmentation modes:
Thorough DefragmentationThis defragmentation mode arranges the newly sorted files particularly intelligently: system files that areused frequently are stored at the start of the hard disk, so that Windows can find them again in no time atall.
It is clear that this defragmentation mode will take longer than simply consolidating the files. TuneUp DriveDefrag is therefore also carried out with particularly low priority so that you can continue working almostundisturbed. This procedure speeds up the booting of Windows considerably. Frequently used programsalso start faster. This noticeably increases the performance of the computer.
Fast DefragmentationThis defragmentation mode consolidates all files again so that they can be read noticeably faster.
The advantage of this method is the speed with which it is carried out: The performance of your hard disk isincreased in no time at all.
TuneUp Utilities Manual 58

How to Defragment Your Hard Disk1. Launch the TuneUp Drive Defragmodule by going to the Optimize system category in the Start
Center and selecting Defragment hard disk underManually run maintenance tasks.
Alternatively, you can start the module by going to Overview of all functions in the Start Center andselecting the Defragment entry under Hard disk.
2. Select which hard disks should be checked for optimization potential.
3. Select how defragmentation should take place according to the analysis.
TuneUp Drive Defrag offers you two different ways to defragment (see Introduction, p. 58) so hereyou choose which analysis option suits best before the defragmentation.
Out of the four options, the first one is preselected because it gives you a personal recommendationafter the analysis and you can decide for yourself how the defragmentation should be carried out.For the other three options, defragmentation starts as soon as the analysis is complete. If, however,the analysis determines that the degree of defragmentation is very low, defragmentation will not becarried out for these three options because TuneUp Drive Defrag deems it unnecessary.
Wait for result and then decideWe recommend this option for you. Once analysis is complete, you decide for each hard disk whetheryou would like to run a fast or thorough defragmentation. You can also decide here to go withoutdefragmentation.
Automatically as recommendedTuneUp Drive Defragmakes the decision for you and defragments each hard disk as soon as the anal-ysis is complete using the mode suited to the degree of fragmentation.
Automatically thoroughYou optimize your hard disk performance down to the last detail, even if this lasts a bit longer - regard-less of the analysis result.
Automatically fastYou would like to save time and defragment each hard disk particularly quickly, regardless of thedegree of fragmentation.
TuneUp Utilities Manual 59
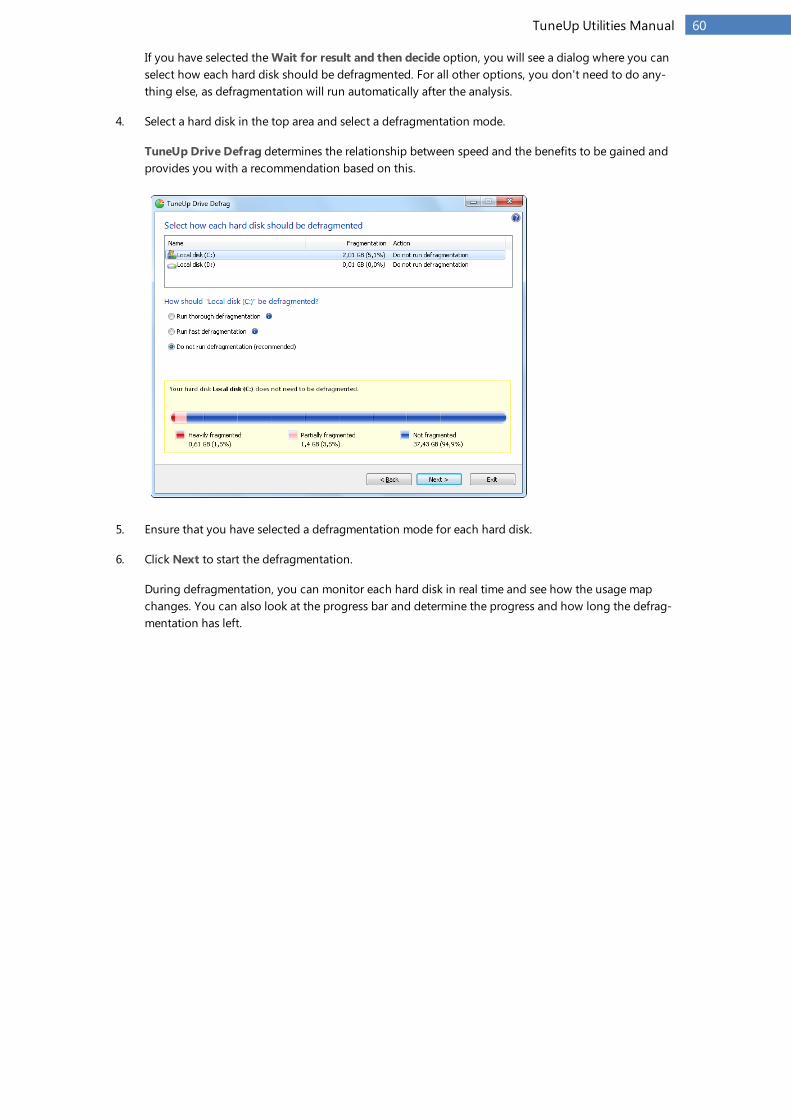
If you have selected theWait for result and then decide option, you will see a dialog where you canselect how each hard disk should be defragmented. For all other options, you don't need to do any-thing else, as defragmentation will run automatically after the analysis.
4. Select a hard disk in the top area and select a defragmentation mode.
TuneUp Drive Defrag determines the relationship between speed and the benefits to be gained andprovides you with a recommendation based on this.
5. Ensure that you have selected a defragmentation mode for each hard disk.
6. Click Next to start the defragmentation.
During defragmentation, you can monitor each hard disk in real time and see how the usage mapchanges. You can also look at the progress bar and determine the progress and how long the defrag-mentation has left.
TuneUp Utilities Manual 60

Tip: NTFS Compared with FATHard disks can either use the NTFS file system, as set in current Windows versions as preference, or the oldFAT system as supported by the first Windows versions. Analysis of drives before defragmentation is sub-stantially faster on NTFS drives. For FAT systems, users must wait considerably longer and can take the pop-ular coffee break. This is just one of several reasons why the old FAT system should be converted to themodern NTFS system.
The NTFS file system (NTFS = New Technology File System) is the file system of Windows NT and its suc-cessors (e.g. Windows 2000, Windows XP, Windows Vista) up to Windows 7. It offers an intelligently devisedaccess protection to file levels, allows flexible management of privileges, accommodates file sizes above 4GB, offers automatic error correction of the file system and can utilize the storage space of today's standardhard disk sizes in a considerably more efficient manner.
If your hard disks still use the FAT file system, you can carry out a very simple conversion.
Although conversion is considered very secure, you should make a backup of your saved databefore attempting this.
Click the Windows Start icon to open All Programs, go to Accessories and click on Command Prompt. Ifyou enter CONVERT.EXE C:/FS:NTFS in the command line, conversion will start.
Replace C: with another drive letter to convert a different partition. If the system partition is changed, thecomputer will need to be restarted. In this case, follow the instructions on your screen.
TuneUp Utilities Manual 61

5. Gaining Disk Space
In the same way as your home can get cluttered, your computer can also get clogged up with unnecessaryballast, which uses up valuable disk space. We recommend that you carry out some spring cleaning fromtime to time and delete unnecessary files from your system.
The "Clean Hard Disk" AreaIn the Clean hard disk section, you can select the drives that you want to clean. After you have selectedthese, TuneUp Utilities runs a quick analysis in the background and informs you how many Unnecessaryfiles, Old backups andWindows functions there are on the drives and how much disk space they are takingup. You can now decide which files you want to delete and/or which Windows functions you want to dis-able.
The "Analyzing Storage Usage and Deleting Data" AreaHere you can go a step further and search drives systematically for unnecessary data and securely deleteany sensitive data.
Use the TuneUp Disk Space Explorer module to find large files and folders on your system. You can thenarchive this data or delete it fully if you are sure you will not need it again in the future. This is a way of free-ing up valuable disk space in one go.
The TuneUp Shredder module allows you to securely remove sensitive data. You can use three intelligentdeletion methods to ensure that even a professional could not restore your data.
TuneUp Utilities Manual 62

Cleaning the Hard DiskIn the following chapters, you will find out how you can free up valuable space on your hard disks underClean hard disk and why it is useful to do so.
Under Clean hard disk, you can see old backups, unnecessary files and unnecessary Windows functions thatcan be safely removed from the hard disk without any negative impact on your system.
IntroductionTuneUp Utilities searches for many types of potentially unnecessary files that can be deleted without caus-ing problems. It then shows you how much space can be freed up. First you will receive a list of all files inquestion and you can then decide yourself which of them you would like to delete.
Particular attention is paid to security: As a result, in contrast to conventional procedures that "blindly"comb through the hard disk using certain patterns, no unpleasant surprises such as sudden error messagesor non-functioning software occur.
The elements recommended for deletion are divided into three categories:
Unnecessary filesFor example, temporary files, the contents of the browser cache, temporary thumbnail views and auto-matically generated log files and the contents of your Recycle Bin are all suggested for deletion.
These files take up valuable disk space that you can easily share. Of course you will have the chance to viewthese files again before deletion.
Old backupsBackups are suggested for deletion that would usually be used to restore an earlier status of your system.These include restore points and Windows Update backups. Of course you will have the chance to viewthese backups again before deletion.
The most recently created restore point is always stored so you can restore the system to a previous status atany time.
Windows functionsThree optional functions fromWindows are displayed. If you do not use these (maybe you didn't know thatthey existed), you can turn them off and thereby gain valuable space on your hard disks. This includes theWindows Desktop Search, Windows Messenger and the hibernation file.
TuneUp Utilities Manual 63

How to Gain Disk SpaceSelect the Gain disk space category from the Start Center.
Under Clean hard disk, select the drive on which you wish to gain disk space.
A bar chart shows you how much free space you have on the selected drive. You can also see how muchdisk space you could free up by deleting the individual data types.
You can now remove unnecessary files and old backups and also remove or disable Windows functions.
Removing unnecessary files or old backups1. Click Unnecessary files or Old backups.
A clearly arranged list of the files found or old backups is opened. You see at a glance how much spaceyou could gain. To exclude individual file or backup types from being cleaned up, uncheck the relevantcheckboxes.
For each file or backup type you can also view a description in the right-hand window area by selectingit.
2. Click Cleanup.
Cleanup may take several minutes. While the cleanup is taking place, very occasionally it can appearthat TuneUp Utilities is not reacting. This is for technical reasons and is no cause for concern. As soonas the cleanup is complete, operations will continue normally, and a message indicating that thecleanup was successful will be displayed. You can close this dialog.
TuneUp Utilities Manual 64

Disabling or Removing Windows FunctionsClickWindows functions to view the status of the individual functions.
For every function you receive a description that helps you decide how to proceed. The system shows youhow much disk space is taken up by an activated function.
You can disable or remove the following optional Windows functions:
Hibernation FileHibernation mode is when your computer is shutdown without needing to close any windows, programs ordocuments that may be open first. All data in the memory of the computer is saved to the hard disk. If thecomputer is turned back on again, you can continue from the point at which you broke off your work. Allpreviously opened windows, programs and documents are immediately restored.
Even if you do not require hibernation mode, the hibernation file takes up valuable disk space. It is exactlythe same size as your computer's memory. If, for example, your computer has 4 gigabytes of memory, thehibernation file will also take up 4 gigabytes of space on your hard disk. This is because in hibernation modethe entire content of the memory must be saved.
If you do not use hibernation mode, you can disable it here and thereby gain the disk space it would other-wise use. You can of course reactivate it at any time.
Windows MessengerWindowsMessenger is a program that lets you exchange instant messages with friends. If you do not useWindowsMessenger, you can easily remove it from your computer here.
Should you need it again in the future, you can downloadWindowsMessenger for free at any time, forexample from the TuneUp Support page, and reinstall it.
Index for Windows Desktop SearchDesktop Search is a Windows function that allows you to find files and folders quickly. It creates a searchindex with entries for each file and folder. When you search for something (in Windows Explorer or Outlook,for example) , you search only this index instead of searching the entire hard disk. This makes the processmuch quicker. Depending on the number of files on your hard disk, this index can be quite large and mayrequire lots of memory.
If you do not use Windows Desktop Search, then you can not only gain disk space by disabling the feature,but also increase your computer's performance.
TuneUp Utilities Manual 65

What Types of File are Suggested for Deletion?TuneUp Utilities searches for the following types of file which can normally be deleted from your hard diskwithout causing problems.
Type Description
Saved lostclusters
Repair programs like CHKDSK search your hard disk for lost clusters and save them.These backups are usually never used by users.
Google Earth™Cache Files
Google Earth™ uses this cache to save image data.
InternetExplorer,Mozilla Firefox,Opera andSafari Cache
All images, text and animations that you view in Internet Explorer while surfing the Inter-net are saved to the cache. If you visit a website again, the text and images can beloaded from the cache more quickly than from the Internet. However, it is advisable toempty your cache from time to time.
ThumbnailsThumbnails of images are used by various programs to provide a quick preview. Thethumbnail views used by Windows, ACDSee™ and Google Picasa™ are taken into con-sideration.
Recycle Bin All files in the Recycle Bin can be deleted if you really do not need them.
Log filesMany programs write log files that can be used to analyze their behavior. This can behelpful, for example, when trying to solve problems. Any log files that you do not planon evaluating can be deleted.
BackupsMany programs automatically create backups of your files. These can be deleted if youdo not need them.
Memory dumpfiles
When problems with an application occur, for troubleshooting purposes Windowssaves the portion of the memory used by the application in question to a file. These filesare unnecessary and can be deleted.
Temporary filesMany programs create files to temporarily store data that should normally be deleted bythe program after its tasks are complete. These files can always be deleted.
Temporary helpfiles
Windows creates temporary help files so that it can display the help files more quickly.These files can be deleted without hesitation.
Temporaryinstallation files
Many Microsoft installation programs create installation files to store data temporarilythat should normally be deleted by the program after its tasks are complete. These filescan always be deleted.
Windows errorreport files
When a program crashes, Windows saves data about the program. If this service hasbeen disabled or if settings do not allow for information to be sent to the manufacturer,these files can be deleted.
What Type of Backups are Suggested for Deletion?
Type Description
Windows XP, Windows Vistaand Windows 7 Update andService Pack Backups
When Windows is updated, backup files are created.
Restore pointsRestore points are used to save the status of system files on the computer.They are created by the System Restore service at specified intervals andwhen changes are made to the computer.
TuneUp Utilities Manual 66

Finding and Deleting Large Amounts of DataIn the following chapters, you will find out how you can use the TuneUp Disk Space Explorer module toobtain a rapid overview of the space taken up on your hard disks, in order to clean them up quickly and effi-ciently.
IntroductionThe capacity of modern hard disks and memory cards has increased tremendously over the last severalyears. At the same time, the needs of the user have also increased to the point where we still manage to com-pletely fill up even the new larger drives.
Obviously, this development hasn't exactly made it easier to keep track of these huge quantities of data.With so many files and nested folders, how is it possible to determine where the most space is being takenup (and possibly wasted)?
TuneUp Disk Space Explorer helps you find the largest files. You can then archive them onto a CD, DVD oran external hard disk, for example. It might be a good idea to make sure that you do not need these files anymore and decide to delete them instead. In this way, you can free up a vast amount of valuable disk space inone go.
First, you need to run an analysis of your disk space. Then you can use many functions from TuneUp Disk Space Explorer.
TuneUp Utilities Manual 67

How to Run an Analysis1. Launch the TuneUp Disk Space Explorer module by going to the Gain disk space category in the
Start Center and selecting Find and delete large amounts of data from the Analyze storage usageand delete data area.
Alternatively, you can start the module by going to Overview of all functions in the Start Center andselecting the Find and delete large amounts of data entry under Disk space.
2. Choose what to analyze.
Analyzing drivesFrom the list of all of the drives attached to your computer, select those that should be included in thesearch for huge files. The wizard shows the total size of each drive and the free space available. It isespecially important to analyze the drives that have little free space remaining.
Analyzing foldersYou can save a lot of time by analyzing individual folders. If you want to analyze an individual folder,you must enable Analyze folders. Click Select to open a tree structure of all your folders, from whichyou can select just one folder by highlighting it and clicking OK.
3. Click Next to start the analysis.
The analysis may take a while depending on the size and usage of the selected drives or folders. Assoon as the analysis is complete, click Finish to display the results in the main window.
TuneUp Utilities Manual 68

Analysis Results
Folder structureAfter the analysis, the TuneUp Disk Space Explorer main window opens. This is divided into two categories.In the left-hand area of the window, there is a tree view of your drives and folders, the same as in WindowsExplorer. The data for the location selected in the tree view is displayed in the right-hand area of the win-dow. By default, the most recently analyzed drive is displayed first.
If you have decided against the analysis and clicked Cancel, the main window still opens, but you will notsee any information on the individual drives. You can also start an analysis from here, but only for one driveeach.
Display of informationTo display information in the right-hand area of the window, you can choose between several views by click-ing on the respective tab at the top edge.
In each view, you will receive a list, and you can sort the columns into ascending or descending order easilyby clicking on the column name. Sorting according to size in particular will give you a quick overview ofyour biggest files.
The following views are available for displaying the disk space allocation.
TuneUp Utilities Manual 69

OverviewThe default view Overview is an ideal first step when cleaning up your drives. The most important infor-mation from all of the other views is combined to give you a general overview.
You can always find information about the selected element in the folder tree at the top of the window, inthe area with a colorful background. The size and percentage of space used is displayed for each drive.
If, however, a folder is selected, this area will show you the size of the folder including all its files and sub-folders. You also receive information on the creation date of the folder and when it was last used.
In the lower area of the window, you will see the following tables:
My ComputerWith regard to the first table, My Computer represents an exception. Instead of an overview of the largestfiles and folders, it will show the occupied space for each drive.
ComputerWith regard to the first table, the Computer view represents an exception. Instead of an overview of thelargest files and folders, it will show the occupied space for each drive.
Computer (Windows XP: My Computer)With regard to the first table, the Computer (orMy Computer) view represents an exception. Instead of anoverview of the largest files and folders, it will show the occupied space for each drive.
Overview of the largest folders and filesHere you can see a graphical overview of the space on the selected drive or folder in the form of a pie chart.The size and percentage of space occupied is shown here for up to 10 folders and files. If you would like tosee more than the 10 elements that are displayed, simply click on the link Show Contents to switch to theContents view.
File typesThis table organizes the files contained in the selected element based on file types and shows you at aglance which types of files (documents, music files, videos or images) are taking up the most disk space.
Please note that this view does not just include the files that are directly located in the selected drive orfolder, but also includes all files in subfolders. You can limit the amount of information being displayed bymoving a level lower in the folder tree on the left.
If you would like to see the individual files included in a given file type, simply click on the name of the filetype in the table. This will directly open the correct category in the file types view.
Top 10 FilesThis table is particularly useful in acute disk space shortages. It shows a list of the top 10 files that take upthe most disk space. As with the last table, this view does not just include the files that are directly located inthe selected drive or folder, but also includes all files in subfolders. If you click on one of the files in thetable or on the link Show top 100 files, the corresponding Top 100 files view will open. There you canmove, archive or delete files.
ContentsThis view shows the contents of the selected element in the folder tree on the left. In addition to basic infor-mation such as name and type, as in Windows Explorer, each element has a field that displays its size andthe percentage of disk space that it takes up. A graphical representation with bars allows you to recognize ata glance which files and folders are taking up the most space.
Double-click on a folder to move a level down and to show the contents of the folder.
TuneUp Utilities Manual 70

File typesOverview and file types
By default, a practical overview of your file types opens, showing you at a glance which ones take up themost disk space.
The top edge of the window displays buttons for Images, Documents, Compressed files,Music files, Videofiles and Other. Click on one of these buttons or on the respective entry in the overview to display all files ofthe respective file type.
Advanced: Which file extensions are included?
Each file type category includes files with many different file extensions. Images, for example, includes thefile extensions .bmp, .jpg, .gif, .tif and .png. The exact list of file extensions included is adapted to suit yoursystem automatically by TuneUp Disk Space Explorer. Click Advanced on the top right of your window todisplay this list. You can customize this easily by unchecking the checkbox.
The Other category shows you all other files that do not belong to any of the other file types.
This is where the list of extensions displayed after clicking Advanced is particularly helpful, as you can con-figure which files should be shown in the list shown below.
In the context menu (displayed after right-clicking on the list of file extensions), you can quickly selecteverything or reverse the current selection.
Explore your own hard drive and use the available views to look for ways that you can gain more disk space.Sorting the list by file size or date of last access can also help you discover interesting files. Simply use themouse to click on the column's gray highlighted title.
Cleanup tip
Sorting files by the date of last access in combination with limiting a view to certain file types allows you tofind objects such as older MP3 files or videos that you may not want to listen to or watch any more.
Top 100 filesFor most users, this is the most interesting view. This shows you the 100 largest files in the selected locationof the folder tree, clearly organized by file size. As the contents of all subfolders are included, this viewallows you to free up hundreds of megabytes or even several gigabytes with a few clicks, depending on thesize of your system.
SettingsTuneUp Disk Space Explorer provides you with some options for personalizing the appearance of your sys-tem. To customize the available options, click File and then Settings.
GeneralOn the General tab, the section Hidden Files and Folders allows you to determine whether hidden files andfolders should be shown in TuneUp Disk Space Explorer or not. The Windows Explorer settings areaccepted by default. If you want to configure different settings to the Windows Explorer settings, simplyclick Configure your own settings and tailor the options to your needs. By default, TuneUp Disk SpaceExplorer protects all elements in system folders to prevent you from accidentally deleting or moving impor-tant system files. If you know your system perfectly, you can disable this protection in the Protected systemelements section. Check the checkbox beside Permanently disable protection (not recommended).
Deletion methodOn the Deletion method tab, you can specify how TuneUp Disk Space Explorer should proceed by defaultin order to delete files and folders for you. The standard deletion methodMove to Recycle Bin is par-ticularly recommended for beginners, as accidentally deleted files can be restored.
TuneUp Utilities Manual 71

However, please note that the Windows Recycle Bin can only hold a limited amount of data. If the storagelimit of the Recycle Bin is exceeded or if Windows needs more space, the oldest files in the Recycle Bin willbe permanently deleted over time.
If the deletion method Permanently delete is selected, the Windows Recycle Bin will be bypassed and thefiles will be deleted directly. Restoring these files at a later time is only possible with luck and special soft-ware such as TuneUp Undelete.
The three other deletion methods use TuneUp Shredder to make restoring the deleted files practicallyimpossible.
You can find more information on these deletion methods and their settings under Introduction, p. 74 andDeletion Methods, p. 76.
TuneUp Utilities Manual 72

How to Archive Files
Archiving Files with TuneUp Disk Space ExplorerIf, when browsing through your computer, you find some files that you don't actually need any more butstill don't want to delete, TuneUp Disk Space Explorer has a great solution to this problem:
Thanks to the smooth cooperation with Windows Explorer you can copy these files to a USB stick or externalhard disk before deletion, for example.
1. Click on the selected file(s) and select Copy from the Edit menu or use the shortcut Ctrl+C.
2. Open the selected target drive in Windows Explorer and paste the copied files using the Pastemenuitem or the shortcut Ctrl+V.
Thanks to support for all major burning programs, you can also easily burn files to a CD or DVD.Simply drag the files you want by holding down the mouse key ( Drag & Drop) directly to the burn listin your burning program.
Deleting Archived Files with TuneUp Disk Space ExplorerAfter successfully archiving the files, you can delete them safely in TuneUp Disk Space Explorer andthereby free up valuable disk space. Select a file and then click Delete in the toolbar.
TuneUp Utilities Manual 73

Securely Deleting DataIn the following chapters, you will find out how you can use the TuneUp Shredder module to permanentlydelete files, folders and the Recycle Bin and why it is important to do so.
Securely Deleting Data AfterwardsIf you deleted a sensitive file in a "normal" way, you cannot subsequently delete it with TuneUp Shredder.However we have a tip for you:
When you defragment hard disks, any deleted files are normally overwritten and cannot be recov-ered afterwards. Simply use TuneUp Drive Defrag to subsequently increase the security of a nor-mal deletion method (see How to Defragment Your Hard Disk, p. 59).
IntroductionWhen you delete a file, it generally ends up in the Recycle Bin. In Windows, this Recycle Bin is simply afolder that collects files for deletion. Retrieving a file from the Recycle Bin is child's play and therefore manyusers regularly empty the Recycle Bin or delete their files without sending them to the Recycle Bin, in orderto feel that the file has been securely deleted.
Note however that when you delete a file, Windows does not actually remove it altogether - its entire con-tent remains on the hard disk. Windows merely marks the file as "deleted" from the file system and releasesthe space taken up by the file so that it can be used again. Until this disk space is used again, it is very easyto restore this file (for example using TuneUp Utilities -> Restoring Deleted Files, p. 85).
However, if you want to be absolutely sure that even professionals could not restore your sensitive data, useTuneUp Shredder to irreversibly delete files, folders and the Recycle Bin. There are three different DeletionMethods, p. 76 and you can choose the one that suits you best.
How to Securely Delete DataLaunch the TuneUp Shredder module by going to the Gain disk space category in the Start Center andselecting Securely delete data from the Analyze storage usage and delete data area.
Alternatively, you can start the module by going to Overview of all functions in the Start Center and select-ing the Securely delete data entry under Hard disk.
TuneUp Utilities Manual 74

What would you like to delete?Files1. Select Files.
This option lets you search for files on your computer to select them for deletion.
2. Click Add to add a file to be deleted to the list.
The Explorer opens. Double-click on a file to be deleted to add it to the list. Alternatively, you can drag afile from your opened Explorer or from the Desktop to the list (using Drag & Drop). Select a file with themouse and drag it into the list.
The Delete allocated free disk space option overwrites the space that becomes free through deletion,thereby increasing security of deletion.
If you add a file to the list by mistake, you can remove it again by selecting the entry and clickingRemove.
3. Click Next to confirm your selection.
You can now select the desired deletion method (see Deletion Methods, p. 76).
Folders1. Select Folders.
This option lets you search for folders on your computer to select them for deletion. When a folder isdeleted, all the files it contains will also be deleted. When you select a folder for deletion, the programdetects whether this contains subfolders and you have the opportunity to exclude these from thesearch.
2. Click Select.
A tree structure opens in your folder. Select here a folder to be deleted and click OK. Alternatively, enterinto the text field the full path of the folder to be deleted.
The Delete allocated free disk space option overwrites the space reserved for the files in the selectedfolder, thereby increasing deletion security.
If the selected folders have subfolders, here you can remove them from the search. Do this by uncheck-ing the Include subordinate folders checkbox.
3. Click Next to confirm your selection.
You can now select the desired deletion method (see Deletion Methods, p. 76).
TuneUp Utilities Manual 75

Recycle Bin1. Select Recycle Bin.
This option shows you the Recycle Bin, so that you can empty it. You receive information on thenumber of files it contains and the amount of disk space taken up by the Recycle Bin. You can also dis-play the content before deleting it.
2. Click Show contents.
You receive information on the size of the Recycle Bin and the number of files it contains. To ensurethat there are no important files in the Recycle Bin, you can display the content before deletion takesplace.
The Delete allocated free disk space option overwrites the reserved free space of files in the RecycleBin, thereby increasing security of deletion.
3. Click Next to confirm your selection.
You can now select the desired deletion method (seeDeletion Methods, p. 76).
Deletion MethodsTuneUp Shredder provides the following three deletion methods that differ in terms of length of deletionand security of deletion. Each of these deletion methods can be increased by repeating the deletion process.Note however, that the deletion process then takes longer.
Fast deletionFiles will be overwritten with a single character. The original text of the files will be replaced with endless col-umns of a certain letter.
Secure deletion in accordance with DoD 5220.22-MA procedure developed by the United States Department of Defense (Regulation DoD 5220.22-M) will beused. Prior to deletion, the files are overwritten with special data patterns multiple times, destroying the orig-inal contents so effectively that even expensive examinations of the magnetic structure of the disk in a spe-cial laboratory would not allow the data to be recovered.
Secure deletion, Gutmann methodThis method, named after its inventor Peter Gutmann, overwrites the files to be deleted 35 times with ran-dom values in a special pattern and then deletes them. This method is considered the most secure way todelete files with software, but also takes the longest time.
TuneUp Utilities Manual 76

6. Fixing Problems
Unfortunately, things sometimes don't go quite as you expected when you are working with a computer.With Fix problems, TuneUp Utilities offers you various functions for discovering and rectifying any prob-lems that occur. In addition, the program helps you to recover accidentally deleted files. Advanced usershave the option of managing running processes or displaying system information.
Fixing common problemsIn the following chapters, you will find out why it is important to do so and how you can use the TuneUpRepair Wizardmodule to fix common problems easily. Simply select the problems in question and TuneUpRepair Wizardwill fix them for you.
All modifications to your system will be monitored by TuneUp Rescue Center and can be undone ifnecessary.
IntroductionYou keep having problems with your computer. Without warning, Windows suddenly displays the wrongicons, hides the taskbar or shortcuts on the desktop disappear.
If you discover problems like these on your computer but do not know how to describe them, you will findthis function very useful. You select the problems that are occurring from a list of typical computer prob-lems, and TuneUp Repair Wizard fixes them immediately.
TuneUp Utilities Manual 77

How to Fix Common Problems1. Start the TuneUp Repair Wizardmodule by going to the Fix problems category in the Start Center
and selecting Fix common problems.
Alternatively, you can start the module by going to Overview of all functions in the Start Center andselecting the Fix common problems entry underWindows.
2. Select the problems you have for repair.
TuneUp Repair Wizard shows you a clearly arranged list of common Windows problems. After youselect an entry in the list, a detailed explanation of this problem appears in the right-hand windowarea. Select the checkbox for every problem that you are experiencing.
3. Click Next to start the repair.
This opens a list of the selected problems opens that you must confirm by clicking again on Next. Therepairs are now carried out.
4. Click Finish to close the module.
TuneUp Utilities Manual 78
Checking the Hard Disk for ErrorsIn the following chapters, you will find out how you can analyze your drives using the TuneUp Disk Doctormodule and why it is important to do so.
IntroductionWhen working with your computer, files are constantly being read and written – regardless of whether youare editing a text document, looking at pictures or simply starting an application. Windows places all files inspecial file systems to allow quick access to all necessary information at any time.
More information on system filesFile systems keep track of every file and folder on a drive and save information about these objects such astheir name, size, date of last access, location and much more.
The file systems used by Windows for hard drives, USB flash drives, memory cards (such as those used bydigital cameras) and diskettes are called FAT and NTFS. The newer of the two file systems, NTFS, allows youto save additional information such as access authorizations and is better suited for the size of modern disksthan FAT.
Over time, errors may occur in these complicated systems - due to defects in the drives being used, poweroutages or program crashes. If these errors are not found and corrected quickly, this can lead to error mes-sages, problems with programs and, in the worst case, total loss of important data.
TuneUp Disk Doctor performs a thorough analysis of your drives and their file systems. If any errors arefound during analysis, they can be repaired automatically. This is how you guard against data loss.
TuneUp Utilities Manual 79
How to Check your Hard Disk1. Start up the TuneUp Disk Doctor module by going to the Fix problems category in the Start Center
and selecting the Check hard disk for errors entry.
Alternatively, you can start the module by going to Overview of all functions in the Start Center andselecting the Check for errors entry under Hard disk.
2. Select the drive to be checked by TuneUp Disk Doctor and click Next.
3. Select Normal analysis or Thorough analysis.
Because the Thorough analysis can take a long time for large drives, theNormal analysis of theselected drive is sufficient in most cases – this usually takes 1-2 minutes.
However, if errors occur on your system or Windows reports problems with reading or writing data, aThorough analysis is recommended.
For more information on the analysis procedure, see: Normal vs. Thorough Analysis, p. 81
4. Click Next to start the analysis.
During the analysis, TuneUp Disk Doctor provides you with a graphical display of the progress. Theboxes displayed represent the space usage of the drive being examined.
5. If no errors have been found, click Finish to exit the module.
In some cases it is necessary to restart your computer in order to successfully complete the analysis orrepair process. This can happen, for example, when active programs or Windows itself are using theselected drive and thus prevent TuneUp Disk Doctor from having exclusive access.
If a system restart is necessary, TuneUp Disk Doctor will show you a corresponding message. You canthen decide if the necessary restart should be performed immediately or if you would like to restartthe system yourself at a later time.
TuneUp Utilities Manual 80

Normal vs. Thorough Analysis
Normal analysisNormal analysis takes approx. 1-2 minutes and is generally sufficient.
Normal analysis is carried out in several phases. The table below shows explanations of all possible steps(only the first three lines are performed during the normal analysis).
Thorough AnalysisThorough analysis covers all of the steps of the normal analysis. In addition, it checks your drives for phys-ical defects.
Storage space on drives is divided into "sectors", each of which is usually 512 bytes in size. In order to detectphysical defects on a drive, the thorough analysis checks each of these sectors.
The length of this analysis depends on several factors, including the size of the drive and the degree of frag-mentation. You should allow at least 5 to 20 minutes.
The following table explains all possible steps.
Analysisstep Explanation
Normal and thorough analysis
Checkingfiles andfolders(NTFS andFAT)
Every element in the file system is checked. The program ensures that the structures of all filesand folders are correct.
Checkingindexes(NTFSonly)
Indexes are references to folders in the NTFS file system. If any of these indexes are damaged,the associated folders will not be displayed in the file system.If any of your files or folders have suddenly "disappeared", there is a good chance that theywill be recovered after repairing the file system.
Checkingsecuritydescriptors(NTFSonly)
Files and folders in the NTFS file system are usually protected by security descriptors that pre-vent access by unauthorized users. During analysis, errors in these descriptions are found andcorrected.
Thorough analysis only
Checkingfile data(NTFSonly)
All sectors of the drive that currently contain data will be checked. This ensures that no readerrors take place when working with files. If sectors are found that require multiple readattempts to successfully read the data, the file data contained will be moved to a sector that isfree of errors. The sector is then marked as defective. This prevents future problems.
Checkingfree space(NTFS andFAT)
All drive sectors that do not contain any files will be checked for error-free readability. Iferrors occur during this analysis, the sector in question will be marked as defective to preventfiles from being saved there in the future.
TuneUp Utilities Manual 81

Managing Running ProcessesIn the following chapters, you will find out how you can use the TuneUp Process Manager module to mon-itor and manage running processes, system capacity and open files and why it is important to do so.
IntroductionTuneUp Process Manager gives you constant control over the programs and processes that are running onyour system and allows you to monitor your system activity.
You can find out how much memory is being used by which processes, view numerous details and ter-minate unwanted processes with a single mouse click.
The tool also offers real-time graphs for processor and memory usage and provides up-to-date informationon what your computer is doing at any given time.
TuneUp Utilities Manual 82

How to Manage Running ProcessesStart the TuneUp Process Manager module by going to the Fix problems category in the Start Center andselecting the Display and close running processes entry under Check system and fix problems.
Alternatively, you can start the module by going to Overview of all functions in the Start Center and select-ing the Display and close running processes entry underWindows.
TuneUp Process Manager provides a great deal of information on the current status of your system. Thisinformation is divided into three tabs:
ProcessesAfter launching the module, the 'Processes' tab shows all of the currently running programs and processes.The table shows you the names of the processes together with their priority and CPU usage. The modulealso shows you how much memory space the individual processes are taking up.
If you select a process from the list you can view more information on each application with Show details.Select End process to close an application. This is a somewhat drastic measure, but is sometimes necessaryto close a program that has crashed, or if you want to stop an unwanted dialer.
When User Account Control is enabled, it is possible that only the processes started by you are displayed. Tosee the processes started by other users and by the system, click Show all processes at the bottom of thewindow.
If you have selected a process in the list, you can click Edit and then Set Process Priority to specify howmuch processing power Windows should assign to this process.
TuneUp Utilities Manual 83

Open FilesIn the Open Files tab, you will have an overview of the files and folders that are currently open. The table willshow you what the file type is, where the file or folder is and which process has opened it at that time.
You should not be surprised when some files are shown in the list more than once. Files and folders can beopened by more than one process at the same time. It is also normal when files that are obviously "open"cannot be found in the list. Applications like Microsoft Word and the text editor Notepad only open a filebriefly to read its contents or to save it, but do not keep it open the entire time you are working on it.
Tip: If you try to delete a file and you get an error message telling you that it is currently in use, you can usethis tool to find out what process is using the file and end it. This will then let you delete the file.
PerformanceThe 'Performance' tab provides you with various information on the system.
You can view the current processor usage in percent, and a graph of the processor usage for the last severalseconds. A similar graph also shows memory usage for the last several seconds. You can also view the cur-rent usage of the page file and the physical memory in kilobytes.
There is also a menu bar and a toolbar. Some of the functions here adjust the content of the active tab.These are described in the sections above. The general functions of the File, Tools and Helpmenus arealways displayed.
General menu bar functions"File" MenuIn the Filemenu, you can use theNew Task entry to call up the well-known Windows Run dialog to start anew application or open a file. Click Exit Windows to shut down or restart the computer so that new set-tings can take effect.
A function of particular interest is Replace Task Manager, which works by replacing Windows Task Man-ager on your system with TuneUp Process Manager. This means you can call it up using the Ctrl+Alt+Delshortcut, or right-click in a free area of the taskbar to select it. If you want to use the Windows Task Man-ager again, simply select the same menu item to remove the check mark in front of it.
"Tools" MenuIn the Toolsmenu you can configure how TuneUp Process Manager is to be displayed on your computer.You can keep it always in the foreground, e.g. to monitor the processor usage for your system's uptime. Youcan also display TuneUp Process Manager in the notification area on the bottom right of your desktopwhen you minimize the window. There is an icon there, which you can click any time in order to maximizethe window again in no time at all.
"Help" MenuIn theHelpmenu you can call up the program help at any time, visit the TuneUp website, check TuneUpUtilities for updates or display information on your version of TuneUp Utilities.
TuneUp Utilities Manual 84

Restoring Deleted FilesIn the following chapters, you will find out how you can use the TuneUp Undeletemodule to restore acci-dentally deleted files.
IntroductionHave you accidentally deleted an important file and want to restore it? Perhaps you already looked in theRecycle Bin but it wasn't there?
Then you will be pleased with the functions offered by TuneUp Undelete.Here you can restore deleted files,provided Windows has not yet overwritten the drive space that these files took up.
Valuable tips for rescuing dataThe following rule of thumb applies: The longer ago a file was deleted and the more you have worked onyour computer since then, the smaller the chance of complete restoration. Therefore, as soon as you realizethat the file should not have been deleted, try to rescue it with TuneUp Undelete.
Never install software for recovering deleted files on your system if the mishap has already occurred. Youcould overwrite important data irrevocably precisely by installing such software.
Even if you install the application on a different drive, deleted data is still at risk from temporary installationfiles. Data recovery software like TuneUp Undelete should therefore always be installed and ready for use inadvance. This means you are always fully equipped to deal with an emergency situation, should one occur.
Background Info: What Happens when Files are Deleted?You can find more information about this in the How Secure is Deleting a File? section in Introduction, p.74. This section also provides information on how to delete confidential files securely so that they cannot berestored even with TuneUp Undelete.
TuneUp Utilities Manual 85

How to Search for Deleted Files1. Start up the TuneUp Undeletemodule by going to the Fix problems category in the Start Center and
selecting the Restore deleted files entry.
Alternatively, you can start the module by going to Overview of all functions in the Start Center andselecting the Restore files entry under Hard disk.
2. Select the drives you want to scan for deleted files.
Even if you want to recover a file on an external storage medium (for example a USB flashdrive), this option will still be displayed.
If you can no longer remember where the files were stored, you can also browse all drives.
3. Restrict your search.
You can refine your search through the entry of search terms. This is recommended if you canremember the name of the file or even just part of the name.
Search tip: Use the wildcards * and ?When entering your search terms you can usewildcards. These function in exactly the same way as inmany standard search engines.
The use of wildcards when searching is useful if you cannot remember the precise name of the file oronly wish to search for a certain file extension.
* and ? can be used as wildcards, whereby * represents multiple characters and ? stands for an individ-ual character.
Examples for the use of wildcardsl A search using photo*will find all files whose name starts with photo, and of all file types i.e.photo_01.jpg, photo.bmp, photo_paris.tif, etc.
l A search for photo.* or for photo (no wildcard) will find all files called photo and of all filetypes, i.e. photo.jpg, photo.doc, photo.tif, etc.
l A search for *.doc will find all files with the extension .doc.l A search for photo_?? finds all files whose name starts with photo_ and which have two furthercharacters in their name, and of any file type, i.e. photo_01, photo_09, etc.
TuneUp Utilities Manual 86

Why should I search for 0 byte files?0 byte files consist solely of the file name. It is impossible to restore the content of such files. If, forexample, you have deleted a file with a strictly confidential file name and want to be sure that this filecan never be found again, you can include 0 byte files in the search.
Why should I only search for files in good condition?With files that are in good condition you stand a good chance of recovering the file in full.
4. Click Next to start the search.
TuneUp Undelete searches every selected drive in turn. For large hard disks and if you have notentered any search terms, the search can take quite a long time.
Search result displays the file name, the original storage location (folder), the size, file type, date lastchanged and an estimate of the condition of the file.
File Restoration
Condition of a deleted fileFor every deleted file, TuneUp Undelete determines its probable condition. This is of course the most impor-tant information at this point: you receive a very accurate prediction of whether a file can be restored againin full.
Good conditionIf the condition of a file is likely to be good, the place the file originally took up on the hard disk will not yethave been replaced with another file. It is therefore highly probable that the file can be successfullyrestored.
Poor conditionIf the condition of a file is likely to be poor, this means that the place that it once took up on the hard disk,will have been partly overwritten by other files. However, there is still a chance that at least some of the filecan be restored. The precise result of the restoration cannot at this time be determined for certain, however.
Restoring files1. Select the files that you wish to restore.
Use Ctrl-click to select multiple files.
2. Click Restore to start the recovery attempt.
3. Specify whether the files should be restored to the original folder or to another location.
If you wish to select a different location, the folder hierarchy appears and you can select a folder orcreate a new folder. Click OK to confirm your entry.
TuneUp Undelete now restores the selected files to the location specified.
You can also exit the dialog at any time by pressing Cancel.
Was the recovery successful?As soon as restoration has finished, you can try to open the file. If this works, the file was successfullyrestored. If this doesn't work, the file had probably already been overwritten by another file.
If you now wish to use another program to recover deleted files, so as to be sure that you havetried everything, we strongly urge you not to install this on the same hard disk as the file wasstored on.
TuneUp Utilities Manual 87

Showing System InformationIn the following chapters, you will find out how you can use the TuneUp System Informationmodule todisplay system information.
IntroductionTuneUp System Information looks into your computer and collects all sorts of facts and information aboutyour hardware and software and your computer's performance.
This information is important if you wish to upgrade your computer or if an engineer asks you whether cer-tain components are installed on your computer.
How to Show System InformationStart the TuneUp System Informationmodule by going to the Fix problems category in the Start Centerand clicking on Show system information.
Alternatively, you can start the module by going to Overview of all functions in the Start Center and select-ing the Show system information entry under Computer.
The facts about your system are displayed on the following nine tabs:
OverviewThe overview displays summarized information on the most important components of your computer. Thisquickly shows you what processor is installed, the system RAM, the graphic card performance, the mouse inuse, and any available information regarding the disk drives.
WindowsHere you can find out what version of Windows and of Internet Explorer you are using and when you lastbooted your computer.
DisplayAll important information, including the supported display modes and the abilities of your monitor andgraphics card can be found here.
TuneUp Utilities Manual 88

MemoryHere you see current memory usage and also how much memory is being used by each of the applicationsthat are currently loaded.
PerformanceShown here are all facts on processor usage, physical memory and the size of the page file. This informationis displayed in three real-time graphs.
DrivesFor each drive, here you are shown information on use of storage space and hardware. You can also findinformation about how your drives are organized under File system.
I/O DevicesThis lists all the important ports, the installed printers and the audio devices.
CommunicationWhen a dial-up connection is open, two real-time graphs show how much data is being sent and receivedin kilobytes per second.
System devicesInformation on the processor and BIOS memory is displayed here. Click the link Processor details to viewdetailed information on the features of your processor.
TuneUp Utilities Manual 89

7. CustomizingWindows
Using the CustomizeWindows category, you can specifically configure how your Windows should lookand function, thereby personalizing your computer. Under Frequently used settings, you will find the ele-ments and areas of Windows that you often personalize and you can open these with a simple click.
The "Change Windows Appearance" AreaUnder Personalize the appearance of Windows, you will find the TuneUp Styler module, which you canuse to design the Windows user interface entirely to your personal taste. For example, settings such asicons, the logon screen, the appearance of windows and buttons and much more can be very easily mod-ified.
If you would like a completely new design, you can download entire design packages from the Internet atwww.tuneup-software.co.uk/services/styler. Simply click on the link to download new Windows themesfor free.
The "Modify Windows Settings" AreaUnder Personalize options and behavior, you will find the TuneUp System Controlmodule, which you canuse to adapt the visual effects, user logon, desktop and much more to your personal needs and preferences.
TuneUp Utilities Manual 90

Changing Windows AppearanceIn the following chapters, you will find out how to change the appearance of Windows with the TuneUpStyler module.
Please note that the "Boot screen" and "Startup logo" categories can only be used on Windows Vista.
IntroductionWindows would not be very useful without its graphical user interface. The importance of an attractive inter-face is demonstrated by the new design of Windows Vista and Windows 7: the whole system feels imme-diately fresher and more modern.
But just as in fashion, it is easy to tire of the new design, not to mention those who from the beginningnever liked the "candy" look.
With TuneUp Styler, you can change the appearance of numerous elements in Windows to suit your per-sonal taste. You'll be pleasantly surprised at how many changes you can make here.
TuneUp Utilities Manual 91

How to Change Windows Appearance1. Start the TuneUp Styler module by going to the CustomizeWindows category in the Start Center and
clicking on the Personalize the appearance of Windows entry in the ChangeWindows appearancearea.
Alternatively, you can start the module by going to Overview of all functions in the Start Center andselecting the ChangeWindows appearance entry underWindows.
The TuneUp Styler start page opens from which all adjustment options of the module can be quicklyreached.
2. Click on the area in which you wish to make changes.
3. Give your creativity free reign and design your Windows system completely to your own tastes.
TuneUp Utilities Manual 92

"Boot Screen" CategoryPlease note that this function is not available in Windows 7, as Windows 7 does not use a boot screen.
IntroductionWhen you boot up Windows, a black screen is displayed as standard. TuneUp Styler lets you switch thisboot screen for a different one with just a few clicks. Or let your imagination run wild and create your ownboot screen with your favorite vacation photo, for example.
This is how it works:1. Start the TuneUp Styler module by going to the CustomizeWindows category in the Start Center
and selecting Personalize the appearance of Windows under ChangeWindows appearance.
2. On the navigation bar, click in the left-hand window area on Boot screen.
TuneUp Styler lists all available boot screens. When you use the module for the first time, you willonly see the default Windows screen here.
3. You can add new boot screens to the list before finally accepting them. To do so you have the fol-lowing options:To select an existing boot screen in the list, proceed with step 4.
Downloading previously created boot screens1. In the top left, click Add under Boot screens.
2. Select the entry Download Boot Screens from TuneUp Online.
This takes you to TuneUp Website, where you find a wide range of different boot screens, whichyou can use to customize the start process to suit you.
3. Click on a boot screen.
This is automatically opened with TuneUp Styler and added to the list.
TuneUp Utilities Manual 93

Adding Boot Screens from a File1. In the top left, click Add under Boot screens.
2. Select Load boot screen from a file.
An Explorer window opens and you can select any given file on your computer. The following for-mats are supported:
TypeFile exten-sion
Description
TuneUpboot screen
.TBS The individual format of TuneUp Styler
StardockBootskin
.BOOTKSKINThe format of many boot screens on websites such as www.wi-ncustomize.com
Images.BMP; .PNG;.GIF; .JPG;.JPEG
If you select an image in one of these formats, the Create bootscreen dialog is automatically called up with this image, allow-ing you to make additional adjustments.
Ntoskrnl.exefiles
.EXEThe system kernel of Windows XP, in which a boot screen wasincorporated. TuneUp Styler extracts the boot screen from thisEXE file and saves it in Styler format.
3. Select a new boot screen and give it a name under which it will appear in the TuneUp Styler list.
You can also enter the name of an author. The newly added boot screen now appears in the list.You can add additional boot screens.
Creating your Own Boot Screen1. Under Boot screens click Create new.
A wizard appears with which you can search for and adapt an image. You can select an image onyour computer or on an external storage device.
You also have the option of first transferring an image from a camera or scanner or starting aGoogle™ image search directly from TuneUp Styler. In both cases, you save the required image toa location that you can easily find again and click on Search local drives to load the saved image.
2. Optimize the appearance of your new image.
Please note that the available alignment options are only effective if the picture is not yet the cor-rect size for a boot screen (640 x 480 pixels). Under Background, you can specify the color to beused for areas not covered by your image.
For technical reasons, this includes the background of the progress bar. You can also set position,foreground color and edge color to suit your individual taste. Position the progress bar at a loca-tion that does not interfere with the overall picture.
For more information, see: Tips for Attractive Boot screens (Windows XP only) , p. 96
3. Save the new boot screen to the TuneUp Styler list under a name of your choosing.
You can also enter the name of an author. The boot screen you added now appears in the list.
TuneUp Utilities Manual 94

Restoring the DefaultIf you no longer like your new boot screen, you can restore the default Windows screen at any time.
1. Click on the Restore Defaults button.
The default screen is then automatically selected from the list and a preview opens.
2. Click Apply to apply it.
Steps 4 and 5 do not apply.
4. Select the visual style you want from the list to preview it.
5. Click Apply.
TuneUp Styler accepts the new boot screen.
TuneUp Utilities Manual 95

Tips for Attractive Boot screens (Windows XP only)For technical reasons, all boot screens in Windows XP may only have 16 colors, of which some are pre-scribed (e.g. black). TuneUp Styler therefore has to reduce the full range of colors in your composition (nor-mally 16.7 million) to a very few when you click Save boot screen.
TuneUp Styler uses a sophisticated algorithm for this to automatically determine the best 16 colors for yourpicture. If the image contains too many different colors, the results of this conversion may not be sat-isfactory.
Experience has shown that the best boot screens are those that use only a few different colors. This meansthat an image that consists predominantly of different blue shades and only a few contrasting colors willprobably make an attractive boot screen.
Set the foreground color of the progress bar to a color that is contained in your image. This way, you do notuse one of the precious 16 colors in the progress bar only. Wherever possible, avoid skin tones in your bootscreen. Images with skin tones normally cannot be displayed correctly with only 16 colors (ask any graphicartist). Of course, you may be lucky. The best thing to do is try!
TuneUp Utilities Manual 96

"Startup Logo" CategoryPlease note that this function is only available on Windows Vista because neither Windows XP nor Windows7 use the startup logo.
Please note that this feature is not available on Windows 7 because Windows 7 does not use the startuplogo.
IntroductionJust before logon, a small, animated Windows logo appears. With TuneUp Styler you can replace thisstartup logo without making risky interventions in the system.
This is how it works:1. Start the TuneUp Styler module by going to the CustomizeWindows category in the Start Center and
clicking on the Personalize the appearance of Windows entry in the ChangeWindows appearancearea.
2. On the navigation bar, click in the left-hand window area on Startup logo.
TuneUp Styler lists all available startup logos. You can now add additional predesigned startup logosor create your own startup logo.
3. You can add new startup logos to the list before you accept it finally. You have the following optionsfor this:To select an existing startup logo in the list, proceed with step 4.
Downloading Previously Created Startup Logos1. In the top left, under Startup logos, click Add.
2. Select the entry Download Startup Logos from TuneUp Online.
This takes you to the TuneUp Website, where you can find a wide selection of different startuplogos with which you can improve the appearance of the startup process exactly how you want.
3. On the TuneUp website simply click on a startup logo. This is then automatically opened withTuneUp Styler and added to the list.
These attractive startup logos can also be stored as a file (with extension .tla) to a USB flash drive.You can then transfer these startup logos to any computer on which TuneUp Utilities is installedby clicking Add and Load startup logo from a file.
Adding Startup Logos from a File1. In the top left, under Startup logos, click Add.
2. Select the entry Load startup logo from a file.
An Explorer window opens and you can select any image on your computer to be used in place ofthe animated startup logo. For best results, your image should be in 300x300 pixel format.
3. Select a new startup logo and give it a name under which it will be included in the TuneUp Stylerlist.
You can also enter the name of an author. The startup logo you added now appears in the list.You can add additional startup logos.
TuneUp Utilities Manual 97

Creating your Own Startup Logo1. Under Startup logos click Create new.
An Explorer window opens and you select an image on your computer or an external storagemedium.
2. Save the new startup logo to the TuneUp Styler list under a name of your choosing.
You can also enter the name of an author. The startup logo you added now appears in the list.
Restoring the DefaultIf you no longer like your new startup logo, you can restore the Windows default at any time.
1. Click on Use default.
The default startup logo is then automatically selected from the list and a preview opens.
2. Click Apply to apply it.
4. To preview the startup logo you want, select it in the list.
You can even animate the preview by clicking on the Play button.
5. Click Apply.
TuneUp Styler uses the new startup logo.
TuneUp Utilities Manual 98

"Logon Screen" Category
IntroductionIf you share your computer with other users, or if you use a password to protect your account, you will befamiliar with the Windows logon screen. TuneUp Styler lets you change the logon screen to suit your per-sonal taste.
This logon screen shows a list of all user accounts. Users must select their account from this list, enter theirpassword (if one is set) and are then logged on to the system.
This is how it works:1. Start the TuneUp Styler module by going to the CustomizeWindows category in the Start Center and
clicking on the Personalize the appearance of Windows entry in the ChangeWindows appearancearea.
2. On the navigation bar, click in the left-hand window area on Logon screen.
TuneUp Styler lists all available logon screens. The first time you use the module, the only screen inthe list will be the default Windows boot screen.
3. You can first add new logon screens to the list before you accept it finally. You have the followingoptions for this:To select an existing logon screen from the list, proceed with step 4.
Downloading previously created logon screens1. Click Add in the top left under Logon screens.
2. Select the entry Download Logon Screens from TuneUp Online.
This takes you to the TuneUp Online where you will find a wide selection of different logonscreens which you can use to give your system an individual style.
3. Click on a logon screen.
This is automatically opened with TuneUp Styler and added to the list.
Adding Logon Screens from a File1. Click Add in the top left under Logon screens.
2. Select the entry Load logon screen from a file.
An Explorer window opens and you can select a file on your computer. However, only files inTuneUp Styler format (with the .TLS extension) are supported.
In addition, all available logon screens can be directly installed with the file Logonui.exe or in Star-dock LogonStudio format (LOGONXP).
3. Select a new logon screen and give it a name under which it should appear in the TuneUp Stylerlist.
You can also enter the name of an author. The newly added boot screen now appears in the list.You can add additional logon screens.
TuneUp Utilities Manual 99

Creating your Own Logon Screen1. Please note that this feature is not available on Windows XP.
Under Logon screens, click Create new.
A wizard appears with which you can search for and adapt an image. You can select an image onyour computer or on an external storage device.
You also have the option of first transferring an image from a camera or scanner or starting aGoogle™ image search directly from TuneUp Styler. In both cases, you save the required image toa location that you can easily find again and click on Search local drives to load the saved image.Please note that images found using the Google™ image search may be protected by copyright.You must only use those images that are not protected by copyright.
2. Optimize the appearance of your new image.
Please note that the available alignment options are only effective if the picture is not yet the cor-rect size for a logon screen (640 x 480 pixels). Under Background, you can specify the color to beused for areas not covered by your image.
3. Save the new boot screen to the TuneUp Styler list under a name of your choosing.
You can also enter the name of an author. The boot screen you added now appears in the list.
Restoring the DefaultIf you no longer want to use your new welcome screen, you can naturally restore the default Windowsscreen at any time.
1. Click on the Restore Defaults button.
The default screen is then automatically selected from the list and a preview opens.
2. Click Apply to apply it.
Steps 4 and 5 do not apply.
4. Select the desired logon screen from the list to preview it.
5. Click Apply.
Not all logon screens are in English. After installing a new screen, your Windows may greet you in adifferent language the next time you start your computer. For example, instead of "Click on your username to log on," the screen might read "Klicken Sie auf Ihren Benutzernamen, um sich anzumelden."
In this case, you may be asked if you want to use the texts in the selected logon screen, or if you wantto use the texts from the default logon screen in your system language.
TuneUp Styler applies the new logon screen.
You can test the logon screen by simultaneously pressing Ctrl + Alt + Del.
TuneUp Utilities Manual 100

"System Elements" Category
IntroductionIn this category you can swap typical Windows icons for new ones.
Here's how it works:1. Start the TuneUp Styler module by going to the CustomizeWindows category in the Start Center and
clicking on the Personalize the appearance of Windows entry in the ChangeWindows appearancearea.
2. In the navigation bar in the left window area, click under Icons on System elements.
TuneUp Styler shows you on the right-hand side tabs for the following areas, in which you canchange system elements:
You change the icons for all elements in the Desktop, Start menu, Explorer and Control Panel. You canalso adjust the icons for the display of file types.
For some elements you can even specify new names (e.g. the Recycle Bin or My Network Places).
If you are missing the term "My Computer" fromWindows XP, you could for example rename the ele-ment now called "Computer" in Windows Vista to "My Computer".
3. Click through the individual tabs and select an element that you wish to change.
4. Click Replace icon.
The icon library opens in which the current icon of the selected element appears. This is usually alibrary that was already installed with Windows. If you have your own icon library on your computer,you can import its content using Browse.
5. Select an icon to mark it for replacement.
Your changes will initially be indicated by a small orange asterisk next to the relevant elements in thelist.
Any change that has not yet been accepted can be discarded at any time by selecting an elementmarked with such an asterisk in the list and clicking on Discard unsaved changes made to this ele-ment.
6. At the bottom right of the window, click Accept to carry out the change.
How to undo changesYou can discard any changes not yet accepted for an element by selecting them in the list and clicking onDiscard unsaved changes made to this element.
Any changes already made to an element can be undone by selecting the element and clicking Reset ele-ment toWindows default. Please note that this link is only displayed if the element does not currently cor-respond to the Windows default.
If you should want to undo changes made to multiple items, you can click Reset category or Reset all cat-egories. The first link only resets the elements of the currently selected tab, the second all system elementsthat can be changed with TuneUp Styler.
TuneUp Utilities Manual 101

When you click on either link, a dialog appears where you can choose whether you want to reset all ele-ments to the Windows default or whether you only wish to discard any unsaved changes for these elements.The second option is only available if there are changes that have not yet been applied.
TuneUp Utilities Manual 102

Managing Icon Packages
IntroductionIt is of course a very laborious task to change every Windows icon individually. TuneUp Styler thereforeallows you to swap all old-fashioned Windows icons for new ones in one fell swoop.
Adding an Icon Package1. In the TuneUp Styler the left area of the window under Icons, click System elements. Then click Icon
packages at the bottom.
A new window opens that shows all the available icon packages. Now you can add new icon pack-ages to the list or install an existing one (continue to step 4).
2. Click Add.
This allows you to add additional icon packages to the list. You have the option of using an icon pack-age from your computer or downloading a new package from TuneUp Online. Here you can down-load numerous creatively designed icon packages.
On the web pages, just click on an icon package and open it with TuneUp Styler. After just a few sec-onds the package is displayed in the list.
Creating a new icon packageAs an alternative, you can create your own icon package from your current icon set and either back it up orshare it with friends.
1. Click Create new package at the top of the list.
A wizard opens to guide you through the process of creating an icon package.
2. Information about the author: Here you can immortalize yourself, if you want, and enter your name,e-mail address and website address.
3. Package name and description: Enter a meaningful package name here. If you wish, you can add addi-tional information on the package in the Description field.
4. Optimize package size: Use the options in this step to ensure that your package is not too large, sothat it can be sent via e-mail without problems.
5. Creating icon package: The icons are now collected and optimized if necessary, after which they aresaved together in an icon package.
6. Finishing the wizard: The icon package has now been successfully created and will be added to the listof icon packages when you click Finish. Clicking Open folder takes you to the icon package folder inTuneUp Styler, so that you can copy the icon package to a different location or attach it to an e-mail.
TuneUp Utilities Manual 103
"File System" Category
IntroductionWindows assigns a default icon to every drive, every folder, every Start menu folder and every entry in Favor-ites.
Here's how it works:1. Start the TuneUp Styler module by going to the CustomizeWindows category in the Start Center and
selecting Personalize the appearance of Windows under ChangeWindows appearance.
2. In the navigation bar in the left-hand window area, click under Icons on File system.
A tree structure of your drives and folders opens. Click through the individual elements of the treestructure to select those elements to which you would like to assign a more individual icon.
Ideas and tipsl Under the first node, you could assign the drive containing your games an especially funkyicon, but a more serious one to the drive with your office programs.
l You can proceed in the same way for folders - a few well-chosen icons help you to keep trackof things, even if your drives are really full.
l The icons on the Start menu can also be swapped for more meaningful icons.l You can even give your favorites in Internet Explorer their own icon. This will help you to findyour most favorite favorites from a usually very long list.
3. Click through the individual elements of the tree structure and select an element to which you wouldlike to assign a more creative icon.
4. Click Replace icon.
Please note that this is not possible for the three elements Computer, Start menu and Favorites.
The icon library opens in which the current icon of the selected element appears. This is usually alibrary that was already installed with Windows. If you have your own icon library on your computer,you can find its content using Browse...
5. Select an icon.
6. Click OK to apply your changes immediately.
Undoing individual changesTo undo a change, select an item in the list and click Reset element toWindows default.
Undoing multiple changesIf you want to undo several changes at once, you may find the Restore backup of an old session link useful.It starts TuneUp Rescue Center and enables you to undo the changes carried out with TuneUp Styler on acertain date.
TuneUp Utilities Manual 104

"Icon Display" Category
IntroductionHere you can change the appearance of icons on the desktop.
Here's how it works:1. Start the TuneUp Styler module by going to the CustomizeWindows category in the Start Center and
clicking on the Personalize the appearance of Windows entry in the ChangeWindows appearancearea.
2. In TuneUp Styler in the left area of the window under Icons, click Icon display.
TuneUp Styler provides a preview of some items on your desktop that you can personalize.
3. Specify how big the gap between items on the desktop should be and whether a shortcut should beindicated by an arrow.
Specify the size of items on the desktop, specify how big the gap between them should be andwhether a shortcut should be indicated by an arrow.
TuneUp Utilities Manual 105

"Repair" Category
IntroductionIt can be fun to change the Windows icons and to make a few personal settings here and there. However, itis possible that the desired icons are suddenly not displayed correctly or are even swapped. TuneUp Stylerhas two repair functions.
This is how it works:1. Start the TuneUp Styler module by going to the CustomizeWindows category in the Start Center and
selecting Personalize the appearance of Windows under ChangeWindows appearance.
2. In TuneUp Styler, click Repair under Icons in the left-hand area of the window.
3. Click Reload Icons.
This function usually clears up any problems and allows you to continue restyling your Windows sys-tem. If reloading the icons does not resolve matters, there may be a serious problem with your iconcache. If this is the case, continue with step 4.
4. Click Repair Icon Cache.
The icon cache is a file in which Windows stores all loaded icons, for faster loading in the future.Should an error occur with this file, all icons could be corrupted. Luckily, this error can be repaireddirectly from TuneUp Styler.
Note that you may need to restart your computer or log on again for this repair to take effect.
TuneUp Utilities Manual 106
"Visual Style" Category
IntroductionThis is where you can personalize the visual style. This defines the appearance of windows and Windows but-tons.
Here's how it works:1. Start the TuneUp Styler module by going to the CustomizeWindows category in the Start Center and
clicking on the Personalize the appearance of Windows entry in the ChangeWindows appearancearea.
2. In TuneUp Styler in the left-hand window area under Interface, click Visual Style.
TuneUp Styler displays a list of all available visual styles. On the right, you can see a preview andother details of the style selected in the list.
3. You can add new visual styles to the list before finally accepting them. You have the followingoptions for this:To select an existing visual style from the list, proceed with step 4.
Download Visual Styles From TuneUp Online1. In the top left under Visual Styles click Add.
2. Select the entry Download Visual Styles from TuneUp Online.
This takes you to the TuneUp Online website where you can choose from a wide range of visualstyles that you can download for free at any time.
3. Click on a visual style that you particularly like.
This is automatically opened with TuneUp Styler and added to the list.
TuneUp Utilities Manual 107

Adding Visual Styles From a File1. In the top left under Visual Styles click Add.
2. Select Load visual styles from a file...
An Explorer window opens and you can select a visual style on your computer or an external stor-age media, if you have already saved one. TuneUp Styler recognizes and supports almost everycommon format:
TypeFile exten-sion
Description
TuneUp Vis-ual Styles
.TVS The individual format of TuneUp Styler
MicrosoftVisual Styles
.MSSTYLESThis Microsoft format often includes additional files that can befound in the same folder or in subfolders.
Compressedarchives
.RAR, .ZIPArchives are searched for all file types in this list, and decom-pressed automatically if such files are found.
Self-extract-ing archives
.EXEThese files are searched for compressed archives in RAR or ZIP for-mat, which are treated according to the description of the Com-pressed Archive file type.
3. Select a new visual style and give it a name under which it will appear in the TuneUp Styler list.
You can also enter the name of an author. The visual style you added now appears in the list.
Restoring the DefaultIf you no longer like your new visual style, you can restore the default Windows style at any time.
1. Click on the Restore Defaults button.
The default visual style is then automatically selected from the list and the preview changesaccordingly.
2. Click Apply.
Steps 4 and 5 do not apply.
4. Select the visual style you want from the list to preview it.
5. Click Apply.
The display is now temporarily darkened while TuneUp Styler activates the new visual style for you.After this brief moment, your Windows system shines with a new brilliance.
Deleting a Visual StyleIf you want to remove a visual style from your computer entirely, select it and click Delete.
TuneUp Utilities Manual 108

Modifying Windows SettingsIn the following chapters, you will find out how to modify your Windows system settings with the TuneUpSystem Controlmodule.
All modifications to your system will be monitored by TuneUp Rescue Center and can be undone ifnecessary.
IntroductionTuneUp System Control is a type of control center that allows you to quickly and easily adapt your Win-dows system to your own requirements.
Regardless of whether you want to change the visual effects, the desktop, the way users log on, the securityof your system or memory management, TuneUp System Control lets you configure and optimize any set-ting, down to the smallest detail.
The program protects your privacy by disabling, on request, Internet features that send data about your sur-fing habits.
Simply browse through the individual categories - you will be surprised by how many interesting and usefulsettings options there are.
TuneUp Utilities Manual 109

How to Modify Windows SettingsStart the TuneUp System Controlmodule by going to the CustomizeWindows category in the Start Centerand clicking on the Personalize options and behaviors entry in theModifyWindows settings area.
Alternatively, you can start the module by going to Overview of all functions in the Start Center and select-ing theModifyWindows settings entry underWindows.
On the left-hand side of the TuneUp System Control window, you can see the various categories that areavailable for the settings options.
Each category contains subcategories. If you click on these, tabs open on the right-hand side containingthe individual settings options.
Here you will find detailed information on all settings options, sorted by the categories in the left-hand win-dow area:
"Display" CategoryHere you specify exactly which of the Windows visual effects you wish to use, configure how file types arehandled and specify how folder windows and the Explorer should look and act.
"Usage" CategoryHere you can enter a range of mouse and keyboard options, adapt the items of the Start menu and thespeed at which submenus open, and determine the appearance and behavior of the taskbar.
"Communication" CategoryHere, you can configure the behavior of Windows in the network, personalize Internet Explorer and OutlookExpress and/or Office Outlook, speed up web surfing and protect your privacy by preventing data aboutyour surfing habits from being sent.
"Administration" CategoryHere you can set many internal system settings for Windows. For example, you can adapt the startup proc-ess and user logon, configure automatic CD playing, system paths and user data, and adapt the default set-tings of the command prompt.
TuneUp Utilities Manual 110

"Wizards" CategoryHere you will find the Copy settings wizard.It copies your settings to other user accounts and to the Win-dows logon screen.
TuneUp Utilities Manual 111

"Display" CategoryHere you specify exactly which of the Windows visual effects you wish to use, configure how file types arehandled and specify how folder windows and the Explorer should look and act.
Here you will find detailed descriptions of your settings options, sorted by subcategory in the left side of thewindow:
Animations and EffectsEffectsHere you can change settings that relate to the display and operation of the Windows user interface.
Under Settings, there are numerous options that you can enable or disable using the checkboxes.
To learn more about an option, simply select it with your mouse. Several lines of explanatory text openunder Description.
Depending on the performance capabilities of your system, switching off unwanted effects can improvespeed. Click Best appearance to select all the options that will give Windows an outstanding visual appear-ance. If the performance is more important to you, select Best performance. Selecting Default settingsrestores the Windows default settings.
AnimationsUnderWindow andmessage animation, specify whether windows or tooltips should be animated. Hereyou can switch on the animation when minimizing and maximizing windows.
If the Animate tooltips with the following effect is switched on, you can select the effect you want fromthe selection list.
Under Animation of elements, you can specify for which display and control elements scrolling and open-ing should be animated. You can turn on the three options list & tree view, list boxes and dropdown lists.
Click Best performance to turn off all the options that only serve to provide showy effects. SelectingDefault settings restores the Windows default settings.
Menu AppearanceUnder Animation you specify whether menu items are to be hidden after the menu is accessed. You canalso select a display effect from the list.
Under Effects, you can specify whether Windows should use flat 2Dmenus or whether a small 3D shadowshould be displayed beneath an open window.
Font SmoothingTo improve the legibility of text on your computer, here you can select your preferred font smoothingmethod. The font smoothing type ClearTypemerits special attention: it is particularly suitable for flat-screenmonitors (TFT and LCD) and makes use of their so-called subpixels to effectively smooth the edges of evensmall fonts. Select ClearType and click ClearType Settings to obtain the optimal adjustment of ClearTypesmoothing to your screen.
TuneUp Utilities Manual 112

File TypesMenu OperationsIn the Drives and folders section you configure their context menus.
The Show "command prompt here" opens the command prompt at the desired location. You can executeDOS commands via the command prompt.
Under Files and folders you can specify what commands are to be shown in the context menus of files andfolders. Here, the four commands Send to,Move to folder, Copy to folder and Encrypt/Decrypt can be dis-played. The checkbox is active for commands that are already enabled.
Selecting Default settings restores the Windows default settings.
"New" MenuHere you can select which file types should be shown in theNew submenu of the context menu for thedesktop, Explorer and the "Save" dialog. Use the checkboxes to set which file types should be displayed.
Select Remove to remove a selected entry from the list. Select Add... to include other file types in the list.
Under Options, you can specify whether the "New" menu should appear in the context menu of the desk-top and the free area of folder windows.
Opening FilesHere you can select how Windows should proceed when opening files with unknown extensions. UnderDefault application, you can specify that either the "Open with" dialog is displayed or that a file is auto-matically accessed with a certain program (for example with Notepad). To do so, write the start name of thedesired program in the field. Alternatively, select a program via Edit.
AdvancedWindows XP:
Here you can specify whether a new link should be automatically marked as such. By default the name ofthe shortcut is prefixed with a "Shortcut to".
In theWindows Picture and Fax Viewer section, you can decide whether double-clicking on images andfax files automatically loads them into the Windows Picture and Fax Viewer.
Windows Vista and Windows 7:
Here you can specify whether a new link should be automatically marked as such. By default, the text "shortcut" is added to the end of the shortcut name.
TuneUp Utilities Manual 113

Folder OptionsViewHere you can determine how folder windows and the elements they contain are to be displayed.
Windows XP:
In theWindow section you specify whether the tree view of directories in a folder window is always to bevisible, whether the folder window last opened on logon is to be restored, whether compressed ZIP files areto be displayed as folders, and whether a detailed list is to be displayed.
Under View settings you can use the slide control to determine how many folder views should be stored.
Windows Vista and Windows 7:
UnderWindow, you specify whether the menu bar in a folder window should always be visible, whethercompressed ZIP files should be displayed as folders and whether a details bar should be shown. In WindowsVista, you can also specify whether the most recently opened folder window should be restored at logon.
ListHere you adjust the display of additional information in a folder window to suit your specific requirements.
The Pop-ups with detailed information section determines whether a tooltip displaying additional infor-mation should be shown when the mouse cursor is moved over a file or folder in a folder window.
Under Icon arrangement, you specify whether the files should only be sorted alphabetically or whetherthey should be arranged logically according to numerical values and the alphabet.
Under Encrypted and compressed files you can specify that both file types be marked with a certain color.By default, compressed files are blue and encrypted files are green.
Only Windows XP and Windows Vista:
In addition you can define the color assignment to suit your needs via the Edit button.
ThumbnailsWindows XP:
In a given folder, Windows can show thumbnail images as appropriate for a collection of photos. Here youdetermine the size and quality of these preview images. The standard size is 96 pixels. You can enter a dif-ferent value if you wish. You specify the quality using the slide control.
The higher the picture quality, the more disk space the thumbnails take up. Under Cache, you specifywhether these thumbnails should be temporarily saved to a file called THUMBS.DB. This file is also stored inthe folder and allows the thumbnails to be loaded particularly quickly in the future.
SelectionHere you can set the color of the selection rectangle that should be used in folder windows. This rectangleshows the movement of the clicked mouse button if you select multiple files simultaneously.
Only Windows Vista and Windows 7:
You can also decide whether a checkbox should be displayed for selecting elements, allowing multiple filesand folders to be selected with the mouse without the need to use the Ctrl or Shift keys.
AdvancedHere you can set what elements are to be displayed on the Desktop and underMy Computer. You caneasily hide entire drives and specify how the address bar in Explorer, Internet Explorer and the Run dialogshould behave.
TuneUp Utilities Manual 114

"Usage" CategoryHere you can enter a range of mouse and keyboard options, adapt the items of the Start menu and thespeed at which submenus open, and determine the appearance and behavior of the taskbar.
Here you will find detailed descriptions of your settings options, sorted by subcategory in the left side of thewindow:
Input optionsMouse functionsUnder Swapmouse buttons you can swap the left and right mouse button. You would then click with theright-hand button and open the context menu with the left-hand button.
Many mice now come with a scroll wheel. In accordance with Microsoft Intellimouse and similar models,under Scroll wheel you can specify what should happen when this wheel is used. The standard setting isscroll by 3 lines. You can change the number of lines, increase the scrolling setting to a full screen page orturn it off completely.
Under Set pointer automatically you can specify that the cursor automatically moves to the highlightedbutton when a dialog box opens so that you can click this button right away.
Mouse SensitivityUnder Double clicking and dragging you can specify how much you can move the mouse when doubleclicking and how far you have to move the mouse to start dragging an object. The values are given in pixels.
Tip: Try out your new settings on the Test icon.
Under Hover effect you can change the movement tolerance and the hover time of the mouse cursor forthe display of the Hover effect. This takes effect as soon as the cursor hovers over an item for a certainlength of time.
Tip: Here too you can try out the setting on a Test icon. It lights up as soon as the mouse pointer is placedover it.
Active Window TrackingHere, you can activate a little-known Windows function that could entirely change the way you work withwindows: Active window tracking.
If you enable this feature, all you need to do is move the mouse pointer over an inactive window to activateit so that you can work with that program. You then no longer need to click on a window in order to enableit.
You can turn on the option in the Foreground section in order to pull the active window immediately to thetop.
TuneUp Utilities Manual 115

KeyboardUnder Flashing cursor you can set how the cursor flashes at the point at which data is to be input (e.g. in aword processing program).
Tip: Look in the small preview to the right of your current settings and the changes made.
Use the slide control to specify the frequency of flashing. If desired, you can also set the cursor width toyour liking and enter a value in pixels.
Modern keyboards are made with a special Windows key with the Windows logo printed on it. This key isused to open the Windows Start menu and it can also be used in combination with other keys to initiate spe-cial functions, e.g. maximizing all windows (Windows + M) or showing the Desktop or, since Windows Vista,the Computer (Windows + E).
If you do not need these key combinations or sometimes hit them by accident due to the layout of your key-board, you should turn this option off.
TuneUp Utilities Manual 116

Start MenuGeneralUnder Opening submenus you specify whether the submenus should open automatically as soon as themouse points to the menu entry in question or whether a click is also necessary. you specify whether sub-menus are to open automatically as soon as the cursor points to the menu item, or whether you must clickfirst. There are great differences here between the various operating systems, about which we would like togo into further detail.
Windows XP:
If you opt for Display when pointed to, you can set for how long the mouse pointer must be positioned overthe item before the menu opens.
Under Users you can specify whether your user name should be displayed in the upper area of the startmenu. In addition to the Shut down button, you can also display or remove a Log off button by which toswitch users.
Windows 7:
Under Exit a session, you can specify which action should be taken when you click the Exit a session but-ton. By default, the computer is shut down.
For theHibernate and Power savemodes, the current status, including all opened documents and pro-grams, is preserved so that after switching your computer back on you can continue working right whereyou left off. Whereas power save mode still requires a small amount of power, in hibernate mode the com-puter can be completely disconnected from the power supply. However, putting the computer into hiber-nate mode and then "waking" it will take much longer.
Alternatively, you can specify here that this button causes the computer to restart, the computer to belocked, the current user to be logged off, or that the user should be changed. Simply decide based on yourpreferences.
Note than when an update is ready for installation, this button is temporarily assigned to the Shut downcomputer function (until the update has been installed). This ensures that key program updates are not acci-dentally forgotten.
Windows Vista:
Under Power off button you can set what action is to be carried out when you click on the Power off but-ton. By default, the computer is put into Power savemode.
If you would prefer to shut down your computer quickly (or you are missing this function entirely in Win-dows Vista), you are advised to select Shut down computer. This saves you from having to open the sub-menu and selecting Shut down there. The third option is to put your PC into hibernate mode.
For theHibernate and Power savemodes, the current status, including all opened documents and pro-grams, is preserved so that after switching your computer back on you can continue working right whereyou left off. Whereas power save mode still requires a small amount of power, in hibernate mode the com-puter can be completely disconnected from the power supply. However, putting the computer into hiber-nate mode and then "waking" it will take much longer.
You can find the Launch TuneUp Styler option in both Windows 7 and Windows Vista. It opens the TuneUpStyler tool in a new window. Here you can personalize the appearance of Windows to suit you, e.g. adjustthe icons of folders and menu items.
TuneUp Utilities Manual 117

Recently UsedUse the Default settings button to restore the Windows default settings.
Windows XP:
Under Recently used files you can set whether recently used files are to appear under Documents in theStart Menu. You can also define the exact number of documents to be displayed. When logging off, youcan also automatically clear the list.
Windows Vista and Windows 7:
Under Recently used files you can set whether recently used files appear in the Start menu under Recentlyused. You can also delete the content of the list.
Under Recently used programs you can specify whether recently used programs should appear in the Startmenu. On Windows Vista you can also use Settings to specify which programs you want to be displayed inthe Start menu. common dialogs. The default setting is for Windows to show all recently used programshere.
ShortcutsUnderMove and edit shortcuts you can set whether the moving of shortcuts is allowed.
From here you can also start TuneUp Shortcut Cleaner to remove all invalid shortcuts from your StartMenu.
AdvancedWindows XP:
Here you can open the TuneUp Styler tool in a new window and thereby personalize the appearance of Win-dows to suit you, e.g. change the icons for folders and menu items.
TaskbarFlashing ButtonsWhile entering text and other content, the activation of other windows is prohibited. A flashing icon in thetaskbar alerts you to the fact that other software is trying to communicate with you. If this flashing is to beretained, the option Enable flashing taskbar buttonsmust be turned on.
Under Flashing speed you specify how rapidly the button on the taskbar should flash. You have two optionsto choose from: The first one lets a window button in the taskbar flash until it is clicked again. The secondoption restricts flashing to a certain number specified by you. The default setting is 7.
Under General, you can specify how long Windows should wait after your last key press before windowsfrom other programs are allowed to appear again.
Button ViewHere you can specify whether and if so which windows should be represented by buttons on the taskbar.
Under Display you specify the desired maximum width of buttons in pixels. The default value is 154 pixels. Ifyou disable the option Show animated buttons, Windows will no longer animate the taskbar button whena window is opened. This leaves more computing power available for other tasks.
Under Grouping you can specify whether and in which cases several windows of a program are to be rep-resented by a shared button on the taskbar.
TuneUp Utilities Manual 118

Minimized WindowsSometimes, after the windows of a program have been minimized, only the title bar remains which is thenautomatically positioned at the base of the window.
Under Position and alignment you determine the exact target position of these bars. The default setting ison the bottom left, where several bars are displayed side by side.
Under Spacing, you can specify how many pixels there should be between the individual bars.
AdvancedNotifications are often shown in the (next to the clock) to inform you of important events or ask you to per-form various tasks, such as removing unused shortcuts from the desktop. Here you can specify differentoptions for these reminders.
Here you can also disable the "New hardware found" notification. If you turn off the Show notificationarea option, the entire notification area will be hidden, including the notifications.
TuneUp Utilities Manual 119

"Communication" CategoryIn this category, you can configure the behavior of Windows in the network, personalize Internet Explorerand Outlook Express and/or Office Outlook, speed up web surfing and protect your privacy by preventingcertain programs from automatically sending data about your surfing habits.
Here you will find detailed descriptions of your settings options, sorted by subcategory in the left side of thewindow:
NetworkMy Network PlacesHere, you can configure a number of settings that affect the display of shares under My Network Places.Among other things you can prevent your computer from being displayed in My Network Places of othercomputers and that (using your password) all drives on your computer can be accessed, although you didnot specify any shares.
AdvancedIn the Universal Plug & Play section you can turn off the Windows service for automatically detecting net-work devices. This function is a potential security risk and should be disabled if you do not need it.
Under Quality of Service (QoS), you can prevent Windows from reserving part of your Internet connectionbandwidth for important packets. Disable Reserve bandwidth if you always want to have your full band-width for surfing.
PasswordsWindows XP:
Saving your passwords means that you don't have to enter your password every time you dial into the Inter-net, access protected shares, etc. However, hackers may be able to access and misuse these passwords. Youcan therefore disable the automatic saving of passwords here.
Internet TimeHere you can set the clock on your computer to be synchronized regularly with an atomic clock over theInternet, to ensure your computer always shows the correct time. The following option must be enabledfirst: Automatically synchronize with an Internet time server.
The Available time servers section lists some popular reference clocks. If you know other servers, you canenter their online addresses into the list by clicking Add.
InternetHere you can determine how an existing dial-up connection behaves when a user logs off, and you can dis-able the integrated Windows firewall.
Only Windows XP:
By clicking on the Settings button you can also set various advanced options for your Internet connection.In the window that appears, click on the underlined links to obtain additional information about the individ-ual options.
Internet ExplorerExplorer BarsHere you can set how the toolbars in Internet Explorer should behave. For example, you can set Google™ asthe default search engine in the search bar or enable the Autocomplete feature in the address bar.
ViewUnder Title bar, enter the text you would like to be displayed in the Internet Explorer title bar.
TuneUp Utilities Manual 120

FavoritesHere you can show and hide favorites folders and their contents andthereby hide unwanted folders. Pleasenote that the contents of the favorites folders is not shown here and only the available folders are listed.You can also sort the folders by name.
MenuThis is where you can customize the Internet Explorer menu bar and use the Settings button to add manyuseful commands to the context menu that is called up when you right-click on any web page.
Under Show source code you can specify whether, when you select Show source code, the website shouldbe opened with Internet Explorer or with a different program, e.g. the Windows editor (notepad.exe).
NavigationIn theWebsite behavior section, you can specify how Internet Explorer should react when links are calledup. For example, you could specify that pop-ups or links opened in other programs can be opened in a newtab in the current window.
Under Start pages, specify which websites should automatically open when Internet Explorer is launched.Several sites can be selected for this. Use theMove up andMove down buttons to change the order of thepages.
SecurityThis section concerns security settings in the Internet Explorer.
In the User Agent String section, specify how Internet Explorer identifies with the websites you visit.
Under Download confirmation, you can specify whether Internet Explorer is permitted to download certainfile types such as videos or music files without confirmation. If you wish to be asked before such files aredownloaded, you must select Always confirm before downloading files.
PerformanceHere you specify the profile that corresponds most closely to the bandwidth of your Internet connection. IntheMaximum number of connections section, you can specify how many server connections can be estab-lished.
Mozilla FirefoxGeneralThis is where you can make the following general settings for Mozilla Firefox Internet browser.
Under Text animations you can turn off annoying text effects, e.g. constant flashing or horizontally scroll-ing text (marquees). By enabling the Disable flashing text and Disable scrolling text (marquees) optionsyou can disable potentially annoying effects.
Under Error messages you can specify whether error messages regarding a failed connection attempt to aweb server should be shown as a window (dialog) or as a web page in the browser window.
Under Sidebar position you can specify whether the sidebar should appear on the right or left side of thebrowser window. The sidebar can contain your bookmarks, history and downloads.
TuneUp Utilities Manual 121

UsageThis is where you can make changes regarding the usage of Mozilla Firefox.
Under Address bar you can specify that addresses will be automatically completed in the address bar, i.e.Internet addresses appear automatically in the address bar after you have entered the first few letters of theaddress (provided that you have already visited this website).
For Mozilla Firefox 2 and more recent versions, you can also specify whether the Load address buttonshould appear beside the address bar.
Under Open submenus you can specify how long before a submenu automatically opens when you hoverover it with the cursor.
WindowsThis is where you can specify how popup windows and links should be displayed in Mozilla Firefox and howmuch influence websites can have on the display of the popup window.
In the Opening links section, you can specify whether, after clicking on a link, the contents should be dis-played in the current window or in a new window.
In the Javascript section, under Permitted window manipulations, you can limit changes that websites areallowed to make to popup windows. Some websites try to hide the navigation bars in a popup window sothat it looks like a Windows message dialog. You can prevent this here.
Tabs (Mozilla Firefox 2 or later versions)Here you can make the settings for the Mozilla Firefox tabs.
In the "Close" button section, you can specify where the Close button for the tabs should appear. There arefour different positions.
In theMinimum width section, you can specify the minimum width of the tabs, fromMozilla Firefox 2onwards. If more than one tab is open, the width of each tab will be automatically reduced until the mini-mum width set here has been reached. If further tabs are opened, a scrollbar will be shown on the right-hand side of the screen by which you can scroll to the tabs that are not visible.
Under Color of active tab you can use theHighlight with color option to specify which color should beused to highlight the tab currently active in the browser. Click on the Change button to change the colorused to highlight the top and bottom borders of the active tab.
PerformanceHere you can enable the pipelining feature of Mozilla Firefox. Pipelining is an experimental functionthrough which the web browser sends multiple download requests to a web server over a single connection.This is not supported by all web servers.
OperaTitle BarHere you can configure the settings for displaying the Opera title and logo.
UnderWindow title, enter in the Title field the text you want to appear in Opera's title bar. If you leave thefield empty and click on Accept or OK, the field is automatically filled with the default entry Opera.
In the Opera icon section, in place of the red "O" opera icon you can select a different icon from your harddisk. The selected icon is then displayed in the Windows taskbar and in the Opera window.
If the icon file you select is valid, the icon is displayed immediately. If the icon file you select is invalid, thestandard Opera icon is reinstated.
TuneUp Utilities Manual 122

UsageThis is where you can make changes regarding the usage of Opera.
Under Autocomplete for web addresses you can specify that addresses will be automatically completed inthe address bar, i.e. Internet addresses appear automatically in the address bar after you have entered thefirst few letters of the address. If, for example, you enter just one word only, then top-level domain suffixeslike ".net" and ".com" are added to the end and the prefix "www." to the beginning. Disabling this functioncan speed up Opera a little.
Under Show source code you can specify whether, when selecting Show source code the internal editor ofOpera should be used in the website context menu or another program, e.g. Windows editor (notepad.exe).
PerformanceYou can turn on fast navigation again here, which is set to automatic mode by default in Opera 9 onwards.
By selecting Automatic mode, you can specify that the web server setting should be taken into accountwhen you navigate through the browser history, which informs the browser whether a site can be loadedfrom the cache using "Back" or "Forward" or whether the website should be downloaded anew each time.The latter is necessary for certain shop pages to function correctly. However the server often demands thatthe page be downloaded again from the web server when it is not necessary.
By selecting Compatibility mode you can specify that, regardless of how the server is set, the sites are neverdownloaded from the browser cache when you navigate through the browser history, but are always down-loaded anew from the website. This setting is generally not required and is not recommended for fast sur-fing.
By selecting Fast mode, you can specify that the websites already on your computer are always loaded fromthe cache. This not only has the advantage that the back and forward functions are suddenly very fastagain, but also that a lower data volume needs to be downloaded over the Internet connection. Fur-thermore, entries you have made into form fields are generally retained during navigation in a browser. Forwebsites to function correctly with active site contents, it may however be necessary to manually refresh thewebsites regularly (e.g. using F5).
SearchHere you can set which search engine Opera should use in general and for speed dial and how the speeddial should be displayed.
Under Default search engine you can specify which search engine Opera uses. This is automaticallyselected in the search field, in the address bar, when "Search" is selected in the context menu of selectedtext and when entering several words in the address bar.
Under Speed dial default search engine you can change the search engine that is displayed by default inthe speed dial page in a new empty tab.
E-Mail and ChatOutlook ExpressWindows XP:
You can change the font here which is displayed in the application title bar. You can also decide whetherthe application should show a splash screen when starting up.
Here you can also configure the security function that blocks executable e-mail attachments. If you do notwish to block these attachments, you can disable this function. But please note that such attachments mayalso contain malware such as viruses that are run when you click them.
TuneUp Utilities Manual 123

Windows MailWindows Vista:
You can change the font here which is displayed in the application title bar. You can also decide whetherthe application should show a splash screen when starting up.
Here you can also configure the security function that blocks executable e-mail attachments. If you do notwish to block these attachments, you can disable this function. But please note that such attachments mayalso contain malware such as viruses that are run when you click them.
Office OutlookWindows 7:
UnderMinimize Outlook you can select whether Outlook 2003/XP should, when minimizing the window,create an icon either in the taskbar or in the taskbar notification area (beside the clock). If you opt for thenotification area, turn on theMinimize Outlook to the notification area option.
Under E-Mail Attachment Security click the Settings button to open a window in which you can specifywhich file attachment types are automatically blocked.
Windows MessengerWindows XP:
Under Run, you can specify whether and for which events Windows Messenger should open automatically.If you want to prevent Windows Messenger from running entirely, select DisableWindowsMessenger.
If you do not use Windows Messenger at all, you can also remove it from your system entirely. Simply usethe Uninstall option for this.
PrivacyGeneralHere you can configure settings for your privacy and security when working with your computer.
Under Automatic Windows Updates you can specify whether Windows should automatically establish aconnection with Microsoft or not. If Enable automatic Windows Updates is activated, Windows may thenestablish automatic contact with the Microsoft server as soon as there is an Internet connection, in order tocheck if there are any updates for your system.
TheNotify before downloading updates option should be enabled if you want to be asked permissionbefore Windows downloads available updates from the Internet.
Cover TracksHere you can configure settings to cover your tracks when working with documents and surfing the Inter-net.
Under Delete history lists you can click Delete now to clear the list of recently opened files in the Startmenu.
Under Clear Internet Explorer cache enable the Clear Internet Explorer cache when closing option if theweb browser should clear its cache as soon as it closes. You should only select this option when maximumsecurity is important to you and you do not wish others to be able to find out which sites you visited on theInternet by viewing the cache.
TuneUp Utilities Manual 124

Internet ExplorerThis is where you determine your privacy security settings.
Under Integrated SmartScreen filters you can enable the SmartScreen filters to ensure that InternetExplorer checks the websites accessed for suspicious and known scam websites.
Under IntegratedWindows authentication, you can enable the Disable integratedWindows authen-tication option to ensure that Internet Explorer no longer automatically attempts to log on to websitesusing Windows authentication.
Windows Media PlayerHere you can configure your privacy settings for Windows Media Player.
Windows Media Player communicates frequently with the Internet. Under Settings, you can specify thatneither the list of recently played media files nor information about playback media or music files should besaved. Click Highest security to turn all options on in one go.
Click Advanced to proceed to the data protection settings for Windows Media Player. Here you can blockscript commands from running, prevent the automatic purchase of licenses, disable the automatic down-load of codecs and block Internet sites from identifying the player.
AdvancedHere you can make additional privacy settings.
Under Paging file you can click Go to "Memorymanagement" to specify that the Windows paging fileshould be deleted automatically when the system shuts down.
Under Internet Time you can disable the automatic synchronization of the Windows system clock with anInternet reference clock.
Under Error reporting you can specify whether Windows should send an error report with your system con-figuration to Microsoft following a crash. Use the Error reporting button to open the various reports anddisable them with a click of the mouse.
TuneUp Utilities Manual 125

"Management" CategoryThis category of TuneUp System Control gives you control over many internal system settings. For example,you can adapt the startup process and user logon, configure automatic CD playing, system paths and userdata, and adapt the default settings of the command prompt.
Here you will find detailed descriptions of your settings options, sorted by subcategory in the left side of thewindow:
User LogonGeneralWindows XP:
Here you can choose between the Welcome screen and the logon prompt. The default setting in WindowsXP is the Welcome screen. This shows a list of available user names, which can be selected with a mouseclick. Alternatively, you can select the option Use the old logon dialog. This brings up the secure logondialog, where you are required to enter your logon data manually.
You can also specify here additional settings concerning the behavior and appearance of the logon screen.
Windows Vista and Windows 7:
Here you can adjust the behavior and appearance of your logon screen and the logon dialog. Click on theAdjust button to set individual options.
Automatic LogonTo skip logging on to the system a user can be logged onto the system automatically. If you wish to do this,select the Enable automatic logon option and enter your logon data in the placeholders below.
Under Security you specify whether or not logon can be skipped using the Shift key. You can also have thesystem carry out a logon immediately after a logoff.
MessagesUnderNotification before logon, you can set a predefined notification that is displayed to all users beforelogon - for example a warning from the boss not to surf the Internet during office hours. To do so, first ena-ble the Show notification before logon option and then enter the title and actual text of the notification inthe input fields.
Under Error search during logon and logoff, you can specify that detailed status messages should beshown during the logon and logoff process.
TourWindows XP:
First-time users can go on a tour of Windows XP following system startup. During this tour, the user isshown all important Windows XP modules. Deselect the Show theWindows Tour after logon option if youdo not want the tour option to be displayed following system startup. Under Scope, you can specifywhether this option only applies to the current user or to all users.
Welcome Center (Windows Vista) / Getting Started (Windows 7)New users can be shown theWelcome Center (in Windows Vista) or the Getting Startedwindow when thesystem is started up, which is designed make it easier to set up the system and shows links to further infor-mation and offers on the Internet. You can turn this display on or off here.
TuneUp Utilities Manual 126

DrivesGeneralWindows XP:
Here you make certain settings concerning your hard drives. For example you can enable UDMA66 support,which can speed up access to your drives.
UnderNTFS file system, you can set two options that relate to the new Windows NTFS file system: Save thedate of the last access to a file and Save short (DOS) file names. We recommend that you leave bothoptions enabled, as disabling themmay have negative side effects on the efficiency of hard disk defrag-mentation and on compatibility with older software.
Disk SpaceWindows automatically sounds the alarm if there is only a small amount of disk space remaining on a drive.If this warning disturbs you, you can disable the Display warning about low disk space option.
AutoPlayUnderMonitoringmedia changes, you can turn on theMonitor CD drives for change of media option. Ifyou do so, Windows monitors the CD drives. As soon as a new data carrier is inserted, Windows reads it andtries to launch its content automatically.
Under AutoPlay, you can click on Advanced to open a window in which you can specify autoplay settingsfor various data carriers, such as music CDs.
AdvancedUnder TuneUp Styler, you can click on Start TuneUp Styler to call up the tool and use it to change theicons of individual drives.
Under TuneUp Drive Defrag, you can click on Start TuneUp Drive Defrag to open the tool for defrag-menting drives and for optimally arranging files on the drives.
Windows XP:
UnderMy Computer, you can click on Settings to specify which drives are displayed in the Windows MyComputer.
Windows Vista and Windows 7:
Under Computer, you can click on Settings to specify which drives are displayed in the Windows My Com-puter.
Memory and CacheMemory ManagementThis includes settings for managing the physical and virtual memory.
Under Virtual memory, you can specify that drivers and the Windows system core can be replaced if nec-essary or are always kept in the RAM.
Under Paging file, you can specify that TuneUp Utilities always overwrites the content of the Windows pag-ing file with zeros, thereby deleting it when the system is shut down.
Clicking on Recommended accepts the settings recommended by TuneUp Utilities.
Memory UsageHere you can set whether the computer should reserve more RAM for the programs or for the system cache.
TuneUp Utilities Manual 127

AdvancedClicking on the corresponding buttons here, takes you to the TuneUp StartUpManager and TuneUp Proc-ess Manager modules, which you can use to configure the system startup and manage running programs.
Startup and MaintenanceSystem StartupHere you can make general settings about how Windows should proceed when starting up the system.
Under Boot defragmentation, you can enable the Enable boot defragmentation option to specify that filesrequired for booting should be arranged on the hard disk so that they can be found particularly quickly.
Under Boot logo and error messages you can enable the Do not display original boot logo and error mes-sages option to specify that Windows should not only suppress the boot logo display but also the display oferror messages during startup.
UnderWaiting time for drive check, you can specify how long the user should be given to decide againstrunning the CHKDSK scan program. This program is launched automatically if the computer was not shutdown properly and checks the integrity of the data on the hard disks.
ExitWindows XP:
Here, you specify what Windows should do if individual programs have crashed.
UnderWaiting time without response, you can specify the time in milliseconds that the system gives theprogram to show a response. It will then be ended in the Task Manager or when the computer is shut down.
Under End programs automatically, you can set whether applications should be closed automatically orwhether the End program dialog should be shown.
Desktop and TaskbarHere you can make settings regarding the stability of the desktop and taskbar.
Under Desktop& taskbar in separate process, you can enable the Run desktop and taskbar in a separateprocess option to increase the stability of the system if Explorer crashes. This increases stability, but requiresan additional 8 MB of disk space.
Under Restart desktop& taskbar automatically, you can enable the options to ensure that both the desk-top and taskbar are restarted again automatically if they should crash. This means that the system remainsoperational.
ErrorsHere you can specify how the system should behave in the event of errors.
Under Audible error message, you can enable the Give audible signal for errors option to specify that thesystem should make a sound if there is an error message or incorrect entry.
Under System errors, you can select from the dropdown list what should happen if the system has beenstopped due to a critical system error. You can also specify that the event should be entered in the systemlog.
Under Error reporting, you can specify whether Windows should send an error report to Microsoft fol-lowing a crash. This will communicate not only information about the error but also information about yoursystem.
TuneUp Utilities Manual 128

SystemGeneralUnderWindows registration, you can change the name and company of the user who registered the cur-rent Windows version. Here you can also see the serial number and product ID of your Windows license.
UnderWindows Installer - user data, enter the name and company name that should be automaticallyentered into the user information when new software is installed.
Under Support information, you can use the Settings button to open a configuration window in whichyou can modify the information shown in the system properties.
Common DialogsHere you specify the appearance of the common dialogs for opening and saving files.
In the File name section you can specify whether, in common dialogs, a selection field containing the filesmost recently used is to be displayed instead of a single input field.
Only Windows XP:
Under Folder navigation, you specify which navigation elements should be shown for simplified operationin common dialogs. You can also determine if the "Back" button should be displayed and if a navigation barshould be displayed on the left-hand side of the common dialog.
SearchWindows XP:
Here you can define the appearance and the behavior of the search dialog.
The Disable Indexing service option prevents the system from automatically indexing the contents of yourfiles when the computer is idle.
The Use classic search in Explorer option replaces the modern style search dialog with the classic style.
Under Searched file types, you use the File types button to specify which text file types can be searched fora specific content.
Special FoldersHere you specify the physical paths to which special folders such as "My Documents" should link. Highlighta predefined path and click on Change to change it to your requirements.
Command PromptYou can configure the appearance and behavior of the command prompt here.
Under completion, you can specify thekey combinations to be used to complete file and folder names.
Under Advanced settings, you can click on the Advanced button to open a window where you can specifythe visual appearance and start folder of the command prompt.
SecurityGeneralUnder Screensaver password prompt you can specify how long the screensaver has to be running beforethe password protection is activated (if this option is selected). The default value is 5 seconds.
TuneUp Utilities Manual 129

User Account ControlWindows Vista and Windows 7:
The User Account Control feature ensures that no unauthorized changes are made to the computer. It doesthis by asking whether a user has administrator rights to allow any changes to be made to the system. If UserAccount Control is enabled, a standard user will always be asked to enter an administrator password tomake such changes.
You can specify here how a user logged on as an administrator is to be informed of potential changes to thecomputer and prompted for confirmation.
This is how Windows differentiates between changes that the user makes himself (e.g. security-related set-tings) and the startup of programs that can carry out changes. You can set here in detail, which changesmust require confirmation first and whether a password must be entered beforehand.
Because this is a security-relevant setting, it is advisable to leave the user account control activated andselect at least Confirmation prompt without password entry (for Windows Vista) or For changes by pro-grams, without password entry (for Windows 7).
One aim of User Account Control is to ensure that no programs start in the background without the userbeing aware of it. At every program startup, Windows determines whether this program will make changesto the computer. If this is the case and User Account Control is enabled, the user will be prompted to havean administrator confirm the program startup. This feature is a key security step in case an unknown (andpotentially harmful) program starts up without the user having initiated it himself.
Security Center (Windows Vista) / Maintenance Center (Windows 7)The Security Center or Maintenance Center, as it is called in Windows 7, regularly runs in the background tocheck the security status of your computer and displays warnings if a possible security problem is deter-mined.
If these warnings are displayed on your computer in error or you do not want to be shown warnings fromthe Security/Maintenance Center, you can switch the warnings off here.
AdvancedUnder Screensaver password prompt, you can specify how long the screensaver has to be running beforethe password protection is activated (if this option is enabled). The default value is 5 seconds.
TuneUp Utilities Manual 130

"Wizards" CategoryIn this category you will find the Copy settings wizard. It copies your settings to other user accounts and tothe Windows logon screen.
Copy settingsYou can use TuneUp System Control to make a number of settings by which to change the appearance andthe behavior of the system to suit your requirements. However, these settings are only normally valid foryour current user account.
Use the Copy settings wizard to copy your settings to other user accounts and to the Windows logonscreen.
The wizard shows you a list of settings that can be copied. Make your selection and click Next.
Now you can choose where the selected settings should be copied to. A possible target (depending on theselected settings) is the logon screen. If you have several users set up, all other users are also shown as pos-sible destinations. Select the destinations you want and click Next to start the copy process.
After successfully completing the copy process, close the wizard by clicking Finish.
TuneUp Utilities Manual 131

8. Overview of All Functions
On the far right of the Start Center, you will see the Overview of all functionsmenu. Opening this menugives you a list of all functions that TuneUp Utilities offers - clearly sorted according to application area.
Installed ProgramsDisableAllows you to deactivate programs that you are not currently using, but do not wish to uninstall.
(See also How to Disable Programs, p. 29).
Disabling startup programsAllows you to disable programs that are automatically started in the background when the system starts up,so as to speed up the system startup.
(See also How to Configure Your System Startup, p. 35).
UninstallShows all the programs installed on your PC with detailed information about them, and allows you to selectprograms to uninstall.
(See also How to Uninstall Programs, p. 32).
Hard DiskDefragmentRearranges blocks of data on your hard disk, providing more disk space and quicker loading times for doc-uments and programs.
(See also How to Defragment Your Hard Disk, p. 59).
Check for errorsChecks the surface of your hard disk and your file system structure for errors and fixes them to prevent dataloss.
(See also How to Check your Hard Disk, p. 80).
TuneUp Utilities Manual 132

Securely delete dataGives you three options for deleting your files or folders so that they cannot be restored, even by pro-fessionals.
(See also How to Securely Delete Data, p. 74).
Restore deleted filesSearches your hard disk and mobile data carriers for deleted files and restores them.
(See also How to Search for Deleted Files, p. 86).
Disk SpaceGain disk spaceSearches for old backups, unnecessary files and unnecessary Windows features, which can be safelyremoved from the hard disk without any negative impact on your system.
(See also How to Gain Disk Space, p. 64).
Finding and Deleting Large Amounts of DataAllows you to find and delete large amounts of data on your storage media, so as to create more disk space.
(See also How to Run an Analysis, p. 68).
RegistryDefragmentRewrites the central database of your Windows system (the registry), eliminating gaps and structural errorsto create a more stable system.
(See also How to Defragment the Registry, p. 51).
CleanSpecifically searches for faulty entries in the central database of your Windows system (the registry) andrepairs or removes them to create a more stable system.
(See also How to Clean the Registry, p. 44).
EditAllows you to search quickly and easily for keys and values in the registry and make changes (for expe-rienced users only).
(See also How to Edit Your Registry, p. 136).
ComputerStart 1-Click MaintenanceChecks your system for optimization options and then allows you to implement these optimizations directly.
(See also How to Make Maintenance Settings, p. 16).
Showing System InformationShows you important information about your hardware and software and the performance of your com-puter.
(See also How to Show System Information, p. 88).
TuneUp Utilities Manual 133
WindowsTurn on Turbo ModeAllows you to temporarily turn off unnecessary background programs or maintenance processes to giveyour computer a performance boost.
(See also How to Switch on Turbo Mode, p. 39).
Fixing Common ProblemsShows you a list of common Windows problems and allows you to easily remedy your problems.
(See also How to Fix Common Problems, p. 78).
Modifying Windows SettingsAllows you to modify visual effects, browser options, the desktop, the user logon and much more to yourpersonal requirements.
(See also How to Modify Windows Settings, p. 110).
Changing Windows AppearanceAllows you to change the Windows user interface to your personal wishes and requirements.
(See also How to Change Windows Appearance, p. 92).
Removing Broken ShortcutsSearches your system for shortcuts and references that are no longer valid and deletes them. This preventserror messages when these references are called up.
(See also How to Remove Broken Shortcuts, p. 54).
Displaying and Closing Running ProcessesAllows you to view your running processes and open files and to exit or close these in the event of prob-lems.
(See also How to Manage Running Processes, p. 83).
RecommendationsIncrease performanceShows you recommendations for increasing your system performance by making modifications to hardwareand software, Internet settings and visual effects.
(See also How to Increase the Performance of Your Computer, p. 19).
Fixing ProblemsShows you existing problems that have a negative impact on your system's health and suggests solutionsfor remedying these problems.
(See also Fixing Problems - Details, p. 22).
Accelerating System Startup and ShutdownChecks your computer for recommendations for accelerating system startup and shutdown, e.g. disablingunnecessary startup programs.
(See also How to Accelerate System Startup and Shutdown, p. 56).
TuneUp Utilities Manual 134

TuneUp SettingsGeneral SettingsAllows you to customize TuneUp Utilities to suit your needs, apply maintenance settings, and configure LiveOptimization, Turbo Mode and the updates check for TuneUp Utilities.
Configure MaintenanceAllows you to specify maintenance tasks that should be run automatically at regular intervals.
(See also How to Make Maintenance Settings, p. 16).
Configuring Live OptimizationAllows you to activate two optimization measures for increasing the response rate and system startup speed.
(See also How to Configure Live Optimization, p. 24).
Configuring Turbo ModeAllows you to specify the background programs and maintenance processes that should be temporarilyturned off for a performance boost.
(See also How to Configure Your Own TuneUp Turbo Mode, p. 39).
TuneUp UtilitiesUndoing ChangesAllows you to reverse changes made with TuneUp Utilities or to resort to Windows restore points.
(See also How to Undo Changes, p. 138.)
Checking for UpdatesChecks whether new updates are available for your TuneUp Utilities and installs them.
(See also How to Check for Updates, p. 141).
Showing the Optimization ReportShows you what TuneUp Utilities has optimized on your computer to date.
(See also How to Display the TuneUp Optimization Report, p. 143.)
TuneUp Utilities Manual 135

Editing the RegistryIn the following chapters, you will find out how you can edit the registry using the TuneUp Registry Editormodule.
Please note that this feature is only intended to be used by experienced users.
IntroductionThe Windows registry is in effect a huge central database. Every new item of hardware or software youinstall is "registered" here. Over time, the registry gets larger and larger, making it increasingly difficult tokeep a handle on things.
Experts in these matters searching for a suitable tool with which to get inside Windows and change anumber of settings by hand should use the TuneUp Registry Editor. It also offers the protection of theTuneUp Rescue Center, which enables you to undo the changes you made at any time.
How to Edit Your RegistryStart the TuneUp Registry Editor module by going to Overview of all functions in the Start Center andselecting the Edit entry under Registry.
The registry is the very heart of your Windows system. Please note that you should be sure youknow what you are doing before making any changes here.
In the left-hand column the Editor displays the registry in a tree structure. The registry consists of countlesskeys broken down by subject matter into different categories. These categories are represented by differentfolders and subfolders.
Showing a keyDouble-click on a folder in the left-hand column to display its subfolders. When you get to the end of thehierarchy chain, the individual keys are displayed on the right.
TuneUp Utilities Manual 136

Editing a keyIn the context menu of a key, select the different editing functions. You can delete keys, rename them, andcopy them to the clipboard. You can also edit the values of a key.
In the context menu of a folder, select New to create a new key.
Browsing the registryFrom the Context menu of a folder in the tree structure, select Search to begin searching within the registry.TuneUp Registry Editor offers you comprehensive search options here.
Showing a bookmark and setting a bookmarkSelect Set bookmark from the context menu of a folder in the tree structure so that you can find individualfolders more quickly in the future.
Additional FunctionsIn the menu bar, you will find numerous additional functions for editing your registry. For example you canexport or print individual areas or indeed the entire registry. You can also edit the registry using the entriesin the toolbar.
TuneUp Utilities Manual 137
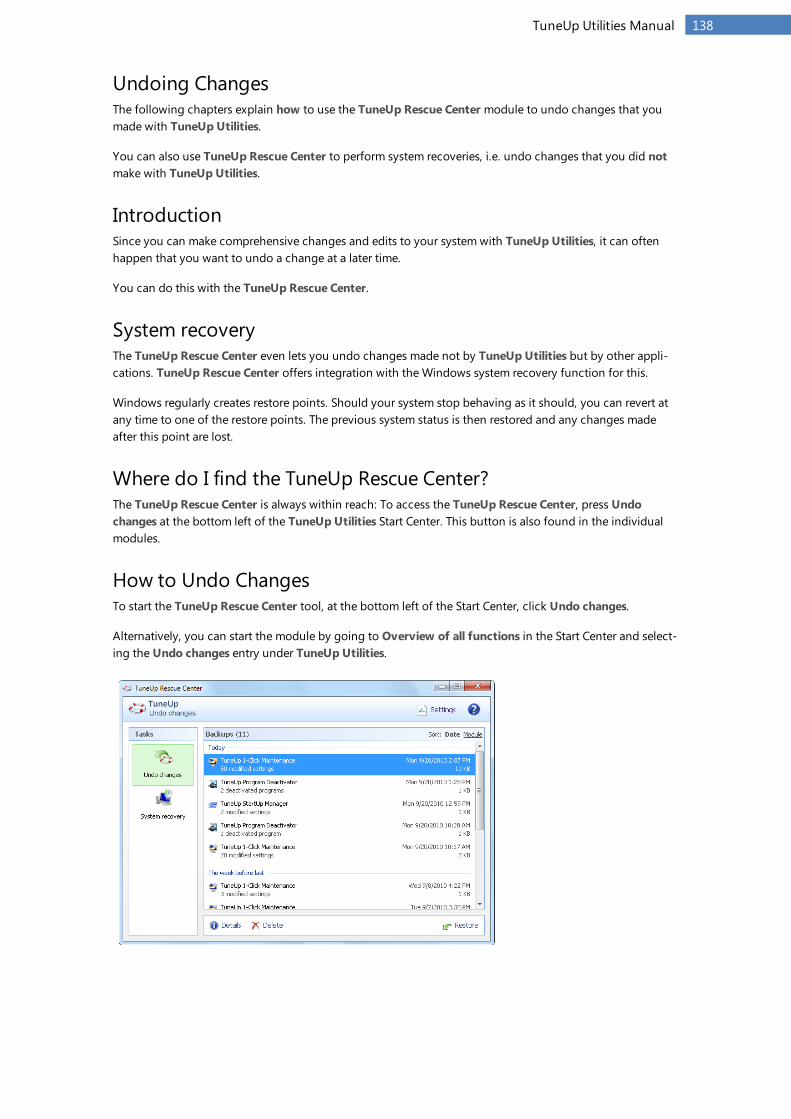
Undoing ChangesThe following chapters explain how to use the TuneUp Rescue Center module to undo changes that youmade with TuneUp Utilities.
You can also use TuneUp Rescue Center to perform system recoveries, i.e. undo changes that you did notmake with TuneUp Utilities.
IntroductionSince you can make comprehensive changes and edits to your system with TuneUp Utilities, it can oftenhappen that you want to undo a change at a later time.
You can do this with the TuneUp Rescue Center.
System recoveryThe TuneUp Rescue Center even lets you undo changes made not by TuneUp Utilities but by other appli-cations. TuneUp Rescue Center offers integration with the Windows system recovery function for this.
Windows regularly creates restore points. Should your system stop behaving as it should, you can revert atany time to one of the restore points. The previous system status is then restored and any changes madeafter this point are lost.
Where do I find the TuneUp Rescue Center?The TuneUp Rescue Center is always within reach: To access the TuneUp Rescue Center, press Undochanges at the bottom left of the TuneUp Utilities Start Center. This button is also found in the individualmodules.
How to Undo ChangesTo start the TuneUp Rescue Center tool, at the bottom left of the Start Center, click Undo changes.
Alternatively, you can start the module by going to Overview of all functions in the Start Center and select-ing the Undo changes entry under TuneUp Utilities.
TuneUp Utilities Manual 138

Undoing ChangesIn the right column, TuneUp Rescue Center shows you a list of all saved backups arranged by module ordate and specifies for each entry the number of modified settings, time of change and the disk space freedup by the changes.
Showing detailsThe Details button takes you to an exact log of the changes carried out. However you can only view thislog. You cannot undo only selected changes. For this reason you may have to restore a number of super-fluous files before you can use just one file again that you deleted by accident.
DeleteIf you are quite sure that you no longer need a backup, you can delete it permanently using this button.
RestoreUse this button to restore the system to its status before the selected backup.
System RestoreIn the right-hand column, TuneUp Rescue Center shows you a list of all stored backups and also the time atwhich each entry was changed.
For more information, see: Introduction, p. 138
Create BackupUse this button to create a system restore point. Give this point a name by which to remember this systemstatus at a later time.
Since a system restore point saves the status of your configuration and system files, before making any sig-nificant changes to the system (such as installing a program) you are advised to create a system restorepoint. If something goes wrong during installation or your computer no longer works the way it used to,you can always restore it back to its original status at any time.
DeleteIf you are quite sure that you no longer need a backup, you can delete it permanently using this button.
RestoreUse this button to restore the system to its status before the selected backup. You will need to restart yoursystem.
This function is useful if your computer no longer functions properly following a change to the system.
First, select a restore point that is as recent as possible, in order to avoid undoing too many systemchanges.
Changing SettingsYou can change some of the settings of the TuneUp Rescue Center. In TuneUp Rescue Center, click on theSettings button.
Alternatively, you can enter these settings from the Start Center. In the Settingsmenu select General andopen the Rescue Center tab.
TuneUp Utilities Manual 139

Rescue Center ProtectionEvery TuneUp Utilitiesmodule is protected by TuneUp Rescue Center as standard. You can disable this sup-port for individual modules by clearing the relevant checkboxes.
BackupsHere you can set for how long the individual backups of TuneUp Rescue Center should be stored. Thestandard setting is for backups to be automatically deleted after two weeks and for a maximum of 60 back-ups to be stored.
Do not restrict the TuneUp Rescue Center protection too much in order to save disk space. In the event ofproblems, the protection function is very useful as a last resort and generally more important than saving asmall amount of space on your hard disk.
TuneUp Utilities Manual 140

Checking for UpdatesIn the following chapters, you will find out how you can use the TuneUp UpdateWizardmodule to keepyour TuneUp Utilities up to date and why it is important to do so.
IntroductionTuneUp Utilities is constantly being developed: individual features are expanded or adapted to suit thelatest technology and any errors are fixed. When a new version is available it will be made available to youon the Internet.
You have the option of automatically checking for updates or manually checking for updates.
Changing SettingsTo change the update check settings, go to the menu bar and click Settings, General and then Updates.Here you can decide whether TuneUp Utilities should regularly check for updates automatically. You canalso specify here how often you should be informed of updates that have been found.
Checking for Updates ManuallyIf you do not want TuneUp Utilities to check for updates automatically, you can turn this function off. Inthis case we recommend that you regularly check for updates yourself.
How to Check for UpdatesStart up the TuneUp UpdateWizardmodule by going to the Overview of all functions category in theStart Center and selecting the Check for updates entry under TuneUp Utilities.
Alternatively, you can start the module by clicking on Help & Support in the menu bar of the Start Centerand then selecting Check for updates.
TuneUp UpdateWizard starts and establishes a connection to the Internet to check for updates.
TuneUp Utilities Manual 141

If updates existYou receive a list of the available updates with a short description of the new or modified functions.
Click Next to install the updates.
If no updates existIf there are no updates, your TuneUp Utilities is already up to date and you can close the wizard by clickingFinish.
TuneUp Utilities Manual 142

Displaying the TuneUp Optimization ReportIn the following chapters, you will find out how you can use the TuneUp Optimization Report to keep aconstant overview of the extent to which you have optimized your computer to date with TuneUp Utilities.
IntroductionThe TuneUp optimization report summarizes all of the optimization steps already performed by TuneUpUtilities. This report is particularly relevant if you use the numerous automatic background optimizations ofTuneUp Utilities. Here you can check at any time to what extent TuneUp Utilities has optimized your com-puter so far.
How to Display the TuneUp Optimization ReportDisplay the TuneUp optimization report by going to Overview of all functions in the Start Center and select-ing Display optimization report under TuneUp Utilities.
This opens a clear summary of the optimizations already performed with TuneUp Utilities and the benefitsthat these have provided.
If you hold your cursor over an optimization, a small information window opens that displays details on thebenefit of the optimization or details on the individual optimizations.
You can display this optimization report for the last seven days, the last 30 days or for the entire period sinceinstallation. To do so, simply switch to the relevant tabs.
TuneUp Utilities Manual 143

9. Rating Function for Programs
You can turn on the useful Rating function for programs in the TuneUp Program Deactivator, TuneUpStartUpManager and TuneUp Uninstall Manager modules. It shows you how useful other users ofTuneUp Utilities found the programs that you have installed. You can use the rating function to help youdecide which programs you really need in your day-to-day work.
Often, you are faced with a decision about which of your installed programs you really need for your day-to-day work: that is why the Rating function for programs was developed.
The experiences of numerous TuneUp Utilities users will help you to make your decisions in the TuneUpProgram Deactivator, TuneUp StartUpManager and TuneUp Uninstall Manager modules. The ratingfunction for programs shows you which programs have been classified as useful and helps you to decidewhich startup programs you want to disable and which programs you want to disable or uninstall.
Please note: you need to have an active Internet connection to use the rating function.
Display of the Rating Function in the ModulesIf you have switched on the rating function, it is integrated into the TuneUp Program Deactivator, TuneUpStartUpManager and TuneUp Uninstall Manager modules as a separate column in the program list. Youcan identify your ratings by the blue stars in the Usefulness column. If you have not yet given your own rat-ing, the column displays the average rating that other TuneUp Utilities users have given the program. If noratings have been given, the column is blank.
If you hover the mouse cursor over the column, a tooltip is displayed showing your rating and the rating ofother TuneUp Utilities users.
TuneUp Utilities Manual 144

How to Turn On the Rating FunctionStart either the TuneUp Program Deactivator, TuneUp StartUpManager or TuneUp Uninstall Managermodules. The Rating function for programs dialog is displayed. Click OK.
If you do not want to make a decision just now, you can click on Decide later. The module is started with-out the rating function. You can enable the rating function at any time by clicking on Turn on rating func-tion in the toolbar and this time clicking OK in the dialog that appears.
How to Turn Off the Rating FunctionIn the toolbar, click Rating function and select Turn off. In the dialog that opens, you can decide whetheryou wish to archive your ratings for any subsequent use of the function. The ratings of other users aredeleted from the database on your PC and will have to be downloaded again from the server if you switchthe function back on.
How to Submit a Rating1. Move the mouse cursor over the Usefulness column. When you rate a program, you must give it at
least one star. A maximum of 5 stars can be awarded.
2. Click on the number of stars that you wish to award the program. So, if you wish to give three stars,click on the third star.
3. Your rating is automatically saved and transferred to the TuneUp Utilities server.
If you wish to change your rating, you can proceed in exactly the same way as for the initial rating.
TuneUp Utilities Manual 145

10. The TuneUp Utilities Gadget
Another function of TuneUp Utilities is the gadget. This is not supported by Windows XP and is thereforeonly available to you with Windows Vista and Windows 7.
The practical gadget can be displayed on the desktop. It keeps you constantly informedof the status of your computer. You no longer need to start TuneUp Utilities to find outwhether potential for optimization has been identified in theMaintain system, Increaseperformance and Fix problems categories. What is more, you can start TuneUp Util-ities and also turn on Turbo Mode from the gadget.
TuneUp Utilities Gadget - Introduction
Please note that gadgets are not supported in Windows XP, so unfortunately you cannot enjoy thisfunction unless you have Windows Vista or Windows 7.
What is a Gadget?Gadgets (or widgets) are small programs that are permanently displayed on the desktop and which providethe user with up-to-date information.
What is the TuneUp Utilities Gadget for?The TuneUp Utilities Gadget tells you the status of your computer at all times, without you needing to startTuneUp Utilities separately. The gadget is integrated in TuneUp Utilities and informs you of the currentstatus of the three areas of the Status & recommendations category:
Clicking on one of the three buttons in the gadget opens Status & recommendations in the TuneUp Util-ities Start Center. Here you can address the problems or recommendations directly.
You can update the gadget display at any time using the small refresh button.
Turbo ModeThe TuneUp Utilities Gadget also gives you the option of turning on the TuneUp TurboMode.
You can see that the TuneUp Utilities Gadget is a continuously visible source of information on the statusof your computer. In addition it offers practical direct access to the Start Center of TuneUp Utilities.
TuneUp Utilities Manual 146

How to Display the TuneUp Utilities GadgetYou can display the TuneUp Utilities Gadget on your desktop at any time.
In Windows Vista, proceed as follows:
l Open the Accessories folder under All Programs in the Windows Start menu.l Then click onWindows Sidebar. A list of all the gadgets installed on your computer is shown.l Activate the TuneUp Utilities gadget by double-clicking on it.
In Windows 7, proceed as follows:
l Right-click on a free space on the desktop and select Gadget from the context menu.l Select TuneUp Utilities Gadget and enable it with a double-click.
TuneUp Utilities Manual 147
11. TuneUp Utilities in taskbar notification area
The notification area is the area on the right-hand side of the Windows taskbar. This displays, for example,the time, status icons or program shortcuts. TuneUp Utilities has a notification area icon, which displaysinformation on the status of your system at any time and provides an entry point to TuneUp Utilities.
When you double-click on the notification area icon, TuneUp Utilities starts up.
You can configure if, how and about what TuneUp Utilities you would like to be informed in the taskbarnotification area.
System StatusUnder System status, you can see whether the TuneUp Utilities Start Center currently shows the opti-mization potential. You can open the Start Center using the Start TuneUp Utilities link.
You can find further information on the Start Center under: The Start Center, p. 8
Live OptimizationUnder Live Optimization, you can see the most recent activities of the two Live Optimization methods. Alink takes you to the Live Optimization configuration dialog.
You can find further information on Live Optimization under: How to Configure Live Optimization, p. 24
Automatic maintenanceUnder Automatic Maintenance, you can see when automatic maintenance was last performed. A link takesyou to the Automatic Maintenance configuration dialog.
You can find further information on Automatic Maintenance under: How to Make Maintenance Settings, p.16
Turbo ModeUnder TurboMode, you can see whether Turbo Mode is currently on and use the switch to turn it on or offas necessary. A link also takes you to the configuration wizard.
You can find further information on Turbo Mode under: How to Configure Your Own TuneUp Turbo Mode,p. 39
SettingsYou can configure if, how and about what TuneUp Utilities you would like to be informed in the taskbarnotification area. Just proceed as follows:
If the icon is displayed on your computer, simply right-click on it. Now select Configure notification areasettings in the context menu that appears. This takes you to the configuration dialog, where you can con-figure your settings. In addition to the icon, you can choose to have messages displayed in the form of bal-loons.
If the icon is not displayed on your computer, call this dialog up by going to the TuneUp UtilitiesSettingsmenu in the Start Center and selecting General, then theNotification area tab.
TuneUp Utilities Manual 148

12. Index
1-Click Maintenance 14, 16
Accelerate Program Startups 25
Animations 112
Animations and Effects 112
Archiving Files 73
Audible Signals 46
Automatic Maintenance 14
Boot Screen 93
Button View 118
Cache 127
Change Windows Appearance 90-92
Check for updates 9, 141
Checking for Updates 141
Checking Hard Disks for Errors 79-80
Cleaning the Hard Disk 62-63
Cleaning the Registry 43-44, 46, 48
Common files 46
Communication 110, 120
Computer resources 41
Configuring System Startup 34, 36
Customizing Windows 90
Database Drivers 46
Defragmentation, Registry 50-51
Defragmenting the Hard disk 58-59
Defragmenting the Registry 50
Defragmenting, Hard disk 58-59, 61
Degree of fragmentation 58
Deletion method 71, 76
Destroying Data 76
Disabling Programs 27, 29
Disabling Startup Programs 34
Disk Space Allocation 69
Display 105
Displaying and uninstalling programs 32
Displaying and uninstalling Programs 31
Drives 127
E-Mail and Chat 123
Editing the Registry 136
Effects 112
Explorer Bars 120
Fast Defragmentation 58
File Restoration 87
File System 104
Files Types 46, 113
Finding and Deleting Large Amounts of Data 67
Firewall 46
Fix common problems 77-78
Fix Problems 22
Fixing Common Problems 77
Fixing Problems 13, 77
Flashing Buttons 118
Flashing Cursor 116
Folder Options 114
Folder view 114
Folder Window 114
Font Smoothing 112
Fonts 46
Gadget 146
Gain disk space 62
Gain Disk Space 64
Hard Disk, Defragmenting 58
Help 9
Help Files 46
Hibernation File 65
History Lists 46
Hover effect 115
Icon Cache 106
Icon Packages 103
Increase Performance 19
Increasing Performance 12, 19
Increasing Performance, Details 18
Increasing the Response Rate 24
Input options 115
Installed Programs 46
Internet 120
Internet Explorer Menu 121
Internet Explorer Navigation 121
Internet Explorer Security 121
Internet Explorer View 120
Internet Time 120
Keyboard 116
List Options 114
Live Optimization 23-24
Load points 30
Logon Screen 99
Maintenance 14
TuneUp Utilities Manual 149

Maintenance Center 130
Maintenance Tasks 14, 17
Management 126
Managing running programs 82-83
Manually Running Maintenance Tasks 26
Memory Management 127
Memory Usage 127
Menu Appearance 112
Menu Bar 9
Menu Operations 113
Minimized Windows 119
Modify Windows Settings 90, 109-110
Mouse functions 115
Mouse Pointer 116
Mouse Sensitivity 115
Mozilla Firefox 121
My Network Places 120
Network 120
New Menu 113
Normal analysis 81
Notification area of the taskbar 119
NTFS vs. FAT file system 61
Old backups 63-64, 66
Open Files 84, 113
Opera 122
Optimization Report 143
Optimizing System Startup and Shutdown 55-56
Optimizing the System 26
Organizing Files and Folders 68-69
Overview of All Functions 6, 9, 132
Passwords 120
Performing Maintenance 16
Postpone automatic maintenance tasks 40
Privacy 124
Processes 83
Processor usage 82
Profile 19
Program Components 46
Program Extensions 46
Program Paths 46
Program Settings 46
Programs-on-Demand-Technology 27
Rating function for programs 6, 144
Recently Used Files 118
Reducing System Load 26
Registry 44
Remove broken shortcuts 53-54
Restoring Deleted Files 85-86
Scroll wheel 115
Security 129
Security Center 130
Settings 9, 148
Shortcuts 118
Showing System Information 88
Showing the Optimization Report 135
Speed up the startup of my programs 25
Start Center 6, 8
Start Menu 117
Start process 35
Startup 36
Startup and Maintenance 128
Startup Logo 97
Startup programs 34-36, 46
Support 7, 9
System Elements 101
SystemMaintenance 14
System requirements 7
System Restore 139
System Startup 35
Taskbar 128, 148
Thorough Analysis 81
Thorough Defragmentation 58
Thumbnails 114
Tips for Boot Screens 96
TuneUp 1-Click Maintenance 14
TuneUp Disk Doctor 79-80
TuneUp Disk Space Explorer 62, 67-69, 73
TuneUp Drive Defrag 58-59, 61
TuneUp Live Optimization 23
TuneUp Optimization Report 143
TuneUp Process Manager 82-83
TuneUp Program Deactivator 6, 27, 29
TuneUp Programs-on-Demand Technology™ 27, 30
TuneUp Registry Cleaner 43-44, 46, 48
TuneUp Registry Defrag 43, 50-51
TuneUp Registry Editor 136
TuneUp Repair Wizard 77-78
TuneUp Rescue Center 9, 138-139
TuneUp Utilities Manual 150

TuneUp Shortcut Cleaner 53-54
TuneUp Shredder 62, 74, 76
TuneUp StartUp Manager 34-36
TuneUp StartUp Optimizer 55-56
TuneUp Styler 90-92
TuneUp System Control 90, 109-110
TuneUp System Information 88
TuneUp Tuning Status 6
TuneUp Turbo Mode 38
TuneUp Undelete 85-87
TuneUp Uninstall Manager 31-32
TuneUp Update Wizard 9, 141
TuneUp Utilities Gadget 146
Tuning Status 9-11
Turbo Mode 9, 38-39
Undo changes 9, 138-139
Undoing Changes 135
Unnecessary files 63-64, 66
User Account Control 129-130
User Logon 126
Visual effects 40
Visual Style 107
Widget 146
Window Tracking 115
Windows Desktop Search 65
Windows functions 63, 65
Windows Messenger 65
Windows Picture and Fax Viewer 113
TuneUp Utilities Manual 151