Tube FM - 2 - Cupwise FXTube FM - 2 Tube Radios, Mic'd Cupwise Nebula Programs . General Information...
17
Tube FM - 2 Tube Radios, Mic'd Cupwise Nebula Programs
Transcript of Tube FM - 2 - Cupwise FXTube FM - 2 Tube Radios, Mic'd Cupwise Nebula Programs . General Information...
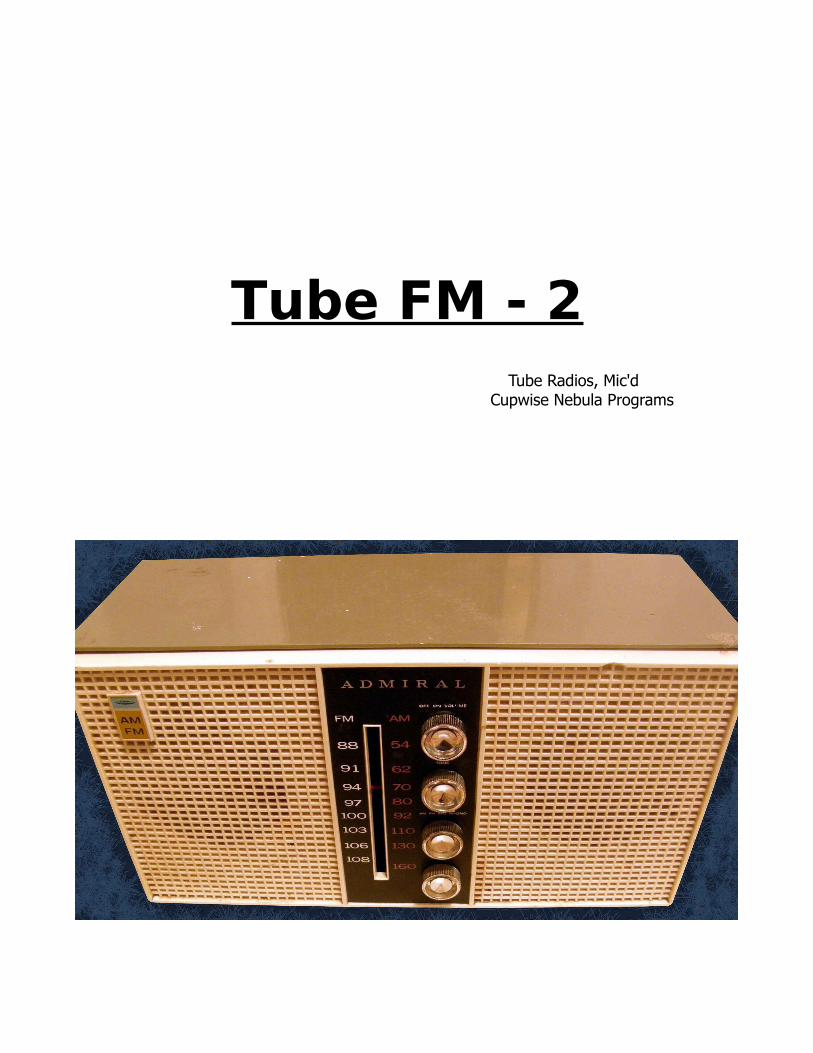
Tube FM - 2Tube Radios, Mic'd
Cupwise Nebula Programs

General Information
This is the classic sound of old tube radios, captured by the power of Nebula! The same radios that were used to produce Tube FM1 were used here again, but this time microphones were used to sample them. The mics include an AT2020 condenser, an XM8500 dynamic, and an Akai ADM-6 (also dynamic). Each mic was used at least once with each radio.
Among the radios are a pair of tuners by Heathkit and Bell. Being tuners, they don't have their own built-in speakers to mic, so a HS80M usually stood in. Besides the tuners there were 4 table-top radios. These include an Arvin, a Zenith, an Admiral (with tone knob and phono-in, both used/sampled), and an ”All American Five” style Philco AM. Again, the 'HLLY TX-01S' and the 'EDM TX LCD' FM transmitters were used to send the signal to the radios. In some cases the signal was sent to the radios through a direct electrical connection instead. To do this, a simple 'hack' was used- the signal was injected at a point in the radio's circuitry where it would run directly through the tubes. This was the only way the Philco could be sampled, being an AM only radio.
Besides the use of different mics, several others factors were constantly mixed up to provide the most amount of variety. A modified VTB1 (upgraded op-amps) was also used in some cases. The AT2020 always used it for its phantom power, but a few times it was used with the other mics. In a few cases, its optional starved plate tube circuit was engaged as well, mixed in at a low level (just a few 'clicks' of the knob). The stock tube in the pre was usually replaced with others when this was used, including modern Tung-Sol and Mullard re-issues, and an original Mullard as well. The RME Hammerfall 96/32 was used for all conversions, and programs were all sampled at 96khz.
UsageThe programs will all be found in the 'RAD' category in Nebula. Below that,
the 96khz version of the set will be in the 'T2' subcategory, and the 44khz version in 'T2*'. Some of the sampled effects were enhanced to produce '+' versions. The enhancement produces a fuller frequency response, which means a less filtered sound. The enhancement was done in a very transparent way, which perfectly preserves most other aspects (besides the freq. response) of the effects. In one case, the post-enhancement wasn't used, but instead an EQ was applied before the signal went to the radio. Try the + effects if you want a very analog, vintage effect with minimal filtering. The stereo programs were made by pairing up others from the set (one for left, other for right).

Each effect has two options with different kernel amounts. The number after the program name indicates how many orders of harmonic distortion there are (minus the fundamental). If less harmonic distortion is desired (or CPU is tight), select the lower option. The lower option will provide the most accurate frequency response over more of a dynamic range, but you get less distortion/saturation.
The 'gdrv' control represents the trim function. Use it to quickly find the exact amount of input drive you need to get the sound you are after. It's like having another input level control, except that it automatically compensates by adjusting the output level. This way, you can make adjustments to the input gain, and instantly hear the change in tone/distortion content, without having to manually re-adjust the output control to get the level to match. If you go too high, you will get nasty distortion, unrelated to the actual hardware.
The 'dist' control is usually called 'drive' in other Nebula programs, it has just been renamed here. Use it to independently adjust the harmonics/distortion level, relative to the fundamental. This will create an unnatural relationship between them, but can be useful. The 'dry' control will mix some of the original, unprocessed signal back into the output. This can 'open a whole new can of worms' because the phase of the processed signal will probably not match up with that of the original all across the frequency spectrum, so you may get phasey sound at certain frequencies. By default, no dry signal is added. With some programs you actually won't notice phasing, and in cases where there are phase cancellations, they can be used to nice effect. It adds another dimension of control to the tone shaping possibilities. For some programs, you may need to crank 'gdrv' a bit to even get any effect from 'dry', and even then it may be subtle. When used in combination, gdrv, dry, and dist give you a lot more control over the tone you get out of the effect.
InstallationJust copy the .n2p files to your Nebula 'Programs' folder, and the .n2v files
to the 'Vectors' folder.Don't hesitate to contact me at [email protected] for support with the set!
Program Specific DetailsFollowing are program details, along with frequency response and
harmonic distortion graphs.

Admiral Mic1
The signal was sent directly in through the 'phono in' for this capture.D/A > Admiral, DI > AT2020 mic > VTB1 > A/D.__________________________________________________________________________________
Admiral Mic2+
This time, an EQ cut was applied to the sampling tones before they were sent out to the radio. The EQ cut was set up to bring down the peak at 150hz, and makes for a more balanced response. I believe a post-EQ may have been used to bring up the highs some, but I'm not sure.Chain: vst EQ > D/A > Admiral, DI > XM8500 mic > AT mixer > A/D.__________________________________________________________________________________
Admiral Mic3
Again, the 'phono in' was used.Chain: D/A > Admiral, DI > Akai ADM-6 mic > VTB1 > A/D.

Admiral Mic3+
Source: Admiral Mic3 samples were enhanced.__________________________________________________________________________________
Admiral Mic4
This program has an adjustable 'tone' control, sampled straight from the radio's tone knob. Unlike with the equivalent 'direct out' program from the Tube FM1 set, here the effect of the knob isn't so obvious. It can't really be thought of as a simple bass/treble balance knob. Different settings may enhance bass or other frequencies, but not in a predictable way. Try slowly going through the whole range of settings to see how the tone of your input is effected in different areas. The graph above was taken from the middle position. Chain: D/A > EDM trans > Admiral > AT2020 > VTB1 > A/D.__________________________________________________________________________________
Admiral Mic5
This program also has an adjustable tone control, like Mic4. It behaves in the same unpredictable manner, but the bass is noticeably cut when you leave the lowest setting.Chain: D/A > EDM trans > Admiral > XM8500 mic > A/D.
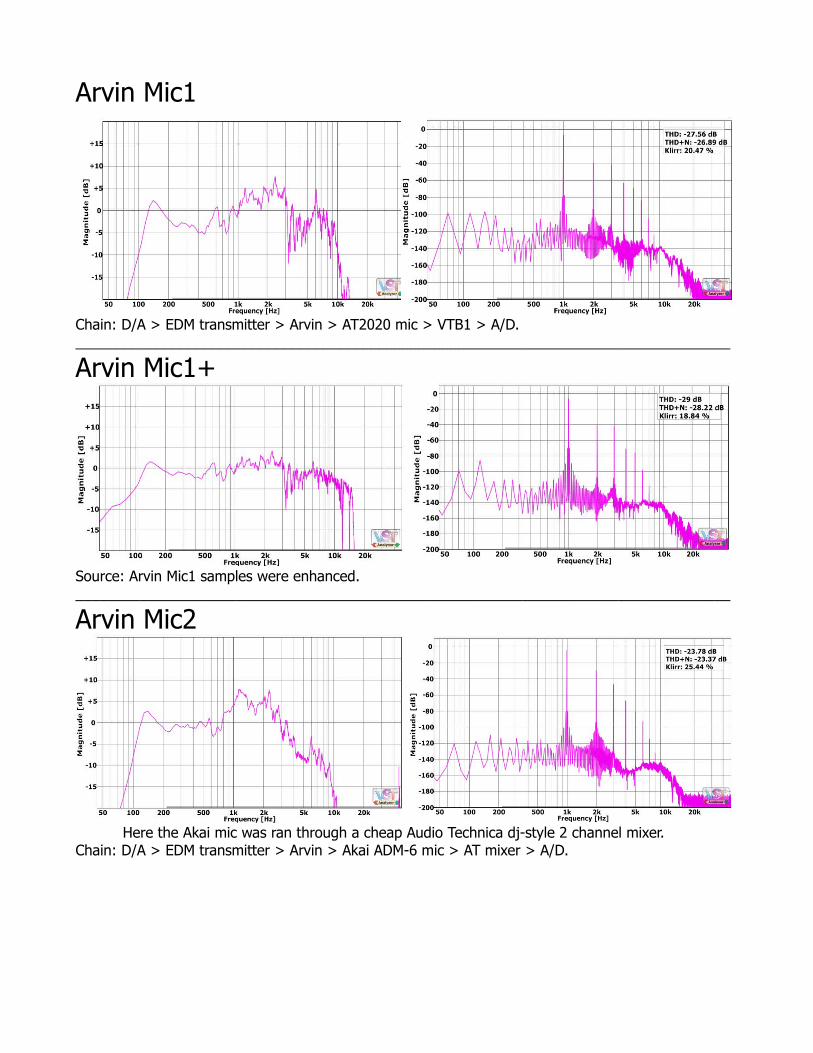
Arvin Mic1
Chain: D/A > EDM transmitter > Arvin > AT2020 mic > VTB1 > A/D.__________________________________________________________________________________
Arvin Mic1+
Source: Arvin Mic1 samples were enhanced.__________________________________________________________________________________
Arvin Mic2
Here the Akai mic was ran through a cheap Audio Technica dj-style 2 channel mixer.Chain: D/A > EDM transmitter > Arvin > Akai ADM-6 mic > AT mixer > A/D.
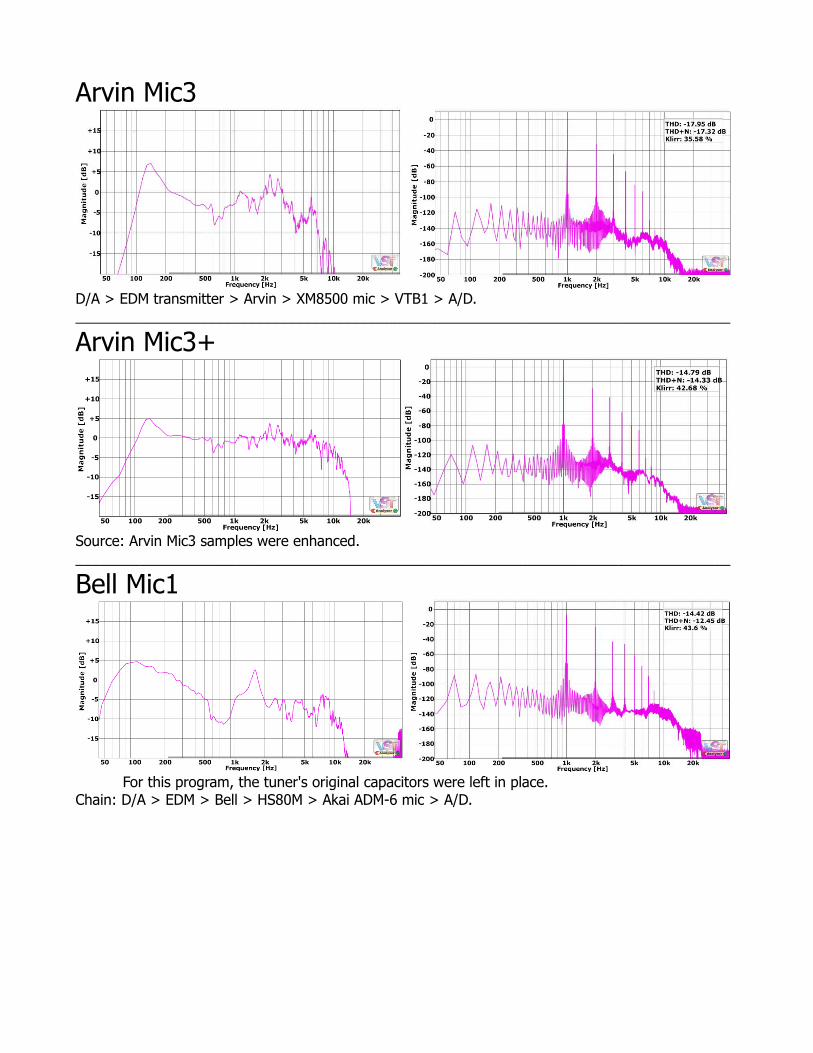
Arvin Mic3
D/A > EDM transmitter > Arvin > XM8500 mic > VTB1 > A/D.__________________________________________________________________________________
Arvin Mic3+
Source: Arvin Mic3 samples were enhanced.__________________________________________________________________________________
Bell Mic1
For this program, the tuner's original capacitors were left in place.Chain: D/A > EDM > Bell > HS80M > Akai ADM-6 mic > A/D.

Bell Mic2
The old caps were used here too. Small amount of VTB1's tube-blend was used, with Mullard re-issue.Chain: D/A > EDM > Bell > HS80M > XM8500 mic > VTB1 > A/D.__________________________________________________________________________________
Bell Mic3
The Bell's original capacitors were finally replaced before this capture.Chain: D/A > EDM > Bell > HS80M > AT2020 mic > VTB1 > A/D.__________________________________________________________________________________
Bell Mic3+
Source: Bell Mic3 samples were enhanced.

Bell Mic4
This time a Bose system was used as the speaker for the Bell.Chain: D/A > HLLY > Bell > Bose > AT2020 mic > VTB1 > A/D.__________________________________________________________________________________
Bell Mic5
Again the Bose was used.Chain: D/A > HLLY > Bell > Bose > XM8500 mic > A/D.__________________________________________________________________________________
Heathkit Mic1
Chain: D/A > HLLY > Heathkit > HS80M > Akai ADM-6 mic > A/D.

Heathkit Mic1+
Source: Heathkit Mic1 samples were enhanced.__________________________________________________________________________________
Heathkit Mic2
This time the bass cut filter on the HS80M was used, at 100hz.Chain: D/A > EDM > Heathkit > HS80M (w/cut at 100hz) > AT2020 mic > VTB1 > A/D.__________________________________________________________________________________
Heathkit Mic3
Small amount of VTB1's tube-blend used, with Tung-Sol re-issue.Chain: D/A > HLLY > Heathkit > HS80M > XM8500 mic > VTB1 > A/D.

Heathkit Mic4
This time the Heathkit was fed into the Admiral through its phono-in, and the Admiral was then mic'd.Chain: D/A > EDM > Heathkit > Admiral, DI > AT2020 mic > VTB1 > A/D.__________________________________________________________________________________
Heathkit Mic5
Again the Admiral was used as the Heathkit's speaker, but this time some pre-EQ was used to neutralize the bass boost added by the Admiral. This one isn't called a '+' program, because the EQ was subtle, and the final spectrum is still very filtered.Chain: vst EQ > D/A > EDM > Heathkit > Admiral, DI > XM8500 mic > A/D.__________________________________________________________________________________
Philco Mic1
This is an AM only radio, so the only method used to get the signal into it was the direct input method (DI).Chain: D/A > Philco, direct in > Akai ADM-6 mic > A/D.

Philco Mic2
This time the VTB1 was used, without any of its tube-blend.Chain: D/A > Philco, direct in > XM8500 mic > VTB1 > A/D.__________________________________________________________________________________
Philco Mic2+
The frequency response of the original Philco Mic2 program was enhanced to be fuller. The harmonics were taken directly from the original program and are exactly the same (the graphs shown here look different, but that's due to different input levels). All + programs, except for Admiral Mic2+, have exactly the same harmonic content as the original effect they are based off of.Source: Philco Mic2 samples were enhanced.__________________________________________________________________________________Chain: D/A > Philco, direct in > XM8500 mic > VTB1 > A/D > enhanced.
Philco Mic3
The ADM-6 was used again, but this time with the VTB1. The signal was also injected into the radio at a different point than with the others.Chain: D/A > Philco, direct in > Akai ADM-6 mic > VTB1 > A/D.
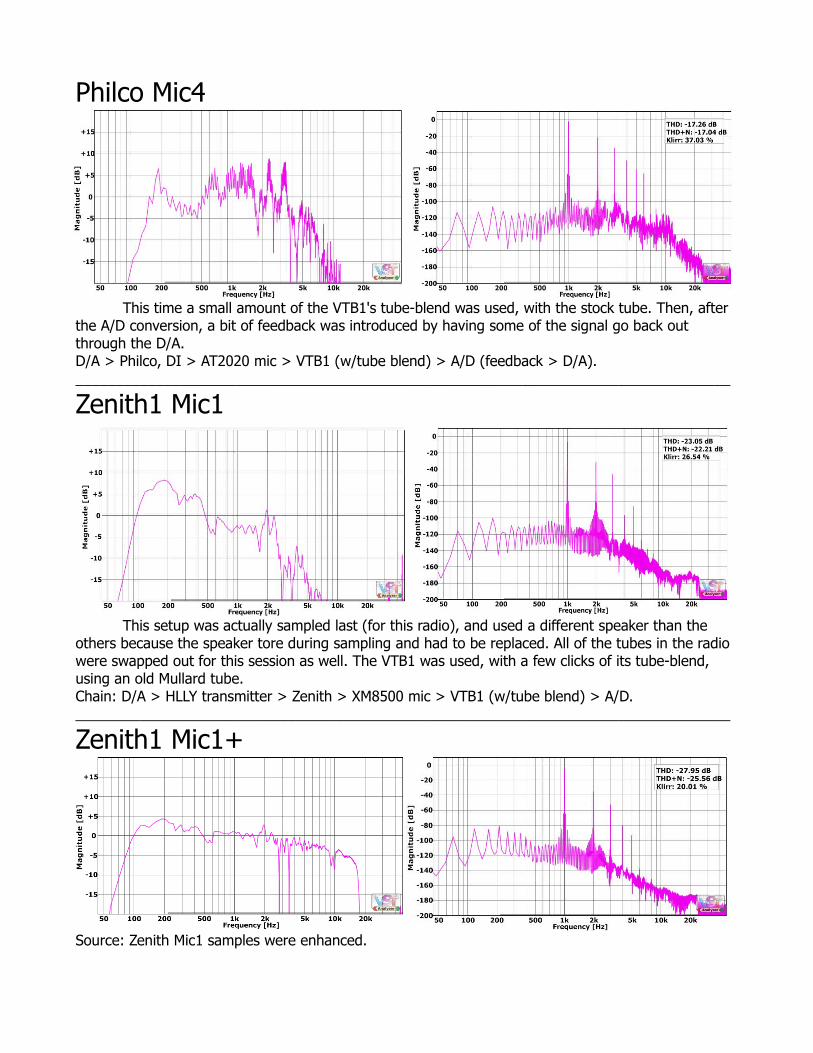
Philco Mic4
This time a small amount of the VTB1's tube-blend was used, with the stock tube. Then, after the A/D conversion, a bit of feedback was introduced by having some of the signal go back out through the D/A.D/A > Philco, DI > AT2020 mic > VTB1 (w/tube blend) > A/D (feedback > D/A).__________________________________________________________________________________
Zenith1 Mic1
This setup was actually sampled last (for this radio), and used a different speaker than the others because the speaker tore during sampling and had to be replaced. All of the tubes in the radio were swapped out for this session as well. The VTB1 was used, with a few clicks of its tube-blend, using an old Mullard tube.Chain: D/A > HLLY transmitter > Zenith > XM8500 mic > VTB1 (w/tube blend) > A/D.__________________________________________________________________________________
Zenith1 Mic1+
Source: Zenith Mic1 samples were enhanced.

Zenith1 Mic2
This one used the original speaker and tube set of the Zenith radio.Chain: D/A > EDM transmitter > Zenith > AT2020 mic > VTB1 > A/D.__________________________________________________________________________________
Zenith1 Mic3
Chain: D/A > EDM trans > Zenith > Akai ADM-6 mic > VTB1 > A/D.__________________________________________________________________________________
Stereo Mic1
Here, Zen1 Mic1 was used on the left side, and Zen1 Mic3 for the right.

Stereo Mic2
Heathkit Mic1 for left, Heathkit Mic3 for right.__________________________________________________________________________________
Stereo Mic3
Arvin Mic2 left, Philco Mic4 right.__________________________________________________________________________________
Stereo Mic4
Admiral Mic2 left, Bell Mic5 right.__________________________________________________________________________________
Stereo Mic5+
Arvin Mic3+ left, Zen1 Mic1+ right.
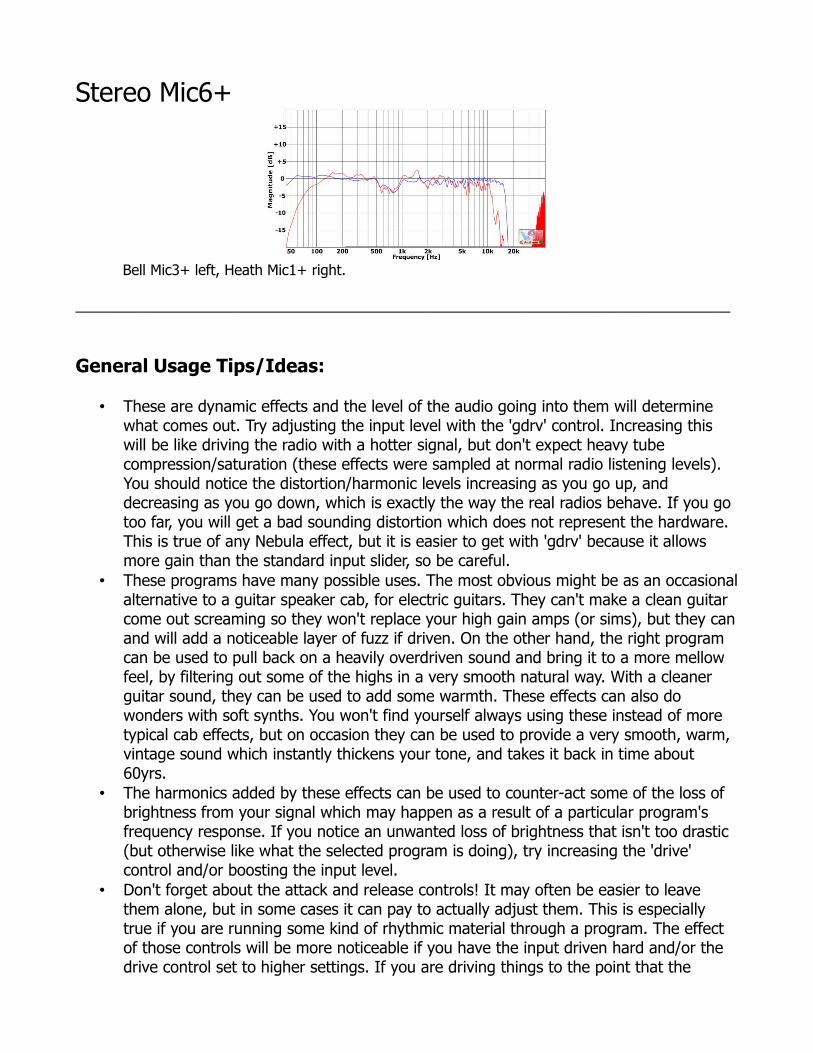
Stereo Mic6+
Bell Mic3+ left, Heath Mic1+ right.
__________________________________________________________________________________
General Usage Tips/Ideas:
• These are dynamic effects and the level of the audio going into them will determine what comes out. Try adjusting the input level with the 'gdrv' control. Increasing this will be like driving the radio with a hotter signal, but don't expect heavy tube compression/saturation (these effects were sampled at normal radio listening levels). You should notice the distortion/harmonic levels increasing as you go up, and decreasing as you go down, which is exactly the way the real radios behave. If you go too far, you will get a bad sounding distortion which does not represent the hardware. This is true of any Nebula effect, but it is easier to get with 'gdrv' because it allows more gain than the standard input slider, so be careful.
• These programs have many possible uses. The most obvious might be as an occasional alternative to a guitar speaker cab, for electric guitars. They can't make a clean guitar come out screaming so they won't replace your high gain amps (or sims), but they can and will add a noticeable layer of fuzz if driven. On the other hand, the right program can be used to pull back on a heavily overdriven sound and bring it to a more mellow feel, by filtering out some of the highs in a very smooth natural way. With a cleaner guitar sound, they can be used to add some warmth. These effects can also do wonders with soft synths. You won't find yourself always using these instead of more typical cab effects, but on occasion they can be used to provide a very smooth, warm, vintage sound which instantly thickens your tone, and takes it back in time about 60yrs.
• The harmonics added by these effects can be used to counter-act some of the loss of brightness from your signal which may happen as a result of a particular program's frequency response. If you notice an unwanted loss of brightness that isn't too drastic (but otherwise like what the selected program is doing), try increasing the 'drive' control and/or boosting the input level.
• Don't forget about the attack and release controls! It may often be easier to leave them alone, but in some cases it can pay to actually adjust them. This is especially true if you are running some kind of rhythmic material through a program. The effect of those controls will be more noticeable if you have the input driven hard and/or the drive control set to higher settings. If you are driving things to the point that the

effects are adding noticeable 'fuzz' to your audio, adjusting the attack and release controls should produce a noticeable change in that layer of fuzz.
• Sometimes pushing the effects beyond the 'realistic results' point can produce new, interesting results.
• The stereo programs are there as extras. You may or may not find them any more useful than the non-stereo ones, in any given situation. Obviously you shouldn't use them if you want a mono output. The phase of each channel will not match up perfectly, and this has to be accepted as part of the effect.
Programs and manual copyright 2011 Tim Wisecup
Thanks:
Giancarlo, Enrique, and everyone else who has helped further the Nebula experiment!www.acustica-audio.com