TS4: Commissioning with external Cloud Connect CCA · WITH TIGO SMART APP. Look for the Tigo SMART...
35
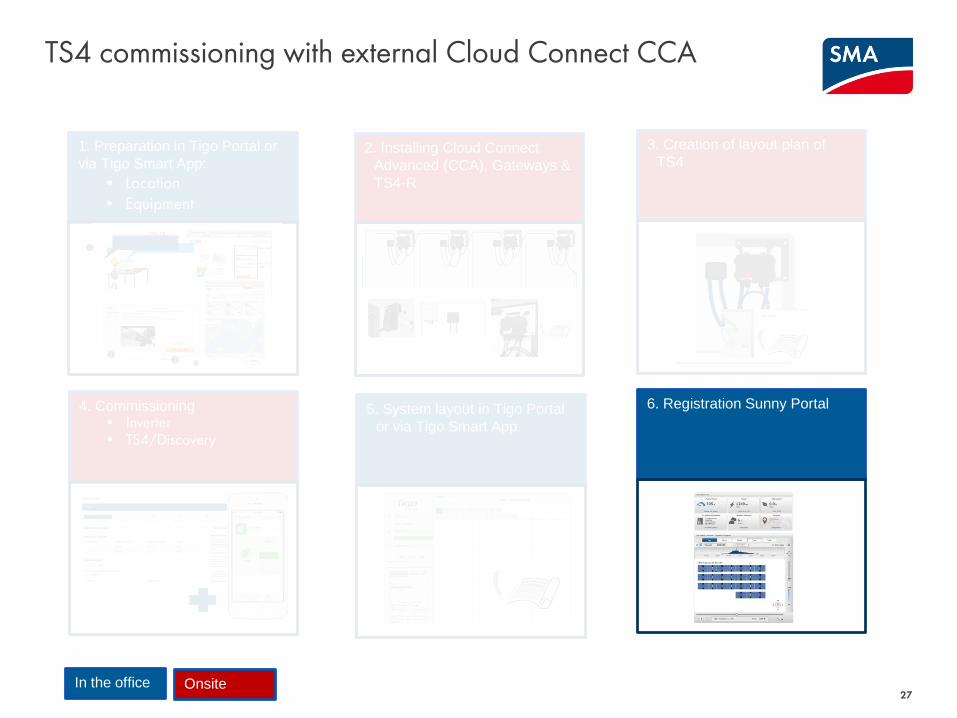
TS4 commissioning with external Cloud Connect CCA
Transcript of TS4: Commissioning with external Cloud Connect CCA · WITH TIGO SMART APP. Look for the Tigo SMART...

TS4 commissioning with external Cloud Connect CCA
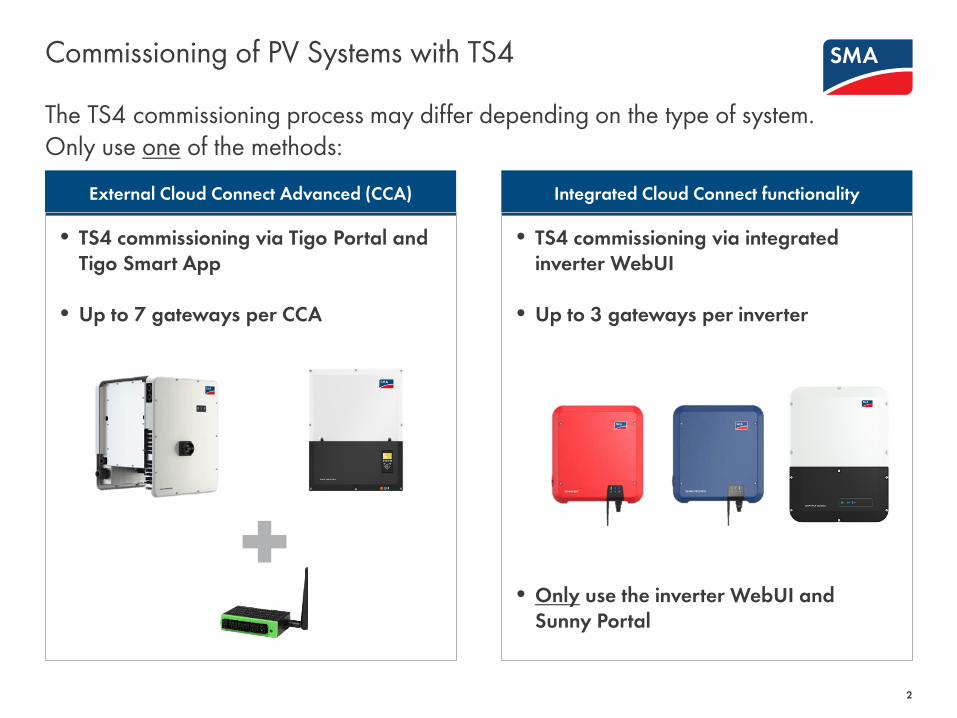
Commissioning of PV Systems with TS4
2
External Cloud Connect Advanced (CCA) Integrated Cloud Connect functionality
• TS4 commissioning via Tigo Portal and Tigo Smart App
• Up to 7 gateways per CCA
• TS4 commissioning via integrated inverter WebUI
• Up to 3 gateways per inverter
• Only use the inverter WebUI and Sunny Portal
The TS4 commissioning process may differ depending on the type of system. Only use one of the methods:
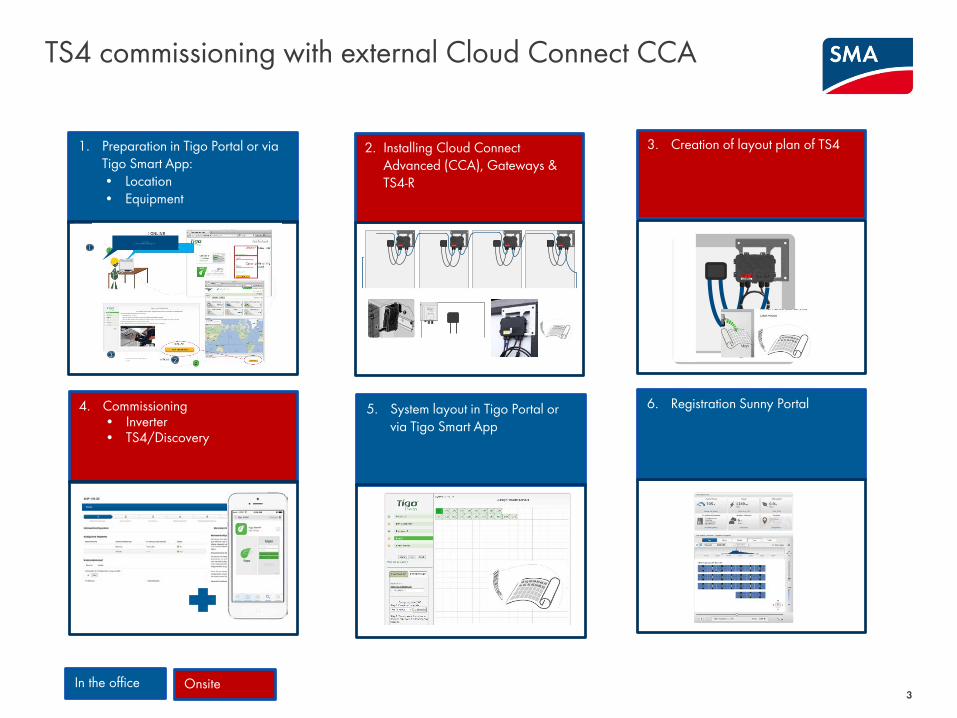
TS4 commissioning with external Cloud Connect CCA
3
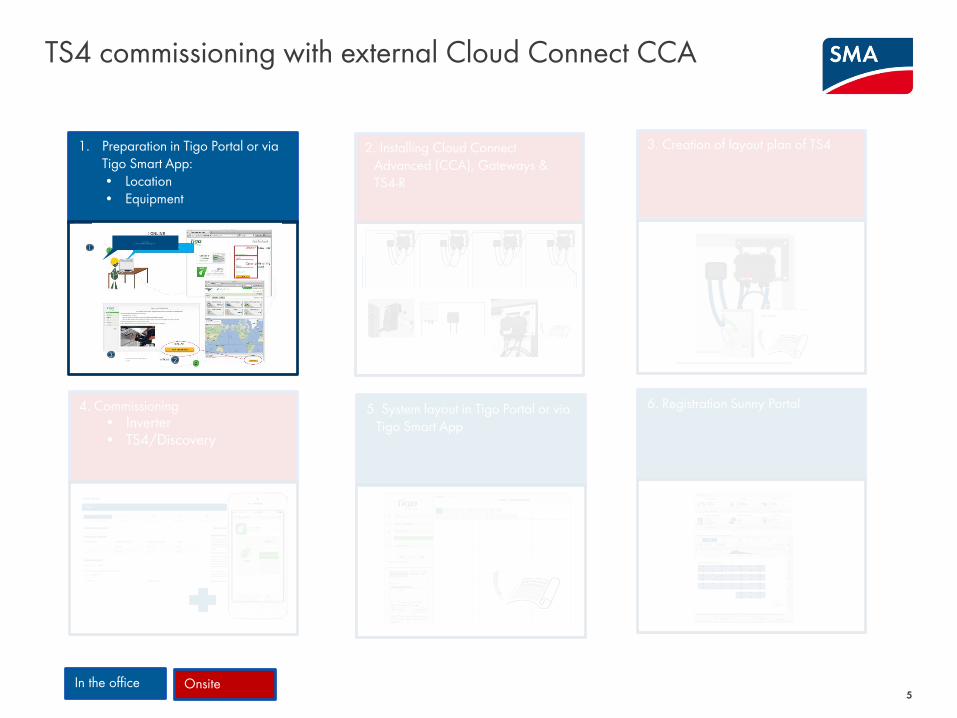
1. Preparation in Tigo Portal or via Tigo Smart App:• Location• Equipment
Fol l ow t he i nst ructions of the i nstall ation
assi st ant
C
lic
k o
n
CLI CK HEREht t p: //i nstal lations. tigoenergy.com/
32
1
2. Installing Cloud Connect Advanced (CCA), Gateways & TS4-R
3. Creation of layout plan of TS4
5. System layout in Tigo Portal or via Tigo Smart App
4. Commissioning• Inverter• TS4/Discovery
6. Registration Sunny Portal
In the office Onsite
Internet
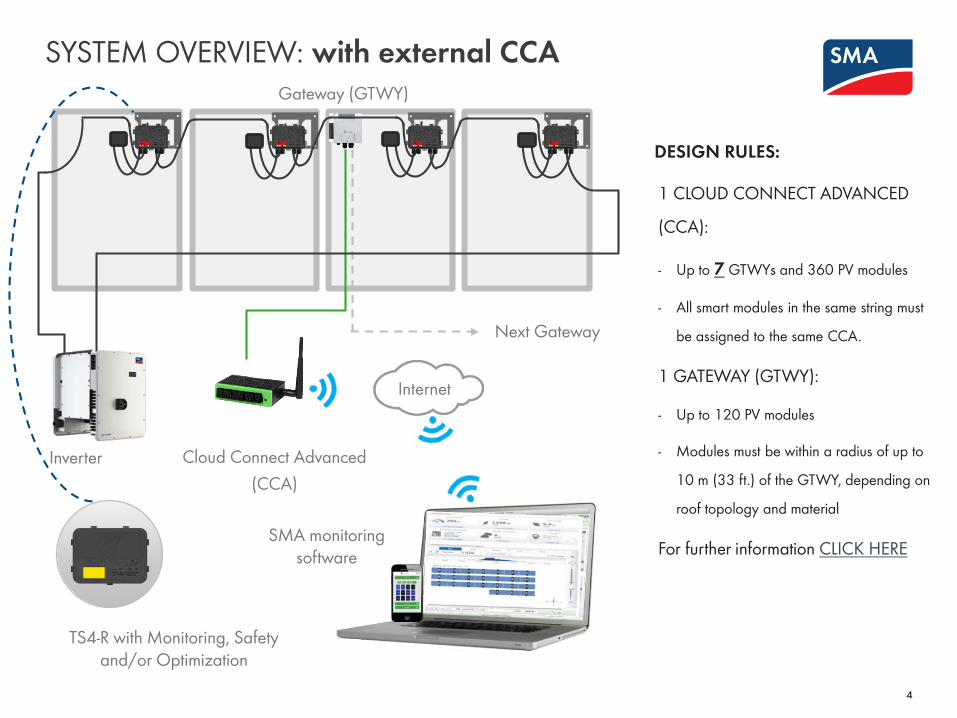
SYSTEM OVERVIEW: with external CCA
1 CLOUD CONNECT ADVANCED
(CCA):
- Up to 7 GTWYs and 360 PV modules
- All smart modules in the same string must
be assigned to the same CCA.
1 GATEWAY (GTWY):
- Up to 120 PV modules
- Modules must be within a radius of up to
10 m (33 ft.) of the GTWY, depending on
roof topology and material
For further information CLICK HERE
DESIGN RULES:
Inverter
TS4-R with Monitoring, Safety and/or Optimization
SMA monitoring software
Gateway (GTWY)
Next Gateway
Cloud Connect Advanced(CCA)
4
TS4 commissioning with external Cloud Connect CCA
5
1. Preparation in Tigo Portal or via Tigo Smart App:• Location• Equipment
Fol l ow t he i nst ructions of the i nstall ation
assi st ant
C
lic
k o
n
CLI CK HEREht t p: //i nstal lations. tigoenergy.com/
32
1
2. Installing Cloud Connect Advanced (CCA), Gateways & TS4-R
3. Creation of layout plan of TS4
5. System layout in Tigo Portal or via Tigo Smart App
4. Commissioning• Inverter• TS4/Discovery
6. Registration Sunny Portal
In the office Onsite

Follow the instructions of the installation assistant.
Click on
CLICK HEREhttp://installations.tigoenergy.com/
32
1
CONFIGURE SYSTEM ONLINE *1
• Go to www.Tigoenergy.com.
• Create Installer account (if necessary).
• To begin online configuration process, enter installation details, such as location and equipment type.*2
• For large sites, create a system map and use it for organized barcode collection process
• Sites with 50 panels or less do not require a map in case physical position isn't mandatory
6
*1 Only for systems with external CCA. In case of inverters with integrated Cloud Connect functionality, the system is configured using the commissioning assistant of the inverter.
*2 For smart module systems with less than 50 panels, this step can be done after the physical installation via the Tigo APP.
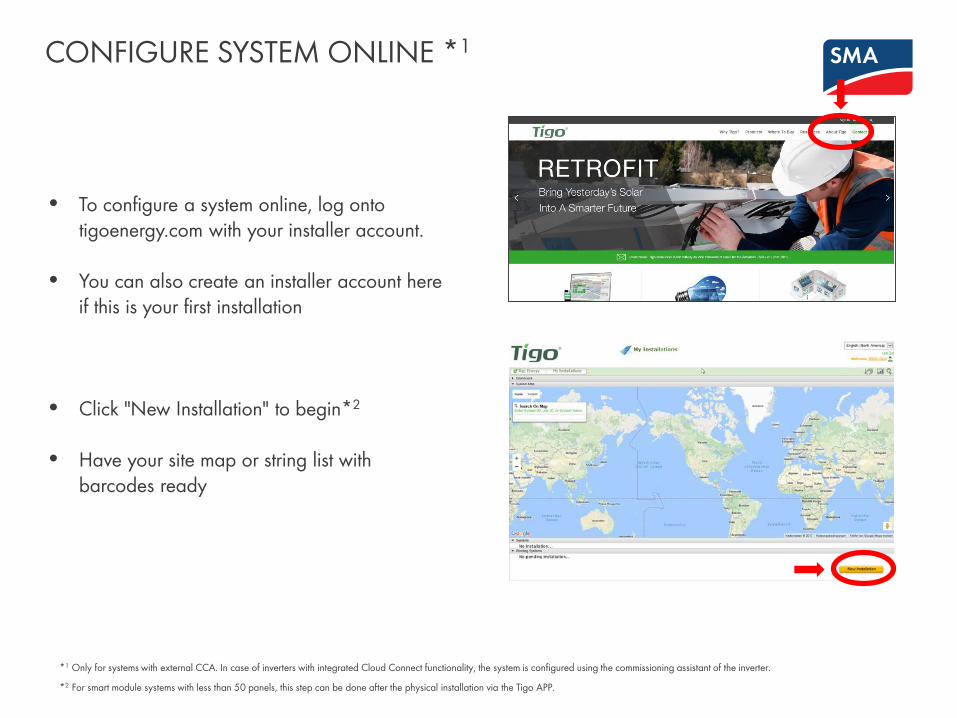
CONFIGURE SYSTEM ONLINE *1
7
• To configure a system online, log onto tigoenergy.com with your installer account.
• You can also create an installer account here if this is your first installation
• Click "New Installation" to begin*2
• Have your site map or string list with barcodes ready
*1 Only for systems with external CCA. In case of inverters with integrated Cloud Connect functionality, the system is configured using the commissioning assistant of the inverter.
*2 For smart module systems with less than 50 panels, this step can be done after the physical installation via the Tigo APP.
CONFIGURE SYSTEM ONLINE *1
8
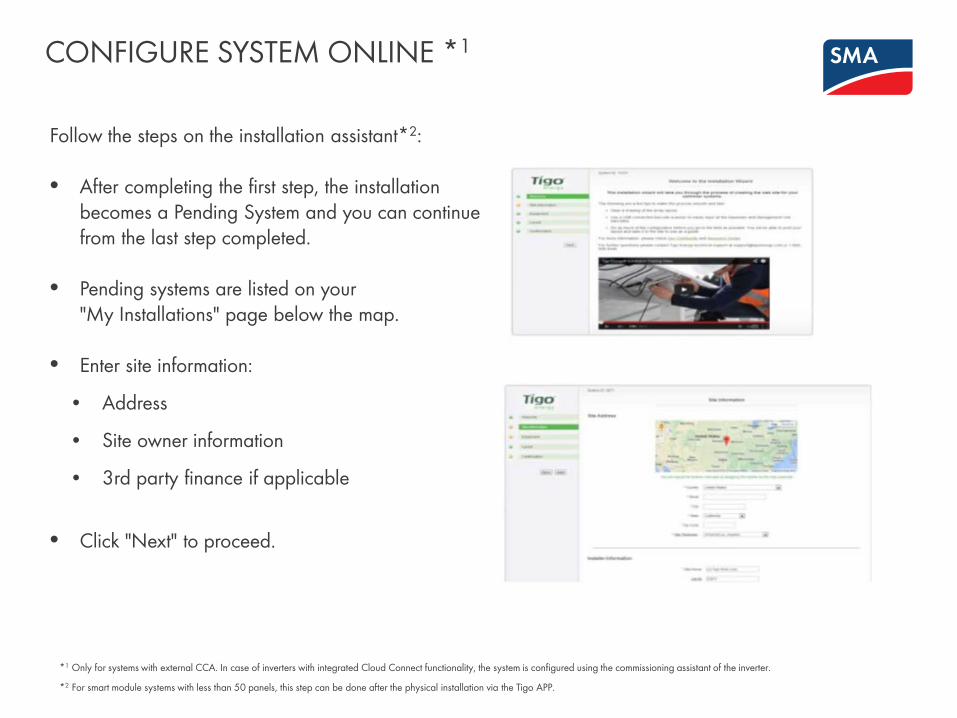
Follow the steps on the installation assistant*2:
• After completing the first step, the installation becomes a Pending System and you can continue from the last step completed.
• Pending systems are listed on your "My Installations" page below the map.
• Enter site information:
• Address
• Site owner information
• 3rd party finance if applicable
• Click "Next" to proceed.
*1 Only for systems with external CCA. In case of inverters with integrated Cloud Connect functionality, the system is configured using the commissioning assistant of the inverter.
*2 For smart module systems with less than 50 panels, this step can be done after the physical installation via the Tigo APP.

COMMISSIONING *1 WITH TIGO SMART APP
Look for the Tigo SMART APP
• Go to the App Store or Google Play and search for "Tigo SMART"
• Download the app and open it once the installation process is complete
9
As an alternative, the setup and commissioning of a new PV system can be carried out via the Tigo SMART app.
*1 Only for systems with external CCA. In case of inverters with integrated Cloud Connect functionality, the system is configured using the commissioning assistant of the inverter.

COMMISSIONING *1 WITH TIGO SMART APP
• Login by entering your user name and password.
• If you have not signed up yet, press "Enroll" to create a new account.
• To create a new system, press "+" in the right top corner of your screen.
• To edit and monitor an already configured system, click on the respective system.
10
Requires active mobile data connection
*1 Only for systems with external CCA. In case of inverters with integrated Cloud Connect functionality, the system is configured using the commissioning assistant of the inverter.

COMMISSIONING *1 WITH TIGO SMART APP
• Enter system details and select "Create System".
• Ensure that "Site Info" is checked.
• When you open the "Site Info" once more, you will see that now the system has a "system id".
Note: The "system id" clearly identifies the system and must be mentioned in case of support requests.
Note: Now the new system is in Pending state.
• Go to "Site Owner Info".
11
Requires active mobile data connection
*1 Only for systems with external CCA. In case of inverters with integrated Cloud Connect functionality, the system is configured using the commissioning assistant of the inverter.
6. COMMISSIONING *1 WITH TIGO SMART APP
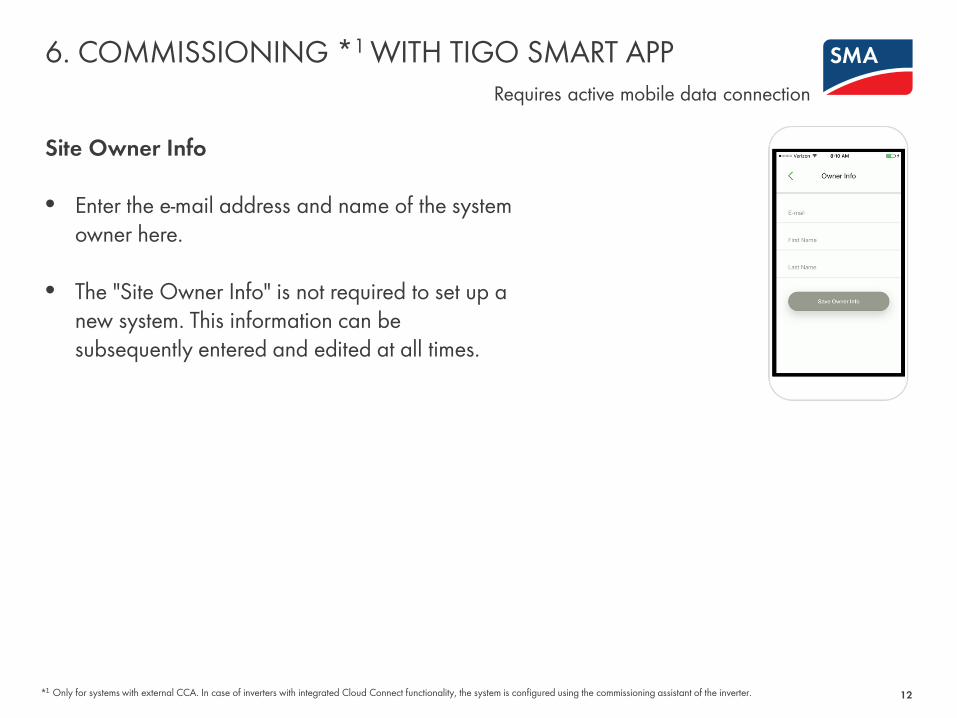
Site Owner Info
• Enter the e-mail address and name of the system owner here.
• The "Site Owner Info" is not required to set up a new system. This information can be subsequently entered and edited at all times.
12
Requires active mobile data connection
*1 Only for systems with external CCA. In case of inverters with integrated Cloud Connect functionality, the system is configured using the commissioning assistant of the inverter.

COMMISSIONING *1 WITH TIGO SMART APP
Select Equipment
• After saving the "Site Owner Info", ensure that it is checked.
• Go to "Select Equipment".
• Press "+" in the right top corner of your screen.
• Select "Cloud Connect Advanced" (CCA).
• Give each CCA an unique name or leave the default value.
• Enter number of Gateways connected to the CCA.
13
Requires active mobile data connection
*1 Only for systems with external CCA. In case of inverters with integrated Cloud Connect functionality, the system is configured using the commissioning assistant of the inverter.
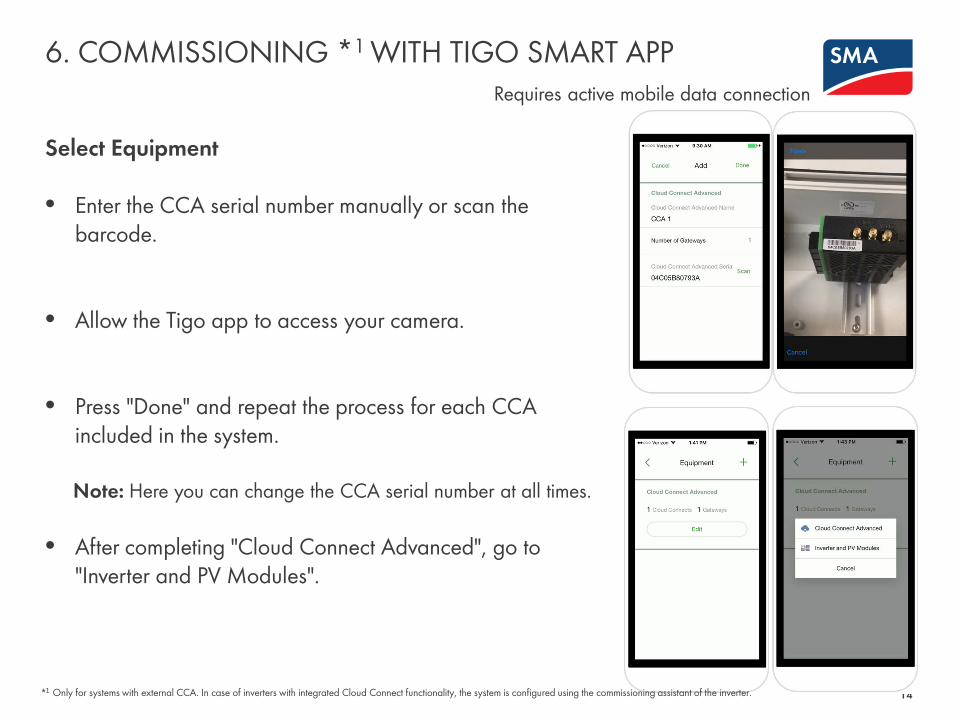
6. COMMISSIONING *1 WITH TIGO SMART APP
Select Equipment
• Enter the CCA serial number manually or scan the barcode.
• Allow the Tigo app to access your camera.
• Press "Done" and repeat the process for each CCA included in the system.
Note: Here you can change the CCA serial number at all times.
• After completing "Cloud Connect Advanced", go to "Inverter and PV Modules".
14
Requires active mobile data connection
*1 Only for systems with external CCA. In case of inverters with integrated Cloud Connect functionality, the system is configured using the commissioning assistant of the inverter.
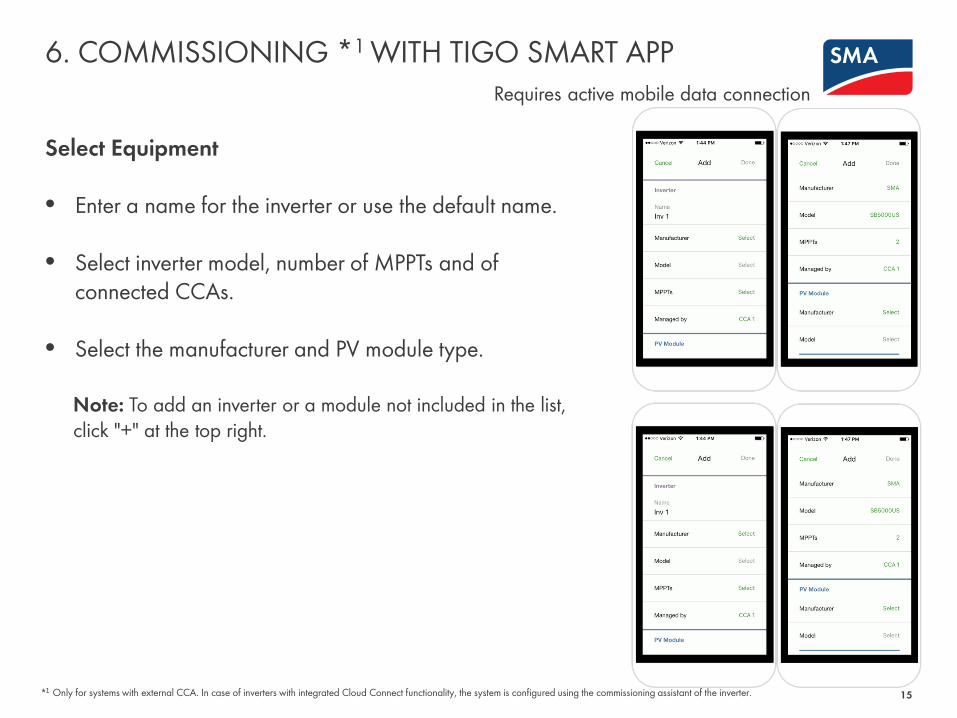
6. COMMISSIONING *1 WITH TIGO SMART APP
Select Equipment
• Enter a name for the inverter or use the default name.
• Select inverter model, number of MPPTs and of connected CCAs.
• Select the manufacturer and PV module type.
Note: To add an inverter or a module not included in the list, click "+" at the top right.
15
Requires active mobile data connection
*1 Only for systems with external CCA. In case of inverters with integrated Cloud Connect functionality, the system is configured using the commissioning assistant of the inverter.
6. COMMISSIONING *1 WITH TIGO SMART APP
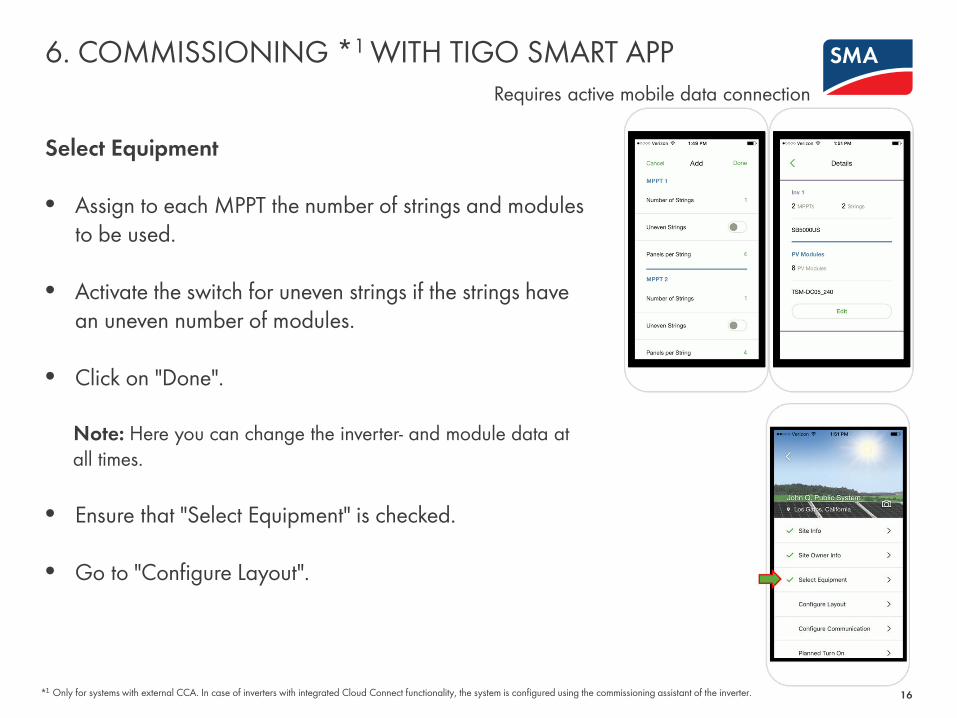
Select Equipment
• Assign to each MPPT the number of strings and modules to be used.
• Activate the switch for uneven strings if the strings have an uneven number of modules.
• Click on "Done".
Note: Here you can change the inverter- and module data at all times.
• Ensure that "Select Equipment" is checked.
• Go to "Configure Layout".
16
Requires active mobile data connection
*1 Only for systems with external CCA. In case of inverters with integrated Cloud Connect functionality, the system is configured using the commissioning assistant of the inverter.

TS4 commissioning with external Cloud Connect CCA
17
1. Preparation in Tigo Portal or via Tigo Smart App:
• Location• Equipment
Fol l ow t he i nst ructions of the i nstall ation
assi st ant
C
lic
k o
n
CLI CK HEREht t p: //i nstal lations. tigoenergy.com/
32
1
2. Installing Cloud Connect Advanced (CCA), Gateways & TS4-R
3. Creation of layout plan of TS4
5. System layout in Tigo Portal or via Tigo Smart App
4. Commissioning• Inverter• TS4/Discovery
6. Registration Sunny Portal
In the office Onsite

RS485 communication cable is recommended.2 twisted pair, sunlight resistant or direct burial
Additional information:• Gateway Hardware Guide• Gateway Placement Guide• Communication Cable Guide
Locate Gateway near center of array or each sub-array
Gateway attaches to module frame using provided bracket
50 ft (15 m)
Installation:
1. Connect all GTWY cables beforepowering on Cloud Connect
2. Install GTWY on back of PV module using provided bracket or bolt to the racking system
3. Power on Cloud Connect Advanced and perform Gateway test from Tigo SMART App
Installing Gateways (GTWY)
18
Place GTWY on back of PV module or racking system
1
Run a RS485 wire from the CCA to the first GTWY
2Connect multiple Gateways in series and leave terminating
resistor only in final Gateway.
3
Installing Gateways (GTWY)
19
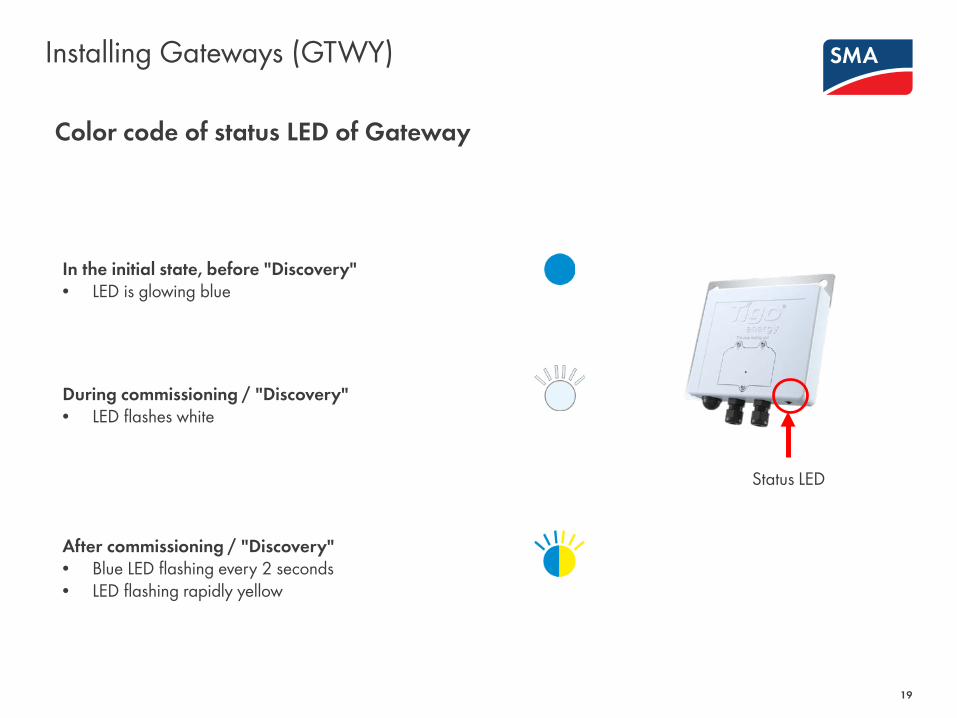
Color code of status LED of Gateway
During commissioning / "Discovery"• LED flashes white
Status LED
In the initial state, before "Discovery"• LED is glowing blue
After commissioning / "Discovery"• Blue LED flashing every 2 seconds• LED flashing rapidly yellow
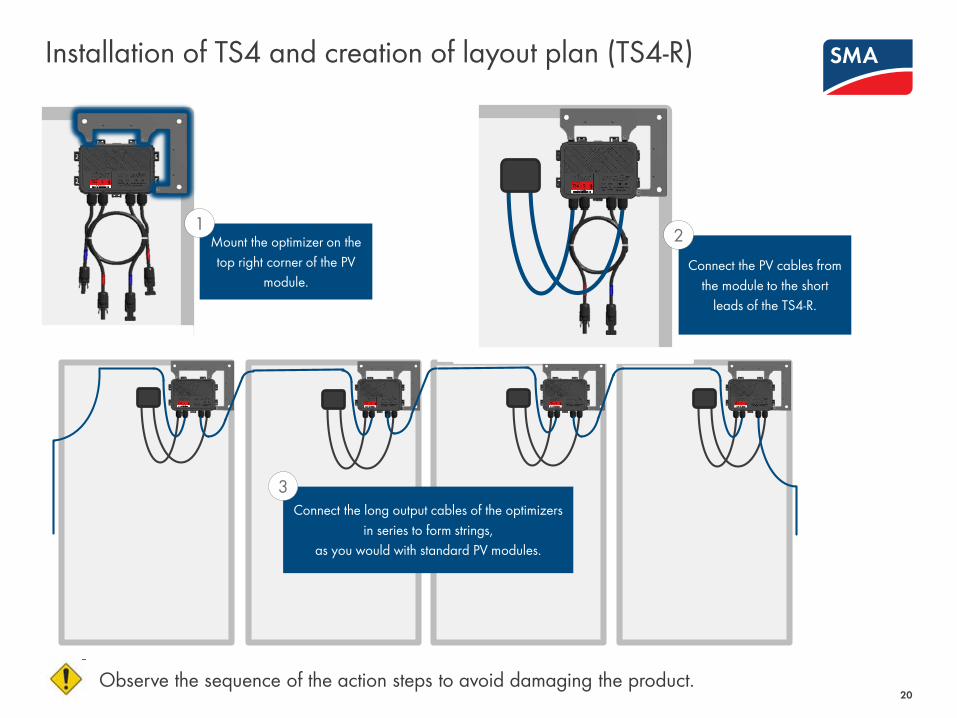
Installation of TS4 and creation of layout plan (TS4-R)
Mount the optimizer on the top right corner of the PV
module.
1
Connect the long output cables of the optimizers in series to form strings,
as you would with standard PV modules.
3
Connect the PV cables from the module to the short
leads of the TS4-R.
2
20Observe the sequence of the action steps to avoid damaging the product.

Installation of TS4 and creation of layout plan (TS4-R)
Place the sticker on the map, string list or construction drawing, in the exact position you are going to place modules in the field or on the roof.
Remove 1 barcode sticker from the TS4 junction box or add-on
Create your layout plan using Tigo's string list
template. To view and download, CLICK
HERE.
Another option is to first map your site online
(see next page). At the end, you'll be able to
download a physical map of your system to
help map the barcodes
Note:
If you're installing 50 modules or less and
don't need an exact physical position you may
skip the mapping step and go straight to
commissioning
MAKE SURE you take the junction box's label
or the TS4-R label, NOT the module's
TEMPLATES:
Place PV modules in a way matches the map you made using barcodes.
Also record the serial numbers of the GTWY(s)
1
3
21
2
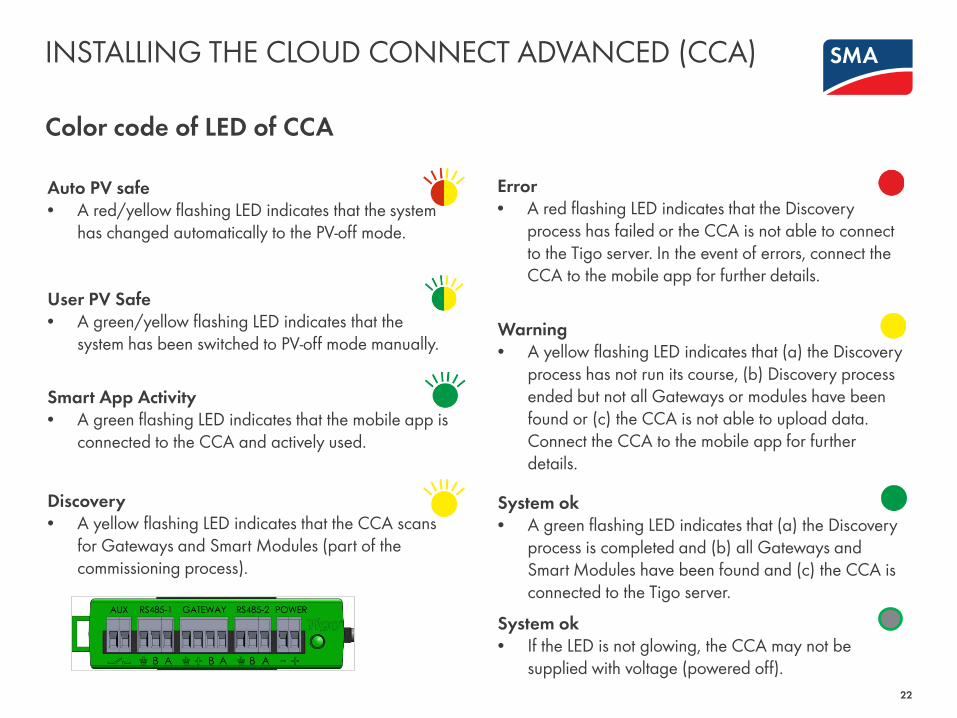
INSTALLING THE CLOUD CONNECT ADVANCED (CCA)
Color code of LED of CCA
22
System ok• If the LED is not glowing, the CCA may not be
supplied with voltage (powered off).
User PV Safe• A green/yellow flashing LED indicates that the
system has been switched to PV-off mode manually.
Smart App Activity• A green flashing LED indicates that the mobile app is
connected to the CCA and actively used.
Discovery• A yellow flashing LED indicates that the CCA scans
for Gateways and Smart Modules (part of the commissioning process).
Error• A red flashing LED indicates that the Discovery
process has failed or the CCA is not able to connect to the Tigo server. In the event of errors, connect the CCA to the mobile app for further details.
Warning• A yellow flashing LED indicates that (a) the Discovery
process has not run its course, (b) Discovery process ended but not all Gateways or modules have been found or (c) the CCA is not able to upload data. Connect the CCA to the mobile app for further details.
System ok• A green flashing LED indicates that (a) the Discovery
process is completed and (b) all Gateways and Smart Modules have been found and (c) the CCA is connected to the Tigo server.
Auto PV safe• A red/yellow flashing LED indicates that the system
has changed automatically to the PV-off mode.
Measurments during commissioning
23
All measurements can be carried out as usual during commissioning. Deviating from usual measurements, currents may only be measured via the operating-current monitoring system when using TS4 optimizers. This must be carried out during feed-in operation. Test-voltage specifications remain unaffected when using TS4 optimizers.The following test measurements must be carried out when commissioning a PV system with TS4 optimizers:
Recommended procedure:1. Carry out the following test measurements before commissioning TS4 communications:
• Check polarity.• Check open-circuit voltage of string. • Check insulation resistance of DC circuit.
2. Commission entire system.3. Carry out the following test measurements after commissioning TS4 communications:
• Check string-circuit currents (during feed-in operation). • Measure insulation resistance of module string.• Carry out function test.
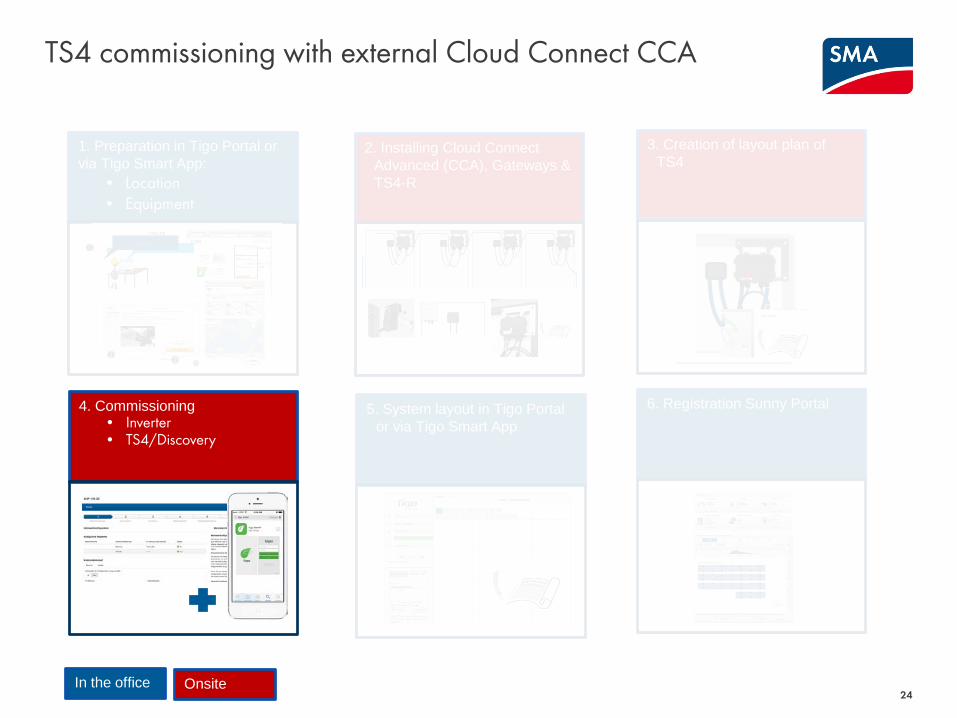
TS4 commissioning with external Cloud Connect CCA
24
1. Preparation in Tigo Portal or via Tigo Smart App:
• Location• Equipment
Fol l ow t he i nst ructions of the i nstall ation
assi st ant
C
lic
k o
n
CLI CK HEREht t p: //i nstal lations. tigoenergy.com/
32
1
2. Installing Cloud Connect Advanced (CCA), Gateways & TS4-R
3. Creation of layout plan of TS4
5. System layout in Tigo Portal or via Tigo Smart App
4. Commissioning• Inverter• TS4/Discovery
6. Registration Sunny Portal
In the office Onsite

To commission the Tigo devices, three simple steps must be completed:1. NETWORK TEST2. GATEWAY TEST3. DISCOVERY
For systems with multiple Cloud Connect Advanced units, these tests need to be performed on each individual Cloud Connect Advance . Network and Gateway tests can run at the same time on different CCAs. However, Discovery must be initiated on Cloud Connect Advanced one by one, making sure GTWY discovery stage is complete before moving to the next one.This may take several minutes to several hours depending on the size of the system.Note:The discovery process can be initiated for sites with more than 50 Smart Modules only after the online configuration of the system has been completed and downloaded by the Cloud Connect.
To Commission the system use your smartphone, download the Tigo SMART app and follow its instructions.
COMMISSIONING *1 WITH TIGO SMART APP
25
*1 Only for systems with external CCA. In case of inverters with integrated Cloud Connect functionality, the system is configured using the commissioning assistant of the inverter.
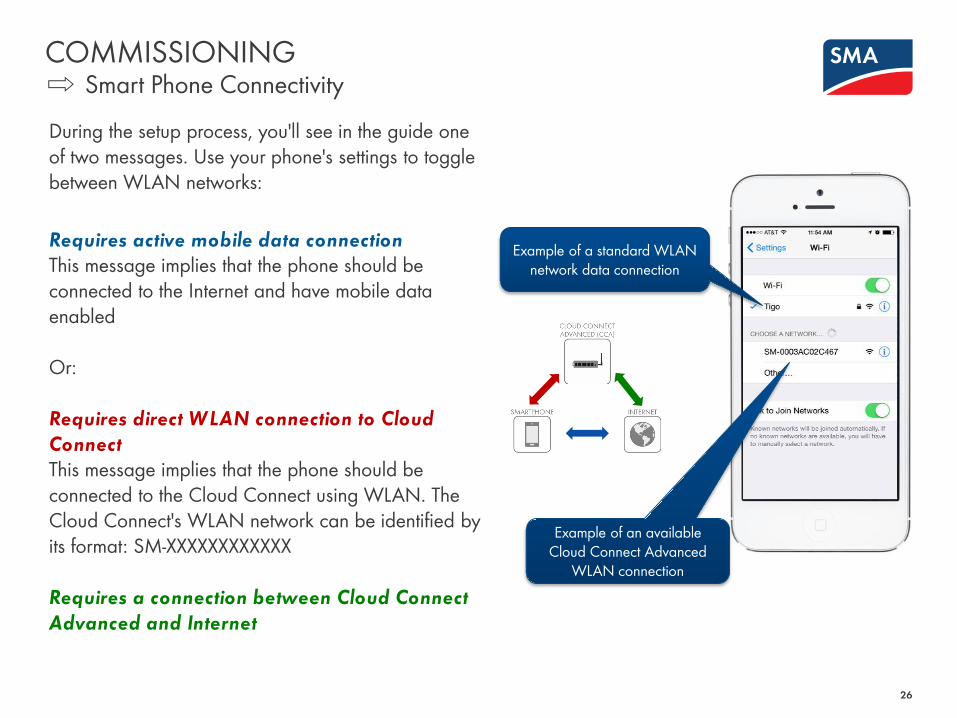
COMMISSIONING ⇨ Smart Phone Connectivity
During the setup process, you'll see in the guide one of two messages. Use your phone's settings to toggle between WLAN networks:
Requires active mobile data connectionThis message implies that the phone should be connected to the Internet and have mobile data enabled
Or:
Requires direct WLAN connection to Cloud ConnectThis message implies that the phone should be connected to the Cloud Connect using WLAN. The Cloud Connect's WLAN network can be identified by its format: SM-XXXXXXXXXXXX
Requires a connection between Cloud Connect Advanced and Internet
Example of a standard WLAN network data connection
Example of an available Cloud Connect Advanced
WLAN connection
26
TS4 commissioning with external Cloud Connect CCA
27
1. Preparation in Tigo Portal or via Tigo Smart App:
• Location• Equipment
Fol l ow t he i nst ructions of the i nstall ation
assi st ant
C
lic
k o
n
CLI CK HEREht t p: //i nstal lations. tigoenergy.com/
32
1
2. Installing Cloud Connect Advanced (CCA), Gateways & TS4-R
3. Creation of layout plan of TS4
5. System layout in Tigo Portal or via Tigo Smart App
4. Commissioning• Inverter• TS4/Discovery
6. Registration Sunny Portal
In the office Onsite
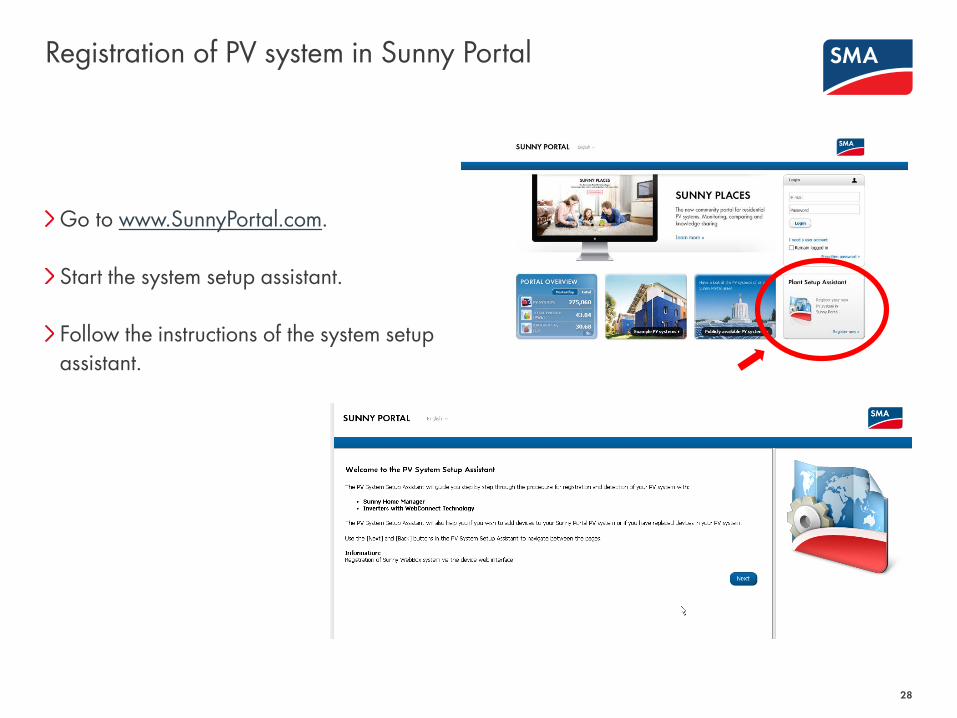
Registration of PV system in Sunny Portal
28
Go to www.SunnyPortal.com.
Start the system setup assistant.
Follow the instructions of the system setup assistant.

Registration of PV system in Sunny Portal
29
Plant Setup Assistant
• Login / User Registration• Enter PV System name and Speedwire
Installer password

Registration of PV system in Sunny Portal
30
Plant Setup Assistant
• Enter inverters PIC & RID• Repeat the process using systems with
multiple inverters.
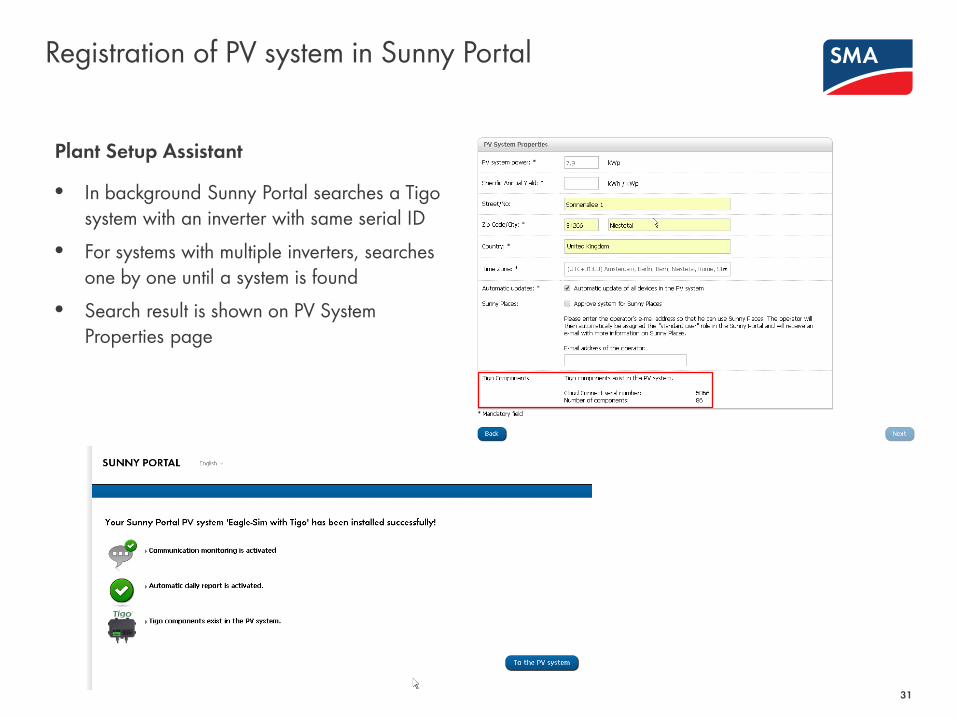
Registration of PV system in Sunny Portal
31
Plant Setup Assistant
• In background Sunny Portal searches a Tigo system with an inverter with same serial ID
• For systems with multiple inverters, searches one by one until a system is found
• Search result is shown on PV System Properties page
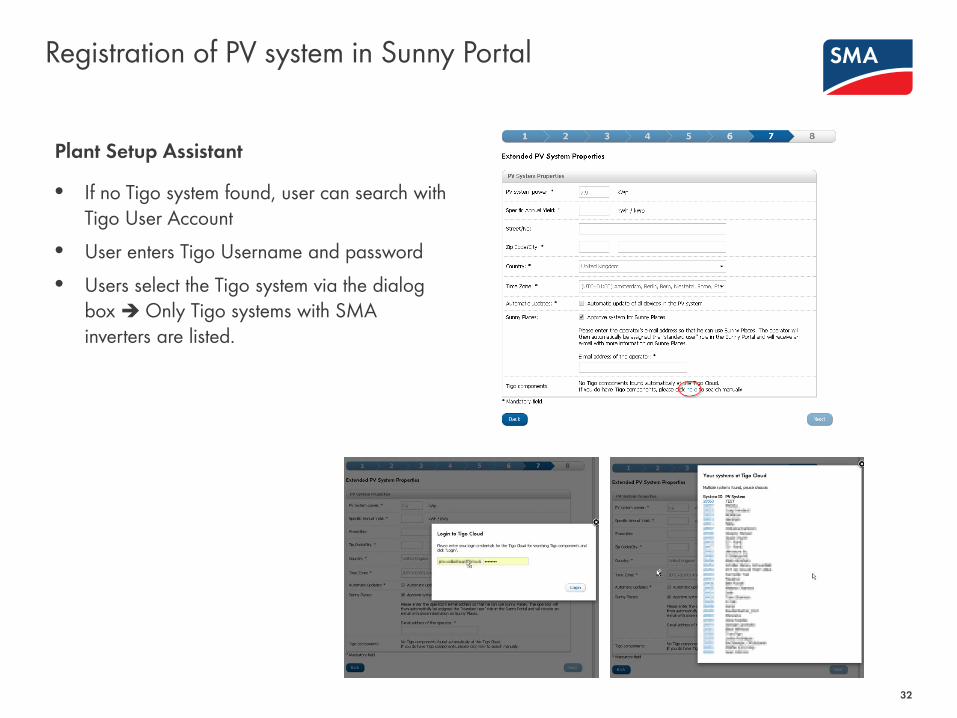
Registration of PV system in Sunny Portal
32
Plant Setup Assistant
• If no Tigo system found, user can search with Tigo User Account
• User enters Tigo Username and password• Users select the Tigo system via the dialog
box Only Tigo systems with SMA inverters are listed.

Registration of PV system in Sunny Portal
33
System properties
• Tigo commissioning in already existing PV systems is available on page „PV System propetires“, tab „parameters“
• Searches first for Tigo systems with same inverter serial numbers (as with the system setup assistant).
• If no system has been found, the search with Tigo user credentials is possible (as with the system setup assistant).

Registration of PV system in Sunny Portal
34
Panel Level Monitoring
• On page „PV System Overview“, the PLM (Panel Level Monitoring) view is shown below the widgets
• Layout is currently copied from Tigo Cloud. • Copying data from Tigo cloud is frequently
copied. May take up to 30 minutes until data is initially shown

SOCIAL MEDIAwww.SMA.de/Newsroom