Trusted Solaris Administration...
99
Trusted Solaris Administration Overview Sun Microsystems, Inc. 901 San Antonio Road Palo Alto, CA 94303-4900 U.S.A. Part Number 805-8119–10 December 2000
Transcript of Trusted Solaris Administration...

Trusted Solaris AdministrationOverview
Sun Microsystems, Inc.901 San Antonio RoadPalo Alto, CA 94303-4900U.S.A.
Part Number 805-8119–10December 2000

Copyright 2000 Sun Microsystems, Inc. 901 San Antonio Road, Palo Alto, California 94303-4900 U.S.A. All rights reserved.This product or document is protected by copyright and distributed under licenses restricting its use, copying, distribution, anddecompilation. No part of this product or document may be reproduced in any form by any means without prior written authorization ofSun and its licensors, if any. Third-party software, including font technology, is copyrighted and licensed from Sun suppliers.Parts of the product may be derived from Berkeley BSD systems, licensed from the University of California. UNIX is a registeredtrademark in the U.S. and other countries, exclusively licensed through X/Open Company, Ltd.Sun, Sun Microsystems, the Sun logo, docs.sun.com, AnswerBook, AnswerBook2, Trusted Solaris, and Solaris are trademarks, registeredtrademarks, or service marks of Sun Microsystems, Inc. in the U.S. and other countries. All SPARC trademarks are used under license andare trademarks or registered trademarks of SPARC International, Inc. in the U.S. and other countries. Products bearing SPARC trademarksare based upon an architecture developed by Sun Microsystems, Inc.The OPEN LOOK and SunTM Graphical User Interface was developed by Sun Microsystems, Inc. for its users and licensees. Sunacknowledges the pioneering efforts of Xerox in researching and developing the concept of visual or graphical user interfaces for thecomputer industry. Sun holds a non-exclusive license from Xerox to the Xerox Graphical User Interface, which license also covers Sun’slicensees who implement OPEN LOOK GUIs and otherwise comply with Sun’s written license agreements.Federal Acquisitions: Commercial Software – Government Users Subject to Standard License Terms and ConditionsDOCUMENTATION IS PROVIDED “AS IS” AND ALL EXPRESS OR IMPLIED CONDITIONS, REPRESENTATIONS AND WARRANTIES,INCLUDING ANY IMPLIED WARRANTY OF MERCHANTABILITY, FITNESS FOR A PARTICULAR PURPOSE ORNON-INFRINGEMENT, ARE DISCLAIMED, EXCEPT TO THE EXTENT THAT SUCH DISCLAIMERS ARE HELD TO BE LEGALLYINVALID.
Copyright 2000 Sun Microsystems, Inc. 901 San Antonio Road, Palo Alto, Californie 94303-4900 Etats-Unis. Tous droits réservés.
Ce produit ou document est protégé par un copyright et distribué avec des licences qui en restreignent l’utilisation, la copie, ladistribution, et la décompilation. Aucune partie de ce produit ou document ne peut être reproduite sous aucune forme, par quelquemoyen que ce soit, sans l’autorisation préalable et écrite de Sun et de ses bailleurs de licence, s’il y en a. Le logiciel détenu par des tiers, etqui comprend la technologie relative aux polices de caractères, est protégé par un copyright et licencié par des fournisseurs de Sun.Des parties de ce produit pourront être dérivées du système Berkeley BSD licenciés par l’Université de Californie. UNIX est une marquedéposée aux Etats-Unis et dans d’autres pays et licenciée exclusivement par X/Open Company, Ltd.Sun, Sun Microsystems, le logo Sun, docs.sun.com, AnswerBook, AnswerBook2, et Solaris sont des marques de fabrique ou des marquesdéposées, ou marques de service, de Sun Microsystems, Inc. aux Etats-Unis et dans d’autres pays. Toutes les marques SPARC sont utiliséessous licence et sont des marques de fabrique ou des marques déposées de SPARC International, Inc. aux Etats-Unis et dans d’autres pays.Les produits portant les marques SPARC sont basés sur une architecture développée par Sun Microsystems, Inc.L’interface d’utilisation graphique OPEN LOOK et SunTM a été développée par Sun Microsystems, Inc. pour ses utilisateurs et licenciés.Sun reconnaı̂t les efforts de pionniers de Xerox pour la recherche et le développement du concept des interfaces d’utilisation visuelle ougraphique pour l’industrie de l’informatique. Sun détient une licence non exclusive de Xerox sur l’interface d’utilisation graphique Xerox,cette licence couvrant également les licenciés de Sun qui mettent en place l’interface d’utilisation graphique OPEN LOOK et qui en outrese conforment aux licences écrites de Sun.CETTE PUBLICATION EST FOURNIE “EN L’ETAT” ET AUCUNE GARANTIE, EXPRESSE OU IMPLICITE, N’EST ACCORDEE, YCOMPRIS DES GARANTIES CONCERNANT LA VALEUR MARCHANDE, L’APTITUDE DE LA PUBLICATION A REPONDRE A UNEUTILISATION PARTICULIERE, OU LE FAIT QU’ELLE NE SOIT PAS CONTREFAISANTE DE PRODUIT DE TIERS. CE DENI DEGARANTIE NE S’APPLIQUERAIT PAS, DANS LA MESURE OU IL SERAIT TENU JURIDIQUEMENT NUL ET NON AVENU.
PleaseRecycle

Contents
Preface 11
1. Introduction to Administration 15
Basic Concepts Review 15
How the Trusted Solaris Environment Protects Against Intruders 16
How the Trusted Solaris Environment Enforces Access ControlPolicy 16
How the Trusted Solaris Environment Implements Administration 17
Understanding Trusted Software Administration 17
Overview of Trusted Software Administration 17
Understanding Roles 20
Understanding Rights Profiles 21
Understanding Authorizations 25
Understanding Privileges 29
Understanding Labels 31
Dominance Relationships Between Labels 32
Label Encodings Files 33
Label Ranges 33
How Labeled Files are Stored 35
Applying Labels to Email 37
3

Applying Labels to Printed Output 38
How the Trusted Solaris Environment Controls Device Access 39
Device Allocation 40
Device Label Ranges 40
Administering Devices through the Device Allocation Manager 41
2. Quick Tour of the Admin Tools 47
Introduction to Trusted Solaris Administration 47
Accessing Tools in a Role Workspace 47
Remote Administration 48
Solaris Management Console Tools 48
Trusted CDE Actions 53
Administering Users 56
Default User Attributes 56
User Attribute Databases 57
Managing Users from the Command Line 59
Managing Users through the SMC 59
Administering Hosts and Networks 64
Security Families Tool Set 66
Administering Other Aspects of the Trusted Solaris Environment 68
File Management Commands 68
File System Management Commands 68
Mount Management 68
Process Commands 69
3. Administering Trusted Networking 71
Overview of Trusted Solaris Networking 71
Homogeneous Networks 72
Heterogeneous Networks 72
Trusted Solaris Data Packets 73
4 Trusted Solaris Administration Overview ♦ December 2000
Security Families 74
Related Subsystems 78
Routing in Trusted Solaris 78
Loading Routing Information at Boot Time 78
Routing Tables in the Trusted Solaris Environment 78
Accreditation Checking 79
Routing Example 81
Using Routing Commands 81
Routing through Non-Trusted Solaris Gateway Clusters 82
Trusted Solaris Network Commands 83
Troubleshooting Networks 84
Overview of Trusted NFS Mounting 85
Specifying Security Attributes for Mounting 86
4. Administering Auditing 87
Planning and Setting Up Auditing 87
Audit Classes 87
Public Objects 88
Audit Information Storage 88
Audit Configuration Files 89
Auditing Tools 89
audit and auditd 89
auditconfig 90
audit_startup 90
audit_warn 90
praudit 90
auditreduce 91
auditstat 91
Index 93
Contents 5

6 Trusted Solaris Administration Overview ♦ December 2000

Tables
TABLE P–1 Typographic Conventions 12
TABLE 1–1 Roles and their Responsibilities 20
TABLE 1–2 Rights Profile Descriptions 22
TABLE 1–3 Authorizations 26
TABLE 1–4 Privilege Categories 30
TABLE 1–5 Examples of Label Relationships 32
TABLE 1–6 Adornment—Related Commands 36
TABLE 2–1 Administrative Actions, Purposes, and Default Roles 53
TABLE 2–2 User Properties Summary 61
TABLE 2–3 Rights Manager Dialog Box Summary 63
TABLE 2–4 Template Dialog Box Summary 67
TABLE 3–1 Security Attributes by Host Type 76
TABLE 3–2 tnrhdb Fallback Mechanisms Example 77
7

8 Trusted Solaris Administration Overview ♦ December 2000
Figures
Figure 1–1 Security Element Assignment in the Trusted Solaris Environment 19
Figure 1–2 Assigning Rights Profiles to Users 22
Figure 1–3 Rights Dialog Box 25
Figure 1–4 Normal Viewing of a Directory 37
Figure 1–5 Viewing the Contents of Multiple SLDs 37
Figure 1–6 Typical Print Banner Page 39
Figure 1–7 Device Allocation Administration Dialog Boxes 41
Figure 1–8 Device Administration Dialog Box 42
Figure 1–9 Device Allocation Configuration Dialog Box 43
Figure 1–10 Device Allocation Authorizations Dialog Box 44
Figure 2–1 Typical Trusted Solaris SMC 49
Figure 2–2 Simple SMC Tool Example 51
Figure 2–3 Tabbed SMC Tool Example 52
Figure 2–4 SMC Wizard Example 53
Figure 2–5 User Database Relationships 58
Figure 2–6 SMC User Tool Collection 59
Figure 2–7 User Properties Dialog Box 61
Figure 2–8 Rights Properties Dialog Box 63
Figure 2–9 Computers and Networks Tool Collection 65
9

Figure 2–10 Computer Properties Dialog Box 66
Figure 2–11 Modify Template Dialog Box 67
Figure 3–1 Homogeneous Network 72
Figure 3–2 Heterogeneous Network 73
Figure 3–3 Comparison of Data Packet Formats 73
Figure 3–4 Typical Trusted Solaris Routes and Routing Table 81
Figure 3–5 Tunneling Example 83
10 Trusted Solaris Administration Overview ♦ December 2000

Preface
The Trusted Solaris Administration Overview is an introduction to administering theTrusted SolarisTM environment. As prerequisites, you should be familiar with basicsystem administration in the UNIX environment, understand security policyconcepts, and should read the Trusted Solaris User’s Guide.
Related MaterialsThe Trusted Solaris documentation set is supplemental to the Solaris 8documentation set. You should obtain a copy of both sets for a completeunderstanding of Trusted Solaris. The Trusted Solaris documentation set consists of:
� Trusted Solaris Documentation Roadmap shows all volumes in the documentationset.
� Trusted Solaris 7 Release Notes presents information regarding the hardwarerequirements for installing Trusted Solaris, features included in the release, anyknown problems, and interoperability with previous versions.
� Trusted Solaris Installation and Configuration describes the process of planning for,installing, and configuring a new or upgraded Trusted Solaris system.
� Trusted Solaris User’s Guide describes basic features of the Trusted Solarisenvironment from the end user’s point of view.
Note - Trusted Solaris User’s Guide contains a glossary that applies to the entiredocumentation set.
� Trusted Solaris Administrator’s Procedures provides detailed information forperforming specific administration tasks.
11

� Trusted Solaris Audit Administration describes the auditing system for systemadministrators.
� Trusted Solaris Label Administrationprovides information on specifying labelcomponents in the label encodings file.
� Trusted Solaris Reference Manual is a printed version of the man pages availablein the Trusted Solaris environment.
� Compartmented Mode Workstation Labeling: Encodings Format describes the syntaxused in the label encodings file for enforcing the various rules concerningwell-formed labels for a system.
� Trusted Solaris 7 Transition Guide provides an overview of the differencesbetween Trusted Solaris 1.x and Trusted Solaris 2.5.
How This Guide is OrganizedChapter 1 provides an overview of basic concepts needed to administer TrustedSolaris.
Chapter 2 presents an overview of the tools available in the Trusted Solarisenvironment, how they are accessed, and the databases on which they operate.
Chapter 3 provides an overview of how networking is implemented in the TrustedSolaris environment and discusses the tools for administering networking.
Chapter 4 describes the basics of performing auditing in the Trusted Solarisenvironment.
Typographic Changes and SymbolsThe following table describes the type changes and symbols used in this book.
12 Trusted Solaris Administration Overview ♦ December 2000

TABLE P–1 Typographic Conventions
Typeface orSymbol
Meaning Example
AaBbCc123 The names of commands, files, anddirectories; on-screen computeroutput
Edit your .login file.
Use ls -a to list all files.
system% You have mail.
AaBbCc123 What you type, contrasted withon-screen computer output
system% su
Password::
AaBbCc123 Command-line placeholder orvariable name. Replace with a realname or value
To delete a file, type rm filename.
The errno variable is set.
AaBbCc123 Book titles, new words or terms, orwords to be emphasized
Read Chapter 6 in User’s Guide.These are called class options.
You must be root to do this.
Code samples are in code font and may display the following:
% UNIX C shell prompt system%
$ UNIX Bourne and Korn shellprompt
system$
# Superuser prompt, all shells system#
Preface 13

14 Trusted Solaris Administration Overview ♦ December 2000

CHAPTER 1
Introduction to Administration
This chapter introduces you to system administration in the Trusted Solarisenvironment. It begins with a quick review of Trusted Solaris concepts from theTrusted Solaris User’s Guide and goes on to explain some advanced conceptsnecessary for Trusted Solaris administrators.
� “Basic Concepts Review” on page 15
� “Understanding Labels” on page 31
� “Understanding Rights Profiles” on page 21
� “Understanding Roles” on page 20
� “Understanding Authorizations” on page 25
� “Understanding Privileges” on page 29
� “How the Trusted Solaris Environment Controls Device Access” on page 39
Basic Concepts ReviewThe Trusted Solaris environment is an enhanced version of Solaris that incorporatesconfigurable security policy into the system. The concepts in this section are basic tounderstanding the Trusted Solaris environment, both for users and administrators.They are briefly covered here and are discussed in more depth in the Trusted SolarisUser’s Guide.
15

How the Trusted Solaris Environment ProtectsAgainst IntrudersTrusted Solaris protects access to the system by providing accounts requiring usernames with passwords. Passwords can be created by users or system-generated,according to your site’s security policy. You can also require that passwords bechanged regularly. In addition, users can work within their approved label rangeonly limiting the information they can access. Additional passwords are required forcertain administrative tasks; this limits the damage that can be done by an intruderwho guesses the root password.
The Trusted Solaris environment displays the Trusted Path symbol, an unmistakable,tamper-proof emblem that appears at the bottom of the screen, indicating to userswhen they are using security-related parts of the system. If the Trusted Path symboldoes not appear when the user is running a trusted application, that version of theapplication should be checked immediately for authenticity.
As administrator, you should always verify personally with your users instructionsyou send them via email. The purpose of this policy is to avoid such situations asimposters posing as administrators and sending email to users to try to getpasswords to accounts or other sensitive information.
How the Trusted Solaris Environment EnforcesAccess Control PolicyThe Trusted Solaris environment protects information and other resources throughdiscretionary access control—the traditional UNIX permission bits and access controllists set at the discretion of the owner—and mandatory access control—a mechanismenforced by the system automatically that controls all transactions by checking thelabels of processes and data in the transaction.
A user’s label represents the sensitivity level at which the user is permitted to andchooses to operate. It determines which information the user is allowed to access.Both mandatory and discretionary access controls can be overridden by specialpermissions called privileges, which are granted to processes. In some cases, usersmay need authorizations as well, which are granted to users (and roles) by anadministrator.
As administrator, you need to train users on the proper procedures for securing theirfiles and directories, according to your site’s security policy. Furthermore, you shouldinstruct any users allowed to upgrade or downgrade labels as to when it isappropriate to change a label.
16 Trusted Solaris Administration Overview ♦ December 2000
How the Trusted Solaris Environment ImplementsAdministrationIn conventional UNIX systems, superuser (root) is all-powerful with the ability toread and write to any file, run all programs, and send kill signals to any process. Inthe Trusted Solaris environment, root’s capabilities are divided into separate roleaccounts that can be assigned to different individuals.
Roles are used mainly for security-related tasks. They require separateauthentication, are assigned to sysadmin group 14, are privileged NIS+ principals,and operate in special workspaces that can supply the trusted path attribute to thoseprocesses requiring them; many administrative applications require all fourconditions to run successfully.
Understanding Trusted SoftwareAdministrationThe following sections describe trusted software administration:
� “Overview of Trusted Software Administration” on page 17
� “Understanding Roles” on page 20
� “Understanding Rights Profiles” on page 21
� “Understanding Authorizations” on page 25
� “Understanding Privileges” on page 29
Overview of Trusted Software AdministrationAs mentioned earlier in this chapter, the superuser’s capabilities are divided intoseparate role accounts rather than being concentrated in the superuser account only.This separation is accomplished through two override mechanisms in the TrustedSolaris environment: authorizations, which are rights associated with users, andprivileges, which are rights associated with processes. An application that canoverride system controls is called a trusted application. Trusted applications haveeither been designed to check for authorizations or have been assigned specialsecurity attributes (that is, effective and real user IDs (UIDs) and group IDs (GIDs),process labels, clearances, and privileges). Instead of becoming superuser, users orroles can run their assigned trusted applications with the same capabilities that thesuperuser would have running these applications.
Trusted applications and authorizations are grouped in rights profiles or profiles, forshort, which can be assigned to users or more commonly to roles. Users access
Introduction to Administration 17

trusted CDE actions granted to them through the Front Panel, the ApplicationManager, the Workspace menu, and the File Manager. Users access trustedcommands granted to them through special shells called profile shells. The profile shellis a Bourne, Korn, or C shell that has been modified to grant roles (and users) accessto those programs assigned to their rights profiles and to make security attributesavailable to commands. From a profile shell, a user can execute those commands andonly those commands assigned to that user’s profiles. Note that a profile can be usedto enable users, that is, give them access to commands, privileges, and authorizationsnot available to normal users; or to restrict users, that is, to limit them to a specificset of commands (this might be appropriate for unsophisticated users).
In practice, here is how access control is enforced and can be overridden by anadministrator or authorized user. When a user attempts to access a file, themandatory access controls (MAC) are checked. The process label of the program theuser is running must dominate the label on the file; if this is not the case, then theuser’s process needs MAC privileges, such as file_mac_search to access thedirectory and file_mac_read to read the file. There are also discretionary accesscontrols, that is, UNIX permissions, to be checked. If the user does not have readpermission, then privileges such as file_dac_search and file_dac_read areneeded. If the file’s ownership were to be changed through the File Manager, thenthe user would need the authorization solaris.file.chown .
The following figure summarizes the elements used in Trusted Solarisadministration. The arrows in the figure indicate the direction of an assignment. Inshort, roles are special accounts that can be assigned to users. Rights profiles arepackages of permitted operations that are assigned commonly to roles andoccasionally to users. Authorizations, CDE actions, and commands are assigned torights profiles. Privileges are assigned to sets. The allowed and forced privilege setscan be assigned to executable files. CDE action and command processes can have thefollowing security attributes applied: privileges in the inheritable privilege set;effective and real UIDs/GIDs; and clearances and security labels.
These elements and their relations are discussed in the following sections.
18 Trusted Solaris Administration Overview ♦ December 2000

Roles
Allowed
privilege set
Authorizations
Forced
privilege set
Ro le − a special
user account
Privileges
Privil eg e − an
override assigned
to processes
Au tho r ization −
an override
assigned to users
Inh eri tab le p r iv il eg e set − privileges
applied to processes through rights
profiles and parent processes
All o w ed p r iv il eg e
set − privileges that
can be applied if
forced or inheritable
Fo rced p r iv il eg e
set − privileges
available to any
user
Trusted applications
Rights Profile
Inheritable
privilege set
User/Group Ids
Process labels
CDE actions
Users
Righ ts Pro f il e − a package
of permitted operations
User/Group IDs − effective and
real UIDs and GIDs applied to
processes
Pro cess lab els − clearance
and sensitivity label at which
an application can operate
Executable filesCommands
Figure 1–1 Security Element Assignment in the Trusted Solaris Environment
Note - The Solaris environment also provides roles, authorizations, rights profiles,and profile shells (also referred to as “administrator shells”). The only securityattributes that trusted applications in the Solaris environment can make use of arereal and effective UIDs/GIDs. There are no labels, clearances, or privileges in theSolaris environment.
Introduction to Administration 19

Understanding RolesA role is a special user account that gives a user access to specific programs and theauthorizations and privileges necessary for running them. All users who can assumethe same role have the same role home directory, operate in the same environment,and have access to the same files. Users cannot log in directly to a role; they must loginto their user account prior to assuming a role to ensure that the user’s real UID isrecorded for auditing. (Another restriction that supports auditing is that a usercannot assume any other role directly from a role.) Assuming a role requires users toauthenticate themselves by providing the role password. The user is then grantedaccess to a dedicated role workspace where the user has access to trustedapplications, the profile shell, and the trusted path attribute.
The Trusted Solaris environment provides one preconfigured role (Root) and fourrecommended roles as shown in the table below. If your site plans to use these roles,you need to configure them according to the instructions in the “How to CreateAdministrative Roles” in Trusted Solaris Installation and Configuration.
TABLE 1–1 Roles and their Responsibilities
Role (Login Name) Responsibilities
Root (root) Initial installation and configuration of the operating environment.After configuration, the root role is not used for administration andshould not be assigned to any user.
System administrator(admin)
Performs standard UNIX system administration tasks. Adds newusers; configures user templates; modifies certain user properties;configures hosts, networks, routes, and printers. Can also make andrestore backups and administer printing.
Securityadministrator(secadmin)
Responsible for security tasks and decisions. Administers labels;modifies security-relevant attributes of users, networks, printers andother devices and hosts. Configures host templates. Can modifydefault roles and profiles and add new roles, but cannot grantcapabilities beyond those of the security administrator role itself.
Primaryadministrator(primaryadmin)
Not used in normal system operations, the primary administratorrole is designed to be used only when the security administrator rolecannot accomplish a task, for example, adding a new role or profilewith capabilities the security administrator does not have.
System operator(oper)
Makes backups and administers printing.
The Trusted Solaris environment is highly configurable so that you can implement acustomized set of roles and rights profiles. (Note that this type of customization
20 Trusted Solaris Administration Overview ♦ December 2000

would be done by the primary administrator role.) If your site does reconfigure roles,make sure all users know who is performing each set of duties.
Your site may need new roles in addition to the predefined administrative roles. Themain reason for creating a role is to define an explicit job responsibility that can usespecial commands and actions and any necessary privileges, that needs to be isolatedfrom normal users, and that uses a shared home directory, files, and environment. (Ifyou need to isolate commands and privileges with separate home directories andfiles for different users, then you should create a special rights profile instead of arole. See next section.)
Understanding Rights ProfilesTrusted applications and authorizations can be grouped into packages called rightsprofiles for assignment to user or role accounts. The main purpose of a rights profileis to provide limited override power to a user or role who needs this capability.
The potential contents of a rights profile are:
� Authorizations
� CDE actions with or without real and effective UIDs and GIDs, privileges, processlabels, and clearances
� Commands with or without real and effective UIDs and GIDs, privileges, processlabels, and clearances
Assigning Rights Profiles to Users or RolesTo assign rights profiles to users, you open the User Properties dialog box from theUser Tool in the Solaris Management Console and select the Rights tab, as shown inthe following figure. The rights profiles not assigned to the current user or role aredisplayed in the Excluded column on the left and must be moved to the rightcolumn for assignment to the current account. For more information, see the onlinehelp. In similar fashion, you can make changes to roles through the AdministrativeRoles dialog box in the User Tool.
Introduction to Administration 21

Figure 1–2 Assigning Rights Profiles to Users
Predefined Trusted Solaris Rights ProfilesThe Trusted Solaris environment provides a set of predefined rights profiles (see thefollowing table). Before you assign any of these rights profiles, you should familiarizeyourself with their contents. To view the contents of predefined rights profiles, usethe −list option in the smprofile command (see next section) or the Rights dialogbox. The profiles can be modified according to the needs of your organization.
TABLE 1–2 Rights Profile Descriptions
Rights Profile Purpose
All Provides access to all executables but without privileges.
All Actions Provides access to all actions but without privileges.
All Authorizations Provides all authorizations. For testing.
All Commands Provides access to all commands but without privileges.
Audit Control For managing the audit subsystem but without ability to read files.
Audit Review For reading the audit trail.
Basic Actions Provides access to the applications on the Front Panel with the necessaryprivileges.
22 Trusted Solaris Administration Overview ♦ December 2000

TABLE 1–2 Rights Profile Descriptions (continued)
Rights Profile Purpose
Basic Commands Provides access to rudimentary commands necessary for all roles.
Basic Solaris User Assigned to all users of the Solaris Management Console. Provides Readpermissions and lets users add con jobs to their crontab files. Contains All rightsprofile.
Convenient Authorizations Provides authorizations for normal users.
Cron Management For managing cron and at jobs.
Custom Admin Role This is an empty right for adding security attributes to the default Admin role.
Custom Oper Role This is an empty right for adding security attributes to the default Oper role.
Custom Root Role This is an empty right for adding security attributes to the default Root role.
Custom Secadmin Role This is an empty right for adding security attributes to the default Secadmin role.
Custom SSP This is an empty right for adding security attributes to the default SSP role forSun Enterprose 10000 administration.
Device Management For allocating and deallocating devices, and correcting error conditions.
Device Security For managing and configuring devices.
Enable Login Provides the authorization for allowing yourself and other users to log in afterboot.
File System Management For managing file systems.
File System Security For managing file system labels and other security attributes.
Information Security For setting access control policy.
Mail Management For configuring sendmail, modifying aliases, and checking mail queues.
Maintenance and Repair Provides commands needed to maintain or repair a system.
Media Backup Backup files.
Media Restore Restore files from backup.
Name Service Management Grants right to control the name service daemon.
Name Service Security Grants right to control the name service properties and table data.
Introduction to Administration 23

TABLE 1–2 Rights Profile Descriptions (continued)
Rights Profile Purpose
Network Management For managing the host and network configuration.
Network Security For managing network and host security, with authorizations for modifyingtrusted network databases.
Object Access Management For changing ownership and permissions on files.
Object Label Management For changing labels of files and setting up system-wide labels.
Object PrivilegeManagement
For changing privileges on executable files.
Outside Accred Operate outside system accreditation range.
Primary Adminstrator Contains subordinate rights profiles for primary administrator role.
Privileged Shells For developers to run Bourne, Korn, and C shells with all privileges. NOTintended for secure environments.
Process Management For managing current processes, including cron and at jobs.
Remote Administration Remote administration of headless systems.
Rights Delegation Lets user or role assign rights assigned to that user or role to other users orroles. Lets user assign roles assigned to that user to other users.
Rights Security For managing assignment of rights profiles, labels, and privileges, and forsetting account security.
Software Installation For adding application software to the system.
SSP Administration Tools for administering the SSP.
SSP Installation Tools for installing the SSP.
System Administrator Contains subordinate rights profiles for system administrator role.
User Management For creating and modifying users but without the ability to modify self (as asecurity measure).
User Security For creating and modifying users’ security attributes but without the ability tomodify self (as a security measure).
24 Trusted Solaris Administration Overview ♦ December 2000

Displaying Rights Profile InformationUse the −list option in the smprofile command to obtain various rights profileinformation. This command lets you display the contents of any profile for all usersor specified user(s) and optionally the contents of the profiles. Another option fordisplaying rights profile information is profiles (1).
Customizing Rights ProfilesIf the predefined rights profiles as they are shipped are not appropriate for yourorganization, they can be modified by the security administrator (or other role withequivalent powers). The Rights dialog box is used to edit the contents of rightsprofiles (see figure below). The Rights dialog box is accessed from the User Tool inthe Solaris Management Console. For more information, see the online help.
Figure 1–3 Rights Dialog Box
Understanding AuthorizationsAn authorization is a discrete right granted to a user or role that is checked by certaintrusted applications to determine whether the user is permitted to execute arestricted function. For example, in a conventional system, the file manager allowssuperuser only to change the ownership of a file. In the Trusted Solaris operatingenvironment, the authorization Change File Owner is required.
Introduction to Administration 25

An authorization has a name, which is used internally and in files (for example,solaris.file.owner ) , and a short description, which appears in the graphicalinterfaces (for example, Act as File Owner ). By convention, authorization namesbegin with the reverse order of the internet name followed by the subject area, anysubarea, and the function, all separated by dots, for example,com.xyzcorp.device.access . The exceptions to this convention areauthorizations from Sun Microsystems, Inc., which use the prefix solaris. insteadof an internet name. This convention enables administrators to apply authorizationsin a hierarchical fashion using a wildcard (*) to represent any strings to the right of adot.
The authorizations provided in the Trusted Solaris environment are shown in thefollowing table.
TABLE 1–3 Authorizations
Authorization Category Authorization Name — Short Description
solaris.admin.dcmgr.* solaris.admin.dcmgr.admin—Manage OS Services andPatches
solaris.admin.dcmgr.clients—Manage Diskless Clients
solaris.admin.dcmgr.read—View OS Services, Patches andDiskless Clients
solaris.admin.diskmgr.* solaris.admin.diskmgr.read—View Disks
solaris.admin.diskmgr.write—Manage disks
solaris.admin.fsmgr.* solaris.admin.fsmgr.write—Mount and Share Files
solaris.admin.fsmgr.read—View Mounts and Shares
solaris.admin.logsvc.* solaris.admin.logsvc.write—Manage Log Settings
solaris.admin.logsvc.purge—Remove Log Files
solaris.admin.logsvc.read – View Log Files
solaris.admin.nameservice.* solaris.admin.nameservice.config—Name ServiceConfiguration
solaris.admin.printer.* solaris.admin.printer.read—View Printer Information
solaris.admin.printer.modify—Update Printer Information
solaris.admin.printer.delete—Delete Printer Information
solaris.admin.procmgr.* solaris.admin.procmgr.admin—Manage All Processes
solaris.admin.procmgr.user—Manage Owned Processes
26 Trusted Solaris Administration Overview ♦ December 2000

TABLE 1–3 Authorizations (continued)
Authorization Category Authorization Name — Short Description
solaris.admin.serialmgr.* solaris.admin.serialmgr.modify—Manage Serial Ports
solaris.admin.serialmgr.delete—Delete Serial Ports
solaris.admin.serialmgr.read—View Serial Ports
solaris.admin.usermgr.* solaris.admin.usermgr.audit—Set User Audit Info
solaris.admin.usermgr.write—Manage Users
solaris.admin.usermgr.psword—Change Password
solaris.admin.usermgr.read—View Users and Roles
solaris.admin.usermgr.labels—Set User Label Info
solaris.audit.* solaris.audit.config—Configure Auditing
solaris.audit.read—Read Audit Trail
solaris.compsys.* solaris.compsys.read—View Computer System Information
solaris.compsys.write—Manage Computer SystemInformation
solaris.device.* solaris.device.allocate—Allocate Device
solaris.device.config—Configure Device Attributes
solaris.device.grant—Delegate Device Administration
solaris.device.revoke—Revoke or Reclaim Device
solaris.file.* solaris.file.audit—Set File Audit Attributes
solaris.file.chown—Change File Owner
solaris.file.privs—Set File Privilege
solaris.file.owner—Act as File Owner
solaris.grant solaris.grant—Grant All Solaris Authorizations
solaris.jobs.* solaris.jobs.admin—Manage All Jobs
solaris.jobs.grant—Delegate Cron & At Administration
solaris.jobs.user—Manage Owned Jobs
Introduction to Administration 27

TABLE 1–3 Authorizations (continued)
Authorization Category Authorization Name — Short Description
solaris.label.* solaris.label.print—View Printer Queue at All Labels
solaris.label.file.downgrade—Downgrade File Label
solaris.label.file.upgrade—Upgrade File Label
solaris.label.range—Set Label Outside User Accred Range
solaris.label.win.downgrade—Downgrade DragNDrop orCutPaste Info
solaris.label.win.noview—DragNDrop or CutPaste withoutviewing contents
solaris.label.win.upgrade—Upgrade DragNDrop or CutPasteInfo
solaris.login.* solaris.login.enable—Enable Logins
solaris.login.remote—Remote Login
solaris.login.su—Switch User Without Trusted Path
solaris.network.* solaris.network.hosts.read—View Computers and Networks
solaris.network.hosts.write–Manage Computers andNetworks
solaris.network.security.write–Manage Trusted Networking
solaris.network.security.read–View Trusted Networking
solaris.print.* solaris.print.admin–Administer Printer
solaris.print.list–List Jobs in Printer Queue
solaris.print.cancel–Cancel Print Job
solaris.print.nobanner–Print without Banner
solaris.print.ps–Print Postscript
solaris.print.unlabeled–Print without Label
solaris.profmgr.* solaris.profmgr.assign–Assign All Rights
solaris.profmgr.delegate–Assign Owned Rights
solaris.profmgr.execattr.write–Manage Commands
solaris.profmgr.read–View Rights
solaris.profmgr.write–Manage Rights
28 Trusted Solaris Administration Overview ♦ December 2000

TABLE 1–3 Authorizations (continued)
Authorization Category Authorization Name — Short Description
solaris.role.* solaris.role.assign–Assign All Roles
solaris.role.delegate–Assign Owned Roles
solaris.role.write–Manage Roles
solaris.system.* solaris.system.date–Set Date & Time
solaris.system.shutdown–Shutdown the System
For a complete list of authorizations, see the /etc/security/auth_attr file.Authorizations are assigned to rights profiles using the Rights dialog box in the SMCUser Manager.
Understanding PrivilegesA privilege is a discrete right granted to a process to perform an operation that wouldotherwise be prohibited by the Trusted Solaris environment. For example, processescannot normally open data files unless they have the proper file permission. In theTrusted Solaris environment, the file_dac_read privilege gives a process theability to override the UNIX file permissions for reading a file.
How a Process Acquires PrivilegesThe Trusted Solaris environment determines which privileges a process can makeeffective based on the allowed and forced privilege sets assigned to the executablefile and the inheritable privileges inherited by the process.
The allowed privilege attribute satisfies one condition necessary for that privilege to beeffective. If an allowed privilege for an application is not set, the privilege cannot beeffective under any condition. The forced privilege attribute makes the privilegeeffective to all users running that application. Both types of attributes are assignedusing either the File Manager or the setfpriv (1) command. The commandgetfpriv (1) lets you see which privileges are set on the executable file. Note that ifan executable file is modified, all allowed and forced privileges are removed.
The inheritable privilege attribute is assigned to the application within a rights profile.Only users who have been assigned that rights profile are granted the privilege forthat application. Inheritable privilege attributes are assigned to an application insidea rights profile using either the Rights Manager or the −add option in the smexeccommand. An inheritable privilege is made effective when the process is launchedby one of the trusted launchers. For the terminal environment, the Trusted Solaris
Introduction to Administration 29

environment provides three profile shells corresponding to the Bourne, Korn and Cshells; for the desktop, the Workspace Menu, the Front Panel, and the ApplicationManager interpret profiles for actions; and for remote environments the SolarisManagement Console legacy application tool interprets profiles. A process can alsopass inheritable privileges to any program it executes, provided that the particularprivilege is allowed by the program.
Note - In contrast to inheritable privileges, forced privileges cannot be inherited bychild processes except in applications that have been customized especially for theTrusted Solaris environment to have that specific capability. To provide privileges toa shell script, one should thus use inheritable privileges, not forced privileges.
Default Privileges Supplied by the Trusted SolarisEnvironmentThe Trusted Solaris environment provides more than 80 privileges that you canapply to applications to override security policy. For a complete list of privileges, seethe priv_desc (4) man page. The privileges provided fall into the categories shownin the following table.
TABLE 1–4 Privilege Categories
PrivilegeCategory
Summary Example Privileges in theCategory
File systemsecurity
For overriding file system restrictions on user andgroup IDs, access permissions, labeling, ownership,and file privilege sets
file_dac_chown – lets a processchange the owner user ID of a file.
System VInterprocessCommunication(IPC) security
For overriding restrictions on message queues,semaphore sets, or shared memory regions
ipc_dac_read – lets a process read aSystem V IPC message queue,semaphore set, or shared memoryregion whose permission bits orACL do not allow process readpermission
Networksecurity
For overriding restrictions on reserved port binding orbinding to a multilevel port, sending broadcastmessages, or specifying security attributes (such aslabels, privileges on a message, or network endpointdefaults)
net_broadcast – lets a process send abroadcast packet on a specifiednetwork
Process security For overriding restrictions on auditing, labeling,covert channel delays, ownership, clearance, user IDs,or group IDs
proc_mac_read – lets a process readanother process where the readingprocess label is dominated by theother process label
30 Trusted Solaris Administration Overview ♦ December 2000

TABLE 1–4 Privilege Categories (continued)
PrivilegeCategory
Summary Example Privileges in theCategory
System security For overriding restrictions on auditing, workstationbooting, workstation configuration management,console output redirection, device management, filesystems, creating hard links to directories, increasingmessage queue size, increasing the number ofprocesses, workstation network configuration,third-party loadable modules, or label translation
sys_boot – lets a process halt orreboot a Trusted Solarisworkstation
Windowsecurity
For overriding restrictions on colormaps, reading toand writing from windows, input devices, labeling,font paths, moving data between windows, X serverresource management, or direct graphics access (DGA)X protocol extensions
win_selection – allows a process torequest inter-window data moveswithout the intervention ofselection arbitrator
Understanding LabelsLabels and clearances are the heart of mandatory access control in the Trusted Solarisenvironment. They determine which users can access which files and directories.Labels and clearances consist of one classification component and zero or morecompartment components. The classification component indicates a hierarchical levelof security such as TOP SECRET or CONFIDENTIAL. The compartment componentrepresents a group of users who may need access to a common body of information.Some typical types of compartments are projects, departments, or physical locations.
The Trusted Solaris environment mediates all attempted security-related transactions.It compares the labels of the accessing entity, typically a process, and the entity beingaccessed, usually a file, and then permits or disallows the transaction depending onwhich label is dominant (as described in the following section). Labels are also usedto determine access to other system resources, such as allocatable devices, networks,framebuffers, and other hosts.
Note - CMW labels are primarily of importance to programmers. They are composedof regular labels (also called sensitivity labels) and an obsolete label type called aninformation label. Although they are present in CMW labels (for backwardscompatibility), information labels are no longer used by the system.
Introduction to Administration 31

Dominance Relationships Between LabelsOne entity’s label is said to dominate another’s if the following two conditions aremet:
� The classification component of the first entity’s label is equal to or higher than thesecond entity’s classification. (The security administrator assigns numbers toclassifications in the label_encodings (4) file; these numbers are comparedwhen determining dominance.)
� The set of compartments in the first entity includes all of the second entity’scompartments.
Two labels are said to be equal if they have the same classification and the same set ofcompartments. If they are equal, they dominate each other and access is permitted.
If one label has a higher classification or if it has the same classification and itscompartments are a superset of the second label’s compartments or both, the firstlabel is said to strictly dominate the second label.
Two labels are said to be disjoint or noncomparable if neither label dominates the other.
The following table presents examples of label comparisons for dominance. In theexample, NEED_TO_KNOW is a higher classification than INTERNAL. There arethree compartments: Eng, Mkt, and Fin.
TABLE 1–5 Examples of Label Relationships
Label 1 Relationship Label 2
NEED_TO_KNOW Eng Mkt (strictly) dominates INTERNAL Eng Mkt
NEED_TO_KNOW Eng Mkt (strictly) dominates NEED_TO_KNOW Eng
NEED_TO_KNOW Eng Mkt (strictly) dominates INTERNAL Eng
NEED_TO_KNOW Eng Mkt dominates (equals) NEED_TO_KNOW Eng Mkt
NEED_TO_KNOW Eng Mk is disjoint with NEED_TO_KNOW Eng Fin
NEED_TO_KNOW Eng Mkt is disjoint with NEED_TO_KNOW Fin
NEED_TO_KNOW Eng Mkt is disjoint with INTERNAL Eng Mkt Fin
Administrative LabelsThe Trusted Solaris environment provides two special labels for administration to beused as labels or clearances: ADMIN_HIGH and ADMIN_LOW. (You can rename
32 Trusted Solaris Administration Overview ♦ December 2000

these two labels in the label_encodings (4) file if you choose.) These labels areused to protect system resources and are intended for administrators rather thannormal users.
ADMIN_HIGH is the highest label; it dominates all other labels in the system and isused to protect system data, such as administration databases or audit trails, frombeing read. You need to work at the ADMIN_HIGH label (typically in a role) or havethe privilege to read up from your current label to read data labeled ADMIN_HIGH.
ADMIN_LOW is the lowest label; it is dominated by all other labels in a system.Mandatory access control does not permit users to write data to files with labelslower than the subject’s label. Thus, applying ADMIN_LOW, the lowest label, to afile ensures that normal users cannot write to it although they can read it.ADMIN_LOW is typically used to protect public executables and configuration filesto prevent them from being modified, since only a user working at ADMIN_LOW orwith the privilege to write down would be able to write to these files. Typically, onlyan administrator would work at ADMIN_LOW.
Label Encodings FilesAll label components for a system, that is, classifications, compartments, and theassociated rules are stored in a file called label_encodings (4) (located in /etc/security/tsol ). The security administrator sets up the label_encodings file forthe site. A label encodings file contains:
� component definitions—definitions of classifications, compartments, labels, andclearances, including rules for required combinations and constraints
� accreditation range definitions—specification of the clearances and minimumlabels that define the sets of available labels for the entire system and for normal(non-administrative) users
� printing specifications—identification and handling information for print banners,trailers, headings, footers, and other security features for printouts
� customizations—local definitions including label color codes, alternative names forclassifications, compartments, and markings in the graphical interface, and otheritems
For more information on the label_encodings file, see the man page forlabel_encodings (4) and the manuals, Trusted Solaris Label Administration andCompartmented Mode Workstation Labeling: Encodings Format.
Label RangesA label range is the set of potentially usable labels at which users can operate.Resources that can be protected by label ranges include such things as allocatabledevices, file systems, networks, interfaces, frame buffers (effectively workstations),
Introduction to Administration 33

and commands or actions. A label range is defined by a clearance at the top of therange and a minimum label at the bottom. A range is not necessarily allcombinations of labels that fall between a maximum and minimum label. There maybe rules in the label encodings file that disqualify certain combinations. A label mustbe well-formed, that is, permitted by all applicable rules in the label encodings file, inorder to be included in a range. On the other hand, a clearance does not have to bewell-formed. Suppose, for example, that a label encodings file prohibits anycombination of compartments Eng, Mkt, and Fin in a label. INTERNAL Eng Mkt Finwould be a valid clearance but not a valid label; as a clearance, it would let a useraccess files labeled INTERNAL Eng, INTERNAL Mkt, and INTERNAL Fin.
Account Label RangeWhen you assign a clearance and a minimum label to a user, you define the upperand lower boundaries of the account label range in which that user is permitted tooperate. The following equation describes the account label range, using ≤ to indicatedominated by or the same as:
minimum label ≤ permitted label ≤ clearance
Thus, the user is permitted to operate at any label that is dominated by the clearanceas long as that label is not strictly dominated by the minimum label. If you do notexpressly set a user’s clearance or minimum label, the defaults defined in the labelencodings file will take effect. Make sure when you assign a clearance that theclassification dominates (or is the same as) all classifications at which the user canwork and that the list of compartments include all compartments that user mightneed. Combinations of compartments in the clearance will be governed by rules inthe label_encodings file.
To assign single-label operation to a user, you set the user’s clearance equal to theminimum label.
Session RangeThe session range is the set of labels available to a user during a Trusted Solarissession. The session range must be within the user’s account label range and thelabel range set for the system. If the user selects single-label session mode, thesession range will be limited to that label. If the user selects multilabel mode, thenthe label entered will serve as the session clearance, defining the upper boundary ofthe session range while the user’s minimum label defines the lower bound. The userenters the session at the minimum label and can switch to a workspace at any labelin the session range.
34 Trusted Solaris Administration Overview ♦ December 2000

How Labeled Files are StoredIn the Trusted Solaris environment, labels are automatically associated with all filesand directories, and are stored as extended attributes of the file. These attributes areprotected by privilege and mandatory controls.
In addition, special directories called multilevel directories (MLDs) allow files to beisolated by label in subdirectories called single-level directories (SLDs). SLDs aretransparent to users and applications.
The purpose of MLDs is to enable applications that are running at different labels towrite into what appears to be the same directory. For example, the /tmp directory isoften used by multiple applications; for that reason, /tmp is an MLD. Applicationsare not aware that when they write a file into /tmp they are actually writing the fileinto the SLD within /tmp that has the label at which the application is running. If asingle-level directory corresponding to the label does not yet exist, the TrustedSolaris environment creates one automatically.
New MLDs are built by creating a new folder with the File Manager using the MLDoption or at the command line using the −-M option of the mkdir (1). Thecrontab (1) and at-job directories are shipped as MLDs so that you can set up batchjobs for a user that run at different labels. See the “Administering the AutomaticRunning of Jobs Using cron, at, and batch” in Trusted Solaris Administrator’sProcedures.
Home directories are MLDs so that accounts can create files and folders at differentlabels within their home directories. When user or role accounts change into theirhome directories, they do not need to be aware that they have actually changed intoan SLD that is at the same label as their current workspace. For example, whensetting up a new account for user roseanne, the User Tool creates the home directory/export/home/roseanne as an MLD. When the user roseanne changes to herhome directory, she is automatically and transparently redirected to an SLD withinher home directory MLD. The SLD has the same label as her current workspace, so ifthe workspace has a label of NEED_TO_KNOW, she changes into the SLD that has theNEED_TO_KNOWlabel.
To allow normal users to create their own MLDs, the administrator role must firstcreate a new directory that is not an MLD and make it writable by normal users. Forexample, an administrator could create a directory called /myDir/doc mounted byand writable by all developers at a single label, so that design specifications andother project-wide documentation could be kept in one commonly accessible place.Anyone in the development group could then create a new directory within thatdirectory and make it an MLD. If desired, the prefix can be changed from MLDusing the mount (1M) command.
Multilevel directory names contain a hidden string, .MLD. (referred to as anadornment), which is appended to the beginning of the directory name but is notvisible to standard UNIX commands.
Single-level directories are named .SLD. n where the number n represents the orderin which the SLDs in the multilevel directory are created. Thus, the single-level
Introduction to Administration 35

directories are named .SLD.0 , SLD.1 , and so on. The implementation is transparentso that directory names with adornments are not displayed except through thespecial commands in the table below. A user with appropriate privileges can viewthe contents of a hidden directory outside of the current SL by explicitly specifyingthe adornments to the path.
TABLE 1–6 Adornment—Related Commands
Command Name Description
adornfc (1)The adornfc(1) command displays the specified directorypathname with the final component adorned, that is, thestrings .MLD. or .SLD. used to identify whether thedirectory is multilevel or single-level.
getfattrflag (1)The −moption indicates whether or not the directory is anMLD.
getmldadorn (1)The getmldadorn(1) command displays the MLDadornment of the filesystem on which the specifiedpathname resides.
getsldname (1)The getsldname(1) command displays the single-leveldirectory name associated with the label of the currentprocess within the multilevel directory referred to bypathname.
mkdir (1)When used with −Moption or when the directory name hasthe .MLD. adornment, creates a new MLD.
mldpwd (1)The mldpwd(1) command displays the pathname of thecurrent working directory, including any MLD adornmentsand SLD names.
mldrealpath (1)The mldrealpath(1) command displays the canonicalizedabsolute pathname, including any MLD adornments andSLD names. It expands all symbolic links and resolvesreferences to special characters (/. and /..) and translationsin pathnames. The resulting path has no special characters,unadorned multilevel directories, or any hidden SLD names.
rm(1), rmdir (1)The −Moption when used with the −R option removes SLDsubdirectories recursively.
The following figure illustrates the normal view of an SLD, depicting directories asovals, files as rectangles, visible items with solid lines and bolding, and hidden items
36 Trusted Solaris Administration Overview ♦ December 2000

with dashed lines and normal font. In this case, the user is operating with aNEED_TO_KNOW Eng Mkt label and executes the ls command as shown on theleft side of the figure. The user can view files with the Top Secret label only. Theactual structure and contents of myHomeDir , which is a multilevel directory, isshown at the right of the figure.
Figure 1–4 Normal Viewing of a Directory
The following figure demonstrates how a user can view directory contents outside ofthe current SL. By typing ls /.MLD.myHomeDir/.SLD.* , the user sees all hiddendirectories in the multilevel directory, in this case, .SLD.0 which contains files withan SL of INTERNAL Eng and .SLD.1 which holds a TOP SECRET file.
Figure 1–5 Viewing the Contents of Multiple SLDs
Applying Labels to EmailAll email messages have labels in the Trusted Solaris environment. The underlyingtool sendmail (1M) does not deliver mail to a user outside of the user’s account
Introduction to Administration 37

range; use the −p option in the sendmail.cf file to provide for out-of-range mail.Furthermore, the restrictmailq option in the sendmail.cf file is set by defaultto restrict users from listing mail sent by other users; only users in the same group asthe mail queue can list jobs in the queue. Email operations make use of multilabeldirectories both for messages queued prior to delivery and for storage of incomingmessages. Users are notified separately about mail received at each label in theiraccount range and in the range of any role they have assumed. In addition, an optionexists to promote email from administrators from ADMIN_LOW to the user’sminimum label.
Applying Labels to Printed OutputYou can arrange for labels, handling information, and other security information tobe printed out in the banner and trailer pages on a printer by printer basis. Thefollowing figure shows a typical banner page. For more information on configuringprinting in the Trusted Solaris environment, see “Managing Printing” in TrustedSolaris Administrator’s Procedures and “Configuring How Labels are Printed onBanner/Trailer and Body Pages” in Trusted Solaris Label Administration.
38 Trusted Solaris Administration Overview ♦ December 2000

Figure 1–6 Typical Print Banner Page
How the Trusted Solaris EnvironmentControls Device AccessSince devices provide a means for the import and export of data to and from aTrusted Solaris system, they must be controlled to properly protect the data. (A deviceis either a physical peripheral that is connected to a Trusted Solaris system or asoftware-simulated device called a pseudo-device.) The Trusted Solaris environment
Introduction to Administration 39

lets you control data flowing through devices through device allocation and devicelabel ranges.
Device AllocationDevice allocation provides a way to control data when it is imported and exportedand prevents unauthorized users from access to the information. In a Trusted Solarissystem the administrator decides which devices, if any, each user can use to importand export data and sets those devices to be allocatable. The administrator thenassigns to selected users the Allocate Device authorization . The ConfigureDevice Attributes , Delegate Device Administration , and Revoke orClaim Device authorizations are used to adminstrate devices. Users authorized touse a device must allocate the device before using it and deallocate the device whenfinished. Between the allocation and deallocation of a device, the user has exclusiveuse of it.
The device allocation applications are provided by the Solaris SunSHIELD BasicSecurity Module (BSM); refer to Chapter 4, “Device Allocation,” in the SunSHIELDBasic Security Module Guide. The Trusted Solaris environment provides a graphicaluser interface on top of these commands called the Device Allocation Manager thatenables device label ranges.
Device allocation provides a way to control the import and export of data. In theTrusted Solaris environment, the administrator decides which devices, if any, can beused to import and export data and includes the devices in the device_maps (4)file.
Users allocate devices through the Device Allocation Manager. The Device AllocationManager mounts the device, runs a clean script to prepare the device and performsthe allocation. When finished, the user deallocates the device through the DeviceAllocation Manager, which runs another clean script and unmounts and deallocatesthe device.
Device Label RangesTo prevent users from copying off sensitive information, each allocatable device hasan associated label range that is assigned by an administrator. To use an allocatabledevice, the user must be currently operating at a label within the device’s labelrange; if not, allocation is denied. The user’s current label is applied to data importedor exported while the device is allocated to the user. The label of exported data isdisplayed when the device is deallocated so that the user can physically label themedium containing the exported data.
Examples of devices that have label ranges are frame buffers, tape drives, disketteand CD-ROM drives, printers, and network interfaces.
40 Trusted Solaris Administration Overview ♦ December 2000
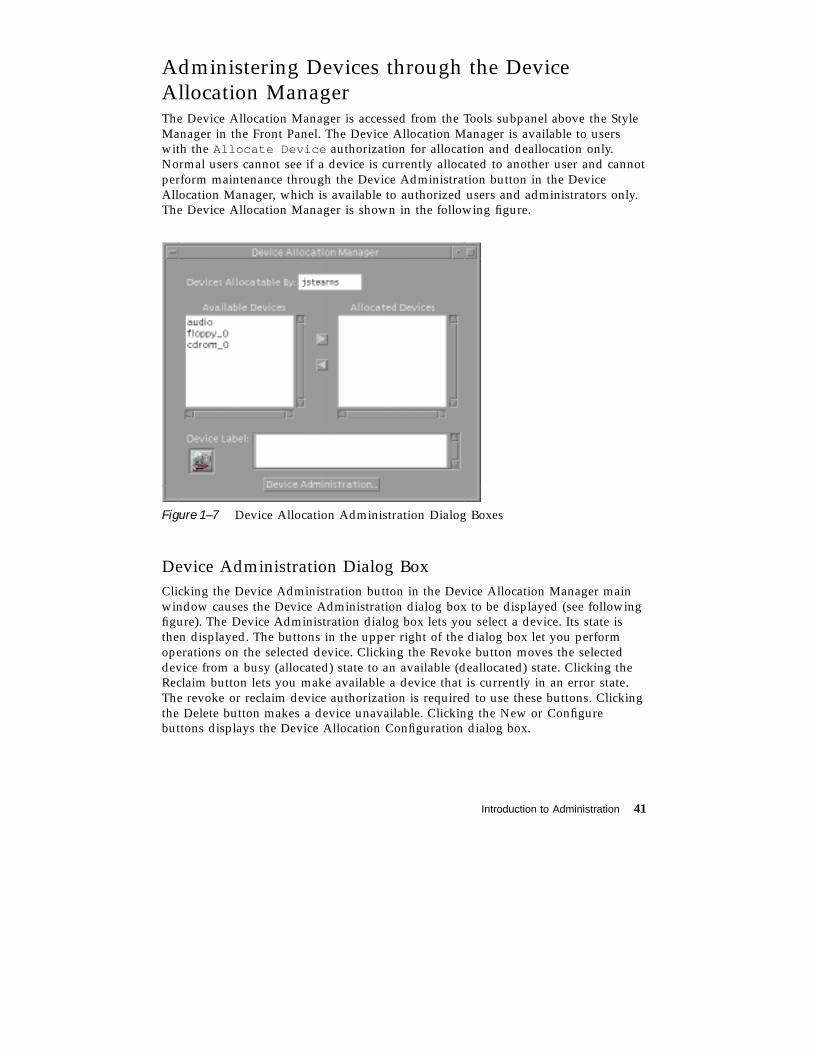
Administering Devices through the DeviceAllocation ManagerThe Device Allocation Manager is accessed from the Tools subpanel above the StyleManager in the Front Panel. The Device Allocation Manager is available to userswith the Allocate Device authorization for allocation and deallocation only.Normal users cannot see if a device is currently allocated to another user and cannotperform maintenance through the Device Administration button in the DeviceAllocation Manager, which is available to authorized users and administrators only.The Device Allocation Manager is shown in the following figure.
Figure 1–7 Device Allocation Administration Dialog Boxes
Device Administration Dialog BoxClicking the Device Administration button in the Device Allocation Manager mainwindow causes the Device Administration dialog box to be displayed (see followingfigure). The Device Administration dialog box lets you select a device. Its state isthen displayed. The buttons in the upper right of the dialog box let you performoperations on the selected device. Clicking the Revoke button moves the selecteddevice from a busy (allocated) state to an available (deallocated) state. Clicking theReclaim button lets you make available a device that is currently in an error state.The revoke or reclaim device authorization is required to use these buttons. Clickingthe Delete button makes a device unavailable. Clicking the New or Configurebuttons displays the Device Allocation Configuration dialog box.
Introduction to Administration 41

Figure 1–8 Device Administration Dialog Box
Device Allocation Configuration Dialog BoxTo use the Device Allocation Configuration dialog box requires the configuredevice attributes authorization. Clicking the Configuration button in theDevice Allocation Maintenance dialog box causes the Device AllocationConfiguration dialog box to be displayed (see following figure).
42 Trusted Solaris Administration Overview ♦ December 2000

Figure 1–9 Device Allocation Configuration Dialog Box
The Device Allocation Configuration dialog box is divided into three parts:
� Device security attributes—includes device name and type, minimum andmaximum labels, clean program, and device map.
� Allocation specifications—from Trusted Path or non-Trusted Path (for commandline users), authorized users (with the authorizations specified in theAuthorizations field), no users (if device is not allocatable), all users (if noauthorizations required), and which authorizations to require for device allocation
� Deallocation options—deallocate any allocated devices on reboot and deallocateany allocated devices on logout
Device Allocation Authorizations Dialog BoxIf you click the Authorizations button in the Device Allocation Configuration dialogbox, the Device Allocation Authorizations dialog box is displayed (see followingfigure). It lets you specify the authorizations required for using the device.
Introduction to Administration 43

Figure 1–10 Device Allocation Authorizations Dialog Box
Device Allocation Databases and CommandsIf you do not have access to the Device Allocation Manager, you can use thecommands below to administer allocatable devices. The commands use the devicedatabases: device_allocate (4), device_deallocate (4), and device_maps (4). Note that the commands are not intended for non-administrative users.
� add_allocatable (1M)—adds devices to the allocation databases.
� allocate (1M)—manages the ownership of devices through its allocationmechanism. It ensures that each device is used by only one qualified user at atime.
� deallocate (1M)—deallocates a device allocated to the evoking user.
� list_devices (1M)—lists the allocatable devices in the system according tospecified qualifications.
� dminfo (1M)—displays information about device entries in the device maps file.
Device Clean ScriptsDevice clean scripts are special scripts that are run when a device is first allocated.Clean scripts address two security concerns:
� Object reuse – the requirement that a device is clean of previous data before beingallocated or reallocated
44 Trusted Solaris Administration Overview ♦ December 2000

� Media labeling – the requirement that removable information storage media havea physical label indicating its label. While the ultimate responsibility for puttingthe labels on the removable media rests with the user, the device clean scripts canprompt the user to do so.
The name of a device clean script for a specific device is stored with that device’sentry in the device_allocate (4), file. The operations of each device cleanprogram are specific to each device. The following is a list of tasks that a deviceclean program performs:
� Eject media – Devices that store information on removable media must be forcedto eject that media upon deallocation or reallocation of the device, to preventpassing information to the next user of the device who may be at a different label.
� Reset device state – Devices that keep state information can potentially be used asa covert channel by the users. Thus driver status information must be reset todefault values during deallocation of the device.
� Remind user about media labeling – It is a requirement that removableinformation storage media be labeled with appropriate external media labels. Thedevice user’s label is passed to the device clean program when it is invoked (Seedevice_clean (1M) man page for interface detail.)
Not all allocatable devices require a device clean program. Devices that do not keepstates and do not use removable media do not need a device clean program.
Device clean programs for tape, floppy disk, CD-ROM, and audio devices areprovided by the Trusted Solaris environment. The configurable nature of the userdevice allocation mechanism lets an administrator install new devices and configuredevice clean programs accordingly.
Device Allocation Security PolicyFor more information on device allocation, see Chapter 15, “Managing Devices,” inTrusted Solaris Administrator’s Procedures.
Introduction to Administration 45

46 Trusted Solaris Administration Overview ♦ December 2000
CHAPTER 2
Quick Tour of the Admin Tools
This chapter presents an overview of the tools available in the Trusted Solarisenvironment, how they are accessed, and the databases on which they operate.
Introduction to Trusted SolarisAdministrationAdministration in the Trusted Solaris operating environment uses many of the sametools available in the Solaris operating environment and offers security-enhancedtools as well. The difference between the environments lies in how administrationtools are accessed and how this access is restricted.
Accessing Tools in a Role WorkspaceTo use the Trusted Solaris administration tools, you must be in a role account withthe assigned rights profiles that contain the desired trusted applications. To access arole workspace, you must log in as a normal user, assume a role using the TrustedPath menu (or by clicking the role workspace button in the Front Panel if it alreadyexists), and supply the role password. Note that the default label for a role workspaceis the role’s minimum label, usually ADMIN_LOW. If desired, you can switch labelsby choosing Change Workspace Label from the Trusted Path menu while thepointer is over the role workspace button. To leave a role workspace temporarily,click any other workspace button. To destroy the workspace, choose Delete fromthe Trusted Path menu while the pointer is over the role workspace button.
Within the role workspace, you can access four types of trusted applications:
47

� Solaris Management Console tools—The Solaris Management Console (SMC)serves as a launcher for various administration tools and is available from: (1) theApplication Manager, (2) the Tools subpanel in the Front Panel, and (3) thecommand line by typing smc.
� commands—In the Trusted Solaris environment, administrative commands andother commands intended for restricted use are assigned to rights profiles.Opening a terminal in a role workspace launches a profile shell that gives youaccess to all commands assigned to the account’s rights profile(s). Any commandsyou run are at the label of the current workspace.
� CDE actions—The System_Admin folder in the Application Manager providesactions for performing miscellaneous system administration tasks. Most of theseactions apply a special version of the vi editor, adminvi (1M) (or the dtpadeditor if you prefer), to one of the configuration files. For security purposes, theediting actions cannot save a file to a different name, create a new file, or escape toa shell. All actions conform with mandatory access control and the local securitypolicy. Any actions you launch are at the label of the current workspace (unlessoverridden by a rights profile).
� enhanced desktop tools—The Trusted Solaris operating environment providesdesktop tools for administrators from the Front Panel that have capabilities notavailable to normal users. For example, the File Manager lets administrators setprivileges and labels on executable files. Similarly, the Device Manager makesdevice administration capabalities available to roles. See “How the Trusted SolarisEnvironment Controls Device Access” on page 39.
Remote AdministrationYou can perform remote administration in the Trusted Solaris operating environmentusing the Solaris Management Console. You can also log into a remote host fromanother Trusted Solaris host in the system. Depending on your site’s security policy,you can make adjustments to log in from a non-Trusted Solaris system, although thiswill make your system somewhat less secure. See“Administering Remote Systems”in Trusted Solaris Administrator’s Procedures.
Solaris Management Console ToolsThe Solaris Management Console (SMC) provides access to families of GUI-basedadministration tools. These tools let you edit items in various configuration databases.
SMC ToolboxesThe SMC tools are stored in collections referred to as toolboxes. For thesecurity-related tools in the Trusted Solaris environment, you need to open the
48 Trusted Solaris Administration Overview ♦ December 2000

toolbox called the Trusted Solaris Management Console. Within the Trusted Solaristoolbox, you can access tools according to scope, that is, the name service for theadministration files accessed by the tools: local host, NIS, or NIS+.
Organization of the Solaris Management ConsoleThe SMC is shown in the following figure, with the Trusted Solaris toolbox loadedand the User Tool open.
Menu bar
Tool bar
Location bar
Navigation pane
View pane
Information pane
Information panetoggles
Status bar
Figure 2–1 Typical Trusted Solaris SMC
At the top of the SMC there is a menu bar, a tool bar, and a location bar. At thebottom is the status bar. The status bar indicates the number of items in thenavigation pane (at the left). The middle panel in the status bar is an indicator that atask is in progress and the right panel displays messages describing the currentphase of the task.
The main part of the SMC consists of three panes:
� Navigation pane (at the left)—For accessing tools (or sets of tools), folders, orother toolboxes. Icons in the navigation pane are called nodes and are expandable
Quick Tour of the Admin Tools 49

if they are folders or toolboxes. In this example, the Trusted Solaris ManagementConsole toolbox icon is expanded; it contains the User Tool collection, the InterfaceManager Tool, and the Computers and Networks Tool collection. The User Toolcollection is selected and expanded also.
� View pane (at the right)—For viewing information related to the node selected inthe navigation pane, either the contents of the selected folder, subordinate tools, ordata associated with the selected tool. In this example, it displays the contents ofthe User Tool collection (which is also expanded in the navigation pane). Note thatyou can double-click a node in either the view pane or the navigation pane toopen it.
� Information pane (at the bottom)—For displaying context-sensitive help or consoleevents.
Changing the SMC WindowThe layout of the SMC window is highly configurable. Use the following to changeyour layout:
� View menu—The Show option in the View menu hides or displays the optionalbars and panes. The other options in the View menu control the display of nodesin the view pane.
� Console menu—The Preferences option lets you set: the initial toolbox, theorientation of panes, clicking or double-clicking for selection, text and/or icons inthe tool bar, fonts, default tool loading, authentication prompts, and advancedlogins.
� Context Help/Console Events toggles—The icons at the bottom of the informationpane let you toggle between displaying context-sensitive help and console events.
SMC DocumentationThe main source of documentation for using the SMC and its tools is the online helpsystem. There are two forms of online help: context-sensitive help and expandedhelp topics. The context-sensitive help is tied to the currently selected feature and isdisplayed in the information pane. The expanded help topics are available from theHelp menu or by clicking cross reference links in the context-sensitive help; the helptopics appear in a separate viewer.
50 Trusted Solaris Administration Overview ♦ December 2000

How SMC Tools WorkThe SMC tools let you edit the attributes (referred to as properties) of items in thesystem databases. Interaction with the SMC tools take three general forms:
� Simple dialog boxes with online help on the left and data entry fields on the right.The Interface Manager below is an example; all its data can be displayed in thedialog box without the need for tabs.
Figure 2–2 Simple SMC Tool Example
� Tabbed dialog boxes are used to edit large sets of attributes. The dialog boxesdisplay online help on the left and data entry fields on the right. If there is moredata than will fit in a single window, a file folder metaphor is used with selectabletabs at the top for choosing a category of data. Within each tab, data may be typedin directly, selected from a menu, or entered in a separate special-purpose dialogbox. The User Manager below is an example of a tabbed dialog box.
Quick Tour of the Admin Tools 51

Figure 2–3 Tabbed SMC Tool Example
� Wizards are series of dialog boxes for creating new data records. They take youthrough a series of steps to enter the new data. They have instructions built intothe interface and use Next and Back buttons to progress through the series. Notethat some wizards enter a subset of the data with the remainder being supplied asdefaults; in such cases, you edit any changes in the corresponding propertiesdialog box. A typical example is the Add New User wizard below.
52 Trusted Solaris Administration Overview ♦ December 2000

Figure 2–4 SMC Wizard Example
As a general rule, you open the tools either by selecting the tool icon (in thenavigation pane or view pane) and choosing Open from the Actions menu or simplyby double-clicking the icon. This will display icons representing data items in theview pane. The operations you can perform on data items are accessed througheither the Actions menu or the popup menu, which is displayed by holding downthe right mouse button.
Trusted CDE ActionsThis section presents the CDE actions available to roles and describes how to use orchange the restricted editor used in these actions. The trusted CDE actions are listedin the following table.
Quick Tour of the Admin Tools 53

TABLE 2–1 Administrative Actions, Purposes, and Default Roles
Action Name Purpose of Action Default Rights Profile
Add AllocatableDevice
Creates entries in device_allocate (4), anddevice_maps (4), and creates an auxiliary file for anew allocatable or nonallocatable device. Userenters device name, device type, and lists all devicespecial files associated with the device. Seeadd_allocatable (1M).
Device Security
Admin Editor Edits any specified file Object Access Management
Audit Classes Edits audit_class (4) Audit Control
Audit Control Edits audit_control (4) Audit Control
Audit Events Edits audit_event (4) Audit Control
Audit Startup Edits the audit_startup.sh script [seeaudit_startup (1M)]
Audit Control
Check Encodings Runs chk_encodings (1M) on specified encodingsfile
Object Label Management
Check TN Files Runs tnchkdb (1M) on local tnidb (4),tnrhdb (4), and tnrhtp (4) files
Network Security
Check TN NIS+
TablesRuns tnchkdb (1M) on tnrhdb (4), andtnrhtp (4) NIS+ trusted network maps
Network Management
ConfigureSelectionConfirmation
Edits /usr/dt/config/sel_config [seesel_config (4)]
Object Label Management
Create NIS Client Runs ypinit (1M), using both the specifiedhostname for the NIS master and the specifieddomain name
Name Server Security
Create NIS+Client
Runs nisclient (1M), using both the specifiedhostname for the NIS+ master and the specifieddomain name
Name Server Security
Create NIS Server Runs ypinit (1M) using the specified domainname
Name Server Security
Create NIS+Server
Runs nisserver (1M) using the specified domainname
Name Server Security
54 Trusted Solaris Administration Overview ♦ December 2000

TABLE 2–1 Administrative Actions, Purposes, and Default Roles (continued)
Action Name Purpose of Action Default Rights Profile
Edit Encodings Edits specified label_encodings (4) file and runschk_encodings (1M)
Object Label Management
Name ServiceSwitch
Edits nsswitch.conf (4) Network Management
Populate NISTables
Runs nispopulate (1M) from the specifieddirectory
Name Service Security
Set Daily Message Edits /etc/motd Network Management
Set DefaultRoutes
Edits /etc/defaultrouter [see the route (1M)man page]
Network Management
Set DNS Servers Edits resolv.conf (4) Network Management
Set Mail Options Edits /etc/mail/sendmail.cf [seesendmail (1M)]
Mail Management
Set MountAttributes
Edits vfstab_adjunct (4) File System Security
Set Mount Points Edits vfstab (4) File System Management
Set Tsol Gateways Edits tsolgateways (4) Network Management
Shared Filesystem Edits dfstab (4); does not run share (1M) File System Management
View TableAttributes
Runs niscat (1) with the −o option on thespecified NIS+ trusted network database to displaythe table’s attributes.
Name Service Management
View TableContents
Runs niscat (1) on the specified NIS+ trustednetwork database to display the table’s contents.
Name Service Management
Admin EditorThe Admin Editor action, which can also be accessed from the commandadminvi (1M) is a modified version of the vi (1) command. It is restricted to prevent
Quick Tour of the Admin Tools 55

the user from executing shell commands and from writing to (saving to) any fileother than the original file being edited. The Admin Editor action, which isassigned to the security administrator role by default, should be used in most casesinstead of adminvi on the command line to edit or create administrative files. (Thisis due to the fact that the Admin Editor is wrapper for adminvi that incorporatesauditing and allows an editor preference.) You can assign the adminvi command toany users with the profile shell as their default if you need to provide them a texteditor with the restrictions of adminvi .
Changing the Default Admin EditorThe admin editor is launched through the /usr/dt/bin/trusted_edit shellscript, which brings up the editor specified in the EDITOR environment variable forthe role account, restricts saves, and audits any changes made at the time the file issaved. The variable is set to adminvi (1M) by default, but the security administratorrole can redefine the EDITOR variable to /usr/dt/bin/dtpad . When adminvi isspecified, /bin/adminvi is invoked as root to edit the file. The adminvi commandprevents the saving of the file with any other name. If dtpad (1) is specified, the New,Save , and Open options in the File menu are disabled when the action runs, sothat the file cannot be renamed.
Administering UsersYou can administer users through either the SMC User Tool applications or from thecommand line. This section is divided into these parts:
� “User Attribute Databases” on page 57
� “User Properties Dialog Box” on page 60
� “Right Properties Dialog Box” on page 62
Note - To administer users, you need the User Manager rights profile (for generaluser attributes) and the User Security rights profile (for security-related attributes).
Default User AttributesThe task of entering new users is greatly simplified by setting up default userattributes so that only those attributes unique to a specific user need be added. Thereare three mechanisms for setting up defaults:
56 Trusted Solaris Administration Overview ♦ December 2000

� policy.conf (4) database—lets you specify authorizations, rights profiles,password generation, account locking, label display, and unattended workstationcontrols.
� label_encodings (4) database—lets you specify default values for userclearances and minimum SLs and public alternative names for ADMIN_HIGH andADMIN_LOW.
� user templates—let you specify all user properties not covered by thepolicy.conf (4) and the label_encodings (4) databases except propertiesspecific to a user such as user name and ID.
The tools for creating new users are the Add User With Wizard... and AddUser From Template... menu options. The wizard approach offers simplicitybut with these tradeoffs:
� The login shell defaults to Bourne.
� It does not set a skeleton path for initialization files.
� Secondary groups are not set.
The user template approach offers a larger set of user properties, but requires you toset up one or more templates of default user attributes ahead of time. Both methodsshould be used in conjunction with the policy.conf (4) and thelabel_encodings (4) databases. The User Properties dialog box lets you makemodifications after the initial user information has been entered.
User Attribute DatabasesThe user information is held in the following databases:
� user_attr (4)—The /etc/user_attr file contains extended user attributes,using a keyword=value format.
� auth_attr (4)—The /etc/security/auth_attr file contains the definitions ofauthorizations, which can be included in rights profiles.
� prof_attr (4)—The /etc/security/prof_attr file contains the name,description, authorizations, subordinate rights profiles, and help files for rightsprofiles.
� exec_attr (4)—The /etc/security/exec_attr file contains commands andactions with security attributes assigned to rights profiles.
These databases can be edited manually, although this practice is not generallyrecommended.
The following figure shows how the databases work together to provide userattributes.
Quick Tour of the Admin Tools 57

user_attruser nameauthorizationsprofilestype (normal or role)roles (for type=normal)lock_after_retriespassword generation (manual or auto)idletimeidlecmd (lock or logout)labelviewlabel translationclearanceminimum label
prof_attrprofile namedescriptionhelp fileauthorizationssubordinate profiles
exec_attrprofile namepolicy (suser or tsol)command IDaction IDaction argumentsprivilegesclearancelabelreal/effective UID/GID
auth_attrauthorization namedisplay namelong descriptionhelp file
policy.confauthorizations grantedidle commandidle timelabelviewlock after retriespassword generation (manual or auto)profiles granted
label_encodingsdefault user clearancedefault user sensitivy labelAdmin Low nameAdmin High namedefault label view
User/Role
Figure 2–5 User Database Relationships
The user_attr database contains the attributes shown, including acomma-separated list of profile names. The contents of the profiles are split betweenthe prof_attr file, which contains profile identification information, authorizationsassigned to the profile, and subordinate profiles, and the exec_attr file, which
58 Trusted Solaris Administration Overview ♦ December 2000

contains commands and actions with their associated security attributes. Theauth_attr file supplies available authorizations to the prof_attr file and thepolicy.conf file. (Note that although you can assign authorizations directly tousers through user_attr , this practice is discouraged.) The policy.conf filesupplies default attributes to be applied to all users. The label_encodings filesupplies label defaults if they are not otherwise specified.
Managing Users from the Command LineThe user files can also be managed from the command line. The smuser (1M)command adds, modifies, deletes, and lists user information. You can usesmmultiuser(1M) to enter a batch of users.
Managing Users through the SMCThis section describes the SMC User Tool collection and selected dialog boxes asfollows:
� “User Tool Collection Summary” on page 59
� “User Properties Dialog Box” on page 60
� “Right Properties Dialog Box” on page 62
For complete descriptions of elements in the User Tool collection, refer to the onlinehelp.
User Tool Collection SummaryThe SMC User Tool collection is shown in the following figure.
Figure 2–6 SMC User Tool Collection
The six dialog boxes in the User Tool collection are:
� Administrative Roles dialog box—Lets you create or edit a role account and assignusers to roles. Note that the roles data is the same as the user data except that (1)
Quick Tour of the Admin Tools 59

there is no Roles tab since roles cannot be assigned to other roles, (2) there is noPassword Options tab because these are not appropriate for roles, and (3) theRoles dialog box has a Users tab for assigning users to the role.
� Groups dialog box—Lets you create or edit user groups and change the membersin the group.
� Mailing Lists dialog box—Lets you create or edit mail aliases, including changingthe recipients in the list.
� Rights dialog box—Lets you create or edit a rights profile. See “Right PropertiesDialog Box” on page 62 for an example of the Rights Properties dialog box and adescription of the rights profile data.
� User Accounts dialog box—Lets you add new users singly or in a batch, with orwithout a template, and lets you edit the properties of existing users. See “UserProperties Dialog Box” on page 60 for an example of the User Properties dialogbox and a description of the user data.
� User Templates dialog box—Lets you create a named set of user properties thatcan be applied to new users to facilitate data entry.
User Properties Dialog BoxThe User Properties dialog box is shown below with the General tab selected.
60 Trusted Solaris Administration Overview ♦ December 2000

Figure 2–7 User Properties Dialog Box
The following table describes the purpose of each tab in the User Properties dialogbox.
TABLE 2–2 User Properties Summary
Tab Description
General Specifies the user, the default login shell, and the account availability.
Group Sets the user’s primary and secondary groups for the purpose ofaccessing and creating files and directories.
Home Directory Specifies the user’s home directory, home directory server, automounting,and directory access.
Password Specifies whether the user or the adminstrator will select the firstpassword and whether the selection and changes will be manual or fromthe password generator.
Quick Tour of the Admin Tools 61

TABLE 2–2 User Properties Summary (continued)
Tab Description
PasswordOptions
Sets the time limits and requirements for password changes.
Mail Specifies the server that provides email and the mailbox in which it isreceived.
Rights Allows rights profiles to be assigned to the user. The precedence of theassigned rights profiles can be changed.
Roles Allows available roles to be assigned to the user.
Trusted SolarisAttributes
Specifies the clearance and minimum label at which the user can operateand how labels are displayed to the user. Also specifies a time limit forwhich a workstation may remain idle and the action taken when the limitis reached.
Audit Specifies the audit classes for which the user is to be audited.
Right Properties Dialog BoxThe Rights Properties dialog box is shown below with the General tab selected.
62 Trusted Solaris Administration Overview ♦ December 2000

Figure 2–8 Rights Properties Dialog Box
The following table describes the purpose of each tab in the Right Properties dialogbox
TABLE 2–3 Rights Manager Dialog Box Summary
Tab Description
General Identifies and describes the rights profile and provides the name of thehelp file used to explain it.
Commands Assigns commands to the rights profile and adds security attributes(effective and real UIDs and GIDs; minimum label and clearance; andinheritable privileges) to specific commands in the profile.
Actions Assigns CDE actions to the rights profile and adds security attributes(effective and real UIDs and GIDs; minimum label and clearance; andinheritable privileges) to specific actions in the profile.
Quick Tour of the Admin Tools 63

TABLE 2–3 Rights Manager Dialog Box Summary (continued)
Tab Description
Authorizations Assigns authorizations to the profile.
SupplementaryRights
Specifies other rights profiles to be contained within the current rightsprofile.
Administering Hosts and NetworksTo administer hosts and networks, you need to open the Computers and Networkstool collection. A typical collection is shown in the view pane of the following figure.
64 Trusted Solaris Administration Overview ♦ December 2000

Figure 2–9 Computers and Networks Tool Collection
This gives you access to three tools:
� Computers tool—When open, the host icons for all local networks are displayed inthe view pane, which let you edit IP address, ethernet adress, and host aliasinformation. A typical Computer properties dialog box is shown below.
Quick Tour of the Admin Tools 65

Figure 2–10 Computer Properties Dialog Box
� Subnetwork tool—This tool groups hosts by subnetwork and works the same asthe Computers tool above. Its icon is displayed as two monitors connected by acable, with a partial IP address as a caption.
� Security families tool—Lets you add or modify network templates including theassignments of hosts to the templates. This tool is described in more detail below.
Security Families Tool SetA security family is a group of workstations that use a common networking protocoland have the same security requirements. As a result, you can apply the sametemplate of network security attributes to them for the purpose of receiving andtransmitting data. Trusted networking and templates are explained in more detail inChapter 3.
When the Security Families tool is opened, all available templates display as icons.You can modify either the templates or the host assignments as follows:
� If you double-click a template icon, all hosts in that security family, that is, thoseassigned to the selected template, are displayed as icons. Double-clicking a host
66 Trusted Solaris Administration Overview ♦ December 2000

icon (or selecting it and choosing Properties from the Action or popup menu) letsyou modify its IP address or template assignment.
� If you select a template icon and choose Properties from the Action or popupmenu, the Modify Template dialog box is displayed, as illustrated in the followingfigure, and you can change the definition of the template.
Figure 2–11 Modify Template Dialog Box
The tabs in the Modify Template dialog box are described in the following table.
TABLE 2–4 Template Dialog Box Summary
Tab Description
General Specifies templates, host types, and minimum/maximum labels.
Access ControlAttributes
Specifies security attributes to be applied to incoming data from hosts towhich this template is applied. The potential incoming security attributesinclude minimum label, maximum label, default label, and defaultclearance.
AdvancedSecurityAttributes
Specifies security attributes to be applied to outgoing data to hosts towhich this template is applied. The potential outgoing security attributesinclude DOI, IP label type, forced privileges, allowed privileges, RIPSOsend class, RIPSO send PAF, RIPSO return PAF, and CIPSO domain.
Quick Tour of the Admin Tools 67

Administering Other Aspects of theTrusted Solaris EnvironmentThis section lists other commands available for administering elements in the TrustedSolaris operating environment.
File Management CommandsFile privileges and labels can be administered either through the File Manager or thefollowing commands:
� getfattrflag (1)—for getting a file’s security attributes.
� setfattrflag (1)—for setting a file’s security attributes.
� getfpriv (1)—for getting an executable file’s forced and allowed privileges.
� setfpriv (1)—for setting an executable file’s forced and allowed privileges.
� getlabel (1)—for getting a file’s label.
� setlabel (1)—for setting a file’s label.
� testfpriv (1)—for checking an executable file’s forced and allowed privilege sets.
File System Management CommandsThe following commands are for administering attributes on file systems.
� getfsattr (1M)—for displaying the security attributes of a file system.
� getfsattr_ufs (1M)—for displaying the security attributes of a UFS file system.
� setfsattr (1M)—for setting the security attributes on a file system. The filesystem should be unmounted first.
� newsecfs (1M)—for setting security attributes on a new file system.
Mount ManagementThe following commands are for mounting file systems. Check the Trusted SolarisSummary section of each man page for differences from the Solaris operatingenvironment.
� mount (1M)—requires the sys_mount privilege. Both mandatory and discretionaryread access (or overriding privileges) are required to the mount point and the
68 Trusted Solaris Administration Overview ♦ December 2000

device being mounted. Depending on the configuration of the vfstab_adjunctfile, the process may need some combination of the proc_setsl and proc_setclrprivileges. The mount command supports mounts to multilabel directories(MLDs). It has a special option, −-S which lets you specify security attributes tobe associated with the filesystem mount (this option requires that you havesufficient clearance for the label specified).
� share_nfs (1M)—provides these options with -S :
� dev|nodev – access to character and block devices is allowed or disallowed.The default is dev.
� priv|nopriv – Forced privileges on execution are allowed or disallowed. Thedefault is priv.
Running share_nfs requires the following:� sys_nfs privilege� effective uid 0� process label of [ADMIN_LOW]
� share (1M)—makes a resource of a specified file system type available formounting. It requires the sys_nfs privilege.
� unshare (1M)—makes a resource unavailable for mounting. It requires thesys_nfs privilege.
� nfsstat (1M)—lets you display statistics concerning the NFS and RPC (remoteprocedure call) interfaces to the kernel. The Trusted Solaris version of thenfsstat command requires that you have the net_config privilege when usingthe -z option, which reinitializes the statistics.
� nfsd (1M)—handles client file system requests. The Trusted Solaris version of thenfsd command requires the sys_nfs and net_mac_read privileges to run.
Process CommandsThe following commands are for managing processes:
� pattr (1)—lets you display the viewable Process Attribute Flags of the currentprocess or a process specified by pid. Those flags that cannot be viewed normallycan be viewed with privilege.
� pclear (1)—lets you display the clearance at which the selected process isrunning.
� plabel (1)—gets the CMW label (that is, combined sensitivity label andinformation label) for the process.
� ppriv (1)—gets the effective privileges of a process.
� pprivtest (1)—tests if the specified privileges are currently in effect.
Quick Tour of the Admin Tools 69

70 Trusted Solaris Administration Overview ♦ December 2000

CHAPTER 3
Administering Trusted Networking
This chapter describes networking in the Trusted Solaris environment. The TrustedSolaris networking subsystem is an exhanced version of the regular Solaris TCP/IPnetwork. The extensions enable communication between workstations on thenetwork in a trusted fashion. The networking subsystem helps ensure that thesystem’s security policy (for example, MAC) is preserved across distributedapplications. The amount of administration and protection required for your networkdepends on whether it is homogeneous or heterogeneous.
Note - In the default configuration, the security administrator role is responsible fornetwork security.
� “Overview of Trusted Solaris Networking” on page 71
� “Routing in Trusted Solaris” on page 78
� “Trusted Solaris Network Commands” on page 83
� “Troubleshooting Networks” on page 84
Overview of Trusted Solaris NetworkingThis section covers the following networking topics:
� Homogeneous networks
� Heterogeneous networks
� Host types
� Network configuration databases
� Related subsystems
71
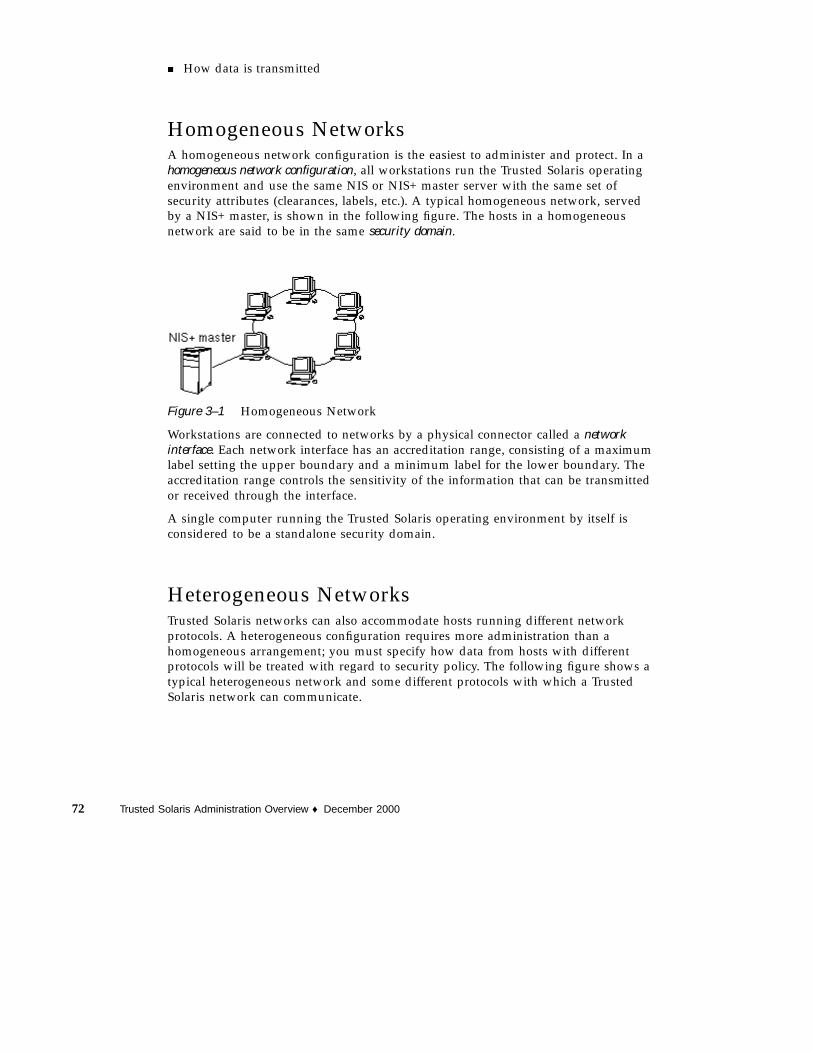
� How data is transmitted
Homogeneous NetworksA homogeneous network configuration is the easiest to administer and protect. In ahomogeneous network configuration, all workstations run the Trusted Solaris operatingenvironment and use the same NIS or NIS+ master server with the same set ofsecurity attributes (clearances, labels, etc.). A typical homogeneous network, servedby a NIS+ master, is shown in the following figure. The hosts in a homogeneousnetwork are said to be in the same security domain.
Figure 3–1 Homogeneous Network
Workstations are connected to networks by a physical connector called a networkinterface. Each network interface has an accreditation range, consisting of a maximumlabel setting the upper boundary and a minimum label for the lower boundary. Theaccreditation range controls the sensitivity of the information that can be transmittedor received through the interface.
A single computer running the Trusted Solaris operating environment by itself isconsidered to be a standalone security domain.
Heterogeneous NetworksTrusted Solaris networks can also accommodate hosts running different networkprotocols. A heterogeneous configuration requires more administration than ahomogeneous arrangement; you must specify how data from hosts with differentprotocols will be treated with regard to security policy. The following figure shows atypical heterogeneous network and some different protocols with which a TrustedSolaris network can communicate.
72 Trusted Solaris Administration Overview ♦ December 2000
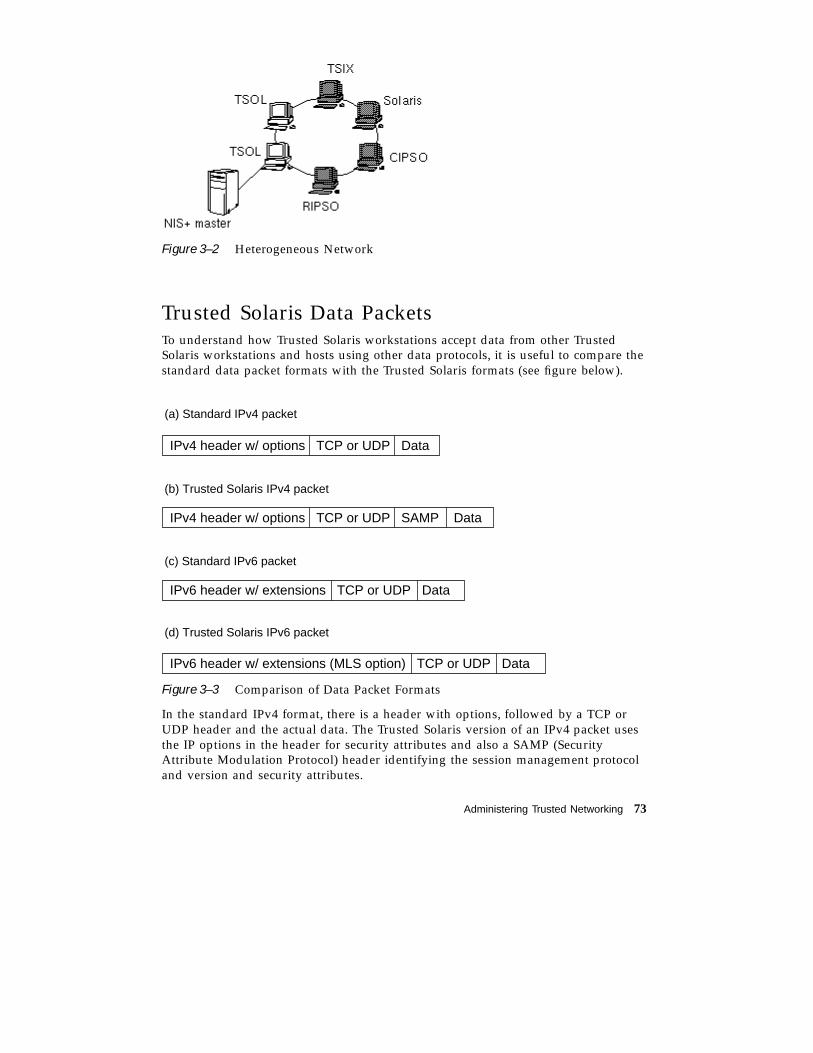
Figure 3–2 Heterogeneous Network
Trusted Solaris Data PacketsTo understand how Trusted Solaris workstations accept data from other TrustedSolaris workstations and hosts using other data protocols, it is useful to compare thestandard data packet formats with the Trusted Solaris formats (see figure below).
(a) Standard IPv4 packet
(b) Trusted Solaris IPv4 packet
(c) Standard IPv6 packet
(d) Trusted Solaris IPv6 packet
IPv4 header w/ options TCP or UDP SAMP Data
IPv4 header w/ options TCP or UDP Data
IPv6 header w/ extensions TCP or UDP Data
IPv6 header w/ extensions (MLS option) TCP or UDP Data
Figure 3–3 Comparison of Data Packet Formats
In the standard IPv4 format, there is a header with options, followed by a TCP orUDP header and the actual data. The Trusted Solaris version of an IPv4 packet usesthe IP options in the header for security attributes and also a SAMP (SecurityAttribute Modulation Protocol) header identifying the session management protocoland version and security attributes.
Administering Trusted Networking 73

The standard IPv6 format contains a header with extensions, followed by a TCP orUDP header and the actual data. The Trusted Solaris IPv6 packet includes amultilevel security option in the header extensions.
When you configure the network configuration databases for your site, you specifyall hosts with which workstations on your network can communicate. You set uptemplates with default security attribute values, categorized by the host types asexplained in the following section.
Security FamiliesNetwork administration in the Trusted Solaris environment is based on the conceptof security families, that is, treating host machines with common protocols andidentical security requirements the same way. For a host to be able to communicatewith other hosts on a Trusted Solaris network, you must identify its host type, thatis, its networking protocol, and assign it a template of security attributes.
Host Types in NetworkingTrusted Solaris classifies host types according to the networking protocols as follows:
� Trusted Solaris —refers to workstations running Trusted Solaris. It uses binaryrepresentation for security attributes in the protocol.
� unlabeled —refers to hosts that do not send or recognize security attributes.
� TSIX —refers to hosts supporting the TSIX (RE) 1.1 (Trusted Systems InformationeXchange for Restricted Environments standard). It uses the same format asTrusted Solaris hosts (see Figure 3–3) except that it uses tokens (arbitrary 32-bitnumbers) rather than binary data to represent security attributes. The tokens usethe security attribute token mapping protocol (SATMP).
� CIPSO—refers to hosts conforming to CIPSO, TSIX (RE) 1.1. The only securityattributes supported under CIPSO are the DOI (domain of interpretation) andCIPSO label.
� RIPSO—refers to hosts conforming to RIPSO, as described in the IETF RFC 1108.The Trusted Solaris environment supports an administratively-set fixed RIPSOlabel to be applied to incoming and outgoing network packets. Although thisfunctionality does not fully meet the RFC specifications, it supplies sufficientfunctionality where RIPSO labels are needed.
Note - The TSIX, CIPSO, and RIPSO host types lie in the category of hosts runningother trusted operating environments. The unlabeled host type is intended for thosehosts that use the standard networking protocol and do not support securityattributes.
74 Trusted Solaris Administration Overview ♦ December 2000

Networking Security AttributesThe security attributes that can be specified in networking templates are:
� minimum label—defines the bottom of the label range for this security family.Outgoing packets to hosts in this security family cannot be below the minimumlabel.
� maximum label—defines the top of the label range for this security family.Outgoing packets to hosts in this security family cannot be higher than themaximum label.
� default label—sets the label to be applied by default to incoming packets fromhosts in this security family.
� default clearance—sets the clearance to be applied by default to incoming packetsfrom hosts in this security family.
� DOI—an integer that identifies the domain of interpretation, that is, the labellingscheme used by the default label and clearance for the particular host type.
� IP label—identifies type of IP label: RIPSO, CIPSO, or none. If CIPSO, the /etc/system and label_encodings files must be modified to accommodate theADMIN_HIGH label (see the “About Security Families” help card). If RIPSO, youmust specify a RIPSO label for the RIPSO Send Class
� allowed privileges—can be used to restrict privileges available to remote TrustedSolaris hosts. If these hosts can use any privileges, set All ; if there is a limit,specify only those privileges that can be applied.
� forced privileges—sets privileges to enable a remote host, typically an unlabeledhost, to perform specific functions that may override security policy.
� RIPSO Send Class—used by RIPSO hosts and with RIPSO IP labels only, theclassification level at which datagrams sent to a host of that template are protected.The predefined Classes are Top Secret, Secret, Confidential and Classified.
� RIPSO Send PAF (protection authority flag)—used by RIPSO hosts and withRIPSO IP labels only, the bit mask identifying the protection authorities ondatagrams sent to a host of that template. The predefined authorities are:GENSER, SIOP-ESIm SCI, NSA, and DOE.
� RIPSO Return PAF (protection authority flag)—used by RIPSO hosts and withRIPSO IP labels only, specifies the PAF portion of the RIPSO label on ICMP errormessages sent back from hosts using this template.
Networking TemplatesThe purpose of the Trusted Solaris networking templates is to specify the securityattribute values to be applied to hosts within a security family. Not all of the securityattributes are appropriate to each host type. The following table indicates how
Administering Trusted Networking 75

security attributes are applied to which host types. The term default means that theattribute is supplied by default. Optional means that is your choice whether to usethis default. Not allowed means that any entry will be ignored. Required with orwithout conditions means the attribute is mandatory.
TABLE 3–1 Security Attributes by Host Type
Host Types —>Security Attributes
TrustedSolaris TSIX Unlabeled CIPSO RIPSO
minimum label default default default default default
maximum label default default default default default
default label not allowed not allowed default notallowed
default
default clearance not allowed not allowed default default default
DOI optional optional optional optional optional
IP label optional optional optional optional optional
forced privileges not allowed not allowed default default default
allowed privileges default default not allowed notallowed
not allowed
RIPSO Send Class required ifhost or IPlabel isRIPSO
not allowed required ifhost or IPlabel isRIPSO
notallowed
required
RIPSO Send PAF required ifhost or IPlabel isRIPSO
not allowed required ifhost or IPlabel isRIPSO
notallowed
required
RIPSO Return PAF required ifhost or IPlabel isRIPSO
not allowed required ifhost or IPlabel isRIPSO
notallowed
required
76 Trusted Solaris Administration Overview ♦ December 2000

Network Configuration DatabasesThere are three network configuration databases for establishing externalcommunication:
� tnrhdb
� tnrhtp
� tnidb
These databases are loaded into the kernel and are used in accreditation checks asdata is transmitted from one host to another. These databases are maintained usingthe Computers and Security Families dialog boxes in the SMC Computers andNetworks tool and the SMC Interface Manager. Trusted Solaris can use a namingservice for central management of the tnrhdb and tnrhtp databases; the tnidbdatabase is maintained separately on each host.
Network host information is stored in the tnrhdb (4) database. It holds the IPaddresses for all hosts permitted to communicate with workstations in the networkand the templates (from the tnrhtp database) assigned to them. The tnrhdbdatabase can also hold default values as part of a fallback mechanism. Substituting 0in the rightmost byte(s) of the IP address serves as a wildcard for unlisted hosts withIP addresses that match the non-zero portion of the default. You can also set a fixedprefix length by adding a slash (/) followed by the number of fixed bits. See thefollowing table for examples.
TABLE 3–2 tnrhdb Fallback Mechanisms Example
tnrhdb Entry Addresses Covered
129.150.118.0:tsol addresses beginning with 129.150.118.
129.150.0.0:tsol addresses beginning with 129.150.
129.0.0.0:tsol addresses beginning with 129.
0.0.0.0:tsol all addresses on network
129.150.118.128/26:tsol addresses from 129.150.118.0 to129.150.118.63
Network template information is stored in the tnrhtp (4) database. In ahomogeneous network, only one template is needed; in a heterogeneous network,you need a separate template for each type of host. The attributes in the templatesprovide attributes from incoming data. They also provide destination information foroutgoing data and are use in accreditation checks for incoming packets.
Administering Trusted Networking 77

The tnidb (4) database is local to each host. It contains the host’s network interfaceswith their accreditation ranges. Default values for labels, clearances, effective UIDs/GIDs, and forced privileges apply to communications to and from hosts runningenvironments that do not support these attributes. Note that any default values set intnrhtp override the values in tnidb . By default, the file is empty because defaultvalues are used for all interfaces.
Related SubsystemsThe trusted NFS feature of Trusted Solaris permits mounting between Trusted Solarishosts and the other host types. Transmitted data is protected by MAC and DAC.Missing labels are supplied by the tnrhtp and tnidb databases. For moreinformation, see “Mounting Various Types of File Systems in the Trusted SolarisSystem” in Trusted Solaris Administrator’s Procedures.
Routing in Trusted SolarisIn the Trusted Solaris operating environment, routes between hosts on differentnetworks must maintain security at each step in the transmission.
Loading Routing Information at Boot TimeWhen a Trusted Solaris host boots, it loads routing information so it can transmitdata. If the file /etc/tsolgateways (which is maintained manually by theadministrator) exists, then the gateways in the file serve as the host’s defaults. If,however, /etc/tsolgateways does not exist, then the host uses the default routesfrom the file /etc/defaultrouter, which is also maintained manually by theadministrator. If either file exists, then the host is said to use static routing.
If neither the /etc/tsolgateways nor the /etc/defaultrouter file exists, thenthe host uses dynamic routing and must start a special daemon, either in.rdisc (1M)(the network router discovery daemon) or in.routed (1M) (the network routingdaemon). If the host also serves as a gateway (that is, a host that connects to two ormore networks), then both in.rdisc and in.routed are started.
Routing Tables in the Trusted Solaris EnvironmentThe main objective for routing is to find the shortest secure route between two hosts.Trusted Solaris routing tables are based on extended metrics (called emetrics). An
78 Trusted Solaris Administration Overview ♦ December 2000

emetric is a combination of a routing metric and Security Routing Information (SRI),for measuring security. The SRI can incorporate these security attributes:
� Minimum SL
� Maximum SL
� DOI
� RIPSO label
� RIPSO error
� CIPSO only
� RIPSO only
This information is propagated by the routing daemon in.routed using the TrustedSolaris-extended Routing Information Protocol if dynamic routing is used, or if staticrouting is used, by manual entry using the route command or through the /etc/tsolgateways or /etc/defaultrouter files. The emetric for a particular route isused for accreditation checks when this route is being considered.
Not every route in the routing table must have an emetric. If a route does not havean emetric, the remote host template of its first hop gateway is used for theaccreditation check instead.
Accreditation CheckingTo determine the suitability of a route regarding security, Trusted Solaris runs aseries of tests called accreditation checks on the source host, destination host, and theroute’s emetrics. If the emetric for a particular route is missing, the security attributesfor the first-hop gateway in the route are checked. A host’s security attributes arederived from information in the tnrhdb , tnrhtp , and tnidb files. The tests check,for example, that a data packet’s label is within the range of each host in the route.
Source Accreditation ChecksThe accreditation checks conducted on the source host are:
� The label of the data being sent must be within the destination host’s accreditationrange.
� The label of the data must be within the accreditation range of the emetric for theroute or, if the emetric is not available, first-hop gateway’s security attributes.
� The label of the data must be within the accreditation range of the source host’snetwork interface.
� The DOI of an outgoing packet must match the DOI of the destination and theroute’s emetric (or first-hop gateway).
Administering Trusted Networking 79
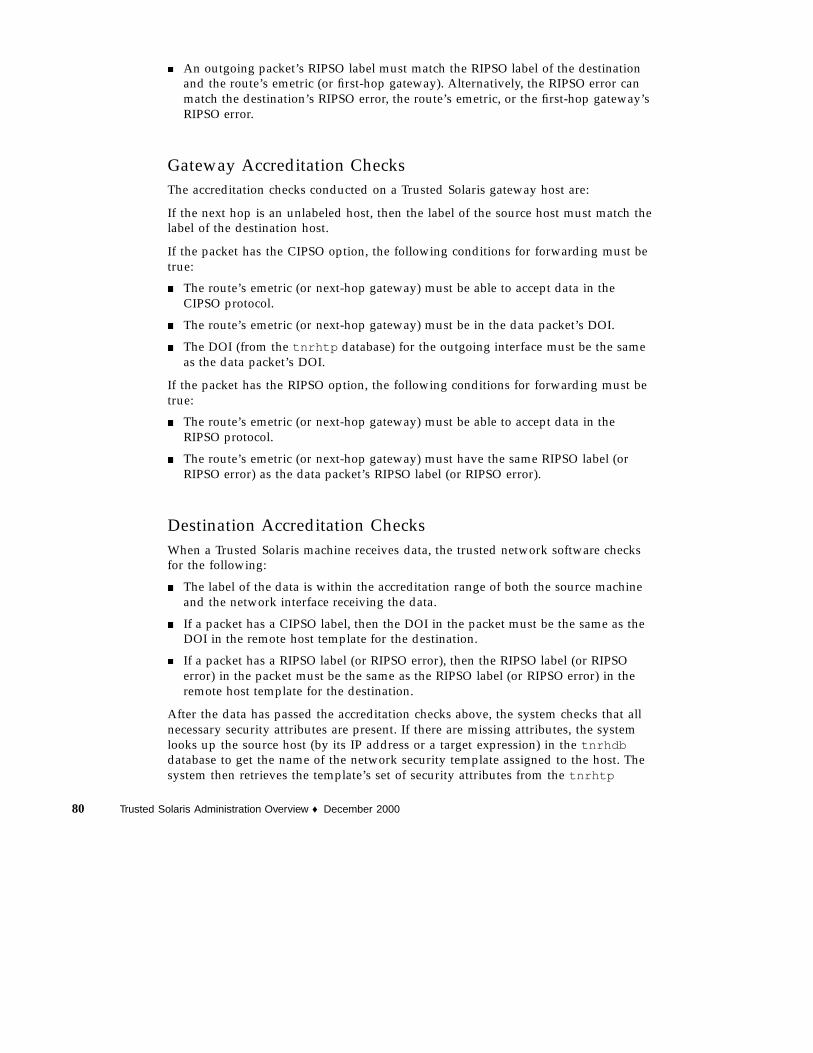
� An outgoing packet’s RIPSO label must match the RIPSO label of the destinationand the route’s emetric (or first-hop gateway). Alternatively, the RIPSO error canmatch the destination’s RIPSO error, the route’s emetric, or the first-hop gateway’sRIPSO error.
Gateway Accreditation ChecksThe accreditation checks conducted on a Trusted Solaris gateway host are:
If the next hop is an unlabeled host, then the label of the source host must match thelabel of the destination host.
If the packet has the CIPSO option, the following conditions for forwarding must betrue:
� The route’s emetric (or next-hop gateway) must be able to accept data in theCIPSO protocol.
� The route’s emetric (or next-hop gateway) must be in the data packet’s DOI.
� The DOI (from the tnrhtp database) for the outgoing interface must be the sameas the data packet’s DOI.
If the packet has the RIPSO option, the following conditions for forwarding must betrue:
� The route’s emetric (or next-hop gateway) must be able to accept data in theRIPSO protocol.
� The route’s emetric (or next-hop gateway) must have the same RIPSO label (orRIPSO error) as the data packet’s RIPSO label (or RIPSO error).
Destination Accreditation ChecksWhen a Trusted Solaris machine receives data, the trusted network software checksfor the following:
� The label of the data is within the accreditation range of both the source machineand the network interface receiving the data.
� If a packet has a CIPSO label, then the DOI in the packet must be the same as theDOI in the remote host template for the destination.
� If a packet has a RIPSO label (or RIPSO error), then the RIPSO label (or RIPSOerror) in the packet must be the same as the RIPSO label (or RIPSO error) in theremote host template for the destination.
After the data has passed the accreditation checks above, the system checks that allnecessary security attributes are present. If there are missing attributes, the systemlooks up the source host (by its IP address or a target expression) in the tnrhdbdatabase to get the name of the network security template assigned to the host. Thesystem then retrieves the template’s set of security attributes from the tnrhtp
80 Trusted Solaris Administration Overview ♦ December 2000
database. If there are still security attributes missing, the software looks up thenetwork interface in the tnidb database and retrieves default security attributes.
Routing ExampleAn example of routing in the Trusted Solaris environment is shown in the followingfigure; Figure 3–4 (a) shows the routing diagram and Figure 3–4 (b) shows therouting table. There are three potential routes between Host 1 and Host 2:
� Route #1 is the shortest with a Routing Information Protocol (RIP) metric of 3.Datagrams using route #1 are restricted to a label range of CONFIDENTIAL (C) toSECRET (S).
� Route #2 has a larger label range of ADMIN_LOW to ADMIN_HIGH. Datagramsusing route #2 must use have an IP Option set to CIPSO.
� Route #3 has the longest distance of the three routes with an RIP of 6. Its SecurityRouting Information is unknown, so any security attributes must be derived fromthe template in tnrhtp for Gateway #5.
Host 1 Host 2
Gateway 1
Gateway 3
Gateway 5
Gateway 2
Gateway 4
Gateway 6
Route #1
Route #2
Route #3
Figure 3–4 Typical Trusted Solaris Routes and Routing Table
RouteFirst hopgateway RIP Metric Min SL Max SL DOI CIPSO
1 Gateway 1 3 C S
2 Gateway 3 4 ADMIN_LOWADMIN_HIGH Y
3 Gateway 5 6
Using Routing CommandsTo display the contents of the routing table, use the command netstat with the -Roption. To make a manual change to the routing table, use the route command withthe add or delete option. For example,
% route add net 129.150.115.0 129.150.118.39 \−m metric=2,min_sl=c,max_sl=ts,ripso_label="top_secret sci",\ripso_error="genser;sci"
Administering Trusted Networking 81

add net 129.150.115.0: gateway 129.150.118.39
adds to the routing table a loop with the hosts at 129.150.115.0 and 129.150.118.39with a distance metric of 2, an SL range from C to TS, a RIPSO label = top_secret sci,and a RIPSO error = genser;sci. To see the results of the added loop, type:
% netstat -Rn...129.150.115.0 129.150.118.39 UG 0 0
metric=2,min_sl=C,max_sl=TS,ripso_label=0x3d 0x20000000 (top_secret sci),ripso_error=0xa0000000 (genser;sci)...
The new route is shown above. The other routes are replaced by ellipses (...). Asecond example of adding a route with two new emetrics and viewing the newrouting table follows:
% route add net 129.150.114.0 129.150.118.39 \−m metric=3,min_sl=admin_low,max_sl=s,doi=3 \−m metric=4,min_sl=c,max_sl=admin_high,doi=4,ripso_label="top_secret sci",\ripso_error="genser;sci"
add net 129.150.114.0: gateway 129.150.118.39% netstat -Rn...129.150.115.0 129.150.118.39 UG 0 0
metric=2,min_sl=C,max_sl=TS,ripso_label=0x3d 0x20000000 (top_secret sci),ripso_error=0xa0000000 (genser;sci)129.150.114.0 129.150.118.39 UG 0 0
metric=4,min_sl=C,max_sl=ADMIN_HIGH,doi=4,ripso_label=0x3d 0x20000000 (top_secret sci),ripso_error=0xa0000000 (genser;sci)
metric=3,min_sl=ADMIN_LOW,max_sl=S,doi=3...
Routing through Non-Trusted Solaris GatewayClustersIt is possible to route secure data through clusters containing non-Trusted Solarisgateways. This procedure is called tunneling. For our purposes, a cluster is acontiguous set of either Trusted Solaris hosts and gateways only, or non-TrustedSolaris hosts and gateways only. An edge gateway is a gateway (Trusted Solaris ornon-Trusted Solaris) that connects a cluster to a cluster of the other type.
The following figure shows an example of tunneling. The shaded rectanglesrepresent non-Trusted Solaris gateways. The loops with thick lines indicate clusters.Cluster #1 is a non-Trusted Solaris cluster; cluster #2 is a Trusted Solaris cluster.
82 Trusted Solaris Administration Overview ♦ December 2000

Figure 3–5 Tunneling Example
To transmit data from host #1 to host #2 requires a route through cluster #1, anon-Trusted Solaris cluster, and cluster #2, a Trusted Solaris cluster. This is permittedunder these two conditions only:
� All the gateways in the non-Trusted Solaris cluster (in the example, gateways #1,#2, and #3) must have the same security attributes. At start-up, each gateway musthave a local file called /etc/security/tsol/tunnel containing the addressesof target hosts with which it can connect.
� If there is more than one possible route and the routes enter the non-TrustedSolaris cluster through the same edge gateway and can exit from the clusterthrough different edge gateways, then the emetrics for these routes must be thesame. For example, assume that gateway #4 has an SL range of CONFIDENTIALto SECRET and gateway #5 has a broader range of ADMIN_LOW toADMIN_HIGH. Because gateway #1 is a non-Trusted Solaris host, it uses astandard routing table without security attributes and would be unable todistinguish between the route through gateway #4 and the route through gateway#5.
Trusted Solaris Network CommandsThe following network commands come from the Solaris environment and have beenmodified to operate in the Trusted Solaris environment (see the Trusted SolarisSummary section of each man page for the differences).
� arp (1M)
� ifconfig (1M)
� ndd (1M)
� netstat (1M)
� rdate (1M)
� route (1M)
� snoop (1M)
� spray (1M)
Administering Trusted Networking 83

The following network commands are ony available in the Trusted Solaris operatingenvironment.
� tnchkdb (1M)
� tnctl (1M)
� tnd (1M)
� tninfo (1M)
� tokmapctl (1M)
� tokmapd (1M)
The tnd and tokmapd commands launch the trusted network daemon and tokenmapping daemons, respectively. Token mapping is used when your network iscommunicating with TSIX host types. The tnctl command loads networkinginformation into the kernel caches; the tninfo command lets you check thisinformation. The tnchkdb examines the network configuration databases forproblems. The tokmapctl command lets you troubleshoot problems with TSIXtoken mapping.
Troubleshooting NetworksThe Trusted Solaris tools and commands described in this section can help youdebug networking problems. For information on the commands, refer to theappropriate man pages. Refer also to Part 3, “Managing Hosts and Networks,” in theTrusted Solaris Administrator’s Procedures manual. In addition, standard networkdebugging commands such as snoop (1M), ipcs (1), and netstat (1M) areavailable in the Trusted Solaris environment.
� To get security information for the source, destination, and gateway hosts in thetransmission, use tninfo (1M). You can check whether the information that thekernel is caching is correct. This command is intended to be run at ADMIN_HIGHand effective user ID 0. These restrictions can be overridden by thefile_mac_read , sys_trans_label , and file_dac_read privileges. Usetninfo as follows:
� tninfo -h [< hostname>] displays the IP Address, port, and template for allhosts or the given host.
� tninfo -t < templatename> displays the following information for alltemplates or the given template: host type, minimum label (in label and hexformat), maximum label (in label and hex format), allowed privileges, and IPlabel type (RIPSO, CIPSO, or none).
� tninfo -k displays kernel statistics: number of host accreditation checkfailures, number of network accreditation check failures, and memoryallocation statistics.
84 Trusted Solaris Administration Overview ♦ December 2000

� To change or check network security information, use the SMC tools to access thetnrhtp , tnrhdb , and tnidb files. If you are not using the NIS+ tables fornetworking, these changes will take place immediately after you exit from SMC. Ifyou are using NIS+ tables, then the changes will take place when the networkdaemon next polls the databases or when the system is rebooted. If you wish thechange to take place sooner, you can shorten the polling interval usingtnctl (1M) with the -p option on the host that needs the updated information.
� To collect debugging information from the network daemon if the network isalready running, use tnctl (1M) with the -d option. Debugging data is writtenby default to the file /var/tsol/tndlog . Search the log file for failures andother symptoms of problems.
� To check TSIX transmissions, use tokmapd with the -d option (or tokmapctl -d )to create a log and choose an appropriate debugging level. Debugging data iswritten by default to the file /var/tsol/tokmapdlog . Use snoop (1M) to checkthat both source and destination can transmit tokens.
Overview of Trusted NFS MountingMounting filesystems in the Trusted Solaris environment is similar to mounting inthe regular Solaris system. You can enter the standard mounting information in thevfstab file on the client and the sharing information in the dfstab file on theserver or you can set up mounting dynamically by using the mount (1M) command.
The major differences for setting up mounts in the Trusted Solaris environment are:
� The vfstab (4) file is supplemented by a special file called vfstab_adjunct (4),whose purpose is to hold security attributes to be applied to the file system.
� The server needs to have a template assigned in its tnrhdb file that it can applyto the client. If you are setting up a mount between two Trusted Solaris hosts, usea template for Trusted Solaris hosts. If you are setting up a mount between aTrusted Solaris host and an unlabeled host, all data is transmitted by default at thesingle label specified for the unlabeled host in the tnrhdb file; however, you canspecify different non-label security attributes at mount time using thevfstab_adjunct (4) file or the mount (1M) command with the −S or −o option.
� The physical connection between the server and the client must be capable ofpassing the accreditation checks discussed in “Routing Example” on page 81.
� The mount (1M) command requires that UID is 0. Thus you can only run mountfrom a role or user account with an execution profile that includes mount ,specifies an effective UID of 0, and runs at ADMIN_LOW. The mount commandmay need these privileges: sys_mount , file_dac_read , file_dac_write ,file_dac_search , file_mac_read , file_mac_write , file_mac_search ,
Administering Trusted Networking 85

net_privaddr , proc_setsl , proc_setclr , and sys_trans_label . Seepriv_desc (4) for more information on these privileges. See also“Managing Filesand File Systems” in Trusted Solaris Administrator’s Procedures
Specifying Security Attributes for MountingThe vfstab_adjunct file and mount command with −S option let you specify thesecurity attributes for mounts.
The available security attributes are:
� label—the label of the files
� forced privileges—the set of forced privileges to be applied to executable files inthe mounted filesystem
� allowed privileges—the set of allowed privileges to be applied to executable filesin the mounted filesystem
� label range—the range of labels that can be applied to directories and files in themounted filesystem
� MLD prefix—a substitute for .MLD. as a prefix for multilevel directories
86 Trusted Solaris Administration Overview ♦ December 2000
CHAPTER 4
Administering Auditing
This chapter introduces you to auditing in the Trusted Solaris environment. Auditingis the process of capturing user activity and other events on the system, storing thisinformation in a set of files called an audit trail, and producing system activityreports to fulfill site security policy. Should a breach of security occur, the auditrecords may enable you to determine how the breach occurred and which user orusers were involved. For a more complete description of the auditing process, referto the Trusted Solaris Audit Administration guide.
� “Planning and Setting Up Auditing ” on page 87
� “Auditing Tools” on page 89
Planning and Setting Up AuditingBefore you set up auditing for your site, you need to:
� Decide which classes of events to audit, including any new classes or events youwish to add to your site.
� Plan where to store the auditing information.
� Define the audit configuration files.
Audit ClassesYou need to decide which events you want to audit. You can capture user actions ornon-attributable events (that is, events such as interrupts which cannot be attributedto specific users). For the user actions, you can separate successful and failed
87

transactions. Auditing events are organized into classes in Trusted Solaris. Theauditing classes for files fall into these general areas:
� Open for reading
� Open for writing
� Attribute changes
� Creations
� Deletions
You can also create your own classes and events as needed and can rearrange themapping of classes to events. Other classes keep track of such items as processoperations, network events, window operations, IPC operations, administrativeactions, logins, logouts, application-defined events, ioctl system calls, programexecutions, Xserver operations, and miscellaneous events. Because auditinginformation can take up a lot of disk space, you need to decide carefully whichevents to auditand select only the classes that contain events necessary for your site’ssecurity policy.
Public ObjectsOne way to reduce the amount of auditing information collected is to specify certainfiles and directories to be public objects. A public object typically contains read-onlyinformation, is not modifiable by normal users, and has no implications on security,eliminating the need to track who accesses the object. The system clock is a goodexample of a public object. When you set the public object flag, any other auditingflags specifying the object are ignored.
Audit Information StorageThe large amount of disk space needed for auditing requires that you plan carefullywhere the information is going will be collected.
If your site uses individual non-networked workstations, it is recommended thateach workstation have a dedicated disk for audit records. The dedicated disk shouldhave at least two partitions:
� a primary storage area
� a partition for holding overflow records
For a network of workstations, you should dedicate at least one separate server forcollecting audit information and a second server for administering and analyzing theaudit data.
In any case, you should set MAC and DAC protections on the audit files anddirectories to preserve their integrity and prevent snooping.
88 Trusted Solaris Administration Overview ♦ December 2000

Audit Configuration FilesThe specifications for auditing at a site are stored in these configuration files, whichreside in the /etc/security subdirectory:
� audit_control (4)—stores audit control information used by the audit daemon,including the preferred order of directories where audit information is stored (theaudit daemon uses a directory until the minimum free space warning limit isreached, at which point it stores audit records in the next directory in the list),minimum free space warning limit, system-wide audit flags indicating classes tobe audited, and special audit flags for events that cannot be attributed to specificusers. The audit flags set in this file are applied to all users. Any exceptions tothese flags are set on a per-user basis and specified in the audit_user file, whichis modified using the User Accounts tool in SMC.
� audit_user (4)—stores auditing criteria for users who are exceptions to theauditing specifications in audit_control . This information includes user name,events that are always to be audited, and events that are never to be audited.
� audit_class (4)—stores audit class definitions, including the class mask (that is,the filter that determines which classes are to be tracked), class name, anddescription.
� audit_event (4)—stores audit event information, including event number, eventname, description, and audit flags identifying the audit class.
If you are setting up auditing for a network, there must be identical versions of theaudit_class , and audit_event files on each workstation. Use the SMC to updatethe audit_user site-wide NIS maps and NIS+ tables..
Auditing ToolsThis section describes the main utility programs and scripts for administeringauditing. Auditing is enabled during system installation. You can enable or disableauditing by editing the /etc/init.d/audit script and the /etc/system file.
audit and auditdThe audit (1M) command is an interface to control the current audit daemon. Theaudit daemon. auditd (1M), controls the generation and location of audit trail files,using information from the audit_control file. The auditd command starts theaudit daemon (if auditing has been enabled). The audit command can halt thedaemon, which stops the recording but not the collection of audit records; the auditcommand provides other options as well for controlling the daemon.
Administering Auditing 89

The audit command lets you
� Reset the first directory in the list of audit storage directories in theaudit_control file.
� Open a new audit file in the audit directory specified in the audit_control file,as last read by the audit daemon.
� Signal the audit daemon to close the audit trail and halt the recording but not thecollection of audit records.
auditconfigThe auditconfig (1M) command provides a command line interface to get and setkernel audit parameters, including setting various aspects of auditing policy.
audit_startupThe audit_startup (1M) script lets you configure auditing parameters duringsystem startup. The script initializes the audit subsystem before the audit daemon isstarted. This script currently consists of a series of auditconfig commands to setthe system default policy and download the initial event-to-class mapping. Thesecurity administrator can access audit_startup by opening the system_adminfolder in the Application Manager. You can configure it as necessary for your site.
audit_warnThe audit_warn (1M) script lets you specify warnings to send out and other actionsto take when the audit daemon detects problems. When a problem is encountered,the audit daemon calls audit_warn with the appropriate arguments. The optionargument specifies the error type. You can specify a list of mail recipients to benotified when an audit_warn situation arises by defining a mail alias calledaudit_warn in aliases (4).
prauditThe praudit (1M) command prints the contents of an audit trail file in readableform.
90 Trusted Solaris Administration Overview ♦ December 2000
auditreduceThe auditreduce (1M) command lets you select or merge records from audit trailfiles from one or more machines. The merge function merges audit records from oneor more input audit trail files into a single output file. The select function lets youselect audit records on the basis of criteria relating to the record’s content. Themerge and select functions can be combined in a script with the prauditcommand to produce customized reports for your site.
auditstatThe auditstat (1M) command displays kernel audit statistics, such as the numberof audit records processed and how much memory is being used by the kernel auditmodule.
Administering Auditing 91

92 Trusted Solaris Administration Overview ♦ December 2000

Index
Aaccreditation checking
networks 83accreditation checks
overview 79, 81accreditation ranges
label encodings file 33network interfaces 78
actionsin rights 21administrative
accessing 56Add Allocatable Device 54Admin Editor 56Audit Classes 54Audit Control 54Audit Events 54Audit Startup 54Check Encodings 54Check TN Files 54Check TN NIS+ Tables 54Configure Selection Confirmation 54Create NIS+ Client 54Create NIS+ Server 54Edit Encodings 55Name Service Switch 55Set Mail Options 55Set Mount Attributes 55Set Mount Points 55Set Tsol Gateways 55Share Filesystems 55
running 18Add Allocatable Device action
described 54add_allocatable(1M) command 54Admin Editor action 56
described 54ADMIN_HIGH label
defined 33ADMIN_LOW label
defined 33administration labels
defined 33administrative actions
accessing 56administrative roles
defined 17adminvi(1M ) command
described 56adminvi(1M) command
default editor for administrativeactions 56
adornmentsdefined 37
Application Manageraccessing applications 18
applicationsaccessing 18administering 21
assigning privilegesoverview 29
audit classesoverview 88
Audit Classes actiondescribed 54
audit command
93

overview 90Audit Control action
described 54Audit Events action
described 54Audit Startup action
described 54audit_class file
overview 89audit_class(4) file
action for editing 54audit_control(4) file
action for editing 54audit_event file
overview 89audit_event(4) file
action for editing 54audit_startup script
overview 90audit_startup(1M) command
action for editing 54audit_user file
overview 89audit_warn script
overview 90auditconfig command
overview 90auditing
configuration files 89overview 87, 91planning 87, 89process privileges 30system privileges 31tools 89, 91
auditreduce commandoverview 91
auditstat commandoverview 91
authorizationsin software administration 21in rights 21categories 7, 26, 27defined 16overview 25, 29
Bbooting the workstation
system privileges 31broadcast messages
network privileges 30
CCheck Encodings action
described 54Check TN Files action
described 54Check TN NIS+ Tables action
described 54chk_encodings(1M) command
action for invoking 54CIPSO
host type 74classification label component
defined 32clearances
label overview 31network interfaces 78remote host templates 75
closed networksdefined 72
colormapswindow privileges 31
commandsin rights 21
compartment label componentdefined 32
component definitionslabel encodings file 33
configuration managementsystem privileges 31
Configure Selection Confirmation actiondescribed 54
console redirectionsystem privileges 31
covert channel delaysprocess privileges 30
Create NIS+ Client actiondescribed 54
Create NIS+ Server actiondescribed 54
customizationslabel encodings file 33
94 Trusted Solaris Administration Overview ♦ December 2000

DDAC
defined 16databases
tnidb database 78tnrhdb(4TSOL) 77
defaultrouter fileaction for editing 55
defaultsprivileges 30rights 22
Device Allocation Manageroverview 45
device_allocate(4) fileaction for editing 54
device_maps(4) fileaction for editing 54
devicesallocation 40clean scripts 44, 45configuration files 40label ranges 40overview 40
dfstab(4) fileaction for editing 55
DGA (direct graphics access)window privileges 31
dominance of labelsoverview 32
dtpad(1) commandusing in administrative actions 56
EEdit Encodings action
described 55emetrics
defined 79/etc/defaultrouter file
action for editing 55/etc/mail/sendmail.cf file
action for editing 55/etc/motd file
action for editing 55
FFile Manager
accessing applications 18file systems
privileges 30font paths
window privileges 31Front Panel
accessing applications 18
Ggateway host
defined 72GIDs
in rights 21network interfaces 78
Hhost types
cipso 74networking 73ripso 74sun_tsol 74tsix 74unlabeled 74
Iinter-window movement
window privileges 31IP addresses
tnrhdb database 77IP labels
remote host templates 75IPC
privileges 30
Llabel encodings file
overview 33label ranges
assigning to devices 40defined 34in rights 21
label_encodings(4) fileaction for editing and checking 55
labels
95

classification component 32compartment component 32dominance 32overview 31privileges for overriding 30relationships 32remote host templates 75well-formed 34
linkingsystem privileges 31
loadable modulessystem privileges 31
loginauthorizations 26
MMAC
defined 16maximum labels
remote host templates 75media labeling
clean scripts 45message queues
overriding restrictions 30system privileges 31
minimum labelsremote host templates 75
motd fileaction for editing 55
mountingdefined for Trusted Solaris 78overview 85, 87
multilevel port bindingsnetwork privileges 30
NName Service Switch action
described 55ne 81network interfaces
defined 72tnidb( 4TSOL) 78
networksexample 81, 83modified Solaris commands 83overview 71, 85
privileges 30Trusted Solaris commands 84, 85
niscat(1) commandaction to invoke 55
nisclient(1M) commandaction for creating NIS+ client 54
nispopulate(1M) fileaction for invoking 55
nisserver(1M) fileaction for invoking 54
nsswitch.conf(4) fileaction for editing 55
Oobject-reuse
clean scripts 45open networks
defined 72
Ppackets
standard Solaris 73Trusted Solaris 73
pattr commandoverview 69
permissionsoverriding 30
plabel commandoverview 69
Populate NIS+ Tables actiondescribed 55
port bindingsnetwork privileges 30
ppriv commandoverview 69
pprivtest commandoverview 69
praudit commandoverview 90
primary administratordefined 20
printing definitionslabel encodings file 33
privilege setsdefined 29
96 Trusted Solaris Administration Overview ♦ December 2000

privilegescategories 30
file system privileges 30network privileges 30process privileges 30system privileges 31System V IPC privileges 30window privileges 31
defined 16inheritable 30network interfaces 78overview 29in rights 21remote host templates 75
processesprivileges 30
profile shelldefined 18
profilesoverview 21
Rremote hosts
tnrhdb(4TSOL) 77resolv.conf(4) file
action for editing 55rights
Alldescribed 22
All Authorizationsdescribed 22
Audit Controldescribed 22
Audit Reviewdescribed 22
Basic Actionsdescribed 22
Basic Commandsdescribed 23
Convenient Authorizationsdescribed 23
Cron Managementdescribed 23
Custom Admin Roledescribed 23
Custom Admin Secadmin Roledescribed 23
Custom Oper Roledescribed 23
Custom Root Roledescribed 23
default 22Device Security
described 23Enable Login
described 23File System Management
described 23File System Security
described 23Mail Management
described 23Maintenance and Repair
described 23Media Backup
described 23Media Restore
described 23Network Management
described 24Object Access Management
described 24Object Label Management
described 24Object Privilege Management
described 24Outside Accred
described 24overview 19, 21Privileged Shells
described 24Process Management
described 24User Management
described 24User Security
described 24Rights Manager
assigning inheritable privileges 30RIPSO
host type 74roles
overview 20route(1M) command
97
55route(1MTSOL)
example 81routing
example 81loading data at boot time 78overview 78, 83tables 79through non-Trusted Solaris clusters 82
routing commandsexamples 81
SSAMP (Security Attribute Modulation
Protocol)Trusted Solaris data packets 74
security administratordefined 20
security attributesin data packets 74
security domaindefined 72
security policyoverriding 30
sel_config(4) fileaction for editing 54
semaphore setsoverriding restrictions 30
sendmail(1M) command 55sendmail.cf file
action for editing 55session range
defined 34Set Daily Message action
described 55Set Default Routes action
described 55Set DNS Server action
described 55Set Mail Options action
described 55Set Mount Attributes action
described 55Set Mount Points action
described 55Set Tsol Gateways action
described 55
Share Filesystems actiondescribed 55
shared memory regionsoverriding restrictions 30
SLsdefined 16label overview 31network interfaces 78
SMC Computers and Networks Toolnetwork configuration databases 77
SMC Interface Manager Toolnetwork configuration databases 77
sun_tsol host typedefined 74
system administratordefined 20
system operatordefined 20
system securityprivileges 31
system security configurationnetworks 72
System V IPCprivileges 30
T/tmp directory
as an MLD 35tnchkdb(1M) command
action for checking NIS+ tn* tables 54action for checking local tn* files 54
tnidb database 78tnidb(4) file
action for checking local version 54tnrhdb database 77tnrhdb(4) file
action for checking local version 54action for checking NIS+ version 54
tnrhtp(4) fileaction for checking NIS+ version 54action for checking local version 54
trusted applicationsdefined 21
trusted path attributedefined 17
trusted_edit shell script
98 Trusted Solaris Administration Overview ♦ December 2000

use in administrative actions 56tsix host type
defined 74tsolgateways(4) file
action for editing 55tunneling
described 82
UUIDs
network interfaces 78in rights 21
unlabeled host typedefined 74
userssession range 34
Vvfstab_adjunct(4) file
action for editing 55View Table Attributes action
described 55View Table Contents action
described 55
Wwell-formed labels
defined 34windows
privileges 31workstation configuration
system privileges 31
XX server
window privileges 31
99