TRUST Pension Administration - Texas Documents/re_portal_training_guide... · RE Reporting (RER)...
44
Reports – RE Portal Training Guide RE Reporting (RER) TRUST Pension Administration Line of Business System
Transcript of TRUST Pension Administration - Texas Documents/re_portal_training_guide... · RE Reporting (RER)...
User Guide
Reports – RE Portal Training Guide RE Reporting (RER)
TRUST Pension Administration Line of Business System

iii
Contents Reports – Reporting Entity Portal ................................................................................. 1
Prerequisites ............................................................................................................... 1 Lesson 1: View RE Reports .............................................................................. 1
Lesson Objectives ...................................................................................................... 1 Task: Search for and View Reports ............................................................................ 1 Task: View Report Details .......................................................................................... 4 Task: View Report History .......................................................................................... 7 TasK: View Report Totals ........................................................................................... 8 Task: View Signature .................................................................................................. 9 Task: Download CSV Report Detail File .................................................................. 11 EXERCISE ............................................................................................................... 12
Lesson 2: Create and Maintain Reports ......................................................... 13 Lesson Objectives .................................................................................................... 13 Reporting Overview .................................................................................................. 13 Task: Create a Report .............................................................................................. 14 Task: Add, Edit, or Delete Detail Records ................................................................ 21 Task: Submit a Report for Validation ........................................................................ 28 Task: Delete a Report ............................................................................................... 31 EXERCISE ............................................................................................................... 33
Lesson 3: Submit Signature ............................................................................ 35 Lesson Objectives .................................................................................................... 35 Task: Submit Signature – Accept the Signature ...................................................... 35 Task: Submit Signature – Reject the Signature ....................................................... 37 Task: Submit Signature – No Detail Records ........................................................... 39 EXERCISE ............................................................................................................... 40

Training Guide Phase 1 - RER - Reports - RE Portal
Lesson 1: View RE Reports 1
Reports – Reporting Entity Portal
Prerequisites Courses Overview – Introduction to the Reporting Entity
Lesson 1: View RE Reports Reporting Entity Portal users can use this activity to perform the following tasks related to viewing Employee Demographic (ED), Regular Payroll (RP), Regular Payroll Adjustment (RP - Adjustment), Employment after Retirement (ER), and Employment After Retirement Adjustment (ER - Adjustment) reports that your Reporting Entity has created in the Reporting Entity Portal.
Lesson Objectives By the end of this lesson, you should be able to view:
Search and view reports
View report details
View report history
View report totals
View signature
Download CSV report detail file
Task: Search for and View Reports Existing reports can be viewed for a reporting entity.
1. Navigate to Wage & Contribution Reporting > View RE Reports.
The Report Summary screen appears.
Training Guide Phase 1 - RER - Reports - RE Portal
2 Lesson 1: View RE Reports
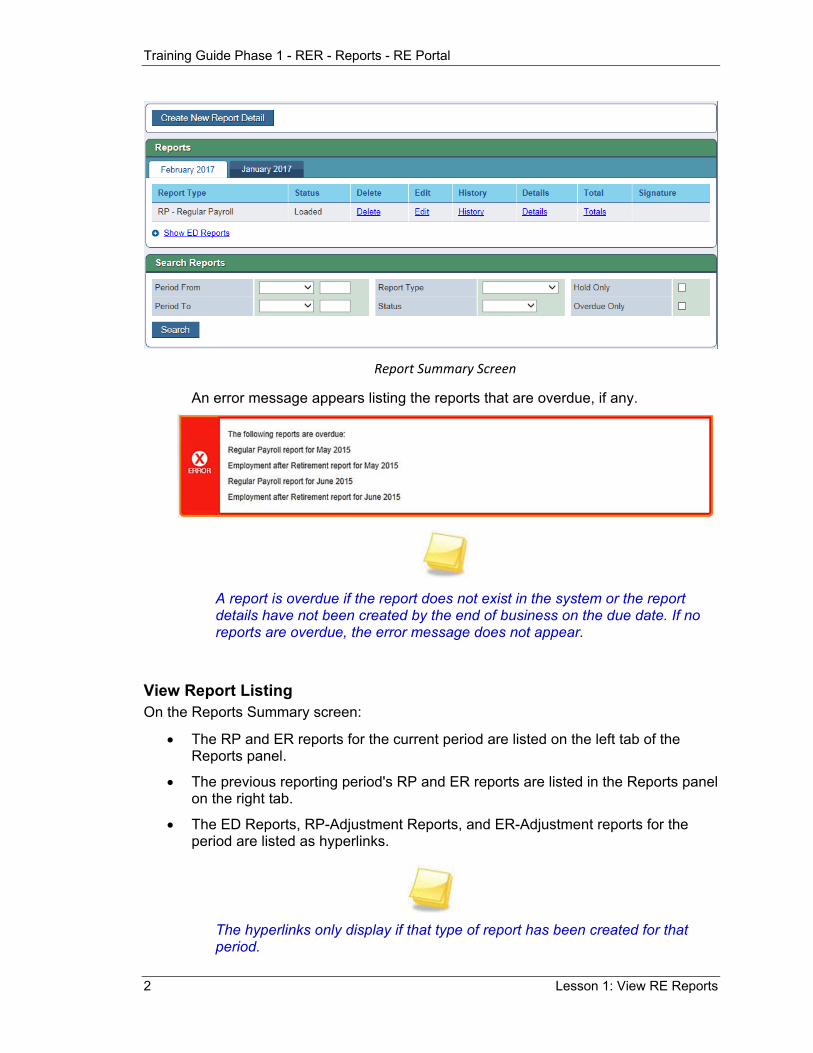
Report Summary Screen
An error message appears listing the reports that are overdue, if any.
A report is overdue if the report does not exist in the system or the report details have not been created by the end of business on the due date. If no reports are overdue, the error message does not appear.
View Report Listing On the Reports Summary screen:
The RP and ER reports for the current period are listed on the left tab of the Reports panel.
The previous reporting period's RP and ER reports are listed in the Reports panel on the right tab.
The ED Reports, RP-Adjustment Reports, and ER-Adjustment reports for the period are listed as hyperlinks.
The hyperlinks only display if that type of report has been created for that period.
Training Guide Phase 1 - RER - Reports - RE Portal
Lesson 1: View RE Reports 3
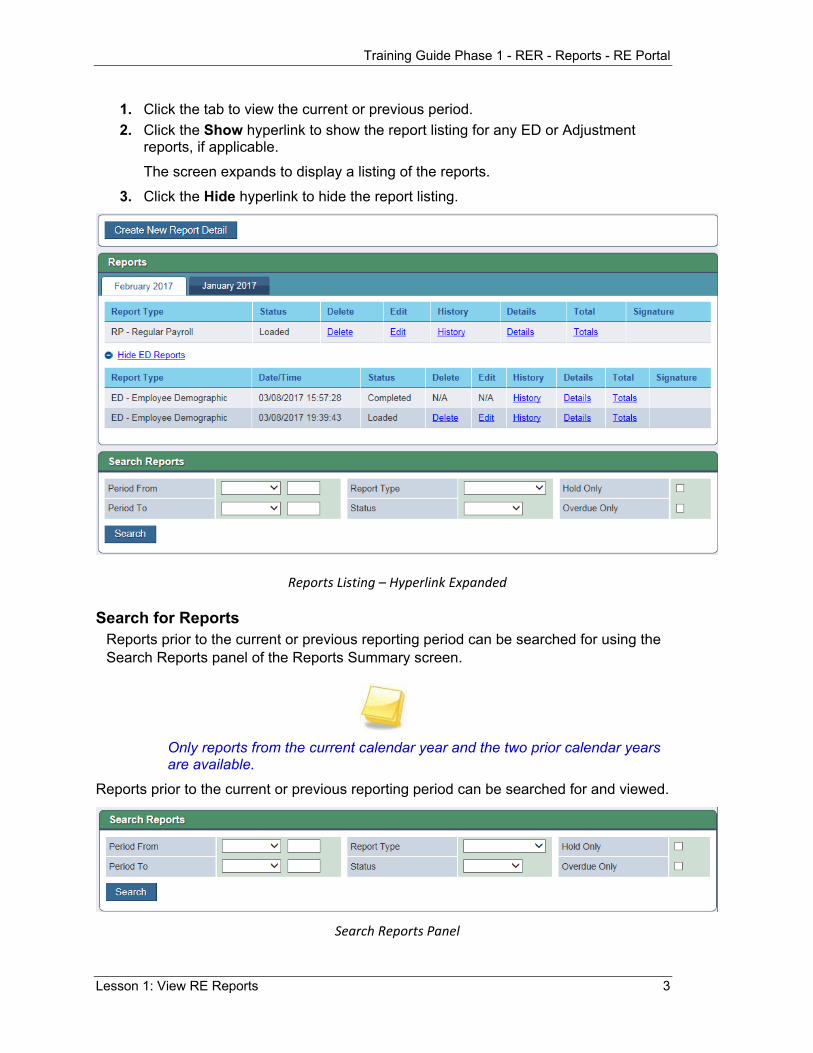
1. Click the tab to view the current or previous period. 2. Click the Show hyperlink to show the report listing for any ED or Adjustment
reports, if applicable.
The screen expands to display a listing of the reports.
3. Click the Hide hyperlink to hide the report listing.
Reports Listing – Hyperlink Expanded
Search for Reports Reports prior to the current or previous reporting period can be searched for using the Search Reports panel of the Reports Summary screen.
Only reports from the current calendar year and the two prior calendar years are available.
Reports prior to the current or previous reporting period can be searched for and viewed.
Search Reports Panel
Training Guide Phase 1 - RER - Reports - RE Portal
4 Lesson 1: View RE Reports
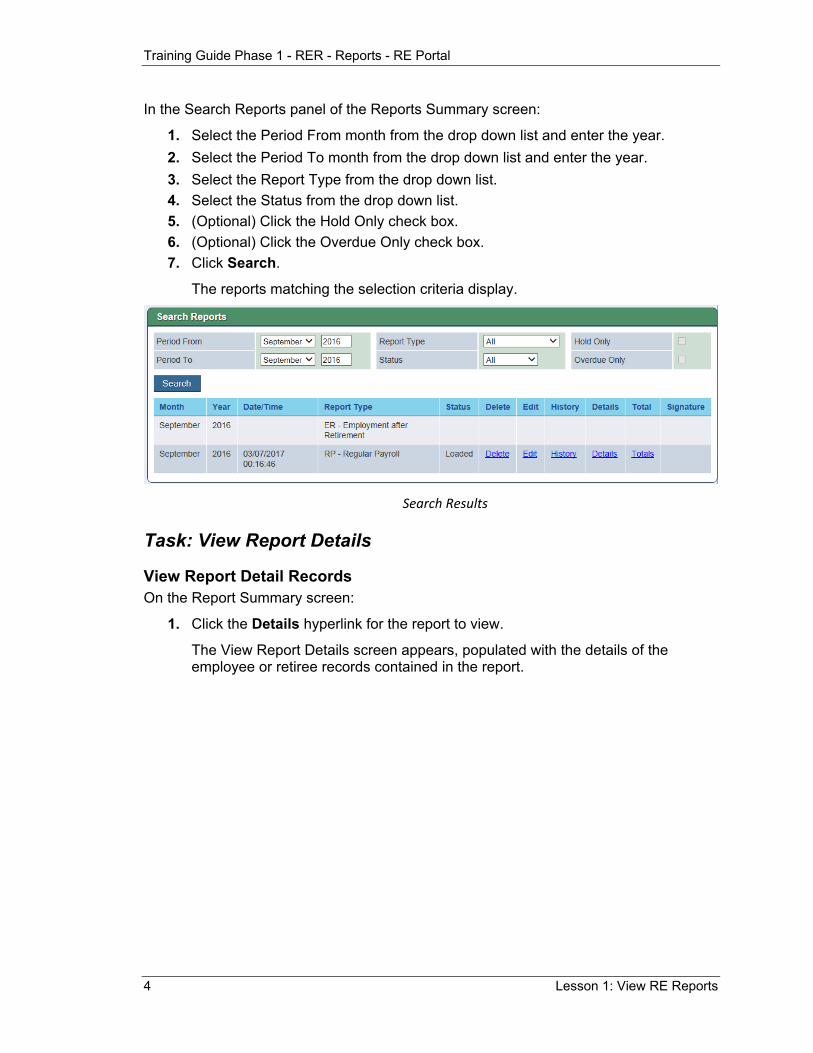
In the Search Reports panel of the Reports Summary screen:
1. Select the Period From month from the drop down list and enter the year. 2. Select the Period To month from the drop down list and enter the year. 3. Select the Report Type from the drop down list. 4. Select the Status from the drop down list. 5. (Optional) Click the Hold Only check box. 6. (Optional) Click the Overdue Only check box. 7. Click Search.
The reports matching the selection criteria display.
Search Results
Task: View Report Details
View Report Detail Records On the Report Summary screen:
1. Click the Details hyperlink for the report to view.
The View Report Details screen appears, populated with the details of the employee or retiree records contained in the report.

Training Guide Phase 1 - RER - Reports - RE Portal
Lesson 1: View RE Reports 5
View Report Details
Use the horizontal scroll bar to view additional columns.
By default, only the first 30 records in the report appear on this screen. To see more or fewer than 30 records, select a different value from the Records per page field. Use the First, Last, page number, Previous and Next buttons to navigate to additional pages of record details.
2. Click Return.
View Report Details Using the Editor On the Report Summary screen:
1. Click the Edit hyperlink for the report to view.
The Edit Report screen appears, populated with a summary of each employee or retiree record in the report.
Training Guide Phase 1 - RER - Reports - RE Portal
6 Lesson 1: View RE Reports
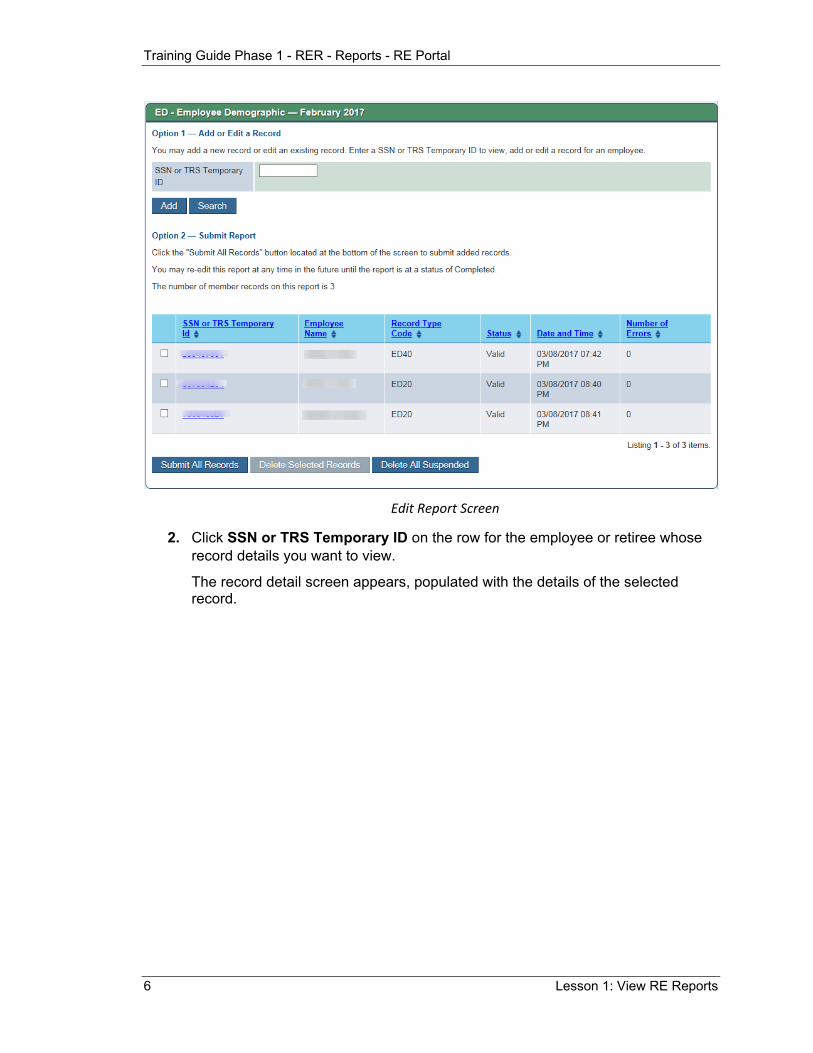
Edit Report Screen
2. Click SSN or TRS Temporary ID on the row for the employee or retiree whose record details you want to view.
The record detail screen appears, populated with the details of the selected record.
Training Guide Phase 1 - RER - Reports - RE Portal
Lesson 1: View RE Reports 7
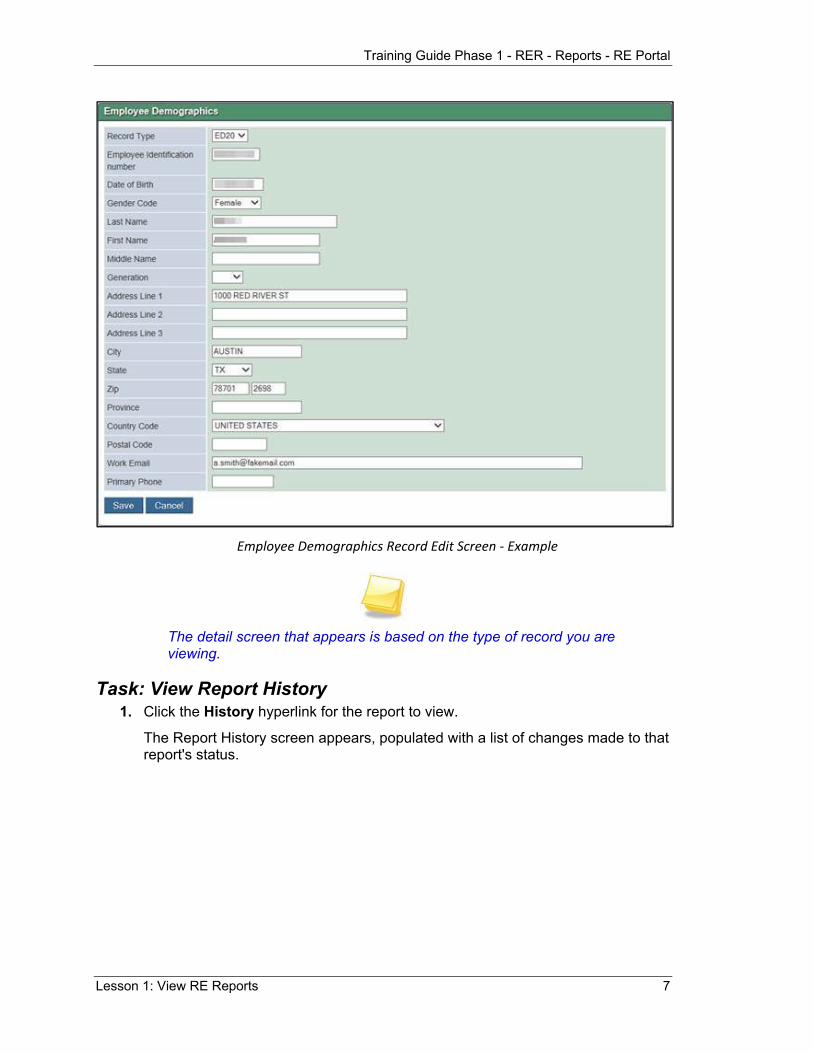
Employee Demographics Record Edit Screen ‐ Example
The detail screen that appears is based on the type of record you are viewing.
Task: View Report History 1. Click the History hyperlink for the report to view.
The Report History screen appears, populated with a list of changes made to that report's status.
Training Guide Phase 1 - RER - Reports - RE Portal
8 Lesson 1: View RE Reports
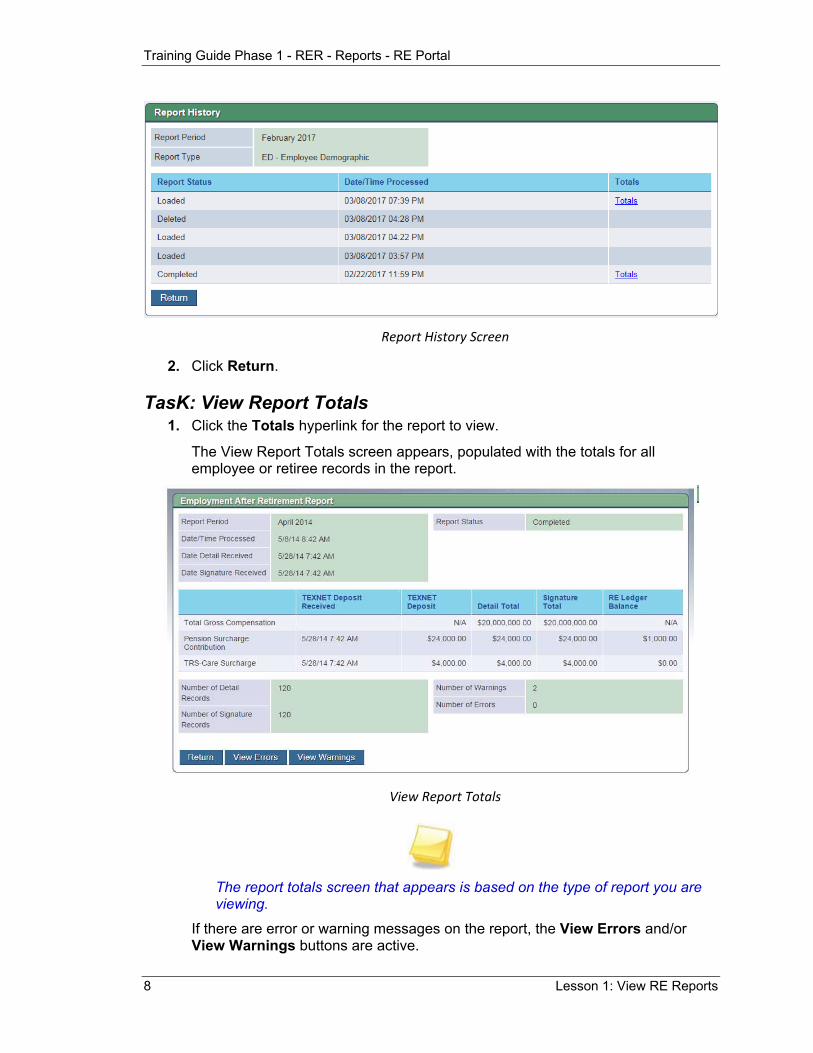
Report History Screen
2. Click Return.
TasK: View Report Totals 1. Click the Totals hyperlink for the report to view.
The View Report Totals screen appears, populated with the totals for all employee or retiree records in the report.
View Report Totals
The report totals screen that appears is based on the type of report you are viewing.
If there are error or warning messages on the report, the View Errors and/or View Warnings buttons are active.
Training Guide Phase 1 - RER - Reports - RE Portal
Lesson 1: View RE Reports 9
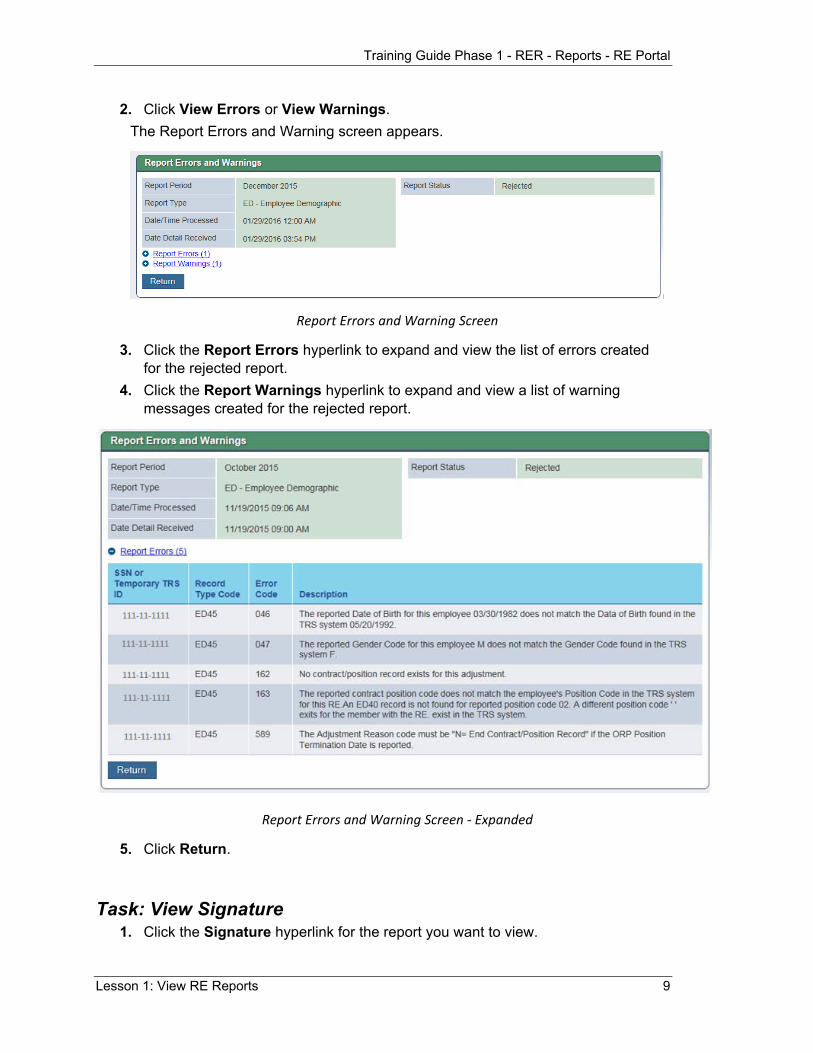
2. Click View Errors or View Warnings. The Report Errors and Warning screen appears.
Report Errors and Warning Screen
3. Click the Report Errors hyperlink to expand and view the list of errors created for the rejected report.
4. Click the Report Warnings hyperlink to expand and view a list of warning messages created for the rejected report.
Report Errors and Warning Screen ‐ Expanded
5. Click Return.
Task: View Signature 1. Click the Signature hyperlink for the report you want to view.
Training Guide Phase 1 - RER - Reports - RE Portal
10 Lesson 1: View RE Reports
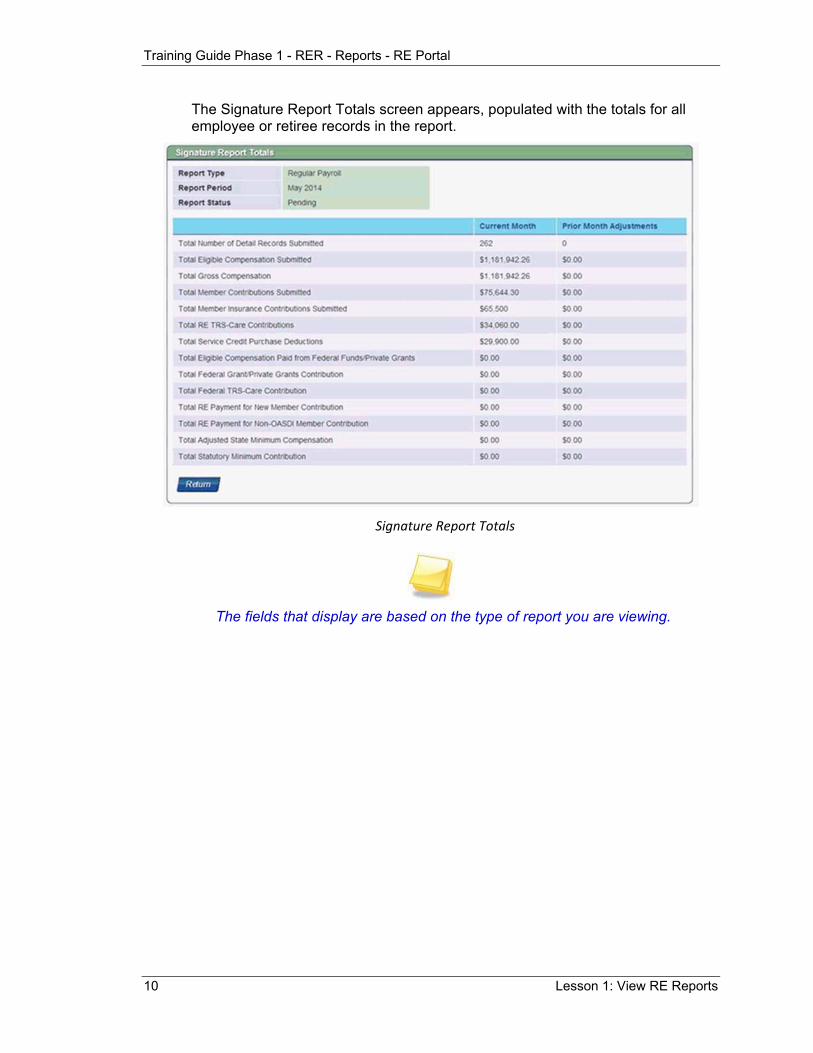
The Signature Report Totals screen appears, populated with the totals for all employee or retiree records in the report.
Signature Report Totals
The fields that display are based on the type of report you are viewing.
Training Guide Phase 1 - RER - Reports - RE Portal
Lesson 1: View RE Reports 11
Task: Download CSV Report Detail File A CSV file of a report can be downloaded.
CSV stands for comma-separated values. A CSV file is one that can be imported readily into a spreadsheet application, such as Microsoft Excel, where each value separated by commas corresponds to a column in the spreadsheet.
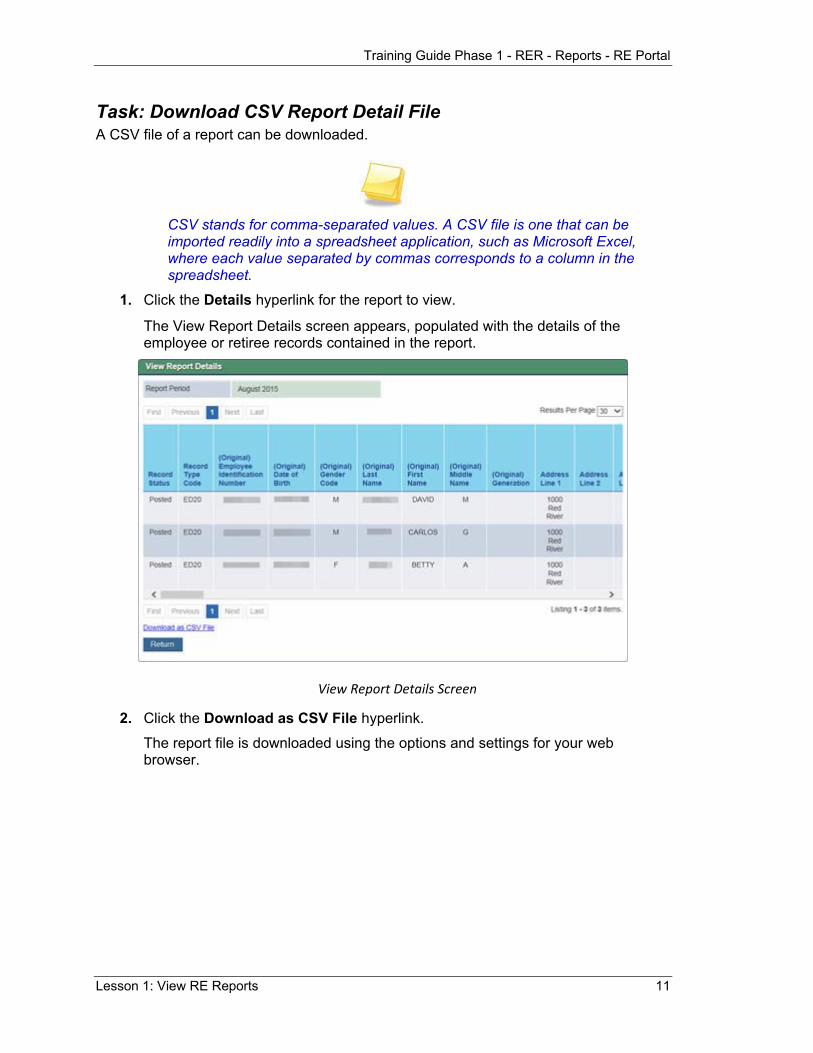
1. Click the Details hyperlink for the report to view.
The View Report Details screen appears, populated with the details of the employee or retiree records contained in the report.
View Report Details Screen
2. Click the Download as CSV File hyperlink.
The report file is downloaded using the options and settings for your web browser.
Training Guide Phase 1 - RER - Reports - RE Portal
12 Lesson 1: View RE Reports
EXERCISE Scenario 1: In this scenario, you will view report details, employee record details, report history, and report totals for your reporting entity.
1) View the reports for the current and previous reporting periods for abc1-1-1. a) Navigate to Wage & Contribution Reporting > View RE Reports. b) View the report list for the current reporting period. c) View the report list for the previous reporting period.
2) View the report details and an employee record. a) Click the Details link for a report in the current reporting period. b) Click the SSN or TRS Temporary ID link for an employee. c) Click Return.
3) View the report history for a report. a) Click the History link. b) Click Return.
4) View the report totals for a report. a) Click the Totals link for a report. b) View any errors or warnings for the report if applicable. c) Click Return.
5) View the signature for a report. a) Click the Signature link for a report. b) Click Return.
Training Guide Phase 1 - RER - Reports - RE Portal
Lesson 2: Create and Maintain Reports 13
Lesson 2: Create and Maintain Reports In this lesson you will learn about how monthly reporting works using the Reporting Entity Portal and how to create and maintain monthly reports.
Lesson Objectives By the end of this lesson, you should be able to:
Understand general information about report types, terminology, and the report creation and maintenance process.
Create a report
Add, edit, or delete a detail record
Submit a report for Validation
Delete a report
Reporting Overview The Reporting Entity Portal allows users with Administration, Submit, or Signature authority level to submit five different types of reports to TRS:
Employee Demographic (ED): Used to report employee demographic information, new and adjusted employment and position information, and employee termination information.
Regular Payroll (RP): Used to report employee compensation and contribution details, as well as adjustments to compensation and contribution details from previous months.
Regular Payroll - Adjustment (RP - Adjustment): Used to report adjustments to employee compensation and contribution details from previous months.
Employment after Retirement (ER) report: Used to report employment information, compensation, and surcharges for retirees, as well as adjustments to previously reported retiree employment information, compensation, and surcharges.
Employment after Retirement - Adjustment (ER - Adjustment) report: Used to report adjustments to previously reported retiree employment information, compensation, and surcharges.
When a submitted report has met TRS requirements and there is no more work to perform for it, the system assigns the report the status of ‘Completed’. Getting a report to the ‘Completed’ status is a multi-step process that requires you to understand the following concepts:
Report Status: The status assigned to the report as a whole.
Detail Records: Reports submitted to TRS contain one or more detail records for each included employee or retiree. The type of detail records vary based on the type of report, as does the information included or required for each one.
Record Status: Each detail record in the report is assigned a status as it is added to a report, validated by the system, or edited to correct errors. In order for
Training Guide Phase 1 - RER - Reports - RE Portal
14 Lesson 2: Create and Maintain Reports
a report to be assigned the ‘Completed’ status, each of the detail records must have a ‘Valid’ status.
Signature: When an RP, RP-Adjustment, ER, or ER Adjustment report has reached the point where each included detail record has a record status of ‘Valid’, that report is put in ‘Pending’ status. A Reporting Entity Portal user with Signature authority level must then review the sum total of the contribution type amounts for all included employees or retirees and “sign” the report by accepting those totals as complete and accurate. If the totals are incorrect, the user has the option to reject them as incomplete or inaccurate. An RP, RP-Adjustment, ER, or ER-Adjustment report is not assigned ‘Completed’ status until the signature is accepted.
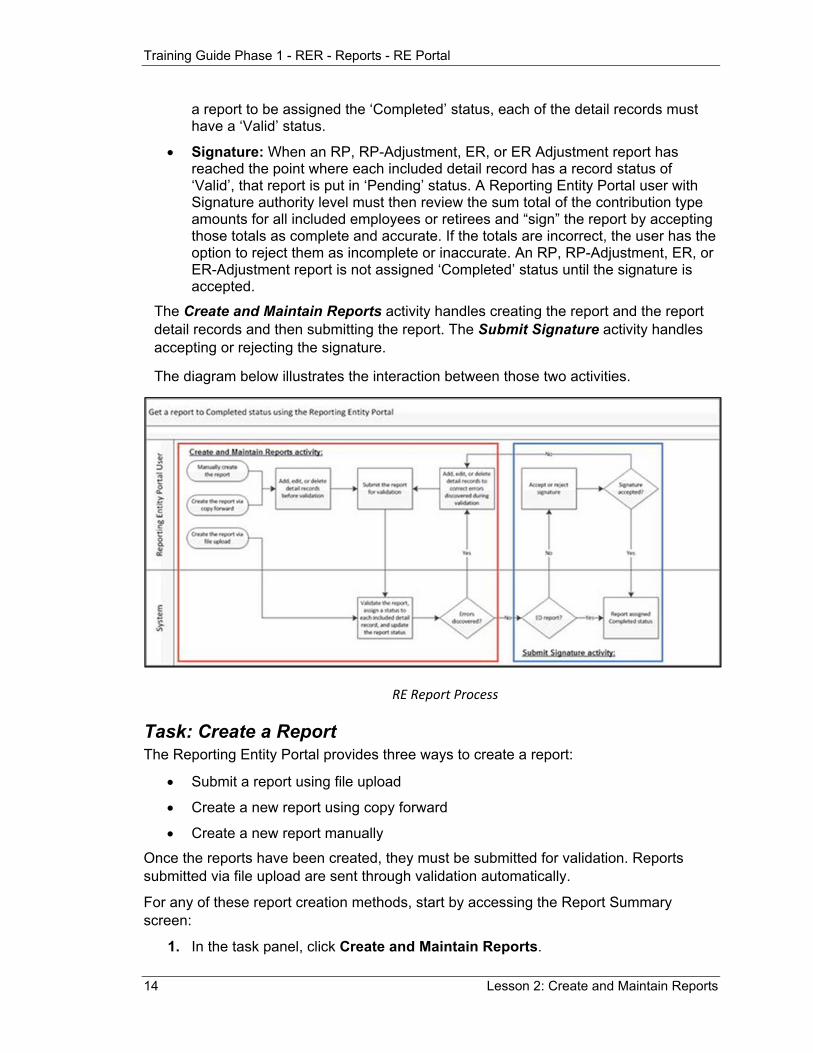
The Create and Maintain Reports activity handles creating the report and the report detail records and then submitting the report. The Submit Signature activity handles accepting or rejecting the signature.
The diagram below illustrates the interaction between those two activities.
RE Report Process
Task: Create a Report The Reporting Entity Portal provides three ways to create a report:
Submit a report using file upload
Create a new report using copy forward
Create a new report manually
Once the reports have been created, they must be submitted for validation. Reports submitted via file upload are sent through validation automatically.
For any of these report creation methods, start by accessing the Report Summary screen:
1. In the task panel, click Create and Maintain Reports.
Training Guide Phase 1 - RER - Reports - RE Portal
Lesson 2: Create and Maintain Reports 15
OR
1. Navigate to Wage & Contribution Reporting > Create and Maintain Reports.
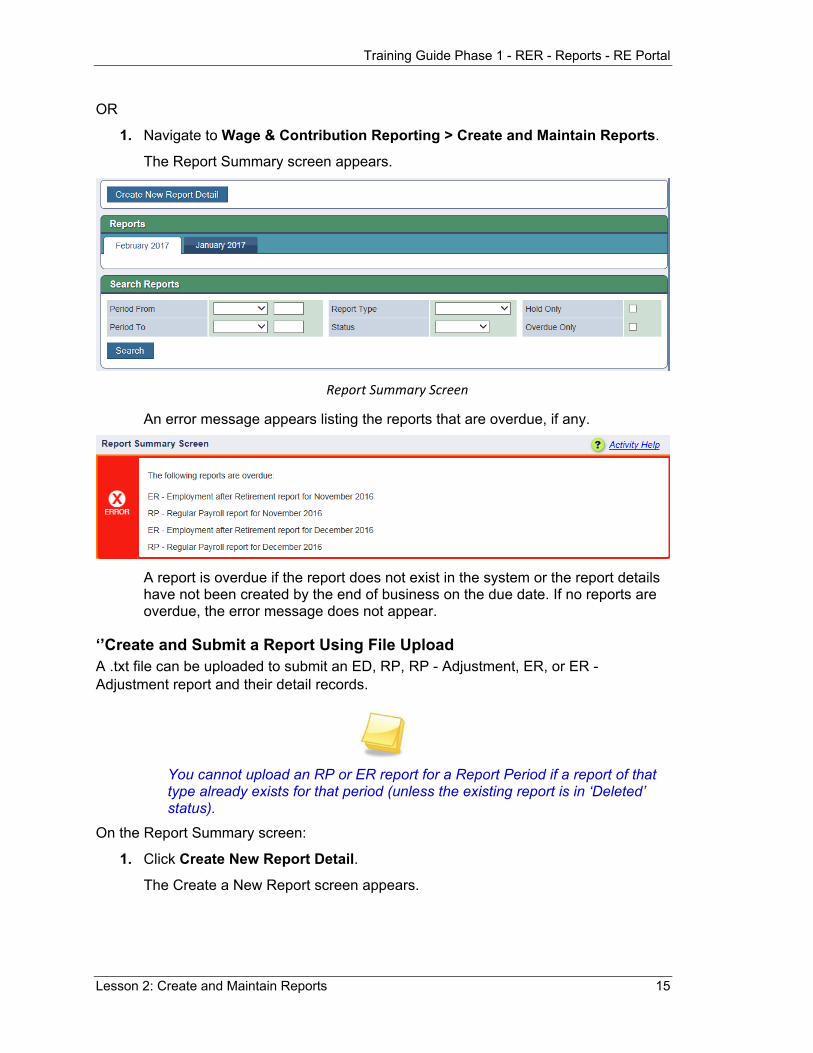
The Report Summary screen appears.
Report Summary Screen
An error message appears listing the reports that are overdue, if any.
A report is overdue if the report does not exist in the system or the report details have not been created by the end of business on the due date. If no reports are overdue, the error message does not appear.
‘’Create and Submit a Report Using File Upload A .txt file can be uploaded to submit an ED, RP, RP - Adjustment, ER, or ER - Adjustment report and their detail records.
You cannot upload an RP or ER report for a Report Period if a report of that type already exists for that period (unless the existing report is in ‘Deleted’ status).
On the Report Summary screen:
1. Click Create New Report Detail.
The Create a New Report screen appears.
Training Guide Phase 1 - RER - Reports - RE Portal
16 Lesson 2: Create and Maintain Reports
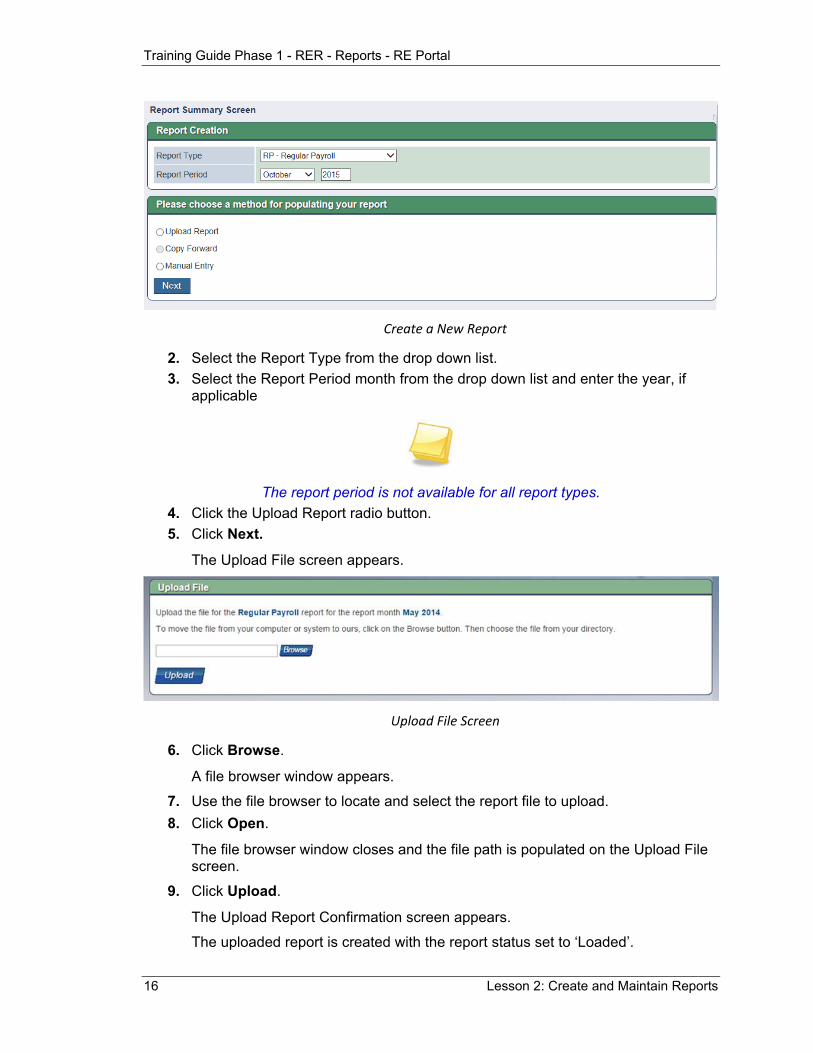
Create a New Report
2. Select the Report Type from the drop down list. 3. Select the Report Period month from the drop down list and enter the year, if
applicable
The report period is not available for all report types. 4. Click the Upload Report radio button. 5. Click Next.
The Upload File screen appears.
Upload File Screen
6. Click Browse.
A file browser window appears.
7. Use the file browser to locate and select the report file to upload. 8. Click Open.
The file browser window closes and the file path is populated on the Upload File screen.
9. Click Upload.
The Upload Report Confirmation screen appears.
The uploaded report is created with the report status set to ‘Loaded’.
Training Guide Phase 1 - RER - Reports - RE Portal
Lesson 2: Create and Maintain Reports 17
If you want to upload another report, click Yes.
The Create a New Report Detail screen appears.
OR
If you do not want to upload another report, click No.
The Report Summary screen appears.
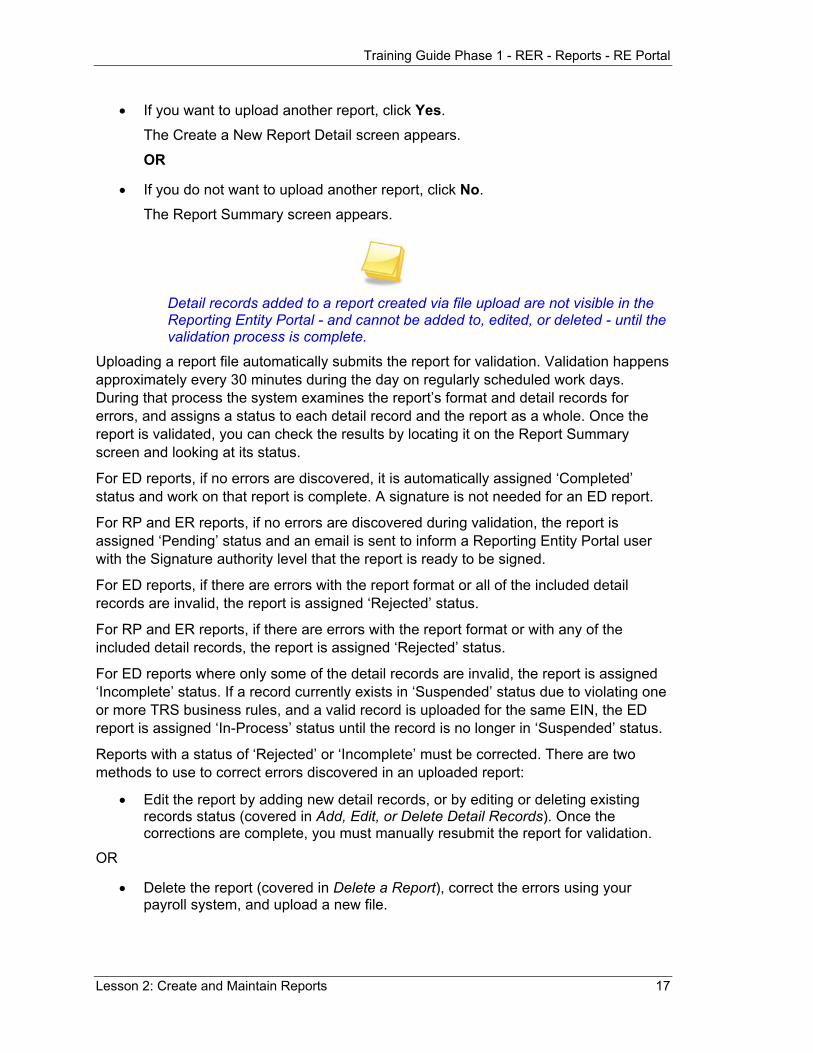
Detail records added to a report created via file upload are not visible in the Reporting Entity Portal - and cannot be added to, edited, or deleted - until the validation process is complete.
Uploading a report file automatically submits the report for validation. Validation happens approximately every 30 minutes during the day on regularly scheduled work days. During that process the system examines the report’s format and detail records for errors, and assigns a status to each detail record and the report as a whole. Once the report is validated, you can check the results by locating it on the Report Summary screen and looking at its status.
For ED reports, if no errors are discovered, it is automatically assigned ‘Completed’ status and work on that report is complete. A signature is not needed for an ED report.
For RP and ER reports, if no errors are discovered during validation, the report is assigned ‘Pending’ status and an email is sent to inform a Reporting Entity Portal user with the Signature authority level that the report is ready to be signed.
For ED reports, if there are errors with the report format or all of the included detail records are invalid, the report is assigned ‘Rejected’ status.
For RP and ER reports, if there are errors with the report format or with any of the included detail records, the report is assigned ‘Rejected’ status.
For ED reports where only some of the detail records are invalid, the report is assigned ‘Incomplete’ status. If a record currently exists in ‘Suspended’ status due to violating one or more TRS business rules, and a valid record is uploaded for the same EIN, the ED report is assigned ‘In-Process’ status until the record is no longer in ‘Suspended’ status.
Reports with a status of ‘Rejected’ or ‘Incomplete’ must be corrected. There are two methods to use to correct errors discovered in an uploaded report:
Edit the report by adding new detail records, or by editing or deleting existing records status (covered in Add, Edit, or Delete Detail Records). Once the corrections are complete, you must manually resubmit the report for validation.
OR
Delete the report (covered in Delete a Report), correct the errors using your payroll system, and upload a new file.
Training Guide Phase 1 - RER - Reports - RE Portal
18 Lesson 2: Create and Maintain Reports
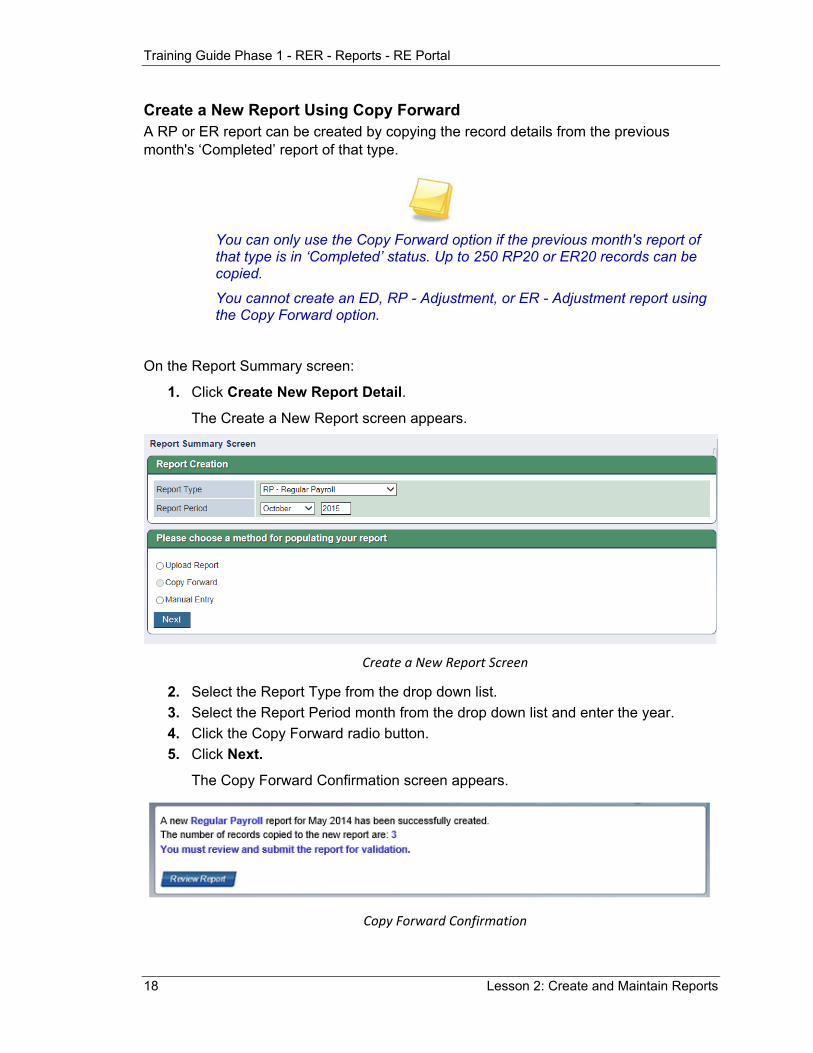
Create a New Report Using Copy Forward A RP or ER report can be created by copying the record details from the previous month's ‘Completed’ report of that type.
You can only use the Copy Forward option if the previous month's report of that type is in ‘Completed’ status. Up to 250 RP20 or ER20 records can be copied.
You cannot create an ED, RP - Adjustment, or ER - Adjustment report using the Copy Forward option.
On the Report Summary screen:
1. Click Create New Report Detail.
The Create a New Report screen appears.
Create a New Report Screen
2. Select the Report Type from the drop down list. 3. Select the Report Period month from the drop down list and enter the year. 4. Click the Copy Forward radio button. 5. Click Next.
The Copy Forward Confirmation screen appears.
Copy Forward Confirmation
Training Guide Phase 1 - RER - Reports - RE Portal
Lesson 2: Create and Maintain Reports 19
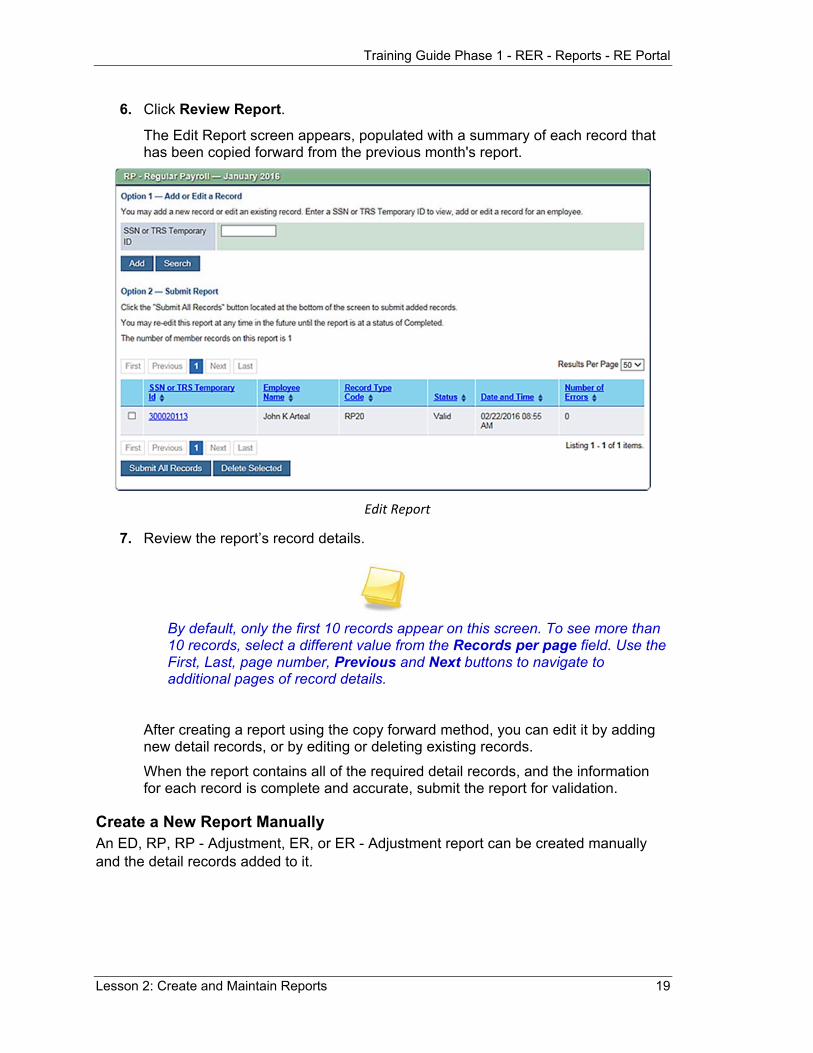
6. Click Review Report.
The Edit Report screen appears, populated with a summary of each record that has been copied forward from the previous month's report.
Edit Report
7. Review the report’s record details.
By default, only the first 10 records appear on this screen. To see more than 10 records, select a different value from the Records per page field. Use the First, Last, page number, Previous and Next buttons to navigate to additional pages of record details.
After creating a report using the copy forward method, you can edit it by adding new detail records, or by editing or deleting existing records.
When the report contains all of the required detail records, and the information for each record is complete and accurate, submit the report for validation.
Create a New Report Manually An ED, RP, RP - Adjustment, ER, or ER - Adjustment report can be created manually and the detail records added to it.
Training Guide Phase 1 - RER - Reports - RE Portal
20 Lesson 2: Create and Maintain Reports
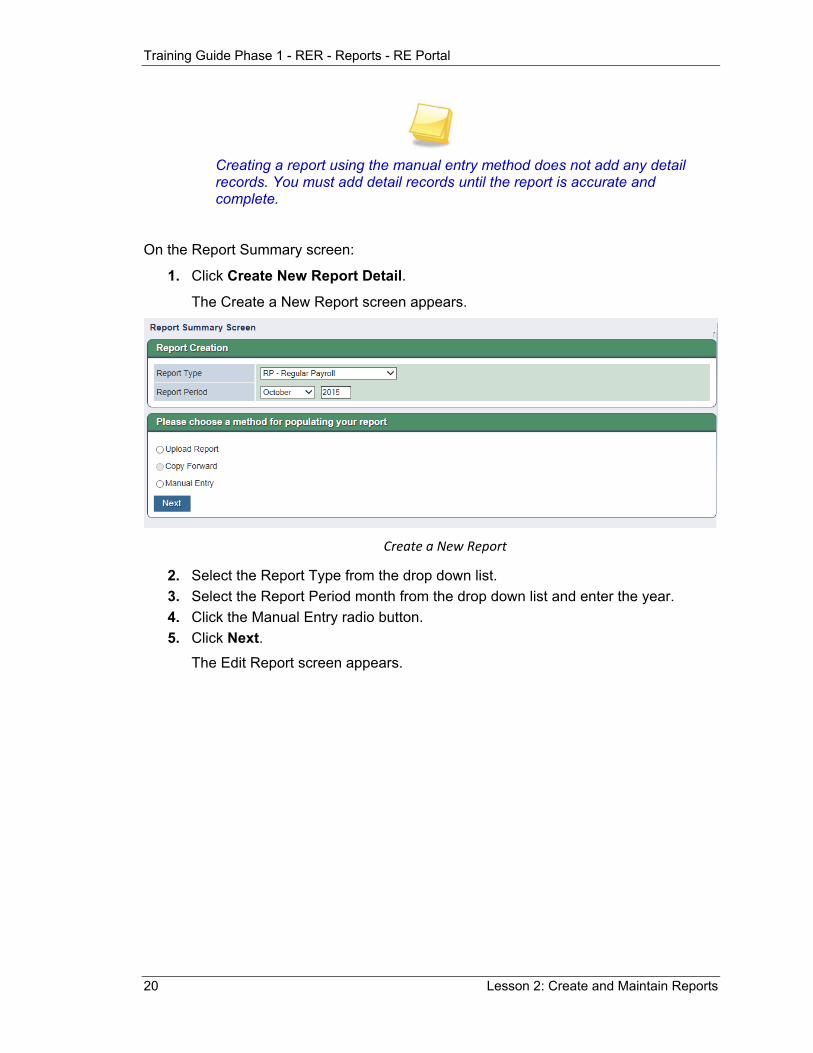
Creating a report using the manual entry method does not add any detail records. You must add detail records until the report is accurate and complete.
On the Report Summary screen:
1. Click Create New Report Detail.
The Create a New Report screen appears.
Create a New Report
2. Select the Report Type from the drop down list. 3. Select the Report Period month from the drop down list and enter the year. 4. Click the Manual Entry radio button. 5. Click Next.
The Edit Report screen appears.
Training Guide Phase 1 - RER - Reports - RE Portal
Lesson 2: Create and Maintain Reports 21
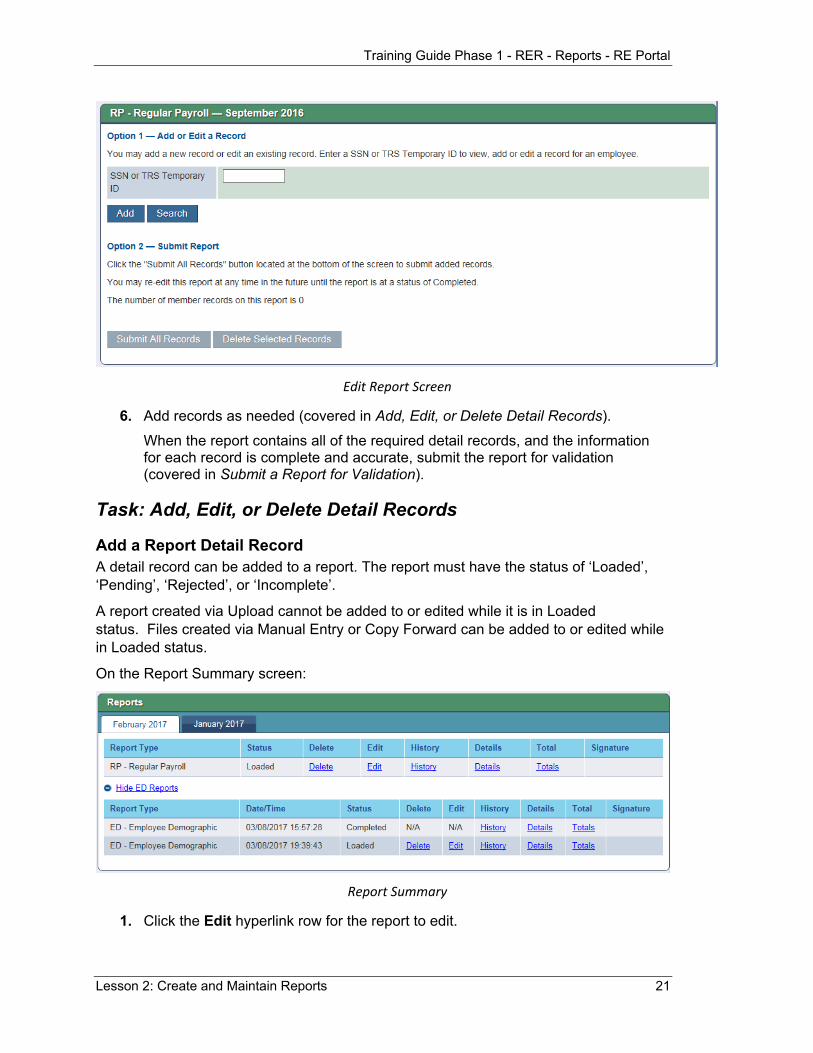
Edit Report Screen
6. Add records as needed (covered in Add, Edit, or Delete Detail Records).
When the report contains all of the required detail records, and the information for each record is complete and accurate, submit the report for validation (covered in Submit a Report for Validation).
Task: Add, Edit, or Delete Detail Records
Add a Report Detail Record A detail record can be added to a report. The report must have the status of ‘Loaded’, ‘Pending’, ‘Rejected’, or ‘Incomplete’.
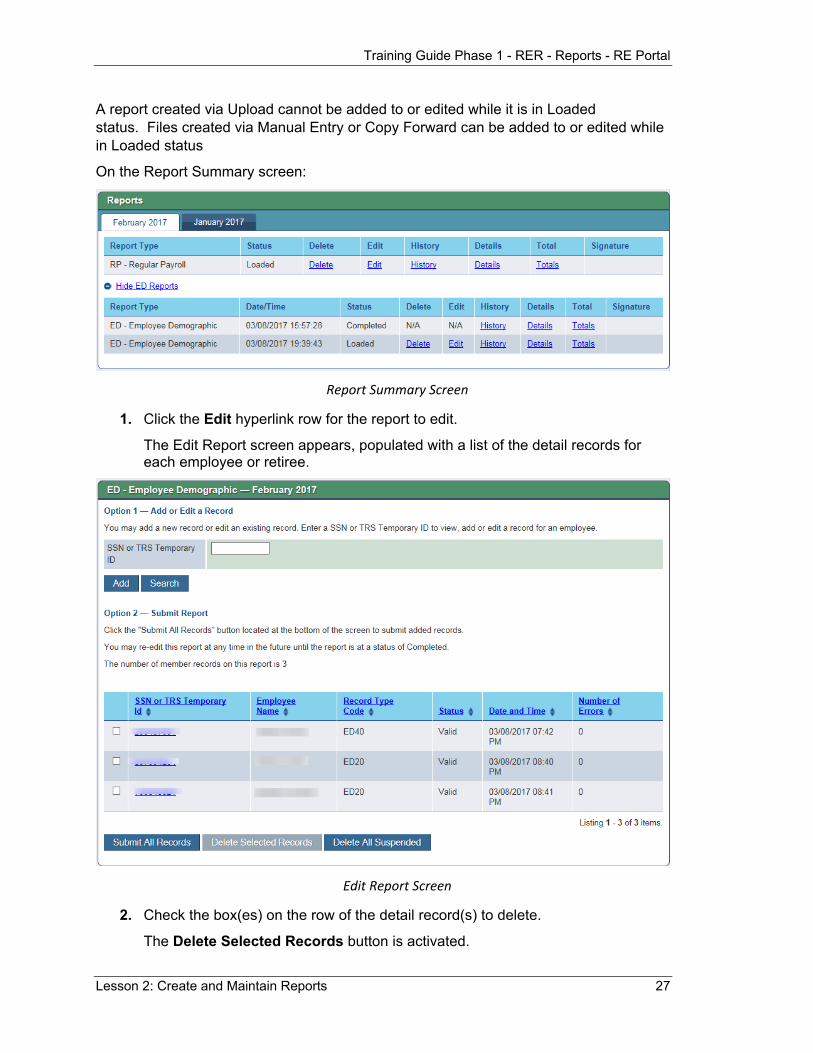
A report created via Upload cannot be added to or edited while it is in Loaded status. Files created via Manual Entry or Copy Forward can be added to or edited while in Loaded status.
On the Report Summary screen:
Report Summary
1. Click the Edit hyperlink row for the report to edit.
Training Guide Phase 1 - RER - Reports - RE Portal
22 Lesson 2: Create and Maintain Reports
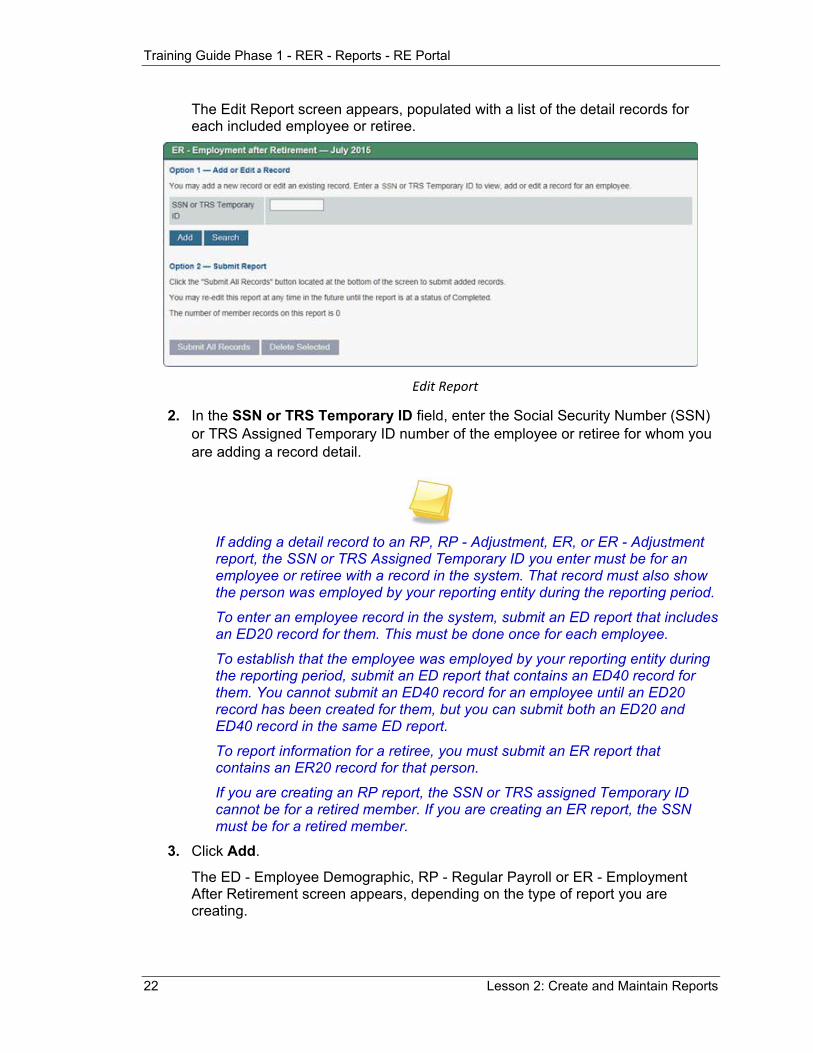
The Edit Report screen appears, populated with a list of the detail records for each included employee or retiree.
Edit Report
2. In the SSN or TRS Temporary ID field, enter the Social Security Number (SSN) or TRS Assigned Temporary ID number of the employee or retiree for whom you are adding a record detail.
If adding a detail record to an RP, RP - Adjustment, ER, or ER - Adjustment report, the SSN or TRS Assigned Temporary ID you enter must be for an employee or retiree with a record in the system. That record must also show the person was employed by your reporting entity during the reporting period.
To enter an employee record in the system, submit an ED report that includes an ED20 record for them. This must be done once for each employee.
To establish that the employee was employed by your reporting entity during the reporting period, submit an ED report that contains an ED40 record for them. You cannot submit an ED40 record for an employee until an ED20 record has been created for them, but you can submit both an ED20 and ED40 record in the same ED report.
To report information for a retiree, you must submit an ER report that contains an ER20 record for that person.
If you are creating an RP report, the SSN or TRS assigned Temporary ID cannot be for a retired member. If you are creating an ER report, the SSN must be for a retired member.
3. Click Add.
The ED - Employee Demographic, RP - Regular Payroll or ER - Employment After Retirement screen appears, depending on the type of report you are creating.

Training Guide Phase 1 - RER - Reports - RE Portal
Lesson 2: Create and Maintain Reports 23
Regular Payroll Screen ‐ Example
4. Select the appropriate Record Type for the new record.
The screen reloads to display the fields applicable to that type. The record types are:
For an ED report:
ED20: Used to report demographic information for a person not previously reported in any ED report
ED25: Used to report adjustments to an employee's personal, address, or contact information
ED40: Used to report new employment and position records
ED45: Used to report adjustments to employment and position records
ED90: Used to report employment termination records
For an RP report:
RP20: Used to report an employee's compensation and contribution information
RP25: Used to report adjustments to an employee's previously reported compensation and contribution information, or to add a detail record omitted from a previous report.
Training Guide Phase 1 - RER - Reports - RE Portal
24 Lesson 2: Create and Maintain Reports
For an RP - Adjustment report:
RP25: Used to report adjustments to an employee's previously reported compensation and contribution information, or to add a detail record omitted from a previous report.
For an ER report:
ER20: Used to report employment information, compensation, and surcharges for a retiree
ER25: Used to report an adjustment that adds a record to a previously reported employment after retirement report
ER27: Used to report adjustments that edit a record on an employment after retirement report
For an ER - Adjustment report:
ER25: Used to report an adjustment that adds a record to a previously reported employment after retirement report
ER27: Used to report adjustments that edit a record on an employment after retirement report
5. Enter the record details for the employee or retiree. See the ED - Employee Demographics, RP - Regular Payroll, or ER - Employment After Retirement screen help topic for field definitions.
6. Click Save.
The Edit Report screen appears.
Repeat these steps for each record to add to the report.
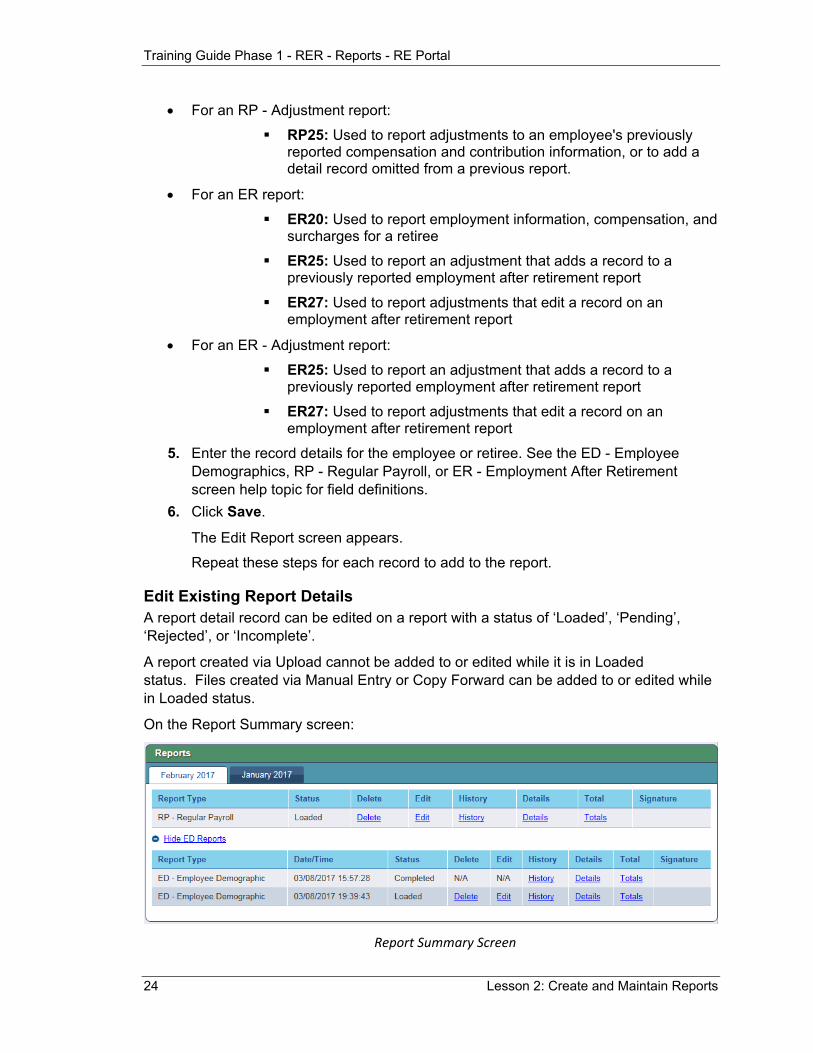
Edit Existing Report Details A report detail record can be edited on a report with a status of ‘Loaded’, ‘Pending’, ‘Rejected’, or ‘Incomplete’.
A report created via Upload cannot be added to or edited while it is in Loaded status. Files created via Manual Entry or Copy Forward can be added to or edited while in Loaded status.
On the Report Summary screen:
Report Summary Screen
Training Guide Phase 1 - RER - Reports - RE Portal
Lesson 2: Create and Maintain Reports 25
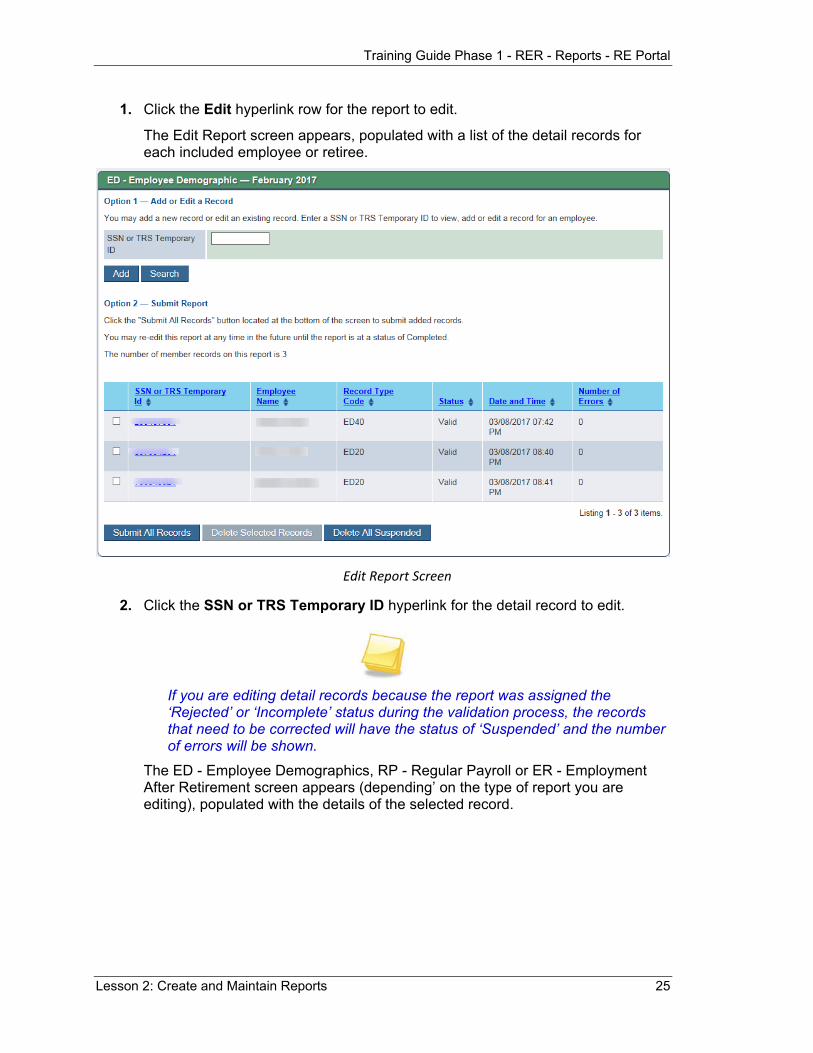
1. Click the Edit hyperlink row for the report to edit.
The Edit Report screen appears, populated with a list of the detail records for each included employee or retiree.
Edit Report Screen
2. Click the SSN or TRS Temporary ID hyperlink for the detail record to edit.
If you are editing detail records because the report was assigned the ‘Rejected’ or ‘Incomplete’ status during the validation process, the records that need to be corrected will have the status of ‘Suspended’ and the number of errors will be shown.
The ED - Employee Demographics, RP - Regular Payroll or ER - Employment After Retirement screen appears (depending’ on the type of report you are editing), populated with the details of the selected record.
Training Guide Phase 1 - RER - Reports - RE Portal
26 Lesson 2: Create and Maintain Reports
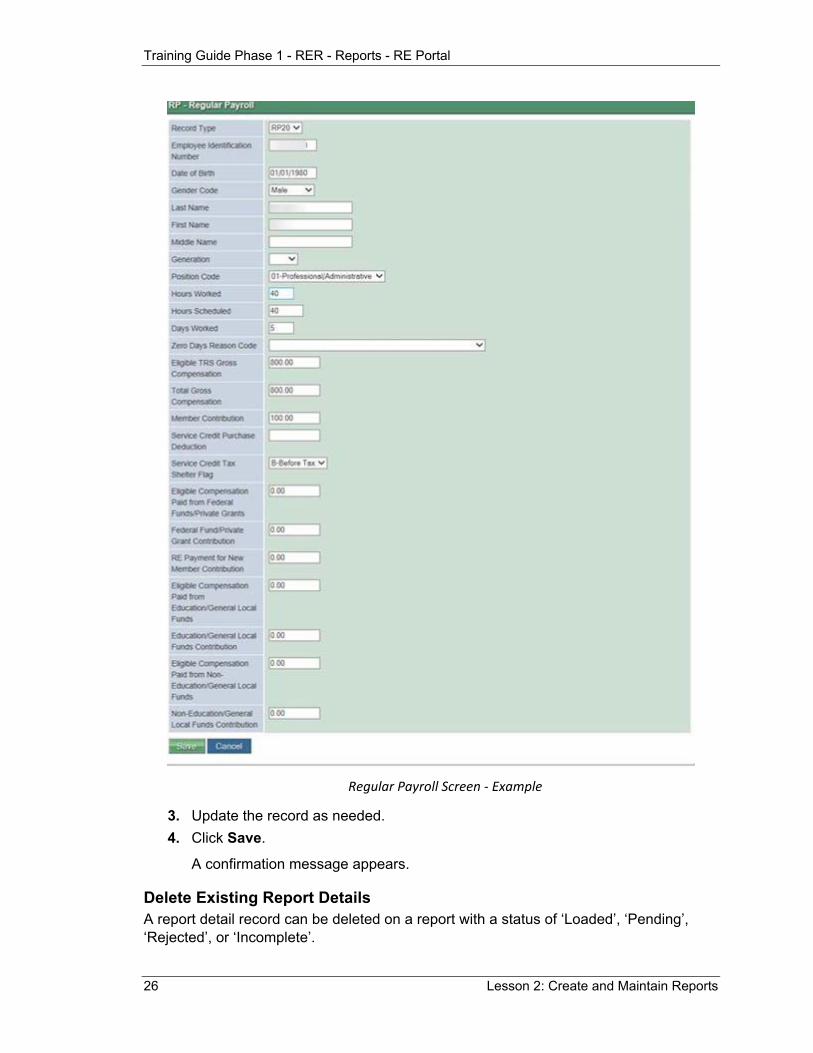
Regular Payroll Screen ‐ Example
3. Update the record as needed. 4. Click Save.
A confirmation message appears.
Delete Existing Report Details A report detail record can be deleted on a report with a status of ‘Loaded’, ‘Pending’, ‘Rejected’, or ‘Incomplete’.
Training Guide Phase 1 - RER - Reports - RE Portal
Lesson 2: Create and Maintain Reports 27
A report created via Upload cannot be added to or edited while it is in Loaded status. Files created via Manual Entry or Copy Forward can be added to or edited while in Loaded status
On the Report Summary screen:
Report Summary Screen
1. Click the Edit hyperlink row for the report to edit.
The Edit Report screen appears, populated with a list of the detail records for each employee or retiree.
Edit Report Screen
2. Check the box(es) on the row of the detail record(s) to delete.
The Delete Selected Records button is activated.
Training Guide Phase 1 - RER - Reports - RE Portal
28 Lesson 2: Create and Maintain Reports
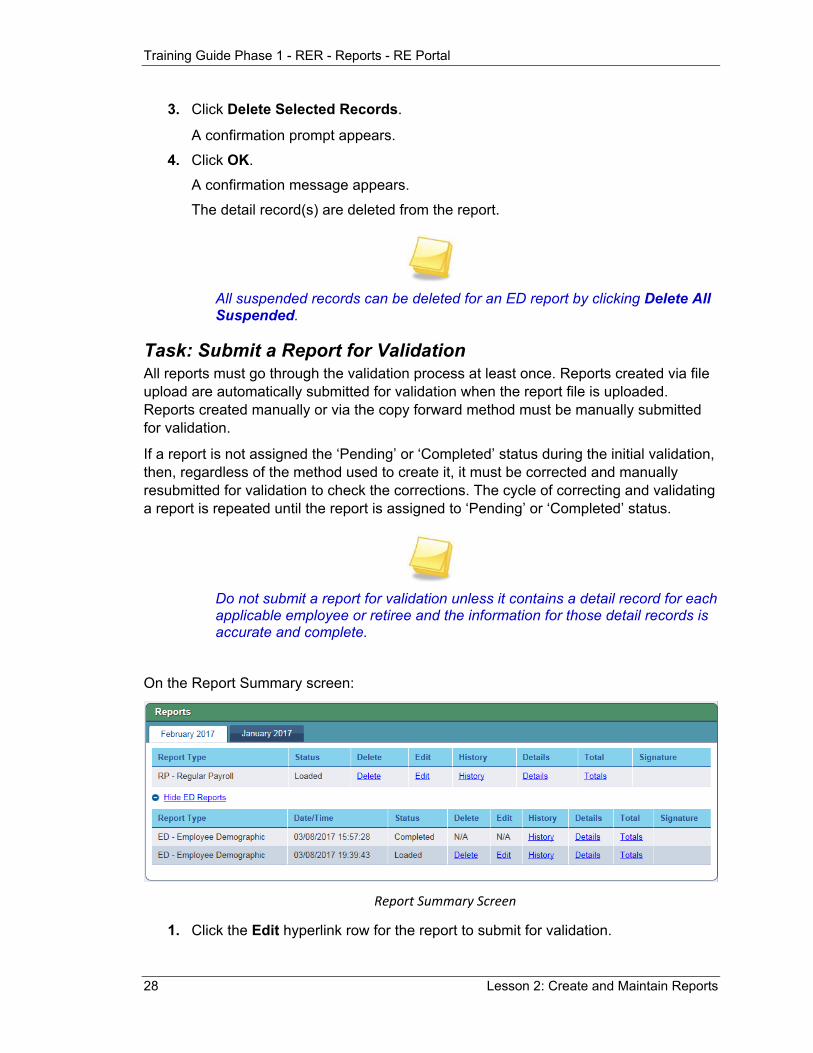
3. Click Delete Selected Records.
A confirmation prompt appears.
4. Click OK.
A confirmation message appears.
The detail record(s) are deleted from the report.
All suspended records can be deleted for an ED report by clicking Delete All Suspended.
Task: Submit a Report for Validation All reports must go through the validation process at least once. Reports created via file upload are automatically submitted for validation when the report file is uploaded. Reports created manually or via the copy forward method must be manually submitted for validation.
If a report is not assigned the ‘Pending’ or ‘Completed’ status during the initial validation, then, regardless of the method used to create it, it must be corrected and manually resubmitted for validation to check the corrections. The cycle of correcting and validating a report is repeated until the report is assigned to ‘Pending’ or ‘Completed’ status.
Do not submit a report for validation unless it contains a detail record for each applicable employee or retiree and the information for those detail records is accurate and complete.
On the Report Summary screen:
Report Summary Screen
1. Click the Edit hyperlink row for the report to submit for validation.
Training Guide Phase 1 - RER - Reports - RE Portal
Lesson 2: Create and Maintain Reports 29
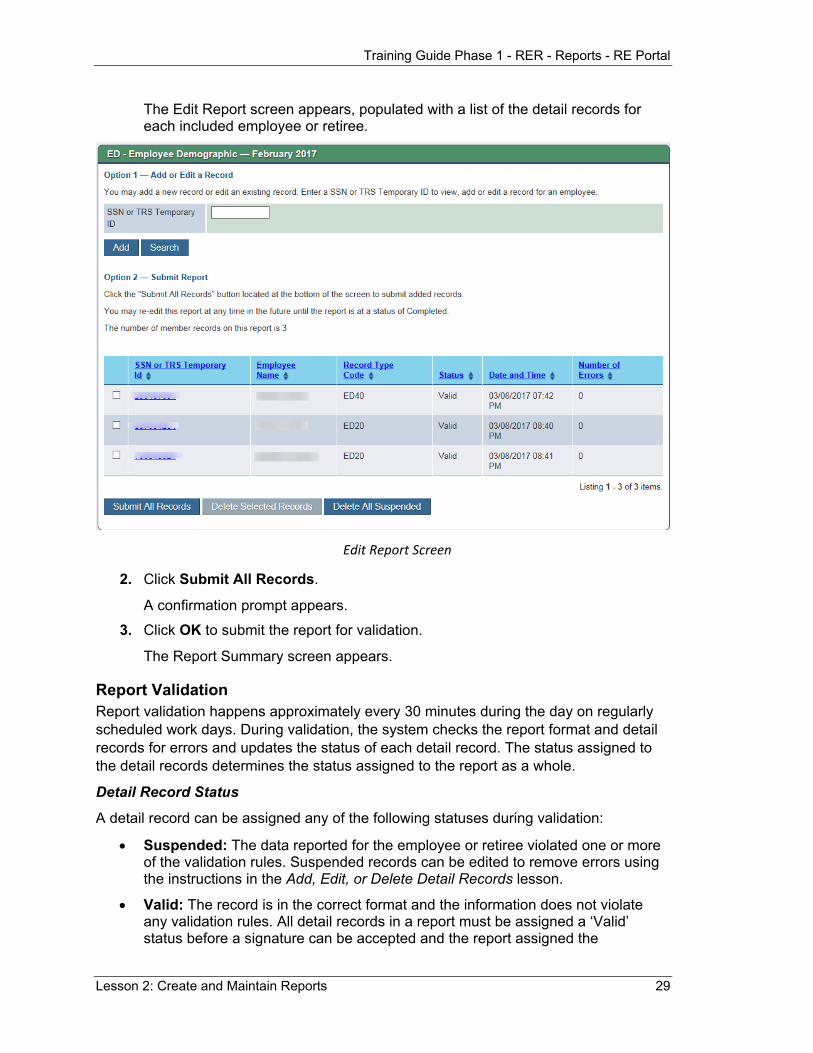
The Edit Report screen appears, populated with a list of the detail records for each included employee or retiree.
Edit Report Screen
2. Click Submit All Records.
A confirmation prompt appears.
3. Click OK to submit the report for validation.
The Report Summary screen appears.
Report Validation Report validation happens approximately every 30 minutes during the day on regularly scheduled work days. During validation, the system checks the report format and detail records for errors and updates the status of each detail record. The status assigned to the detail records determines the status assigned to the report as a whole.
Detail Record Status
A detail record can be assigned any of the following statuses during validation:
Suspended: The data reported for the employee or retiree violated one or more of the validation rules. Suspended records can be edited to remove errors using the instructions in the Add, Edit, or Delete Detail Records lesson.
Valid: The record is in the correct format and the information does not violate any validation rules. All detail records in a report must be assigned a ‘Valid’ status before a signature can be accepted and the report assigned the
Training Guide Phase 1 - RER - Reports - RE Portal
30 Lesson 2: Create and Maintain Reports
‘Completed’ status.
Posted: If it is an ED report, the record is put in ‘Posted’ status if the record is in the correct format, and the information did not violate any validation rules. An employee or retiree's record is only updated with the information in the report when the associated detail record is ‘Posted’. Detail records in an RP, RP - Adjustment, ER, or ER - Adjustment report are not assigned the ‘Posted’ status until the report is signed using the Submit Signature activity.
Report Status
Based on the status of the detail records, the report is assigned one of the following statuses:
Pending (RP, RP - Adjustment, ER, or ER - Adjustment reports only)
Rejected
Completed
In-Process (ED reports only)
Incomplete (ED reports only)
The status assigned to the report determines the next step towards achieving ‘Completed’ status.
Pending:
If it is an RP, RP - Adjustment, ER, or ER - Adjustment report, it is put in ‘Pending’ status if all of the included detail records have a ‘Valid’ status. When a report is assigned the ‘Pending’ status, the system automatically sends an email to inform portal users who have the Signature authority that the report is ready for review and signature.
Rejected:
If it is an RP, RP - Adjustment, ER, or ER - Adjustment report, the report is assigned ‘Rejected’ status if one or more detail records have been assigned a status other than ‘Valid’.
If it is an ED report, the report is assigned ‘Rejected’ status if none of its detail records have been assigned a status of ‘Valid’.
If it is an RP or RP - Adjustment report or an ER or an ER - Adjustment report, the report is assigned ‘Rejected’ status if the prior month's report has a status other than ‘Completed’. You must investigate the status of the prior month's report and fix the problem based on its status.
If there is a problem at the report level, the report is assigned ‘Rejected’ status. If this happens, contact your TRS RE Coach if you need assistance when diagnosing and correcting the issue.
Completed:
If it is an ED report and there are no errors on any of the detail records, the report is assigned ‘Completed’ status. An ED Report does not require
Training Guide Phase 1 - RER - Reports - RE Portal
Lesson 2: Create and Maintain Reports 31
a signature.
If it is a RP, RP-Adjustment, ER, or ER-Adjustment report, the report is assigned ‘Completed’ status after a signature is submitted for the report (covered in Lesson 3: Submit Signature).
In-Process:
If an ED report, the report is assigned ‘In-Process’ status if a record for an EIN is determined to be valid but there is currently a record in ‘Suspended’ status for the same EIN. The system will check again during posting to determine if the record still exists in ‘Suspended’ status.
Incomplete:
If an ED report, it is put in ‘Incomplete’ status if some, but not all, of the included records are in ‘Valid’ or ‘Posted’ status.
Fixing Validation Issues Reports with a status of ‘Rejected’ or ‘Incomplete’ must be corrected. There are two methods to use to correct errors discovered in an uploaded report:
Edit the report by adding new detail records, or by editing or deleting existing records status (covered in Add, Edit, or Delete Detail Records). Once the corrections are complete, you must manually resubmit the report for validation.
OR
Delete the report (covered in Delete a Report), correct the errors using your payroll system, and upload a new file.
Task: Delete a Report A report and all of its detail records can be deleted.
You cannot delete a report in ‘Completed’ status and you cannot delete an ED report in ‘Incomplete’ status.
On the Report Summary screen:
Training Guide Phase 1 - RER - Reports - RE Portal
32 Lesson 2: Create and Maintain Reports
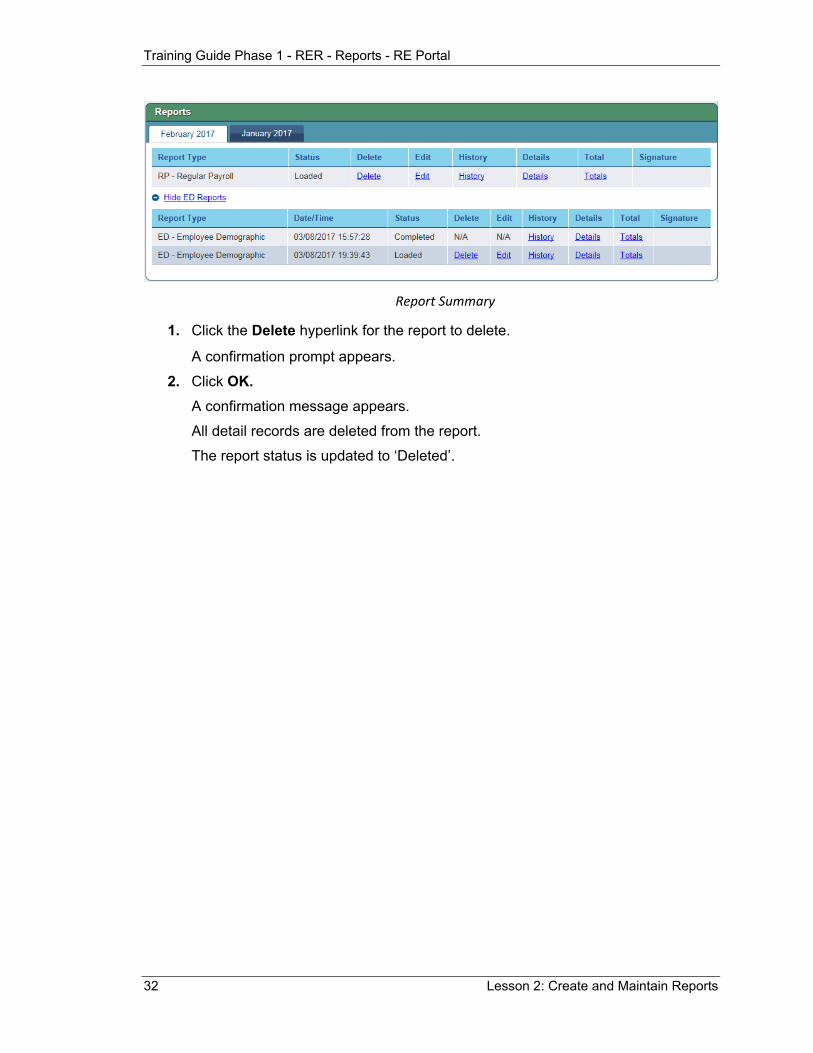
Report Summary
1. Click the Delete hyperlink for the report to delete.
A confirmation prompt appears.
2. Click OK. A confirmation message appears.
All detail records are deleted from the report.
The report status is updated to ‘Deleted’.
Training Guide Phase 1 - RER - Reports - RE Portal
Lesson 2: Create and Maintain Reports 33
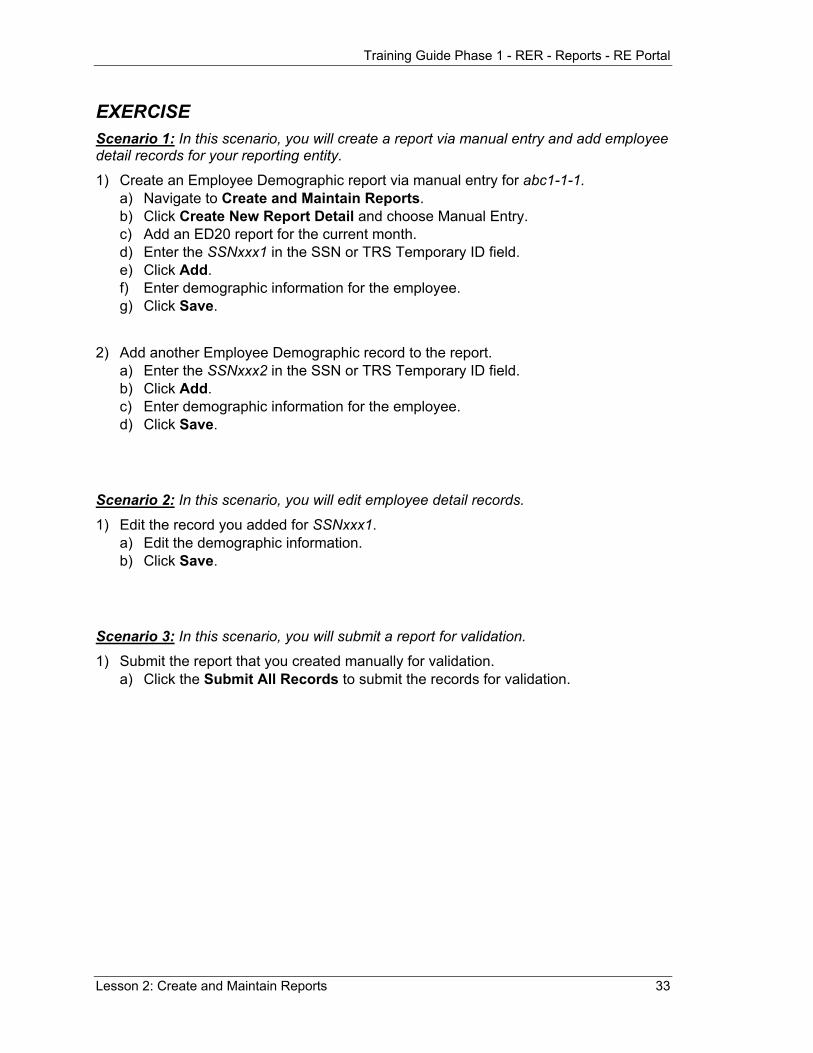
EXERCISE Scenario 1: In this scenario, you will create a report via manual entry and add employee detail records for your reporting entity.
1) Create an Employee Demographic report via manual entry for abc1-1-1. a) Navigate to Create and Maintain Reports. b) Click Create New Report Detail and choose Manual Entry. c) Add an ED20 report for the current month. d) Enter the SSNxxx1 in the SSN or TRS Temporary ID field. e) Click Add. f) Enter demographic information for the employee. g) Click Save.
2) Add another Employee Demographic record to the report. a) Enter the SSNxxx2 in the SSN or TRS Temporary ID field. b) Click Add. c) Enter demographic information for the employee. d) Click Save.
Scenario 2: In this scenario, you will edit employee detail records.
1) Edit the record you added for SSNxxx1. a) Edit the demographic information. b) Click Save.
Scenario 3: In this scenario, you will submit a report for validation.
1) Submit the report that you created manually for validation. a) Click the Submit All Records to submit the records for validation.

Training Guide Phase 1 - RER - Reports - RE Portal
Lesson 3: Submit Signature 35
Lesson 3: Submit Signature Once an RP, RP - Adjustment, ER, or ER - Adjustment report has been created and all of the included detail records have been assigned the ‘Valid’ status, the report is put in ‘Pending’ status. TRS sends an email to the reporting entity users with the Signature authority that a report is ready to be reviewed and ‘signed.’ Submitting a signature is required before a report of these types is assigned a status of ‘Completed’.
The Submit Signature activity is available only to Reporting Entity Portal users with the Signature authority level.
Lesson Objectives By the end of this lesson, you should be able to:
Submit signature – accept the signature
Submit signature – reject the signature
Submit signature – no detail records
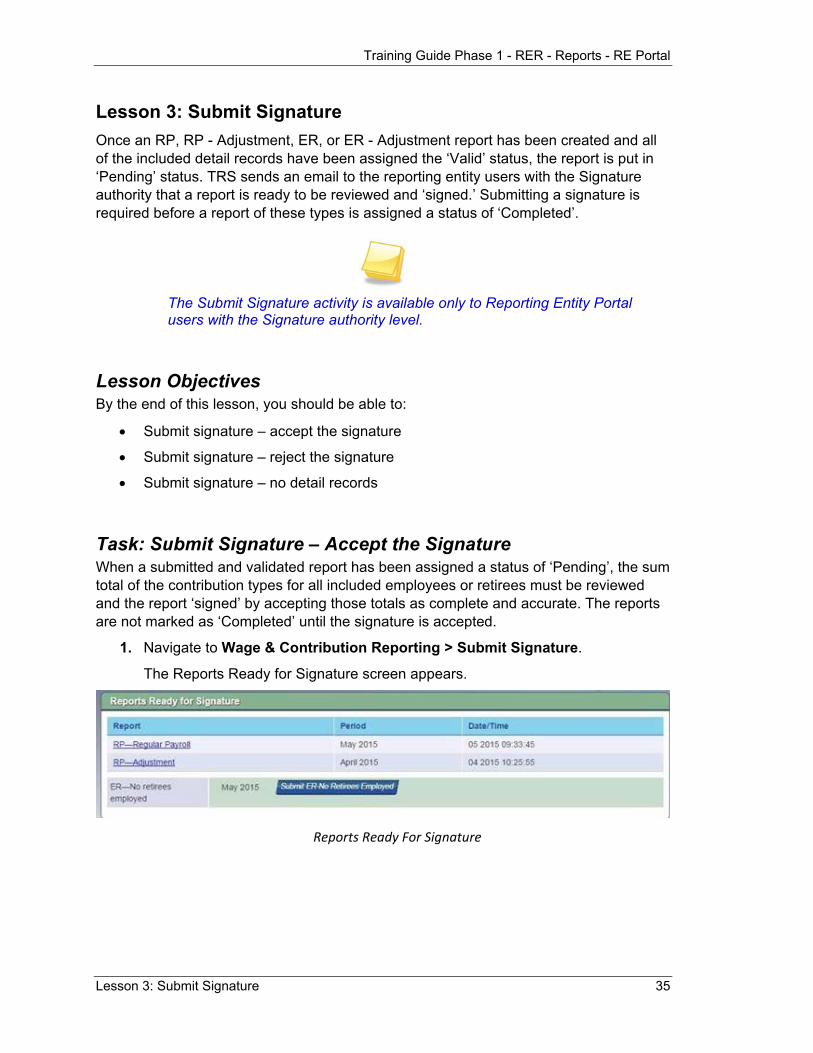
Task: Submit Signature – Accept the Signature When a submitted and validated report has been assigned a status of ‘Pending’, the sum total of the contribution types for all included employees or retirees must be reviewed and the report ‘signed’ by accepting those totals as complete and accurate. The reports are not marked as ‘Completed’ until the signature is accepted.
1. Navigate to Wage & Contribution Reporting > Submit Signature.
The Reports Ready for Signature screen appears.
Reports Ready For Signature
Training Guide Phase 1 - RER - Reports - RE Portal
36 Lesson 3: Submit Signature
A link appears for a report only if its detail records have been submitted for validation, the report is in ‘Pending’ status, all detail records contained in the report are in ‘Valid’ status, and no Accepted signature record exists for that report.
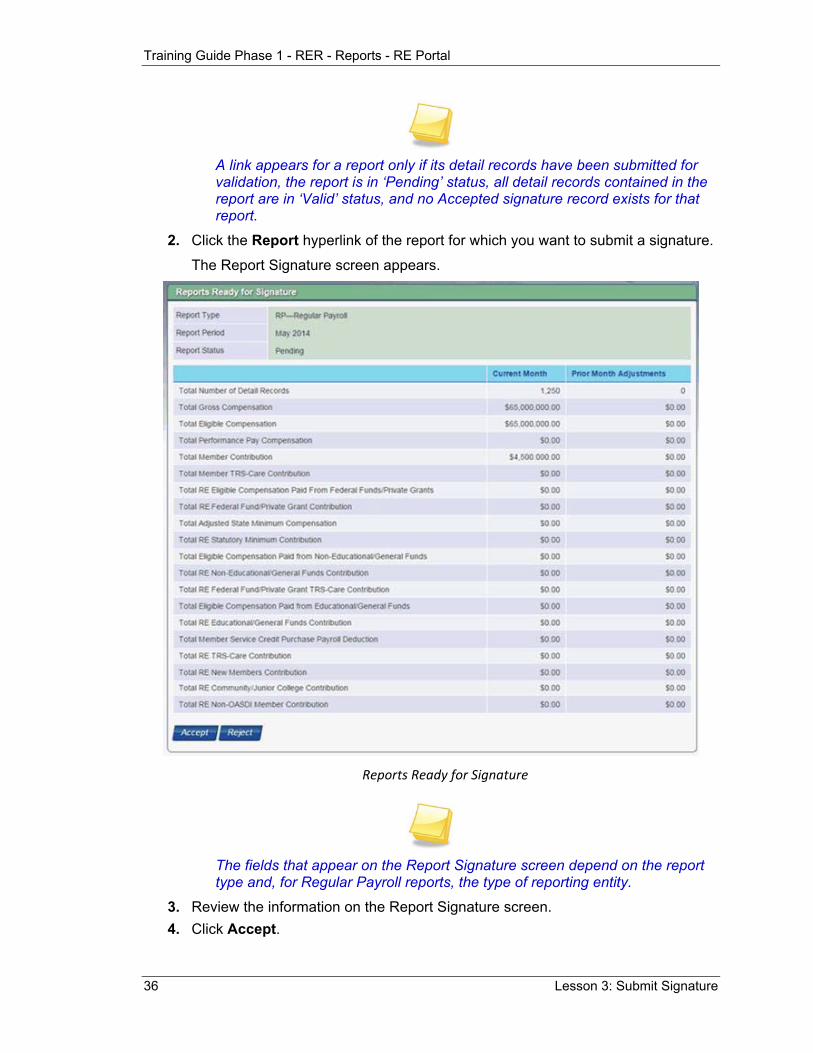
2. Click the Report hyperlink of the report for which you want to submit a signature.
The Report Signature screen appears.
Reports Ready for Signature
The fields that appear on the Report Signature screen depend on the report type and, for Regular Payroll reports, the type of reporting entity.
3. Review the information on the Report Signature screen. 4. Click Accept.
Training Guide Phase 1 - RER - Reports - RE Portal
Lesson 3: Submit Signature 37
A confirmation prompt appears.
5. Click OK.
The Signature Status is updated to Accepted.
Employee or retiree records cannot be added to or deleted from a report once the Signature Status is Accepted. Once a signature is accepted, the report is sent through validation again.
If a report is assigned a Hold status, an email notification is generated to the Reporting Official and Payroll Contact. A TRS representative must remove the hold from the report.
If the report is not assigned the Hold status, it is assigned the ‘Completed’ status and work on that report is complete. The information from the report is applied to your reporting entity's record and/or to the record of any included employee or retiree after the nightly posting job is run for the report.
Task: Submit Signature – Reject the Signature If the totals are incorrect, the signer has the option to reject them as not complete and accurate.
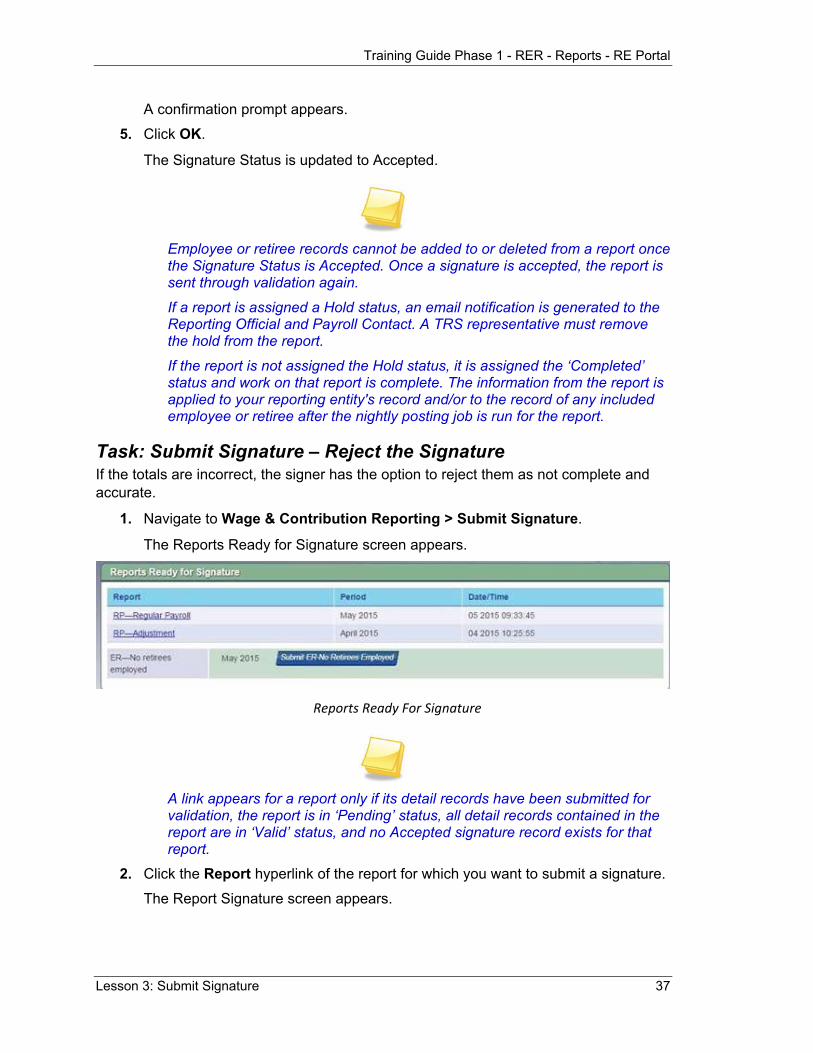
1. Navigate to Wage & Contribution Reporting > Submit Signature.
The Reports Ready for Signature screen appears.
Reports Ready For Signature
A link appears for a report only if its detail records have been submitted for validation, the report is in ‘Pending’ status, all detail records contained in the report are in ‘Valid’ status, and no Accepted signature record exists for that report.
2. Click the Report hyperlink of the report for which you want to submit a signature.
The Report Signature screen appears.

Training Guide Phase 1 - RER - Reports - RE Portal
38 Lesson 3: Submit Signature
Reports Ready for Signature
The fields that appear on the Report Signature screen depend on the report type and, for Regular Payroll reports, the type of reporting entity.
3. Review the information on the Report Signature screen. 4. Click Reject.
A confirmation prompt appears.
5. Click OK.
The Signature Status is updated to ‘Rejected’.
If a signature is rejected, the report status remains ‘Pending’. A Reporting Entity Portal user with the Submit authority level can correct any problems by adding, editing, or deleting detail records.
Training Guide Phase 1 - RER - Reports - RE Portal
Lesson 3: Submit Signature 39
If a signature is rejected in error, resubmit the report for validation. Once the validation is complete, the report will appear on the Reports Ready for Signature screen.
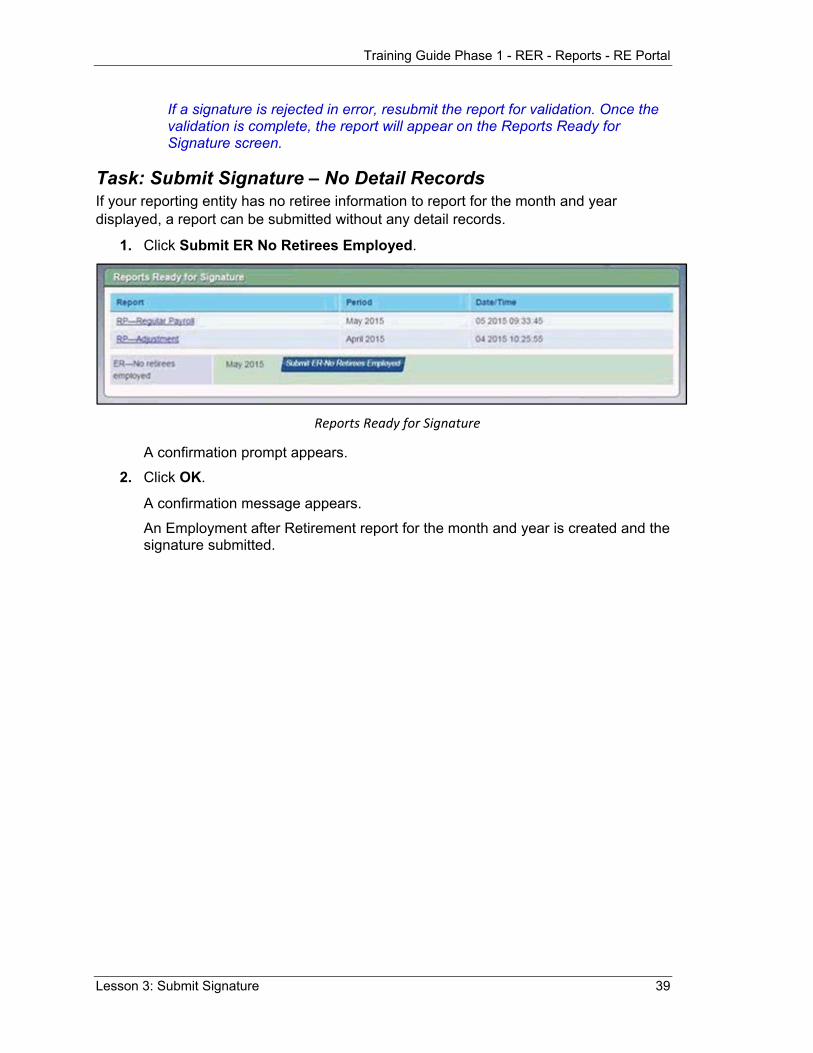
Task: Submit Signature – No Detail Records If your reporting entity has no retiree information to report for the month and year displayed, a report can be submitted without any detail records.
1. Click Submit ER No Retirees Employed.
Reports Ready for Signature
A confirmation prompt appears.
2. Click OK.
A confirmation message appears.
An Employment after Retirement report for the month and year is created and the signature submitted.
Training Guide Phase 1 - RER - Reports - RE Portal
40 Lesson 3: Submit Signature
EXERCISE Scenario 1: In this scenario, as Web Administrator or Reporting Official for abc1-1-1, you will accept the signature for a report.
1) Review and accept the signature on a report. a) Navigate to Wage & Contribution Reporting > Submit Signature. b) Click the Report hyperlink of a report. c) Review the contribution type amounts. d) Click Accept. e) Click OK.