
TRUST FAMILYC@M 300 DIGITAL MOVIE
37
TRUST FAMILYC@M 300 DIGITAL MOVIE UK TRUST FAMILYC@M 300 DIGITAL MOVIE Instruction Manual Version 2.0
Transcript of TRUST FAMILYC@M 300 DIGITAL MOVIE
TRUST FAMILYC@M 300 DIGITAL MOVIE
UK
TRUST FAMILYC@M 300 DIGITALMOVIE
Instruction Manual
Version 2.0

TRUST FAMILYC@M 300 DIGITAL MOVIE
12257-UK-CM-23.DOC
Thank youThank you very much for purchasing this product from the Trust range. We wish you hours of funwith it. Please read this manual carefully before using the product.
RegistrationRegister your purchase via our Internet site at www.trust.com so that you can receive optimalguarantee and service support. You will be automatically informed of developments to yourproduct and other Trust products. You will also have the chance of winning some spectacularprizes.
Copyright statementNo part of this instruction manual may be reproduced or transmitted, in any form or by any means,electronic or mechanical, including photocopying, recording, or information storage and retrievalsystems, for any purpose other than the purchaser's own personal use, without prior writtenpermission from the manufacturer.
Disclaimer statementThe manufacturer specifically disclaims all warranties, either express or implied, including, but notlimited to, implied warranties for the marketability and suitability for a particular purpose, withrespect to the software, the accompanying product manual(s) and written material, and all otheraccompanying hardware. The manufacturer reserves the right to revise or make improvements toits product at any time and without obligation to notify any person of such revisions orimprovements.In no event shall the manufacturer be liable for any consequential or incidental damages, includingany loss of business profits or any other commercial damages, arising out of the use of itsproducts.All company or product names are trademarks or registered trademarks of their respectiveowners.

TRUST FAMILYC@M 300 DIGITAL MOVIE
1
UK
Contents1. Introduction..................................................................................................................................... 3
1.1 Conventions used in the manual ........................................................................................... 3
1.2 Contents of the box ................................................................................................................. 3
1.3 Minimum system requirements.............................................................................................. 3
2. Safety ............................................................................................................................................... 4
2.1 General information................................................................................................................. 4
2.2 Batteries.................................................................................................................................... 4
3. Inserting the batteries .................................................................................................................... 5
4. Camera functions............................................................................................................................ 5
4.1 Camera functions..................................................................................................................... 5
4.2 LCD functions .......................................................................................................................... 6
4.3 Focus Ring functions .............................................................................................................. 7
Taking photographs ............................................................................................................................. 8
5.1 Setting the camera resolution ................................................................................................ 8
5.1.1 Low resolution (320 x 240) ...................................................................................... 8
5.1.2 High resolution (640 x 480) ..................................................................................... 9
5.1.3 Highest resolution (1024 x 768) .............................................................................. 9
5.2 Continuous mode ............................................................................................................ 9
5.3 Deleting recordings ................................................................................................................. 9
5.3.1 Deleting the last recording ...................................................................................... 9
5.3.2 Deleting all the recordings ...................................................................................... 9
5.3.3 Memory information ................................................................................................. 9
5.4 Automatic exposure ...................................................................................................... 10
5.5 Focus function ....................................................................................................................... 10
6. Making a video ....................................................................................................................... 10
7. Installing the driver....................................................................................................................... 11
7.1 Trust Software Installer ......................................................................................................... 11
7.2 Installing the driver (Windows 98 / Windows ME) .............................................................. 11
7.3 Installing the driver in Windows 2000.................................................................................. 12
7.4 Installing the driver in Windows XP..................................................................................... 13

TRUST FAMILYC@M 300 DIGITAL MOVIE
2
8. Installing the software.................................................................................................................. 15
8.1 Installing MGI PhotoSuite III SE............................................................................................ 15
8.2 Installing MGI VideoWave III SE ........................................................................................... 17
8.3 Installing Microsoft ® NetMeeting........................................................................................ 18
9. Connecting the camera to your computer ................................................................................. 22
10. Using the software........................................................................................................................ 23
10.1 Using MGI PhotoSuite III SE ................................................................................................. 23
10.1.1 Once-only settings.......................................................................................................... 23
10.1.2 Loading photographs onto the computer using MGI PhotoSuite III SE.................... 24
10.2 Using MGI VideoWave III SE ................................................................................................. 25
10.2.1 Setting the image ............................................................................................................ 2510.2.1.1 Setting the brightness and contrast............................................................................ 2710.2.1.2 Making and editing a video recording......................................................................... 28
10.3 Using Microsoft ® NetMeeting.............................................................................................. 29
10.4 WebCam & Internet................................................................................................................ 32
11. Troubleshooting ........................................................................................................................... 33
12. Specifications................................................................................................................................ 34
13. Trust Customer Care Centers...................................................................................................... 35

TRUST FAMILYC@M 300 DIGITAL MOVIE
3
UK
1. IntroductionThis instruction manual is for users of the TRUST FAMILYC@M 300 DIGITAL MOVIE. Basic knowledge ofcomputers is necessary to be able to install this product. Please consult one of the Trust Customer CareCenters if you have any problems. The last page of this electronic instruction manual, as well as the back ofthe printed installation manual, contains more information about these Customer Care Centers.
1.1 Conventions used in the manualThe following conventions have been used in the manual to indicate instructions:
<Key> Here you should press a key. The name of the key is given between brackets.
‘System’ This is a specific term used in a program. These are terms used by, for example, MicrosoftWindows 98.
[DIR] Type the text shown between brackets [….].
Extra information will be shown as follows:
Note: If you connect the ‘TRUST FAMILYC@M 300 DIGITAL MOVIE’ to a USB HUB, then this USBHUB should have its own power supply.
The examples assume that the letter "D" has been assigned to your CD-ROM drive. If your system uses adifferent letter for your CD-ROM drive, for example "E", you should replace "D" by "E".
1.2 Contents of the boxCheck the contents of the box before reading the instruction manual. It should contain the following:
• TRUST FAMILYC@M 300 DIGITAL MOVIE
• Camera stand
• CD-ROM containing the driver, applications and instruction manuals
• USB cable
• Wrist strap
• 2 AAA batteries
• Quick installation manual
If anything is missing or damaged, please contact one of the Trust Customer Care Centers. You can findmore information at the back of this instruction manual.
1.3 Minimum system requirements• Intel Pentium 166 MMX CPU
• USB port
• Windows 98 / Windows ME / Windows 2000 / Windows XP
• 24 MB RAM
• 50 MB free hard disk space
• 4-speed CD-ROM drive

TRUST FAMILYC@M 300 DIGITAL MOVIE
4
Recommended system configuration for full use of the applications
• ISDN adapter or modem with an Internet connection
• Sound card with speakers and microphone
2. Safety2.1 General information1. Do not use this device in a damp environment.
2. Do not try to repair this device yourself.
3. Under the following circumstances, have the device repaired by qualified personnel:
a) The cable or plug is damaged or worn.
b) Liquid has entered the device.
c) The device has been dropped and/or the casing has been damaged.
4. Position the device so that the cables cannot be damaged.
2.2 Batteries1. The alkaline batteries supplied are not rechargeable. Do not try to recharge them, because this may
cause them to explode.
2. Never throw the batteries onto an open fire. The batteries may explode.
3. Never drill holes into the batteries.
4. Keep the batteries out of the reach of small children.
5. Only use AAA alkaline or rechargeable NiMH batteries with this camera.
When the batteries are empty, ask your local authority where you can dispose of them.
Note: Standard NiCd batteries are unsuitable for use with this camera.
Note: Do not use old and new batteries at the same time, because the old batteries may deplete thenew ones.
Note: The batteries should be removed if the camera is not going to be used for some time. This willsave the battery capacity.

TRUST FAMILYC@M 300 DIGITAL MOVIE
5
UK
3. Inserting the batteries
Figure 1: Inserting the batteries
1. Open the battery flap by pushing it to the left. The direction is also indicated by the arrow on the batteryflap.
2. Insert the two AAA batteries as shown in figure 1. The position is also shown on the inside of the batteryflap.
3. Close the battery flap by pushing it slightly downwards and sliding it to the right.
4. The TRUST FAMILYC@M 300 DIGITAL MOVIE is now ready for use
4. Camera functions4.1 Camera functions
Figure 2: Functions of the FamilyC@m 300 Digital Movie
Description Function
1 Focus ring For setting the distance to the object to be photographed.
2 Viewfinder This is used to view the subject.
3 Digital output Connection for the USB cable to the computer.
4 Lens Records the image to be taken.

TRUST FAMILYC@M 300 DIGITAL MOVIE
6
Description Function
5 Red LED This flashes if a video is being recorded and will remain lit if thecamera is connected to the computer’s USB port.
6 Green LED This flashes at the same time as the red LED (5) if a video is beingrecorded.
7 Fixing point Fixing point for the wrist strap.
8 DELETE /REMAIN button
Gives information about the camera's memory capacity and can alsobe used to remove images from the camera.
9 Exposure button Saves the image in the memory.
10 MODE / ON-OFFbutton
MODE: Changes the camera mode.
ON-OFF: Turns the camera ON or OFF.
11 LCD screen Displays the life span of the battery, the number of photographs andthe photograph quality (see figure 3).
12 Battery flap Access to the battery compartment.
13 Fixing point Fixing point for the stand.
Table 1: Camera functions
4.2 LCD functions
Figure 3: LCD functions
Symbol Description Function
1 Single photograph One photograph is taken at a time.
2 Continuous Four photographs are taken one after the other.
3 Automatic exposure Takes photographs after a time delay of 10 seconds.
4 Video Video mode for making short films.
5 Frame rate The number of images per second taken in the videomode.
6 Number of photographs Indicates the number of photographs which have already beentaken.
7 Memory Shows, in terms of percent, how much memory the camera hasleft.
8 Appears when the camera is saving the photograph in thecamera's memory.
9 Memory Indicates that the memory is full.

TRUST FAMILYC@M 300 DIGITAL MOVIE
7
UK
Symbol Description Function
10 Delete last photograph Deletes the last photograph from the memory.
11 Delete all thephotographs
Deletes all the photographs from the memory.
12 USB Appears when the camera is connected to the computer's USBport.
13 High resolution(using interpolation)
High resolution (1024 x 768 interpolated)
14 High resolution High resolution mode (640 x 480 pixels)
15 Low resolution Low resolution mode (320 x 240 pixels)
16 Battery capacity Shows the amount of energy remaining in the batteries.
17 Battery capacity The batteries are low.
Table 2: LCD functions
4.3 Focus Ring functions 60 inch (1.5 m) ~ infinity
20 inch (50 cm)
10 inch (25 cm)
5 inch (12 cm)
2 inch (6 cm)
1.5 inch (4 cm)
Figure 4: Focus Ring functions Table 3: Focus Ring functions
TRUST FAMILYC@M 300 DIGITAL MOVIE
8
5. Taking photographsFollow the instructions given below. Also see figures 2 to 4 and the accompanying tables.
1. Press the ON/OFF button (10) for 2 seconds and then release it to turn the camera on. The LCD screen(figure 3) will turn on and two beeps will be heard. The camera is now ready for use.
2. Search for the subject that you wish to photograph in the viewfinder (2).
Note: When the distance to the object is less than 10 cm from the lens, the distance is too smallto use the viewfinder.
3. Press the exposure button (9) to capture the subject.
4. You should wait approximately 2 seconds before taking another photograph (BUSY will disappear fromthe LCD screen). Once the memory is full, 'FULL' will flash in the LCD screen. The memory must beemptied before taking new photographs. See chapter 5.3 for instructions on how to remove recordedimages from the memory.
5. The camera has an automatic exposure which gives a time delay of 10 seconds before the photographis taken. This can be turned on by pressing the MODE button (10) once. Symbol 3 (table 2) will now bedisplayed in the LCD screen. Now press the exposure button (9) to activate the self exposure. Symbol 3will start to flash.
6. If the camera is not being used, it will automatically turn itself off after a certain time.
Note: Keep the glass lens clean so as not to effect the quality of the photographs.
To take good photographs, the object should first be held in view for a couple of seconds before taking thephotograph.
5.1 Setting the camera resolutionThe camera can be set to three different resolutions: S (320 x240), Hi (640 x 480) and SHi (1024 x 768).Instructions on how the camera can be set to the three different resolutions are given below. The camera’sdefault setting is the Hi (640 x 480) resolution.
5.1.1 Low resolution (320 x 240) 1. Turn on the camera by pressing the Mode button (10). Two beeps will be heard. The camera will be in
the Hi mode.
2. Press the Mode button (10) and keep it pressed.
3. Press the exposure button (9) twice to change the camera to the low resolution and release the buttons.A beep will be heard each time the exposure button is pressed.
The camera is now ready for taking photographs in the low resolution.

TRUST FAMILYC@M 300 DIGITAL MOVIE
9
UK
5.1.2 High resolution (640 x 480) The camera is in the high resolution by default when it is turned on.
5.1.3 Highest resolution (1024 x 768) 1. Turn on the camera by pressing the Mode button (10). Two beeps will be heard. The camera will be in
the Hi mode.
2. Press the Mode button (10) and keep it pressed.
3. Press the exposure button (9) once to change the camera to the highest resolution (SHi) and release thebuttons. A beep will be heard when the exposure button is pressed.
The camera is now ready for taking photographs in the highest resolution.
Note: The camera will be in the Hi resolution if it is turned off and turned back on again.
5.2 Continuous modeWhen in the continuous mode, the camera will take 4 photographs one after the other. Follow the instructions givenbelow to set the camera to this mode.
1. Turn the camera on. The camera will be in the standard mode.
2. Press the Mode button (10) twice to set the camera to the continuous mode. Symbol 2 (table 2) will appear in theLCD screen.
3. When the exposure button (9) is pressed, four photographs will be taken one after the other.
Whilst these photographs are being taken, the text “BUSY” will appear in the screen and the counter (6) willcount down from 4 to 1. Whilst counting down, a beep will be heard each time a photograph is taken.
After taking the four photographs, the counter will only have increased by one, although four photographshave been taken. This is because the counter displays how many recordings have been taken and not thenumber of images.
The picture resolution is set in exactly the same way as in the standard camera mode (see chapter 5.1).
5.3 Deleting recordingsTo delete recordings, a choice can be made to either delete all the records or only the last recording.Photographs should be deleted if “FULL” (symbol 9 in table 2) appears in the screen or if you do not wish tokeep the last recording.
5.3.1 Deleting the last recordingPress the DEL / REMAIN button (8) once. Symbol 10 (table 2) will appear in the LCD screen. Now press theexposure button (9) to delete the last recording.
5.3.2 Deleting all the recordingsPress the DEL / REMAIN button (8) twice. Symbol 10 (table 2) will appear together with the flashing text ALLin the LCD screen. Now press the exposure button (9) to delete all the recordings.Wait approximately 5 seconds until the text BUSY disappears before taking new photographs.
5.3.3 Memory informationKeep the DEL / REMAIN button (8) pressed. Symbol 7 (table 2) will appear in the LCD screen. The remainingpercentage of memory can now be read on the LCD screen.

TRUST FAMILYC@M 300 DIGITAL MOVIE
10
5.4 Automatic exposureThe camera has an automatic exposure which gives a time delay of 10 seconds before the photograph istaken. This can be turned on by pressing the MODE button (10) once. Symbol 3 (table 2) will now bedisplayed in the LCD screen. Now press the exposure button (9) to activate the self exposure. Symbol 3 willstart to flash.
5.5 Focus functionThe focus function can be set by turning the focus ring as described in chapter 4.3.This can be set from 4 cm to infinity.
6. Making a videoIn the lowest resolution, short films lasting approximately 2 minutes and 30 seconds can also be recordedusing the Trust FamilyC@m 300 Digital Movie.
A film is made as follows.
1. Turn on the camera. Two beeps will be heard.
2. Press the Mode button (10) four times so that the symbol 4 in table 2 appears.
3. Press the exposure button (9) and keep it pressed to make a recording. A beep will be heard every fiveseconds. The counter will also increase.
4. Release the exposure button (9) to stop the recording. The counter will now only have increased by 1.This is because the counter displays how many recordings have been taken and not the number ofimages.

TRUST FAMILYC@M 300 DIGITAL MOVIE
11
UK
7. Installing the driverThe recordings you make can be uploaded onto your computer. To be able to do this, the driver and thesoftware must be installed onto your computer. Follow the instructions below to do this.
Note: First, remove all drivers for old cameras which may have previously been installed on yourcomputer, because these may cause a conflict with the Trust FamilyC@m 300 Digital Movie. Seethe instruction manual provided with the cameras that you wish to remove for instructions on howto do this.
Note: The driver for the camera must be installed before connecting the camera to your computer.
Note: This camera only works with this driver on a system using Windows 98 or higher. This cameradoes not work on an Apple iMac.
7.1 Trust Software Installer1. Insert the CD-ROM into your CD drive. The installation program will start automatically. If the installation
program does not start automatically, run 'Setup.exe' on the CD-ROM. Figure 5 will appear. The TrustSoftware Installer will appear in Windows 98, Windows ME, Windows 2000 and Windows XP.
Figure 5: Trust Software Installer
7.2 Installing the driver (Windows 98 / Windows ME)1. Click on FAMILYC@M 300 DIGITAL MOVIE to start the installation. Figure 6 will appear.
Figure 6: Installation in Windows 98 / Windows ME
2. Click on 'START' to start the installation or wait 10 seconds for the installation to start automatically.
TRUST FAMILYC@M 300 DIGITAL MOVIE
12
3. Figure 7 will appear after the installation has been completed.
Figure 7: Installation in Windows 98 / Windows ME
4. Click on 'OK' to complete the installation. The Trust Software Installer (figure 5) will appear automaticallyand you will be able to install the other software. See chapter 8 for instructions on how to install the othersoftware.
7.3 Installing the driver in Windows 20001. Click on FAMILYC@M 300 DIGITAL MOVIE to start the installation. Figure 8 will appear.
Figure 8: Installation in Windows 2000
2. Click on 'START' to start the installation or wait 10 seconds for the installation to start automatically.
During the installation of the driver in Windows 2000, you may receive a message stating that the driver has notbeen digitally signed (see figure 9).
Figure 9: Installation in Windows 2000
You can ignore this message, because it does not affect the functionality of the driver. It only means that the driverhad not (yet) been fully certified by Microsoft at the time this instruction manual was written. Click on ‘Yes’ tocontinue with the installation. Figure 10 will appear after the installation.
TRUST FAMILYC@M 300 DIGITAL MOVIE
13
UKFigure 10: Installation in Windows 2000
3. Click on 'OK' to complete the installation. The Trust Software Installer (figure 5) will appear automaticallyand you will be able to install the other software. See chapter 8 for instructions on how to install the othersoftware.
7.4 Installing the driver in Windows XP1. Click on FAMILYC@M 300 DIGITAL MOVIE to start the installation. Figure 11 will appear.
Figure 11: Installation in Windows XP
2. This message does NOT mean that there is an error. It appears because Windows XP was not availableat the time that this camera was developed. Ignore this message. It will not affect the camera’s operation.Click on ‘Continue’ to continue with the installation. Figure 12 will appear.
Figure 12: Installation in Windows XP
4. Click on 'START' to start the installation or wait 10 seconds for the installation to start automatically.
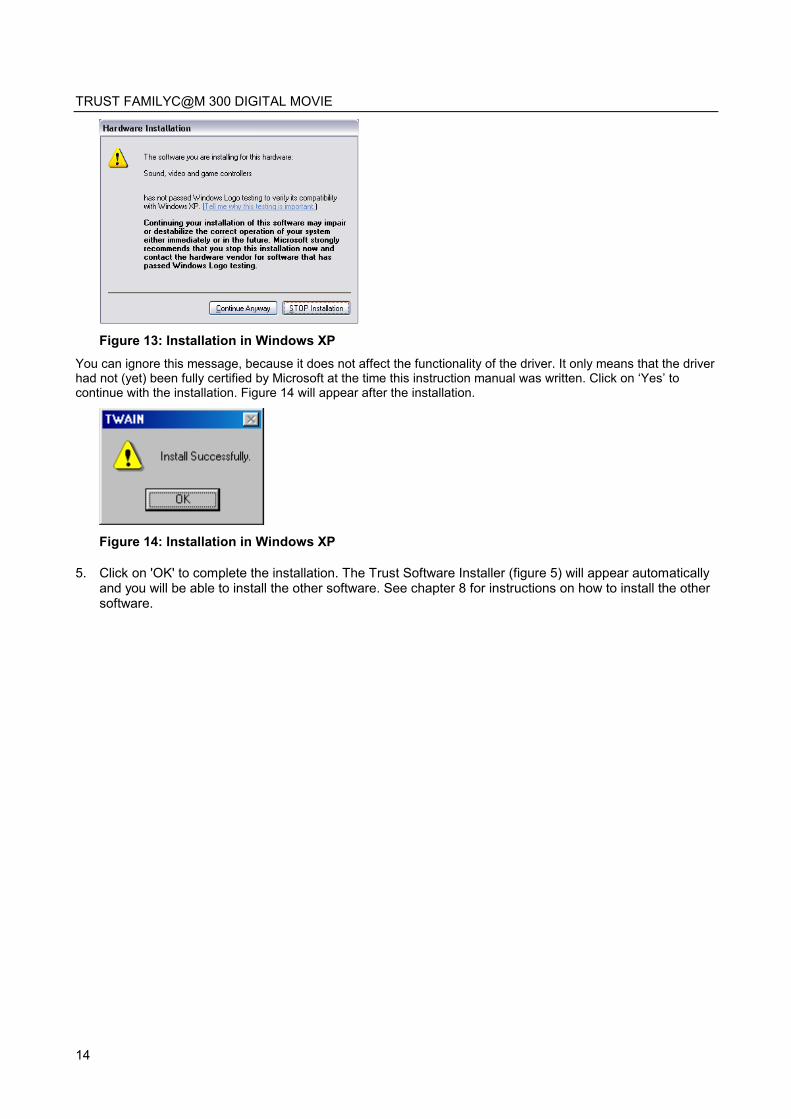
During the installation of the driver in Windows XP, you may receive a message stating that the driver has notpassed Windows Logo testing (see figure 13).
TRUST FAMILYC@M 300 DIGITAL MOVIE
14
Figure 13: Installation in Windows XPYou can ignore this message, because it does not affect the functionality of the driver. It only means that the driverhad not (yet) been fully certified by Microsoft at the time this instruction manual was written. Click on ‘Yes’ tocontinue with the installation. Figure 14 will appear after the installation.
Figure 14: Installation in Windows XP
5. Click on 'OK' to complete the installation. The Trust Software Installer (figure 5) will appear automaticallyand you will be able to install the other software. See chapter 8 for instructions on how to install the othersoftware.

TRUST FAMILYC@M 300 DIGITAL MOVIE
15
UK
8. Installing the software8.1 Installing MGI PhotoSuite III SEMGI PhotoSuite III SE is an image editing program that can be used to load and edit the photographs on yourPC which you have taken using your FAMILYC@M 300 DIGITAL MOVIE. Follow the instructions below toinstall MGI PhotoSuite SE.
1. Start the Trust Software Installer and click on ‘MGI PhotoSuite III SE’ (see figure 5).
2. Select the language you wish MGI PhotoSuite to be installed in.
3. Click on ‘OK’. Figure 15 will appear.
Figure 15: Installing MGI PhotoSuite III SE
4. Click on 'Next'. Figure 16 will appear.
Figure 16: Installing MGI PhotoSuite III SE
5. Click on 'Yes' to accept the license agreement and continue with the installation.
6. Click on 'Next' a number of times to install MGI PhotoSuite at the default location. Figure 17 will appearafter the installation.

TRUST FAMILYC@M 300 DIGITAL MOVIE
16
Figure 17: Installing MGI PhotoSuite III SE
7. Click on ‘Register Later’. Figure 18 will appear.
Figure 18: Installing MGI PhotoSuite III SE
8. Click on ‘Finish’. Figure 19 will appear.
Figure 19: Installing MGI PhotoSuite III SE
9. Click on ‘Finish’ to complete the installation of MGI PhotoSuite III SE and to restart your computer.
You have now completed the installation of MGI PhotoSuite III SE. Continue to chapter 8.2 for instructions onhow to install MGI VideoWave III SE.
TRUST FAMILYC@M 300 DIGITAL MOVIE
17
UK
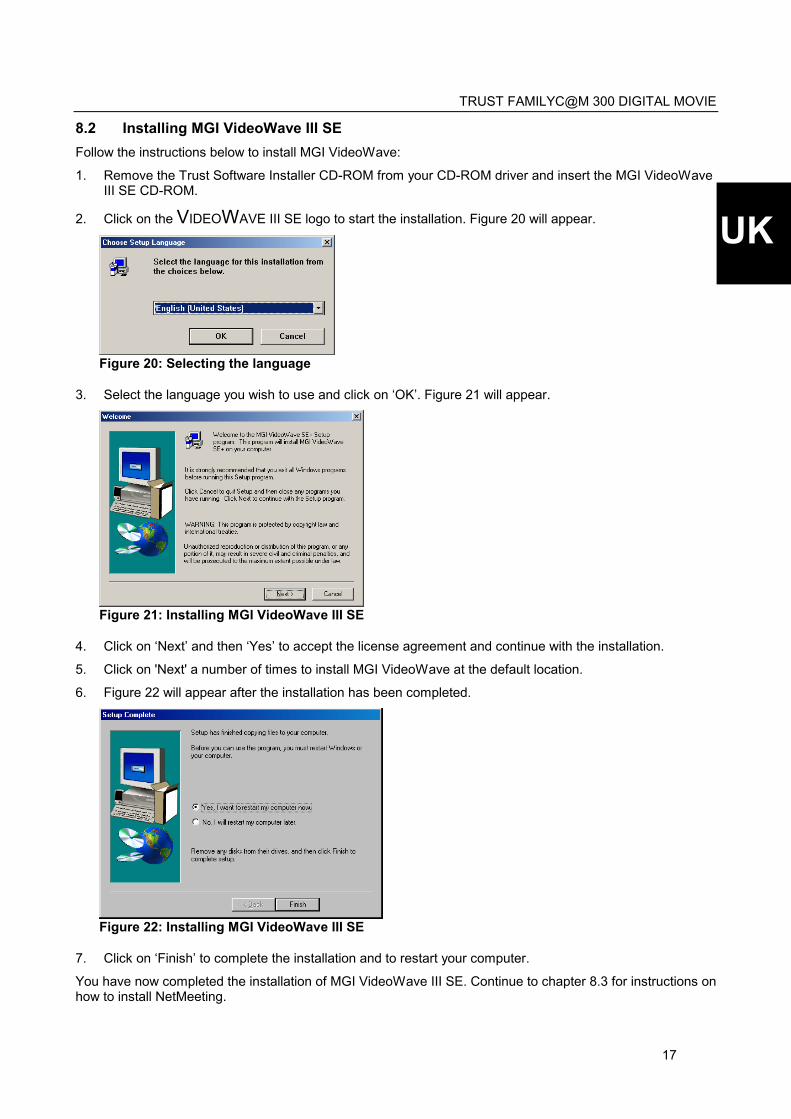
8.2 Installing MGI VideoWave III SEFollow the instructions below to install MGI VideoWave:
1. Remove the Trust Software Installer CD-ROM from your CD-ROM driver and insert the MGI VideoWaveIII SE CD-ROM.
2. Click on the VIDEOWAVE III SE logo to start the installation. Figure 20 will appear.
Figure 20: Selecting the language
3. Select the language you wish to use and click on ‘OK’. Figure 21 will appear.
Figure 21: Installing MGI VideoWave III SE
4. Click on ‘Next’ and then ‘Yes’ to accept the license agreement and continue with the installation.
5. Click on 'Next' a number of times to install MGI VideoWave at the default location.
6. Figure 22 will appear after the installation has been completed.
Figure 22: Installing MGI VideoWave III SE
7. Click on ‘Finish’ to complete the installation and to restart your computer.
You have now completed the installation of MGI VideoWave III SE. Continue to chapter 8.3 for instructions onhow to install NetMeeting.
TRUST FAMILYC@M 300 DIGITAL MOVIE
18
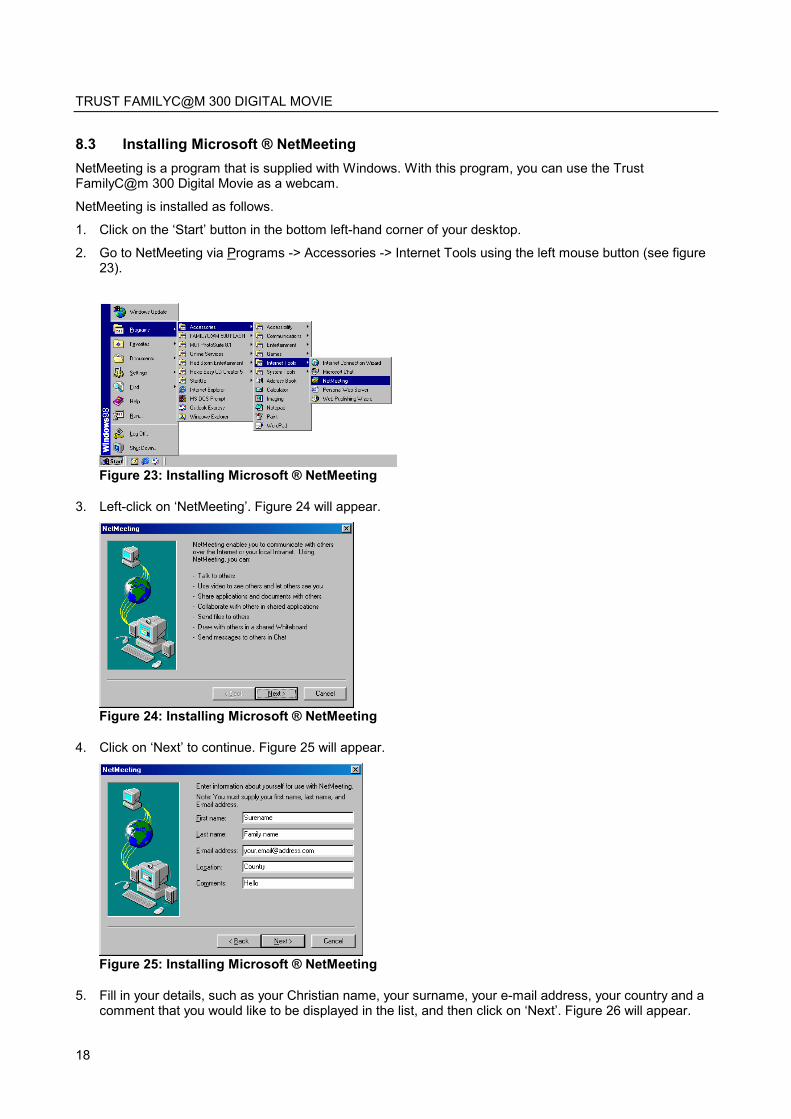
8.3 Installing Microsoft ® NetMeetingNetMeeting is a program that is supplied with Windows. With this program, you can use the TrustFamilyC@m 300 Digital Movie as a webcam.
NetMeeting is installed as follows.
1. Click on the ‘Start’ button in the bottom left-hand corner of your desktop.
2. Go to NetMeeting via Programs -> Accessories -> Internet Tools using the left mouse button (see figure23).
Figure 23: Installing Microsoft ® NetMeeting
3. Left-click on ‘NetMeeting’. Figure 24 will appear.
Figure 24: Installing Microsoft ® NetMeeting
4. Click on ‘Next’ to continue. Figure 25 will appear.
Figure 25: Installing Microsoft ® NetMeeting
5. Fill in your details, such as your Christian name, your surname, your e-mail address, your country and acomment that you would like to be displayed in the list, and then click on ‘Next’. Figure 26 will appear.

TRUST FAMILYC@M 300 DIGITAL MOVIE
19
UK
Figure 26: Installing Microsoft ® NetMeeting
6. If you do not want to be displayed in the NetMeeting list, select ‘Do not list my name in the directory’ andclick on ‘Next’. Click on ‘Next’ to continue. Figure 27 will appear.
Figure 27: Installing Microsoft ® NetMeeting
7. Select the type of connection you use and click on ‘Next’. Figure 28 will appear.
Figure 28: Installing Microsoft ® NetMeeting
8. Select the ‘TRUST,WDM Video Capture’ as the camera you wish to use for NetMeeting and click on‘Next’ to continue. Figure 29 will appear.

TRUST FAMILYC@M 300 DIGITAL MOVIE
20
Figure 29: Installing Microsoft ® NetMeeting
9. Select ‘Put a shortcut to NetMeeting on my desktop’ if you wish to have a shortcut to NetMeeting on yourdesktop. Select ‘Put a shortcut to NetMeeting on My Quick Launch bar’ is you wish to have a shortcut toNetMeeting on your Windows taskbar. You do not have to select either option if you do not wish to.
10. Click on ‘Next’ to continue. Figure 30 will appear.
Figure 30: Installing Microsoft ® NetMeeting
11. Click on ‘Next’ to set and test the audio settings for NetMeeting. Figure 31 will appear.
Figure 31: Installing Microsoft ® NetMeeting
12. Click on ‘Test’ to test your speakers. The ‘Test’ button will now change to a ‘Stop’ button. You will hear anoise from your speakers.
13. Set the desired volume using the slide bar. If you do not hear anything, then your sound card has notbeen installed correctly. See the instruction manual provided with your sound card for instructions onhow to install it correctly. If you hear a noise, click on ‘Stop’. Next, click on ‘Next’. Figure 32 will appear.

TRUST FAMILYC@M 300 DIGITAL MOVIE
21
UK
Figure 32: Installing Microsoft ® NetMeeting
Note: Make sure the microphone is connected to your sound card’s microphone connection.
14. Speak through the microphone to test the microphone. The indicator must change position. If it movesinto the yellow or red area, you should adjust the sensitivity using the ‘Record Volume’ slide bar until itmoves into the green area. Click on ‘Next’ to continue. Figure 33 will appear.
Figure 33: Installing Microsoft ® NetMeeting
15. Click on 'Finish' to complete the installation of NetMeeting. NetMeeting will now start automatically. Seechapter 10.3 for instructions on how to use NetMeeting.

TRUST FAMILYC@M 300 DIGITAL MOVIE
22
9. Connecting the camera to your computerNote: The driver must be installed on your system before connecting the camera (see chapter 7).
The FAMILYC@M must be connected to a free USB port on your computer. See figure 34 for theconnections.
Figure 34: Camera connections on the computer
A USB connection
B USB connector for connecting to the computer
Table 4: Camera connections on the computer
1. Start Windows.
2. Turn the camera off.
3. Connect the USB cable to connection A on the camera (see figure 34).
4. Connect the other end of the USB cable (B) to a free USB port on your computer.
Turn the camera on. The FAMILYC@M will be detected and the driver will be automatically located. Duringthis procedure, you will hear a beep and the red LED on the front of the camera will flash.
The red LED will continue to flash whilst the camera is turned on and is connected to the USB port on yourcomputer. This signifies that there is communication between the camera and the computer.

TRUST FAMILYC@M 300 DIGITAL MOVIE
23
UK
10. Using the software10.1 Using MGI PhotoSuite III SEMGI PhotoSuite III SE is a drawing and editing program that offers a large number of options. This programcan be used to edit photographed images.
Follow the instructions below to set up and use MGI PhotoSuite III SE.
Note: This program's instruction manual is included on the CD-ROM.
10.1.1 Once-only settingsThe following should be carried out to set up MGI PhotoSuite SE for the FAMILYC@M.
1. Connect the camera to your computer (see chapter 9).
2. Start ‘MGI PhotoSuite III SE’. Figure 35 will appear.
Figure 35: Using MGI PhotoSuite III SE3. Click on the icon indicated by the arrow. Figure 36 will appear.
Figure 36: Using MGI PhotoSuite III SE
4. Click on ‘Digital Camera (TWAIN)’. Figure 37 will appear.

TRUST FAMILYC@M 300 DIGITAL MOVIE
24
Figure 37: Using MGI PhotoSuite III SE
5. Go to point 1 ‘Choose a camera’ and select ‘Trust FamilyC@m’ (see figure 37).
MGI PhotoSuite III SE is now ready for use. See chapter 10.1.2 for instructions on how to use this program toedit photographs.
10.1.2 Loading photographs onto the computer using MGI PhotoSuite III SE1. Click on the ‘Get’ icon in the main window (see figure 36).
2. The TWAIN dialogue window for the Trust FamilyC@m will appear. Click on the photograph (A) that youwish to edit (see figure 38).
Figure 38: Selecting a photograph in the TWAIN dialogue window
3. Click on 'Get Pictures’ (B) to send the selected photograph to the application. Figure 39 will appear.
Figure 39: Sending the photograph to the application
4. Select ‘Open Pictures’. Click on 'OK' to send the photograph to the application.

TRUST FAMILYC@M 300 DIGITAL MOVIE
25
UK
5. The TWAIN dialogue window will be closed when the photograph has been loaded onto your computer.
6. Click on ‘Prepare’ (see figure 36). The photograph can now be edited. Figure 40 will appear.
Figure 40: Saving the edited photograph
7. Click on ‘File’ and then on ‘Save’ to save the file in the location of your choice.
8. See the MGI PhotoSuite III SE instruction manual for more information.
This was only a short description of MGI PhotoSuite III SE. See the instruction manual included with thisprogram for more information.
10.2 Using MGI VideoWave III SEMGI VideoWave III SE is a program for editing videos that offers a large number of options. This programcan be used to record and edit video pictures from your USB Video Editor.
Follow the instructions below to set up and use MGI VideoWave III SE.
10.2.1 Setting the image1. Start ‘MGI VideoWave III SE’.
2. Click 'A' followed by 'B' to start a new production (see figure 41).

TRUST FAMILYC@M 300 DIGITAL MOVIE
26
Figure 41: Starting a new production
3. Click on 'C' (Settings), to set the various options for the image display (see figure 41). Figure 42 willappear.
Figure 42: Starting a new production
4. Select ‘TRUST WDM Video Capture’ as the ‘Capture Device’. Click on ‘Advanced’. Figure 43 will appear.
Figure 43: Various options for the image display settings
TRUST FAMILYC@M 300 DIGITAL MOVIE
27
UK
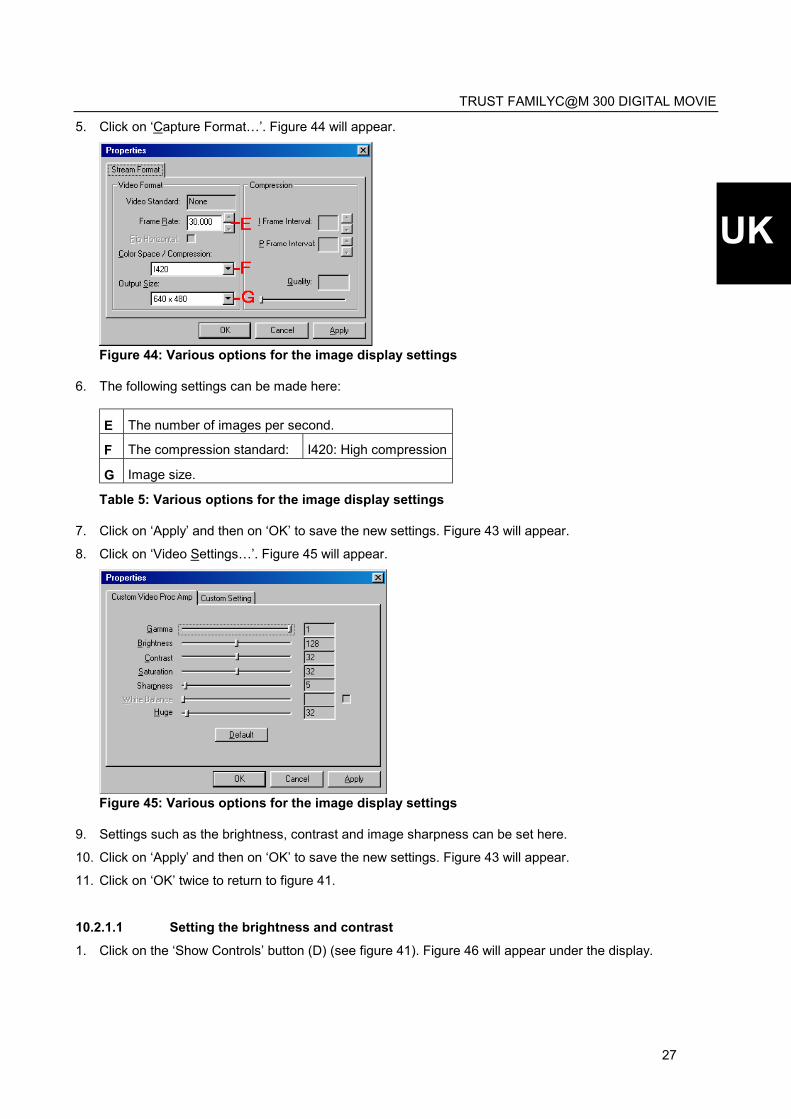
5. Click on ‘Capture Format…’. Figure 44 will appear.
Figure 44: Various options for the image display settings
6. The following settings can be made here:
E The number of images per second.
F The compression standard: I420: High compression
G Image size.
Table 5: Various options for the image display settings
7. Click on ‘Apply’ and then on ‘OK’ to save the new settings. Figure 43 will appear.
8. Click on ‘Video Settings…’. Figure 45 will appear.
Figure 45: Various options for the image display settings
9. Settings such as the brightness, contrast and image sharpness can be set here.
10. Click on ‘Apply’ and then on ‘OK’ to save the new settings. Figure 43 will appear.
11. Click on ‘OK’ twice to return to figure 41.
10.2.1.1 Setting the brightness and contrast1. Click on the ‘Show Controls’ button (D) (see figure 41). Figure 46 will appear under the display.
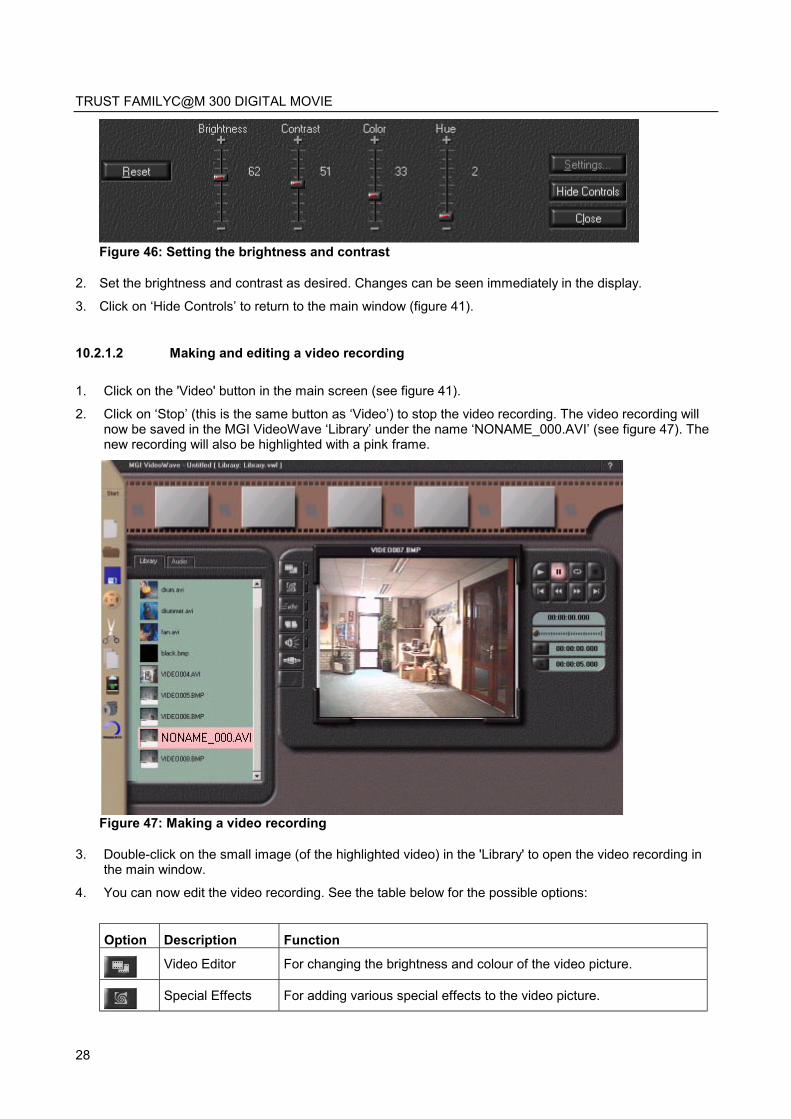
TRUST FAMILYC@M 300 DIGITAL MOVIE
28
Figure 46: Setting the brightness and contrast
2. Set the brightness and contrast as desired. Changes can be seen immediately in the display.
3. Click on ‘Hide Controls’ to return to the main window (figure 41).
10.2.1.2 Making and editing a video recording
1. Click on the 'Video' button in the main screen (see figure 41).
2. Click on ‘Stop’ (this is the same button as ‘Video’) to stop the video recording. The video recording willnow be saved in the MGI VideoWave ‘Library’ under the name ‘NONAME_000.AVI’ (see figure 47). Thenew recording will also be highlighted with a pink frame.
Figure 47: Making a video recording
3. Double-click on the small image (of the highlighted video) in the 'Library' to open the video recording inthe main window.
4. You can now edit the video recording. See the table below for the possible options:
Option Description Function
Video Editor For changing the brightness and colour of the video picture.
Special Effects For adding various special effects to the video picture.

TRUST FAMILYC@M 300 DIGITAL MOVIE
29
UK
Option Description Function
Text Animator For adding various texts and text effects to the video picture.
Transition Effects For setting various transition effects between different video recordings.
Audio Studio For adding various sounds and sound effects to the video picture.
Capture Goes to the current video picture of the USB Video Editor to make anew video recording.
Table 6: Editing video recordings
This was only a short description of MGI VideoWave III SE. See the instruction manual provided with thisprogram for more information. This can be found on the MGI VideoWave installation CD-ROM in the folder[D:\MGI VideoWave III SE\Docs]. Abode Acrobat Reader must be installed on your computer. This is alsoincluded on the CD-ROM.
10.3 Using Microsoft ® NetMeeting1. Make sure you have an Internet account installed before starting NetMeeting.
Figure 48: Starting NetMeeting
2. Start NetMeeting (Start -> Programs -> Accessories -> Internet Tools -> NetMeeting) (see figure 48).
3. Two windows will be opened, namely NetMeeting and your Dial-up connection (see figure 49).
Figure 49: Using Microsoft ® NetMeeting
4. Fill in your user name and password and click on ‘Connect’ to connect to the Internet.
5. Once a connection has been made with the Internet, only the NetMeeting window will remain visible (seefigure 50).
TRUST FAMILYC@M 300 DIGITAL MOVIE
30
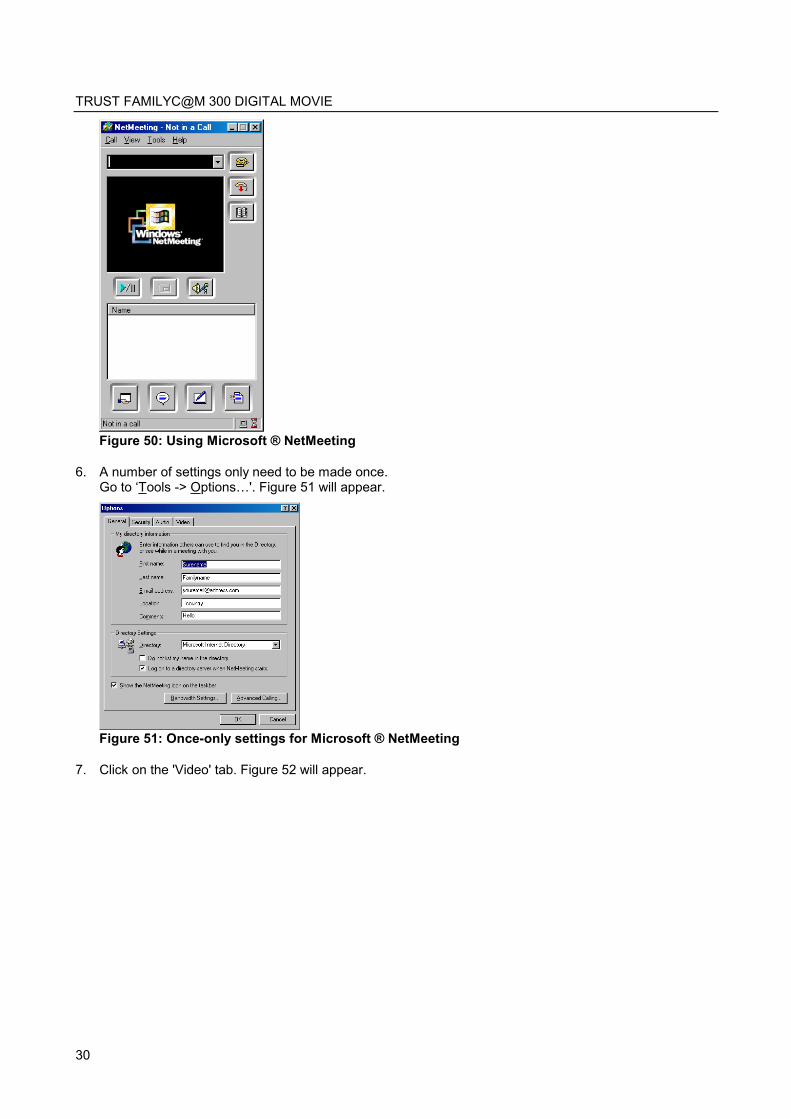
Figure 50: Using Microsoft ® NetMeeting
6. A number of settings only need to be made once.Go to ‘Tools -> Options…'. Figure 51 will appear.
Figure 51: Once-only settings for Microsoft ® NetMeeting
7. Click on the 'Video' tab. Figure 52 will appear.

TRUST FAMILYC@M 300 DIGITAL MOVIE
31
UK
Figure 52: Once-only settings for Microsoft ® NetMeeting
8. To prevent a mirror image of your camera being displayed, do not select‘Show mirror image in preview video window’. Image settings, such as the image size and quality, canalso be changed in this window. Click on ‘OK’ to save the new settings and return to the start window ofNetMeeting (see figure 50). The once-only settings have now been completed.
9. Click on ‘View’ (see figure 50) and select the ‘My Video (New Window)’ option. An extra window (‘MyVideo’) will now be opened (see figure 53).
Figure 53: Using Microsoft ® NetMeeting
10. Click on the ‘Play’ button ( ) to turn on your current video image. This image will also be seen by theperson you make a NetMeeting connection with.
11. You are now ready to make a NetMeeting connection. Click on the telephone book icon (see figure 50).Figure 54 will appear.
Figure 54: Using Microsoft ® NetMeeting
12. In the address bar, type ‘ils server name’ (for example, ils.worldonline.nl) and click on ‘Enter’. Figure 55will appear.

TRUST FAMILYC@M 300 DIGITAL MOVIE
32
Figure 55: Using Microsoft ® NetMeeting
13. Double-click on a person in the list. A NetMeeting connection will be made.
The person may not wish to make a connection with you, because this person may be communicating withsomebody else. If this is the case, select somebody else from the list.
You can find other ils servers on the Internet.
For more information or instructions on how to solve problems, click on ‘Help’ (see figure 50). This contains adescription of all the functions available with NetMeeting.
10.4 WebCam & InternetThe ‘Trust FamilyC@m 300 Digital Movie’ can also be used as a webcam, for example, on your Internetpage.A number of informative sites about webcams are given below:
http://www.camarades.com
http://www.teveo.com
At these sites, you can download software that you can use to send live video images over the Internet.Please refer to the sites concerned for information on how to install and use the software.

TRUST FAMILYC@M 300 DIGITAL MOVIE
33
UK
11. TroubleshootingProblem Cause Possible solution
The computer's USBport does not work.
Try a different port or connect thecamera to a different computer.
The camera is notconnected to the USBport.
Connect the camera to a USB port.
Windows does not detect anew device after connectingthe camera.
The camera isconnected to a USBHUB which does nothave a power supply.
Connect the camera to a USBHUB which has a power supply orto a USB port on your computer.
The computer becomesjammed when using the USBconnection.
The USB port hasshared an IRQ withanother device.
Remove cards from the computeror divide the IRQ's differently.
The batteries areempty.
Replace the batteries (see chapter3).
The camera does not doanything.
The batteries havebeen insertedincorrectly.
Reinsert the batteries (see chapter3).
The power in thebatteries is low.
Replace the batteries (see chapter3).
NiCd batteries areused.
Use Alkaline or NiMH batteries.
The camera suddenly turnsitself off.
'Auto-off' function isturned on.
Turn the camera on again.
The camera is still busysaving the previousphotograph.
Wait until the camera is ready.No photograph is takenwhen the exposure button ispressed.
The memory is full. Delete images from the cameramemory (see chapter 5.3).
There is a bad cableconnection.
Reconnect the cables (see chapter9).
There is no connection withthe computer.
'Auto-off' function isturned on.
Turn the camera on again.
Problem is not listed here. The latest FAQ updateis available on theInternet.
Go to www.TRUST.com/12257 forFAQ and other productinformation.
Table 7: Troubleshooting
Check the FAQ's on the Internet (www.trust.com). You can also register your product at www.trust.com, sothat you can receive optimal guarantee and service support. You will be automatically informed ofdevelopments to your product and other Trust products. You will also have the chance of winning somespectacular prizes.
If you still have problems after trying these solutions, please contact one of the Trust Customer Care Centers.The last page of this electronic instruction manual, as well as the back of the printed quick installationmanual, contains more information. Please have the following information available:
• The article number. This is 12257

TRUST FAMILYC@M 300 DIGITAL MOVIE
34
• Your hardware information.
• Your operating system and the version.
• A good description of what does not work.
• A good description of when the problem occurs.
12. SpecificationsSensor type CMOS
Recording element(CCD)
1/3”
Lens f=7.1 mm
Shutter speed 1/4 to 1/2000
Focus Manual focus
Pixel resolution Low: 320 x 240, High: 640 x 480, 1024 x 768(software)
Colour depth 24 bits
Memory 8 MB
Connection USB port
TWAIN interface Yes
Power supply 2 x AAA alkaline batteries
Size (HxWxD) 60 x 95 x 38
Weight: 104 grams without batteries
Table 8: Specifications

TRUST FAMILYC@M 300 DIGITAL MOVIE
35
UK
13. Trust Customer Care Centers
www.trust.com
Residents in the UK and Ireland should contact:From8:00 - 16:00
UK OfficePhone +44-(0)0845-6090036Fax +44-(0)1376-514633
I residenti in Italia possono contattare:Orario:9:00 - 13:00 /14:00 -18:00
Ufficio italianoTelefono +39-051-6635947 Fax +39-051-6635843
Les habitants de la France et de l’Afrique du Nord peuvent contacter :De9:00 à 17:00
Bureau françaisTéléphone +33-(0)825-083080Fax +33-(0)1-48630261
Kontaktadresse für Einwohner Deutschlands:Erreichbar:9:00 - 17:00
Deutsche GeschäftsstelleTelefon 0800-00TRUST (0800-0087878)Fax +44-(0)2821-58873
Los habitantes de España pueden ponerse en contacto con:De las9:00 a las 17:00 horas
Oficina españolaTeléfono +34-(0)902-160937Fax +31-(0)78-6543299
Inwoners van Nederland kunnen contact opnemen met:Van9:00 - 17:00 uur
Kantoor NederlandTelefoon 0800-BELTRUST (0800-23587878)Fax +31-(0)78-6543299
All other countries / Alle anderen Länder / Tous les autres paysTutti gli altri paesi / Todos los demás países / Alle andere landenFrom:9:00 - 17:00
European Head OfficePhone +31-(0)78-6549999Fax +31-(0)78-6543299


![5 movie mas mayo [movie-mas.com]](https://static.fdocuments.in/doc/165x107/559b4a451a28ab9c678b4596/5-movie-mas-mayo-movie-mascom.jpg)