
Troubleshooting Guide to the St. Jude Cure4Kids Web ... LM... · extension are ok (for example:...
23
Troubleshooting Guide to the St. Jude Cure4Kids Web Conferencing System Instructions for: Hosts, Presenters, Participants and Mobile users
Transcript of Troubleshooting Guide to the St. Jude Cure4Kids Web ... LM... · extension are ok (for example:...

Troubleshooting Guide to the
St. Jude Cure4Kids
Web Conferencing System
Instructions for:
Hosts, Presenters, Participants
and Mobile users

In this section we will present resolutions to common technical problems participants might have and which the administrator/host can use to help resolve.
Troubleshooting Tips

1. If Participants can not hear the other members, have
them check to verify that the speakers are plugged in,
turned ON, and have the volume turned up.
2. Verify that their speaker button is not muted
Audio is not working
Speakers not muted. It should look like this

3. Next verify that their computer audio is not set to Muted.
Audio is not working
Audio not muted. It should look like this
Audio muted.
Solution is to click this icon to unmute.
Gray out, it is muted

1. Check the microphone connection: is it
plugged in to the appropriate input jack on the
computer? Is it turned ON (if there is an on/off
switch)
2. Make sure that the microphone is
connected/enabled and unmuted in the Live
Meeting room (many forget to do this).
Microphone is not working
Microphone activated

3. Run the Audio Setup Wizard by clicking
Meeting>Audio Setup Wizard
Microphone is not working

• Audio Setup Wizard: If a participant is unable to hear the playback
of his/her recorded voice during the Step 3: Tune Microphone
Volume of the Audio Setup Wizard, they will need to check both the
microphone and its settings.
Microphone is not working
At step 2, make sure you click the down arrow and select the microphone option

4. Check the computer recording controls for the proper settings and
volume levels and reconfigure if necessary.
Verify that the computer is set to accept audio input:
a) Click Start Icon>Control Panel>Sound>…
Microphone is not working

b) A “Sound” window appear. Click the Recording tab.
c) Speak or tap the microphone, it will let you know which one is the correct
microphone (green lines go up and down). Select the microphone, then click
Properties
Microphone is not working

d) Click on the Levels tab and increase the input volume. Be sure to click
OK.
Microphone is not working

5. Check Microphone Function:
If your volume controls have the proper settings, and the microphone is still
not working, you should ensure that your microphone is functioning. You can
record an audio clip and listen to that clip to ensure that your computer can
properly capture your audio:
a) Click Start Icon>All Programs>Accessories>Sound Recorder.
b) Click the Start Recording Button to start the recording
Microphone is not working

5. Check Microphone Function:
c) Speak into your microphone for several seconds. As you speak, you
should see the audio meter register your voice.
d) Click the Stop Recording button to stop your recording.
e) It will prompt you to save a wma file. You can save in your Desktop for
easy access. Double click the wma file to hear the audio clip you have
recorded.
f) If you can’t hear the clip (or did not see the audio meter register your
voice), the issue is most likely related to your microphone and it should be
replaced.
•
Microphone is not working

• If the microphone is not working or the user just
doesn’t have one, he/she can still communicate
via Text Chat
Participating without a Microphone

If the audio cuts in and out during the presentation/meeting it is likely due to one of the
following:
a) Ensure that your speakers or headphones are still plugged correctly into your
computer.
b) Make sure that the speaker button is not muted
c) Audio cutting and some delay is due to temporarily losing the network connection,
likely to be caused by:
-Using a high load of resources from your computer.
-A Network outage.
-Insufficient or fluctuating bandwidth. Particularly it occurs while uploading or sharing a
presentation.
-Attending via mobile (wireless).
Solution: close all other programs, (like Word, email); switch to an Ethernet-connected
workstation; exit the meeting room and re-enter
Audio lost during the Presentation

1. Sometimes the audio of the person speaking gets picked up by the
open microphones of other attendees and causes echoing
(especially when using open-air microphones instead of headsets).
Solution: Host/moderators need to ask the other attendees to mute
their microphones and to follow meeting etiquette for asking the host for
a turn to speak (raise the hand button ).
It is best to use headsets with microphones, but if that is not possible,
attendees need to move the microphone as far away possible from the
speakers and lower the volume of the speakers.
Attendees hear echo

2. An attendee (especially the speaker) may have logged in more than
once (they have multiple sessions active).
Solution: check the taskbar at the bottom of the screen to see if there
are multiple active, but “minimized,” Live Meeting icons. Right click
and close all but one.
Attendees hear echo
Close one window

Because of bandwidth issues and delays communicating over the
internet, it frequently can take 5-10 seconds for all of the attendees to
see the slides as the presenter advances them.
Solution: If after waiting a participant is still not able to see the slides
as they are advanced, or if their “Share” area remains blank, they
should try exiting the meeting (click the X at the top right of your
screen) and reentering the room.
Slides are not advancing or the Share Area is
blank during the Presentation

When uploading a presentation, you may get an error message alerting you to
issues with file names or sizes, or the file may get “hung” and never load.
The following could be the cause:
• Issue with file name? Try renaming:
1. The file name should not include spaces and unusual characters or extra
punctuation marks (. , / * >). Underlines and a single period before the
extension are ok (for example: “AML_cases.pptx “).
2. The file name, including extensions, should be less than 50 characters long.
We recommend naming files with the date as the prefix and including a very
abbreviated descriptor, for example: “2015_01_22AML.pptx”.
3. The presenter will need to find the file on their computer and rename it,
before trying to share it again.
Error Uploading Presentation
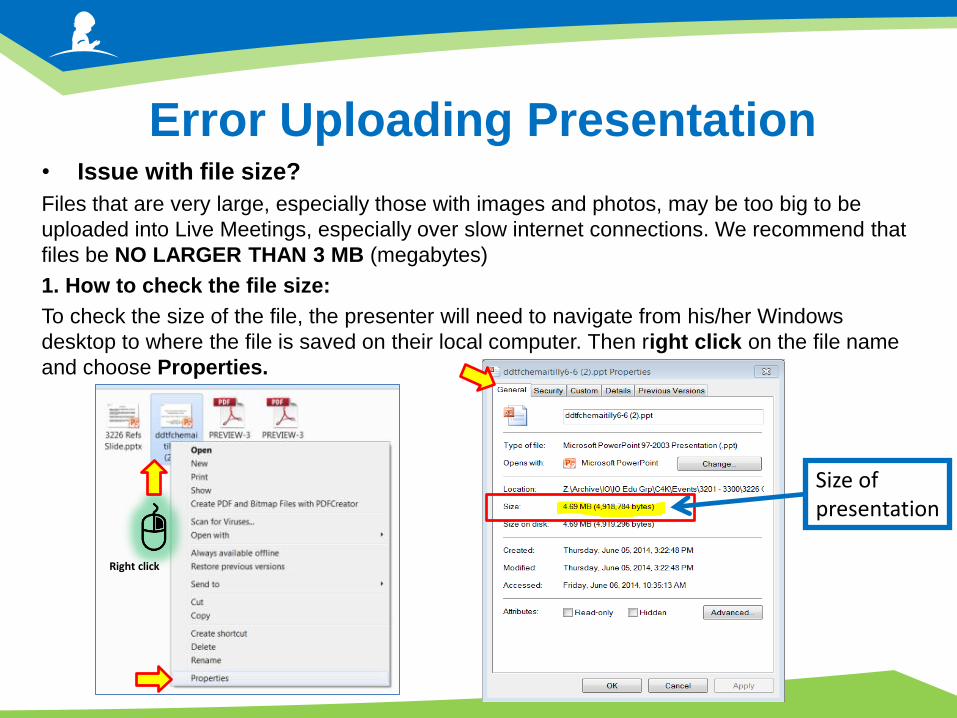
• Issue with file size?
Files that are very large, especially those with images and photos, may be too big to be
uploaded into Live Meetings, especially over slow internet connections. We recommend that
files be NO LARGER THAN 3 MB (megabytes)
1. How to check the file size:
To check the size of the file, the presenter will need to navigate from his/her Windows
desktop to where the file is saved on their local computer. Then right click on the file name
and choose Properties.
Error Uploading Presentation
Right click
Size of presentation

• Issue with file size? Might need to compress:
1. Compress the size of the presentation (PowerPoint 2010 instructions):
A single photo or all the pictures in a PowerPoint presentation can be compressed quickly
to reduce the overall file size of the presentation.
a) From within the PowerPoint presentation, click on any picture to activate the Picture
Tools
b) Click the Format button, then the Compress Pictures button.
Error Uploading Presentation

2. Compress the size of the presentation Continuation (PowerPoint 2010
instructions):
c) A Compress Pictures window opens. By default, PowerPoint 2010 assumes that you
will want to compress only this photo in the presentation. If you want to compress all
photos in the presentation, uncheck the check the box for “Apply only to this picture.”
Error Uploading Presentation
Uncheck to compress all pictures

2. Compress the size of the presentation Continuation (PowerPoint 2010
instructions):
d) Compression options:
-By default, all cropped areas of any picture will be deleted.
e) Save the presentation with a new name (check the file size again!) and re-
upload/share in the Cure4Kids Live Meeting via Share Document.
Error Uploading Presentation
Select these options, then click OK

If you have questions, need assistance or would like to report a technical
problem, please contact St. Jude Cure4Kids Live Events Help
[email protected] and provide the following information:
1. A full description of the technical problem.
2. A screenshot of the error you are getting. To take a screenshot:
a. Click on the screen with the error to make sure it is active and
visible.
b. Hold the CTRL key down while clicking the PtrScn (print screen) key to
copy the screen into the Windows clipboard (memory).
3. Paste the screenshot into the email by clicking in the body of the email and
pressing CTRL+ V.
4. Send the e-mail ([email protected])
5. Or contact Ana Shuler at [email protected]
How To Report a Technical Problem