TRIPODMAKER BLACK EDITION USER MANUAL - … · 2 3 TABLE OF CONTENT Specifications and box content...
18
TRIPODMAKER BLACK EDITION USER MANUAL
Transcript of TRIPODMAKER BLACK EDITION USER MANUAL - … · 2 3 TABLE OF CONTENT Specifications and box content...
TRIPODMAKER BLACK EDITIONUSER MANUAL

2 3
TABLE OF CONTENT
Specifications and box content1. Specifications of the Tripodmaker..................................................................42. Box content.......................................................................................................53. Terminology........................................................................................................64. Attentions and warnings................................................................................8
Unboxing 1. Preparations.....................................................................................................102. Load filament....................................................................................................113. Calibration........................................................................................................124. Plexi covers......................................................................................................15
Menu1. Info screen.......................................................................................................162. Quick settings...................................................................................................183. Print file.............................................................................................................194. Extruder............................................................................................................205. SD card.............................................................................................................216. Configuration...................................................................................................22
MAINTENANCE & TROUBLESHOOTING1. General..............................................................................................................242. Extruder drive cleaning...................................................................................263. Cart alignment..................................................................................................284. Clogged nozzle - Cold pull ................................................................................345. Troubleshooting and easy fixes.....................................................................36
THANK YOU for your purchasing a Tripodmaker!
This is the user manual for your Tripodmaker Black Edition. In this manual, you will be guided through the printing process. Read this manual carefully and take the
needed time to get familiar with your new product. This is a manufacturing device that requires thorough understanding. If for any reason something would be unclear
or wrong, feel free to contact us at: [email protected]
4 5
SPECIFICATIONS OF THE TRIPODMAKER
HARDWARE
technology FDM (Fused Deposition modeling)dimensions 42 cm x 53 cm x 101 cmshipping dimensions 45 cm x 55 cm x 110 cm weight 23 kgshipping weight 25 kgprint area Ø 30 cm x 45 cmnozzle Ø 0.4 mm; full metal - up to 295°Cheated bed up to 95°Cpower 88 - 264 V; 47 - 63 Hz; 5Aconnectivity Stand alone printing from SD cardcasing plexi cover (optional)
MATERIALS
diameter 1.75 mmplastics PLA; PETG; HIPS; ABS; Polycarbonate
SOFTWARE
software PRISMA cloud platformprintable files .STLsupported Chrome - Safari - Firefox
PERFORMANCE
bed leveling full automatic / manual screw assistedlayer thickness / resolution 75 micron - 300 micronmachine tolerance 0.1 mm
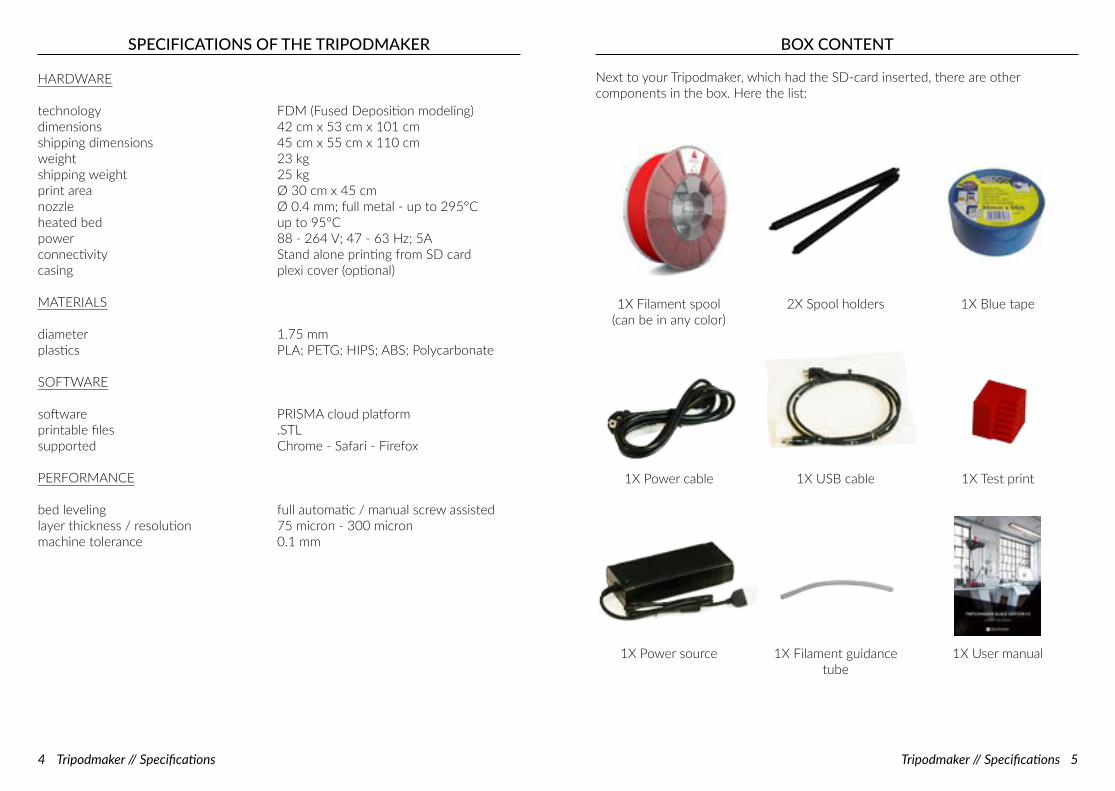
BOX CONTENT
Next to your Tripodmaker, which had the SD-card inserted, there are other components in the box. Here the list:
1X Filament spool (can be in any color)
1X Power cable
1X Power source
2X Spool holders
1X USB cable
1X Filament guidance tube
1X Blue tape
1X Test print
1X User manual
Tripodmaker // Specifications Tripodmaker // Specifications

6 7
TERMINOLOGY
PRINT HEAD / HOT-END
1. Display2. SD-card slot3. Push and rotate button4. USB Socket5. Build plate6. Spool holder mount location
7. Filament guide tube8. Print head cables9. Filament driver10. Rods11. Carts (wheels or linear sliders)12. Vertical slides
1
1
23
7
8
9
6
34
5
10
12
11
2
1. Nozzle2. Probe3. Cooling fans
Tripodmaker // Specifications Tripodmaker // Specifications

8 9
ATTENTIONS AND WARNINGS Please read this attentions carefully and keep them in mind while unboxing and operating the device.
ATTENTION! Make sure your power switch is in the OFF[o] position before you attach or detach the power cable.
ATTENTION! Turning the -Tripodmaker ON lights up the LCDscreen and the LED lights.-Switching OFF can be done at any time, however it is recommendedto only turn it of when not in use.-Turning the Tripodmaker OFF extinguishes the LCD screen.
ATTENTION! Using a glass or wooden sheet to cover the original aluminum build plate will make the nozzle crash. The sensor isunable to sense the aluminum through these sheets of glass or wood.
ATTENTION! make sure your plate is free of objects.
ATTENTION! When storing your spool, make sure your filament doesn’t get tangled as this might block the unwinding of the spool in a next print
The TripodMaker is an electrical device and contains motors and hot elements. During operation of the printer, be always aware of possible hazards.
WARNING! Age WarningUser under the age of 18 are recommended adult supervision. The printer includes small parts that can lead to choking.
WARNING! Burn HazardThe extruder nozzle or heated building platform might be hot during operation. Never touch these before they cooled down. This can take more than 20 minutes. Also the extruded plastic is hot and should not be touched.
WARNING! Electric Shock HazardWhen the printer powered, touching the electronics may result in an electric shock. Make sure you disconnected the power source and power supply when opening the electronics. Wait at least one minute before opening the box to allow the power supply to discharge.
WARNING! Fire HazardKeep flammable liquids and/or materials away from the printer when powered or in operation.
WARNING! Pinch HazardDuring operation, keep fingers, hair and loose clothing away from moving parts like belts, pulleys, gears or fans.
WARNING! Static ChargeGround yourself before touching the printer electronics. Electrostatic charge can damage electronic components. Ground yourself by touching a grounded source.
ATTENTION! During the printing process, the hot-end and print bed can get hot. Do not touch these until printing is done.
Tripodmaker // Attentions and warnings Tripodmaker // Attentions and warnings
10 11
UNBOXING
Go to prisma.tripodmaker.com and enter your device ID. The setup process will guide you with a series of instruction videos until your first test print.The steps are also covered in this manual.
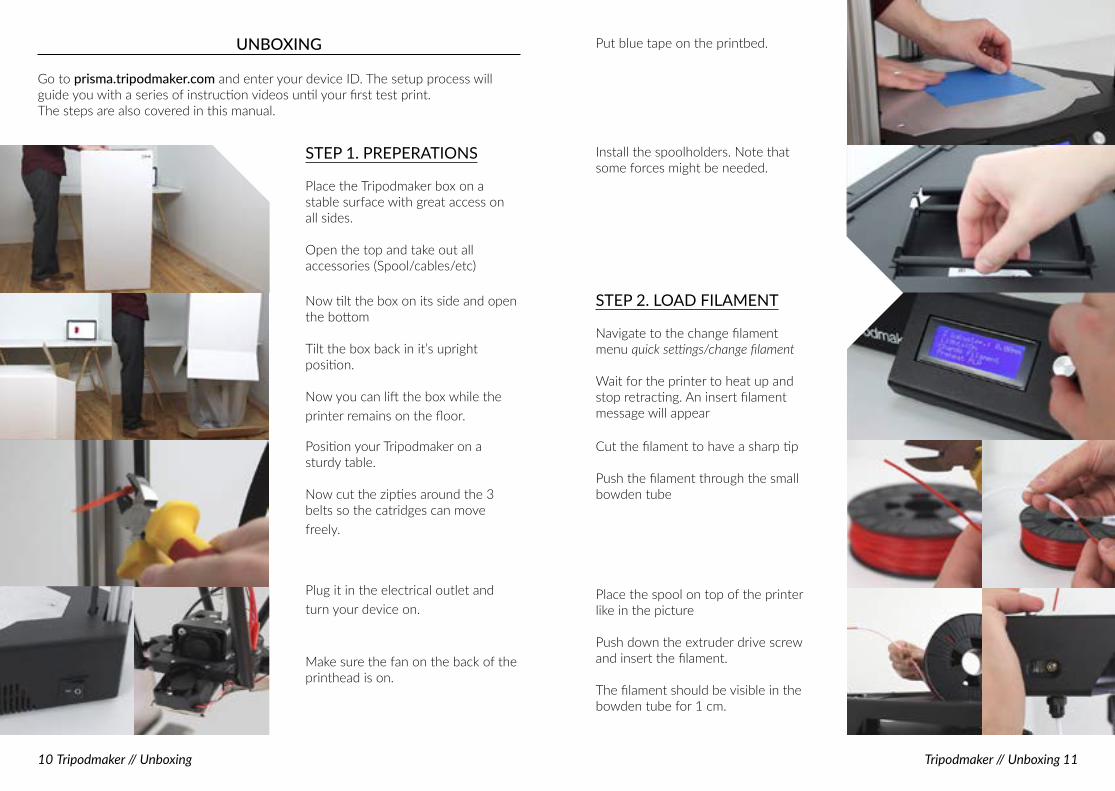
STEP 1. PREPERATIONS
Place the Tripodmaker box on a stable surface with great access on all sides.
Open the top and take out all accessories (Spool/cables/etc)
Now tilt the box on its side and open the bottom
Tilt the box back in it’s upright position.
Now you can lift the box while the printer remains on the floor.
Position your Tripodmaker on a sturdy table.
Now cut the zipties around the 3 belts so the catridges can move freely.
Plug it in the electrical outlet and turn your device on.
Make sure the fan on the back of the printhead is on.
Tripodmaker // Unboxing
Put blue tape on the printbed.
Install the spoolholders. Note that some forces might be needed.
STEP 2. LOAD FILAMENT
Navigate to the change filament menu quick settings/change filament
Wait for the printer to heat up and stop retracting. An insert filament message will appear
Cut the filament to have a sharp tip
Push the filament through the small bowden tube
Place the spool on top of the printer like in the picture
Push down the extruder drive screw and insert the filament.
The filament should be visible in the bowden tube for 1 cm.
Tripodmaker // Unboxing
12 13
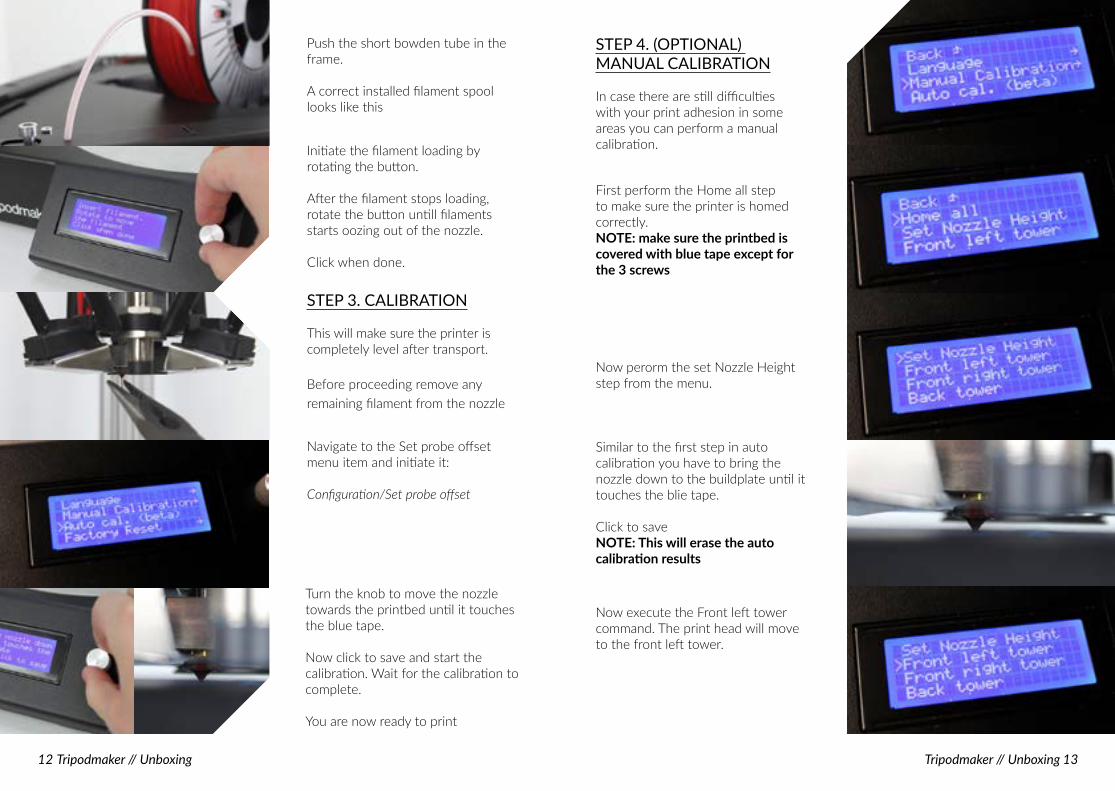
Initiate the filament loading by rotating the button.
After the filament stops loading, rotate the button untill filaments starts oozing out of the nozzle.
Click when done.
Push the short bowden tube in the frame.
A correct installed filament spool looks like this
STEP 3. CALIBRATION
This will make sure the printer is completely level after transport.
Before proceeding remove any remaining filament from the nozzle
Navigate to the Set probe offset menu item and initiate it:
Configuration/Set probe offset
Turn the knob to move the nozzle towards the printbed until it touches the blue tape.
Now click to save and start the calibration. Wait for the calibration to complete.
You are now ready to print
Tripodmaker // Unboxing Tripodmaker // Unboxing
STEP 4. (OPTIONAL) MANUAL CALIBRATION
In case there are still difficulties with your print adhesion in some areas you can perform a manual calibration.
First perform the Home all step to make sure the printer is homed correctly.NOTE: make sure the printbed is covered with blue tape except for the 3 screws
Now execute the Front left tower command. The print head will move to the front left tower.
Now perorm the set Nozzle Height step from the menu.
Similar to the first step in auto calibration you have to bring the nozzle down to the buildplate until it touches the blie tape.
Click to saveNOTE: This will erase the auto calibration results

14 15
STEP 5. (OPTIONAL)INSTALL PLEXI COVERS
If you gor you Tripodmaker Black Edition with plexi covers follow the diagram to install the covers.
Install the lock on the left side when facing the front of the printer.
Connect bolts as in the picture
Repeat this for each door.
Continue by performing this same procedure on the front right tower.
Continue by performing this same procedure on the back tower.
Adjust the screw with a size 3 allen wrench until the nozzle touches the blue tape on the printbed.
You are now ready to print
Tripodmaker // Unboxing Tripodmaker // Unboxing
16 17
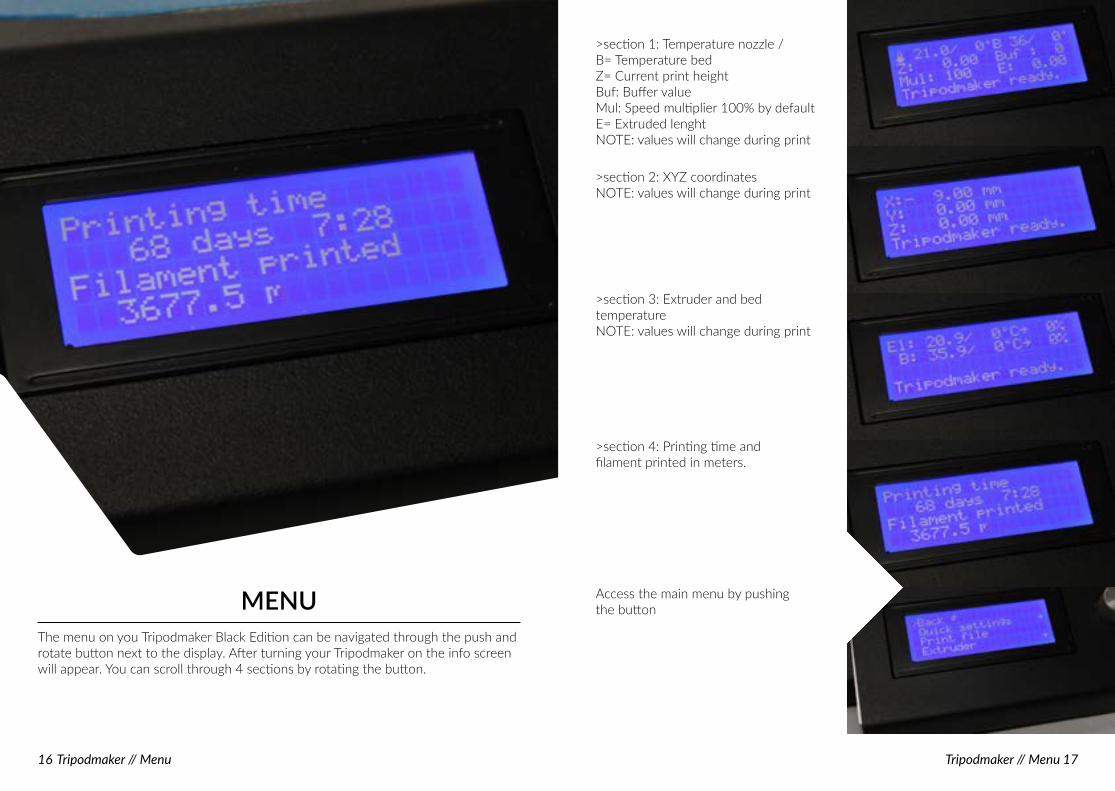
MENUThe menu on you Tripodmaker Black Edition can be navigated through the push and rotate button next to the display. After turning your Tripodmaker on the info screen will appear. You can scroll through 4 sections by rotating the button.
Tripodmaker // Menu Tripodmaker // Menu
>section 1: Temperature nozzle / B= Temperature bedZ= Current print heightBuf: Buffer valueMul: Speed multiplier 100% by defaultE= Extruded lenghtNOTE: values will change during print
>section 2: XYZ coordinatesNOTE: values will change during print
>section 3: Extruder and bed temperatureNOTE: values will change during print
>section 4: Printing time and filament printed in meters.
Access the main menu by pushing the button

18 19
> Quick settings >Home all This wil home the printhead to the top of the printer.
Navigate by rotating the button. Click to access> Quick settings
> Quick settings >Z babystep: Adjust the z height of the print-head. Do not perform this setting unless you suffer from bad bed adhesion.
> Quick settings >Lights: Turn the led lights on or off
> Quick settings > Change filament: Use this function to load or unload filament.
Tripodmaker // Menu
> Quick settings > Preheat PLA/ABS: This setting will preheat the nozzle and buildplate to the right temperatures for PLA and ABS. Prints will start imidiately with a pre-heated printer.
> Quick settings > Fan speed:Here you can turn the fans on or off.
> Quick settings >CooldownThis will boost all fans to cool the print head rapidly.
> Quick settings > Disable stepperThis will disable the stepper motors. Now you can move the carts and the print-head by hand.
> Print file This will navigate to your SD card. Now you can select the file you want to print.
Tripodmaker // Menu

20 21
> Extruder > Bed temp:Click to access and rotate to adjust the bed temperature > Extruder > Temp1:Click to access and rotate to adjust the nozzle temperature> Extruder > Tuen extr. 1 off: This will turn the nozzle off
Navigate by rotating the button. Click to access> Extruder
> Extruder > Extr. position Access this menu to perform manual extrusion of the filament.
> Extruder > Extr. position Rotate the button clockwise to push the filament through the nozzle. NOTE: the nozzle must be heated otherwise nothing will happen.
> Extruder > Set OriginThis menu has to be executed if instructed by our support team.
Tripodmaker // Menu
> SD card: This menu gives access to your SD card. While printing this menu gives access to the pause and resume functions.
> SD card > Print file:This will navigate to the files on your SD card.
Navigate by rotating the button. Click to access> Configuration
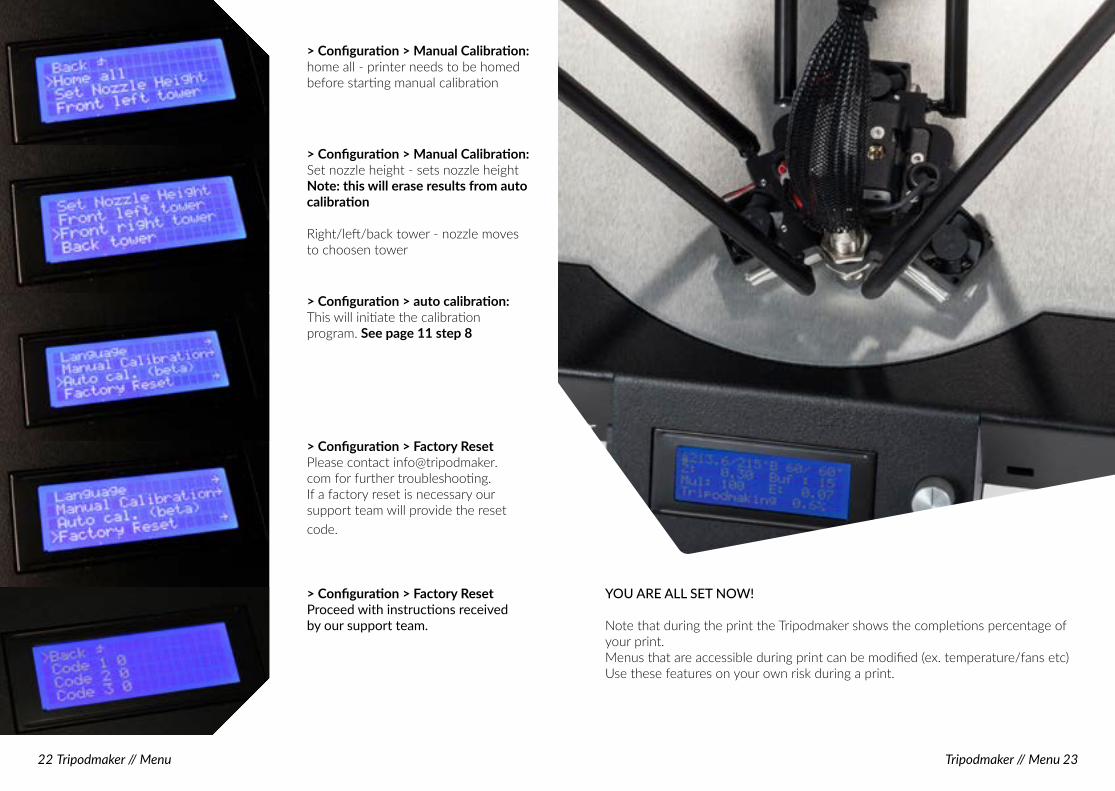
> Configuration > language:Printer menu language is available in english only.
> Configuration > Manual Calibration: This will enter the manual calibration menu. See page 13 step 4
Tripodmaker // Menu
22 23
> Configuration > Manual Calibration: Set nozzle height - sets nozzle heightNote: this will erase results from auto calibration
Right/left/back tower - nozzle movesto choosen tower
> Configuration > Manual Calibration: home all - printer needs to be homedbefore starting manual calibration
> Configuration > auto calibration: This will initiate the calibration program. See page 11 step 8
> Configuration > Factory ResetPlease contact [email protected] for further troubleshooting. If a factory reset is necessary our support team will provide the reset code.
> Configuration > Factory ResetProceed with instructions received by our support team.
Tripodmaker // Menu Tripodmaker // Menu
YOU ARE ALL SET NOW!
Note that during the print the Tripodmaker shows the completions percentage of your print. Menus that are accessible during print can be modified (ex. temperature/fans etc) Use these features on your own risk during a print.

24 25
MAINTENANCE & TROUBLESHOOTING
1. EXTRUDER DRIVE
Check the extruder on a regular base for accumulated filament dust. We recommend cleaning the extruder drive every 3 months or after periods of intensive usage. How to clean your extruder is explained from page 16 onwards.
Tripodmaker // Maintenance
2. MOVING PARTS
Check your carts on wobble after a while. If the carts are loose on the track, you can tighten the eccentric nut in order to remove the cart wobble. The carts must run smooth. If you over tighten the eccentric nut, you will need to use allot of force to move the cart and it will seem you have “hick-ups” during the sliding maneuver. How to tighten your carts is explained on page 21 step 11.
3. NOZZLE AND HOT-END
Make sure that the nozzle and hot-end are cleaned when covered with plastic residues. To clean of the nozzle, simply heat it until the plastic gets sticky, and use a printed cube to peel of the sticky plastic.
Tripodmaker // Maintenance
26 27
MAINTENANCE & TROUBLESHOOTING
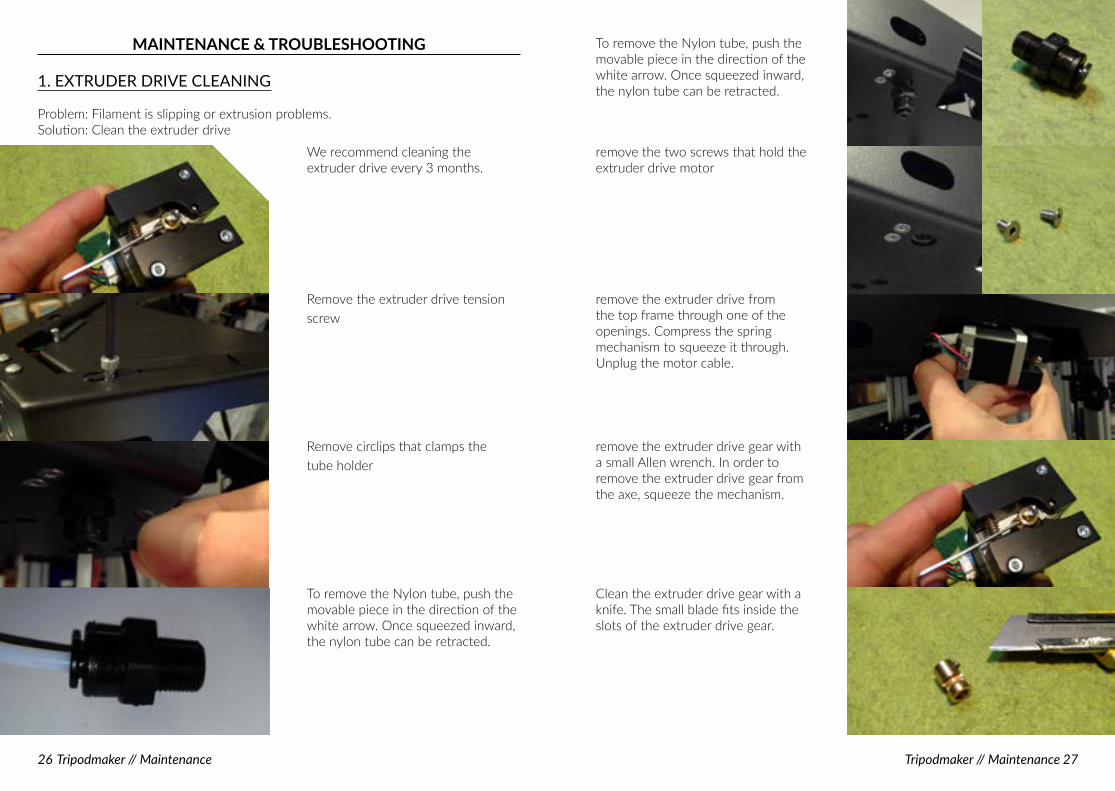
1. EXTRUDER DRIVE CLEANING
Problem: Filament is slipping or extrusion problems.Solution: Clean the extruder drive
We recommend cleaning the extruder drive every 3 months.
Remove the extruder drive tension screw
Remove circlips that clamps the tube holder
To remove the Nylon tube, push the movable piece in the direction of the white arrow. Once squeezed inward, the nylon tube can be retracted.
Tripodmaker // Maintenance
To remove the Nylon tube, push the movable piece in the direction of the white arrow. Once squeezed inward, the nylon tube can be retracted.
remove the two screws that hold the extruder drive motor
remove the extruder drive from the top frame through one of the openings. Compress the spring mechanism to squeeze it through. Unplug the motor cable.
remove the extruder drive gear with a small Allen wrench. In order to remove the extruder drive gear from the axe, squeeze the mechanism.
Clean the extruder drive gear with a knife. The small blade fits inside the slots of the extruder drive gear.
Tripodmaker // Maintenance

28 29
Remount the complete assembly. Pay attention that the extruder drive gear is positioned flush with the front of the black anodized components. The screw rests on the flat surface of the motor axe. Pay attention to the orientation of the extruder drive gear!
Plug the cable and squeeze the extruder drive back in its position. Make sure to plug the extruder drive cable so the colors match when the plug is plugged in!
Retighten the screws for positioning the extruder drive motor.
Insert the pneufit coupling. Make sure it is hand tight, do not over tighten it!
Slide in the white tube and make sure it is deep enough. Push-pull-push-pull to be sure it is deep enough.
Insert the extruder drive tension screw and retighten it.
Done!
Tripodmaker // Maintenance

30 31
3. CLOGGED NOZZLE CLEANING
Problem: No filament is coming through the heated nozzleSolution: Clean the nozzle wiith the cold-pull method
1. Remove the filament from the printer through thhe menu: quick settings>change filament
2. Remove bowden tube from the print head by pushing the black clip downards (with a screwdriver) and pulling the tube out.
3. Heat up the print headGo to Menu > Extruder > Temp.1 (click)Set temperature to 180 degrees C (click to confirm)
4. Insert (light preferably colored) filament in the print head by bypassing the bowden tubeMake sure filament oozes out of the nozzle
Tripodmaker // Maintenance
5. Cool down the hot endGo to Menu > Extruder > Temp.1 (click)Set temperature to 0 degrees C (click to confirm)
7. Check if black residue is stuck on the outer end of the filament you just pulled out of the hot-end
6. Wait until hot-end temperature is 110 degrees C and pull firmly the filament back. You should hear a “plopping” sound.
8. In case allot of residue was found, go back to step 3 and repeat the operation.
Else, put back the bowden tube.
Make sure the bowden is inserted deep enough until the point it can’t go any further.
Tripodmaker // Maintenance

32 33
TROUBLESHOOTING AND EASY FIXES
PRINT DOESN’T STICK TO THE PRINTER BED OR DETACHES ON CERTAIN SPOTS.
Cause:- Build plate is not leveled properly.Solution:1. Try to use new tape2. Try to level the build plate by re-calibrating the device
THE PRINT IS STUCK ON THE BUILD PLATE.
Cause: This can happen with prints that have a large area touching the buildplate.Solution:Use a putty knife to get the pieces from the build plate. WARNING! Make sure your other hand is not in the path of the knife as the print migh come loose all of a sudden.
CLOGGED NOZZLE
Solution:Try manually feeding the nozzle while setting the temperature on 245 degrees.See on page 32 how to manually feed the nozzle. Try different temperatures between 245 and 180 degrees. If no filament is getting through try the following:1. Heat the extruder to 215 degrees. Take a short piece of clear/white PLA (1/2 meter) and push it in the nozzle from top like on page 32 of this manual. Push it inside until you can’t get any further. Then pull it out. Cut the dirty tip off with pliers and re-insert. Keep doing this until the filament is clear and the clog is eventually gone.
2. To improve results with this process it might help to push a neelde of <0.4 (specialised 3D printing needles or the classic needles from your local pharmacy) in the bottom of the nozzle and then pull it out again. Perform step 1 again. Alternate step 1 and 2 a few times until the clog is gone.
In case this doens’t solve the problem, contact support: [email protected].
Tripodmaker // Maintenance Tripodmaker // Maintenance
THE FILAMENT IS STUCK IN THE TUBE
Cause:Filament is stuck in the nylon tube due to a blob that is retracted in the tube.Solution:Remove the tube out of its couplings and remove the filament. The tube can be removed by pushing in the couplings in the opposite direction you want to pull out the tube.

34 ©Tripodmaker