
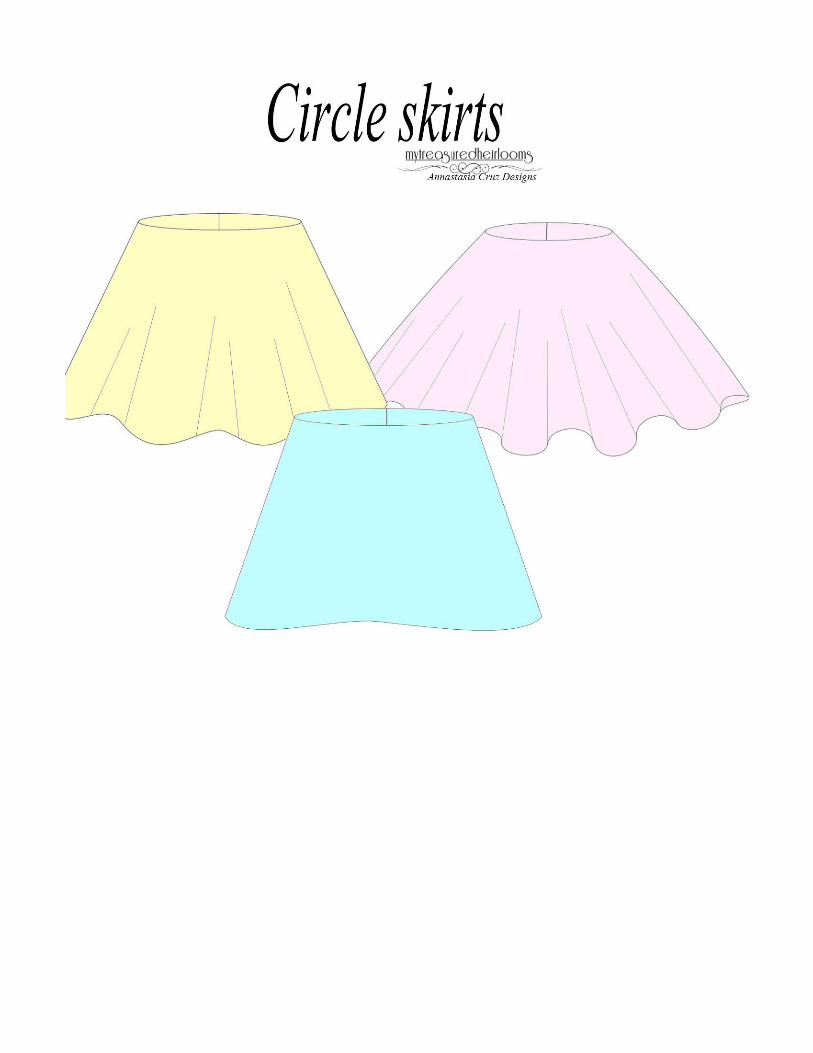
Trio of Circle Skirts
71
-
Upload
fauziahlee -
Category
Documents
-
view
23 -
download
0
description
Skirts Pattern
Transcript of Trio of Circle Skirts
Copyright © August 2014 Annastasia Cruz 2
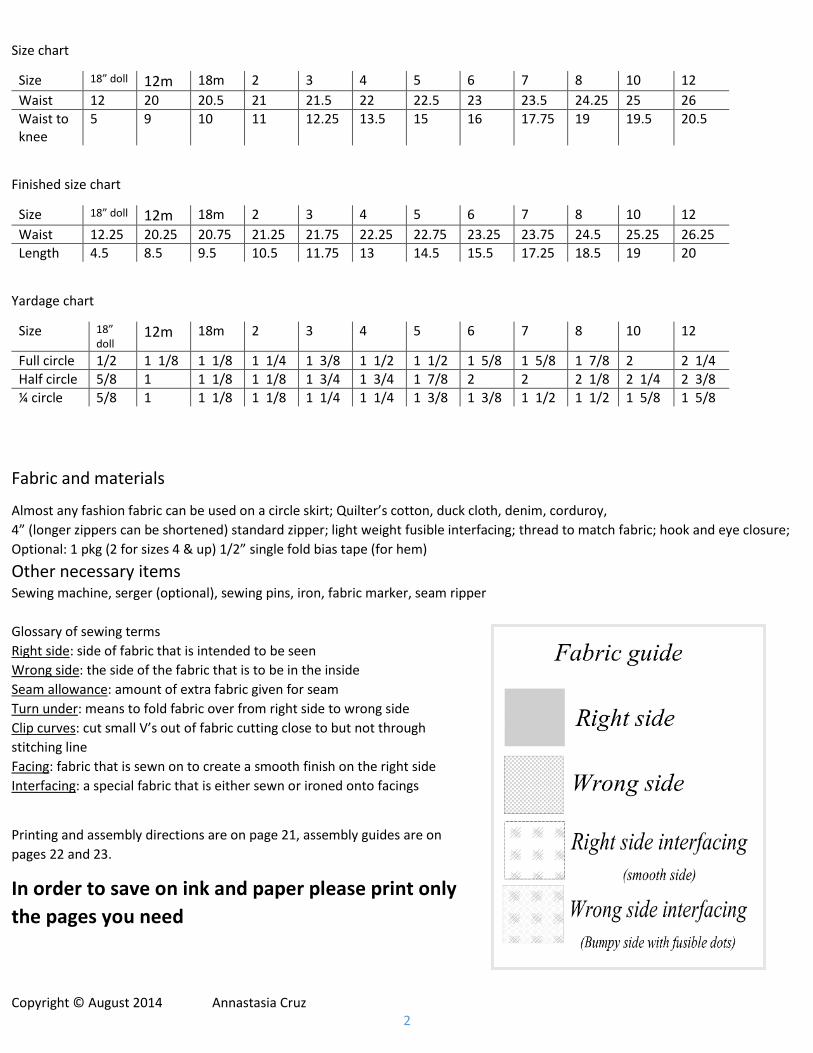
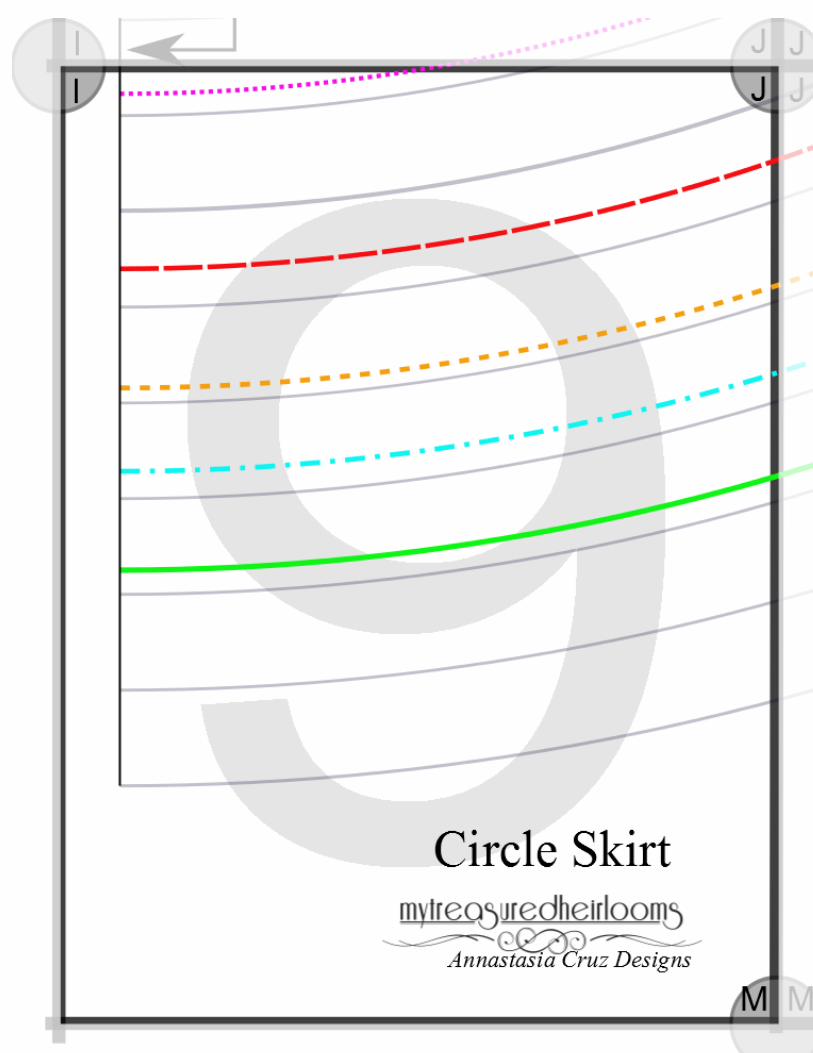
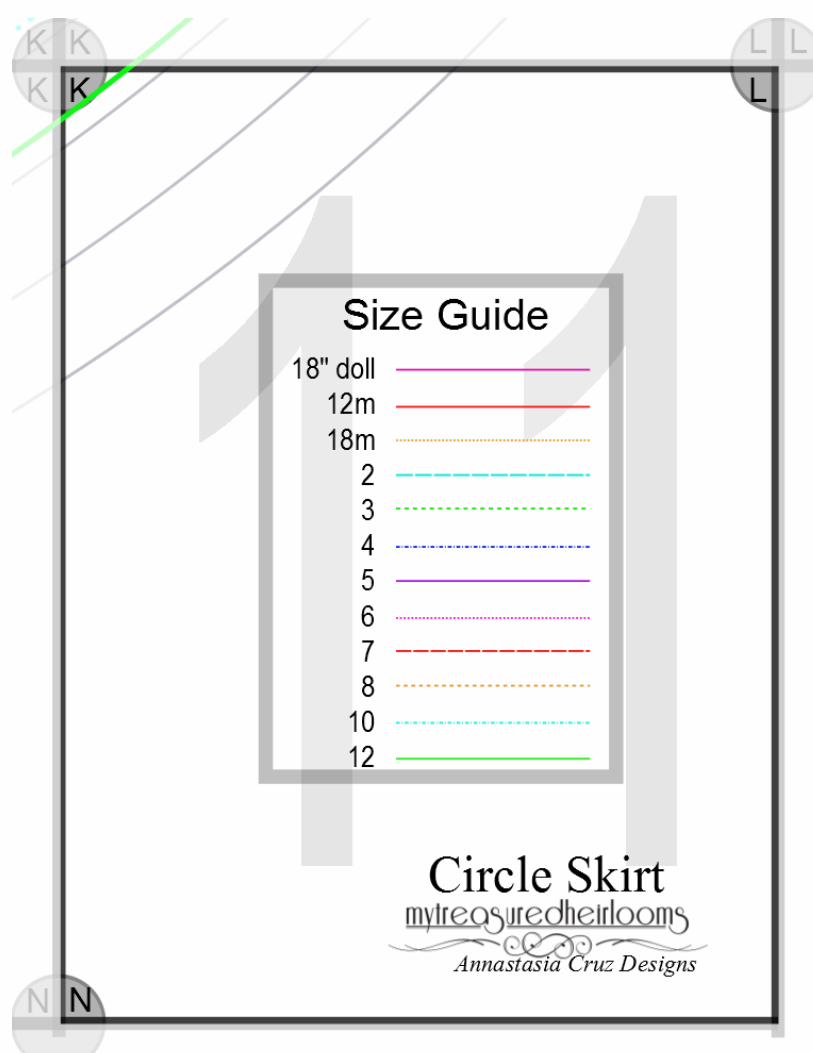
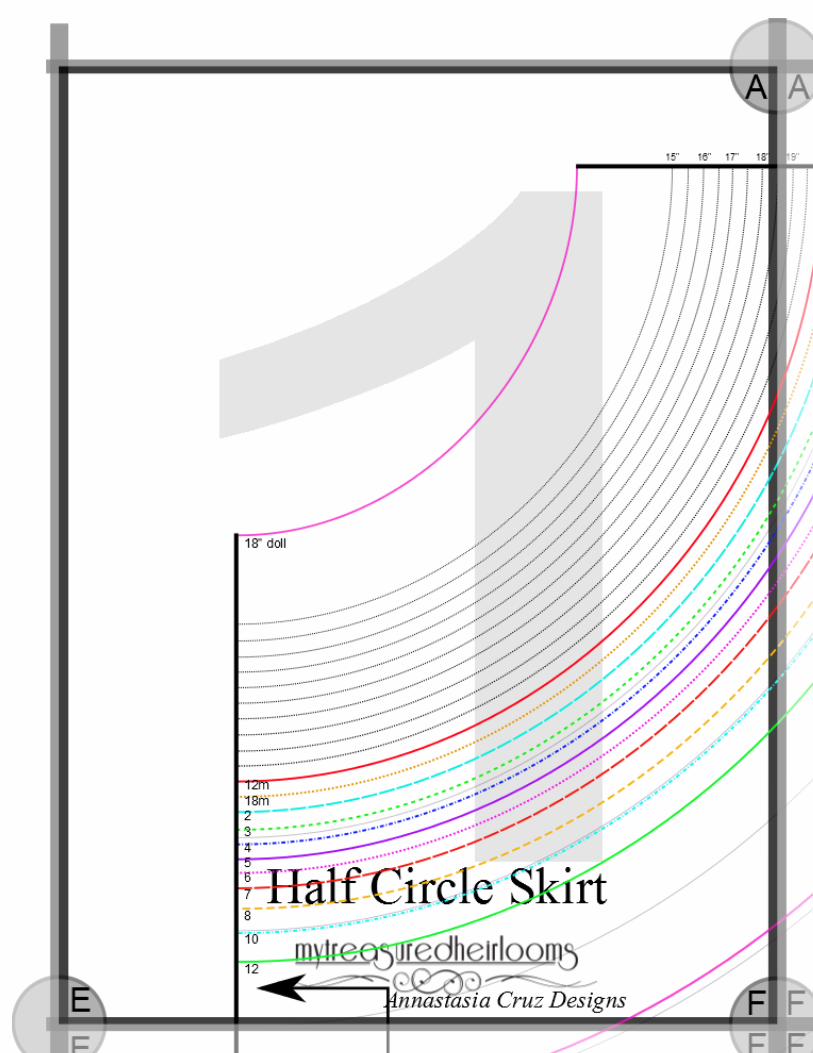
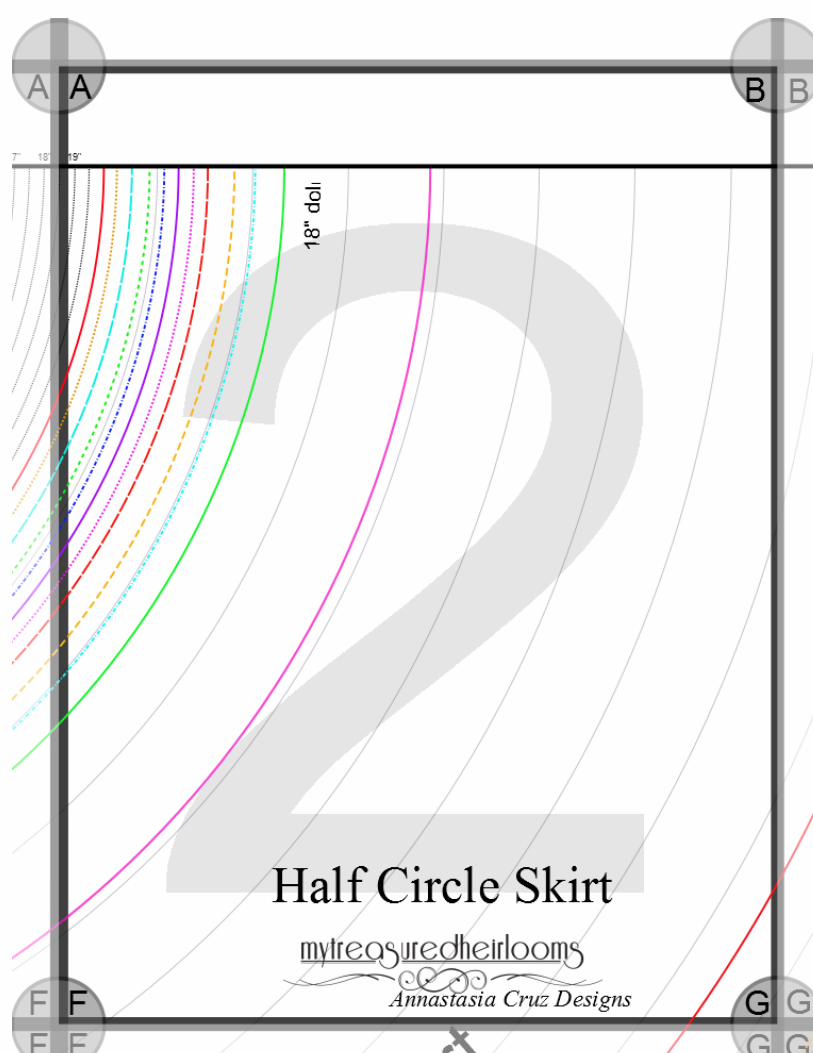
Size chart
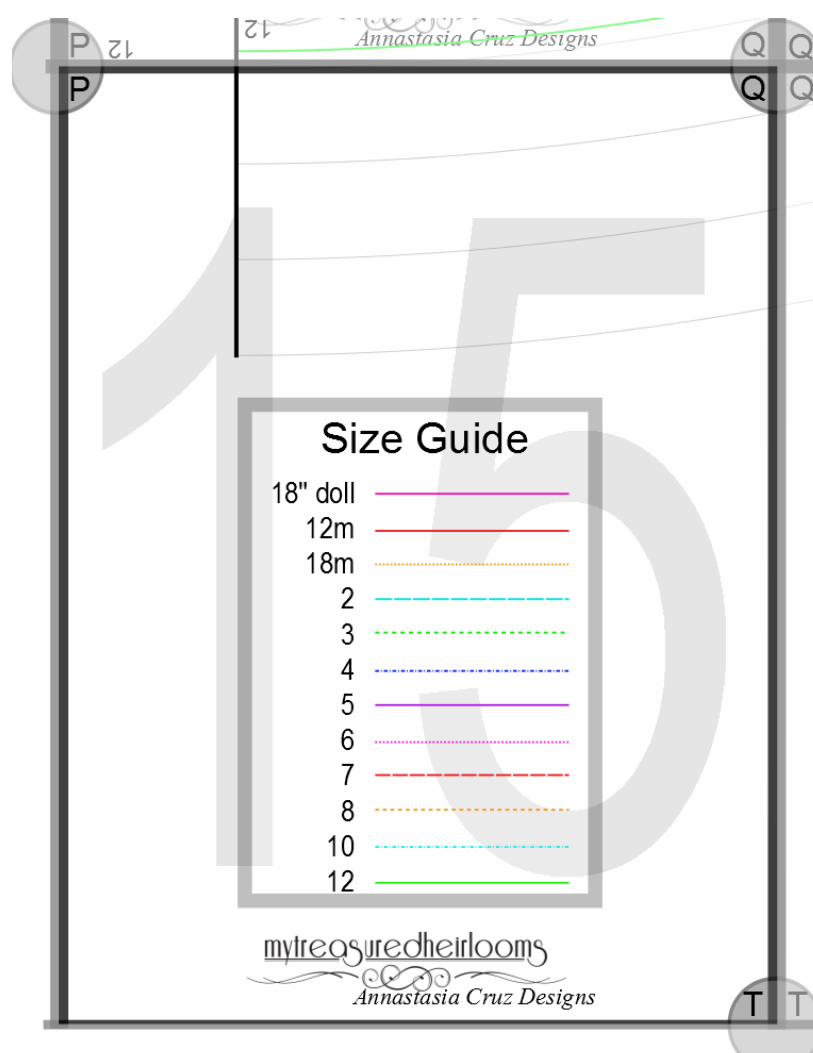
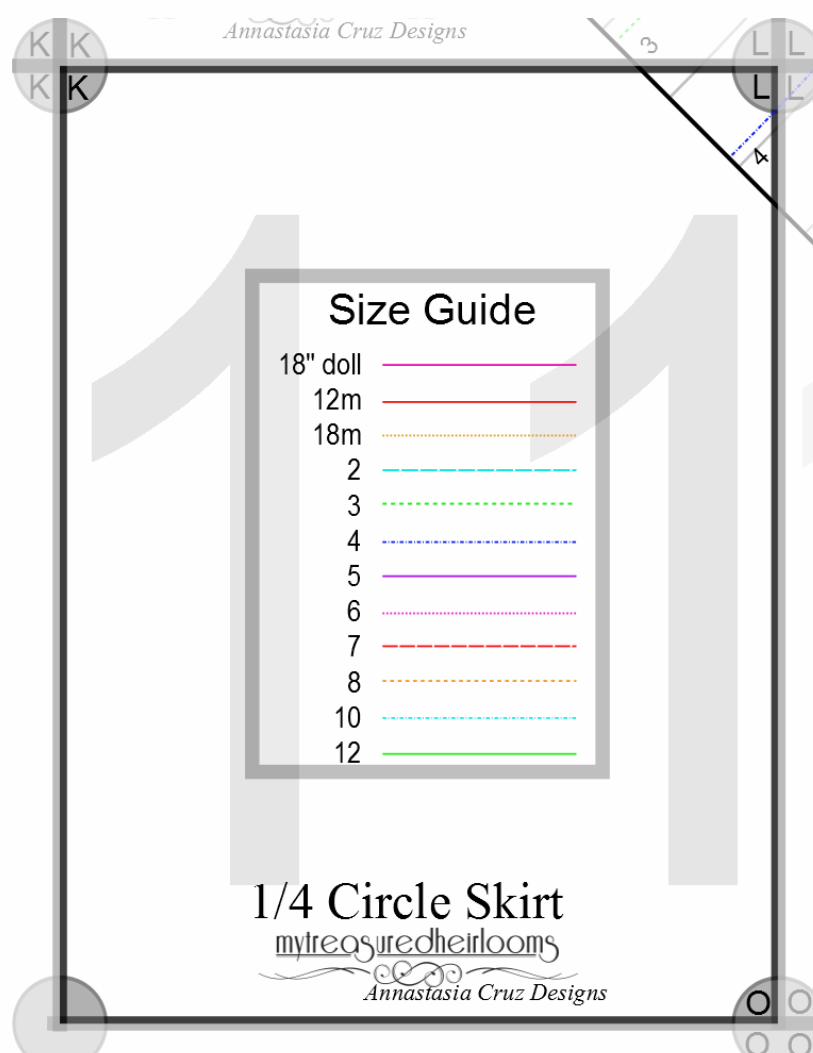
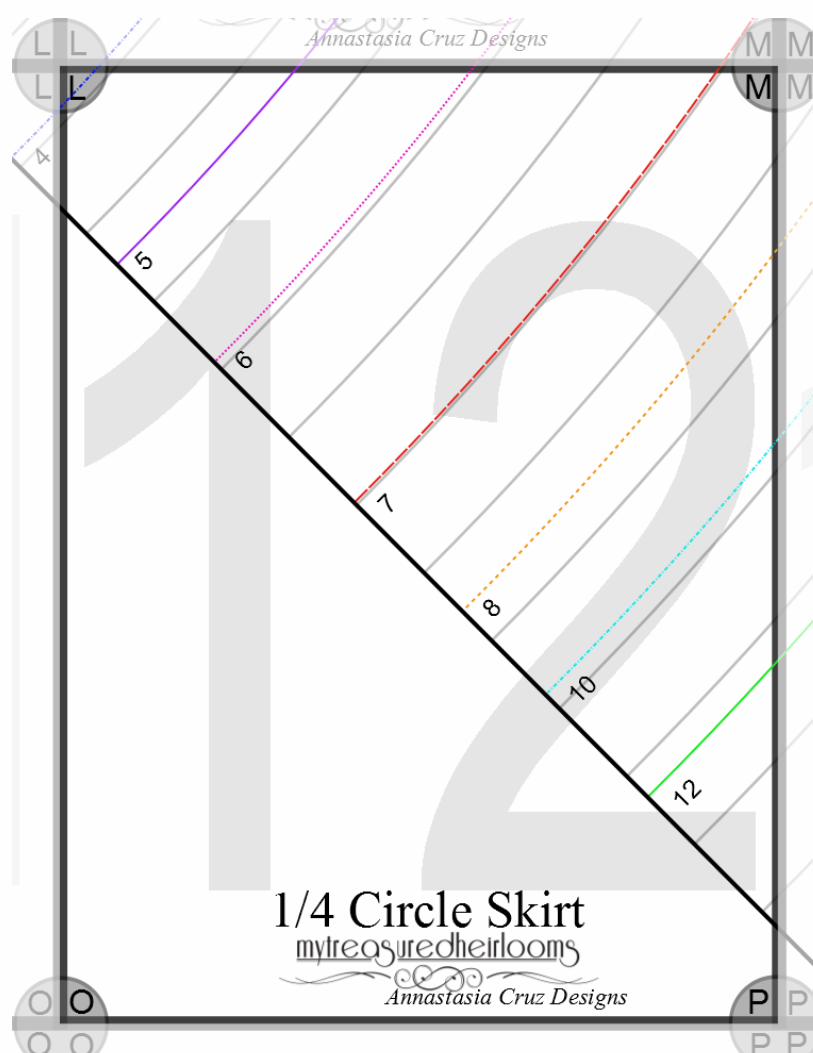
Size 18” doll 12m 18m 2 3 4 5 6 7 8 10 12
Waist 12 20 20.5 21 21.5 22 22.5 23 23.5 24.25 25 26
Waist to knee
5 9 10 11 12.25 13.5 15 16 17.75 19 19.5 20.5
Finished size chart
Size 18” doll 12m 18m 2 3 4 5 6 7 8 10 12
Waist 12.25 20.25 20.75 21.25 21.75 22.25 22.75 23.25 23.75 24.5 25.25 26.25
Length 4.5 8.5 9.5 10.5 11.75 13 14.5 15.5 17.25 18.5 19 20
Yardage chart
Size 18” doll
12m 18m 2 3 4 5 6 7 8 10 12
Full circle 1/2 1 1/8 1 1/8 1 1/4 1 3/8 1 1/2 1 1/2 1 5/8 1 5/8 1 7/8 2 2 1/4
Half circle 5/8 1 1 1/8 1 1/8 1 3/4 1 3/4 1 7/8 2 2 2 1/8 2 1/4 2 3/8
¼ circle 5/8 1 1 1/8 1 1/8 1 1/4 1 1/4 1 3/8 1 3/8 1 1/2 1 1/2 1 5/8 1 5/8
Fabric and materials
Almost any fashion fabric can be used on a circle skirt; Quilter’s cotton, duck cloth, denim, corduroy,
4” (longer zippers can be shortened) standard zipper; light weight fusible interfacing; thread to match fabric; hook and eye closure;
Optional: 1 pkg (2 for sizes 4 & up) 1/2” single fold bias tape (for hem)
Other necessary items Sewing machine, serger (optional), sewing pins, iron, fabric marker, seam ripper
Glossary of sewing terms
Right side: side of fabric that is intended to be seen
Wrong side: the side of the fabric that is to be in the inside
Seam allowance: amount of extra fabric given for seam
Turn under: means to fold fabric over from right side to wrong side
Clip curves: cut small V’s out of fabric cutting close to but not through
stitching line
Facing: fabric that is sewn on to create a smooth finish on the right side
Interfacing: a special fabric that is either sewn or ironed onto facings
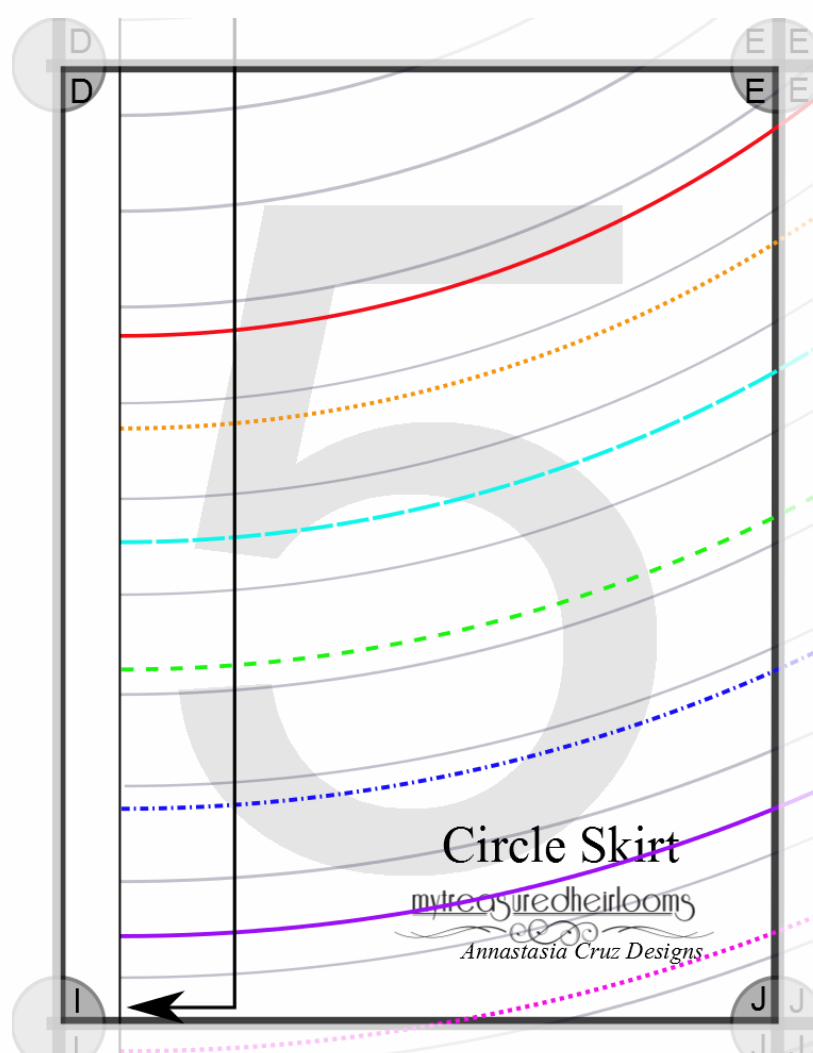
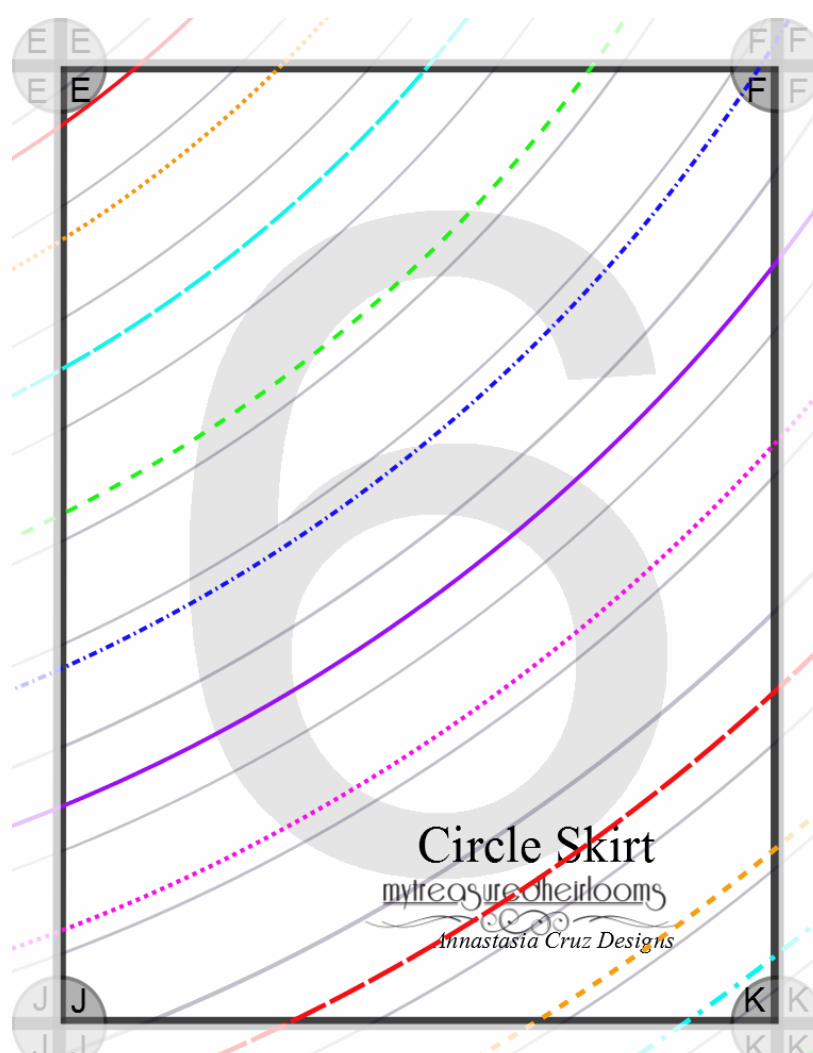
Printing and assembly directions are on page 21, assembly guides are on
pages 22 and 23.
In order to save on ink and paper please print only
the pages you need
Sweet Innocence Copyright © August 2014 Annastasia Cruz 3 | P a g e
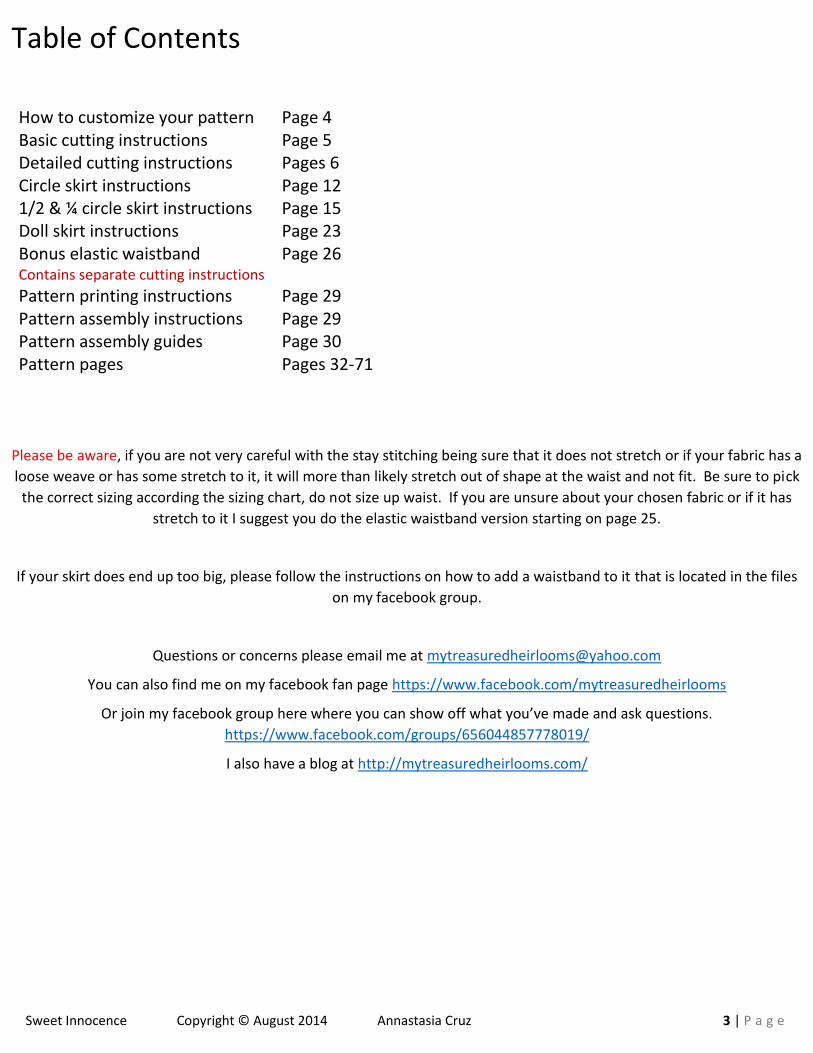
Table of Contents
How to customize your pattern Page 4 Basic cutting instructions Page 5 Detailed cutting instructions Pages 6 Circle skirt instructions Page 12 1/2 & ¼ circle skirt instructions Page 15 Doll skirt instructions Page 23 Bonus elastic waistband Contains separate cutting instructions
Page 26
Pattern printing instructions Page 29 Pattern assembly instructions Page 29 Pattern assembly guides Page 30 Pattern pages Pages 32-71
Please be aware, if you are not very careful with the stay stitching being sure that it does not stretch or if your fabric has a
loose weave or has some stretch to it, it will more than likely stretch out of shape at the waist and not fit. Be sure to pick
the correct sizing according the sizing chart, do not size up waist. If you are unsure about your chosen fabric or if it has
stretch to it I suggest you do the elastic waistband version starting on page 25.
If your skirt does end up too big, please follow the instructions on how to add a waistband to it that is located in the files
on my facebook group.
Questions or concerns please email me at [email protected]
You can also find me on my facebook fan page https://www.facebook.com/mytreasuredheirlooms
Or join my facebook group here where you can show off what you’ve made and ask questions.
https://www.facebook.com/groups/656044857778019/
I also have a blog at http://mytreasuredheirlooms.com/
Sweet Innocence Copyright © August 2014 Annastasia Cruz 4 | P a g e
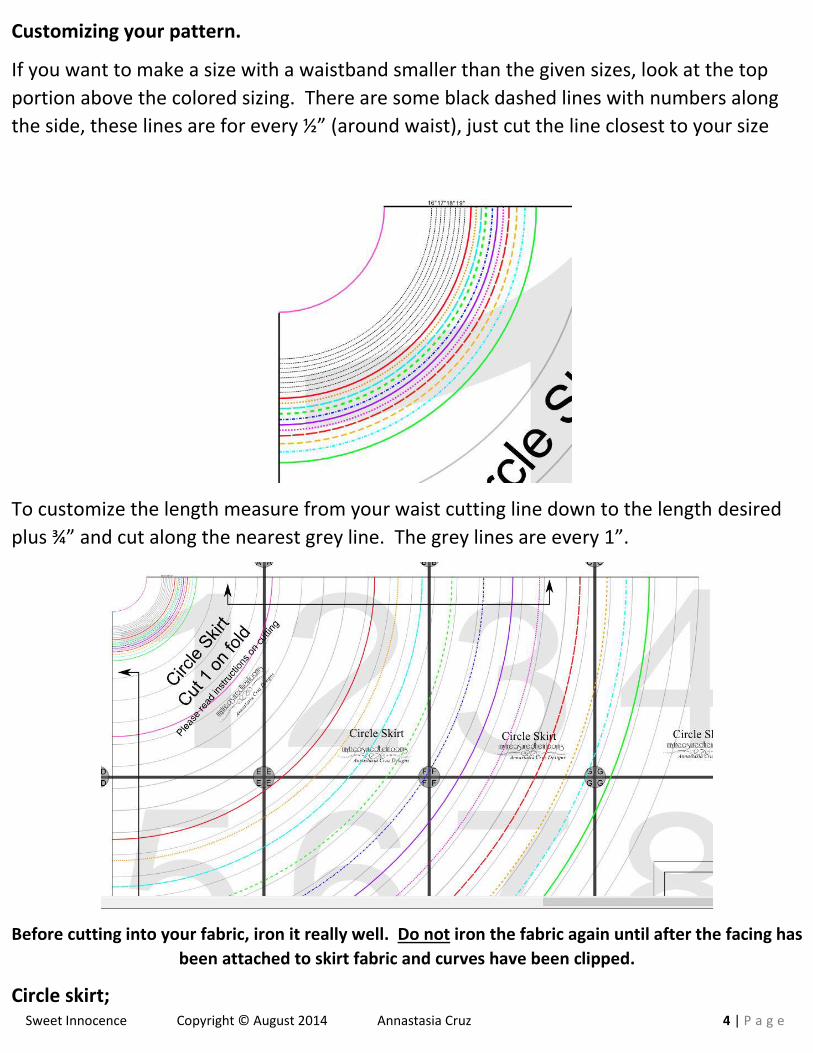
Customizing your pattern.
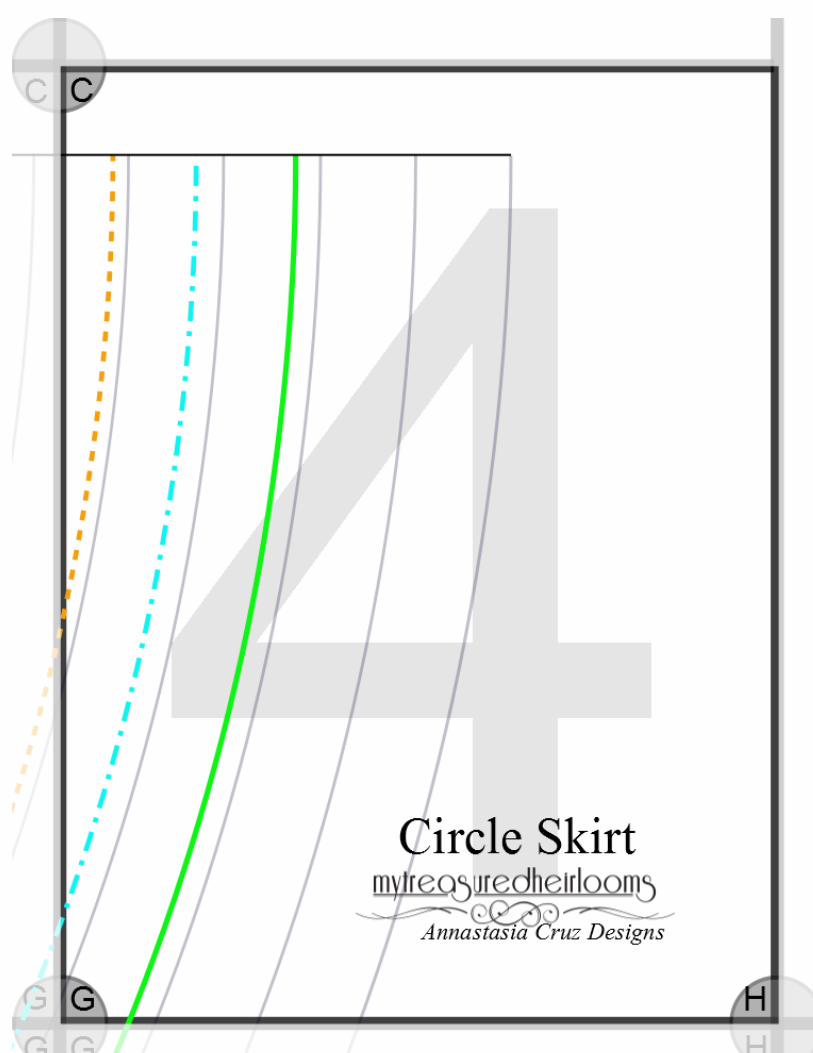
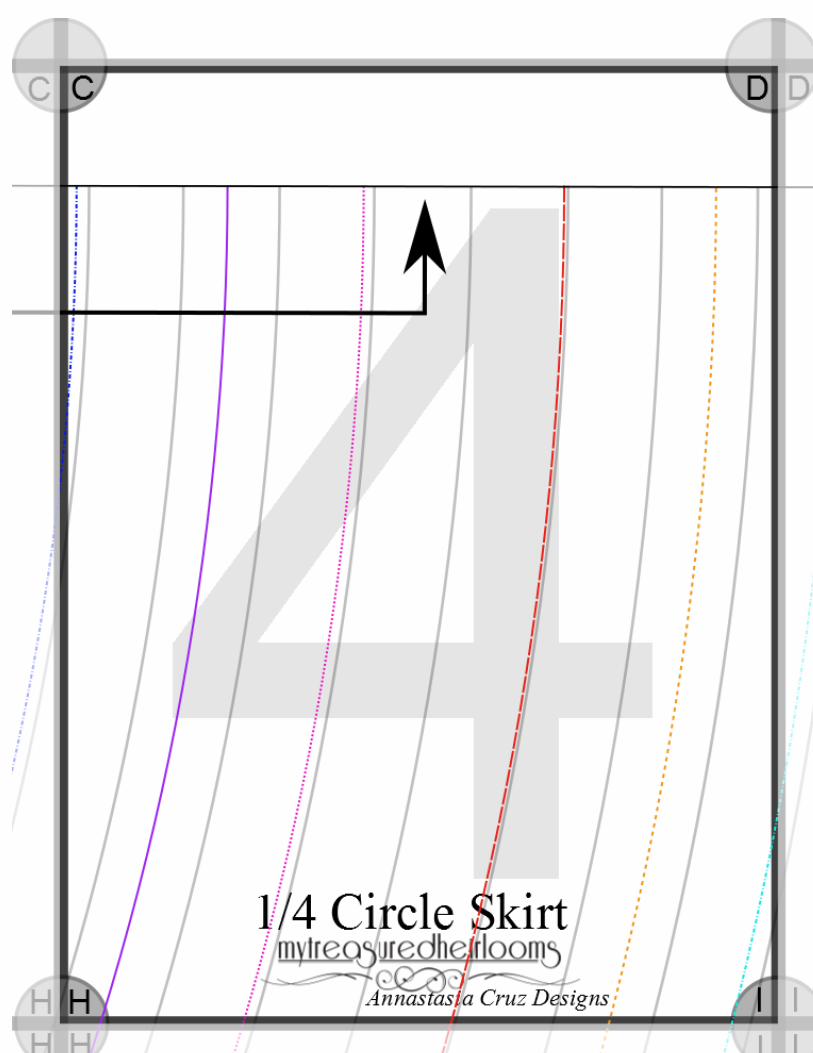
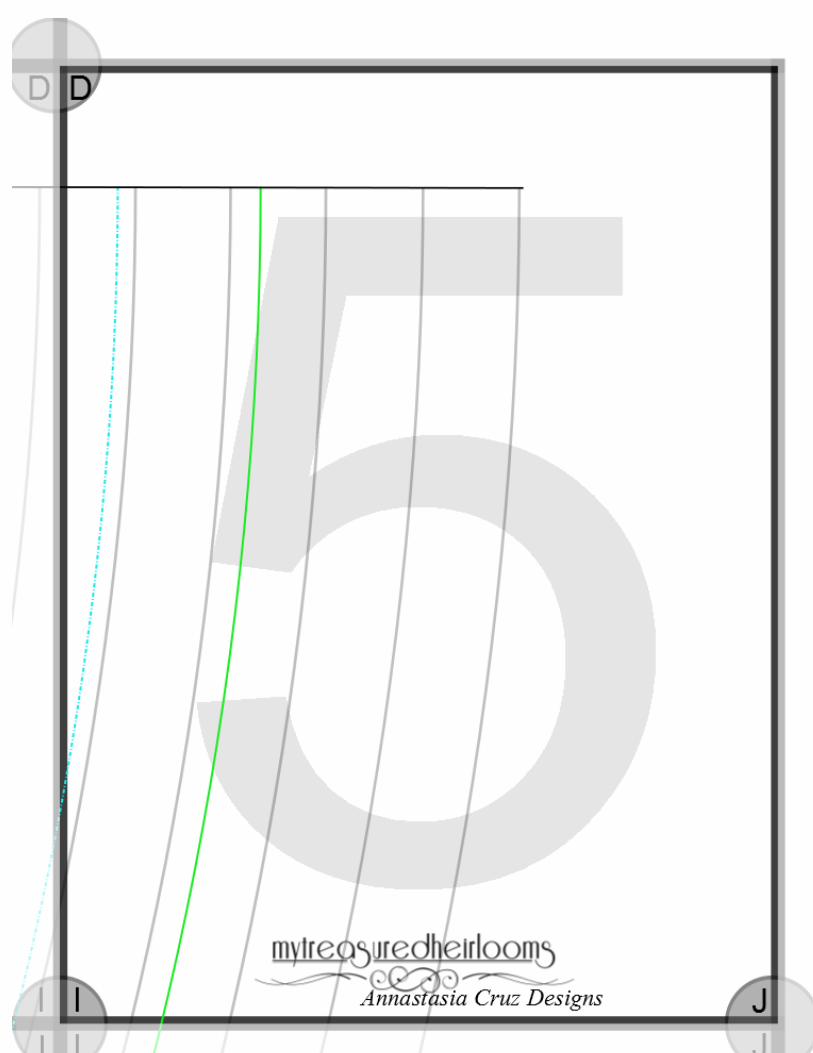
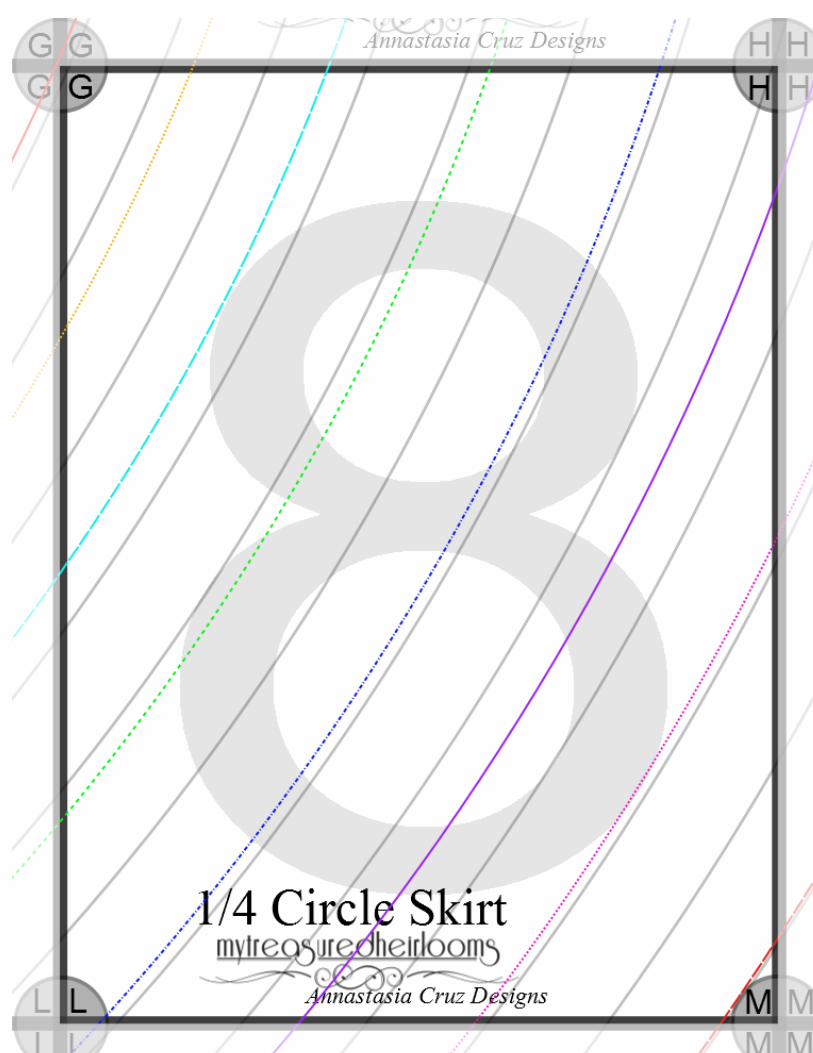
If you want to make a size with a waistband smaller than the given sizes, look at the top
portion above the colored sizing. There are some black dashed lines with numbers along
the side, these lines are for every ½” (around waist), just cut the line closest to your size
To customize the length measure from your waist cutting line down to the length desired
plus ¾” and cut along the nearest grey line. The grey lines are every 1”.
Before cutting into your fabric, iron it really well. Do not iron the fabric again until after the facing has
been attached to skirt fabric and curves have been clipped.
Circle skirt;
Sweet Innocence Copyright © August 2014 Annastasia Cruz 5 | P a g e
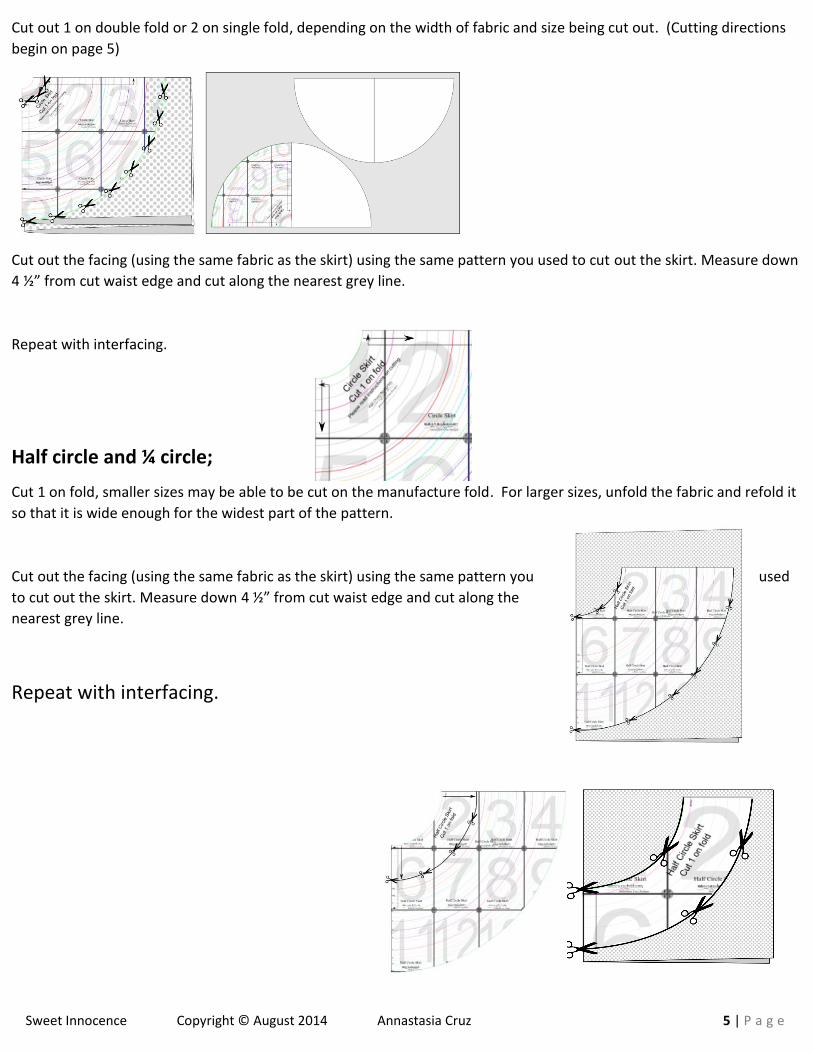
Cut out 1 on double fold or 2 on single fold, depending on the width of fabric and size being cut out. (Cutting directions
begin on page 5)
Cut out the facing (using the same fabric as the skirt) using the same pattern you used to cut out the skirt. Measure down
4 ½” from cut waist edge and cut along the nearest grey line.
Repeat with interfacing.
Half circle and ¼ circle;
Cut 1 on fold, smaller sizes may be able to be cut on the manufacture fold. For larger sizes, unfold the fabric and refold it
so that it is wide enough for the widest part of the pattern.
Cut out the facing (using the same fabric as the skirt) using the same pattern you used
to cut out the skirt. Measure down 4 ½” from cut waist edge and cut along the
nearest grey line.
Repeat with interfacing.
Sweet Innocence Copyright © August 2014 Annastasia Cruz 6 | P a g e
Pages 6-11 are more detailed cutting instructions, to go directly to sewing instructions skip to section page 12
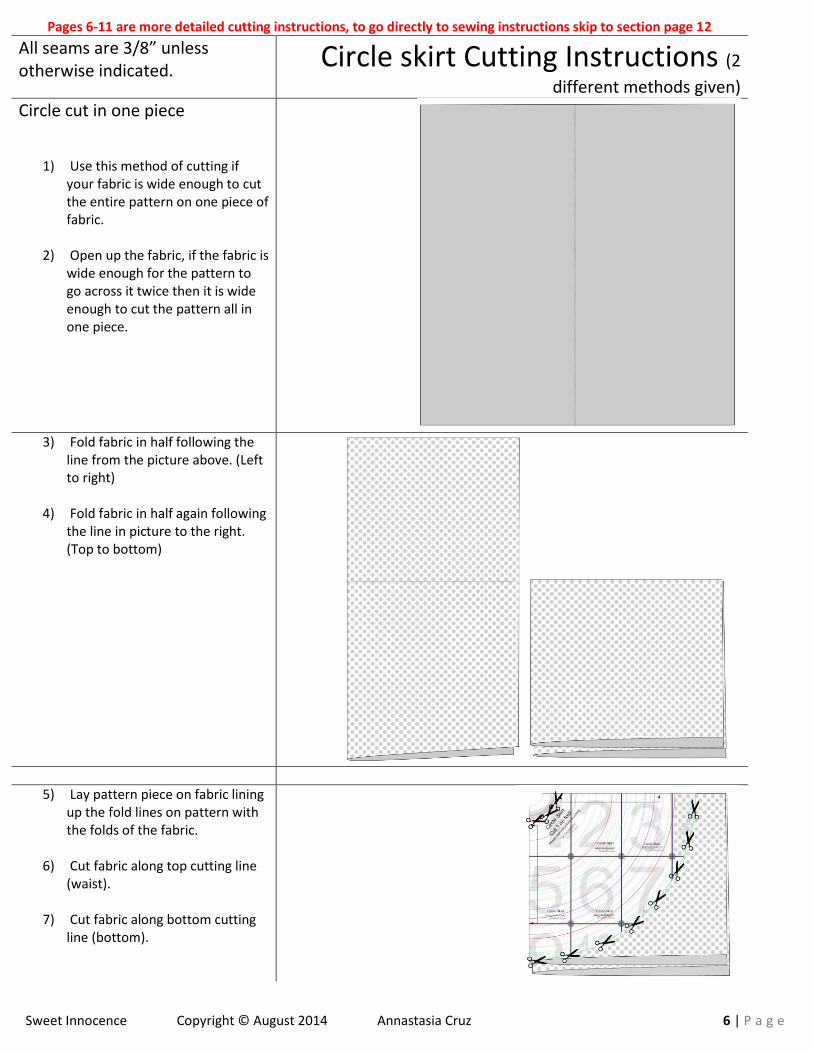
All seams are 3/8” unless otherwise indicated.
Circle skirt Cutting Instructions (2
different methods given)
Circle cut in one piece
1) Use this method of cutting if your fabric is wide enough to cut the entire pattern on one piece of fabric.
2) Open up the fabric, if the fabric is
wide enough for the pattern to go across it twice then it is wide enough to cut the pattern all in one piece.
3) Fold fabric in half following the
line from the picture above. (Left to right)
4) Fold fabric in half again following
the line in picture to the right. (Top to bottom)
5) Lay pattern piece on fabric lining up the fold lines on pattern with the folds of the fabric.
6) Cut fabric along top cutting line
(waist).
7) Cut fabric along bottom cutting line (bottom).
Sweet Innocence Copyright © August 2014 Annastasia Cruz 7 | P a g e
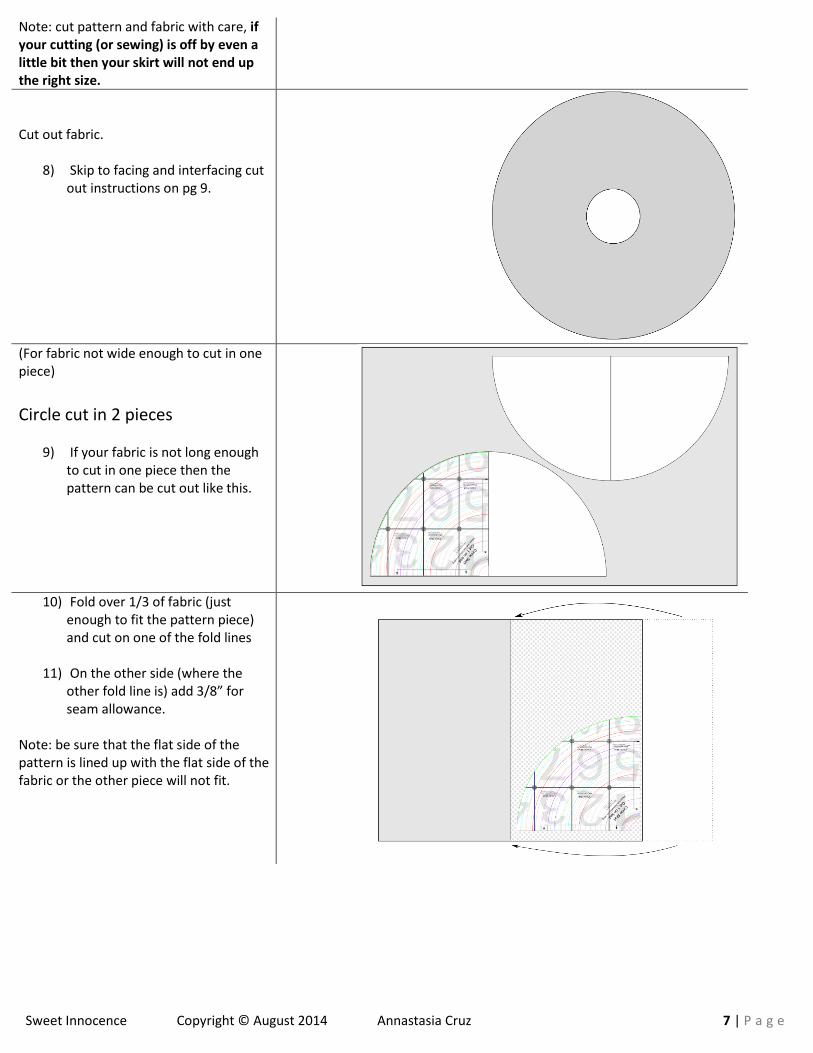
Note: cut pattern and fabric with care, if your cutting (or sewing) is off by even a little bit then your skirt will not end up the right size.
Cut out fabric.
8) Skip to facing and interfacing cut out instructions on pg 9.
(For fabric not wide enough to cut in one piece)
Circle cut in 2 pieces
9) If your fabric is not long enough to cut in one piece then the pattern can be cut out like this.
10) Fold over 1/3 of fabric (just
enough to fit the pattern piece) and cut on one of the fold lines
11) On the other side (where the
other fold line is) add 3/8” for seam allowance.
Note: be sure that the flat side of the pattern is lined up with the flat side of the fabric or the other piece will not fit.
Sweet Innocence Copyright © August 2014 Annastasia Cruz 8 | P a g e
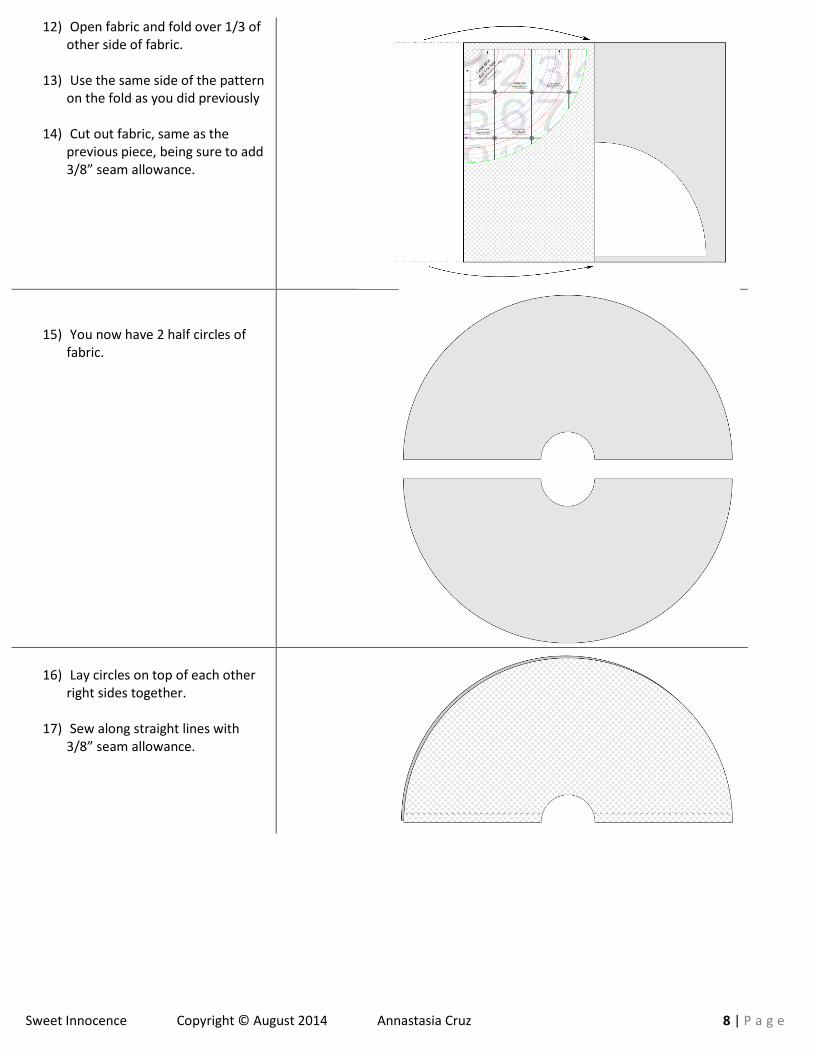
12) Open fabric and fold over 1/3 of other side of fabric.
13) Use the same side of the pattern
on the fold as you did previously
14) Cut out fabric, same as the previous piece, being sure to add 3/8” seam allowance.
15) You now have 2 half circles of fabric.
16) Lay circles on top of each other right sides together.
17) Sew along straight lines with
3/8” seam allowance.
Sweet Innocence Copyright © August 2014 Annastasia Cruz 9 | P a g e
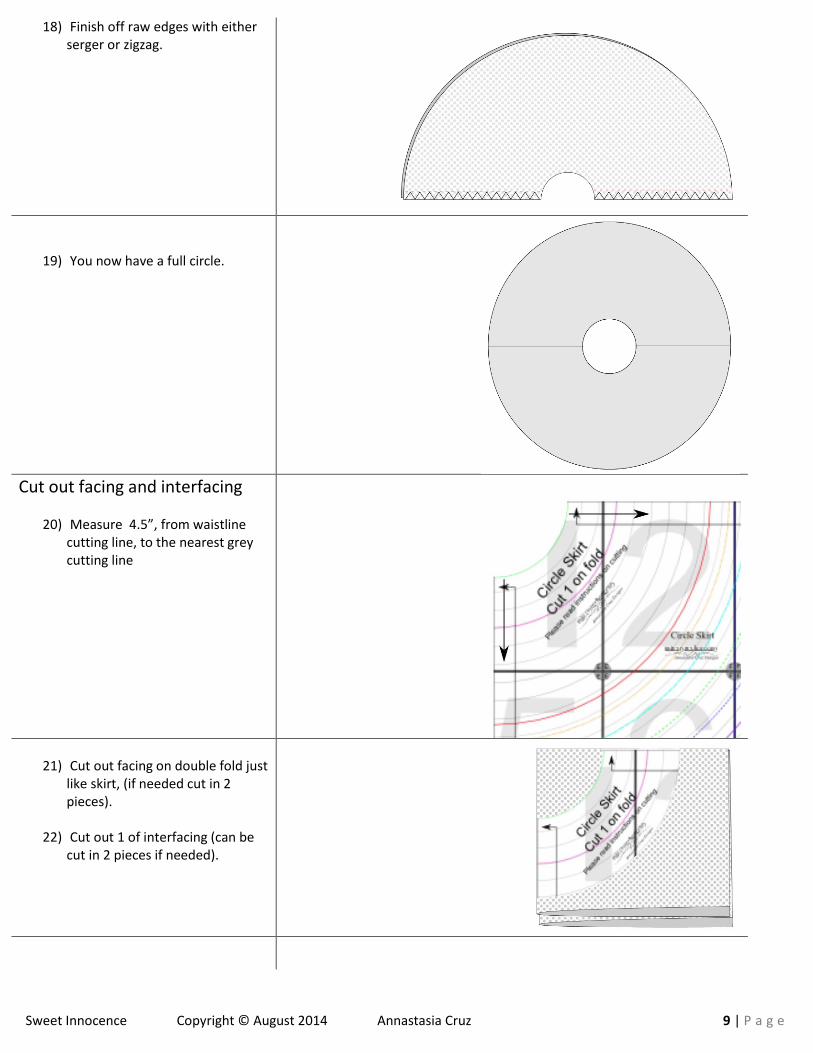
18) Finish off raw edges with either serger or zigzag.
19) You now have a full circle.
Cut out facing and interfacing
20) Measure 4.5”, from waistline
cutting line, to the nearest grey cutting line
21) Cut out facing on double fold just like skirt, (if needed cut in 2 pieces).
22) Cut out 1 of interfacing (can be
cut in 2 pieces if needed).
Sweet Innocence Copyright © August 2014 Annastasia Cruz 10 | P a g e
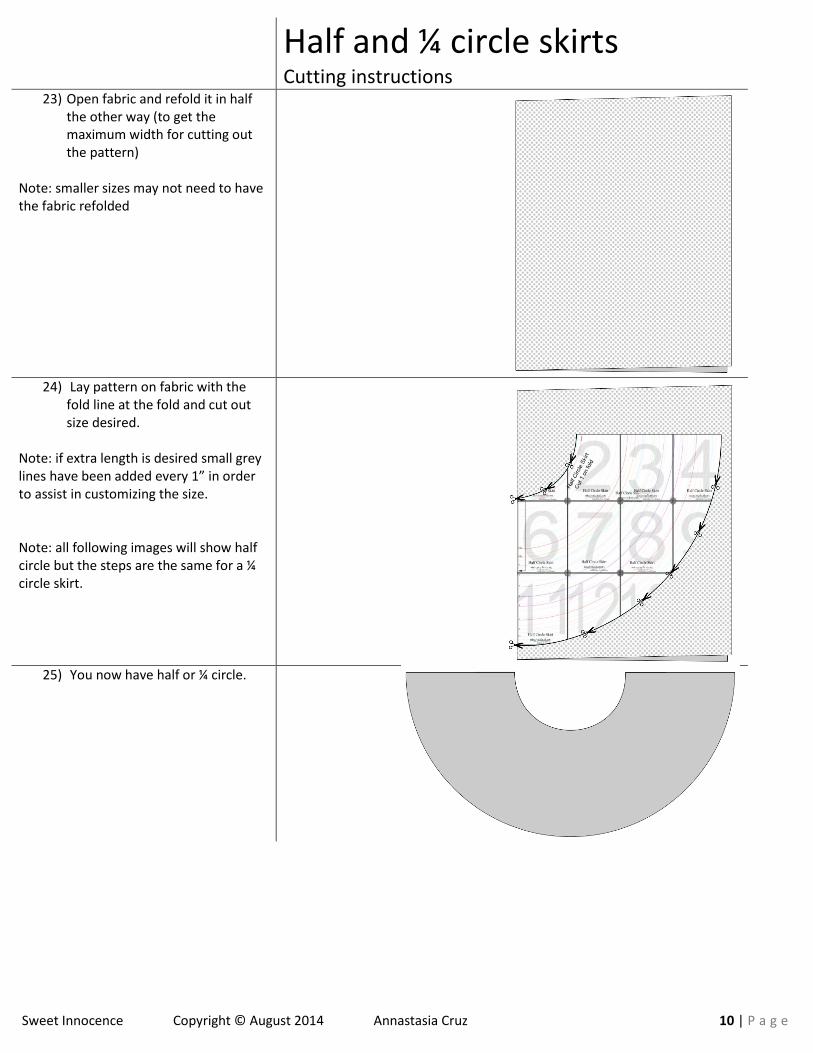
Half and ¼ circle skirts Cutting instructions
23) Open fabric and refold it in half the other way (to get the maximum width for cutting out the pattern)
Note: smaller sizes may not need to have the fabric refolded
24) Lay pattern on fabric with the
fold line at the fold and cut out size desired.
Note: if extra length is desired small grey lines have been added every 1” in order to assist in customizing the size. Note: all following images will show half circle but the steps are the same for a ¼ circle skirt.
25) You now have half or ¼ circle.
Sweet Innocence Copyright © August 2014 Annastasia Cruz 11 | P a g e
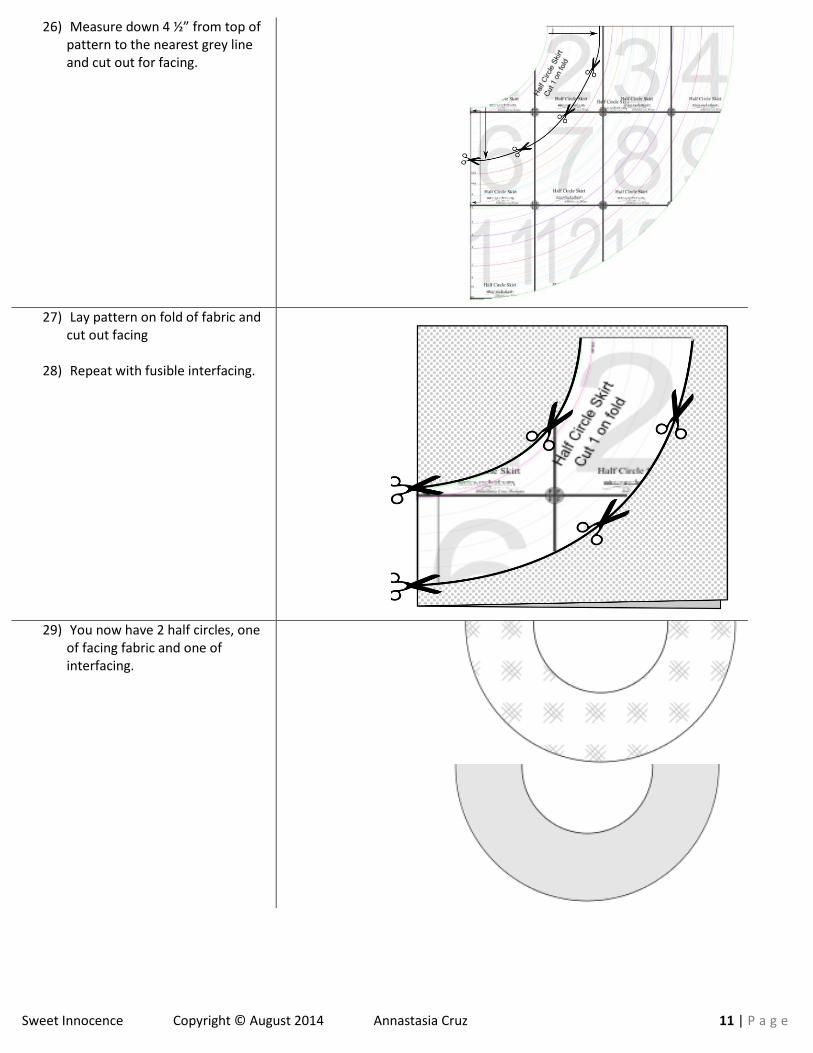
26) Measure down 4 ½” from top of pattern to the nearest grey line and cut out for facing.
27) Lay pattern on fold of fabric and
cut out facing
28) Repeat with fusible interfacing.
29) You now have 2 half circles, one
of facing fabric and one of interfacing.
Sweet Innocence Copyright © August 2014 Annastasia Cruz 12 | P a g e
Sewing instructions
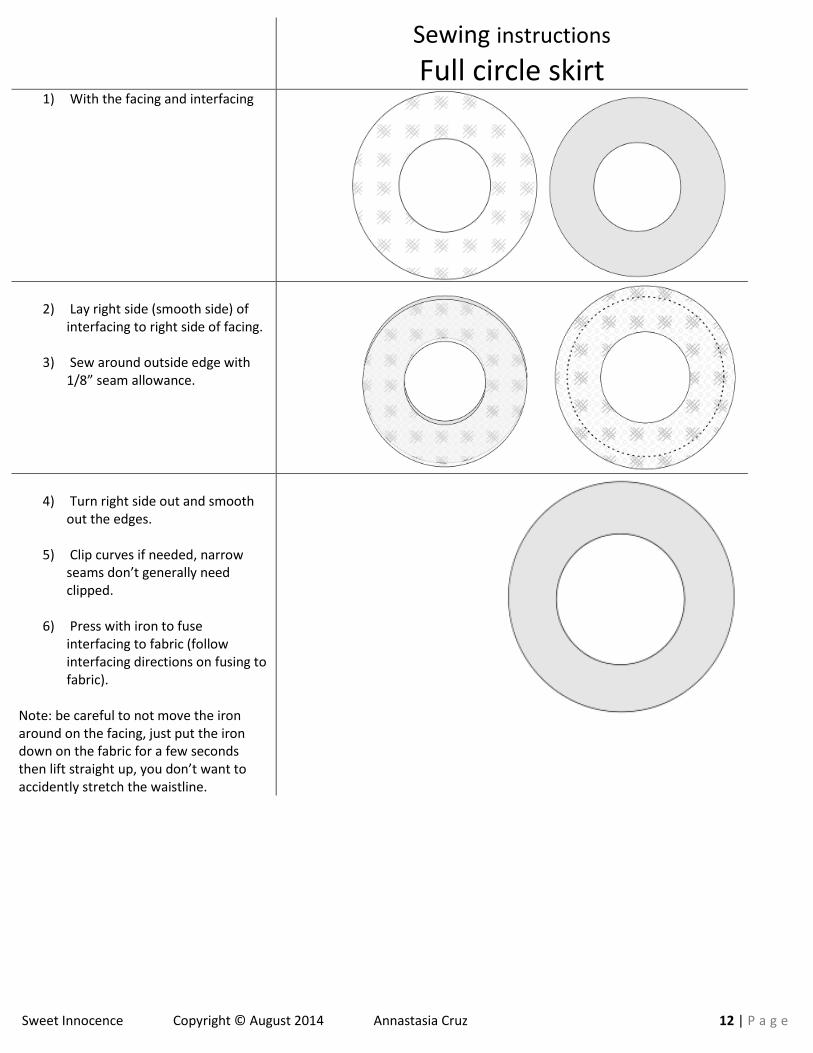
Full circle skirt
1) With the facing and interfacing
2) Lay right side (smooth side) of interfacing to right side of facing.
3) Sew around outside edge with
1/8” seam allowance.
4) Turn right side out and smooth out the edges.
5) Clip curves if needed, narrow
seams don’t generally need clipped.
6) Press with iron to fuse
interfacing to fabric (follow interfacing directions on fusing to fabric).
Note: be careful to not move the iron around on the facing, just put the iron down on the fabric for a few seconds then lift straight up, you don’t want to accidently stretch the waistline.
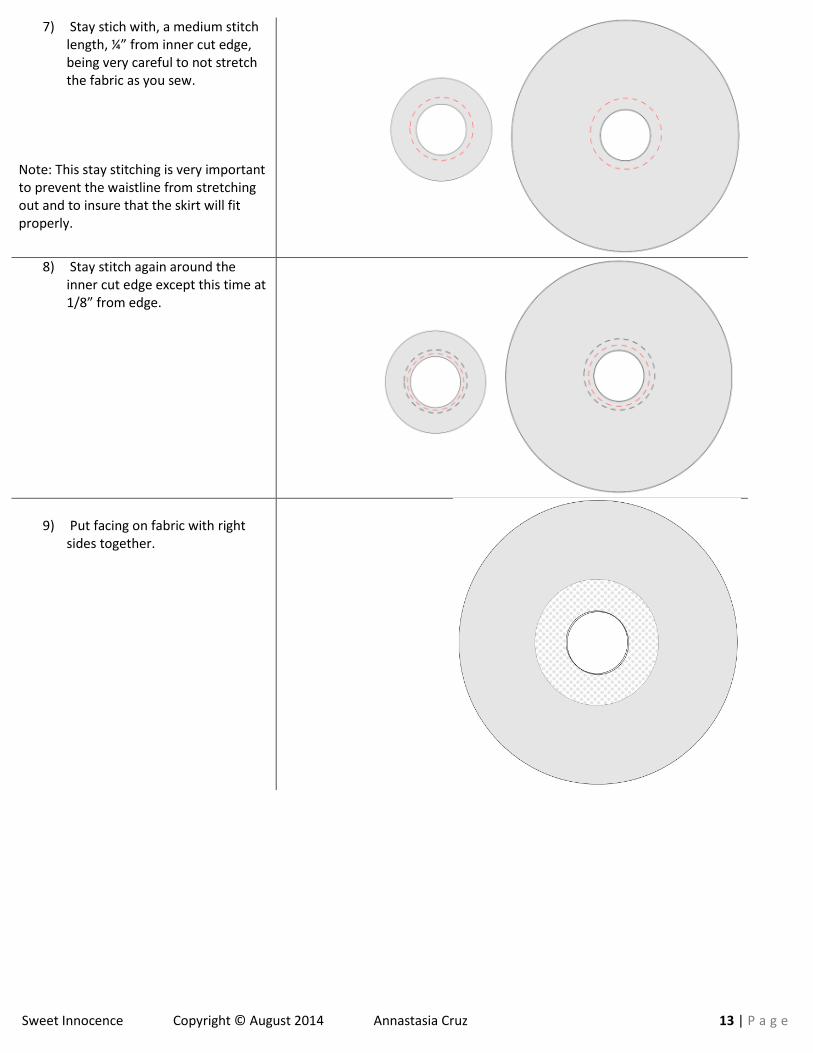
Sweet Innocence Copyright © August 2014 Annastasia Cruz 13 | P a g e
7) Stay stich with, a medium stitch length, ¼” from inner cut edge, being very careful to not stretch the fabric as you sew.
Note: This stay stitching is very important to prevent the waistline from stretching out and to insure that the skirt will fit properly.
8) Stay stitch again around the
inner cut edge except this time at 1/8” from edge.
9) Put facing on fabric with right sides together.
Sweet Innocence Copyright © August 2014 Annastasia Cruz 14 | P a g e
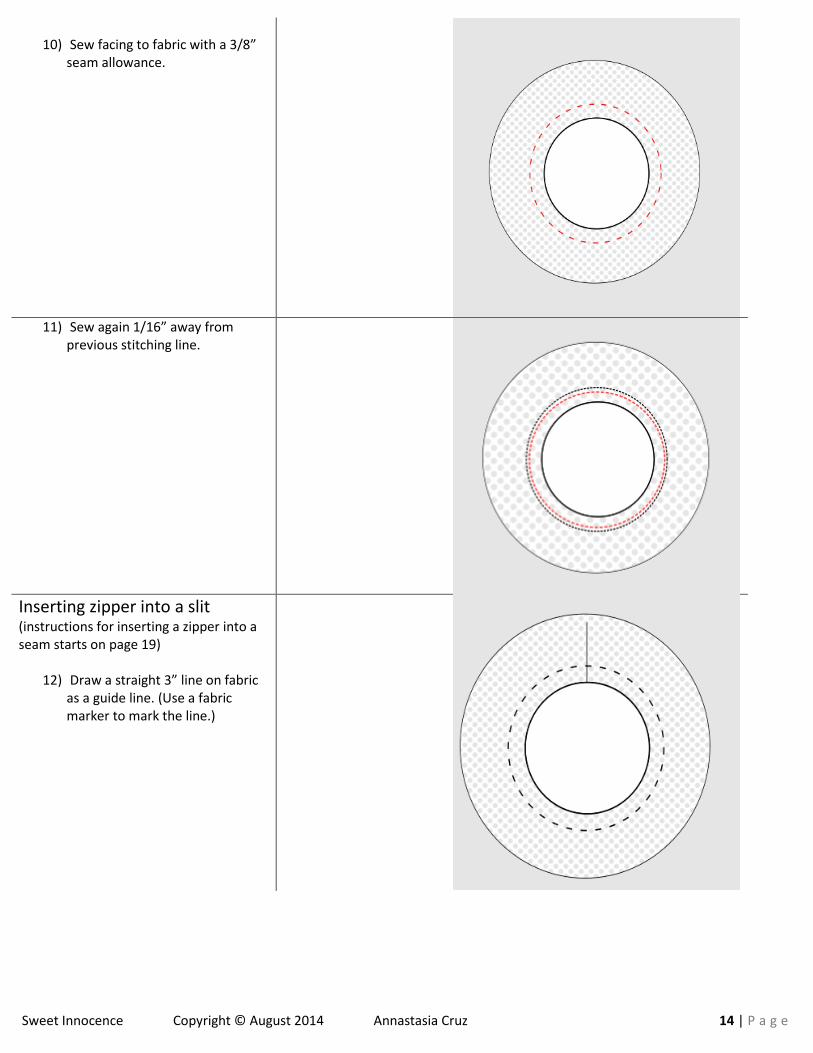
10) Sew facing to fabric with a 3/8”
seam allowance.
11) Sew again 1/16” away from
previous stitching line.
Inserting zipper into a slit (instructions for inserting a zipper into a seam starts on page 19)
12) Draw a straight 3” line on fabric as a guide line. (Use a fabric marker to mark the line.)
Sweet Innocence Copyright © August 2014 Annastasia Cruz 15 | P a g e
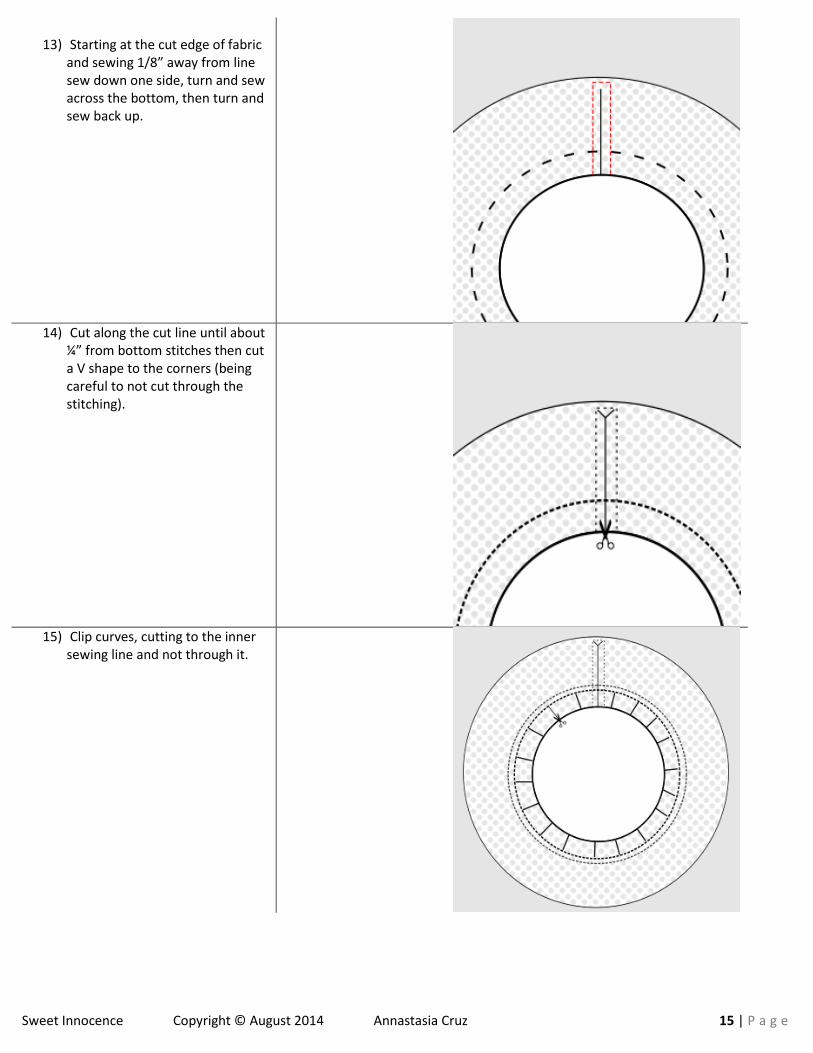
13) Starting at the cut edge of fabric
and sewing 1/8” away from line sew down one side, turn and sew across the bottom, then turn and sew back up.
14) Cut along the cut line until about
¼” from bottom stitches then cut a V shape to the corners (being careful to not cut through the stitching).
15) Clip curves, cutting to the inner
sewing line and not through it.
Sweet Innocence Copyright © August 2014 Annastasia Cruz 16 | P a g e
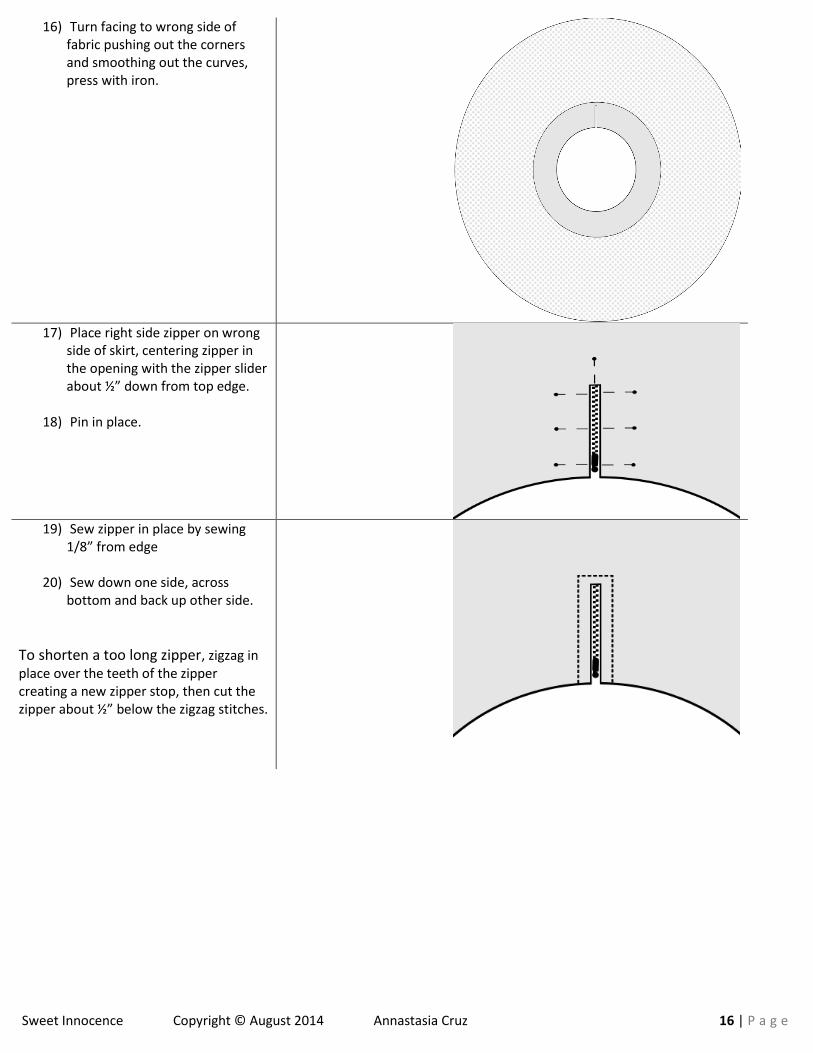
16) Turn facing to wrong side of fabric pushing out the corners and smoothing out the curves, press with iron.
17) Place right side zipper on wrong
side of skirt, centering zipper in the opening with the zipper slider about ½” down from top edge.
18) Pin in place.
19) Sew zipper in place by sewing
1/8” from edge
20) Sew down one side, across bottom and back up other side.
To shorten a too long zipper, zigzag in place over the teeth of the zipper creating a new zipper stop, then cut the zipper about ½” below the zigzag stitches.
Sweet Innocence Copyright © August 2014 Annastasia Cruz 17 | P a g e
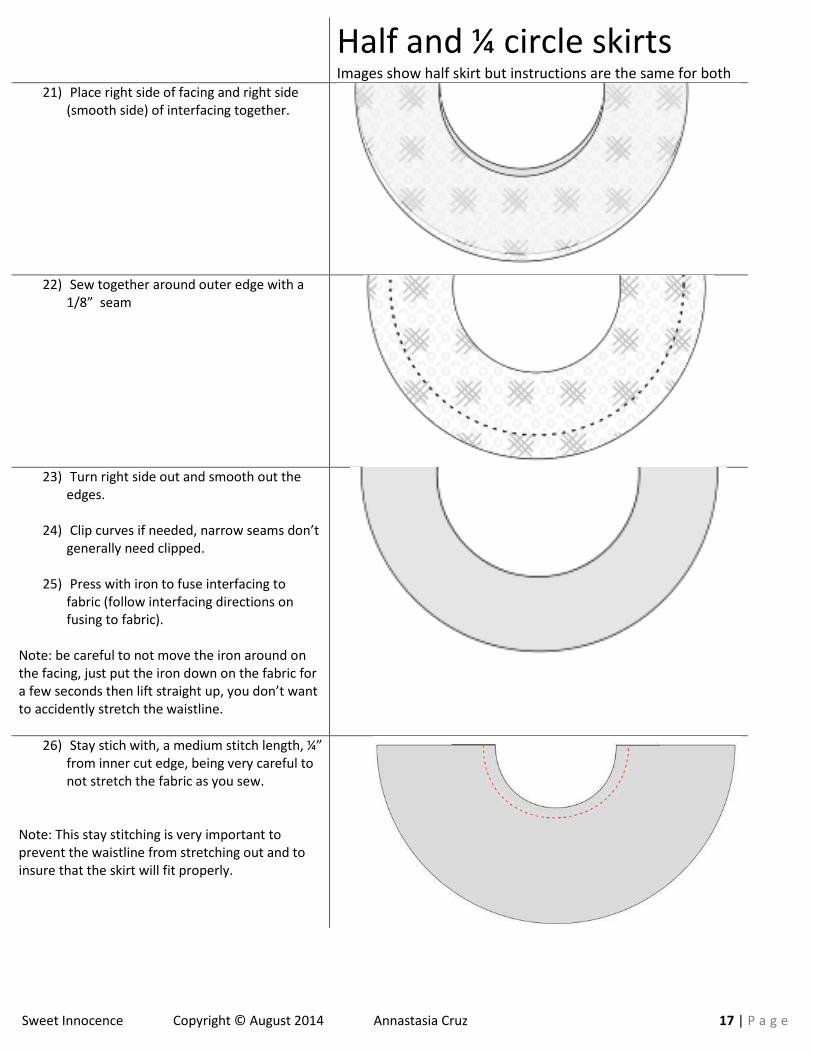
Half and ¼ circle skirts Images show half skirt but instructions are the same for both
21) Place right side of facing and right side (smooth side) of interfacing together.
22) Sew together around outer edge with a
1/8” seam
23) Turn right side out and smooth out the
edges.
24) Clip curves if needed, narrow seams don’t generally need clipped.
25) Press with iron to fuse interfacing to
fabric (follow interfacing directions on fusing to fabric).
Note: be careful to not move the iron around on the facing, just put the iron down on the fabric for a few seconds then lift straight up, you don’t want to accidently stretch the waistline.
26) Stay stich with, a medium stitch length, ¼” from inner cut edge, being very careful to not stretch the fabric as you sew.
Note: This stay stitching is very important to prevent the waistline from stretching out and to insure that the skirt will fit properly.
Sweet Innocence Copyright © August 2014 Annastasia Cruz 18 | P a g e
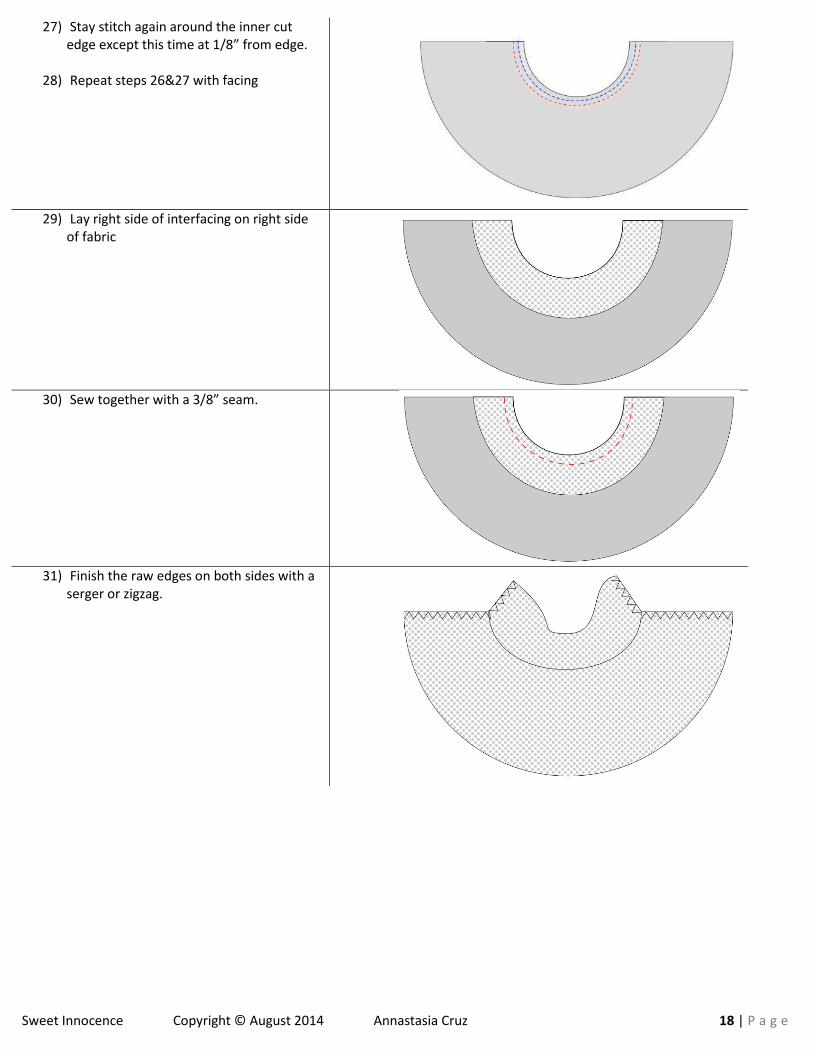
27) Stay stitch again around the inner cut edge except this time at 1/8” from edge.
28) Repeat steps 26&27 with facing
29) Lay right side of interfacing on right side
of fabric
30) Sew together with a 3/8” seam.
31) Finish the raw edges on both sides with a
serger or zigzag.
Sweet Innocence Copyright © August 2014 Annastasia Cruz 19 | P a g e
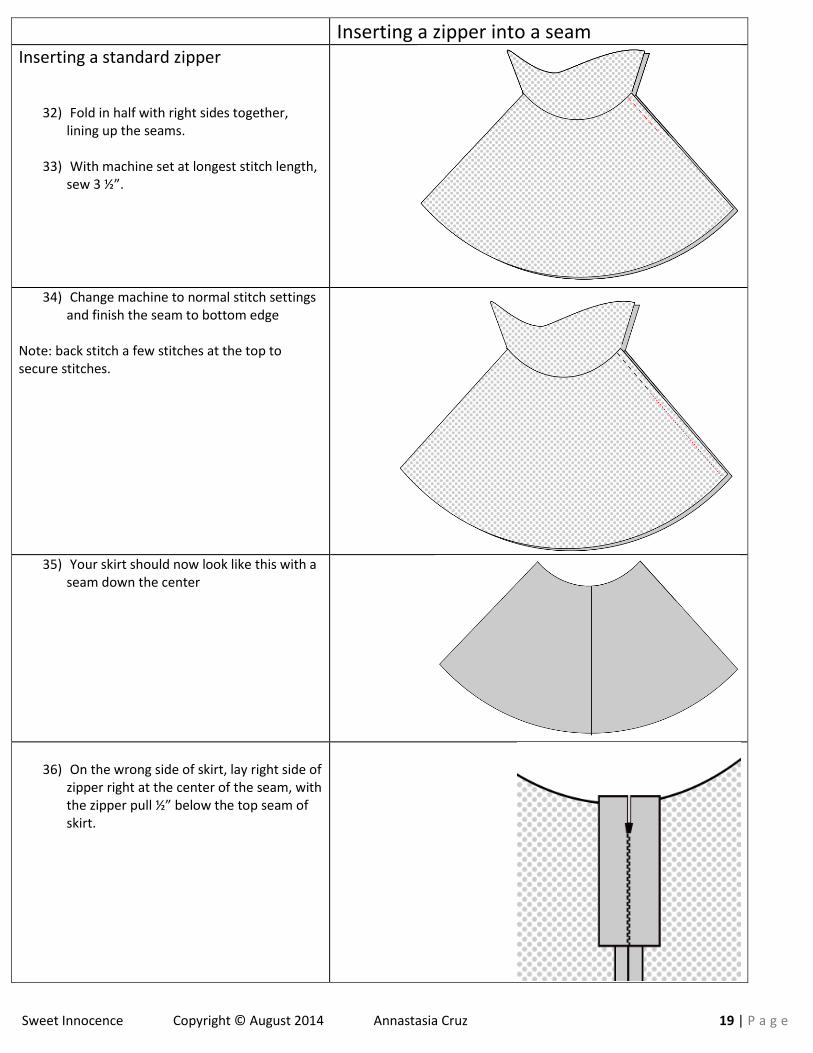
Inserting a zipper into a seam Inserting a standard zipper
32) Fold in half with right sides together, lining up the seams.
33) With machine set at longest stitch length,
sew 3 ½”.
34) Change machine to normal stitch settings
and finish the seam to bottom edge Note: back stitch a few stitches at the top to secure stitches.
35) Your skirt should now look like this with a
seam down the center
36) On the wrong side of skirt, lay right side of zipper right at the center of the seam, with the zipper pull ½” below the top seam of skirt.
Sweet Innocence Copyright © August 2014 Annastasia Cruz 20 | P a g e
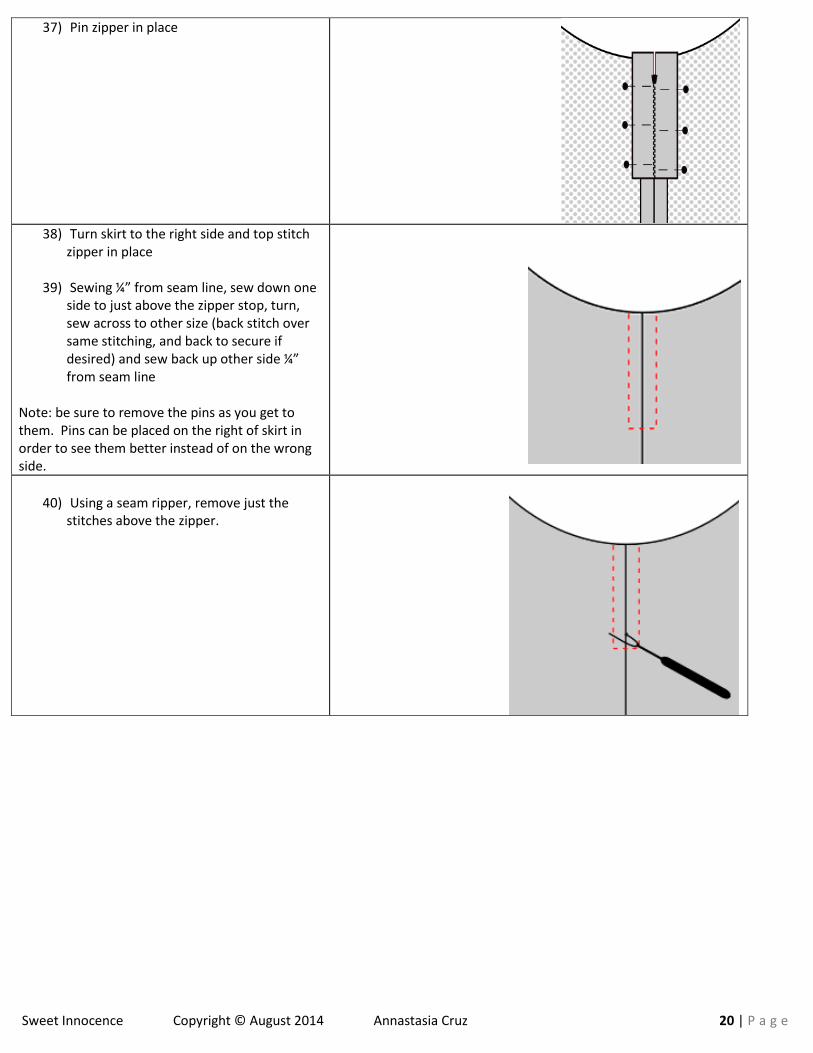
37) Pin zipper in place
38) Turn skirt to the right side and top stitch
zipper in place
39) Sewing ¼” from seam line, sew down one side to just above the zipper stop, turn, sew across to other size (back stitch over same stitching, and back to secure if desired) and sew back up other side ¼” from seam line
Note: be sure to remove the pins as you get to them. Pins can be placed on the right of skirt in order to see them better instead of on the wrong side.
40) Using a seam ripper, remove just the
stitches above the zipper.
Sweet Innocence Copyright © August 2014 Annastasia Cruz 21 | P a g e
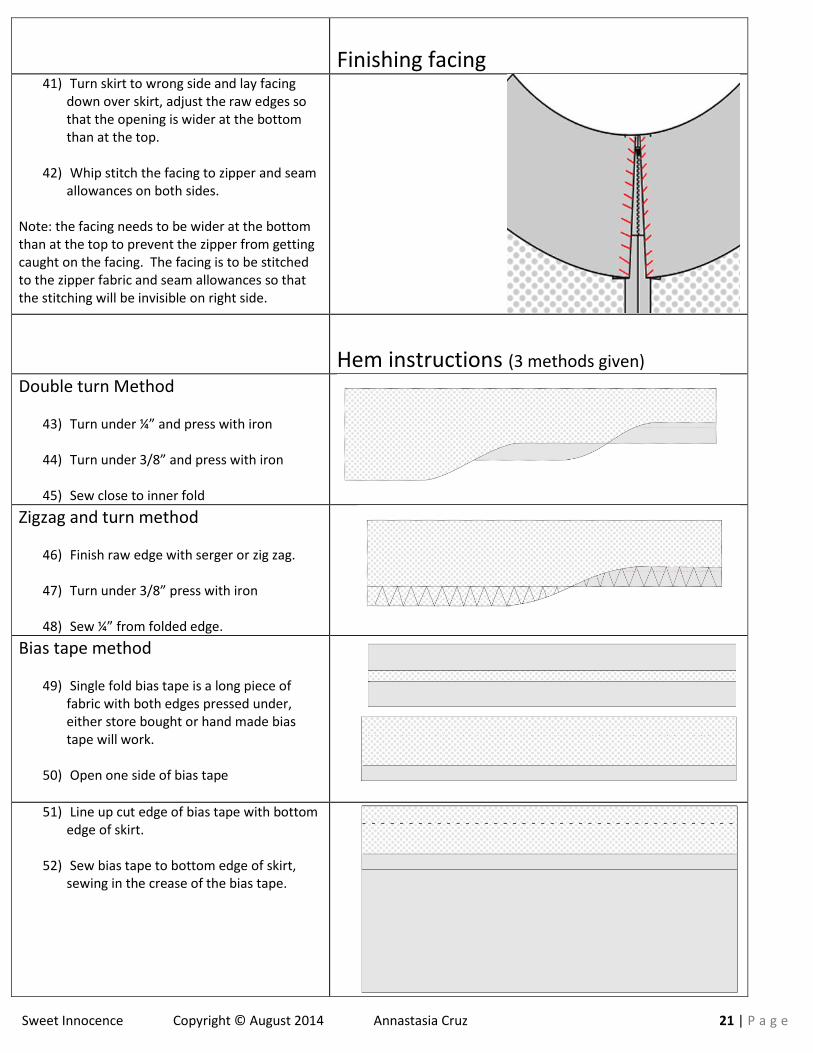
Finishing facing
41) Turn skirt to wrong side and lay facing down over skirt, adjust the raw edges so that the opening is wider at the bottom than at the top.
42) Whip stitch the facing to zipper and seam
allowances on both sides. Note: the facing needs to be wider at the bottom than at the top to prevent the zipper from getting caught on the facing. The facing is to be stitched to the zipper fabric and seam allowances so that the stitching will be invisible on right side.
Hem instructions (3 methods given)
Double turn Method
43) Turn under ¼” and press with iron
44) Turn under 3/8” and press with iron
45) Sew close to inner fold
Zigzag and turn method
46) Finish raw edge with serger or zig zag.
47) Turn under 3/8” press with iron
48) Sew ¼” from folded edge.
Bias tape method
49) Single fold bias tape is a long piece of fabric with both edges pressed under, either store bought or hand made bias tape will work.
50) Open one side of bias tape
51) Line up cut edge of bias tape with bottom edge of skirt.
52) Sew bias tape to bottom edge of skirt,
sewing in the crease of the bias tape.
Sweet Innocence Copyright © August 2014 Annastasia Cruz 22 | P a g e
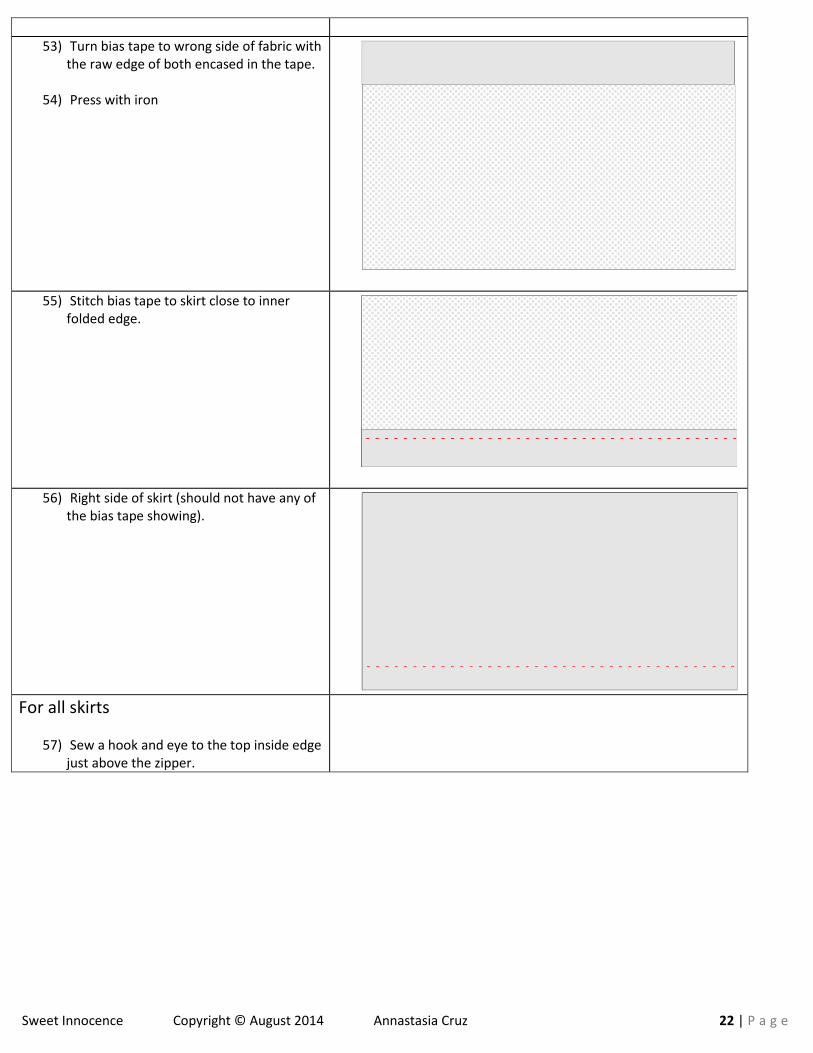
53) Turn bias tape to wrong side of fabric with the raw edge of both encased in the tape.
54) Press with iron
55) Stitch bias tape to skirt close to inner folded edge.
56) Right side of skirt (should not have any of the bias tape showing).
For all skirts
57) Sew a hook and eye to the top inside edge just above the zipper.
Sweet Innocence Copyright © August 2014 Annastasia Cruz 23 | P a g e
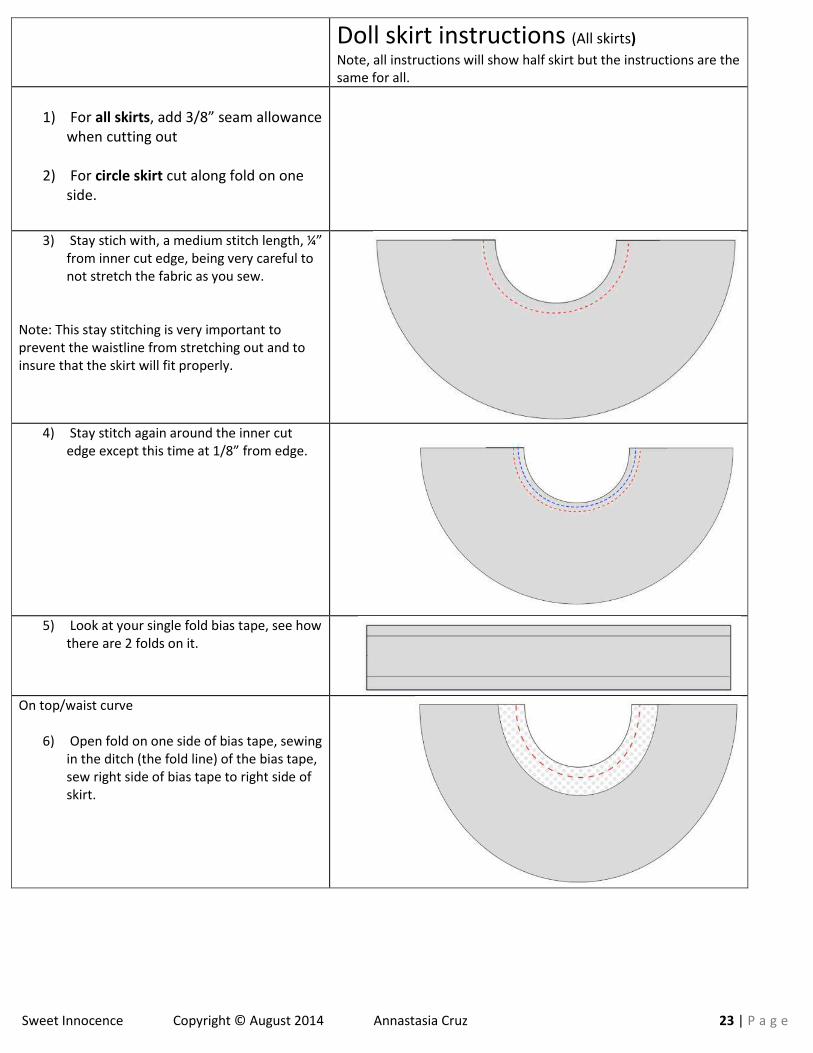
Doll skirt instructions (All skirts)
Note, all instructions will show half skirt but the instructions are the same for all.
1) For all skirts, add 3/8” seam allowance
when cutting out
2) For circle skirt cut along fold on one side.
3) Stay stich with, a medium stitch length, ¼” from inner cut edge, being very careful to not stretch the fabric as you sew.
Note: This stay stitching is very important to prevent the waistline from stretching out and to insure that the skirt will fit properly.
4) Stay stitch again around the inner cut
edge except this time at 1/8” from edge.
5) Look at your single fold bias tape, see how
there are 2 folds on it.
On top/waist curve
6) Open fold on one side of bias tape, sewing in the ditch (the fold line) of the bias tape, sew right side of bias tape to right side of skirt.
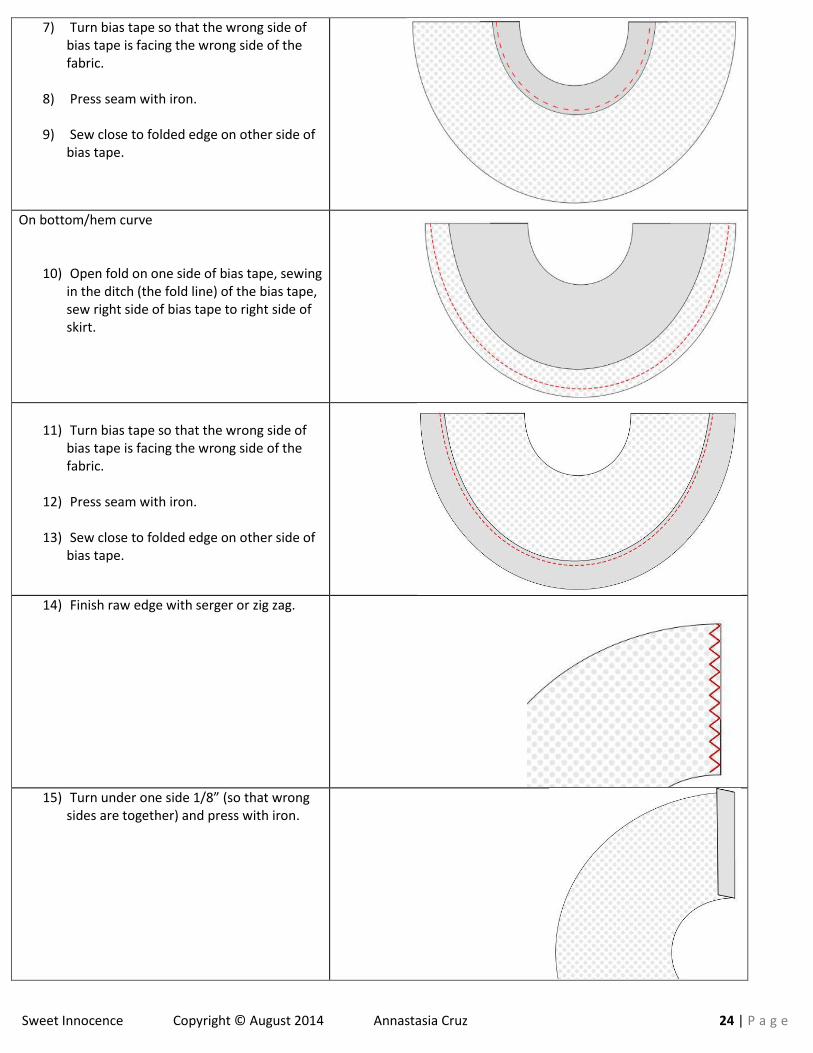
Sweet Innocence Copyright © August 2014 Annastasia Cruz 24 | P a g e
7) Turn bias tape so that the wrong side of bias tape is facing the wrong side of the fabric.
8) Press seam with iron.
9) Sew close to folded edge on other side of
bias tape.
On bottom/hem curve
10) Open fold on one side of bias tape, sewing in the ditch (the fold line) of the bias tape, sew right side of bias tape to right side of skirt.
11) Turn bias tape so that the wrong side of bias tape is facing the wrong side of the fabric.
12) Press seam with iron.
13) Sew close to folded edge on other side of
bias tape.
14) Finish raw edge with serger or zig zag.
15) Turn under one side 1/8” (so that wrong
sides are together) and press with iron.
Sweet Innocence Copyright © August 2014 Annastasia Cruz 25 | P a g e
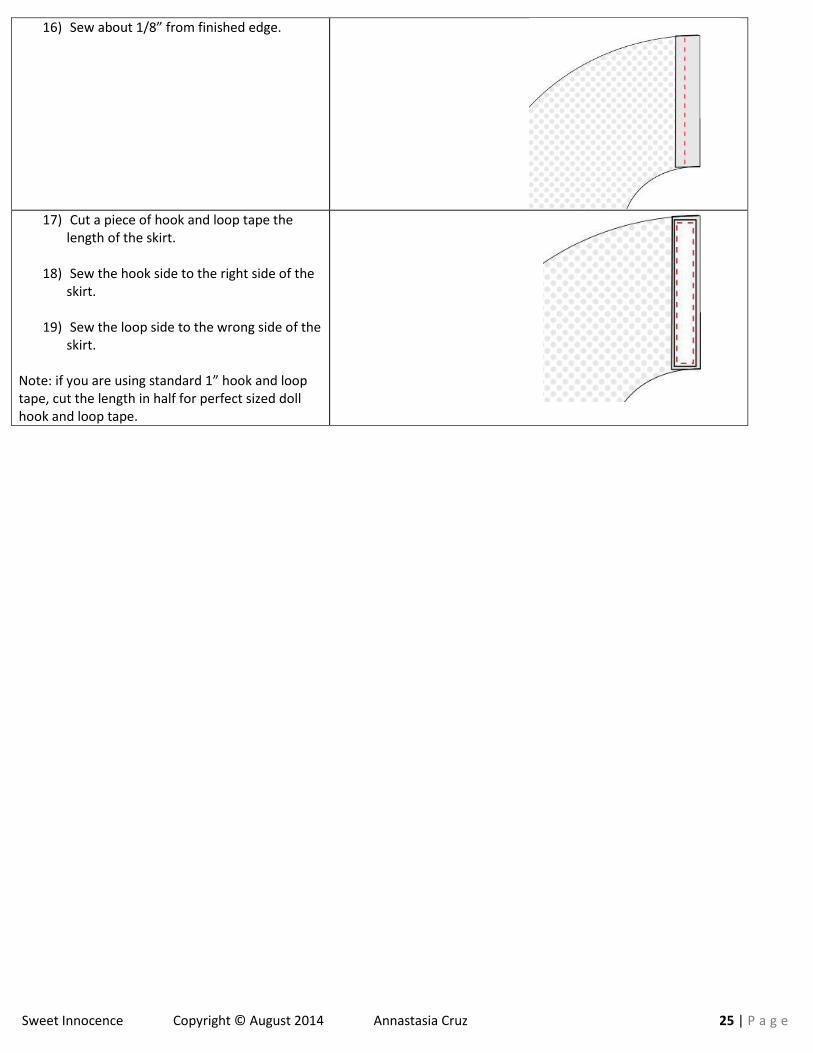
16) Sew about 1/8” from finished edge.
17) Cut a piece of hook and loop tape the
length of the skirt.
18) Sew the hook side to the right side of the skirt.
19) Sew the loop side to the wrong side of the
skirt. Note: if you are using standard 1” hook and loop tape, cut the length in half for perfect sized doll hook and loop tape.
Sweet Innocence Copyright © August 2014 Annastasia Cruz 26 | P a g e
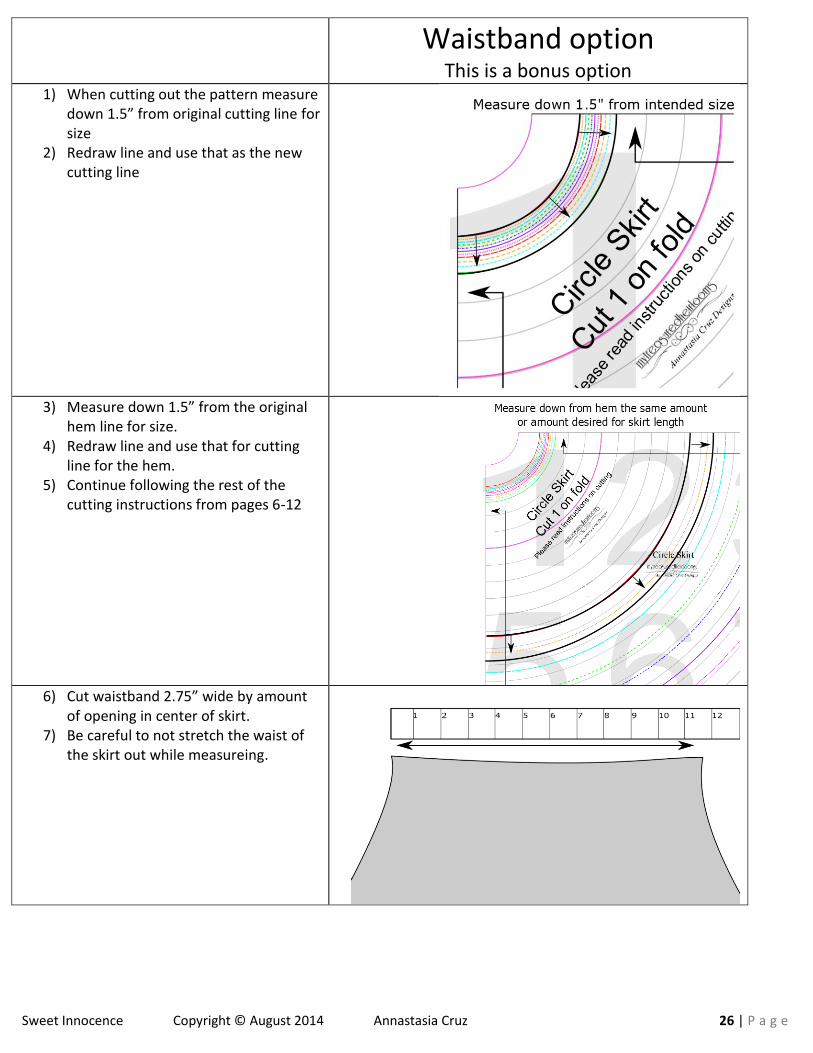
Waistband option
This is a bonus option
1) When cutting out the pattern measure down 1.5” from original cutting line for size
2) Redraw line and use that as the new cutting line
3) Measure down 1.5” from the original
hem line for size. 4) Redraw line and use that for cutting
line for the hem. 5) Continue following the rest of the
cutting instructions from pages 6-12
6) Cut waistband 2.75” wide by amount
of opening in center of skirt. 7) Be careful to not stretch the waist of
the skirt out while measureing.
Sweet Innocence Copyright © August 2014 Annastasia Cruz 27 | P a g e
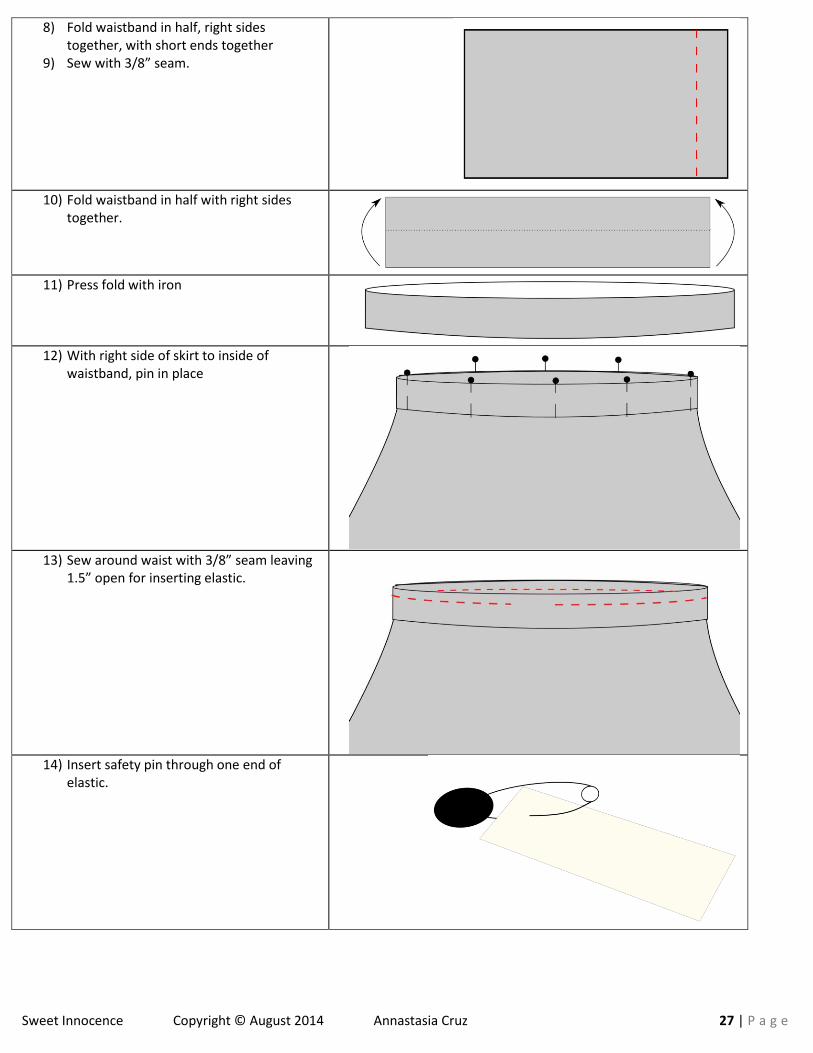
8) Fold waistband in half, right sides together, with short ends together
9) Sew with 3/8” seam.
10) Fold waistband in half with right sides
together.
11) Press fold with iron
12) With right side of skirt to inside of
waistband, pin in place
13) Sew around waist with 3/8” seam leaving
1.5” open for inserting elastic.
14) Insert safety pin through one end of
elastic.
Sweet Innocence Copyright © August 2014 Annastasia Cruz 28 | P a g e
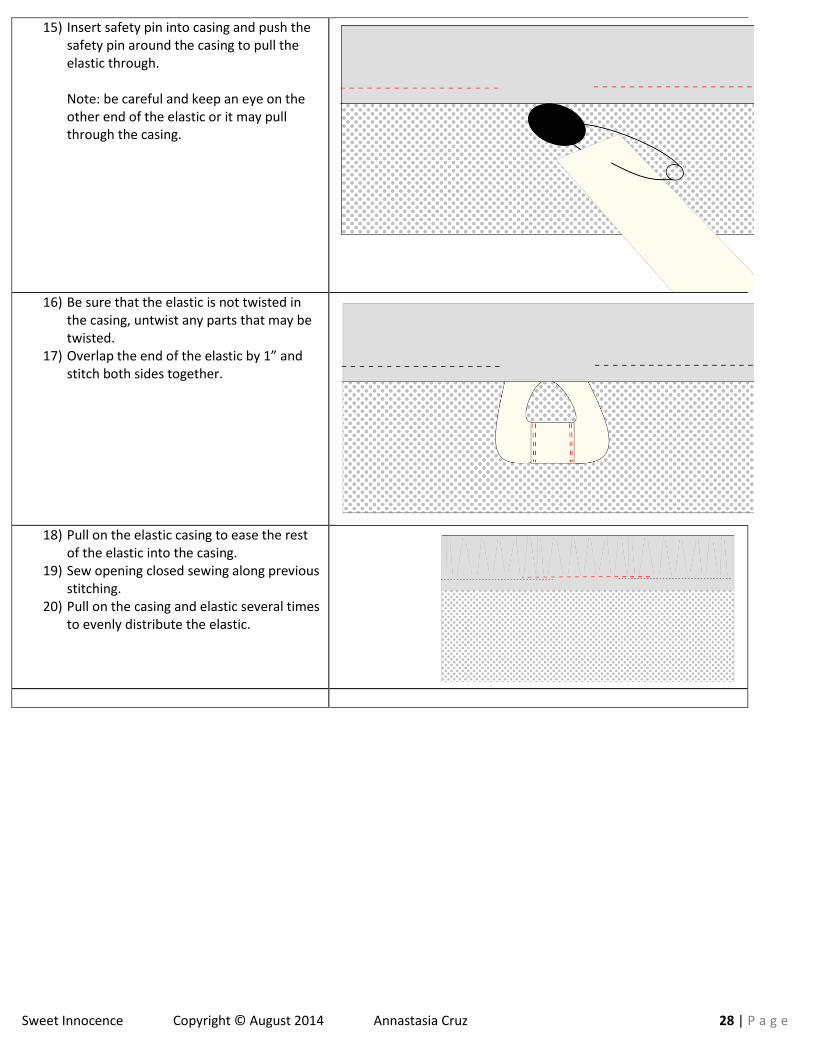
15) Insert safety pin into casing and push the safety pin around the casing to pull the elastic through. Note: be careful and keep an eye on the other end of the elastic or it may pull through the casing.
16) Be sure that the elastic is not twisted in
the casing, untwist any parts that may be twisted.
17) Overlap the end of the elastic by 1” and stitch both sides together.
18) Pull on the elastic casing to ease the rest
of the elastic into the casing. 19) Sew opening closed sewing along previous
stitching. 20) Pull on the casing and elastic several times
to evenly distribute the elastic.
Sweet Innocence Copyright © August 2014 Annastasia Cruz 29 | P a g e
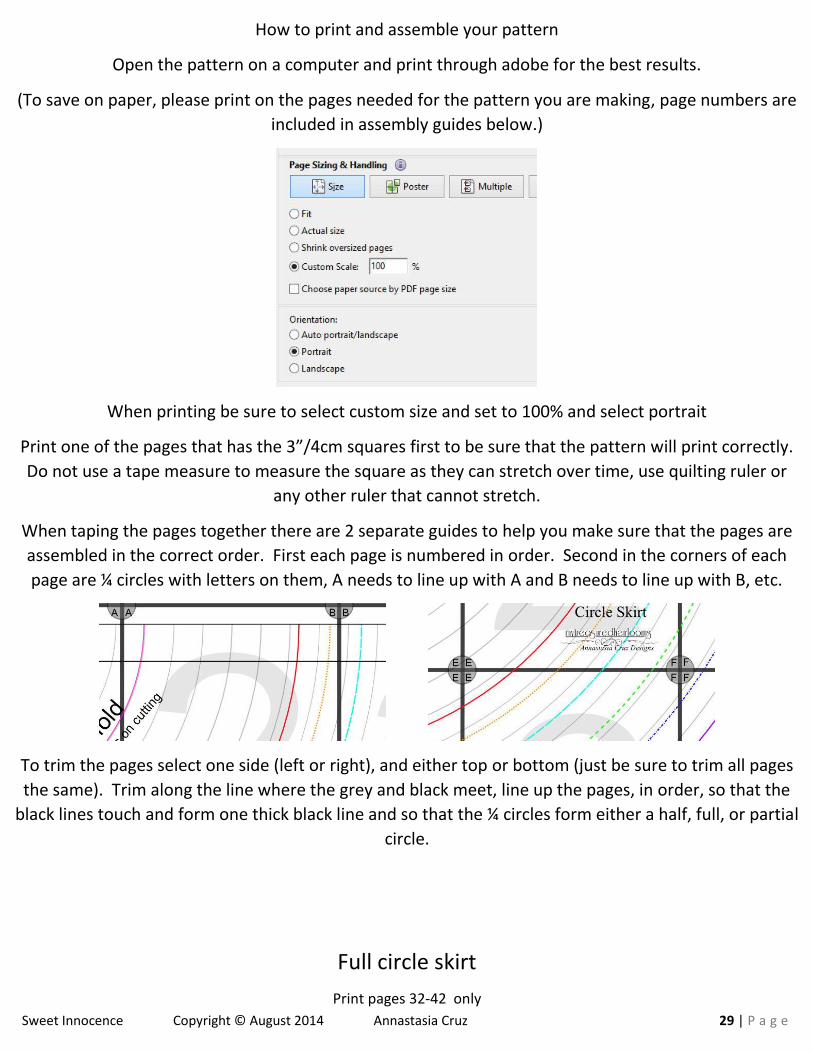
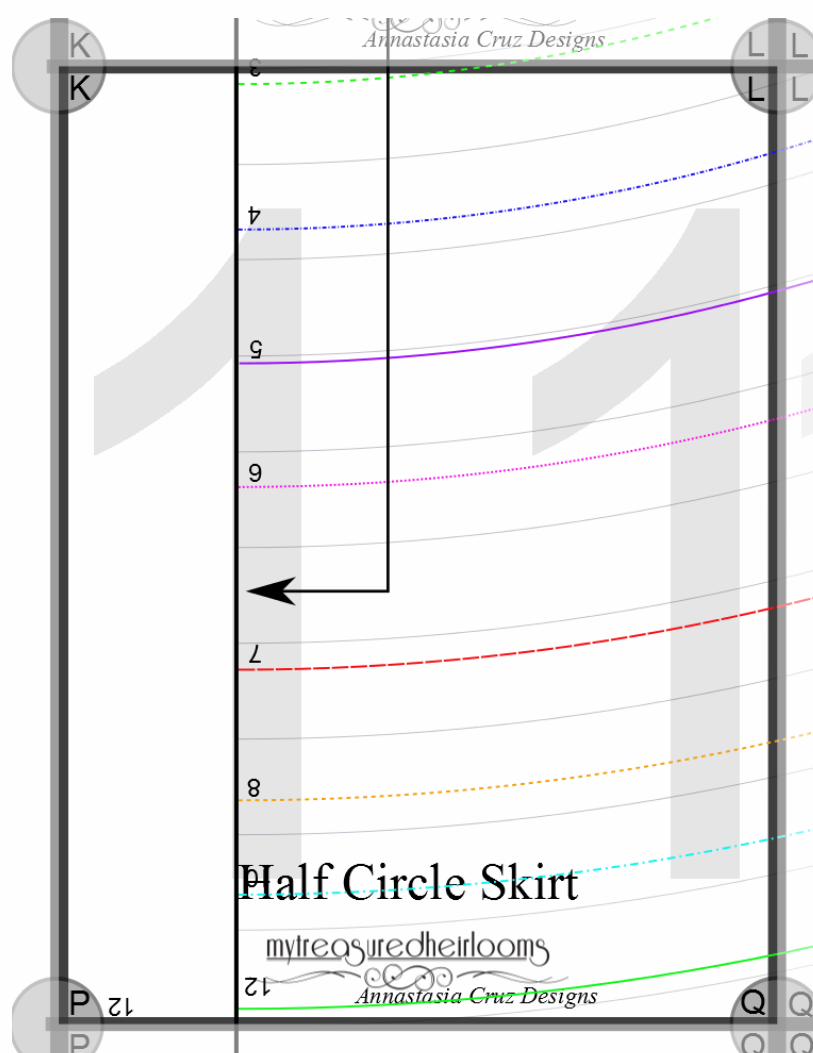
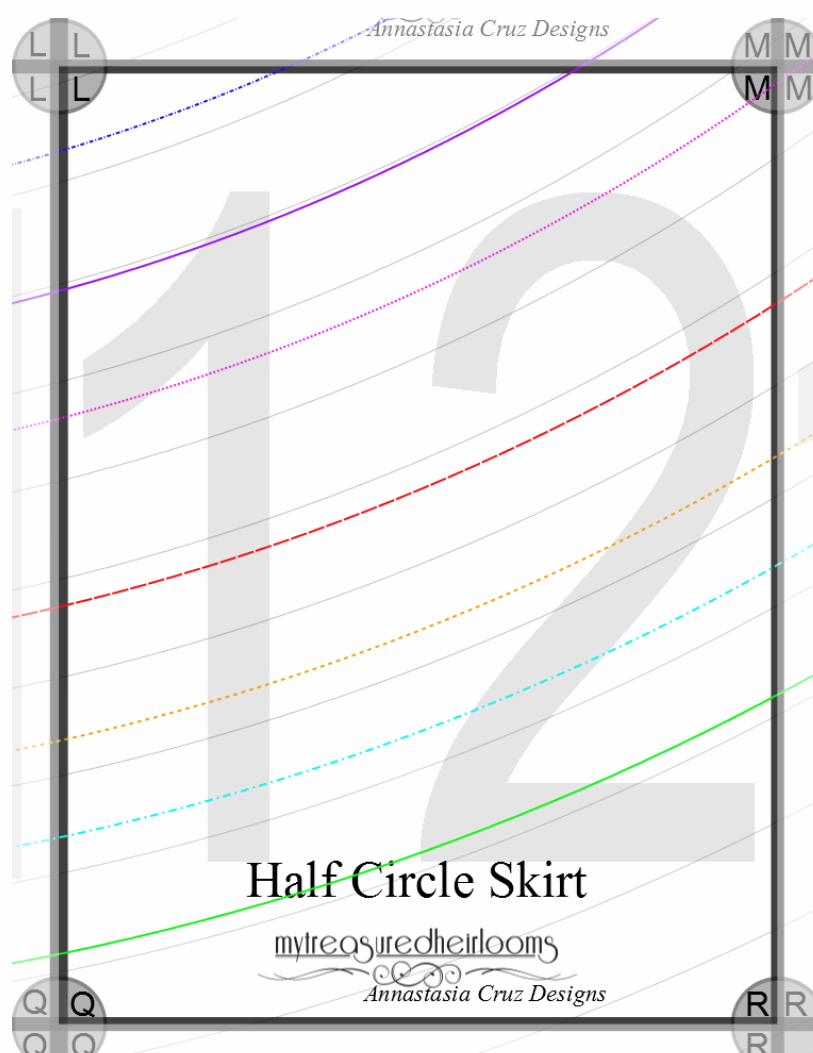
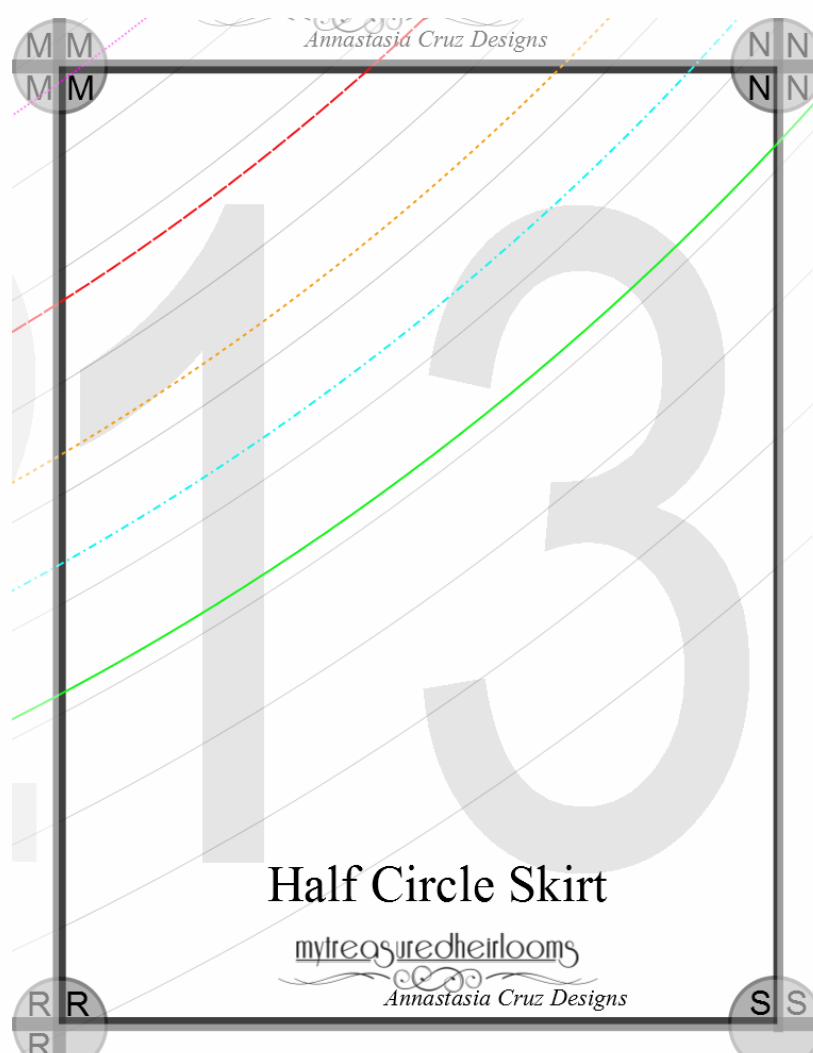
How to print and assemble your pattern
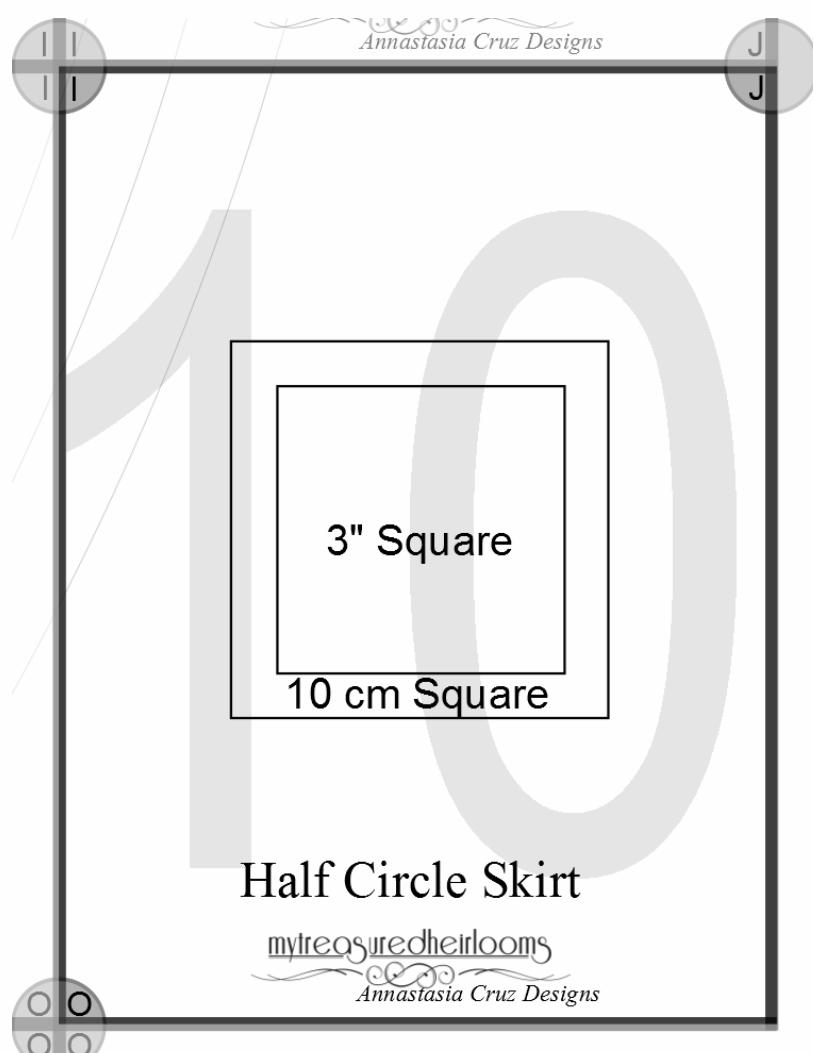
Open the pattern on a computer and print through adobe for the best results.
(To save on paper, please print on the pages needed for the pattern you are making, page numbers are
included in assembly guides below.)
When printing be sure to select custom size and set to 100% and select portrait
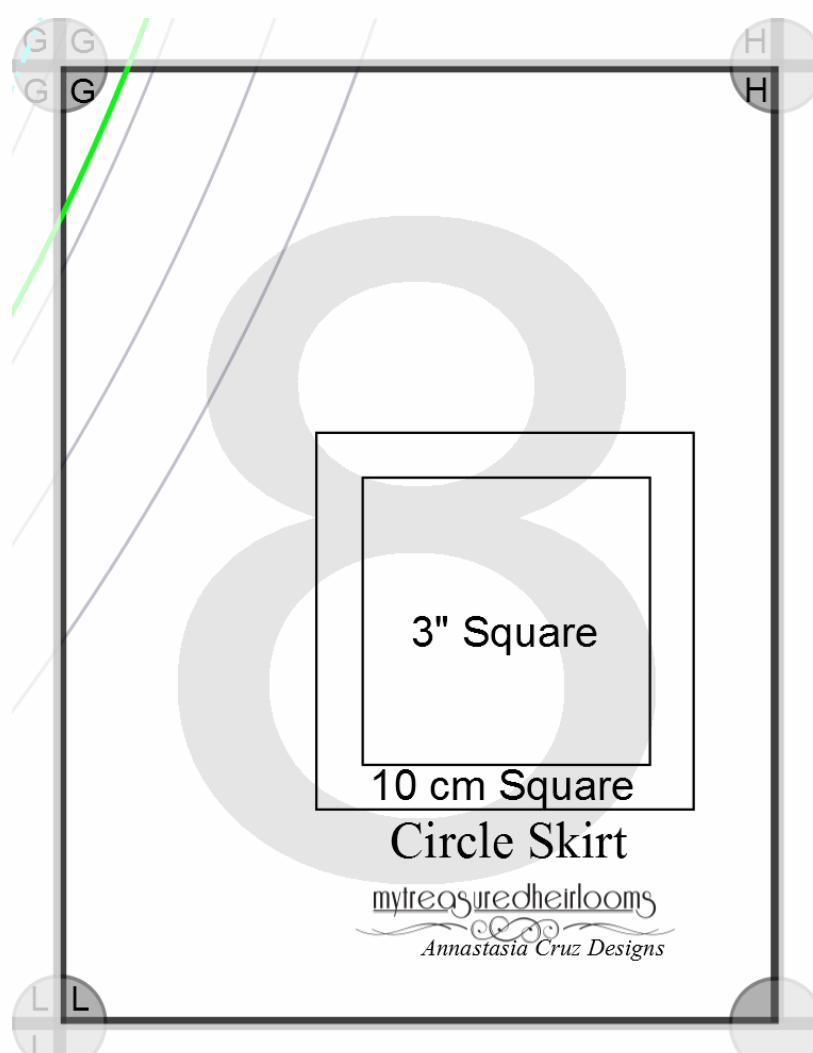
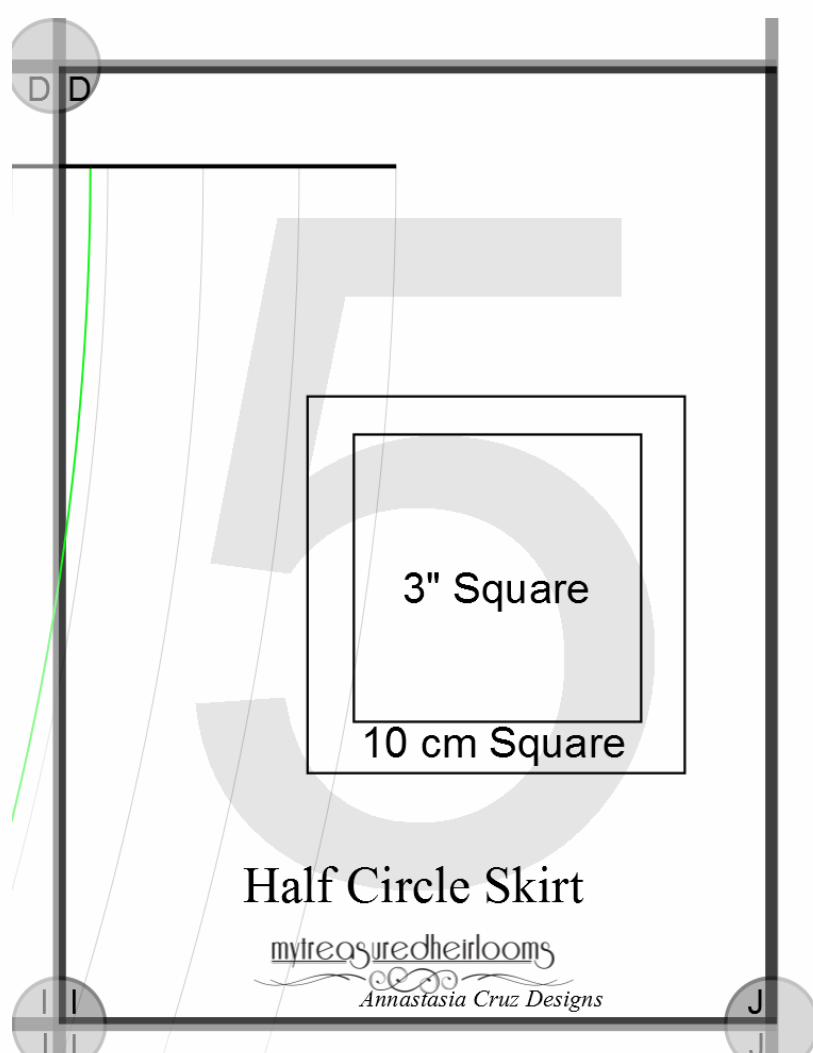
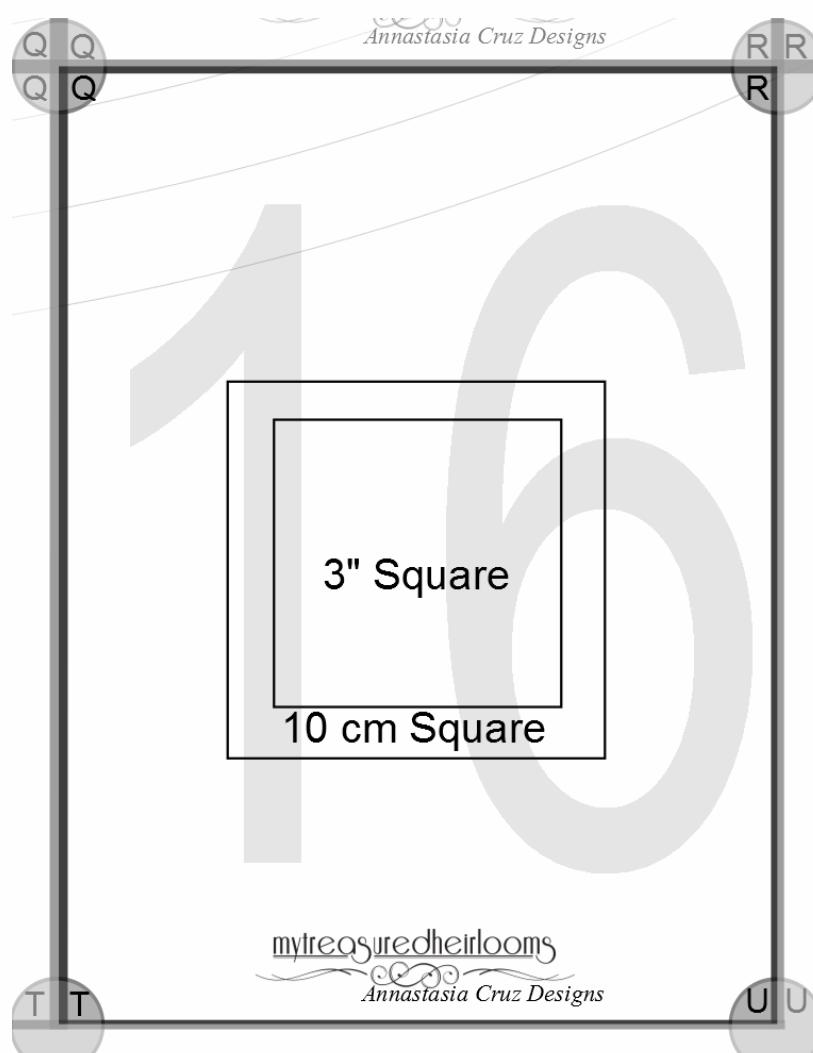
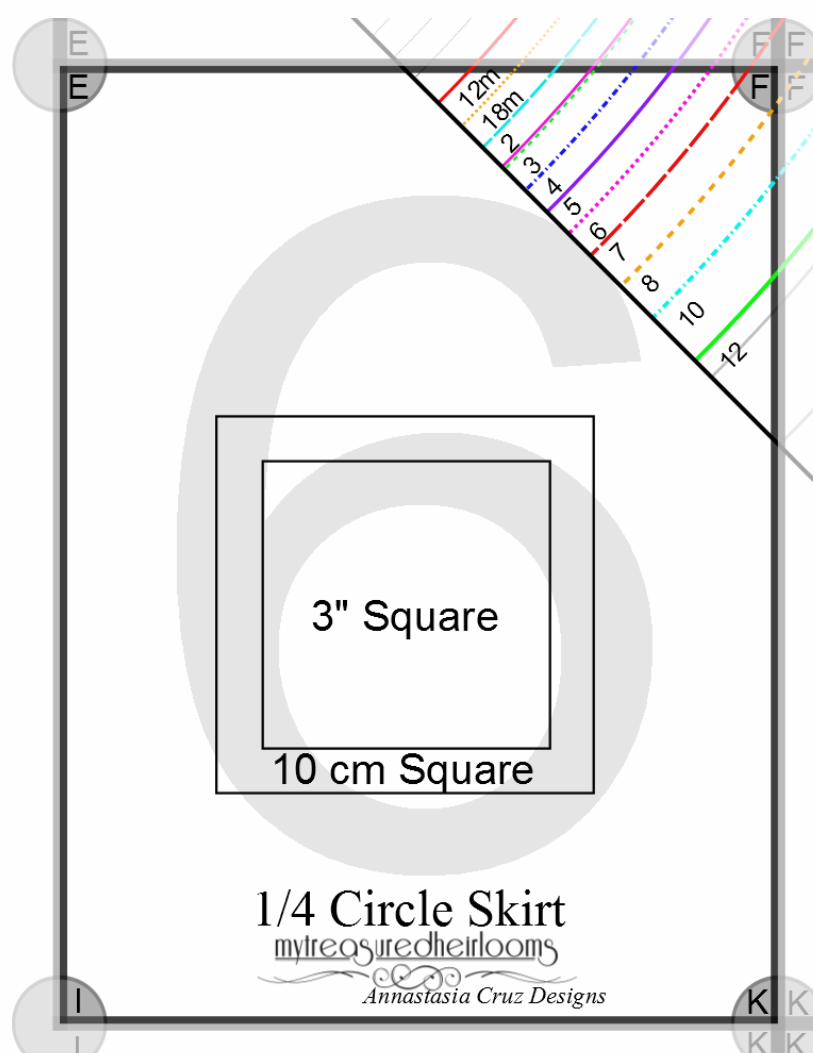
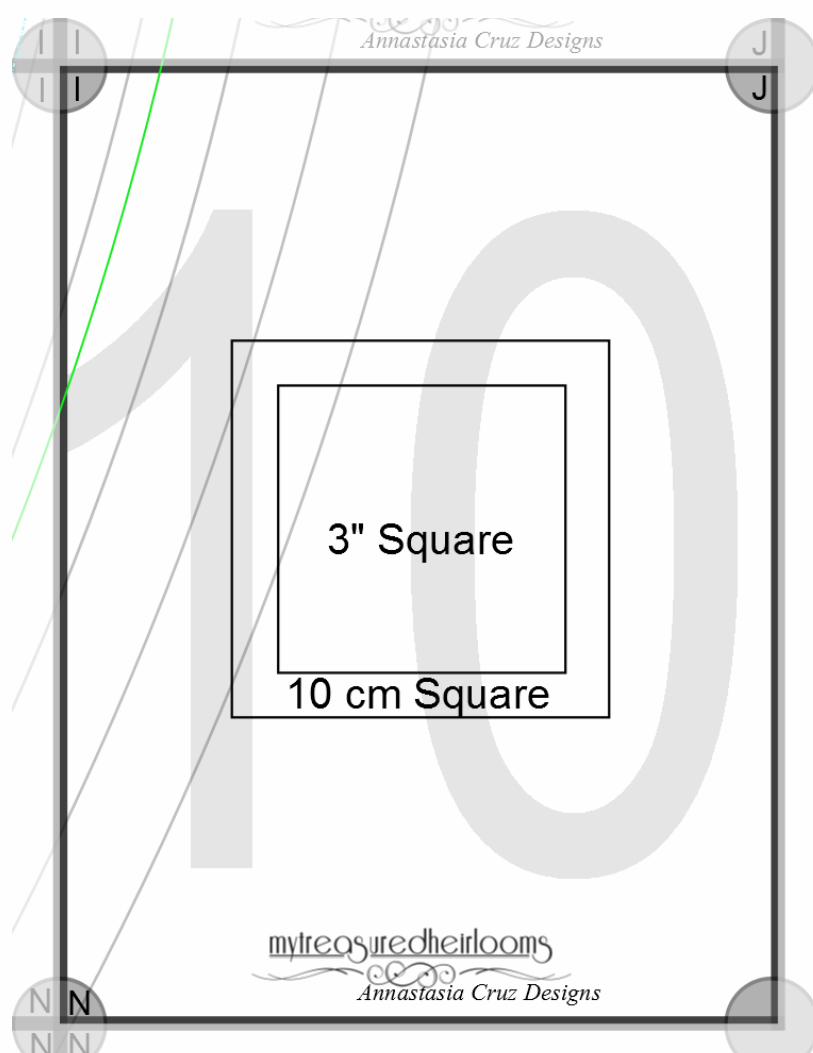
Print one of the pages that has the 3”/4cm squares first to be sure that the pattern will print correctly.
Do not use a tape measure to measure the square as they can stretch over time, use quilting ruler or
any other ruler that cannot stretch.
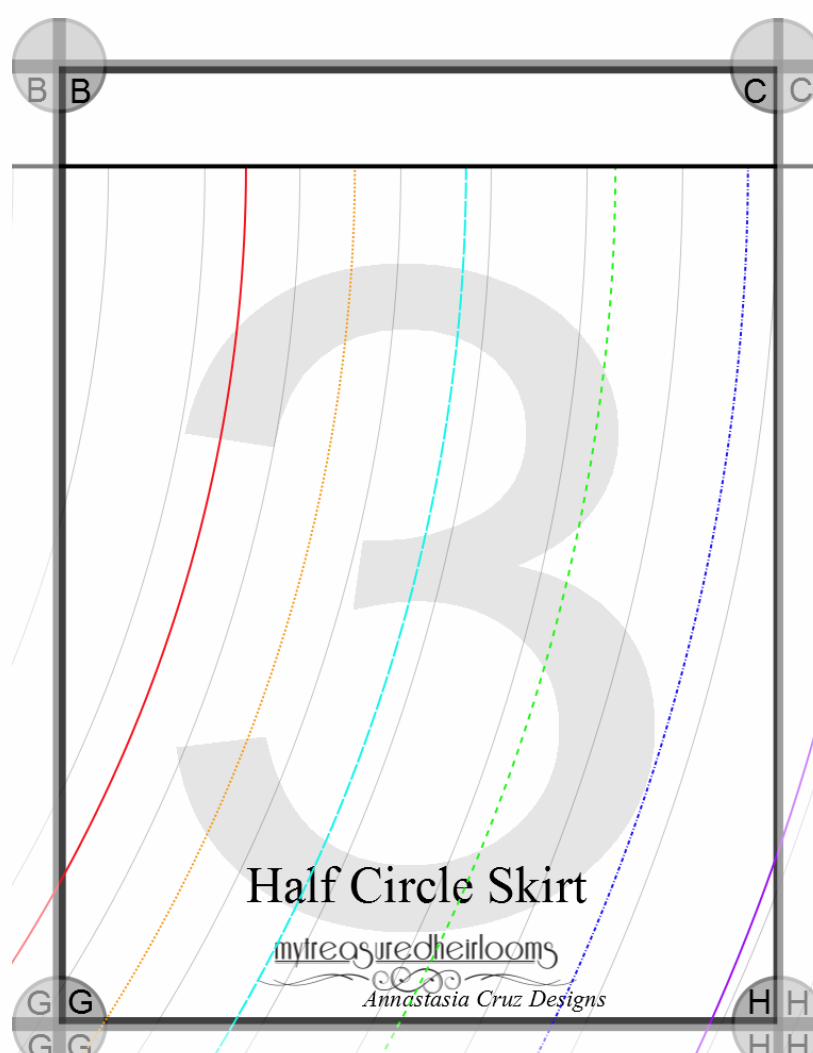
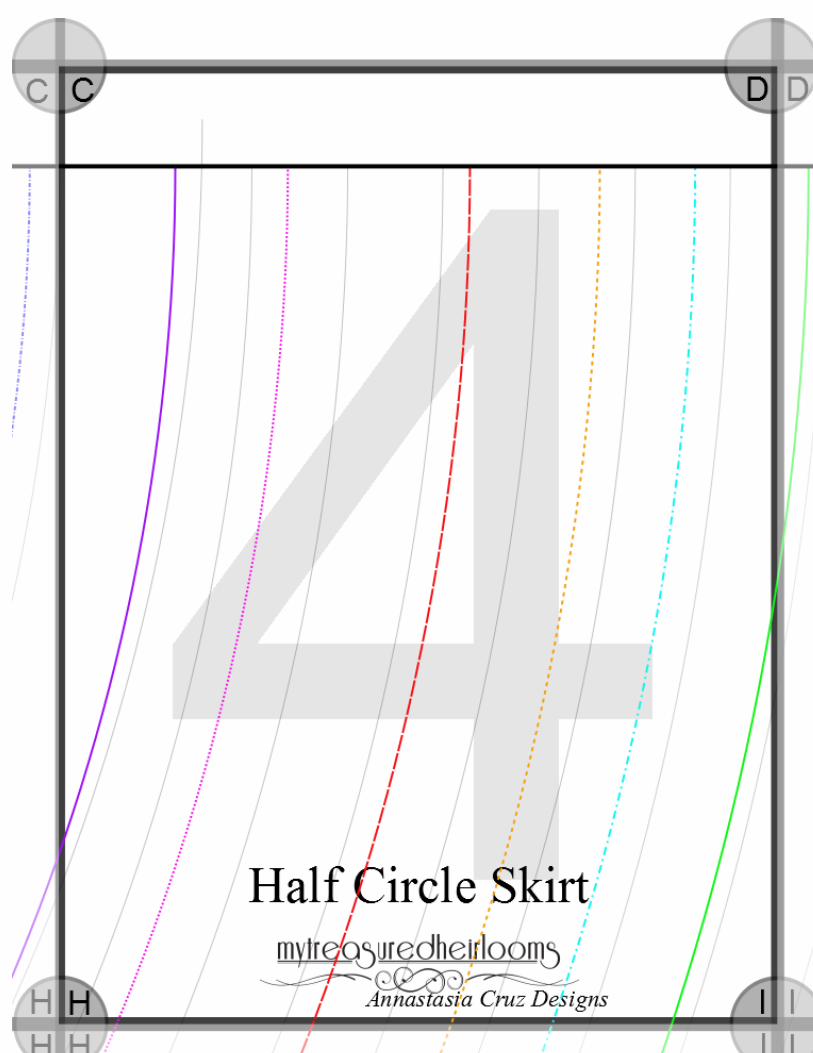
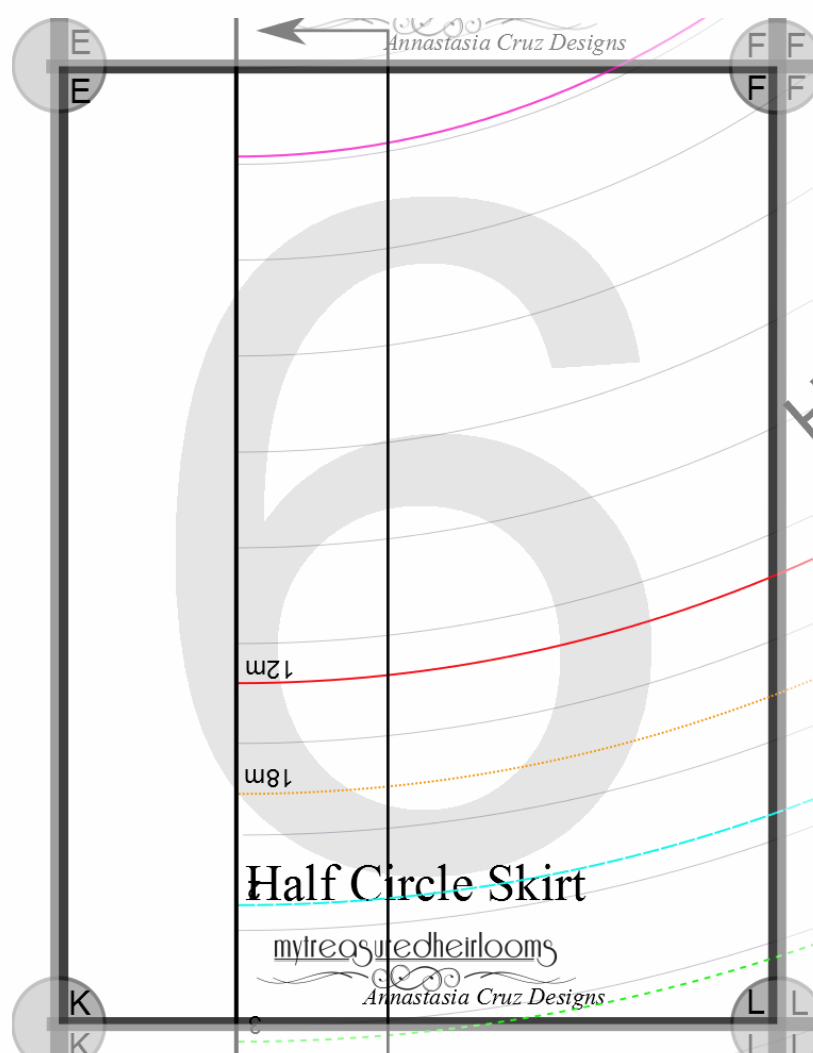
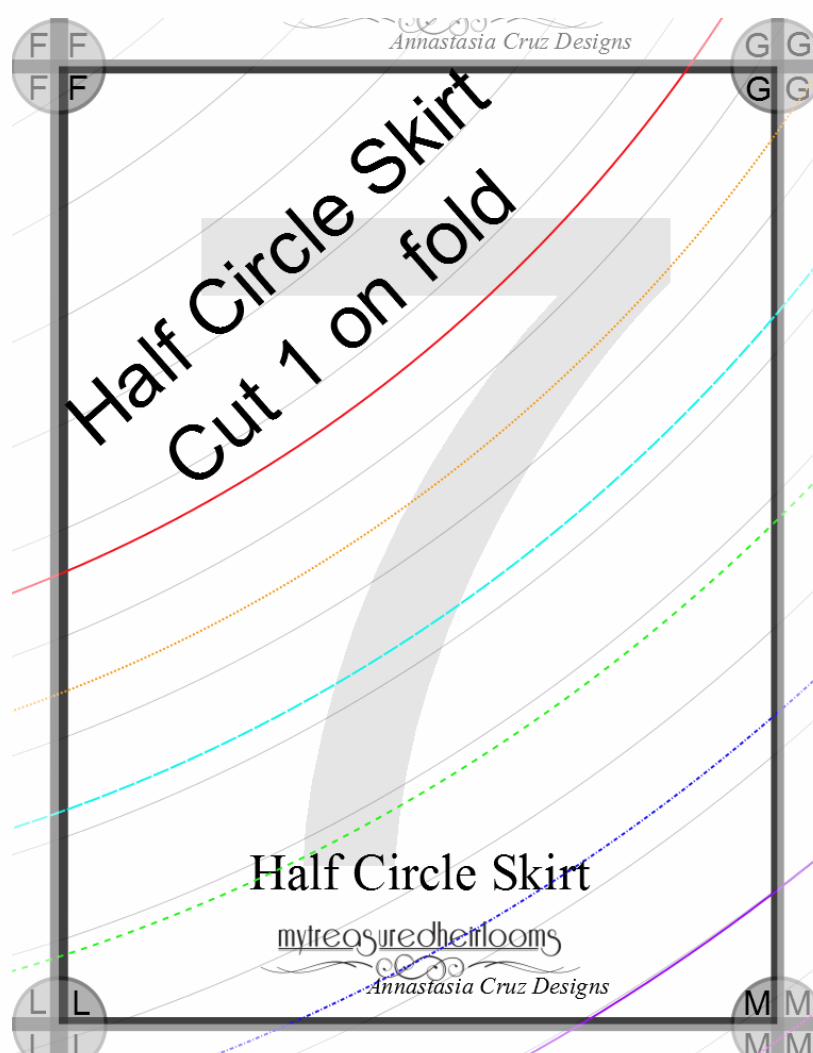
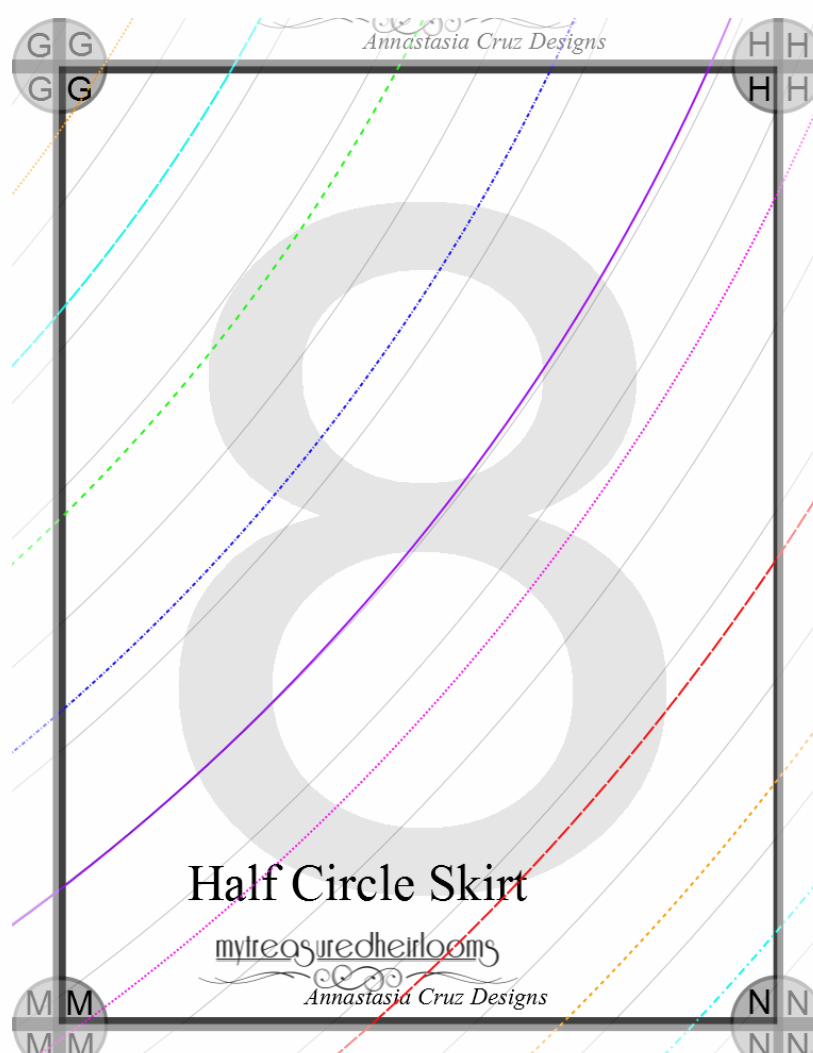
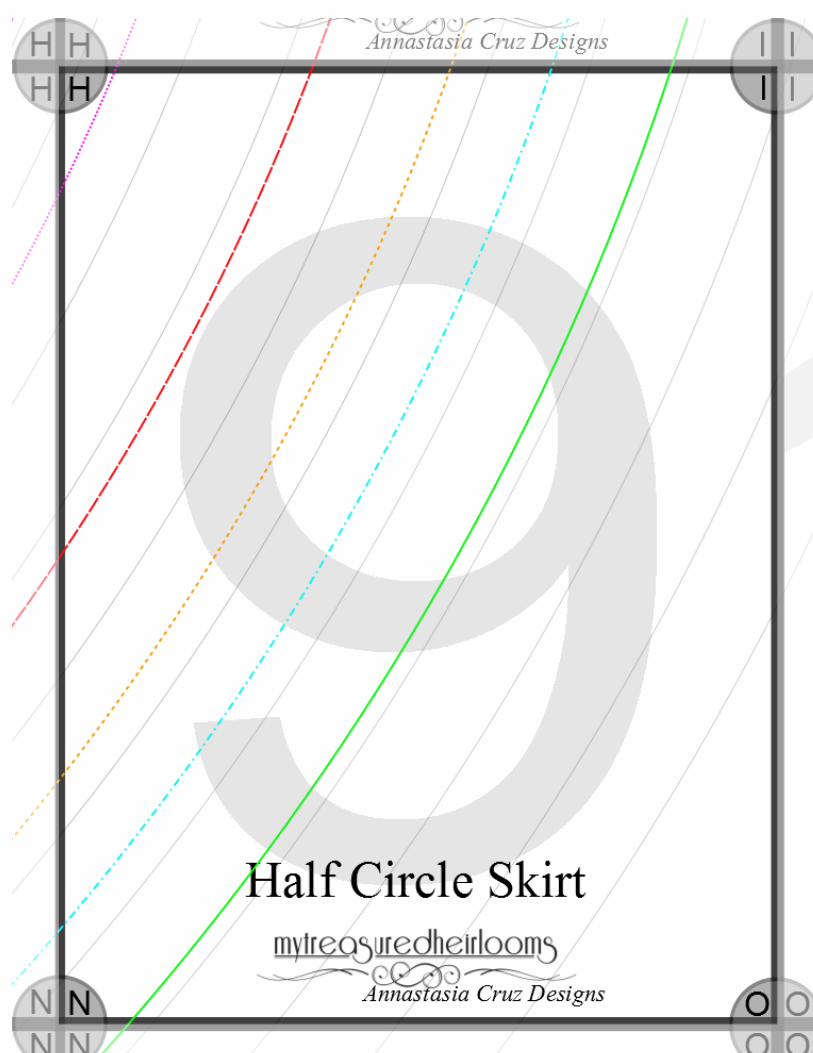
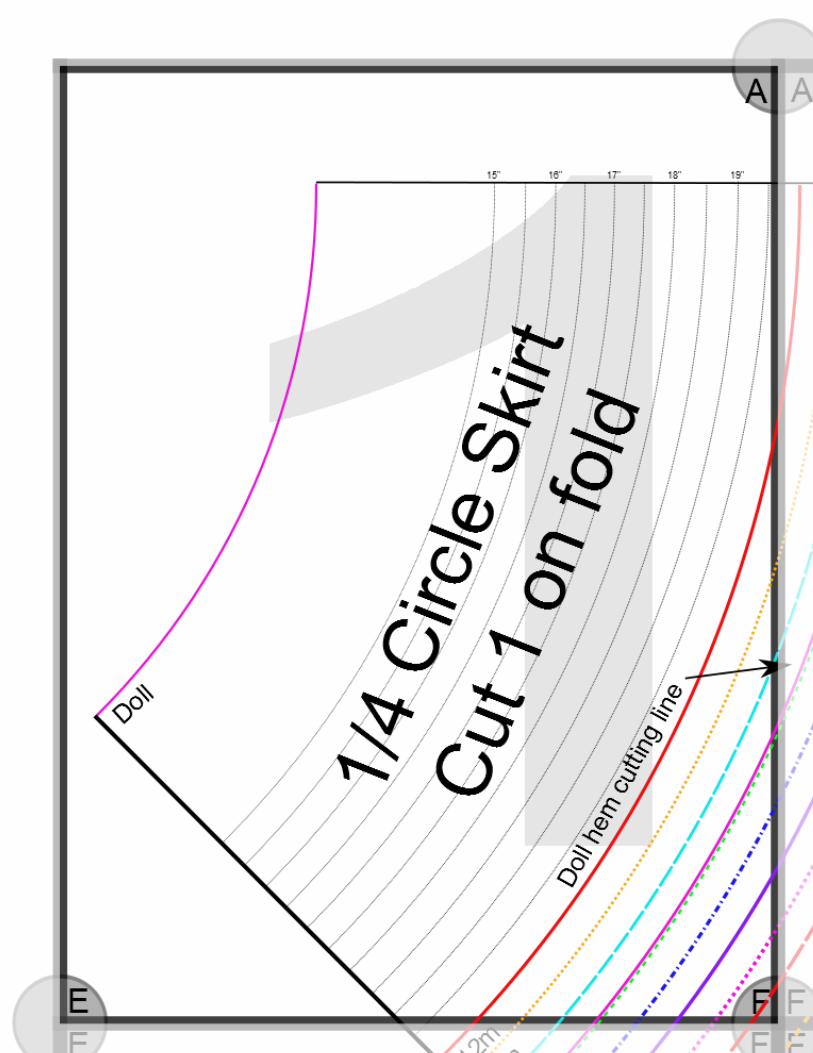
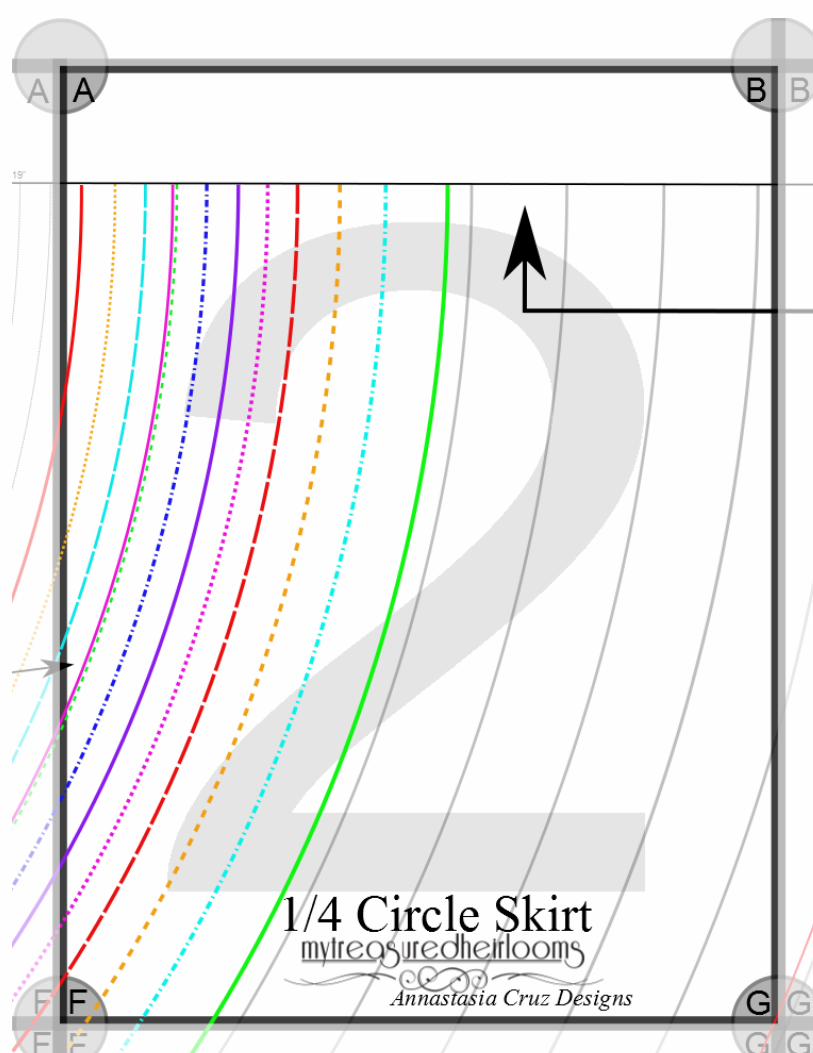
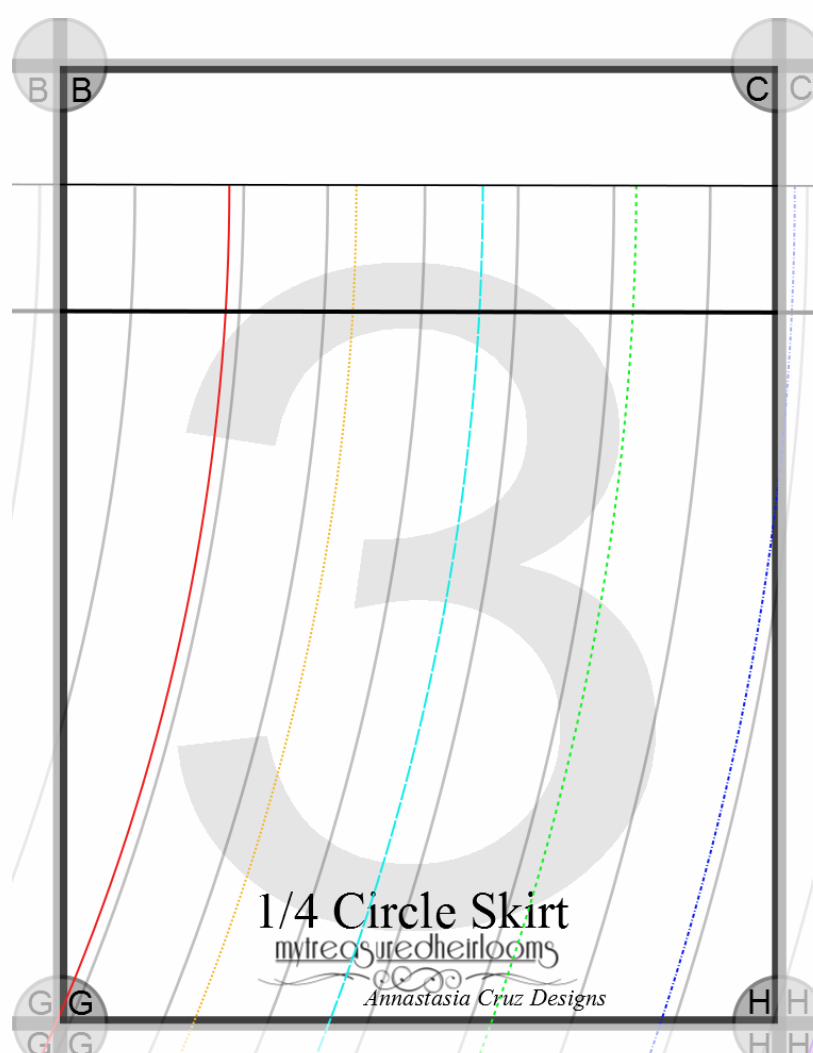
When taping the pages together there are 2 separate guides to help you make sure that the pages are
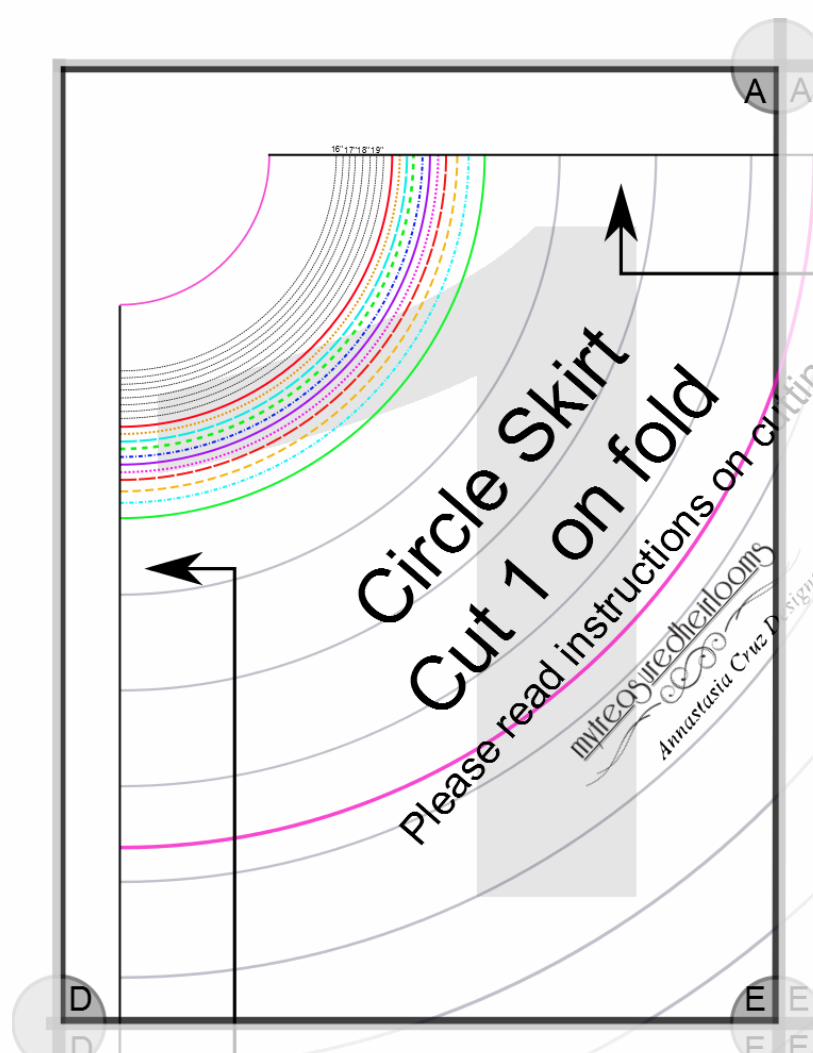
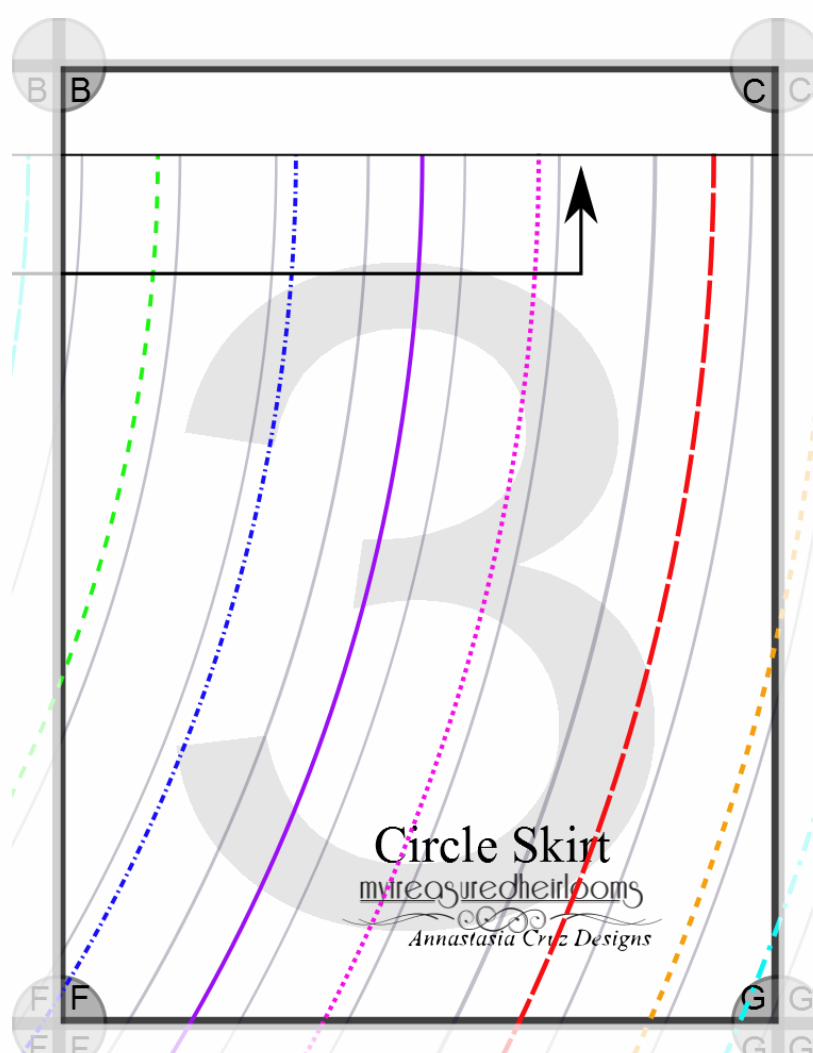
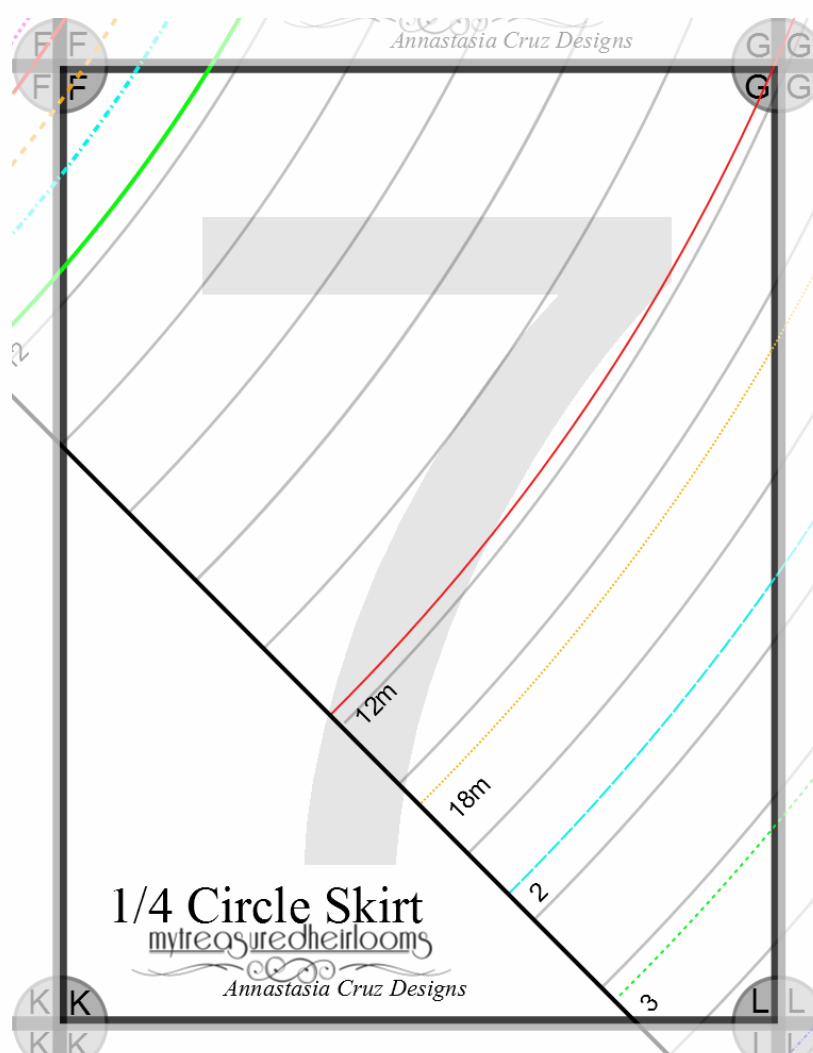
assembled in the correct order. First each page is numbered in order. Second in the corners of each
page are ¼ circles with letters on them, A needs to line up with A and B needs to line up with B, etc.
To trim the pages select one side (left or right), and either top or bottom (just be sure to trim all pages
the same). Trim along the line where the grey and black meet, line up the pages, in order, so that the
black lines touch and form one thick black line and so that the ¼ circles form either a half, full, or partial
circle.
Full circle skirt
Print pages 32-42 only
Sweet Innocence Copyright © August 2014 Annastasia Cruz 30 | P a g e
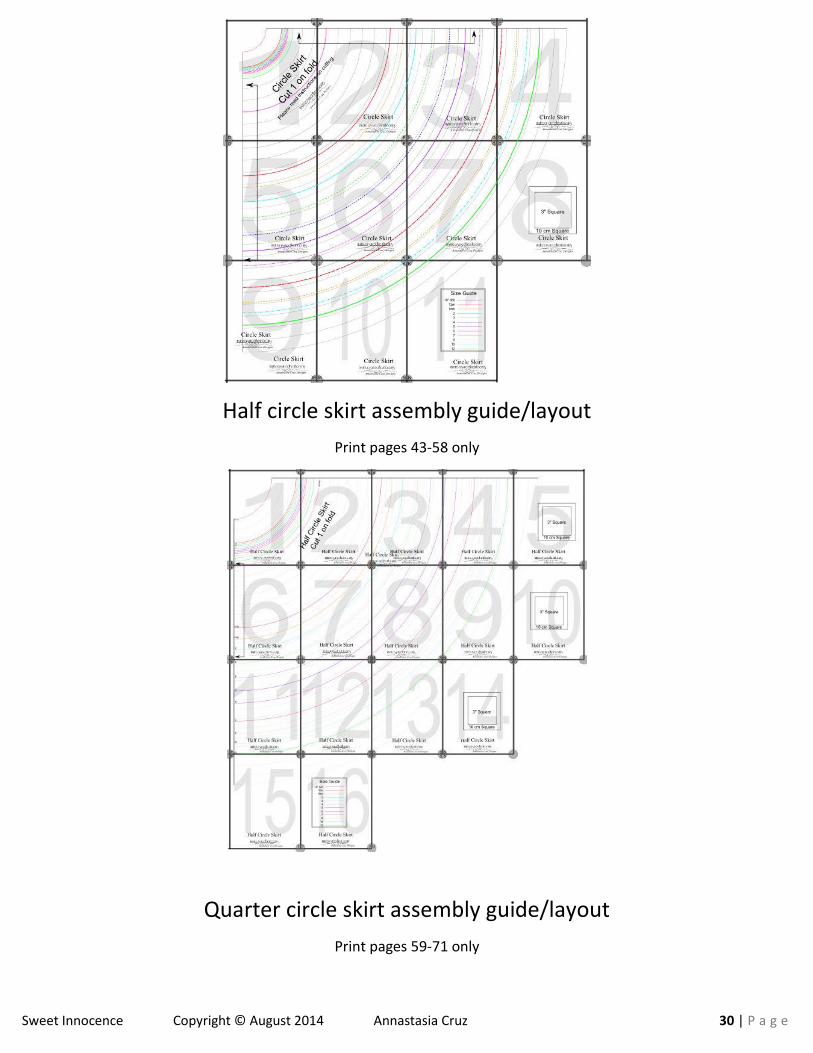
Half circle skirt assembly guide/layout
Print pages 43-58 only
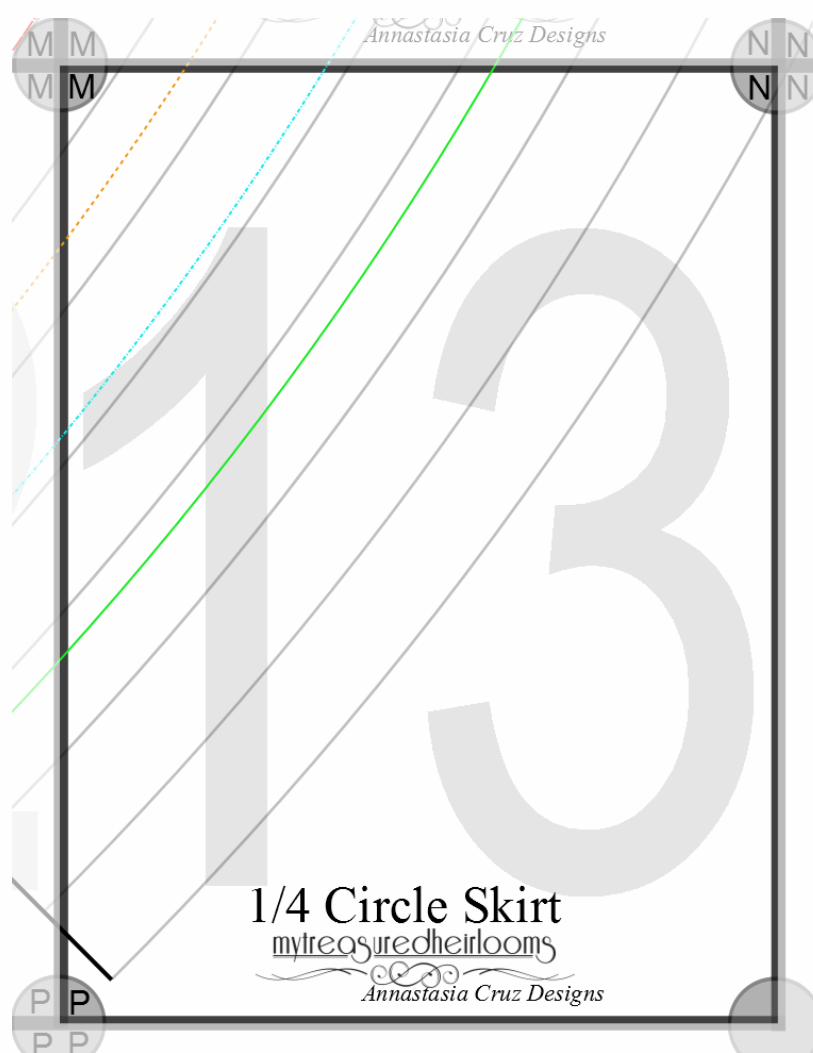
Quarter circle skirt assembly guide/layout
Print pages 59-71 only

Sweet Innocence Copyright © August 2014 Annastasia Cruz 31 | P a g e
Sweet Innocence Copyright © August 2014 Annastasia Cruz 32 | P a g e

Sweet Innocence Copyright © August 2014 Annastasia Cruz 33 | P a g e
Sweet Innocence Copyright © August 2014 Annastasia Cruz 34 | P a g e
Sweet Innocence Copyright © August 2014 Annastasia Cruz 35 | P a g e
Sweet Innocence Copyright © August 2014 Annastasia Cruz 36 | P a g e
Sweet Innocence Copyright © August 2014 Annastasia Cruz 37 | P a g e

Sweet Innocence Copyright © August 2014 Annastasia Cruz 38 | P a g e
Sweet Innocence Copyright © August 2014 Annastasia Cruz 39 | P a g e
Sweet Innocence Copyright © August 2014 Annastasia Cruz 40 | P a g e

Sweet Innocence Copyright © August 2014 Annastasia Cruz 41 | P a g e
Sweet Innocence Copyright © August 2014 Annastasia Cruz 42 | P a g e
Sweet Innocence Copyright © August 2014 Annastasia Cruz 43 | P a g e
Sweet Innocence Copyright © August 2014 Annastasia Cruz 44 | P a g e
Sweet Innocence Copyright © August 2014 Annastasia Cruz 45 | P a g e
Sweet Innocence Copyright © August 2014 Annastasia Cruz 46 | P a g e
Sweet Innocence Copyright © August 2014 Annastasia Cruz 47 | P a g e
Sweet Innocence Copyright © August 2014 Annastasia Cruz 48 | P a g e
Sweet Innocence Copyright © August 2014 Annastasia Cruz 49 | P a g e
Sweet Innocence Copyright © August 2014 Annastasia Cruz 50 | P a g e
Sweet Innocence Copyright © August 2014 Annastasia Cruz 51 | P a g e
Sweet Innocence Copyright © August 2014 Annastasia Cruz 52 | P a g e
Sweet Innocence Copyright © August 2014 Annastasia Cruz 53 | P a g e
Sweet Innocence Copyright © August 2014 Annastasia Cruz 54 | P a g e
Sweet Innocence Copyright © August 2014 Annastasia Cruz 55 | P a g e

Sweet Innocence Copyright © August 2014 Annastasia Cruz 56 | P a g e
Sweet Innocence Copyright © August 2014 Annastasia Cruz 57 | P a g e
Sweet Innocence Copyright © August 2014 Annastasia Cruz 58 | P a g e
Sweet Innocence Copyright © August 2014 Annastasia Cruz 59 | P a g e
Sweet Innocence Copyright © August 2014 Annastasia Cruz 60 | P a g e
Sweet Innocence Copyright © August 2014 Annastasia Cruz 61 | P a g e
Sweet Innocence Copyright © August 2014 Annastasia Cruz 62 | P a g e
Sweet Innocence Copyright © August 2014 Annastasia Cruz 63 | P a g e
Sweet Innocence Copyright © August 2014 Annastasia Cruz 64 | P a g e
Sweet Innocence Copyright © August 2014 Annastasia Cruz 65 | P a g e
Sweet Innocence Copyright © August 2014 Annastasia Cruz 66 | P a g e

Sweet Innocence Copyright © August 2014 Annastasia Cruz 67 | P a g e
Sweet Innocence Copyright © August 2014 Annastasia Cruz 68 | P a g e
Sweet Innocence Copyright © August 2014 Annastasia Cruz 69 | P a g e
Sweet Innocence Copyright © August 2014 Annastasia Cruz 70 | P a g e
Sweet Innocence Copyright © August 2014 Annastasia Cruz 71 | P a g e