Trimming a Basement Window - … a Basement Window ... This discrepancy can be taken up by tipping...
6
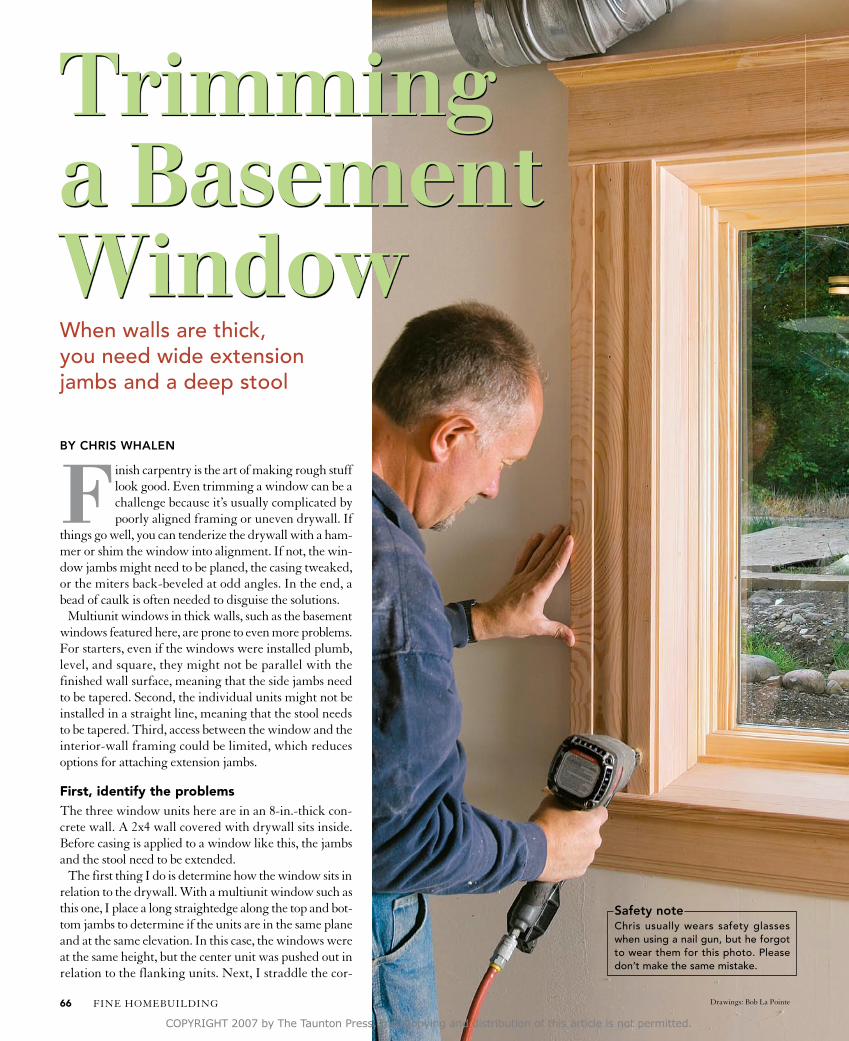
F inish carpentry is the art of making rough stuff look good. Even trimming a window can be a challenge because it’s usually complicated by poorly aligned framing or uneven drywall. If things go well, you can tenderize the drywall with a ham- mer or shim the window into alignment. If not, the win- dow jambs might need to be planed, the casing tweaked, or the miters back-beveled at odd angles. In the end, a bead of caulk is often needed to disguise the solutions. Multiunit windows in thick walls, such as the basement windows featured here, are prone to even more problems. For starters, even if the windows were installed plumb, level, and square, they might not be parallel with the finished wall surface, meaning that the side jambs need to be tapered. Second, the individual units might not be installed in a straight line, meaning that the stool needs to be tapered. Third, access between the window and the interior-wall framing could be limited, which reduces options for attaching extension jambs. First, identify the problems The three window units here are in an 8-in.-thick con- crete wall. A 2x4 wall covered with drywall sits inside. Before casing is applied to a window like this, the jambs and the stool need to be extended. The first thing I do is determine how the window sits in relation to the drywall. With a multiunit window such as this one, I place a long straightedge along the top and bot- tom jambs to determine if the units are in the same plane and at the same elevation. In this case, the windows were at the same height, but the center unit was pushed out in relation to the flanking units. Next, I straddle the cor- Trimming a Basement Window When walls are thick, you need wide extension jambs and a deep stool BY CHRIS WHALEN Safety note Chris usually wears safety glasses when using a nail gun, but he forgot to wear them for this photo. Please don’t make the same mistake. FINE HOMEBUILDING 66 Drawings: Bob La Pointe COPYRIGHT 2007 by The Taunton Press, Inc. Copying and distribution of this article is not permitted.
Transcript of Trimming a Basement Window - … a Basement Window ... This discrepancy can be taken up by tipping...
F inish carpentry is the art of making rough stuff look good. Even trimming a window can be a challenge because it’s usually complicated by poorly aligned framing or uneven drywall. If
things go well, you can tenderize the drywall with a ham-mer or shim the window into alignment. If not, the win-dow jambs might need to be planed, the casing tweaked, or the miters back-beveled at odd angles. In the end, a bead of caulk is often needed to disguise the solutions.
Multiunit windows in thick walls, such as the basement windows featured here, are prone to even more problems. For starters, even if the windows were installed plumb, level, and square, they might not be parallel with the finished wall surface, meaning that the side jambs need to be tapered. Second, the individual units might not be installed in a straight line, meaning that the stool needs to be tapered. Third, access between the window and the interior-wall framing could be limited, which reduces options for attaching extension jambs.
First, identify the problemsThe three window units here are in an 8-in.-thick con-crete wall. A 2x4 wall covered with drywall sits inside. Before casing is applied to a window like this, the jambs and the stool need to be extended.
The first thing I do is determine how the window sits in relation to the drywall. With a multiunit window such as this one, I place a long straightedge along the top and bot-tom jambs to determine if the units are in the same plane and at the same elevation. In this case, the windows were at the same height, but the center unit was pushed out in relation to the flanking units. Next, I straddle the cor-
Trimming a Basement WindowWhen walls are thick, you need wide extension jambs and a deep stool
BY CHRIS WHALEN
Safety notechris usually wears safety glasses when using a nail gun, but he forgot to wear them for this photo. please don’t make the same mistake.
FINE HOMEBUILDING66 Drawings: Bob La pointe
COPYRIGHT 2007 by The Taunton Press, Inc. Copying and distribution of this article is not permitted.

RemoVe the NaRRoW stool eXteNsioN, aND bUilD a Deep oNethe stool needs to be wide enough to get past the drywall while leaving room to scribe the final fit. to get the stool deep enough, glue and biscuit an exten-sion to the profiled stool, keeping the two parts flush on top.
Window frame
Pocket screws are strong and hidden.
Offset biscuit joint creates a small reveal.
concrete foundation wall
casing
profiled stool
A wide site-made stool replaces the narrow stool extension installed at the factory.
Assemble the two-piece stool. I use biscuits and glue, then clamp the stool assembly overnight, making sure the tops of these two pieces are flush.
Return the profile to the wall. I miter the returns at the end of the stool using two biscuits (stacked), glue, and blue painter’s tape as a clamp.
Mitered horn returns to the wall.
interior 2x4 wall
side extension jamb
top or head extension jamb
cap
Framing tip: hold the interior framing back 1 in. to 11⁄2 in. from the window‘s rough opening, depending on the casing size. this lets you use pocket screws to fasten the extension jambs. biscuits provide offsets on the sides and head.
AUGUST/SEpTEMBEr 2007 67www.finehomebuilding.com
COPYRIGHT 2007 by The Taunton Press, Inc. Copying and distribution of this article is not permitted.

ners of each window unit with a short straightedge on the drywall and measure from the window jamb. This tells me how wide the extension jambs will be and if tapering is required. For reference, I write the measurement on the drywall along the edge of the opening where the trim will cover it later. If the variation is less than 1⁄8 in., there’s no need to worry about tapering the extension jambs or stool. This discrepancy can be taken up by tipping the casing slightly. If the difference is greater than 1⁄8 in., the jambs need to be tapered.
Solutions start with the stoolMany windows have factory-applied 2-in. extension jambs that make the window suitable for a 2x6 wall. For basement walls, you need to extend the side and head jambs even more. I do this with a simple offset biscuit joint (more on that later). This offset joint looks good on the jambs, but it’s impractical for a stool. That’s why I carefully remove the factory-applied stool extension and replace it with a new full-depth stool.
The new stool needs to fit between the rough opening in the framed wall while extending past the side casings. The overall length of the stool is the sum of the distance between the side jambs, the width of the casings, the cas-ing reveals (typically 1⁄4 in.), and the amount of overhang beyond the casings. After cutting the stool to length, I miter the ends so that the profile returns to the wall. The extension is biscuited and glued to the back of the profiled stool. When this assembly is dry, I scrape excess glue, sand, fill gaps, and sand again, making it ready to install.
Set the new stool in the opening, and check its fit. The width will probably need adjustment. Because the three individual window units weren’t perfectly in line on this project, I needed to taper the stool in addition to notch-ing around the mullions. I use a square and a scribe to measure and mark the notches and the ends of the stool extending past the window. After removing excess material with a jigsaw, I slide the stool into position again for final scribing and planing. Finally, I bore for pocket screws, clamp the stool into position, and screw it to the window frame. I use a lot of screws (every 6 in. to 9 in.) because someone is going to sit on this window stool sometime in the future, and I don’t want it to break.
Install jamb extensions with an offset revealFor the head and side jambs, I add a piece to the factory extensions using an offset reveal of about 1⁄8 in. The head
fit the stoolWith the deep stool assembled, scraped, puttied, and sanded, i turn to fitting. Ultimately, the stool needs to be tight to the win-dow frame and drywall, and notched around the mullions. this begins with positioning the stool exactly parallel to the window and ends with a slight back bevel on the final cut. Rough- and final-scribing, cutting, and fine-tuning come between.
Mark the mul-lions and horns. The depth of the notch and the amount I cut off the horns is the distance between the window frame and the stool. I square the notch lines at this depth and scribe the horns accordingly.
Rough-scribe1
FINE HOMEBUILDING68
COPYRIGHT 2007 by The Taunton Press, Inc. Copying and distribution of this article is not permitted.
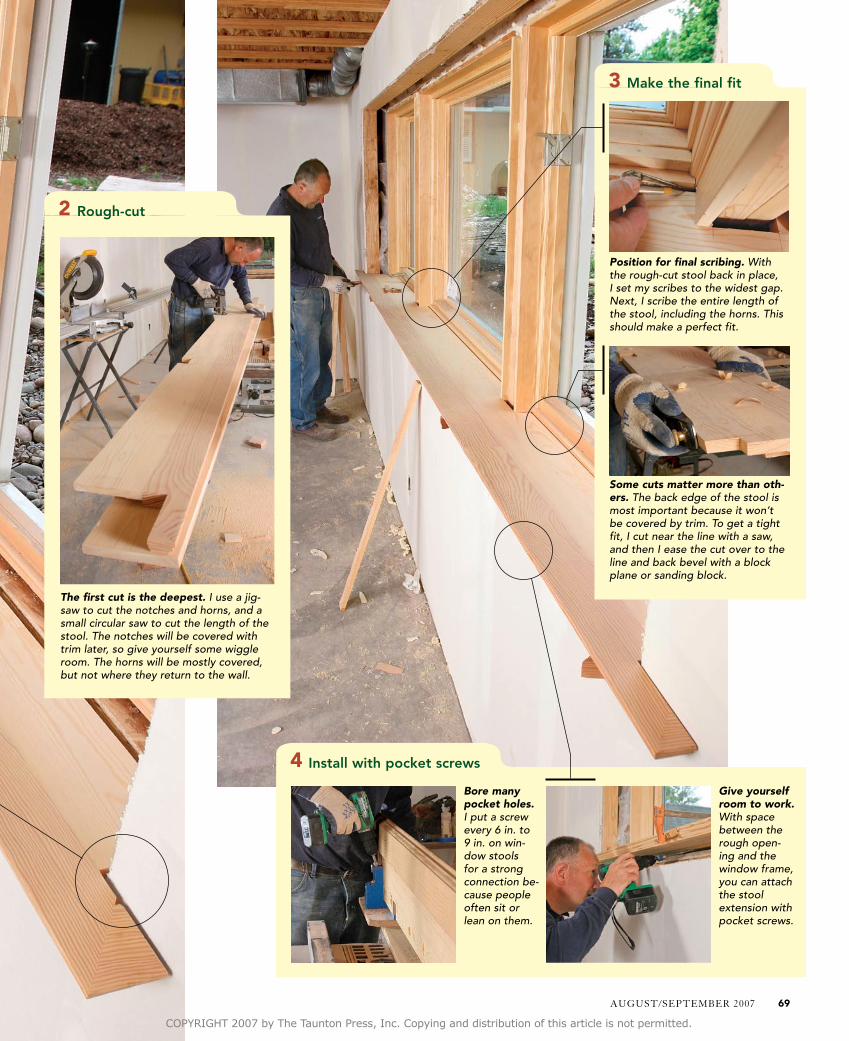
The first cut is the deepest. I use a jig-saw to cut the notches and horns, and a small circular saw to cut the length of the stool. The notches will be covered with trim later, so give yourself some wiggle room. The horns will be mostly covered, but not where they return to the wall.
Position for final scribing. With the rough-cut stool back in place, I set my scribes to the widest gap. Next, I scribe the entire length of the stool, including the horns. This should make a perfect fit.
Make the final fit3
Rough-cut2
Some cuts matter more than oth-ers. The back edge of the stool is most important because it won’t be covered by trim. To get a tight fit, I cut near the line with a saw, and then I ease the cut over to the line and back bevel with a block plane or sanding block.
Install with pocket screws4Bore many pocket holes. I put a screw every 6 in. to 9 in. on win-dow stools for a strong connection be-cause people often sit or lean on them.
Give yourself room to work. With space between the rough open-ing and the window frame, you can attach the stool extension with pocket screws.
AUGUST/SEpTEMBEr 2007 69
COPYRIGHT 2007 by The Taunton Press, Inc. Copying and distribution of this article is not permitted.

fit the top aND siDe Jambs With aN offsetfor a great-looking joint that’s fast to fit, i use a biscuit joiner with a clip-on offset plate. a 1⁄8-in. offset adds a shadowline to the profile and eliminates all the fussy fitting, sanding, and patching that a flush fit can require.
1⁄8-in. offset
Clamps prop the top jamb for scribing. Just like the stool, the top extension jamb needs to be scribe-fit to all three window units. Don’t get bogged down trying to get the exact length; it just needs to be long enough to land on the side jambs. What’s impor-tant is that the top exten-sion is parallel to the inte-rior-wall surface when you scribe (1). Scribe the back edge along the window frame (2), setting the scribes to the biggest dis-tance that the front edge of
The Lamello Top 10 biscuit joiner has a clip-on offset plate.
1
the jamb sticks out past the drywall. Because the framing wasn’t held back enough from the window, I had to face-nail the head and side extensions into the framing (3) rather than using pocket screws. The side jambs need to fit tightly top to bottom and also along their width (4). If the framed wall isn’t as plumb as the foundation wall (or as out of plumb), the board needs to be tapered. To get a tight fit top to bottom, I measure in two steps. First, I make a mark 20 in. up from the stool. Next, I measure down to the mark, and I add the two numbers together. This is more accurate (and faster) than bending my tape into a corner and guessing at the exact measurement.
2
3
4
FINE HOMEBUILDING70
COPYRIGHT 2007 by The Taunton Press, Inc. Copying and distribution of this article is not permitted.
jamb needs to be long enough to pass the side jambs, but it does not have to be fit to anything else. I cut it slightly longer than the overall length of the window. To scribe the head jamb, I set it in place with bar clamps and shims. Next, I measure at a few spots to determine what needs to be removed from the jamb stock, and I set the scribe and mark along the length of the jamb. I cut to the scribe line with a small circular saw, then use a power planer, a block plane, and a sanding block to adjust until the fit is acceptable. As with the stool, the process takes a couple of fittings.
At this point, I use a biscuit joiner to create a consistent offset or reveal between the extension jamb I’m making and the one applied by the factory.
On the project here, because there wasn’t as much clear-ance between the window frame and the rough framing on top of the window as there was on the stool, pocket screws wouldn’t work. Instead, after applying glue and inserting the biscuits, I shimmed and nailed the head-jamb extension in place, making sure it was square to the side jambs.
The only difference in installing the side jambs is that the length needs to fit precisely between the new stool and head jamb. rather than bending my tape measure into a corner, I measure in two steps: up from the stool 20 in., then down from the head to the 20-in. mark. I then add the two numbers together. I cut the jambs to length and then to width according to the numbers written pre-viously on the drywall. Finally, I fit the pieces and then biscuit, shim, and nail them in place, making sure they are square and tight to both the head jamb and the stool.
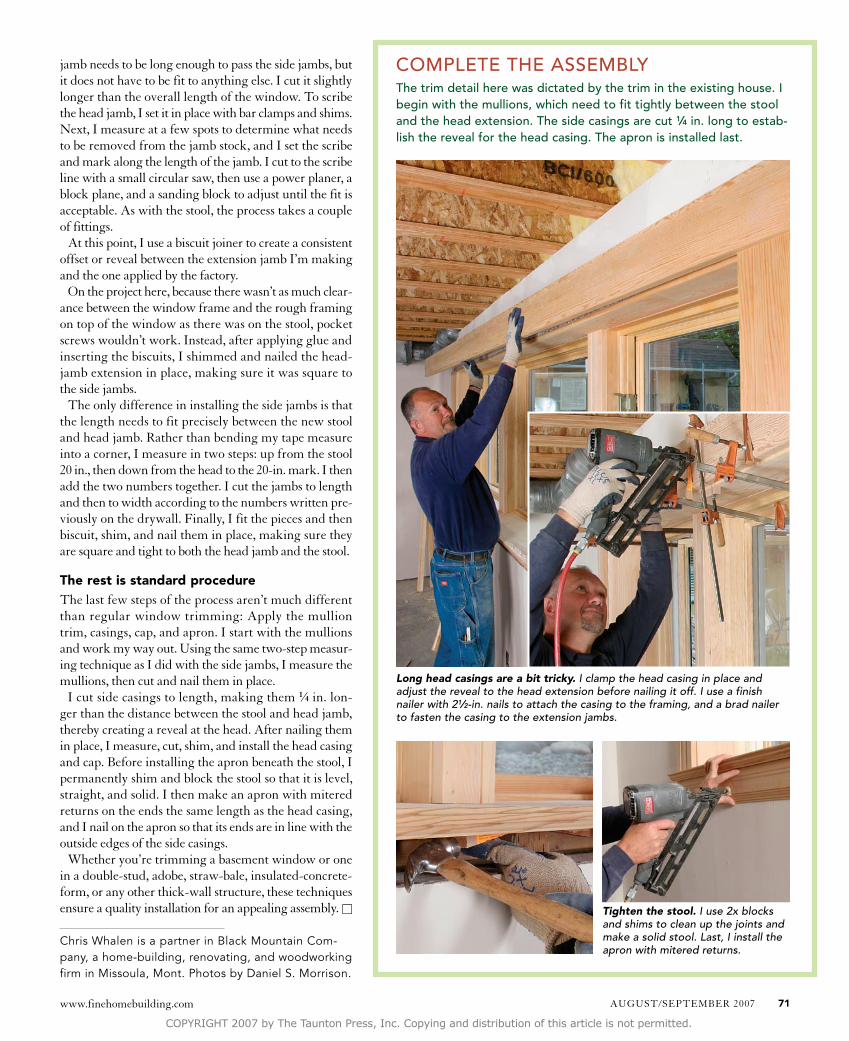
The rest is standard procedureThe last few steps of the process aren’t much different than regular window trimming: Apply the mullion trim, casings, cap, and apron. I start with the mullions and work my way out. Using the same two-step measur-ing technique as I did with the side jambs, I measure the mullions, then cut and nail them in place.
I cut side casings to length, making them 1⁄4 in. lon-ger than the distance between the stool and head jamb, thereby creating a reveal at the head. After nailing them in place, I measure, cut, shim, and install the head casing and cap. Before installing the apron beneath the stool, I permanently shim and block the stool so that it is level, straight, and solid. I then make an apron with mitered returns on the ends the same length as the head casing, and I nail on the apron so that its ends are in line with the outside edges of the side casings.
Whether you’re trimming a basement window or one in a double-stud, adobe, straw-bale, insulated-concrete-form, or any other thick-wall structure, these techniques ensure a quality installation for an appealing assembly. □
Chris Whalen is a partner in Black Mountain Com-pany, a home-building, renovating, and woodworking firm in Missoula, Mont. Photos by Daniel S. Morrison.
complete the assemblythe trim detail here was dictated by the trim in the existing house. i begin with the mullions, which need to fit tightly between the stool and the head extension. the side casings are cut 1⁄4 in. long to estab-lish the reveal for the head casing. the apron is installed last.
Tighten the stool. I use 2x blocks and shims to clean up the joints and make a solid stool. Last, I install the apron with mitered returns.
Long head casings are a bit tricky. I clamp the head casing in place and adjust the reveal to the head extension before nailing it off. I use a finish nailer with 21⁄2-in. nails to attach the casing to the framing, and a brad nailer to fasten the casing to the extension jambs.
AUGUST/SEpTEMBEr 2007 71www.finehomebuilding.com
COPYRIGHT 2007 by The Taunton Press, Inc. Copying and distribution of this article is not permitted.