Tria+UHD - Ross Video
74
Tria+ UHD User Manual v07A
Transcript of Tria+UHD - Ross Video

Tria+ UHDUser Manual
v07A

Thank You For Choosing RossYou've made a great choice. We expect you will be very happy with your purchase of Ross Technology.Our mission is to:1. Provide a Superior Customer Experience
• offer the best product quality and support
2. Make Cool Practical Technology• develop great products that customers love
Ross has become well known for the Ross Video Code of Ethics. It guides our interactions and empowersour employees. I hope you enjoy reading it below.If anything at all with your Ross experience does not live up to your expectations be sure to reach outto us at [email protected].
David RossCEO, Ross [email protected]
Ross Video Code of EthicsAny company is the sum total of the people that make things happen. At Ross, our employees are aspecial group. Our employees truly care about doing a great job and delivering a high quality customerexperience every day. This code of ethics hangs on the wall of all Ross Video locations to guide ourbehavior:1. We will always act in our customers' best interest.2. We will do our best to understand our customers' requirements.3. We will not ship crap.4. We will be great to work with.5. We will do something extra for our customers, as an apology, when something big goes wrong and
it's our fault.6. We will keep our promises.7. We will treat the competition with respect.8. We will cooperate with and help other friendly companies.9. We will go above and beyond in times of crisis. If there's no one to authorize the required action in
times of company or customer crisis - dowhat you know in your heart is right. (Youmay rent helicoptersif necessary.)
ii • Thank You For Choosing Ross — Tria+ UHD User Manual (v07A)
Document Information• Ross Part Number: 4607DR-120-07A• Release Date: July, 2021.
Copyright©2021 Ross Video Limited, Ross®, Abekas®, AirCleaner®, AirCleaner-2™,Tria, Tria+, Mira, Mira+, TriaExpress, Mira Express, Tria News, Kiva, and any related marks are trademarks or registered trademarksof Ross Video Limited. All other trademarks are the property of their respective companies. PATENTSISSUED and PENDING. All rights reserved. No part of this publication may be reproduced, stored in aretrieval system, or transmitted in any form or by any means, mechanical, photocopying, recording orotherwise, without the prior written permission of Ross Video. While every precaution has been takenin the preparation of this document, Ross Video assumes no responsibility for errors or omissions.Neither is any liability assumed for damages resulting from the use of the information contained herein.Microsoft®, Windows®, and Windows XP® are either registered trademarks or trademarks of MicrosoftCorporation in the United States and/or other countries.Macintosh®, OS X®, Apple®, and QuickTime® are trademarks of Apple Inc., registered in the U.S. andother countries.Google Chrome™, Google®, and the Google logo are registered trademarks of Google Inc.FFmpeg is a trademark of Fabrice Bellard, originator of the FFmpeg project.Bethesda, Bethesda Softworks and Bethesda Game Studios and their respective logos are registeredtrademarks of ZeniMax Media Inc. in the U.S. and/or other countries. All Rights Reserved.ZeniMax and its logo are registered trademarks or trademarks of ZeniMax Media Inc. All Rights Reserved.© 2011 ZeniMax Media Inc. Brink, Bethesda Softworks, ZeniMax and related logos are registeredtrademarks or trademarks of ZeniMax Media Inc. in the U.S. and/or other countries. Developed inassociation with Splash Damage Ltd. Splash Damage and the Splash Damage logo are registeredtrademarks or trademarks of Splash Damage Ltd. All Rights Reserved.GoPro® and Cineform® and their respective logos are trademarks or registered trademarks of GoPro,Inc.Creative are trademarks or registered trademarks of Creative Technology Ltd or Cambridge SoundWorks,Inc. in the United States and/or other countries.© 2019 OpenEXR, Industrial Light & Magic and ILM are trademarks and service marks of Lucasfilm Ltd.;all associated intellectual property is protected by the laws of the United States and other countries. Allrights reserved.Mirillis is a registered trademark of Mirillis Ltd. Read more at: https://mirillis.com/© 2019 - fraps® and beepa® are registered trademarks of Beepa Pty Ltd - ACN 106 989 815LogMeIn, and GoToMeeting are the trademarks and service marks of LogMeIn, Inc., and may be registeredin the U.S. Patent and Trademark Office and in other countries.are trademarks of Intel Corporation or its subsidiaries in the U.S. and/or other countries.id, id Software and related logos are registered trademarks or trademarks of id Software LLC in the U.S.and/or other countries. All Rights Reserved.© 1997 id Software LLC, a ZeniMax Media company. QUAKE, id, id Software, id Tech and related logosare registered trademarks or trademarks of id Software LLC in the U.S. and/or other countries. Bethesda,Bethesda Softworks, ZeniMax and related logos are registered trademarks or trademarks of ZeniMaxMedia Inc. in the U.S. and/or other countries. All Rights Reserved.RealNetworks and RealVideo are registered trademarks of RealNetworks, Inc.
Tria+ UHD User Manual (v07A) — Document Information • iii

are registered trademarks of Oracle and/or its affiliates. Other names may be trademarks of theirrespective owners.TechSmith® and Camtasia® are either registered marks or marks of TechSmith Corporation in the U.S.and/or other countries.ATI is a trademark of Advanced Micro Devices, Inc.The Miro name, logo, and icon are trademarks of the Participatory Culture Foundation (PCF).VMware, the VMware logo, VMware Cloud Foundation, VMware Cloud Foundation Service, VMwarevCenter Server, and VMware vSphere are registered trademarks or trademarks of VMware, Inc. or itssubsidiaries in the United States and/or other jurisdictions.SEGA and the SEGA logo are either registered trademarks or trademarks of the SEGA Holdings Co., Ltdor its affiliates.Dolby, Dolby Audio, and the double-D symbol are trademarks of Dolby Laboratories.
FCC Compliance and User InformationThe following information has been provided to clarify FCC requirements for operation of this device.These requirements are found in the FCC rules for radio frequency devices, Part 15.
ComplianceThis equipment has been tested and found to comply with the limits for a Class A digital device pursuantto Part 15 of the FCC Rules. These limits are designed to provide reasonable protection against harmfulinterference when the equipment is operated in a commercial environment. This equipment generates,uses, and can radiate radio frequency energy and, if not installed and used in accordance with theinstruction manual, may cause harmful interference to radio communications. Operation of thisequipment in a residential area is likely to cause harmful interference in which case the user will berequired to correct the interference at his or her own expense.
Important - Modifications & Shielded CablesChanges or modifications to this product not authorized by Ross® Video Limited could void the FCCCompliance and negate authority to operate the product.This product was tested for FCC compliance under conditions that included the use of Ross® Abekas®
peripheral devices and Ross® Abekas® shielded cables and connectors between system components. Itis important that Ross® Abekas® peripheral devices are used, and shielded cables and connectors areused between system components to reduce the possibility of causing interference to radios, televisionsets, and other electronic devices. Ross® Abekas® peripheral devices and the properly shielded cablesand connectors can be obtained directly from Ross® Abekas®, or through a Ross® Abekas®-authorizeddealer.
EMC Notices
CanadaThis Class “ A ” digital apparatus complies with Canadian ICES-003.Cet appareil numérique de la classe “ A ” est conforme a la norme NMB-003 du Canada.
EuropeThis equipment is in compliance with the essential requirements and other relevant provisions of CEDirective 93/68/EEC.
Important: This equipment is compliant with Class A of CISPR32. In a residential environment this equipment may cause radiointerference.
iv • Document Information — Tria+ UHD User Manual (v07A)

AustraliaThis equipment has been tested toAS/NZS CISPR 22:2009 +A1:2010 and found to comply with the limitsfor a Class A Digital device.
InternationalThis equipment has been tested to CISPR 22:2008 and found to comply with the limits for a Class ADigital device.
Important: This is a Class A product. In domestic environments, this product may cause radio interference, in which case theuser may have to take adequate measures.
Safety and First AidRoss® Abekas® equipment is designed to the highest standards of quality and reliability. However, nomatter how these systems are designed, operators and maintenance personnel can be exposed to electricalshock hazard when protective covers are removed for maintenance or the installation of options. Withthis caution in mind, each operator and engineer must observe all safety regulations, and have a clearunderstanding of first aid procedures related to electrical hazards.
Safety and Compliance Certifications
Power InformationTo ensure safe operation and to guard against potential shock or risk of fire, ensure your AC powersource for the system is within the required voltage range and frequency.
Operating EnvironmentThe optimum operating environment is within the following ranges:• Recommended Operating Temperature:• Recommended Operating Humidity: 20% to 80% non-condensing
Note: High temperature/humidity should be avoided at all times.
Safety Information
Important Safety NoticesThis system complies with safety standard . To ensure safe option and to guard against potential shockhazard or risk of fire, the following must be fulfilled:• This system features auto-ranging power supplies. Ensure that your power source is within the correct
range of voltage and frequency, as required by the system.• Each chassis in this system must be electrically grounded by connecting the input power cord(s) to
a correctly wired and grounded power outlet.
Warning: Completely disconnect all input AC power cords from the chassis before removing the top cover from the chassis.Failure to do so will expose dangerous electric currents and voltages. Physical contact with these electric currents and voltagesis extremely dangerous and may result in severe physical injury or death! Only qualified service personnel should remove thetop cover from the chassis.
Warning Hazardous Voltages: Modules marked with this symbol may be removed while the system is operating (powered).After removing amodule, beware of dangerous electric currents and voltages that are exposed on themodule receptacle connector
Tria+ UHD User Manual (v07A) — Document Information • v

inside the chassis. Please keep fingers, tools, and foreign metal objects away from the exposed receptacle connector while thechassis has input AC power applied. Physical contact with these electric currents and voltages is extremely dangerous and mayresult in severe physical injury or death! Only qualified service personnel should remove these modules.
Environmental InformationThe equipment that you purchased required the extraction and use of natural resources for itsproduction. It may contain hazardous substances that could impact health and the environment.To avoid the potential release of those substances into the environment and to diminish the need forthe extraction of natural resources, Ross Video encourages you to use the appropriate take-back systems.These systems will reuse or recycle most of the materials from your end-of-life equipment in anenvironmentally friendly and health conscious manner.The crossed-out wheeled bin symbol invites you to use these systems.
If you need more information on the collection, reuse, and recycling systems, please contact your localor regional waste administration.You can also contact Ross Video for more information on the environmental performances of ourproducts.
Company AddressRoss Video Limited — 8 John Street Iroquois, Ontario, Canada, K0E 1K0Ross Video Incorporated — P.O. Box 880, Ogdensburg, New York, USA, 13669-0880
(+1)613-652-4886General Business Office:
(+1)613-652-4425Fax:
1-844-652-0645Toll Free Technical Support (North America):
+800 1005 0100Toll Free Technical Support (International):
(+1)613-652-4886Technical Support:
(+1)613-349-0006After Hours Emergency:
[email protected] (Support):
[email protected] (General):
www.rossvideo.comWebsite
Technical SupportAt Ross Video, we take pride in the quality of our products, but if a problem does occur, help is as closeas the nearest telephone.Our 24-Hour Hot Line service ensures you have access to technical expertise around the clock. After-salesservice and technical support are provided directly by Ross Video personnel. During business hours(eastern standard time), technical support personnel are available by telephone. Outside of normalbusiness hours and on weekends, a direct emergency technical support phone line is available. If thetechnical support personnel who is on call does not answer this line immediately, a voice message can
vi • Document Information — Tria+ UHD User Manual (v07A)

be left and the call will be returned shortly. Our Technical support staff are available to react to anyproblem and to do whatever is necessary to ensure customer satisfaction.
Tria+ UHD User Manual (v07A) — Document Information • vii

Contents
Required Equipment..................................................................................................................................11
Getting Started...........................................................................................................................................12Power On/Off......................................................................................................................................................................................................................12Windows® Login..................................................................................................................................................................................................................12Software...............................................................................................................................................................................................................................12
Server Configuration..................................................................................................................................13Channel Setup.....................................................................................................................................................................................................................13
To Configure the Hardware Channels..............................................................................................................................................................13Video Formats.....................................................................................................................................................................................................................13
To Configure the Video Format.........................................................................................................................................................................13Video Router Setup.............................................................................................................................................................................................................14
To Connect to a Video Router...........................................................................................................................................................................14Audio Setup.........................................................................................................................................................................................................................15
To Configure the Audio Setup...........................................................................................................................................................................15Audio Router Setup............................................................................................................................................................................................................16
To Configure the Audio Router.........................................................................................................................................................................16Timecode Setup..................................................................................................................................................................................................................18
To Configure the Timecode...............................................................................................................................................................................18Channel Label Setup...........................................................................................................................................................................................................18
To Assign Labels to Channels............................................................................................................................................................................19TSL Tally Setup....................................................................................................................................................................................................................19
To Configure the TSL Tally Input.......................................................................................................................................................................19
Import..........................................................................................................................................................21Supported Media Files for Hardware Import..................................................................................................................................................................21To Import Media Files........................................................................................................................................................................................................22To Configure Tria Import.................................................................................................................................................................................................23
Tria Explorer................................................................................................................................................27Tria Explorer Login ...........................................................................................................................................................................................................27
To Log In to Tria Explorer.................................................................................................................................................................................27Managing Accounts............................................................................................................................................................................................................28
To Set Account Permissions..............................................................................................................................................................................28To Set Account Passwords.................................................................................................................................................................................28
Channel Transport Control........................................................................................................................30To Load a Clip......................................................................................................................................................................................................................31To Play a Clip.......................................................................................................................................................................................................................31To Unload a Clip..................................................................................................................................................................................................................32Clip Repeat Modes..............................................................................................................................................................................................................32
Normal (Off)........................................................................................................................................................................................................32Loop......................................................................................................................................................................................................................32Ping-Pong............................................................................................................................................................................................................32Loop to Play.........................................................................................................................................................................................................32
Recording a Clip..................................................................................................................................................................................................................33To Record a New Clip.........................................................................................................................................................................................33To Overwrite/Append to a Clip.........................................................................................................................................................................34
Locking Channel Transport Control.................................................................................................................................................................................35To Lock/Unlock a Channel Transport...............................................................................................................................................................35
viii • Contents — Tria+ UHD User Manual (v07A)

Keyboard Shortcuts............................................................................................................................................................................................................36
Clip Library..................................................................................................................................................39Search...................................................................................................................................................................................................................................39Play Lists..............................................................................................................................................................................................................................40
To Create/Edit a Play List...................................................................................................................................................................................40To Air a Play List..................................................................................................................................................................................................41Play List Commands...........................................................................................................................................................................................41
Folders..................................................................................................................................................................................................................................42Clip Library Columns..........................................................................................................................................................................................................42Clip Metadata......................................................................................................................................................................................................................42
To Edit the Label Metadata of a Clip.................................................................................................................................................................42To Edit the Attributes Metadata of a Clip.........................................................................................................................................................43To Edit the Timecode Metadata of a Clip.........................................................................................................................................................44To Edit the Trim Metadata of a Clip..................................................................................................................................................................45
Parent/Child Clips...............................................................................................................................................................................................................46To Create a Child Clip.........................................................................................................................................................................................46
Deleting a Clip.....................................................................................................................................................................................................................46To Delete a Clip...................................................................................................................................................................................................46
Lock/Unlock Clips................................................................................................................................................................................................................47To Lock/Unlock a Clip.........................................................................................................................................................................................47
Timecode Chase..................................................................................................................................................................................................................47To Create a TC Chase List...................................................................................................................................................................................47To Air a TC Chase List.........................................................................................................................................................................................49
Desktop Multi-Viewer................................................................................................................................50
Export...........................................................................................................................................................51Supported Media Files for Export.....................................................................................................................................................................................51To Select an Export Destination........................................................................................................................................................................................51To Export Media Files.........................................................................................................................................................................................................52Growing File Export............................................................................................................................................................................................................52
To Set NAS Permissions for Growing File Export............................................................................................................................................53To Create Growing Export Files.........................................................................................................................................................................53
Remote Control Support............................................................................................................................55Remote Communications (RS-422)...................................................................................................................................................................................55
To Configure a Room for the BVW-75 Protocol...............................................................................................................................................55To Configure a Room for the Odetics Protocol...............................................................................................................................................56To Configure a Room for the VDCP Protocol...................................................................................................................................................58To Configure a Room for the AMP Protocol....................................................................................................................................................59
DashBoard...........................................................................................................................................................................................................................61Abekas® DashBoard Service..............................................................................................................................................................................61
Clip ID Support....................................................................................................................................................................................................................65Sony® MVS Series Switcher................................................................................................................................................................................................65
Maintenance...............................................................................................................................................66Media Drives........................................................................................................................................................................................................................66
Disk Space............................................................................................................................................................................................................66
AsRun Log Creator......................................................................................................................................67To Run an AsRun Report....................................................................................................................................................................................................67
Tria+ UHD User Manual (v07A) — Contents • ix

Troubleshooting.........................................................................................................................................69
Specifications..............................................................................................................................................71Resources............................................................................................................................................................................................................................71Operating Temperature.....................................................................................................................................................................................................71
Ports.............................................................................................................................................................72LTC Port................................................................................................................................................................................................................................72
Index................................................................................................................................73
x • Contents — Tria+ UHD User Manual (v07A)
Required EquipmentTo set up and operate your server you will need the following equipment:• Computer monitor with minimum 1920×1080 resolution.A standard USB keyboard (QWERTY) and mouse are provided with your server.
Tria+ UHD User Manual (v07A) — Required Equipment • 11

Getting StartedThe server consists of a 3RU computer with advanced video processing, storage, and streamingcapabilities. The server runs a standard Microsoft® Windows® operating system with the pre-installedAbekas® software applications for interacting with the video processing hardware.
Power On/OffThe system powers on with the single power button located at the front of the chassis. When the powerbutton is pressed the system will boot up and launch Windows®.To power the system off, perform the standard Windows® Shutdown procedure or press and hold thepower button for 10 seconds.
Warning: Even with the system powered off, hazardous voltages are present inside the chassis. Disconnect both the primaryand secondary power supplied before opening up the chassis.
Windows® LoginThe server comes with the Microsoft® Windows® operating system and all the required softwarepre-installed.Refer to the Windows® help system for information on changing the password.
Note: Once you have logged in to the system, the video channels and serial control are all active. If you are using an external serial controller,that controller can now be used to control the video channels (including loading and playing clips).
SoftwareThe server comes pre-installed with all the software needed for operation and setup.• Tria Explorer — provides a graphical interface to the operation of the server.• Tria Import — allows you to import media files into the server.• Tria Config — allows you to configure the hardware of the server.
12 • Getting Started — Tria+ UHD User Manual (v07A)

Server ConfigurationThe Tria Config application allows you to configure various aspects of the hardware in your server.The number of channels and inputs and outputs you have depend on the hardware installed in yourserver.
Important: Not all settings are available on all servers or require a option to be purchased or installed.
Channel SetupThe hardware channels can be set up in a number of ways, depending on the task you need the serverto perform.
Table 1: Video-Only / Video+Key Modes
DescriptionMode
Two (2) background channel transports with audio.Two VA Channels
One (1) keyer channel transport (video+alpha) with audio.One VKA Channel
Two (2) record channels (cameras or angles).One ISO-2 Channel
To Configure the Hardware ChannelsThe number of hardware channels on your server depends on the configuration you purchased.1. Launch the Tria Config application.
You may be prompted to allow the program to make changes on the computer, click Yes.
2. Click the Channels tab.
3. Select the video processing mode and how you want the channels grouped.4. Click Apply.
Video FormatsSelect the video format that the server is operating in, and the source of the reference signal.
To Configure the Video FormatThe server can only operate in one video format at a time. All channel transports will play and recordin the same format.
Note: Not all video resolutions and frequencies are compatible. Some selections will be grayed out if they are not compatible.
1. Launch the Tria Config application.You may be prompted to allow the program to make changes on the computer, click Yes.
2. Click the Video tab.
Tria+ UHD User Manual (v07A) — Server Configuration • 13

3. In the Video Reference Frequency area, select the frequency you want the server to operate in.4. In the Video Resolution area, select the video resolution you want the server to operate in.5. In the Video Reference Source area, select the type of input reference signal that the server is using.
This is the video signal that is connected to the REF IN HD-BNC on the back of the server.
Note: You should only use Free Run when the server is not receiving video from, or outputting video to, another device.
Important: If you select Tri-Level External Reference or Bi-Level External Reference with no valid reference signalcoming into the server, you will get corrupt video on all outputs.
6. In the Horizontal Phase area, select a timing offset for the video output relative to the referencetiming.
7. In the Net Video area, select whether the server can share clips with another servers on the samenetwork (Enable Network Video). All servers must have the same hardware and be operating inthe same video format.
Tip: Clips from another server can be loaded and included in a local Play List. Clips are not copied between servers. The clip is playedacross the network between servers. The network connection must be maintained to use the clip on a remote server.
8. Click Restart Tria. A confirmation dialog box is displayed.9. Click Restart Tria to restart the server application and services with the new setting.10. Click OK when the restart has completed to dismiss the window.
Video Router SetupYou can connect the server to an external router and control the sources feeding the server.
Note: The router must support the Evertz® Quartz or Probel SW-P-08 protocol.
To Connect to a Video RouterYou can change which destinations are coming into the server from the router, as well as which sourceson the router are routed to those destinations.1. Launch the Tria Config application.
You may be prompted to allow the program to make changes on the computer, click Yes.
2. Click the Video Router tab.
14 • Server Configuration — Tria+ UHD User Manual (v07A)

3. In the Router Protocol area, select the protocol you want to use to communicate with the router.• Probel SW-P-08 — select this option of your router uses the Snell Advanced Media® SW-P-08
protocol.• Quartz — select this option if your router uses the Evertz® Quartz protocol.
4. In the Router Levels field, select the number of levels that the router is using.5. In the Router IP Address field, enter the IP address of the router you want to control.6. In the Router Port Number field, enter the port on the router you want to connect to.7. Click Connect to Router to connect to the router.8. In the Video Router Destinations area, select which destinations on the router are connected to
each video channel input on the server. This is the physical connection from one BNC to the other.9. In theChangeRouter Sources area you can change which sources are being routed to the destinations
that are assigned to each video channel input on the server.10. Click Apply.
Audio SetupYou can select the number of audio tracks to record, which sources audio will use, and how audio ismuted.
To Configure the Audio SetupSelect the number of tracks to record and which tracks are sent to the headphones jacks.1. Launch the Tria Config application.
You may be prompted to allow the program to make changes on the computer, click Yes.
2. Click the Audio tab.
Tria+ UHD User Manual (v07A) — Server Configuration • 15

3. In the Audio Tracks area, select the number of audio tracks to record.• 2 track audio — record two tracks of audio.• 4 track audio — record four tracks of audio• 8 track audio — record eight tracks of audio. This option is not available when the server is
operating in an SD video format(525/480i or 625/576i).• 16 track audio — (software option) record sixteen tracks of audio. This option is not available
when the server is operating in an SD video format(525/480i or 625/576i).
4. In theAudio Tracks in an ISOClip area, select the number of audio tracks to record per input channelwhen recording in ISO mode.
5. In the Audio Muting Policy area, select how the audio output (AES, embedded, and analog audioout) is muted during playback.• Mute everything except 100% play speed and JOG STEP — audio is muted at all play speeds
except 1× (100%) and during single-frame jogging.• Mute everything except 100% play speed. Mute JOG STEP — audio is muted at all play speeds
except 1× (100%).• Mute when speed is not in the range 85% through 115% of play speed — audio is muted at all
play speeds except in the range of 85% to 115% play speed.• Mute when playback speed exceeds 200% play speed. — audio is muted only when play speed
exceeds 2× (200%).
6. Click Apply.
Audio Router SetupThere are two integrated audio routers built into the server. An input router that sends audio from anaudio input to any channel transport, and an output router that sends the audio from a channel transportto any audio output. The number of audio inputs and outputs depends on the options you have installedin your server.
To Configure the Audio RouterThe Audio Input Router tab allows you to set the audio tracks that get recorded on the server and theAudio Output Router tab allows you to set which audio tracks are played from the server.1. Launch the Tria Config application.
You may be prompted to allow the program to make changes on the computer, click Yes.
2. Click the Audio Router tab.
16 • Server Configuration — Tria+ UHD User Manual (v07A)

Tip: If the audio routing on an input or output has been changed, a dot is shown next to the name on the tab.
3. Click the Audio Input Router tab.
4. Click on the tab for the record channel that you want to route audio tracks to.5. In the ChX Recorder Track 1 row, select the source channel input (ChX Input) and the audio track
(Track #) from the input that you want to record on track 1 of the clip.6. Repeat this step for all of the remaining recorder tracks.
Tip: Click NORMANIZE ALL ChX Input Routes to reset all the input audio tracks to their default recorder track assignment.
7. Click the Audio Output Router tab.
8. Click on the tab for the channel output into which you want to route audio tracks.9. In the ChX Audio Output Track 1 row, select the source channel player (ChX Player) and the audio
track (Track #) from the player that you want to route to track 1 of the output video stream.10. Repeat this step for all of the remaining output tracks and channel outputs.
Tip: Click NORMANIZE ALL ChX Output Routes to reset all the player audio track to their default output track assignment.
Tria+ UHD User Manual (v07A) — Server Configuration • 17

11. Click Apply.
Timecode SetupThe timecode information can be overlaid on the output video stream of the server. This can be time ofday linear timecode (LTC) coming into the server, or the embedded ancillary timecode (ATC) in the videostream being recorded.
Important: When you turn the timecode overlay on, it is shown over the image on the video output.
To Configure the TimecodeThe timecode information can be overlayed on the output video stream of the server.1. Launch the Tria Config application.
You may be prompted to allow the program to make changes on the computer, click Yes.
2. Click the Timecode tab.
3. In the Timecode Input Source area, select the timecode source for each channel.• Time of Day LTC In — the LTC signal coming into the server.• ATC In — the embedded digital timecode in the video source.
4. In the Replace ATC Output with Timecode Remain area, select the video channels that you wantthe normal count-up ATC timecode to be replaced with the count-down (time-remaining) ATCtimecode.
Tip: This is useful when you want to display count-down timecode in downstream devices that can decode and display ATC timecode.
5. In the Timecode Overlay on Video Output area, select whether the timecode is displayed on thevideo output for each channel.• Off — the timecode is not shown on the video output stream.
6. In the Timecode Overlay Position And Size area, use the Left/Right and Top/Bottom sliders toposition the timecode overlay on the background video source, and use the H Small/H Large and VSmall/ V Large sliders to adjust the size of the timecode text.
7. Click Apply.
Channel Label SetupYou can assign a custom name to each channel transport to help identify the server it is on or what it isused for.Labels are shown at the far right of each channel transport in Tria Explorer.
18 • Server Configuration — Tria+ UHD User Manual (v07A)

Note: The Quad Viewer Label Overlay option must be enabled for the labels to be visible on the Quad Viewer output.
To Assign Labels to ChannelsLabels can be shown on the channel transport to help identify each channel.1. Launch the Tria Config application.
You may be prompted to allow the program to make changes on the computer, click Yes.
2. Click the Labels tab.
3. Enter a new label name for each channel transport as required.4. Click Apply.
TSL Tally SetupThe server can receive TSL messages from a downstream device to tally the channels on the server.For example, when a production switcher takes the Channel A source from the server on-air, the switchersends a signal back to the server telling it that Channel A is on-air and should be tallied.The tally status is shown using the color of the background of the Channel Label.• Gray — the channel is not on program or preview.• Red — the channel is on program.• Green — the channel is on preview.• Amber — the channel is being recorded by a downstream device.
Note: TSL tally colors are set by how the protocol was implemented in the source device and may not be as listed above. Check with thedevice that is sending the TSL information to the server for information on how the protocol was implemented.
To Configure the TSL Tally InputTally information sent to the server over ethernet using the TSL protocol is used to show red and greentallies (as well as gray and amber) on the channel labels. You will need the IP address and port of thedevice sending the tally information, as well as the screen mapping.1. Launch the Tria Config application.
You may be prompted to allow the program to make changes on the computer, click Yes.
2. Click the Tally tab.
Tria+ UHD User Manual (v07A) — Server Configuration • 19

3. In the Server Address field enter the IP address of the device that is sending the TSL tally information.4. In the Server Port field enter the port number on the device that the server is listening to.5. In the Server Connection Type area, select the type of ethernet communication you want to use.
• UDP — select if the tally server uses the UDP protocol.• TCP Server — select of the tally server is using the TCP protocol as a server.• TCP Client — select of the tally server is using the TCP protocol as a client.
6. In the Tally Protocol area, select the TSL protocol the tally server is using.• TSL UMD V5.0 — select if the tally server is using the TSL tally protocol v5.0.• TSL UMD V3.1 — select if the tally server is using the TSL tally protocol v3.1.
7. In the Assign Preview Tally area, select which indicator is lit when a channel transport is tallied onpreview.
8. In the Assign Preview Tally Color area, select the color to use when a channel transport is talliedon preview.
9. In the Tally Index Number area, enter the tally ID that is assigned on the tally server to the inputon the server.
Tip: Refer to the device that you are receiving the tally information from for the ID that is assigned to the video input that is connectedto the output of each channel on the server.
10. Click Apply.
20 • Server Configuration — Tria+ UHD User Manual (v07A)

ImportThe Tria Import file import utility converts all imported media files to the current video output formatthat the server is operating in.
Supported Media Files for Hardware ImportNote: Some file formats require a third-party codec to be installed on the server.
Note: Ancillary data is preserved from the import of MXF files in systems with JPEG 2000 or AVC-Intra native recording formats.
Plug-inCodecFile Type
none needed(DV25) DVCPRODV
Calibrated{Q} DV50 Decode2(DV50) DVCPRO 50
Calibrated{Q} DV100 Decode + MXF Import Bundle #25(DV50) DVCPRO 50
none needed(DV25) DVCPROMOV
Calibrated{Q} DV50 Decode2(DV50) DVCPRO 50
Calibrated{Q} QuickTime® DVCPRO HD Playback components6(DV100) DVCPRO HD
none neededAnimation
none neededH.264
none neededJPEG
none neededJPEG 2000
none neededMPEG-E Video
none neededNONE (No Compression)
none neededProRes
none neededPNG
Calibrated{Q} XD Decode3Apple® XDCam-HD
Avid® DNxHD7Avid® DNxHD
Calibrated{Q} XD Decode + MXF Import Bundle #14Apple® XDCam-HD
Calibrated{Q} XD Decode + MXF Import Bundle #14XDCam EX
Calibrated{Q} XD Decode + MXF Import Bundle #14HDV
Calibrated{Q} DV100 Decode + MXF Import Bundle #25(DV50) DVCPRO 50
Calibrated{Q} XD Decode + MXF Import Bundle #14Apple® XDCam-HDMXF
Calibrated{Q} XD Decode + MXF Import Bundle #14XDCam EX
Calibrated{Q} XD Decode + MXF Import Bundle #14HDV
Calibrated{Q} MXF Import1(DV25) DVCPRO
Calibrated{Q} MXF Import1(DV50) DVCPRO 50
Calibrated{Q} DV50 Decode2
Calibrated{Q} DV100 Decode + MXF Import Bundle #25(DV100) DVCPRO HD
Calibrated{Q} XD Decode + MXF Import Bundle #14Apple® XDCam-HD
Calibrated{Q} XD Decode + MXF Import Bundle #14XDCam EX
Calibrated{Q} XD Decode + MXF Import Bundle #14HDV
Calibrated{Q} DV100 Decode + MXF Import Bundle #25(DV50) DVCPRO 50
Tria+ UHD User Manual (v07A) — Import • 21

Plug-inCodecFile Type
Calibrated{Q} MXF Import1(DV25) DVCPROP2*
Calibrated{Q} MXF Import1(DV50) DVCPRO 50
Calibrated{Q} DV50 Decode2
Calibrated{Q} DV100 Decode + MXF Import Bundle #25(DV100) DVCPRO HD
Calibrated{Q} XD Decode + MXF Import Bundle #14Apple® XDCam-HD
Calibrated{Q} XD Decode + MXF Import Bundle #14XDCam EX
Calibrated{Q} XD Decode + MXF Import Bundle #14HDV
Calibrated{Q} DV100 Decode + MXF Import Bundle #25(DV50) DVCPRO 50
• * When importing a P2 file, select the .mxf file in the P2 CONTENTS/VIDEO directory.• 1 This plugin from Calibrated Software enables Tria+ UHD to read MXF files. Additional codec(s) may
be required to decode the video essence within some MXF files. MXFImport_Win.asp• 2 This codec from Calibrated Software enables import of DVCPRO 50 essence within MOV or DV files.
QDV50.asp
Tip: In combination with the Calibrated{Q} MXF Import component, this DV50 codec enables import of DVCPRO 50 essence within MXFfiles [MXFImport_Win.asp].
• 3 This codec from Calibrated Software enables import of XDCam-HD essence within MOV files.QXD.asp• 4 This codec from Calibrated Software enables import of XDCam-HD essence within MXF and P2 files.
WindowsBundleStore.asp (select Bundle#1• 5 This codec from Calibrated Software enables import of DV100 essence within MXF and P2 files.
WindowsBundleStore.asp (select Bundle#2)• 6 This codec from Calibrated Software enables import of DVCPRO HD essence within MOV files.
QDVCProHDDownload.asp
Tip: In combination with Calibrated{Q} MXF Import component, this codec enables import of DVCPRO HD essence within MXF files.
• 7 This codec from Avid® enables import of DNxHD essence within MOV files. AvidCodecsLESetup.zip
To Import Media FilesTranscode a media file of a different format to a clip that can be played in the server.
Note: Ensure that Tria Import is properly configured for the type of import you want to perform. For example, if you are importing aMulti-Screen image, you must configure the import for the size of the canvas and codec you are using.
Tip: You can close the Tria Import application at any point during an import to stop the process and release the channel. When you startthe Tria Import application again, it will detect the import queue and prompt you to resume.
1. Launch the Tria Import application.2. In the Import Method list, select the how you want to import the media file.
• Software Transcode — use the software based transcoder to import the media file that is in adifferent media format than your hardware.
• Native Import Only: No Transcoding — import the media file that is in the native media formatfor your hardware.
Tip: SelectNative Import Only if the file you are importing is XAVC 300/480 or use the Software Transcoder for any published codec.No channels are consumed for either of these operations.
The Tria Import window is shown.
22 • Import — Tria+ UHD User Manual (v07A)

3. Click Import From and select the folder that the media files you want to import are located in.
Tip: If you want to point the import application to a network drive, you must map that drive in Windows® before you can select it asa source.
4. Click Choose.5. Click Destination and select the H:\Video folder, or a folder below this one, on the media drive.
Note: The destination must be under the H:\Video folder on the media drive or the imported files will not be available to theserver.
6. Click the green add files (+) button and select the media files that you want to import.7. Click Add Files.
Tip: If you want to remove files from the import list, select the files and click the red remove files (-) button. The files are not deleted,only removed from the import queue.
Tip: You can change the order that the files are imported by selecting the file(s) you want to move and click the up or down arrowbuttons on the right of the window. The file(s) are moved up or down in the list. You can also drag and drop the files to order the files.
To Configure Tria ImportThe Tria Import configuration menus allow you to change the destination folder, set how the RGB colorspace is interpreted, the raster size of the imported video, set up a watch folder, and to set an auto startbehavior.1. Launch the Tria Import application.2. In the Import Method list, select the how you want to import the media file.
• Software Transcode — use the software based transcoder to import the media file that is in adifferent media format than your hardware.
• Native Import Only: No Transcoding — import the media file that is in the native media formatfor your hardware.
Tip: SelectNative Import Only if the file you are importing is XAVC 300/480 or use the Software Transcoder for any published codec.No channels are consumed for either of these operations.
The Tria Import window is shown.
Tria+ UHD User Manual (v07A) — Import • 23

3. Click Edit > Configure.4. Click the Destination tab and click Change and select a new destination folder for import.
5. Click the Color tab and select how the RGB luminance color range is interpreted when a file isimported.
• Normal — color luminance range is scaled from 0 to 255.• Prescaled to 10-235 — color luminance range is scaled from 10 to 235.
Tip: If the blacks of your imported media files appear crushed or the whites do not appear as bright as expected, try selecting theopposite mode.
Tip: Select Normal if you are importing a media file with alpha (key). The alpha may not import properly otherwise.
6. Click the Multi-Screen tab to allow the import of media file rasters with a resolution larger than1920×1080.
• Number of monitors horizontally — select the number of full rasters you want horizontally.• Number of monitors vertically — select the number of full rasters you want vertically.
Tip: To import a Multi-Screen media file, click File > Open Multi-Screen... on Tria Import and select the Multi-Screen media file youwant to import.
7. Click the Watch tab and set the amount of time the system will wait after it has detected a new filein the watch folder and how often it polls remote file servers. These settings are used in conjunctionwith the AutoStart configurations and the watch folder selection.
24 • Import — Tria+ UHD User Manual (v07A)

• File Settle Time— the length of time the import application will wait after a file has been modifiedbefore starting to import it. If the media files are being rendered directly into the watch folder,set a long wait time. If the watch folder is being used for drag and drop, set a short wait time.
• Remote Fileserver Rescan Interval — the length of time the import application waits to poll anexternal server for changes. This setting is ignored if the external server is running a Windows®
operating system.
8. Click the AutoStart tab and select whether the Tria Import application is started automatically,and whether the selected folders are watched.
• Start importer 30 seconds after login — the Tria Import application will be started 30 secondsafter you log into Windows®.
• Enable watch folders at login — the watch folder functionality will start automatically withTria Import.
• Import Channel— select the channel transport to be used for import when the import applicationstarts automatically.
9. Click the Import Codec tab and select codec you want to use when a file is imported.
Tria+ UHD User Manual (v07A) — Import • 25

• QuickTime — use the Apple® QuickTime® codec.
Note: Multi-Screen import while operating in 1080p or UHDTV1 is only supported with the QuickTime® codec.
• FFmpeg — use the FFmpeg™ codec.
26 • Import — Tria+ UHD User Manual (v07A)

Tria ExplorerTria Explorer is a Windows® application that provides a graphical interface to the operation of theserver. Although this application allows you to control the operation of the server, it does not need tobe running for the server to operate.You can quit Tria Explorer at any time without affecting any of the active real-time video and audiorecording and playback operations.
Tip: The Library, Viewer, Export Editor, and Export Queue buttons at the top of the window allow you to quickly switch between the ClipLibrary, the Multi-Viewer, and the export modes.
Tip: A yellow bar will appear at the bottom of the window to provide status updates on various services running on the server.
Tria Explorer LoginWhen you launch Tria Explorer you have the option of logging in as an administrator, privileged user,or guest user. Each of these types have specific privileges that are assigned by the administrator account.• Administrator — full access to all features of the application and can set the privileges for the other
account types. This account is password protected by default.• Privileged User — the default account type for using the application. This account is not password
protected by default.• Guest User — a secondary user account if you want to give limited access to the application. This
account is not password protected by default.
To Log In to Tria Explorer1. Open the Tria Explorer application.
Tria+ UHD User Manual (v07A) — Tria Explorer • 27

2. In the Login Type box select the type of account you want to log in as.• Administrator• Privileged User• Guest User
3. If required, enter a password in the Enter Password field.• Administrator — default password is multiflex• Privileged User — no password by default• Guest User — no password by default
4. Click OK.
Managing AccountsThe administrator account has access to all of the features of the server, as well as the ability to assignprivileges to the other accounts.
To Set Account PermissionsThe different types of accounts can have different permissions. Only the Administrator account musthave permission to set the permissions for other types of accounts.1. Log into Tria Explorer as the Administrator.2. Click Configure > General Configuration and click the Permissions tab.
3. Select those permissions you want assigned to each account.The Guest User account cannot have permission to set passwords or set user permissions.
4. Click OK.
To Set Account PasswordsOnly the Administrator and Privileged User accounts can have a password.
28 • Tria Explorer— Tria+ UHD User Manual (v07A)

1. Log into Tria Explorer as the Administrator.2. Click Configure > General Configuration and click the Passwords tab.
3. Enter the new password for the account you want to set the password for. Passwords can use letters,numbers, and special characters, and are case-sensitive.
Tip: If the Privileged User password field is left blank, you will not be prompted to enter a password when logging in with thataccount.
4. Click OK.
Tria+ UHD User Manual (v07A) — Tria Explorer • 29

Channel Transport ControlEach channel in the server has a dedicated channel transport in Tria Explorer that is used to load, play,record, and seek within clips. Clips are loaded into the channel transport from the Clip Library.
1. Active Channel — The channel transport that is currently selected. Keyboard commands and clipselections are applied to this channel.
2. Video Window — Shows the full-motion video output of the channel. This can be the clip that iscurrently playing or the live video input to the channel when EE is on.
3. Load Clip ( ) — Load the selected clip in the Clip Library into this channel. Press and hold theShift button and press to eject the clip.
4. Clip Name — The name of the clip currently loaded into the channel transport.5. Activity Indicator — Shows the current activity of the channel transport. RECORDING when the
channel transport is actively recording, and EXPORTING when the channel transport is activelyexporting.
6. Jog ( ) — Jog forward ( ) or reverse ( ) by one frame/field in the active clip.7. Rewind ( ) — Rewind the current clip at 30-times normal speed.8. Play Reverse ( ) — Play the current clip in reverse at 1-times normal speed.9. Stop ( ) — Stops playback or recording on the current channel transport.10. Record ( ) — Opens the Record Setup dialog to assist in recording a clip.11. Play Forward ( ) — Play the current clip forward at 1-times normal speed.12. Fast Forward ( ) — Fast-Forward the current clip at 30-times normal speed.13. Timecode — Shows the timecode value of the current position in the clip. An f1 or f2 at the end of
the timecode indicates Field playback (interlaced), and an f1-2 indicates Frame playback (progressive).
Tip: Double-click on the timecode to enter a new timecode value manually. The channel transport immediately seeks to that timecodein the clip once you press Enter.
14. Count-Down Timer — Shows the time remaining in the current clip. When the clip reaches the endthe timer will show 00.00.00.00.
15. EE ( ) — Turns EE (Electronic to Electronic) mode On/Off for the selected channel transport. Alsocalled bypass mode where the video signal coming into the video channel is routed directly to theoutput without being stored and read from disk.
16. Seek to Start ( ) — Seek to the first frame of the clip.17. Play Repeat Normal ( ) — Normal play mode where the clip plays to the end and stops. Only one
play repeat mode can be active at one time.18. Play Repeat Ping-Pong ( ) — Ping-pong repeat mode where the clip plays back and forth between
the in and out points stored in the clip.19. Play Repeat Loop ( ) — Loop repeat mode where the clip starts playing again from the in point
after it reaches the out point.
Note: If the channel transport is being controlled externally using the Odetics protocol, this button is disabled.
30 • Channel Transport Control — Tria+ UHD User Manual (v07A)

20. Play Repeat Loop to Play ( ) — Multipoint repeat mode (also known as 3-Point Loop mode)where the clip can start playing from a point before the in point but starts playing again from thein point when it reaches the out point. The clip will continue to loop between the in point and outpoint from then on.
Tip: Clicking Play Repeat Normal allows the clip to ignore the out point and play through to the end frame of the clip. This does notinterrupt the loop play in progress.
21. Play Speed — Shows the current play speed of the clip.
Tip: Double-click on the play speed to enter a new play speed manually as a percentage. The clip will start playing at the new speedonce you press Enter.
22. Clip Position Slider Handle — Indicates the current point in the clip that is being played. You candrag the handle back and forth to select a different point in the clip. Playback stops if you move theslider handle.
23. Clip Position Slider Bar — A graphical representation of the current clip. When the clip is playingor recording, the slider handle moves along the slider bar showing real-time progress through theclip. The slider handle and bar are green when playing and red when recording.
24. Seek to End ( ) — Seek to the last frame of the clip.25. Chain ( ) — Selects whether a channel transport is ganged with other channel transports. When
Chain is turned on for a channel transport, that channel transport becomes linked to the otherchannel transports in the chain in Tria Explorer. Within Tria Explorer, any transport commandsrun on one channel transport in the chain are frame-accurately duplicated on all the other channeltransports in the same chain. Commands sent to a channel transport from an external device overserial/ethernet control are not chained to the other channels.
Note: Record and Load/Eject Clip are not support as chained commands and will only be performed on the channel transport thatyou run them on.
To Load a ClipThe clip can start to play as soon as it is loaded into a channel transport. Ensure that you are using theright channel configuration for the clip you want to load.1. Select the channel transport you want to load a clip into.
Note: If you are loading a VK (video + alpha) clip, ensure that the channel transport has been configured as VK as well.
2. Double-click the clip you want to load into the transport control. The clip must be in the same videoformat that the server is operating in.
Tip: You can also drag and drop the clip onto the channel transport area, or click the load clip button ( ) next to the clip name inthe transport control area.
Tip: Click the up arrow next to the Clip Library title to expand the listing. Only the selected channel transport is shown with theexpanded library list. Click the same button again to return the list to normal.
The clip is loaded into the channel transport and the transport control buttons become active. The firstframe of the clip is shown in the preview window in the transport control area. If you are using a remoteTria Explorer client, the preview window is not available.
Note: If the Auto Play feature is enabled (Channel Transport > Enable Auto Play), the clip will start to play as soon as it is loaded.
To Play a ClipClips can play automatically once loaded, loop, or play at faster or slower speeds.
Note: If the Auto Play feature is enabled (Channel Transport > Enable Auto Play), a clip will start to play as soon as it is loaded into achannel. This feature applies to all channels and cannot be turned on or off for a particular channel transport.
Tria+ UHD User Manual (v07A) — Channel Transport Control • 31

1. Load the clip or playlist you want to play into the channel transport you want to play it out on.2. Click the play button ( ).
Tip: You can add Cue Points to a clip that allow you to quickly seek to different points in the clip. Seek to the point in the clip that youwant to add a cue point to and click Channel Transport >Mark Cue Point. Press Ctrl and use the left or right arrows to seek to thecue points before or after the current point in the clip. You can press Ctrl+' to delete the selected cue point, or click Channel Transport> Clear All Cue Points to clear all of the cue points in the clip.
The clip starts to play on the selected channel transport. If the selected channel transport is configuredas V+K (Video+Alpha) and the loaded clip contains an alpha track, both video and alpha tracks fromthe clip are load and played simultaneously.
To Unload a ClipRemove a clip from the current channel transport.1. Select the channel transport you want to eject a clip from.2. Click Channel Transport > UnLoad.
Tip: Press and hold the Shift button and press F1 to unload the clip.
The clip is unloaded from the channel transport and color bars are loaded into the preview windowand video output of the selected channel.
Clip Repeat ModesThere are a number of ways to have a clip continuously loop when playing out. These modes can be setin the metadata of a clip so that the clip always loads in this mode. They can also be set manually fromthe channel transport controls, or they can be set remotely from an external device.Only one play repeat mode can be active at a time.
Tip: Repeat modes use Play Repeat IN and Play Repeat OUT points to determine what video to repeat. The default values for these pointsare stored in the metadata of the clip.
Normal (Off)This is the normal play mode ( ) where the clip plays to the end and stops. This mode is automaticallyset if you are controlling the channel transport from an external device, such as a switcher.
LoopThe repeat mode ( ) where the clip starts playing again from the in point again after it reaches theout point. When the clip starts playing, it immediately seeks to the Play Repeat IN point and plays untilit reaches the Play Repeat OUT point. When it reaches the Play Repeat OUT point it seeks back to thePlay Repeat IN point and plays again. The clip will continue to play like this until stopped.
Ping-PongThe repeat mode ( ) where the clip plays back and forth between the in and out points. When the clipstarts playing, it immediately seeks to the Play Repeat IN point and plays until it reaches the Play RepeatOUT point. When it reaches the Play Repeat OUT point it starts playing in reverse until it reaches thePlay Repeat IN point again. The clip will continue to play like this until stopped.
Loop to PlayThe Multipoint (3-Point Loop) repeat mode ( ) where the clip can start playing from a point beforethe in point but starts playing again from the in point when it reaches the out point. The clip startsplaying from the beginning passing through the Play Repeat IN point and continues playing until itreaches the Play Repeat OUT point. When it reaches the Play Repeat OUT point it seeks back to the PlayRepeat IN point and plays again. The clip will continue to play like this until stopped.
32 • Channel Transport Control — Tria+ UHD User Manual (v07A)

The portion of the clip before the Play Repeat IN point is only played the first time. This can be used ifthe repeating portion of the clip has a lead-in at the beginning. The lead-out portion of the clip can beplayed by switching the clip to the normal ( ) mode after the last repeat has started. The clip will thenplay to the end.
Recording a ClipWhen recording a clip you can record a new clip, append to the end of an existing clip, or overwrite anexisting clip. Clips can be recorded to the root, or a sub-folder in the Clip Library.
Tip: If you want to quickly record a clip using the same settings as the last time you recorded, press and hold the Shift button and clickthe record button ( ).
To Record a New ClipUse a channel transport to record the video signal coming into the server.1. Select the channel transport that you want to record a clip to. This is the channel for the BNC on the
back of the server that the audio/video you want to record is coming in on.2. Eject any clip that may already be loaded into the channel transport.3. Click the record button ( ).
The Clip Record Setup dialog box is shown.
4. In the Record Type area, select the type of recording you want to do.• New Clip (Record After Arming) — arms the channel transport for recording a new clip.
5. In the Record Tracks area, select which tracks you want to record.
Note: Audio is recorded depending on how the Audio Input Source is set in Tria Config.
• Video — record the video and any embedded audio coming into the Video In BNC, depending onthe audio source.
• Key — record the alpha signal coming into the associated Video In BNC.• Audio — record the digital audio coming into the the embedded audio on the Video In BNC,
depending on the audio source.
6. In the New Clip area, enter a name for the clip in the Clip Name field.
Tria+ UHD User Manual (v07A) — Channel Transport Control • 33

Tip: If you want to record the clip into a sub-folder on the media drive you must include the folder path with the new. For example,1080p Clips\Downtown-Fire records the clip Downtown-Fire in the 1080p Clips folder. The folder mustalready exist in the Clip Library to be able to record to it.
7. Enter an 8-charater id for the clip in the Clip ID field.If you are controlling the server from an external device, the clip id is used on the external deviceto load a clip. If you do not assign a clip id to the clip, the first 8 characters of the clip name can beused.
8. Turn Auto Name on if you want to create a series of clips with the same name plus an identifier.• Off — overwrite any existing clip of the same name.• Numeric Append— add a numeric digit to the end of the new clip name and increment it by one
with each new clip of the same name.• Time of Day — add the current date and time to the end of the clip name.• LTC In— add a timecode stamp from the embedded timecode in the video signal being recorded.
9. Select a Timecode source for the new clip.• Striped — use the internally generated timecode data. The starting point for the timecode is set
in the Starting at field.• External TC — use the timecode data embedded in the video signal being recorded.
10. Click OK.The channel transport is now armed to record. The video window shows live video coming into thechannel, the EE button is on, and the record button ( ) is flashing.
11. Click the flashing record button ( ) when you are ready to record.The server starts recording, the EE button goes off, and name of the new clip is shown at the top ofthe channel transport area, and the RECORDING indicator appears.
12. Click the stop ( ) button to stop recording.
To Overwrite/Append to a ClipAdd to the end of an existing clip, or overwrite the clip entirely.1. Select the channel transport that you want to record a clip to. This is the channel for the BNC on the
back of the server that the audio/video you want to record is coming in on.2. Prepare the channel transport for the type of recording you want to do.
• Append — load the clip that you want to append the new recording to.• Overwrite — load the clip that you want to overwrite and seek to the point in the clip that you
want to start the new recording.
3. Click the record button ( ).The Clip Record Setup dialog box is shown.
34 • Channel Transport Control — Tria+ UHD User Manual (v07A)

4. In the Record Type area, select the type of recording you want to do.• Append — arms the channel transport to start recording at the end of the current clip.• Overwrite — arms the channel transport to start recording at the currently selected point in the
exiting clip. Everything after this point in the clip will be overwritten.
5. In the Record Tracks area, select which tracks you want to record.
Note: Audio is recorded depending on how the Audio Input Source is set in Tria Config.
• Video — record the video and any embedded audio coming into the Video In BNC, depending onthe audio source.
• Key — record the alpha signal coming into the associated Video In BNC.• Audio — record the embedded audio on the Video In BNC, depending on the audio source.
6. Click OK.The channel transport is now armed to record. The video window shows live video coming into thechannel, the EE button is on, and the record button ( ) is flashing.
7. Click the flashing record button ( ) when you are ready to record.The server starts recording, the EE button goes off, the name of the new clip is shown at the top ofthe channel transport area, and the RECORDING indicator appears.
8. Click the stop ( ) button to stop recording.
Locking Channel Transport ControlYou can lock any channel transport control in Tria Explorer. This prevents someone from accidentallyloading or ejecting a clip, or using any of the transport controls.
Note: Locking a channel transport does not prevent the external control of that channel.
To Lock/Unlock a Channel TransportLock a channel so that it can't be accidentally changed directly. Chained, or ganged, channels are notaffected by the lock.Press and hold the Ctrl button and click on the channel transport that you want to lock/unlock.
Tria+ UHD User Manual (v07A) — Channel Transport Control • 35

The channel transport controls are grayed out and a lock symbol is shown over the controls when thechannel transport is locked.
Keyboard ShortcutsThese keyboard shortcuts work on the currently selected video channel transport in the Tria Explorerwindow.
Tip: Two or more video channel transports can be linked together (Chained) so that commands sent to one channel are also sent to theothers. Not all the keyboard shortcuts support Chain control.
ChainDescriptionShortcutFunction
No(Windows® shortcut) Sets the Tria Explorer window tofull screen mode, or back to windowed mode.
F11Full Screen
No(Windows® shortcut) Switch between Windows®applications.
Alt+TabChange Application
NoSelects channel A as the active channel transport.Ctrl+1 1 ASelect Channel A
NoSelects channel B as the active channel transport.Ctrl+1 1 BSelect Channel B
NoClear all Channels— set all channel chain controls toOff.
Ctrl+1 C CChain Channel TransportControl
NoChain Current Channel— turn channel chain controlOn for the selected channel transport.
Ctrl+1 C Y
NoUnchain Current Channel—turn channel chain controlOff for the selected channel transport.
Ctrl+1 C N
NoToggle Chain Current Channel— toggles the chaincontrol On or Off for the selected channel transport.
Ctrl+1 C T
YesStop or Play on the selected channel transport.(spacebar)Stop/Play
NoEE On— turn EE (Electronic to Electronic) mode On forthe selected channel transport. Also called bypassmodewhere the video signal coming into the server is routeddirectly to the outputwithout being stored and read fromdisk.
Ctrl+E YEE
NoEE Off— turn EE mode Off for the selected channeltransport. The video output comes from the disk.
Ctrl+E N
NoEE Toggle— toggles EE mode On or Off for the selectedchannel transport.
Ctrl+E T
NoLoad the highlighted clip in the Clip Library into theselected channel transport.
F1Load
NoUnloads the clip from the selected channel transport andloads a color-bar test pattern.
Shift+F1Unload
YesReverse the clip in the selected channel transport by oneframe/field. Press and hold the button to play the clip inreverse at 33% speed.
F3Jog Reverse
YesAdvance the clip in the selected channel transportforward by one frame/field. Press and hold the buttonto play the clip forward at 33% speed.
F4Jog Forward
36 • Channel Transport Control — Tria+ UHD User Manual (v07A)

ChainDescriptionShortcutFunction
YesRewind the clip in the selected channel transport.F6Rewind
YesPlay the clip in the selected channel transport in reverse.F7Play Reverse
YesStop playing or recording the clip in the selected channeltransport.
F8Stop
YesPlay the clip in the selected channel transport.F9Play
YesFast-forward the clip in the selected channel transport.F10Fast Forward
YesSeek to the first frame of the clip in the selected channeltransport and stop.
Ctrl+F6Seek to Start of Clip
YesSeek to the last frame of the clip in the selected channeltransport and stop.
Ctrl+F10Seek to End of Clip
NoMark a cue point in the selected channel transport, orremove the current cue point.
Ctrl+'Cue Points
NoSeek backwards to the next cue point in the selectedchannel transport.
Ctrl+Left
NoSeek forwards to the next cue point in the selectedchannel transport.
Ctrl+Right
Yes1× Forward— play the clip in the selected channeltransport forward at 1 times speed.
F12Variable Play
Yes3× Forward— play the clip in the selected channeltransport forward at 3 times speed.
F13
Yes4× Forward— play the clip in the selected channeltransport forward at 4 times speed.
F14
Yes8× Forward— play the clip in the selected channeltransport forward at 8 times speed.
F15
Yes16× Forward— play the clip in the selected channeltransport forward at 16 times speed.
F16
Yes30× Forward— play the clip in the selected channeltransport forward at 30 times speed.
F17
Yes0.33× Forward— play the clip in the selected channeltransport forward at 33% of 1 times speed.
F18
Yes0.33× Reverse— play the clip in the selected channeltransport backwards at 33% of 1 times speed.
Ctrl+F11
Yes1× Reverse— play the clip in the selected channeltransport backwards at 1 times speed.
Ctrl+F12
Yes3× Reverse— play the clip in the selected channeltransport backwards at 3 times speed.
Ctrl+F13
Yes4× Reverse— play the clip in the selected channeltransport backwards at 4 times speed.
Ctrl+F14
Yes8× Reverse— play the clip in the selected channeltransport backwards at 8 times speed.
Ctrl+F15
Yes16× Reverse— play the clip in the selected channeltransport backwards at 16 times speed.
Ctrl+F16
Yes30× Reverse— play the clip in the selected channeltransport backwards at 30 times speed.
Ctrl+F17
NoHead— trim head from the clip in the selected channeltransport.
Ctrl+T HTrim
NoTail— trim tail from the clip in the selected channeltransport.
Ctrl+T T
Tria+ UHD User Manual (v07A) — Channel Transport Control • 37

ChainDescriptionShortcutFunction
YesGang Play— play all clips loaded in all channeltransports.
Ctrl+G PGang All
YesGang Stop— stop all clips loaded in all channeltransports.
Ctrl+G S
YesGang Re-cue— re-cue all clips loaded in all channeltransports.
Ctrl+G R
NoNewClip Record—creates a new clip in the Clip Library,loads it into Channel A Transport, selects LIVE EE mode,and starts recording to that clip.
Ctrl+2 NRecord
NoCreate and Load New Clip— creates a new clip in theChannel A Transport with a 1-frame duration and parkson the first frame. It does not start recording.
Ctrl+2 C
NoAppend Record— seeks to the end of the clip loaded inChannel A Transport, selects LIVE EE mode, and startsrecording to that clip. A clip must be loaded into theChannel A Transport before running this command.
Ctrl+2 A
NoOverwrite Record— selects LIVE EE mode and startsrecording over the clip loading in Channel A Transport.The server starts recording over the current clip at thelocation Channel A Transport is parked.
Ctrl+2 O
NoMove Cursor to On-Air Item— selects the item that iscurrently airing on the on-air playlist.
Ctrl+L AList Play
NoMoveCursor toNextOn-Air Item—selects the previewitem on the on-air playlist.
Ctrl+L B
NoMove Cursor to On-Air Item X— selects item X (1 to 9)on the on-air playlist.
Ctrl+L 1 to L 9
NoList Play Loop Mode ON— turns looping on for theon-air playlist. The entire contents of the playlist islooped.
Ctrl+L L Y
NoList Play Loop Mode OFF— turns looping off for theon-air playlist.
Ctrl+L L N
NoList Play Loop Mode Toggle— toggles looping on oroff for the on-air playlist.
Ctrl+L L T
NoTake— takes the next item on the on-air playlist. TheEnter button found with the numeric keypad of yourkeyboard does not work for this command.
Enter
38 • Channel Transport Control — Tria+ UHD User Manual (v07A)

Clip LibraryThe Clip Library appears on the bottom half of the Tria Explorer window and shows all the media fileclips that are currently available to the server. These clips can be located on the internal media driveof the Tria+ UHD or on the media drive of a separate Tria+ UHD. The list can be filtered using theDisplayClips selection at the top of the list.
Tip: You can change the width and position of each column in the list, as well as sort the list based on the information in any column. Youcan select which columns are shown from the Clip Library > Select Columns.
• Cueable Local — show only those clips that are in the same video format that the server is operatingin and are stored on the local media drive.
• All Local— show all clips that are stored on the local media drive. Clips that are not in the same videoformat that the server is operating in are displayed, but cannot be loaded.
• Remote— show only those clips that are located on a remote server. You can only load the clips froma remote server that is on the same network and operating in the same video format. Remote serversappear as folders in the Clip Library.
• Local & Remote — show all clips that are stored on the local media drive and on remote servers. Seeabove for restrictions on remote servers.
SearchYou can search the Clip Library for clip names that contain a specific word.Enter the name of a clip you want to find in the search field located to the right of the Clip Library titlebar. The Clip Library will only show those clips that match your search criteria and the number of clipsshown is indicated in yellow at the bottom.
Tria+ UHD User Manual (v07A) — Clip Library • 39

Play ListsA Play List is a collection of clips that are sorted into the order you want them played. Play Lists arecreated and edited within the Clip Library.
To Create/Edit a Play ListCreate the Play List and add the clips. Arrange the clips in the order you want them to play and set howyou want to transition between clips and the speed you want the clip to play out when the Play List isplayed.1. If you are creating a new Play List, clickNew >New Playlist and enter a name for the new Play List.
If you are editing a Play List, proceed to the next step.2. Double-click on the name of the Play List you just created.
The Playlist Editor opens to the right of the Clip Library.
3. Drag and drop clips from the Clip Library to your Play List.
Tip: Right-click on a clip and click Remove from list to remove the clip from the Play List.
4. Drag and drop clips within the Play List to order them how you want them to play out.5. Set a different behaviour for the start (@START) of a clip by right-clicking on the clip and selecting
Set @START....
• Play— the clip plays out automatically when the Play List transitions to this clip in ON-AIR mode.This is the default setting.
• Pause — the clip is paused on the first frame when the Play List transitions to this clip in ON-AIRmode.
6. Set a different behaviour for the end (@END) of a clip by right-clicking on the clip and selecting Set@END....• Take — the Play List transitions to the next clip in ON-AIR mode. This is the default setting.• Pause — the clip is paused on the last frame when it reaches the end of the clip in ON-AIR mode.
You must click TAKE to transition to the next clip.
40 • Clip Library — Tria+ UHD User Manual (v07A)
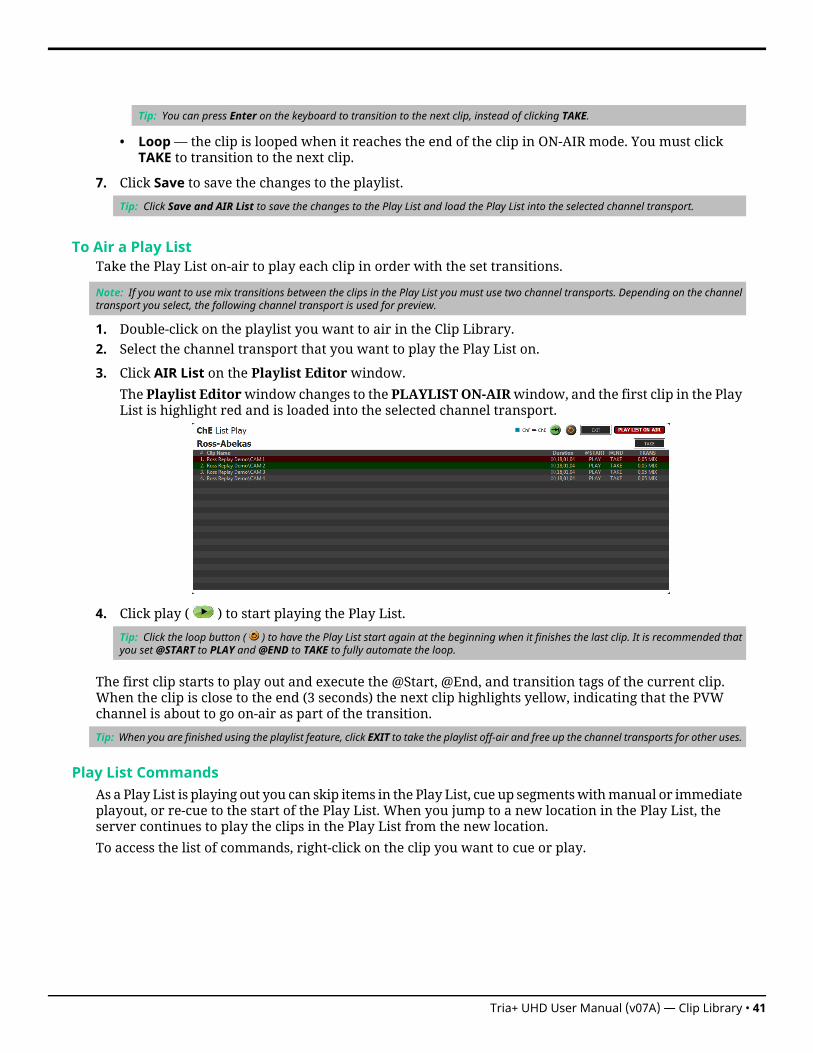
Tip: You can press Enter on the keyboard to transition to the next clip, instead of clicking TAKE.
• Loop — the clip is looped when it reaches the end of the clip in ON-AIR mode. You must clickTAKE to transition to the next clip.
7. Click Save to save the changes to the playlist.
Tip: Click Save and AIR List to save the changes to the Play List and load the Play List into the selected channel transport.
To Air a Play ListTake the Play List on-air to play each clip in order with the set transitions.
Note: If you want to use mix transitions between the clips in the Play List you must use two channel transports. Depending on the channeltransport you select, the following channel transport is used for preview.
1. Double-click on the playlist you want to air in the Clip Library.2. Select the channel transport that you want to play the Play List on.
3. Click AIR List on the Playlist Editor window.The Playlist Editorwindow changes to the PLAYLISTON-AIRwindow, and the first clip in the PlayList is highlight red and is loaded into the selected channel transport.
4. Click play ( ) to start playing the Play List.
Tip: Click the loop button ( ) to have the Play List start again at the beginning when it finishes the last clip. It is recommended thatyou set @START to PLAY and @END to TAKE to fully automate the loop.
The first clip starts to play out and execute the @Start, @End, and transition tags of the current clip.When the clip is close to the end (3 seconds) the next clip highlights yellow, indicating that the PVWchannel is about to go on-air as part of the transition.
Tip: When you are finished using the playlist feature, click EXIT to take the playlist off-air and free up the channel transports for other uses.
Play List CommandsAs a Play List is playing out you can skip items in the Play List, cue up segments with manual or immediateplayout, or re-cue to the start of the Play List. When you jump to a new location in the Play List, theserver continues to play the clips in the Play List from the new location.To access the list of commands, right-click on the clip you want to cue or play.
Tria+ UHD User Manual (v07A) — Clip Library • 41

• Play this segment next — play the selected clip after the currently playing clip finishes on the PGMchannel. The clip is highlighted green and is played next.
• Cue this segment next — cue the selected clip after the currently playing clip finishes on the PGMchannel. The clip is highlighted green and is cued next. The clip pauses at the first frame and mustbe played manually.
Tip: You can manually play the clip by pressing the Spacebar on the keyboard.
• Play this segment immediately — immediately load and play the selected clip on the PGM channel.• Cue this segment immediately — immediately load and cue the selected clip on the PGM channel.
The clip pauses at the first frame and must be played manually.• Cue to start of playlist immediately — immediately load and cue the first clip in the Play List on
the PGM channel. The clip pauses at the first frame and must be played manually.
Tip: You can quickly take a different clip in the list by selecting the new clip and clicking the TAKE button or pressing Enter on the keyboard.
FoldersClips are stored on the media drive in the server, or on external servers connected to the server you areusing. You can organise the clips into folders on the media drive either from Windows® Explorer orfrom the Clip Library.
Important: You cannot delete a folder from the Clip Library. You can only delete a folder from Windows®.
• To create a folder, right-click on an empty line in the Clip Library and click New Folder.• You can type in a name for the new folder and drag and drop clips into it.
Clip Library ColumnsYou can set up the Clip Library to show or hide specific columns. Any column, with the exception of theclip name column, can be shown or hidden.• To change the columns, click Clip Library > Select Columns....• Select which columns you want to show, or deselect the columns you want to hide, and click OK.
Clip MetadataClip metadata includes information like the name of the clip, the repeat mode, timecode source, andtrim points. This information is stored with the clip and is copied to other servers with the clip.
Note: You cannot edit the metadata of a clip (Abekas® .CLIP) if it is locked. You must unlock the clip before you can edit the metadata.
Tip: Most metadata shown in the Clip Library can be edited directly by double-clicking on the cell in the table and either entering the newdata or selecting it from a drop-down list.
To Edit the Label Metadata of a ClipThe label metadata is shown in the Clip Library and is used to sort and identify clips.
42 • Clip Library — Tria+ UHD User Manual (v07A)

1. Select the clip in the Clip Library you want to edit the metadata for.
Note: You cannot edit the metadata of a clip if it is locked.
2. Click Clip Library > Modify....3. Click on the Labels tab.
4. Edit the metadata item you want to change.• Comments — a 255-character free form field.• Project Name — a 255-character free form field.• Creator — a 255-character free form field.• Keywords— 6 independent 35-character searchable words. A keyword can only be a single word
or conjunction without spaces.
5. Click OK.
To Edit the Attributes Metadata of a ClipThe attributes metadata sets the default output mode for the clip, as well as the repeat function.1. Select the clip in the Clip Library you want to edit the metadata for.
Note: You cannot edit the metadata of a clip if it is locked.
2. Click Clip Library > Modify....3. Click on the Attributes tab.
Tria+ UHD User Manual (v07A) — Clip Library • 43

4. In the Output Mode area, select the output video mode that you want to clip to play out in.• Frame — select this option if the clip was shot in a progressive video format.• Field VI — select this option if the clip was shot in an interlaced video format and you want to
apply vertical interpolation (VI) to it. This mode is useful for clips that will be played out in slowmotion or will be frequently paused. The VI helps to eliminate vertical hopping during slowmotion playback and jagged edges in paused images.
• Field — select this option if the clip was shot in an interlaced video format and you don't wantto apply vertical interpolation (VI) to it.
Note: The server does not support video format conversion. If a clip is in a different video format than the server is operating in youwill not be able to load it into a channel transport.
5. In the Play Repeat area, select the repeat mode you want to use for the clip.• OFF — play repeat is turned off by default when the clip is loaded.• Loop — play repeat loop is turned on by default when the clip is loaded. When the clip starts
playing, it immediately seeks to the Play Repeat IN point and plays until it reaches the PlayRepeat OUT point. When it reaches the Play Repeat OUT point it seeks back to the Play RepeatIN point and plays again.
• Ping Pong — play repeat ping-pong is turned on by default when the clip is loaded. When theclip starts playing, it immediately seeks to the Play Repeat IN point and plays until it reaches thePlay Repeat OUT point. When it reaches the Play Repeat OUT point it starts playing in reverseuntil it reaches the Play Repeat IN point again.
• Loop To — play repeat loop to play is turned on by default when the clip is loaded. The clip startsplaying from the beginning passing through thePlay Repeat IN point and continues playing untilit reaches the Play Repeat OUT point. When it reaches the Play Repeat OUT point it seeks backto the Play Repeat IN point and plays again.
• Ping Pong To — play repeat ping pong is turned on by default when the clip is loaded. When theclip starts playing, it immediately seeks to the Play Repeat IN point and plays until it reaches thePlay Repeat OUT point. When it reaches the Play Repeat OUT point it starts playing in reverseuntil it reaches the Play Repeat IN point again..
6. Use the Play Repeat IN and Play Repeat OUT fields to the set the timecode for the in and out pointsof the clip.• Play Repeat IN — the first inclusive field/frame of the repeated portion of the clip. By default
this is the first field/frame of the clip.• Play Repeat OUT— the field/frame before the last field/frame of the repeated portion of the clip.
By default this is one field/frame beyond the end of the clip.
7. Click OK.
To Edit the Timecode Metadata of a ClipThe timecode metadata sets the source of the timecode information for the clip.1. Select the clip in the Clip Library you want to edit the metadata for.
Note: You cannot edit the metadata of a clip if it is locked.
2. Click Clip Library > Modify....3. Click on the Timecode tab.
44 • Clip Library — Tria+ UHD User Manual (v07A)

4. In the TC Source area, select the timecode source.• External TC - First Frame Only — the clip uses the external timecode data of the first field/frame
that was originally recorded with the clip. The timecode for the remainder of the clip is synthesized.This option is useful if there was a break or interruption in timecode data during recording.
• External TC - Entire Clip Length — the clip uses the external timecode data that was originallyrecorded with the clip. This option is useful if the clip has different segments in it with differenttimecode ranges that you want to use.
• Striped — the clip uses the internally generated, or synthesised, timecode starting at a definedpoint. Enter the numeric timecode value that you want to use for the start of the clip.
5. In the Dropframe Flag area, select if you want to use Drop frame timecode or Nondrop frametimecode.This option is only available if the clip was recorded in a 59.94Hz video format.
6. Click OK.
To Edit the Trim Metadata of a ClipThe trim metadata allows you to trim the head or tail off of the clip, setting a new start and end pointfor the clip. You can also offset a specific track in the clip.1. Select the clip in the Clip Library you want to edit the metadata for.
Note: You cannot edit the metadata of a clip if it is locked.
2. Click Clip Library > Modify....3. Click on the Trim tab.
Tria+ UHD User Manual (v07A) — Clip Library • 45

4. In the Trim In field, enter the new starting timecode value for the clip. The Record Start field showsthe timecode at the start of the clip.
5. In the Trim Out field, enter the new ending timecode value for the clip. The Recording End fieldshows the timecode at the end of the clip.
6. Use the Advance fields to slip the video, audio, or timecode track back in relation to the other tracksin the clip. Only those tracks that are present in the clip are shown.Any content slipped past the start of the clip will not be present in the output of the clip.
Tip: Select Advance by an extra half-frame to slip that particular track back half of a field/frame.
• Advance Video Track — slip the video track back in time relative to all the other tracks.• Advance Key Track — slip the key track back in time relative to all the other tracks.• Advance Audio Track — slip the audio track back in time relative to all the other tracks.• Advance Timecode Track — slip the timecode track back in time relative to all the other tracks.
7. Click OK.
Parent/Child ClipsYou can create virtual copies of a clip. These child clips are essentially pointers to the parent clip thatuse an independent set of metadata. This allows you to create a number of child clips that are trimmeddifferently from their parent and each other without taking up additional space on the media drive.Once a child clip has been created, you cannot delete the parent clip until all the child clips have beendeleted.
To Create a Child ClipThe child clip can have different metadata from the parent clip.
Note: You cannot create a child clip if the parent clip is locked.
1. Right-click on the clip that you want to create a child of.2. Click Create Child Clip.
The child clip appears in the clip list with the same name as the parent clip with - Child appended tothe end of the clip name.
Deleting a ClipBy default, you can only delete a single clip at a time. The Administrator and Privileged User accountscan be granted permission to delete multiple clips at once.
Note: Only Administrator and Privileged accounts can delete clips from the server.
To Delete a ClipRemove the clip from the Clip Library and the hard drive of the server.
Note: You cannot delete a clip if it is locked. Unlock the clip first and then you can delete it.
1. Select the clip(s) that you want to delete.
Note: Your account must have permission to delete more than one clip at a time.
2. Click Clip Library > Delete.You are prompted to confirm the deletion. Click Delete to delete the clip(s).
46 • Clip Library — Tria+ UHD User Manual (v07A)
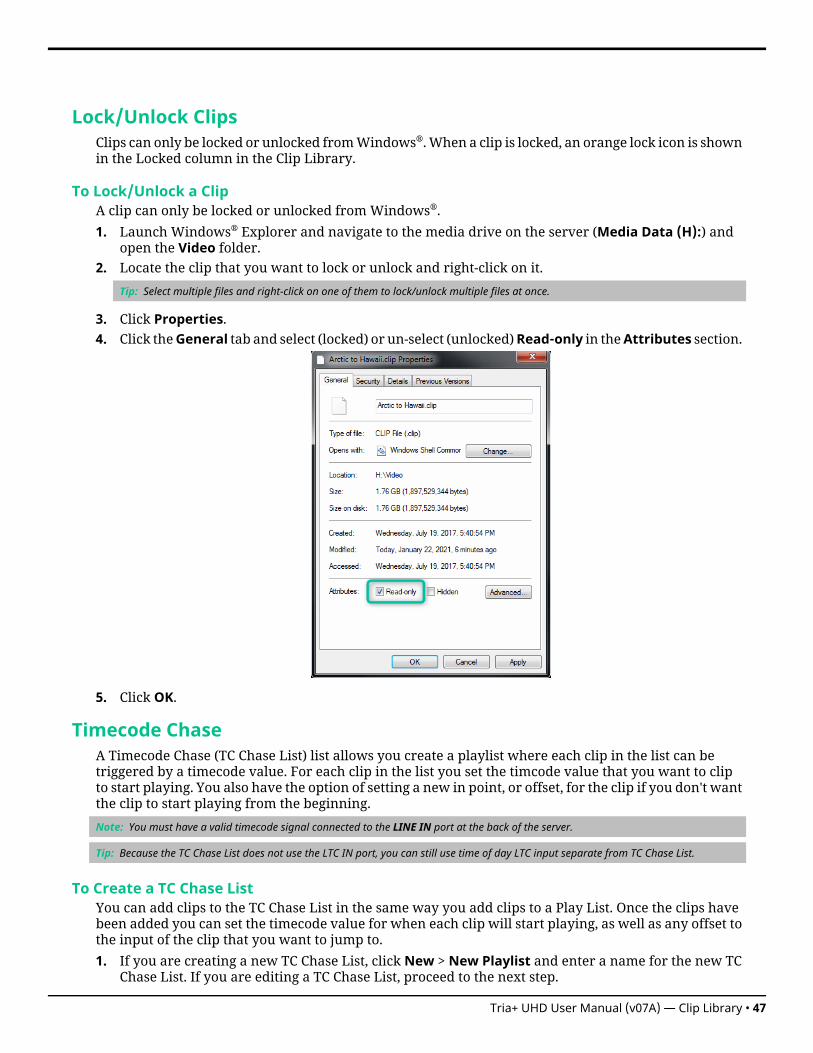
Lock/Unlock ClipsClips can only be locked or unlocked from Windows®. When a clip is locked, an orange lock icon is shownin the Locked column in the Clip Library.
To Lock/Unlock a ClipA clip can only be locked or unlocked from Windows®.1. Launch Windows® Explorer and navigate to the media drive on the server (Media Data (H):) and
open the Video folder.2. Locate the clip that you want to lock or unlock and right-click on it.
Tip: Select multiple files and right-click on one of them to lock/unlock multiple files at once.
3. Click Properties.4. Click theGeneral tab and select (locked) or un-select (unlocked)Read-only in theAttributes section.
5. Click OK.
Timecode ChaseA Timecode Chase (TC Chase List) list allows you create a playlist where each clip in the list can betriggered by a timecode value. For each clip in the list you set the timcode value that you want to clipto start playing. You also have the option of setting a new in point, or offset, for the clip if you don't wantthe clip to start playing from the beginning.
Note: You must have a valid timecode signal connected to the LINE IN port at the back of the server.
Tip: Because the TC Chase List does not use the LTC IN port, you can still use time of day LTC input separate from TC Chase List.
To Create a TC Chase ListYou can add clips to the TC Chase List in the same way you add clips to a Play List. Once the clips havebeen added you can set the timecode value for when each clip will start playing, as well as any offset tothe input of the clip that you want to jump to.1. If you are creating a new TC Chase List, click New > New Playlist and enter a name for the new TC
Chase List. If you are editing a TC Chase List, proceed to the next step.
Tria+ UHD User Manual (v07A) — Clip Library • 47
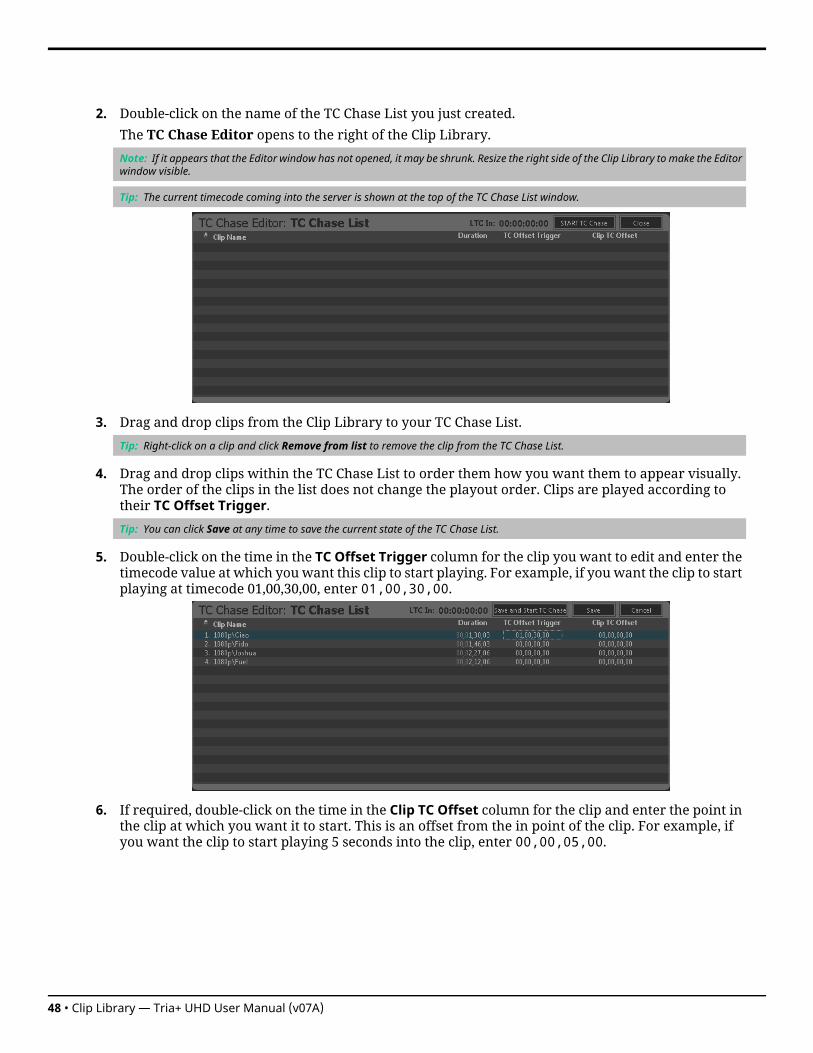
2. Double-click on the name of the TC Chase List you just created.The TC Chase Editor opens to the right of the Clip Library.
Note: If it appears that the Editor window has not opened, it may be shrunk. Resize the right side of the Clip Library to make the Editorwindow visible.
Tip: The current timecode coming into the server is shown at the top of the TC Chase List window.
3. Drag and drop clips from the Clip Library to your TC Chase List.
Tip: Right-click on a clip and click Remove from list to remove the clip from the TC Chase List.
4. Drag and drop clips within the TC Chase List to order them how you want them to appear visually.The order of the clips in the list does not change the playout order. Clips are played according totheir TC Offset Trigger.Tip: You can click Save at any time to save the current state of the TC Chase List.
5. Double-click on the time in the TC Offset Trigger column for the clip you want to edit and enter thetimecode value at which you want this clip to start playing. For example, if you want the clip to startplaying at timecode 01,00,30,00, enter 01,00,30,00.
6. If required, double-click on the time in the Clip TC Offset column for the clip and enter the point inthe clip at which you want it to start. This is an offset from the in point of the clip. For example, ifyou want the clip to start playing 5 seconds into the clip, enter 00,00,05,00.
48 • Clip Library — Tria+ UHD User Manual (v07A)

7. Repeat these steps for every clip in the TC Chase List.8. Click Save.
To Air a TC Chase ListTake the TC Chase List on-air to play each clip in order at the specified timecode values.
Note: A TC Chase List has no mix transition and only uses a single channel transport.
1. Double-click on the TC Chase List you want to air in the Clip Library.2. Select the channel transport that you want to play the TC Chase List on.3. Click START TC Chase on the TC Chase Editor window.
The TC Chase Editor window changes to the TC Chase ON-AIR window. As the timecode reachesthe point for each clip, the clip is highlighted red and plays out on the channel transport. The channeltransport outputs black if no clip is scheduled to play during the current timecode.
Tria+ UHD User Manual (v07A) — Clip Library • 49

Desktop Multi-ViewerThe integrated Multi-Viewer allows you to monitor multiple channel transports in a separate windowon the server. The layout of the Multi-Viewer depends on how many channels you have and how thechannels on the server are configured.
Tip: Connect a second computer monitor to the server to maximise the Multi-Viewer and the Tria Explorer on their own monitors.
Refer to Windows® documentation for information working with multiple monitors connected to thesame computer.You can launch the Multi-Viewer either in the Tria Explorer window or in an independent window.• Docked — Click Viewer at the top of the Tria Explorer window.• Un-Docked — Click View > Undock Viewer. The Multi-Viewer opens in a separate window that can
be moved to a different screen and maximized.
50 • Desktop Multi-Viewer — Tria+ UHD User Manual (v07A)

ExportYou can export a clip from the Clip Library to a number of formats for use in an external device.Files are exported in the same video format that the server is operating in.
Supported Media Files for ExportTable 2: Supported Video Codecs
DescriptionCodecFile Type
XAVC Class 300/480XAVCMXF
50Mb/sD10/IMX
native clip.NativeCLIP
To Select an Export DestinationYou can set up to nine export destinations, each with a different export format. Destination foldersshould only be located on network drives or high-speed USB drives (USB 2.0/3.0/3.1) mounted on theserver.
Important: Do not select an export destination on the system (C:) or media drive (H:) of the server. These drives are reservedfor the operating system and media playout and recording. Exporting to either of these drives could cause video errors andsystem instability.
1. Click Configure > Export Configuration.
2. Click the Destination X tab for the destination you want to set up or edit.3. Select Enable this destination to make this destination available for export.
Destination 1 is always available for export.
4. In the Destination Name field, enter a new name for the destination tab.5. Click Export Type and select the codec you want to use for the export.
Note: Only Abekas native .clip and AVC-Intra .mxf are available when operating in a 1080p video format.
6. Click Change and select the network drive or USB folder that you want to export to.7. Click Select Folder.
The selected folder is shown in the Export directory field.
8. Select additional export destination as required.9. Click Verify Export Destinations to verify that all destination can be found.
A message is shown next to the button stating that all destination are valid, or that destinations aremissing. The destinations that are missing are highlighted in yellow.
Tria+ UHD User Manual (v07A) — Export • 51

10. Click OK.
To Export Media FilesExport media files from the server to another format that can be used by another device.
Note: Some export functions require a channel to export video. Ensure that the channel you want to use for exporting is not being usedbefore you start the export.
1. Launch the Tria Explorer application.2. Click Clip Library.3. Select the clip(s) that you want to export in the Clip Library.4. Click Clip Library > Export.
The Export Editor opens with the selected clips listed.
5. To select a different destination for a clip, right-click on the clip and click Set Destination... andselect the new destination.
6. To set a custom in-point and out-point, load the clip into the selected channel transport and use thetransport controls to locate the new in-point or out-point and click IN or OUT to set that point. Thetimecode for the new in-point and out-point is shown in the table.
Tip: To split the clip into segments, set the in-point to where you want the segment to end and click Split Segment. A new clip of thesame name and export destination is created.
Tip: To duplicate the segment, set the in-point and end-point to where you want to new clip to start and end and click DuplicateSegments. A new clip of the same name and export destination is created.
7. Select all the clips you want to export and click Move to Export Queue.The Export Queue opens with the selected clips listed.
8. Click Start Export.9. If your export requires transcoding, in the Channel to take offline list, select the channel that you
want to use for the export and click OK.The server starts exporting the clips to the destination folders.
Tip: Click Abort Export to stop the export. The current clip is put back into the Export Queue with the remaining clips.
Growing File ExportYou can constantly export any channel that is being recorded, including one or more angles of a replayevent, to an export location on network drives or network attached storage (NAS). The growing files canthen be imported into a non-linear editor where is can be worked on in near real-time as the file continuesto grow. There is some delay (about 40 seconds) in the export process relative to the live record point.The Growing File Export service needs permissions to access the NAS for the export. Once this is set upyou can direct the Growing File Export to that network storage location.
52 • Export — Tria+ UHD User Manual (v07A)

To Set NAS Permissions for Growing File ExportThe Growing File Export service in Windows® needs permission to access the NAS where you want tolocate the Growing File Export.1. Launch the Services application from Windows®.
Tip: Click the Start button and search for services to quickly find the application.
2. In the Services list, locate Abekas Growing File Export.3. Right click on Abekas Growing File Exporter and click Properties.4. Click the Log On tab.5. Select This account and click Browse.
The Select User dialog opens.6. Click Advanced.
A new Select User dialog opens.7. Click Find Now.
A list of valid User Accounts is shown.8. Select the user account of the NAS you want to use for the Growing File Export and click OK.9. Verify that the user account is now listed in the Enter the object name to select field and click OK.10. Enter the password for the selected user account in the Password and Confirm password fields and
click OK.11. Click OK on the Services popup.12. Select the Abekas Growing File Exporter and click Restart the service.
To Create Growing Export FilesThe growing export works in real-time to export clips or replay events as they are being recorded. Thereis a separate growing file export for each record channel transport on the server.
Note: When exporting to a NAS, the Growing Export File service must have permissions to access the NAS and the NAS must be mapped toa network drive to be able to use the feature. Refer to your Windows® documentation for information on mapping a network drive.
Note: The configuration options that are available for export depend on the channel configuration of the server.
1. Click Configure > Export Configuration > Growing File Export.2. Select Enable for the record channel that you want to set up the growing export for.
Note: The options available depend on how the server is configured and whether the hardware channel has been set up forsingle-channel or multi-channel IOS operation.
3. Click Browse and select the network drive or USB folder that you want to export to.
Tria+ UHD User Manual (v07A) — Export • 53

4. Click Select Folder.The selected folder is shown in the Path field and the Ch Status line shows IDLE in green.
5. Select From 1st frame to have the export start with the first frame of the recording.6. In the Export Angles area, select which camera angles you want to include in the export.7. In the MXF Filename Field area, select how you want the export file to be named. An example of
how the name will appear is shown below.8. Select how you want to export different camera angles:
• Create ONE MXF file containing Multiple Angles• Create MANY MXF files; one for each Angle
9. Click START Export to start the growing file export operation.The growing file export starts about 40 seconds after the selected record channel starts recording.If the record channel is already recording, the growing file export starts about 40 seconds after youclick START Export.
10. Click OK.
54 • Export — Tria+ UHD User Manual (v07A)

Remote Control SupportUse the information in this section to assist you in setting up an external device to control your server.
Remote Communications (RS-422)Direct control of each channel transport on the server is available through ethernet communications.
Note: The BVW-75 and Odetics protocols are not supported over ethernet at this time.
The procedure for setting up a room for external control depends on the protocol you want to use.
To Configure a Room for the BVW-75 ProtocolSet up a Room to use the BVW-75 protocol to control server channels.
Note: The BVW-75 protocol does not support clip library listing or clip loading.
1. Launch the Tria Config application.You may be prompted to allow the program to make changes on the computer, click Yes.
2. Click the RS422 tab.
3. Click Room X Configuration and select the room you want to configure. Later you will assign thisroom to a channel.
4. In the RS422 Protocol area, select BVW-75.5. In the Response Time area, select how quickly the server executes the Clip Play command after the
Clip Load command.• Fast — executes the play command immediately after the load command. This is recommended
when controlling the server from an external switcher.• Accurate— executes the play command only after receiving confirmation that the clip has loaded.
This is recommended when controlling the server from an automation system.
Tria+ UHD User Manual (v07A) — Remote Control Support • 55

6. In the Edit Timing area, select a timing offset for when you are controlling the server from an externaleditor over serial.• Timecode Alignment — select the offset, in frames, of the timecode information that is sent to
the editor during playout or record.• Source Alignment — select the offset, in frames, of the timecode information that is sent to the
editor during playout.• Out Point Offset — select the offset, in fields, of the out-point timecode value that is sent to the
editor during record.
7. In the Video Edit Effect area, select which tracks get recorded when an external editor issues theVideo Record command to the server.• Edit Video Track — only the video track is recorded.• Edit Key Track — only the alpha (key) track is recorded.• Edit Video and Key Tracks— both the video and alpha (key) tracks are recorded. The clip loaded
into the VKA channel transport must have an alpha track.
8. In the BVW-75 Protocol Configuration area, select specific configurations for the protocol you areusing.• Select Disable field timecode reporting to force the server to report timecode only once every
video frame. If this option is not selected, the server reports timecode every field.• Select the Protocol ID that you want to use (Abekas 6000, Sony BVW-75, or Generic DDR).
9. Click on the Ch-X: list and select the room that you want to assign to the channel.10. Click Restart Tria. A confirmation dialog box is displayed.11. Click Restart Tria to restart the server application and services with the new setting.12. Click OK when the restart has completed to dismiss the window.
To Configure a Room for the Odetics ProtocolSet up a Room to use the Odetics protocol to control server channels.1. Launch the Tria Config application.
You may be prompted to allow the program to make changes on the computer, click Yes.
2. Click the RS422 tab.
56 • Remote Control Support — Tria+ UHD User Manual (v07A)

3. Click Room X Configuration and select the room you want to configure. Later you will assign thisroom to a channel.
4. In the RS422 Protocol area, select Odetics.5. In the Response Time area, select how quickly the server executes the Clip Play command after the
Clip Load command.• Fast — executes the play command immediately after the load command. This is recommended
when controlling the server from an external switcher.• Accurate— executes the play command only after receiving confirmation that the clip has loaded.
This is recommended when controlling the server from an automation system.
6. In the Edit Timing area, select a timing offset for when you are controlling the server from an externaleditor over serial.• Timecode Alignment — select the offset, in frames, of the timecode information that is sent to
the editor during playout or record.• Source Alignment — select the offset, in frames, of the timecode information that is sent to the
editor during playout.• Out Point Offset — select the offset, in fields, of the out-point timecode value that is sent to the
editor during record.
7. In the Video Edit Effect area, select which tracks get recorded when an external editor issues theVideo Record command to the server.• Edit Video Track — only the video track is recorded.• Edit Key Track — only the alpha (key) track is recorded.• Edit Video and Key Tracks— both the video and alpha (key) tracks are recorded. The clip loaded
into the VKA channel transport must have an alpha track.
8. In the Odetics Protocol Configuration area, select specific configurations for the protocol you areusing.• Select Disable field timecode reporting to force the server to report timecode only once every
video frame. If this option is not selected, the server reports timecode every field.
Tria+ UHD User Manual (v07A) — Remote Control Support • 57

• Select the Protocol ID that you want to use (Abekas 6000, Sony BVW-75, or Generic DDR).
9. Click on the Ch-X: list and select the room that you want to assign to the channel.10. Click Restart Tria. A confirmation dialog box is displayed.11. Click Restart Tria to restart the server application and services with the new setting.12. Click OK when the restart has completed to dismiss the window.
To Configure a Room for the VDCP ProtocolSet up a Room to use the VDCP (Louth) protocol to control server channels.
Note: When controlling the server from a remote device over ethernet, you must select the port on the server corresponding to the channeltransport you want to send commands to. For example, channel transport A = port 8000, channel transport B = port 8001, and so on.
1. Launch the Tria Config application.You may be prompted to allow the program to make changes on the computer, click Yes.
2. Click the RS422 tab.
3. Click Room X Configuration and select the room you want to configure. Later you will assign thisroom to a channel.
4. In the RS422 Protocol area, select VDCP.5. In the Restrict to Folder area, select if you want to restrict remote control of the selected room to
only seeing the contents of a specific folder, or all folders (All Folders).6. In the Response Time area, select how quickly the server executes the Clip Play command after the
Clip Load command.• Fast — executes the play command immediately after the load command. This is recommended
when controlling the server from an external switcher.
58 • Remote Control Support — Tria+ UHD User Manual (v07A)

• Accurate— executes the play command only after receiving confirmation that the clip has loaded.This is recommended when controlling the server from an automation system.
7. In the Channel Control Port area, select whether you want to use the serial ports or ethernetconnection for the channels assigned to the room.
Note: The Tria+ UHD does not have an serial port for device control. You must select Ethernet.
8. In the Edit Timing area, select a timing offset for when you are controlling the server from an externaleditor over serial.• Timecode Alignment — select the offset, in frames, of the timecode information that is sent to
the editor during playout or record.• Source Alignment — select the offset, in frames, of the timecode information that is sent to the
editor during playout.• Out Point Offset — select the offset, in fields, of the out-point timecode value that is sent to the
editor during record.
9. In the Video Edit Effect area, select which tracks get recorded when an external editor issues theVideo Record command to the server.• Edit Video Track — only the video track is recorded.• Edit Key Track — only the alpha (key) track is recorded.• Edit Video and Key Tracks— both the video and alpha (key) tracks are recorded. The clip loaded
into the VKA channel transport must have an alpha track.
10. In the VDCP Configuration area, select specific configurations for the protocol you are using.• Select Louth Preview to allow clips to be pre-cued in the background for seamless back-to-back
transitions during playout.• Select Allow playlists control to allow a playlist to be cued and played from an external device
just like a clip.• In the Maximum length of Clip Name field, select the maximum length of a clip name that is
reported to the controlling device.
11. Click on the Ch-X: list and select the room that you want to assign to the channel.12. Click Restart Tria. A confirmation dialog box is displayed.13. Click Restart Tria to restart the server application and services with the new setting.14. Click OK when the restart has completed to dismiss the window.
To Configure a Room for the AMP ProtocolSet up a Room to use the AMP protocol to control server channels.
Note: When controlling the server from a remote device over ethernet, you must select the port as 3811 and then select the channel youwant to send the commands to.
1. Launch the Tria Config application.You may be prompted to allow the program to make changes on the computer, click Yes.
2. Click the RS422 tab.
Tria+ UHD User Manual (v07A) — Remote Control Support • 59

3. Click Room X Configuration and select the room you want to configure. Later you will assign thisroom to a channel.
4. In the RS422 Protocol area, select AMP.5. In the Response Time area, select how quickly the server executes the Clip Play command after the
Clip Load command.• Fast — executes the play command immediately after the load command. This is recommended
when controlling the server from an external switcher.• Accurate— executes the play command only after receiving confirmation that the clip has loaded.
This is recommended when controlling the server from an automation system.
6. In the Edit Timing area, select a timing offset for when you are controlling the server from an externaleditor over serial.• Timecode Alignment — select the offset, in frames, of the timecode information that is sent to
the editor during playout or record.• Source Alignment — select the offset, in frames, of the timecode information that is sent to the
editor during playout.• Out Point Offset — select the offset, in fields, of the out-point timecode value that is sent to the
editor during record.
7. In the Video Edit Effect area, select which tracks get recorded when an external editor issues theVideo Record command to the server.• Edit Video Track — only the video track is recorded.• Edit Key Track — only the alpha (key) track is recorded.• Edit Video and Key Tracks— both the video and alpha (key) tracks are recorded. The clip loaded
into the VKA channel transport must have an alpha track.
8. In the AMP Protocol Configuration area at the bottom of the window, select specific configurationsfor the protocol you are using.
60 • Remote Control Support — Tria+ UHD User Manual (v07A)

• Select Disable field timecode reporting to force the server to report timecode only once everyvideo frame. If this option is not selected, the server reports timecode every field.
• Select Allow overlapped commands to allow the server to accept overlapping commands.• Select Allow playlists control to allow a playlist to be cued and played from an external device
just like a clip.• Select the Protocol ID that you want to use (Abekas 6000, Sony BVW-75, or Generic DDR).
9. Click on the Ch-X: list and select the room that you want to assign to the channel.10. Click Restart Tria. A confirmation dialog box is displayed.11. Click Restart Tria to restart the server application and services with the new setting.12. Click OK when the restart has completed to dismiss the window.
DashBoardThe DashBoard control system allows remote access to multiple pieces of Ross Video equipment, includingopenGear® cards, Carbonite production switchers, Ross video servers, and Ross cameras. Download andinstall the latest version of DashBoard from www.rossvideo.com/support/software-downloads/.Review the documentation that comes with DashBoard for information on installing and launchingDashBoard.To control Tria+ UHD from DashBoard you must create a custom panel in DashBoard using PanelBuilderto send VDCP or Tria+ UHD Ethernet API commands to the server.
Note: DashBoard can only display active video for a channel transport if DashBoard is running on the same Tria+ UHD server. Active videofor a channel transport cannot be shown in DashBoard when DashBoard is running on a separate computer.
Abekas® DashBoard ServiceThe Abekas® OGP (openGear® Protocol) Service allows you to connect to your server from DashBoard.
To Install the Abekas® OGP ServiceThe AbekasOGP application should already be installed on your server. If it is not, you can downloadand install the application manually.1. Navigate to the Downloads section of the Ross® website for your server product and download the
Abekas® OGP DashBoard Service.
Tip: For example, if you have a Mira server, you would navigate to https://www.rossvideo.com/support/software-downloads/mira/.
2. Run the Abekas_#.#.#_setup.exe application on your server and follow the wizard to install theservice.
To Connect to the Server from DashBoard1. Click File > New > TCP/IP DashBoard Connect or openGear Device.
Tria+ UHD User Manual (v07A) — Remote Control Support • 61

2. In the IP Address field, enter the IP address of the server. The default IP address is 192.168.0.1.3. In the Display Name field, enter the name you want to use to identify the server in DashBoard. This
should be a unique name for the server you are setting up.4. Select JSON.5. In the Port field, enter 5254.6. Click Finish.
The server appears in the Tree View.
DashBoard InterfaceThe server appears as a node in the DashBoard Basic Tree View. The Replay and Explorer sub-nodescan be expanded to show the Operator and Explorer pages.
ReplayThe Operator 1 and Operator 2 pages are also known as MiraTouch Horse Racing panels and areintended to be used in a 4-in/2-out replay configuration for horse racing.
ExplorerThe Explorer and Explorer Touch pages mirror the operation of the Explorer application of your server.The Explorer Touch page is smaller version designed to fit into Live Assist.
Tip: Portions of these pages can be dragged onto a custom panel in DashBoard PanelBuilder.
62 • Remote Control Support — Tria+ UHD User Manual (v07A)

PaletteThe Palette page provides a number of widgets for use in PanelBuilder.
PanelBuilder Custom Panel AttributesWhen building a custom panel in DashBoard, you can connect to your server as a data source. Thisallows you access to numerous powerful commands and parameters native to your server.
To Add a Server Command to a Custom Panel1. Double-click on the canvas of your custom panel and click the openGear or XPression DataLinq
Configure button.
Tria+ UHD User Manual (v07A) — Remote Control Support • 63
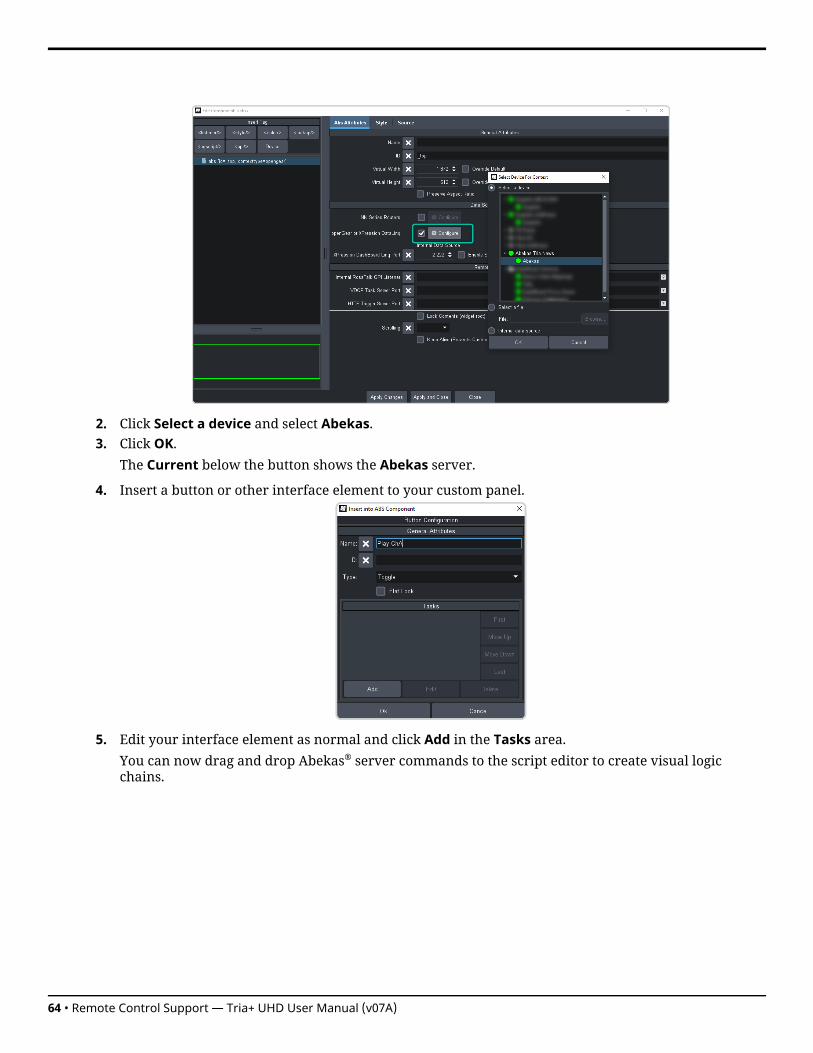
2. Click Select a device and select Abekas.3. Click OK.
The Current below the button shows the Abekas server.
4. Insert a button or other interface element to your custom panel.
5. Edit your interface element as normal and click Add in the Tasks area.You can now drag and drop Abekas® server commands to the script editor to create visual logicchains.
64 • Remote Control Support — Tria+ UHD User Manual (v07A)

Clip ID SupportDevices using the VDCP or Odetics protocol can use the 8-character clip ID assigned to a clip. By default,the server does not assign a clip ID to the clip when it is recorded. If there is no clip ID, the first 8characters of the clip name are used instead.
Sony® MVS Series SwitcherUse the following information to set up your Sony® MVS series switcher to control the server as eithera Recorder or Player device.
Table 3: VDCP RS422 Protocol Constants
SettingItemNo.
(1-N)*Video Port1
10Maximum Open Delay2
0Maximum Cueup Delay3
0Play After Cueup Delay4
2Stop Delay5
6Still Delay6
0Continue Delay7
2Idle Delay8
* Set this value to the MVS virtual RS422 Port # that is connected to the server.
Tria+ UHD User Manual (v07A) — Remote Control Support • 65

MaintenanceRefer to the following information for performing maintenance on your server, muting an alarm,restoring factory defaults, or upgrading the software.
Media DrivesThe server uses a RAID array of media drives to store all media content.
Disk SpaceThe amount of free disk space that is available for clips is shown at the top of theTria Explorerwindow.The free space is shown in time (HH:MM:SS:FF) and percentage of free space on the drive. When theamount of free space goes below 10% the text is highlighted in yellow. If the amount of free disk spacegoes below 5% the text is highlighted in red.
Tip: When the amount of free disk space goes below 5% you should consider removing unused content in order to free-upmedia disk space.To assist you in locating older or unused content, the Clip Library contains Date Loaded and Date Played columns that can be used to sortcontent.
66 • Maintenance — Tria+ UHD User Manual (v07A)

AsRun Log CreatorThe server keeps a log of stills and clips that have been played in their entirety on all channel of theserver. This information can then be filtered and output into either a CSV file or a PDF report.
Note: Clips must be played out in their entirety to be added to the AsRun log.
The AsRun log can be filtered for a number of criteria for the media items and when or where they wereplayed.• Date Range — the range of dates that the media items was played in.• Channels — the transport channels that the media items were played on.• Media Players — the type of media item that was played (audio and video).• Media File Name — the name of the media item that was played.
To Run an AsRun ReportGenerate a PDF or CSV report of what clips and stills were played on the server.1. Launch the AsRunReport application on your server.
2. Set the parameters and filters you want to apply to the report
DescriptionItem
This is the name that appears on the report.Report Name
Add any additional notes that you want to appear on the report.Additional Notes
Select how you want the report to be formatted.• Aggregate— lists how many times each clip was played during the selected date range• Individual— lists every instance that a clip was played, including the start and stop times,
during the selected date range
Format
Set the from and to date range between which you want to generate the report.Date Range
Select which transport channels on the server that you want to generate the report for.Channel that are not present on your server are grayed out.
Channels
Select whether you want to show only audio clips, only video clips, or both.Media Players
Tria+ UHD User Manual (v07A) — AsRun Log Creator • 67

DescriptionItem
Enter a name or part of a name in the field, or leave the field blank. The clips that were playedduring the date range will be filter to only include those clip names that include theMediaFile Name. If no name is specified the filter will return all clip names.
Media File Name
3. Click Apply Filter.The table below lists all the results of the filter.
Tip: You can change the filter settings and click Apply Filter again to update the search results.
4. Click a Create button to generate the report file. You are prompted for a location to save the file.• Create CSV — creates a standard comma segmented value (CSV) file.• Create PDF — creates a formatted PDF report file.
5. Click Exit.
68 • AsRun Log Creator — Tria+ UHD User Manual (v07A)

TroubleshootingRefer to the applicable section below for information on troubleshooting the operation or setup of yourserver.
Tria Explorer Problems• Transport control buttons (Play, Stop, etc.) are grayed out.
• Is a play channel transport selected and active?• Is a clip loaded in the selected play channel?
• A play channel is selected, and a clip is loaded, but still can’t control anything.• Are you logged in as Guest user? Guest user level may not have permission to use all transport
controls. Quit Tria Explorer, and log back in as either Administrator or as Privileged User.
• There are clips stored on the server but they aren't listed in the Clip Library.• Expand the clip listing within the Clip ID column by clicking + before the server name.
• I cannot see all of the information for a given column in the Clip Library. There is a … symbol at endof the field.• Expand the width of the given column.
• I cannot modify any of the clip metadata in Clip Modify menu.• Is the clip locked? Clip metadata cannot be modified on locked clips.
• I cannot see any other windows or the taskbar because Tria Explorer covers the entire computerscreen.• Tria Explorer is in Full Screen mode. Press the F11 button on the keyboard to exit (or to enter)
this mode.
• I cannot delete a clip, or cannot delete any clips.• Is the clip locked? Clips cannot be deleted if they are locked.• Do you have proper user permissions? You may not have permission to delete clips at your user
level.
• I see the Keywords field in the ClipModifymenu. I can enter a keyword but I can’t see the keywordsin the Clip Library listing.• While it is possible to enter, save and search (find) keywords for all clips, the feature to display
the keywords in the Clip Library is not implemented at this time.
Tria Import Problems• Cannot see any remote directories when choosing the Import From directory, or when selecting clips
to import.• Have you mapped the remote directory as a local disk drive?
• Video on channel is disrupted when importing media files.• The processing hardware for a video channel is used during media file import.
• I get a missing codec error message when importing some QuickTime® MOV files.• If the MOV file you are attempting to import was created with a proprietary codec (for example,
with Avid® DNxHD codec), then you will need to visit the web site of the codec creator and downloadand install that codec on the server.
Tria+ UHD User Manual (v07A) — Troubleshooting • 69

• To identify which codec was used to create the MOV file, open the MOV file in the standardQuickTime® player and choose the Window > Movie Inspector (CTRL+i). The codec will be listedwithin the Source information.
General Problems• Video output is not synchronized with downstream devices.
• Check that a reference signal is connected to the Reference BNC on the back of the server and thatthe correct reference format is selected.
• I cannot record external timecode.• Check that a valid analog timecode signal is connected to the LTC IN port.• Verify that the timecode signal is 1V peak-to-peak minimum.
• I hear a beeping sound from inside the main server chassis.• Check to see if two power cords are connected to the AC input on both power supplies. If only one
power cord is connected, then the internal alarm will sound. The only way to silence the alarm isto either connect AC power to both modules, or remove the module without power. Although theserver can operate with just one power module, it is not recommended.
• If the two power cords are connected to the two modules of the power supply, and you are surethere is full power on both power cords, then check the small LED on each of the two power supplymodules (from the chassis rear). These LEDs should be solid green. If either LED is blinking, orhas changed to yellow or red, then you may have a fault in the power supply module. Remove thesuspect power supply module immediately (the alarm should then mute). Contact Ross® technicalsupport for assistance.
• If the power supply checks okay, check the LEDs on the media drives on the front of the server.These LEDs should be BLUE or PURPLE. If any of the LEDs are RED there may be a failed mediadrive. Eject the drive and re-seat the dive in the bay. If this does not clear the fault after 5-10seconds the drive may have failed. Contact Ross® technical support for assistance.
70 • Troubleshooting — Tria+ UHD User Manual (v07A)

SpecificationsResources, video specifications, power rating, and port pinouts.The information is this section is subject to change without notice.
ResourcesThe number of resources specific to your server depends on the model.
2-ChResource
2 12G UHDTV1Video Inputs
2 12G UHDTV1Video Outputs
2 (embedded) × 16-tracks,48kHz @ 24-bits
Digital Audio Inputs
2 (embedded) × 16-tracks,48kHz @ 24-bits
Digital Audio Outputs
Operating TemperatureThe system has been qualified at an operational temperature range of 13 to 35°C (55 to 95°F) and anon-condensing humidity range of 20 to 80%.
Table 4: Safe Operation and Non-operating Environmental Conditions
Non-operatingOperating
-40 to 65°C (-40 to 149°F)5 to 55°C (41 to 131°F)Temperature
5 to 95% non-condensing8 to 90% non-condensingRelative Humidity
35°C (95°F) non-condensing29.5°C (85°F) non-condensingMax. Wet Bulb Temperature
15°C/hour (59°F/hour)15°C/hour (59°F/hour)Max. Temperature Gradient
-300 to 12,200m (-984 to 40,026ft.)-300 to 3,048m (-984 to 10,000ft.)Altitude Range
Note: Operator is responsible for providing sufficient ventilation to maintain surface temperature below 40°C (104°F) at the center of thetop cover of the media drive.
Note: Non-condensing conditions should be maintained at all times.
Note: Maximum storage period inside shipping package is one year.
Tria+ UHD User Manual (v07A) — Specifications • 71

PortsLTC Port
SignalPin
Ground1
LTC-2
LTC+3
72 • Ports — Tria+ UHD User Manual (v07A)

Index
Numerics3-Point Loop 30, 323G Formats 13
AActive Channel 30Administrator 28Administrator Account 27Air Playlist 41AsRun 67Audio Routers 16Audio Setup 15Auto Play 31
CChain 30Channel Labels 18Chase, Timecode 47Child Clips 46Clip Export 51Clip Folders 42Clip ID Support 65Clip Library 39Clip Search 39Clip, Delete 46Count-Down Timer 30Cue Points 32
DDelete Clip 46Disk Space 66Duplicate Segment, Export 52
EEE 30Eject Clip, See Unload ClipElectronic-to-Electronic 30Ethernet Control 55Exit Playlist 41Explorer 27Export 52Export Destination 51
FFast-Forward 30Find Clip 39Folders 42Free Disk Space 66
GGrowing Export 52Guest User Account 27
HHD Export Codecs 51
IImport 21, 23
AutoStart 23Codec 23Color Config 23Destination 23Multi-Screen 23Multi-Screen File 23Watch 23
Import Media Files 21ISO-2 13
JJog Forward/Reverse 30
KKeyboard Shortcuts 36
LLabels, Channels 18Load Clip 30–31Lock/Unlock Channel 35Locked Clips 47Locked, Clips 47Loop Repeat 30, 32Loop to Play Repeat 30, 32Loop, Off 32Looping 32Looping, Play List 41
MMaintenance 66Media Drives 66Metadata 42Metadata, Attributes 43Metadata, Labels 42Metadata, Timecode 44Metadata, Trim 45Multi-Screen 23
Import 23Multi-Viewer 50
Tria+ UHD User Manual (v07A) — Index • 73

OOGP Service 61Operating Temperature 71
PParent Clips 46Ping-Pong Repeat 30, 32Play Forward 30Play List 40Play List Commands 41Play List, Exit 41Play List, Looping 41Play Reverse 30Play Speed 30Privileged User Account 27
RRecord 30, 33Remote Control 55Repeat Modes 32Required Equipment 11Rewind 30Router 14RS-422 55
SSearch Clips 39
Seek End 30Seek Start 30Select Columns 42Setup 13Slider Handle 30Specifications 71Stop 30
TTC Chase 47Timecode 18, 30Timecode Chase 47Tria Config 12Tria Explorer 12Tria Import 12TSL Tallies 19
UUndock Multi-Viewer 50Unload Clip 32
VVA 13Verify Destinations 51Video Format 13VKA 13
74 • Index — Tria+ UHD User Manual (v07A)