Trend Micro, the Trend Micro t-ball logo, InterScan, and Control ... · Mail Auditing and Tracking...
195
Transcript of Trend Micro, the Trend Micro t-ball logo, InterScan, and Control ... · Mail Auditing and Tracking...


Trend Micro Incorporated reserves the right to make changes to this document and tothe product described herein without notice. Before installing and using the product,review the readme files, release notes, and/or the latest version of the applicabledocumentation, which are available from the Trend Micro website at:
http://docs.trendmicro.com/en-us/enterprise/interscan-messaging-security-suite-for-linux.aspx
Trend Micro, the Trend Micro t-ball logo, InterScan, and Control Manager aretrademarks or registered trademarks of Trend Micro Incorporated. All other product orcompany names may be trademarks or registered trademarks of their owners.
Copyright © 2012. Trend Micro Incorporated. All rights reserved.
Document Part No.: MSEM76002_130725
Release Date: September 2013
Protected by U.S. Patent No.: 5,951,698

This documentation introduces the main features of the product and/or providesinstallation instructions for a production environment. Read through the documentationbefore installing or using the product.
Detailed information about how to use specific features within the product may beavailable at the Trend Micro Online Help Center and/or the Trend Micro KnowledgeBase.
Trend Micro always seeks to improve its documentation. If you have questions,comments, or suggestions about this or any Trend Micro document, please contact us [email protected].
Evaluate this documentation on the following site:
http://www.trendmicro.com/download/documentation/rating.asp

i
Table of ContentsAbout this Manual
About this Manual ........................................................................................... vii
What's New ...................................................................................................... viii
Audience ............................................................................................................ xii
InterScan Messaging Security Suite Documentation .................................. xii
Document Conventions ................................................................................. xiii
Chapter 1: Introducing InterScan Messaging Security SuiteAbout InterScan Messaging Security Suite ................................................. 1-2
IMSS Main Features and Benefits ................................................................ 1-2
About Spyware/Grayware ............................................................................ 1-9How Spyware/Grayware Gets into your Network ......................... 1-10Potential Risks and Threats ................................................................ 1-10
About Web Reputation ................................................................................ 1-11
About Trend Micro Control Manager ...................................................... 1-11Control Manager Support ................................................................... 1-12
About Trend Micro Smart Protection ....................................................... 1-14The Need for a New Solution ............................................................ 1-15Trend Micro Smart Protection Network .......................................... 1-16
About Marketing Email Message Scanning .............................................. 1-16
Chapter 2: Component DescriptionsAbout IMSS Components ............................................................................. 2-2
The IMSS Admin Database .......................................................................... 2-2
Central Controller ........................................................................................... 2-2
Scanner Services .............................................................................................. 2-2

Trend Micro InterScan Messaging Security Suite Installation Guide
ii
Policy Services ................................................................................................. 2-3Policy Synchronization .......................................................................... 2-4
End-User Quarantine Service ....................................................................... 2-4Primary and Secondary End-User Quarantine Services ................... 2-4End-User Quarantine Server Components ........................................ 2-4Apache Web Server and mod_jk ......................................................... 2-5Tomcat ..................................................................................................... 2-5Struts Framework ................................................................................... 2-6End-User Quarantine Application ....................................................... 2-6
The End-User Quarantine Database ........................................................... 2-7
IP Filtering ....................................................................................................... 2-7How IP Profiler Works ......................................................................... 2-8
Email Reputation ............................................................................................ 2-9Types of Email Reputation ................................................................... 2-9How Email Reputation Technology Works ..................................... 2-10
About End-User Quarantine (EUQ) ........................................................ 2-11
About Centralized Reporting ...................................................................... 2-12
Chapter 3: Planning for DeploymentDeployment Checklist .................................................................................... 3-2
Component and Sub-module Installation ................................................... 3-7
IMSS Ports ....................................................................................................... 3-8
Network Topology Considerations ........................................................... 3-12Installing without a Firewall ............................................................... 3-12Installing in Front of a Firewall .......................................................... 3-13Installing Behind a Firewall ................................................................ 3-14Installing on a Former SMTP Gateway ............................................ 3-15Installing in the De-Militarized Zone ................................................ 3-16
About Operating Models ............................................................................ 3-17The Standalone Model ......................................................................... 3-18The Sandwich Model ........................................................................... 3-20The Proxy Model .................................................................................. 3-24
Table of Contents
iii
Understanding Installation Scenarios ........................................................ 3-25Single-Server Installation ..................................................................... 3-26Multiple Scanner Service Installation ................................................ 3-27Multiple End-User Quarantine Service Installation ........................ 3-30Complex Distributed Installation ...................................................... 3-33Wide-Area Network Installation ........................................................ 3-35
IP Filtering ..................................................................................................... 3-38Deployment with IP Filtering ............................................................ 3-38
About Failover .............................................................................................. 3-39
Chapter 4: Installing and Uninstalling IMSS 7.1 SP1System Requirements ..................................................................................... 4-2
Preparing the Message Transfer Agents ...................................................... 4-5Preparing Postfix .................................................................................... 4-5About Sendmail ...................................................................................... 4-6About Qmail ......................................................................................... 4-11
Preparing to Install IMSS Components and End-User Quarantine ..... 4-12Installing IMSS Components and End-User Quarantine .............. 4-12
About IP Filtering Components ................................................................ 4-16IPv6 Support and IP Filtering ............................................................ 4-16Installing Email Reputation Services and IP Profiler ..................... 4-17Integrating IMSS with Sendmail and Qmail .................................... 4-21
Verifying the Installation ............................................................................. 4-24
About IPv6 Support ..................................................................................... 4-25Configuring the Server for IPv6 ........................................................ 4-26Configuring IMSS for IPv6 Support ................................................. 4-27
Performing Uninstallation ........................................................................... 4-30Uninstalling IMSS Components ........................................................ 4-31Uninstalling Email Reputation Services and IP Profiler ................ 4-32Performing Manual Uninstallation .................................................... 4-33
Chapter 5: Upgrading from Previous VersionsUpgrading from an Evaluation Version ...................................................... 5-2
Trend Micro InterScan Messaging Security Suite Installation Guide
iv
Upgrading to IMSS 7.1 Linux ....................................................................... 5-4Upgrading from IMSS Linux 5.7 to IMSS 7.1 ................................... 5-4Installing IMSS Linux 7.1 Over IMSS Linux 5.7 ............................ 5-20Upgrading from IMSS Linux 7.0 to IMSS Linux 7.1 ...................... 5-24
Migrating to IMSS 7.1 Linux ...................................................................... 5-33Migrating from IMSS Linux 5.7 to IMSS Linux 7.1 ....................... 5-33Migrating from IMSS Linux 7.0 to IMSS Linux 7.1 ....................... 5-35
Migrating to IMSS 7.1 SP1 Linux .............................................................. 5-38Migrating from IMSS 7.0 SP1 Linux to IMSS 7.1 SP1 Linux ....... 5-38Migrating from IMSS 7.0 SP1 Patch 4 Solaris to IMSS 7.1 SP1 Linux .................................................................................................................. 5-40Migrating from IMSS 7.1 Linux Patch 3 to IMSS 7.1 SP1 Linux . 5-43
Activating Supported Services .................................................................... 5-45
Rolling Back the Upgrade ........................................................................... 5-45Rolling Back to IMSS 5.7 .................................................................... 5-45Rolling Back to IMSS 7.0 .................................................................... 5-47
Chapter 6: Troubleshooting and Support InformationTroubleshooting .............................................................................................. 6-2
Installation Troubleshooting Issues .................................................... 6-2
Frequently Asked Questions About Installation ....................................... 6-2Postfix MTA Settings ............................................................................. 6-2Installation / Uninstallation .................................................................. 6-3Upgrading ................................................................................................ 6-4
Support Information ...................................................................................... 6-7Using the Support Portal ....................................................................... 6-7Contacting Technical Support .............................................................. 6-8TrendLabs ................................................................................................ 6-9Security Intelligence ............................................................................... 6-9Download Center ................................................................................. 6-10Sending Suspicious Content to Trend Micro ................................... 6-10
IndexIndex .............................................................................................................. IN-1

Table of Contents
v


vii
Preface
About this ManualWelcome to the Trend Micro™ InterScan™ Messaging Security Suite InstallationGuide. This manual contains information about InterScan Messaging Security Suite(IMSS) features, system requirements, as well as instructions on installing and upgradingIMSS settings.
Refer to the IMSS 7.1 SP1 Administrator's Guide for information about configuring IMSSsettings and the Online Help in the management console for detailed information abouteach field on the user interface.
Topics include:
• What's New on page viii
• Audience on page xii
• InterScan Messaging Security Suite Documentation on page xii
• Document Conventions on page xiii
Trend Micro InterScan Messaging Security Suite Installation Guide
viii
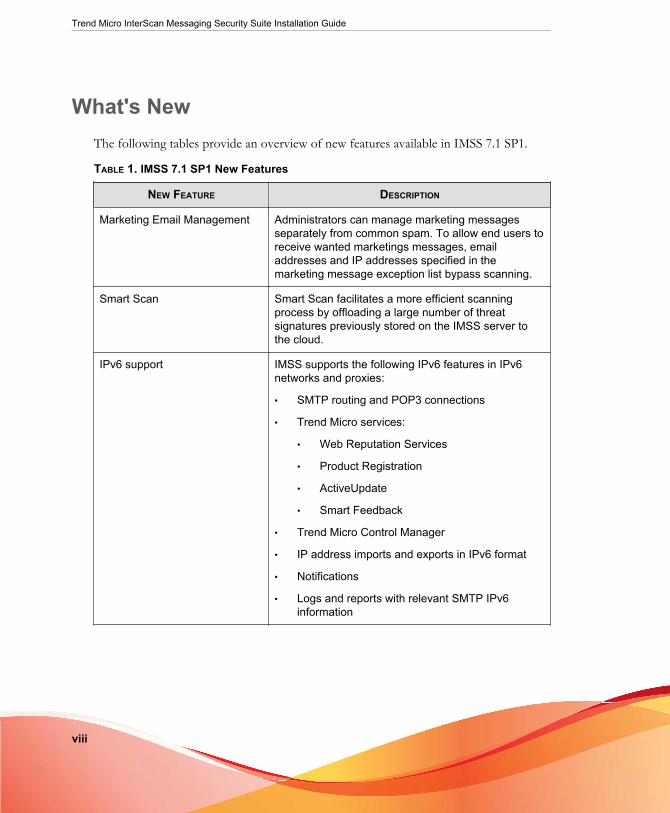
What's NewThe following tables provide an overview of new features available in IMSS 7.1 SP1.
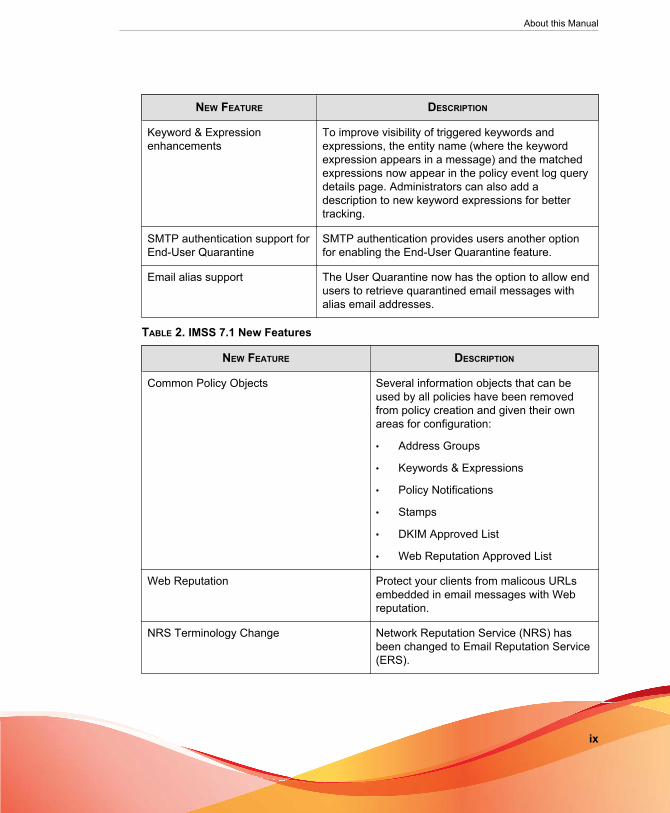
TABLE 1. IMSS 7.1 SP1 New Features
NEW FEATURE DESCRIPTION
Marketing Email Management Administrators can manage marketing messagesseparately from common spam. To allow end users toreceive wanted marketings messages, emailaddresses and IP addresses specified in themarketing message exception list bypass scanning.
Smart Scan Smart Scan facilitates a more efficient scanningprocess by offloading a large number of threatsignatures previously stored on the IMSS server tothe cloud.
IPv6 support IMSS supports the following IPv6 features in IPv6networks and proxies:
• SMTP routing and POP3 connections
• Trend Micro services:
• Web Reputation Services
• Product Registration
• ActiveUpdate
• Smart Feedback
• Trend Micro Control Manager
• IP address imports and exports in IPv6 format
• Notifications
• Logs and reports with relevant SMTP IPv6information
About this Manual
ix
NEW FEATURE DESCRIPTION
Keyword & Expressionenhancements
To improve visibility of triggered keywords andexpressions, the entity name (where the keywordexpression appears in a message) and the matchedexpressions now appear in the policy event log querydetails page. Administrators can also add adescription to new keyword expressions for bettertracking.
SMTP authentication support forEnd-User Quarantine
SMTP authentication provides users another optionfor enabling the End-User Quarantine feature.
Email alias support The User Quarantine now has the option to allow endusers to retrieve quarantined email messages withalias email addresses.
TABLE 2. IMSS 7.1 New Features
NEW FEATURE DESCRIPTION
Common Policy Objects Several information objects that can beused by all policies have been removedfrom policy creation and given their ownareas for configuration:
• Address Groups
• Keywords & Expressions
• Policy Notifications
• Stamps
• DKIM Approved List
• Web Reputation Approved List
Web Reputation Protect your clients from malicous URLsembedded in email messages with Webreputation.
NRS Terminology Change Network Reputation Service (NRS) hasbeen changed to Email Reputation Service(ERS).
Trend Micro InterScan Messaging Security Suite Installation Guide
x
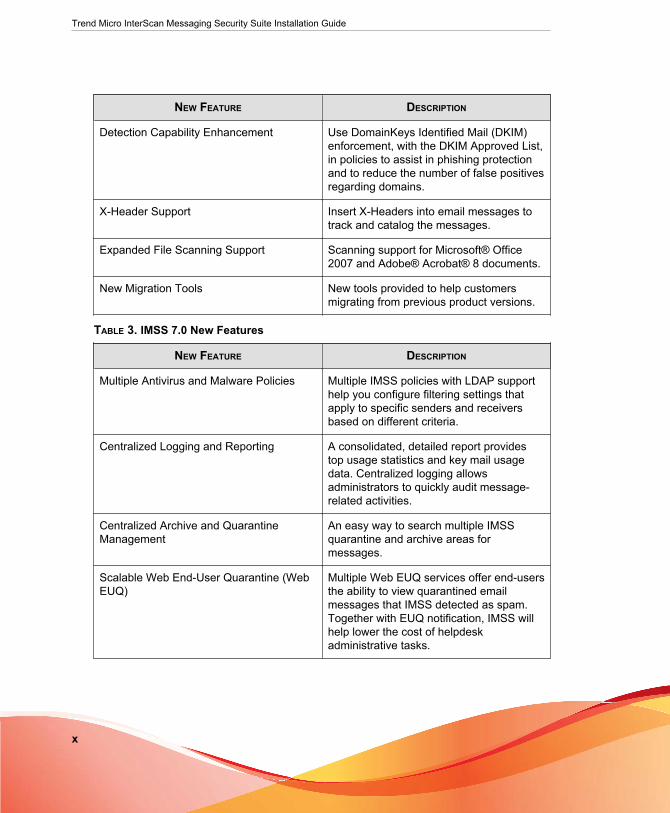
NEW FEATURE DESCRIPTION
Detection Capability Enhancement Use DomainKeys Identified Mail (DKIM)enforcement, with the DKIM Approved List,in policies to assist in phishing protectionand to reduce the number of false positivesregarding domains.
X-Header Support Insert X-Headers into email messages totrack and catalog the messages.
Expanded File Scanning Support Scanning support for Microsoft® Office2007 and Adobe® Acrobat® 8 documents.
New Migration Tools New tools provided to help customersmigrating from previous product versions.
TABLE 3. IMSS 7.0 New Features
NEW FEATURE DESCRIPTION
Multiple Antivirus and Malware Policies Multiple IMSS policies with LDAP supporthelp you configure filtering settings thatapply to specific senders and receiversbased on different criteria.
Centralized Logging and Reporting A consolidated, detailed report providestop usage statistics and key mail usagedata. Centralized logging allowsadministrators to quickly audit message-related activities.
Centralized Archive and QuarantineManagement
An easy way to search multiple IMSSquarantine and archive areas formessages.
Scalable Web End-User Quarantine (WebEUQ)
Multiple Web EUQ services offer end-usersthe ability to view quarantined emailmessages that IMSS detected as spam.Together with EUQ notification, IMSS willhelp lower the cost of helpdeskadministrative tasks.

About this Manual
xi
NEW FEATURE DESCRIPTION
Multiple Spam Prevention Technologies Three layers of spam protection:
• Email Reputation Services filtersconnections from spam senders whenestablishing SMTP sessions.
• IP Profiler helps protect the mailserver from attacks with smart profiles(SMTP IDS).
• Trend Micro Anti-spam engine detectsand takes action on spam.
IntelliTrap IntelliTrap provides heuristic evaluation ofcompressed files that helps reduce the riskthat a virus in a compressed file will enteryour network through email.
Delegated Administration LDAP-integrated account managementallows users to assign administrative rightsfor different configuration tasks.
Easy Deployment with ConfigurationWizard
An easy-to-use configuration wizard to getIMSS up and running.
Advance MTA Functions Opportunistic TLS, domain based delivery,and other MTA functions help IMSS handleemail efficiently and securely.
Migration Easy upgrade process ensures thatsettings will be migrated with minimumeffort during setup.
Mail Auditing and Tracking Detailed logging for all messages tracksand identifies message flow related issues.
Integration with Trend Micro ControlManager
Perform log queries on Email ReputationServices from Control Manager, in additionto other supported features.
Trend Micro InterScan Messaging Security Suite Installation Guide
xii
AudienceThe IMSS documentation is written for IT administrators in medium and largeenterprises. The documentation assumes that the reader has in-depth knowledge ofemail messaging networks., including details related to the following:
• SMTP and POP3 protocols
• Message transfer agents (MTAs), such as Postfix or Microsoft™ Exchange
• LDAP
• Database management
The documentation does not assume that the reader has any knowledge of antivirus orantispam technology.
InterScan Messaging Security SuiteDocumentation
The IMSS documentation consists of the following:
Administrator’s GuideHelps you get IMSS up and running with post-installation instructions on howto configure and administer IMSS.
Installation GuideContains introductions to IMSS features, system requirements, and providesinstructions on how to deploy and upgrade IMSS in various networkenvironments.
Online HelpProvides detailed instructions on each field and how to configure all featuresthrough the user interface. To access the online help, open the webmanagement console, then click the help icon.

About this Manual
xiii
Readme FileContain late-breaking product information that might not be found in theother documentation. Topics include a description of features, installationtips, known issues, and product release history.
The documentation is available at:
http://docs.trendmicro.com
Document ConventionsThe documentation uses the following conventions:
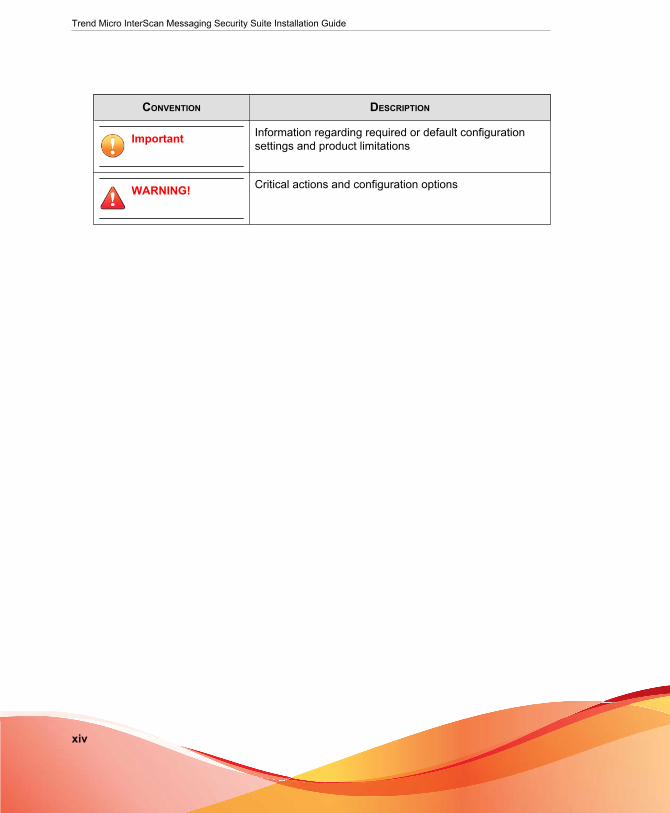
TABLE 4. Document Conventions
CONVENTION DESCRIPTION
UPPER CASE Acronyms, abbreviations, and names of certaincommands and keys on the keyboard
Bold Menus and menu commands, command buttons, tabs,and options
Italics References to other documents
Monospace Sample command lines, program code, web URLs, filenames, and program output
Navigation > Path The navigation path to reach a particular screen
For example, File > Save means, click File and then clickSave on the interface
Note Configuration notes
Tip Recommendations or suggestions
Trend Micro InterScan Messaging Security Suite Installation Guide
xiv
CONVENTION DESCRIPTION
Important Information regarding required or default configurationsettings and product limitations
WARNING! Critical actions and configuration options

1-1
Chapter 1
Introducing InterScan™ MessagingSecurity Suite
This chapter introduces InterScan™ Messaging Security Suite (IMSS) features,capabilities, and technology, and provides basic information on other Trend Microproducts that will enhance your anti-spam capabilities.
Topics include:
• About InterScan Messaging Security Suite on page 1-2
• IMSS Main Features and Benefits on page 1-2
• About Spyware/Grayware on page 1-9
• About Trend Micro Control Manager on page 1-11
• About Trend Micro Smart Protection on page 1-14

Trend Micro InterScan Messaging Security Suite Installation Guide
1-2
About InterScan Messaging Security SuiteInterScan Messaging Security Suite (IMSS) 7.1 SP1 integrates antivirus, anti-spam, anti-phishing, and content filtering technology for complete email protection. This flexiblesoftware solution features award-winning antivirus and zero-day protection to blockknown and potential viruses.
Multi-layered anti-spam combines the first level of defense in Email reputationtechnology with customizable traffic management through IP Profiler and the blendedtechniques of a powerful composite engine. Multi-lingual anti-spam provides additionalsupport to global companies. Advanced content filtering helps to achieve regulatorycompliance and corporate governance, and protects confidential information. IMSSdelivers protection on a single, highly scalable platform with centralized management forcomprehensive email security at the gateway.
IMSS Main Features and BenefitsThe following table outlines the main features and benefits that IMSS can provide toyour network.
TABLE 1-1. Main Features and Benefits
FEATURE DESCRIPTIONS BENEFITS
Data and system protection
Antivirusprotection
IMSS performs virus detectionusing Trend Micro scan engine anda technology called patternmatching. The scan enginecompares code in files travelingthrough your gateway with binarypatterns of known viruses thatreside in the pattern file. If the scanengine detects a match, it performsthe actions as configured in thepolicy rules.
Enhanced virus/content scannerkeeps your messaging systemworking at top efficiency.
Introducing InterScan Messaging Security Suite
1-3
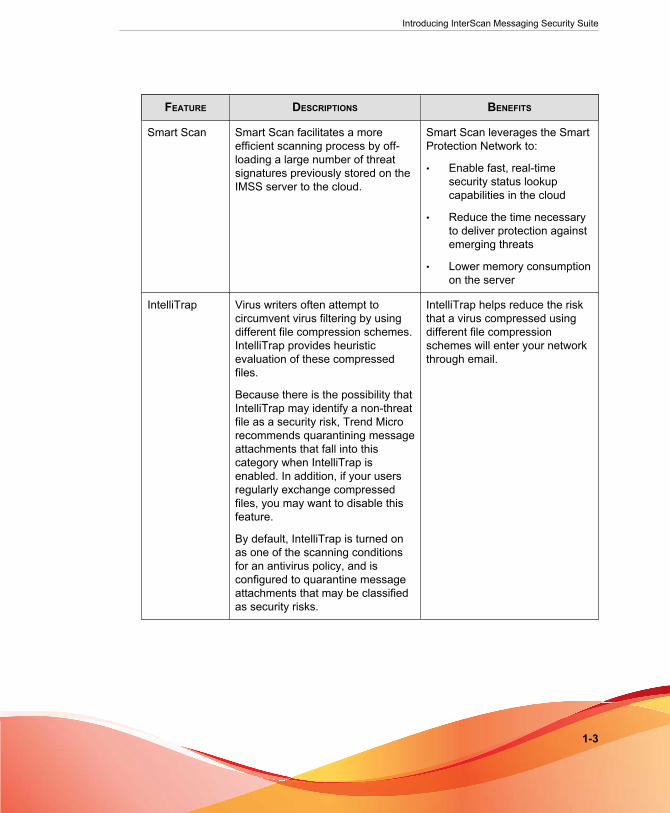
FEATURE DESCRIPTIONS BENEFITS
Smart Scan Smart Scan facilitates a moreefficient scanning process by off-loading a large number of threatsignatures previously stored on theIMSS server to the cloud.
Smart Scan leverages the SmartProtection Network to:
• Enable fast, real-timesecurity status lookupcapabilities in the cloud
• Reduce the time necessaryto deliver protection againstemerging threats
• Lower memory consumptionon the server
IntelliTrap Virus writers often attempt tocircumvent virus filtering by usingdifferent file compression schemes.IntelliTrap provides heuristicevaluation of these compressedfiles.
Because there is the possibility thatIntelliTrap may identify a non-threatfile as a security risk, Trend Microrecommends quarantining messageattachments that fall into thiscategory when IntelliTrap isenabled. In addition, if your usersregularly exchange compressedfiles, you may want to disable thisfeature.
By default, IntelliTrap is turned onas one of the scanning conditionsfor an antivirus policy, and isconfigured to quarantine messageattachments that may be classifiedas security risks.
IntelliTrap helps reduce the riskthat a virus compressed usingdifferent file compressionschemes will enter your networkthrough email.

Trend Micro InterScan Messaging Security Suite Installation Guide
1-4
FEATURE DESCRIPTIONS BENEFITS
Contentmanagement
IMSS analyzes email messagesand their attachments, traveling toand from your network, forappropriate content.
Content that you deeminappropriate, such as personalcommunication, largeattachments, and so on, can beblocked or deferred effectivelyusing IMSS.
Protection against other email threats
DoS attacks By flooding a mail server with largeattachments, or sending messagesthat contain multiple viruses orrecursively compressed files,individuals with malicious intent candisrupt mail processing.
IMSS allows you to configure thecharacteristics of messages thatyou want to stop at the SMTPgateway, thus reducing thechances of a DoS attack.
Maliciousemail content
Many types of file attachments,such as executable programs anddocuments with embedded macros,can harbor viruses. Messages withHTML script files, HTML links, Javaapplets, or ActiveX controls canalso perform harmful actions.
IMSS allows you to configure thetypes of messages that areallowed to pass through theSMTP gateway.
Degradation ofservices
Non-business-related email traffichas become a problem in manyorganizations. Spam messagesconsume network bandwidth andaffect employee productivity. Someemployees use companymessaging systems to sendpersonal messages, transfer largemultimedia files, or conductpersonal business during workinghours.
Most companies haveacceptable usage policies fortheir messaging system—IMSSprovides tools to enforce andensure compliance with existingpolicies.

Introducing InterScan Messaging Security Suite
1-5
FEATURE DESCRIPTIONS BENEFITS
Legal liabilityand businessintegrity
Improper use of email can also puta company at risk of legal liability.Employees may engage in sexualor racial harassment, or other illegalactivity. Dishonest employees canuse a company messaging systemto leak confidential information.Inappropriate messages thatoriginate from a company’s mailserver damage the company’sreputation, even if the opinionsexpressed in the message are notthose of the company.
IMSS provides tools formonitoring and blocking contentto help reduce the risk thatmessages containinginappropriate or confidentialmaterial will be allowed throughyour gateway.
Mass mailingviruscontainment
Email-borne viruses that mayautomatically spread bogusmessages through a company’smessaging system can beexpensive to clean up and causepanic among users.
When IMSS detects a mass-mailingvirus, the action performed againstthis virus can be different from theactions against other types ofviruses.
For example, if IMSS detects amacro virus in a Microsoft Officedocument with importantinformation, you can configure theprogram to quarantine the messageinstead of deleting the entiremessage, to ensure that importantinformation will not be lost.However, if IMSS detects a mass-mailing virus, the program canautomatically delete the entiremessage.
By auto-deleting messages thatcontain mass-mailing viruses,you avoid using server resourcesto scan, quarantine, or processmessages and files that have noredeeming value.
The identities of known mass-mailing viruses are in the MassMailing Pattern that is updatedusing the TrendLabs℠ActiveUpdate Servers. You cansave resources, avoid help deskcalls from concerned employeesand eliminate post-outbreakcleanup work by choosing toautomatically delete these typesof viruses and their emailcontainers.
Protection from spyware and other types of grayware

Trend Micro InterScan Messaging Security Suite Installation Guide
1-6
FEATURE DESCRIPTIONS BENEFITS
Spyware andother types ofgrayware
Other than viruses, your clients areat risk from potential threats suchas spyware, adware and dialers.For more information, see AboutSpyware/Grayware on page 1-9.
IMSS’s ability to protect yourenvironment against spywareand other types of graywareenables you to significantlyreduce security, confidentiality,and legal risks to yourorganization.
Integrated anti-spam features
SpamPreventionSolution (SPS)
Spam Prevention Solution (SPS) isa licensed product from TrendMicro that provides spam detectionservices to other Trend Microproducts. To use SPS, obtain anSPS Activation Code. For moreinformation, contact your salesrepresentative.
SPS works by using a built-in spamfilter that automatically becomesactive when you register andactivate the SPS license.
The detection technology usedby Spam Prevention Solution(SPS) is based on sophisticatedcontent processing and statisticalanalysis. Unlike otherapproaches to identifying spam,content analysis provides high-performance, real-time detectionthat is highly adaptable, even asspam senders change theirtechniques.
Spam Filteringwith IP Profilerand Emailreputation
IP Profiler is a self-learning, fullyconfigurable feature that proactivelyblocks IP addresses of computersthat send spam and other types ofpotential threats. Email reputationblocks IP addresses of knownspam senders that Trend Micromaintains in a central database.
NoteActivate SPS before youconfigure IP Profiler andEmail reputation.
With the integration of IPFiltering, which includes IPProfiler and Email reputation,IMSS can block spammers at theIP level.
Administration and integration

Introducing InterScan Messaging Security Suite
1-7
FEATURE DESCRIPTIONS BENEFITS
LDAP anddomain-basedpolicies
You can configure LDAP settings ifyou are using LDAP directoryservices such as Lotus Domino™or Microsoft™ Active Directory™for user-group definition andadministrator privileges.
Using LDAP, you can definemultiple rules to enforce yourcompany’s email usageguidelines. You can define rulesfor individuals or groups, basedon the sender and recipientaddresses.
Web-basedmanagementconsole
The management console allowsyou to conveniently configure IMSSpolicies and settings.
The management console isSSL-compatible. Being SSL-compatible means access toIMSS is more secure.
End-UserQuarantine(EUQ)
IMSS provides Web-based EUQ toimprove spam management. TheWeb-based EUQ service allowsend-users to manage their ownspam quarantine. Spam PreventionSolution (SPS) quarantinesmessages that it determines arespam. The EUQ indexes thesemessages into a database. Themessages are then available forend-users to review, delete, orapprove for delivery.
With the web-based EUQmanagement console, end-userscan manage messages thatIMSS quarantines.
Delegatedadministration
IMSS offers the ability to createdifferent access rights to themanagement console. You canchoose which sections of theconsole are accessible for differentadministrator logon accounts.
By delegating administrativeroles to different employees, youcan promote the sharing ofadministrative duties.

Trend Micro InterScan Messaging Security Suite Installation Guide
1-8
FEATURE DESCRIPTIONS BENEFITS
Centralizedreporting
Centralized reporting gives you theflexibility of generating one time (ondemand) reports or scheduledreports.
Helps you analyze how IMSS isperforming.
One time (on demand) reportsallow you to specify the type ofreport content as and whenrequired. Alternatively, you canconfigure IMSS to automaticallygenerate reports daily, weekly,and monthly.
Systemavailabilitymonitor
A built-in agent monitors the healthof your IMSS server and deliversnotifications through email orSNMP trap when a fault conditionthreatens to disrupt the mail flow.
Email and SNMP notification ondetection of system failure allowsyou to take immediate correctiveactions and minimize downtime.
POP3scanning
You can choose to enable ordisable POP3 scanning from themanagement console.
In addition to SMTP traffic, IMSScan also scan POP3 messagesat the gateway as messagingclients in your network retrievethem.
Clusteredarchitecture
The current version of IMSS hasbeen designed to make distributeddeployment possible.
You can install the various IMSScomponents on differentcomputers, and somecomponents can exist inmultiples. For example, if yourmessaging volume demands,you can install additional IMSSscanner components onadditional servers, all using thesame policy services.

Introducing InterScan Messaging Security Suite
1-9
FEATURE DESCRIPTIONS BENEFITS
Integrationwith TrendMicro ControlManager™
Trend Micro Control Manager™(TMCM) is a software managementsolution that gives you the ability tocontrol antivirus and contentsecurity programs from a centrallocation regardless of the program’sphysical location or platform. Thisapplication can simplify theadministration of a corporate virusand content security policy.
Outbreak Prevention Servicesdelivered through Trend MicroControl Manager™ reduces therisk of outbreaks. When a TrendMicro product detects a newemail-borne virus, TrendLabsissues a policy that uses theadvanced content filters in IMSSto block messages by identifyingsuspicious characteristics inthese messages. These ruleshelp minimize the window ofopportunity for an infectionbefore the updated pattern file isavailable.
About Spyware/GraywareYour clients are at risk from potential threats other than viruses/malware. Grayware cannegatively affect the performance of the computers on your network and introducesignificant security, confidentiality, and legal risks to your organization.
TABLE 1-2. Types of Grayware
TYPE DESCRIPTION
Spyware Gathers data, such as account user names and passwords, andtransmits them to third parties
Adware Displays advertisements and gathers data, such as user websurfing preferences, to target advertisements at the userthrough a web browser
Dialers Change computer Internet settings and can force a computer todial pre-configured phone numbers through a modem
Joke Programs Cause abnormal computer behavior, such as closing andopening the CD-ROM tray and displaying numerous messageboxes

Trend Micro InterScan Messaging Security Suite Installation Guide
1-10
TYPE DESCRIPTION
Hacking Tools Help hackers enter computers
Remote Access Tools Help hackers remotely access and control computers
Password CrackingApplications
Help hackers decipher account user names and passwords
Other Other types not covered above
How Spyware/Grayware Gets into your Network
Spyware/grayware often gets into a corporate network when users download legitimatesoftware that has grayware applications included in the installation package.
Most software programs include an End User License Agreement (EULA), which theuser has to accept before downloading. Often the EULA does include informationabout the application and its intended use to collect personal data; however, users oftenoverlook this information or do not understand the legal jargon.
Potential Risks and Threats
The existence of spyware/grayware on your network has the potential to introduce thefollowing:
TABLE 1-3. Types of Risks
TYPE DESCRIPTION
Reduced computerperformance
To perform their tasks, spyware/grayware applications oftenrequire significant CPU and system memory resources.
Increased webbrowser-relatedcrashes
Certain types of grayware, such as adware, are often designedto create pop-up windows or display information in a browserframe or window. Depending on how the code in theseapplications interacts with system processes, grayware cansometimes cause browsers to crash or freeze and may evenrequire a system reboot.

Introducing InterScan Messaging Security Suite
1-11
TYPE DESCRIPTION
Reduced userefficiency
By needing to close frequently occurring pop-up advertisementsand deal with the negative effects of joke programs, users canbe unnecessarily distracted from their main tasks.
Degradation ofnetwork bandwidth
Spyware/grayware applications often regularly transmit the datathey collect to other applications running on your network or tolocations outside of your network.
Loss of personal andcorporate information
Not all data that spyware/grayware applications collect is asinnocuous as a list of websites users visit. Spyware/graywarecan also collect the user names and passwords users type toaccess their personal accounts, such as a bank account, andcorporate accounts that access resources on your network.
Higher risk of legalliability
If hackers gain access to the computer resources on yournetwork, they may be able to utilize your client computers tolaunch attacks or install spyware/grayware on computersoutside your network. Having your network resources unwillinglyparticipate in these types of activities could leave yourorganization legally liable to damages incurred by other parties.
About Web ReputationTrend Micro web reputation technology helps break the infection chain by assigningwebsites a “reputation” based on an assessment of the trustworthiness of an URL,derived from an analysis of the domain. Web reputation protects against web-basedthreats including zero-day attacks, before they reach the network. Trend Micro webreputation technology tracks the lifecycle of hundreds of millions of web domains,extending proven Trend Micro anti-spam protection to the Internet.
About Trend Micro Control ManagerTrend Micro™ Control Manager™ is a software management solution that gives youthe ability to control antivirus and content security programs from a central location-regardless of the program’s physical location or platform. This application can simplifythe administration of a corporate virus/malware and content security policy.

Trend Micro InterScan Messaging Security Suite Installation Guide
1-12
• Control Manager server: The Control Manager server is the machine upon whichthe Control Manager application is installed. The web-based Control Managermanagement console is hosted from this server.
• Agent: The agent is an application installed on a managed product that allowsControl Manager to manage the product. The agent receives commands from theControl Manager server, and then applies them to the managed product. The agentcollects logs from the product, and sends them to Control Manager.
• Entity: An entity is a representation of a managed product on the ProductDirectory link. Each entity has an icon in the directory tree. The directory treedisplays all managed entities residing on the Control Manager console.
Control Manager Support
The following table shows a list of Control Manager features that IMSS supports.
TABLE 1-4. Supported Control Manager Features
FEATURE DESCRIPTION SUPPORTED?
Two-waycommunication
Using 2-way communication,either IMSS or ControlManager may initiate thecommunication process.
No.
Only IMSS can initiate acommunication process withControl Manager.
Outbreak PreventionPolicy
The Outbreak PreventionPolicy (OPP) is a quickresponse to an outbreakdeveloped by TrendLabs thatcontains a list of actions IMSSshould perform to reduce thelikelihood of the IMSS serveror its clients from becominginfected.
Trend Micro ActiveUpdateServer deploys this policy toIMSS through ControlManager.
Yes

Introducing InterScan Messaging Security Suite
1-13
FEATURE DESCRIPTION SUPPORTED?
Log upload for query Uploads IMSS virus logs,Content Security logs, andEmail reputation logs toControl Manager for querypurposes.
Yes
Single Sign-on Manage IMSS from ControlManager directly without firstlogging on to the IMSSmanagement console.
No.
You need to first log on to theIMSS management consolebefore you can manage IMSSfrom Control Manager.
Configurationreplication
Replicate configurationsettings from an existingIMSS server to a new IMSSserver from Control Manager.
Yes
Pattern update Update pattern files used byIMSS from Control Manager
Yes
Engine update Update engines used byIMSS from Control Manager.
Yes
Product componentupdate
Update IMSS productcomponents such as patchesand hot fixes from ControlManager.
No.
Refer to the specific patch orhot fix readme file forinstructions on how to updatethe product components.
Configuration by userinterface redirect
Configure IMSS through theIMSS management consoleaccessible from ControlManager.
Yes
Renew productregistration
Renew IMSS product licensefrom Control Manager.
Yes
Customized reportingfrom Control Manager
Control Manager providescustomized reporting and logqueries for email-related data.
Yes

Trend Micro InterScan Messaging Security Suite Installation Guide
1-14
FEATURE DESCRIPTION SUPPORTED?
Control Manager agentinstallation/uninstallation
Install or uninstall IMSSControl Manager agent fromControl Manager.
No.
IMSS Control Manager agentis automatically installedwhen you install IMSS. Toenable/disable the agent, dothe following from the IMSSmanagement console:
1. Go to Administration >Connections.
2. Click the TMCM Servertab.
3. To enable/disable theagent, select/clear thecheck box next to EnableMCP Agent.
Event notification Send IMSS event notificationfrom Control Manager.
Yes
Command tracking forall commands
Track the status of commandsthat Control Manager issuesto IMSS.
Yes
About Trend Micro Smart ProtectionTrend Micro provides next-generation content security through smart protectionservices. By processing threat information in the cloud, Trend Micro smart protectionreduces demand on system resources and eliminates time-consuming signaturedownloads.
Smart protection services include:
File Reputation ServicesFile reputation decouples the pattern file from the local scan engine andconducts pattern file lookups to the Trend Micro Smart Protection Network.
Introducing InterScan Messaging Security Suite
1-15
High performance content delivery networks ensure minimum latency duringthe checking process and enable more immediate protection.
Trend Micro continually enhances file reputation to improve malwaredetection. Smart Feedback allows Trend Micro to use community feedback offiles from millions of users to identify pertinent information that helpsdetermine the likelihood that a file is malicious.
Web Reputation ServicesWith one of the largest reputation databases in the world, Trend Micro webreputation tracks the credibility of domains based on factors such as age,historical location changes, and suspicious activity indicators discoveredthrough malware behavior analysis. Trend Micro assigns reputation scores tospecific pages instead of classifying entire sites to increase accuracy and reducefalse positives.
Web reputation technology prevents users from:
• Accessing compromised or infected sites
• Communicating with Command & Control (C&C) servers used incybercrime
The Need for a New SolutionThe conventional threat handling approach uses malware patterns or definitions that aredelivered to a client on a scheduled basis and stored locally. To ensure continuedprotection, new updates need to be received and reloaded into the malware preventionsoftware regularly.
While this method works, the continued increase in threat volume can impact server andworkstation performance, network bandwidth usage, and the overall time it takes todelivery quality protection. To address the exponential growth rate of threats, TrendMicro pioneered a smart approach that off-loads the storage of malware signatures tothe cloud. The technology and architecture used in this effort allows Trend Micro toprovide better protection to customers against the volume of emerging malware threats.

Trend Micro InterScan Messaging Security Suite Installation Guide
1-16
Trend Micro™ Smart Protection Network™Trend Micro delivers File Reputation Services and Web Reputation Services to IMSSthrough the Trend Micro™ Smart Protection Network™.
The Trend Micro Smart Protection Network is a next-generation cloud-client contentsecurity infrastructure designed to protect customers from security risks and webthreats. It powers both on-premise and Trend Micro hosted solutions to protect userswhether they are on the network, at home, or on the go. The Smart Protection Networkuses lighter-weight clients to access its unique in-the-cloud correlation of email, web,and file reputation technologies, as well as threat databases. Customers' protection isautomatically updated and strengthened as more products, services and users access thenetwork, creating a real-time neighborhood watch protection service for its users.
The Smart Protection Network provides File Reputation Services by hosting themajority of the malware pattern definitions. A client sends scan queries to the SmartProtection Network if its own pattern definitions cannot determine the risk of a file.
The Smart Protection Network provides Web Reputation Services by hosting webreputation data previously available only through Trend Micro hosted servers. A clientsends web reputation queries to the Smart Protection Network to check the reputationof websites that a user is attempting to access. The client correlates a website'sreputation with the specific web reputation policy enforced on the computer todetermine whether access to the site is allowed or blocked.
For more information on the Smart Protection Network, visit:
www.smartprotectionnetwork.com
About Marketing Email Message ScanningMarketing email messages contain commercial or fund-raising content that the user mayhave requested. These email messages often do not include a functional opt-out facility.Managing marketing email messages separately from spam allows approved marketingmessages to reach the end user. IMSS identifies marketing email messages in two ways:
• Email Reputation Services scoring the source IP address
• Trend Micro Anti-Spam Engine identifying message content

Introducing InterScan Messaging Security Suite
1-17
Administrators identify the email message source and define the rule criteria to take anaction on those email messages. Every marketing email message rule has an exceptionlist containing address objects that bypass message filtering. An address object is anemail address, a single IP address or address range (IPv4 or IPv6), or the Classless Inter-Domain Routing (CIDR) block. The action attached to each rule appears as an optionon the spam rule and can be any action applicable to spam rules.
Administrators have several options to understand marketing email message traffic inthe network. Reports illustrate the highest senders and recipients of marketing emailmessages from external or internal sources. Administrators can also query detailed loginformation or view the email quarantine and release messages identified as permittedmarketing email messages when necessary.
The marketing email message exception list can be exported and imported.


2-1
Chapter 2
Component DescriptionsThis chapter explains the requirements necessary to manage the product and the varioussoftware components it needs to function.
Topics include:
• About IMSS Components on page 2-2
• The IMSS Admin Database on page 2-2
• Central Controller on page 2-2
• Scanner Services on page 2-2
• Policy Services on page 2-3
• End-User Quarantine Service on page 2-4
• The End-User Quarantine Database on page 2-7
• IP Filtering on page 2-7
• Email Reputation on page 2-9
• About End-User Quarantine (EUQ) on page 2-11
• About Centralized Reporting on page 2-12

Trend Micro InterScan Messaging Security Suite Installation Guide
2-2
About IMSS ComponentsThe new architecture of IMSS separates the product into distinct components that eachperform a particular task in message processing. The following sections provide anoverview of each component.
You can install IMSS components on a single computer or on multiple computers. Forgraphical representations of how these components work together, see UnderstandingInstallation Scenarios on page 3-25.
The IMSS Admin DatabaseThe IMSS Admin database stores all global configuration information. The databasecontains server settings, policy information, log information, and other data that isshared between components. When installing IMSS, you must install the database serverand run the appropriate queries to create the database tables before you install any othercomponent. You can install a new database or use existing PostgreSQL databases.
Central ControllerThe Central Controller contains a web server component that serves web consoleinterface screens to browsers, allowing administrators to configure and control IMSSthrough the IMSS web console. The web console provides an interface between theadministrator and the IMSS database that the various components use to performscanning, logging, and other message processing tasks.
Scanner ServicesServers configured as scanner services do the following:
• Accept SMTP and POP3 messaging traffic
• Request policy from a policy service

Component Descriptions
2-3
• Evaluate the message based on the applicable policies
• Take the appropriate action on the message based on the evaluation outcome
• Store quarantined and archived messages locally
• Log policy and system activity locally, and automatically update the log portion ofthe IMSS database at scheduled intervals, providing indexing to allow users tosearch through quarantined items and logs
As IMSS applies scanner service settings globally to all scanner services through theIMSS Web management console, choose servers that have the same hardwareconfiguration to serve as scanner services. If your environment does not havecomputers with identical hardware configurations, set the scanner service limits so thatthey provide protection to the scanner service with the lowest resources. For instance, ifyou have two scanner services, one with a 10GB hard drive and another with an 80GBhard drive, set the maximum disk usage to 9GB to protect the computer with the leastresources.
Alternatively, you can edit the scanner service’s local configuration file to set the limitlocally, as limits set in the configuration file override the global settings. Once youconfigure a scanner service locally, you can no longer configure it through the IMSSWeb management console, and the interface may not reflect all the details of the localconfiguration.
Note
Use care when modifying an .ini file for customization. Contact your support provider ifnecessary.
Policy ServicesTo enhance performance and ensure that rule look-ups are efficient, IMSS uses a policyservice to store the messaging rules using an in-memory cache. The policy service acts asa remote store of rules for the scanner services, caching rules that would otherwiserequire a database look-up (with associated network and disk I/O overhead). Thismechanism also increases scanner service efficiency, allowing most message scanningtasks to occur in scanner service memory without the need for disk activity.

Trend Micro InterScan Messaging Security Suite Installation Guide
2-4
Policy Synchronization
The IMSS Admin database schema includes a versioning mechanism. The policy servicechecks the database version periodically. If the version number in the database isdifferent from the version cached on the policy service, the policy service performs adatabase query and retrieves the latest version. This keeps the cached version of thedatabase synchronized with the database, without the need to check the entire databasefor new or changed entries.
When you make changes through the IMSS web console, IMSS pushes the changes tothe policy service within three minutes.
End-User Quarantine ServiceThe primary End-User Quarantine (EUQ) Service hosts a Web-based console similar tothe IMSS Web management console so your users can view, delete, or resend spam thatwas addressed to them.
Primary and Secondary End-User Quarantine Services
To assist with load balancing, you can install additional EUQ services, referred to assecondary services. The first EUQ service you install, referred to as the primaryservice, runs the Apache Web server to work with the secondary services.
End-User Quarantine Server Components
The EUQ Server includes the following software components:
Apache HTTP ServerAccepts the HTTP requests from end users and distributes them across allinstalled EUQ Servers. The Apache Web server is only installed on thePrimary EUQ Server.
Tomcat Application ServerAccepts the HTTP requests from end users and passes them to Struts.
Component Descriptions
2-5
Struts FrameworkControls the page presentation flow for end users.
End-User Quarantine ApplicationCommunicates with the other IMSS components to implement the EUQConsole logic.
The Tomcat and Apache servers are installed in the {IMSS}/UI directory. The othercomponents are installed in the {IMSS}/UI/euqUI directory. Both Apache andTomcat are controlled by the S99EUQ script in the {IMSS}/script directoryaccepting the stop, start and restart commands.
Apache Web Server and mod_jk
The Apache HTTP Server (see http://httpd.apache.org/) is installed on the PrimaryEUQ Server and uses the Apache Tomcat Connector mod_jk (see http://tomcat.apache.org/connectors-doc/) loadable module to forward all requests to thelocally installed Tomcat Application Server.
The Apache Web server is installed in the {IMSS}/UI/apache directory that has astandard Apache ServerRoot structure. The Apache main configuration file, EUQ.confin the {IMSS}/UI/euqUI/confdirectory, contains configuration settings that definethe TCP port where Apache accepts incoming connections (8447), the maximumnumber of serviced connections (150) and configuration settings for mod_jk, includingthe name of the Tomcat thread that will receive all requests forwarded by the ApacheWeb server.
Tomcat
The EUQ Server uses Tomcat Application server to handle the requests from end users.The Tomcat Application Server installed in the Primary EUQ Server also acceptsrequests from the Apache HTTP Server and balances the load across all installed EUQServers using the Apache JServ Protocol version 1.3 protocol AJP13 (see http://tomcat.apache.org/tomcat-3.3-doc/AJPv13.html) and the round robin algorithm.
The Tomcat configuration file, server.xml in the {IMSS}/UI/euqUI/confdirectory, defines various configuration settings, including TCP port (8446),

Trend Micro InterScan Messaging Security Suite Installation Guide
2-6
protocol (HTTPS) and location of the SSL key ring ()({IMSS}/UI/tomcat/sslkey/.keystore.
The workers.properties configuration file in the {IMSS}/UI/euqUI/confdirectory (http://tomcat.apache.org/tomcat-3.3-doc/Tomcat-Workers-HowTo.html)keeps configuration settings for the Tomcat worker threads. It defines two thread types:loadbalancer and worker. The loadbalancer threads distribute the load across all installedEUQ Servers. The worker threads process the incoming requests and run the End-UserQuarantine Application. This configuration file is maintained automatically - theManager updates it during restart based on the information about all available EUQServers from the tb_component_list database table.
The AJP13 protocol keeps permanent connection between the Apache Web server andTomcat that is used to forward requests to Tomcat and receive the results of processingthis request, without additional overhead.
Struts FrameworkStruts is a Model-View-Controller Java-based Framework used to simplify developmentand control of the complex Java-based applications that process HTTP requests (seehttp://struts.apache.org/).
Struts controls the relationship between the incoming HTTP request, the Java-program(Servlet) that is used to process this request, and the Java Server Page (JSP) that is usedto display a result of this processing.
Struts itself is a set of Java classes packaged in the struts.jar archive file configured by thestruts-config-common.xml and struts-config-enduser.xml configurationfiles.
End-User Quarantine ApplicationThe End-User Quarantine Application is written in Java and takes care of presenting,releasing, or deleting the quarantined mail messages based on the end user requests. Italso allows end users to maintain their Approved Senders Lists.
To implement this functionality, EUQ accesses the Admin and EUQ databases andcommunicates with Managers.

Component Descriptions
2-7
The EUQ Application is implemented as a set of Java classes in thecom.trendmicro.imss.ui package stored in the {IMSS}/UI/euqUI/ROOT/WEB-INF/classes directory and set of Java Server Pages stored in the {IMSS}/UI/euqUI/ROOT/jsp directory.
The EUQ Application writes the log entries in the {IMSS}/log/imssuieuq.<Date>.<Count> log file. The [general]/ log_levelconfiguration setting in the imss.ini file controls the amount of information writtenby the EUQ Application. To increase the amount of information logged, set log_level to"debug" and restart Tomcat using the S99EUQ script: "S99EUQ restart".
The End-User Quarantine DatabaseThe EUQ database stores quarantined spam email information, and the end userapproved sender list. If you install EUQ service, you must also install the EUQ database(or multiple databases for scalability). You can also use an existing PostgreSQL databaseserver to install the EUQ database.
You can install the EUQ database called imsseuq using one of the following options:
• On the Database Server that hosts the Administration database
• On the other database server available in the network
• Together with the database server software
One IMSS instance can have up to 8 EUQ databases. The EUQ data is distributedacross all EUQ databases. If a database is lost, users whose data were stored in thisdatabase will not have access to their quarantined data.
IP FilteringIMSS includes optional IP Filtering, which consists of two parts:
IP ProfilerAllows you to configure threshold settings used to analyze email traffic. Whentraffic from an IP address violates the settings, IP Profiler adds the IP address
Trend Micro InterScan Messaging Security Suite Installation Guide
2-8
of the sender to its database and then blocks incoming connections from theIP address.
IP profiler detects any of these four potential Internet threats:
• Spam: Email messages with unwanted advertising content.
• Viruses: Various virus threats, including Trojan programs.
• Directory Harvest Attack (DHA): A method used by spammers tocollect valid email addresses by generating random email addresses usinga combination of random email names with valid domain names. Emailsare then sent to these generated email addresses. If an email message isdelivered, the email address is determined to be genuine and thus addedto the spam databases.
• Bounced Mail: An attack that uses your mail server to generate emailmessages that have the target's email domain in the "From" field.Fictitious addresses send email messages and when they return, theyflood the target's mail server.
Email ReputationBlocks email from known spam senders at the IP-level.
How IP Profiler Works
IP Profiler proactively identifies IP addresses of computers that send email messagescontaining threats mentioned in the section IP Filtering on page 2-7. You can customizeseveral criteria that determine when IMSS starts taking a specified action on an IPaddress. The criteria differ depending on the potential threat, but commonly include aduration during which IMSS monitors the IP address and a threshold.
To accomplish this, IP Profiler makes use of several components, the most important ofwhich is Foxproxy—a server that relays information about email traffic to IMSS.
The following process takes place after IMSS receives a connection request from asending mail server:
1. FoxProxy queries the IP Profiler’s DNS server to see if the IP address is on theblocked list.
Component Descriptions
2-9
2. If the IP address is on the blocked list, IMSS denies the connection request.
If the IP address is not on the blocked list, IMSS analyzes the email trafficaccording to the threshold criteria you specify for IP Profiler.
3. If the email traffic violates the criteria, IMSS adds the sender IP address to theblocked list.
Email ReputationTrend Micro designed Email reputation to identify and block spam before it enters acomputer network by routing Internet Protocol (IP) addresses of incoming mailconnections to Trend Micro Smart Protection Network for verification against anextensive Reputation Database.
Types of Email ReputationThere are two types of Email reputation: Standard on page 2-9 and Advanced on page2-10.
Email Reputation: Standard
This service helps block spam by validating requested IP addresses against the TrendMicro reputation database, powered by the Trend Micro Smart Protection Network.This ever-expanding database currently contains over 1 billion IP addresses withreputation ratings based on spamming activity. Trend Micro spam investigatorscontinuously review and update these ratings to ensure accuracy.
Email reputation: Standard is a DNS single-query-based service. Your designated emailserver makes a DNS query to the standard reputation database server whenever anincoming email message is received from an unknown host. If the host is listed in thestandard reputation database, Email reputation reports that email message as spam.

Trend Micro InterScan Messaging Security Suite Installation Guide
2-10
Email Reputation: Advanced
Email reputation: Advanced identifies and stops sources of spam while they are in theprocess of sending millions of messages.
This is a dynamic, real-time antispam solution. To provide this service, Trend Microcontinuously monitors network and traffic patterns and immediately updates thedynamic reputation database as new spam sources emerge, often within minutes of thefirst sign of spam. As evidence of spam activity ceases, the dynamic reputation databaseis updated accordingly.
Like Email reputation: Standard, Email reputation: Advanced is a DNS query-basedservice, but two queries can be made to two different databases: the standard reputationdatabase and the dynamic reputation database (a database updated dynamically in realtime). These two databases have distinct entries (no overlapping IP addresses), allowingTrend Micro to maintain a very efficient and effective database that can quickly respondto highly dynamic sources of spam. Email reputation: Advanced has blocked more than80% of total incoming connections (all were malicious) in customer networks. Resultswill vary depending on how much of your incoming email stream is spam. The morespam you receive, the higher the percentage of blocked connections you will see.
How Email Reputation Technology Works
Trend Micro Email reputation technology is a Domain Name Service (DNS) query-based service. The following process takes place after IMSS receives a connectionrequest from a sending mail server:
1. IMSS records the IP address of the computer requesting the connection.
2. IMSS forwards the IP address to the Trend Micro Email reputation DNS serversand queries the Reputation Database. If the IP address had already been reportedas a source of spam, a record of the address will already exist in the database at thetime of the query.
3. If a record exists, Email reputation instructs IMSS to permanently or temporarilyblock the connection request. The decision to block the request depends on thetype of spam source, its history, current activity level, and other observedparameters.
Component Descriptions
2-11
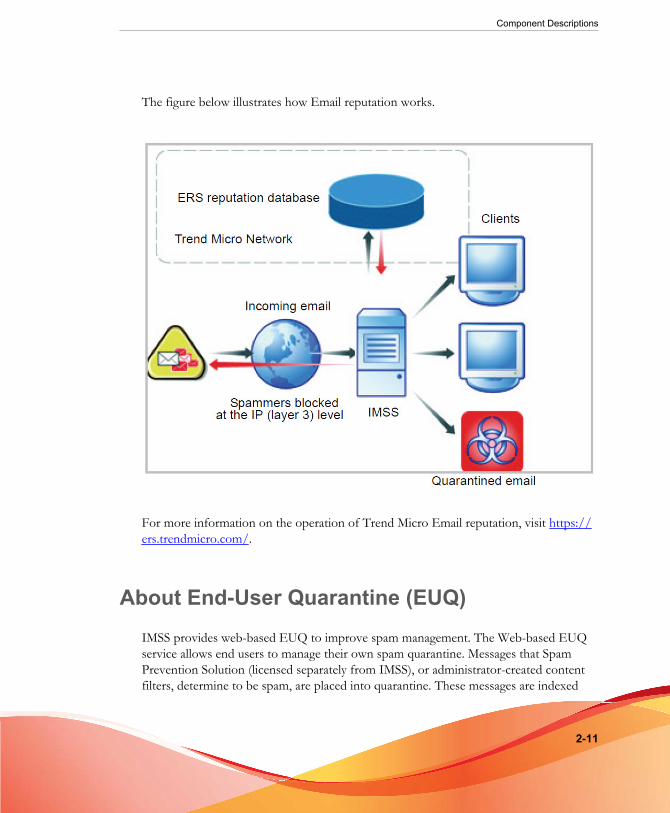
The figure below illustrates how Email reputation works.
For more information on the operation of Trend Micro Email reputation, visit https://ers.trendmicro.com/.
About End-User Quarantine (EUQ)IMSS provides web-based EUQ to improve spam management. The Web-based EUQservice allows end users to manage their own spam quarantine. Messages that SpamPrevention Solution (licensed separately from IMSS), or administrator-created contentfilters, determine to be spam, are placed into quarantine. These messages are indexed
Trend Micro InterScan Messaging Security Suite Installation Guide
2-12
into a database by the EUQ agent and are then available for end users to review anddelete or approve for delivery.
About Centralized ReportingTo help you analyze how IMSS is performing, use the centralized reporting feature. Youcan configure one time (on demand) reports or automatically generate reports (daily,weekly, and monthly).

3-1
Chapter 3
Planning for DeploymentThis chapter explains how to plan for IMSS deployment.
Topics include:
• Deployment Checklist on page 3-2
• Component and Sub-module Installation on page 3-7
• IMSS Ports on page 3-8
• Network Topology Considerations on page 3-12
• About Operating Models on page 3-17
• Understanding Installation Scenarios on page 3-25
• IP Filtering on page 3-38
• About Failover on page 3-39
Trend Micro InterScan Messaging Security Suite Installation Guide
3-2
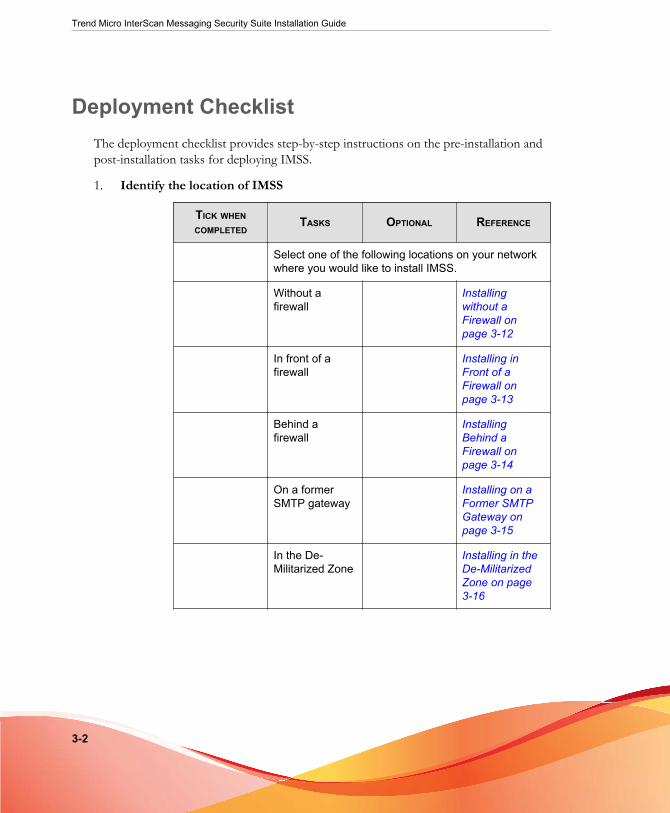
Deployment ChecklistThe deployment checklist provides step-by-step instructions on the pre-installation andpost-installation tasks for deploying IMSS.
1. Identify the location of IMSS
TICK WHENCOMPLETED
TASKS OPTIONAL REFERENCE
Select one of the following locations on your networkwhere you would like to install IMSS.
Without afirewall
Installingwithout aFirewall onpage 3-12
In front of afirewall
Installing inFront of aFirewall onpage 3-13
Behind afirewall
InstallingBehind aFirewall onpage 3-14
On a formerSMTP gateway
Installing on aFormer SMTPGateway onpage 3-15
In the De-Militarized Zone
Installing in theDe-MilitarizedZone on page3-16
Planning for Deployment
3-3
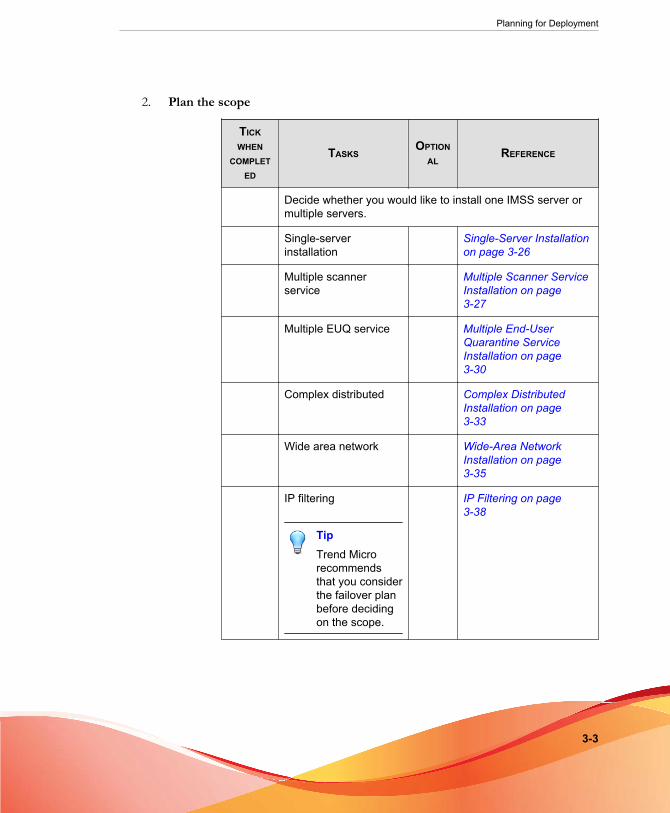
2. Plan the scope
TICKWHEN
COMPLETED
TASKSOPTION
ALREFERENCE
Decide whether you would like to install one IMSS server ormultiple servers.
Single-serverinstallation
Single-Server Installationon page 3-26
Multiple scannerservice
Multiple Scanner ServiceInstallation on page3-27
Multiple EUQ service Multiple End-UserQuarantine ServiceInstallation on page3-30
Complex distributed Complex DistributedInstallation on page3-33
Wide area network Wide-Area NetworkInstallation on page3-35
IP filtering
TipTrend Microrecommendsthat you considerthe failover planbefore decidingon the scope.
IP Filtering on page3-38

Trend Micro InterScan Messaging Security Suite Installation Guide
3-4
3. Install or Upgrade
TICKWHEN
COMPLETED
TASKSOPTION
ALREFERENCE
Perform a fresh installation of IMSS or upgrade from aprevious version.
Prepare MTA Preparing the MessageTransfer Agents on page4-5
Install IMSScomponents
Installing IMSSComponents and End-User Quarantine on page4-12
Install IP Filtering Yes Installing EmailReputation Services andIP Profiler on page 4-17
Upgrade from aprevious version
Upgrading from PreviousVersions on page 5-1
Verify that installationis successful
Verifying the Installationon page 4-24
4. Configure basic IMSS settings
TICKWHEN
COMPLETED
TASKSOPTION
ALREFERENCE
Configure the Central Controller through the ConfigurationWizard.
Configure settingsusing the ConfigurationWizard
Performing BasicConfiguration with theConfiguration Wizardsection of theAdministrator’s Guide

Planning for Deployment
3-5
5. Start services
TICKWHEN
COMPLETED
TASKSOPTION
ALREFERENCE
Activate IMSS services to start protecting your networkagainst various threats.
Scanner IMSS Services section ofthe Administrator’s Guide
Policy
EUQ Yes
6. Configure other IMSS settings
TICKWHEN
COMPLETED
TASKSOPTION
ALREFERENCE
Configure various IMSS settings to get IMSS up and running.
IP Filtering Rules Yes IP Filtering Servicesection of theAdministrator's Guide
SMTP Routing Scanning SMTPMessages section of theAdministrator's Guide
POP3 Settings Yes Scanning POP3Messages section of theAdministrator's Guide

Trend Micro InterScan Messaging Security Suite Installation Guide
3-6
TICKWHEN
COMPLETED
TASKSOPTION
ALREFERENCE
Policy and scanningexceptions
Managing Policiessection of theAdministrator's Guide
NoteIf scanning formarketingmessages, makesure that the DNSconfiguration andDNS query arecorrect.
Perform a manualupdate of componentsand configurescheduled updates
Updating Scan Engineand Pattern Files sectionof the Administrator'sGuide
Log settings Configuring Log Settingssection of theAdministrator's Guide
7. Back up IMSS
TICKWHEN
COMPLETED
TASKSOPTION
ALREFERENCE
Perform a full or minimal backup of IMSS as a precautionagainst system failure.
Full backup Backing Up IMSS sectionof the Administrator’sGuide. Minimal backup
Planning for Deployment
3-7
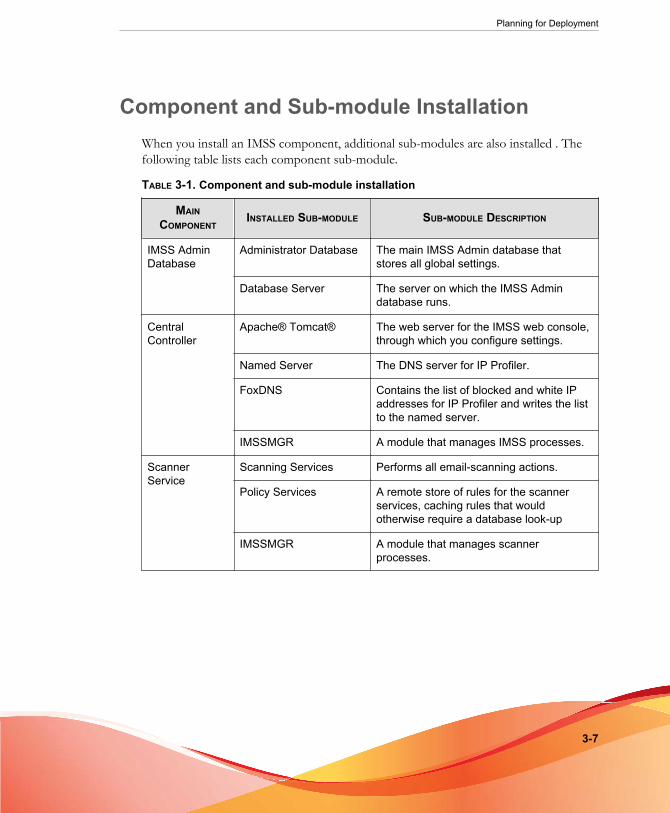
Component and Sub-module InstallationWhen you install an IMSS component, additional sub-modules are also installed . Thefollowing table lists each component sub-module.
TABLE 3-1. Component and sub-module installation
MAINCOMPONENT
INSTALLED SUB-MODULE SUB-MODULE DESCRIPTION
IMSS AdminDatabase
Administrator Database The main IMSS Admin database thatstores all global settings.
Database Server The server on which the IMSS Admindatabase runs.
CentralController
Apache® Tomcat® The web server for the IMSS web console,through which you configure settings.
Named Server The DNS server for IP Profiler.
FoxDNS Contains the list of blocked and white IPaddresses for IP Profiler and writes the listto the named server.
IMSSMGR A module that manages IMSS processes.
ScannerService
Scanning Services Performs all email-scanning actions.
Policy Services A remote store of rules for the scannerservices, caching rules that wouldotherwise require a database look-up
IMSSMGR A module that manages scannerprocesses.

Trend Micro InterScan Messaging Security Suite Installation Guide
3-8
MAINCOMPONENT
INSTALLED SUB-MODULE SUB-MODULE DESCRIPTION
EUQ Service Apache Tomcat The web server for the EUQ web console,though which your users can access theemail messages that IMSS quarantined asspam.
Apache Service Install this module with the primary EUQservices for load balancing purposes whenyou choose to install multiple EUQservices.
IMSSMGR A module that manages EUQ processes.
EUQ Database EUQ Database The database that contains all emailmessages that IMSS quarantined as spam.
Database Server* The server on which the EUQ databaseruns.
IP Profiler FoxProxy An IP Filtering module that checks theblocked list on FoxDNS to see if IMSSshould reject or approve an email request.
Foxlib An IP filtering module that retrieves the IPaddress of the computer making aconnection request and passes the IPaddress to Postfix.
ERS Maillog Parser A module to parse ERS-related mail logs.
NoteSub-module(s) in the table marked with an asterisk (*) are the sub-componentsthat you can choose to install when you install the main component.
IMSS PortsSee the following table for the ports IMSS uses.

Planning for Deployment
3-9
TABLE 3-2. IMSS Ports
PORTNUMBER
COMPONENT AND ROLE CONFIGURATION LOCATION
25 The Postfix mail service port.
The mail server will listen at thisport to accept messages. Thisport must be opened at thefirewall, or the server is not ableto accept mails.
master.cf
953 The IP Filtering service port. Not configurable on the IMSS server.
110 IMSS scanner generic POP3port. The scanner uses this portto accept POP3 request andscan POP3 mails.
imss.ini / [Socket_2]/proxy_port
5060 Policy Server listening port. Thescanner will connect to this portto query matched rules forevery message.
From the web console, go toAdministration > IMSS Configuration> Connections > Components on themenu.
8005 Admin Web Server (Tomcat)management port that canhandle Tomcat managementcommands.
{IMSS}/UI/adminUI/conf/server.xml: Server / port
8009 EUQ Console Tomcat AJP port.This port is used to performload balancing between severalTomcat servers and the ApacheHTTP server.
{IMSS}/UI/euqUI/conf/server.xml:Server / Service / Connector(protocol=AJP/1.3) / port
8015 Tomcat management port thatcan handle Tomcatmanagement commands.
{IMSS}/UI/euqUI/conf/server.xml:Server/port
8445 IMSS web console listeningport. Open this port to log on tothe Web management consoleusing a Web browser.
Tomcat listening port:
{IMSS}/UI/adminUI/conf/server.xml: Server / Service /Connector / port
Trend Micro InterScan Messaging Security Suite Installation Guide
3-10
PORTNUMBER
COMPONENT AND ROLE CONFIGURATION LOCATION
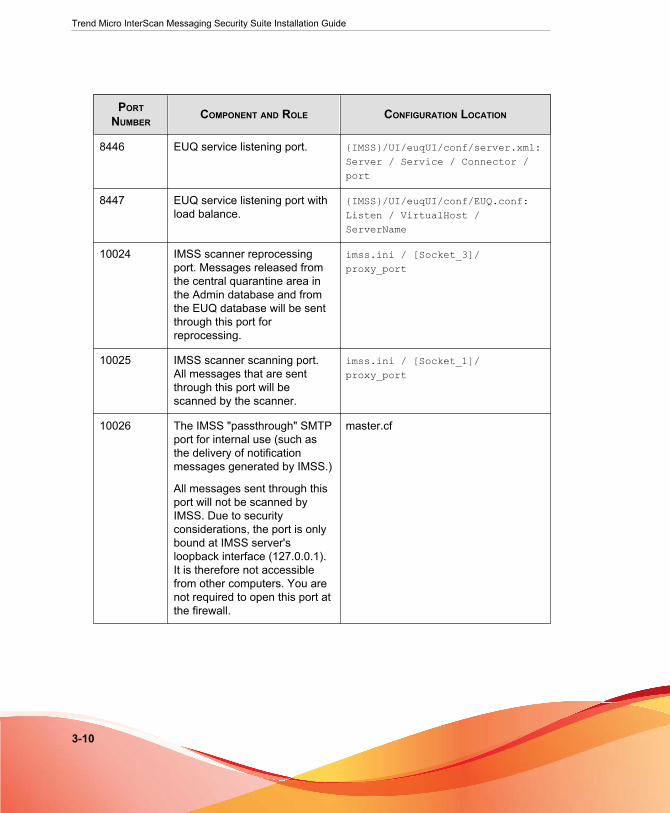
8446 EUQ service listening port. {IMSS}/UI/euqUI/conf/server.xml:Server / Service / Connector /port
8447 EUQ service listening port withload balance.
{IMSS}/UI/euqUI/conf/EUQ.conf:Listen / VirtualHost /ServerName
10024 IMSS scanner reprocessingport. Messages released fromthe central quarantine area inthe Admin database and fromthe EUQ database will be sentthrough this port forreprocessing.
imss.ini / [Socket_3]/proxy_port
10025 IMSS scanner scanning port.All messages that are sentthrough this port will bescanned by the scanner.
imss.ini / [Socket_1]/proxy_port
10026 The IMSS "passthrough" SMTPport for internal use (such asthe delivery of notificationmessages generated by IMSS.)
All messages sent through thisport will not be scanned byIMSS. Due to securityconsiderations, the port is onlybound at IMSS server'sloopback interface (127.0.0.1).It is therefore not accessiblefrom other computers. You arenot required to open this port atthe firewall.
master.cf

Planning for Deployment
3-11
PORTNUMBER
COMPONENT AND ROLE CONFIGURATION LOCATION
15505 IMSS Manager listening port.The manager uses this port toaccept managementcommands (such as servicestart/stop) from the webconsole. The manager alsoprovides quarantine/archivequery results to the webconsole and the EUQ Webconsole through this port.
From the web console, go toAdministration > IMSS Configuration> Connections > Components on themenu.
IMSS uses the following ports when you enable related services:
389 LDAP server listening port. Not configurable on the IMSS server.
5432 PostgreSQL database listeningport. Do not assign a differentport number
You cannot change this port.
80 Microsoft IIS HTTP listeningport. You need this port if youare using Control Manager tomanage IMSS, as the ControlManager Server depends onMicrosoft IIS.
From the web console, go toAdministration > IMSS Configuration> Connections > TMCM Server on themenu.
443 Microsoft IIS HTTPS listeningport. You need this port if youare using Control Manager tomanage IMSS, as the ControlManager Server depends onMicrosoft IIS.
From the web console, go toAdministration > IMSS Configuration> Connections > TMCM Server on themenu.
88 KDC port for Kerberos realm. Not configurable on the IMSS server.
53 The Bind service listening port.Do not assign a different portnumber.
Not configurable on the IMSS server.

Trend Micro InterScan Messaging Security Suite Installation Guide
3-12
Network Topology ConsiderationsThis section illustrates different ways to deploy IMSS based on the location of firewallson your network.
Deploy IMSS in an existing messaging environment at the SMTP gateway. This sectionprovides a description of where IMSS fits in various network topologies, withillustrations of each scenario and general instructions for configuring other gatewayservices.
Note
The illustrations below assume a single-server installation of IMSS. Since any IMSSinstallation functions as a logical unit, the same topologies would apply to a distributeddeployment installation. However, as IMSS does not handle the distribution of messagesbetween scanners, you need to use third-party software or a switch to balance the trafficbetween multiple instances of the IMSS scanner component.
Installing without a Firewall
The following figure illustrates how to deploy IMSS and Postfix when your networkdoes not have a firewall.
FIGURE 3-1. Installation topology: no firewall
Planning for Deployment
3-13
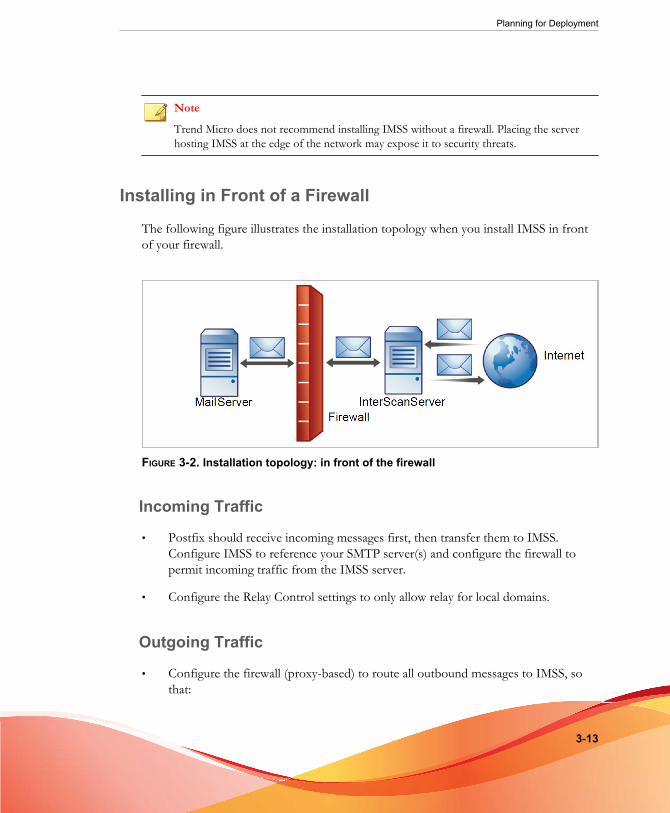
Note
Trend Micro does not recommend installing IMSS without a firewall. Placing the serverhosting IMSS at the edge of the network may expose it to security threats.
Installing in Front of a Firewall
The following figure illustrates the installation topology when you install IMSS in frontof your firewall.
FIGURE 3-2. Installation topology: in front of the firewall
Incoming Traffic
• Postfix should receive incoming messages first, then transfer them to IMSS.Configure IMSS to reference your SMTP server(s) and configure the firewall topermit incoming traffic from the IMSS server.
• Configure the Relay Control settings to only allow relay for local domains.
Outgoing Traffic
• Configure the firewall (proxy-based) to route all outbound messages to IMSS, sothat:
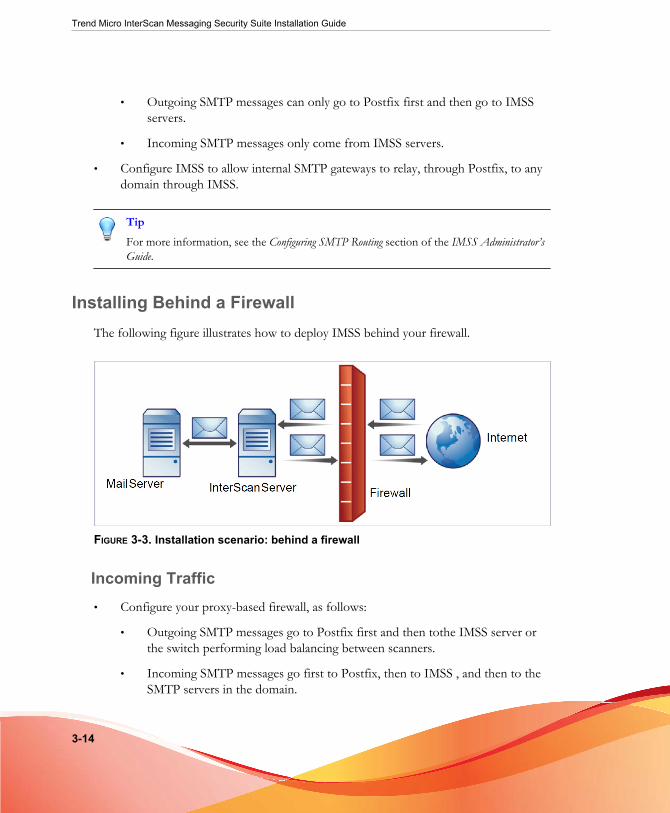
Trend Micro InterScan Messaging Security Suite Installation Guide
3-14
• Outgoing SMTP messages can only go to Postfix first and then go to IMSSservers.
• Incoming SMTP messages only come from IMSS servers.
• Configure IMSS to allow internal SMTP gateways to relay, through Postfix, to anydomain through IMSS.
TipFor more information, see the Configuring SMTP Routing section of the IMSS Administrator’sGuide.
Installing Behind a FirewallThe following figure illustrates how to deploy IMSS behind your firewall.
FIGURE 3-3. Installation scenario: behind a firewall
Incoming Traffic• Configure your proxy-based firewall, as follows:
• Outgoing SMTP messages go to Postfix first and then tothe IMSS server orthe switch performing load balancing between scanners.
• Incoming SMTP messages go first to Postfix, then to IMSS , and then to theSMTP servers in the domain.

Planning for Deployment
3-15
• Configure your packet-based firewall, as follows:
• Change the MX records on the DNS server that currently reference yourSMTP gateway to reference the address of the server hosting IMSS.
• Point your MX records to IMSS or the firewall, if you configured it to managea secure subnet.
• Configure IMSS to route messages destined for your local domain(s) to the SMTPgateway or your internal mail server.
• Configure relay restriction to only allow relay for local domain(s).
Outgoing Traffic• Configure all internal SMTP gateways to send outgoing messages to Postfix and
then to IMSS servers.
• If you are replacing your SMTP gateway with IMSS, configure your internal mailserver to send outgoing messages through Postfix and then to IMSS servers.
• Configure Postfix and IMSS to route all outgoing messages (to domains other thanlocal), to the firewall, or deliver the messages .
• Configure IMSS to allow internal SMTP gateways to relay to any domain usingIMSS.
TipFor more information, see the Configuring SMTP Routing section of the IMSSAdministrator’s Guide.
Installing on a Former SMTP GatewayYou can also install IMSS and Postfix on the same server that formerly hosted yourSMTP gateway.
On the SMTP gateway:
• Allocate a new TCP/IP port to route SMTP mail to IMSS . Ensure the port is notused by any other services.

Trend Micro InterScan Messaging Security Suite Installation Guide
3-16
• Configure IMSS to bind to the newly allocated port, which frees port 25.
NoteThe existing SMTP gateway binds to port 25.
Incoming TrafficConfigure IMSS to route incoming email messages to the SMTP gateway and the newlyallocated port.
Outgoing Traffic• Configure the SMTP gateway to route outgoing email messages to the IMSS port
25.
• Configure Postfix and IMSS to route all outgoing email messages (destined fordomains that are not local) to the firewall or deliver them .
Installing in the De-Militarized ZoneYou can also install IMSS and Postfix in the De-Militarized Zone (DMZ).
Incoming Traffic• Configure your proxy-based firewall, so that incoming and outgoing SMTP
messages can only go from the DMZ to the internal email servers.
• Configure your packet-based firewall.
• Configure Postfix and IMSS to route email messages destined for your localdomain(s) to the SMTP gateway or your internal mail server.
Outgoing Traffic• Configure Postfix to route all outgoing messages (destined for domains other than
the local domains) to the firewall or deliver them using IMSS .
Planning for Deployment
3-17
• Configure all internal SMTP gateways to forward outgoing mail to Postfix and thento IMSS.
• Configure IMSS to allow internal SMTP gateways to relay to any domain, throughPostfix and IMSS.
TipFor more information, see the Configuring SMTP Routing section of the IMSSAdministrator’s Guide.
About Operating ModelsYou can deploy IMSS in different ways depending on how the IMSS server interactswith your existing MTAs and mail servers. There are three operating models:
Standalone modelDeploys IMSS on the same computer as an MTA, such as Postfix.
Sandwich modelDeploys IMSS between an upstream MTA and a downstream MTA.
Proxy modelDeploys IMSS between an upstream mail server and a downstream mailserver.
NoteIn the proxy model, IMSS is placed at the edge of your intranet without any co-work MTA.This model does not support the use of IP Filtering features (IP Profiler and ERS).
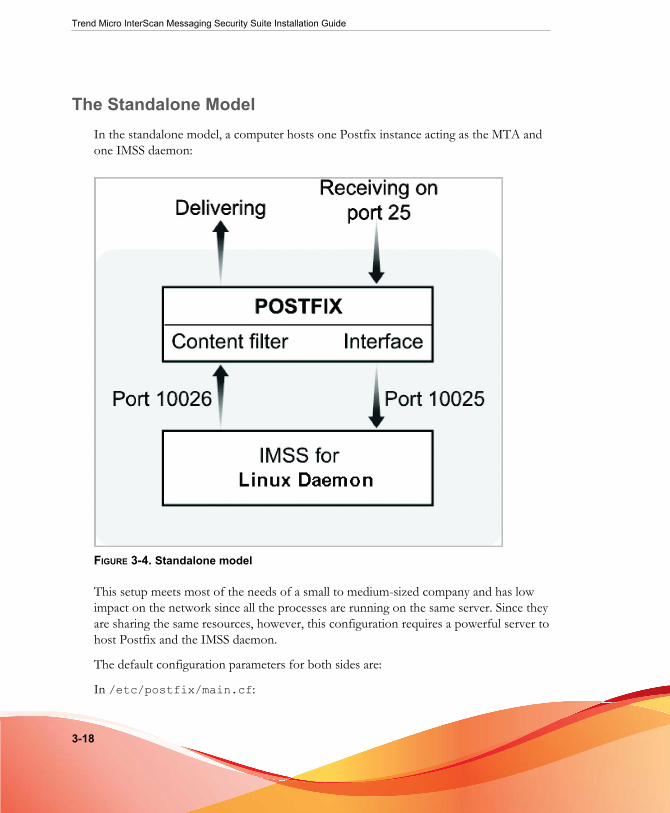
Trend Micro InterScan Messaging Security Suite Installation Guide
3-18
The Standalone ModelIn the standalone model, a computer hosts one Postfix instance acting as the MTA andone IMSS daemon:
FIGURE 3-4. Standalone model
This setup meets most of the needs of a small to medium-sized company and has lowimpact on the network since all the processes are running on the same server. Since theyare sharing the same resources, however, this configuration requires a powerful server tohost Postfix and the IMSS daemon.
The default configuration parameters for both sides are:
In /etc/postfix/main.cf:

Planning for Deployment
3-19
mydomain = your.domain.namemyhostname = your.hostname.domainnamemydestination = $myhostname, localhost.$mydomain, $mydomain default_process_limit=200 imss_timeout=10m imss_connect_timeout=1s content_filter = imss:localhost:10025 imss_destination_recipient_limit=200 imss_destination_concurrency_limit=200
In /etc/postfix/master.cf:
#IMSS: content filter smtp transport imss for IMSS imss unix - - n - - smtp -o disable_dns_lookups=yes -o smtp_connect_timeout=$imss_connect_timeout -o smtp_data_done_timeout=$imss_timeout #IMSS: content filter loop back smtpd localhost:10026 inet n - n - 200 smtpd -o content_filter= -o smtpd_timeout=$imss_timeout -o local_recipient_maps= -o myhostname=postfix.imss71 -o smtpd_client_restrictions= -o smtpd_enforce_tls=no
The Standalone Model in IPv6 EnvironmentsFor IPv6 support, make the following changes to in /etc/postfix/main.cf:
mydomain = your.domain.namemyhostname = your.hostname.domainnamemydestination = $myhostname, localhost.$mydomain, $mydomain default_process_limit=200 imss_timeout=10m imss_connect_timeout=1s

Trend Micro InterScan Messaging Security Suite Installation Guide
3-20
content_filter = imss:[::1]:10025 imss_destination_recipient_limit=200 imss_destination_concurrency_limit=200
For IPv6 support, make the following changes to in /etc/postfix/master.cf:
#IMSS: content filter smtp transport imss for IMSS imss unix - - n - - smtp -o disable_dns_lookups=yes -o smtp_connect_timeout=$imss_connect_timeout -o smtp_data_done_timeout=$imss_timeout #IMSS: content filter loop back smtpd [::1]:10026 inet n - n - 200 smtpd -o content_filter= -o smtpd_timeout=$imss_timeout -o local_recipient_maps= -o myhostname=postfix.imss71 -o smtpd_client_restrictions= -o smtpd_enforce_tls=no
In /opt/trend/imss/config/imss.ini, open connection restrictions and pointthe downstream server IP to IPv6 localhost:
[socket]proxy_smtp_server_ip=all[smtp]smtp_allow_client_ip=127.0.0.1, ::1downstream_smtp_server_addr=::1
The Sandwich ModelIn this configuration, one server hosts a Postfix instance as an upstream MTA forreceiving (Server #1) and a second server hosts a Postfix instance as the downstream

Planning for Deployment
3-21
MTA for delivering (Server #3). A third server hosts the IMSS daemon , which sitsbetween the two Postfix servers as a scanning proxy (Server #2).
FIGURE 3-5. Sandwich model
This configuration is suitable for large corporations with heavy SMTP traffic. Eachserver has its own specific purpose and task and will not affect other servers. Using thistype of setup increases your network load.
Trend Micro InterScan Messaging Security Suite Installation Guide
3-22
This configuration is highly flexible; you can replace Postfix with any SMTP MTA. Butyou are responsible for setting up connection control and domain relaying.
Here are the configuration settings if you use Postfix as the MTA:
• In /etc/postfix/main.cf on server#1, add the following to relay mail toserver #2:
relayhost=[ip_of_server2]:10025 default_destination_recipient_limit=100 default_destination_concurrency_limit=50
• In /opt/trend/imss/config/imss.ini, open connection restrictions andpoint the downstream server IP to server #3:
imss socket binding address [socket] proxy_smtp_server_ip=all [smtp] smtp_allow_client_ip=127.0.0.1, ip_of_server1 downstream_smtp_server_addr=ip_of_server3
• In /etc/postfix/master.cf on server #3, modify smtpd settings to receivemail on port 10026:
10026 inet n - n - - smtpd
The Sandwich Model in IPv6 Environments
Here are the configuration settings if you use Postfix as the MTA.
In /etc/postfix/main.cf on server#1, add the following to relay mail to server#2:
relayhost=[ipv6_address_of_server2]:10025default_destination_recipient_limit=100default_destination_concurrency_limit=50
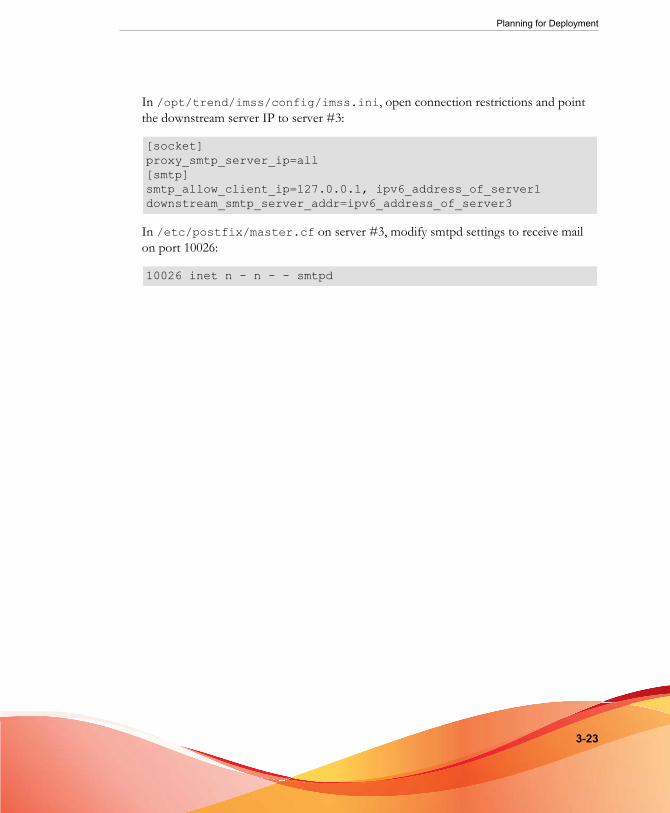
Planning for Deployment
3-23
In /opt/trend/imss/config/imss.ini, open connection restrictions and pointthe downstream server IP to server #3:
[socket]proxy_smtp_server_ip=all[smtp]smtp_allow_client_ip=127.0.0.1, ipv6_address_of_server1downstream_smtp_server_addr=ipv6_address_of_server3
In /etc/postfix/master.cf on server #3, modify smtpd settings to receive mailon port 10026:
10026 inet n - n - - smtpd

Trend Micro InterScan Messaging Security Suite Installation Guide
3-24
The Proxy ModelIn this model, IMSS is located between an upstream and downstream mail server, withMTAs located in other places on the network.
FIGURE 3-6. Proxy model

Planning for Deployment
3-25
The greatest advantage of this model is better performance and faster throughput.However, with this model, you cannot use IP Profiler or ERS, which requires that thereare no modifications to incoming IP addresses before they reach IMSS.
The Proxy Model in IPv6 Environments
In /etc/postfix/main.cf on server#1, add the following to relay mail to server#2:
relayhost=[ipv6_address_of_server2]:10025default_destination_recipient_limit=100default_destination_concurrency_limit=50
In /opt/trend/imss/config/imss.ini, open connection restrictions and pointthe downstream server IP to server #3:
[socket]proxy_smtp_server_ip=all[smtp]smtp_allow_client_ip=127.0.0.1, ipv6_address_of_server1downstream_smtp_server_addr=ipv6_address_of_server3
In /etc/postfix/master.cf on server #3, modify smtpd settings to receive mailon port 10026:
10026 inet n - n - - smtpd
Tip
IMSS 7.1 SP1 can connect to TMCM servers residing in IPv6 networks. Make sure toconfigure the TMCM to support IPv6.
Understanding Installation ScenariosIMSS allows you to install either a single instance of each component on a single server(single-server installation) or several IMSS components on multiple servers (distributeddeployment installation). Use the following information as a guide to choose a scenario.

Trend Micro InterScan Messaging Security Suite Installation Guide
3-26
Single-Server InstallationFor a single-server installation, you need a server that meets the single-server installationrequirements. The single-server installation of IMSS can handle average messagingtraffic for approximately 1,000 users. If you install IMSS as a single-server installationand need to add capacity later, you can easily add additional scanner services byappending components to the existing IMSS server from the Setup program.
You can install all the IMSS components on a single server, including:
• Central Controller
• IMSS Admin Database
• Policy Service
• Scanner Service
• Primary EUQ Service and EUQ Database

Planning for Deployment
3-27
The following figure shows how a single-server installation of IMSS fits into a standardmessaging network topology.
FIGURE 3-7. Single server deployment
Performing Single-Server Installation
Procedure
1. Install IMSS and End-User Quarantine.
2. On the edge MTA server, install all IP Filtering components.
Multiple Scanner Service InstallationFor some larger organizations, a single server cannot provide sufficient messagethroughput. In these cases, you can install all the IMSS components on one server, and
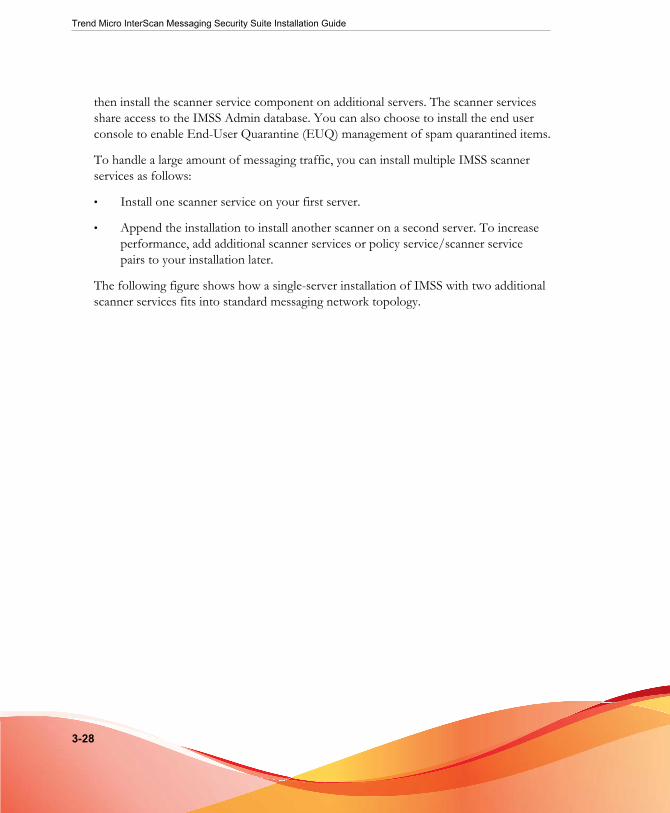
Trend Micro InterScan Messaging Security Suite Installation Guide
3-28
then install the scanner service component on additional servers. The scanner servicesshare access to the IMSS Admin database. You can also choose to install the end userconsole to enable End-User Quarantine (EUQ) management of spam quarantined items.
To handle a large amount of messaging traffic, you can install multiple IMSS scannerservices as follows:
• Install one scanner service on your first server.
• Append the installation to install another scanner on a second server. To increaseperformance, add additional scanner services or policy service/scanner servicepairs to your installation later.
The following figure shows how a single-server installation of IMSS with two additionalscanner services fits into standard messaging network topology.

Planning for Deployment
3-29
You must deploy a layer 4 switch between the MTA and the scanner services.
FIGURE 3-8. Multiple scanner service and policy service deployment
Performing Multiple Scanner Service Installation
Procedure
1. On one computer, install IMSS and End-User Quarantine.
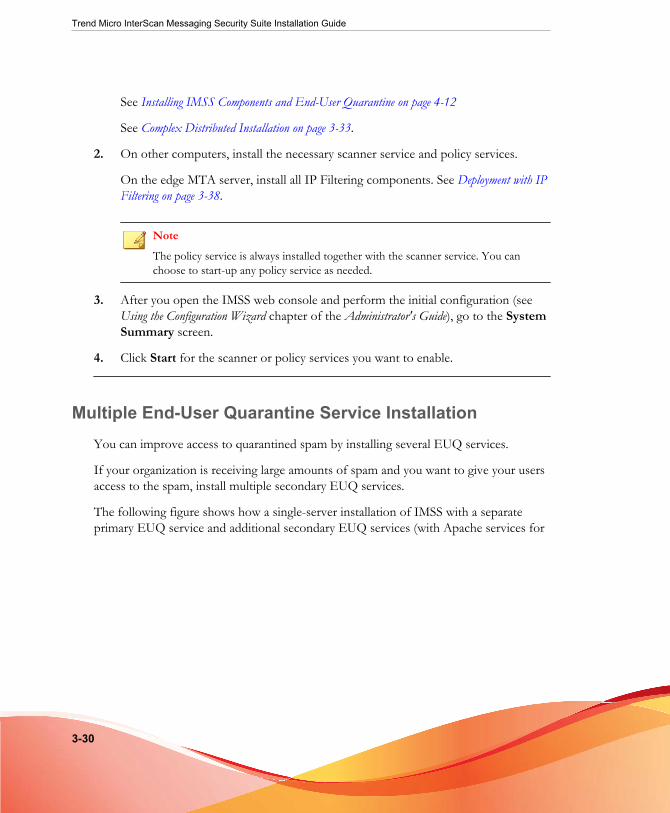
Trend Micro InterScan Messaging Security Suite Installation Guide
3-30
See Installing IMSS Components and End-User Quarantine on page 4-12
See Complex Distributed Installation on page 3-33.
2. On other computers, install the necessary scanner service and policy services.
On the edge MTA server, install all IP Filtering components. See Deployment with IPFiltering on page 3-38.
NoteThe policy service is always installed together with the scanner service. You canchoose to start-up any policy service as needed.
3. After you open the IMSS web console and perform the initial configuration (seeUsing the Configuration Wizard chapter of the Administrator's Guide), go to the SystemSummary screen.
4. Click Start for the scanner or policy services you want to enable.
Multiple End-User Quarantine Service InstallationYou can improve access to quarantined spam by installing several EUQ services.
If your organization is receiving large amounts of spam and you want to give your usersaccess to the spam, install multiple secondary EUQ services.
The following figure shows how a single-server installation of IMSS with a separateprimary EUQ service and additional secondary EUQ services (with Apache services for

Planning for Deployment
3-31
load balancing) and distributed EUQ databases fit into a standard messaging networktopology.
FIGURE 3-9. Multiple EUQ service deployment

Trend Micro InterScan Messaging Security Suite Installation Guide
3-32
Performing Multiple EUQ Service Installation
Procedure
1. On one computer, install IMSS.
See Installing IMSS Components and End-User Quarantine on page 4-12
Note
You can choose whether to install an EUQ service on the same computer. To installthe first EUQ service on another computer, do not choose EUQ-related componentson the first computer. The first EUQ service will be the primary EUQ service. Forload balancing, the Apache service is installed with the primary EUQ service.
2. On other computers that can communicate with the primary EUQ service, installadditional EUQ services. You must install at least one EUQ database for EUQservices. You can also install additional EUQ databases for better performance.
Note
You can install the EUQ database on the same computer where EUQ services willrun, or on different computers. However, for performance reasons, IMSS does notallow installing multiple EUQ databases on the same database server.
3. On the edge MTA server, install all IP Filtering components.
See Installing Email Reputation Services and IP Profiler on page 4-17.
4. After you open the IMSS web console and perform initial configuration (seePerforming Basic Configuration with the Configuration Wizard and Configuring IMSS Settingssections of the Administrator’s Guide), go to the System Summary screen.
5. Click Start for the EUQ services you want to enable.
Note
A single IMSS Central Controller and database can manage up to eight (8) EUQservices/databases.

Planning for Deployment
3-33
Other Considerations When Deploying End-User Quarantine
For the end users in your organization to be able to access the web-based quarantine,they must have HTTPS access to the server. In addition, server hosting the EUQcomponents must be able to connect to the EUQ database that IMSS uses to storeinformation about quarantined items.
This means that any firewall between EUQ and end user computers on your networkmust not prevent HTTPS connections from internal addresses, or must be configured toallow such traffic.
You can also install web-based quarantine and the database on a separate server fromIMSS. In this case, you must configure any firewall between IMSS and the other serverto allow database connections between them.
For more information, see Installing IMSS Components and End-User Quarantine on page4-12.
Communication Between Servers
If you have an internal firewall, configure it to allow communication between IMSS, theEUQ service, and the database. For instance, if you install the EUQ service on oneserver, and the database on another, configure any firewall between the two servers toallow communication on port 5432 for database connections.
Complex Distributed InstallationFor very large organizations, a distributed deployment installation is the best solution.You will need to have servers that meet the component installation requirements. In thisscenario, you will be installing IMSS and EUQ components on different servers. Youcan install the database on one server, the Central Controller on another, and then installboth a policy service and scanner service on additional servers.
You can also choose to install multiple instances of the EUQ console to enable EUQmanagement of spam quarantined items. Likewise, you can install multiple EUQdatabases to enhance EUQ performance.
If your environment requires high-throughput, you can install each IMSS component ona separate computer and deploy multiple scanner services, EUQ services, and databases.
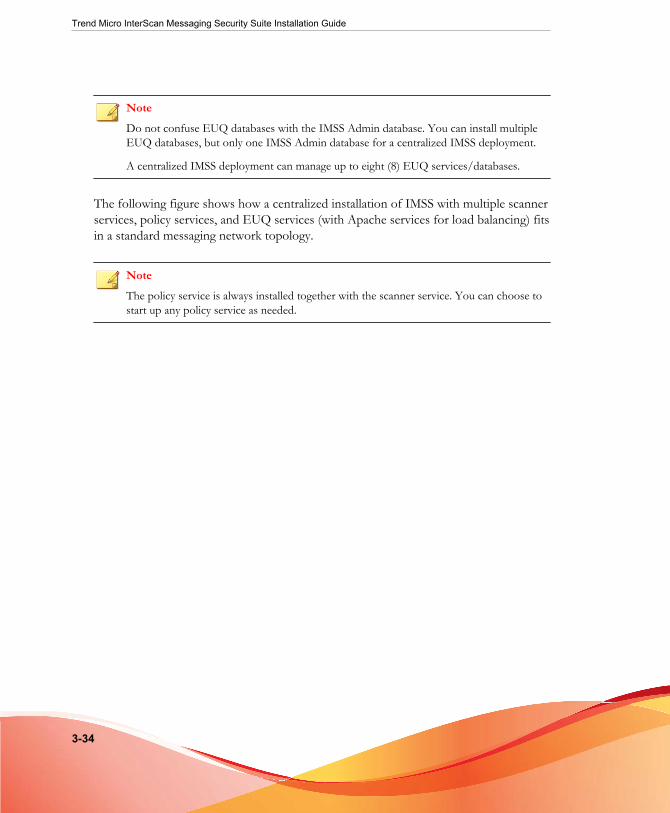
Trend Micro InterScan Messaging Security Suite Installation Guide
3-34
NoteDo not confuse EUQ databases with the IMSS Admin database. You can install multipleEUQ databases, but only one IMSS Admin database for a centralized IMSS deployment.
A centralized IMSS deployment can manage up to eight (8) EUQ services/databases.
The following figure shows how a centralized installation of IMSS with multiple scannerservices, policy services, and EUQ services (with Apache services for load balancing) fitsin a standard messaging network topology.
NoteThe policy service is always installed together with the scanner service. You can choose tostart up any policy service as needed.
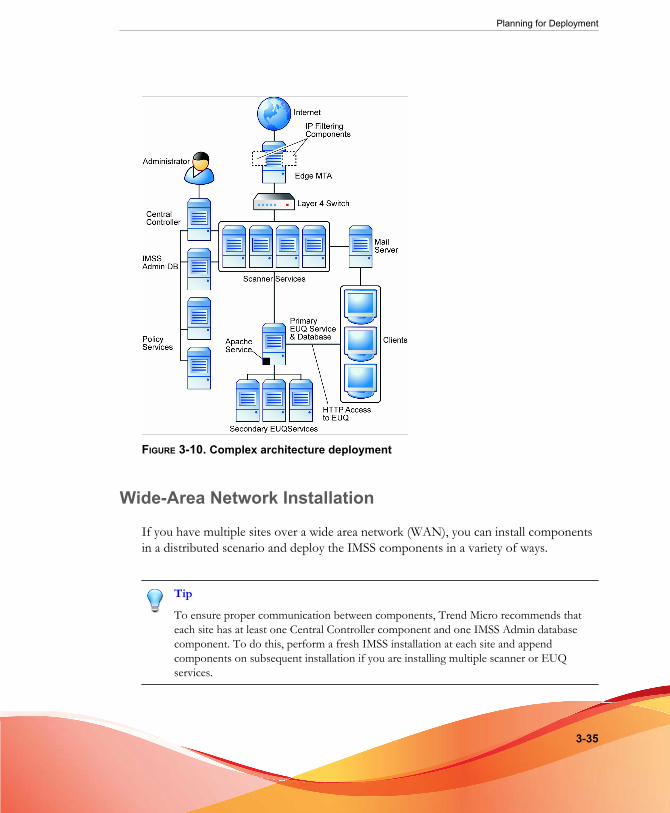
Planning for Deployment
3-35
FIGURE 3-10. Complex architecture deployment
Wide-Area Network Installation
If you have multiple sites over a wide area network (WAN), you can install componentsin a distributed scenario and deploy the IMSS components in a variety of ways.
Tip
To ensure proper communication between components, Trend Micro recommends thateach site has at least one Central Controller component and one IMSS Admin databasecomponent. To do this, perform a fresh IMSS installation at each site and appendcomponents on subsequent installation if you are installing multiple scanner or EUQservices.

Trend Micro InterScan Messaging Security Suite Installation Guide
3-36
Trend Micro Control Manager
This scenario includes two Trend Micro Control Manager (TMCM) servers that manageall sites. Each Control Manager server can replicate database information between IMSSscanners registered to Control Manager.
Tip
To easily manage all IMSS servers (with Central Controllers installed), Trend Microrecommends installing a Control Manager server.
The following figure describes how each site differs in this scenario:
FIGURE 3-11. WAN deployment

Planning for Deployment
3-37
Site 1An IMSS server with a Central Controller, IMSS Admin database, and policyservice + two IMSS scanner services with policy services enabled.
Site 2An IMSS server with a Central Controller, IMSS Admin database, and policyservice + two IMSS scanner services with policy services enabled (for faulttolerance).
Site 3An IMSS Central Controller + IMSS Admin database + a single policy serviceonly + two IMSS scanner services with policy services enabled (for faulttolerance).
Site 4An IMSS server with a Central Controller and IMSS Admin database + oneIMSS scanner services with policy services enabled.
Fault Tolerance and Failover in a WAN Scenario
Three out of the four sites in this scenario use multiple scanner services with policyservices installed. Policy services can access cached IMSS settings from the IMSS Admindatabase. Any scanner service that goes down can use another active policy service.Therefore, if one policy service stops or if communication between the central databaseis interrupted, both scanner services will remain operational and continue processingmail by using the active policy service that has a connection to the IMSS server.
Each site has its own Central Controller and database server, all of which are reportingback to two Control Manager servers. A Control Manager server can replicateIMSSAdmin databases that directly report to it. If one of the IMSS Admin databases becomescorrupted or nonoperational, you can restore the replicated databases.
NoteControl Manager servers cannot replicate IMSS Admin database information if the serverdoes not report to Control Manager.

Trend Micro InterScan Messaging Security Suite Installation Guide
3-38
FIGURE 3-12. Failover
IP FilteringIf you will be deploying IP Filtering (IP Profiler or Email reputation), there are someadditional network topology considerations you must address.
Deployment with IP FilteringIP Filtering (IP Profiler and Email reputation) both block connections at the IP level. IPProfiler uses your customized settings for email messages that signify different types ofattack. Email reputation uses information from the Trend Micro Threat ReputationNetwork to determine if the computer initiating an SMTP connection is a known senderof spam.
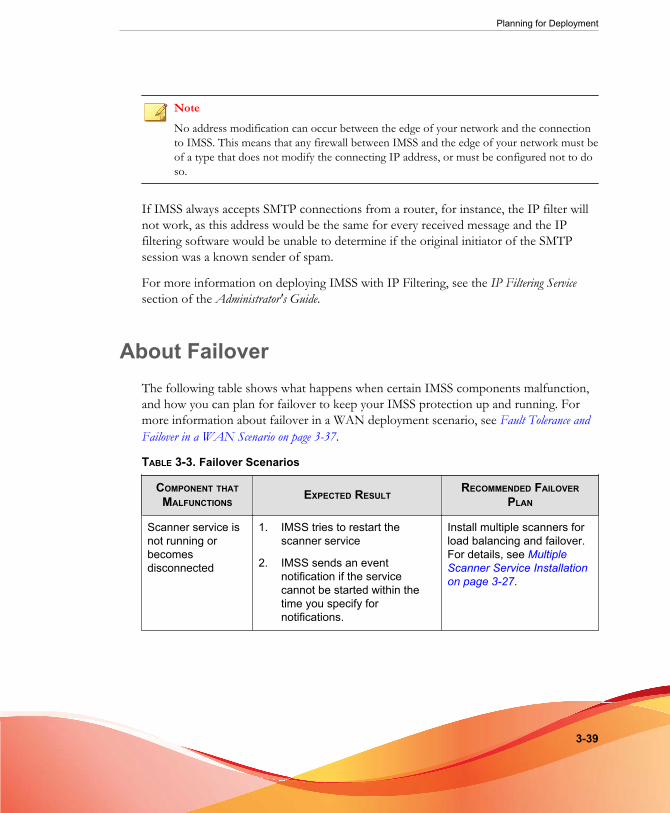
Planning for Deployment
3-39
NoteNo address modification can occur between the edge of your network and the connectionto IMSS. This means that any firewall between IMSS and the edge of your network must beof a type that does not modify the connecting IP address, or must be configured not to doso.
If IMSS always accepts SMTP connections from a router, for instance, the IP filter willnot work, as this address would be the same for every received message and the IPfiltering software would be unable to determine if the original initiator of the SMTPsession was a known sender of spam.
For more information on deploying IMSS with IP Filtering, see the IP Filtering Servicesection of the Administrator's Guide.
About FailoverThe following table shows what happens when certain IMSS components malfunction,and how you can plan for failover to keep your IMSS protection up and running. Formore information about failover in a WAN deployment scenario, see Fault Tolerance andFailover in a WAN Scenario on page 3-37.
TABLE 3-3. Failover Scenarios
COMPONENT THATMALFUNCTIONS
EXPECTED RESULTRECOMMENDED FAILOVER
PLAN
Scanner service isnot running orbecomesdisconnected
1. IMSS tries to restart thescanner service
2. IMSS sends an eventnotification if the servicecannot be started within thetime you specify fornotifications.
Install multiple scanners forload balancing and failover.For details, see MultipleScanner Service Installationon page 3-27.

Trend Micro InterScan Messaging Security Suite Installation Guide
3-40
COMPONENT THATMALFUNCTIONS
EXPECTED RESULTRECOMMENDED FAILOVER
PLAN
Policy service is notrunning or acommunicationproblem with theIMSS server occurs
1. Scanner services using thestopped policy service switchto an active policy service (ifavailable).
2. IMSS tries to restart the policyservice.
3. IMSS sends an eventnotification if the servicecannot be started orreconnected within the timeyou specify for notifications.
Install multiple scanners forload balancing and failover.For details, see MultipleScanner Service Installationon page 3-27.
IMSS Admindatabase is notrunning
1. The IMSS server will continueto operate.
2. The IMSS web console isunavailable.
Back up the Admin databaseperiodically.
For more information onbackup and restore, visitwww.postgresql.org.
EUQ servicedatabase is notrunning
An error message appears on theEUQ Web console.
Back up the EUQ Databaseperiodically.
For more information onbackup and restore, visitwww.postgresql.org.
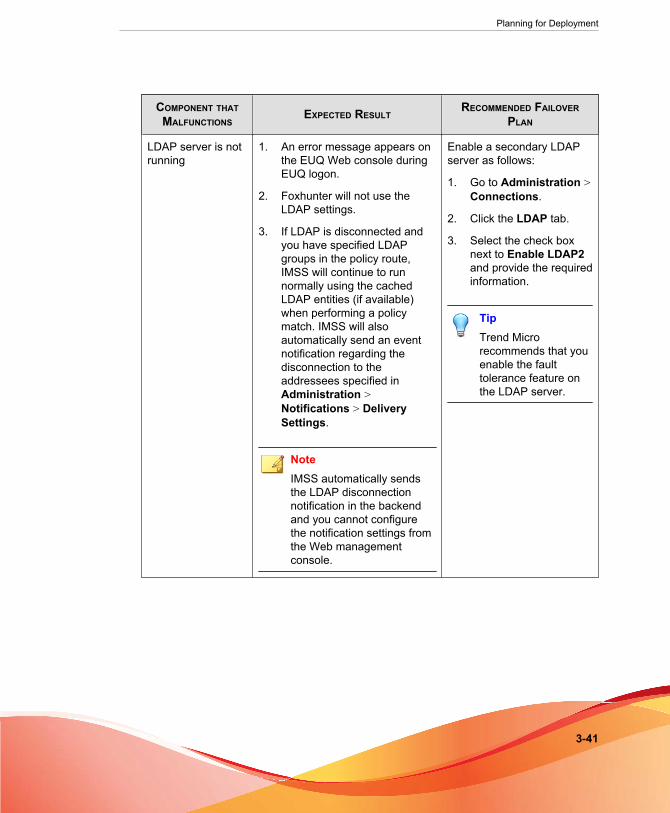
Planning for Deployment
3-41
COMPONENT THATMALFUNCTIONS
EXPECTED RESULTRECOMMENDED FAILOVER
PLAN
LDAP server is notrunning
1. An error message appears onthe EUQ Web console duringEUQ logon.
2. Foxhunter will not use theLDAP settings.
3. If LDAP is disconnected andyou have specified LDAPgroups in the policy route,IMSS will continue to runnormally using the cachedLDAP entities (if available)when performing a policymatch. IMSS will alsoautomatically send an eventnotification regarding thedisconnection to theaddressees specified inAdministration >Notifications > DeliverySettings.
NoteIMSS automatically sendsthe LDAP disconnectionnotification in the backendand you cannot configurethe notification settings fromthe Web managementconsole.
Enable a secondary LDAPserver as follows:
1. Go to Administration >Connections.
2. Click the LDAP tab.
3. Select the check boxnext to Enable LDAP2and provide the requiredinformation.
TipTrend Microrecommends that youenable the faulttolerance feature onthe LDAP server.


4-1
Chapter 4
Installing and Uninstalling IMSS 7.1SP1
This chapter explains how to install IMSS under different scenarios.
Topics include:
• System Requirements on page 4-2
• Preparing the Message Transfer Agents on page 4-5
• Preparing to Install IMSS Components and End-User Quarantine on page 4-12
• About IP Filtering Components on page 4-16
• Verifying the Installation on page 4-24
• About IPv6 Support on page 4-25
• Performing Uninstallation on page 4-30

Trend Micro InterScan Messaging Security Suite Installation Guide
4-2
System RequirementsThe following table provides the recommended and minimum system requirements forrunning IMSS.
TABLE 4-1. System Requirements
SPECIFICATION DESCRIPTION
Operating System • Red Hat™ Enterprise Linux™ AS 4 Update 3 or above
• Red Hat Enterprise Linux ES 4 Update 3 or above
• Red Hat Enterprise Linux 5 (32/64-bit)
• Red Hat Enterprise Linux 6.0, 6.1, 6.2, 6.3, 6.4 (32/64-bit)
CPU • Recommended:
Intel™ Quad Core 2.0GHz or above
• Minimum:
Intel™ Dual Pentium™ IV 3GHz or above
Memory • Recommended:
4GB RAM
• Minimum:
2GB RAM

Installing and Uninstalling IMSS 7.1 SP1
4-3
SPECIFICATION DESCRIPTION
Disk Space • Recommended:
250GB total
The following recommendations are based on 500,000messages/day, a 50% quarantine rate, and logs preserved fora month.
• 10GB for mail storage
• 50GB or more for the Admin database
• 20GB or more for the EUQ database
• 40GB or more for the working quarantine folder
• Minimum:
80GB total
NoteThe default location for the Admin database and EUQdatabase is /var/imss. The Default location for theworking quarantine folders is /opt/trend/imss/queue/.
Swap Space • Recommended:
• 2GB swap space if memory is greater than or equal to4GB
• 4GB swap space if memory is less than 4GB
• Minimum:
2GB swap space
Browser• Microsoft™ Internet Explorer™ 7, 8, 9, 10
• Mozilla™ Firefox™ 3.5, 3.6, 21
Monitor Monitor that supports 800 x 600 resolution with 256 colors orhigher
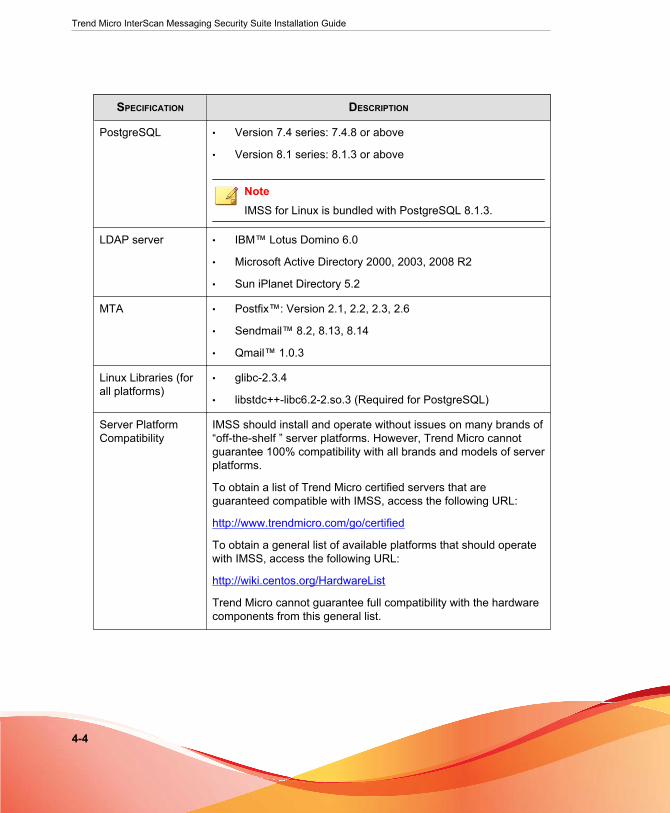
Trend Micro InterScan Messaging Security Suite Installation Guide
4-4
SPECIFICATION DESCRIPTION
PostgreSQL • Version 7.4 series: 7.4.8 or above
• Version 8.1 series: 8.1.3 or above
NoteIMSS for Linux is bundled with PostgreSQL 8.1.3.
LDAP server • IBM™ Lotus Domino 6.0
• Microsoft Active Directory 2000, 2003, 2008 R2
• Sun iPlanet Directory 5.2
MTA • Postfix™: Version 2.1, 2.2, 2.3, 2.6
• Sendmail™ 8.2, 8.13, 8.14
• Qmail™ 1.0.3
Linux Libraries (forall platforms)
• glibc-2.3.4
• libstdc++-libc6.2-2.so.3 (Required for PostgreSQL)
Server PlatformCompatibility
IMSS should install and operate without issues on many brands of“off-the-shelf ” server platforms. However, Trend Micro cannotguarantee 100% compatibility with all brands and models of serverplatforms.
To obtain a list of Trend Micro certified servers that areguaranteed compatible with IMSS, access the following URL:
http://www.trendmicro.com/go/certified
To obtain a general list of available platforms that should operatewith IMSS, access the following URL:
http://wiki.centos.org/HardwareList
Trend Micro cannot guarantee full compatibility with the hardwarecomponents from this general list.
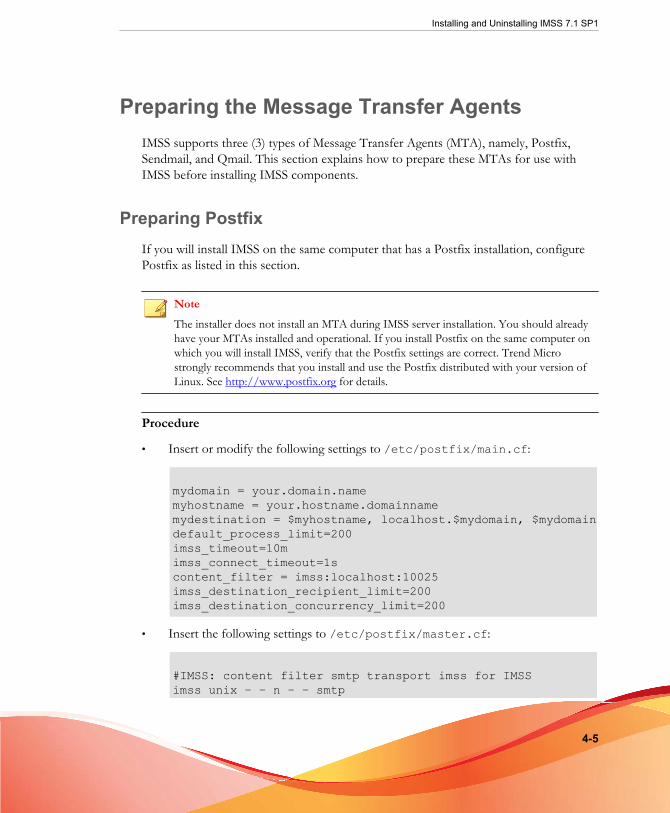
Installing and Uninstalling IMSS 7.1 SP1
4-5
Preparing the Message Transfer AgentsIMSS supports three (3) types of Message Transfer Agents (MTA), namely, Postfix,Sendmail, and Qmail. This section explains how to prepare these MTAs for use withIMSS before installing IMSS components.
Preparing PostfixIf you will install IMSS on the same computer that has a Postfix installation, configurePostfix as listed in this section.
NoteThe installer does not install an MTA during IMSS server installation. You should alreadyhave your MTAs installed and operational. If you install Postfix on the same computer onwhich you will install IMSS, verify that the Postfix settings are correct. Trend Microstrongly recommends that you install and use the Postfix distributed with your version ofLinux. See http://www.postfix.org for details.
Procedure
• Insert or modify the following settings to /etc/postfix/main.cf:
mydomain = your.domain.namemyhostname = your.hostname.domainnamemydestination = $myhostname, localhost.$mydomain, $mydomaindefault_process_limit=200imss_timeout=10mimss_connect_timeout=1scontent_filter = imss:localhost:10025imss_destination_recipient_limit=200imss_destination_concurrency_limit=200
• Insert the following settings to /etc/postfix/master.cf:
#IMSS: content filter smtp transport imss for IMSSimss unix – – n – – smtp

Trend Micro InterScan Messaging Security Suite Installation Guide
4-6
–o disable_dns_lookups=yes –o smtp_connect_timeout=$imss_connect_timeout -o smtp_data_done_timeout=$imss_timeout#IMSS: content filter loop back smtpdlocalhost:10026 inet n – n – 200 smtpd –o content_filter= –o smtpd_timeout=$imss_timeout –o local_recipient_maps= –o myhostname=postfix.imss71 –o smtpd_client_restrictions= –o smtpd_enforce_tls=no
Enabling Postfix IPv6 Support
The following procedure explains how configure Postfix for IPv6 support. For detailsabout Postfix 2.2 support for IPv6 protocol, visit:
http://www.postfix.org/IPV6_README.html
Procedure
1. Open /etc/postfix/main.cf.
2. Set inet_protocols = all.
3. Restart the Postfix service.
About Sendmail
This section explains how to configure and use Sendmail with IMSS.
Note
Sendmail supports IPv6 from v8.10. For details, see the supporting documentationavailable at:
http://www.sendmail.org/~gshapiro/8.10.Training/IPv6.html
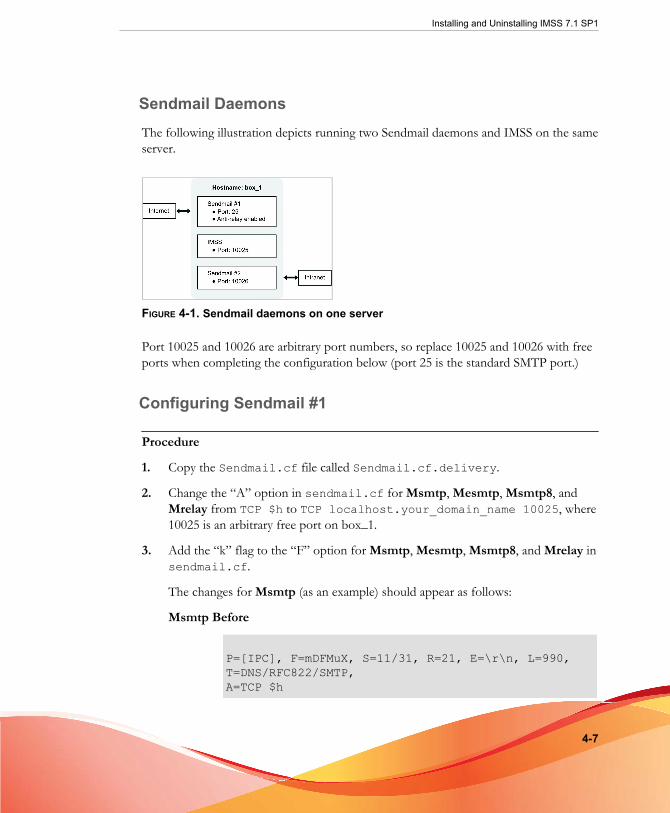
Installing and Uninstalling IMSS 7.1 SP1
4-7
Sendmail DaemonsThe following illustration depicts running two Sendmail daemons and IMSS on the sameserver.
FIGURE 4-1. Sendmail daemons on one server
Port 10025 and 10026 are arbitrary port numbers, so replace 10025 and 10026 with freeports when completing the configuration below (port 25 is the standard SMTP port.)
Configuring Sendmail #1
Procedure
1. Copy the Sendmail.cf file called Sendmail.cf.delivery.
2. Change the “A” option in sendmail.cf for Msmtp, Mesmtp, Msmtp8, andMrelay from TCP $h to TCP localhost.your_domain_name 10025, where10025 is an arbitrary free port on box_1.
3. Add the “k” flag to the “F” option for Msmtp, Mesmtp, Msmtp8, and Mrelay insendmail.cf.
The changes for Msmtp (as an example) should appear as follows:
Msmtp Before
P=[IPC], F=mDFMuX, S=11/31, R=21, E=\r\n, L=990,T=DNS/RFC822/SMTP,A=TCP $h

Trend Micro InterScan Messaging Security Suite Installation Guide
4-8
Msmtp After
P=[IPC], F=kmDFMuX, S=11/31, R=21, E=\r\n, L=990,T=DNS/RFC822/SMTP,A=TCP localhost.your_domain_name 10025
To make these changes through the macro file, use the following:
define('SMTP_MAILER_FLAGS','k')dnl
define('SMTP_MAILER_ARGS','TCP [127.0.0.1] 10025')dnl
4. Replace the local mailer with [IPC] for Mlocal in sendmail.cf.
5. Change the “A” option to TCP localhost.your_domain_name 10025 forMlocal in sendmail.cf.
6. Add the “k” flag to the “F” option for Mlocal in sendmail.cf.
The changes for Mlocal appear as follows:
Mlocal Before
P=/usr/lib/mail.local, F=lsDFMAw5:/|@qfSmn9, S=10/30, R=20/40 =DNS/RFC822/X-Unix,A=mail.local -d $u
Mlocal After
P=[IPC], F=klsDFMAw5:/|@qSmn9, S=10/30, R=20/40,T=DNS/RFC822/X-Unix,A=TCP localhost.your_domain_name 10025
The corresponding (steps 4 - 6) changes to the macro file are:
define('LOCAL_MAILER_PATH','[IPC]')dnl
define('LOCAL_MAILER_FLAGS','k')dnl
define('LOCAL_MAILER_ARGS','TCP [127.0.0.1] 10025')dnl

Installing and Uninstalling IMSS 7.1 SP1
4-9
Note
Make sure the “F” option of Mlocal does not include the “f’” and “z” flags.
7. To enable IPv6 support, use:
DaemonPortOptions=Port=25,Addr=<IPv6_address>, Name=MTA, Family=inet6
Configuring Sendmail #2
Procedure
1. Change the listening port to 10026 in sendmail.cf.delivery file.
Before
O DaemonPortOptions=Name=MTA-v4, Family=inetO DaemonPortOptions=Name=MTA-v6, Family=inet6O DaemonPortOptions=Port=587, Name=MSA, M=E
After
#O DaemonPortOptions=Name=MTA-v4, Family=inet#O DaemonPortOptions=Name=MTA-v6, Family=inet6#O DaemonPortOptions=Port=587, Name=MSA, M=EO DaemonPortOptions=Port=10026
Corresponding macro file change:
DAEMON_OPTIONS('Port=10026')dnl
2. Change the mail queue to a different directory in sendmail.cf.delivery.
Before
O QueueDirectory=/var/spool/mqueue

Trend Micro InterScan Messaging Security Suite Installation Guide
4-10
After
O QueueDirectory=/var/spool/mqueue1
Corresponding macro file change:
define('QUEUE_DIR','/var/spool/mqueue1')dnl
3. Create the directory /var/spool/mqueue1 and make sure it has the sameownership and permissions as the original in /var/spool/mqueue.
4. Add the “k” flag to the “F” option for Mlocal, Msmtp, Mesmtp, Msmtp8, andMrelay in sendmail.cf.delivery.
The macro file changes are:
define('LOCAL_MAILER_FLAGS','k')dnl
define('SMTP_MAILER_FLAGS','k')dnl
define('ESMTP_MAILER_FLAGS','k')dnl
define('SMTP8_MAILER_FLAGS','k')dnl
define('RELAY_MAILER_FLAGS','k')dnl
Finishing Setup and Restarting Sendmail services
Procedure
1. Restart the first Sendmail daemon to receive SMTP traffic on port 25 using thefollowing command:
/usr/lib/sendmail –bd –q1h
2. Restart the second Sendmail daemon to receive SMTP traffic from IMSS using thefollowing command:
/usr/lib/sendmail –bd –q1h –C/etc/mail/sendmail.cf.delivery

Installing and Uninstalling IMSS 7.1 SP1
4-11
About Qmail
The following illustration depicts deploying Qmail with IMSS based on the sandwichmodel.
FIGURE 4-2. Deploying Qmail with IMSS
For detailed information on installing and configuring Qmail, visit
http://www.lifewithqmail.org/lwq.html
Note
You can only deploy IMSS using the sandwich or proxy model if you use Qmail as theMTA.
Configuring Qmail
Procedure
• On the computer where Qmail is installed, add the name or IP address of theserver that hosts IMSS to the smtproutes file using the command:

Trend Micro InterScan Messaging Security Suite Installation Guide
4-12
echo ":[server name/IP:port]" > /var/qmail/control/smtproutes
Preparing to Install IMSS Components andEnd-User Quarantine
This section shows you how to install IMSS components and End-User Quarantine.
When installing IMSS components, both the Admin and EUQ database must be in thesame IP segment as IMSS. If the components are not in the same IP segment, thecomponents cannot connect to the databases.
Procedure
1. Change the file /var/imss/pgdata/pg_hba.conf in both the Admin andEUQ databases by adding the following line:
host all all <IMSS component IP address> <IMSS componentnetmask> password
2. Reload the databases using the command:
/opt/trend/imss/script/dbctl.sh reload
Installing IMSS Components and End-User Quarantine
The following is a list of the key steps you need to perform to install IMSS and End-User Quarantine.
Procedure
1. Log on as a superuser and go to the installation package directory.
2. Type ./isinst.sh.

Installing and Uninstalling IMSS 7.1 SP1
4-13
The Main Menu appears showing the status of each component. If you areinstalling IMSS for the first time, [Not Installed] appears.
3. Type 1 to begin installation.
4. Read and accept the license agreement.
5. On the IMSS Deployment Config Menu, decide whether to install a new IMSSserver or append to an existing installation.
To append a scanner service or EUQ service to an existing IMSS server, you willneed the database information for those components.
6. Do one of the following:

Trend Micro InterScan Messaging Security Suite Installation Guide
4-14
• If you chose to install a new IMSS server, decide whether to install a newdatabase server or use an existing database server, and then type that databaseserver’s information.
• If you chose to append the installation, type the database information.
The Install Components Menu screen appears showing the status of theIMSS components. [YES] appears next to the component that the installerwill install. By default, the installer will install Central Controller and aScanner Service. These two components are necessary to use IMSS.

Installing and Uninstalling IMSS 7.1 SP1
4-15
7. To modify the selection of the components to install, type the correspondingnumber for the component and type yes (Y/y) or no (N/n) to the install question.
You can also modify the install directory. The default is /opt/trend.
The installer will install a primary service if no EUQ service exists. The installer willnot install an EUQ service if an EUQ service exists.
If you want to install the EUQ database, you can install a new database server oruse an existing database server, and then type that database server’s information.
8. Type 6 to continue.
The installer checks the available free disk space, memory, swap space, and BINDserver on the computer and gives you an opportunity to cancel the installation ifyour computer does not meet the minimum requirements.
If you continue the installation, required settings for your Postfix server appear.For a summary of these settings, see Preparing Postfix on page 4-5.
Trend Micro InterScan Messaging Security Suite Installation Guide
4-16
Note
IP Profiler requires BIND server 9.x or above. Please make sure your existing DNSserver meets this requirement. Otherwise, please uninstall the lower version ofBIND, and then install BIND 9.5.0 (provided with the IMSS install package).
9. Press ENTER to continue. The installer provides a note on whether the DNSserver on your computer is active. To use IP Profiler, which you can install later,the DNS server must be active and running properly. For instructions on how toinstall IP Profiler, see About IP Filtering Components on page 4-16.
Note
To verify DNS settings, use the command:
nslookup www.antivirus.com
A valid IP address should return.
10. Press ENTER to begin installing the components you selected.
About IP Filtering ComponentsTrend Micro IP Filtering consists of two components:
IP ProfilerTakes action on email messages when IMSS detects spam, virus threats,DHA, or bounced mail attacks.
Email Reputation Services (ERS)Blocks known spammers at the network (IP) level.
IPv6 Support and IP Filtering
Due to the large address pool of IPv6 addresses, IP Filtering only supports IPv4networks. If you enable Email Reputation and IP Profiler, rules do not apply to

Installing and Uninstalling IMSS 7.1 SP1
4-17
incoming email messages from IPv6 networks. Email Reputation or IP Profiler will notnot block incoming email messages from IPv6 networks.
Enabling Port 25 on IPv6 Networks
If you enable IP Profiler and IPv6 at the same time, the IP Profiler listens to IPv4 onlyusing port 25 while Postfix listens on both IPv4 and IPv6 using port 2500. To enableport 25 on IPv6 networks when IP Profiler is enabled, add an additional Postfixinstances on the IPv6 network, using port 25.
Procedure
1. Add the following configuration in the Postfix master.cf file:
:::25 inet n - n - - smtpd
2. Restart Postfix.
A new Postfix instance listening on the IPv6 network using port 25 is added.
Installing Email Reputation Services and IP ProfilerTrend Micro Email Reputation Service (ERS) runs on a modified Postfix installation.The ERS installation script modifies the Postfix configuration files and installs a logparser to allow IP filter reporting. During installation, you will also be asked for an ERSActivation Code and for information about your IMSS Admin Database. Install thedatabase before installing Email Reputation Services and IP Profiler.
The server on which you install ERS must already have an instance of Postfix installed.It must also be able to connect to the IMSS Admin Database and the server that isprocessing your messaging (most likely the IMSS server). Trend Micro recommendsrunning ERS and IP Profiler on a gateway/edge server.
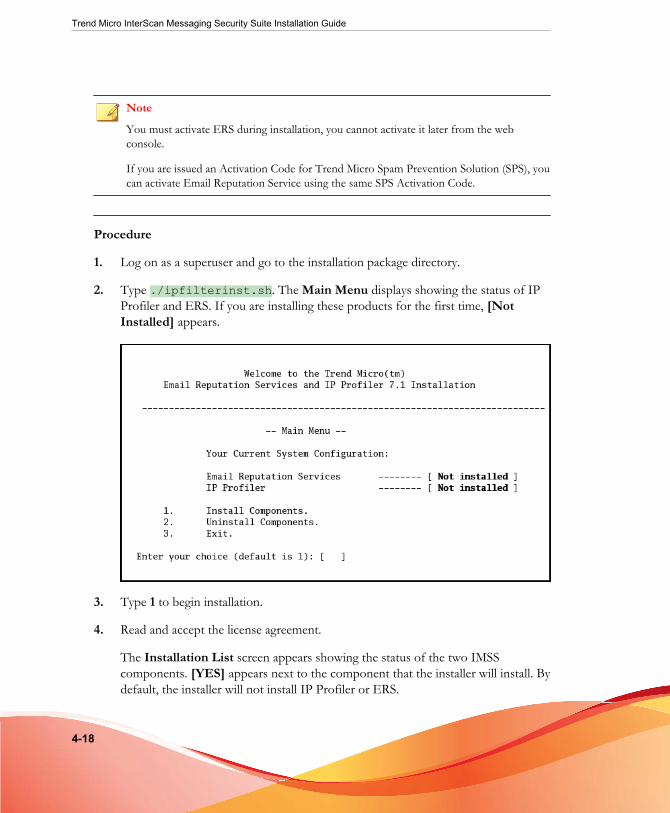
Trend Micro InterScan Messaging Security Suite Installation Guide
4-18
Note
You must activate ERS during installation, you cannot activate it later from the webconsole.
If you are issued an Activation Code for Trend Micro Spam Prevention Solution (SPS), youcan activate Email Reputation Service using the same SPS Activation Code.
Procedure
1. Log on as a superuser and go to the installation package directory.
2. Type ./ipfilterinst.sh. The Main Menu displays showing the status of IPProfiler and ERS. If you are installing these products for the first time, [NotInstalled] appears.
3. Type 1 to begin installation.
4. Read and accept the license agreement.
The Installation List screen appears showing the status of the two IMSScomponents. [YES] appears next to the component that the installer will install. Bydefault, the installer will not install IP Profiler or ERS.

Installing and Uninstalling IMSS 7.1 SP1
4-19
5. Choose to install IP Profiler or ERS:
• To install ERS:
a. Type 1.
The ERS Configuration screen appears.
b. Decide whether to install ERS on the current computer.
c. Type the ERS Activation Code.
The installer prompts you with a note about how it will change thePostfix server.
d. Accept the change.
e. The installer then prompts you to specify the following IMSS details toregister ERS settings with the Admin database:
i. IP address
ii. Database name
iii. Database user name

Trend Micro InterScan Messaging Security Suite Installation Guide
4-20
iv. Database user password
f. Type the path for the mail log.
The install menu reappears showing [YES] next to Install ERS.
• To install IP Profiler:
a. Type 2.
The IP Profiler Configuration screen appears.
b. Decide whether to install IP Profiler on the current computer.
c. Type a port for the IP Profiler (default is 25).
The installer prompts you with a note about ports if port 25 is already inuse. Change the port number if necessary or change your Postfixlistening port to 2500 after installation is complete.
d. Press ENTER to continue.
e. Type the IP address where you installed the Central Controller thatcontains the IMSS foxdns. IP Profiler requires communication withfoxdns.
f. Type the domain name of your mail server.
g. Press ENTER.
h. The installer then prompts you to enter the following IMSS Postgresdatabase details to register IP Profiler settings with the Admin database:
i. IP address
ii. Database name
iii. Database user name
iv. Database user password
Type the requested information. The install menu reappears showing[YES] next to Install IP Profiler.
6. To modify the install directory, type 3, and then type the new directory path.

Installing and Uninstalling IMSS 7.1 SP1
4-21
The default is opt/trend.
7. Type 4 to begin the installation.
8. Press ENTER to begin installing the components you selected.
Integrating IMSS with Sendmail and QmailIMSS allows you to replace Postfix with other MTAs. This section describes theprocedures for configuring Sendmail and Qmail to support FoxProxy and ERS.
Integrating FoxLib with Sendmail
If IP Profiler is used together with the Sendmail MTA, the following steps must be doneto ensure that Sendmail uses FoxLib and therefore gets the real IP address of the SMTPclient contacting FoxProxy:
Procedure
1. Change the listening port to 2500 in the sendmail.cf file and restart sendmail.
Before
O DaemonPortOptions=Name=MTA-v4, Family=inetO DaemonPortOptions=Name=MTA-v6, Family=inet6O DaemonPortOptions=Port=587, Name=MSA, M=E
After
#O DaemonPortOptions=Name=MTA-v4, Family=inet#O DaemonPortOptions=Name=MTA-v6, Family=inet6#O DaemonPortOptions=Port=587, Name=MSA, M=EO DaemonPortOptions=Port=2500
2. Collect information about Sendmail:
a. Use the which command to find the Sendmail program file:

Trend Micro InterScan Messaging Security Suite Installation Guide
4-22
# which sendmail
/usr/sbin/sendmail
b. Use the ls command to identify the user and group used by Sendmail:
# ls –al /usr/sbin/sendmail
-rwxr-sr-x 1 root root 732356 Sep 1 2004 /usr/sbin/sendmail
(User is root and group is root)
c. Find the user ID and the group ID for the user and group used by Sendmail:
# fgrep root /etc/passwd
root:x:0:0:root:/root:/bin/bash
# fgrep root /etc/group
root:x:0:root
(User ID is 0, group ID is 0)
3. Modify the foxlibd script in the /opt/trend/ipprofiler/scriptdirectory:
a. Set the TM_FOX_UID parameter to the user ID:
TM_FOX_UID=0
b. Set the TM_FOX_GID parameter to the group ID:
TM_FOX_GID=0
c. Add the following two lines after the line containing exportLD_LIBRARY_PATH:
TM_FOX_PROXY_CONNECT_PORT=2500
export TM_FOX_PROXY_CONNECT_PORT
4. Modify the foxproxy.ini configuration file in the /opt/trend/ipprofiler/config directory:
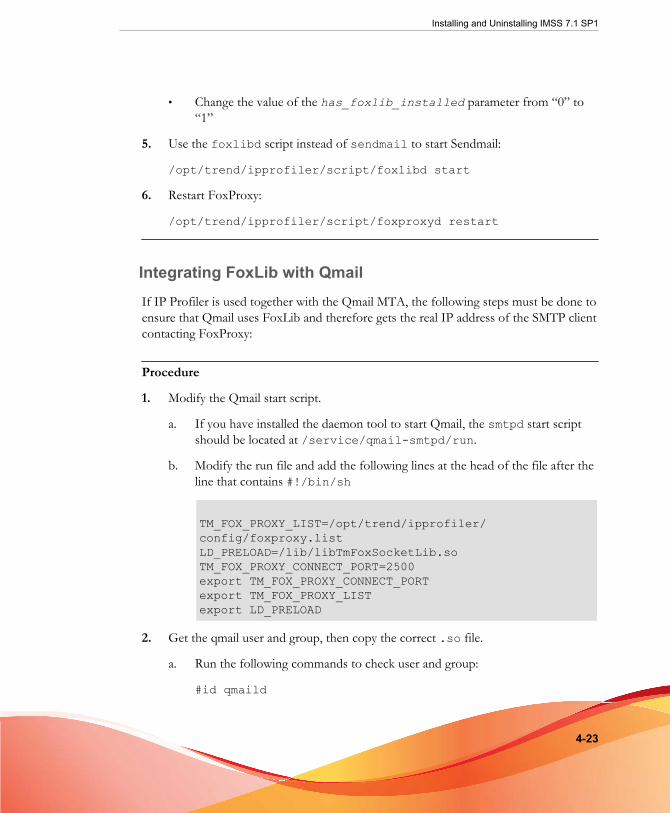
Installing and Uninstalling IMSS 7.1 SP1
4-23
• Change the value of the has_foxlib_installed parameter from “0” to“1”
5. Use the foxlibd script instead of sendmail to start Sendmail:
/opt/trend/ipprofiler/script/foxlibd start
6. Restart FoxProxy:
/opt/trend/ipprofiler/script/foxproxyd restart
Integrating FoxLib with Qmail
If IP Profiler is used together with the Qmail MTA, the following steps must be done toensure that Qmail uses FoxLib and therefore gets the real IP address of the SMTP clientcontacting FoxProxy:
Procedure
1. Modify the Qmail start script.
a. If you have installed the daemon tool to start Qmail, the smtpd start scriptshould be located at /service/qmail-smtpd/run.
b. Modify the run file and add the following lines at the head of the file after theline that contains #!/bin/sh
TM_FOX_PROXY_LIST=/opt/trend/ipprofiler/config/foxproxy.listLD_PRELOAD=/lib/libTmFoxSocketLib.soTM_FOX_PROXY_CONNECT_PORT=2500export TM_FOX_PROXY_CONNECT_PORTexport TM_FOX_PROXY_LISTexport LD_PRELOAD
2. Get the qmail user and group, then copy the correct .so file.
a. Run the following commands to check user and group:
#id qmaild

Trend Micro InterScan Messaging Security Suite Installation Guide
4-24
uid=101(qmaild) gid=100(nofiles)
The smtp user is qmaild, and the group is nofiles.
b. Copy the .so file to the correct path, change its attributes, then run thefollowing commands:
#cp /opt/trend/ipprofiler/lib/libTmFoxSocketLib.so /lib/libTmFoxSocketLib.so#chown qmaild /lib/libTmFoxSocketLib.so#chgrp nofiles /lib/libTmFoxSocketLib.so#chmod 550 /lib/libTmFoxSocketLib.so
3. Modify the foxproxy.ini configuration file in the /opt/trend/ipprofiler/config directory as follows:
Change the value of the has_foxlib_installed parameter from "0" to "1"
4. Run the following script to restart foxproxyd:
#/opt/trend/ipprofiler/script/foxproxyd restart
5. Type the following command to start Qmail:
#/command/svscanboot </dev/null >/var/log/svscan 2>&1 &
Alternatively, restart the system if Qmail has been started previously and has beenadded into the system start-up script.
Verifying the InstallationAfter the installation is complete, to see a list of the daemons, type the following at thecommand prompt:
# ps -ef | grep imss
Telnet to port 25 to ensure that IMSS/Postfix answers.

Installing and Uninstalling IMSS 7.1 SP1
4-25
About IPv6 SupportConfigure IPv6 support after installing IMSS. IMSS supports the following IPv6features in IPv6 networks and proxies in IPv6 networks:
SMTP routingIMSS can communicate to upstream or downstream components in IPv6networks.
POP3 connectionsIMSS supports connections to IPv6 POP3 servers.
Trend Micro servicesIMSS supports communication with the following services using IPv6:
• Web Reputation Services
• Product Registration
• ActiveUpdate
• Smart Feedback
Email protectionIMSS supports incoming message scanning from IPv6 networks, includingmarketing messages.
NotificationsIMSS supports sending notifications to IPv6 Notification servers.
Network proxyIMSS supports proxies in IPv6 networks. For configuration details, see TheProxy Model in IPv6 Environments on page 3-25.
Trend Micro Control ManagerIMSS can connect to TMCM servers residing in IPv6 networks. Make sure toconfigure the TMCM to support IPv6.
IP address imports and exportsIMSS recognizes addresses imported in IPv6 format, and can export addressesto IPv6 format.
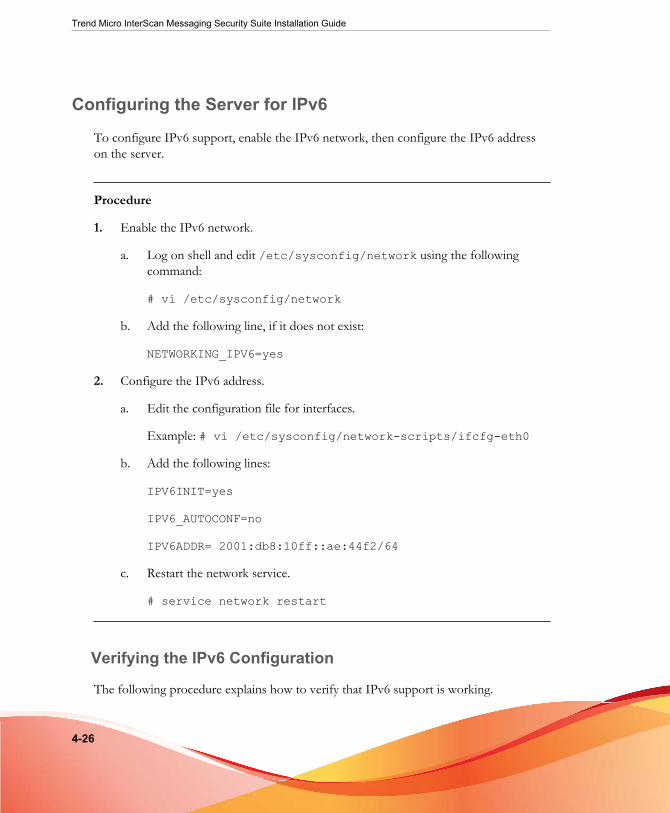
Trend Micro InterScan Messaging Security Suite Installation Guide
4-26
Configuring the Server for IPv6
To configure IPv6 support, enable the IPv6 network, then configure the IPv6 addresson the server.
Procedure
1. Enable the IPv6 network.
a. Log on shell and edit /etc/sysconfig/network using the followingcommand:
# vi /etc/sysconfig/network
b. Add the following line, if it does not exist:
NETWORKING_IPV6=yes
2. Configure the IPv6 address.
a. Edit the configuration file for interfaces.
Example: # vi /etc/sysconfig/network-scripts/ifcfg-eth0
b. Add the following lines:
IPV6INIT=yes
IPV6_AUTOCONF=no
IPV6ADDR= 2001:db8:10ff::ae:44f2/64
c. Restart the network service.
# service network restart
Verifying the IPv6 Configuration
The following procedure explains how to verify that IPv6 support is working.
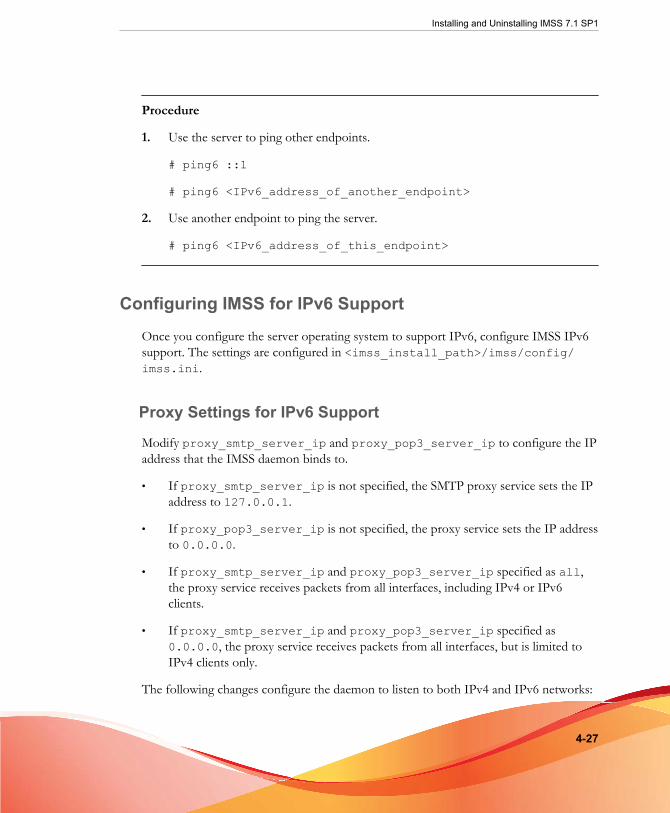
Installing and Uninstalling IMSS 7.1 SP1
4-27
Procedure
1. Use the server to ping other endpoints.
# ping6 ::1
# ping6 <IPv6_address_of_another_endpoint>
2. Use another endpoint to ping the server.
# ping6 <IPv6_address_of_this_endpoint>
Configuring IMSS for IPv6 Support
Once you configure the server operating system to support IPv6, configure IMSS IPv6support. The settings are configured in <imss_install_path>/imss/config/imss.ini.
Proxy Settings for IPv6 Support
Modify proxy_smtp_server_ip and proxy_pop3_server_ip to configure the IPaddress that the IMSS daemon binds to.
• If proxy_smtp_server_ip is not specified, the SMTP proxy service sets the IPaddress to 127.0.0.1.
• If proxy_pop3_server_ip is not specified, the proxy service sets the IP addressto 0.0.0.0.
• If proxy_smtp_server_ip and proxy_pop3_server_ip specified as all,the proxy service receives packets from all interfaces, including IPv4 or IPv6clients.
• If proxy_smtp_server_ip and proxy_pop3_server_ip specified as0.0.0.0, the proxy service receives packets from all interfaces, but is limited toIPv4 clients only.
The following changes configure the daemon to listen to both IPv4 and IPv6 networks:

Trend Micro InterScan Messaging Security Suite Installation Guide
4-28
proxy_smtp_server_ip=allproxy_pop3_server_ip=all
Settings to Allow IPv6 Clients
Modify smtp_allow_client_ip to specify the client IP addresses (separated by acomma or space) that can connect to the IMSS daemon SMTP stream port.
• If smtp_allow_client_ip is not specified, the default value is 127.0.0.1.
• smtp_allow_client_ip supports IPv4 and IPv6 addresses in the following IPformats:
127.0.0.1
::1
123.123.123.123
2001:db8:10ff::ae:44f2
123.123.123.123/24
2001:db8:10ff::ae:44f2/64
123.123.123.123-223
2001:db8:10ff::ae:44f2-45ff
For example, if you only want to allow a localhost (either IPv4 and IPv6) and the IPv6address 2001:db8:10ff::ae:44f3 to connect to the daemon service, use thefollowing configuration:
smtp_allow_client_ip=127.0.0.1, ::1, 2001:db8:10ff::ae:44f3
Settings for Downstream IPv6 Servers
Modify downstream_smtp_server_addr and downstream_smtp_server_portto specify the downstream or backend MTA server IP address or hostname and port.

Installing and Uninstalling IMSS 7.1 SP1
4-29
Note
To avoid security issues that arise from resolving the host, Trend Micro recommends usingthe IP address.
• If downstream_smtp_server_addr and downstream_smtp_server_portare not specified, the default values are 127.0.0.1 and 10026, respectively.
• downstream_smtp_server_addr supports IPv4 and IPv6 addresses in thefollowing IP formats:
127.0.0.1
::1
123.123.123.123
2001:db8:10ff::ae:44f2
Domain.com
For example, if the downstream IP address is 2001:db8:10ff::ae:44f2 and theport is 25, use the following configuration:
downstream_smtp_server_addr=2001:db8:10ff::ae:44f2downstream_smtp_server_port=25
Verifying the IPv6 Configuration
Before you begin
Configure the following parameters:
• proxy_smtp_server_ip
• proxy_pop3_server_ip
• smtp_allow_client_ip
• downstream_smtp_server_addr
• downstream_smtp_server_port
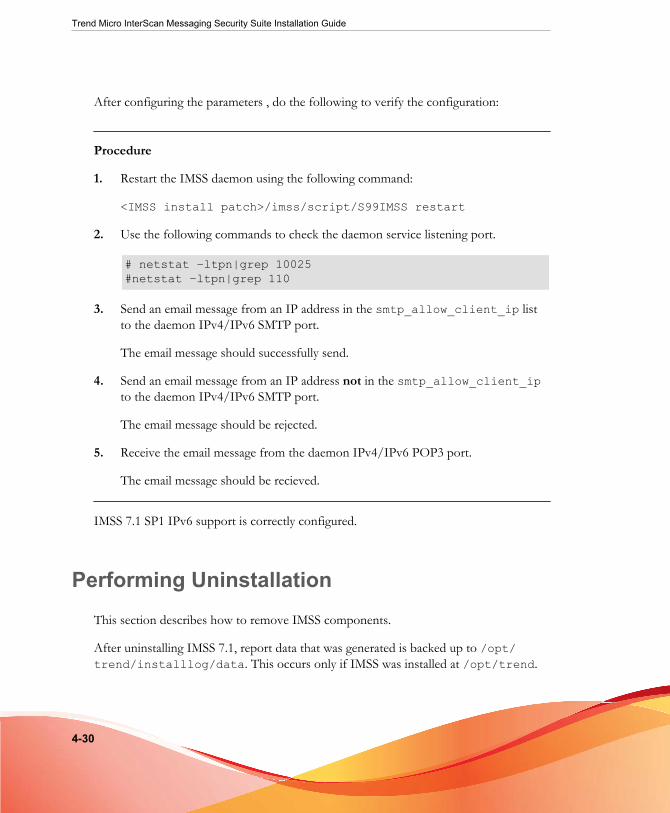
Trend Micro InterScan Messaging Security Suite Installation Guide
4-30
After configuring the parameters , do the following to verify the configuration:
Procedure
1. Restart the IMSS daemon using the following command:
<IMSS install patch>/imss/script/S99IMSS restart
2. Use the following commands to check the daemon service listening port.
# netstat –ltpn|grep 10025#netstat –ltpn|grep 110
3. Send an email message from an IP address in the smtp_allow_client_ip listto the daemon IPv4/IPv6 SMTP port.
The email message should successfully send.
4. Send an email message from an IP address not in the smtp_allow_client_ipto the daemon IPv4/IPv6 SMTP port.
The email message should be rejected.
5. Receive the email message from the daemon IPv4/IPv6 POP3 port.
The email message should be recieved.
IMSS 7.1 SP1 IPv6 support is correctly configured.
Performing UninstallationThis section describes how to remove IMSS components.
After uninstalling IMSS 7.1, report data that was generated is backed up to /opt/trend/installlog/data. This occurs only if IMSS was installed at /opt/trend.

Installing and Uninstalling IMSS 7.1 SP1
4-31
Uninstalling IMSS ComponentsYou can uninstall the Central Controller, Scanner services, and EUQ componentsseparately or concurrently.
Procedure
1. Log on as a superuser and go the installation package directory.
2. Type ./isinst.sh.
The Main Menu shows the status of the components. If you already installed theseproducts, [Installed] appears.
3. Type 2.
The uninstallation menu appears showing the components that you can remove. Bydefault, the uninstallation status for each component is set to [NO], signifying thatthey will not be removed. If a component was not installed, [Not installed]appears.
4. To remove the components, type the number that corresponds to the component,and then type Y/y to change the uninstall status to [YES] on the uninstallationmenu.
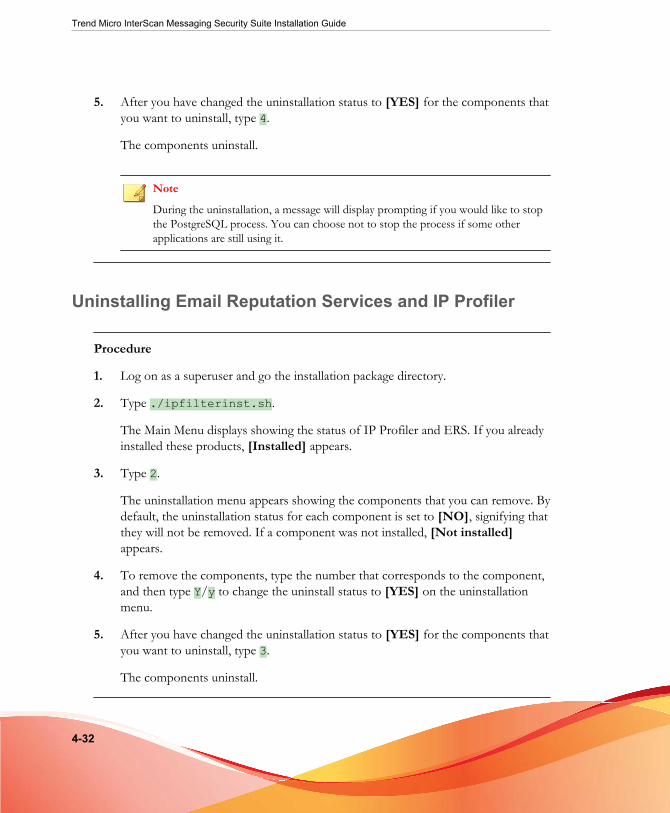
Trend Micro InterScan Messaging Security Suite Installation Guide
4-32
5. After you have changed the uninstallation status to [YES] for the components thatyou want to uninstall, type 4.
The components uninstall.
Note
During the uninstallation, a message will display prompting if you would like to stopthe PostgreSQL process. You can choose not to stop the process if some otherapplications are still using it.
Uninstalling Email Reputation Services and IP Profiler
Procedure
1. Log on as a superuser and go the installation package directory.
2. Type ./ipfilterinst.sh.
The Main Menu displays showing the status of IP Profiler and ERS. If you alreadyinstalled these products, [Installed] appears.
3. Type 2.
The uninstallation menu appears showing the components that you can remove. Bydefault, the uninstallation status for each component is set to [NO], signifying thatthey will not be removed. If a component was not installed, [Not installed]appears.
4. To remove the components, type the number that corresponds to the component,and then type Y/y to change the uninstall status to [YES] on the uninstallationmenu.
5. After you have changed the uninstallation status to [YES] for the components thatyou want to uninstall, type 3.
The components uninstall.

Installing and Uninstalling IMSS 7.1 SP1
4-33
Performing Manual Uninstallation
Uninstalling IMSS Manually
Uninstall IMSS manually only if automated uninstallation encounters issues.
Procedure
1. Stop all IMSS related processes using the command:
$Home_IMSS/script/imssstop.sh
2. Remove the IMSS package as follows:
rpm -e imsscctrl-7.1-1
rpm -e imss-7.1-1
rpm -e imsseuq-7.1-1
Note
If some components have not been installed, the uninstall command may not work.
3. Remove $Home_IMSS, such as /opt/trend/imss.
4. Remove daemon start/stop scripts.
• Start scripts run automatically upon system restart. Remove these scriptsfrom /etc/rc2.d/, /etc/rc3.d, and /etc/rc5.d.
S99IMSS, S98dbctl, S99CMAGENT, S99POLICY, S99bindctl,S99IMSSUI, S99FOXDNS, S99SCHEDULED, S99MONITOR, S99MANAGER
• Stop scripts kill the processes automatically upon system shutdown. Removethese scripts from /etc/rc0.d and /etc/rc6.d.
K98dbctl, K97CMAGENT, K97IMSS, K97POLICY, K97EUQ, K97bindctl,K97IMSSUI, K97FOXDNS, K97SCHEDULED, K96MONITOR, K96MANAGER,K99IMSSSTOP
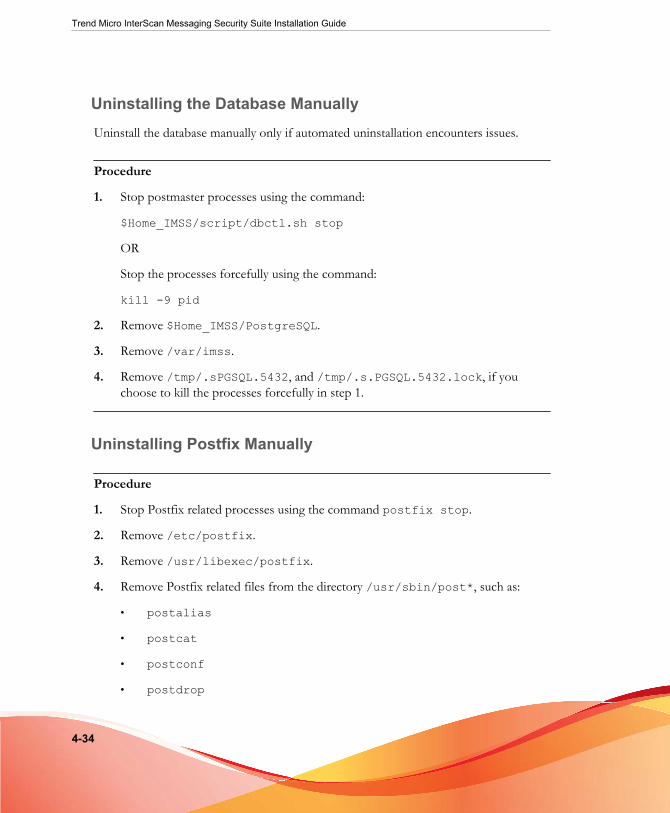
Trend Micro InterScan Messaging Security Suite Installation Guide
4-34
Uninstalling the Database ManuallyUninstall the database manually only if automated uninstallation encounters issues.
Procedure
1. Stop postmaster processes using the command:
$Home_IMSS/script/dbctl.sh stop
OR
Stop the processes forcefully using the command:
kill -9 pid
2. Remove $Home_IMSS/PostgreSQL.
3. Remove /var/imss.
4. Remove /tmp/.sPGSQL.5432, and /tmp/.s.PGSQL.5432.lock, if youchoose to kill the processes forcefully in step 1.
Uninstalling Postfix Manually
Procedure
1. Stop Postfix related processes using the command postfix stop.
2. Remove /etc/postfix.
3. Remove /usr/libexec/postfix.
4. Remove Postfix related files from the directory /usr/sbin/post*, such as:
• postalias
• postcat
• postconf
• postdrop
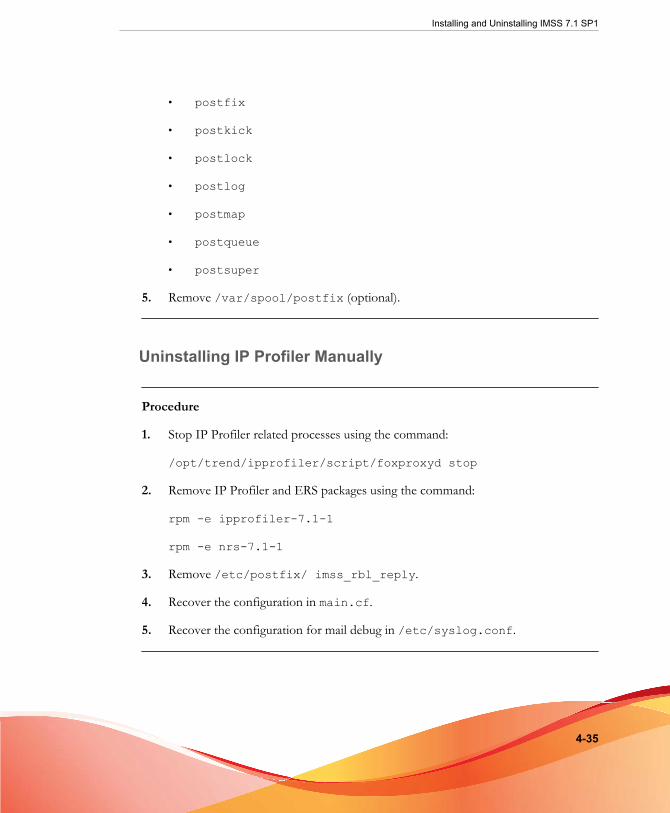
Installing and Uninstalling IMSS 7.1 SP1
4-35
• postfix
• postkick
• postlock
• postlog
• postmap
• postqueue
• postsuper
5. Remove /var/spool/postfix (optional).
Uninstalling IP Profiler Manually
Procedure
1. Stop IP Profiler related processes using the command:
/opt/trend/ipprofiler/script/foxproxyd stop
2. Remove IP Profiler and ERS packages using the command:
rpm -e ipprofiler-7.1-1
rpm -e nrs-7.1-1
3. Remove /etc/postfix/ imss_rbl_reply.
4. Recover the configuration in main.cf.
5. Recover the configuration for mail debug in /etc/syslog.conf.


5-1
Chapter 5
Upgrading from Previous VersionsThis chapter provides instructions on upgrading from previous versions of IMSS.
Topics include:
• Upgrading from an Evaluation Version on page 5-2
• Upgrading to IMSS 7.1 Linux on page 5-4
• Migrating to IMSS 7.1 Linux on page 5-33
• Migrating to IMSS 7.1 SP1 Linux on page 5-38
• Activating Supported Services on page 5-45
• Rolling Back the Upgrade on page 5-45
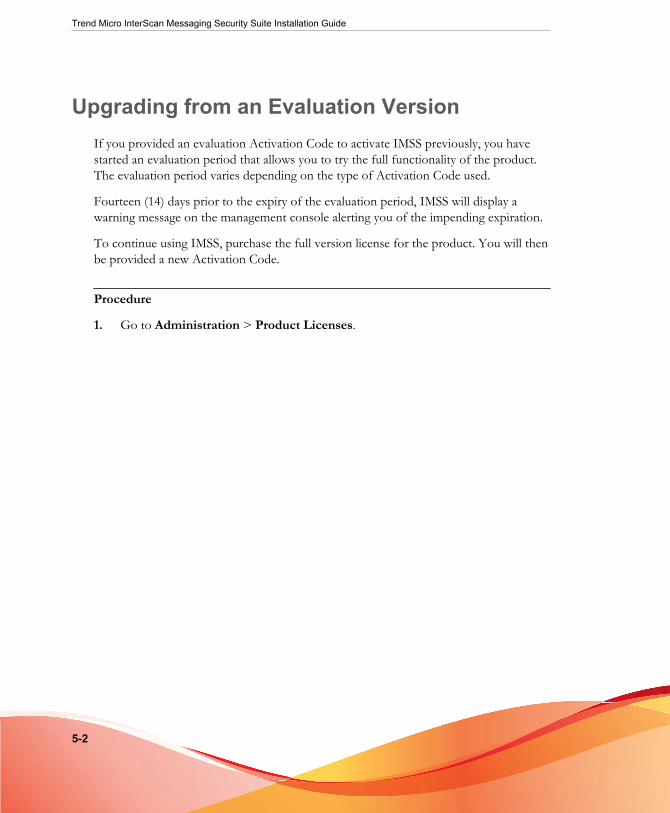
Trend Micro InterScan Messaging Security Suite Installation Guide
5-2
Upgrading from an Evaluation VersionIf you provided an evaluation Activation Code to activate IMSS previously, you havestarted an evaluation period that allows you to try the full functionality of the product.The evaluation period varies depending on the type of Activation Code used.
Fourteen (14) days prior to the expiry of the evaluation period, IMSS will display awarning message on the management console alerting you of the impending expiration.
To continue using IMSS, purchase the full version license for the product. You will thenbe provided a new Activation Code.
Procedure
1. Go to Administration > Product Licenses.

Upgrading from Previous Versions
5-3
The Product License screen appears.
2. Click the Enter a new code hyperlink in section for the product or service youwant to activate.

Trend Micro InterScan Messaging Security Suite Installation Guide
5-4
The Enter A New Code screen appears.
3. Type the new Activation Code in the box provided.
Note
When you purchase the full licensed version of IMSS, Trend Micro will send the newActivation Code to you by email. To prevent mistakes when typing the ActivationCode (in the format xx-xxxx-xxxxx-xxxxx-xxxxx-xxxxx-xxxxx), you can copy theActivation Code from the email and paste it in the box provided.
4. Click Activate.
5. Repeat steps 2 to 5 for all the products or services you want to activate.
Upgrading to IMSS 7.1 Linux
Upgrading from IMSS Linux 5.7 to IMSS 7.1
Upgrade from IMSS Linux 5.7 to IMSS Linux 7.1 in one of the following ways:
• Installing a fresh version of IMSS Linux 7.1 on a server and then migrating allsettings from IMSS Linux 5.7
• Installing IMSS Linux 7.1 over an installation of IMSS Linux 5.7

Upgrading from Previous Versions
5-5
WARNING!
• The Setup program does not support automatic rollback to IMSS Linux 5.7. If theinstallation encounters issues, a manual rollback is the only option.
For more information, see Rolling Back the Upgrade on page 5-45.
• After upgrading, IMSS Linux 5.7 queue data will be lost.
IMSS Linux 5.7 Upgrade Considerations
Consider the following before migrating or installing over IMSS Linux 5.7:
• Installing over IMSS Linux 5.7 , IMSS Linux 7.1 retains IMSS Linux 5.7 logs andemail messages (in the local quarantine and archive areas). However, you will notbe able to query the logs from the IMSSLinux 7.1 web console.
• Installing over IMSS 5.7 Linux requires stopping message traffic to the serverwhere IMSS Linux 5.7 resides. Migration to an IMSS Linux 7.1 server does notimpact message traffic on your network.
Tip
• Trend Micro recommends migration, using the Migration Tool, to perform anupgrade instead of installing over the previous version.
• Although the installation program will back up your old IMSS settings, Trend Microrecommends that you back up your version 5.7 settings manually before performingthe migration (see Backing Up IMSS 5.7 Settings on page 5-16). If problems occurduring migration, you can roll back to version 5.7 (see Rolling Back the Upgrade on page5-45.
• If you choose not to migrate your old IMSS settings, Trend Micro recommends thatyou completely uninstall IMSS 5.7 and then do a fresh install, rather than installingIMSS 7.1 over an existing installation.
The IMSS Setup program can automatically upgrade from InterScan Messaging SecuritySuite version 5.7 on the supported platforms. If the Setup program detects this version,it can do the following:
1. Back up your old IMSS settings.

Trend Micro InterScan Messaging Security Suite Installation Guide
5-6
2. Install IMSS Linux 7.1.
3. Migrate the existing settings.
The Setup program does not unregister the current IMSS server from Control Manager.That means that all logs from the old server can still be queried by Control Manager.
Upgrading IMSS 5.7: Policy Recommendations
To streamline migration and to avoid issues during migration, Trend Micro recommendsthe following actions before exporting configuration settings:
• Remove unused policy objects
• Merge policy objects
• Modify existing policy objects
Removing Unused Policy Objects
Removing unused policy objects before exporting configuration settings can improveperformance and simplify policy management for the new IMSS server.
TABLE 5-1. Unused Policy Objects to Remove
UNUSED POLICY OBJECT BENEFIT
Policy routes Reduces policy management
Policies Reduces the number of migrated filters
Sub-policies Reduces complexity of inheritancerelationships
Spam block/approved list entries Improves performance
Keywords and expressions Improves performance
Address groups Improves performance
Filter actions Improves performance
Quarantine areas Improves performance

Upgrading from Previous Versions
5-7
Merging Policy Objects
Merging policy objects results in improved performance and simplified policymanagement.
• Merge similar filters whenever possible. For example, attachment filters enabling"attachment extension and name", "MIME type", and "attachment type" separatelycould be merged into a single policy.
• Merge SPS filter's "Blocked senders", "Phishing email" and "Spam" action names.For example, if SPS filters were configured with different action names and thosefilters take the same actions, rename them using the same name.
• Merge policies of the same priority level.
• Merge quarantine areas because IMSS Linux 7.1 does not support quarantiningemail messages to different physical folders.
Modifying Policy Objects
For policy objects that do not migrate, described in IMSS Linux 5.7 Settings that Cannot beMigrated on page 5-9, modify the objects to other similar functions to avoid unexpectedbehavior.
For policy objects that migrate, described in IMSS Linux 5.7 Settings that Change AfterMigration on page 5-12, modify them to other similar functions if you do not wantmigration to change them.
Upgrading IMSS 5.7: Process Recommendations
The following topics outline Trend Micro recommended tasks when upgrading fromIMSS Linux 5.7 to IMSS Linux 7.1.
Perform a Fresh Installation of IMSS 7.1 Linux
Perform a fresh installation of IMSS Linux 7.1, and then migrate to IMSS Linux 7.1,instead of installing over an existing IMSS Linux 5.7 Linux installation.

Trend Micro InterScan Messaging Security Suite Installation Guide
5-8
Tip
1. Prepare the system environment according to Trend Micro recommended systemrequirements. See the system requirements for more information.
2. Carefully plan your deployment strategy for IMSS Linux 7.1.
Become Familiar with IMSS Linux 7.1 Before Upgrading
To ease implementing IMSS Linux 7.1 into the network, administrators need tofamiliarize themselves with IMSS Linux 7.1 before upgrading from IMSS Linux 5.7. Thisalso gives administrators the opportunity to learn about new features.
Tip
1. Study the Administrator’s Guide.
2. Create a test environment for IMSS Linux 7.1 to test functions and policies.
General IMSS Linux 5.7 Migration Tasks
Perform the following tasks to simplify migration:
• Back up and then delete all mail messages under the quarantine and archive areas.
• Clean up IMSS Linux 5.7 policies. See Upgrading IMSS 5.7: Policy Recommendations onpage 5-6 for detailed information.
• Export settings using the Export Tool.
• If you want to continue testing the delivery route, do not migrate MTA settings.This will mean manually configuring MTA settings after migration.
Tip
If no complex address groups, detailed approved lists, or rules exist in IMSS Linux 5.7Linux, Trend Micro recommends manually configuring IMSS Linux 7.1 Linux.
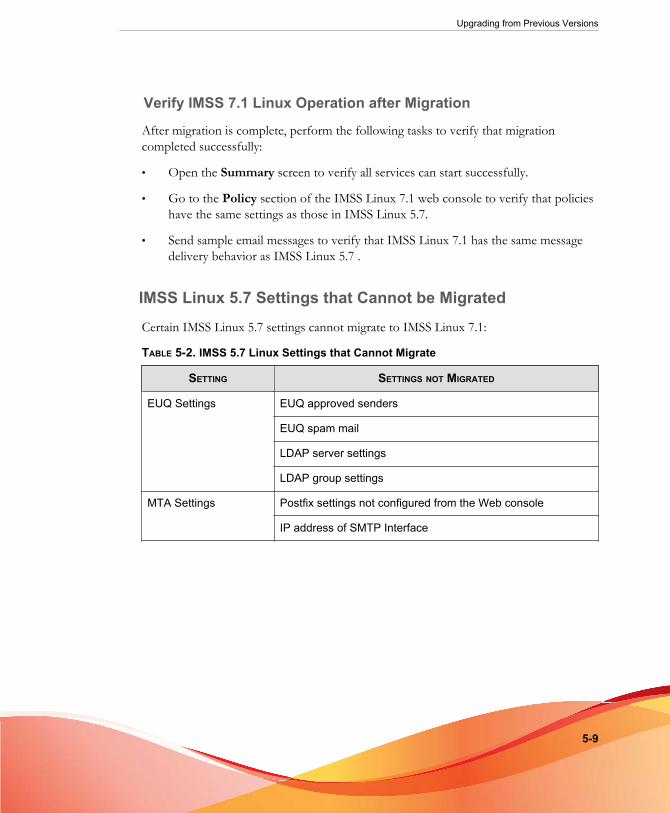
Upgrading from Previous Versions
5-9
Verify IMSS 7.1 Linux Operation after Migration
After migration is complete, perform the following tasks to verify that migrationcompleted successfully:
• Open the Summary screen to verify all services can start successfully.
• Go to the Policy section of the IMSS Linux 7.1 web console to verify that policieshave the same settings as those in IMSS Linux 5.7.
• Send sample email messages to verify that IMSS Linux 7.1 has the same messagedelivery behavior as IMSS Linux 5.7 .
IMSS Linux 5.7 Settings that Cannot be Migrated
Certain IMSS Linux 5.7 settings cannot migrate to IMSS Linux 7.1:
TABLE 5-2. IMSS 5.7 Linux Settings that Cannot Migrate
SETTING SETTINGS NOT MIGRATED
EUQ Settings EUQ approved senders
EUQ spam mail
LDAP server settings
LDAP group settings
MTA Settings Postfix settings not configured from the Web console
IP address of SMTP Interface

Trend Micro InterScan Messaging Security Suite Installation Guide
5-10
SETTING SETTINGS NOT MIGRATED
Policy Settings Security limits:
• "Number of cleaning attempts"
• "Number of viruses reported"
• "Message size"
Virus actions:
• "No virus detected"
• "Joke program attachment detected"
Spam Filter settings:
• "Global spam scanning mode"
• "Baseline detection rate"
• "Additional sensitivity"
• Approved and blocked lists for POP3
• Actions for Graymail
• Advanced action settings
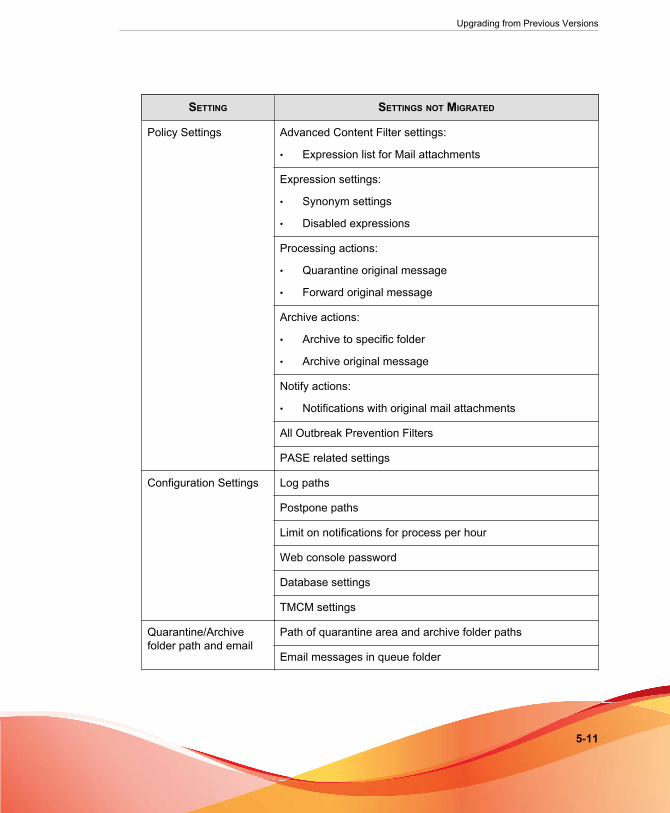
Upgrading from Previous Versions
5-11
SETTING SETTINGS NOT MIGRATED
Policy Settings Advanced Content Filter settings:
• Expression list for Mail attachments
Expression settings:
• Synonym settings
• Disabled expressions
Processing actions:
• Quarantine original message
• Forward original message
Archive actions:
• Archive to specific folder
• Archive original message
Notify actions:
• Notifications with original mail attachments
All Outbreak Prevention Filters
PASE related settings
Configuration Settings Log paths
Postpone paths
Limit on notifications for process per hour
Web console password
Database settings
TMCM settings
Quarantine/Archivefolder path and email
Path of quarantine area and archive folder paths
Email messages in queue folder

Trend Micro InterScan Messaging Security Suite Installation Guide
5-12
SETTING SETTINGS NOT MIGRATED
Report Settings Perl reports
SPS reports
IMSS Linux 5.7 Settings that Change After Migration
Certain IMSS Linux 5.7 settings change after migrating to IMSS Linux 7.1:
TABLE 5-3. IMSS 5.7 Linux Settings that Change After Migration
SETTING SETTINGS THAT CHANGE
Policy Settings Message size filter:
• If an attachment/message size exceeds 99999MB,migration truncates the attachment/message size to99999MB.
• If the number of attachments in an email messageexceeds 99999, migration truncates the number to 99999.
Scanning limits: Any policies that exceed the maximum valuefor IMSS Linux 7.1 will be reset to the maximum value forIMSS Linux 7.1.
Forward actions: Migration changes the filter's forward actionto "Change Recipient", and scan exception's forward action to"Delete and Notify"
Archive actions: Migration changes "archive to mail" to "BCC"
Message tokens: Migration changes:
• "%GLOBALACTION%" to "%ACTION%"
• "%ACTION%" to "%VIRUSACTION%" for the antivirus filter and"TACTION" for other types of filters
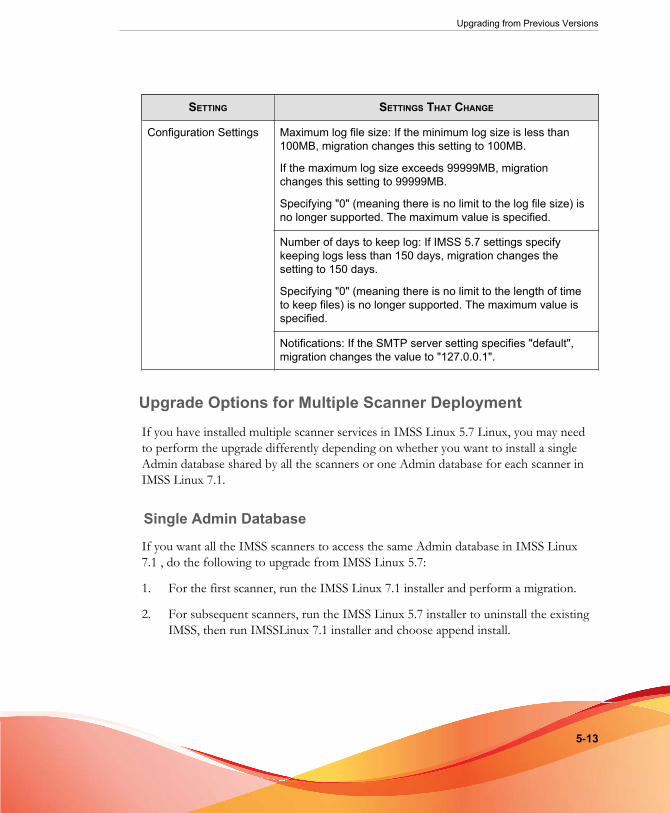
Upgrading from Previous Versions
5-13
SETTING SETTINGS THAT CHANGE
Configuration Settings Maximum log file size: If the minimum log size is less than100MB, migration changes this setting to 100MB.
If the maximum log size exceeds 99999MB, migrationchanges this setting to 99999MB.
Specifying "0" (meaning there is no limit to the log file size) isno longer supported. The maximum value is specified.
Number of days to keep log: If IMSS 5.7 settings specifykeeping logs less than 150 days, migration changes thesetting to 150 days.
Specifying "0" (meaning there is no limit to the length of timeto keep files) is no longer supported. The maximum value isspecified.
Notifications: If the SMTP server setting specifies "default",migration changes the value to "127.0.0.1".
Upgrade Options for Multiple Scanner Deployment
If you have installed multiple scanner services in IMSS Linux 5.7 Linux, you may needto perform the upgrade differently depending on whether you want to install a singleAdmin database shared by all the scanners or one Admin database for each scanner inIMSS Linux 7.1.
Single Admin Database
If you want all the IMSS scanners to access the same Admin database in IMSS Linux7.1 , do the following to upgrade from IMSS Linux 5.7:
1. For the first scanner, run the IMSS Linux 7.1 installer and perform a migration.
2. For subsequent scanners, run the IMSS Linux 5.7 installer to uninstall the existingIMSS, then run IMSSLinux 7.1 installer and choose append install.

Trend Micro InterScan Messaging Security Suite Installation Guide
5-14
Note
The single Admin database upgrade option has the following characteristics:
1. There is only one IMSS server.
2. You can control all scanners centrally.
3. Choose this upgrade option only if all the scanners share the same settings.
4. If you configured different settings for each scanner, but choose this upgrade option,IMSS will only retain the settings for the first scanner.
FIGURE 5-1. Single Admin database
Upgrading from Previous Versions
5-15
Multiple Admin Databases
If you want each IMSS scanner to access a different Admin database in version 7.1Linux, perform migration for each scanner as illustrated below.
NoteThe multiple Admin databases upgrade option has the following characteristics:
1. Multiple IMSS servers are installed on multiple sites.
2. Choose this option if you want to configure different settings for the scanners.
3. You can control the scanners centrally using Control Manager.
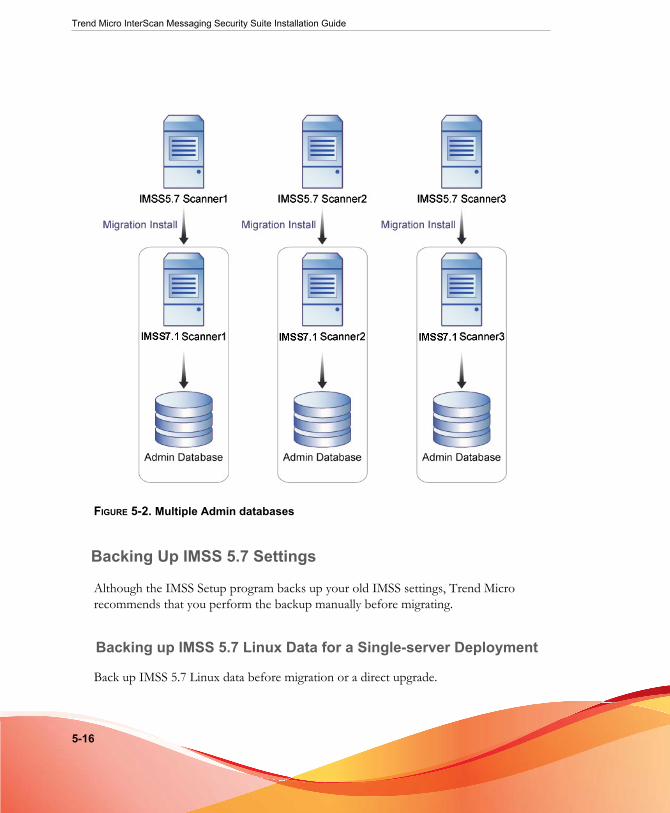
Trend Micro InterScan Messaging Security Suite Installation Guide
5-16
FIGURE 5-2. Multiple Admin databases
Backing Up IMSS 5.7 Settings
Although the IMSS Setup program backs up your old IMSS settings, Trend Microrecommends that you perform the backup manually before migrating.
Backing up IMSS 5.7 Linux Data for a Single-server Deployment
Back up IMSS 5.7 Linux data before migration or a direct upgrade.

Upgrading from Previous Versions
5-17
Note
The IMSS 7.1 Linux installer creates a full binary backup. However, users are responsiblefor creating a full backup of the IMSS 5.7 Linux package information and the IMSS 5.7EUQ database (optional).
Procedure
1. Stop IMSS 5.7 Linux message traffic for approximately one minute.
2. Stop all IMSS 5.7 processes using the commands:
$IMSS_HOME/imss/script/S99ISIMSS stop
$IMSS_HOME/imss/script/S99ADMINUI stop
$IMSS_HOME/imss/script/S99EUQ stop
$IMSS_HOME/imss/script/dbctl.sh stop
3. Stop postfix using the command:
postfix stop
4. Back up the home folder of IMSS 5.7 using the command:
tar cvf imss57.tar /$IMSS_HOME/imss
5. Back up the RPM database-related data using the command:
tar cvf rpm.tar /var/lib/rpm
6. Back up the IMSS 5.7 EUQ database:
a. If you use the IMSS 5.7 bundled PostgreSQL to manage the IMSS 5.7 EUQdatabase, complete the following:
i. Stop the PostgreSQL server with the command
$IMSS_HOME/imss/script/dbctl.sh
ii. Back up the PostgreSQL data with the command:
tar cvf imssdb.tar /var/imss

Trend Micro InterScan Messaging Security Suite Installation Guide
5-18
b. If you use your own PostgreSQL server to manage the IMSS 5.7 EUQdatabase, perform either a cold physical backup or a hot logical backup. Fordetailed instructions, refer to your DBMS documentation.
7. Back up the Postfix configuration files using the command:
tar cvf postfix_config.tar /etc/postfix
Backing up IMSS 5.7 Linux Data for a Distributed Deployment
Back up your IMSS 5.7 Linux data before migration. This scenario assumes thefollowing distributed deployment:
• Server 1—running scanners
• Server 2—running the database
• Server 3—running EUQ and central reporting
• Server 4—running NRS
Note
In the commands below, “s1” refers to server 1, “s2” refers to server 2, and so on.
Procedure
• On computers with scanner services:
a. Stop all IMSS 5.7 related processes using the command:
# /$IMSS_HOME/imss/script/S99ISIMSS stop
b. Back up the IMSS 5.7 home folder using the command:
# tar cvf imss57_s1_scanner.tar /$IMSS_HOME/imss
• On computers with only an IMSS 5.7 database:
a. Back up the database using the command:

Upgrading from Previous Versions
5-19
# $IMSS_HOME/imss/PostgreSQL/bin//pg_dump –d imss –U sa> /home/sam/imss57_db
b. Stop all database-related processes using the command:
# /$IMSS_HOME/imss/script/dbctl.sh stop
c. Back up the IMSS 5.7 home folder using the command:
# tar cvf imss57_s2_db.tar /$IMSS_HOME/imss
d. Back up the database-related data folder using the command:
# tar cvf imss57_s2_db_data.tar /var/imss
• On computers with EUQ and central reporting:
a. Stop all IMSS related processes with scripts using the command:
# /$IMSS_HOME/imss/script/S99ADMINUI stop
# /$IMSS_HOME/imss/script/S99EUQ stop
b. Back up the IMSS 5.7 home folder using the command:
# tar cvf imss57_s3_euq.tar /$IMSS_HOME/imss
• On computers with NRS:
a. Stop all IMSS related processes and stop the maillog parser process if it is stillrunning.
b. Back up the IMSS 5.7 home folder using the command:
# tar cvf imss57_s4_nrs.tar /$IMSS_HOME/imss
c. Stop Postfix using the command:
# postfix stop
d. Back up the Postfix configuration files using the command:
# tar cvf s4_postfix_config.tar /etc/postfix
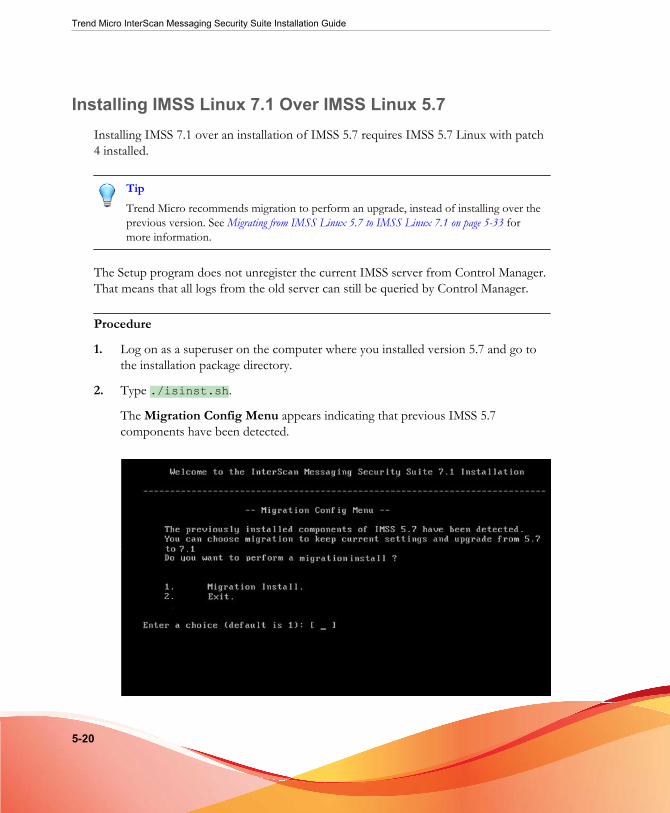
Trend Micro InterScan Messaging Security Suite Installation Guide
5-20
Installing IMSS Linux 7.1 Over IMSS Linux 5.7Installing IMSS 7.1 over an installation of IMSS 5.7 requires IMSS 5.7 Linux with patch4 installed.
TipTrend Micro recommends migration to perform an upgrade, instead of installing over theprevious version. See Migrating from IMSS Linux 5.7 to IMSS Linux 7.1 on page 5-33 formore information.
The Setup program does not unregister the current IMSS server from Control Manager.That means that all logs from the old server can still be queried by Control Manager.
Procedure
1. Log on as a superuser on the computer where you installed version 5.7 and go tothe installation package directory.
2. Type ./isinst.sh.
The Migration Config Menu appears indicating that previous IMSS 5.7components have been detected.

Upgrading from Previous Versions
5-21
3. Type 1 to install IMSS 7.1 over IMSS 5.7.
The Migration Database Config Menu appears. The installer will back up theold IMSS settings before uninstalling IMSS 5.7 and installing IMSS 7.1.
4. Select whether to install a new IMSS admin database server or use an existingserver.
5. Supply database connection information if you choose to use an existing databaseserver:
a. Database server address (required when using an external database server)
b. Database name (required when using external database server). Default isimss.
c. Database account. Default is sa.
NoteYou must specify a superuser account.
d. Database password.

Trend Micro InterScan Messaging Security Suite Installation Guide
5-22
The Install Components Menu screen appears showing the status of theIMSS components. [YES] appears next to the component that the installerwill install. By default, IMSS will install the Central Controller and a Scanner.These two components are necessary to use IMSS.
NoteIf you want to use the existing IMSS 5.7 database server to install the IMSS 7.1admin database or EUQ database, you need to modify the access control ofPostgreSQL as follows:
i. vi /var/imss/pgdata/pg_hba.conf
ii. Modify "255.255.255.255" on line 60 to "255.255.255.0"
iii. Modify "ffffff00" on line 63 to "255.255.255.0"
iv. Save the changes
v. /opt/trend/imss/script/dbctl.sh stop
vi. /opt/trend/imss/script/dbctl.sh start
6. If EUQ is installed with IMSS 5.7, type 2 if you want to modify EUQ databasesettings (by default IMSS 7.1 installer uses the same database server asadministrative database).
7. To modify the selection of the components to install, type the correspondingnumber for the component and type yes (Y/y) or no (N/n) to the install question.
Upgrading from Previous Versions
5-23
Note
By default, the installer uses the install path of the old version. You cannot modifythe install path if you choose migration install.
• If you want to install the EUQ service, please note that the first EUQ serviceyou installed is a primary service. Secondary services provide load-balanceassistance to the primary service.
• If you want to install the EUQ database, you can install a new database serveror use an existing database server, and then enter that database server’sinformation.
8. Type 1 to start installation. The installer checks the available free disk space,memory, and swap space on the computer and gives you an opportunity to cancelthe installation if your computer does not meet the minimum requirements.
The Migration Report appears.
9. Check the migration report and press ENTER to continue.
This report is saved to:
/opt/trend/installlog/migration/MigrationReport/GeneralReport.txt
WARNING!
This is the last chance to stop the upgrade process without harming the current IMSS5.7 installation. If you are not ready to upgrade, press Ctrl-C to stop the installation,otherwise press ENTER to continue.
10. Check Postfix configuration of IMSS 7.1 and press ENTER to continue.
The configuration sample is saved to:
/opt/trend/installlog/ImssInstall.log
a. If you choose to proceed with the installation, the installer then checks for anexisting domain name server (DNS) on your computer and prompts you toinstall BIND if you intend to install Trend Micro IP Profiler later.

Trend Micro InterScan Messaging Security Suite Installation Guide
5-24
Note
IMSS 7.1 Linux is bundled with BIND 9.5.0.
Next, a list of the settings that cannot be migrated appears.
b. The installer backs up the old settings, uninstalls IMSS 5.7 and then installsIMSS 7.1.
Note
a. Filters under your version 5.7 policies and sub-policies will appear as rules inversion 7.1. The installer will automatically detect and migrate your policies torules. For more information on IMSS 7.1 rules, see the Online Help from theweb console.
b. The installer might not be able to migrate old IMSS 5.7 policies with specialroutes. For these cases, the Policy Migration Menu appears and you need toselect one of the following policy directions:
• [1]—incoming
• [2]—outgoing
c. Uninstall the old version of ERS in IMSS 5.7 manually if you want to installERS of IMSS 7.1 after migration.
Upgrading from IMSS Linux 7.0 to IMSS Linux 7.1
The IMSS Setup program can automatically upgrade from IMSS version 7.0 onsupported platforms. If the Setup program detects this version, it can do the following:
• Back up your old IMSS settings
• Install IMSS IMSS
• Migrate the existing settings
The Setup program does not unregister the current IMSS server from Control Manager.That means that all logs from the old server can still be queried by Control Manager.

Upgrading from Previous Versions
5-25
Upgrading to IMSS from IMSS 7.0 varies depending on your deployment of IMSS.Single server and distributed deployments require different procedures to upgrade.
Migrating or Installing Over IMSS 7.0 Linux
Consider the following before migrating or installing over IMSS 7.0:
• IMSS 7.1 retains all IMSS 7.0 data.
• IMSS 7.1 retains IMSS 7.0 hidden key configuration settings in the file.
• IMSS 7.1 retains all IMSS 7.0 reports.
• IMSS 7.1 retains all IMSS 7.0 Control Manager settings.
• While in a distributed deployment, IMSS 7.1 maintains the deployment. This meansyou do not need to make any changes to your deployment or make anyconfiguration modifications to maintain the deployment.
• Administrators must stop message traffic to the server where IMSS 7.0 resides.Migration to an IMSS 7.1 server does not impact message traffic on your network.
SELinux enabled servers also require special preparation before upgrading to IMSS 7.1 .See Preparing an SELinux Server for Upgrade on page 5-25 for detailed information.
IMSS 7.1 Linux Settings That Cannot be Migrated
All data and configuration on all scanners remain after upgrading or migrating.
Preparing an SELinux Server for Upgrade
SELinux impacts IMSS 7.1 Linux upgrading in two ways:
• Dynamic library context setup
• Port bind policy
During installation, IMSS 7.1 Linux sets up the context of all dynamic libraries used byIMSS automatically. However, users must configure the SELinux port bind policymanually.

Trend Micro InterScan Messaging Security Suite Installation Guide
5-26
WARNING!Many IMSS services will not function properly without setting up the port bind policy.
Configure the port bind policy before launching the IMSS 7.1 Linux installer. Afterinstallation, each time users change the port assignment from the web console, manuallyconfigure the port bind policy.
TABLE 5-4. Default IMSS Ports
PORT DESCRIPTION
Internal Ports
25 SMTP port
2500 SMTP port when FoxHunter has beeninstalled
53 Bind port
8005 IMSS web console management port
8015 EUQ web console management port
8445 IMSS web console port (HTTPS)
8446 EUQ web console port (HTTPS)
8447 EUQ Load balance port
10024 Mail re-process port
10025 IMSS scanner port
10026 Postfix delivery port
5432 PostgreSQL port
Occupied Ports
15505 IMSS manager port
5060 Policy server port

Upgrading from Previous Versions
5-27
PORT DESCRIPTION
110 Incoming POP3 port
Users can use both the command line SELinux configuration tool (semanage) and theGUI configuration tool (system-config-securitylevel) to open these ports.
NoteThe above table only lists the default port numbers. If port numbers were modified fromthe default values, change the corresponding port number in SELinux policy rules.
Backing Settings UpTo back up a product means to copy the product data and log files to a backup folder. Ifan error occurs during an upgrade, the new database can be dropped. Then attaching thebackup data and log files to the original product database fully recovers the originaldatabase.
Configuration Settings Backup
The IMSS 7.1 Linux Setup program automatically backs up IMSS 7.0 Linuxconfiguration files when IMSS 7.1 Linux installs over an IMSS 7.0 Linux installation.Back up of configuration files occurs just prior to the Admin database upgrade, duringthe course of installation.
Backing up IMSS 7.0 Linux Settings
Procedure
1. Stop IMSS 7.0 Linux mail traffic for approximately one minute.
2. Stop all IMSS 7.0 Linux processes using the command:
$IMSS_HOME/imss/script/imssstop.sh stop
3. Stop postfix using the command:
postfix stop
Trend Micro InterScan Messaging Security Suite Installation Guide
5-28
4. Back up the IMSS 7.0 administrative database (required if the current scanner hasan IMSS Central Controller installed) and EUQ database (required if the currentscanner has an IMSS EUQ database installed):
a. If you use the IMSS 5.7 bundled PostgreSQL to manage the IMSS 7.0administrative database or the EUQ database, complete the following:
i. Stop the PostgreSQL server with the command
$IMSS_HOME/imss/script/dbctl.sh
ii. Back up the PostgreSQL data with the command:
tar cvf imssdb.tar /var/imss
b. If you use your own PostgreSQL server to manage the IMSS 5.7 EUQdatabase, perform either a cold physical backup or a hot logical backup. Fordetailed instructions, refer to your DBMS documentation.
5. Back up the RPM database-related data using the command:
tar cvf rpm.tar /var/lib/rpm
6. Back up the Postfix configuration files using the command:
tar cvf postfix_config.tar/etc/postfix
Upgrading an IMSS 7.0 Single Server Deployment
If upgrading an SELinux server refer to Preparing an SELinux Server for Upgrade on page5-25 for instructions on preparing the SELinux server.
NoteIMSS 7.0 SP1 with patch 2 or above is required when upgrading or migrating.
Procedure
1. Back up IMSS 7.0 data before installation. See Backing Settings Up on page 5-27 fordetailed information.

Upgrading from Previous Versions
5-29
2. Extract the IMSS 7.1 package, IMSS_v7.1_Linux_1144.tar.gz, using thecommand:
tar xzvf IMSS_v7.1_Linux_1144.tar.gz
Note
On each scanner, first upgrade IMSS components, and then upgrade IP Profiler. Thissequence cannot be changed.
3. Start the installation using the command:
imss/isinst.sh
The Main Menu appears and the IMSS installer reports that IMSS 7.0 has beendetected.
4. Type 1 to migrate your settings and upgrade to version 7.1. This upgrades thecurrent IMSS 7.0 server to 7.1 and retains existing configuration settings.
The Install Components Menu screen appears showing the status of the IMSScomponents. [YES] appears next to the component that the installer will install.
5. Type 1 to start installation. The installer checks the available free disk space,memory, and swap space on the computer and gives you an opportunity to cancelthe installation if your computer does not meet the minimum requirements.
WARNING!
This is the last chance to stop the upgrade process without harming the current IMSS7.0 installation. If you are not ready to upgrade, press Ctrl-C to stop the installation,otherwise press ENTER to continue.
The installer then performs constraint verification of the following:
• IMSS 7.0 administrative database connectivity check
• IMSS 7.0 component status check. The installer checks the status of theprocess imssmgr on all scanners and ensures all of them have been shutdown.

Trend Micro InterScan Messaging Security Suite Installation Guide
5-30
• IMSS 7.0 distribution upgrade sequence check (performed only whenupgrading a distributed installation)
After constraint verification, the installer performs the following:
• Backs up the administrative database (only on the Central Controller)
• Creates an IMSS binary package
• Installs IMSS 7.1 component packages
• Migrates all configuration settings to IMSS 7.1
NoteDepending on your hardware and deployment, this process may take up to 1 hour.
6. After the upgrade of components completes, upgrade IPProfiler using thecommand:
imss/ipfilterinst.sh
NoteIP Profiler upgrades automatically once started.
Upgrading an IMSS 7.0 Distributed Deployment
If upgrading SELinux servers refer to Preparing an SELinux Server for Upgrade on page 5-25for instructions on preparing the SELinux server.
NoteIMSS 7.0 SP1 with patch 2 or above is required when upgrading or migrating.
Procedure
1. Back up IMSS 7.0 data before installation. See Backing Settings Up on page 5-27 fordetailed information.

Upgrading from Previous Versions
5-31
2. Stop all mail traffic in the group and wait for approximately one minute.
3. Stop all components on all scanners in the group:
a. On each scanner, type following command:
/etc/rc.d/init.d/S99IMSSSTOP stop
b. If you use the IMSS 7.0 bundled PostgreSQL database, restart thePostgreSQL (the S99IMSSSTOP command stops it) using the command:
/etc/rc.d/init.d/S98dbctl start
4. Upgrade the Central Controller by extracting the IMSS 7.1 package,IMSS_v7.1_Linux_1144.tar.gz, using the command:
tar xzvf IMSS_v7.1_Linux_1144.tar.gz
Note
On each scanner, first upgrade IMSS components, and then upgrade IP Profiler. Thissequence cannot be changed.
5. Start the installation using the command:
imss/isinst.sh
The Main Menu appears and the IMSS installer reports that IMSS 7.0 has beendetected.
6. Type 1 to migrate your settings and upgrade to version 7.1. This upgrades thecurrent IMSS 7.0 server to 7.1 and retains existing configuration settings.
The Install Components Menu screen appears showing the status of the IMSScomponents. [YES] appears next to the component that the installer will install.
7. To modify the selection of the components to install, type the correspondingnumber for the component and enter yes (Y/y) or no (N/n) to the install question.
8. Type 1 to start installation. The installer checks the available free disk space,memory, and swap space on the computer and gives you an opportunity to cancelthe installation if your computer does not meet the minimum requirements.
Trend Micro InterScan Messaging Security Suite Installation Guide
5-32
WARNING!This is the last chance to stop the upgrade process without harming the current IMSS7.0 installation. If you are not ready to upgrade, press Ctrl-C to stop the installation,otherwise press ENTER to continue.
The installer then performs constraint verification of the following:
• IMSS 7.0 administrative database connectivity check
• IMSS 7.0 component status check. The installer checks the status of theprocess imssmgr on all scanners and ensures all of them have been shutdown.
• IMSS 7.0 distribution upgrade sequence check (performed only whenupgrading a distributed installation)
After constraint verification, the installer performs the following:
• Backs up the administrative database (only on the Central Controller)
• Creates an IMSS binary package
• Installs IMSS 7.1 component packages
• Migrates all configuration settings to IMSS 7.1
NoteDepending on your hardware and deployment, this process may take up to 1 hour.
9. After the upgrade of components completes, upgrade IPProfiler using thecommand:
imss/ipfilterinst.sh
NoteIP Profiler upgrades automatically once started.
10. Upgrade all other scanners following steps 4 to 9. No special sequence is requiredwhen upgrading subsequent scanners.
Upgrading from Previous Versions
5-33
11. After upgrading all scanners, start the IMSS service on all scanners using thecommand:
$IMSS_HOME/imss/script/imssstart.sh
Migrating to IMSS 7.1 LinuxThe following migration paths are supported:
Migrating from IMSS Linux 5.7 to IMSS Linux 7.1Using the IMSS Linux 5.7 Migration Tool is the Trend Micro recommended process toupgrade from IMSS Linux 5.7 to IMSS Linux 7.1 .
TipBefore migrating refer to the best practices: Upgrading IMSS 5.7: Policy Recommendations onpage 5-6 and Upgrading IMSS 5.7: Process Recommendations on page 5-7.
Exporting IMSS Linux 5.7 SettingsUse the IMSS Linux 5.7 Export Tool to export settings from IMSS Linux 5.7. The IMSSLinux 5.7 Export Tool is located in the IMSS Linux 7.1 installation folder.
You can obtain the latest migration tool at:
http://www.trendmicro.com/download/
Procedure
1. Clean up IMSS Linux 5.7 configuration settings.
See Upgrading IMSS 5.7: Policy Recommendations on page 5-6 and Upgrading IMSS 5.7:Process Recommendations on page 5-7 for detailed information.
2. Copy migration_tool_57to71.tar.gz to a directory on the IMSS Linux 5.7server.

Trend Micro InterScan Messaging Security Suite Installation Guide
5-34
3. Use the following command to extract the Export Tool:
tar xzvf migration_tool_57to71.tar.gz
4. Run the Export Tool using the following command:
./export_tool_57.sh –e <filename>
NoteUse -h to display the Export Tool help notes.
The Export Tool exports configuration settings to imss_config_57.tar.gzunder the current folder if no parameters are specified.
NoteThe Export Tool creates a detailed export log export_57.yyyymmdd.log underthe current folder.
Importing IMSS Linux 5.7 Settings to IMSS Linux 7.1
After migration, IMSS settings are overwritten and all services are restarted.
WARNING!During migration do not perform any database operations.
During migration do not start/stop any services in the group.
Procedure
1. Install IMSS Linux7.1 on a server.
2. Use the IMSS Linux 5.7 Export Tool to obtain the IMSS 5.7 migration package.
3. Put the migration package migration_tool_57to71.tar.gz on to IMSS 7.1.
4. Before migration, ensure port 5069 is not used by other applications.

Upgrading from Previous Versions
5-35
5. Extract the migration tool using the following command:
tar xzvf migration_tool_57to71.tar.gz
6. Start the migration tool using the following command:
./migration_tool_57.sh
Note
Read the Migration Tool's scope and limitations carefully before continuing.
7. Follow the instructions that display to use the Migration Tool.
• C:\Imss7InstLog\migrationfrom57\MigrationReport
• C:\Imss7InstLog\migrationfrom57
8. Perform the following post-migration tasks to verify the results of the migration:
a. Check for items that did not migrate. Add missing items manually to IMSS7.1.
b. Check the results for migrated items. This helps to gain a basic understandingabout the mapping relationship between IMSS 5.7 Linux filters and IMSS 7.1rules.
c. Verify that all services can be started, especially the policy server.
d. Verify that all policies can be accessed on the web console.
Migrating from IMSS Linux 7.0 to IMSS Linux 7.1
The migration process requires the following tasks:
• Step 1: Exporting IMSS 7.0 Linux settings
• Step 2: Importing IMSS 7.0 Linux settings to IMSS 7.1
Before migrating, verify the status and operation of the IMSS Linux 7.0 database.
Trend Micro InterScan Messaging Security Suite Installation Guide
5-36
Note
IMSS Linux 7.0 SP1 with patch 2 or above is required when upgrading or migrating.
Exporting IMSS Linux 7.0 Settings
Use the IMSS Linux 7.0 Export Tool to export settings from IMSS Linux 7.0. The IMSSLinux 7.0 Export Tool is located in the IMSS Linux 7.1 installation folder.
You can obtain the latest migration tool at:
http://www.trendmicro.com/download/
Procedure
1. Copy to following file to the IMSS 7.0 server.
migration_tool_70to71.tar.gz
2. Use the following command to extract the Export Tool:
tar zxf migration_tool_70to71.tar.gz
3. Run the Export Tool using the following command:
./export_tool_70.sh –e <filename>
Note
Use -h to display the Export Tool help notes.
The Export Tool exports the configuration settings package,imss_config_70.tar.gz, to $PWD.
Note
The Export Tool creates a detailed export log export_70.xxxxxxxx.log under thecurrent folder.
Upgrading from Previous Versions
5-37
Importing IMSS Linux 7.0 Settings to IMSS Linux 7.1After migration, IMSS settings are overwritten and all services are restarted.
WARNING!During migration do not perform any database operations.
During migration do not start/stop any services in the group.
TipTrend Micro recommends performing migration on a fresh installation of IMSS Linux 7.1.
Procedure
1. Copy the migration package migration_tool_70to71.tar.gz on to IMSS7.1.
2. Extract the migration tool using the following command:
tar zxf migration_tool_70to71.tar.gz
3. Copy the IMSS 7.0 Linux configuration package onto IMSS 7.1. See ExportingIMSS Linux 7.0 Settings on page 5-36 for detailed information.
4. Start the migration tool using the following command:
./migration_tool_70.sh
NoteRead the Migration Tool scope and limitations carefully before continuing.
5. Follow the instructions that display to use the Migration Tool.
IMSS 7.1 creates a detailed migration report and logs at the following location:
{IMSS_INSTALLPATH}/installlog/migration/MigrationReport andmigration_70.yyyymmdd.log
6. Perform the following post-migration tasks to verify the results of the migration:

Trend Micro InterScan Messaging Security Suite Installation Guide
5-38
a. Check the results for migrated items.
b. Verify that all services can be started, especially the policy server.
c. Verify that all policies can be accessed on the web console.
Migrating to IMSS 7.1 SP1 LinuxThe following migration paths are supported:
• IMSS 7.0 SP1 Linux to IMSS 7.1 SP1 Linux
• IMSS 7.0 SP1 Patch 4 Solaris to IMSS 7.1 SP1 Linux
• IMSS 7.1 Patch 3 Linux to IMSS 7.1 SP1 Linux
Migrating from IMSS 7.0 SP1 Linux to IMSS 7.1 SP1 LinuxThe migration process requires the following tasks:
• Step 1: Exporting IMSS 7.0 settings
• Step 2: Importing IMSS 7.0 settings to IMSS 7.1 SP1
Before migrating verify the status and operation of the IMSS 7.0 database.
Exporting IMSS 7.0 Linux SettingsUse the IMSS 7.0 Linux Export Tool to export settings from IMSS 7.0 Linux. The IMSS7.0 Linux Export Tool is located in the IMSS 7.1 SP1 installation folder.
You can obtain the latest migration tool at:
http://www.trendmicro.com/download/
NoteThere are no command line tools for the IMSS 7.1 SP1 Linux migration. Use the IMSSweb console to export or import settings.

Upgrading from Previous Versions
5-39
Procedure
1. Export the settings by running the following migration tool on the IMSS 7.0 Linuxserver:
migration_tool_70to71.tar.gz
2. Use the following command to extract the Export Tool:
tar zvf migration_tool_70to71.tar.gz
3. Use the following command to run the Export Tool:
./export_tool_70.sh –e <filename>
Note
Use -h to display the Export Tool help notes.
The Export Tool exports the configuration settings package,imss_config_70.tar.gz, to $PWD.
4. Copy the exported settings file to any computer with access to the IMSS webmanagement console.
Importing IMSS Settings to IMSS 7.1 SP1 Linux
The following procedure explains how to import configuration files from the followingIMSS versions:
• IMSS 7.0 Linux SP1
• IMSS 7.1 Linux Patch 3
• IMSS 7.1 Linux SP1
• IMSS 7.0 Solaris SP1 Patch 4
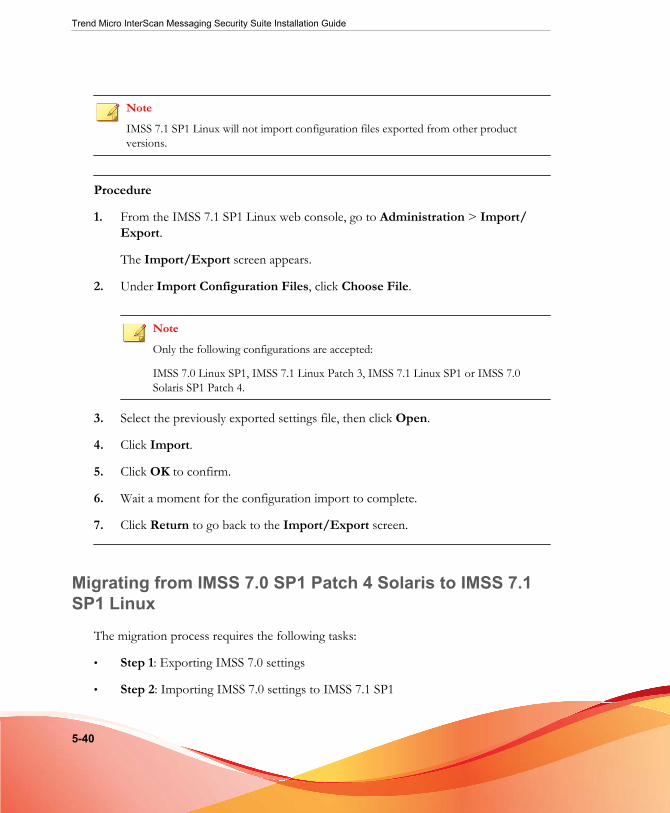
Trend Micro InterScan Messaging Security Suite Installation Guide
5-40
Note
IMSS 7.1 SP1 Linux will not import configuration files exported from other productversions.
Procedure
1. From the IMSS 7.1 SP1 Linux web console, go to Administration > Import/Export.
The Import/Export screen appears.
2. Under Import Configuration Files, click Choose File.
Note
Only the following configurations are accepted:
IMSS 7.0 Linux SP1, IMSS 7.1 Linux Patch 3, IMSS 7.1 Linux SP1 or IMSS 7.0Solaris SP1 Patch 4.
3. Select the previously exported settings file, then click Open.
4. Click Import.
5. Click OK to confirm.
6. Wait a moment for the configuration import to complete.
7. Click Return to go back to the Import/Export screen.
Migrating from IMSS 7.0 SP1 Patch 4 Solaris to IMSS 7.1SP1 Linux
The migration process requires the following tasks:
• Step 1: Exporting IMSS 7.0 settings
• Step 2: Importing IMSS 7.0 settings to IMSS 7.1 SP1

Upgrading from Previous Versions
5-41
Before migrating verify the status and operation of the IMSS 7.0 database.
Exporting IMSS 7.0 Solaris Settings
Use the IMSS 7.0 Solaris Export Tool to export settings from IMSS 7.0 Solaris. TheIMSS 7.0 Solaris Export Tool is located in the IMSS 7.1 SP1 installation folder.
You can obtain the latest migration tool at:
http://www.trendmicro.com/download/
Note
There are no command line tools for the IMSS 7.1 SP1 Linux migration. Use the IMSSweb console to export or import settings.
Procedure
1. Export the settings by running the following migration tool on the IMSS 7.0 Solarisserver:
export_tool_sol_70.tar.gz
2. Use the following command to extract the Export Tool:
tar zvf export_tool_sol_70.tar.gz
3. Use the following command to run the Export Tool:
./export_tool_70.sh
Note
Solaris ignores all option switches.
The Export Tool exports the configuration settings package,imss_config_70.tar.gz, to the current directory.
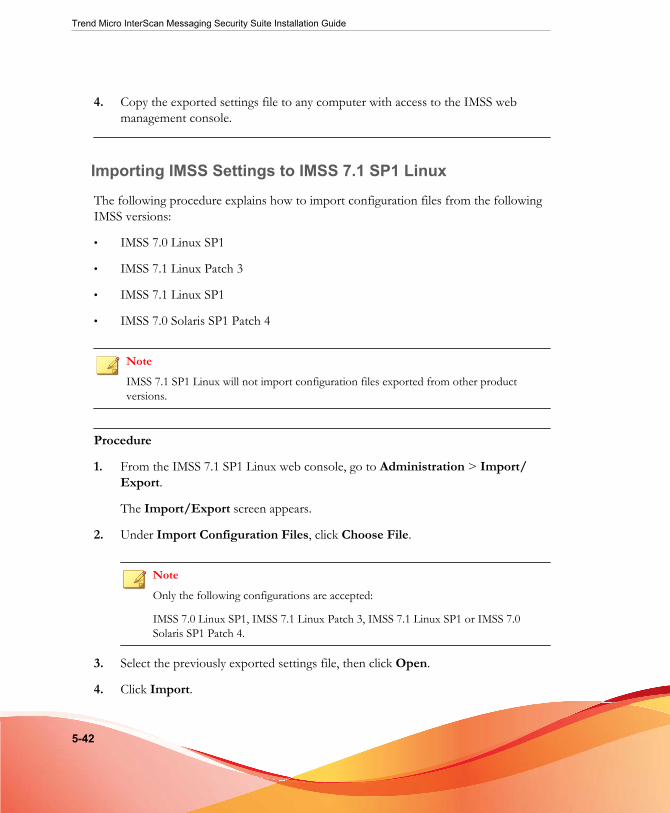
Trend Micro InterScan Messaging Security Suite Installation Guide
5-42
4. Copy the exported settings file to any computer with access to the IMSS webmanagement console.
Importing IMSS Settings to IMSS 7.1 SP1 Linux
The following procedure explains how to import configuration files from the followingIMSS versions:
• IMSS 7.0 Linux SP1
• IMSS 7.1 Linux Patch 3
• IMSS 7.1 Linux SP1
• IMSS 7.0 Solaris SP1 Patch 4
NoteIMSS 7.1 SP1 Linux will not import configuration files exported from other productversions.
Procedure
1. From the IMSS 7.1 SP1 Linux web console, go to Administration > Import/Export.
The Import/Export screen appears.
2. Under Import Configuration Files, click Choose File.
NoteOnly the following configurations are accepted:
IMSS 7.0 Linux SP1, IMSS 7.1 Linux Patch 3, IMSS 7.1 Linux SP1 or IMSS 7.0Solaris SP1 Patch 4.
3. Select the previously exported settings file, then click Open.
4. Click Import.

Upgrading from Previous Versions
5-43
5. Click OK to confirm.
6. Wait a moment for the configuration import to complete.
7. Click Return to go back to the Import/Export screen.
Migrating from IMSS 7.1 Linux Patch 3 to IMSS 7.1 SP1Linux
The migration process requires the following tasks:
• Step 1: Exporting IMSS 7.1 settings
• Step 2: Importing IMSS 7.1 settings to IMSS 7.1 SP1
Before migrating verify the status and operation of the IMSS 7.0 database.
Exporting IMSS 7.1 Patch 3 Linux Settings
Procedure
1. From the IMSS 7.1 Patch 3 Linux web console, go to Administration > Import/Export
The Import/Export screen appears.
2. Under Export Configuration Files, click Export to export the settings
3. Wait a moment for the configuration files to generate.
4. Save the exported configuration file to local storage on the server.
Importing IMSS Settings to IMSS 7.1 SP1 Linux
The following procedure explains how to import configuration files from the followingIMSS versions:
• IMSS 7.0 Linux SP1

Trend Micro InterScan Messaging Security Suite Installation Guide
5-44
• IMSS 7.1 Linux Patch 3
• IMSS 7.1 Linux SP1
• IMSS 7.0 Solaris SP1 Patch 4
Note
IMSS 7.1 SP1 Linux will not import configuration files exported from other productversions.
Procedure
1. From the IMSS 7.1 SP1 Linux web console, go to Administration > Import/Export.
The Import/Export screen appears.
2. Under Import Configuration Files, click Choose File.
Note
Only the following configurations are accepted:
IMSS 7.0 Linux SP1, IMSS 7.1 Linux Patch 3, IMSS 7.1 Linux SP1 or IMSS 7.0Solaris SP1 Patch 4.
3. Select the previously exported settings file, then click Open.
4. Click Import.
5. Click OK to confirm.
6. Wait a moment for the configuration import to complete.
7. Click Return to go back to the Import/Export screen.

Upgrading from Previous Versions
5-45
Activating Supported ServicesAfter upgrading, IMSS 7.1 SP1 retains the Activation Code from the previous productversion. If the Activation Code has expired, provide a new Activation Code to use thefollowing:
• Antivirus and Content Filter
• SPS (includes IP Profiler)
To use Email reputation, you can specify the Activation Code during installation orfrom the web console after installation completes.
Rolling Back the UpgradeIf any problems occur with the upgrade to version 7.1 SP1, you can roll back to theprevious version. For more information about IMSS 5.7/7.0 installation, see your IMSS5.7/7.0 documentation.
Rolling Back to IMSS 5.7To a certain stage the upgrade process automatically rolls back upgrading. However,there is a point of no return (step 10 in the Installing IMSS Linux 7.1 Over IMSS Linux 5.7on page 5-20 process) where rolling back must be performed manually.
The rollback process requires the following steps:
Related information
➥ Removing IMSS 7.1 Components➥ Rolling Back to IMSS 7.0
Removing IMSS 7.1 Components
Procedure
1. Remove the IMSS 7.1 package using the command:

Trend Micro InterScan Messaging Security Suite Installation Guide
5-46
rpm –e imss imsscctrl imsseuq
NoteIgnore any error messages that appear concerning missing packages.
2. Remove PostgreSQL if a new PostgreSQL was installed during the upgrade usingthe commands:
su - imss -c "/opt/trend/imss/PostgreSQL/bin/pg_ctl -D'/var/imss/pgdata' -w -m fast stop"
rm –rf /var/imss
3. Remove all existing IMSS 7.1 SP1 autostart scripts, using the commands:
rm –rf /etc/rc.d/*/*dbctl
rm –rf /etc/rc.d/*/*bindctl
rm –rf /etc/rc.d/*/*CMAGENT
rm –rf /etc/rc.d/*/*FOXDNS
rm –rf /etc/rc.d/*/*IMSS
rm –rf /etc/rc.d/*/*IMSSSTOP
rm –rf /etc/rc.d/*/*IMSSUI
rm –rf /etc/rc.d/*/*MANAGER
rm –rf /etc/rc.d/*/*MONITOR
rm –rf /etc/rc.d/*/*POLICY
rm –rf /etc/rc.d/*/*SCHEDULED

Upgrading from Previous Versions
5-47
Completing the Rollback to IMSS 5.7
Procedure
1. Roll back to the IMSS 5.7 package information using the commands:
tar xvf rpm.tar -C /
rpm –rebuilddb
NoteAfter doing this, information of all RPM packages installed after the backup has beencreated will be lost. Do not install other RPM packages during the IMSS 5.7 upgrade.
2. Roll back to the IMSS 5.7 binary using the command:
tar xvf imss57.tar -C /
3. Roll back to the IMSS 5.7 EUQ database using the command:
tar xvf imssdb.tar -C /
4. Roll back to the Postfix configuration using the command:
tar xvf postfix_config.tar -C /
5. Re-create the IMSS 5.7 auto start script using the command:
imss/recreate_rclink_57.sh
The IMSS 5.7 environment should now be the same as before the upgrade.
Rolling Back to IMSS 7.0To a certain stage the upgrade process automatically rolls back upgrading. However,there is a point of no return:
• Upgrading IMSS components: After Step 6 in the Upgrading an IMSS 7.0 SingleServer Deployment on page 5-28 process or Step 8 in the Upgrading an IMSS 7.0Distributed Deployment on page 5-30.

Trend Micro InterScan Messaging Security Suite Installation Guide
5-48
• Upgrading IP Profiler
During the above processes rolling back must be performed manually.
Rolling Back After IMSS Components Upgrade
At this stage during the upgrade process, the installer removes the IMSS 7.0 package, theIMSS 7.1 package administrative database installs, and data migrates to the newadministrative database.
When the installer encounters issues at this stage, the rollback process requires thefollowing steps:
• Step 1: Removing IMSS 7.1 components
• Step 2: Rolling back to IMSS 7.0
Removing IMSS 7.1 Components
Procedure
1. Remove the IMSS 7.1 package using the command:
rpm –e imss imsscctrl imsseuq
Note
Ignore any error messages that appear concerning missing packages.
2. Remove PostgreSQL if a new PostgreSQL was installed during the upgrade usingthe commands:
su - imss -c "/opt/trend/imss/PostgreSQL/bin/pg_ctl -D'/var/imss/pgdata' -w -m fast stop"
rm –rf /var/imss

Upgrading from Previous Versions
5-49
Completing the Rollback to IMSS 7.0
Procedure
1. Roll back to the IMSS 7.0 package information using the commands:
tar xvf rpm.tar -C /
rpm –rebuilddb
NoteAfter doing this, information of all RPM packages installed after the backup has beencreated will be lost. Do not install other RPM packages during the IMSS 7.0 upgrade.
2. Roll back to the IMSS 7.0 binary using the command:
mv $IMSS_HOME/imss/queue $IMSS_HOME/installlog/binary
rm –rf $IMSS_HOME/imss
mv $IMSS_HOME/installlog/binary $IMSS_HOME/imss
3. Roll back to the IMSS 7.0 EUQ database using the command:
tar xvf imssdb.tar -C /
4. Roll back to the Postfix configuration using the command:
tar xvf postfix_config.tar -C /
5. Re-create the IMSS 7.0 auto start script using the command:
imss/recreate_rclink_70.sh
The IMSS 7.0 environment should now be the same as before the upgrade.
Rolling Back After IP Profiler UpgradesAt this stage during the upgrade process, the installer removed the IMSS 7.0 package,the IMSS 7.1 package administrative database was installed, and data migrated to thenew administrative database. IP Profiler attempts to install but may encounter issues.

Trend Micro InterScan Messaging Security Suite Installation Guide
5-50
When the installer encounters issues at this stage, the rollback process requires thefollowing steps:
• Step 1: Removing IMSS 7.1 components
• Step 2: Rolling back to IMSS 7.0
Removing IMSS 7.1 Components
Procedure
1. Remove the IMSS 7.1 package using the command:
rpm –e imss imsscctrl imsseuq
Note
Ignore any error messages that appear concerning missing packages.
2. Remove PostgreSQL if a new PostgreSQL was installed during the upgrade usingthe commands:
su - imss -c "/opt/trend/imss/PostgreSQL/bin/pg_ctl -D'/var/imss/pgdata' -w -m fast stop"
rm –rf /var/imss
Completing the Rollback to IMSS 7.0
Procedure
1. Roll back to the IMSS 7.0 package information using the commands:
tar xvf rpm.tar -C /
rpm –rebuilddb

Upgrading from Previous Versions
5-51
Note
After doing this, information of all RPM packages installed after the backup has beencreated will be lost. Do not install other RPM packages during the IMSS 7.0 upgrade.
2. Roll back to the IMSS 7.0 binary using the command:
mv $IMSS_HOME/imss/queue $IMSS_HOME/installlog/binary
rm –rf $IMSS_HOME/imss
mv $IMSS_HOME/installlog/binary $IMSS_HOME/imss
3. Roll back to the IMSS 7.0 EUQ database using the command:
tar xvf imssdb.tar -C /
4. Roll back to the Postfix configuration using the command:
tar xvf postfix_config.tar -C /
5. Re-create the IMSS 7.0 auto start script using the command:
imss/recreate_rclink_70.sh
The IMSS 7.0 environment should now be the same as before the upgrade.
6. Remove IP Profiler packages using the command:
imss/remove_ipp.sh
7. Complete the rollback to IMSS 7.0 with the command:
imss/ipfilterinsh.sh #IMSS 7.0
Note
Provide the ERS/IP Profiler Activation Code when you re-install the IP Profiler.


6-1
Chapter 6
Troubleshooting and SupportInformation
This chapter explains how to troubleshoot common IMSS issues, search the TrendMicro Knowledge Base, and contact support.
Topics include:
• Troubleshooting on page 6-2
• Frequently Asked Questions About Installation on page 6-2
• Support Information on page 6-7

Trend Micro InterScan Messaging Security Suite Installation Guide
6-2
TroubleshootingFor common issues that you might encounter when installing, or configuring andadministering IMSS, see Installation Troubleshooting Issues on page 6-2. If you haveadditional problems, check the Trend Micro Knowledge Base.
Installation Troubleshooting Issues
ISSUE SUGGESTED RESOLUTION
The ERS installation doesnot validate the ERSActivation Code
To validate the Activation Code, the ERS installation scriptaccesses Trend Micro through the Internet.
Verify that your DNS server is functioning properly and thatthe computer on which you are installing ERS has accessto the Internet.
Frequently Asked Questions About Installation
Postfix MTA Settings
If I deploy multiple scanners with Postfix, how can I managethese Postfix instances centrally?To control all the Postfix computers from the web management console, enable theApply settings to all scanners option. Choose Administrator > SMTP Routing >SMTP from the menu.
Can I make an exception on the settings for some Postfix instancesseparately?
To make an exception for some Postfix settings, search for the key"detach_key_postfix" in imss.ini, and add the keys that you do not want to applyfrom the web management console. For example:
Troubleshooting and Support Information
6-3
detach_key_postfix=smtpd_use_tls:smtpd_enforce_tls:queue_directory
The parameters above will not be overwritten by any settings that you configure throughthe web console. You can modify main.cf manually.
Note
“{Parameter1:{Parameter2}:…::{Parameter n}" means you can use one ormore parameters by separating them using colons.
You can find the parameter names in the table tb_postfixconfig from the database,under the column fieldname.
WARNING!
Use extreme caution when modifying the configuration file.
Installation / Uninstallation
Can the IMSS Admin database be installed separately?
Yes. You can install IMSS admin database separately. Run the installation program andconfigure the IMSS database only without selecting any other IMSS components.
How many EUQ services and EUQ databases can beinstalled?
Up to eight (8) EUQ services and EUQ databases can be installed.
Should I install an EUQ database for each EUQ service?
No. Multiple EUQ services can share an EUQ database, but the EUQ service requiresat least one EUQ database.

Trend Micro InterScan Messaging Security Suite Installation Guide
6-4
Is the IMSS EUQ database deleted during uninstallation?
No. The IMSS EUQ database is not removed during IMSS uninstallation.
Why am I not able to remove the old IMSS database duringinstallation?
Some applications may be connected to the old IMSS database when the installationprogram tries to remove it. Disconnect all connections to the old database, and retry.
Is there any problem if I install IMSS 7.1 on a computer with anexternal DNS server?
There should be no functional problem integrating IMSS 7.1 with DNS server.Functionally, you can integrate IMSS with an external DNS server on the samecomputer, but this is not recommended for performance reasons.
Is there any problem if I install IMSS 7.1 on a computer with anexisting Apache Server?
IMSS installs Apache server in $IMSS_HOME/imss/UI/apache directory for thepurpose of EUQ Server load balancing. It will not conflict with the existing Apacheserver if there is no port conflict. IMSSApache takes the port 8447.
Upgrading
Are all IMSS 7.1 settings retained during an upgrade ormigration?
No. Due to architectural changes in IMSS 7.1, some settings cannot be retained. TheIMSS 7.1 installer will ask for the new values of these settings during an upgrade. Thesettings can be found in the general migration report:
$IMSS_HOME/installlog/migration/MigrationReport/GeneralReport.txt.

Troubleshooting and Support Information
6-5
How do I upgrade IMSS 7.1 scanners?
To upgrade from multiple IMSS 7.1 scanners:
• Upgrade from the scanner with the most desired settings for the migration.
• Uninstall the remaining scanners.
• Append the multiple scanners.
For more information, see Upgrade Options for Multiple Scanner Deployment on page 5-13.
Can I upgrade the administrator database and EUQdatabase from the same IMSS 7.1 database server?
Yes. IMSS 7.1 database settings (such as LDAP settings and EUQ settings) are kept.
Is rollback to IMSS 7.1 possible after upgrading?
Yes. For details instructions, see Rolling Back the Upgrade on page 5-45.
Is it possible to upgrade on a computer that only has theEUQ component?
No. Upgrade from a computer with an IMSS 7.1 scanner installed.
How do I simplify SPS rules after an upgrade?
To keep all SPS filter settings for all policies of IMSS 7.1, IMSS 7.5 migrates each SPSfilter to one or multiple SPS rule(s) in IMSS 7.5. To reduce the number of SPS rulesafter upgrading, perform the following:
• Create a new SPS rule after migration.
• Delete all migrated SPS rules.
Trend Micro InterScan Messaging Security Suite Installation Guide
6-6
How are IMSS 7.1 filters and policies mapped during anupgrade?The architectures of IMSS 7.0 and IMSS7.1 are very similar. All policies and filters mapwithout issues.
The architectures of IMSS 5.7 and IMSS7.1 are very different. Therefore, the upgrademodule maps all IMSS 5.7 filters to related rules in IMSS 7.1 in the following ways:
• Virus filter(s): The number of virus rules vary according to the following:
• There will be several rules for one virus filter after migration if there aremultiple routes with different "To" or "From" addresses.
For example: A virus filter with the routes (a->b; c->d; e->b) will be migratedto two virus rules with the routes (a,e->b; c->d).
• There will be two rules for one virus filter after migration if it was "active" inIMSS5.7 for both SMTP and POP3 traffic.
• There will be only one rule for one virus filter after migration if it is "inactive"in IMSS 5.7 for both SMTP and POP3 traffic. The rule direction is for "allroutes".
• SPS filter(s): The migration module maps each SPS filter to one SPS rule aftermigration or several SPS rules depending on the Routes and Filter Actions. Therewill normally be one SPS rule after migration. The following are exceptions whenthere will be several SPS rules:
• If there are multiple routes with different "To" or "From" addresses.
For example: SPS filter with the routes (a->b; c->d; e->b) will be migrated totwo SPS rules with the routes (a,e->b; c->d).
• If three filter actions are different.
For example, SPS filter with the following filter actions will be migrated totwo SPS rules named "Spam Filter (SPS) BlackWhiteList And Phish >GlobalPolicy" and "Spam Filter (SPS) Spam >Global Policy":
• "Tag and Deliver" for "Blocked senders"
• "Delete" for "Phishing email"

Troubleshooting and Support Information
6-7
• "Quarantine" for "Spam"
• eManager filter:
• There will be several rules for one eManager filter after migration if there aremultiple routes with different "To" or "From" addresses.
• For example: eManager filter with the routes (a->b; c->d; e->b) will bemigrated to two eManager rules with the routes (a,e->b; c->d).
• There will be one rule for one eManager filter after migration if it was "active"in IMSS 5.7 for both SMTP and POP3 traffic.
• There will be one rule for one eManager filter after migration if it is "inactive"in IMSS 5.7 for both SMTP and POP3 traffic. The rule direction is for "Bothincoming and outgoing directions". You can add the related rule for the POP3rule direction in IMSS 7.0 if necessary.
For the detailed mapping relationship of each policy, check:
$IMSS_HOME/installlog/migration/MigrationReport/DetailReport.txt
Support Information
Using the Support Portal
The Trend Micro Support Portal is a 24x7 online resource that contains the most up-to-date information about both common and unusual problems.
Procedure
1. Go to http://esupport.trendmicro.com.
2. Select a product or service from the appropriate drop-down list and specify anyother related information.
The Technical Support product page appears.

Trend Micro InterScan Messaging Security Suite Installation Guide
6-8
3. Use the Search Support box to search for available solutions.
4. If no solution is found, click Submit a Support Case from the left navigation andadd any relevant details, or submit a support case here:
http://esupport.trendmicro.com/srf/SRFMain.aspx
A Trend Micro support engineer investigates the case and responds in 24 hours orless.
Contacting Technical SupportTrend Micro provides technical support, pattern downloads, and program updates forone year to all registered users. After one year, users must purchase renewalmaintenance. To get help or to submit feedback, feel free to contact Trend Micro anytime.
• Get a list of the worldwide support offices at:http://esupport.trendmicro.com
• Get the latest Trend Micro product documentation at:http://docs.trendmicro.com
In the United States, reach Trend Micro representatives by phone, fax, or email:
Address Trend Micro, Inc. 10101 North De Anza Blvd., Cupertino, CA 95014
Phone Toll free: +1 (800) 228-5651 (sales)
Voice: +1 (408) 257-1500 (main)
Fax +1 (408) 257-2003
Website http://www.trendmicro.com
Email address [email protected]
Speeding Up the Support Call
To improve problem resolution, have the following information available:

Troubleshooting and Support Information
6-9
• Steps to reproduce the problem
• Appliance or network information
• Computer brand, model, and any additional hardware connected to the endpoint
• Amount of memory and free hard disk space
• Operating system and service pack version
• Endpoint client version
• Serial number or activation code
• Detailed description of install environment
• Exact text of any error message received.
TrendLabsTrendLabs℠ is a global network of research, development, and action centers committedto 24x7 threat surveillance, attack prevention, and timely and seamless solutions delivery.Serving as the backbone of the Trend Micro service infrastructure, TrendLabs is staffedby a team of several hundred engineers and certified support personnel that provide awide range of product and technical support services.
TrendLabs monitors the worldwide threat landscape to deliver effective securitymeasures designed to detect, preempt, and eliminate attacks. The daily culmination ofthese efforts is shared with customers through frequent virus pattern file updates andscan engine refinements.
Learn more about TrendLabs at:
http://cloudsecurity.trendmicro.com/us/technology-innovation/experts/index.html#trendlabs
Security IntelligenceComprehensive security information is available at the Trend Micro website.
http://www.trendmicro.com/vinfo

Trend Micro InterScan Messaging Security Suite Installation Guide
6-10
Security information includes:
• List of malware and malicious mobile code currently active or "in the wild"
• Computer malware hoaxes
• Internet threat advisories
• Malware weekly report
• Threat Encyclopedia, which includes a comprehensive list of names and symptomsfor known malware, spam, malicious URLs, and known vulnerabilities, plus write-ups on web attacks and online trends.
Download CenterFrom time to time, Trend Micro may release a patch for a reported known issue or anupgrade that applies to a specific product or service. To find out whether any patchesare available, go to:
http://www.trendmicro.com/download/
If a patch has not been applied (patches are dated), open the Readme file to determinewhether it is relevant to your environment. The Readme file also contains installationinstructions.
Sending Suspicious Content to Trend MicroSeveral options are available for sending suspicious content to Trend Micro for furtheranalysis.
Email Reputation Services
Query the reputation of a specific IP address and nominate a message transfer agent forinclusion in the global approved list:
https://ers.trendmicro.com/
Refer to the following Knowledge Base entry to send message samples to Trend Micro:

Troubleshooting and Support Information
6-11
http://esupport.trendmicro.com/solution/en-us/1055473.aspx
File Reputation Services
Gather system information and submit suspicious file content to Trend Micro:
http://esupport.trendmicro.com/solution/en-us/1059565.aspx
Record the case number for tracking purposes.
Web Reputation Services
Query the safety rating and content type of a URL suspected of being a phishing site, orother so-called "disease vector" (the intentional source of Internet threats such asspyware and malware):
http://global.sitesafety.trendmicro.com/
If the assigned rating is incorrect, send a re-classification request to Trend Micro.


IN-1
IndexAabout IMSS, 1-2admin database
multiple, 5-15single, 5-13
Admin database, 3-7adware, 1-9Apache
Tomcat, 3-7Apache Web server, 3-8audience, xii
Bbacking up settings, 5-16browser requirements, 4-3
CCentralized Reporting, 2-12component and sub-module installation, 3-7Control Manager
see Trend Micro Control Manager, 1-11CPU requirements, 4-2
DDatabase
on Central Controller, 2-2dialers, 1-9disk space requirements, 4-3documentation, xii
EEmail reputation
about, 2-9types, 2-9
email threats
spam, 1-4unproductive messages, 1-4
End-User Quarantine, 2-11
Ffailover, 3-39FAQ
postfix, 6-2File Reputation Services, 1-14filtering, how it works, 1-6Firefox, 4-3
Hhacking tools, 1-10
IIMSS
about, 1-2imss.ini, 4-30IMSS 5.7, 5-5IMSS components
installation, 3-7IMSSMGR, 3-7installation
clustered, 3-33IP Filtering, 4-16IP Filtering, installation
EUQ, 3-38procedures, 4-12removing IMSS, 4-31scenarios, 3-25using Control Manager, 3-36verifying, 4-24
installingbefore a firewall, 3-13

Trend Micro InterScan Messaging Security Suite Installation Guide
IN-2
behind a firewall, 3-14in the DMZ, 3-16no firewall, 3-12on SMTP gateway, 3-15
Internet Explorer, 4-3InterScan Components
Admin database, 2-2Apache Web Server, 2-5Central Controller, 2-2EUQ components, 2-4EUQ primary and secondary services,2-4EUQ service, 2-4Policy services, 2-3Policy services synchronization, 2-4Scanner services, 2-2Struts Framework, 2-6Tomcat, 2-5
IP Filteringabout, 2-7installation, 4-16
IP Profilerabout, 2-7detects, 2-8how it works, 2-8
IPv6, 4-25, 4-27allowing clients, 4-28downstream, 4-28verify, 4-30
Jjoke program, 1-9
LLDAP server requirements, 4-4Linux Libraries requirements, 4-4
Mmaillog parser, 3-8mass mailing viruses
pattern, 1-5memory requirements, 4-2migrating
from IMSS 5.7, 5-33from IMSS 7.0, 5-35from IMSS 7.0 to 7.1 SP1, 5-40from IMSS 7.1 patch 3 to 7.1 SP1, 5-43to 7.1, 5-33to 7.1 SP1, 5-38
migrationrollback, 5-45
minimum requirements, 4-2MTA requirements, 4-4
Nnetwork topology, 3-12new features, viii
Oonline help, xii
Ppassword cracking applications, 1-10Postgre requirements, 4-4preparation
configuring IPv6, 4-26verifying IPv6, 4-26
Rreadme file, xiiiremote access tools, 1-10requirements, 4-2rolling back
to IMSS 5.7, 5-45to IMSS 7.0, 5-47
Index
IN-3
rolling back the migration, 5-45
Ssecurity risks
spyware/grayware, 1-9server platform compatibility requirements,4-4settings
backup, 5-16Smart Protection, 1-14Smart Protection Network, 1-16spyware/grayware, 1-9
adware, 1-9dialers, 1-9entering the network, 1-10hacking tools, 1-10joke program, 1-9password cracking applications, 1-10remote access tools, 1-10risks and threats, 1-10
supportknowledge base, 6-7resolve issues faster, 6-8technical support, 6-8TrendLabs, 6-9
swap space requirements, 4-3system requirements, 4-2
Ttechnical support, 6-8Tomcat, 3-7, 3-8TrendLabs, 6-9Trend Micro Control Manager, 1-11
agent, 1-11server, 1-11
troubleshooting, 6-2ERS, 6-2
Uuninstallation, 4-30, 4-31upgrade options
multiple scanner, 5-13upgrading
IMSS 5.7, 5-4merging policies objects, 5-7modifying policy objects, 5-7policy recommendations, 5-6process recommendations, 5-7remove unused policy objects, 5-6
IMSS 7.0, 5-24install over IMSS 5.7, 5-20
Vverifying the installation, 4-24version 5.7, 5-5
WWeb Reputation Services, 1-15what’s new, viii