Trend Micro Incorporated reserves the right to make...
105
Transcript of Trend Micro Incorporated reserves the right to make...


Trend Micro Incorporated reserves the right to make changes to this document and to the products described herein without notice. Before installing and using the software, please review the readme files, release notes, and the latest version of the applicable user documentation, which are available from the Trend Micro Web site at:
http://www.trendmicro.com/download
Trend Micro, the Trend Micro logo, OfficeScan, and TrendLabs are trademarks or registered trademarks of Trend Micro, Incorporated. All other product or company names may be trademarks or registered trademarks of their owners.
Copyright© 2004-2011 Trend Micro Incorporated. All rights reserved.
Release Date: September 2011
Document Part No.: TSEM74851/110520

The user documentation for Trend Micro™ Mobile Security is intended to introduce the main features of the software and installation instructions for your production environment. You should read through it prior to installing or using the software.
Detailed information about how to use specific features within the software are available in the online help file and the online Knowledge Base at Trend Micro’s Web site.
Trend Micro is always seeking to improve its documentation. Your feedback is always welcome. Please evaluate this documentation on the following site:
http://www.trendmicro.com/download/documentation/rating.asp

Contents
Contents
Preface
Audience ........................................................................................................ 1-viii
Mobile Security Documentation .............................................................. 1-viii
Document Conventions ............................................................................... 1-ix
Chapter 1: Introduction
Understanding Mobile Threats ..................................................................... 1-2
About Trend Micro Mobile Security v7.1 ................................................... 1-2
Mobile Security Components ........................................................................ 1-3Basic Security Model (Single Server Installation) ............................. 1-4Enhanced Security Model (Dual Server Installation) ...................... 1-5Master Server ......................................................................................... 1-5Policy Server .......................................................................................... 1-6SMS Sender ............................................................................................ 1-6Mobile Device Agent ............................................................................ 1-6
What's New in This Release (v7.1) ............................................................... 1-7
What's New in This Release (v7.0) ............................................................... 1-7Support for Android Mobile Devices ................................................ 1-7Call Filtering Policies ............................................................................ 1-7Updated Feature Locking .................................................................... 1-7Locate Remote Device ......................................................................... 1-8Updated Architecture ........................................................................... 1-8
What's New in This Release (v5.5) ............................................................... 1-8Data Encryption Support .................................................................... 1-8Increased Server Scalability ................................................................. 1-8Full Support for Symbian S60 devices ............................................... 1-8Updated Architecture ........................................................................... 1-8
What’s New in This Release (v5.1) .............................................................. 1-9Data Encryption Support .................................................................... 1-9
1-1

Trend Micro™ Mobile Security for Enterprise v7.0 Administrator’s Guide
Feature Locking .....................................................................................1-9SMS Sender Status .................................................................................1-9SMS Anti-Spam Policy ..........................................................................1-9WAP-Push Protection Policy ..............................................................1-9Enable Uninstall Protection .................................................................1-9On-Demand Remote Wipe ................................................................1-10Monitoring SMS Senders ....................................................................1-10Updated Summary Screen ..................................................................1-10
What’s New in This Release (v5.0 SP1) .....................................................1-10Fully Qualified Domain Names ........................................................1-10SD card Data Recovery Tool .............................................................1-10Event Log .............................................................................................1-10Malware scan performance on Windows Mobile platform ..........1-11
What’s New in This Release (v5.0) .............................................................1-11Mobile Security Management Module (MSMM) ............................1-11Authentication ......................................................................................1-11Granular Password Settings ...............................................................1-11Data Encryption ..................................................................................1-11Policy Management .............................................................................1-12Service Load (SL) and SMS Messaging ............................................1-12
Main Mobile Device Agent Features ..........................................................1-13Anti-Malware Scanning .......................................................................1-13Firewall ..................................................................................................1-13Web Security ........................................................................................1-13SMS Anti-Spam ...................................................................................1-13Call Filtering .........................................................................................1-14WAP-Push Protection ........................................................................1-14Authentication ......................................................................................1-14Data Encryption ..................................................................................1-15Regular Updates ...................................................................................1-15Logs .......................................................................................................1-15
Supported Features .......................................................................................1-16
Chapter 2: Getting Started with Mobile Security
Accessing Mobile Security Management Console ......................................2-2
1-2

Contents
Summary Information .................................................................................... 2-2
Product License ............................................................................................... 2-3
Administration Settings .................................................................................. 2-5Configuring Active Directory (AD) Settings ......................................... 2-5Configuring Database Settings ................................................................. 2-5Configuring Policy Server Settings .......................................................... 2-5
Chapter 3: Managing Mobile Devices
Mobile Security Domains .............................................................................. 3-2Basic Mobile Device Agent Search ......................................................... 3-3Advanced Mobile Device Agent Search ................................................. 3-3Device Tree View Options ....................................................................... 3-4
Mobile Device Status ...................................................................................... 3-4
Mobile Device Agent Tasks .......................................................................... 3-5Mobile Device Agent Provisioning ......................................................... 3-5Lost Device Protection ............................................................................. 3-6Remote Device Unlock ............................................................................. 3-7
Security Policies ............................................................................................... 3-7
Logs ................................................................................................................... 3-8
Device Tree Management .............................................................................. 3-8
Chapter 4: Protecting Devices with Policies
About Security Policies .................................................................................. 4-2
General Policies ............................................................................................... 4-3User Privileges ............................................................................................ 4-3Update Settings .......................................................................................... 4-4Log Settings ................................................................................................ 4-4Notification Settings .................................................................................. 4-4
Threat Protection Policies ............................................................................. 4-5Scan Types ............................................................................................ 4-5
Spam Prevention Policy ................................................................................. 4-6.................................................................Spam SMS Prevention Policies 4-6
1-3

Trend Micro™ Mobile Security for Enterprise v7.0 Administrator’s Guide
Spam WAP-Push Prevention Policies .....................................................4-7
Call Filtering Policies ......................................................................................4-7
Firewall Policies ...............................................................................................4-8
Application Control Policies ........................................................................4-10
Encryption and Password Policies .............................................................4-10Password Settings and Password Security ............................................4-10Encryption Settings ..................................................................................4-13
Feature Lock Policy ......................................................................................4-14Supported Features/Components .........................................................4-15
Configuring Components Availability ..............................................4-16
Chapter 5: Updating Components
About Component Updates ..........................................................................5-2
Server Update ...................................................................................................5-2Manual Server Update ...............................................................................5-2Scheduled Server Update ..........................................................................5-3Specifying a Download Source .................................................................5-6
Device Update .................................................................................................5-7Types of Updates ........................................................................................5-7
Manually Updating a local AU server ...........................................................5-9
Chapter 6: Viewing and Maintaining Logs
About Mobile Device Agent Logs ................................................................6-2
Viewing Mobile Device Agent Logs ............................................................6-2
Event Log Messages .......................................................................................6-3
Log Maintenance .............................................................................................6-4
Log Deletion ....................................................................................................6-5
Chapter 7: Using Notifications
About Notification Messages ........................................................................7-2
1-4

Contents
Configuring Notification Settings ................................................................ 7-2Configuring Email Notifications ............................................................. 7-2Configuring SMS Sender ........................................................................... 7-2
SMS Sender List .................................................................................... 7-3Configuring SMS Sender List .............................................................. 7-3SMS Sender Status ................................................................................ 7-4Administrator Notification .................................................................. 7-5User Notification .................................................................................. 7-6
Chapter 8: Data Recovery Tool
Installing the Data Recovery Tool ............................................................... 8-2
Using the Data Recovery Tool ..................................................................... 8-5
Chapter 9: Troubleshooting and Contacting Technical Support
Troubleshooting .............................................................................................. 9-2
Before Contacting Technical Support ......................................................... 9-7
Contacting Technical Support ...................................................................... 9-7
Sending Infected Files to Trend Micro ....................................................... 9-8
TrendLabs ........................................................................................................ 9-8
About Software Updates ............................................................................... 9-9Known Issues .......................................................................................... 9-10
Other Useful Resources ............................................................................... 9-10
About Trend Micro ...................................................................................... 9-11
1-5

Trend Micro™ Mobile Security for Enterprise v7.0 Administrator’s Guide
1-6

Preface
Preface
Welcome to the Trend Micro™ Mobile Security for Enterprise version 7.1 Administrator’s Guide. This guide provides detailed information about all Mobile Security configuration options. Topics include how to update your software to keep protection current against the latest security risks, how to configure and use policies to support your security objectives, configuring scanning, synchronizing policies on mobile devices, and using logs and reports.
This preface discusses the following topics:
• Audience on page viii
• Mobile Security Documentation on page viii
• Document Conventions on page ix
vii

Trend Micro™ Mobile Security for Enterprise v7.1 Administrator’s Guide
AudienceThe Mobile Security documentation is intended for both administrators—who are responsible for administering and managing Mobile Device Agents in enterprise environments—and mobile device users.
Administrators should have an intermediate to advanced knowledge of Windows system administration and mobile device policies, including:
• Installing and configuring Windows servers
• Installing software on Windows servers
• Configuring and managing mobile devices (such as smartphones and Pocket PC/Pocket PC Phone)
• Network concepts (such as IP address, netmask, topology, and LAN settings)
• Various network topologies
• Network devices and their administration
• Network configurations (such as the use of VLAN, HTTP, and HTTPS)
Mobile Security Documentation The Mobile Security documentation consists of the following:
• Installation and Deployment Guide—this guide helps you get “up and running” by introducing Mobile Security, and assisting with network planning and installation.
• Administrator’s Guide—this guide provides detailed Mobile Security configuration policies and technologies.
• User’s Guide—this guide introduces users to basic Mobile Security concepts and provides Mobile Security configuration instructions on their mobile devices.
• Online help—the purpose of online help is to provide “how to’s” for the main product tasks, usage advice, and field-specific information such as valid parameter ranges and optimal values.
• Readme—the Readme contains late-breaking product information that is not found in the online or printed documentation. Topics include a description of new features, installation tips, known issues, and release history.
viii

Preface
• Knowledge Base— the Knowledge Base is an online database of problem-solving and troubleshooting information. It provides the latest information about known product issues. To access the Knowledge Base, open:
http://esupport.trendmicro.com/
Tip: Trend Micro recommends checking the corresponding link from the Update Center (http://www.trendmicro.com/download) for updates to the product documentation.
Document ConventionsTo help you locate and interpret information easily, the documentation uses the following conventions.
Convention Description
ALL CAPITALS Acronyms, abbreviations, and names of certain com-mands and keys on the keyboard
Bold Menus and menu commands, command buttons, tabs, options, and tasks
Italics References to other documentation
Monospace Example, sample command line, program code, Web URL, file name, and program output
Link Cross-references or hyperlinks.
ix

Trend Micro™ Mobile Security for Enterprise v7.1 Administrator’s Guide
Note:Configuration notes
Tip: Recommendations
WARNING! Reminders on actions or configurations that should be avoided
Convention Description
x

Chapter 1
Introduction
Trend Micro™ Mobile Security for Enterprise v7.1 is an integrated security solution for your mobile devices. Read this chapter to understand Mobile Security features and how they protect your mobile devices.
This chapter includes the following sections:
• Understanding Mobile Threats on page 1-2
• About Trend Micro Mobile Security v7.1 on page 1-2
• Mobile Security Components on page 1-3
• What's New in This Release (v7.1) on page 1-7
• Main Mobile Device Agent Features on page 1-13
• Supported Features on page 1-16
• Supported Features on page 1-16
1-1

Trend Micro™ Mobile Security for Enterprise v7.1 Administrator’s Guide
Understanding Mobile ThreatsWith the standardization of platforms and their increasing connectivity, mobile devices are susceptible to an increasing number of threats. The number of malware programs that run on mobile platforms is growing and more spam messages are sent through SMS. New sources of content, such as WAP and WAP-Push are also used to deliver unwanted material.
In addition to threats posed by malware, spam and other undesirable content, mobile devices are susceptible to hacking and Denial of Service (DoS) attacks. Mobile devices, many of which now have the same network connectivity traditionally associated only with larger computing devices like notebook computers and desktops, are now targets for these attacks.
Additionally, the theft of mobile devices may lead to the compromise of personal or sensitive data.
About Trend Micro Mobile Security v7.1Trend Micro™ Mobile Security for Enterprise v7.1 is a comprehensive security solution for your mobile devices. Mobile Security incorporates the Trend Micro anti-malware technologies to effectively defend against the latest threats to mobile devices.
The integrated firewall and filtering functions enable Mobile Security to block unwanted network communication to mobile devices. Some of these unwanted network communications include: SMS messages, WAP push mails and data received through 3G/GPRS connections.
This version of Mobile Security supports OfficeScan™ integration, which offers centralized device management, automatic configuration policies and component updates. Additionally, Mobile Security comes with a universal Encryption Module that provides logon password protection and data encryption features for mobile devices. This Encryption Module helps prevent data from being compromised if a mobile device is lost or stolen.
1-2

Introduction
WARNING! Trend Micro cannot guarantee compatibility between Mobile Security and file system encryption software. Software products that offer similar features, like anti-malware scanning, SMS management and firewall pro-tection may be incompatible with Mobile Security.
Mobile Security ComponentsThis section describes each Mobile Security component in a typical network environment including: component installation and how it interfaces with other components. Depending on your network topology and needs, you may install optional components.
Mobile Security for Enterprise 7.1 consists of the following four components:
• Master Server
• Policy server
• SMS Senders (optional)
• Mobile Device Agent (MDA)
Depending on your company needs, you can implement Mobile Security with different client-server communication methods. You can also choose to set up one or any combination of client-server communication methods in your network.
Trend Micro Mobile Security supports two different models of deployment:
• Basic Security Model (Single Server Installation)
• Enhanced Security Model (Dual Server Installation)
1-3

Trend Micro™ Mobile Security for Enterprise v7.1 Administrator’s Guide
Basic Security Model (Single Server Installation)The Basic Security Model supports the installation of Policy Server and Master Server on the same computer. Figure 1-1 shows where each Mobile Security component resides in a typical Basic Security Model.
FIGURE 1-1. Basic Security Model
1-4

Introduction
Enhanced Security Model (Dual Server Installation)The Enhanced Security Model supports the installation of Policy Server and Master Server on two different server computers. Figure 1-2 shows where each Mobile Security component resides in a typical Enhanced Security Model.
Note: Trend Micro strongly recommends deploying the Enhanced Security Model on two server computers. This model provides maximum security.
FIGURE 1-2. Enhanced Security Model
Master ServerThe Master Server is a plug-in program that enables you to control Mobile Device Agents from the OfficeScan Web console. Once mobile devices are registered, you can configure Mobile Device Agent policies and perform updates.
1-5
Trend Micro™ Mobile Security for Enterprise v7.1 Administrator’s Guide
Policy ServerThe Policy Server handles communications between the Master Server and Mobile Device Agents. The Policy Server allows the Master Server to manage Mobile Device Agents outside the corporate intranet. Mobile Device Agents can connect to the public IP address of the Policy Server.
You can use the OfficeScan Web console to configure policies for the Policy Server.
SMS SenderSMS senders are designated mobile devices connected to the Policy Server over WLAN connections or ActiveSync (version 4.0 or above). An SMS sender receives commands from server and relays them to mobile devices via SMS text messages.
SMS text messages may be used to notify mobile devices to:
• download and install Mobile Device Agent
• register Mobile Device Agent to the Mobile Security server
• update the Mobile Device Agent components from the Mobile Security server
• wipe, lock or locate the remote mobile device
• synchronize policies with the Mobile Security server
Mobile Device AgentInstall the Mobile Device Agent on supported platforms using one of the installation methods—SMS message notification, email notification, memory card and manual installation. The Mobile Device Agent provides seamless protection against malware, unwanted SMS/WAP-Push messages or network traffic. Users will enjoy the benefits of real-time scanning, firewall protection and data encryption when sending/receiving messages and opening files on the mobile devices.
1-6

Introduction
What's New in This Release (v7.1)This section describes additional features that come with Mobile Security for Enterprise v7.1.
Support for iOS and Blackberry Mobile Devices
Mobile Security v7.1 added support for iOS and Blackberry mobile devices.
Integrated with Active Directory
Mobile Security v7.1 leverages the corporate’s Active Directory (AD) for importing users and for performing user authentication.
Updated Architecture
In Mobile Security for Enterprise v7.1, single and dual server deployment models are introduced. SMS Gateway is also removed in v7.1.
Provisioning policy
Mobile Security v7.1 introduces the provisioning policy for mobile devices.
What's New in This Release (v7.0)This section describes additional features that come with Mobile Security for Enterprise v7.0.
Support for Android Mobile DevicesMobile Security v7.0 added support for Android v2.1 or above mobile devices.
Call Filtering PoliciesEnables the administrator to control the incoming or outgoing calls on Android mobile devices.
Updated Feature LockingEnables the administrator to control the availability of certain components for Android mobile devices that are within the range of certain access point(s).
1-7

Trend Micro™ Mobile Security for Enterprise v7.1 Administrator’s Guide
Locate Remote DeviceEnables the administrator to locate the remote device through the wireless network or by using mobile device’s GPS and displaying its location on Google Maps. This new feature helps locate the lost, stolen or misplaced mobile devices.
Updated ArchitectureIn Mobile Security for Enterprise v7.0, SMS Gateway is added as an alternate to SMS Sender to send SMS messages to mobile devices.
What's New in This Release (v5.5)This section describes additional features that come with Mobile Security for Enterprise v5.5.
Data Encryption SupportThe support for Windows Mobile devices is included in version 5.5. The data encryption module is not device-dependent, and can support all Windows Mobile devices.
Increased Server ScalabilityThe server scalability is increased to support up to 5000 devices with concurrent connections
Full Support for Symbian S60 devicesMobile Security version 5.5 fully support Symbian S60 5th edition mobile devices. However, the encryption module support is not available for Symbian mobile devices.
Updated ArchitectureIn Mobile Security for Enterprise v5.5, the SMS sender is able to connect with the MSMM or MSCM server.
1-8

Introduction
What’s New in This Release (v5.1)This section describes additional features that come with Mobile Security for Enterprise v5.1.
Data Encryption Support Mobile Device Agent provides dynamic data encryption for data stored both on the internal storage and inserted memory cards. You can specify the type of data to be encrypted and which encryption algorithm to use.
Feature LockingEnables the administrator to control the availability of certain components for Windows mobile devices.
SMS Sender StatusThe SMS Sender Status appears on the SMS Sender mobile device. Refer to SMS Sender Status on page 7-4 for more information.
SMS Anti-Spam PolicyEnables the administrator to control the SMS Anti-Spam Policy both globally and by domain. Refer to SMS Anti-Spam on page 1-13.
WAP-Push Protection PolicyPrevious versions provided only for end-users to control WAP push protection. This release now enables both the administrator and end-user to control WAP push protection. Refer to WAP-Push Protection on page 1-14
Enable Uninstall ProtectionPrevious versions allowed users to uninstall the Mobile Device Agent without the knowledge of administrators; a function that may violate the company's security policy. This release enables the administrator to restrict uninstalling the Agent by securing the uninstaller with a password.
1-9

Trend Micro™ Mobile Security for Enterprise v7.1 Administrator’s Guide
On-Demand Remote Wipe This feature will remotely clear the hard disk and SD card if present. This new feature helps ensure the security of the data for lost, stolen or misplaced mobile devices.
Monitoring SMS SendersIn this version, if an SMS sender is disconnected for a few minutes, an email message is sent to the administrators. Refer to Monitoring SMS Senders on page 7-5 for more information.
Updated Summary Screen The Summary screen now also displays:
• The total number of registered and unregistered mobile devices managed by Mobile Security
• Updated server and component update status
What’s New in This Release (v5.0 SP1)This section describes additional features that come with Mobile Security for Enterprise v5.0, Service Pack 1.
Fully Qualified Domain NamesTrend Micro Mobile Security now supports Fully Qualified Domain Names (FQDN) in addition to IP addresses.
SD card Data Recovery ToolThe Data Recovery Tool is a GUI application that enables an administrator to decrypt files that had been encrypted by the encryption module in Mobile Security 5.0.
Event LogIn addition to Malware, Encryption and Firewall logs, Mobile Security now includes event logs which list normal events in addition to errors.
1-10

Introduction
Malware scan performance on Windows Mobile platformSignificant speed improvements in scanning on the Windows Mobile platform.
What’s New in This Release (v5.0)This section describes additional features that come with Mobile Security for Enterprise v5.0.
Mobile Security Management Module (MSMM)This version of Mobile Security comes with MSMM, which is a plug-in program installed and managed on the OfficeScan server. MSMM provides greater flexibility in managing Mobile Device Agents. MSMM enables you to manage Mobile Device Agents from a central location and deploy policies and security policies to groups of Mobile Device Agents. You may also view consolidated mobile device status and logs in the Mobile Security Management Module.
AuthenticationAfter installing the Mobile Device Agent a mobile device is associated with a user. The user must type a password (also known as the power-on password) to log on to the mobile device. To access additional Mobile Device Agent features on mobile devices, you must provide the administrator password.
Granular Password SettingsTo enhance security, you can specify parameters for both the power-on password that users type and the administrator password. These parameters include the password type (numeric or alphanumeric), password complexity, minimum password length, expiry date, timeout period and number of password attempts.
Data EncryptionMobile Device Agent provides dynamic data encryption for data stored both on the internal storage on Windows Mobile devices and inserted memory cards. You can specify the type of data to be encrypted and which encryption algorithm to use.
1-11

Trend Micro™ Mobile Security for Enterprise v7.1 Administrator’s Guide
Policy ManagementSetting up a consistent security policy for all mobile devices is a standard procedure in securing data in a network. You can configure a global security policy that all mobile devices use or a security policy for each Mobile Security domain. After configuring a security policy that contains password, data encryption and firewall policies, you can configure Mobile Security Management Module to notify Mobile Device Agents to update policy settings.
Service Load (SL) and SMS Messaging Also new in Mobile Security for Enterprise v5.0 is the instant phone message notification capabilities for Mobile Device Agent installation, registration, component updates and configuration synchronization. The SMS Sender sends the following notification messages to mobile devices:
• SL message (also known as WAP-Push)—message to notify mobile devices to download the setup package and install Mobile Device Agent.
• Installation SMS message—instructs users to download the setup package and install Mobile Device Agent.
• Registration SMS message—notifies Mobile Device Agent to register to the Mobile Security Management Module. After the registration is completed successfully, this SMS message is automatically removed from the inbox on a mobile device.
• Update SMS message—notifies Mobile Device Agent to update components or synchronize security policies with the Mobile Security Management Module.
Note: You should warn the users not to delete the registration SMS message from the inbox on their mobile devices. If they accidentally delete the message, you can configure the Mobile Security Management Module to send the registration SMS message again (refer to Mobile Device Agent Provisioning on page 3-5) or manually register on the mobile devices (refer to the Installation and Deployment Guide or the User’s Guide for the mobile device platform).
1-12

Introduction
Main Mobile Device Agent Features
Anti-Malware ScanningMobile Security incorporates Trend Micro’s anti-malware technology to effectively detect threats to prevent attackers from taking advantage of vulnerabilities on mobile devices. Mobile Security is specially designed to scan for mobile threats and enables you to quarantine and delete infected files.
FirewallMobile Security includes the Trend Micro firewall module, which comes with predefined security levels to filter network traffic. You can also define your own filtering rules and filter network traffic from specific IP addresses and on specific ports. The Intrusion Detection System (IDS) enables you to block attempts to continually send multiple packets to mobile devices. Such attempts typically constitute a Denial of Service (DoS) attack and can render your mobile device too busy to accept other connections.
Web SecurityAs technology increases for mobile devices, the sophistication of mobile threats is also increasing. Trend Micro Mobile Security provides Web Reputation and Parental Controls to protect your mobile device from unsafe Web sites and the Web sites that may contain objectionable material for children, teenagers and other family members. You can modify your Web Reputation and Parental Controls setting levels as per your desired settings. Mobile Security also maintains the log of the Web sites that were blocked by Web Reputation or Parental Controls in their specific logs.
SMS Anti-SpamMobile devices often receive unwanted messages or spam through SMS messaging. To filter unwanted SMS messages into a spam folder, you can specify the phone numbers from which all SMS messages will be considered spam or you can specify a list of approved phone numbers and configure Mobile Security to filter all messages from senders that are not in the approved list. You can also filter unidentified SMS messages or messages without sender numbers. Your mobile device will automatically store these messages to the spam folder in your inbox.
1-13

Trend Micro™ Mobile Security for Enterprise v7.1 Administrator’s Guide
Note: The SMS Anti-Spam feature is not available on mobile devices without phone capabilities.
Call FilteringMobile Security enables you to filter incoming or outgoing calls from the server. You can configure Mobile Security to block incoming calls from certain phone numbers or you can specify a list of approved phone numbers to which the calls may be made from the mobile device. Mobile Security also enables mobile device users to specify their own Blocked or Approved list to filter unwanted incoming calls.
Note: The Call Filtering feature is not available on mobile devices without phone capabilities.
WAP-Push ProtectionWAP-Push is a powerful method of delivering content to mobile devices automatically. To initiate the delivery of content, special messages called WAP-Push messages are sent to users. These messages typically contain information about the content and serve as a method by which users can accept or refuse the content.
Malicious users have been known to send out inaccurate or uninformative WAP-Push messages to trick users into accepting content that can include unwanted applications, system settings, and even malware. Mobile Security lets you use a list of trusted senders to filter WAP-Push messages and prevent unwanted content from reaching mobile devices.
Note: The WAP-Push protection feature is not available on mobile devices without phone capabilities.
AuthenticationAfter installing the Mobile Device Agent a mobile device is associated with a user. The user must type a password (also known as the power-on password) to log on to the mobile device.
1-14

Introduction
Data EncryptionMobile Security provides dynamic data encryption for data stored on mobile devices and memory cards. You can specify the type of data to be encrypted and the encryption algorithm to use.
Regular UpdatesTo protect against the most current threats, you can either update Mobile Security manually or configure it to update automatically. Updates include component updates and Mobile Security program patch updates.
LogsThe following Mobile Device Agent logs are available on the Master Server:
• threat protection log
• encryption log
• firewall log
• event log
You can view the following logs on mobile devices:
• Windows Mobile and Symbian:
• virus/malware logs
• firewall logs
• SMS anti-spam logs
• WAP Push protection logs
• Task logs
• Android:
• malware logs
• Web security logs
• Blocked Message logs
• Call filtering logs
• System logs
1-15

Trend Micro™ Mobile Security for Enterprise v7.1 Administrator’s Guide
Supported FeaturesThe following table shows the list of features that Trend Micro Mobile Security supports per platform:
PO
LIC
Y
FE
AT
UR
ES
SE
TT
ING
S
IOS
AN
DR
OID
BL
AC
KB
ER
RY
WIN
DO
WS
MO
BIL
E
SY
MB
IAN
Pro
visi
on
ing Wi-Fi Wi-Fi configuration
Exchange Active-Sync
Exchange ActiveSync configuration
VPN VPN configuration
TABLE 1-1. Trend Micro Mobile Security 7.1 Feature Matrix
1-16

Introduction
De
vice
Se
curi
ty
Threat Protection Real-time scan
Card scan
Spam Prevention Server-side control
Use blocked list
Use approved list
WAP Push Protec-tion
Server-side control
Use approved list
Call Filtering Server-side control
Use blocked list
Use approved list
Firewall Enable firewall
Enable Intrusion Detec-tion System (IDS)
PO
LIC
Y
FE
AT
UR
ES
SE
TT
ING
S
IOS
AN
DR
OID
BL
AC
KB
ER
RY
WIN
DO
WS
MO
BIL
E
SY
MB
IAN
TABLE 1-1. Trend Micro Mobile Security 7.1 Feature Matrix
1-17

Trend Micro™ Mobile Security for Enterprise v7.1 Administrator’s Guide
Da
ta P
rote
ctio
n
Password Settings Use Password for login
Admin password
Allow simple password
Require alphanumeric password
Minimum password length
Password expiration
Password history
Auto-lock
Password failure action
Encryption Encrypt PIM
Encrypt documents
Encrypt memory cards
PO
LIC
Y
FE
AT
UR
ES
SE
TT
ING
S
IOS
AN
DR
OID
BL
AC
KB
ER
RY
WIN
DO
WS
MO
BIL
E
SY
MB
IAN
TABLE 1-1. Trend Micro Mobile Security 7.1 Feature Matrix
1-18

Introduction
Da
ta P
rote
ctio
n
Enable/Disable Device components
Restrict Camera
Restrict screen capture
Restrict apps installa-tion
Restrict sync while roaming
Restrict voice dialing
Restrict in-app pur-chase
Restrict multiplayer gaming
Restrict adding game center friends
Force encrypted back-ups
Restrict explicit music & podcast
Restrict bluetooth
PO
LIC
Y
FE
AT
UR
ES
SE
TT
ING
S
IOS
AN
DR
OID
BL
AC
KB
ER
RY
WIN
DO
WS
MO
BIL
E
SY
MB
IAN
TABLE 1-1. Trend Micro Mobile Security 7.1 Feature Matrix
1-19

Trend Micro™ Mobile Security for Enterprise v7.1 Administrator’s Guide
Da
ta P
rote
ctio
n
Enable/Disable Device components
Restrict infrared
Restrict USB storage
Restrict WLAN/WI-FI
Restrict serial
Restrict speaker/speak-erphone/microphone
restrict Microsoft ActiveSync
Restrict MMS/SMS
Restrict memory cards
Restrict GPS
Re
mo
te c
on
tro
l
Register
Update
Anti-theft Remote locate
Remote lock
Remote wipe
Reset password
PO
LIC
Y
FE
AT
UR
ES
SE
TT
ING
S
IOS
AN
DR
OID
BL
AC
KB
ER
RY
WIN
DO
WS
MO
BIL
E
SY
MB
IAN
TABLE 1-1. Trend Micro Mobile Security 7.1 Feature Matrix
1-20

Chapter 2
Getting Started with Mobile Security
This chapter helps you start using Mobile Security and provides you the basic usage instructions. Before you proceed, be sure to install the Master Server, Policy Server, and the Mobile Device Agent on mobile devices.
The chapter includes the following sections:
• Accessing Mobile Security Management Console on page 2-2
• Summary Information on page 2-2
• Product License on page 2-3
2-1

Trend Micro™ Mobile Security for Enterprise v7.1 Administrator’s Guide
Accessing Mobile Security Management Console
You can access the configuration screens through the OfficeScan Web console.
The Web console is the central point for managing and monitoring Mobile Security throughout your corporate network. The console comes with a set of default settings and values that you can configure based on your security requirements and specifications.
You can use the Web console to do the following:
• Manage Mobile Device Agents installed on mobile devices
• Configure security policies for Mobile Device Agents
• Configure scan settings on a single or multiple mobile devices
• Group devices into logical domains for easy configuration and management
• View registration and update information
To access the management console for Mobile Security:
1. Log on to the OfficeScan Web console and click Plug-in Manager.
2. Click Manage Program for Mobile Security.
Summary InformationThe Summary screen displays first when you access the Master Server. This screen provides an overview of the mobile device registration status and component details.
In the Summary screen, you can:
• View product registration status or click View license upgrade instructions to renew your product license
• View the total number of registered and unregistered mobile devices managed by Mobile Security.
A mobile device may remain unregistered if one of the following happens:
• a connection to the Policy Server is unsuccessful
• the mobile device user has deleted the registration SMS message
• the SMS message containing the registration information is lost on transit
2-2

Getting Started with Mobile Security
• View mobile devices’ status:
• Healthy—shows that the device is registered with the Mobile Security server and the components and policies on the mobile device are up-to-date.
• Unhealthy—shows that the device is registered with the Mobile Security server, but either the components or the polices are out-of-date.
• Unregistered—shows that the device is not yet registered with the Mobile Security server.
• View mobile device program patch and component update status:
• Current Version—the current version number of the Mobile Device Agent or components on the Mobile Security server
• Up-to-date—the number of mobile device with updated Mobile Device Agent version or component
• Out-of-date—the number of mobile devices that are using an out-of-date component
• Update Rate—the percentage of mobile devices using the latest component version
• Upgraded—the number of mobile devices using the latest Mobile Device Agent version
• Not Upgraded— the number of mobile devices that have not upgraded to use the latest Mobile Device Agent version
• Upgrade Rate—the percentage of mobile devices using the latest Mobile Device Agent
• View server update status:
• Server—the name of the module
• Address—the domain name or IP address of the machine hosting the module
• Current Version—the current version number of the Mobile Security server modules
• Last Updated—the time and date of the last update
Product LicenseThe type of Activation Code (also known as serial number) you purchase for the Mobile Security server determines which features are available and when those features expire.
2-3

Trend Micro™ Mobile Security for Enterprise v7.1 Administrator’s Guide
FIGURE 2-1. Product License
There are two license types: Standard Edition and Advanced Edition. The Standard Edition license activates provisioning, general, anti-malware, anti-spam, call filtering, firewall and app control policies. The Advanced Edition license activates the same features as the Standard Edition license, but also activates: Encryption and Password, Feature Locking, Locate Remote Device, On-Demand Remote Wipe features and On-Demand Remote Lock.
After the Evaluation version license expires, all program features will be disabled. Additionally, all encrypted data on mobile devices and inserted memory cards will be decrypted. A Full license version enables you to continue using all features, even after the license expires. It’s important to note however, that the Mobile Device Agent will be unable to obtain updates from the server, making anti-malware components susceptible to the latest security risks.
If your license expires, you will need to register the Mobile Security server with a new Activation Code. Consult your local Trend Micro sales representative for more information.
To download updates and allow remote management, Mobile Device Agents must register to the Mobile Security server. For instructions to manually register Mobile Device Agents on mobile devices, refer to the Installation and Deployment Guide or the User’s Guide for the mobile device platform.
To view license upgrade instructions for Mobile Security Management Module on the Master Server, click the View license upgrade instructions link in Mobile Security Product License screen.
2-4

Getting Started with Mobile Security
Administration Settings
Configuring Active Directory (AD) SettingsTrend Micro Mobile Security 7.1 enables you to configure user authorization based on the Active Directory (AD). You can also add mobile devices to the device list using your AD. Refer to Initial Server Setup in the Installation and Deployment Guide for the detail configuration steps.
Configuring Database SettingsRefer to Initial Server Setup in the Installation and Deployment Guide for the detail configuration steps.
Configuring Policy Server SettingsRefer to Initial Server Setup in the Installation and Deployment Guide for the detail configuration steps.
2-5

Trend Micro™ Mobile Security for Enterprise v7.1 Administrator’s Guide
2-6

Chapter 3
Managing Mobile Devices
This chapter helps you start using Mobile Security. It provides basic setup and usage instructions. Before you proceed, be sure to install the Master Server, Policy Server, and the Mobile Device Agent on mobile devices.
The chapter includes the following sections:
• Mobile Security Domains on page 3-2
• Mobile Device Agent Tasks starting on page 3-5
• Mobile Device Agent Provisioning starting on page 3-5
• Lost Device Protection starting on page 3-6
• Remote Device Unlock starting on page 3-7
• Security Policies starting on page 3-7
• Logs starting on page 3-8
• Device Tree Management on page 3-8
3-1

Trend Micro™ Mobile Security for Enterprise v7.1 Administrator’s Guide
Mobile Security DomainsSimilar to OfficeScan, a domain in Mobile Security is a group of Mobile Device Agents that share the same settings and run the same tasks. By grouping your Mobile Device Agents into domains, you can simultaneously configure, manage and apply the same settings to all domain members.
To configure Mobile Security domains, click Device Management.
The Device Management screen enables you to perform tasks related to the settings, organization or searching of Mobile Device Agents. The toolbar above the device tree viewer lets you perform the following tasks:
• search for and display Mobile Device Agent status
• on-demand Mobile Device Agent component update, registration, wipe/lock/locate remote device, and sync configuration
• rename Mobile Device Agents
• configure the following domain-specific policies: general policy, threat protection policy, spam prevention policy, call filtering policy, firewall policy, SMS anti-spam policy, call filtering policy, app control policy, encryption and password policy and feature lock policy. (See About Security Policies on page 4-2.)
• view Mobile Device Agent Threat Protection Log, Firewall Log, Encryption Log and Event Log
• configure the device tree (such as creating, deleting, or renaming domains and creating or deleting Mobile Device Agents)
• export data for further analysis or backup
The following table describes the icons in the device tree to indicate the update status for mobile devices:
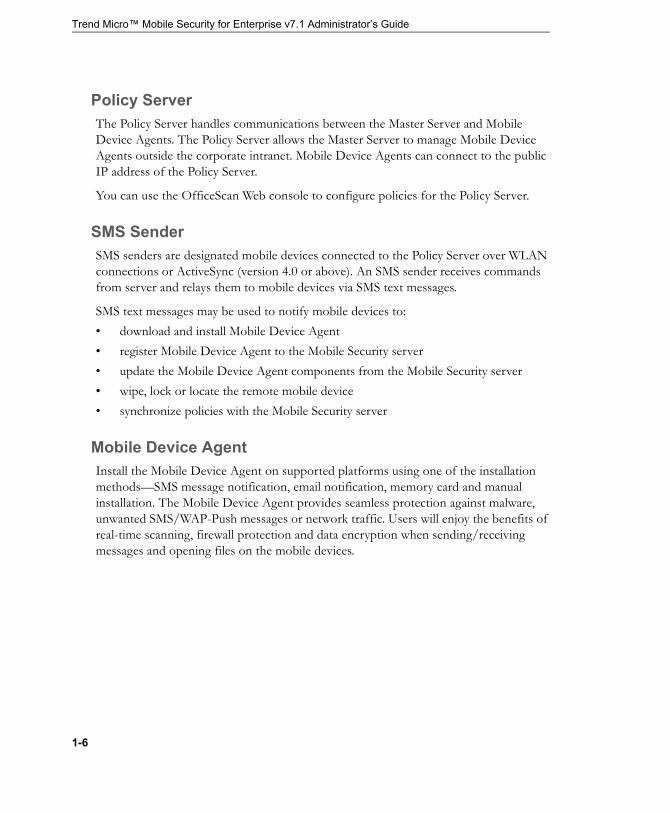
TABLE 3-1. Mobile Device Icons
ICON DESCRIPTION
• The Mobile Device Agent successfully registered to the Mobile Security server.
• All Mobile Device Agent components are updated.
• All security policies are synchronized with the Mobile Security server.
3-2
Managing Mobile Devices
Basic Mobile Device Agent SearchTo search for a Mobile Device Agent based on the mobile device name or phone number, type the information in the Device Management screen and click Search. The search result displays in the device Tree.
Advanced Mobile Device Agent SearchYou can use the Advanced search screen to specify more Mobile Device Agent search criteria.
To perform an advanced Mobile Device Agent search:
1. In the Device Management screen, click the Advanced search link. A pop-up window displays.
2. Select the search criteria and type the values in the fields provided (if applicable):
• Device Name—descriptive name that identifies a mobile device
• Phone No.—phone number of a mobile device
• Platform—operating system the mobile device is running
• Domain—domain to which the mobile device belongs
• Program version—Mobile Device Agents version number on the mobile device
• Malware Pattern version—Malware Pattern file version number on the mobile device
• Malware Scan Engine version—Malware Scan Engine version number of the mobile device
• The Mobile Device Agent is not registered to the Mobile Security server.
• One or more Mobile Device Agent components are not updated.
• One or more security policies are not synchronized with the Mobile Security server.
TABLE 3-1. Mobile Device Icons
ICON DESCRIPTION
3-3

Trend Micro™ Mobile Security for Enterprise v7.1 Administrator’s Guide
• Infected client—confine the search to mobile devices with the specified number of detected malware
• Unregistered device—confine the search to unregistered mobile devices
• Outdated configuration file—confine the search to mobile devices with an out-of-date configuration file
• Outdated component—confine the search to mobile devices with an out-of-date component
3. Click Search. The search result displays in the device tree.
Device Tree View OptionsYou can use the Device tree view drop-down list box to select one of the pre-defined views: General view and View all. This enables you to quickly view information presented in the device tree. The information displayed in the device tree varies according to the selected option.
Mobile Device StatusIn the Device Management screen, click Status to display mobile device information in a separate pop-up screen. Mobile device information in the status window is divided in the following tabs:
• Basic—includes registration status, phone number, LDAP Account, and platform information.
• Device—shows the detailed mobile device information including device and model names, operating system version, memory information, cellular technology, International Mobile Equipment Identity (IMEI) and MEID numbers, and firmware version information.
• Network—displays the Integrated Circuit Card ID (ICCID), bluetooth and WiFi MAC information, detailed network information including carrier network name, settings version, roaming status, and Mobile Country Codes (MCC) and Mobile Network Codes (MNC) information.
• Policy—shows the times the configuration and the security policy were last updated.
3-4

Managing Mobile Devices
Mobile Device Agent TasksTrend Micro Mobile Security enables you to perform different tasks on the mobile devices from the Device Management screen.
Mobile Device Agent ProvisioningUsers can initiate the product registration, component update and configuration synchronization processes anytime from their mobile devices. You can also manually set the Mobile Security server to send SMS messages to Mobile Device Agents to trigger these processes.
You can use the Device Update screen to send update notification to mobile devices with an out-of-date component. Refer to Device Update on page 5-7 for more information.
To manually initiate the update process, select the Tasks menu options in the Device Management screen for Mobile Security on the Mobile Security Management server.
• Update—notifies Mobile Device Agents to update to the latest components available and Sync security policy settings with the Master Server.
• Register—notifies Mobile Device Agents to register to the Master Server
Note: Trend Micro recommends synchronizing settings on Mobile Device Agents immediately after you have changed the security policy settings in the Domain Policies screens.
On Windows Mobile or Symbian mobile devices, if you have not enabled the SMS messaging feature for Mobile Security, you need to configure update schedule in the General Policies screen (see General Policies on page 4-3) to periodically update components. However, on Android mobile devices, if you have not enabled the SMS messaging feature for Mobile Security, you can also update components and sync policies through push instructions.
Note: You can disable or enable push notifications for Android as per your requirements.
3-5

Trend Micro™ Mobile Security for Enterprise v7.1 Administrator’s Guide
To enable or disable push notifications for Android:
1. Open the SQL table dbo.Configuration,
2. Add an ID Keep_Http_Long_Connection, and set its value as follows:
• 0—to disable push notifications
• 1—to enable push notifications
3. Log on to the OfficeScan Web console and click Plug-in Manager.
4. Click Manage Program for Mobile Security.
5. Click Device Management. The Device Management screen displays.
6. Click the root domain Mobile Security in the device management tree, and then Click Domain Policies > Device Security > General Policy
7. On the General Policy page, select Apply changes to all domains and send notification messages to all mobile devices after clicking 'Save'..
8. Click Save. The setting will take effect, after the polices are updated on the client.
Lost Device ProtectionIf a user loses or misplaces the mobile device, you can remotely locate, lock or delete all of the data on that mobile device.
• On-demand Remote Device Locate—administrator can locate the mobile device through the wireless network or by using mobile device’s GPS and view its location on Google Maps.
• On-demand Remote Device Lock—administrator can send lock instruction to remotely lock mobile device.
Note: Encryption must be enabled on Windows Mobile device to use this feature.
• On-demand Remote Device Wipe—administrator can remotely clear the mobile phone’s internal memory and SD card, if present, by sending remote wipe instruction to the mobile device.
3-6

Managing Mobile Devices
Remote Device UnlockIf a user has forgotten the power-on password, you can remotely reset the password and unlock the mobile device from the Master Server. After the mobile device is successfully unlocked, the user is able to log on and change the power-on password.
Before you can unlock a mobile device remotely, request users to generate a challenge code (16-digit hexadecimal number) on their mobile devices.
To remotely reset a mobile device:
1. Obtain the mobile device name and the challenge code the user generated on the mobile device. Refer users to the User’s Guide for instructions on challenge code generation.
2. Log on to the OfficeScan Web console and click Plug-in Manager.
3. Click Manage Program for Mobile Security, and then click Tasks > Password Reset.
4. In the Remote Unlock screen, click Select a device.
5. The device tree displays. Select the mobile device you want to unlock remotely, and click Select.
6. Type the challenge code in the field and click Generate.
7. The Master Server generates the response code and displays the code on a pop-up screen.
8. Instruct the user to click Next in the Password screen on the mobile Device and type the response code to unlock the mobile device.
Security PoliciesYou can configure security policies for a Mobile Security domain on the Master Server. These policies apply to all mobile devices in the domain. Refer to chapter Protecting Devices with Policies starting on page 4-1 for more information about these policies and the detailed steps for their configuration.
3-7

Trend Micro™ Mobile Security for Enterprise v7.1 Administrator’s Guide
LogsMobile Security maintains threat protection log, encryption log, firewall log, and event log on the Master Server. Refer to chapter Viewing and Maintaining Logs starting on page 6-1 for more information about these policies and the detailed steps for their configuration.
Device Tree ManagementUse the Manage Device Tree menu options to configure Mobile Security domains and Mobile Device Agents.
Mobile Security server automatically creates two domains in the Mobile Security device tree: the "Mobile Security" domain (root domain) and the "default" domain. The "default" domain contains Mobile Device Agents to which you have not specified a domain. You cannot delete or rename the "Mobile Security" and "default" domains in the Mobile Security device tree.
Tip: When you apply settings to the root domain (Mobile Security), you can also apply the settings to other domains by selecting the Apply changes to all domains after clicking 'Save' option.
For instructions, refer to the Online Help for Mobile Security server.
3-8

Chapter 4
Protecting Devices with Policies
This chapter shows you how to configure and apply security policies to mobile devices in a Mobile Security domain. You can use policies related to provisioning, device security and data protection.
The chapter includes the following sections:
• About Security Policies on page 4-2
• General Policies on page 4-3
• Threat Protection Policies on page 4-5
• Spam Prevention Policy on page 4-6
• Call Filtering Policies on page 4-7
• Firewall Policies on page 4-8
• Application Control Policies on page 4-10
• Encryption and Password Policies on page 4-10
• Feature Lock Policy on page 4-14
4-1

Trend Micro™ Mobile Security for Enterprise v7.1 Administrator’s Guide
About Security PoliciesYou can configure security policies for a Mobile Security domain on the Master Server. These policies apply to all mobile devices in the domain. You can apply security policies to all Mobile Security domains by selecting the Mobile Security domain (the root domain).
The following is a list of the various types of security policies:
• Provisioning
• Device security:
• General
• Threat protection
• Spam prevention
• Call filtering
• Firewall
• App control
• Data protection
• Encryption and password
• Feature lock
To configure security policies for a Mobile Security domain:
1. Log on to the OfficeScan Web console and click Plug-in Manager.
2. Click Manage Program for Mobile Security.
3. Click Device Management and select one or more domains in the device tree.
4. Click Domain Policies and then click Device Security > General Policy, Threat Protection Policy, Spam Prevention Policy, Call Filtering Policy, Firewall Policy, or App Control Policy; or Data Protection > Encryption and Password Policy, or Feature Lock Policy.
Note: Trend Micro recommends synchronizing settings on Mobile Device Agents immediately after you have changed the security policy settings in the Domain Policies screens. Refer to Mobile Device Agent Provisioning on page 3-5 for more information.
4-2

Protecting Devices with Policies
General PoliciesTo configure general security policy settings, select a domain from the device tree; then, click Domain Policies > Device Security > General Policy.
User Privileges You can enable or disable the feature that allows users to uninstall the Mobile Device Agent. Additionally, you can select whether to allow users to configure Mobile Security device agent settings.
The following is a list of features associated with uninstall protection:
• turn On/Off uninstall protection from the management console
• password length must have a minimum of six (6) and a maximum of twelve (12) characters; password may contain numbers, characters or symbols.
• password can be set for each domain from the management console.
FIGURE 4-1. General Policies, User Privileges section
If you do not select the Allow users to configure Mobile Security client settings check box, users cannot change Mobile Device Agent settings. However, Spam Prevention Policy and Call Filtering Policy are not affected when this option is selected. For more information, see Spam SMS Prevention Policies on page 4-6 and Spam WAP-Push Prevention Policies on page 4-7.
4-3

Trend Micro™ Mobile Security for Enterprise v7.1 Administrator’s Guide
Update SettingsYou can select to have the Mobile Security server notify Mobile Device Agents when a new component is available for update. Or you can select the auto-check option to have Mobile Device Agents periodically check for any component or configuration updates on the Mobile Security server.
When you enable the wireless connection notification option, a prompt screen displays on mobile devices before Mobile Device Agents connect to the Policy Server through a wireless connection (such as 3G or GPRS). Users can choose to accept or decline the connection request.
FIGURE 4-2. General Policies, Update Settings section
Log SettingsWhen Mobile Device Agents detect a security risk, such as an infected file or firewall violation, a log is generated on mobile devices. If the Encryption Module is activated, the encryption logs are also generated. You can set the mobile devices to send these logs to the Mobile Security server. Do this if you want to analyze the number of infections or pinpoint possible network attacks and take appropriate actions to prevent threats from spreading.
Notification SettingsSelect whether to display a prompt screen on mobile devices when a mobile device agent tries to establish a connection to the Policy Server.
4-4
Protecting Devices with Policies
Threat Protection PoliciesYou can configure threat protection policies that include: Scan type (real-time and card scan), action taken for malware, number of compression layers to scan, and the File type.
Scan Types Mobile Security provides several types of scans to protect mobile devices from malware.
Real-time Scan
Mobile Device Agent scans files on mobile devices in real time. If Mobile Device Agent detects no security risk, users can proceed to open or save the file. If Mobile Device Agent detects a security risk, it displays the scan result, showing the name of the file and the specific security risk. Mobile Security will generate a log with the scan result on the mobile device. The scan log is sent and stored on the Mobile Security database.
Card Scan
If you select the Card Scan option in the General Policies screen, Mobile Security scans data on a memory card when the memory card is inserted to a mobile device. This prevents infected files from spreading through memory cards.
Scan Actions
When malware is detected on a mobile device, Mobile Security can delete or quarantine the infected file. If the file is in use, the operating system may deny access to it.
• Delete—removes an infected file
• Quarantine—renames and then moves an infected file to the mobile device’s quarantine directory in\TmQuarantine (for Windows Mobile) or {Disk Label}\TmQuarantine (for Symbian OS).
• When connected, Mobile Device Agents send malware logs to the Mobile Security server.
Note: Scan actions only apply to Real-time scan.
4-5

Trend Micro™ Mobile Security for Enterprise v7.1 Administrator’s Guide
File Type and Compression Level Options
For ZIP or CAB files, you can specify the number of compression layers to scan. If the number of compression in a ZIP/CAB file exceeds this number, Mobile Security will not scan the file. Mobile Security will take no further action unless the appropriate number of compression layers are specified.
You can select to have Mobile Security scan executable, CAB/ZIP files, or all files on mobile devices.
Spam Prevention PolicyThe spam prevention policy in Mobile Security provides protection against spam WAP-push and SMS text messages.
Spam SMS Prevention PoliciesThis feature provides you server-side control of SMS spam prevention policies. The following features are available when configuring the SMS Spam Prevention Policies:
• enable or disable spam SMS prevention for mobile device
• configure the mobile device to use a blocked list, approved list or disable the SMS anti-spam feature for mobile device.
• configure an approved list from the management console
• configure a blocked list from the management console
• if the administrator has enabled server-side control, the user will be unable to change the spam SMS prevention type defined by the administrator
• if the administrator has disabled server-side control, the user will be unable to view or edit the blocked or approved list defined by the administrator; however, user may edit the personal spam SMS prevention approved or blocked list on the mobile device
4-6

Protecting Devices with Policies
Note: The SMS approved and blocked list must use the format: "[name1:]number1;[name2:]number2;...".
The 'name' length should not exceed 30 characters, while phone number should be between 4 and 20 characters long and can contain the following: 0-9, +, -, #, (, ) and spaces. The maximum number of entries should not exceed 200.
Spam WAP-Push Prevention PoliciesThis feature provides you server-side control of WAP-Push Protection. If enabled, you can select whether to use a WAP approved list. The following features is a list of features available when configuring WAP-Push Protection policies:
• enable or disable WAP-Push protection for mobile device
• configure the mobile device to use an approved list or disable WAP-Push protection on the mobile device
• configure an approved list from the management console
• if the administrator has enabled server-side control, the user will be unable to change the WAP-Push protection type defined by the administrator
• if the administrator has disable server-side control, the user will be unable to view or edit the WAP-Push protection list configured by the administrator; however, user may edit the personal WAP-Push protection list on the mobile device side
Note: The WAP approved list must use the format: "[name1:]number1;[name2:]number2;...".
The 'name' length should not exceed 30 characters, while phone number should be between 4 and 20 characters long and can contain the following: 0-9, +, -, #, (, ) and spaces. The maximum number of entries should not exceed 200.
Call Filtering PoliciesThis feature provides you server-side control of call filtering policies. The following features are available when configuring the Call Filtering Policies:
• enable or disable call filtering for mobile device
4-7

Trend Micro™ Mobile Security for Enterprise v7.1 Administrator’s Guide
• configure the mobile device to use a blocked list or an approved list
• configure an approved list from the management console
• configure a blocked list from the management console
• if the administrator has enabled server-side control, the user will be unable to change the call filtering type defined by the administrator
• if the administrator has disabled server-side control, the user will be unable to view or edit the blocked or approved list defined by the administrator; however, user may edit the personal call filtering approved or blocked list on the mobile device
Note: The call filtering approved and blocked list must use the format: "[name1:]number1;[name2:]number2;...".
The 'name' length should not exceed 30 characters, while phone number should be between 4 and 20 characters long and can contain the following: 0-9, +, -, #, (, ) and spaces. The maximum number of entries should not exceed 200.
Firewall PoliciesThe Mobile Security firewall protects mobile devices on the network using stateful inspection, high performance network traffic control and the intrusion detection system (IDS). You can create rules to filter connections by IP address, port number, or protocol, and then apply the rules to mobile devices in specific Mobile Security domains.
Note: Trend Micro recommends uninstalling other software-based firewall applications on mobile devices before deploying and enabling Mobile Security firewall. Multiple vendor firewall installations on the same computer may produce unexpected results.
You can configure firewall policies for Mobile Security in Domain Policies > Device Security > Firewall Policies.
A firewall policy includes the following:
• Firewall Policy: Enable/Disable the Mobile Security firewall and the IDS. Also includes a general policy that blocks or allows all inbound and/or all outbound traffic on mobile devices
4-8

Protecting Devices with Policies
• Exception list: A list of configurable rules to block or allow various types of network traffic
Pre-defined Firewall Security Level
The Mobile Security firewall comes with three pre-defined security levels that allow you to quickly configure firewall policies. These security levels limit network traffic based on traffic directions.
• Low—allow all inbound and outbound traffic.
• Normal—allow all outbound traffic but block all inbound traffic.
• High—block all inbound and outbound traffic.
Intrusion Detection System
The Mobile Security firewall integrates the Intrusion Detection System (IDS). When enabled, IDS can help identify patterns in network packets that may indicate a potential attack on mobile devices.
The Mobile Security firewall helps prevent SYN Flood attacks (a type of Denial of Service attack) where a program sends multiple TCP synchronization (SYN) packets to a computer, causing the mobile device to continually send synchronization acknowledgment (SYN/ACK) responses. This can exhaust system resource and may leave mobile devices unable to handle other requests.
Exception Rules
Exception rules include more specific settings to allow or block different kinds of traffic based on mobile device port number(s) and IP address(es). The rules in the list override the Security level policy.
Exception rule settings include the following:
• Action—blocks or allows/logs traffic that meets the rule criteria
• Direction—inbound or outbound network traffic on mobile devices
• Protocol—type of traffic: TCP, UDP, ICMP
• Port(s)—ports on the mobile devices on which to perform the action
• IP addresses—IP addresses of network devices to which the traffic criteria apply
4-9

Trend Micro™ Mobile Security for Enterprise v7.1 Administrator’s Guide
Application Control PoliciesThis features enables you to control the applications that users can run on their mobile devices. The following applications are available when configuring the Application Control Policies.
• YouTube
• iTunes
• Safari
• AutoFill
• JavaScript
• Popups
• Force fraud warning
• Accept cookies
Encryption and Password PoliciesThe encryption and password module provides password authenticating and data encryption on mobile devices. These features prevent unauthorized access to data on mobile devices.
To configure Encryption and Password Policy for Mobile Device Agents, click Domain Policies > Data Protection > Encryption and Password Policy.
Password Settings and Password SecurityWhen Mobile Device Agent is installed, each mobile device is associated with a user. The user must type the correct power-on password to log on to the mobile device. When a user has forgotten the power-on password, you can type the administrator password to unlock a mobile device.
The following table describes the power-on password policies you can configure:
4-10

Protecting Devices with Policies
OPTION DESCRIPTION
Password type Passwords must contain only numbers or alphanu-meric characters.
Minimum password length
Passwords must be longer than the number of char-acters specified.
Password complexity For alphanumeric passwords, users must configure passwords that contain upper case, lower case, spe-cial characters, or numbers to make passwords harder to guess.
Initial Mobile Device Agent password
Password that allows users to log on to their Win-dows Mobile devices after installing the Mobile Device Agent and the Encryption Module. The default is "123456".
Admin password Password used by an administrator to unlock a mobile Device. The default is "1234567890".
Expiry period The number of days a logon password is valid. After the password expires, the user must configure a new password to log on.
Inactivity timeout The number of minutes of no user activity before the mobile device automatically goes into secure mode and display the logon screen.
TABLE 4-1. Password Policies
4-11

Trend Micro™ Mobile Security for Enterprise v7.1 Administrator’s Guide
Note: When specifying the characters for the initial or admin password, keep in mind the input method used by mobile devices. Otherwise, the device user may not be able to unlock the device after encryption is enabled.
Limit logon attempts Limit the number of logon attempts to prevent brute force password attack. Possible actions when the limit is reached:
• Soft reset—restarts the mobile device.
• Admin access only—requires logon using the administrator password.
• Hard reset—resets the mobile device back to the factory default policies.
• Clear all data—resets the mobile device back to the factory default policies and deletes all the data on the mobile device and the inserted memory card.
WARNING! After a "Clear all data" action, users need to reformat the memory card to use it again for storing data.
Change initial power-on password
Request users to change the initial password after the first logon.
Forgotten password questions
If a user has forgotten the power-on password, this feature allows the user to unlock mobile devices and configure a new password by answering the selected question.
OPTION DESCRIPTION
TABLE 4-1. Password Policies
4-12

Protecting Devices with Policies
Encryption SettingsMobile Device Agent provides on-the-fly data encryption function to secure data on mobile devices. Two encryption algorithms are available: Advanced Encryption Standard (AES, with 128-bit, 192-bit, or 256-bit keys) and XTS-Advanced Encryption Standard (AES).
Note: Mobile Security can only manage the data security policy on Windows Mobile devices. The encryption module does not support Symbian mobile devices.
You can select specific file types to encrypt on Windows Mobile devices, the encryption algorithm to use, trusted applications that are allowed to access encrypted data, or apply data encryption on memory cards inserted on mobile devices.
Mobile Device Agent does not encrypt Dynamic Link Library (*.DLL) files. Mobile Device Agent only encrypts files that a user has modified. Reading a file and closing it without any modifications does not result in the file being encrypted.
After the Encryption Module is enabled, certain file types and PIM information are encrypted. These file types and PIM Information are listed in Table 4-2.
TABLE 4-2. Encrypted Information
ENCRYPTED INFORMATION TYPES
File Types • doc
• txt
• ppt
• pxl
• xls
• psw
• docx
PIM Information • Contacts
• Tasks
• Calendar
• SMS
• MMS
4-13

Trend Micro™ Mobile Security for Enterprise v7.1 Administrator’s Guide
The Encryption Module only allows trusted applications to access encrypted data. Therefore, the administrator must add these applications to the trusted application list. To add software to the trusted application list, add the full software path to the appropriate list under: "Allow more applications to access encrypted data".
Note: For advanced configuration, you can set Mobile Security to encrypt other file types. To enable encryption of custom file types, set the parameter Enable_Custom_Extension to 1 in the file TmOMSM.ini (located in \OfficeScan\Addon\Mobile Security). When the parameter is set to "1" in the file TmOMSM.ini, the Encrypt other file types field displays in the Data Security Policies screen. Specify the file types in this field.
To disable this feature, set the parameter Enable_Custom_Extension to 0. When the parameter is set to "0" in the file TmOMSM.ini, the Encrypt other file types field is not available in the Data Security Policies screen.
After making the change in the TmOMSM.ini file, restart OfficeScan Plug-in Manager service for the change to take effect.
WARNING! Trend Micro does not recommend customizing file types for encryption. You cannot encrypt certain files types (for example, .exe, .cert, .dll, etc.). If you set Mobile Security to encrypt file types that should not be encrypted, unexpected system errors may occur.
Feature Lock PolicyWith this feature, you can restrict (disable) or allow (enable) the use of certain mobile device features/components. For example, you can disable the camera for all mobile devices on a particular domain.
Note: The availability of components on Symbian devices CANNOT be managed.
4-14

Protecting Devices with Policies
Supported Features/ComponentsYou can control the availability of the following features on Windows mobile devices:
• Camera
• Video conference
• Bluetooth & Bluetooth Discover: disabling this feature also disables ActiveSync via Bluetooth and external GPS connections.
• Screen capture
• Apps installation
• Sync while roaming
• Voice dialing
• In App purchase
• Multiplayer gaming
• Add Game Center friends
• Force encrypted backups
• Explicit music & podcast
• Infrared: disabling this feature on a mobile device blocks the incoming beam service (Receive all incoming beams).
• USB storage
• WLAN/WIFI
• Serial: disabling this feature also disables ActiveSync via USB using a pseudo serial connection and external GPS connections. This could also disable certain infrared and Bluetooth services.
• Speaker/speakerphone/microphone
• Microsoft ActiveSync
• MMS/SMS: disabling this feature blocks all incoming and outgoing messages; including messages sent by Mobile Security.
• Memory cards
• GPS: disabling this feature only blocks the internal GPS feature (applicable only if the mobile device has an in-built GPS component) and external GPS connections based on GPSID (GPS Intermediate Driver). External GPS connections using the serial port are not affected.
4-15

Trend Micro™ Mobile Security for Enterprise v7.1 Administrator’s Guide
WARNING! Use caution while disabling WLAN/WIFI and/or Microsoft ActiveSync. The mobile device may not be able to communicate with the server if both these options are unavailable.
You can also add access point(s) for Android mobile devices to control the availability of the device components within the range of those access point(s).
Configuring Components AvailabilityTo configure the availability of components mobile devices on a particular domain, click Domain Policies > Data Protection > Feature Lock Policy.
Note: Mobile Devices may need to reboot for changes to take effect.
4-16

Chapter 5
Updating Components
This chapter shows you how to configure scheduled and manual server updates and then specify the update source for ActiveUpdate. You will also learn to perform component updates on specific Mobile Device Agents.
The chapter includes the following sections:
• About Component Updates on page 5-2
• Server Update on page 5-2
• Device Update on page 5-7
• Manually Updating a local AU server on page 5-9
5-1

Trend Micro™ Mobile Security for Enterprise v7.0 Administrator’s Guide
About Component UpdatesIn Mobile Security, the following components or files are updated through ActiveUpdate, the Trend Micro Internet-based component update feature:
• Malware Pattern—file containing thousands of malware signatures, and determines Mobile Security’s ability to detect these hazardous files. Trend Micro updates pattern files regularly to ensure protection against the latest threats.
• Malware Scan Engine—component that performs the actual scanning and cleaning functions. The scan engine employs pattern-matching technology, using signatures in the pattern file to detect malware. Trend Micro occasionally issues a new scan engine to incorporate new technology.
• Mobile Device Agents installation program—program installation package for the Mobile Device Agents.
• Mobile Device Agent program patch—program patch file that includes the latest updates to the Mobile Device Agent program installed on mobile devices.
Server UpdateYou can configure scheduled or manual component updates on the Mobile Security server to obtain the latest component files from the ActiveUpdate server. After a newer version of a component is downloaded on Mobile Security server, the Mobile Security server automatically notifies mobile devices to update components.
You can perform updates manually, or let Mobile Security perform them according to a schedule.
Manual Server UpdateYou can perform a manual server update in the Manual Update screen. You should have already configured the download source in the Source screen (refer to Specifying a Download Source on page 5-6 for more information).
To perform a manual server update:
1. Log on to the OfficeScan Web console and click Plug-in Manager.
2. Click the Manage Program button for Mobile Security.
3. Click Updates > Server Update. The Server Update screen appears.
5-2

Updating Components
4. On the Manual tab, select the check box of the component you want to update. Select the Anti-Malware Components, Program and/or Program Installation Package check box(es) to select all components in that group. This screen also displays the current version of each component and the time the component was last updated. Refer to About Component Updates on page 5-2 for more information on each update component.
Click Update to start the component update process
FIGURE 5-1. Starting a manual server update
Scheduled Server UpdateScheduled updates allow you to perform regular updates without user interaction; thereby, reducing your workload. You should have already configured the download source in the Source screen (refer to Specifying a Download Source on page 5-6 for more information).
To configure a scheduled server update:
1. Log on to the OfficeScan Web console and click Plug-in Manager.
2. Click the Manage Program button for Mobile Security.
5-3

Trend Micro™ Mobile Security for Enterprise v7.0 Administrator’s Guide
3. Click Updates > Server Update and click the Scheduled tab. The Scheduled Update screen appears. Select the check box of the component you want to update. Select the Anti-Malware Components, Program and/or Program Installation Package check box(es) to select all components in that group. This screen also displays each component’s current version and the time the component was last updated.
4. Under Update Schedule, configure the time interval to perform a server update. The options are Hourly, Daily, Weekly, and Monthly.
• For weekly schedules, specify the day of the week (for example, Sunday, Monday, and so on.)
• For monthly schedules, specify the day of the month (for example, the first day, or 01, of the month and so on).
Note: The Update for a period of x hours feature is available for the Daily, Weekly, and Monthly options. This means that your update will take place sometime within the x number of hours specified, following the time selected in the Start time field. This feature helps with load balancing on the ActiveUpdate server.
5. Click Save to save the settings.
5-4

Updating Components
FIGURE 5-2. Configuring scheduled server update
5-5

Trend Micro™ Mobile Security for Enterprise v7.0 Administrator’s Guide
Specifying a Download SourceYou can set Mobile Security to use the default ActiveUpdate source or a specified download source for server update.
To customize the download source:
1. Log on to the OfficeScan Web console and click Plug-in Manager.
2. Click the Manage Program button for Mobile Security.
3. Click Updates > Server Update. For more information about the server update (see Manual Server Update on page 5-2) or for scheduled update (see Scheduled Server Update on page 5-3).
4. Click the Source tab and select one of the following download sources:
• Trend Micro ActiveUpdate server—the default update source.
• Other update source—specify HTTP or HTTPS Web site (for example, your local Intranet Web site), including the port number that should be used from where Mobile Device Agents can download updates.
Note: The updated components have to be available on the update source (Web server). Provide the host name or IP address, and directory (for example, https://12.1.123.123:14943/source).
5. Click Save to save the settings.
FIGURE 5-3. Specifying a download source for server update
5-6

Updating Components
Device UpdateRegistered Mobile Device Agents can connect to either the Policy Server to obtain the latest scan engine, malware pattern, or program patch files.
When an updated file is available on the Mobile Security server, an SMS update message is sent to Mobile Device Agents to install the new components. In addition, you can set Mobile Device Agents to regularly check for any component updates on the Mobile Security server.
Types of UpdatesMobile Security has three types of updates.
Use the Device Update screen to send an update notification to all mobile devices with out-of-date components or the mobile devices you select.
Note: You can also configure devices to perform scheduled component updates. For more information, refer to Update Settings on page 4-4 and/or the User’s Guide for your mobile device
To send update notification to mobile devices:
1. Log on to the OfficeScan Web console and click Plug-in Manager.
2. Click the Manage Program button for Mobile Security.
TABLE 5-1. Mobile Security Updates
TYPE DESCRIPTION
Manual User-initiated; users can run these updates anytime.
Automatic Runs whenever a user initiates a network connection on their mobile device if the minimum check-in interval has elapsed.
Forced Runs at specified intervals regardless whether other updates run within the interval period; forced updates open the default wireless connection if the device is not connected to the Mobile Security Management server.
5-7

Trend Micro™ Mobile Security for Enterprise v7.0 Administrator’s Guide
3. Click Updates > Device Update. The Device Update screen displays. You can see the current component versions for each supported device and the time the components were last updated.
4. Specify which devices to send update notifications:
• Select All devices with outdated components to send update notifications to all mobile devices with an older component version. This is the default selection.
• Choose Select devices manually to display the device tree that enables you to choose devices you want to send update notifications and download new components.
5. Click Update. Depending on your selection, Mobile Security server searches for all mobile devices with an out-of-date component and notifies them to perform a component update on those mobile devices, or notifies the selected mobile devices.
FIGURE 5-4. Configuring device update settings
5-8

Updating Components
Manually Updating a local AU serverIf the Server/Device is updated through a Local AutoUpdate Server, but the Mobile Security Management server cannot connect to the Internet; then, manually update the local AU Server before doing a Server/Device Update.
To update a local AutoUpdate Server:
1. Obtain the installation package from your Trend Micro sales representative.
2. Extract the installation package.
3. Copy the folders TmmsServerAu and TmmsClientAu to the directory where the virtual directory TmmsAu is located (refer to the section Installing Server Components with a Local Update Source in Chapter 1 of the Installation and Deployment Guide, for how to create the virtual directory). If prompted, accept to overwrite any existing folders in the directory.
Note: When using a Local AU Server, you should check for updates periodically.
5-9

Trend Micro™ Mobile Security for Enterprise v7.0 Administrator’s Guide
5-10

Chapter 6
Viewing and Maintaining Logs
This chapter shows you how to view Mobile Device Agent logs on the Mobile Security Management Module and configure log deletion settings.
The chapter includes the following sections:
• About Mobile Device Agent Logs on page 6-2
• Viewing Mobile Device Agent Logs on page 6-2
• Log Deletion on page 6-5
• Event Log Messages on page 6-3
6-1

Trend Micro™ Mobile Security for Enterprise v7.0 Administrator’s Guide
About Mobile Device Agent LogsWhen Mobile Device Agents generate a threat protection log, firewall log, encryption log, or an event log, the log is sent to the Mobile Security Management Module. This enables Mobile Device Agent logs to be stored on a central location so you can assess you organization's protection policies and identify mobile devices at a higher risk of infection or attack.
Note: You can view SMS anti-spam, WAP-push protection, and call filtering logs on the mobile devices.
Viewing Mobile Device Agent LogsYou can view Mobile Device Agent logs on mobile devices or view all Mobile Device Agent logs on the Mobile Security Management Module. On the Mobile Security Management Module, you can view the following Mobile Device Agent logs:
• Threat Protection Log—Mobile Device Agent generates a log when a malware is detected on the mobile device. These logs allow you to keep track of the malware that were detected and the measures taken against them.
• Firewall Log—these logs are generated when a firewall rule is matched or when the firewall feature (such as the predefined security level or IDS) blocks a connection.
• Encryption Log—include information such as successful user logon attempts and actions taken after reaching the logon attempt limit.
• Event Log—these logs are generated when certain actions are taken by the server and the Mobile Device Agent (see Event Log Messages on page 6-3).
To view Mobile Device Agent logs:
1. Log on to the OfficeScan Web console and click Plug-in Manager.
2. Click the Manage Program button for Mobile Security.
1. Click Logs and select Threat Protection Log, Firewall Log, Encryption Log or Event Log.
2. Specify the query criteria for the logs you want to view. The parameters are:
6-2

Viewing and Maintaining Logs
• Time period—select a predefined date range. Choices are All, Last 24 hours, Last 7 days, and Last 30 days. If the period you require is not covered by the above options, select Range and specify a date range.
• From—type the date for the earliest log you want to view. Click the icon to select a date from the calendar.
• To—type the date for the latest log you want to view. Click the icon to select a date from the calendar.
• Sort by—specify the order and grouping of the logs.
3. Click Display Logs to begin the query.
FIGURE 6-1. Set log criteria for log display
Event Log MessagesThe following are possible event log messages:
EVENT LOG MESSAGE
Add device on console (causes a mobile device registration; also logged)
Delete device in console (causes a mobile device unregistration; also logged)
Administrator changes the mobile device name or phone number
Administrator changes the domain of the mobile device
Master Service receives a registration request from a mobile device
TABLE 6-1. Event log messages
6-3

Trend Micro™ Mobile Security for Enterprise v7.0 Administrator’s Guide
The following are possible errors in the event log:
Log MaintenanceWhen Mobile Device Agents generate event logs about security risk detection, the logs are sent and stored on the Mobile Security Management Module. Use these logs to assess your organization's protection policies and identify mobile devices that face a higher risk of infection or attack.
To help save space on your hard disk, you can either manually delete logs or configure Mobile Security Management Module to schedule automatic deletion.
To schedule log deletion:
1. Log on to the OfficeScan Web console and click Plug-in Manager.
2. Click Manage Program for Mobile Security.
3. Click Logs > Log Maintenance. The Log Maintenance screen displays.
4. Select Enable scheduled deletion of logs.
Master Service receives an unregistration request from a mobile device
ERROR CODE
ERROR TEXT
-200 Operation failed for general error. Please try the operation again.
-202 Device does not exist, it may have been removed by another ses-sion.
-203 Domain does not exist, it may have been removed by another ses-sion.
-204 The phone number has already been assigned to another mobile device, please use a different phone number and try again.
TABLE 6-2. Event log error codes
EVENT LOG MESSAGE
TABLE 6-1. Event log messages
6-4

Viewing and Maintaining Logs
5. Select the log types to delete: Malware, Firewall, Encryption or Event.
6. Select whether to delete logs for all the selected log types or those older than the specified number of days.
7. Specify the log deletion frequency and time.
8. Click Save.
To manually delete logs:
1. Log on to the OfficeScan Web console and click Plug-in Manager.
2. Click Manage Program for Mobile Security.
3. Click Logs > Log Maintenance. The Log Maintenance screen displays.
4. Select whether to delete logs for all the selected log types or only older than the specified number of days.
5. Select the log types to delete.
6. Click Delete Now.
Log DeletionTo keep the size of your Mobile Device Agent logs from occupying too much space on your hard disk, delete the logs manually or configure Mobile Security Management Module to delete the logs automatically based on a schedule in the Log Maintenance screen.
6-5

Trend Micro™ Mobile Security for Enterprise v7.0 Administrator’s Guide
FIGURE 6-2. Log Maintenance
To delete logs based on a schedule:
1. Select Enable scheduled deletion of logs.
2. Select whether to delete logs for all the selected log types or only older than the specified number of days.
3. Select the log types to delete.
4. Specify the log deletion frequency and time.
5. Click Save.
To manually delete logs:
1. Select whether to delete logs for all the selected log types or only older than the specified number of days.
2. Select the log types to delete.
3. Click Delete now.
6-6

Chapter 7
Using Notifications
This chapter shows you how to configure and use notifications in Mobile Security.
The chapter includes the following sections:
• About Notification Messages on page 7-2
• Configuring Notification Settings on page 7-2
• Configuring Email Notifications on page 7-2
• Configuring SMS Sender on page 7-2
• Administrator Notification on page 7-5
• User Notification on page 7-6
7-1

Trend Micro™ Mobile Security for Enterprise v7.1 Administrator’s Guide
About Notification MessagesYou can configure Mobile Security to send notifications via email or SMS text message to the administrator(s) and/or users.
• To Administrator—sends email notifications to the administrator in case any system abnormality occurs.
• To user—sends email and/or a text message to notify mobile devices to download and install Mobile Device Agent.
Configuring Notification Settings
Configuring Email NotificationsIf you want to send email message notifications to the users, then you must configure these settings.
To configure email notification settings:
1. Log on to the OfficeScan Web console and click Plug-in Manager.
2. Click Manage Program for Mobile Security.
3. Click Notification > Settings. The Notification Settings screen displays.
4. In Email Settings section, type the From email address, the SMTP server IP address and its port number.
5. If the SMTP server requires authentication, select Authentication, and then type the username and password.
6. Click Save.
Configuring SMS SenderThe Policy Server controls and monitors SMS Senders connected to the server. The SMS Senders send messages to mobile devices to perform Mobile Device Agent installation, registration, component update, security policy setting, and remote wipe/lock/locate.
Use the SMS Sender Settings to:
• configure SMS sender phone numbers
7-2

Using Notifications
• view SMS sender connection status
• set Mobile Device Agent installation message
• delete or view SMS messages waiting to be sent
• configure SMS sender disconnect notification
SMS Sender ListYou need to configure SMS sender device phone numbers before the Policy Server can instruct SMS senders to send messages to mobile devices.
WARNING! If you do not configure the phone number of an SMS sender in the SMS sender list, the Policy Server prevents the SMS sender from sending mes-sages to mobile devices.
To view the SMS sender list:
1. Log on to the OfficeScan Web console and click Plug-in Manager.
2. Click Manage Program for Mobile Security.
3. Click Notification > Settings. The Notification Settings screen displays. In SMS Sender Settings section, the list of SMS sender phone numbers and the connection status are displayed. If the SMS sender is connected to the Policy Server successfully, the Status field displays Connected.
Note: After three (3) failed attempts to send an SMS message(s), the mobile device will display "disconnected".
Configuring SMS Sender List Specify the phone number of an SMS sender to enable the Mobile Security server to manage the SMS senders. SMS senders send messages to notify mobile devices to:
• download and install Mobile Device Agent
• register to the Mobile Security Management Module
• unregister from the Mobile Security Management Module
• update Mobile Device Agent components
7-3

Trend Micro™ Mobile Security for Enterprise v7.1 Administrator’s Guide
• synchronize security policy settings with the Mobile Security Management Module
• remote wipe the mobile device
• remote lock the mobile device
• remote locate the mobile device
To configure an SMS sender phone number:
1. Log on to the OfficeScan Web console and click Plug-in Manager.
2. Click Manage Program for Mobile Security.
3. Click Notification > Settings. The Notification Settings screen displays.
4. In SMS Sender Settings section, click Add, type the phone number of an SMS sender and click Save. The SMS sender appears in the list.
5. Check that the Status field displays "Connected" for the number you have configured. If the Status field displays "Disconnected", make sure the SMS sender device is connected to the Policy Server.
Note: Existing SMS senders can be modified by clicking the phone number.
SMS Sender StatusMobile Security updates the status of the SMS Sender on the mobile device. Depending on the connection status, the following status will appear on the device:
• SMS Agent Status: Normal
• SMS Agent Status: Stopped
• SMS Agent Status: Disconnected
• SMS Agent Status: Not in use
• SMS Agent Status: Unknown
7-4

Using Notifications
FIGURE 7-1. SMS Sender Status
Monitoring SMS Senders
Mobile Security can monitor the status of SMS Senders and send out email notifications if any of the SMS Senders is disconnected for more than ten minutes. Additionally, the SMS Sender device also displays the connection status: Agent stopped, Agent running, Agent not in use, or Agent disconnected. Refer to Administrator Notification on page 7-5 for the configuration details.
Administrator Notification Use the Administrator Notification screen to type the subject of the message, the recipients, and the SMTP server details.
To configure administrator notification:
1. Log on to the OfficeScan Web console and click Plug-in Manager.
2. Click Manage Program for Mobile Security.
3. Click Notification > To Administrator.
4. Select Email Settings, and update the following details as required:
• To: The email addresses of recipients. You can separate multiple email addresses with a semi-colon.
• Subject: The subject of the email message.
• Message: The body of the email message.
7-5

Trend Micro™ Mobile Security for Enterprise v7.1 Administrator’s Guide
Note: While editing the Message field, make sure to include the token variables <%problem%> , <%reason%> and <%suggesstion%>, which will be replaced by the actual values in the email message.
5. Click Save.
User Notification Use the User Notification screen to configure email and/or SMS text message notification.
To configure user notification:
1. Log on to the OfficeScan Web console and click Plug-in Manager.
2. Click Manage Program for Mobile Security.
3. Click Notification > To User.
4. Do either or both of the following as per your requirements:
• If you want to configure email notification messages, select Email Settings, and update the following details as required:
• Subject: The subject of the email message.
• Message: The body of the email message.
Note: While editing the Message field, make sure to include the token variables <%downloadUrl%>, which will be replaced by the actual URL in the email message.
• If you want to configure text notification messages, select Text Message Settings, and update the body of the email message in the Message field.
Note: While editing the Message field, make sure to include the token variables <%downloadUrl%>, which will be replaced by the actual URL in the text message.
5. Click Save.
7-6

Chapter 8
Data Recovery Tool
The Data Recovery Tool is a stand-alone application for administrators to decrypt user files encrypted by the Encryption Module in Mobile Security. It is used if, for any reason, the user cannot decrypt files that have been saved on a storage card.
This chapter includes the following sections:
• Installing the Data Recovery Tool on page 8-2
• Using the Data Recovery Tool on page 8-5
8-1

Trend Micro™ Mobile Security for Enterprise v7.0 Administrator’s Guide
Installing the Data Recovery ToolTo install the Data Recovery tool:
1. To begin the installation, open the Data Recovery Tool installer file TmmsDataRecoverySetup.exe.
The installation wizard starts with the Welcome screen. Click Next.
FIGURE 8-1. Welcome screen
2. The License Agreement screen appears. Select I accept the terms of the license agreement and click Next.
8-2

Data Recovery Tool
FIGURE 8-2. License Agreement screen
3. The Destination Folder screen appears. Click Change to change the folder. Otherwise, click Next to accept the default folder.
FIGURE 8-3. Select the Destination folder
4. The Ready to Install the Program screen appears. Click Install to install the program.
8-3

Trend Micro™ Mobile Security for Enterprise v7.0 Administrator’s Guide
FIGURE 8-4. Ready to Install the Program screen
5. When the InstallShield Wizard Completed screen appears, click Finish to exit the wizard.
FIGURE 8-5. Installation Wizard Complete screen
The program is installed.
8-4

Data Recovery Tool
Using the Data Recovery ToolTo use the Recovery Tool, a Recovery File is needed. The administrator exports a Recovery File for a particular domain from the Web console. The exported encryption file includes the encryption key history.
To decrypt user files:
1. Obtain the files to be decrypted from the user.
2. Create and download the policy file from the UI by logging on to the Mobile Security Management server, then log on to the OfficeScan Web console and click Plug-in Manager.
3. Click Manage Program for Mobile Security, and then click Device Management > {Domain} > Domain Policies > Data Protection > Encryption and Password Policy. The Encryption and Password Policies window displays.
4. On the Windows Mobile tab, click Download Recovery File.
FIGURE 8-6. Downloading the policy file
8-5

Trend Micro™ Mobile Security for Enterprise v7.0 Administrator’s Guide
5. Open the tool by clicking Start > Programs > Trend Micro > Trend Micro TMMS Recovery Tool > Launch TmmsDataRecovery.exe. Type:
• the location of the recovery file (the correct recovery file MUST be used—see note that follows)
• the location of the user file(s) to be decrypted (multiple files can be selected)
• the location where the decrypted files will be placed (the destination folder cannot be the same as the location of the files you want to decrypt)
6. Select the Overwrite without prompt and click Decrypt Now.
FIGURE 8-7. Data Recovery Tool main user interface
Note: The recovery file for the Data Recovery Tool is associated with a particular domain. The recovery file contains history of keys that generated with administrator's password, which works as a decryption key. If the key in the recovery file is incorrect, but the password is correct, the target file cannot be decrypted correctly. Therefore, the correct recovery file MUST be used.
7. A pop-up screen appears. Type the administrator password and click OK to start decrypting the files.
8-6

Data Recovery Tool
FIGURE 8-8. Password entry
8. Upon completion, the following screen appears. Click OK to end, or View Log to view the decryption logs.
FIGURE 8-9. Encryption completed
9. The log file opens in your default text editor.
8-7

Trend Micro™ Mobile Security for Enterprise v7.0 Administrator’s Guide
FIGURE 8-10. Data Recovery Log
The log file lists the decryption log entries and the result.
8-8

Chapter 9
Troubleshooting and Contacting Technical Support
Here you will find answers to frequently asked questions and you learn how to obtain additional Mobile Security information.
The chapter includes the following sections:
• Troubleshooting on page 9-2
• Before Contacting Technical Support on page 9-7
• Contacting Technical Support on page 9-7
• Sending Infected Files to Trend Micro on page 9-8
• TrendLabs on page 9-8
• About Software Updates on page 9-9
• Other Useful Resources on page 9-10
• About Trend Micro on page 9-11
9-1

Trend Micro™ Mobile Security for Enterprise v7.0 Administrator’s Guide
TroubleshootingThis section provides tips for dealing with issues you may encounter when using Mobile Security.
OfficeScan does not display the updated Plug-in Manager version for Mobile Security.
If a new version of Master Server is available on the ActiveUpdate server and your Mobile Security server does not display the version number properly, restart the Plug-in Manager on the Mobile Security server.
The OfficeScan Web console prompts me to install TMMS_AtxConsole.cab every time I access the Device Management screen for Mobile Security.
You have configured Internet Explorer to use a higher security level. To resolve this problem, return the security level for Internet Explorer to the default policy.
Unable to access the management console for Mobile Security through Control Manager.
Mobile Security does not support remote management through Control Manager.
The status of an SMS sender is always disconnected.
1. Make sure the phone services for the SMS senders are still available. For example, check that you have paid the phone bills and the services are not terminated.
2. If you connect an SMS sender to a host computer using ActiveSync and a firewall is installed on the Policy Server, you must configure a firewall rule to allow traffic on port 5721. Otherwise, the SMS sender cannot receive instructions from the server to send messages to mobile devices.
SMS senders are not sending messages.
• Check that SMS senders are connected to the Policy Server.
• Make sure the phone services for the SMS senders are still available. For example, check that you have paid the phone bills and the services are not terminated.
• If you installed SMS sender and Mobile Device Agent on the same mobile device, and a firewall is installed on the Policy Server, you must configure a firewall rule to allow traffic on port 5721. Otherwise, the SMS sender cannot receive instructions from the server to send messages to mobile devices.
9-2

Troubleshooting and Contacting Technical Support
• Change the encoding method on SMS senders and try again. By default, SMS senders use the unicode encoding method when sending messages. Select "7-bit GSM" if service providers do not support unicode encoding.
User cannot input uninstall passwords on their devices.
Mobile device keyboards can only support a certain set of characters. Trend Micro recommends that the administrator compile a list of characters supported by the devices. After compiling the list of supported characters, the administrator can then set the uninstall protection password from the management console using the list of supported characters.
The Mobile Security agent cannot receive the server's SMS notification or connect to the server via the public DNS name.
The version of Mobile Security agent supporting a DNS name should be higher than 5.0.0.1099 for Windows Mobile platform and higher than 5.0.0.1061 for Symbian OS 9.x S60 3rd Edition platform. Previous versions can connect via IP address only.
Sync Flood Attack
The firewall may pop up a SYN Flood warning dialog when an administrator is using the Mobile Security 7 web console remotely/locally. This is an Intrusion Detection System (IDS) warning from the firewall. It is caused by the OfficeScan web server that doesn't have the "Keep alive" option enabled. This option should be enabled in order to keep this message from reappearing. See your web server documentation for instructions on how to do this.
Application(s) fail to function after enabling Encryption Module.
When a user uses the Encryption Module on a device, some existing applications may not function. The reason is that these existing applications may be not be contained in the trusted list. After the Encryption Module is enabled, certain file types will be encrypted (for example, doc, txt, ppt, pdf, xls and etc). The Encryption Module only allows trusted applications to access encrypted data. Therefore, the administrator must add these applications to the trusted application list. For more information see Encryption Settings on page 4-13.
9-3

Trend Micro™ Mobile Security for Enterprise v7.0 Administrator’s Guide
On the OfficeScan Management console, the device component status or configuration status displays "Out-of-date” after the Mobile Device Agent successfully updates.
If Master Server and Policy Server are not accessible during the update, the Mobile Device Agent will update from Trend Micro’s official AU server. In this case, the update may succeed, but the Mobile Device Agent will not sync with the Policy server. This will cause the device's component status or configuration status to be out-of-date.
After canceling the Policy Server uninstallation process, the Policy Server fails to function normally.
If the uninstallation process started deleting the files and services that are important for the Policy Server’s normal operation before the process was stopped, the Policy Server may not function normally. To resolve this issue, install and configure the Policy Server again.
iOS mobile devices cannot enroll successfully to the Master Server, and displays "Unsupported URL" error message.
This issue may happen if the system clock of SCEP server is set to the incorrect time or the Simple Certificate Enrollment Protocol (SCEP) certificate is not obtained by Trend Micro Mobile Security. Make sure that the system clock of SCEP server is set to the correct time. If the issue persists, perform the following steps:
1. Log on to the OfficeScan Web console and click Plug-in Manager.
2. Click Manage Program for Mobile Security, and then click Administration > Policy Server Settings.
3. Without changing the settings, click Save.
The Master Server cannot receive policy from the BlackBerry Enterprise Server (BES).
The Policy Server cannot receive the policy from the BlackBerry Enterprise Server (BES) if the policy name contains special characters. Check if the policy name contain any special characters and replace them with alphabets and numbers.
9-4

Troubleshooting and Contacting Technical Support
After performing the upgrade on the Master Server, the device management page is not displayed.
The Device Management page uses Active X to display various data on the page. Performing the upgrade on the Master Server replaces the old Active X on the server. You must restart the Master Server to enable Internet Explorer to use the latest Active X.
If the problem persists even after restarting the Master Server, then perform the following steps:
1. Close Internet Explorer.
2. Go to the directory C:\Windows\Downloaded Program Files and delete TMMS_AtxConsole.ocx.
3. Open Internet Explorer, and log on to the OfficeScan Web console to access Trend Micro Mobile Security.
Unable to save Database Settings if you use SQL Server Express.
If you are using SQL Server Express, use the following format in the Server address field: <SQL Server Express IP address>\sqlexpress.
Note: Replace <SQL Server Express IP address> with the IP address of SQL Server Express.
Unable to connect to SQL Server 2005 or SQL Server 2005 Express.
This problem may occur when SQL Server 2005 is not configured to accept remote connections. By default, SQL Server 2005 Express Edition and SQL Server 2005 Developer Edition do not allow remote connections. To configure SQL Server 2005 to allow remote connections, complete all the following steps:
1. Enable remote connections on the instance of SQL Server that you want to connect to from a remote computer.
2. Turn on the SQL Server Browser service.
3. Configure the firewall to allow network traffic that is related to SQL Server and to the SQL Server Browser service.
9-5

Trend Micro™ Mobile Security for Enterprise v7.0 Administrator’s Guide
Unable to connect to SQL Server 2008 R2.
This problem may occur if Visual Studio 2008 is not installed in the default location and therefore, the SQL Server 2008 setup cannot find devenv.exe.config configuration file. To resolve this issue, perform the following steps:
1. Go to <Visual Studio installation folder>\Microsoft Visual Studio 9.0\Common7\IDE folder, find and copy devenv.exe.config file and paste it to the following folder (you may need to enable display extensions for known file types in folder options):
• For 64-bit Operating System:
C:\Program Files (x86)\Microsoft Visual Studio 9.0\Common7\IDE
• For 32-bit Operating System:
C:\Program Files\Microsoft Visual Studio 9.0\Common7\IDE
2. Run the SQL Server 2008 setup again and add BIDS feature to the existing instance of SQL Server 2008.
Unable to export the client device list in Device Management.
This may occur if the downloading of encrypted files is disabled in the Internet Explorer. Perform the following steps to enable the encrypted files download:
1. On your Internet Explorer, go to Tools > Internet options, and then click the Advanced tab on the Internet Options window.
2. Under Security section, clear Do not save encrypted pages to disk.
3. Click OK.
The status of certain Android mobile device is always Out of Sync.
This is because the Mobile Security device administrator is not activated on that mobile device. If the user does not activate Mobile Security in the Device administrators list, then the Mobile Security cannot synchronize server policies with the mobile device, and displays its status as Out of Sync.
9-6

Troubleshooting and Contacting Technical Support
Before Contacting Technical SupportBefore contacting technical support, here are two things you can quickly do to try and find a solution to your problem:
• Check your documentation—The manual and online help provide comprehensive information about Mobile Security. Search both documents to see if they contain your solution.
• Visit our Technical Support Web site—Our Technical Support Web site, called Knowledge Base, contains the latest information about all Trend Micro products. The support Web site has answers to previous user inquiries.
To search the Knowledge Base, visit
http://esupport.trendmicro.com
Contacting Technical SupportIn addition to telephone support, Trend Micro provides other resources for your product.
Email support
Help database—configuring the product and parameter-specific tips
Readme—late-breaking product news, installation instructions, known issues, and version specific information
Knowledge Base—technical information procedures provided by the Support team:
http://esupport.trendmicro.com/
Product updates and patches
http://www.trendmicro.com/download/
To locate the Trend Micro office nearest you, visit the following URL:
http://www.trendmicro.com/en/about/contact/overview.htm
To speed up the problem resolution, when you contact our staff please provide as much of the following information as you can:
9-7

Trend Micro™ Mobile Security for Enterprise v7.0 Administrator’s Guide
• Product Activation Code
• Product Build version
• Exact text of the error message, if any
• Steps to reproduce the problem
Sending Infected Files to Trend MicroYou can send malware and other infected files to Trend Micro. More specifically, if you have a file that you think is some kind of malware but the scan engine is not detecting it or cleaning it, you can submit the suspicious file to Trend Micro using the following Web address:
http://subwiz.trendmicro.com/SubWiz/Default.asp
Please include in the message text a brief description of the symptoms you are experiencing. Our team of malware engineers will “dissect” the file to identify and characterize any malware it may contain and return the cleaned file to you, usually within 48 hours.
TrendLabsTrend Micro TrendLabsSM is a global network of anti-malware research centers that provide continuous 24x7 coverage to Trend Micro customers around the world.
Staffed by a team of more than 250 engineers and skilled support personnel, the TrendLabs dedicated service centers in Paris, Munich, Manila, Taipei, Tokyo, and Irvine, CA. ensure a rapid response to any malware outbreak or urgent customer support issue, anywhere in the world.
The TrendLabs modern headquarters, in a major Metro Manila IT park, has earned ISO 9002 certification for its quality management procedures in 2000—one of the first anti-malware research and support facilities to be so accredited. Trend Micro believes TrendLabs is the leading service and support team in the anti-malware industry.
For more information about TrendLabs, please visit:
http://www.trendmicro.com/en/security/trendlabs/overview.htm
9-8

Troubleshooting and Contacting Technical Support
About Software UpdatesAfter a product release, Trend Micro often develops updates to the software, to enhance product performance, add new features, or address a known issue. There are different types of updates, depending on the reason for issuing the update.
The following is a summary of the items Trend Micro may release:
• Hot fix—A hot fix is a workaround or solution to a single customer-reported issue. Hot fixes are issue-specific, and therefore not released to all customers. Windows hot fixes include a Setup program, while non-Windows hot fixes do not (typically you need to stop the program daemons, copy the file to overwrite its counterpart in your installation, and restart the daemons).
• Security Patch—A security patch is a hot fix focusing on security issues that is suitable for deployment to all customers. Windows security patches include a Setup program, while non-Windows patches commonly have a setup script.
• Patch—A patch is a group of hot fixes and security patches that solve multiple program issues. Trend Micro makes patches available on a regular basis. Windows patches include a Setup program, while non-Windows patches commonly have a setup script.
• Service Pack—A service pack is a consolidation of hot fixes, patches, and feature enhancements significant enough to be considered a product upgrade. Both Windows and non-Windows service packs include a Setup program and setup script.
Check the Trend Micro Knowledge Base to search for released hot fixes:
http://esupport.trendmicro.com
Consult the Trend Micro Web site regularly to download patches and service packs:
http://www.trendmicro.com/download
All releases include a readme file with the information needed to install, deploy, and configure your product. Read the readme file carefully before installing the hot fix, patch, or service pack file(s).
9-9
Trend Micro™ Mobile Security for Enterprise v7.0 Administrator’s Guide
Known Issues Known issues are features in Mobile Security that may temporarily require a workaround. Known issues are typically documented in the Readme document you received with your product. Readmes for Trend Micro products can also be found in the Trend Micro Update Center:
http://www.trendmicro.com/download/
Known issues can be found in the technical support Knowledge Base:
http://esupport.trendmicro.com
Note: Trend Micro recommends that you always check the Readme text for information on known issues that could affect installation or performance, as well as a description of what’s new in a particular release, system requirements, and other tips.
Other Useful ResourcesTrend Micro offers a host of services through its Web site, http://www.trendmicro.com.
Internet-based tools and services include:
• Virus Map– monitor malware incidents around the world
• Virus risk assessment– the Trend Micro online malware protection assessment program for corporate networks.
9-10

Troubleshooting and Contacting Technical Support
About Trend MicroTrend Micro, Inc. is a global leader in network anti-malware and Internet content security software and services. Founded in 1988, Trend Micro led the migration of malware protection from the desktop to the network server and the Internet gateway–gaining a reputation for vision and technological innovation along the way.
Today, Trend Micro focuses on providing customers with comprehensive security strategies to manage the impacts of risks to information, by offering centrally controlled server-based malware protection and content-filtering products and services. By protecting information that flows through Internet gateways, email servers, and file servers, Trend Micro allows companies and service providers worldwide to stop malware and other malicious code from a central point, before they ever reach the desktop.
For more information, or to download evaluation copies of Trend Micro products, visit our award-winning Web site:
http://www.trendmicro.com
9-11

Trend Micro™ Mobile Security for Enterprise v7.0 Administrator’s Guide
9-12