Tree Owner's Manual - Wyoming...
40
Wyoming Tree OWner’s Manual Revised and printed by- Wyoming State Forestry Division with permission from USDA Forest Service, Northeastern Area
Transcript of Tree Owner's Manual - Wyoming...

Wyoming Tree Owner’s Manual ~ 1
Wyoming Tree OWner’s Manual
Revised and printed by- Wyoming State Forestry Division with permission from USDA Forest Service, Northeastern Area

Authors:Jill r. Johnson, Forest service Gary r. Johnson, university of Minnesota Maureen H. McDonough, Michigan state universitylisa l. Burban, Forest service Janette K. Monear, Tree Trust
Illustrator:Jennifer salveson
Technical Reviewers:Katie armstrong, Forest service Bert Cregg, Michigan state university Paul Dykema, City of lansing, MI Dennis Fallon, Xcel energy Danielle Fitzko, Vermont Dept. of Forests, Parks, and recreation Justine Gartner, Missouri Department of Conservation sharon lilly, International society of arboriculture Pam louks, Indiana Dept. of natural resources rita McKenzie, Purdue university Jill Pokorny, Forest service Bob ricard, university of Connecticut Tom Wawra, Bachman’s landscaping les Werner, university of Wisconsin-stevens Point Paul Wierzbicki, Tree Trustron Zillmer, Mid-state Technical College
Revisions/Additions for Wyoming Version by: Mark Hughes, Mark ellison, Wyoming state Forestry Division
Table of Contents
Important Precautions . . . . . . . . . .1Model Information and Parts Diagram . . . . . . . . . . . . .2 Deciduous Model . . . . . . . . . . . .2 evergreen Model . . . . . . . . . . . .3Packaging . . . . . . . . . . . . . . . . . .3 roots. . . . . . . . . . . . . . . . . . . .3 Trunk and Branches . . . . . . . . . .3Pre-Installation (Preparing to Plant) .4 Materials . . . . . . . . . . . . . . . . .4 Instructions . . . . . . . . . . . . . . .4Installation (Planting) . . . . . . . . . .6 Materials . . . . . . . . . . . . . . . . .6 Instructions . . . . . . . . . . . . . . .6Maintenance schedule . . . . . . . . . 12Maintenance Instructions . . . . . . . 13 Watering . . . . . . . . . . . . . . . . 13 Installing a Trunk Guard . . . . . . 14 Preventing and Correcting encircling roots. . . . . . . . . . . . 15 Mulching . . . . . . . . . . . . . . . . 16 Fertilizing. . . . . . . . . . . . . . . . 16 Checking Tree Health . . . . . . . . 17 Checking Tree safety . . . . . . . . 17 Pruning . . . . . . . . . . . . . . . . . 18Protecting Trees from Construction Damage . . . . . . . . 23record of Tree Types and locations 25service and repair. . . . . . . . . . . . 27 How to Hire an arborist. . . . . . . 27 record of service. . . . . . . . . . . 28Troubleshooting . . . . . . . . . . . . . 29Other sources of Help . . . . . . . . . 30In the event of an emergency . . . . 31removal and Disposal. . . . . . . . . . 32 Whole Tree . . . . . . . . . . . . . . . 32 Trimmings. . . . . . . . . . . . . . . . 32 leaves . . . . . . . . . . . . . . . . . . 32Buying a new Tree. . . . . . . . . . . . 33 Decide on the type of tree. . . . . 33 select a high quality tree at the nursery. . . . . . . . . . . . . 34additional sources of Information . 34Trees for Wyoming. . . . . . . . . . . . 35Transporting Your Tree . . . . . . . . . 37storing Your Tree until Planting . . . 37
Wyoming TreeOWner’s Manual
Wyoming Tree Owner’s Manual ~ 1
WARNING: To reduce the risk of personal injury or permanent damage to your tree, read and follow these important precautions:
c Do not dig until you are sure there are no buried utilities. For utility locates, call 811 in WY or 1-800-849-2476 if calling out-of-state, at least 2 days before you intend to dig.
c never prune trees or branches that are within 10 feet of utility lines; contact your local utility company.
c Keep lawn mowers and weed whips away from the base of your tree.
c Do not tie string, ribbon, wire, or pet leashes around the trunk or branches.
c Do not allow construction activities (digging, repaving, grading, building) within the Protected root Zone (p. 23).
c Do not top your tree (p. 22).
c When hiring an arborist, select someone who has general liability insurance of at least $1 million per occurrence and $2 million aggregate (p. 27).
c Check with your city or town to see if there are laws regarding planting and pruning.
c If you cannot prune your tree with both feet on the ground, hire an arborist (p. 27).
c Do not let children climb trees that have branches within 25 feet of a power line.
c Do not nail or screw anything into your tree.
These symbols are used throughout this manual:
= Potential for personal injury or legal issues
= Potential for permanent damage to tree
> > > > > > > save this manual for future reference. < < < < < < <
IMPoRTANT PReCAUTIoNS

2 ~ www.treeownersmanual.info
MoDel INFoRMATIoN AND PARTS DIAGRAM
Deciduous Model(loses leaves in the autumn)
Crown (branches and leaves)
note: Flowers and fruit vary by tree type in shape and time of appearance
Ground surface
roots
Graft union*root Collar
Central leader* (one main branch that extends straight up from the trunk)
Branches
BranchBark ridge
Trunk Collar
Dripline(line on the ground under the outermost edge of a tree’s crown)
Trunk
*not present on all trees

Wyoming Tree Owner’s Manual ~ 3Wyoming Tree Owner’s Manual ~ 3
evergreen Model(keeps green leaves all year long)
Dripline (line on the ground under the outermost edge of a tree’s crown)
rootCollar
Crown
Groundsurface
RootsYour tree has been packaged in one of the following ways:
Balled and burlapped Containerized
Bare root
(no soil or packaging)
Trunk and Branches
Twine aroundbranches
Tag(s)
Trunk wrap
PACKAGING
roots
4 ~ www.treeownersmanual.info
PRe-INSTAllATIoN (PRePARING To PlANT)
Materials
c Tape measure c Phone
Instructions
Step 1: Check above ground.
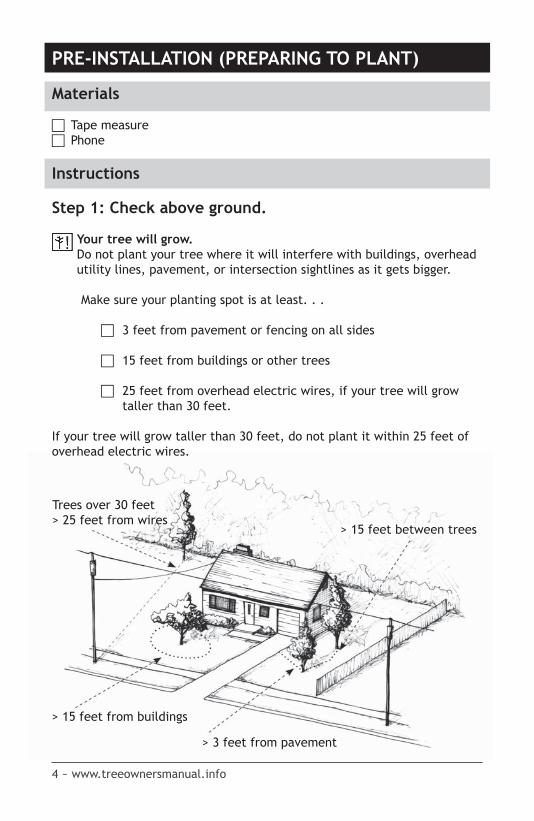
Your tree will grow.Do not plant your tree where it will interfere with buildings, overhead utility lines, pavement, or intersection sightlines as it gets bigger.
Make sure your planting spot is at least. . .
c 3 feet from pavement or fencing on all sides
c 15 feet from buildings or other trees
c 25 feet from overhead electric wires, if your tree will grow taller than 30 feet.
If your tree will grow taller than 30 feet, do not plant it within 25 feet of overhead electric wires.
Trees over 30 feet > 25 feet from wires
> 15 feet between trees
> 15 feet from buildings
> 3 feet from pavement

Wyoming Tree Owner’s Manual ~ 5
Step 2: Check below ground.
It’s the law to call.
electrical shocks can be deadly.
at least 24 hours in advance of planting, call the underground utility locating service in your area to be sure that there are no buried utilities where you want to plant. Most services will mark utilities (e.g., electric, cable, gas) for free.
Step 3: Check laws.
some government agencies have laws governing tree planting, care, and removal. Check with your town or municipality to be sure that you are complying with these regula-tions and landscape ordinances.
Call before you dig!811 or 1-800-849-2476
> 15 feet between trees
Will Your Tree Become a “Public Tree,” Under the Control of Your
City or Town?
Public trees are those located on municipal property or within the road right-of-way (rOW)– regard-less of who planted the tree.
The rOW is an extension of your city’s or town’s control beyond the street edge, oftentimes reaching 10 feet or more beyond the pavement.
Trees located within the rOW are under the jurisdiction of the municipality.
In these cases, state or local laws may dictate the type and location of trees that can be planted in the rOW. Check with your city or town regarding ordinances or policies pertaining to public trees.

6 ~ www.treeownersmanual.info
Materials
c Tape measure or yard stick
c Metal skewer, coat hanger, stout wire, or pointed screwdriver
c shovel
c sharp knife or scissors
c Hand pruner—bypass type (p. 19)
c 5 gallons of water
c 4-5 cubic feet of mulch (one wheelbarrow load or two large bags)
c large-gauge wire cutter if balled and burlapped
c Hand saw if containerized and the main root system is more than 1 inch below the soil sur-face (step 4). an inexpensive folding pruning saw works well, but any saw would work.
Instructions
If you have NoT yet read thesection on Pre-Installation (Preparing to Plant), do so now.
Do not dig until Step 6.
*Hargrave, r.; Johnson, G.; Zins, M. 2002. Planting trees and shrubs for long-term health. st. Paul, Mn: university of Minnesota extension service. 12 p.
How to Move Your Tree
Carry your tree by its root package (ball or container)—not the trunk! steady it by holding the lowest part of the trunk.
large containerized trees may be tipped onto the bottom edgeand rolled.
For balled-and-burlapped trees, you may find it easiest to place tarps or ropes under the ball as a sling.
a dolly or other cart may also beused.
Protect the trunk. even a small wound on a young tree can cause permanent damage.
INSTAllATIoN (PlANTING)*
Wyoming Tree Owner’s Manual ~ 7
Step 1. Move the tree.
Young trees are not 2 by 4’s.Do not lift or carry your tree by its trunk (unless bare root). see the sidebar on How to Move Your Tree.
Step 2. Remove trunk and branch packaging.
remove trunk wrap, twine around the branches, and labels. leave any root packaging in place for now.
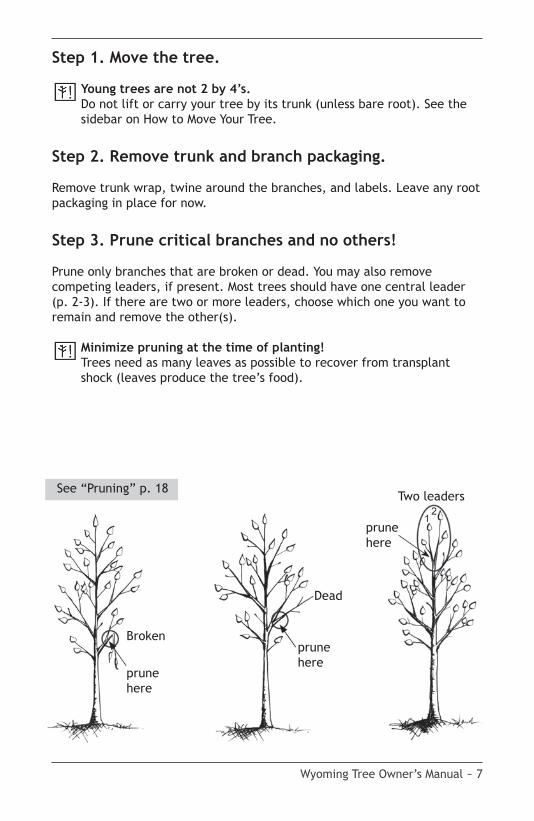
Step 3. Prune critical branches and no others!
Prune only branches that are broken or dead. You may also remove competing leaders, if present. Most trees should have one central leader (p. 2-3). If there are two or more leaders, choose which one you want to remain and remove the other(s).
Minimize pruning at the time of planting!Trees need as many leaves as possible to recover from transplant shock (leaves produce the tree’s food).
Two leaders
prune here
Dead
prune here
Broken
prunehere
see “Pruning” p. 18

8 ~ www.treeownersmanual.info
Step 4. Find the main root system, and remove excess soil.
remove soil from the top of the root ball until the top of the main root system is exposed. There should be several roots at least as big around as a pencil extending in opposite directions from the trunk. You may have to remove 2-4 inches of soil before finding the main roots.
TIP: Probe the soil ball with a wire, kabob skewer, or screwdriver to find the main root system and estimate how much soil to remove. If the roots are located more than 4 inches deep, return the tree to the place of purchase.
Bare root trees: There is no soil or root packaging to remove.
Balled-and-burlapped trees: remove the top of the root ball packaging. Cut any twine from around the trunk taking care not to nick the bark. Then bend the wire basket back off the top of the ball. remove soil from the top of the root ball until the main root system is found. You may have to cut some of the wire. leave the rest of the wire basket in place until the tree is put in the ground.
Containerized trees: remove the entire container. Pull or cut the soil off the top of the root ball until the main root system is found.
TIP: A saw works well to remove the top layer of soil. Be careful not to cut into the trunk.
Wyoming Tree Owner’s Manual ~ 9
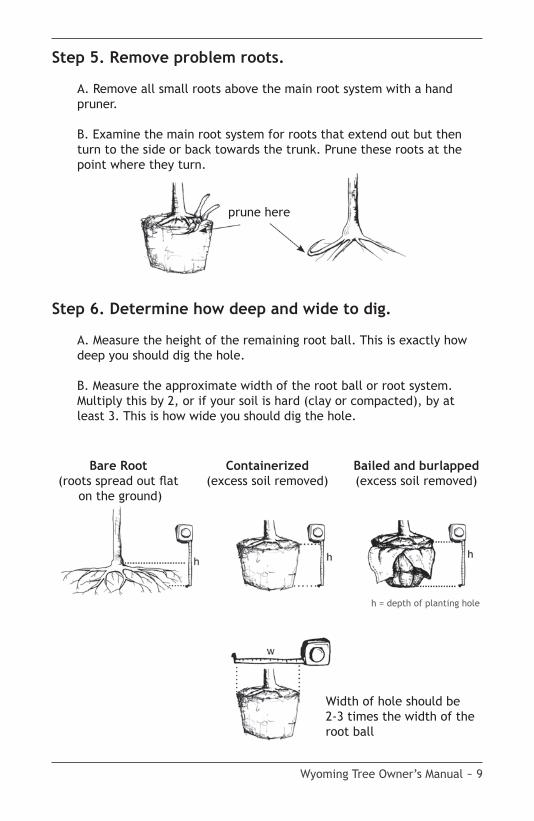
Step 5. Remove problem roots.
a. remove all small roots above the main root system with a hand pruner.
B. examine the main root system for roots that extend out but then turn to the side or back towards the trunk. Prune these roots at the point where they turn.
Step 6. Determine how deep and wide to dig.
a. Measure the height of the remaining root ball. This is exactly how deep you should dig the hole.
B. Measure the approximate width of the root ball or root system. Multiply this by 2, or if your soil is hard (clay or compacted), by at least 3. This is how wide you should dig the hole.
Bare Root(roots spread out flat
on the ground)
Containerized(excess soil removed)
Bailed and burlapped(excess soil removed)
h = depth of planting hole
Width of hole should be 2-3 times the width of the root ball
prune here

10 ~ www.treeownersmanual.info
Step 7. Dig a hole.
Do not put a $100 tree in a $10 hole. The dimensions of the hole are very important in determining the survival of your tree. Dig the hole OnlY as deep as the root system (nO deeper!).
HOle DePTH = height of root ball (h)HOle WIDTH = width of root ball (w) x 2 or 3
Step 8. Put the tree in the hole.
If the tree has a heavy root ball, slide it into the hole, and straighten the trunk.
Step 9. For balled-and-burlapped trees, remove root ball packaging.
Balled-and-burlapped trees: Without loosening the root ball, cut, peel back, and remove as much of the wire basket and burlap as possible (at least the top two-thirds).
A root ball should remain a root ball. If it starts to fall apart as you take off the wire and burlap, backfill the hole with enough soil to stabilize it. Then carefully remove the wire and burlap, and backfill as you go to keep the root ball intact.
Wyoming Tree Owner’s Manual ~ 11
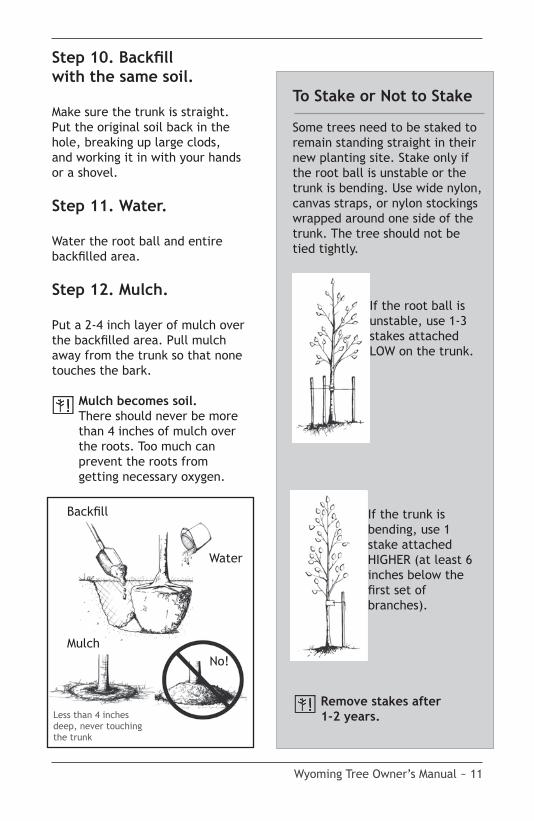
Step 10. Backfill with the same soil.
Make sure the trunk is straight. Put the original soil back in the hole, breaking up large clods, and working it in with your hands or a shovel.
Step 11. Water.
Water the root ball and entirebackfilled area.
Step 12. Mulch.
Put a 2-4 inch layer of mulch over the backfilled area. Pull mulch away from the trunk so that none touches the bark.
Mulch becomes soil. There should never be more than 4 inches of mulch over the roots. Too much can prevent the roots from getting necessary oxygen.
To Stake or Not to Stake
some trees need to be staked to remain standing straight in their new planting site. stake only if the root ball is unstable or the trunk is bending. use wide nylon, canvas straps, or nylon stockings wrapped around one side of the trunk. The tree should not be tied tightly.
If the root ball is unstable, use 1-3 stakes attached lOW on the trunk.
If the trunk is bending, use 1 stake attached HIGHer (at least 6 inches below the first set ofbranches).
Remove stakes after 1-2 years.less than 4 inches
deep, never touching the trunk
Backfill
Mulch
Water
no!

12 ~ www.treeownersmanual.info
MAINTeNANCe SCHeDUle
Follow this maintenance schedule for the life of your tree. Detailed in-structions are on the pages indicated in parentheses.
*For some tree types, pruning or removal during spring and summer requires special care toprevent disease transmission. see p. 20 for details.
n/a—not applicable
TIMelINeType of Care at planting Years 1 to 3 Years 4 to 10 after 10 years
Water (p.13) 5 gallons Correct amount is critical from spring through autumn
as needed from spring through autumn
Mulch (p.16) 2-4 inches deep, not against trunk
Check and adjust level in spring
Protect Trunk (p. 14)
as needed Check in spring and autumn
n/a
stake (p.11) Only if needed Check in spring and autumn. remove after 1-2 years
n/a n/a
Clean root Collar (p. 15)
n/a Clean root collar every year
Check for encircl-ing roots (p.9, 15)
Check before planting (p. 9)
n/a Check every 4-5 years (p. 15)
Check Health (p.17, 35)
select a healthy tree (p.35)
Inspect leaves branches, crown and trunk every year (p.17)
Check safety (p.17)
n/a Inspect in summer, winter, and after storms (p.17)
Prune* (p.7, 18-22)
Prune only critical branches or to eliminate extra leaders (p.7)
Prune lightly in year 2 or 3 (p.18-22)
every 3 years Fruit trees every 1-3 years, decidu-ous shade trees every 5 years everygreens only as needed

Wyoming Tree Owner’s Manual ~ 13
MAINTeNANCe INSTRUCTIoNS
Watering*
an important factor in tree survival is providing the right amount of water. The first 3 years are most critical, but pay attention to watering needs throughout the tree’s life.
How often and how much?
Frequency depends on soil drainage. soils that drain quickly will require more frequent watering than those that drain slowly. To determine your soil’s drainage rate, see p. 33. The best way to know how often and how much to water is to check the soil moisture at 6 inches below the surface. Water when dry.
First 3 years after planting: If the soil is dry, provide about 1-1/2 gallons of water per diameter inch of the trunk.
all other years: Because soil type and weather conditions influence the demand for water, irrigation schedules and amounts vary.
Tree roots need oxygen. soil saturated with water for more than 24 hours can prevent roots from getting oxygen. Therefore, watering too much is as dangerous as watering too little (and is harder to correct).
*Gilman, e. 1997. Trees for urban and suburban landscapes. albany, nY: Delmar Publishers. 662 p.Tree Owner’s Manual 13
RCheck every other day in fast-draining soils, weekly in slow- draining soils
Water the root ball and just beyond
First 3 years after planting:
All other years: RCheck
weekly
Water within the dripline or, for large trees, at the base and at the dripline
Where? Water the area within the dripline. For large trees, focus watering on the area within 6 feet of the trunk and at the dripline.
When? start checking soil moisture and watering when necessary in early spring, and continue until the soil freezes.

14 ~ www.treeownersmanual.info
Installing a Trunk Guard
Trunk Protection
Young deciduous trees have thin bark that can easily be damaged by animals and equipment (most commonly string trimmers and lawn mowers). Mulch does a great job of keeping grass (and therefore grass-cutting equipment) away from trunks, but rodents such as rabbits and mice like to chew on young bark (usually low on the trunk). Deer also scrape tree trunks with their antlers.
To prevent long-term damage associated with trunk wounding, install plastic tubing or hardware cloth (stiff wire fencing with 1/4-1/2 inch mesh squares) around the trunk. The tube should be big enough around to allow 1-4 inches of space between it and the trunk. It should be 1-3 feet tall (extending above the anticipated snow depth) for small rodents and as tall as possible for deer.
How? Wrap the tube around the trunk, taking care not to scratch the bark. use a few pieces of wire to keep the tube closed. Push the tube into the ground or mulch less than an inch. attach it to one or two stakes if necessary.
When? at a minimum, the trunk should be protected during the winter months (apply early in the autumn to prevent deer scraping). Protection can be applied anytime and left on all year round, as long as it does not touch the bark.
Your tree will grow. as the tree grows, the tube will need to be enlarged and eventually removed.

Wyoming Tree Owner’s Manual ~ 15
Preventing and Correcting encircling Roots*
Problem
roots that encircle the trunk will likely cause health or safety problems later. Make sure that soil or mulch is never piled against the root collar.
How to Prevent
Plant at correct depth (see Planting steps 4-7, p. 8-10). annually clean the root collar by removing soil and mulch.
How to Monitor and Correct
every 4-5 years, check for roots that encircle the trunk. use a hand trowel to loosen and remove the soil around the base of the tree until the first set of roots is found.
TIP: Removing soil with a wet-dry vacuum speeds the work without harming the roots.
If a tree has an encircling root, leave the top of the root exposed, and consult an arborist regarding treatment. When caught early, this can be an inexpensive and effective way to save your tree.
expose the root collar
R Check Yearly
root likely to become a problem (when trunk and root meet)
Problem root already touching the trunk
Covering the root collar with soil or mulch encourages encircling roots
*Johnson, G.; Fallon, D. 2007. stem girdling roots: the underground epidemic killing our trees. st. Paul, Mn: university of Minnesota.

16 ~ www.treeownersmanual.info
Mulching
Maintain a ring of mulch around the tree (the wider the better). Organic materials like wood chips and leaves are best. Wood chips will take longer to break down and, therefore, will not require replacement as often.
TIP: Newspaper kills grass. If there is grass in the area that needs to be mulched, put a 5-page layer of newspaper over the grass, and then add mulch on top (this will help keep the grass from growing up through the mulch).
Mulch becomes soil. There should never be more than 4 inches of mulch over the roots. Too much mulch or soil can prevent oxygen from reaching the roots.
Fertilizing
apply nitrogen fertilizer OnlY if diagnosis by an arborist indicates that it is necessary.
apply other fertilizers OnlY if a soil test shows that nutrients are lacking.
Do not overdose. Fertilizer that is not absorbed by the tree has the potential to alter the soil or leach out and pollute groundwater, rivers, ponds, and lakes. Overdosing with fertilizer can harm your tree.
Applying “weed and feed” to your lawn might injure or kill your tree. some combination weed killers and lawn fertilizers will injure trees. Do not use anything that states it will kill broadleaved weeds (most deciduous trees are broadleaved). Preemergent herbicides are safe to use near trees.
no!notagainst bark, <4 inches deep
R Check yearly

Wyoming Tree Owner’s Manual ~ 17
Checking Tree Health
Tree health can be difficult to determine, but checking your tree yearly may help you notice problems as they appear.
Is the current year’s growth much less than past years’ growth? Fast growth does not mean good health, but a dramatic reduction in growth rate may be an indication of poor health.
TIP: look at the branch tips or tree top. Current year’s branches will typically be smaller in diameter and a different color.
also inspect the size, color, and distribution of the leaves. look at individual leaves as well as the whole crown for differences between branches or sections of the crown.
Inspect the base of the trunk for damage (e.g., from rodents or string trimmers).
also inspect the base of the tree to see if there is a flat side to the trunk.
If anything is found, follow the guidance in the Troubleshooting section, p. 29-30.
Checking Tree Safety
Healthy trees can fall down. a tree may be green and lush, but that does not guarantee that it is structurally safe.
Inspect trees anytime, but especially after storms. examine the crown, branches, trunk, and area around the roots for these common dangers:
• Broken, dead, or hanging branches• Cracks, fungi, and cavities• Weak trunk or branch unions• encircling root compressing the
trunk (a flat-sided trunk at the ground level is a good indicator). see illustration above.
• recent lean (especially if the soil or grass has lifted on one side).
If anything is found, or if in doubt, contact an arborist, p. 27.
Branch unions
strong—bark pushed out
Weak— bark grown in

18 ~ www.treeownersmanual.info
Pruning*
Pruning can be dangerous work. Follow these safety precautions to be sure you are around to enjoy your tree.
electricity flows through branches. never prune trees or branches that are within 10 feet of utility lines; instead contact your local utility company.
ladders and trees do not mix. If pruning cannot be done with both feet on the ground, hire an arborist (p. 27).
Chainsaws cut limbs. If power equipment is required, hire an arborist (p. 27).
The main reasons for pruning trees are safety, health, and esthetics. Pruning can encourage trees to develop a strong structure and reduce the likelihood of damage during severe weather.
Pruning for safety involves removing branches that could fall and cause injury or property damage, trimming branches that interfere with lines of sight on streets or driveways, and removing branches that grow into utility lines.
Pruning for health involves removing diseased or insect-infested wood, thinning the crown to increase airflow and reduce some pest problems, and removing crossing and rubbing branches.
Pruning for esthetics involves enhancing the natural form and character of trees or stimulating flower production.
*except where noted, this section has been adapted in part, from: Bedker, P.; O’Brien, J.; Mielke, M. 1995. How to prune trees. [newtown square], Pa: usDa Forest service northeastern area. 30 p.

Wyoming Tree Owner’s Manual ~ 19
Where to Cut
support the branch with one hand while you make the cut to prevent the bark from ripping. If the branch is too large to support, use the three-step method (see details below).
For the final cut, look for the branch bark ridge and trunk collar. Begin the cut just outside of the branch bark ridge, and angle down away from the trunk. stay close to the trunk collar without cutting into it (see images below).
Three-step method1. Cut one-third of the
way through the branch on the under side.
2. Go 2-4 inches beyond the undercut to re-move the branch.
3. Make the final cut just outside the branch bark ridge and trunk collar.
branch bark ridge
trunk collar
Hand pruner—bypass type lopper—bypass type
Hand saw Pole saw or pruner
Bypass blades cross each other like those in a scissors.
Pruning saws usually have curved blades with teeth that cut when you pull.
Bow saws can be used, but it is often difficult to fit the saw between branches to make the correct pruning cut.
BeST
oK
small branch
largerbranch
final cut
Pruning tools

20 ~ www.treeownersmanual.info
How often
Beginning 2 years after planting, prune lightly every year or every other year. after 10 years, frequency of pruning depends on the type of tree and amount of shade the canopy receives.
Do not remove more than 25 percent of the tree’s live branches (and therefore leaves) at any one time.
* Pruning lightly and more frequently is better than pruning heavily and less often. ** evergreen trees usually need pruning only if they are diseased or their branches need to be raised up from the ground. In either case, prune off the entire branch (p. 19).
removal of the following can be done every year:• Broken, dead, or rubbing branches• Branches sprouting from the base of the trunk.
Time of Year
Winter is best time of year to prune because branches are easy to see, diseases cannot be spread, and there is minimal stress to the tree. But for most trees, pruning can be done at any time. exceptions are trees that are prone to fire blight.
Trees susceptible to fire blight include mountain ash, apple, crabapple, hawthorn, and pear. To minimize disease infection follow the pruning guidelines on the next page.
Tree Type First 10 years 10+ Years after Planting
Fruit trees Once every 1-2 years Once every 1-3 years
Deciduous shade trees Once every 1-2 years Once every 4-7 years*
evergreen trees Only as needed** Only as needed**
Wyoming Tree Owner’s Manual ~ 21
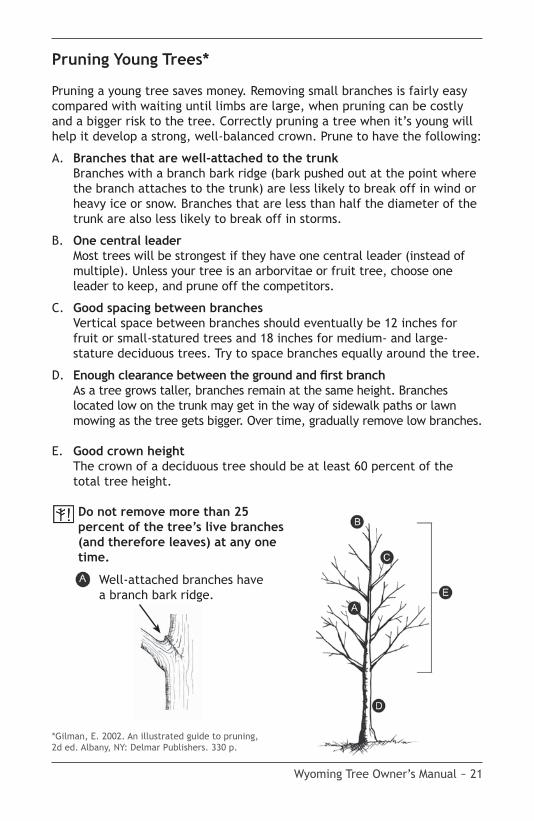
Pruning Young Trees*
Pruning a young tree saves money. removing small branches is fairly easy compared with waiting until limbs are large, when pruning can be costly and a bigger risk to the tree. Correctly pruning a tree when it’s young will help it develop a strong, well-balanced crown. Prune to have the following:
a. Branches that are well-attached to the trunk Branches with a branch bark ridge (bark pushed out at the point where
the branch attaches to the trunk) are less likely to break off in wind or heavy ice or snow. Branches that are less than half the diameter of the trunk are also less likely to break off in storms.
B. one central leader Most trees will be strongest if they have one central leader (instead of
multiple). unless your tree is an arborvitae or fruit tree, choose one leader to keep, and prune off the competitors.
C. Good spacing between branches Vertical space between branches should eventually be 12 inches for
fruit or small-statured trees and 18 inches for medium- and large- stature deciduous trees. Try to space branches equally around the tree.
Well-attached branches have a branch bark ridge.
D. enough clearance between the ground and first branch as a tree grows taller, branches remain at the same height. Branches
located low on the trunk may get in the way of sidewalk paths or lawn mowing as the tree gets bigger. Over time, gradually remove low branches.
e. Good crown height The crown of a deciduous tree should be at least 60 percent of the
total tree height.
Do not remove more than 25 percent of the tree’s live branches (and therefore leaves) at any one time.
*Gilman, e. 2002. an illustrated guide to pruning, 2d ed. albany, nY: Delmar Publishers. 330 p.

22 ~ www.treeownersmanual.info
Topping*: (Also called stubbing, heading, tipping, hat-racking, dehorning, or roundover)
Topping is not pruning. Topping is the indiscriminate removal of branch ends. Topping injures and ultimately results in early failure or death of a tree.
TIP: If the end of the branch must be removed, cut it back to a side branch that is at least one-third (preferably one-half) the diameter of the branch being cut.
Myth: Topping will make the tree easierto maintain.Truth: Topped trees can regain their original height quickly, often in 2 years. a topped tree will require more attention than a properly pruned tree because of the fast growing, loosely attached shoots that form.
Myth: Topping invigorates a tree.Truth: Topping immediately injures a tree and starts it on a downward spiral. Topping wounds expose the tree to decay and invasion from insects and disease. While a tree may survive topping, its life span will be significantly reduced.
Myth: Topped trees will add value to your property.Truth: Topped trees lack natural beauty and may actually reduce your property values. also, a topped tree can become hazardous and cause property damage, making it a liability.
*adapted, with permission, from the “experts agree: Don’t Top Your Tree” campaign which was developed by the Missouri Community Forestry Council and Forest releaf of Missouri, with financial assistance currently provided by the Missouri Department of Conservation.
Topped tree
Topped tree with regrowth

Wyoming Tree Owner’s Manual ~ 23
PrZ radius (ft) = 1.0 or 1.5 x trunk diameter (in)
PRoTeCTING TReeS FRoM CoNSTRUCTIoN DAMAGe*
are you planning to build or remodel a home? are you going to expand or pave your driveway? are your city’s streets, curbs, sidewalks, and buried utilities about to be widened, modernized, or replaced? Before construction begins, consider the impact on trees.
Careful tree protection will help you avoid the expense and heartache of later repairing or removing trees that were located too close to construction activities (see “How Close is Too Close?” below). Depending on the type of construction and proximity to trees, you may be able to protect the trees yourself, or it may be best to consult with an arborist to design, implement, and enforce a tree protection plan.
Start planning early. To minimize costs and increase the likelihood of successful tree preservation, start tree protection planning as soon as possible.
How Close Is Too Close? Defining The Protected Root Zone (PRZ)
The tree’s Protected root Zone (PrZ) can be identified as follows:
1. Measure the diameter (width) of the trunk at chest height, to the nearest inch. To do this, either wrap a tape measure around the trunk and divide that number by 3 or hold a yard stick up to the trunk and approximate the distance.
2. Multiply that number by 1.5 for mature or stressed trees or by 1.0 for young, healthy trees. express the result in feet.
3. Measure that distance from the trunk of the tree. The area within this radius is the Protected root Zone (PrZ).
*adapted, with permission, from: Johnson, G. 1999. Protecting trees from construction damage: a homeowner’s guide. st. Paul, Mn: university of Minnesota extension. 21 p.

24 ~ www.treeownersmanual.info
The activities listed below all negatively impact tree roots. To protect your trees, define the Protected root Zone (PrZ), and keep these activities away from this area, at a minimum.
Storing Materials and Moving equipmentsoil compaction is one of the main killers of urban trees. stockpiling building materials, using heavy machinery, and excessive foot traffic all compact the soil. To minimize damage, install orange polypropylene or chain link fencing and post “Off limits” signs around the PrZ of the trees you plan to save. Check the fence often to be sure that it is still intact and serving as a barrier.
Changing the Grade adding or removing as little as 2 inches of soil in the PrZ can kill a tree. To minimize damage, consult an arborist about methods to protect the roots if fill needs to be added or soil needs to be removed within the PrZ.
excavating If utility or irrigation lines cannot be relocated outside the tree’s PrZ, reduce root damage by requiring tunneling under the tree’s root system (instead of trenching through it). specialized equipment that blows soil away from the roots using compressed air allows utilities to be placed with very little root damage. Otherwise soil tunneling equipment can be used, reducing root damage by up to 25 percent compared with trenching.
For all digging operations, insist that exposed roots be cut cleanly to promote quick wound closure and regeneration. Vibratory plows, chain trenchers, stump grinders, and hand tools do a better job at this than bulldozers and backhoes.
avoid excavating during hot, dry weather; keep the plants well watered before and after digging; and cover exposed roots with soil, mulch, or damp burlap as soon as possible.
Paving To minimize damage, keep walkways at least 3 feet from the anticipated mature trunk.
Trench
tunnelunderroots
excavate with air and snake utilities under roots

Wyoming Tree Owner’s Manual ~ 25
ReCoRD oF TRee TYPeS AND loCATIoNS
use this space to keep a record of trees planted on your property. Map tree locations on p. 26.
ID Tree Type/ Species
Where Purchased
Date Purchased
Date Planted
Warranty Period
Mature Height Max Width
a Heritage river birch
Greens nursery 4/29/07 5/01/07 1 year 40-50’ 50’

26 ~ www.treeownersmanual.info
sketch the location of your house and all trees on your property. label each tree with a letter (a, B, C, etc.) to match the record on the previous page (use a pencil to draw). each square can represent 2, 5, or 10 feet, depending on the size of your yard.
Sample:Key:
Deciduous
evergreen

Wyoming Tree Owner’s Manual ~ 27
SeRVICe AND RePAIR
How to Hire an Arborist*
You can find arborists listed in the phone directory, usually under “Tree service.” When selecting an arborist, look for the following qualifications:
c education (degree in arboriculture, urban forestry, forestry, horticulture)
c Membership in Professional organization(s) Organizations include the International society of arboriculture (Isa),
Tree Care Industry association (TCIa), american society of Consulting arborists (asCa), and your state’s arborist association. such membership demonstrates a willingness to stay current on techniques and information.
c ISA Certification or State Certification/license Certified or state-licensed arborists are experienced professionals who have
passed an examination and meet requirements for on-going education.
c Proof of Insurance a reputable arborist carries personal and property damage insurance
($1 million per occurrence, $2 million aggregate) and worker’s compensation insurance ($1 million). If an arborist is uninsured, homeowners could be held responsible for damages and injuries that occur as a result of the tree work. request certificates, and phone the insurance agency to verify. ask if the entire job will be performed by employees of the tree care company bidding the job. If not, ask for insurance certificates from all independent contractors as well.
c Necessary Permits and licenses some governmental agencies require contractors to apply for
permits, a license, or both, before they are able to work. Be sure contractors comply with any local, state, provincial, or national laws.
other Advice• Ask for references and speak to former clients.• Get more than one estimate.• Do not automatically accept the lowest bid.• Never pay in advance.• Be wary of door-to-door sales. These are especially common after
storms. Know that good arborists perform only accepted practices and wear safety equipment. For example, topping a tree and using climbing spikes for pruning are unacceptable. safety equipment includes hard hats and ear protection.
• Get it in writing. When will the work be started and completed? Who will be responsible for clean-up? What is the hourly rate for additional work?
*adapted, with permission, from: International society of arboriculture. 2004. Why hire an arborist? Champaign, Il. 4p.

28 ~ www.treeownersmanual.info
Record of Service
record work completed on your trees. use the tree letter from the record on page 26.
Tree ID Date: Type of Maintenance Completed: Work Performed By: Date of Next
Service:

Wyoming Tree Owner’s Manual ~ 29
TRoUBleSHooTING
If you see: Potential cause: You should:
TRUNK
a flat-sided trunk at the base of the tree
encircling root restricting the flow of water and nutrients between the roots and rest of the tree
excavate to check for encircl-ing root (see p. 15)
Bark damage near the bottom of the tree rodent or string trimmer
apply mulch/trunk guard to protect from future damage (see p. 14, 16)
an elm tree with liquid oozing from the trunk slime flux or wetwood not worry about health
BRANCHeSan elm tree with bright yellow leaves on one or two branches Dutch elm disease Immediately call your town/
city or an arborist
Webs in the branches or webs covering the tips of branches
Fall webworm or eastern tent caterpillar not worry about health
Many branch tips snipped off and laying on the ground squirrel damage not worry about health
Black clumps on branches of a cherry tree Black knot Call for advice*
Very little growth Many Call for advice*
Hole in trunk or branches Many Call for advice*
leAVeSleaves sticky and covered with a black velvety coating (like soot)
Piercing, sucking insect and sooty mold
not worry. Hose down the leaves to get rid of sap.
leaves wilted Many Call for advice*
spots on leaves Many Call for advice*
small leaves Many Call for advice*
sparse leaves Many Call for advice*
Yellow or brown leaves Many Call for advice*
Holes in leaves Insect feeding not worry about health
Bumps on leaves Many not worry about health
*Call an arborist or your local tree care specialist (next page).

30 ~ www.treeownersmanual.info
oTHeR SoURCeS oF HelP
arborists can provide good information about the health of your tree, and several communities have city foresters/arborists that may be of assistance. In addition, the university of Wyoming Cooperative extension service may be able to assist with tree health questions in your community. Other resources that may also be of assistance in your county include conservation districts, local natural resource Conservation service offices and Wyoming state Forestry Division district offices (see contact information below).
International Society of Arboriculture Certified Arborists:http://www.isa-arbor.com/home.aspx
University of Wyoming Cooperative extension Service: http://www.uwyo.edu/ces/
Wyoming Association of Conservation Districts: http://www.conservewy.com/index.htm
Natural Resource Conservation Service: http://www.wy.nrcs.usda.gov/
Wyoming State Forestry Division: http://lands.state.wy.us/

Wyoming Tree Owner’s Manual ~ 31
IN THe eVeNT oF AN eMeRGeNCYlarge branch or tree on the ground If it is near a downed utility line, do not go near the tree! Call the utility company. If it is in the street, contact the city. If it is in your yard, call an arborist to have it removed.
Tree or branches on utility line stay away from the tree! Call your utility company.
Branches broken, still hanging in the crown Call an arborist (p. 27) to have the “hangers” removed, and make clean cuts at a lateral branch or bud (p. 2, 19).
Heavy snow or ice weighting down the branches stay in a protected area, out from underneath the branches. some limbs may break. Once the ice is gone, check for safety (p. 17), and call an arborist if necessary. Many branches return to their original state after severe bending.
Tree hit by vehicle If possible, get the license plate number, name, and insurance information of the driver. Document the tree’s injuries with photographs. Contact an arborist to evaluate the damage (p. 27).
Wounded trunk use a scissors or hand pruner (p. 19) to cut off any loose bark. Monitor health (p. 17). Do not apply “wound paint.”
Chemical spill around tree Call an arborist (p. 27), asking for someone with experience in soil contamination.
Root severed Photograph and call an arborist to assess safety and make treatments as necessary.
Flooding Monitor the trunk to see if it begins to lean in one direction. Check the ground area around the roots to see if the soil or grass has lifted. If so, contact an arborist right away for a safety assessment. Monitor the tree’s health over time (p. 17). It may take a year or more for symptoms to appear.
lightning or storm damage Call an arborist to assess safety and make necessary treatments.
Trunk nicked by lawn care equipment (weed trimmer or lawn mower) stop doing that! Create a mulch ring around the tree to eliminate grass (p. 16), or use a trunk protector (p. 14).
32 ~ www.treeownersmanual.info
ReMoVAl AND DISPoSAl
Whole Tree
electricity flows through branches. If the tree or branches are within 10 feet of utility lines, contact your local utility company for information on assistance in removal.
To remove a large tree, hire an arborist. If you are interested in having the tree milled into lumber, you could find someone with a portable sawmill in your area. You may also try contacting local woodworkers and technical schools to see if they would like the wood.
Disposing of debris:
Option 1: The arborist can remove the wood for you.Option 2: If you or someone you know could use the tree for firewood, ask the arborist to cut and leave the wood for you in moveable chunks. If you do not know anyone who needs firewood, consider advertising it on community bulletin boards (e.g., at local grocery stores).
Insects and diseases are hitch hikers. Many insects and diseases can be spread by moving firewood. To be safe, do not transport firewood to another town.
Trimmings
Check with your city or town for compost sites that accept tree branches and leaves.
leaves
If you live in the city, keep leaves out of the street to avoid clogging storm sewers and polluting water (nutrients from leaves get leached into the storm drains, which typically lead directly to lakes and rivers). leaves can be used as mulch around your trees and in your garden beds or taken to your city’s compost site. Check with your city to find out if they will collect leaves left on the curb in the autumn.

Wyoming Tree Owner’s Manual ~ 33
BUYING A NeW TRee
Decide on the type of tree
TIP: Matching a tree to your particular site is critical to avoid conflicts and ensure the long term health of the tree. Below are several factors you should consider in determining which type of tree is adaptable to your particular site. Determining these factors will help to narrow down your search and give you more information for choosing a specific tree species.
Check for above ground and below ground conflicts (p. 4-5). Then examine these important factors:
location If within 25 feet of overhead utility wires, choose a tree that will not get taller than 30 feet.
Cold Hardiness Find your cold hardiness zone by contacting the university extension service, garden center, or at: www.usna.usda.gov/Hardzone. select a tree with a number the same or less than your zone.
Soil Drainage Check how quickly water soaks into the ground by digging a hole 18 inches deep and filling it with water. let it drain completely. refill it with water, and time how long it takes for the water to drain.
less than 2 hours = Very Fast18 hours or more = Very slow
Soil pH use a pH meter (for sale at garden centers) or get a soil test (contact university extension services).
Sun exposure Is the area mostly sunny, mostly shady, or partly sunny?
Fill out the following work-sheet to help choose a tree for your site.
Cold Hardiness Zone (write in)
soil Drainage (circle one):
Very fast Medium Very slow
soil pH (circle one): 5.5 6.0 6.5 7.0 7.5 8.0 8.5
acidic alkaline
sun exposure (circle one):
Desired tree features (check all):
Mostly sunny
Morning or afternoon sun
Mostly shady
c spring flowersc summer flowers c autumn leaf color c attract birdsc no messy fruit
c Provide shade c shortc Mediumc Tall

34 ~ www.treeownersmanual.info
SeleCT A HIGH qUAlITY TRee AT THe NURSeRY
Crown height shouldbe at least 60 percent of the total tree height for deciduous trees, 75 percent for evergreens.
One central leader is ideal. If not present, make sure that it can easily be pruned to one leader.
There should not be more than 4 inches of soil over the roots. use a metal kabob skewer or other heavy wire to push through the soil to find the depth to the first roots (roots that are at least as big around as a pencil).
The bark should be free of scrapes or cracks (remove trunk wrap to check underneath).
The trunk should be centered in the soil and should not move independently of the root ball
ADDITIoNAl SoURCeS oF INFoRMATIoNTree Owner’s Manual Web site www.treeownersmanual.info national association of state Foresters www.stateforesters.org/ International society of arboriculture www.treesaregood.org Treelink www.treelink.org american Forests www.americanforests.org arbor Day Foundation www.arborday.org Tree Care Industry association www.treecareindustry.org Forest service www.na.fs.fed.us/urbanInternational society of arboriculture, rocky Mt. Chapter www.isarmc.org/society of Municipal arborists www.urban-forestry.com/Tree Board university www.treeboardu.org/urban natural resource Institute www.unri.org/american Grove thegrove.americangrove.org/
Wyoming Tree Owner’s Manual ~ 35
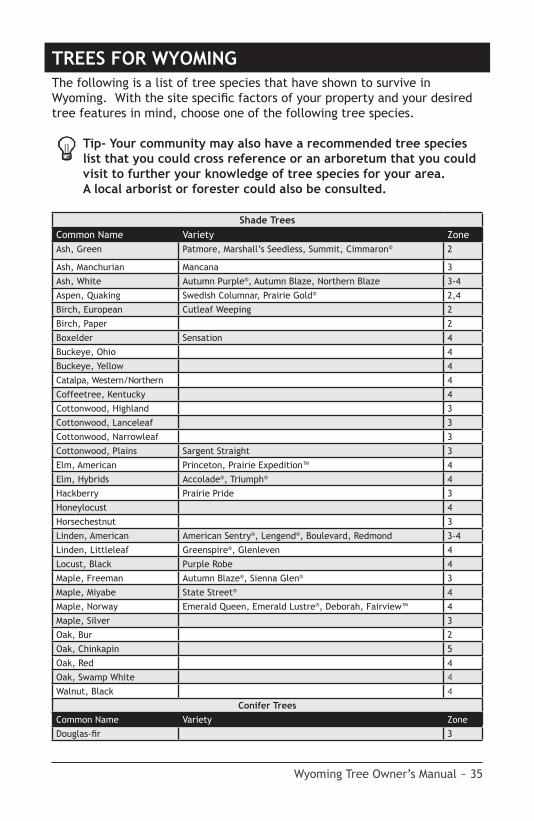
Shade TreesCommon Name Variety ZoneAsh, Green Patmore, Marshall’s Seedless, Summit, Cimmaron® 2
Ash, Manchurian Mancana 3
Ash, White Autumn Purple®, Autumn Blaze, Northern Blaze 3-4
Aspen, Quaking Swedish Columnar, Prairie Gold® 2,4
Birch, European Cutleaf Weeping 2
Birch, Paper 2
Boxelder Sensation 4
Buckeye, Ohio 4
Buckeye, Yellow 4
Catalpa, Western/Northern 4
Coffeetree, Kentucky 4
Cottonwood, Highland 3
Cottonwood, Lanceleaf 3
Cottonwood, Narrowleaf 3
Cottonwood, Plains Sargent Straight 3
Elm, American Princeton, Prairie Expedition™ 4
Elm, Hybrids Accolade®, Triumph® 4
Hackberry Prairie Pride 3
Honeylocust 4
Horsechestnut 3
Linden, American American Sentry®, Lengend®, Boulevard, Redmond 3-4
Linden, Littleleaf Greenspire®, Glenleven 4
Locust, Black Purple Robe 4
Maple, Freeman Autumn Blaze®, Sienna Glen® 3
Maple, Miyabe State Street® 4
Maple, Norway Emerald Queen, Emerald Lustre®, Deborah, Fairview™ 4
Maple, Silver 3
Oak, Bur 2
Oak, Chinkapin 5
Oak, Red 4
Oak, Swamp White 4
Walnut, Black 4
Conifer TreesCommon Name Variety Zone
Douglas-fir 3
The following is a list of tree species that have shown to survive in Wyoming. With the site specific factors of your property and your desired tree features in mind, choose one of the following tree species.
Tip- Your community may also have a recommended tree species list that you could cross reference or an arboretum that you could visit to further your knowledge of tree species for your area. A local arborist or forester could also be consulted.
TreeS for WYoming

36 ~ www.treeownersmanual.info
Fir, White 4
Juniper, rocky Mountain 3
Juniper, utah 4
larch, european 2
larch, siberian 2
larch, Western 4
Pine, austrian 3
Pine, Bristlecone 4
Pine, limber 3
Pine, lodgepole 2
Pine, Pinyon 3
Pine, Ponderosa 3
Pine, scotch 3
Pine, southwestern White 5
redcedar, eastern 2
spruce, Black Hills 2
spruce, Colorado Blue 2
spruce, engelmann 2
spruce, norway 3
ornamental & Fruit TreesCommon name Variety Zone
apple several varieties 3-5
apricot Manchurian, siberian 3
Birch, Western Water 3
Cherry, sour Montmorency, north star, Meteor 4
Chokecherry Canada red 2
Crabapple several varieties 3-4
Hawthorn, Downy 4
Hawthorn, russian 4
Hawthorn, Thornless Cockspur
4
Hawthorn, Toba 4
Ironwood (american Hop-hombeam)
3
Maple, amur 2
Maple Bigtooth (Canyon Maple)
3
Maple, shantung 4
Maple, Tatarian Hot Wings® 2
Mayday Tree 3
Mountain ash, european 3
Mountain ash, Oakleaf 3
Mountain ash, showy 2
Oak, Gambel 3
Pear, Callery autumn Blaze, Chanticleer 5
Pear, ussurian Burgundy, Prairie Gem 3
Plum, american 2
Plum, Canadian Princess Kay 2
Plum european stanley 4
Tree lilac, Japanese Ivory silk 4

TRANSPoRTING YoUR TReeMoving your tree is easiest if the branches are tied.
Do not lift by the trunk if the roots are packaged with soil in a container or bur-lap. Instead, lift the root ball (see the sidebar on How to Move Your Tree, p. 6).
If your tree has leaves and will be sticking out the back of a vehicle, the crown should be wrapped with a sheet, tarp, or burlap.
Wrap branches with a sheet or tarp!
For additional copies of this publication contact the Wyoming state Forestry Division at (307) 777-7586 or download at: http://lands.state.wy.us/
This publication was funded by a grant from the usDa Forest service, state and Private Forestry Program. The usDa is an equal opportunity provider and employer.
Before you leave the Nursery or Garden Center, write down:• Where tree was purchased • Date of purchase • Warranty period (years)
The use of trade or firm names in this publication is for reader information and does not imply endorsement of the u.s. Department of agriculture of any product or service. The u.s. Department of agriculture (usDa) prohibits discrimination in all its programs and activities on the basis of race, color, national origin, age, disability, and where applicable, sex, marital status, familial status, parental status, religion, sexual orientation, genetic informa-tion, political beliefs, reprisal, or because all or part of an individual’s income is derived from any public assistance program. (not all prohibited bases apply to all programs.) Persons with disabilities who require alternative means for communication of program information (Braille, large print, audiotape, etc.) should contact usDa’s TarGeT Center at (202) 720-2600 (voice and TDD). To file a complaint of discrimination, write to usDa, Director, Office of Civil rights, 1400 Independence avenue, s.W., Washington, D.C. 20250-9410, or call (800) 795-3272 (voice) or (202) 720-6382 (TDD). usDa is an equal opportunity provider and employer.
Tree fits in bed Tree hangs out back of vehicle
SToRING YoUR TRee UNTIl PlANTING
Keep the soil around the roots moist to the touch. store in a shady spot.
For bare root trees, pack wet newspapers, sawdust, or mulch around the roots, and wrap them in a big plastic bag. Plant the tree as soon as possible (within 2 days). The biggest risk to bare root trees is the roots drying out.
For balled-and-burlapped or containerized trees, if you cannot plant the tree within 24 hours, water the roots well and either cover the entire root ball with mulch or wrap the root ball in plastic or a tarp. Keep the soil moist to the touch.
• Type of tree (species) • Mature height and width

The original Tree Owner’s Manual was developed by the USDA Forest Ser-vice, Northeastern Area. Their manual contains the latest in tree care practic-es and is a comprehensive handbook for tree care information and guidance. Knowing their manual is the standard guide for tree owner’s and therefore would be virtually impos-sible to improve upon; we chose to make several minor revisions and additions to customize the manual to Wyoming. With the authors’ permission we renamed it the Wyoming Tree Owner’s Manual.
Thanks to the USDA Forest Service for their hard work and foresight in developing the Tree Own-er’s Manual and allowing us to customize it to our state. We hope this guide is useful to you in planting and caring for your trees.
Mark Hughes, Mark Ellison,
Wyoming State
Forestry Division Wyoming Tree OWner’s Manual