Transparency in Government Act (TIGA) Payments and ... · then select the TIGA - Payments and...
22
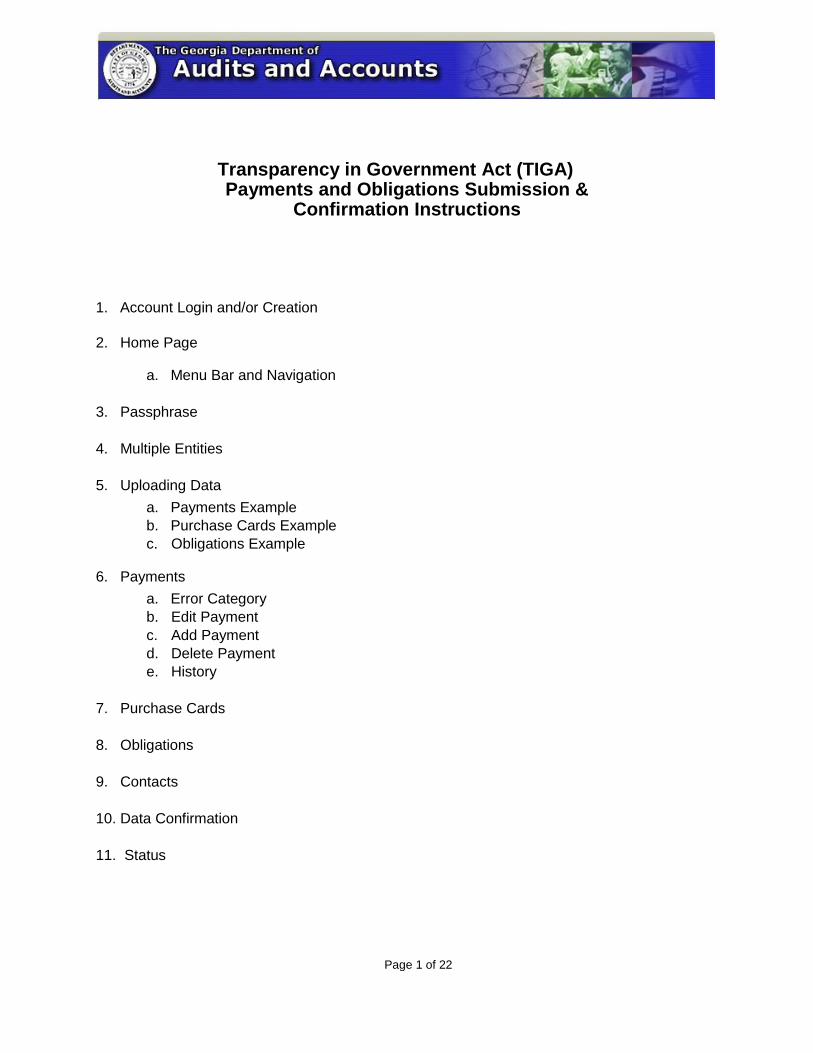
Page 1 of 22 Transparency in Government Act (TIGA) Payments and Obligations Submission & Confirmation Instructions 1. Account Login and/or Creation 2. Home Page a. Menu Bar and Navigation 3. Passphrase 4. Multiple Entities 5. Uploading Data a. Payments Example b. Purchase Cards Example c. Obligations Example 6. Payments a. Error Category b. Edit Payment c. Add Payment d. Delete Payment e. History 7. Purchase Cards 8. Obligations 9. Contacts 10. Data Confirmation 11. Status
Transcript of Transparency in Government Act (TIGA) Payments and ... · then select the TIGA - Payments and...
Page 1 of 22
Transparency in Government Act (TIGA) Payments and Obligations Submission &
Confirmation Instructions
1. Account Login and/or Creation
2. Home Page
a. Menu Bar and Navigation
3. Passphrase
4. Multiple Entities
5. Uploading Data
a. Payments Example
b. Purchase Cards Example
c. Obligations Example
6. Payments
a. Error Category
b. Edit Payment
c. Add Payment
d. Delete Payment
e. History
7. Purchase Cards
8. Obligations
9. Contacts
10. Data Confirmation
11. Status
Page 2 of 22
Account Login and/or Account Creation – go to the Georgia Department of Audits and Accounts (DOAA) website at http://www.audits.ga.gov/auth. For the “Account Creation Instructions” go to http://www.audits.ga.gov/Resources/External_Account_Creation_and_Login_Instructions.pdf, then select the TIGA - Payments and Obligations Submission application.
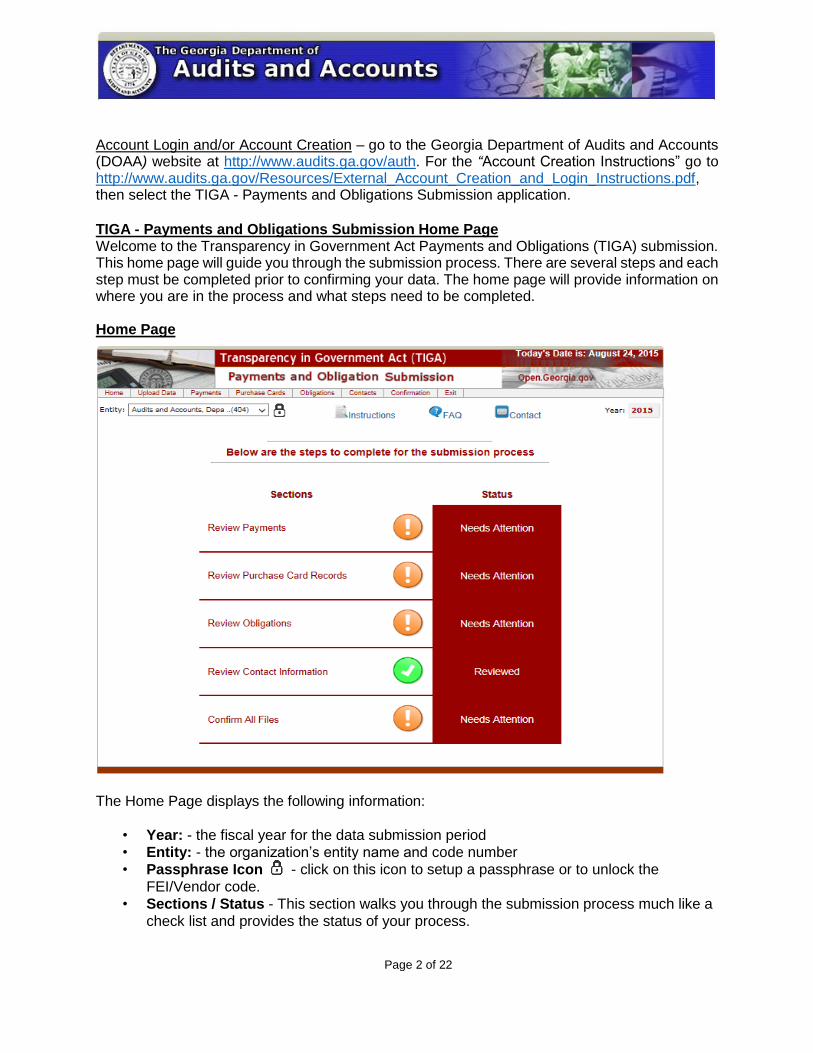
TIGA - Payments and Obligations Submission Home Page Welcome to the Transparency in Government Act Payments and Obligations (TIGA) submission. This home page will guide you through the submission process. There are several steps and each step must be completed prior to confirming your data. The home page will provide information on where you are in the process and what steps need to be completed. Home Page
The Home Page displays the following information:
• Year: - the fiscal year for the data submission period • Entity: - the organization’s entity name and code number
• Passphrase Icon - click on this icon to setup a passphrase or to unlock the
FEI/Vendor code.
• Sections / Status - This section walks you through the submission process much like a
check list and provides the status of your process.
Page 3 of 22
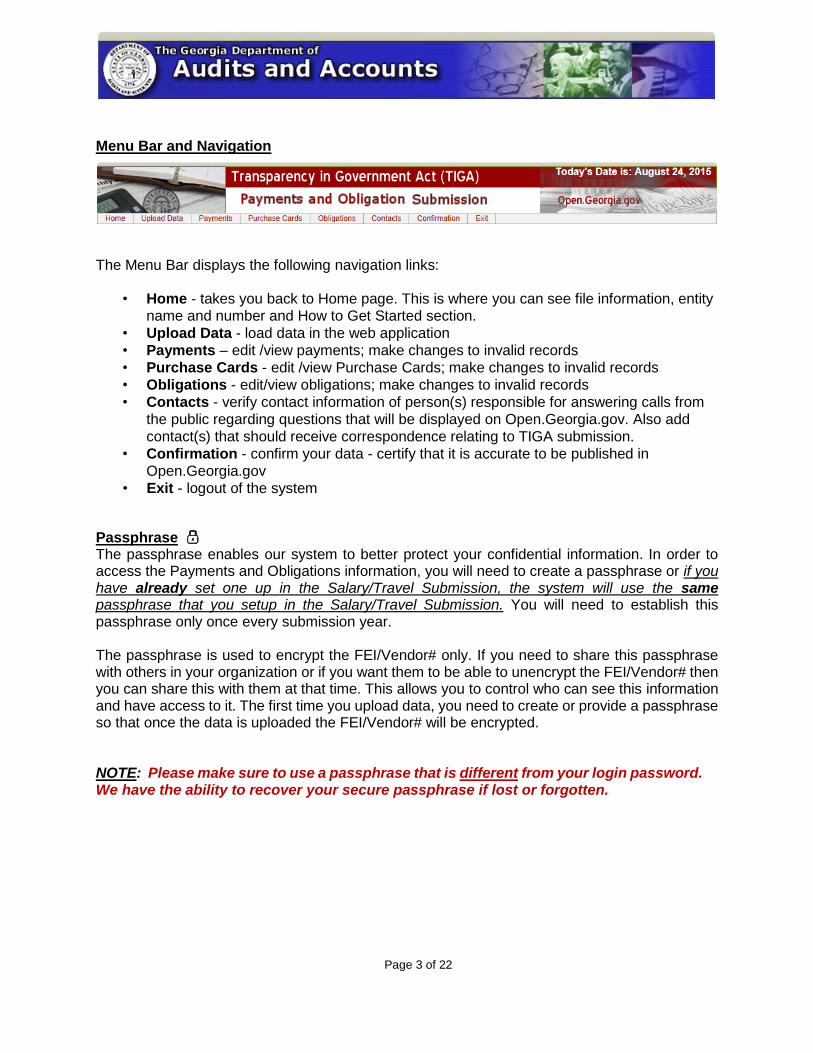
Menu Bar and Navigation
The Menu Bar displays the following navigation links:
• Home - takes you back to Home page. This is where you can see file information, entity name and number and How to Get Started section.
• Upload Data - load data in the web application
• Payments – edit /view payments; make changes to invalid records
• Purchase Cards - edit /view Purchase Cards; make changes to invalid records
• Obligations - edit/view obligations; make changes to invalid records
• Contacts - verify contact information of person(s) responsible for answering calls from
the public regarding questions that will be displayed on Open.Georgia.gov. Also add
contact(s) that should receive correspondence relating to TIGA submission.
• Confirmation - confirm your data - certify that it is accurate to be published in
Open.Georgia.gov
• Exit - logout of the system
Passphrase The passphrase enables our system to better protect your confidential information. In order to access the Payments and Obligations information, you will need to create a passphrase or if you have already set one up in the Salary/Travel Submission, the system will use the same passphrase that you setup in the Salary/Travel Submission. You will need to establish this passphrase only once every submission year. The passphrase is used to encrypt the FEI/Vendor# only. If you need to share this passphrase with others in your organization or if you want them to be able to unencrypt the FEI/Vendor# then you can share this with them at that time. This allows you to control who can see this information and have access to it. The first time you upload data, you need to create or provide a passphrase so that once the data is uploaded the FEI/Vendor# will be encrypted. NOTE: Please make sure to use a passphrase that is different from your login password. We have the ability to recover your secure passphrase if lost or forgotten.
Page 4 of 22
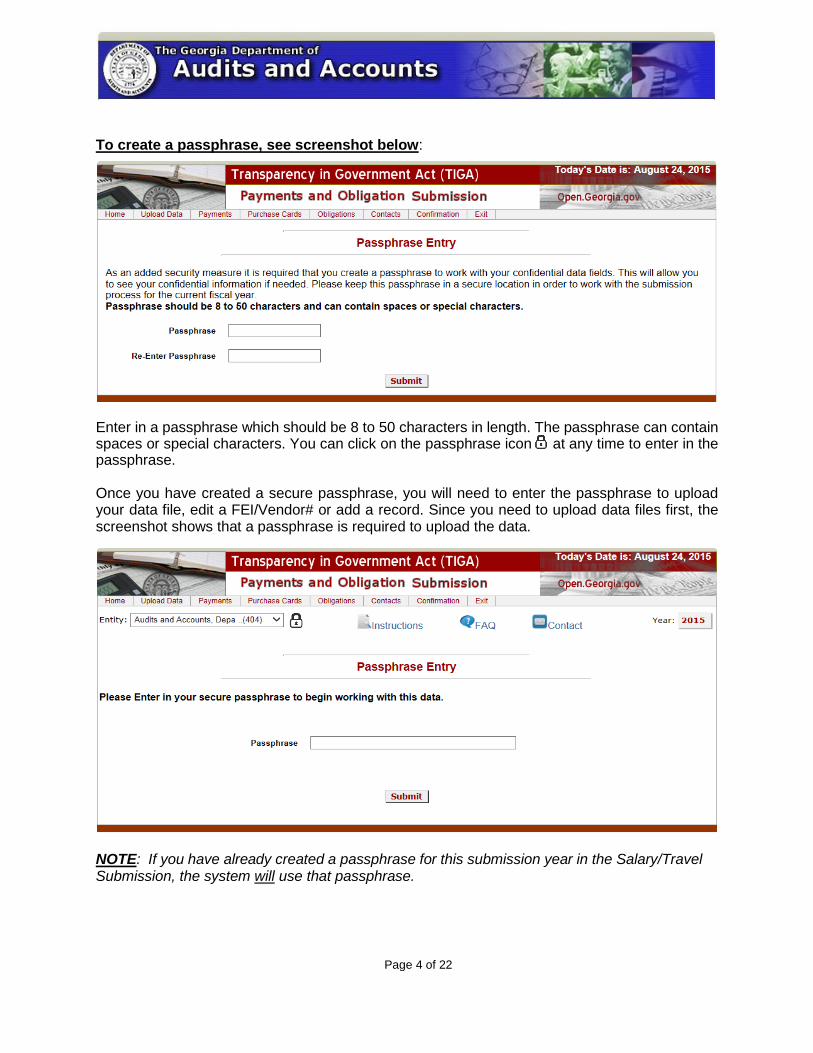
To create a passphrase, see screenshot below:
Enter in a passphrase which should be 8 to 50 characters in length. The passphrase can contain spaces or special characters. You can click on the passphrase icon at any time to enter in the passphrase. Once you have created a secure passphrase, you will need to enter the passphrase to upload your data file, edit a FEI/Vendor# or add a record. Since you need to upload data files first, the screenshot shows that a passphrase is required to upload the data.
NOTE: If you have already created a passphrase for this submission year in the Salary/Travel Submission, the system will use that passphrase.
Page 5 of 22
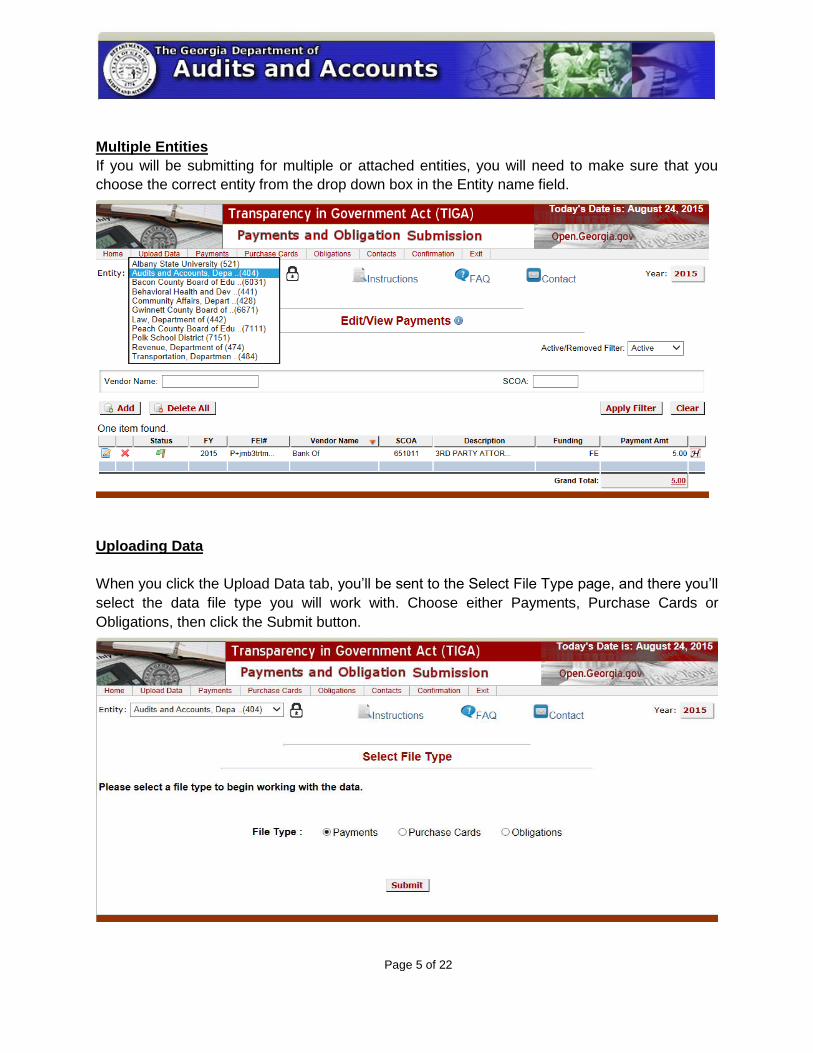
Multiple Entities
If you will be submitting for multiple or attached entities, you will need to make sure that you
choose the correct entity from the drop down box in the Entity name field.
Uploading Data
When you click the Upload Data tab, you’ll be sent to the Select File Type page, and there you’ll
select the data file type you will work with. Choose either Payments, Purchase Cards or
Obligations, then click the Submit button.
Page 6 of 22
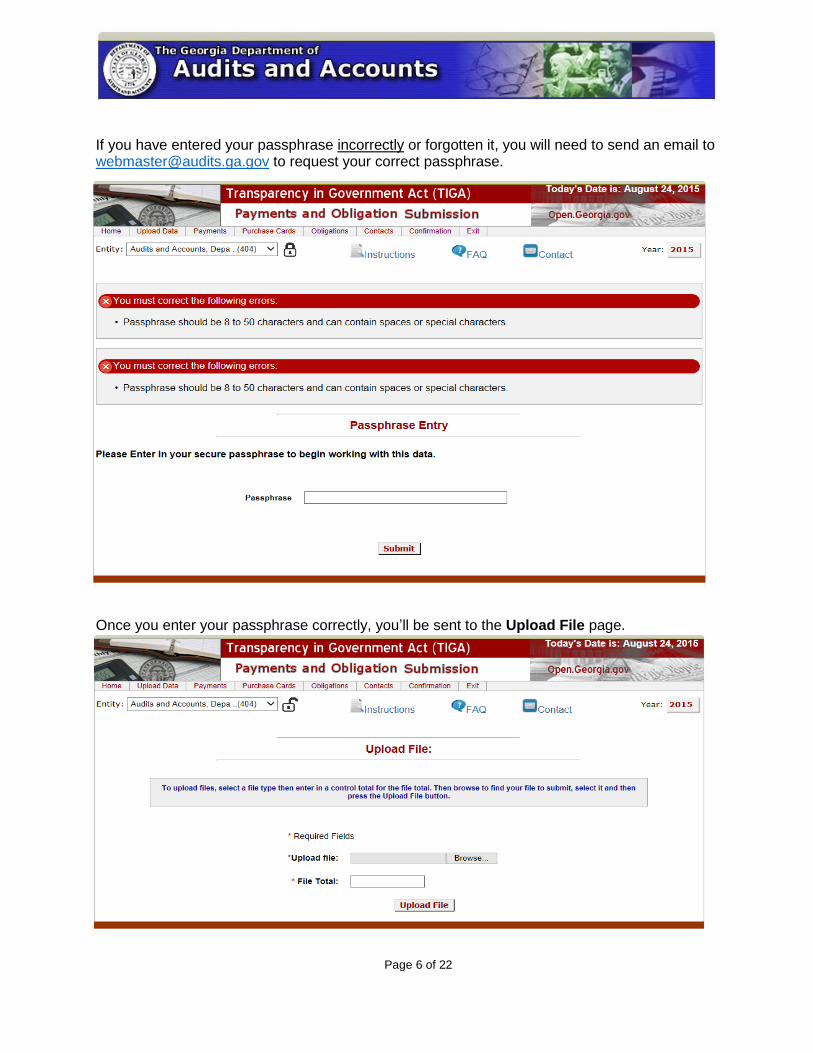
If you have entered your passphrase incorrectly or forgotten it, you will need to send an email to [email protected] to request your correct passphrase.
Once you enter your passphrase correctly, you’ll be sent to the Upload File page.

Page 7 of 22
Click the browse button to browse and find your data file to submit. Your data file must follow the format below and must be a comma-delimited text file. Please do not submit column headings. Next, you should enter in the control / file total for verification purposes. You will not need to include the control total for your purchase card file. NOTE: If you are not an appropriated entity, you do not have to submit obligations. Payments Example: (header row is for display purposes only) Entity Code
Reporting
Fiscal Year
FEI # Vendor Name Payment Amt
SCOA Code
Funding Source
404 201xx 004567895 Name of Vendor1 51000.00 614026 FE
404 201xx 123456789 Name of Vendor2 25.55 614003 SO
404 201xx 345227891 Name of Vendor3 80000.00 616001
SO
404 201xx 568925678 Name of Vendor3 10102.45 651001 FE
Purchase Cards Example: (header row is for display purposes only)
Vendor Name MCC Description Purchase Date Amount Transaction Number
TAYLOR FARM SUPPLY SVSTR
HARDWARE STORES 7/31/20xx 85.47 A-123456789
TAYLOR FARMY SUPPLY
HARDWARE STORES 7/31/20xx (91.45) B-123456789
FEDEX 14270787 COURIER SERVICES 7/31/20xx 682.97 C-123456789
AMAZON MKTPLACE BOOK STORES 7/31/20xx 123.94 D-123456789
SAFETY MAX MISCELLANEOUS 7/31/20xx 387.10 E-123456789
Page 8 of 22
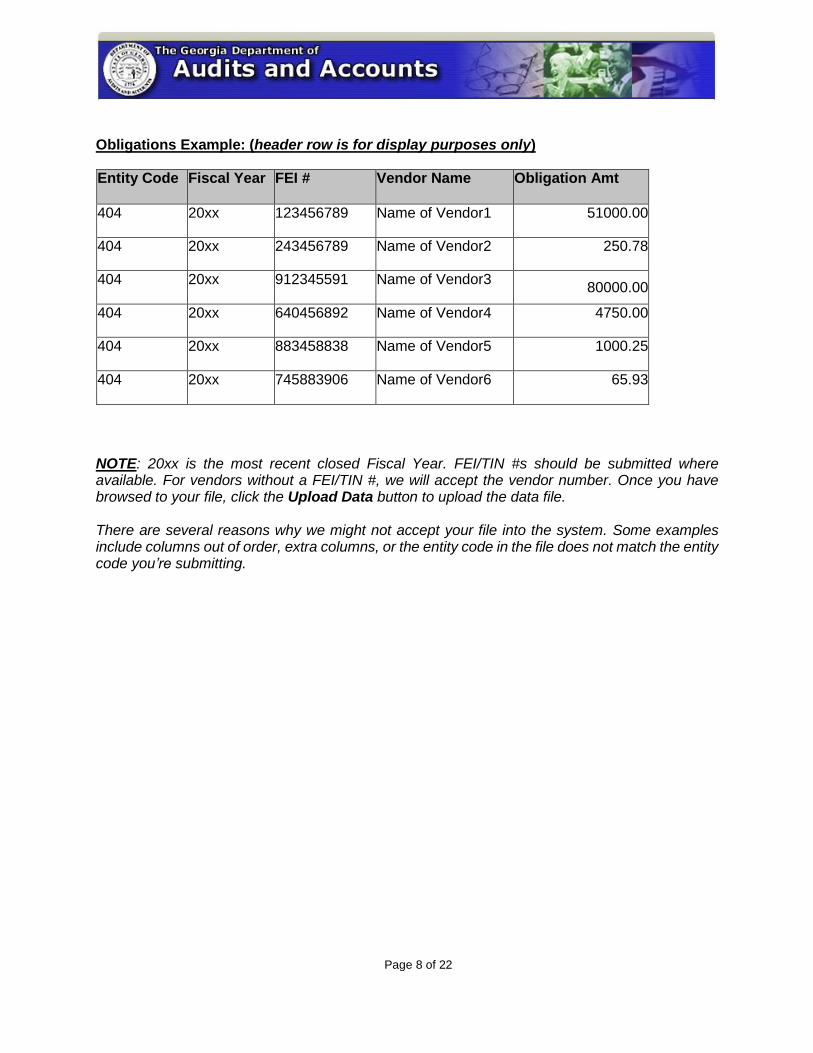
Obligations Example: (header row is for display purposes only) Entity Code Fiscal Year FEI # Vendor Name Obligation Amt
404 20xx 123456789 Name of Vendor1 51000.00
404 20xx 243456789 Name of Vendor2 250.78
404 20xx 912345591 Name of Vendor3 80000.00
404 20xx 640456892 Name of Vendor4 4750.00
404 20xx 883458838 Name of Vendor5 1000.25
404 20xx 745883906 Name of Vendor6 65.93
NOTE: 20xx is the most recent closed Fiscal Year. FEI/TIN #s should be submitted where available. For vendors without a FEI/TIN #, we will accept the vendor number. Once you have browsed to your file, click the Upload Data button to upload the data file. There are several reasons why we might not accept your file into the system. Some examples include columns out of order, extra columns, or the entity code in the file does not match the entity code you’re submitting.
Page 9 of 22
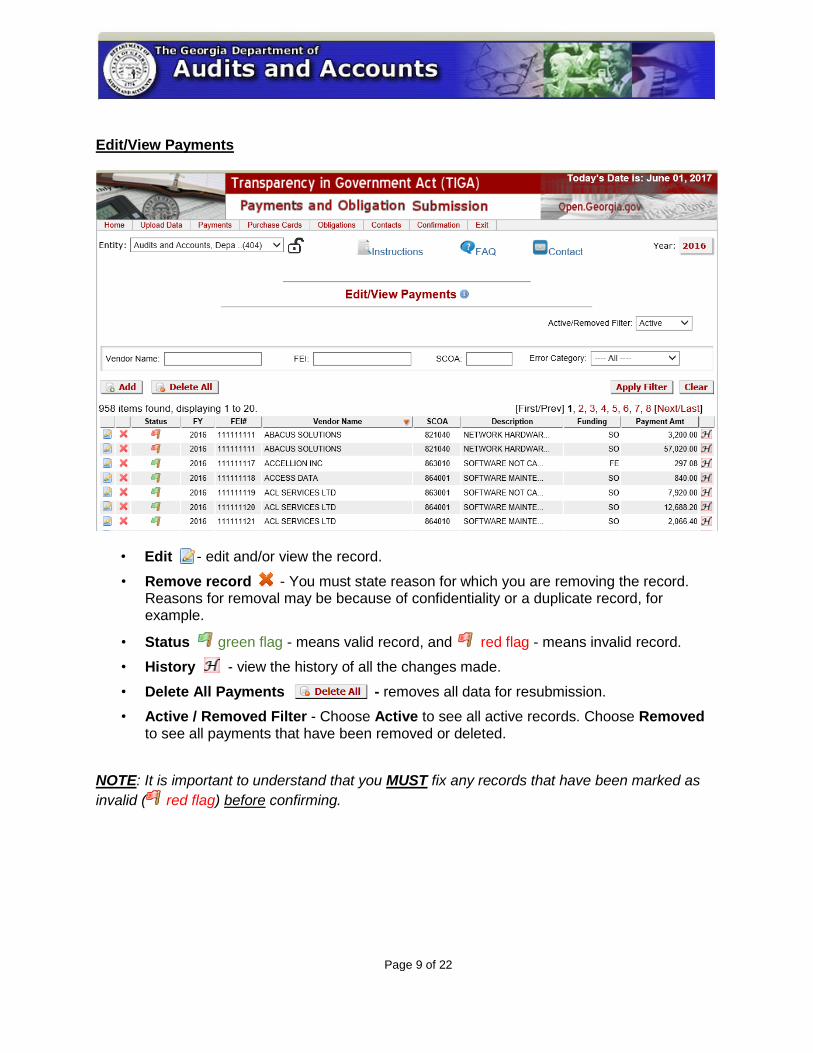
Edit/View Payments
• Edit - edit and/or view the record.
• Remove record - You must state reason for which you are removing the record. Reasons for removal may be because of confidentiality or a duplicate record, for example.
• Status green flag - means valid record, and red flag - means invalid record.
• History - view the history of all the changes made.
• Delete All Payments - removes all data for resubmission.
• Active / Removed Filter - Choose Active to see all active records. Choose Removed to see all payments that have been removed or deleted.
NOTE: It is important to understand that you MUST fix any records that have been marked as
invalid ( red flag) before confirming.
Page 10 of 22
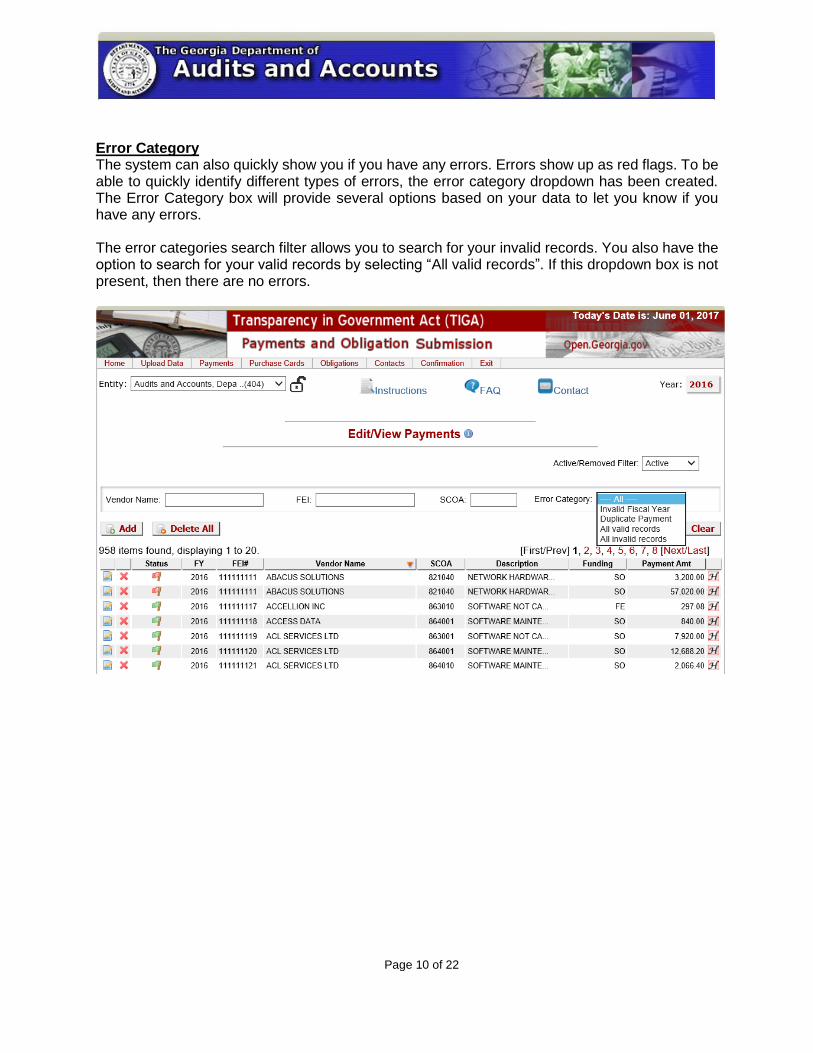
Error Category The system can also quickly show you if you have any errors. Errors show up as red flags. To be able to quickly identify different types of errors, the error category dropdown has been created. The Error Category box will provide several options based on your data to let you know if you have any errors. The error categories search filter allows you to search for your invalid records. You also have the option to search for your valid records by selecting “All valid records”. If this dropdown box is not present, then there are no errors.
Page 11 of 22
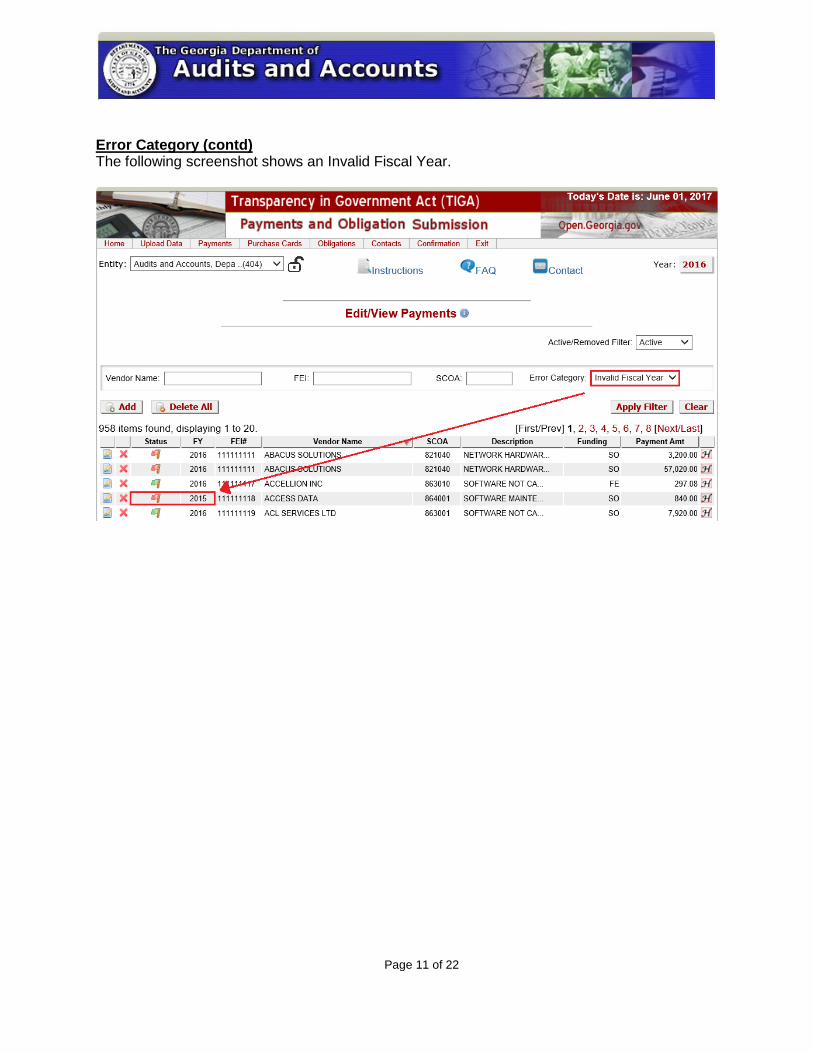
Error Category (contd) The following screenshot shows an Invalid Fiscal Year.
Page 12 of 22
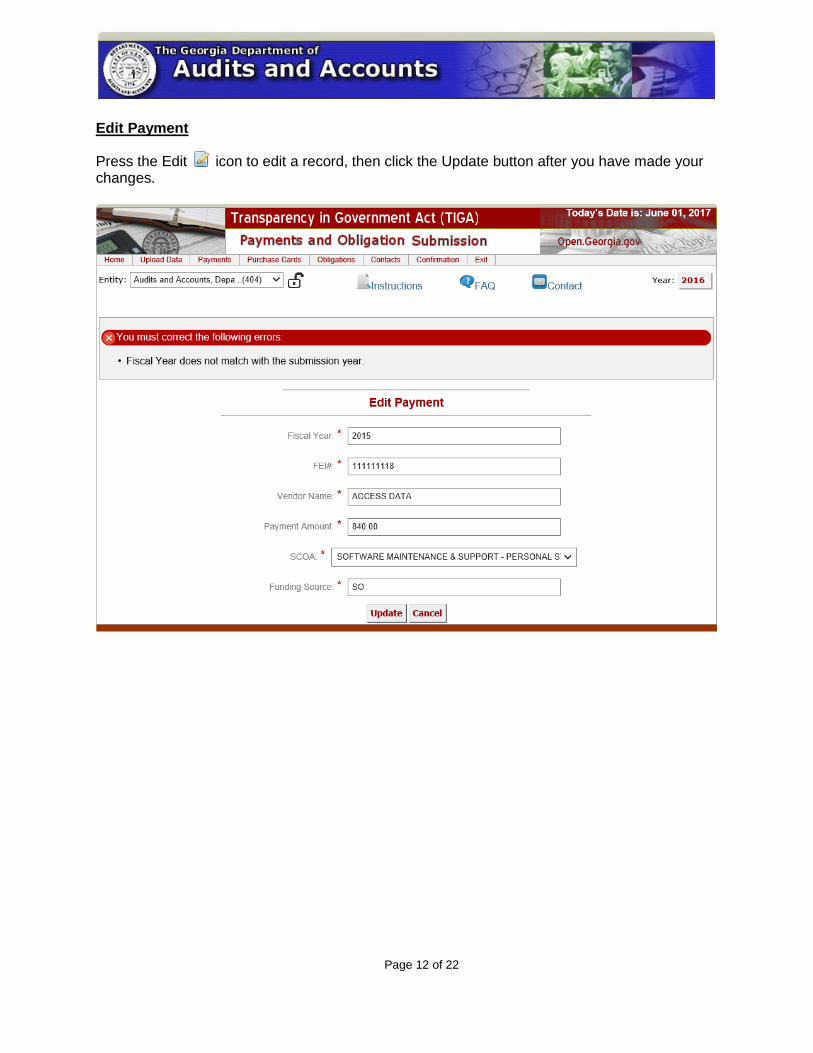
Edit Payment Press the Edit icon to edit a record, then click the Update button after you have made your changes.

Page 13 of 22
Add Payment To add a new record, click the Add button. You must first enter your passphrase if the passphrase icon is showing a locked status. This will unencrypt your data for viewing.
Page 14 of 22
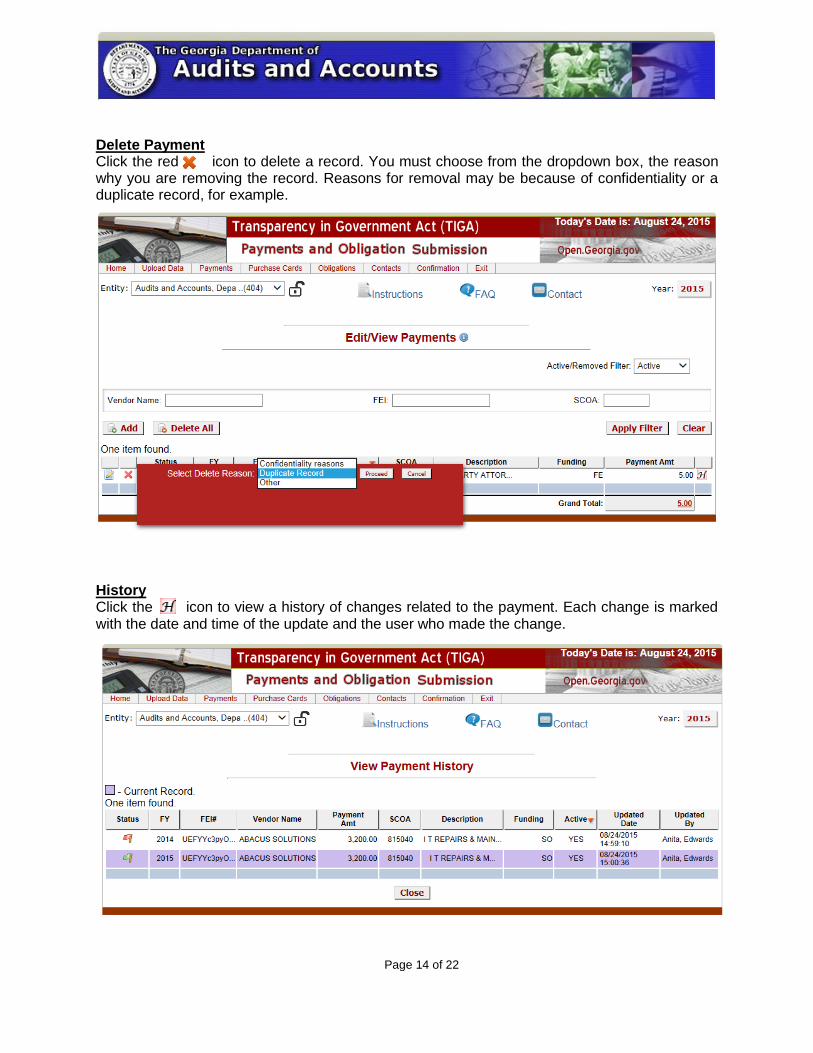
Delete Payment Click the red icon to delete a record. You must choose from the dropdown box, the reason why you are removing the record. Reasons for removal may be because of confidentiality or a duplicate record, for example.
History Click the icon to view a history of changes related to the payment. Each change is marked with the date and time of the update and the user who made the change.
Page 15 of 22
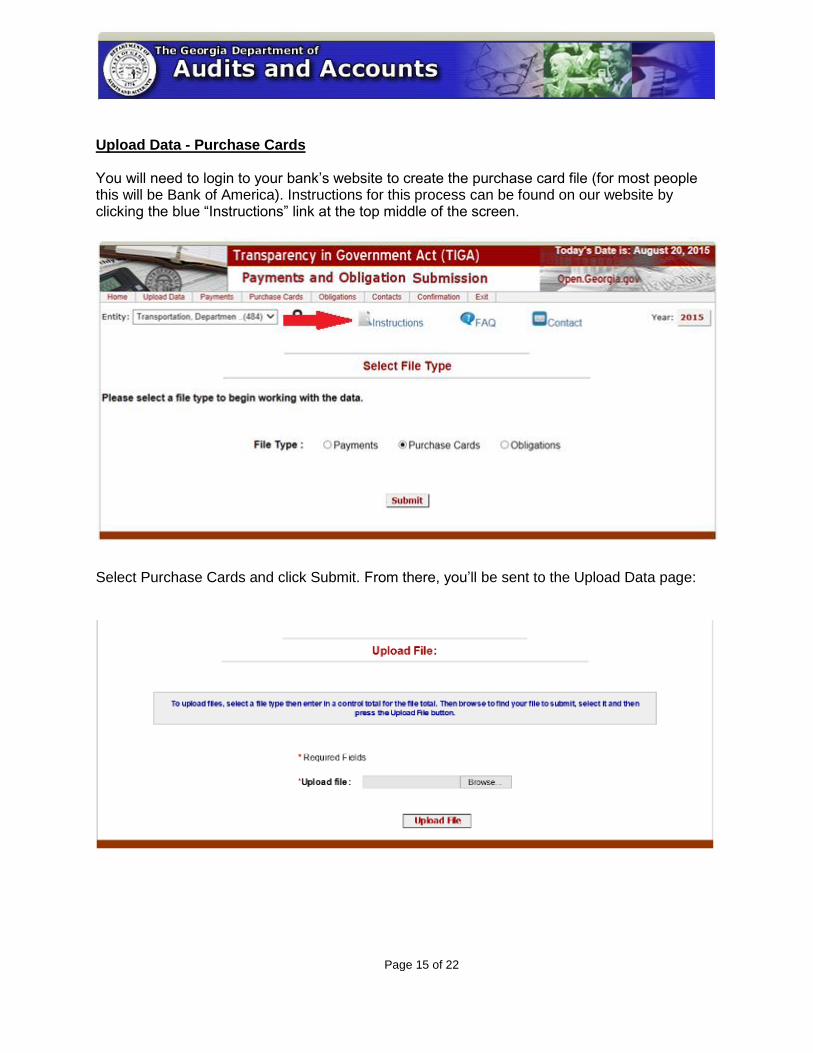
Upload Data - Purchase Cards You will need to login to your bank’s website to create the purchase card file (for most people this will be Bank of America). Instructions for this process can be found on our website by clicking the blue “Instructions” link at the top middle of the screen. Select Purchase Cards and click Submit. From there, you’ll be sent to the Upload Data page:

Page 16 of 22
Edit/View Purchase Cards The Edit/View Purchase Cards works the same way that Edit/View Payments does.
Edit Purchase Card Record
Page 17 of 22
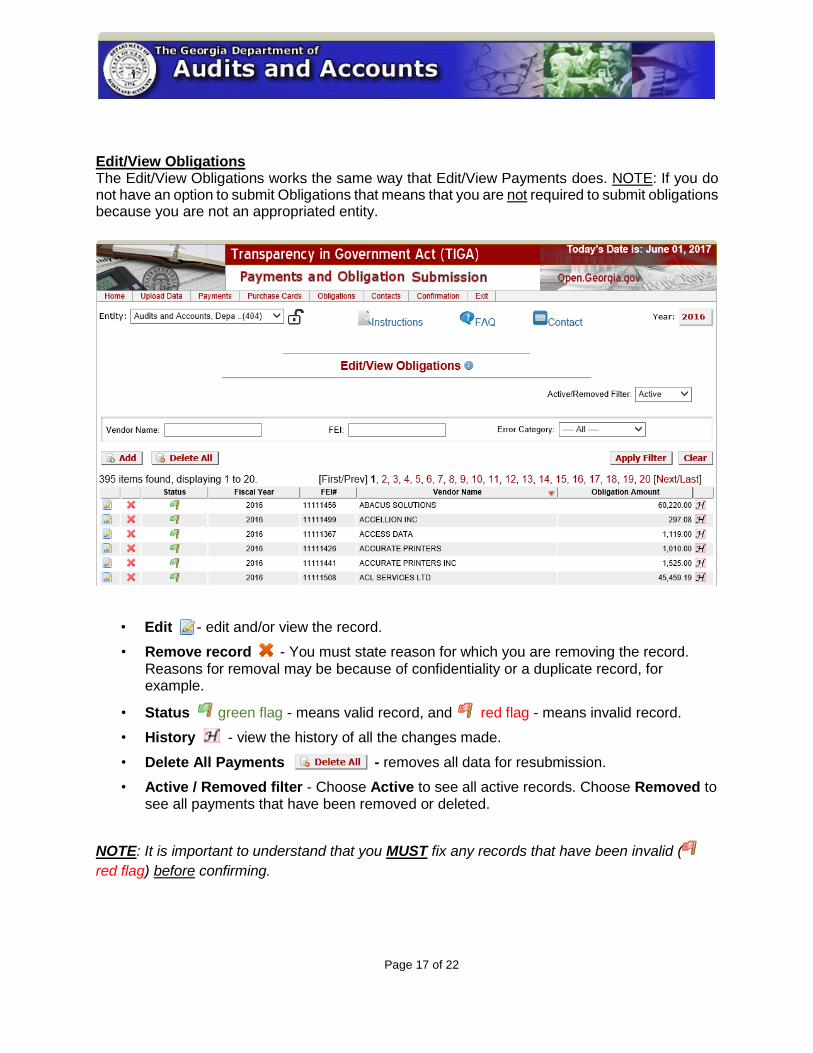
Edit/View Obligations The Edit/View Obligations works the same way that Edit/View Payments does. NOTE: If you do not have an option to submit Obligations that means that you are not required to submit obligations because you are not an appropriated entity.
• Edit - edit and/or view the record.
• Remove record - You must state reason for which you are removing the record. Reasons for removal may be because of confidentiality or a duplicate record, for example.
• Status green flag - means valid record, and red flag - means invalid record.
• History - view the history of all the changes made.
• Delete All Payments - removes all data for resubmission.
• Active / Removed filter - Choose Active to see all active records. Choose Removed to see all payments that have been removed or deleted.
NOTE: It is important to understand that you MUST fix any records that have been invalid (
red flag) before confirming.
Page 18 of 22
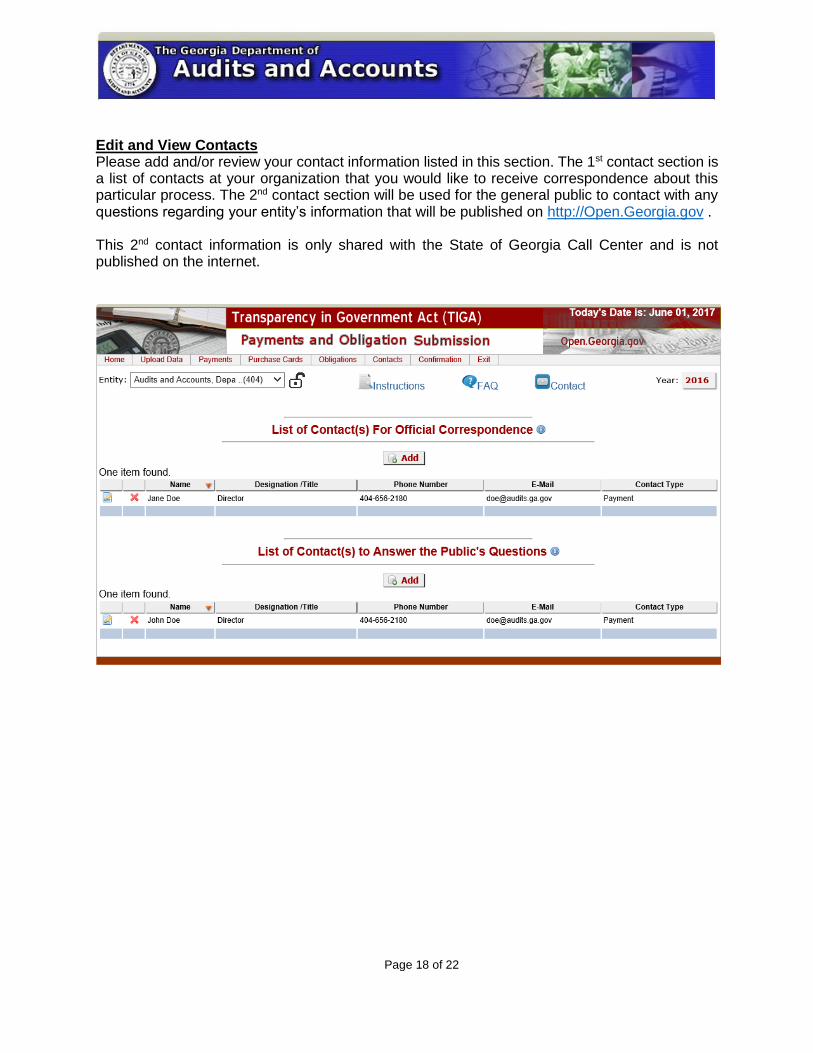
Edit and View Contacts Please add and/or review your contact information listed in this section. The 1st contact section is a list of contacts at your organization that you would like to receive correspondence about this particular process. The 2nd contact section will be used for the general public to contact with any questions regarding your entity’s information that will be published on http://Open.Georgia.gov . This 2nd contact information is only shared with the State of Georgia Call Center and is not published on the internet.
Page 19 of 22
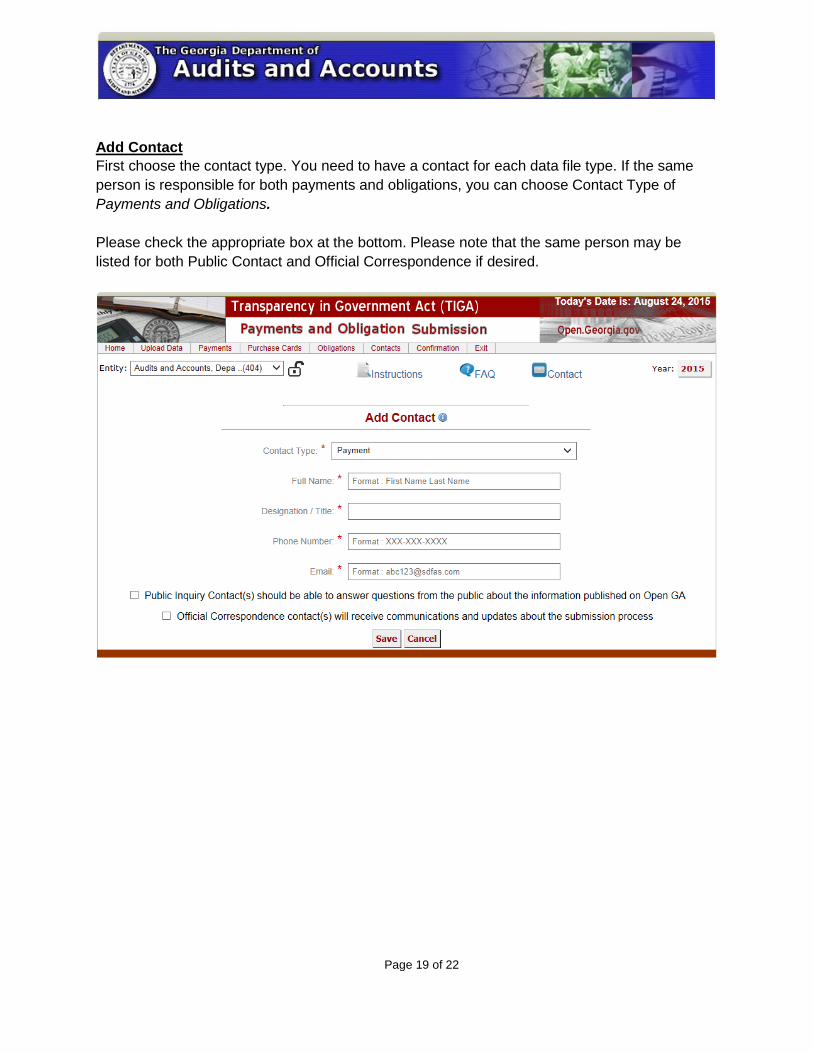
Add Contact
First choose the contact type. You need to have a contact for each data file type. If the same
person is responsible for both payments and obligations, you can choose Contact Type of
Payments and Obligations.
Please check the appropriate box at the bottom. Please note that the same person may be
listed for both Public Contact and Official Correspondence if desired.
Page 20 of 22
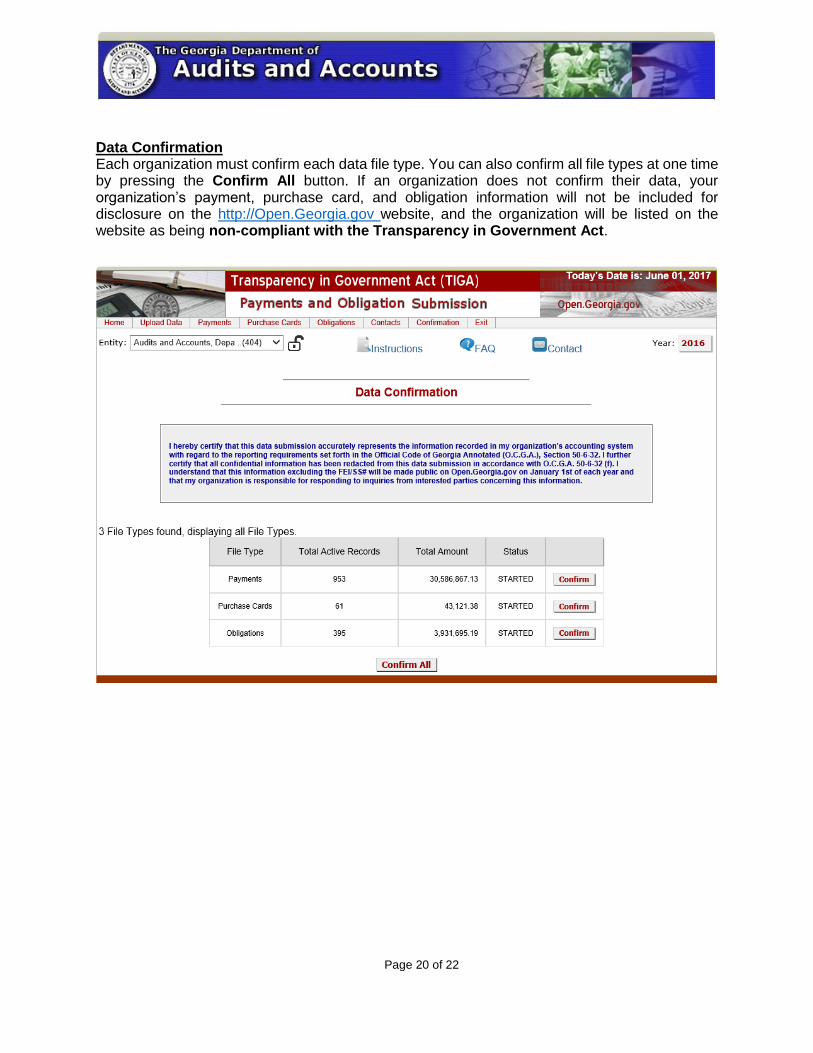
Data Confirmation Each organization must confirm each data file type. You can also confirm all file types at one time by pressing the Confirm All button. If an organization does not confirm their data, your organization’s payment, purchase card, and obligation information will not be included for disclosure on the http://Open.Georgia.gov website, and the organization will be listed on the website as being non-compliant with the Transparency in Government Act.
Page 21 of 22
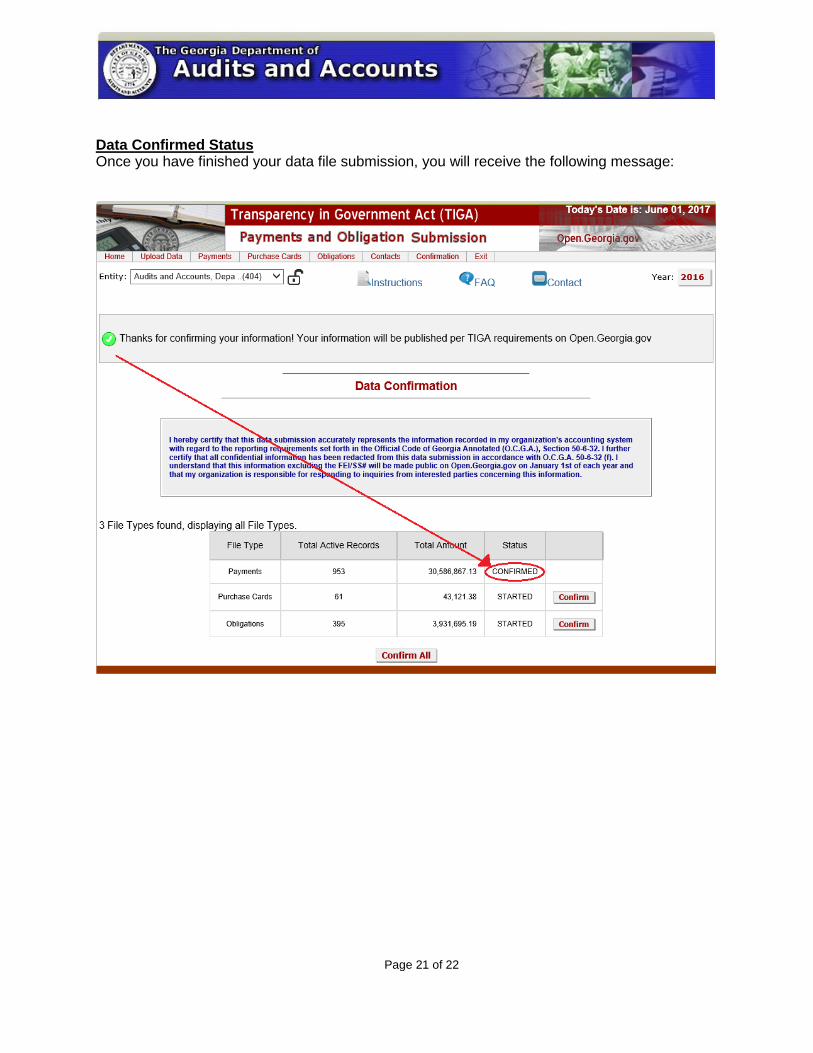
Data Confirmed Status Once you have finished your data file submission, you will receive the following message:
Page 22 of 22
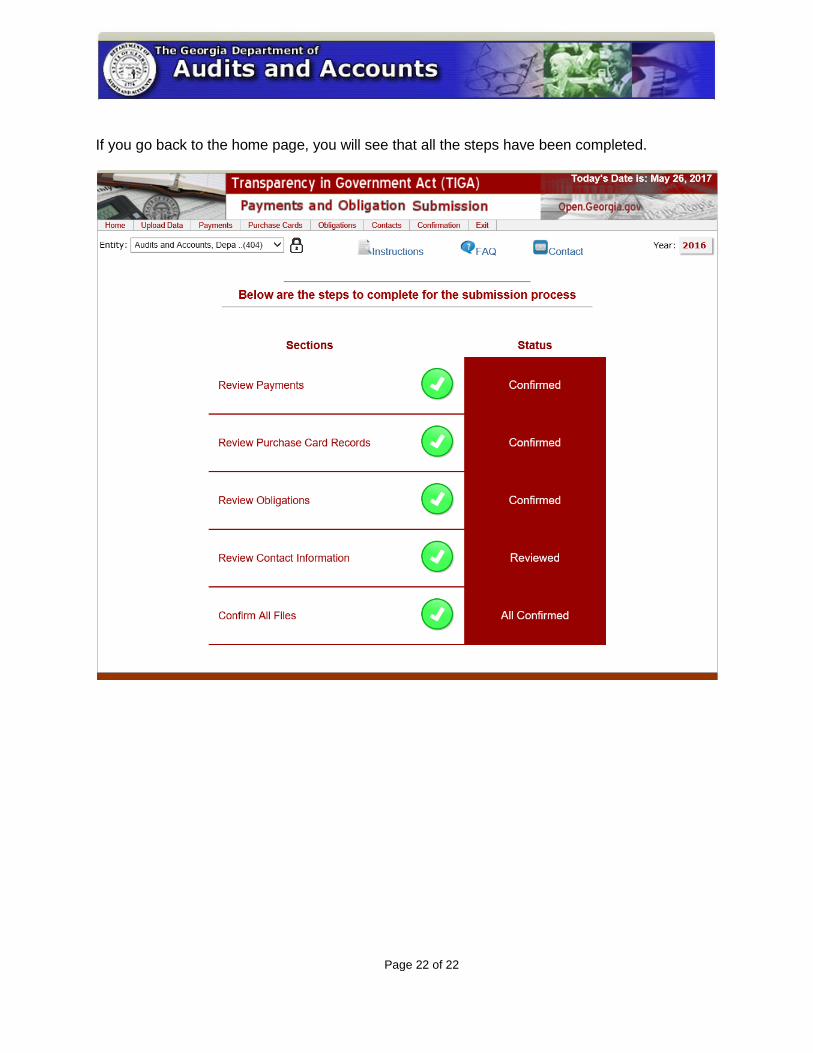
If you go back to the home page, you will see that all the steps have been completed.