Transitioning Your Landscape Team from AutoCAD … · Transitioning Your Landscape Team from...
26
BILT North America 2017 Westin Harbour Castle Toronto August 3-5 About the Speaker: With a background as an Architectural Technologist, Melonie has switched her focus to a support role in Design Technology, where she helps manage BIM on projects in Institutional, Commercial Retail, Health Care, and Residential. Her passion for collaboration and education enables her to successfully transition many, including entire discipline teams, from 2D documentation to BIM. Session 3.3 Transitioning Your Landscape Team from AutoCAD to Revit Melonie Beskowiney, DIALOG Class Description Having recently spent a little over a month with our Landscape Architecture team to help them reach a deadline, I was overwhelmed with the struggle to coordinate and collaborate with their design content using 2D drafting tools, when my background is in 3D tools such as Revit. With four multi-discipline studios across Canada, and our new studio in San Francisco, it became apparent that the Landscape team needed to be able to more effectively collaborate with the other disciplines here at DIALOG. As an Architectural Technologist, I felt that the Landscape team had the potential to transition from traditional 2D tools to a Revit-based project environment. This required a lot of planning, from developing standards and libraries, creating a Revit template, and finally educating the team in Revit. Though this process was specifically used for the Landscape discipline, the general concepts can be applied to any discipline. In this class, I will outline the progression that successfully brought a traditionally 2D-based discipline the 3D world of Revit, including the struggles, solutions, and success stories.
Transcript of Transitioning Your Landscape Team from AutoCAD … · Transitioning Your Landscape Team from...
BILT North America 2017
Westin Harbour Castle Toronto
August 3-5
About the Speaker:
With a background as an Architectural Technologist, Melonie
has switched her focus to a support role in Design Technology,
where she helps manage BIM on projects in Institutional,
Commercial Retail, Health Care, and Residential. Her passion
for collaboration and education enables her to successfully
transition many, including entire discipline teams, from 2D
documentation to BIM.
Session 3.3
Transitioning Your Landscape Team from AutoCAD to
Revit Melonie Beskowiney, DIALOG
Class Description
Having recently spent a little over a month with our Landscape Architecture team to
help them reach a deadline, I was overwhelmed with the struggle to coordinate and
collaborate with their design content using 2D drafting tools, when my background is in
3D tools such as Revit. With four multi-discipline studios across Canada, and our new
studio in San Francisco, it became apparent that the Landscape team needed to be
able to more effectively collaborate with the other disciplines here at DIALOG. As an
Architectural Technologist, I felt that the Landscape team had the potential to
transition from traditional 2D tools to a Revit-based project environment. This required a
lot of planning, from developing standards and libraries, creating a Revit template, and
finally educating the team in Revit. Though this process was specifically used for the
Landscape discipline, the general concepts can be applied to any discipline. In this
class, I will outline the progression that successfully brought a traditionally 2D-based
discipline the 3D world of Revit, including the struggles, solutions, and success stories.
S3.3 – Transitioning Your Landscape Team from AutoCAD to
Revit
Melonie Beskowiney, DIALOG
1.0 Introduction
If you are in this session, you are most likely either a Landscape Architect working in a
multi-disciplinary firm or owner of a consulting firm, and you would like to learn more
about the world of BIM. Perhaps you are from another discipline, such as Architecture,
and you want to learn about how to equip your Landscape team so they can be more
effective in collaborating and coordinating on your projects. Whichever is your case,
Landscape work in the 3D environment of Revit is still a new concept to most firms.
2.0 Industry Changes and Industry Expectations
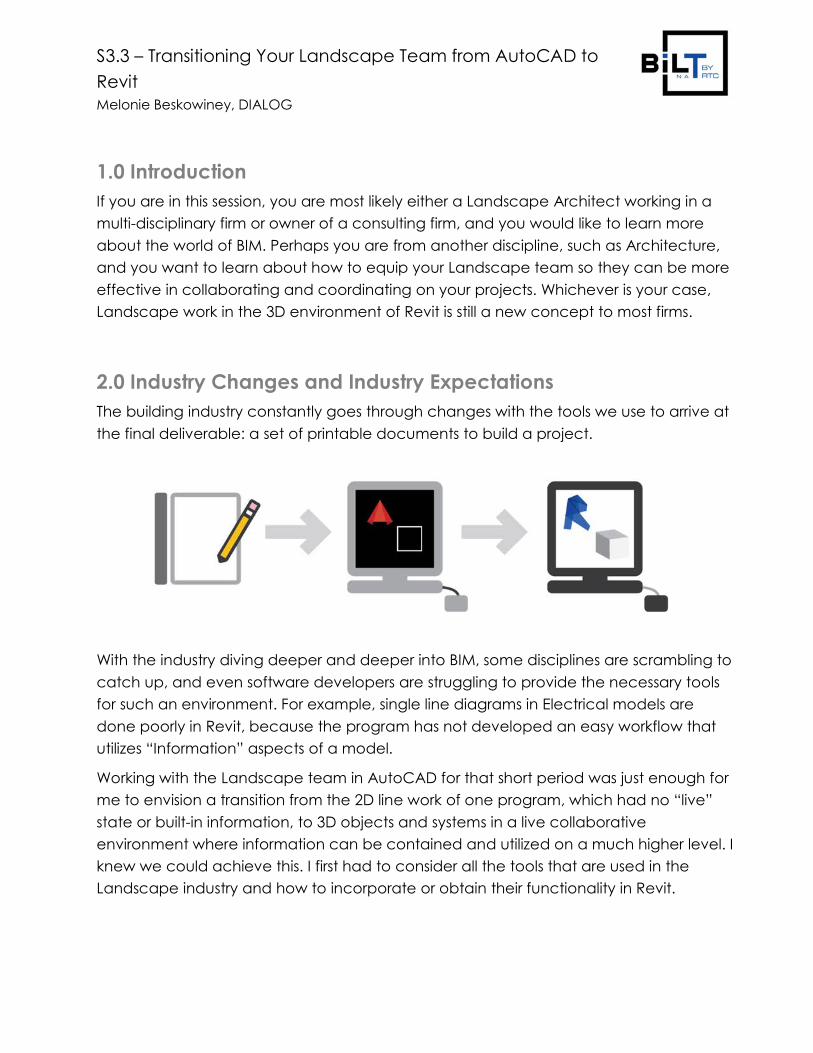
The building industry constantly goes through changes with the tools we use to arrive at
the final deliverable: a set of printable documents to build a project.
With the industry diving deeper and deeper into BIM, some disciplines are scrambling to
catch up, and even software developers are struggling to provide the necessary tools
for such an environment. For example, single line diagrams in Electrical models are
done poorly in Revit, because the program has not developed an easy workflow that
utilizes “Information” aspects of a model.
Working with the Landscape team in AutoCAD for that short period was just enough for
me to envision a transition from the 2D line work of one program, which had no “live”
state or built-in information, to 3D objects and systems in a live collaborative
environment where information can be contained and utilized on a much higher level. I
knew we could achieve this. I first had to consider all the tools that are used in the
Landscape industry and how to incorporate or obtain their functionality in Revit.
S3.3 – Transitioning Your Landscape Team from AutoCAD to
Revit
Melonie Beskowiney, DIALOG
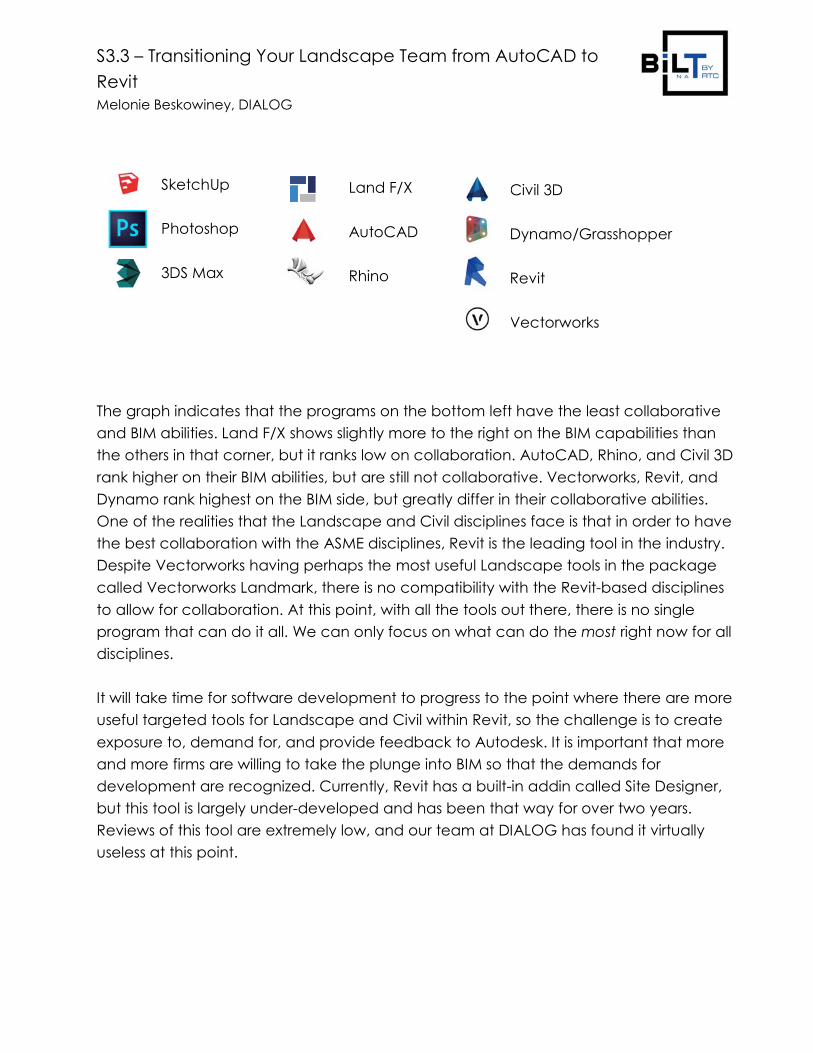
2.1 Current Tools
• AutoCAD: 2D Documentation
• SketchUp: 3D Renderings and Massing
• Civil 3D: 3D Civil information and Modelling
• Land F/X: 2D Documentation
• Rhino: 3D Massing
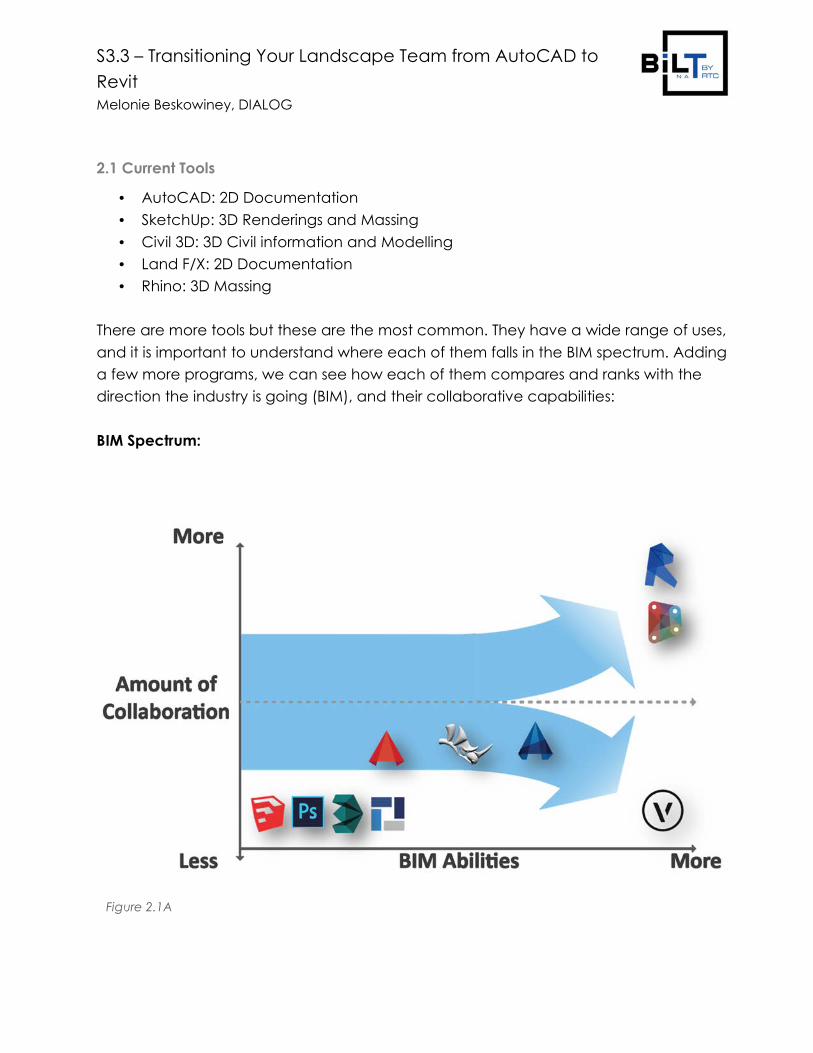
There are more tools but these are the most common. They have a wide range of uses,
and it is important to understand where each of them falls in the BIM spectrum. Adding
a few more programs, we can see how each of them compares and ranks with the
direction the industry is going (BIM), and their collaborative capabilities:
BIM Spectrum:
Figure 2.1A
S3.3 – Transitioning Your Landscape Team from AutoCAD to
Revit
Melonie Beskowiney, DIALOG
The graph indicates that the programs on the bottom left have the least collaborative
and BIM abilities. Land F/X shows slightly more to the right on the BIM capabilities than
the others in that corner, but it ranks low on collaboration. AutoCAD, Rhino, and Civil 3D
rank higher on their BIM abilities, but are still not collaborative. Vectorworks, Revit, and
Dynamo rank highest on the BIM side, but greatly differ in their collaborative abilities.
One of the realities that the Landscape and Civil disciplines face is that in order to have
the best collaboration with the ASME disciplines, Revit is the leading tool in the industry.
Despite Vectorworks having perhaps the most useful Landscape tools in the package
called Vectorworks Landmark, there is no compatibility with the Revit-based disciplines
to allow for collaboration. At this point, with all the tools out there, there is no single
program that can do it all. We can only focus on what can do the most right now for all
disciplines.
It will take time for software development to progress to the point where there are more
useful targeted tools for Landscape and Civil within Revit, so the challenge is to create
exposure to, demand for, and provide feedback to Autodesk. It is important that more
and more firms are willing to take the plunge into BIM so that the demands for
development are recognized. Currently, Revit has a built-in addin called Site Designer,
but this tool is largely under-developed and has been that way for over two years.
Reviews of this tool are extremely low, and our team at DIALOG has found it virtually
useless at this point.
SketchUp
Photoshop
3DS Max
Land F/X
AutoCAD
Rhino
Civil 3D
Dynamo/Grasshopper
Revit
Vectorworks
S3.3 – Transitioning Your Landscape Team from AutoCAD to
Revit
Melonie Beskowiney, DIALOG
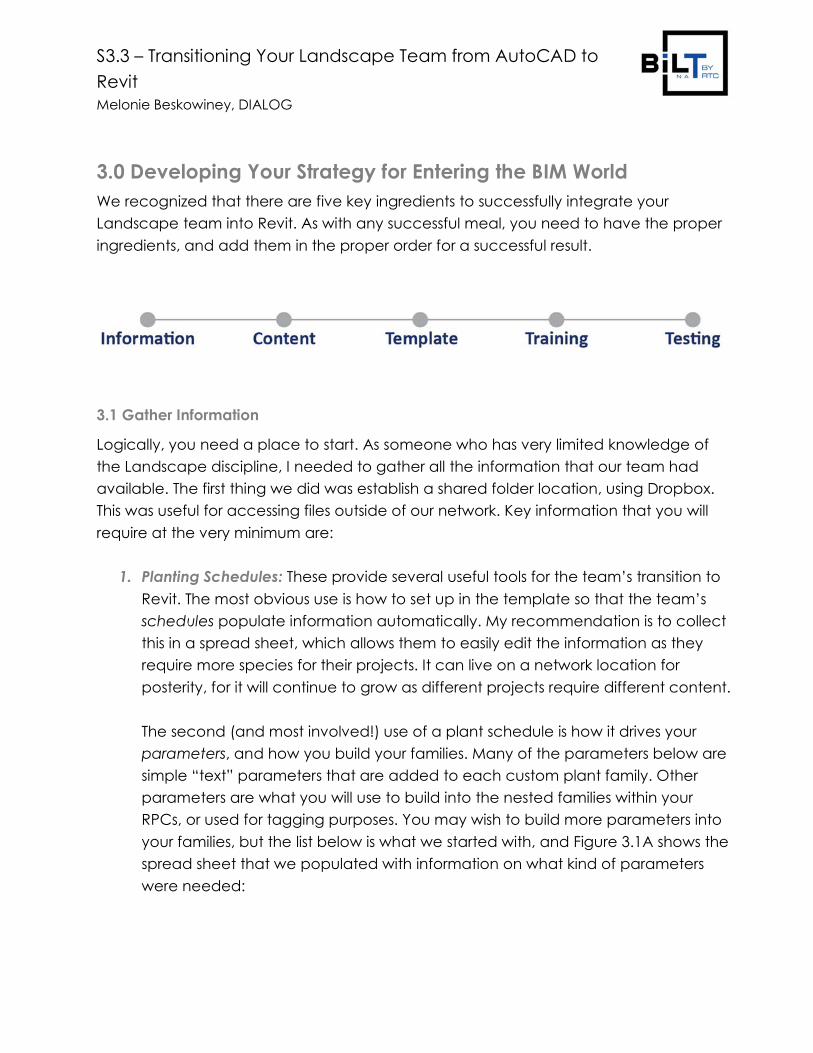
3.0 Developing Your Strategy for Entering the BIM World
We recognized that there are five key ingredients to successfully integrate your
Landscape team into Revit. As with any successful meal, you need to have the proper
ingredients, and add them in the proper order for a successful result.
3.1 Gather Information
Logically, you need a place to start. As someone who has very limited knowledge of
the Landscape discipline, I needed to gather all the information that our team had
available. The first thing we did was establish a shared folder location, using Dropbox.
This was useful for accessing files outside of our network. Key information that you will
require at the very minimum are:
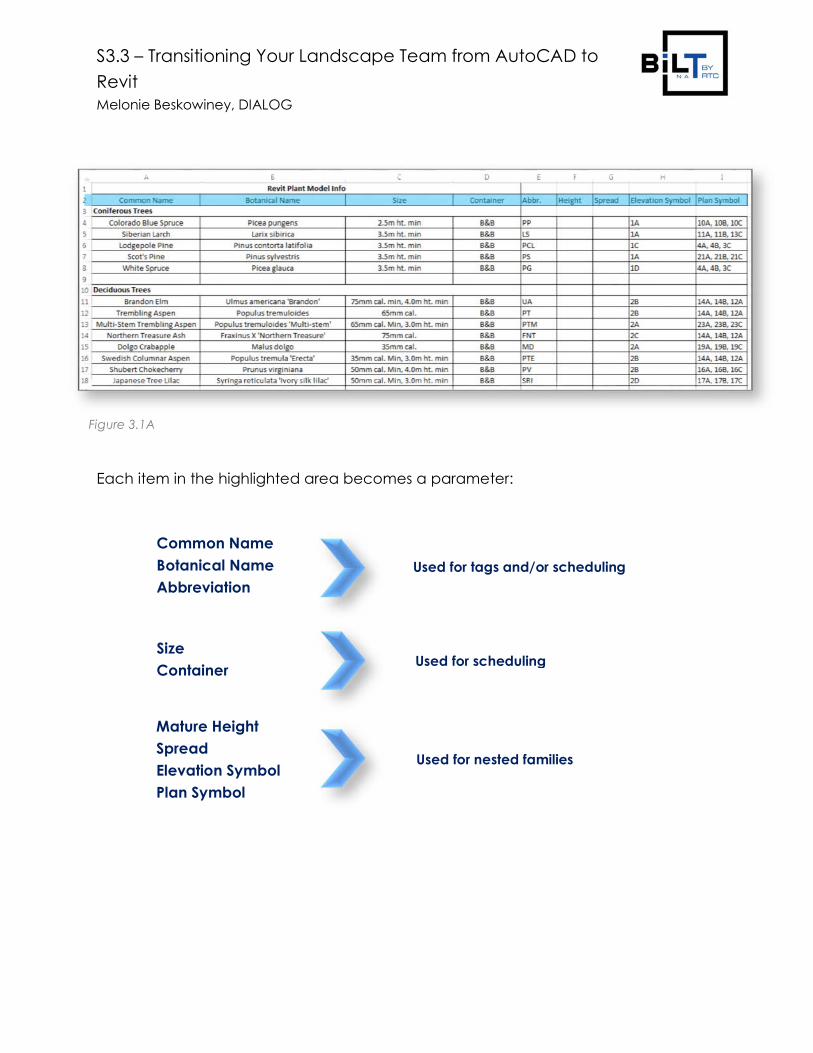
1. Planting Schedules: These provide several useful tools for the team’s transition to
Revit. The most obvious use is how to set up in the template so that the team’s
schedules populate information automatically. My recommendation is to collect
this in a spread sheet, which allows them to easily edit the information as they
require more species for their projects. It can live on a network location for
posterity, for it will continue to grow as different projects require different content.
The second (and most involved!) use of a plant schedule is how it drives your
parameters, and how you build your families. Many of the parameters below are
simple “text” parameters that are added to each custom plant family. Other
parameters are what you will use to build into the nested families within your
RPCs, or used for tagging purposes. You may wish to build more parameters into
your families, but the list below is what we started with, and Figure 3.1A shows the
spread sheet that we populated with information on what kind of parameters
were needed:
S3.3 – Transitioning Your Landscape Team from AutoCAD to
Revit
Melonie Beskowiney, DIALOG
Each item in the highlighted area becomes a parameter:
Figure 3.1A
Common Name
Botanical Name
Abbreviation Used for tags and/or scheduling
Size
Container Used for scheduling
Mature Height
Spread
Elevation Symbol
Plan Symbol
Used for nested families
S3.3 – Transitioning Your Landscape Team from AutoCAD to
Revit
Melonie Beskowiney, DIALOG
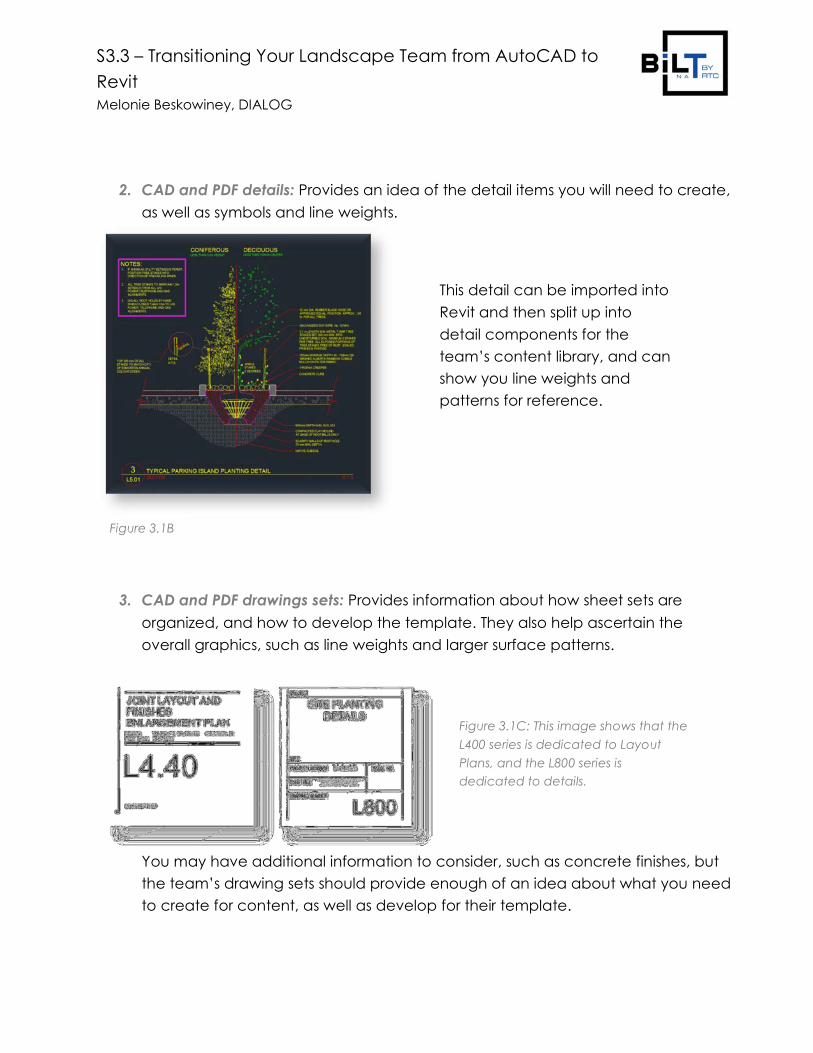
2. CAD and PDF details: Provides an idea of the detail items you will need to create,
as well as symbols and line weights.
3. CAD and PDF drawings sets: Provides information about how sheet sets are
organized, and how to develop the template. They also help ascertain the
overall graphics, such as line weights and larger surface patterns.
You may have additional information to consider, such as concrete finishes, but
the team’s drawing sets should provide enough of an idea about what you need
to create for content, as well as develop for their template.
This detail can be imported into
Revit and then split up into
detail components for the
team’s content library, and can
show you line weights and
patterns for reference.
Figure 3.1B
Figure 3.1C: This image shows that the
L400 series is dedicated to Layout
Plans, and the L800 series is
dedicated to details.
S3.3 – Transitioning Your Landscape Team from AutoCAD to
Revit
Melonie Beskowiney, DIALOG
3.2 Develop Content
Once you have received most of the above information, you can start creating your
content. At DIALOG, we started with the plant schedules, which took care of a large
portion of both the family content, as well as the parameters for developing schedules
(custom plant families with symbols and parameters require a strong understanding of
nested families and parameter mapping). It is important that the majority of your
content is created before your users are trained, and have started their first test project,
or a live project. Because projects have time constraints, you do not want to be holding
back the progress of a project because content is unavailable. You need to get your
team to the point where adding content is easy to do, and very minimal.
1. Collaboration Setup: When you start making content, make sure to use a sensible
folder structure. You will have different types of nested families (detail items or
generic models, RPCs), as well as their symbols and annotations. The organization
that I found worked best was to separate “working” files (families that still need
development) from “finalized” families. Within each of those folders, there were
several more breakdowns, all based on the family type (category).
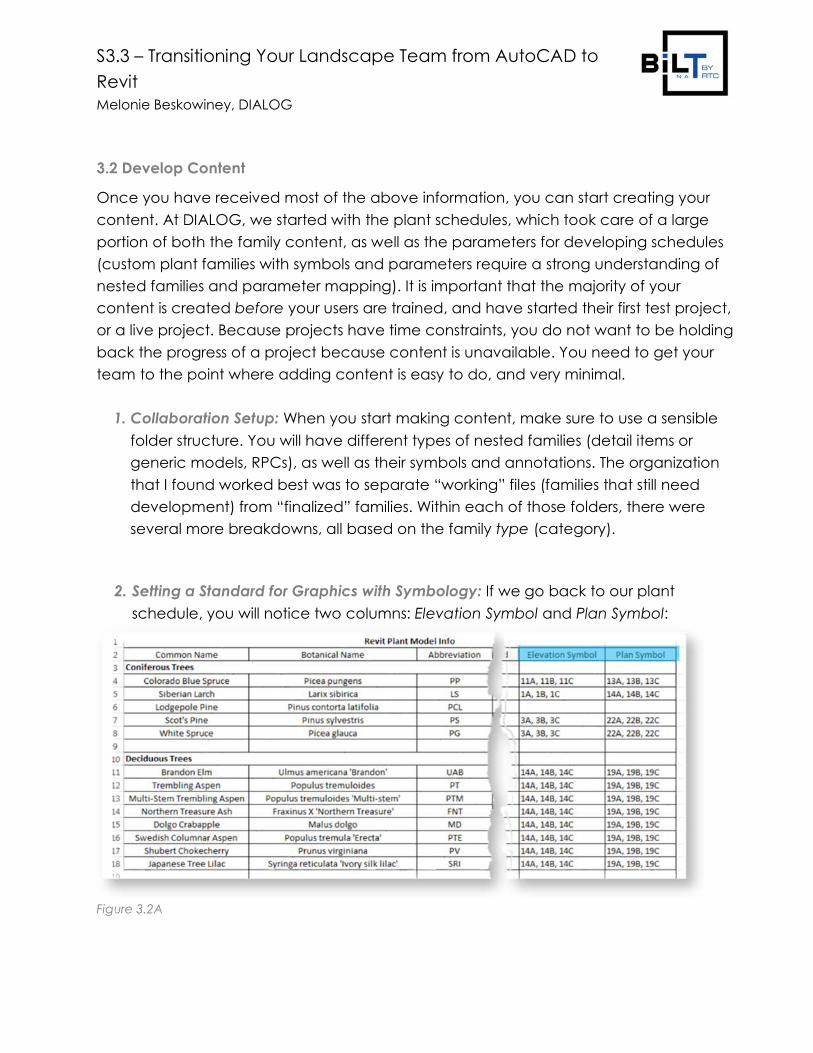
2. Setting a Standard for Graphics with Symbology: If we go back to our plant
schedule, you will notice two columns: Elevation Symbol and Plan Symbol:
Figure 3.2A
S3.3 – Transitioning Your Landscape Team from AutoCAD to
Revit
Melonie Beskowiney, DIALOG
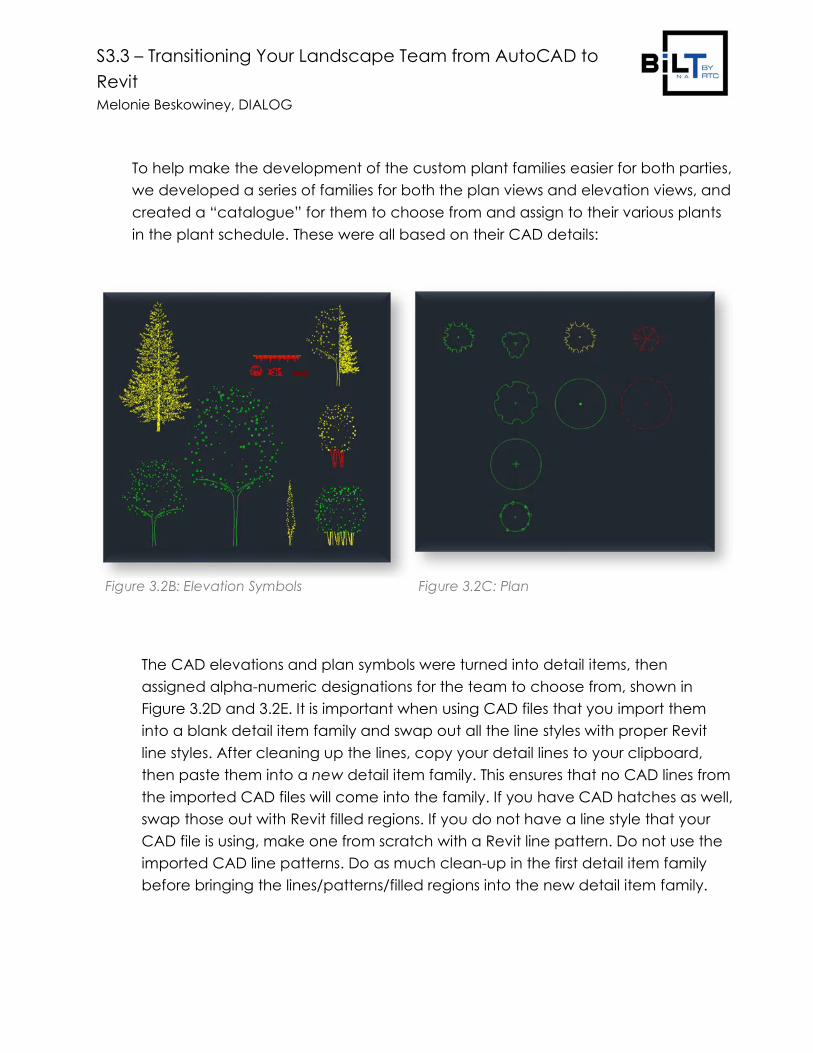
To help make the development of the custom plant families easier for both parties,
we developed a series of families for both the plan views and elevation views, and
created a “catalogue” for them to choose from and assign to their various plants
in the plant schedule. These were all based on their CAD details:
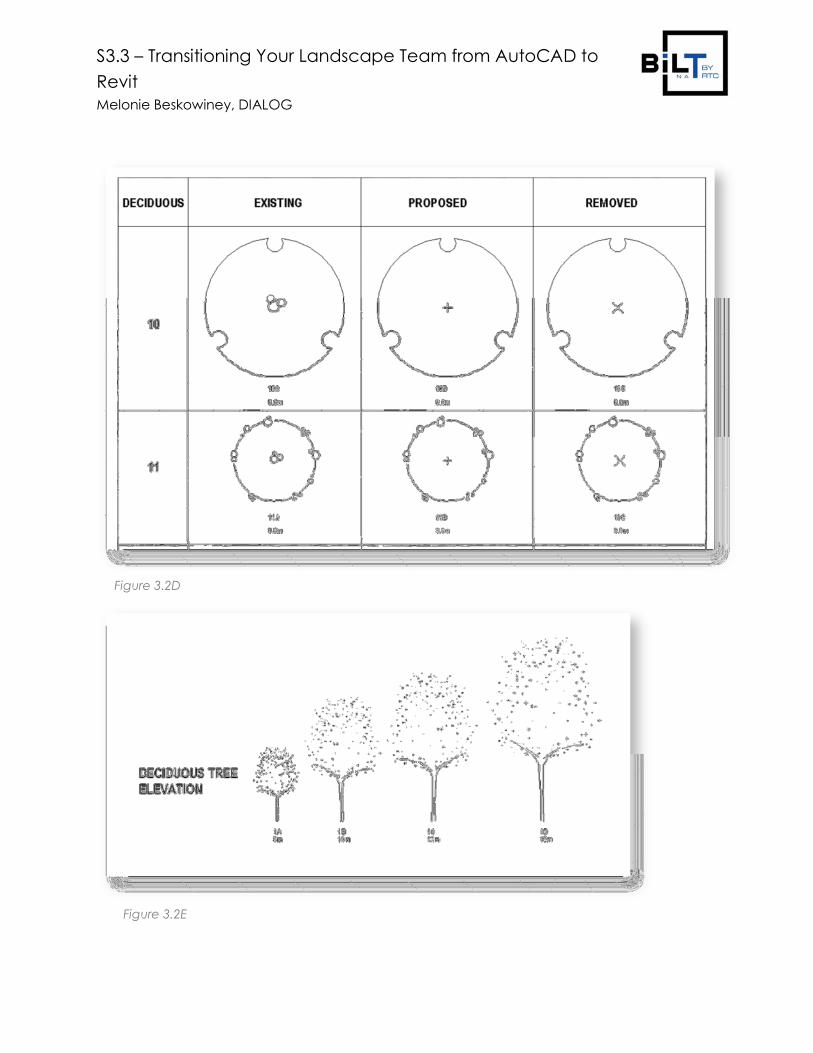
The CAD elevations and plan symbols were turned into detail items, then
assigned alpha-numeric designations for the team to choose from, shown in
Figure 3.2D and 3.2E. It is important when using CAD files that you import them
into a blank detail item family and swap out all the line styles with proper Revit
line styles. After cleaning up the lines, copy your detail lines to your clipboard,
then paste them into a new detail item family. This ensures that no CAD lines from
the imported CAD files will come into the family. If you have CAD hatches as well,
swap those out with Revit filled regions. If you do not have a line style that your
CAD file is using, make one from scratch with a Revit line pattern. Do not use the
imported CAD line patterns. Do as much clean-up in the first detail item family
before bringing the lines/patterns/filled regions into the new detail item family.
Figure 3.2B: Elevation Symbols Figure 3.2C: Plan
S3.3 – Transitioning Your Landscape Team from AutoCAD to
Revit
Melonie Beskowiney, DIALOG
Figure 3.2D
Figure 3.2E

S3.3 – Transitioning Your Landscape Team from AutoCAD to
Revit
Melonie Beskowiney, DIALOG
These symbol combinations from figures 3.2D and 3.2E were then indicated on the
spread sheet:
They were then nested into the corresponding RPC families. Note that you will want
to consider the shared parameter file at this stage. At DIALOG, we have a
company shared parameter file which houses parameters (through groups) for
every discipline. You will want to add the parameters for your Landscape families
to this file. An example of how this looks in the shared parameter file:
Figure 3.2F
Figure 3.2G
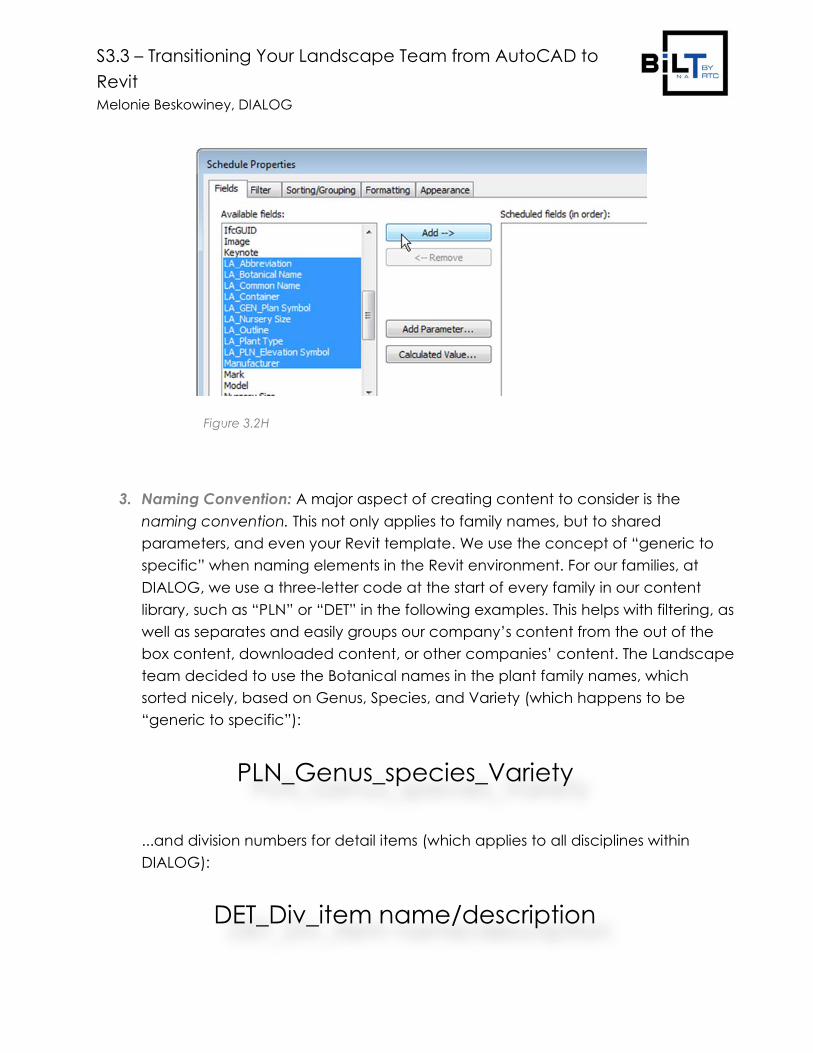
Note: Using a naming convention of
some sort will help you easily grab the
parameters you need when you are
setting up your schedule in the Revit
template, as shown in Figure 3.2H
S3.3 – Transitioning Your Landscape Team from AutoCAD to
Revit
Melonie Beskowiney, DIALOG
3. Naming Convention: A major aspect of creating content to consider is the
naming convention. This not only applies to family names, but to shared
parameters, and even your Revit template. We use the concept of “generic to
specific” when naming elements in the Revit environment. For our families, at
DIALOG, we use a three-letter code at the start of every family in our content
library, such as “PLN” or “DET” in the following examples. This helps with filtering, as
well as separates and easily groups our company’s content from the out of the
box content, downloaded content, or other companies’ content. The Landscape
team decided to use the Botanical names in the plant family names, which
sorted nicely, based on Genus, Species, and Variety (which happens to be
“generic to specific”):
...and division numbers for detail items (which applies to all disciplines within
DIALOG):
PLN_Genus_species_Variety
DET_Div_item name/description
Figure 3.2H
S3.3 – Transitioning Your Landscape Team from AutoCAD to
Revit
Melonie Beskowiney, DIALOG
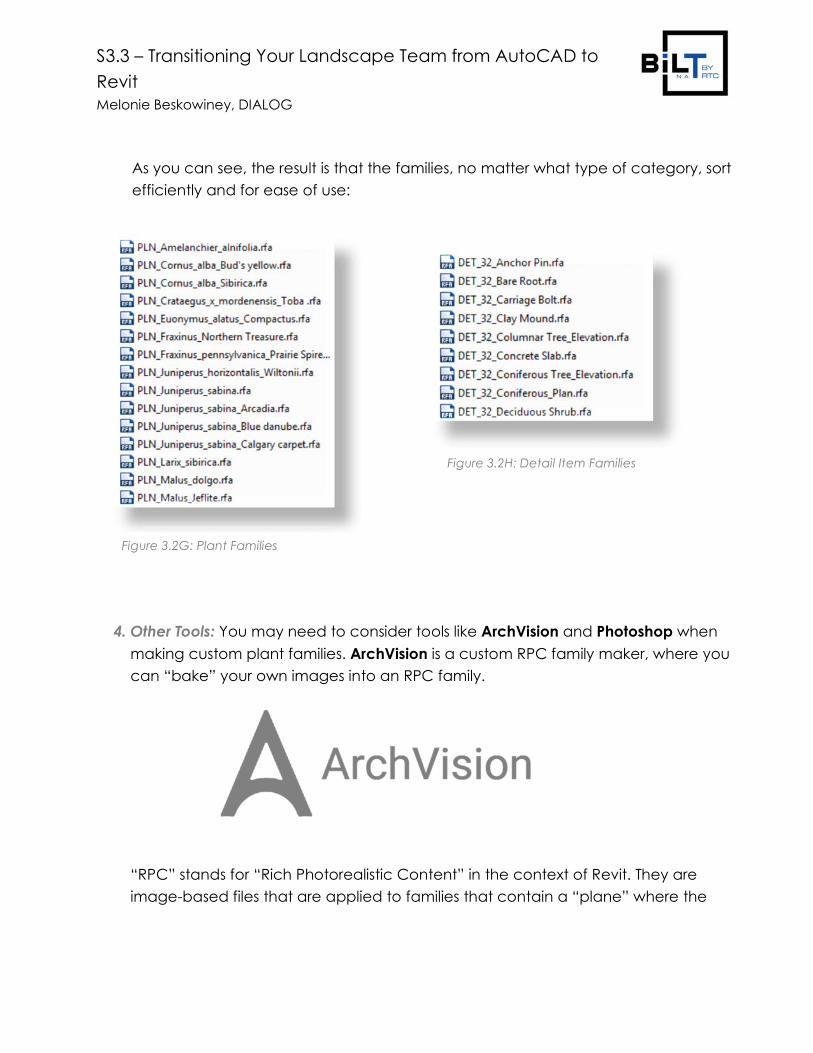
As you can see, the result is that the families, no matter what type of category, sort
efficiently and for ease of use:
4. Other Tools: You may need to consider tools like ArchVision and Photoshop when
making custom plant families. ArchVision is a custom RPC family maker, where you
can “bake” your own images into an RPC family.
“RPC” stands for “Rich Photorealistic Content” in the context of Revit. They are
image-based files that are applied to families that contain a “plane” where the
Figure 3.2G: Plant Families
Figure 3.2H: Detail Item Families
S3.3 – Transitioning Your Landscape Team from AutoCAD to
Revit
Melonie Beskowiney, DIALOG
image is applied. As you navigate around the object, the image follows. In a 3D
view, if your view is set to “realistic”, you will see the image you have applied to the
family, in place of the “wire frame” that you see in “hidden line”.
Photoshop is what you may need to create your custom images. In Canada, about
90% of the out of the box RPC plant families are not indigenous to our region,
which is why we decided to use what we could from the default Revit families, but
had to make plenty more of our own. The main benefit of the ArchVision program
is that you can render your RPC families based on the image you have used. There
are further benefits, such as being able to turn off the “baseball diamond” at the
base of your plant, and other graphic settings. The program also has over 1000
extra plant families available. However, it can be complicated to work with the
image files and their folder location, and the program has no network licensing. It is
slightly clunky to set up for each user, especially if you have multiple studios.
Additionally, if you are using Revizto, your plants will not “render” in 3D, and will be
invisible. Only the out of the box RPCs will show up in 3D in Revizto, due to some
additional programming on Revizto’s part. This is why we use Enscape, because
any custom RPC families will always show.
With your setting at “Realistic”, you can render your views, either through Revit or a
program like Enscape, and see the plant object displayed as your image. Please
note, that your rendered tree is only as good as your Photoshop skills!
S3.3 – Transitioning Your Landscape Team from AutoCAD to
Revit
Melonie Beskowiney, DIALOG
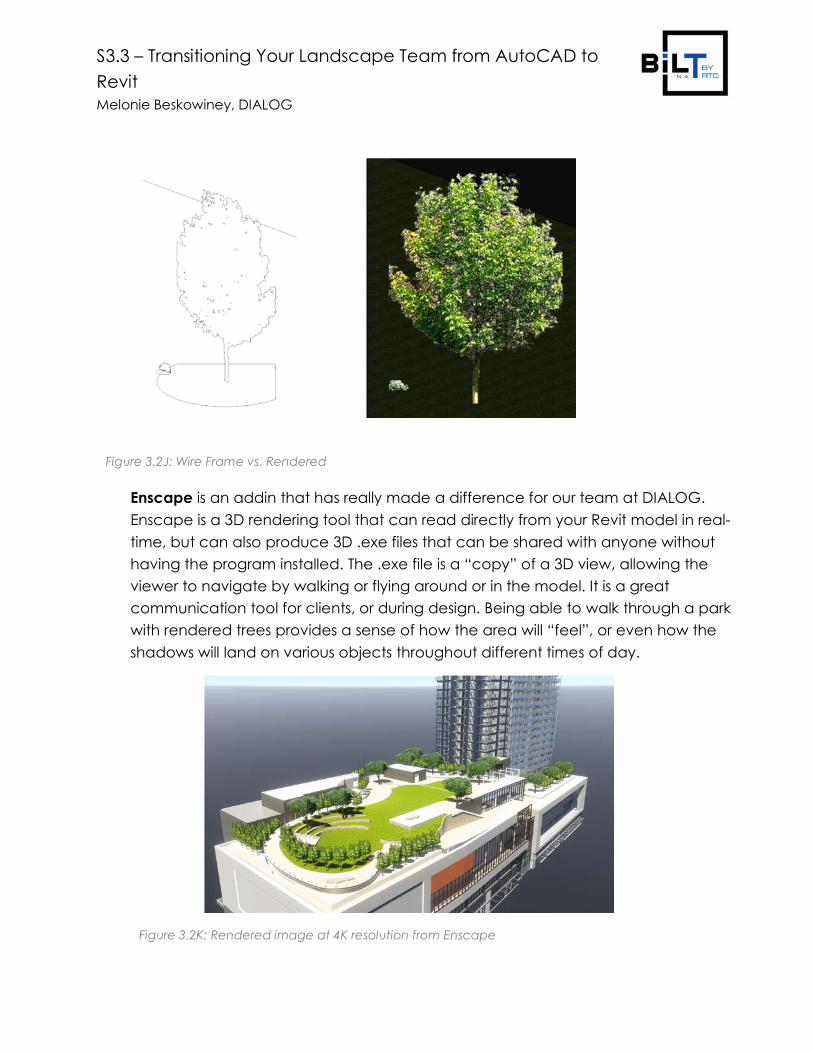
Enscape is an addin that has really made a difference for our team at DIALOG.
Enscape is a 3D rendering tool that can read directly from your Revit model in real-
time, but can also produce 3D .exe files that can be shared with anyone without
having the program installed. The .exe file is a “copy” of a 3D view, allowing the
viewer to navigate by walking or flying around or in the model. It is a great
communication tool for clients, or during design. Being able to walk through a park
with rendered trees provides a sense of how the area will “feel”, or even how the
shadows will land on various objects throughout different times of day.
Figure 3.2J: Wire Frame vs. Rendered
Figure 3.2K: Rendered image at 4K resolution from Enscape
S3.3 – Transitioning Your Landscape Team from AutoCAD to
Revit
Melonie Beskowiney, DIALOG
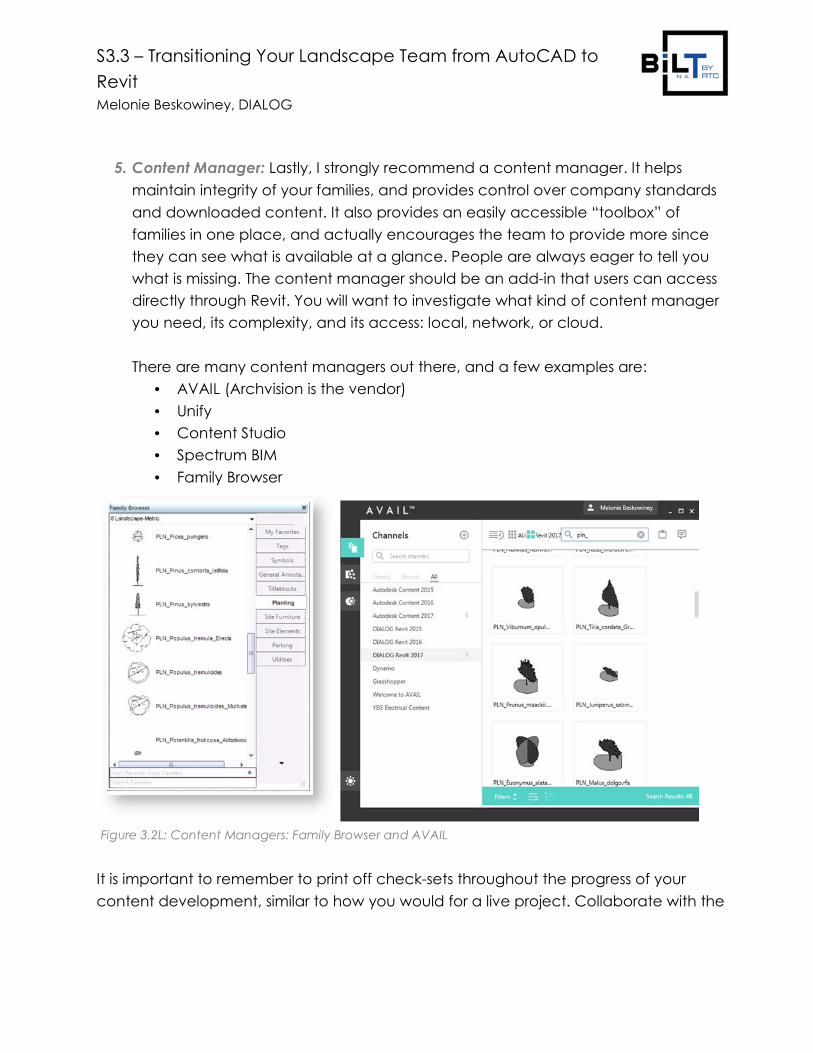
5. Content Manager: Lastly, I strongly recommend a content manager. It helps
maintain integrity of your families, and provides control over company standards
and downloaded content. It also provides an easily accessible “toolbox” of
families in one place, and actually encourages the team to provide more since
they can see what is available at a glance. People are always eager to tell you
what is missing. The content manager should be an add-in that users can access
directly through Revit. You will want to investigate what kind of content manager
you need, its complexity, and its access: local, network, or cloud.
There are many content managers out there, and a few examples are:
• AVAIL (Archvision is the vendor)
• Unify
• Content Studio
• Spectrum BIM
• Family Browser
It is important to remember to print off check-sets throughout the progress of your
content development, similar to how you would for a live project. Collaborate with the
Figure 3.2L: Content Managers: Family Browser and AVAIL
S3.3 – Transitioning Your Landscape Team from AutoCAD to
Revit
Melonie Beskowiney, DIALOG
team to ensure the families you create follow their graphic standards. If they do not
have graphic standards, you may have to assist and guide them in establishing this.
3.3 Create a Template in Revit
Welcome Page for the DIALOG Landscape Revit template
Once you have the majority of your content worked out, you can start a template. For
example, if your plant families have all the correct parameters, you can create pre-set
schedules in the template. Your graphic settings (object styles, filters, and view
templates) are also reliant on having content created first. Other aspects, such as your
project browser, and even your line weights, are not dependent on having families
created first. However, since most of your template is content-driven, it is logical to start
there before moving into this phase.
S3.3 – Transitioning Your Landscape Team from AutoCAD to
Revit
Melonie Beskowiney, DIALOG
Items that you will want to have set up in your template are:
• Project Browser
• Sheets
• Views
• View templates
• Annotation and other Family Content
• Schedules and Legends
• Company graphic standards
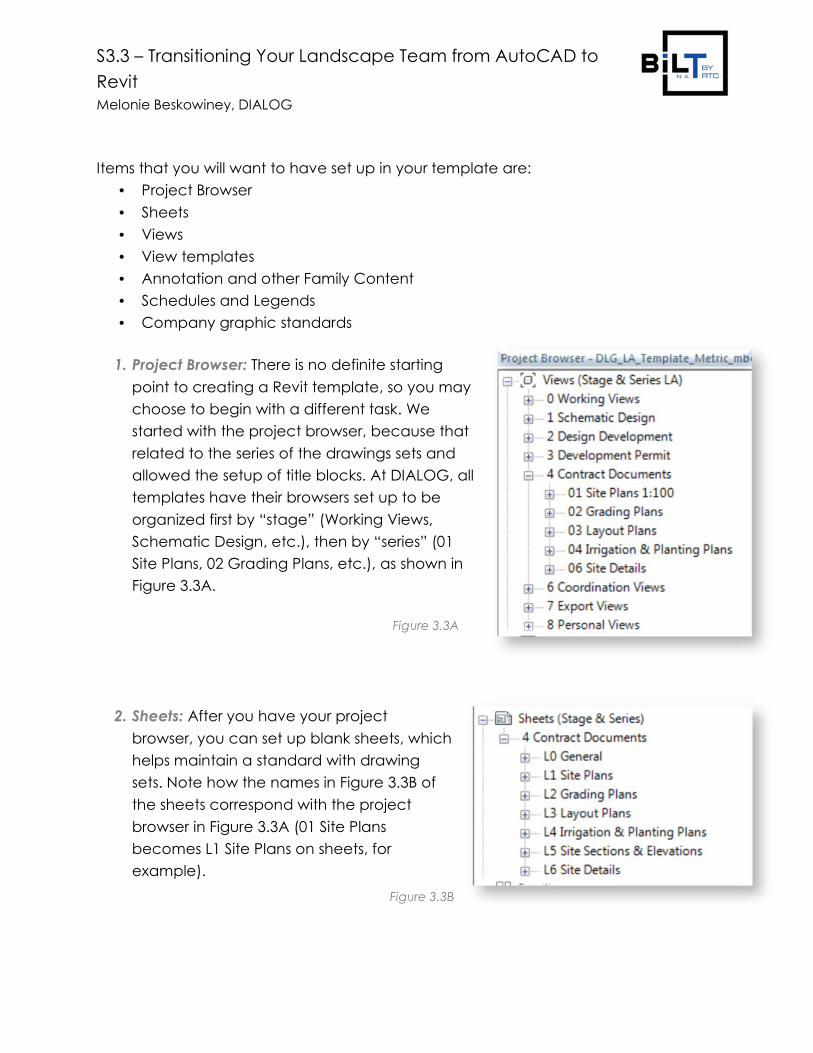
1. Project Browser: There is no definite starting
point to creating a Revit template, so you may
choose to begin with a different task. We
started with the project browser, because that
related to the series of the drawings sets and
allowed the setup of title blocks. At DIALOG, all
templates have their browsers set up to be
organized first by “stage” (Working Views,
Schematic Design, etc.), then by “series” (01
Site Plans, 02 Grading Plans, etc.), as shown in
Figure 3.3A.
2. Sheets: After you have your project
browser, you can set up blank sheets, which
helps maintain a standard with drawing
sets. Note how the names in Figure 3.3B of
the sheets correspond with the project
browser in Figure 3.3A (01 Site Plans
becomes L1 Site Plans on sheets, for
example).
Figure 3.3A
Figure 3.3B
S3.3 – Transitioning Your Landscape Team from AutoCAD to
Revit
Melonie Beskowiney, DIALOG
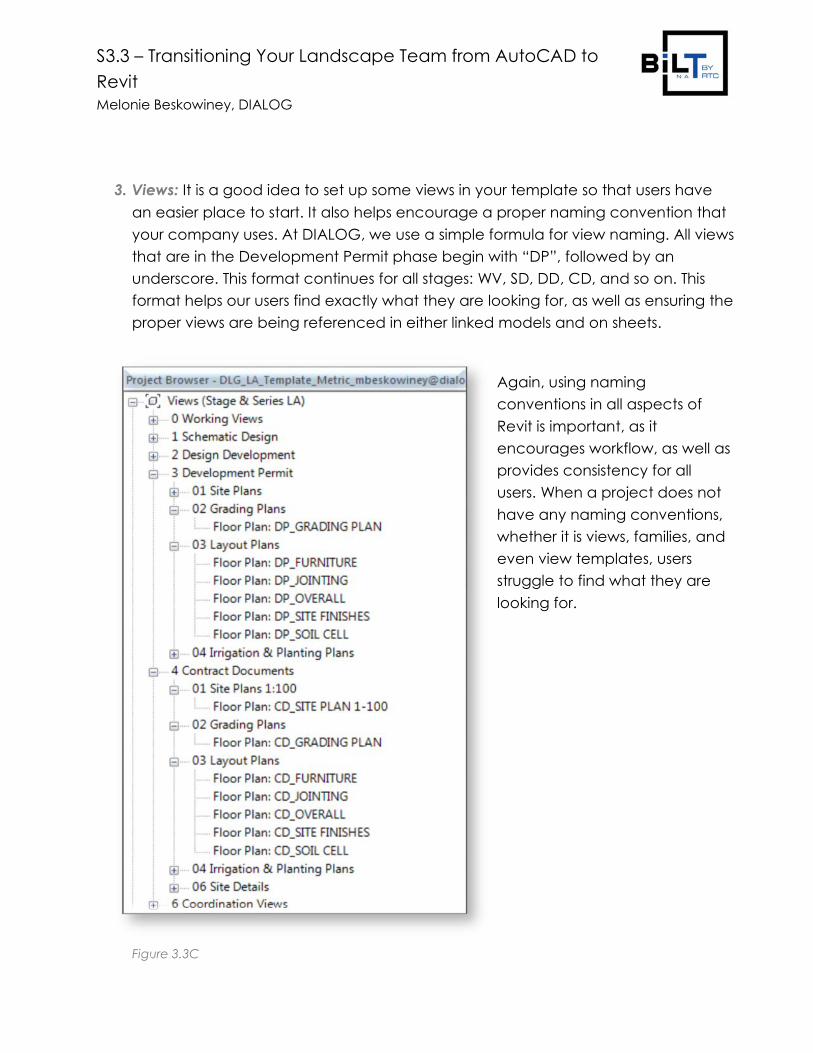
3. Views: It is a good idea to set up some views in your template so that users have
an easier place to start. It also helps encourage a proper naming convention that
your company uses. At DIALOG, we use a simple formula for view naming. All views
that are in the Development Permit phase begin with “DP”, followed by an
underscore. This format continues for all stages: WV, SD, DD, CD, and so on. This
format helps our users find exactly what they are looking for, as well as ensuring the
proper views are being referenced in either linked models and on sheets.
Again, using naming
conventions in all aspects of
Revit is important, as it
encourages workflow, as well as
provides consistency for all
users. When a project does not
have any naming conventions,
whether it is views, families, and
even view templates, users
struggle to find what they are
looking for.
Figure 3.3C
S3.3 – Transitioning Your Landscape Team from AutoCAD to
Revit
Melonie Beskowiney, DIALOG
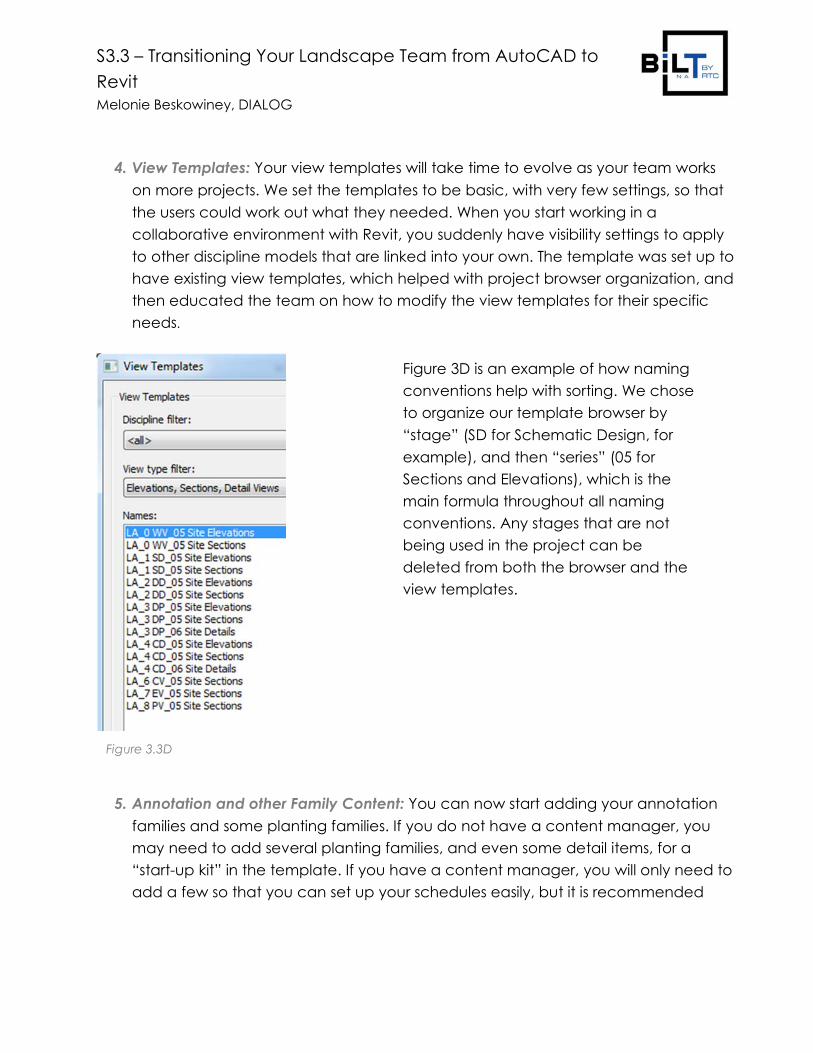
4. View Templates: Your view templates will take time to evolve as your team works
on more projects. We set the templates to be basic, with very few settings, so that
the users could work out what they needed. When you start working in a
collaborative environment with Revit, you suddenly have visibility settings to apply
to other discipline models that are linked into your own. The template was set up to
have existing view templates, which helped with project browser organization, and
then educated the team on how to modify the view templates for their specific
needs.
5. Annotation and other Family Content: You can now start adding your annotation
families and some planting families. If you do not have a content manager, you
may need to add several planting families, and even some detail items, for a
“start-up kit” in the template. If you have a content manager, you will only need to
add a few so that you can set up your schedules easily, but it is recommended
Figure 3D is an example of how naming
conventions help with sorting. We chose
to organize our template browser by
“stage” (SD for Schematic Design, for
example), and then “series” (05 for
Sections and Elevations), which is the
main formula throughout all naming
conventions. Any stages that are not
being used in the project can be
deleted from both the browser and the
view templates.
Figure 3.3D
S3.3 – Transitioning Your Landscape Team from AutoCAD to
Revit
Melonie Beskowiney, DIALOG
that you remove them after. Templates should not “house” families beyond
annotations. Let your content manager be the tool that contains additional
families.
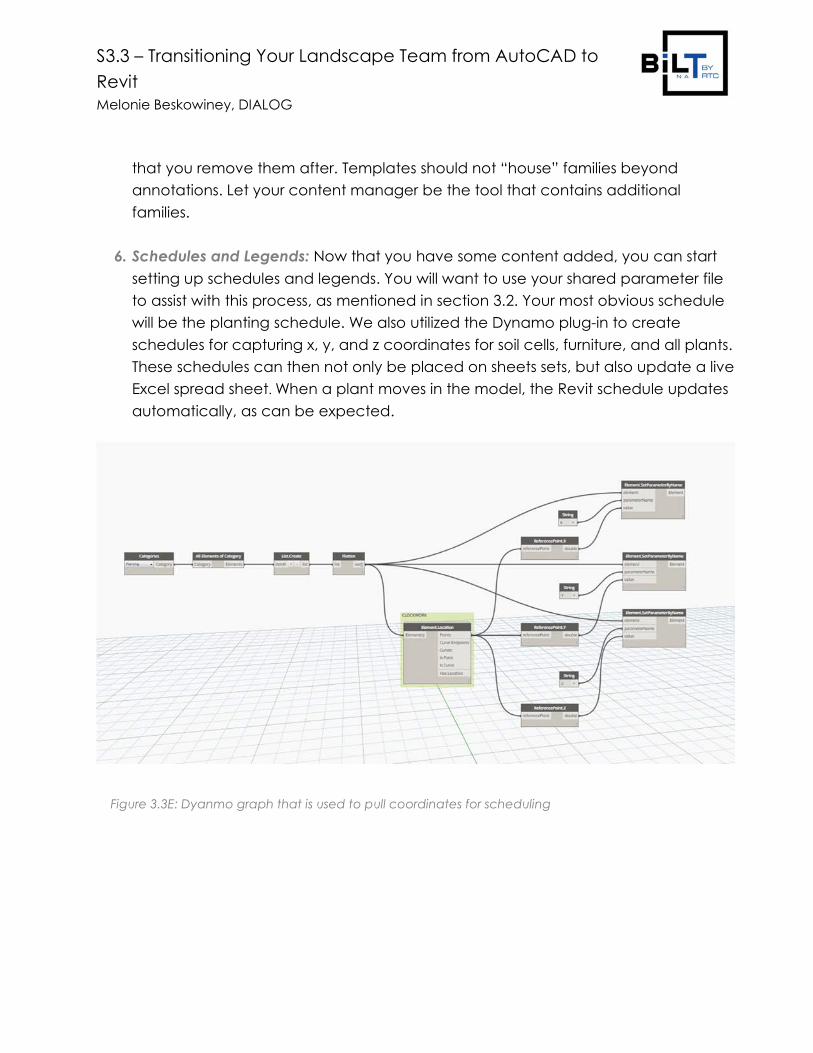
6. Schedules and Legends: Now that you have some content added, you can start
setting up schedules and legends. You will want to use your shared parameter file
to assist with this process, as mentioned in section 3.2. Your most obvious schedule
will be the planting schedule. We also utilized the Dynamo plug-in to create
schedules for capturing x, y, and z coordinates for soil cells, furniture, and all plants.
These schedules can then not only be placed on sheets sets, but also update a live
Excel spread sheet. When a plant moves in the model, the Revit schedule updates
automatically, as can be expected.
Figure 3.3E: Dyanmo graph that is used to pull coordinates for scheduling
S3.3 – Transitioning Your Landscape Team from AutoCAD to
Revit
Melonie Beskowiney, DIALOG
7. Company Graphic Standards: This last step is where you will need a lot of
communication between you and your team. You will want to use the CAD files
you were given to sort out any specific line styles and surface patterns, and
provide the team with print-outs so they can give feedback on the graphic
displays of what they are used to seeing in CAD. You will use the template to
implement any of your team’s graphic standards, and better align with the rest of
your company’s graphic standards. Note that you will want your scaled line
weights to match the other templates within your company.
3.4 Train and Educate the Team
1. Training the team: With the first three steps in place, you now have something to
work with when you start training your team. We began by including the team in a
Revit Fundamentals training class that is typically given to those in the Architectural
or Interior Design disciplines, because the same tools that Architecture and Interiors
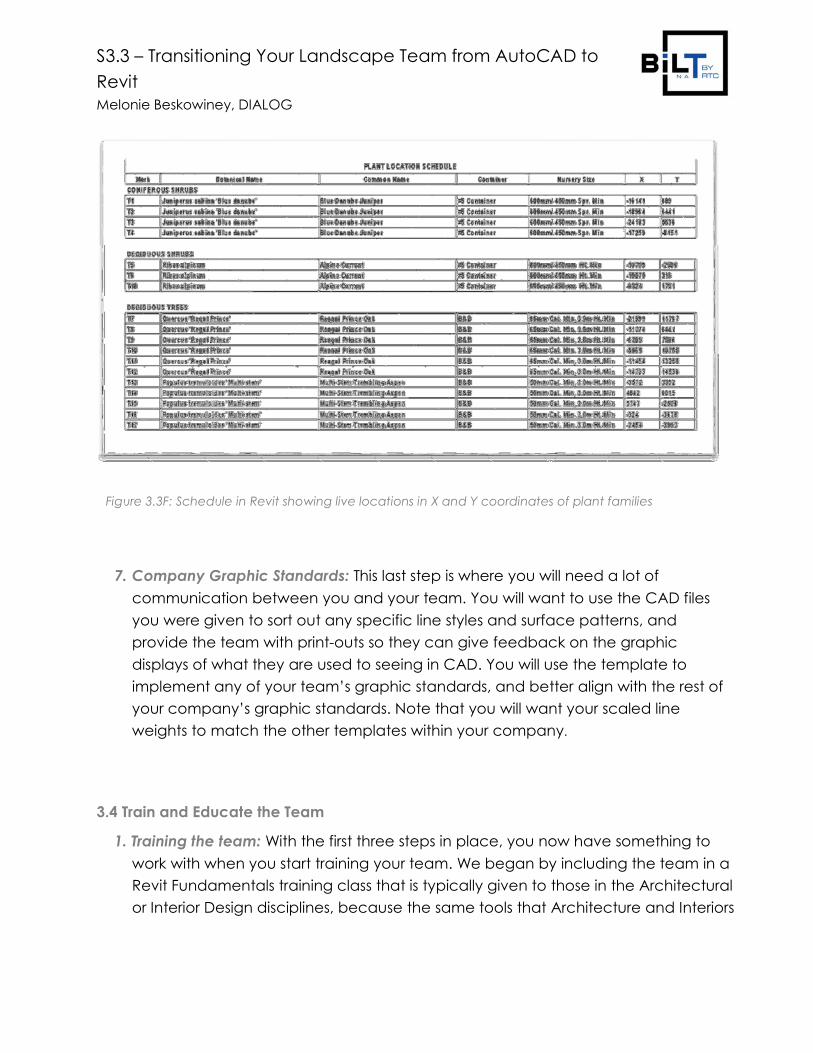
Figure 3.3F: Schedule in Revit showing live locations in X and Y coordinates of plant families
S3.3 – Transitioning Your Landscape Team from AutoCAD to
Revit
Melonie Beskowiney, DIALOG
use will also be used by Landscape. This, as we know, is because of the hurdles
discussed in section 1.0. When the team was trained on the fundamentals, they
made an easy switch from “floors” to “sidewalks”, “walls” to “curbs” or “tables” to
“benches”. They then moved on to learning about more site-dedicated tools such
as topography, working with Civil 3D files, and using the Dynamo add-in. There was
no specific focus on the Site Designer add-in, mainly due to its clunky functionality.
This is a tool with much potential, but Autodesk will need to better develop its
capabilities.
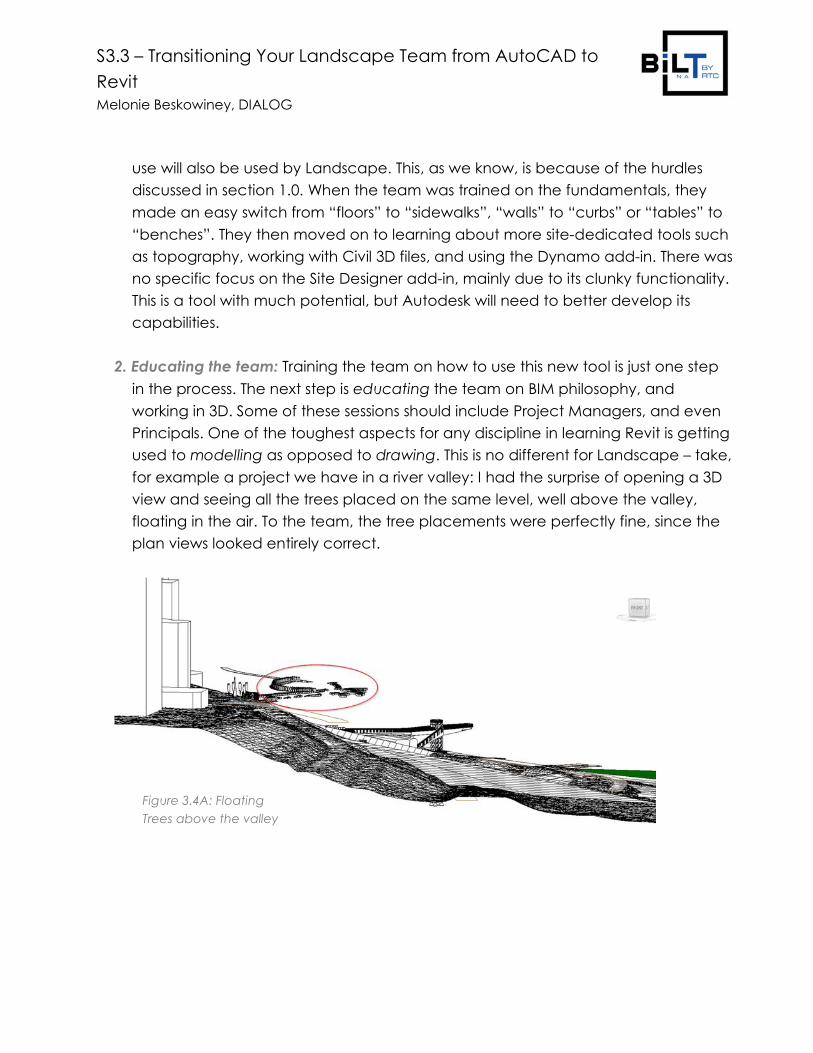
2. Educating the team: Training the team on how to use this new tool is just one step
in the process. The next step is educating the team on BIM philosophy, and
working in 3D. Some of these sessions should include Project Managers, and even
Principals. One of the toughest aspects for any discipline in learning Revit is getting
used to modelling as opposed to drawing. This is no different for Landscape – take,
for example a project we have in a river valley: I had the surprise of opening a 3D
view and seeing all the trees placed on the same level, well above the valley,
floating in the air. To the team, the tree placements were perfectly fine, since the
plan views looked entirely correct.
Figure 3.4A: Floating
Trees above the valley
S3.3 – Transitioning Your Landscape Team from AutoCAD to
Revit
Melonie Beskowiney, DIALOG
At DIALOG, we also have groups that meet to discuss collaboration with other
disciplines, as well as meetings to discuss best practices while using Revit. Once the
Landscape team was working in Revit, we were able to add them to these groups with
no effort. These meetings are integral for your Landscape team to join, so as to gain a
better understanding of BIM and collaboration. Without such an understanding, there
really is no reason to make the switch from AutoCAD to Revit.
3.5 Use a Test Project
Finally, you are now ready to put your team on a test project or a small project to start.
It has always been my opinion that users will learn best by working on actual projects.
This particular team did not have the opportunity to use a test project, so they jumped
right into a new, albeit small, project right away. It is also key that they work in Revit as
soon as they have gone through training, or they will quickly lose what they have
learned. It was in this small project that we developed new processes for many things,
such as surfaces and using the parts tool to show jointing. As the team felt more
comfortable, they moved into more complicated scheduling by using Dynamo, and
also using Dynamo for assistance with topography and floor slopes and shapes.
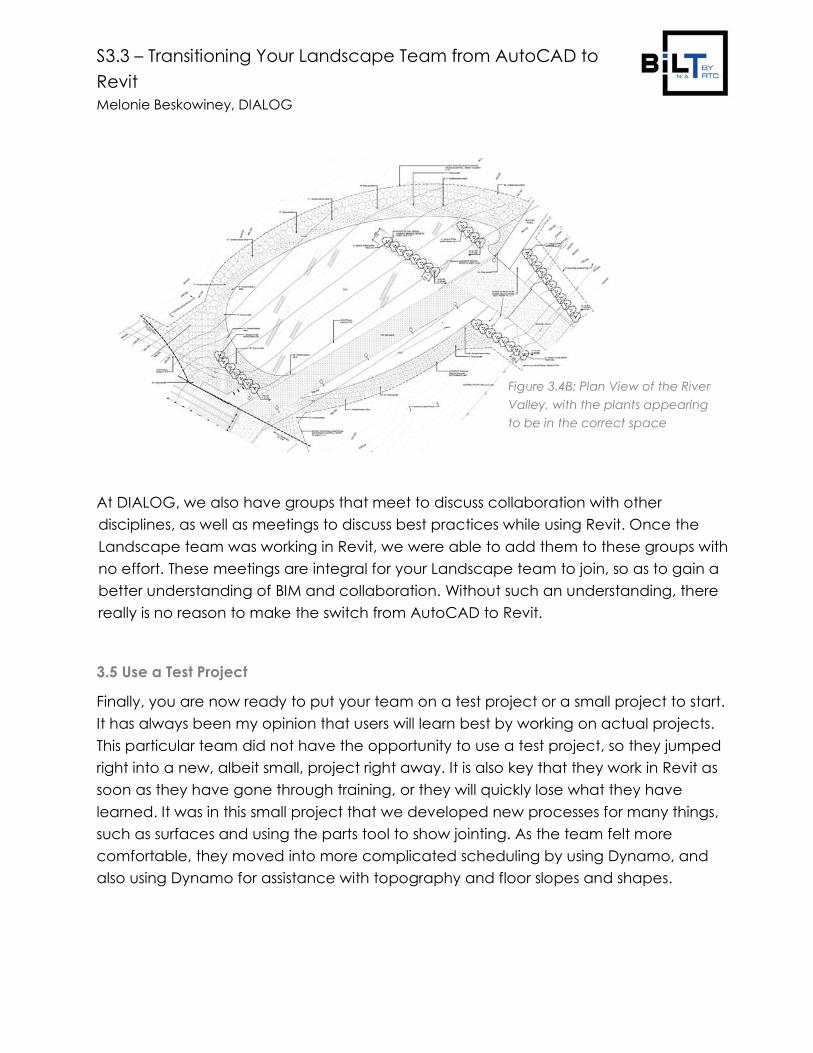
Figure 3.4B: Plan View of the River
Valley, with the plants appearing
to be in the correct space
S3.3 – Transitioning Your Landscape Team from AutoCAD to
Revit
Melonie Beskowiney, DIALOG
Your test project will also be a great place to solidify your graphics. You will likely be
making edits to your families and your template as you work on this project, so you must
remain flexible and willing to make those changes for months and even years to come.
3.6 Overcoming Challenges and Unrealistic Expectations
Now that your team is well on their way with using Revit, you will come across many
struggles, more so in the first few months. A very inspiring Architect at our firm once told
me that as teams move into Revit, be they Landscape or other disciplines, we will have
to take a few bloody noses in the start. This was to imply that there will be struggles, but
they will soon even out. As teams become more comfortable and skilled with Revit, the
efforts pay off, and your projects are more profitable than they were in AutoCAD.
Having said that, you will have other challenges and expectations that are outside of
the Revit tool itself. You will need to encourage the management of expectations that
come from the non-Revit users - that is, the Project Managers or Principals. It is easy for
those who do not use Revit to have high expectations, or to wish to compare Revit with
AutoCAD or other programs. Perhaps they think that Revit will automatically do all the
work. It is a good idea to educate the leaders of your team, so as to help keep those
expectations in check. Not doing so will result in negative feedback and insecurity
about the process of moving from AutoCAD to Revit, therefore potentially putting the
brakes on the entire initiative.
4.0 Final Thoughts
The overall process of moving an entire discipline from AutoCAD into Revit is certainly
not an easy one. Your success will be determined by the support your team receives,
and its ability to continue. At DIALOG, we have a team that is dedicated to support for
all Revit users. This takes much of the stress off of your Landscape team so that they can
focus on learning and working.
The entire purpose of making a switch from AutoCAD into Revit is to give any discipline
a better chance at effective collaboration. With the direction the industry is going,

S3.3 – Transitioning Your Landscape Team from AutoCAD to
Revit
Melonie Beskowiney, DIALOG
Architectural Technicians are already creating models and documents for their sites,
which actually takes away work from the Landscape teams. Time is lost when one party
is working in AutoCAD, and having other parties cut their sections or elevations and
exporting them to AutoCAD, when they should be able to do this themselves. By
training and educating them how to do this, they are able to work within the industry as
they should, or risk being left behind.