TranScan Viewer TranScan/LAN Version 5
44
TranScan Viewer & TranScan/LAN Version 5.11 August 10, 2014 Copyright 1987-2014 Ontrac Consulting, Inc. 7330 Hayden Ave Sebastopol, CA 95472
Transcript of TranScan Viewer TranScan/LAN Version 5

TranScan Viewer
&
TranScan/LAN
Version 5.11
August 10, 2014 Copyright 1987-2014
Ontrac Consulting, Inc.
7330 Hayden Ave
Sebastopol, CA 95472

TranScan Viewer & TranScan/LAN
August 10, 2014 Page ii
Preface
This document contains procedures for use of the TranScan Viewer1 and
TranScan/LAN.
TranScan Viewer will take a message formatted according to ISO/8583 standards,
parse it, and display it in an easily readable format. ISO/8583 is the ISO standard for
message formats for Bankcard interfaces. The major international, and many regional,
ATM and POS switches, use ISO/8583.
TranScan/LAN monitors and analyses financial transactions on a Bank Card local
area network (LAN). TranScan/LAN provides a rich set of layered functions,
addressing the needs of such varied groups as Network Technicians running Bank
Card Networks, Software Developers implementing new functions for those networks
and Network Certifiers ensuring the capability of Network participants.
TranScan/LAN currently utilizes the FTS Ethertest product for “sniffing” the low
level LAN communication packets which contain these financial transactions.
1The Material in this publication is copyright-protected 1987-2014 by Ontrac Consulting, Inc. and
may not be reproduced in any form, by any method for any purpose without the prior written consent
of Ontrac. It is against the law to copy the software, except in accordance with the terms of the
licensing agreement.

TranScan Viewer & TranScan/LAN
August 10, 2014 Page iii
Table of Contents
1. INTRODUCTION .............................................................................................................................................. 1
1.1 TRANSCAN VIEWER ...................................................................................................................................... 1 1.2 TRANSCAN/LAN .......................................................................................................................................... 1
1.2.1 TranScan/LAN as a Network Analyzer for LANs ................................................................................... 1 1.2.2 Operational Principles .......................................................................................................................... 2
2. SYSTEM CONFIGURATION AND SOFTWARE INSTALLATION ......................................................... 3
2.1 SYSTEM REQUIREMENTS .................................................................................................................................. 3 2.2 INSTALLATION FOR TRANSCAN/LAN AND FTS ......................................................................................... 3
2.2.1 Frontline Test System Installation ...................................................................................................... 3 2.2.2 Installation of TranScan/LAN Hooks for FTS Ethertest ........................................................................ 4 2.2.3 FTS Configuration ................................................................................................................................. 4
2.3 INSTALLATION OF TRANSCAN VIEWER.......................................................................................................... 4
3. STARTING THE PROGRAMS ....................................................................................................................... 5
4. RETRIEVING A MESSAGE FOR FORMATTED DISPLAY ..................................................................... 6
4.1 GRAB THE MESSAGE FROM A HOST CONSOLE .................................................................................................. 6 4.2 PASTE MESSAGE FROM THE CLIPBOARD .......................................................................................................... 8 4.3 RETRIEVE A MESSAGE IN A BINARY FILE ......................................................................................................... 8 4.4 RETRIEVE A CHARACTER MESSAGE IN A TEXT FILE ......................................................................................... 8 4.5 RETRIEVE A MESSAGE FROM TRANSCAN/LAN WITH FTS COMPONENT .................................................... 9
4.5.1 Filtering Traffic in FTS .......................................................................................................................... 9 4.5.1.1 FTS Single Address Filter ............................................................................................................................ 9 4.5.1.2 Filter Frames Between Two Endpoints in FTS ............................................................................................ 9
4.6 AUTOMATION SERVER CALLS ........................................................................................................................ 10 4.7 FEATURES FOR MESSAGES RECEIVED FROM TRANSCAN/LAN AND AUTOMATION ........................................ 10
4.7.1 Capture versus Examine Mode ............................................................................................................ 10 4.7.2 TCP Application Message Headers and Advanced TCP/IP Options ................................................... 11
5. DISPLAY OPTIONS ....................................................................................................................................... 13
5.1 SUPPRESSING DISPLAY OF STAY-ALIVE AND VISA HEART BEAT MESSAGES .................................................. 13 5.2 CHANGING MESSAGE FORMATS (DIALECTS) .................................................................................................... 13 5.3 CHANGING FIELD LEVEL DISPLAY ................................................................................................................... 14 5.4 CHANGING BETWEEN DESCRIPTIVE LABELS AND BIT NUMBER LABELS ......................................................... 14 5.5 SHOW BLANKS AS NON-BLANKS ..................................................................................................................... 14 5.6 MOVING THROUGH MESSAGES IN DISPLAY .................................................................................................... 14 5.7 FINDING MATCHING REQUEST/RESPONSE MESSAGES .................................................................................... 14 5.8 FINDING MESSAGES WITH PARSING ERRORS .................................................................................................. 15 5.9 OPENING A SECOND DISPLAY WINDOW ......................................................................................................... 15 5.10 FILTERING BY MESSAGE FIELD .................................................................................................................. 16
6. PRINTING FORMATTED MESSAGES ...................................................................................................... 18
7. SAVING MESSAGES TO FILE ..................................................................................................................... 18
7.1 SAVING A MESSAGE IN BINARY ...................................................................................................................... 18 7.2 SAVING CHARACTER DISPLAY OF MESSAGES FOR LATER VIEWING ............................................................... 18 7.3 SAVING PARSED MESSAGE DISPLAY TO AN RTF OR HTML DOCUMENT ....................................................... 19

TranScan Viewer & TranScan/LAN
August 10, 2014 Page iv
8. COPYING A PARSED MESSAGE TO THE CLIPBOARD ....................................................................... 19
9. CLEAR MESSAGES FROM DISPLAY BUFFERS..................................................................................... 19
10. PRIVACY MASKING ..................................................................................................................................... 19
11. MISCELLANEOUS OPTIONS ...................................................................................................................... 20
11.1 TUNING ..................................................................................................................................................... 20 11.2 FOLDERS ................................................................................................................................................... 22
12. TROUBLE SHOOTING .................................................................................................................................. 23
12.1 TROUBLE SHOOTING TRANSCAN VIEWER ................................................................................................. 23
13. TRANSCAN VIEWER CHARACTER MESSAGE FILE FORMAT ........................................................ 29
14. SPECIFICATIONS FOR AUTOMATION SERVER CALLS .................................................................... 30
14.1 CLEAR TRANSCAN VIEWER DISPLAY BUFFERS ......................................................................................... 30 14.2 FORMAT AND DISPLAY ISO MESSAGE ....................................................................................................... 30 14.3 GET DISPLAY MODE (REALTIME/EXAMINE) .............................................................................................. 31 14.4 SET DISPLAY MODE (REALTIME/EXAMINE) ............................................................................................... 32 14.5 GET DISPLAY FREEZE SETTING.................................................................................................................. 32 14.6 SET DISPLAY FREEZE/UNFREEZE ............................................................................................................... 33 14.7 GET MESSAGE NUMBER OF FIRST MESSAGE IN TRANSCAN VIEWER DISPLAY BUFFER ............................. 33 14.8 GET MESSAGE NUMBER OF LAST MESSAGE IN TRANSCAN VIEWER DISPLAY BUFFER .............................. 34 14.9 GET MESSAGES FORMATTED IN HTML ..................................................................................................... 34 14.10 GET MESSAGES FORMATTED IN RTF......................................................................................................... 35
15. EXAMPLE CODE FOR CALLS TO TRANSCAN VIEWER ..................................................................... 36
15.1 EXAMPLE MFC VISUAL C++ CODE ........................................................................................................... 36 15.2 EXAMPLE VISUAL BASIC CODE ................................................................................................................. 39

TranScan Viewer & TranScan/LAN
August 10, 2014 Page 1
1. Introduction
1.1 TranScan Viewer
The TranScan Viewer supports input from different sources:
1. Paste the message from the clipboard.
2. "Grab" an ISO format message from a TPF console display. Access to the TPF console
must be via the 3270 emulation program Extra2. A request is made to Extra for a copy
of the screen by TranScan Viewer.
3. Read a file containing the binary image of the message. The file must contain the
actual binary image of the message.
4. Read a text file containing the hexadecimal character representation of one or more
messages.
5. Read a file previously saved by TranScan Viewer containing one or more messages.
6. ActiveX Automation (formerly known as OLE Automation) client3
7. TranScan/LAN with the Frontline Test System (FTS)4 network analyzer component.
TranScan Viewer will format the ISO messages and display them in an easily readable
form.
This version of TranScan Viewer runs on Windows XP, Windows Vista, and Windows 7,
Windows 8, and Windows 2008 Server5.
1.2 TranScan/LAN
TranScan/LAN uses the TranScan Viewer working in conjunction with either Frontline
Test Equipment’s Ethertest or Serialtest, and is designed to support the monitoring and
analysis of communications messages on a Bank Card local area network (LAN).
TranScan/LAN provides a rich set of layered functions, addressing the needs of such
varied groups as Network Technicians running Bank Card Networks, Software Developers
implementing new functions for those networks and Network Certifiers ensuring the
capability of Network participants.
1.2.1 TranScan/LAN as a Network Analyzer for LANs
TranScan/LAN with FTS Ethertest component, can perform a range of functions from
displaying and capturing non-interpreted data on local area networks, to performing such
functions as calculating network utilization and collecting network statistics. When
displaying complex communications protocols, such as TCP/IP, FTS Ethertest offers
higher level mnemonic decoding functions. The "non-ISO" set of functions for FTS
Ethertest is described in detail in the FTS documentation.
2 Extra is a trademark of Attachmate, Inc. 3 Includes Microsoft Excel and Access using Visual Basic for Applications 4 Frontline Test System includes Ethertest, SerialTest, SerialSpy, and/or CommProbe. 5 The Windows OS names are trademarks of Microsoft Corporation.

TranScan Viewer & TranScan/LAN
August 10, 2014 Page 2
This manual will provide more detail on those functions pertaining to the higher level
analysis of communications messages. Originally, TranScan was designed to parse and
display various dialects of the ISO/8583 Message Format for BankCard Processors on wide
area networks, WANs (using Bisync, X.25, Frame Relay, and SNA). The ISO/8583
standard has had a number of different transmission implementations, which are referred
to as dialects by TranScan. TranScan has added support for many of these dialects to
support the user base that gateway into the different Bank Card Networks. TranScan has
grown in function and now handles a number of different "higher level" or application
level message formats that are not ISO/8583, yet are can be specified in our table driven
format. We encourage our users to send us specifications for their message formats for
inclusion in their system as a new dialect. So, as on the various screens you see the word
"ISO", please substitute "application message" in your mind, as the TranScan now handles
much more than the ISO/8583 formats.
FTS and TranScan/LAN supports over 60 different Ethernet and WAN protocols.
Currently, the application messages are extracted and parsed (according to the individual
networks ISO/8583 format) for TCP and SNA LU0 and LU2. Contact Ontrac for any
needs concerning additional protocols.
1.2.2 Operational Principles
As you use TranScan/LAN and TranScan Viewer, please remember the following general
operational principles:
There are two forms of capturing data to file for later analysis. An FTS Ethertest
capture file, and a TranScan Viewer ISO message file. For details on the FTS
dump file, see the FTS documentation. Description of the ISO message file is
contained later in this document.
Ethertest capture files, when viewed with TranScan/LAN, will display parsed
protocol information and application message data.
ISO message files can then be viewed and printed with the TranScan Viewer™.
ISO files, when viewed, will display only the application message, without the
accompanying protocol.
LANs, by design, are shared by many computers. There may be a huge amount of
traffic between computers in which you are not interested. The simplest way to
limit the traffic to that in which you are interested, is to use FTS filters. Especially
helpful is the address filter. Later, this manual will discuss the address filter.

TranScan Viewer & TranScan/LAN
August 10, 2014 Page 3
2. System Configuration and Software Installation
When you receive your system, if you have also purchased TranScan/LAN, you will also
have received installation instructions for Frontline Test System (FTS). Please contact
Ontrac for support ([email protected]) for problems with installation of the FTS or
TranScan Viewer product.
During the install process for TranScan/LAN; you will have selected which hard drive and
which starting sub-directory to use when the system is installed. The defaults are "C:" for
the hard drive, and directory “\Program Files\TranScan Viewer”. In this manual, we will
refer to those defaults, so please mentally substitute your choices if you did not use the
defaults.
2.1 System Requirements
Minimum system requirements
32-bit version of Windows XP, Vista or Windows 7. (Contact Ontrac for Windows
Server support.)
Pentium class 300mega-hz or greater CPU (recommend 3ghz for monitor LAN
networks with heavy traffic)
512 megabytes of memory CPU (recommend 4GB for monitor LAN networks with
heavy traffic)
20 megabytes of disk drive space
For the TranScan/LAN with Ethertest component, an Ethernet card supported by 32-
bit Windows XP, Windows Vista or Windows 7. The interface must support
promiscuous mode (also known as “catch all” or CAF, capture all frames).
2.2 Installation for TranScan/LAN and FTS
If you have purchased the optional TranScan/LAN component of Frontline Test System
(FTS), install the following components in the order specified below:
1. FTS Ethertest software
2. TranScan/LAN “hooks” for FTS
3. TranScan Viewer
2.2.1 Frontline Test System Installation
To install FTS Ethertest, execute the FTS installation program
(webinstallnn.nn.nn.nn.exe, where nn.nn.nn.nn represents the latest version of FTS).
When prompted, enter the FTS Ethertest serial number provided to you by Ontrac. If
prompted, under “General Purpose Analyzers”, select “Install Ethertest”.
For Windows 7 and Windows Server, set Ethertest to run as administrator. From the
Windows Start menu, click “All Programs”, and then click on the Ethertest folder. Then
right click on Ethertest, choose properties.
1. On “Compatibility” tab, click "Show settings for all users".

TranScan Viewer & TranScan/LAN
August 10, 2014 Page 4
2. Then check "run as administrator" and under "run this program in compatibility mode",
select "Windows XP (Service Pack 3)". Then click “OK”, then "OK" again.
After installation, run FTS to verify that installation was successful. Test that the
installation was successful by starting FTS and monitoring network traffic.
2.2.2 Installation of TranScan/LAN Hooks for FTS Ethertest
There are TranScan/LAN “hooks” for FTS software which are to be extracted into the FTS
program directory. The files are contained in an installation file
“FileSetTS_yyyymmdd.exe”.
Execute FileSetTS_yyyymmdd.exe (for Windows 7 and Windows Server 2008, right
click and click “run as administrator”). Then follow the on-screen instructions.
If given a choice of FTS installations, choose the one you installed above.
2.2.3 FTS Configuration
Options to consider setting for FTS include buffer wrapping and whether FTS is to start
capturing live data when it is started. From the FTS Control Menu, select “Options”,
then “System Settings…”
“Wrap Buffer” option: When enabled, FTS will wrap the buffer when it becomes
full. The oldest data will be moved out of the buffer to make room for new data.
Any data moved out of the buffer will be lost. This option also applies to capture
files. When disabled, FTS will pause capture when the buffer becomes full.
Either reset the buffer or close your capture file to continue.
“Start up…” option: Start up options determine whether to start data capture
immediately (to buffer and optionally to file) on starting FTS.
2.3 Installation of TranScan Viewer
To install TranScan Viewer,
1. unzip the installation files into a temporary folder
2. execute “setup.exe”
3. follow the setup program directions on the program.
The installation will add “TranScan Viewer” to the Windows Start menu, under
“Programs”, then “TranScan”.
Each copy of TranScan Viewer requires an Activation Code beyond the trial period. For
each license, you are given a grace period between the time the software is installed, and
the time an Activation Code must be entered. Contact Ontrac Consulting via e-mail at
[email protected] or by phone at 707-935-8238, after the installation, to receive your
Activation Code specific to the installed copy of TranScan Viewer. You will need to provide
the Disk Volume Serial Number and the Execution ID, which appears when you first start
TranScan Viewer:

TranScan Viewer & TranScan/LAN
August 10, 2014 Page 5
You may continue to use TranScan Viewer without a Activation Code, until the trial period
is over. Just click the “Cancel” button. Once the Activation Code is entered, the above
dialog box will no longer appear. After entering the Activation Code, TranScan Viewer
will ask you to create a password for turning off Privacy Masking. See section 10. Privacy
Masking, for more information.
3. Starting the Programs
To start TranScan Viewer:
From Windows “Start”, select “Program”, then “TranScan”, then “TranScan Viewer” If
messages are to be retrieved from a host, Extra may be started prior to, or after
starting the TranScan Viewer.
To start FTS:
From Windows “Start”, select “Program”, then select one of the following: “Ethertest”,
“CommProbe”, “Serialtest”, or “SerialSpy”.

TranScan Viewer & TranScan/LAN
August 10, 2014 Page 6
4. Retrieving a Message for Formatted Display
This section describes how to retrieve an ISO message from FTS Ethertest, a file,
clipboard, TPF console or other host console, and display a formatted output of the
message.
4.1 Grab the Message from a Host Console
For a message displayed on a host console, first, display the ISO message on the host
console. TranScan Viewer supports the following TPF console displays:
ZUODF LEV Dn (display of dump)
ZUODF SNAP /tag_name (display of SNAPC)
ZKTRP DATA TRAP=mm SLOT=nn (Online Trap data display)
ZDLEV Dn (SST level display)
The output of the display must not wrap on the screen. The best way to insure this is to
clear the screen before entering the host command to display the message.
Next, switch over to the TranScan Viewer and either
click on the button "Grab Message from Host".
or from the Edit menu, select “Grab Msg from Host Console”
If the entire message does not fit on one host console screen, TranScan Viewer will display:
To grab the rest of the message:
1. Switch to Extra and the host console screen.
2. Display the remainder of the output from the host command.
3. Switch back to TranScan Viewer.
4. Click “OK”
TranScan Viewer & TranScan/LAN
August 10, 2014 Page 7
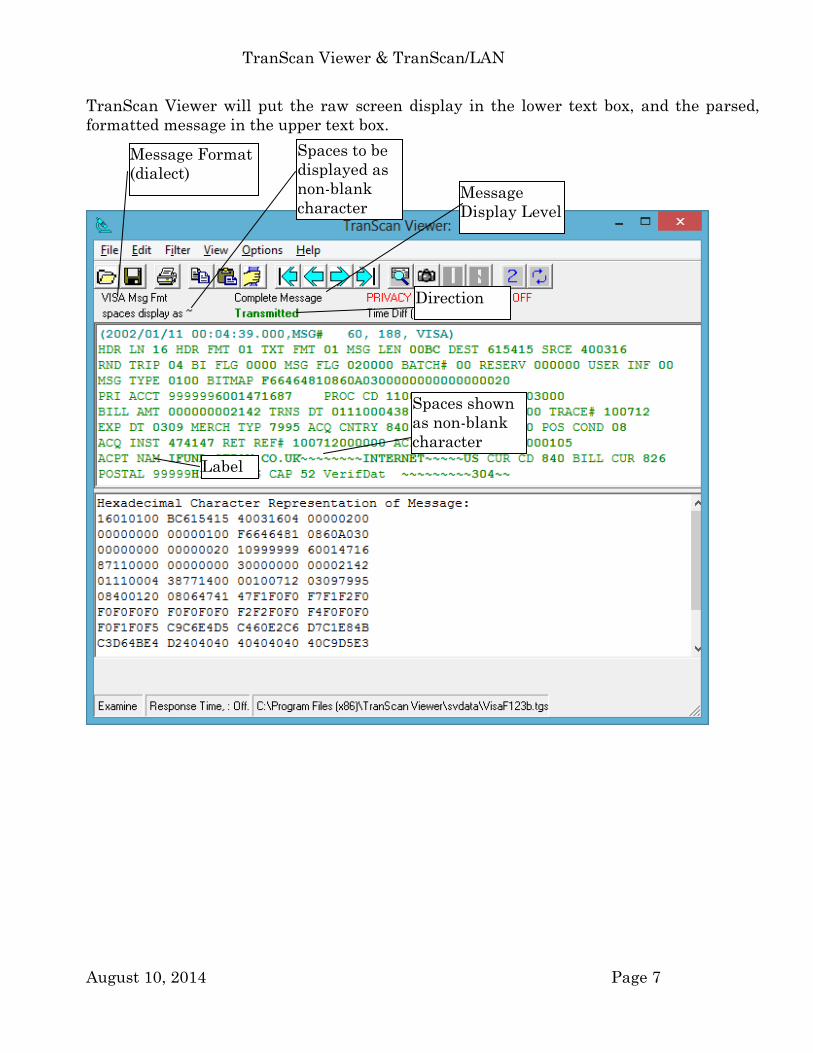
TranScan Viewer will put the raw screen display in the lower text box, and the parsed,
formatted message in the upper text box.
Message
Display Level
Direction
Message Format
(dialect)
Spaces to be
displayed as
non-blank
character
Message Length
Label
Spaces shown
as non-blank
character

TranScan Viewer & TranScan/LAN
August 10, 2014 Page 8
4.2 Paste Message from the Clipboard
TranScan Viewer can “paste” an ISO 8583 message from the clipboard. The clipboard must
contain ASCII character text. The message in the clipboard may be formatted in:
one of the host console formats supported by TranScan Viewer,
hexadecimal character text representation of a message6, or
the message itself, if the message encoding only uses ASCII.
To tell TranScan Viewer, which of the above to use during paste from the clipboard:
1. from the Options menu, select “Clipboard contains:”
2. then select the desired clipboard option
To paste from the clipboard, from the Edit menu, select “Paste msg from clipboard”, or use
the “Paste Message from Clipboard” button on the toolbar.
To see an example, copy the following message into the clipboard.
30323030 0000000000010000 303531 496620796F752063616E
207265616420 74686973 2C2074686520
6D65737361676520 70617273656420636F72726563746C792E
In TranScan Viewer,
1. set the “dialect” (from the “View” menu) to “ASCII/1993” with “Header Bytes to
Skip” set to 0,
2. set the clipboard paste option to “Hex Character Representation of Msg”
3. then “paste” from the clipboard.
4.3 Retrieve a Message in a Binary File
TranScan Viewer has the capability to read a binary file containing the exact binary
image of a message. No added spaces, carriage returns, or line feeds. No character code
conversion (i.e. EBDCIC to ASCII). TranScan Viewer will show the hexadecimal
character display in the lower box, and the parsed message display in the upper box.
To open a binary message file:
1. From the File menu, select “Open binary msg file…”
2. Select the file using the Open File dialog box (the default file extension is .bim).
3. Click “Open”
4.4 Retrieve a Character Message in a Text File
TranScan Viewer can read and parse a character representation of a message in a text
file that was previously saved by TranScan Viewer. (See section 7, Saving Messages to
File.)
1. From the File menu, select “Open character msg file…”
2. Select the file from the Open File dialog box (the default file extension is .tgs).
3. Click “Open”
6 For example: F0F2F0F07204…, for a message format which contains the message type (0200) in EBDCIC
and the bitmap (7204…) in binary. Space, carriage return, and line feed (paragraph) characters are not
considered part of the message and are skipped.

TranScan Viewer & TranScan/LAN
August 10, 2014 Page 9
4.5 Retrieve a Message from TranScan/LAN with FTS Component
TranScan/LAN with FTS component, purchased separately from TranScan Viewer, will
automatically send application messages to the TranScan Viewer during:
Live Capture mode (realtime display)
Examining a Caputure (.cfa) file (already captured frames).
Note that FTS Ethertest can read Sniffer type 1 captured files (.enc).
4.5.1 Filtering Traffic in FTS
If the network you are monitoring has a lot of traffic that you are not interested in seeing,
then use FTS’s filtering capability. Creating and applying filters is performed from the
“Frame Display” window. (The Frame Display window can be opened from the main
window via the menu by clicking “Window”/”Frame Display”.)
4.5.1.1 FTS Single Address Filter
If you are only interested in messages flowing from or to a specific endpoint, specify an
address filter.
From the Frame Display menu, select “Filter”, then ”Create/Apply Filter…”
Click on the “Define Conditions” tab
In the left box, click on the line “Node and Conversation
Under “Node A”, select “IP Address”
Enter the IP address in the text box below the radial buttons
Click the “Add” button”
If asked, enter a filename to save this filter configuration and click Save.
4.5.1.2 Filter Frames Between Two Endpoints in FTS
You may specify multiple filters with logical AND or logical OR conditions.
For example, if you are only interested in messages flowing between two IP addresses on
an Ethernet, follow the procedure below:
From the Frame Display menu, select “Filter”, then ”Create/Apply Filter…”
Click on the “Define Conditions” tab
In the left box, click on the line “Node and Conversation
Under “Node A”, select “IP Address”
Enter the IP address in the text box below the radial buttons
Under “Node B”, select “IP Address”
Enter the IP address in the text box below the radial buttons
Click the “Add” button”

TranScan Viewer & TranScan/LAN
August 10, 2014 Page 10
4.6 Automation Server Calls
TranScan Viewer is an ActiveX Code Component (COM), Automation Server (formerly
known as OLE Automation). Automation is one of the Microsoft standards for calling
applications in Windows. Messages can be sent to TranScan Viewer from an
Automation client.
The TranScan Viewer contains the class “TranScanViewer”, with functions:
ClearISOdisplayBuffers
DisplayISOMsg
GetDisplayMode
SetDisplayMode
GetFreeze
SetFreeze
GetFirstMsgNumber
GetLastMsgNumber
GetFormattedHTMLMsgs
GetFormattedRTFMsgs
See section 14 Specifications for Automation Server Calls, for details specifications of
these server calls.
4.7 Features for Messages Received from TranScan/LAN and Automation
Messages received via Automation
are identified as either being received during a realtime “capture” mode, or a
playback “examine” mode.
can have a “protocol” associated with the message.
TranScan Viewer has additional features which can be utilizes for messages received as
an Automation server:
freezing/unfreezing display during “capture” mode
support for TCP application header for TCP/IP protocol
4.7.1 Capture versus Examine Mode
Note that TranScan Viewer must be in Realtime Capture mode in order to accept
messages from FTS when FTS is in live capture mode, or to accept messages via the
“DisplayISOMsg” function call when the call is identified as “capture” mode.
Either click the Realtime Capture mode button or from the “View” menu, select
“Realtime Capture mode”, to enter Realtime Capture mode.
To enter Examine mode, either click the Examine mode button or from the “View”
menu, select “Examine mode”.

TranScan Viewer & TranScan/LAN
August 10, 2014 Page 11
Use the Freeze option to freeze the TranScan Viewer display during realtime capture.
While in freeze mode, TranScan Viewer will still accept realtime capture messages from
FTS or via the “DisplayISOMsg” function, storing them in buffers.
To freeze, either click the freeze button or from the “View” menu, select “Freeze”
To unfreeze, either click the unfreeze button or from the “View” menu, select
“Unfreeze”
While in examine mode, the Freeze and Unfreeze options are not in effect.
4.7.2 TCP Application Message Headers and Advanced TCP/IP Options
When used a part of the TranScan/LAN package or via the “DisplayISOMsg” function
call, TranScan Viewer supports application message headers for the TCP protocol.
Current supported headers include:
no header
Standard Header (2 byte length), where the length is inclusive of the header
Standard Header (2 byte length), where the length is exclusive of the header
Visa Header (2 byte length, plus 2 bytes reserved)
Hyvee (4 byte ASCII length)
The number of bytes to skip before the TCP Application header can also be set.
Normally this would be set to 0.
TranScan/LAN can be set up to support extracting application message from (Data Link
Switch) DLSw encapsulated SNA data. DLSw uses TCP ports 2065 and 2067. When
monitoring a LAN which is not using DLSw, and there is the possibility of ports 2065 or
2067 being used for non-DLSw data, it is recommended that the DLSw support be
turned off.
To set the desired TCP message header, or to set the DLSw support option: from the
“Options” menu, select “TCP…”. The TCP message header option window will also be
displayed by clicking on the “Advanced” tab of the Dialect Option window via the
“View/Dialect…” menu.
Separate TCP message header options can be chosen for messages over MQSeries versus
those not over MQSeries. To set the TCP message header options for data over
MQSeries, in the list “Set Dialect and TCP Options for:” chose “data over MQSeries”.
TranScan/LAN also supports TCP options and message dialect per defined TCP/IP
port/address range. The order of selection for TCP defined options are:
1. MQSeries
2. First matching TCP/IP port/address range defined in the list, top-down.
3. The Primary Dialect.

TranScan Viewer & TranScan/LAN
August 10, 2014 Page 12
An * for an IP address or TCP port specifies that any value will match.
TCP/IP message formatting rules can be saved in .tmf files. When the TranScan Viewer
is started, the last .tmf file previously loaded will be loaded.

TranScan Viewer & TranScan/LAN
August 10, 2014 Page 13
5. Display Options
5.1 Suppressing Display of Stay-Alive and Visa Heart Beat Messages
“Stay-Alive” messages are used over TCP/IP to keep sessions active, and do not contain
any application message. They can have an application message length of either 0 or 1.
Since there is no application message, the TranScan Viewer will display just the date,
time and message number in the parsed output display. To suppress the displaying and
printing of these zero or one byte length application messages:
1. From the Options menu, select “TCP…”, the “TCP Options” window will appear.
2. Uncheck the “Display Stay alive msgs (0 length application msgs)” check box.
3. If the “Stay-Alive” messages are 1 byte in length, check the “1-byte stay-alive”
checkbox.
4. Click “OK”
Visa Heart Beat messages server the same purpose as “Stay Alive” messages, however
they are usually 22 bytes long and start with “HB” in EBCDIC. To suppress the display
and printing of Visa Heart Beat messages:
1. From the Options menu, select “TCP…”, the “TCP Options” window will appear.
2. Uncheck the “Display Visa Heart Beat Msgs” check box.
3. Click “OK”
5.2 Changing message formats (dialects)
For a simplified screen to change which format (or dialect of ISO 8583) is used for
parsing of a message:
1. From the View menu, select “dialect…”, the “Chose dialect” window will appear.
2. Separate dialect can be chosen for messages over MQSeries versus those not over
MQSeries. To set the dialect for messages over MQSeries, in the drop down list “Set
Dialect Options for:” chose “data over MQSeries”. Otherwise, select “primary
Dialect”
3. Select the dialect from the list.
4. Set header bytes to skip. These are usually set to zeroes7.
5. Click “OK”
Note that for NVFO (Non-Visa Format Option) formats, all messages have a VisaNet
header. TranScan Viewer parsing automatically detects the message format based on
information in the VisaNet header. So, for NVFO MasterCard, NVFO AS2805, etc.,
select Visa format from the dialect list.
7 Some protocols and payment system message formats, have additional protocol bytes that must be
skipped over to get to the message. For Visa format, TranScan supports automatic skip over; thus, the
skip over values can be set to 0.

TranScan Viewer & TranScan/LAN
August 10, 2014 Page 14
For advance message formatting options for data received over TCP/IP, from the “View”
menu, choose “Dialect - advanced…”, or go to the TCP options screen via the “Options”,
“TCP Options…” menu item.
5.3 Changing field level display
To change how many of the parsed fields and sub-fields are displayed:
1. From the View menu, select “Field Display Level”.
2. Select the desired display level.
The options for display level are:
Complete Msg - displays all fields and sub-fields
Msg Overview - displays a sub-set of fields and sub-fields
Hdr/Routing - displays the minimal number of fields, header, plus fields used for
routing
5.4 Changing between Descriptive Labels and Bit Number Labels
To toggle between descriptive labels and bit number for labels:
1. From the View menu, select “Labels”.
2. Select the desired label format.
Example of descriptive label: PRI ACCT
Example of bit number label: BIT 002
5.5 Show blanks as non-blanks
From the View menu, select “Blanks as non-blank” to toggle between showing blanks as
spaces, to showing blanks as the non-blank character ~.
5.6 Moving Through Messages in Display
TranScan Viewer keeps displayed messages in buffers. To move from one message to
another, from the “Edit” menu, select “Go to…”. The following menu options are then
available:
First Message
Previous Message
Next Message
Last Message
Message Number… (go to a specified message number)
The message movement buttons can also be used:
5.7 Finding Matching Request/Response Messages
TranScan Viewer has a feature to find a matching request/response for the currently
displayed message. This feature is limited to the messages in the TranScan Viewer
display buffer. To find a matching Request or Response for the message that is
currently displayed, from the “Edit” menu, select “Find Message…”, then select either

TranScan Viewer & TranScan/LAN
August 10, 2014 Page 15
“Forward, Matching Request/Response” (This is good for finding a subsequent
response for a request.)
“Backward, Matching Request/Response” (This is good for finding a previous a
request for a response.)
The key message fields for matching requests to responses is in the file “msgkey.ini”
which resides in the “\Program Files\TranScan Viewer\System” directory. This file is
also used by the Response Time Calculator add-in. Be sure to create a backup copy of
msgkey.ini prior to making any changes to it.
5.8 Finding Messages with Parsing Errors
TranScan Viewer has a feature to find a messages with parse errors detected by the
TranScan parsing. This feature is limited to the messages in the TranScan Viewer
display buffer. To find a messages with parse errors, from the “Edit” menu, select “Find
Message…”, then select either
“Forward, Message with Parse Error”
“Backward, Message with Parse Error”
5.9 Opening a Second Display Window
To open a second message display window, from the “View” menu, select “2ndWindow”.
A subset of the main window menu items are available in the second window. The
second window is useful for viewer both a request message and its response at the same
time.
The second window can also be opened by clicking on the “2” button:

TranScan Viewer & TranScan/LAN
August 10, 2014 Page 16
5.10 Filtering by Message Field
Message field filtering is only supported for the Visa dialect. The TranScan Viewer
supports filtering by Visa Station ID. Both source and destination station ID in the
VisaNet header are tested for a match.
To specify the filters, from the main TranScan Viewer window, select “Filter” from the
menu. The filter window opens. Below is an example with filters specified:
When multiple filters are specified, the message is considered to match filters, if any of
the filters’ conditions are true.
To add a filter, click the “Add filter” button.

TranScan Viewer & TranScan/LAN
August 10, 2014 Page 17
Filters can be added, modified or removed from the current filter group. After entering
the filters, click “OK” to activate filters. To turn off all filters, click the “Clear all filters”
button, then click “OK”.
The “Message Display Option” can be set to
Show all messages,
Show only messages containing fields which match any of the filters.
Show only messages which do not match any filter.
The filters can be saved to file and later loaded from file. The file extension is “.mft”.
When a message matches one or more of the filters, it is identified with (MSGF) instead of
MSG# in the parsed display. The fields matching the filter are highlighted.
Note: if messages are already displayed, and if either the show only messages which
match a filter or show only messages which do not match any filter option is selected,
and the currently displayed message would now not be eligible for display, an attempt is
made to find a displayable message. However, if none are available the message display
is cleared.
Note: TranScan Viewer message filtering is not a substitute for FTS filters, but should
be used to further filter for desired messages. For high volumes of communications
traffic, were much of the traffic is on IP addresses which is desired to be filtered out, it is
more efficient to include the use FTS IP address filters. See section 4.5.1 Filtering
Traffic in FTS.

TranScan Viewer & TranScan/LAN
August 10, 2014 Page 18
6. Printing Formatted Messages
To print the parsed message as displayed:
1. From the File menu, select “Print…”, or use the Print messages button on the
toolbar. The Print Options window will appear.
2. The default printer is shown at the top in a drop-down list box. To change printers,
select the desired printer from the drop-down list.
3. In the comment box, enter any text you wish to appear as a comment on the printed
output.
4. Use the check box to include the raw, unparsed message if desired.
5. Color or Black and White output can be selected.
6. Select the Print Range; all messages, selected range of messages, or current
displayed message only.
7. Enter the number of copies desired.
8. Click “OK”.
7. Saving Messages to File
This section describes the various file formats to which messages can be saved.
7.1 Saving a Message in Binary
To save messages to file, from the “File” menu, select “Save As…”, or use the “Save
Messages” button on the toolbar. The Save Message(s) window will display.
To save the unparsed message in its binary form:
1. Select the “Binary Message” option.
2. Select the message to be saved; selected message number, or current displayed
message.
3. Click “OK”. The Save As window will display.
4. If needed, change the path to the desired folder.
5. Enter the filename (the file extension will be .bim).
6. Click “Save”.
7.2 Saving Character Display of Messages for Later Viewing
To save messages to file, from the “File” menu, select “Save As…”, or use the “Save
Messages” button on the toolbar. The Save Message(s) window will display.
To save the unparsed screen display (as displayed in the lower text box) for later
viewing with the TranScan Viewer:
1. Select the “TranScan Viewer Character Display” option.
2. Select the messages to be saved; all messages, selected message range, or current
displayed message.
3. Click “OK”. The Save As window will display.
4. If needed, change the path to the desired folder.
5. Enter the filename (the file extension will be .tgs).
6. Click “Save”.

TranScan Viewer & TranScan/LAN
August 10, 2014 Page 19
7.3 Saving Parsed Message Display to an RTF or HTML Document
To save messages to file, from the “File” menu, select “Save As…”, or use the “Save
Messages” button on the toolbar. The Save Message(s) window will display.
To save the parsed message screen display (as displayed in the upper text box) into a
document, either Rich Text Format (RTF) or HTML:
1. Select the “Parsed Display (Rich Text Format)” or “Parsed Display (HTML)” option.
2. In the comment box, enter any text you wish to appear as a comment at the top of the
document.
3. Use the check box to include the raw, unparsed message if desired.
4. Select the messages to be saved; all messages, selected message range, or current
displayed message.
5. For Rich Text Format, Color or Black and White output can be selected. (HTML will
be in color.)
6. Click “OK”. The Save As window will display.
7. If needed, change the path to the desired folder.
8. Enter the filename (the file extension will be .rtf for Rich Text Format).
9. Click “Save”.
8. Copying a Parsed Message to the Clipboard
To copy a parsed message being displayed in the upper box:
From the Edit menu, select “Copy Parsed Msg to Clipboard”, or use the “Copy
Message to Clipboard” button on the toolbar.
The text copied into the clipboard is in Text Format, without color. To copy the parsed
message with color, selected the text in the upper text box using the mouse. Then press
the keys “Ctrl” “C” at the same time.
9. Clear Messages from Display Buffers
To clear all of the messages from the TranScan Viewer display buffers, from the “Edit”
menu, select “Clear Messages”. Note that whenever a file is opened, the messages in the
display buffer are cleared prior to opening the file. If the messages in the buffers were
received via realtime capture, then TranScan Viewer will give a warning if the realtime
capture messages have not been saved to file. The buffers are also cleared when
switching from Examine mode to Realtime Capture mode.
10. Privacy Masking
Privacy Masking allows for masking/hiding sensitive cardholder data, such as account
number, magnetic stripe data, PINs, and card security codes. When Privacy Masking is
turned on, the raw hexadecimal display will be truncated. To turn Privacy Masking on
or off, from the “View” menu, select “Privacy Masking”.
By default, Privacy Masking is turned on. Privacy Masking can only be turned off once
an Activation Code has been entered to activate a TranScan Viewer license. An optional
password may be specified to allow only authorized users to turn off Privacy Masking.

TranScan Viewer & TranScan/LAN
August 10, 2014 Page 20
When a password is set, Privacy Masking can only be turned off when the correct
password is entered.
TranScan Viewer will ask the user to create a password,
when a TranScan license is activated, or
upon first starting TranScan Viewer, if version 5.9 or greater is installed over an
activated earlier version of TranScan Viewer.
The requirement to enter a password when turning off Privacy Masking can be disabled
by clicking the “Don’t Password Protect” button.
To change the password, from the “Options” menu, click “Change Password…”. The old
password must be entered in order to change to a new password.
11. Miscellaneous Options
11.1 Tuning
TranScan Viewer maintains messages in display buffers. TranScan Viewer uses the
buffers in a wraparound fashion. The maximum number of display buffers can be set for
optimal use. If this number is set low, new messages will quickly overlay the buffers
used by older messages. If this number is set high, large memory resources will be used.

TranScan Viewer & TranScan/LAN
August 10, 2014 Page 21
To set the number of message display buffers, from the “Options” menu, select
“Options…”. Set the number of message buffers on the “Tuning” tab, and click “OK”.
Other options available in the Tuning tab are whether or not FTS is so send frames on
open of a capture (.cfa) file; and if so, there is an option to limit what frame numbers are
loaded into the TranScan Viewer from FTS (Ethertest, etc.).

TranScan Viewer & TranScan/LAN
August 10, 2014 Page 22
11.2 Folders
The “folders” tab lists various folders, including the current data folder. The current
data folder can be changed by clicking the “Browse…” button. A data folder can be
selected when saving messages to file. Any folder selected during the save messages
function, will saved as the current data folder.
The other folders listed are for informational purposes, and cannot be changed. The
default folder for the Dialect and TCP options are saved in .tmr extension files in the
“TranScan Viewer” sub-folder of the Common Application Data Folder listed on this
screen. This facilitates sharing of the dialect and TCP options with all users. Users still
have the option of changing the location of .tmr files when saving or opening the files.
See section 5.2 Changing message formats (dialects)
Other user specified configuration values are saved in the tranview.cfg file in the
“TranScan Viewer” sub-folder of the Application Data Folder listed on this screen.

TranScan Viewer & TranScan/LAN
August 10, 2014 Page 23
12. Trouble Shooting
12.1 Trouble Shooting TranScan Viewer
This section covers various errors that may occur with TranScan Viewer. For additional
support, send e-mail to [email protected] or phone 707-935-8238. The TranScan
Viewer also keeps a log, tranview.log, which may be helpful in troubleshooting.
Tranview.log resides in the TranScan Viewer\system directory.
Problem Description/Action to take
No messages are being
displayed, during capture of
frames by FTS (Ethertest,
SerialTest, etc.)
Ensure that the listening port is defined in “port
assignments.ini” and “Transcan.personality” in
Ethertest’s “my decoders\” directory. Make a backup
copy of these files prior to making any changes to
them.
In “port assignements.ini”, add the port(s) to the
[TCP] section. Format is:
n=port, 0x7f028001
or
n=startport-endport, 0x7f028001
In “Transcan.personality”, add the port(s) to the [Port
Assignments:TCP] section. Format is:
port, 0x7f028001
or
startport-endport, 0x7f028001
For TranScan Viewer to display messages from FTS,
put TranScan Viewer into Realtime Capture mode
and the Unfreeze the display.
Ensure the option “FTS to send frames on open of
capture (.cfa) file” is checked. This option is under
the menu “Options”, “Options…”, “Tuning/Settings”
tab.
Error Msg Description/Action to take
Error executing
ParseISO.dll
The file ParseISO.dll should be in the TranScan
Viewer system directory, along with the file
Tranview.exe. If this file has accidentally been
erased, you may have to re-install TranScan Viewer.

TranScan Viewer & TranScan/LAN
August 10, 2014 Page 24
Error Msg Description/Action to take
Error in message #: n
………………
Do you want to continue
with remainder of
messages?
An error was found while parsing the messages in the
TranScan/8583 ASCII output file. Click “Yes” to
continue with the next message. Click “No” to abort
reading the file.
Error - only partial message
found in file
TranScan Viewer is attempting to extract a message
from a host console screen image. The file may not
contain the entire message, or the file format may not
be supported by TranScan Viewer.
When trying to format data from the host console
screen, if TranScan Viewer cannot find what it
detects as a valid AM0SG8 formatted message, an
error message will be displayed. If the file contains a
host console screen, make sure that the host console,
the entire screen may not have been captured.
8 AM0SG format is a TPF standard for the format of a message block.

TranScan Viewer & TranScan/LAN
August 10, 2014 Page 25
Error Msg Description/Action to take
Error
One of the libraries files
needed to run this
application cannot be
found.
TranScan Viewer needs the path to a file called
SessMngr.DLR which is in the Extra! directory.
Normally Extra installation will add/update a path
statement in autoexec.bat so that it appears similar
to:
path=%PATH%;C:\PROGRA~1\CERTIF~1\EXTRA!
which is the DOS short path name. If the
autoexec.bat on your PC does not include the path to
the Extra! directory, you will need to add it.
Remember to make a backup copy of autoexec.bat
prior to making any changes.
To find the exact location of the Extra! directory, from
the Windows "start" menu, select "find", then "files or
folders". Then find file "SessMngr.DLR" on your c:
drive. The default is the directory c:\Program
Files\Certified Apps\Extra!
If the file is in that directory, and there is no path
statement in autoexec.bat, then by adding the
following line as is, with quotation marks, to
autoexec.bat, should take care of the problem. path=%path%;c:"\program files\certified apps\extra!"
If there is a path statement, but the extra! directory
is not specified, add the specification at the end.
Directories in the path are separated by a
semicolon(;).
The PC must be restarted in order for this change to
take effect.
Error reading dialects from
file ISODIAL.TBL
The file isodial.tbl should be in the TranScan Viewer
system directory, along with the file tranview.exe. If
this file has accidentally been erased, you may have
to re-install TranScan Viewer.
Error saving file ……… Ensure you have write access and enough disk space
on the drive on which you are attempting to save the
file.
File contains the text "MSG
TYPE"; thus does not
contain the hexadecimal
display of the message."
Continue reading file?"
The TranScan/8583 ASCII output file being read,
contains the parsed messages. The messages should
be in hexadecimal display. Click “OK” to continue
reading file. Click “Cancel” to cancel reading of the
file. (Note: In TranScan/8583, display the messages
in hexadecimal format before creating the ASCII
output file.)

TranScan Viewer & TranScan/LAN
August 10, 2014 Page 26
Error Msg Description/Action to take
Found start of msg with no
end to prior msg.
TranScan Viewer just previously displayed “Message
too short for AM0SG format. Display next portion
then select OK” (see below) OK was selected without
displaying the next portion of the message on the
TPF console.
Invalid hex data: .. When attempting to extract the ISO message from a
character display, a value of other than 0-9, A-F was
encountered where a hexadecimal digit was expected.
The TPF console output may not have been display
properly. Try clearing the TPF console screen, then
re-entering the functional message.
Message too short for
AM0SG format. Display
next portion then select OK
The most likely cause of this message is due to a TPF
console message that does not fit on one screen. To
grab the rest of the message:
1. Switch to Extra and the TPF Console screen.
2. Display the remainder of the output from the
Functional Message.
3. Switch back to TranScan Viewer.
4. Click “OK”
No messages found in
input.
The Clipboard contains character or hexadecimal
character display of the message, and the Clipboard
option is set to “Host Formatted Msg Display”. Check
the option by selecting “Options” from the menu, then
“Clipboard Contains:”
-Or-
The TPF console screen grabbed from Extra is not
recognized as output from one of the functional
message supported by TranScan Viewer.
-Or-
When trying to format data from the TPF console
screen, if TranScan Viewer cannot find what it
detects as a valid AM0SG formatted message, an
error message will be displayed. Make sure that the
TPF output does not wrap on the screen, clear the
screen and re-enter the TPF functional message. If
the screen output looks correct, print the TPF screen
and contact Ontrac Consulting.
No message in clipboard When pasting from the clipboard, the clipboard must
contain text. The clipboard contains a picture or
some other object, other than text.
No messages read, 0 length
file.
The file you tried to open had a length of 0. Make
sure you opened the correct file.

TranScan Viewer & TranScan/LAN
August 10, 2014 Page 27
Error Msg Description/Action to take
No parsed message to print.
Print Canceled.
Ensure that a message is parsed and displayed in the
upper text box of the TranScan Viewer prior to
selecting the Print option.
Non-hexadecimal value: A paste from clipboard operation was performed with
the “Clipboard contains:” option set to “Hex
Character Representation of Msg”. TranScan Viewer
is looking for only the characters 0 through 9 and A
through F. If there is a host console screen in the
clipboard, or a character message in the clipboard,
change the “Clipboard contains:” options to match.
Odd number of hex
characters, msg # …
When attempting to extract the ISO message from
the TPF console, an odd number of hexadecimal
digits were found. The TPF console output may not
have been display properly. Try clearing the TPF
console screen, then re-entering the functional
message.
SV0005 MORE BITS IN
MAP THAN DATA IN
MESSAGE. LAST BIT
PROCESSED IS 42
- or -
SV0007 LENGTH FIELD
FOR FIELD xxxxxx
EXCEEDS END OF
MESSAGE
For messages from FTS,
the message within TCP/IP protocol may span
more than one frame. When messages span more
than one frame, TranScan Viewer can combine
two parts of a message. In FTS Ethertest, display
the frame containing the remainder of the
message in the frame display.
the message within SNA protocol may be chained
or segmented. TranScan Viewer currently does
not support combining messages which have been
chained or segmented.
System Error, File Sharing
Violation on drive d
TranScan Viewer uses some temporary files when
grabbing and formatting an screen display from
Extra. You may have 2 copies of TranScan Viewer
running. If so, exit all but one.
TranScan Viewer trial
period over.
Each copy of TranScan Viewer requires an Activation
Code beyond the trial period. There is a finite
number of licenses that were purchased and can be
installed. For each license, you are given a grace
period between the time the software is installed, and
the time an Activation Code must be entered.
Contact Ontrac Consulting after the installation, to
receive your Activation Code specific to the installed
copy of TranScan Viewer.

TranScan Viewer & TranScan/LAN
August 10, 2014 Page 28
Error Msg Description/Action to take
Unable to activate link to
Extra
TranScan Viewer normally establishes a session
(connection) to Extra when you click on “Grab
Message”. Make sure Extra is started, then exit and
restart TranScan Viewer.
Unable to activate
TranGrab.dll
The file trangrab.dll should be in the TranScan
Viewer system directory, along with the file
tranview.exe. If this file has accidentally been
erased, you may have to re-install TranScan Viewer.
Unable to get information
from Extra.
1. Remote TPF consoles will automatically logoff the
user when the keyboard has been idle for a few
minutes. If this happens, and a request is made
by TranScan Viewer to "grab" an ISO message,
then this error message will occur. Click "OK" or
press ENTER, then log back onto the TPF console
and redisplay the message..
2. TranScan Viewer normally establishes a session
(connection) to Extra when you click on “Grab
Message”. Make sure Extra is started.
Unable to open temporary
file
..\SVDATA\$$MSG.RAW
for output
-or-
Unable to open output
file ………
- or -
Unable to open file ………
TranScan Viewer uses temporary files to when
extracting a message from an Extra screen display.
These temporary files are put into the svdata\ sub-
directory of the directory where TranScan Viewer was
installed (default install directory is C:\Program
Files\TranScan Viewer\).
1. Verify that you have at least 20 K free disk space.
2. Verify that the svdata\ sub-directory has not been
deleted or renamed.
3. Verify that you have write access to the drive
where TranScan Viewer is installed. (TranScan
Viewer does not support LAN based execution.)

TranScan Viewer & TranScan/LAN
August 10, 2014 Page 29
13. TranScan Viewer Character Message File Format
This section contains the specifications for TranScan Viewer’s Character Message file
format. Files in this format can be opened in TranScan Viewer via the menu option
“File”, “Open Character msg file…”.
The file must be an ASCII text file. TranScan Viewer uses a default file extension of
.tgs.
Record Positions Field
1 1 to 13 The constant ++TSViewer++C
Upper and lower case must be exact.
1 14 to 18 Version number. Currently must be constant
V01.1
The V must be in upper case. The 0 is the
number zero
2 1 to 4 Direction, either RECV or XMIT in upper case.
2 5 filler
2 6 to 28 Optional time stamp. In the form: yyyy/mm/dd hh:mm:ss.mmm
3 to m 1 to x Hexadecimal character representation of the
message. Must be 0-9, A-F, a-f or space. Spaces
are ignored.
m+1 If more than one message, this starts the second
message. The format is the same as record 2,
with direction and timestamp.
m+2 to m+n Hexadecimal character representation of second
message.
… Additional messages formatted as described in
record 2 through record m.
The following example contains messages formatted according to the “ASCII/1993” dialect
of ISO/8583.
++TSViewer++CV01.1
RECV 1999/12/31 01:12:34.567
30383030 00000000 00010000 30353149
6620796F 75206361 6E207265 61642074
6869732C 20746865 206D6573 73616765
20706172 73656420 636F7272 6563746C
792E
XMIT 1999/12/31 01:12:35.321
30383030 0000000000010000 303531 496620796F752063616E
207265616420 74686973 2C2074686520
6D65737361676520 70617273656420636F72726563746C792E

TranScan Viewer & TranScan/LAN
August 10, 2014 Page 30
14. Specifications for Automation Server Calls
14.1 Clear TranScan Viewer Display Buffers
ClearISOdisplayBuffers takes the following arguments:
Argument data type, Visual Basic data type, Visual C++
ClearReason integer short integer
and returns:
data type, Visual Basic data type, Visual C++
{return value}) integer short integer
Where:
ClearReason = reason for clearing buffers. Currently not used. 0-999 reserve
for Ontrac use.
{return value} = 0 if buffers cleared successfully
non-0 if buffers not cleared
14.2 Format and Display ISO Message
DisplayISOMsg takes the following arguments:
Argument data type, Visual Basic data type, Visual C++
ISOMsg String BSTR*
msgDirection Integer short integer*
cProtocol String BSTR*
TimeStamp String BSTR*
Source String BSTR*
Dest String BSTR*
BytesTrunc Integer short integer*
DisplayMode Long long integer*
and returns:
data type, Visual Basic data type, Visual C++
{return value}) integer short integer
Where:
ISOMsg = the message as a string of hexadecimal character
representation of the message
msgDirection = message direction, 0 = transmit, non-0 = receive
cProtocol = protocol used to transmit the message (e.g. TCP, TCPIP, SNA,
NONE) Currently, only TCP and TCPIP have any special
processing for protocol.
TimeStamp = time stamp of message transmission,
format: yyyy/mm/dd hh:mm:ss.mmm or yyyy/mm/dd hh:mm:ss
Source = source associated with message. For example, TranScan/LAN
sets the source to the hardware address of the Ethernet. If
protocol is TCPIP, and the Source is 8 characters of
TranScan Viewer & TranScan/LAN
August 10, 2014 Page 31
hexadecimal digits (0-9, A-F), then Source if interpreted and
formatted as an IP address. (e.g. for Source=”A1CCC728”,
then TranScan Viewer will display “161.204.199.40”)
Dest = destination associated with message. For example,
TranScan/LAN sets the destination to the hardware address of
the Ethernet card. If protocol is TCPIP, and the Dest is 8
characters of hexadecimal digits (0-9, A-F), then the Dest is
interpreted and formatted as an IP address.
BytesTrunc = The number of bytes at the end of the message which have
been truncated, and thus are not available for parsing. For
TCP protocol, with an application header, TranScan Viewer
can then perform a better job of combining messages which
have been split across multiple frames.
DisplayMode = indication of realtime capture versus a playback examine
mode. 0 = realtime capture, 1 = examine mode. This setting
determines how the TranScan Viewer screen display can be
frozen, and still save incoming messages in buffers.
{return value} = numerical expression which is the sum of the value indicating
the following:
1 = message accepted and written to message buffers
2 = TranScan Viewer in Examine mode
4 = Display is frozen (only set when TranScan Viewer is in
Capture mode, i.e. not in Examine mode)
80 = Not authorized. e.g.: TranScan Viewer trial period over.
See section 15. Example Code for Calls to TranScan Viewer, for examples of calls to
“DisplayISOMsg” function from Visual C++, Visual Basic, and Visual Basic for
Application.
14.3 Get Display Mode (Realtime/Examine)
GetDisplayMode takes the following arguments:
Argument data type, Visual Basic data type, Visual C++
(none)
and returns:
data type, Visual Basic data type, Visual C++
{return value}) integer short integer
Where:
{return value} = 0 = Realtime,
1 = Examine

TranScan Viewer & TranScan/LAN
August 10, 2014 Page 32
14.4 Set Display Mode (Realtime/Examine)
SetDisplayMode takes the following arguments:
Argument data type, Visual Basic data type, Visual C++
ViewerDisplayMode integer short integer *
and returns:
data type, Visual Basic data type, Visual C++
{return value}) integer short integer
Where:
ViewerDisplayMode = 0 = Realtime,
1 = Examine
{return value} = 0 if buffers cleared successfully
1 = invalid input value
(other non-zero values reserved for other TranScan
Viewer errors)
14.5 Get Display Freeze Setting
GetFreeze takes the following arguments:
Argument data type, Visual Basic data type, Visual C++
(none)
and returns:
data type, Visual Basic data type, Visual C++
{return value}) integer short integer
Where:
{return value} = 0 = Display is not frozen,
1 = Display is frozen

TranScan Viewer & TranScan/LAN
August 10, 2014 Page 33
14.6 Set Display Freeze/Unfreeze
SetFreeze takes the following arguments:
Argument data type, Visual Basic data type, Visual C++
ViewerFreeze integer short integer *
and returns:
data type, Visual Basic data type, Visual C++
{return value}) integer short integer
Where:
ViewerFreeze = 0 = Unfreeze,
1 = Freeze
{return value} = 0 if buffers cleared successfully
1 = invalid input value
(other non-zero values reserved for other TranScan
Viewer errors)
14.7 Get Message Number of First Message in TranScan Viewer Display Buffer
GetFirstMsgNumber gets the message number of the first message in the TranScan
Viewer buffers. GetFirstMsgNumber takes the following arguments:
Argument data type, Visual Basic data type, Visual C++
(none)
and returns:
data type, Visual Basic data type, Visual C++
{return value}) Long long integer
Where:
{return value} = 0 = no messages in buffer,
otherwise, returns the message number of the first
message in the TranScan Viewer buffer.

TranScan Viewer & TranScan/LAN
August 10, 2014 Page 34
14.8 Get Message Number of Last Message in TranScan Viewer Display Buffer
GetLastMsgNumber gets the message number of the last message in the TranScan
Viewer buffers. GetLastMsgNumber takes the following arguments:
Argument data type, Visual Basic data type, Visual C++
(none)
and returns:
data type, Visual Basic data type, Visual C++
{return value}) Long long integer
Where:
{return value} = 0 = no messages in buffer,
otherwise, returns the message number of the last
message in the TranScan Viewer buffer.
14.9 Get Messages Formatted in HTML
GetFormattedHTMLMsgs takes the following arguments:
Argument data type, Visual Basic data type, Visual C++
RequestedFirstMsgNumber Long long integer *
RequestedLastMsgNumber Long long integer *
IncludeRawMessage String BSTR*
Comment String BSTR*
and returns:
Argument data type, Visual Basic data type, Visual C++
FormattedOutput String BSTR*
ErrMsg String BSTR*
data type, Visual Basic data type, Visual C++
{return value}) integer short integer
Where:
RequestedFirstMsgNumber = 0 = current displayed message
Otherwise, the message number of the first
message to be formatted and returned
RequestedLastMsgNumber = The message number of the last message to be
formatted and returned. (Ignored if
RequestedFirstMsgNumber = 0)
IncludeRawMessage = Y = raw hexadecimal message to be included
with returned formatted message
N = raw hexadecimal message not to be
included.
Comment = Text of comment to be placed in output
FormattedOutput = Output string formatted in HTML
ErrMsg If error occurred (return value not 0), contains
error text

TranScan Viewer & TranScan/LAN
August 10, 2014 Page 35
{return value} = 0 messages successfully formatted
2001 = Requested First Message greater than
last.
2003 = No messages to display.
2004 = Message numbers not within range
2005 = The 'from' value cannot be greater than
the 'to' value.
2006 = Maximum output is 250 messages.
(other non-zero values reserved for other
TranScan Viewer errors)
14.10 Get Messages Formatted in RTF
GetFormattedRTFMsgs takes the following arguments:
Argument data type, Visual Basic data type, Visual C++
RequestedFirstMsgNumber Long long integer *
RequestedLastMsgNumber Long long integer *
IncludeRawMessage String BSTR*
Comment String BSTR*
and returns:
Argument data type, Visual Basic data type, Visual C++
FormattedOutput String BSTR*
ErrMsg String BSTR*
data type, Visual Basic data type, Visual C++
{return value}) integer short integer
Where:
RequestedFirstMsgNumber = 0 = current displayed message
Otherwise, the message number of the first
message to be formatted and returned
RequestedLastMsgNumber = The message number of the last message to be
formatted and returned. (Ignored if
RequestedFirstMsgNumber = 0)
IncludeRawMessage = Y = raw hexadecimal message to be included
with returned formatted message
N = raw hexadecimal message not to be
included.
Comment = Text of comment to be placed in output
FormattedOutput = Output string formatted in RTF
ErrMsg If error occurred (return value not 0), contains
error text

TranScan Viewer & TranScan/LAN
August 10, 2014 Page 36
{return value} = 0 messages successfully formatted
2001 = Requested First Message greater than
last.
2003 = No messages to display.
2004 = Message numbers not within range
2005 = The 'from' value cannot be greater than
the 'to' value.
2006 = Maximum output is 250 messages.
(other non-zero values reserved for other
TranScan Viewer errors)
15. Example Code for Calls to TranScan Viewer
The executable, tranview.exe, include type library information for the TranScan Viewer.
This can be used with Visual Studio, or other programming environment to generate a
class wrapper for the TranScanViewer class, for a programming project.
15.1 Example MFC Visual C++ Code
Using the Class Wizard in Visual Studio, add a class from the tranview.exe executable.
Below is an example of the files generated, tranview.h and tranview.cpp:
tranview.h:
// Machine generated IDispatch wrapper class(es) created with ClassWizard
/////////////////////////////////////////////////////////////////////////////
// _TranScanViewer wrapper class
class _TranScanViewer : public COleDispatchDriver
{
public:
_TranScanViewer() {} // Calls COleDispatchDriver default constructor
_TranScanViewer(LPDISPATCH pDispatch) : COleDispatchDriver(pDispatch) {}
_TranScanViewer(const _TranScanViewer& dispatchSrc) :
COleDispatchDriver(dispatchSrc) {}
// Attributes
public:
// Operations
public:
short DisplayISOMsg(BSTR* ISOMsg, short* msgDirection, BSTR* cProtocol,
BSTR* TimeStamp, BSTR* Source, BSTR* Dest, short* BytesTrunc, long* DisplayMode);
short ClearISOdisplayBuffers(short* ClearReason);
};

TranScan Viewer & TranScan/LAN
August 10, 2014 Page 37
tranview.cpp:
// Machine generated IDispatch wrapper class(es) created with ClassWizard
#include "stdafx.h"
#include "tranview.h"
#ifdef _DEBUG
#define new DEBUG_NEW
#undef THIS_FILE
static char THIS_FILE[] = __FILE__;
#endif
/////////////////////////////////////////////////////////////////////////////
// _TranScanViewer properties
/////////////////////////////////////////////////////////////////////////////
// _TranScanViewer operations
short _TranScanViewer::DisplayISOMsg(BSTR* ISOMsg, short* msgDirection, BSTR*
cProtocol, BSTR* TimeStamp, BSTR* Source, BSTR* Dest, short* BytesTrunc, long*
DisplayMode)
{
short result;
static BYTE parms[] =
VTS_PBSTR VTS_PI2 VTS_PBSTR VTS_PBSTR VTS_PBSTR VTS_PBSTR VTS_PI2
VTS_PI4;
InvokeHelper(0x60030028, DISPATCH_METHOD, VT_I2, (void*)&result, parms,
ISOMsg, msgDirection, cProtocol, TimeStamp, Source, Dest, BytesTrunc,
DisplayMode);
return result;
}
short _TranScanViewer::ClearISOdisplayBuffers(short* ClearReason)
{
short result;
static BYTE parms[] =
VTS_PI2;
InvokeHelper(0x6003002c, DISPATCH_METHOD, VT_I2, (void*)&result, parms,
ClearReason);
return result;
}

TranScan Viewer & TranScan/LAN
August 10, 2014 Page 38
Below is an example C++ call:
{
TranScanViewer m_TSView;
BSTR msgB; /* msg */
short bDirection = 1; /* 1 = receive */
long DisplayMode = 0; /* realtime capture mode */
BSTR ProtocolB;
BSTR srceB;
BSTR destB;
BSTR DateTimeB;
short sTrunc = 0;
msgB = SysAllocString (L"303230300000000000010000"
L"303531496620796F752063616E"
L"207265616420746869732C2074686520"
L"6D6573736167652070617273656420636F72726563746C792E");
ProtocolB = SysAllocString (L"NONE");
srceB = SysAllocString (L"123456");
destB = SysAllocString (L"654321");
DateTimeB = SysAllocString (L"2001/12/31 23:59:59.012");
if (!m_TSView.CreateDispatch(_T("TranView.TranScanViewer"),NULL))
{
AfxMessageBox("cannot create TSView");
}
else
{
try
{
m_TSView.DisplayISOMsg(&msgB, &bDirection, &ProtocolB,
&DateTimeB, &srceB, &destB, &sTrunc, &DisplayMode);
}
catch (COleException* e)
{
e->Delete();
AfxMessageBox("unable to send message to TranScan Viewer");
}
m_TSView.ReleaseDispatch();
}
SysFreeString(msgB);
SysFreeString(DateTimeB);
SysFreeString(srceB);
SysFreeString(destB);
SysFreeString(ProtocolB);
SysFreeString(destB);
}

TranScan Viewer & TranScan/LAN
August 10, 2014 Page 39
15.2 Example Visual Basic Code
The following code is an example of how to call the TranScan Viewer from a Visual Basic
project.
1. Open a new Visual Basic Project
2. Add a Command button to the form
3. Enter the following code9
4. Start the TranScan Viewer
5. Start the Visual Basic program and click the command button.
Private Sub Command1_Click()
Dim TSViewer As Object
Dim rc As Integer
Dim msg As String
Dim Direction As Integer
Dim DateAndTime As String
Dim DispMode As Long
msg = "30323030" & "0000000000010000" 'msg type and bitmap
msg = msg & "303531" & "496620" 'fld len and 1st part
msg = msg & "796F752063616E207265616420746869732C2074686520"
msg = msg & "6D6573736167652070617273656420"
msg = msg & "636F72726563746C792E"
Direction = 1 'direction = received
DateAndTime = "2000/02/29 23:59:59.012"
DispMode = 1 'display mode = examine
Set TSViewer = CreateObject("tranview.TranScanViewer")
rc = TSViewer.DisplayISOMsg(ISOMsg:=msg, _
msgDirection:=Direction, _
cProtocol:="none", _
TimeStamp:=DateAndTime, _
Source:="", _
Dest:="", _
BytesTrunc:=0, _
DisplayMode:=DispMode)
MsgBox "Msg sent to TranScan Viewer. Returned value = " & rc
Set TSViewer = Nothing
End Sub
9 The same code can be used in a Visual Basic for Applications (VBA), such as an Excel macro. (You may
need to remove the “Private” declaration for a VBA macro.

TranScan Viewer & TranScan/LAN
August 10, 2014 Page 40
End of Document