Training_Manual LED Paama
38
UE**D65**V UE**D65**W UE**D67**W UA**D6400U UA**D6600W For LED TV D6000 Series
-
Upload
jorge-fernando-de-tivanta -
Category
Documents
-
view
262 -
download
8
Transcript of Training_Manual LED Paama
UE**D65**VUE**D65**WUE**D67**WUA**D6400UUA**D6600W
For LED TV D6000 Series
Ⅰ. Concept
Ⅱ. Specification
Ⅲ. Front/Rear View
Ⅳ. Layout
Ⅴ. Disassembly
Ⅵ. Key Feature
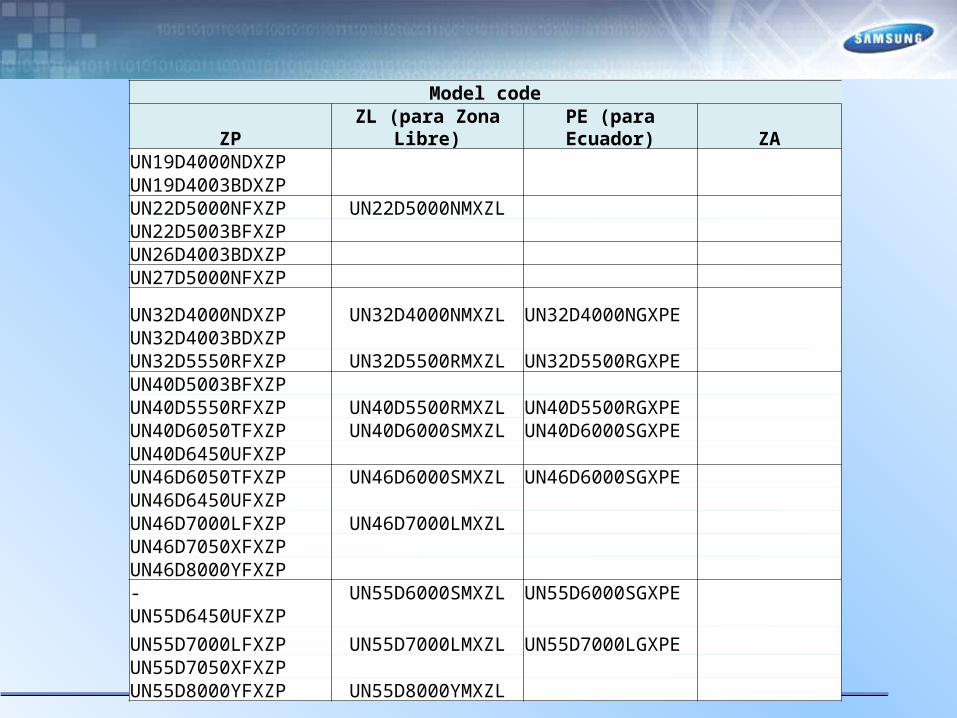
Model codeZP ZL (para Zona Libre) PE (para Ecuador) ZA
UN19D4000NDXZP UN19D4003BDXZP UN22D5000NFXZP UN22D5000NMXZL UN22D5003BFXZP UN26D4003BDXZP UN27D5000NFXZP
UN32D4000NDXZP UN32D4000NMXZL UN32D4000NGXPE UN32D4003BDXZP UN32D5550RFXZP UN32D5500RMXZL UN32D5500RGXPE UN40D5003BFXZP UN40D5550RFXZP UN40D5500RMXZL UN40D5500RGXPE UN40D6050TFXZP UN40D6000SMXZL UN40D6000SGXPE UN40D6450UFXZP UN46D6050TFXZP UN46D6000SMXZL UN46D6000SGXPE UN46D6450UFXZP UN46D7000LFXZP UN46D7000LMXZL UN46D7050XFXZP UN46D8000YFXZP - UN55D6000SMXZL UN55D6000SGXPE UN55D6450UFXZP UN55D7000LFXZP UN55D7000LMXZL UN55D7000LGXPE UN55D7050XFXZP UN55D8000YFXZP UN55D8000YMXZL
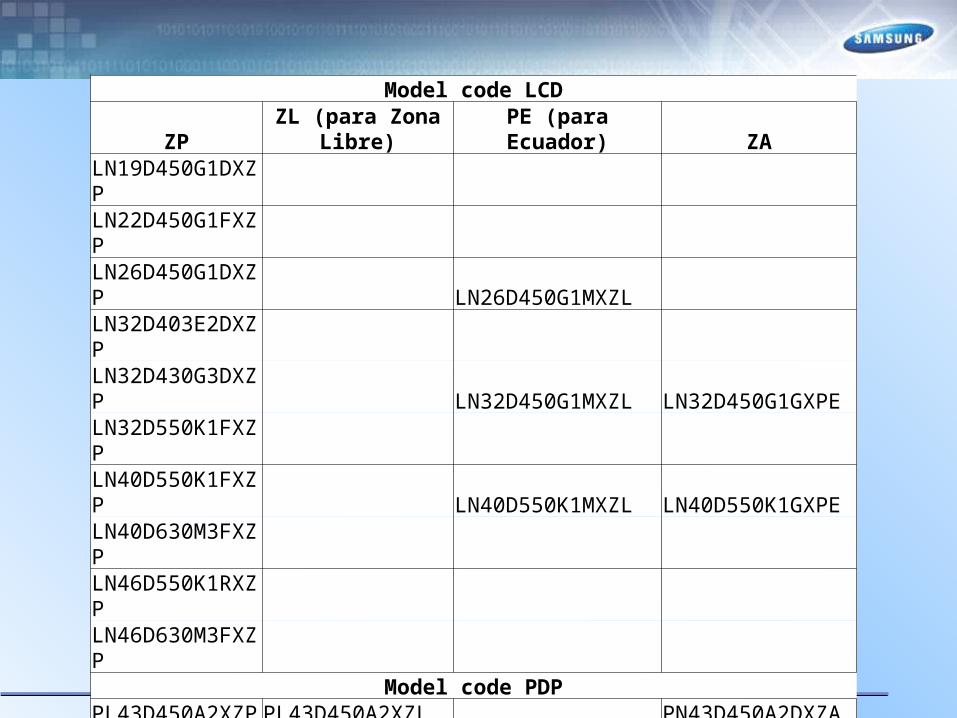
Model code LCDZP ZL (para Zona Libre) PE (para Ecuador) ZA
LN19D450G1DXZP LN22D450G1FXZP LN26D450G1DXZP LN26D450G1MXZL LN32D403E2DXZP LN32D430G3DXZP LN32D450G1MXZL LN32D450G1GXPELN32D550K1FXZP LN40D550K1FXZP LN40D550K1MXZL LN40D550K1GXPELN40D630M3FXZP LN46D550K1RXZP LN46D630M3FXZP
Model code PDPPL43D450A2XZP PL43D450A2XZL PN43D450A2DXZAPL43D490A1XZP PL43D490A1MXZL PL43D490A1GXPE PN43D490A1DXZAPL51D450A2XZP PL51D450A2XZL PN51D450A2DXZAPL51D490A1XZP PL51D490A1MXZL PL51D490A1GXPE PN51D490A1DXZAPL51D550C1RXZP PL51D550C1GXPE PN51D550C1FXZA PN51D560C2FXZA PN51D6450DFXZAPL51D6900DRXZP PL51D6900DGXPE PN51D6900DFXZAPL51D8000FRXZP PN51D8000FFXZAPL64D8000FRXZP PL64D8000FMXZL PN64D800FFXZA

Ⅲ. Front/Rear View
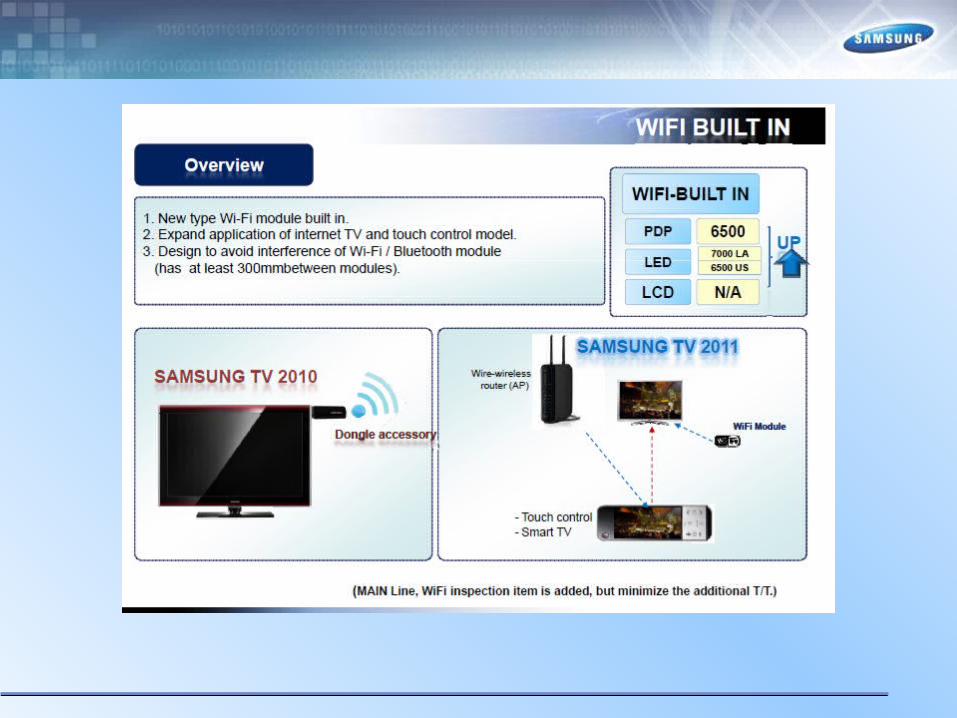
6400~6600 Brushed Black Metal(Built in Wifi 6500↑)
6400~6600 Brushed Black Metal(Built in Wifi 6500↑)
Touch Key : OSD Pop-up
Remote Sensor &
3D IR Emitter & Eco Sensor
Blue Tooth
Built In Wi-Fi(32”,37”,40”)
Built In Wi-Fi(46”)
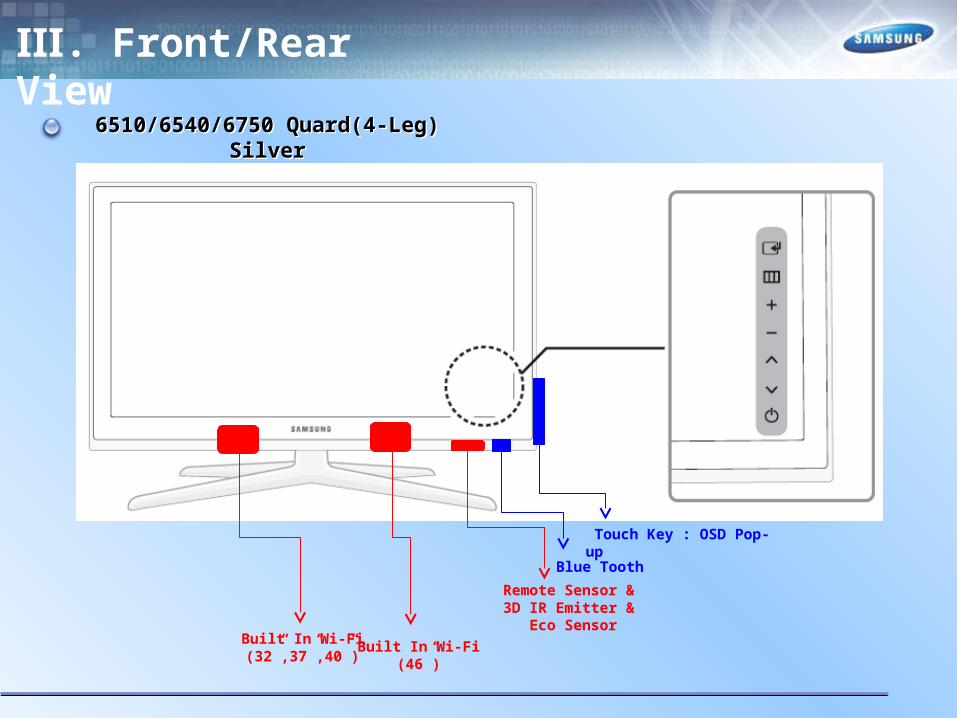
Ⅲ. Front/Rear View
Remote Sensor &
3D IR Emitter & Eco Sensor
Touch Key : OSD Pop-up
Built In Wi-Fi(32”,37”,40”)
Blue Tooth
6510/6540/6750 Quard(4-Leg) Silver
6510/6540/6750 Quard(4-Leg) Silver
Built In Wi-Fi(46”)
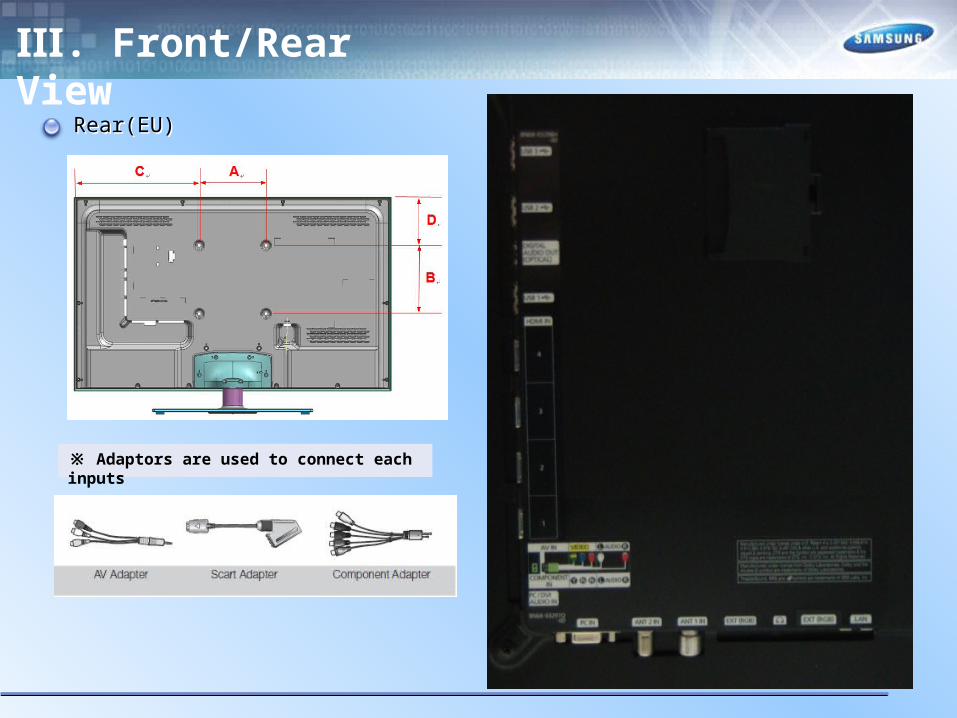
Ⅲ. Front/Rear View
Rear(EU) Rear(EU)
※ Adaptors are used to connect each inputs
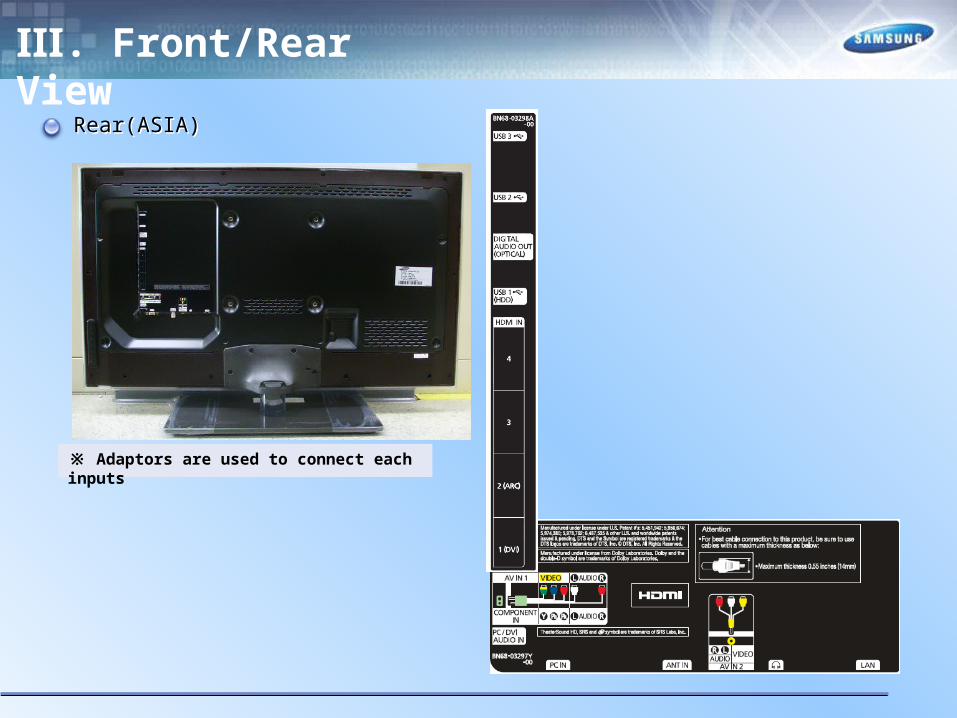
Ⅲ. Front/Rear View
Rear(ASIA) Rear(ASIA)
※ Adaptors are used to connect each inputs

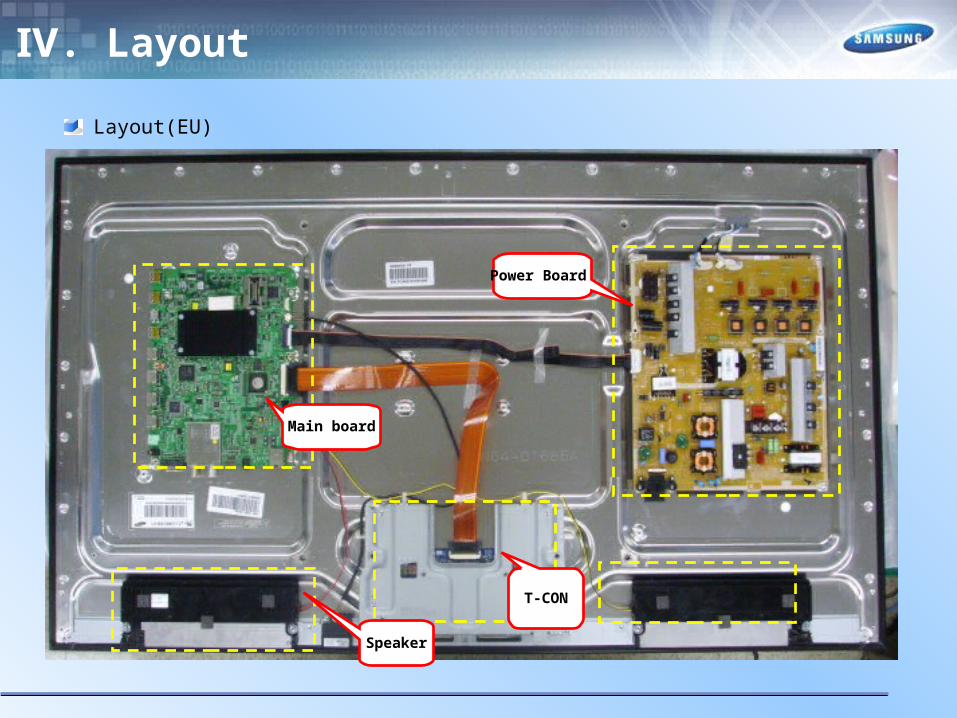
Ⅳ. Layout
Layout(EU)
Main board
Power Board
T-CON
Speaker
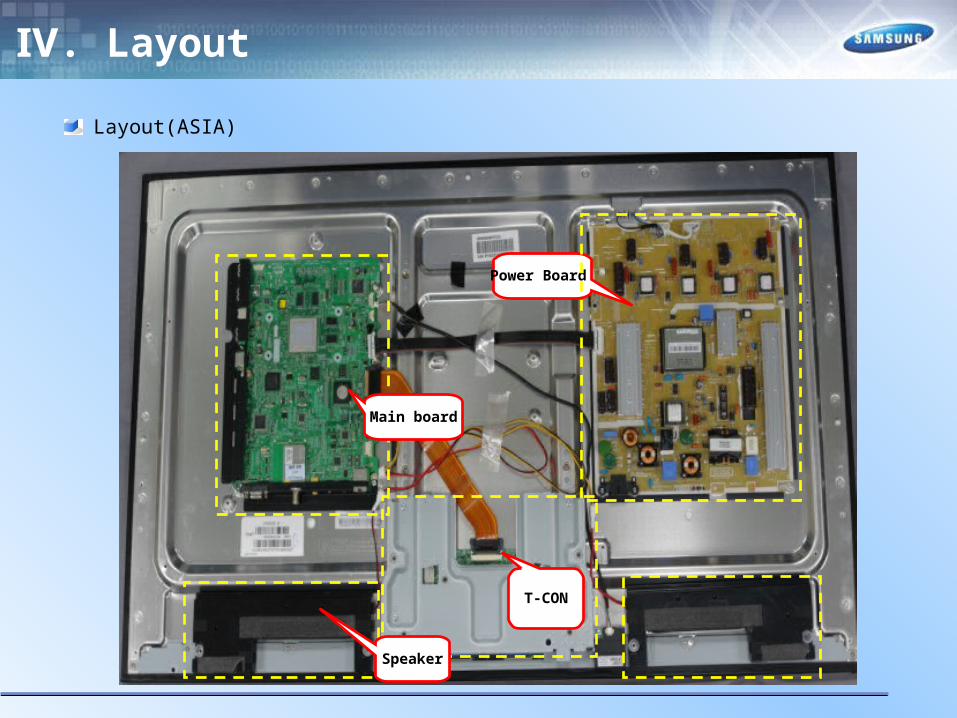
Ⅳ. Layout
Layout(ASIA)
Main board
Power Board
T-CON
Speaker
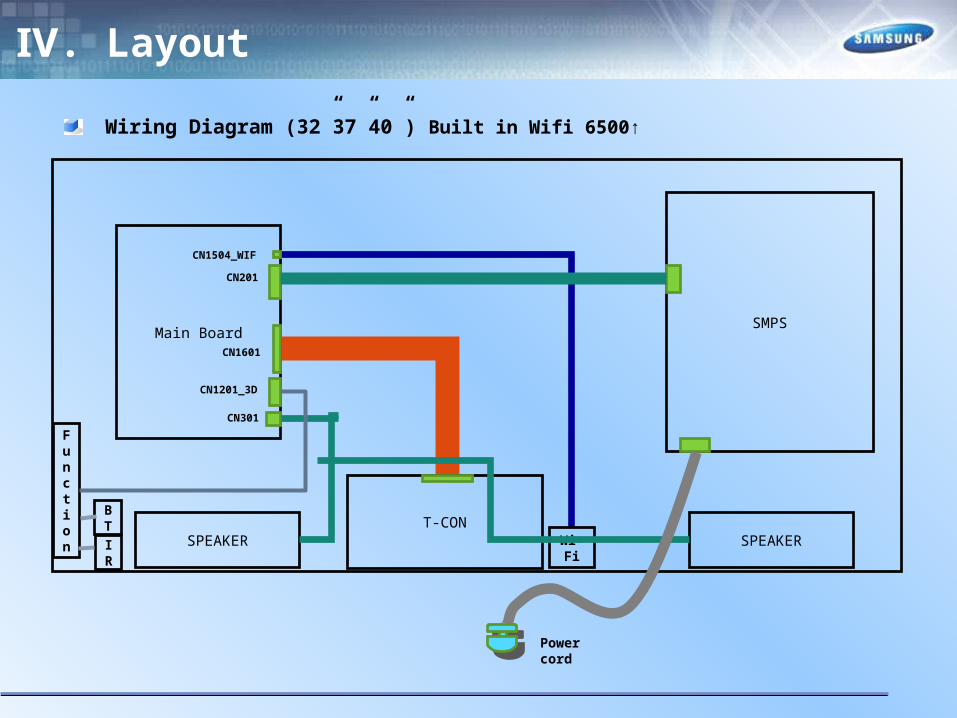
Ⅳ. Layout
Wiring Diagram (32”37”40”) Built in Wifi 6500↑
Main Board
T-CON
SMPS
SPEAKER SPEAKERWi-Fi
Function
CN1504_WIF
CN201
CN1601
CN1201_3D
CN301
Power cord
BTIR
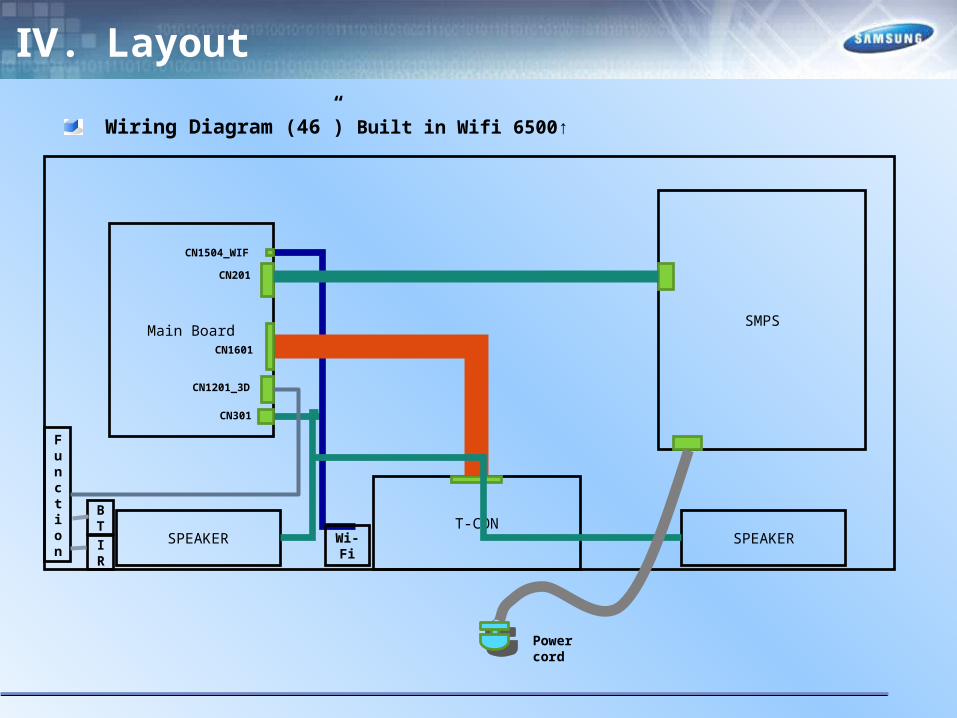
Ⅳ. Layout
Wiring Diagram (46”) Built in Wifi 6500↑
Main Board
T-CON
SMPS
SPEAKER SPEAKERWi-Fi
Function
CN1504_WIF
CN201
CN1601
CN1201_3D
CN301
Power cord
BTIR
Ⅳ. Layout
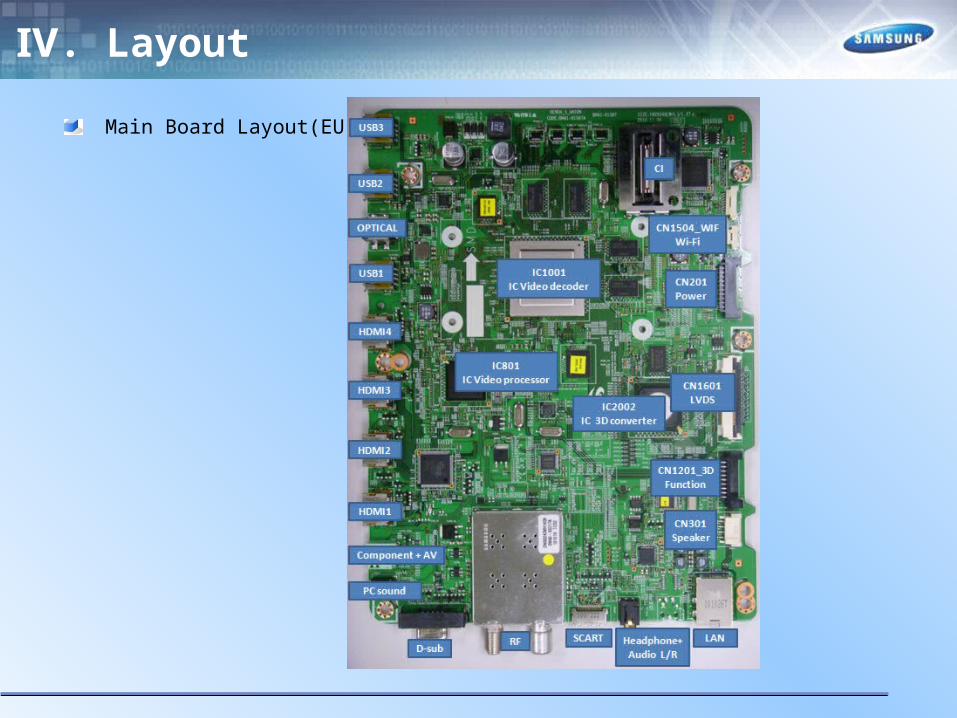
Main Board Layout(EU)
Ⅳ. Layout
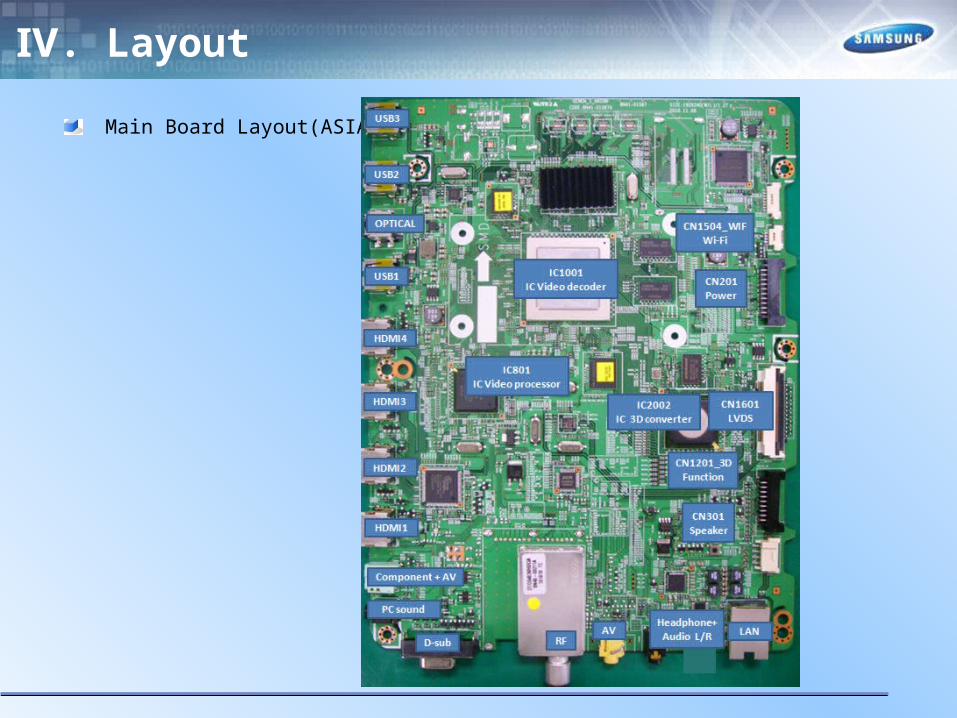
Main Board Layout(ASIA)
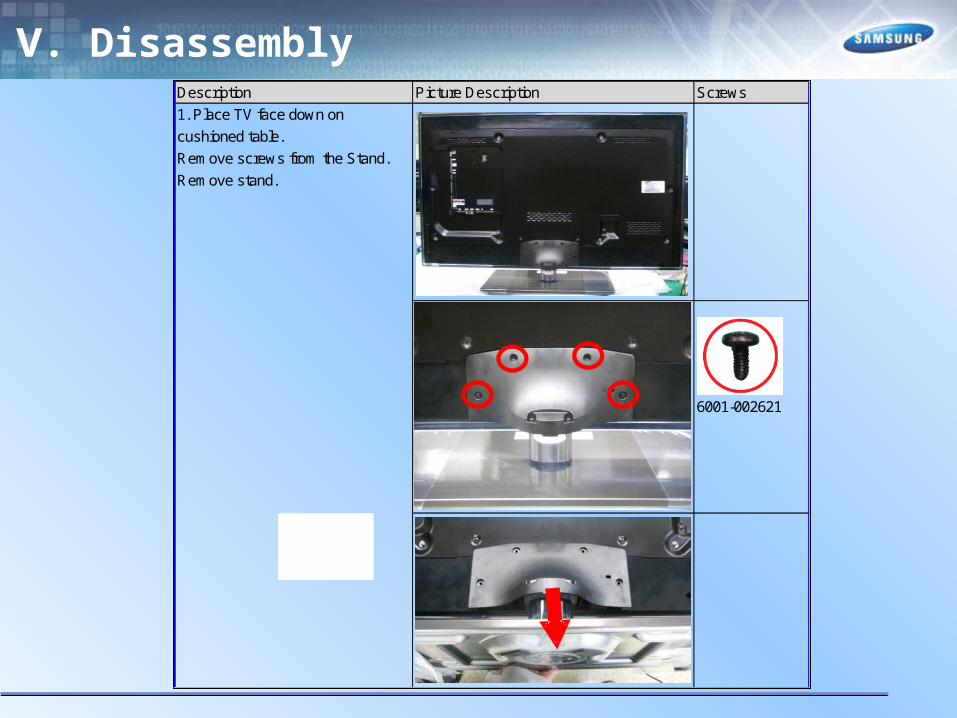
Ⅴ. DisassemblyDescription Picture Description Screws
6001-002621
1. Place TV face down on
cushioned table.
Remove screws from the Stand.
Remove stand.
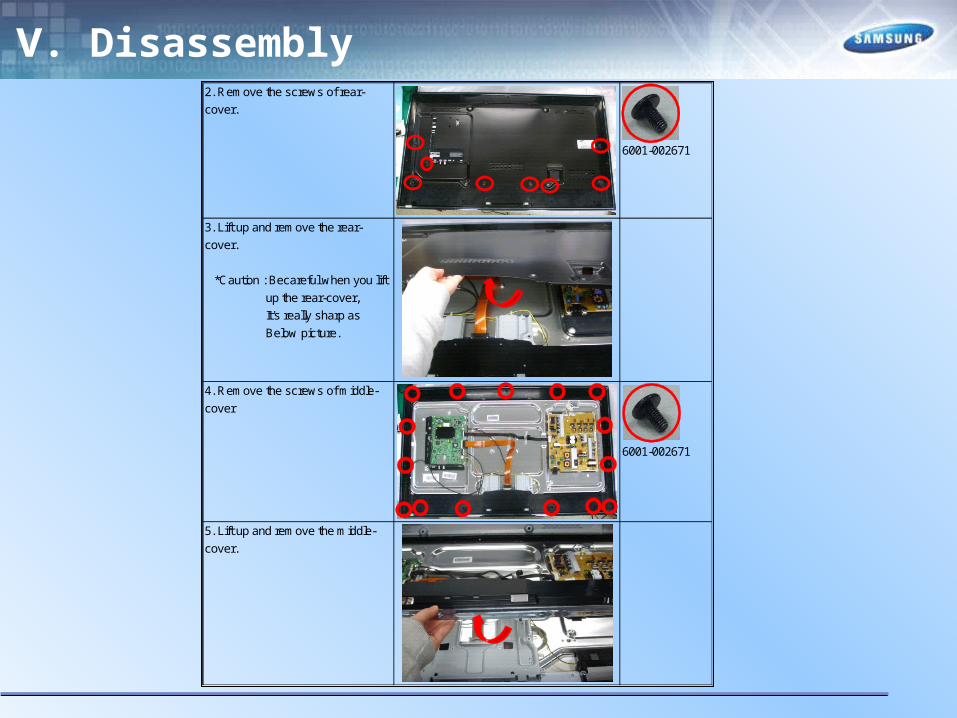
Ⅴ. Disassembly2. Remove the screws of rear-
cover.
6001-002671
3. Lift up and remove the rear-
cover.
*Caution : Becareful when you lift
up the rear-cover,
It's really sharp as
Below picture.
4. Remove the screws of middle-
cover
6001-002671
5. Lift up and remove the middle-
cover.
Ⅴ. Disassembly
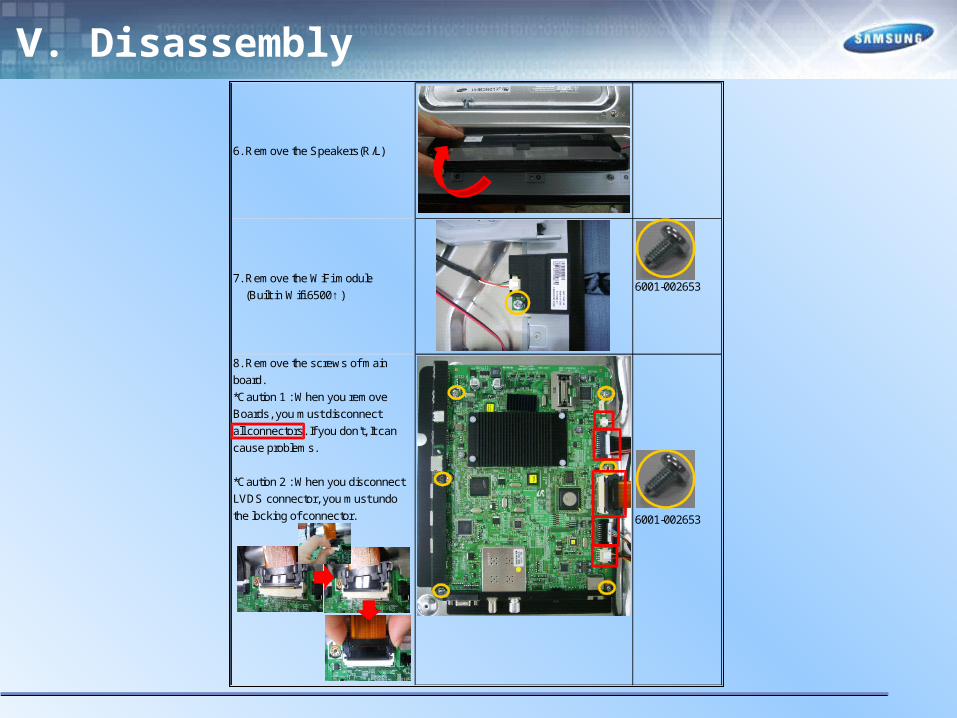
6. Remove the Speakers(R/L)
7. Remove the WiFi module
(Built in Wifi 6500↑)6001-002653
8. Remove the screws of main
board.
*Caution 1 : When you remove
Boards, you must disconnect
all connectors. If you don't, It can
cause problems.
*Caution 2 : When you disconnect
LVDS connector, you must undo
the locking of connector. 6001-002653
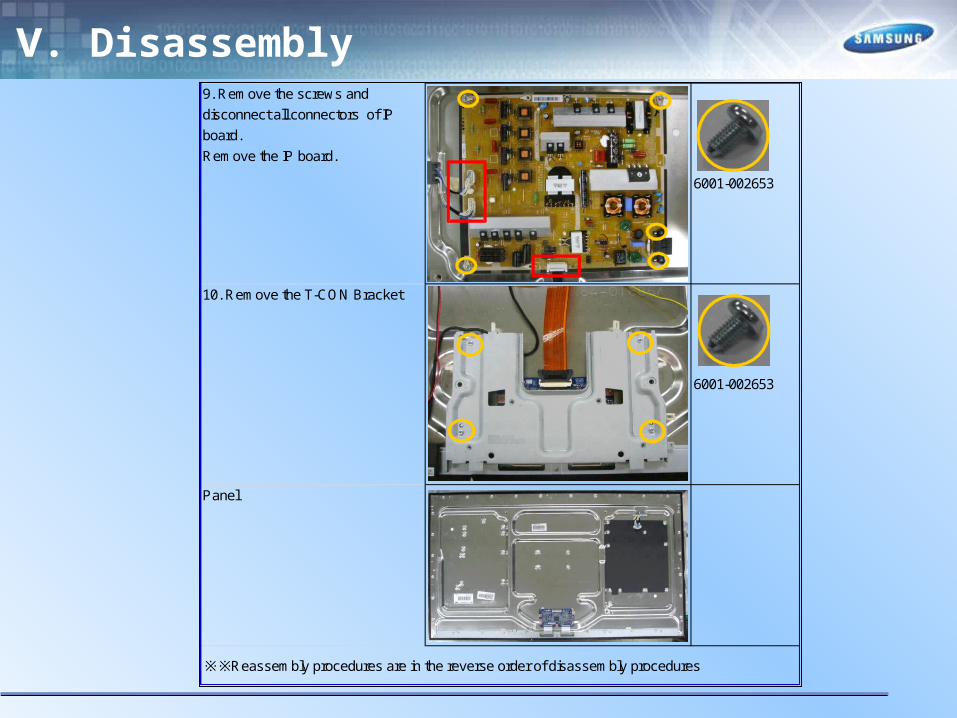
Ⅴ. Disassembly9. Remove the screws and
disconnect all connectors of IP
board.
Remove the IP board.
6001-002653
10. Remove the T-CON Bracket
6001-002653
Panel
※ ※ Reassembly procedures are in the reverse order of disassembly procedures
Ⅵ. Key Feature
3D TV3D TV
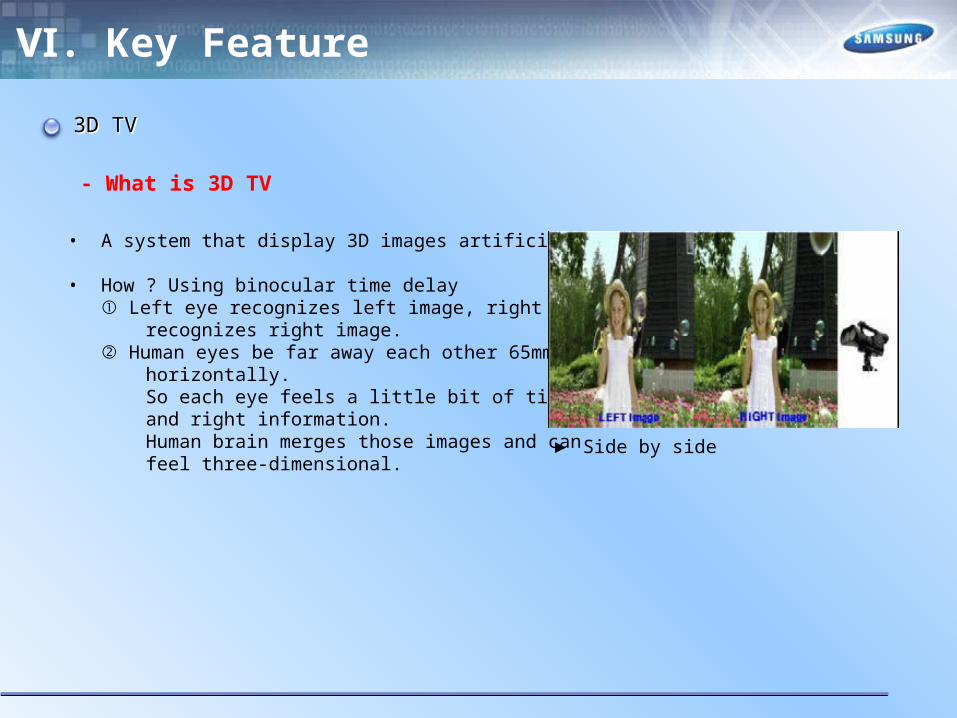
- What is 3D TV
• A system that display 3D images artificially
• How ? Using binocular time delay ① Left eye recognizes left image, right eye recognizes right image. ② Human eyes be far away each other 65mm horizontally. So each eye feels a little bit of time delay of left and right information. Human brain merges those images and can feel three-dimensional.
▶ Side by side
Ⅵ. Key Feature
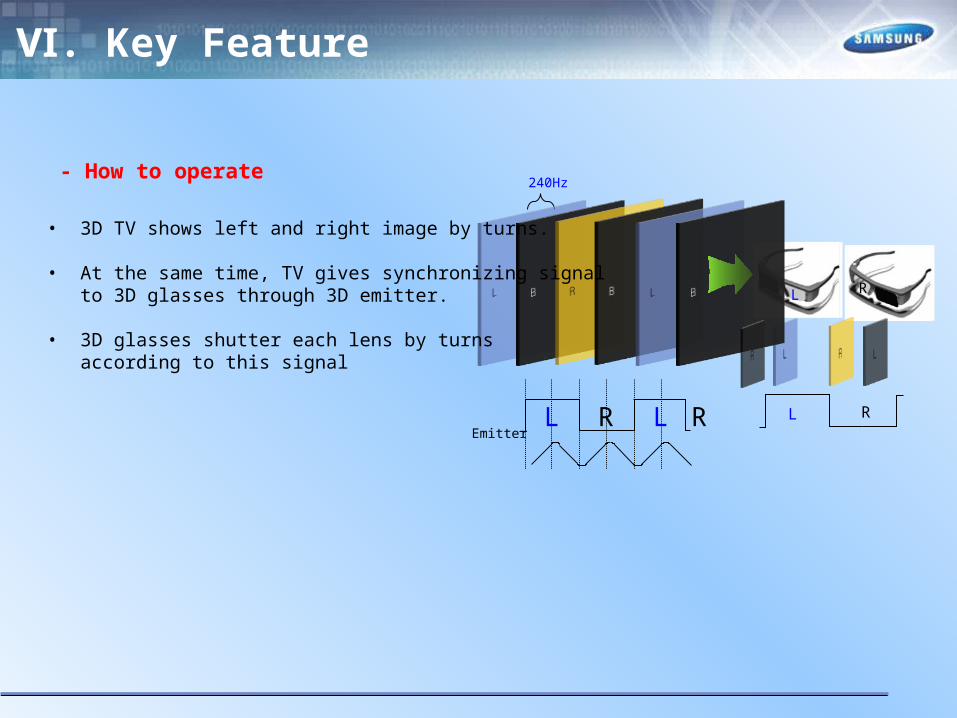
240Hz
L
L
R
RL R L REmitter
- How to operate
• 3D TV shows left and right image by turns.
• At the same time, TV gives synchronizing signal to 3D glasses through 3D emitter.
• 3D glasses shutter each lens by turns according to this signal
Ⅵ. Key Feature
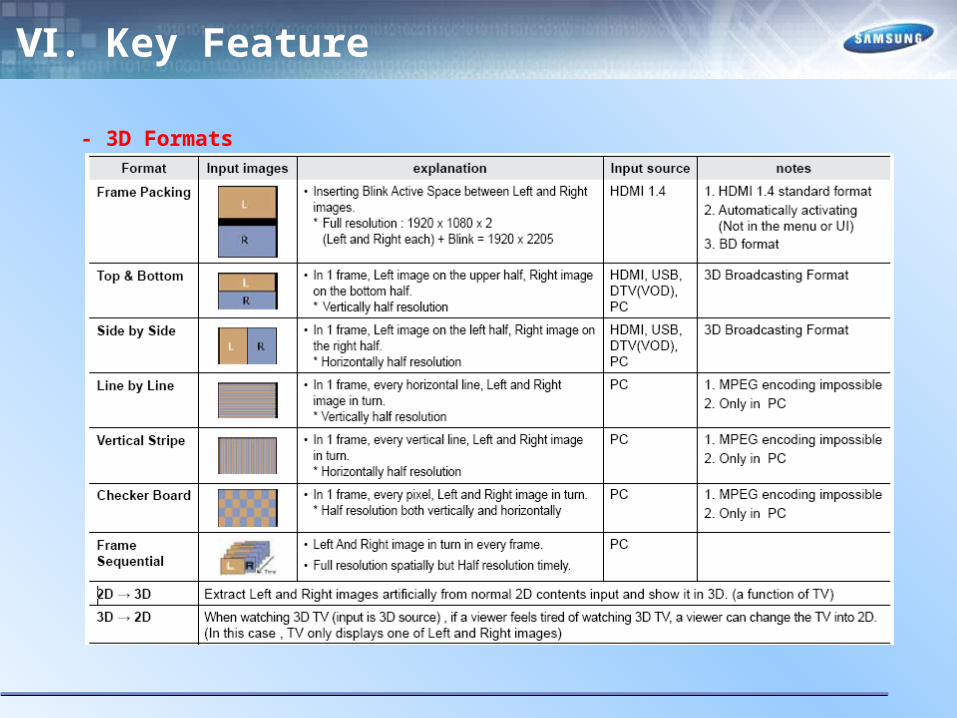
- 3D Formats

Ⅵ. Key Feature
- 3D Formats

Ⅵ. Key Feature
Smart Hub
-The Gateway to all content integrated in one place-All search, web browser, samsung apps-Supply differentialed player accoding to the contents- Support various USB device (multi midea)
Detail
It’s all integrated to guide you to easier and diverse entertainment choices
Control your entertainment life with easy and simple user friendly UI
Access to diverse Apps that are adding up every day
Customize your TV, by App grouping & sorting to your taste

Ⅵ. Key Feature
Ⅵ. Key Feature
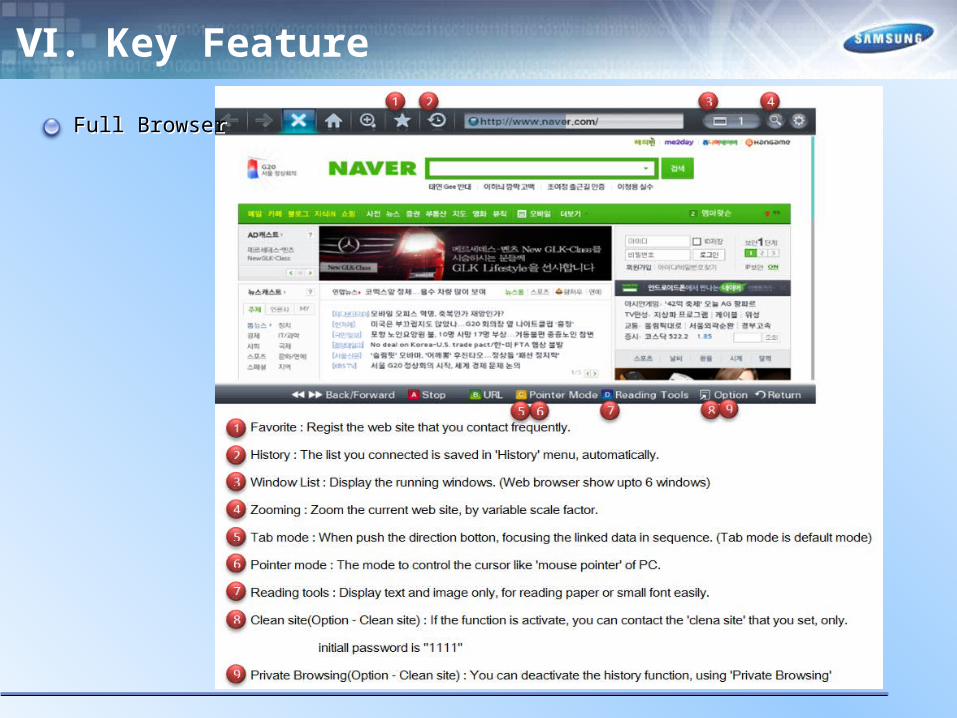
Full BrowserFull Browser
Ⅵ. Key Feature
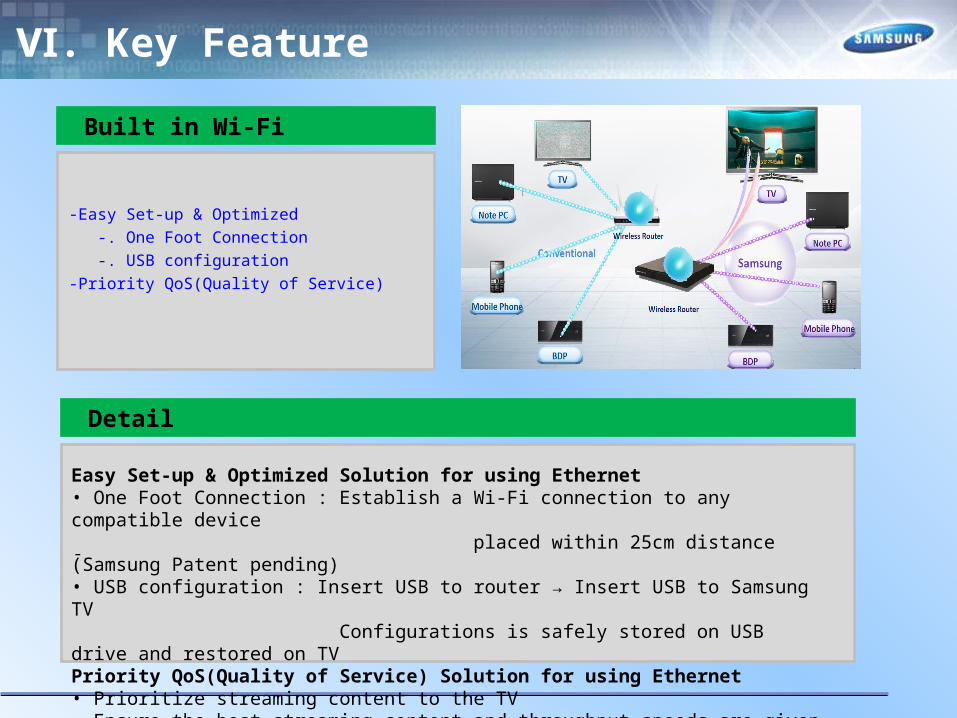
Built in Wi-Fi
-Easy Set‐up & Optimized -. One Foot Connection -. USB configuration -Priority QoS(Quality of Service)
Detail
-
Easy Set‐up & Optimized Solution for using Ethernet• One Foot Connection : Establish a Wi‐Fi connection to any compatible device placed within 25cm distance (Samsung Patent pending)• USB configuration : Insert USB to router → Insert USB to Samsung TV Configurations is safely stored on USB drive and restored on TVPriority QoS(Quality of Service) Solution for using Ethernet• Prioritize streaming content to the TV• Ensure the best streaming content and throughput speeds are given to the TV