Training Guide: Configuring Advanced...
120
Transcript of Training Guide: Configuring Advanced...
Training Guide: Configuring Advanced Windows Server 2012 R2 Services
Orin Thomas
PUBLISHED BYMicrosoft PressA Division of Microsoft CorporationOne Microsoft WayRedmond, Washington 98052-6399
Copyright © 2014 by Orin Thomas
All rights reserved. No part of the contents of this book may be reproduced or transmitted in any form or by any means without the written permission of the publisher.
Library of Congress Control Number: 2014935077ISBN: 978-0-7356-8471-3
Printed and bound in the United States of America.
First Printing
Microsoft Press books are available through booksellers and distributors worldwide. If you need support related to this book, email Microsoft Press Book Support at [email protected]. Please tell us what you think of this book at http://www.microsoft.com/learning/booksurvey.
Microsoft and the trademarks listed at http://www.microsoft.com/en-us/legal/intellectualproperty/Trademarks/EN-US.aspx are trademarks of the Microsoft group of companies. All other marks are property of their respective owners.
The example companies, organizations, products, domain names, email addresses, logos, people, places, and events depicted herein are fictitious. No association with any real company, organization, product, domain name, email address, logo, person, place, or event is intended or should be inferred.
This book expresses the author’s views and opinions. The information contained in this book is provided without any express, statutory, or implied warranties. Neither the authors, Microsoft Corporation, nor its resellers, or distributors will be held liable for any damages caused or alleged to be caused either directly or indirectly by this book.
Acquisitions Editor: Anne HamiltonDevelopmental Editor: Karen Szall Editorial Production: Troy Mott, Backstop Media LLC Technical Reviewer: Telmo Sampaio Copyeditor: Christina Rudloff Indexer: Joe Wizda, Martin Murtonen Cover: Twist Creative • Seattle
Contents at a glance
Introduction xviii
CHAPTER 1 Advanced Active Directory infrastructure 1
CHAPTER 2 Active Directory sites and replication 59
CHAPTER 3 Advanced DHCP and DNS 119
CHAPTER 4 Active Directory Certificate Services 205
CHAPTER 5 Backup and recovery 301
CHAPTER 6 Advanced file services and storage 373
CHAPTER 7 High availability 441
CHAPTER 8 Virtual machine and site resilience 505
CHAPTER 9 DAC and AD RMS 567
CHAPTER 10 Active Directory Federation Services 657
Index 715

This page intentionally left blank
v
What do you think of this book? We want to hear from you! Microsoft is interested in hearing your feedback so we can continually improve our books and learning resources for you. To participate in a brief online survey, please visit:
www.microsoft.com/learning/booksurvey/
Contents
Introduction xviii
Chapter 1 Advanced Active Directory infrastructure 1Before you begin . . . . . . . . . . . . . . . . . . . . . . . . . . . . . . . . . . . . . . . . . . . . . . . . . . 1
Lesson 1: Configuring domains and forests . . . . . . . . . . . . . . . . . . . . . . . . . . 1
Multidomain Active Directory environments 2
Multiforest Active Directory environments 8
Upgrading existing domains and forests 9
User principal name (UPN) suffixes 10
Lesson summary 11
Lesson review 12
Lesson 2: Configuring trusts . . . . . . . . . . . . . . . . . . . . . . . . . . . . . . . . . . . . . . . 13
Trusts 13
SID filtering 21
Name suffix routing 22
Lesson summary 23
Lesson review 24
Practice exercises . . . . . . . . . . . . . . . . . . . . . . . . . . . . . . . . . . . . . . . . . . . . . . . . 25
Exercise 1: Prepare a domain controller to host a child domain with a contiguous namespace 25
Exercise 2: Create a child domain with a contiguous namespace 27
Exercise 3: Prepare domain controller to host the wingtiptoys.com tree in the contoso.com forest 30
Exercise 4: Promote domain controller for new tree in contoso.com forest 31
vi Contents
Exercise 5: Prepare a domain controller to host a new forest 32
Exercise 6: Create new forest 33
Exercise 7: Prepare to configure a forest trust relationship 34
Exercise 8: Begin creating a forest trust relationship 37
Exercise 9: Complete the creation of the forest trust relationship between contoso.com and margiestravel.com 40
Exercise 10: Configure name suffix routing 43
Exercise 11: Configure selective authentication 45
Exercise 12: Configure additional UPN suffixes 50
Exercise 13: Configure a shortcut trust 50
Suggested practice exercises . . . . . . . . . . . . . . . . . . . . . . . . . . . . . . . . . . . . . . 54
Answers . . . . . . . . . . . . . . . . . . . . . . . . . . . . . . . . . . . . . . . . . . . . . . . . . . . . . . . . . 55
Lesson 1 55
Lesson 2 56
Chapter 2 Active Directory sites and replication 59Before you begin . . . . . . . . . . . . . . . . . . . . . . . . . . . . . . . . . . . . . . . . . . . . . . . . . 59
Lesson 1: Configuring sites . . . . . . . . . . . . . . . . . . . . . . . . . . . . . . . . . . . . . . . .59
Configure sites and subnets 60
Manage SRV record registration 68
Moving domain controllers 69
Lesson summary 70
Lesson review 71
Lesson 2: Active Directory replication . . . . . . . . . . . . . . . . . . . . . . . . . . . . . . . 72
Active Directory partitions 72
Understanding multi-master replication 73
RODC replication 76
Configure RODC password replication 77
Monitor and manage replication 81
Repadmin 83
Upgrade SYSVOL replication 85
Lesson summary 86
Lesson review 86
Practice Exercises . . . . . . . . . . . . . . . . . . . . . . . . . . . . . . . . . . . . . . . . . . . . . . . . 88
viiContents
Exercise 1: Create Active Directory sites 89
Exercise 2: Create Active Directory subnets 91
Exercise 3: Create site links 93
Exercise 4: Modify site link cost and replication schedule 94
Exercise 5: Configure MEL-DC as an additional domain controller 96
Exercise 6: Verify site placement and trigger replication 101
Exercise 7: Configure ADL-DC as an RODC 102
Exercise 8: Configure RODC replication 105
Exercise 9: View account passwords replicated to ADL-DC 107
Exercise 10: Monitor replication with repadmin 110
Exercise 11: Remove the RODC and reset accounts 113
Suggested practice exercises . . . . . . . . . . . . . . . . . . . . . . . . . . . . . . . . . . . . . 114
Answers . . . . . . . . . . . . . . . . . . . . . . . . . . . . . . . . . . . . . . . . . . . . . . . . . . . . . . . . 115
Lesson 1 115
Lesson 2 116
Chapter 3 Advanced DHCP and DNS 119Before you begin . . . . . . . . . . . . . . . . . . . . . . . . . . . . . . . . . . . . . . . . . . . . . . . . 119
Lesson 1: Implementing an advanced DNS solution . . . . . . . . . . . . . . . . . 119
DNSSEC 120
DNS event logs 122
GlobalNames zones 124
Advanced DNS options 126
Delegated administration 129
Analyze zone level statistics 131
Lesson summary 132
Lesson review 132
Lesson 2: Implementing an advanced DHCP solution . . . . . . . . . . . . . . . . 134
Superscopes 134
Multicast scopes 135
Split scopes 136
DNS registration 137
Name Protection 138
DHCP failover 139
viii Contents
Lesson summary 141
Lesson review 142
Lesson 3: Deploying and managing IPAM . . . . . . . . . . . . . . . . . . . . . . . . . . 143
Introduction to IPAM 144
Deploy IPAM 144
Configure IPAM database storage 144
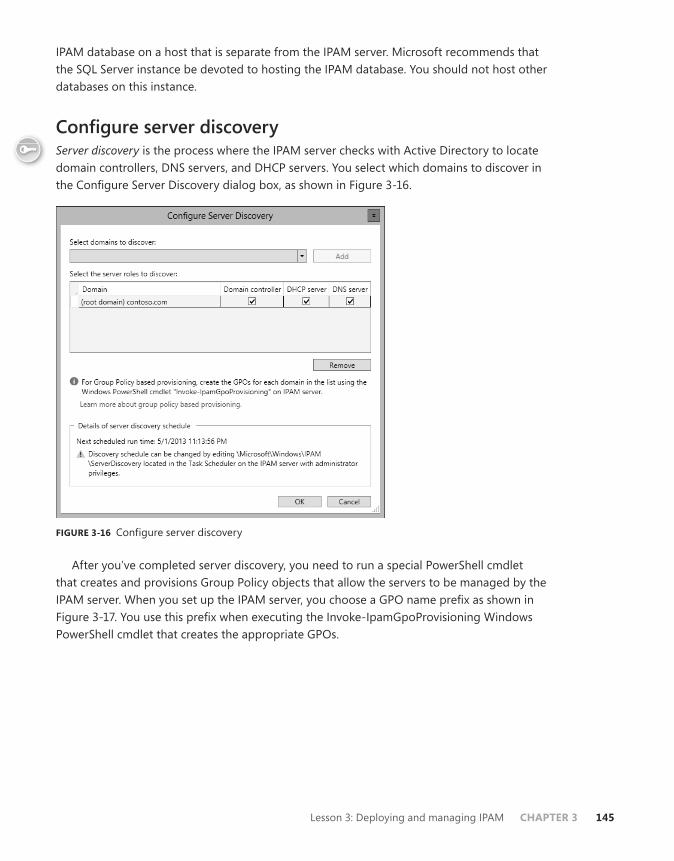
Configure server discovery 145
Managing the IP address space 148
IP address tracking 150
IPAM administration 152
Lesson summary 153
Lesson review 153
Practice exercises . . . . . . . . . . . . . . . . . . . . . . . . . . . . . . . . . . . . . . . . . . . . . . . 154
Exercise 1: Configure MEL-DC 155
Exercise 2: Configure DNSSEC 156
Exercise 3: Configure the name resolution policy 158
Exercise 4: Increase the size of the DNS socket pool 161
Exercise 5: Modify DNS Cache Locking 161
Exercise 6: Create and manage a GlobalNames zone 163
Exercise 7: Configure and view the DNS event log 165
Exercise 8: Verify netmask ordering and disable recursion 167
Exercise 9: Install and activate the DHCP role 168
Exercise 10: Create a DHCP superscope 173
Exercise 11: Create a split scope 177
Exercise 12: Configure DHCP Name Protection 180
Exercise 13: Create new multicast scopes 182
Exercise 14: Configure DHCP failover 184
Exercise 15: Install the IPAM feature 186
Exercise 16: Configure IPAM GPOs and server discovery 187
Exercise 17: Configure servers to be managed by IPAM 189
Exercise 18: Manage servers using IPAM 194
Exercise 19: Use IPAM to create a DHCP scope 196
Exercise 20: Use IPAM to manage IP addresses 197
Suggested practice exercises . . . . . . . . . . . . . . . . . . . . . . . . . . . . . . . . . . . . . 199
ixContents
Answers . . . . . . . . . . . . . . . . . . . . . . . . . . . . . . . . . . . . . . . . . . . . . . . . . . . . . . . .200
Lesson 1 200
Lesson 2 202
Lesson 3 203
Chapter 4 Active Directory Certificate Services 205Before you begin . . . . . . . . . . . . . . . . . . . . . . . . . . . . . . . . . . . . . . . . . . . . . . . . 205
Lesson 1: Installing and configuring Active Directory Certificate Services . . . . . . . . . . . . . . . . . . . . . . . . . . . . 205
Installing certificate authorities 206
CRL distribution points 212
Online Responders 214
Administrative role separation 215
CA backup and recovery 216
Lesson summary 218
Lesson review 219
Lesson 2: Manage certificates . . . . . . . . . . . . . . . . . . . . . . . . . . . . . . . . . . . . . 220
Certificate templates 221
Certificate revocation 222
Certificate renewal 224
Autoenrollment 225
Key archiving and recovery 227
Lesson summary 229
Lesson review 230
Practice exercises . . . . . . . . . . . . . . . . . . . . . . . . . . . . . . . . . . . . . . . . . . . . . . . 231
Exercise 1: Deploy and configure an enterprise root CA 232
Exercise 2: Deploy an enterprise subordinate CA 241
Exercise 3: Install a standalone subordinate CA 246
Exercise 4: Configure a standalone CA 250
Exercise 5: Configure a CRL distribution point 253
Exercise 6: Configure an Online Responder 257
Exercise 7: Configure administrative role separation 264
Exercise 8: Configure a key recovery agent certificate template 268
Exercise 9: Request a key recovery agent certificate 273
Exercise 10: Configure key recovery 277
x Contents
Exercise 11: Configure a certificate template for autoenrollment and key recovery 279
Exercise 12: Configure Group Policy to support autoenrollment, credential roaming, and automatic renewal 282
Exercise 13: Configure a certificate template to support private key archival and recovery and reenroll all certificate holders 287
Exercise 14: Perform certificate revocation 288
Exercise 15: Perform certificate recovery 292
Suggested practice exercises . . . . . . . . . . . . . . . . . . . . . . . . . . . . . . . . . . . . . 296
Answers . . . . . . . . . . . . . . . . . . . . . . . . . . . . . . . . . . . . . . . . . . . . . . . . . . . . . . . . 297
Lesson 1 297
Lesson 2 299
Chapter 5 Backup and recovery 301Before you begin . . . . . . . . . . . . . . . . . . . . . . . . . . . . . . . . . . . . . . . . . . . . . . . . 301
Lesson 1: Configuring and managing backups . . . . . . . . . . . . . . . . . . . . . . 301
Windows Server Backup 302
Windows Azure Backup 306
Role-specifc and application-specific backups 312
Vssadmin 313
Data Protection Manager 316
Lesson summary 317
Lesson review 317
Lesson 2: Recovering servers . . . . . . . . . . . . . . . . . . . . . . . . . . . . . . . . . . . . . 318
Restore from backups 318
Recover servers using Windows Recovery Environment 321
Safe mode and Last Known Good Configuration 322
Configure the Boot Configuration Data store 324
Lesson summary 325
Lesson review 325
Practice exercises . . . . . . . . . . . . . . . . . . . . . . . . . . . . . . . . . . . . . . . . . . . . . . . 326
Exercise 1: Prepare MEL-DC and CBR-DC for exercises 326
Exercise 2: Install Windows Server Backup 327
Exercise 3: Configure CBR-DC for local backup 330
Exercise 4: Perform a backup to a local volume 334
xiContents
Exercise 5: Perform a backup over the network 336
Exercise 6: Use Vssadmin 338
Exercise 7: Perform a full volume recovery using Windows Server Backup 341
Exercise 8: Prepare for Windows Recovery Environment 344
Exercise 9: Perform full server recovery over the network 345
Exercise 10: Boot into Safe Mode 348
Exercise 11: Modify Boot Configuration Data store 350
Exercise 12: Configure a standalone computer for use with Windows Azure Backup 354
Exercise 13: Configure Windows Azure Backup 358
Exercise 14: Backup data to Windows Azure Backup 362
Exercise 15: Restore data from Windows Azure Backup 367
Suggested practice exercises . . . . . . . . . . . . . . . . . . . . . . . . . . . . . . . . . . . . . 369
Answers . . . . . . . . . . . . . . . . . . . . . . . . . . . . . . . . . . . . . . . . . . . . . . . . . . . . . . . . 370
Lesson 1 370
Lesson 2 371
Chapter 6 Advanced file services and storage 373Before you begin . . . . . . . . . . . . . . . . . . . . . . . . . . . . . . . . . . . . . . . . . . . . . . . . 373
Lesson 1: Configuring advanced file services . . . . . . . . . . . . . . . . . . . . . . . . 373
File screens 374
Quotas 377
Server for NFS 379
BranchCache 380
File classification 384
File access auditing 385
Lesson summary 387
Lesson review 387
Lesson 2: Configuring and optimizing storage . . . . . . . . . . . . . . . . . . . . . . 388
iSCSI target and initiator 389
iSNS server 392
Thin provisioning and trim 394
Features on Demand 396
Tiered storage 398
xii Contents
Lesson summary 398
Lesson review 399
Practice exercises . . . . . . . . . . . . . . . . . . . . . . . . . . . . . . . . . . . . . . . . . . . . . . .400
Exercise 1: Prepare MEL-DC and ADL-DC 400
Exercise 2: Deploy FSRM 401
Exercise 3: Configure quota templates and quotas 402
Exercise 4: Create file groups, file screen templates, apply file screens, and apply file screen exceptions 407
Exercise 5: Configure file classification 410
Exercise 6: Verify the classification 413
Exercise 7: Configure file access auditing 414
Exercise 8: Create and assign an iSCSI target 417
Exercise 9: Connect to an iSCSI target 421
Exercise 10: Create a new storage pool and thin provisioned virtual disk 423
Exercise 11: Install the iSNS server and register the initiator 426
Exercise 12: Remove feature files 429
Exercise 13: Configure BranchCache policies 431
Exercise 14: Deploy BranchCache on Windows Server 2012 R2 435
Suggested practice exercises . . . . . . . . . . . . . . . . . . . . . . . . . . . . . . . . . . . . . 437
Answers . . . . . . . . . . . . . . . . . . . . . . . . . . . . . . . . . . . . . . . . . . . . . . . . . . . . . . . . 438
Lesson 1 438
Lesson 2 439
Chapter 7 High availability 441Before you begin . . . . . . . . . . . . . . . . . . . . . . . . . . . . . . . . . . . . . . . . . . . . . . . . 441
Lesson 1: Configuring and managing failover clustering. . . . . . . . . . . . . . 441
Failover clustering 442
Cluster quorum modes 443
Cluster storage and cluster shared volumes 445
Cluster Shared Volumes 446
Shared virtual hard disks 447
Cluster networks 448
Cluster-Aware Updating 449
Migrating and upgrading clusters 451
xiiiContents
Failover and preference settings 452
Continuously available shares 454
Active Directory detached clusters 454
Lesson summary 455
Lesson review 455
Lesson 2: Understanding Network Load Balancing . . . . . . . . . . . . . . . . . . 456
Network Load Balancing 457
Network Load Balancing prerequisites 458
NLB cluster operation modes 459
Managing cluster hosts 461
Port rules 462
Filtering and affinity 463
Upgrading an NLB cluster 464
New NLB PowerShell cmdlets 465
Lesson summary 466
Lesson review 466
Practice exercises . . . . . . . . . . . . . . . . . . . . . . . . . . . . . . . . . . . . . . . . . . . . . . . 467
Exercise 1: Prepare ADL-DC, MEL-DC, and CBR-DC for exercises 468
Exercise 2: Install the Network Load Balancing feature on ADL-DC, CBR-DC, and MEL-DC 469
Exercise 3: Create a three-node NLB cluster 470
Exercise 4: Configure port rules and affinity 473
Exercise 5: Remove an NLB cluster 475
Exercise 6: Create shared storage for failover clustering 477
Exercise 7: Connect potential cluster nodes to shared storage 479
Exercise 8: Install failover cluster features 483
Exercise 9: Validate cluster configuration 484
Exercise 10: Create a two-node failover cluster 485
Exercise 11: Add a cluster node 486
Exercise 12: Change the quorum configuration 488
Exercise 13: Install and configure a highly available file server 489
Exercise 14: Configure a highly available file share 491
Exercise 15: Configure failover settings, failback settings, and move node 493
xiv Contents
Exercise 16: Simulate unplanned failure 495
Exercise 17: Cluster-Aware Updating 496
Suggested practice exercises . . . . . . . . . . . . . . . . . . . . . . . . . . . . . . . . . . . . . 501
Answers . . . . . . . . . . . . . . . . . . . . . . . . . . . . . . . . . . . . . . . . . . . . . . . . . . . . . . . . 502
Lesson 1 502
Lesson 2 503
Chapter 8 Virtual machine and site resilience 505Before you begin . . . . . . . . . . . . . . . . . . . . . . . . . . . . . . . . . . . . . . . . . . . . . . . . 505
Lesson 1: Virtual machine movement . . . . . . . . . . . . . . . . . . . . . . . . . . . . . . 505
Virtual machine failover clustering 506
Shared Nothing Hyper-V live migration 509
Storage migration 512
Virtual machine import and export 515
Lesson summary 516
Lesson review 517
Lesson 2: Site-level fault tolerance . . . . . . . . . . . . . . . . . . . . . . . . . . . . . . . . . 518
Hyper-V Replica 518
Hyper-V Replica Broker 525
Multisite clustering 526
Lesson summary 528
Lesson review 528
Practice exercises . . . . . . . . . . . . . . . . . . . . . . . . . . . . . . . . . . . . . . . . . . . . . . . 529
Exercise 1: Install the Hyper-V role on MEL-HV-1 and MEL-HV-2 531
Exercise 2: Configure identical virtual switches on MEL-HV-1 and MEL-HV-2 536
Exercise 3: Prepare servers for live migration 538
Exercise 4: Prepare servers for replication 541
Exercise 5: Create two virtual machines on MEL-HV-1 544
Exercise 6: Configure TEST-ONE for replication 547
Exercise 7: View replication health and perform planned failover of TEST-ONE to MEL-HV-2 550
Exercise 8: Configure Hyper-V to support live migration 552
Exercise 9: Perform live migration of TEST-TWO 553
Exercise 10: Perform storage migration 556
xvContents
Exercise 11: Perform a virtual machine export 558
Exercise 12: Create a copy of a running virtual machine 558
Exercise 13: Enable reverse replication 559
Exercise 14: Perform an unplanned failover 561
Suggested practice exercises . . . . . . . . . . . . . . . . . . . . . . . . . . . . . . . . . . . . . 563
Answers . . . . . . . . . . . . . . . . . . . . . . . . . . . . . . . . . . . . . . . . . . . . . . . . . . . . . . . .564
Lesson 1 564
Lesson 2 565
Chapter 9 DAC and AD RMS 567Before you begin . . . . . . . . . . . . . . . . . . . . . . . . . . . . . . . . . . . . . . . . . . . . . . . . 567
Lesson 1: Implementing Dynamic Access Control (DAC) . . . . . . . . . . . . . . 567
Introduction to Dynamic Access Control 568
Configuring Group Policy to support DAC 569
Configuring user and device claims 569
Configuring resource properties 571
Central access rules 573
Central access policies 575
Staging 576
Access Denied Assistance 577
Lesson summary 578
Lesson review 579
Lesson 2: Installing and configuring Active Directory Rights Management Services (AD RMS) . . . . . . . . . . 580
Installing AD RMS 580
AD RMS certificates and licenses 582
AD RMS templates 583
AD RMS Administrators and Super Users 586
Trusted user and publishing domains 587
Exclusion policies 589
Apply AD RMS templates automatically 590
Backing up AD RMS 591
Lesson summary 592
Lesson review 592
xvi Contents
Practice exercises . . . . . . . . . . . . . . . . . . . . . . . . . . . . . . . . . . . . . . . . . . . . . . . 593
Exercise 1: Prepare MEL-DC and ADL-DC 594
Exercise 2: Enable group policy support for DAC 595
Exercise 3: Create users and groups 598
Exercise 4: Configure user and device claims 602
Exercise 5: Configure resource properties 607
Exercise 6: Prepare server for file classification 609
Exercise 7: Create a file classification rule 611
Exercise 8: Run and verify the file classification 619
Exercise 9: Create central access rules 621
Exercise 10: Create a central access policy 624
Exercise 11: Configure Access Denied Assistance 627
Exercise 12: Configure staging 629
Exercise 13: Prepare infrastructure for an AD RMS deployment 632
Exercise 14: Install and configure the AD RMS server role 635
Exercise 15: Create the AD RMS Super Users group 641
Exercise 16: Create AD RMS templates 642
Exercise 17: Configure template distribution 647
Exercise 18: Configure application exclusions 648
Exercise 19: Apply RMS templates using file classification 649
Suggested practice exercises . . . . . . . . . . . . . . . . . . . . . . . . . . . . . . . . . . . . . 652
Answers . . . . . . . . . . . . . . . . . . . . . . . . . . . . . . . . . . . . . . . . . . . . . . . . . . . . . . . . 653
Lesson 1 653
Lesson 2 654
Chapter 10 Active Directory Federation Services 657Before you begin . . . . . . . . . . . . . . . . . . . . . . . . . . . . . . . . . . . . . . . . . . . . . . . . 657
Lesson 1: Implementing Active Directory Federation Services . . . . . . . . . 657
AD FS Components 658
Claims, claim rules, and attribute stores 658
Claims provider 659
Relying party 660
Relying party trust 660
Claims provider trust 661
Configuring certificate relationship 662
xviiContents
What do you think of this book? We want to hear from you! Microsoft is interested in hearing your feedback so we can continually improve our books and learning resources for you. To participate in a brief online survey, please visit:
www.microsoft.com/learning/booksurvey/
Attribute stores 663
Claims rules 664
Configure Web Application Proxy 666
Workplace Join 669
Multi-factor authentication 671
Lesson summary 672
Lesson review 672
Practice exercises . . . . . . . . . . . . . . . . . . . . . . . . . . . . . . . . . . . . . . . . . . . . . . . 673
Exercise 1: Prepare separate forests 673
Exercise 2: Configure DNS forwarding 675
Exercise 3: Deploy AD CS in each forest 678
Exercise 4: Prepare SYD-DC for certificate publication 680
Exercise 5: Prepare MEL-DC for certificate publication 684
Exercise 6: Configure CA trust in each forest 689
Exercise 7: Acquire certificates for each server 691
Exercise 8: Deploy AD FS in each forest 694
Exercise 9: Configure relying party trust 699
Exercise 10: Configure a claims provider trust 702
Exercise 11: Prepare claim data 703
Exercise 12: Configure claim rules 705
Suggested practice exercises . . . . . . . . . . . . . . . . . . . . . . . . . . . . . . . . . . . . . 713
Answers . . . . . . . . . . . . . . . . . . . . . . . . . . . . . . . . . . . . . . . . . . . . . . . . . . . . . . . . 714
Lesson 1 714
Index 715
xviii Introduction
Introduction
This Training Guide is designed for information technology (IT) professionals who support, or plan to support, Windows Server 2012 R2 networks, and are ramping up on the latest technology. It is assumed that before you begin using this guide, you have a solid, foundation-level understanding of Microsoft Windows client and server operating systems, and common Internet technologies. This guide provides job-role training for the job role that is covered by the Microsoft certification exam 70-412. Use this book to enhance your job skills or to prepare for an upgrade to Windows Server 2012 R2. You can also use it to complement your exam preparation plan if you are preparing for certification.
When Microsoft Learning puts together exam objectives, it doesn’t randomly select pages from TechNet. Instead, in conjunction with subject matter experts and representatives of the product team, it puts together a list of tasks and areas of knowledge that represents what someone in a specific job role would do and need to know on a day-to-day, a weekly, or even a monthly basis.
Each exam maps to a different job role. The objectives for the 70-412 exam are a list of tasks and areas of knowledge that describe what an advanced administrator of the Windows Server 2012 and Windows Server 2012 R2 operating systems with several years of on-the-job experience (managing other server operating systems as well as Windows Server 2012 and Windows Server 2012 R2) does and understands. These topics include some that experienced administrators may not have encountered before or have limited experience with, such as Active Directory Rights Management Services and Active Directory Federation Services.
This book covers the majority of the topics and skills that are the subject of the Microsoft certification exam 70-412. The idea behind this book is that by reading it and by performing the extensive practice exercises at the end of each chapter in your own lab, you can learn how to perform tasks with the technologies addressed by the exam. By performing the tasks yourself in a test environment you’ll learn enough about how these technologies work that you’ll be able to leverage that knowledge in your real-world role as a Windows Server 2012 or Windows Server 2012 R2 administrator. Reading and performing the practice exercises in this book will assist you in preparing for the exam, but it’s not a complete exam preparation solution. If you are preparing for the exam, you should use additional study materials, such as practice tests and the 70-412 Configuring Advanced Windows Server 2012 Services Exam Ref to help bolster your real-world experience.
xixIntroduction
By using this training guide, you will learn how to do the following:
■■ Configure and manage high availability
■■ Configure file and storage solutions
■■ Implement business continuity and disaster recovery
■■ Configure network services
■■ Configure the Active Directory infrastructure
■■ Configure access and information protection solutions
System requirements
The following are the minimum system requirements your computer needs to meet to complete the practice exercises in this book. This book is designed assuming you will be using Hyper-V—either the client version available with some editions of Windows 8.1, or the version available in Windows Server 2012 R2. You can use other virtualization software instead, such as VirtualBox or VMWare Workstation, but the practice setup instructions later in this introduction assume that you are using Hyper-V. The exercises in Chapter 8 require the version of Hyper-V available in Windows Server 2012 R2 and involve functionality specific to this version of the product.
Hardware requirementsIf you choose to use virtualization software, you need only one physical computer to perform the exercises in this book, except for in Chapter 8, which requires two identical computers. The physical host computer must meet the following minimum hardware requirements:
■■ x64-based processor that includes both hardware-assisted virtualization (AMD-V or Intel VT) and hardware data execution protection. (On AMD systems, the data execution protection feature is called the No Execute or NX bit. On Intel systems, this feature is called the Execute Disable or XD bit.) These features must also be enabled in the BIOS. (Note: You can run Windows Virtual PC without Intel-VT or AMD-V.) If you want to use Hyper-V on Windows 8 or Windows 8.1, you need a processor that supports Second Layer Address Translation (SLAT).
■■ 8 gigabytes (GB) of RAM (more is recommended).
■■ 250 GB of available hard disk space.
■■ Internet connectivity.
xx Introduction
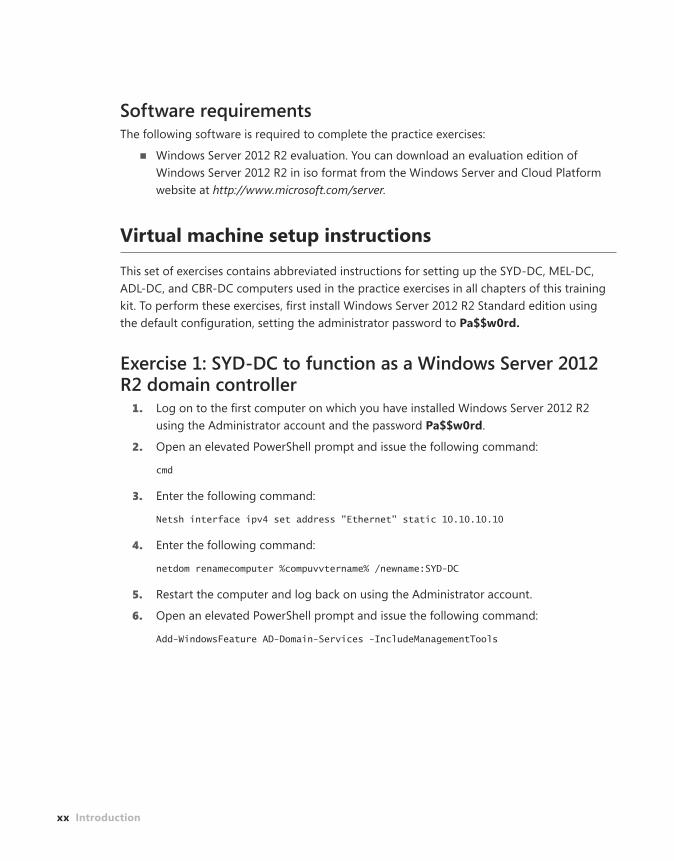
Software requirementsThe following software is required to complete the practice exercises:
■■ Windows Server 2012 R2 evaluation. You can download an evaluation edition of Windows Server 2012 R2 in iso format from the Windows Server and Cloud Platform website at http://www.microsoft.com/server.
Virtual machine setup instructions
This set of exercises contains abbreviated instructions for setting up the SYD-DC, MEL-DC, ADL-DC, and CBR-DC computers used in the practice exercises in all chapters of this training kit. To perform these exercises, first install Windows Server 2012 R2 Standard edition using the default configuration, setting the administrator password to Pa$$w0rd.
Exercise 1: SYD-DC to function as a Windows Server 2012 R2 domain controller
1. Log on to the first computer on which you have installed Windows Server 2012 R2 using the Administrator account and the password Pa$$w0rd.
2. Open an elevated PowerShell prompt and issue the following command:
cmd
3. Enter the following command:
Netsh interface ipv4 set address "Ethernet" static 10.10.10.10
4. Enter the following command:
netdom renamecomputer %compuvvtername% /newname:SYD-DC
5. Restart the computer and log back on using the Administrator account.
6. Open an elevated PowerShell prompt and issue the following command:
Add-WindowsFeature AD-Domain-Services -IncludeManagementTools

xxiIntroduction
7. Open the Server Manager console. Click the Refresh icon.
8. Click the Notifications icon and then click Promote This Server To Domain Controller.
9. On the Deployment Configuration page, choose Add A New Forest. Type Contoso.com as the root domain name and then click Next.
10. On the Domain Controller Options page, configure the following settings and then click Next:
■■ Forest Functional Level: Windows Server 2012 R2
■■ Domain Functional Level: Windows Server 2012 R2
■■ Specify Domain Controller Capabilities: Domain Name System (DNS) Server And Global Catalog
■■ DSRM Password: Pa$$w0rd
11. On the DNS Options page, click Next.
12. On the Additional Options page, click Next.
13. Accept the default settings for the Database, Log Files, and SYSVOL locations, and click Next.
14. On the Review Options page, click Next.
15. On the Prerequisites Check page, click Install.
16. The computer will restart automatically.
Exercise 2: Prepare Active Directory Domain Server (AD DS)1. Log on to server SYD-DC using the Administrator account.
2. Using Active Directory Users And Computers, create a user account named don_funk in the Users container and assign the account the password Pa$$w0rd. Configure the password to never expire. Add this user account to the Enterprise Admins, Domain Admins, and Schema Admins groups.
3. Open the DNS console and create a primary IPv4 Reverse Lookup Zone for the subnet 10.10.10.x. Ensure that the zone is stored within AD DS and is replicated to all DNS servers running on domain controllers in the forest and allows only secure dynamic updates.
xxii Introduction
Exercise 3: Prepare ADL-DC1. Ensure that computer SYD-DC is turned on and connected to the network or virtual
network to which the second computer is connected.
2. Log on to the second computer on which you have installed Windows Server 2012 R2 using the Administrator account and the password Pa$$w0rd.
3. Open an elevated PowerShell prompt and issue the following commands:
cmd Netsh interface ipv4 set address "Ethernet" static 10.10.10.20 Netsh interface ipv4 set dnsservers "Ethernet" static 10.10.10.10 primary
4. Enter the following command:
netdom renamecomputer %computername% /newname:ADL-DC
5. Restart the computer and then log on again using the Administrator account.
6. Shut down the computer.
Exercise 4: Prepare CBR-DC1. Ensure that computer SYD-DC is turned on and connected to the network or virtual
network to which the second computer is connected.
2. Log on to the third computer on which you have installed Windows Server 2012 R2 using the Administrator account and the password Pa$$w0rd.
3. Open an elevated PowerShell prompt and issue the following commands:
cmd Netsh interface ipv4 set address "Ethernet" static 10.10.10.30 Netsh interface ipv4 set dnsservers "Ethernet" static 10.10.10.10 primary
4. Enter the following command:
netdom renamecomputer %computername% /newname:CBR-DC
5. Restart the computer and then log on again using the Administrator account.
6. Shut down the computer.
xxiiiIntroduction
Exercise 5: Prepare MEL-DC1. Ensure that computer SYD-DC is turned on and connected to the network or virtual
network to which the second computer is connected.
2. Log on to the third computer on which you have installed Windows Server 2012 R2 using the Administrator account and the password Pa$$w0rd.
3. Open an elevated PowerShell prompt and issue the following commands:
cmd Netsh interface ipv4 set address "Ethernet" static 10.10.10.40 Netsh interface ipv4 set dnsservers "Ethernet" static 10.10.10.10 primary
4. Enter the following command:
netdom renamecomputer %computername% /newname:MEL-DC
5. Restart the computer and then log on again using the Administrator account.
6. Shut down the computer.
Exercise 6: Checkpoint all virtual machines1. Checkpoint all virtual machines. This is the state that they need to be in prior to
performing exercises. Checkpoints were termed snapshots in prior versions of Hyper-V.
Acknowledgments
I’d like to thank the following people for their dedication and help in getting this book written: Telmo Sampaio, Troy Mott, and Christina Rudloff. I’d also like to thank Oksana and Rooslan for their patience with me during the writing process.
Errata, updates, and book support
We’ve made every effort to ensure the accuracy of this book and its companion content. You can access updates to this book—in the form of a list of submitted errata and their related corrections—at:
http://aka.ms/TG412R2
If you discover an error that is not already listed, please submit it to us at the same page.
If you need additional support, email Microsoft Press Book Support at [email protected].

xxiv Introduction
We want to hear from you
At Microsoft Press, your satisfaction is our top priority, and your feedback is our most valuable asset. Please tell us what you think of this book at:
http://aka.ms/tellpress
The survey is short, and we read every one of your comments and ideas. Thanks in advance for your input!
Stay in touch
Let’s keep the conversation going! We’re on Twitter: http://twitter.com/MicrosoftPress.
119
C H A P T E R 3
Advanced DHCP and DNSWindows Server 2012 and Windows Server 2012 R2 include several tools that increase
the functionality, security, and manageability of name and Internet Protocol (IP) address spaces. It is important to be able to efficiently manage the name and address space because of the increase in computers on organizational networks that use dynamically assigned names and addresses. This chapter discusses IP address management (IPAM), a technology that simplifies the centralized management of Dynamic Host Control Protocol (DHCP) and Domain Name System (DNS) servers. Maintaining the integrity of the DNS is also important, and in recent years there have been an increase in attacks against DNS infrastructure. In this chapter you discover several different methods that enable you to harden your organization’s DNS infrastructure.
Lessons in this chapter:■■ Lesson 1: Implementing an advanced DNS solution
■■ Lesson 2: Implementing an advanced DHCP solution
■■ Lesson 3: Deploying and managing IPAM
Before you begin
To complete the practice exercises in this chapter, you need to have deployed computers SYD-DC, MEL-DC, CBR-DC, and ADL-DC as described in the Introduction, using the evaluation edition of Windows Server 2012 R2.
Lesson 1: Implementing an advanced DNS solution
DNS is one of those core network services to which many administrators pay little attention. It’s possible to manage a Windows Server 2012 R2 Active Directory implementation without having to open the DNS Manager console. In some environments, especially those that have stricter than average security requirements, you might need to go beyond the default configuration to make your organization’s DNS implementation more secure. In this lesson, find out about Domain Name System Security Extensions (DNSSEC), how to log DNS traffic, and how to configure a GlobalNames Zone. You read about several steps that you can take to harden a DNS server against attack by nefarious third parties.
120 Chapter 3 Advanced DHCP and DNS
After this lesson, you will be able to:
■■ Configure DNSSEC
■■ Configure DNS logging
■■ Configure a GlobalNames Zone
■■ Configure recursion
■■ Configure DNS socket pool
■■ Enable cache locking
■■ Configure netmask ordering
■■ Configure delegated administration
■■ View DNS server statistics
Estimated lesson time: 30 minutes
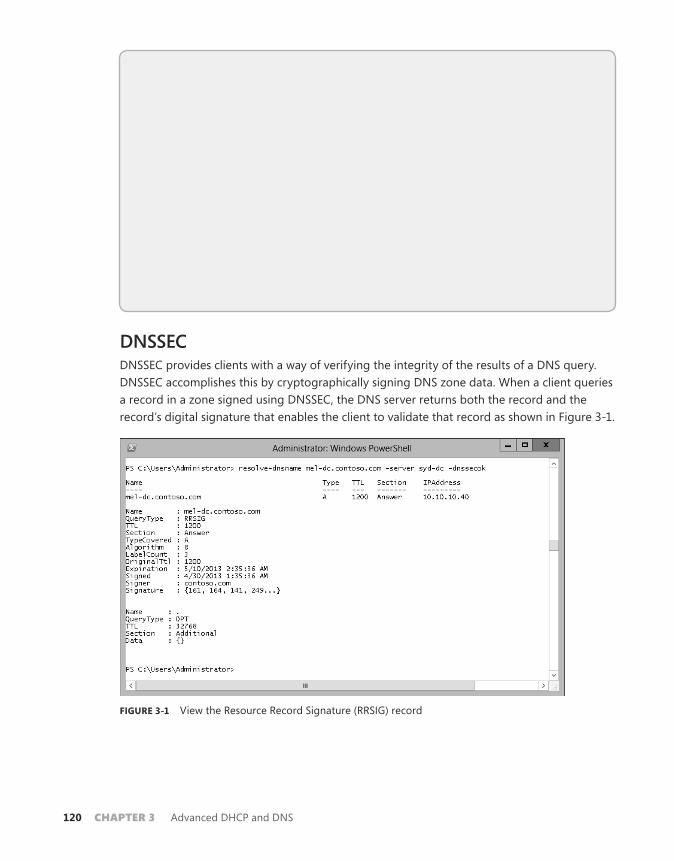
DNSSECDNSSEC provides clients with a way of verifying the integrity of the results of a DNS query. DNSSEC accomplishes this by cryptographically signing DNS zone data. When a client queries a record in a zone signed using DNSSEC, the DNS server returns both the record and the record’s digital signature that enables the client to validate that record as shown in Figure 3-1.
FIGURE 3-1 View the Resource Record Signature (RRSIG) record
Lesson 1: Implementing an advanced DNS solution CHAPTER 3 121
When you sign a zone, the following new resource records are created:
■■ Resource Record Signature (RRSIG) record This record is stored in the DNS zone, and each one is associated with an individual zone record. When a DNS query against the secure zone is performed, the DNS server returns both the record queried and the associated RRSIG record.
■■ DNSKEY This special record allows for cryptographic verification of the RRSIG records.
■■ Next Secure (NSEC/NSEC3) record This record provides proof that a queried record does not exist. For example, if a DNS client is querying the record unicorn.contoso.com and there is no unicorn.contoso.com host record hosted in the contoso.com zone, the DNS server returns an NSEC record.
When you implement DNSSEC, the following additional cryptographic keys are created:
■■ Trust anchor This is a special public cryptographic key associated with a specific zone. The DNSKEY record is validated against this key. When you use DNSSEC with an Active Directory Integrated Zone, the trust anchor is replicated to all DNS servers hosted on domain controllers in the forest.
■■ Key Signing Key (KSK) This special cryptographic key is used to sign all DNSKEY records. This key is created by a computer that hosts the DNSSEC Key Master role. The DNSSEC Key Master is a computer, usually the first DNS server on which DNSSEC is implemented, that generates and manages signing keys for a DNSSEC protected zone. A single DNS server can function as a DNSSEC Key Master for multiple zones.
■■ Zone Signing Key (ZSK) This special cryptographic key is used to sign zone data, such as individual host records. The ZSK is created using the DNSSEC Key Master.
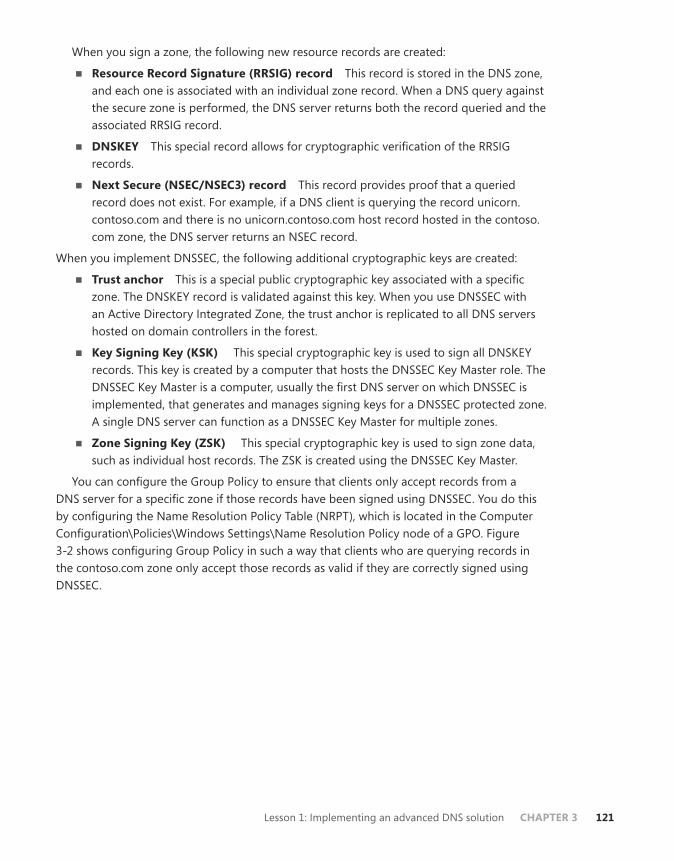
You can configure the Group Policy to ensure that clients only accept records from a DNS server for a specific zone if those records have been signed using DNSSEC. You do this by configuring the Name Resolution Policy Table (NRPT), which is located in the Computer Configuration\Policies\Windows Settings\Name Resolution Policy node of a GPO. Figure 3-2 shows configuring Group Policy in such a way that clients who are querying records in the contoso.com zone only accept those records as valid if they are correctly signed using DNSSEC.
122 Chapter 3 Advanced DHCP and DNS
FIGURE 3-2 Require DNSSEC for a specific DNS suffix
DNSSEC is appropriate for high-security environments, such as those where Internet Protocol Security (IPSec) and authenticating switches are also in use. DNSSEC protects against attacks where clients are fed false DNS information. In many small-sized to medium-sized environments, the likelihood of such an attack is minimal. In high-security environments, enabling DNSSEC is a prudent precaution.
MORE INFO DNSSEC
To learn more about DNSSEC zone, consult the following article: http://technet.microsoft.com/en-us/library/jj200221.aspx.
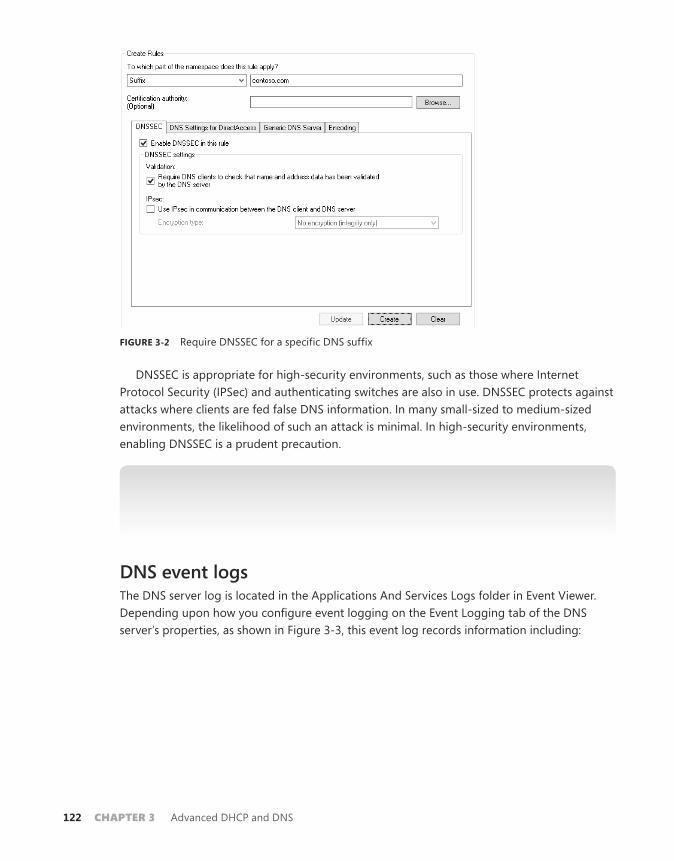
DNS event logsThe DNS server log is located in the Applications And Services Logs folder in Event Viewer. Depending upon how you configure event logging on the Event Logging tab of the DNS server’s properties, as shown in Figure 3-3, this event log records information including:
Lesson 1: Implementing an advanced DNS solution CHAPTER 3 123
FIGURE 3-3 Configure the DNS event logs
■■ Changes to the DNS service. For example when the DNS Server service is stopped or started.
■■ Zone loading and signing events.
■■ Modifications to DNS server configuration.
■■ DNS warning and error events.
By default the DNS server records all of these events. It’s also possible to configure the DNS server to only log errors, or errors and warning events. The key with any type of logging is that you should only enable logging for information that you might need to review at some time. Many administrators log everything “just in case” even though they will only ever be interested in a specific type of event.
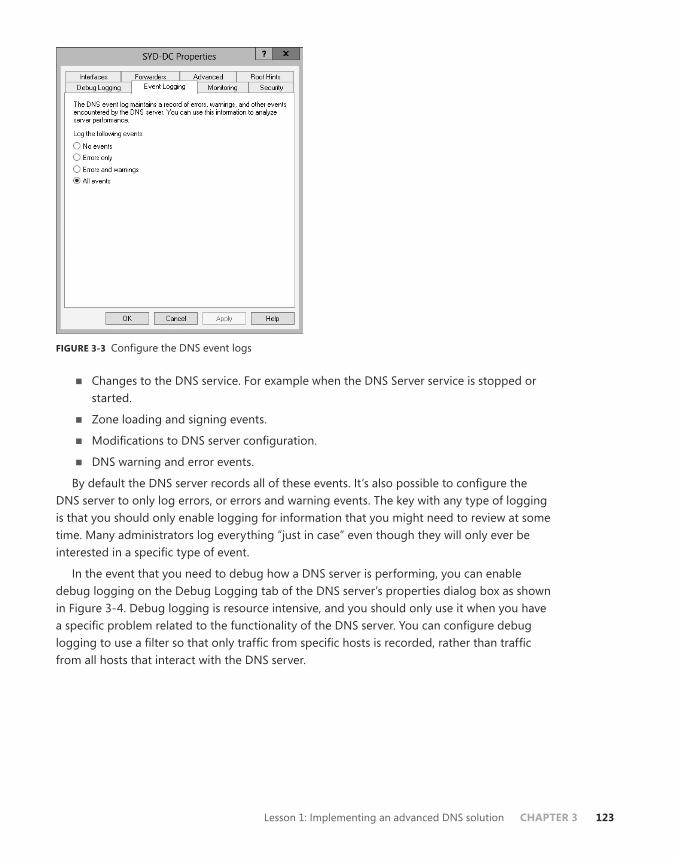
In the event that you need to debug how a DNS server is performing, you can enable debug logging on the Debug Logging tab of the DNS server’s properties dialog box as shown in Figure 3-4. Debug logging is resource intensive, and you should only use it when you have a specific problem related to the functionality of the DNS server. You can configure debug logging to use a filter so that only traffic from specific hosts is recorded, rather than traffic from all hosts that interact with the DNS server.
124 Chapter 3 Advanced DHCP and DNS
FIGURE 3-4 Configure debug logging
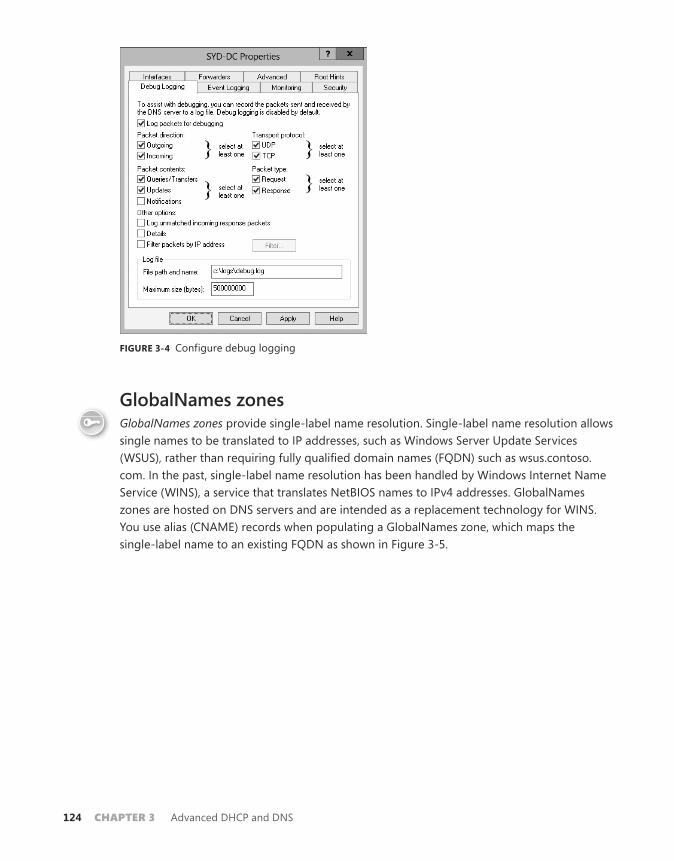
GlobalNames zonesGlobalNames zones provide single-label name resolution. Single-label name resolution allows single names to be translated to IP addresses, such as Windows Server Update Services (WSUS), rather than requiring fully qualified domain names (FQDN) such as wsus.contoso.com. In the past, single-label name resolution has been handled by Windows Internet Name Service (WINS), a service that translates NetBIOS names to IPv4 addresses. GlobalNames zones are hosted on DNS servers and are intended as a replacement technology for WINS. You use alias (CNAME) records when populating a GlobalNames zone, which maps the single-label name to an existing FQDN as shown in Figure 3-5.
Key Terms
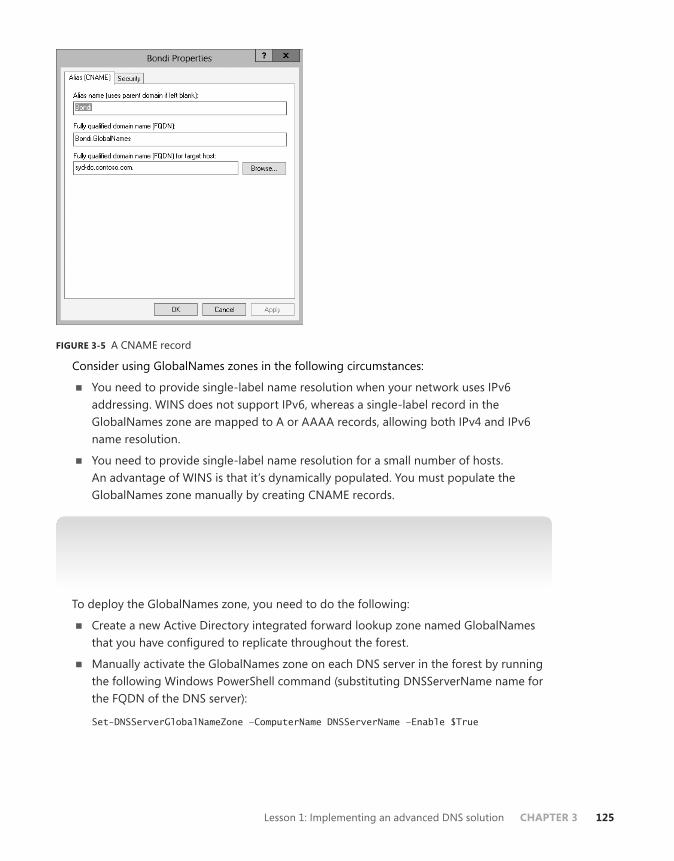
Lesson 1: Implementing an advanced DNS solution CHAPTER 3 125
FIGURE 3-5 A CNAME record
Consider using GlobalNames zones in the following circumstances:
■■ You need to provide single-label name resolution when your network uses IPv6 addressing. WINS does not support IPv6, whereas a single-label record in the GlobalNames zone are mapped to A or AAAA records, allowing both IPv4 and IPv6 name resolution.
■■ You need to provide single-label name resolution for a small number of hosts. An advantage of WINS is that it’s dynamically populated. You must populate the GlobalNames zone manually by creating CNAME records.
MORE INFO GLOBALNAMES ZONE
To learn more about the GlobalNames zone, consult the following article: http://technet.microsoft.com/en-us/library/cc731744.aspx.
To deploy the GlobalNames zone, you need to do the following:
■■ Create a new Active Directory integrated forward lookup zone named GlobalNames that you have configured to replicate throughout the forest.
■■ Manually activate the GlobalNames zone on each DNS server in the forest by running the following Windows PowerShell command (substituting DNSServerName name for the FQDN of the DNS server):
Set-DNSServerGlobalNameZone –ComputerName DNSServerName –Enable $True
126 Chapter 3 Advanced DHCP and DNS
Quick check• What type of DNS records does a GlobalNames zone host?
Quick check answer• A GlobalNames zone hosts CNAME, also known as alias, records.
Advanced DNS optionsIn high-security environments there are a number of steps that you can take to make a DNS server more secure from attackers who attempt to spoof the server so that it provides records that redirect clients to malicious sites. Although DNSSEC provides security for zones hosted on the server, most DNS server traffic involves retrieving information from remote DNS servers and then passing that information on to clients. In this section you find out about settings that you can configure to ensure that the information relayed to clients retains its integrity in the event that a nefarious third party attempts to spoof your organization’s DNS servers.
DNS socket poolDNS socket pool is a technology that makes cache-tampering and spoofing attacks more difficult by using source port randomization when issuing DNS queries to remote DNS servers. To spoof the DNS server with an incorrect record, the attacker needs to guess which randomized port was used as well as the randomized transaction ID issued with the query. A DNS server running on Windows Server 2012 or Windows Server 2012 R2 uses a socket pool of 2,500 by default. You can use the dnscmd command-line tool to vary the socket pool between 0 and 10,000. For example, to set the socket pool size to 4,000, issue the following command:
dnscmd /config /socketpoolsize 4000
You must restart the DNS service before the reconfigured socket pool size is used.
MORE INFO DNS SOCKET POOL
To learn more about the DNS socket pool, consult the following article: http://technet.microsoft.com/en-us/library/ee683907(v=ws.10).aspx.
DNS cache lockingDNS cache locking enables you to control when information stored in the DNS server’s cache can be overwritten. For example, when a recursive DNS server responds to a query for a record that is hosted on another DNS server, it caches the results of that query so that it doesn’t have to contact the remote DNS server if the same record is queried again within the TTL (Time to Live) value of the resource record. DNS cache locking prevents record data in a
Key Terms
Lesson 1: Implementing an advanced DNS solution CHAPTER 3 127
DNS server’s cache from being overwritten until a configured percentage of the TTL value has expired. By default, the DNS cache locking value is set to 100, but you can reset it using the Set-DNSServerCache cmdlet with the LockingPercent option. For example, to set the cache locking value to 80 percent, issue the following command and then restart the DNS server service:
Set-DNSServerCache –LockingPercent 80
MORE INFO DNS CACHE LOCKING
To learn more about the DNS Cache Locking zone, consult the following article: http://technet.microsoft.com/en-us/library/ee683892(v=ws.10).aspx.
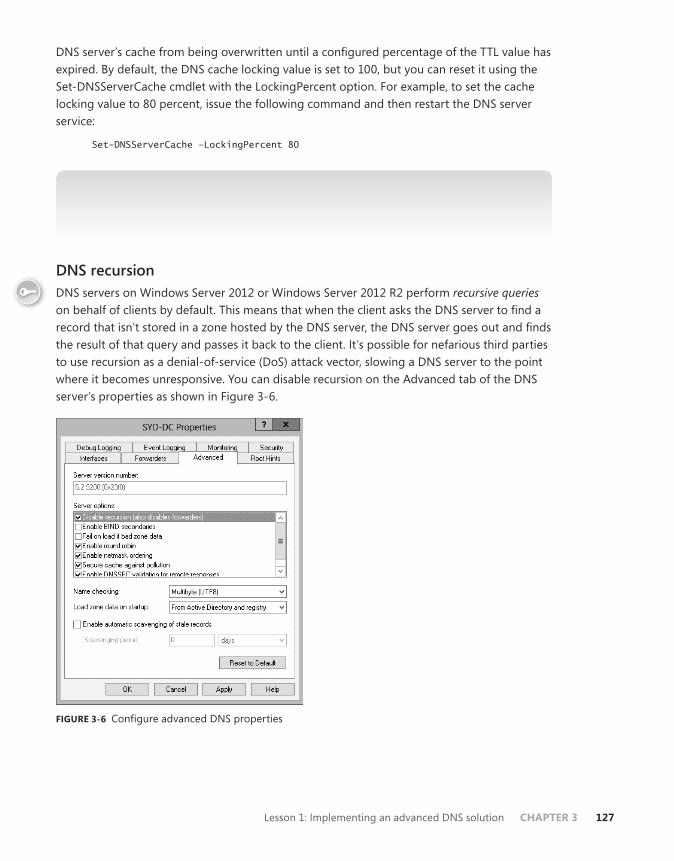
DNS recursionDNS servers on Windows Server 2012 or Windows Server 2012 R2 perform recursive queries on behalf of clients by default. This means that when the client asks the DNS server to find a record that isn’t stored in a zone hosted by the DNS server, the DNS server goes out and finds the result of that query and passes it back to the client. It’s possible for nefarious third parties to use recursion as a denial-of-service (DoS) attack vector, slowing a DNS server to the point where it becomes unresponsive. You can disable recursion on the Advanced tab of the DNS server’s properties as shown in Figure 3-6.
FIGURE 3-6 Configure advanced DNS properties
Key Terms
128 Chapter 3 Advanced DHCP and DNS
MORE INFO DNS RECURSION
To learn more about the DNS recursion, consult the following article: http://technet.microsoft.com/en-us/library/cc771738.aspx.
Netmask orderingNetmask ordering ensures that the DNS server returns the host record on the requesting client’s subnet if such a record exists. For example, imagine that the following host records existed on a network that used 24-bit subnet masks:
■■ 10.10.10.105 wsus.contoso.com
■■ 10.10.20.105 wsus.contoso.com
■■ 10.10.30.105 wsus.contoso.com
If netmask ordering is enabled and a client with the IP address 10.10.20.50 performs a lookup of wsus.contoso.com, it is always returned the record 10.10.20.105 because this record is on the same subnet as the client. If netmask ordering is not enabled, then the DNS server returns records in a round robin fashion. If the requesting client is not on the same network as any of the host records, then the DNS server also returns records in a round robin fashion. Netmask ordering is useful for services such as Windows Server Update Services (WSUS) that you might have at each branch office. When you use it, the DNS server redirects the client in the branch office to a resource on the local subnet when one exists.
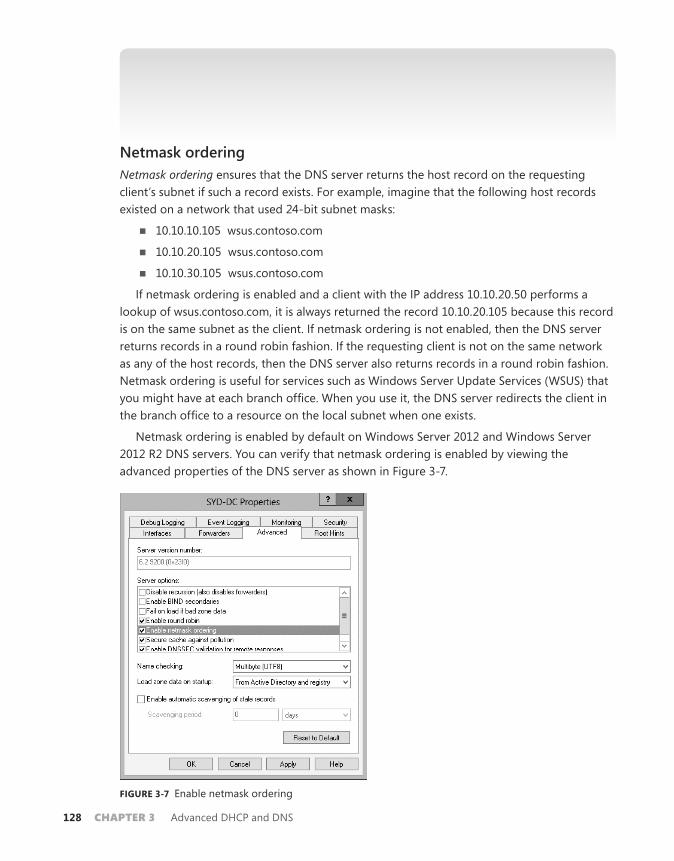
Netmask ordering is enabled by default on Windows Server 2012 and Windows Server 2012 R2 DNS servers. You can verify that netmask ordering is enabled by viewing the advanced properties of the DNS server as shown in Figure 3-7.
FIGURE 3-7 Enable netmask ordering
Lesson 1: Implementing an advanced DNS solution CHAPTER 3 129
REAL WORLD DEFAULTS ARE USUALLY GOOD
For the most part, the defaults such as netmask ordering and round robin are going to be suitable for your environment, and you probably won’t need to change them. When both are enabled, netmask ordering takes priority over round robin, meaning that a record on the same subnet will be returned where appropriate and in a round robin manner if no such record exists. The one that you’re likely to want to enable is automatic scavenging of stale records. This is especially useful if you have a DNS zone that services a large number of mobile clients. If you don’t enable scavenging, the zone becomes populated with the records of computers that might have touched your network a long time ago but never returned.
Delegated administrationIn some larger environments, you might want to separate administrative privileges so that the people who are responsible for managing your organization’s DNS servers don’t have other permissions, such as the ability to create user accounts or reset passwords. By default, members of the Domain Admins group are able to perform all DNS administration tasks on DNS servers within a domain. Members of the Enterprise Admins group are able to perform all DNS administration tasks on any DNS server in the forest.
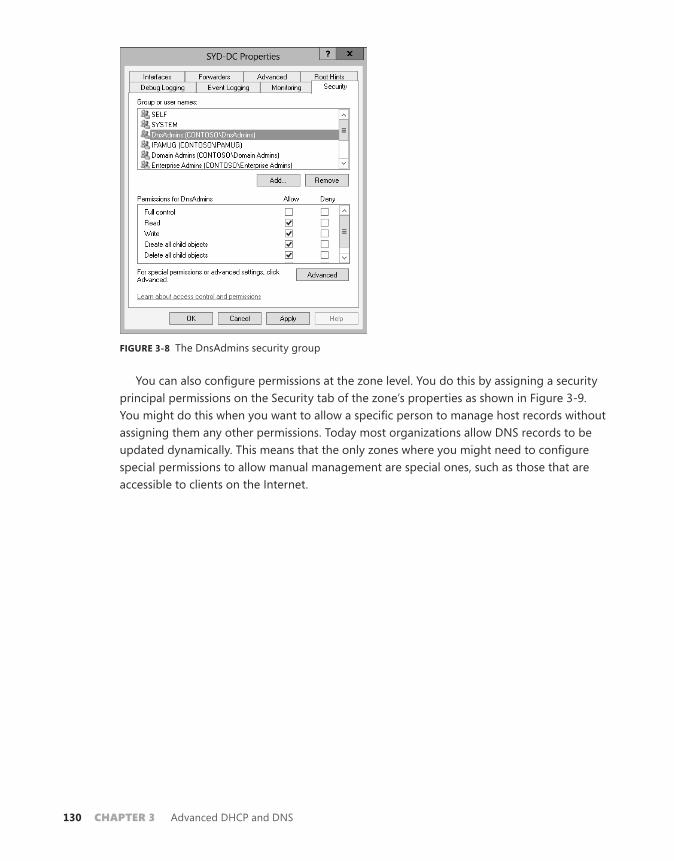
You can use the DNSAdmins domain local group to grant users the ability to view and modify DNS data as well as server configuration of DNS servers within a domain. You add users to this group when you want to allow them to perform DNS administration tasks without giving them additional permissions. You can assign permissions that allow users or security groups to manage a specific DNS server using the Security tab of the server’s properties as shown in Figure 3-8.
130 Chapter 3 Advanced DHCP and DNS
FIGURE 3-8 The DnsAdmins security group
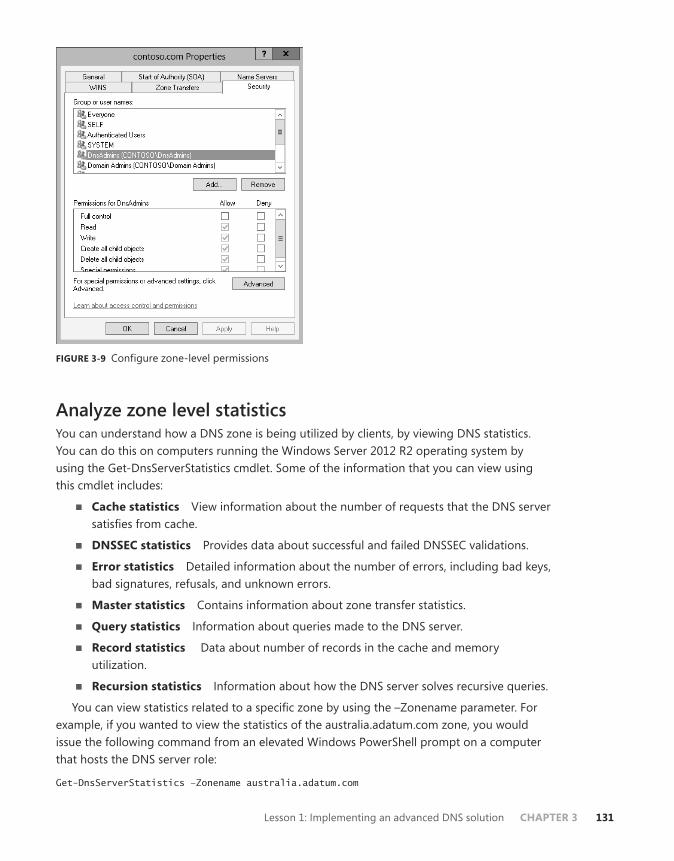
You can also configure permissions at the zone level. You do this by assigning a security principal permissions on the Security tab of the zone’s properties as shown in Figure 3-9. You might do this when you want to allow a specific person to manage host records without assigning them any other permissions. Today most organizations allow DNS records to be updated dynamically. This means that the only zones where you might need to configure special permissions to allow manual management are special ones, such as those that are accessible to clients on the Internet.
Lesson 1: Implementing an advanced DNS solution CHAPTER 3 131
FIGURE 3-9 Configure zone-level permissions
Analyze zone level statisticsYou can understand how a DNS zone is being utilized by clients, by viewing DNS statistics. You can do this on computers running the Windows Server 2012 R2 operating system by using the Get-DnsServerStatistics cmdlet. Some of the information that you can view using this cmdlet includes:
■■ Cache statistics View information about the number of requests that the DNS server satisfies from cache.
■■ DNSSEC statistics Provides data about successful and failed DNSSEC validations.
■■ Error statistics Detailed information about the number of errors, including bad keys, bad signatures, refusals, and unknown errors.
■■ Master statistics Contains information about zone transfer statistics.
■■ Query statistics Information about queries made to the DNS server.
■■ Record statistics Data about number of records in the cache and memory utilization.
■■ Recursion statistics Information about how the DNS server solves recursive queries.
You can view statistics related to a specific zone by using the –Zonename parameter. For example, if you wanted to view the statistics of the australia.adatum.com zone, you would issue the following command from an elevated Windows PowerShell prompt on a computer that hosts the DNS server role:
Get-DnsServerStatistics –Zonename australia.adatum.com
132 Chapter 3 Advanced DHCP and DNS
MORE INFO DNS STATISTICS
To learn more about DNS statistics, consult the following article: http://technet.microsoft.com/en-us/en-us/library/dn305898.aspx.
Lesson summary■■ DNSSEC uses digital signatures to allow clients to verify the integrity of DNS records
returned from a DNS server.
■■ The NRPT enables you to configure whether a client requires a specific zone to be signed using DNSSEC.
■■ A DNS event log records DNS events such as service startup and shutdown as well as errors.
■■ Debug logging enables you to record DNS traffic and events more thoroughly, though this has an effect on performance.
■■ GlobalNames zone provides single-label DNS resolution and can serve as a replacement for WINS.
■■ The DNS socket pool allows for port randomization with DNS requests as a way of protecting against spoofing attacks.
■■ DNS cache locking blocks a record stored in the DNS server’s cache from being overwritten until a specified percentage of the record’s TTL has expired.
■■ You can enable DNS recursion as a way of hardening a DNS server against attacks that use recursion as a way of denying service.
■■ Netmask ordering allows the DNS server to return a DNS record that is on the same IP subnet as the client, if such a record exists.
■■ You can analyze zone level statistics using the Get-DnsServerStatistics cmdlet.
Lesson reviewAnswer the following questions to test your knowledge of the information in this lesson. You can find the answers to these questions and explanations of each answer choice in the “Answers” section at the end of this chapter.
1. The contoso.com zone hosts DNS records that map FQDNs of hosts in the zone to their IPv6 addresses. You have configured a GlobalNames zone and want to allow single-label name resolution of the name WSUS to the appropriate IPv6 address. Which type of record should you create in the GlobalNames zone to accomplish this goal?
a. Host (AAAA)
B. Alias (CNAME)
C. Mail Exchanger (MX)
D. Pointer (PTR)
Lesson 1: Implementing an advanced DNS solution CHAPTER 3 133
2. You have deployed WSUS servers to each of your organization’s branch offices. Each branch office is located on its own subnet. You have created DNS records that use the same name, wsus.contoso.com, for each of the WSUS servers in these different branch offices. You want to ensure that when a client makes a name request for the record wsus.contoso.com, the DNS server returns the record that corresponds to an IP address on the client’s local subnet. Which of the following DNS options do you configure to accomplish this goal?
a. Socket pool
B. Cache locking
C. Recursion
D. Netmask ordering
3. The DNS server that hosts your organization’s external address space is under attack from nefarious third parties who are slowing it down by constantly launching DNS queries against the server for hosts in zones not hosted on the server. The DNS server should only return data for zones that it hosts directly. Which of the following settings should you configure to stop it responding to queries for hostnames located in zones that it does not host?
a. Recursion
B. Netmask ordering
C. Cache locking
D. Socket pool
4. You want to ensure that a record stored in the DNS server’s cache cannot be overwritten until 90 percent of its TTL period has expired. Which of the following DNS server settings would you configure to accomplish this goal?
a. Netmask ordering
B. Recursion
C. Socket pool
D. Cache locking
5. You want to increase the number of ports available that can be used when the DNS server makes a query. Which of the following DNS server settings should you configure to accomplish this goal?
a. Socket pool
B. Netmask ordering
C. Recursion
D. Cache locking
134 Chapter 3 Advanced DHCP and DNS
Lesson 2: Implementing an advanced DHCP solution
Like DNS, DHCP is another network service that most administrators barely pay attention to after they’ve configured it. The main concern that most administrators have with DHCP is that up until the release of Windows Server 2012, it’s been difficult to configure as a highly available service. Although DNS became highly available through being able to be hosted on any domain controller, the problem with making DHCP highly available was ensuring that when multiple DHCP servers were in play, duplicate addresses weren’t assigned to separate clients. In this lesson you find out about superscopes and multicast scopes. You also see how you can make DHCP more fault tolerant by implementing split scopes or by deploying DHCP failover.
After this lesson, you will be able to:■■ Create and manage DHCP superscopes
■■ Implement and maintain multicast scopes
■■ Create DHCP split scopes
■■ Configure DHCP Name Protection
■■ Implement DHCP failover
■■ Configure DNS registration
Estimated lesson time: 30 minutes
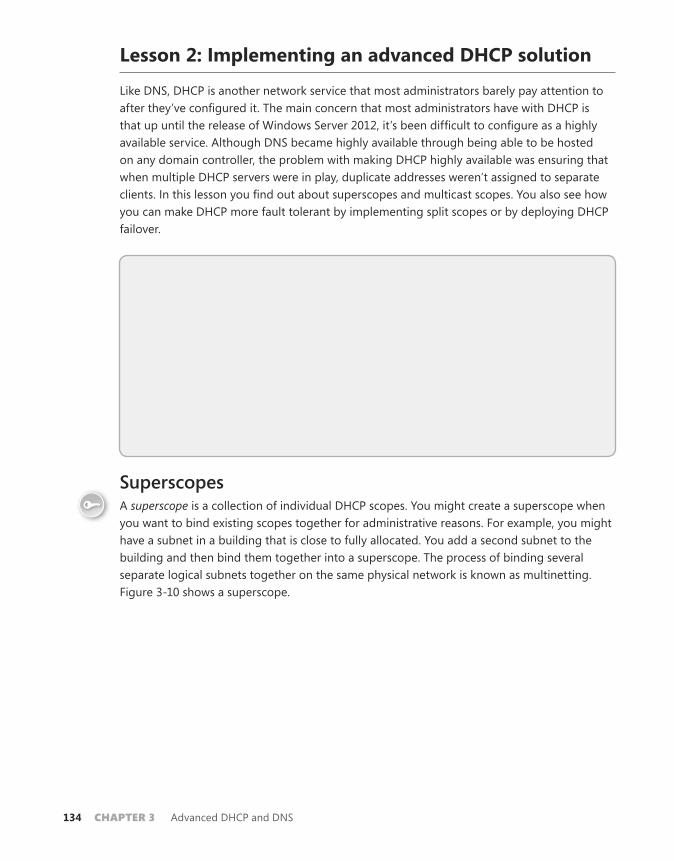
SuperscopesA superscope is a collection of individual DHCP scopes. You might create a superscope when you want to bind existing scopes together for administrative reasons. For example, you might have a subnet in a building that is close to fully allocated. You add a second subnet to the building and then bind them together into a superscope. The process of binding several separate logical subnets together on the same physical network is known as multinetting. Figure 3-10 shows a superscope.
Key Terms
Lesson 2: Implementing an advanced DHCP solution CHAPTER 3 135
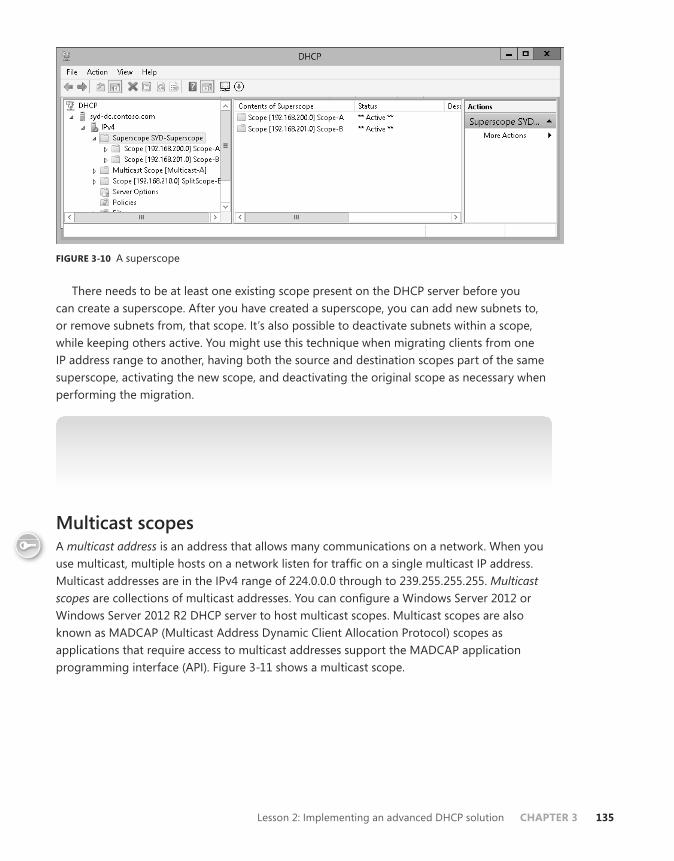
FIGURE 3-10 A superscope
There needs to be at least one existing scope present on the DHCP server before you can create a superscope. After you have created a superscope, you can add new subnets to, or remove subnets from, that scope. It’s also possible to deactivate subnets within a scope, while keeping others active. You might use this technique when migrating clients from one IP address range to another, having both the source and destination scopes part of the same superscope, activating the new scope, and deactivating the original scope as necessary when performing the migration.
MORE INFO SUPERSCOPES
To learn more about superscopes consult the following article: http://technet.microsoft.com/en-us/library/dd759168.aspx.
Multicast scopesA multicast address is an address that allows many communications on a network. When you use multicast, multiple hosts on a network listen for traffic on a single multicast IP address. Multicast addresses are in the IPv4 range of 224.0.0.0 through to 239.255.255.255. Multicast scopes are collections of multicast addresses. You can configure a Windows Server 2012 or Windows Server 2012 R2 DHCP server to host multicast scopes. Multicast scopes are also known as MADCAP (Multicast Address Dynamic Client Allocation Protocol) scopes as applications that require access to multicast addresses support the MADCAP application programming interface (API). Figure 3-11 shows a multicast scope.
Key Terms
136 Chapter 3 Advanced DHCP and DNS
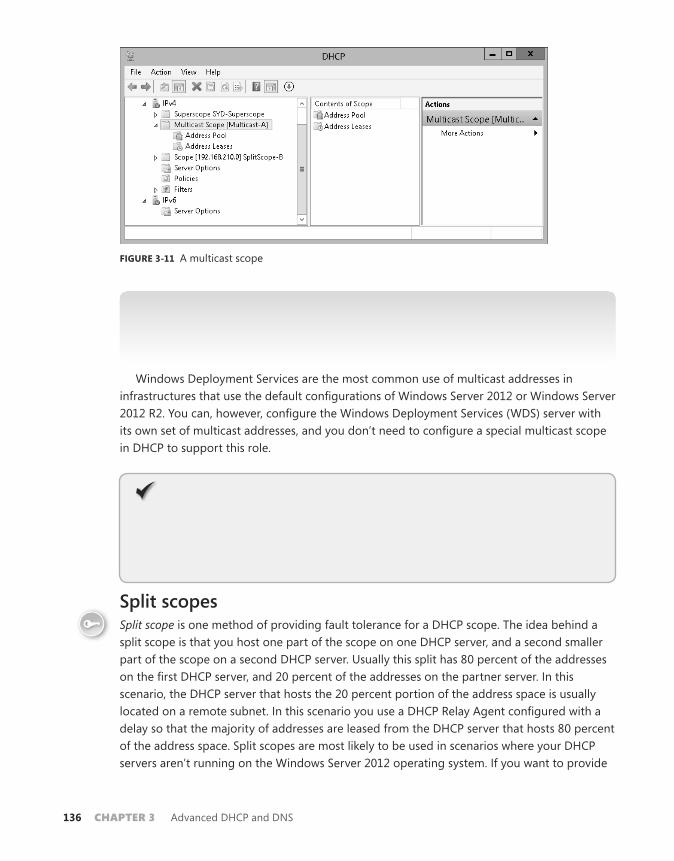
FIGURE 3-11 A multicast scope
MORE INFO MULTICAST SCOPES
To learn more about multicast scopes consult the following article: http://technet.microsoft.com/en-us/library/dd759152.aspx.
Windows Deployment Services are the most common use of multicast addresses in infrastructures that use the default configurations of Windows Server 2012 or Windows Server 2012 R2. You can, however, configure the Windows Deployment Services (WDS) server with its own set of multicast addresses, and you don’t need to configure a special multicast scope in DHCP to support this role.
Quick check■■ What is the range of multicast IP addresses?
Quick check answer■■ Multicast IP addresses are in the range of 224.0.0.0 through 239.255.255.255
Split scopesSplit scope is one method of providing fault tolerance for a DHCP scope. The idea behind a split scope is that you host one part of the scope on one DHCP server, and a second smaller part of the scope on a second DHCP server. Usually this split has 80 percent of the addresses on the first DHCP server, and 20 percent of the addresses on the partner server. In this scenario, the DHCP server that hosts the 20 percent portion of the address space is usually located on a remote subnet. In this scenario you use a DHCP Relay Agent configured with a delay so that the majority of addresses are leased from the DHCP server that hosts 80 percent of the address space. Split scopes are most likely to be used in scenarios where your DHCP servers aren’t running on the Windows Server 2012 operating system. If you want to provide
Key Terms
Lesson 2: Implementing an advanced DHCP solution CHAPTER 3 137
fault tolerance for scopes hosted on servers running Windows Server 2012 or Windows Server 2012 R2, you should instead implement DHCP failover.
MORE INFO SPLIT SCOPES
To learn more about split scopes, consult the following information. This information deals with Windows Server 2003 configurations, but is still relevant to Windows Server 2012 and Windows Server 2012 R2: http://technet.microsoft.com/en-us/library/cc757346(v=ws.10).aspx.
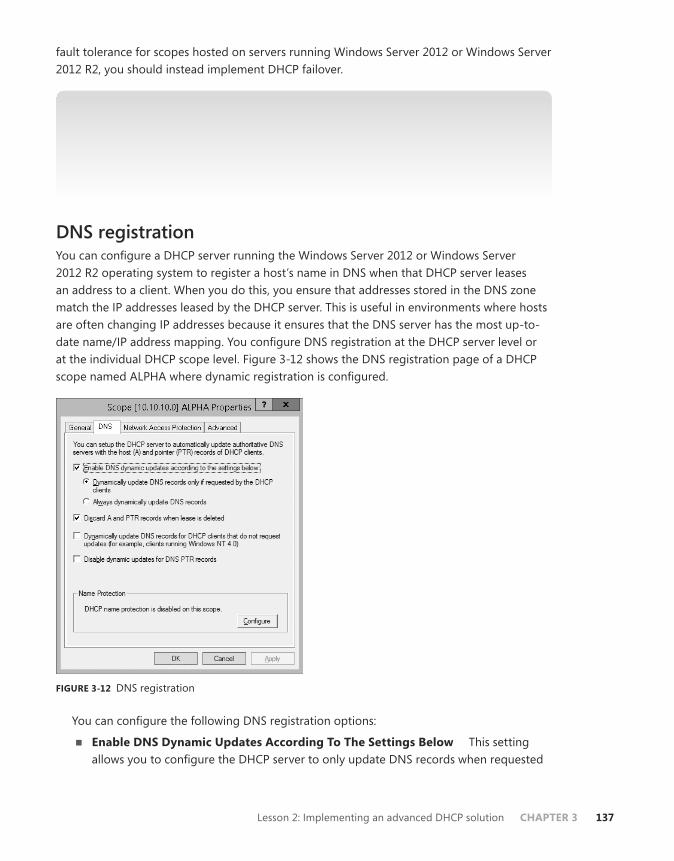
DNS registrationYou can configure a DHCP server running the Windows Server 2012 or Windows Server 2012 R2 operating system to register a host’s name in DNS when that DHCP server leases an address to a client. When you do this, you ensure that addresses stored in the DNS zone match the IP addresses leased by the DHCP server. This is useful in environments where hosts are often changing IP addresses because it ensures that the DNS server has the most up-to-date name/IP address mapping. You configure DNS registration at the DHCP server level or at the individual DHCP scope level. Figure 3-12 shows the DNS registration page of a DHCP scope named ALPHA where dynamic registration is configured.
FIGURE 3-12 DNS registration
You can configure the following DNS registration options:
■■ Enable DNS Dynamic Updates According To The Settings Below This setting allows you to configure the DHCP server to only update DNS records when requested
138 Chapter 3 Advanced DHCP and DNS
by the client (the default value). You can also configure registration to always dynamically update DNS records each time the DHCP server leases an address.
■■ Discard A And PTR Records When Lease Is Deleted Enabled by default, the DHCP server will instruct the DNS server to remove any associated host and reverse lookup records when a DHCP lease expires and is deleted. Use this option in scopes that support transient clients, such as those that only infrequently connect to a specific network.
■■ Dynamically Update DNS Records For DHCP Clients That Do Not Request Updates Enabling this setting will ensure that DNS records are always updated when the DHCP server leases an address. Selecting this option configures the DHCP server to perform registration in a manner similar to when the Always Dynamically Update DNS records option is enabled.
■■ Disable Dynamic Updates For DNS PTR Records This option configures the DHCP server to update host (A) records, but does not update records in a reverse lookup zone. This option is useful for organizations that haven’t configured reverse lookup zones where attempts to register PTR records cause errors in the event log.
Name ProtectionDHCP Name Protection is a feature that enables you to ensure that the hostnames that a DHCP server registers with a DNS server are not overwritten in the event that a non-Windows operating system has the same name. DHCP Name Protection also protects names from being overwritten by hosts that use static addresses that conflict with DHCP-assigned addresses.
For example, in the contoso.com domain there is a computer running the Windows 8.1 operating system that has the name Auckland. It receives its IP address information from a Windows Server 2012 DHCP server. The DHCP server registers this name in DNS, and a record associating the name Auckland.contoso.com with the IP address assigned to the computer running Windows 8.1 is now present in the contoso.com DNS zone. A newly installed computer running on a distribution of Linux is also assigned the name Auckland. Because Name Protection has been enabled, this new computer is unable to overwrite the existing record with a record associating the name Auckland.contoso.com with the Linux computer’s IP address. If Name Protection had not been enabled, it’s possible that the record would have been overwritten.
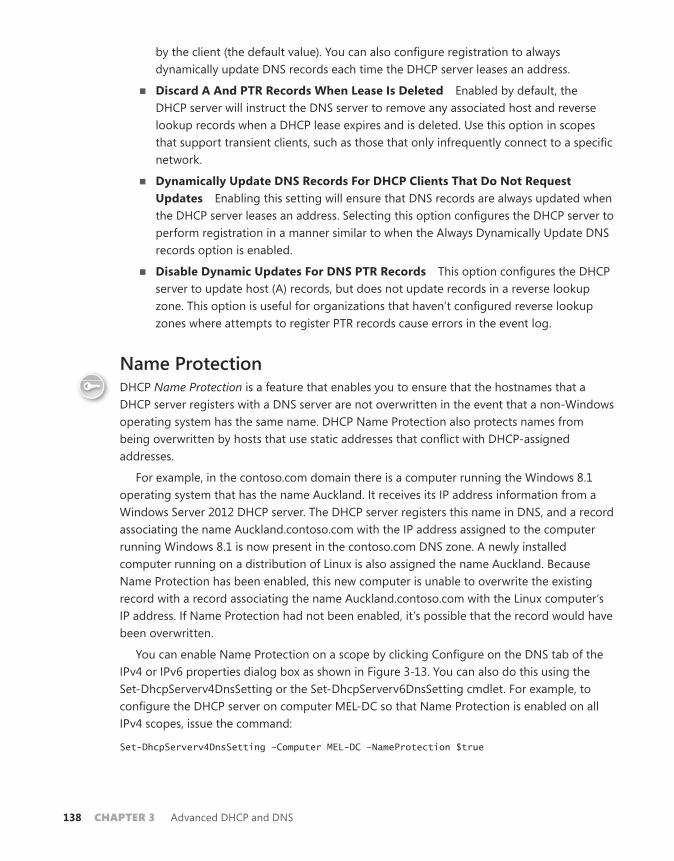
You can enable Name Protection on a scope by clicking Configure on the DNS tab of the IPv4 or IPv6 properties dialog box as shown in Figure 3-13. You can also do this using the Set-DhcpServerv4DnsSetting or the Set-DhcpServerv6DnsSetting cmdlet. For example, to configure the DHCP server on computer MEL-DC so that Name Protection is enabled on all IPv4 scopes, issue the command:
Set-DhcpServerv4DnsSetting –Computer MEL-DC –NameProtection $true
Key Terms
Lesson 2: Implementing an advanced DHCP solution CHAPTER 3 139
FIGURE 3-13 Configure Name Protection
MORE INFO NAME PROTECTION
To learn more about Name Protection, consult the following article: http://technet.microsoft.com/en-us/library/dd759188.aspx.
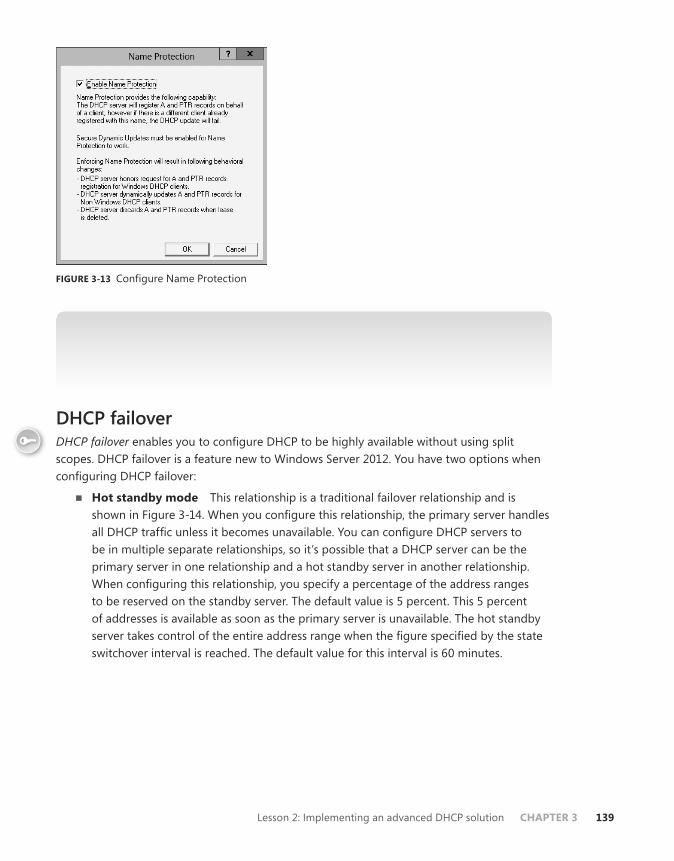
DHCP failoverDHCP failover enables you to configure DHCP to be highly available without using split scopes. DHCP failover is a feature new to Windows Server 2012. You have two options when configuring DHCP failover:
■■ Hot standby mode This relationship is a traditional failover relationship and is shown in Figure 3-14. When you configure this relationship, the primary server handles all DHCP traffic unless it becomes unavailable. You can configure DHCP servers to be in multiple separate relationships, so it’s possible that a DHCP server can be the primary server in one relationship and a hot standby server in another relationship. When configuring this relationship, you specify a percentage of the address ranges to be reserved on the standby server. The default value is 5 percent. This 5 percent of addresses is available as soon as the primary server is unavailable. The hot standby server takes control of the entire address range when the figure specified by the state switchover interval is reached. The default value for this interval is 60 minutes.
Key Terms
140 Chapter 3 Advanced DHCP and DNS
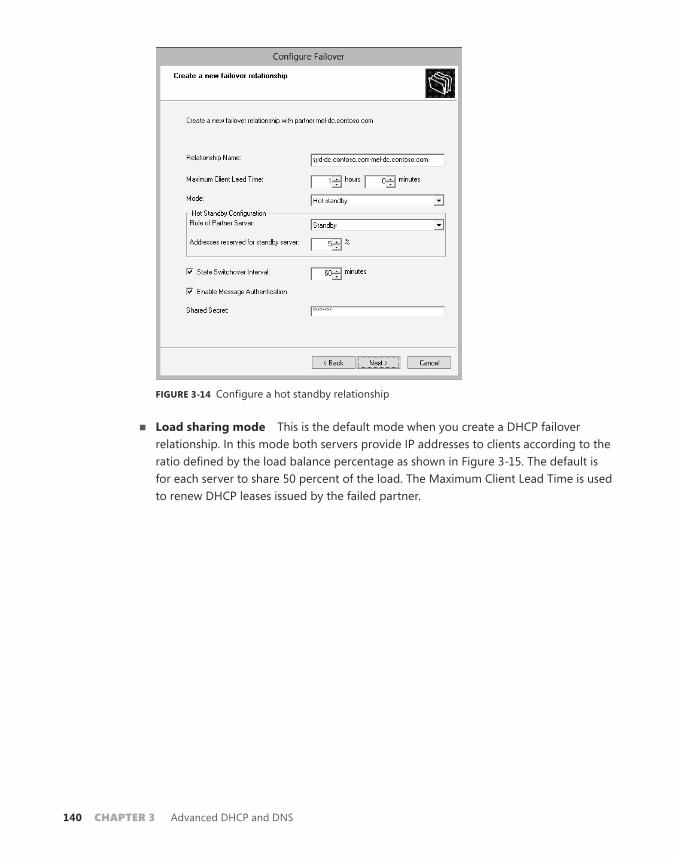
FIGURE 3-14 Configure a hot standby relationship
■■ Load sharing mode This is the default mode when you create a DHCP failover relationship. In this mode both servers provide IP addresses to clients according to the ratio defined by the load balance percentage as shown in Figure 3-15. The default is for each server to share 50 percent of the load. The Maximum Client Lead Time is used to renew DHCP leases issued by the failed partner.
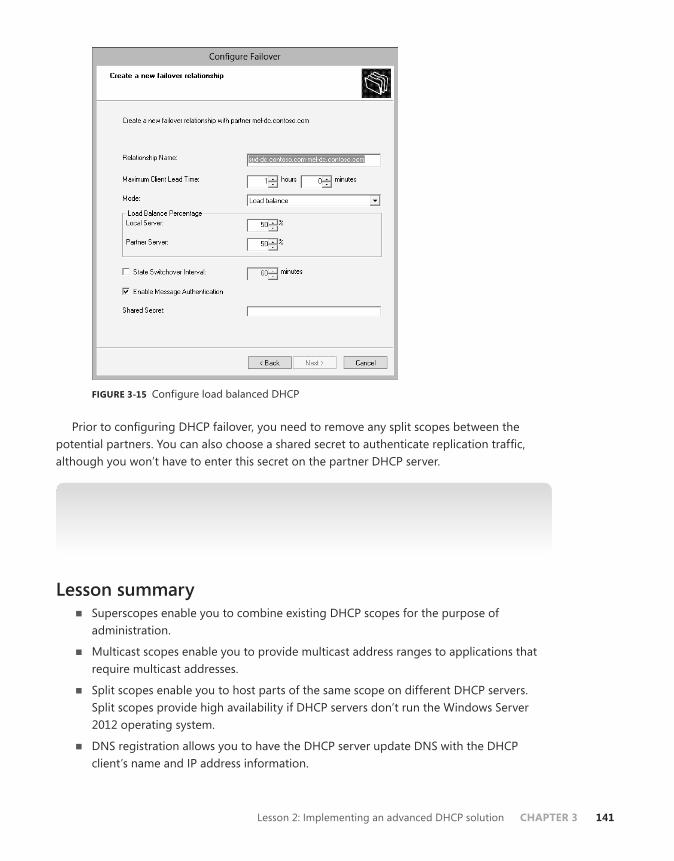
Lesson 2: Implementing an advanced DHCP solution CHAPTER 3 141
FIGURE 3-15 Configure load balanced DHCP
Prior to configuring DHCP failover, you need to remove any split scopes between the potential partners. You can also choose a shared secret to authenticate replication traffic, although you won’t have to enter this secret on the partner DHCP server.
MORE INFO DHCP FAILOVER
To learn more about DHCP failover consult the following article: http://technet.microsoft.com/en-us/library/hh831385.aspx.
Lesson summary■■ Superscopes enable you to combine existing DHCP scopes for the purpose of
administration.
■■ Multicast scopes enable you to provide multicast address ranges to applications that require multicast addresses.
■■ Split scopes enable you to host parts of the same scope on different DHCP servers. Split scopes provide high availability if DHCP servers don’t run the Windows Server 2012 operating system.
■■ DNS registration allows you to have the DHCP server update DNS with the DHCP client’s name and IP address information.
142 Chapter 3 Advanced DHCP and DNS
■■ Name Protection enables you to configure DHCP so that names registered on behalf of Windows clients in DNS can’t be overwritten by hosts using operating systems unrelated to Microsoft.
■■ DHCP failover is a technology new to Windows Server 2012. It enables DHCP servers to be configured in a partner relationship. In hot standby mode, one DHCP server serves as a hot standby for another server, only taking over if the first server becomes unavailable. In load sharing mode, the DHCP servers share IP address allocation duties for the same scope.
Lesson reviewAnswer the following questions to test your knowledge of the information in this lesson. You can find the answers to these questions and explanations of each answer choice in the “Answers” section at the end of this chapter.
1. Your organization has two DHCP servers at its central site. The first one is hosted on a computer running the Windows Server 2012 operating system. The second DHCP server is hosted on a computer running the Windows Server 2008 R2 operating system. You want to make a DHCP scope highly available so that clients can still obtain address leases if one of these DHCP servers fail. Which of the following strategies should you implement to accomplish this goal?
a. Configure DHCP failover. Use hot standby mode.
B. Configure DHCP failover. Use load sharing mode.
C. Configure a split scope.
D. Configure a superscope.
2. Your organization has two DHCP servers at its central site. Both DHCP servers are running on the Windows Server 2012 operating system. One DHCP server also hosts the company’s intranet site. You want to configure DHCP so that one DHCP server handles the majority of the organization’s DHCP traffic and the other DHCP server, installed on the server that hosts the intranet site, only leases addresses if the first one becomes unavailable. The second DHCP server should be able to lease addresses from the entire scope until such time as the first DHCP server is returned to service. Which of the following strategies should you implement to accomplish this goal?
a. Configure DHCP failover. Use load sharing mode.
B. Configure a split scope.
C. Configure DHCP failover. Use hot standby mode.
D. Configure a superscope.
3. You are about to add a large number of users and computers to one of the existing buildings at your company. Unfortunately the existing DHCP scope used at this building is close to exhaustion. You want to configure DHCP so that clients on this physical network can be leased addresses from either the original or an additional
Lesson 3: Deploying and managing IPAM CHAPTER 3 143
address range, but allow these ranges to be administered as a single combined entity. Which of the following strategies should you implement to accomplish this goal?
a. Configure a superscope.
B. Configure a split scope.
C. Configure DHCP failover. Use load sharing mode.
D. Configure DHCP failover. Use hot standby mode.
4. Your organization’s head office has two DHCP servers that are hosted on computers running the Windows Server 2012 operating system. You want to configure these DHCP servers so that they share scopes and respond to client requests in a load-balanced manner. In the event that one server fails, the other server should be able to lease addresses from the entirety of any scope that it hosts after the partner server has been unavailable for a preconfigured amount of time. Which of the following strategies should you implement to accomplish this goal?
a. Configure a split scope.
B. Configure DHCP failover. Use load sharing mode.
C. Configure DHCP failover. Use hot standby mode.
D. Configure a superscope.
Lesson 3: Deploying and managing IPAM
IP Address Management (IPAM) is a technology introduced with the release of Windows Server 2012 that simplifies the process of managing multiple DHCP and DNS servers. Rather than having to keep detailed records to track scopes and DHCP servers, IPAM enables you to view and manage this information centrally. In this lesson you find out about the functionality of the IPAM feature and how you can deploy IPAM to manage your organization’s DHCP and DNS servers.
After this lesson, you will be able to:■■ Configure IPAM
■■ Configure server discovery
■■ Create and manage IP blocks and ranges
■■ Track IP addresses
■■ Delegate IPAM administration
■■ Configure IPAM database storage
Estimated lesson time: 45 minutes
144 Chapter 3 Advanced DHCP and DNS
Introduction to IPAMIPAM enables you to centralize the management of DHCP and DNS servers. Rather than managing each server separately, you can use IPAM to manage them from a single console. You can use a single IPAM server to manage up to 150 separate DHCP servers and up to 500 individual DNS servers. A single IPAM server is able to manage 6,000 separate DHCP scopes and 150 separate DNS zones. You can perform tasks such as creating address scopes, configuring address reservations, and managing DHCP and DNS options globally, rather than having to perform these tasks on a server-by-server basis.
You can also use IPAM to search stored IP address lease data, MAC address data, and corresponding user sign on and sign off information. Microsoft estimates that the Windows Internal Database (WID) used by IPAM is able to store three years of IP address utilization data for an organization that has 100,000 users before data must be purged.
MORE INFO IPAM
To get more of an overview of IPAM, consult the following article: http://technet.microsoft.com/en-us/library/jj878343.aspx.
Deploy IPAMYou can only install the IPAM feature on a computer that is a member of an Active Directory domain. IPAM is also limited so that you can only use it to manage DHCP and DNS servers that are members of the same Active Directory forest. You can’t use IPAM to manage standalone servers or servers that are members of different forests. You can have multiple IPAM servers within a single Active Directory forest. You are likely to do this if your organization is geographically dispersed.
It’s important to note IPAM cannot manage a locally installed DHCP or DNS server. For this reason you should install the IPAM feature on a server that doesn’t host the DNS or DHCP roles. IPAM is also not supported on computers that host the domain controller server role. Additionally, if you want to use the IPAM server to manage IPv6 address ranges, you need to ensure that IPv6 is enabled on the computer that will host the IPAM server.
MORE INFO DEPLOYING THE IPAM SERVER
To learn more about deploying the IPAM server, consult the following TechNet document: http://technet.microsoft.com/en-us/library/jj878327.aspx.
Configure IPAM database storageYou could only use the version of IPAM that shipped with Windows Server 2012 with the Windows Internal Database (WID). The version of IPAM available in Windows Server 2012 R2 supports using a SQL Server 2012 instance for hosting IPAM data. This allows you to host the
Key Terms
Lesson 3: Deploying and managing IPAM CHAPTER 3 145
IPAM database on a host that is separate from the IPAM server. Microsoft recommends that the SQL Server instance be devoted to hosting the IPAM database. You should not host other databases on this instance.
Configure server discoveryServer discovery is the process where the IPAM server checks with Active Directory to locate domain controllers, DNS servers, and DHCP servers. You select which domains to discover in the Configure Server Discovery dialog box, as shown in Figure 3-16.
FIGURE 3-16 Configure server discovery
After you’ve completed server discovery, you need to run a special PowerShell cmdlet that creates and provisions Group Policy objects that allow the servers to be managed by the IPAM server. When you set up the IPAM server, you choose a GPO name prefix as shown in Figure 3-17. You use this prefix when executing the Invoke-IpamGpoProvisioning Windows PowerShell cmdlet that creates the appropriate GPOs.
Key Terms
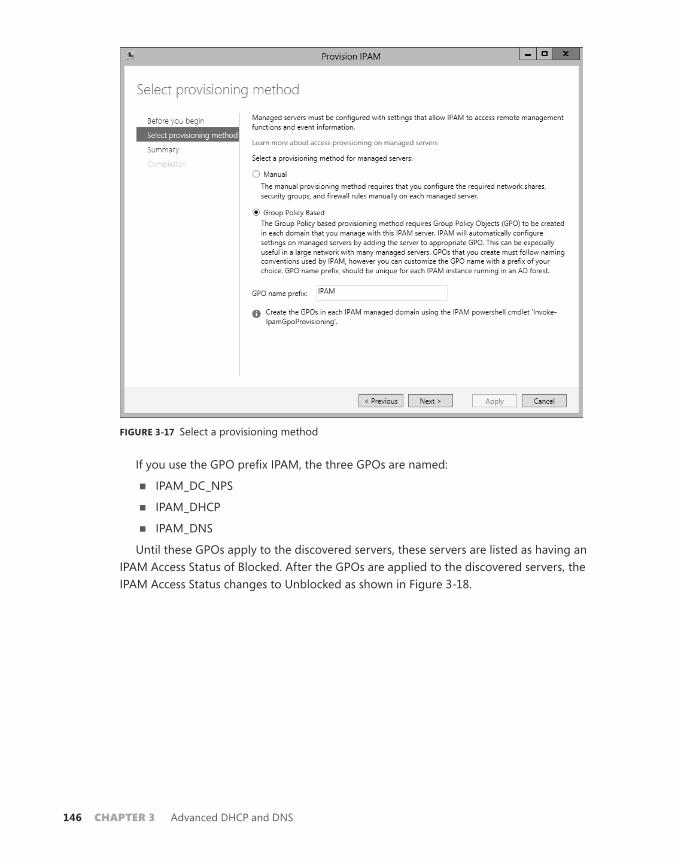
146 Chapter 3 Advanced DHCP and DNS
FIGURE 3-17 Select a provisioning method
If you use the GPO prefix IPAM, the three GPOs are named:
■■ IPAM_DC_NPS
■■ IPAM_DHCP
■■ IPAM_DNS
Until these GPOs apply to the discovered servers, these servers are listed as having an IPAM Access Status of Blocked. After the GPOs are applied to the discovered servers, the IPAM Access Status changes to Unblocked as shown in Figure 3-18.
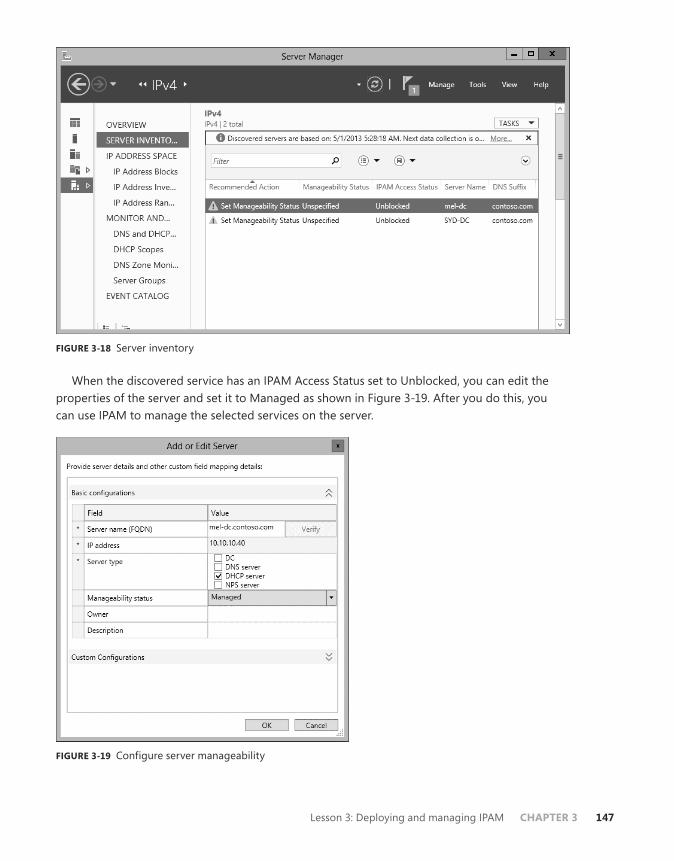
Lesson 3: Deploying and managing IPAM CHAPTER 3 147
FIGURE 3-18 Server inventory
When the discovered service has an IPAM Access Status set to Unblocked, you can edit the properties of the server and set it to Managed as shown in Figure 3-19. After you do this, you can use IPAM to manage the selected services on the server.
FIGURE 3-19 Configure server manageability
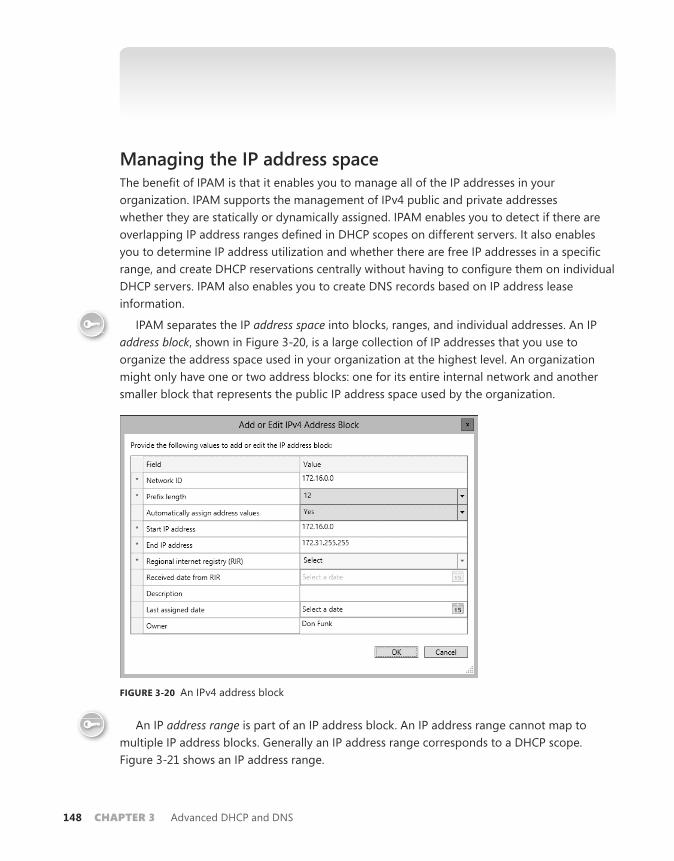
148 Chapter 3 Advanced DHCP and DNS
MORE INFO SERVER DISCOVERY
To learn more about server discovery, consult the following article: http://technet.microsoft.com/en-us/library/jj878355.aspx.
Managing the IP address spaceThe benefit of IPAM is that it enables you to manage all of the IP addresses in your organization. IPAM supports the management of IPv4 public and private addresses whether they are statically or dynamically assigned. IPAM enables you to detect if there are overlapping IP address ranges defined in DHCP scopes on different servers. It also enables you to determine IP address utilization and whether there are free IP addresses in a specific range, and create DHCP reservations centrally without having to configure them on individual DHCP servers. IPAM also enables you to create DNS records based on IP address lease information.
IPAM separates the IP address space into blocks, ranges, and individual addresses. An IP address block, shown in Figure 3-20, is a large collection of IP addresses that you use to organize the address space used in your organization at the highest level. An organization might only have one or two address blocks: one for its entire internal network and another smaller block that represents the public IP address space used by the organization.
FIGURE 3-20 An IPv4 address block
An IP address range is part of an IP address block. An IP address range cannot map to multiple IP address blocks. Generally an IP address range corresponds to a DHCP scope. Figure 3-21 shows an IP address range.
Key Terms
Key Terms
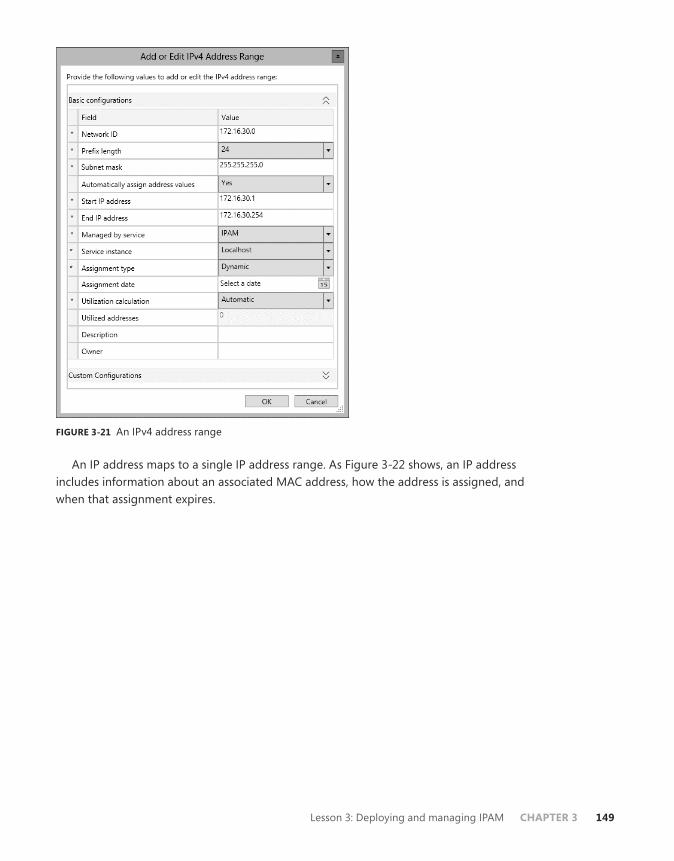
Lesson 3: Deploying and managing IPAM CHAPTER 3 149
FIGURE 3-21 An IPv4 address range
An IP address maps to a single IP address range. As Figure 3-22 shows, an IP address includes information about an associated MAC address, how the address is assigned, and when that assignment expires.
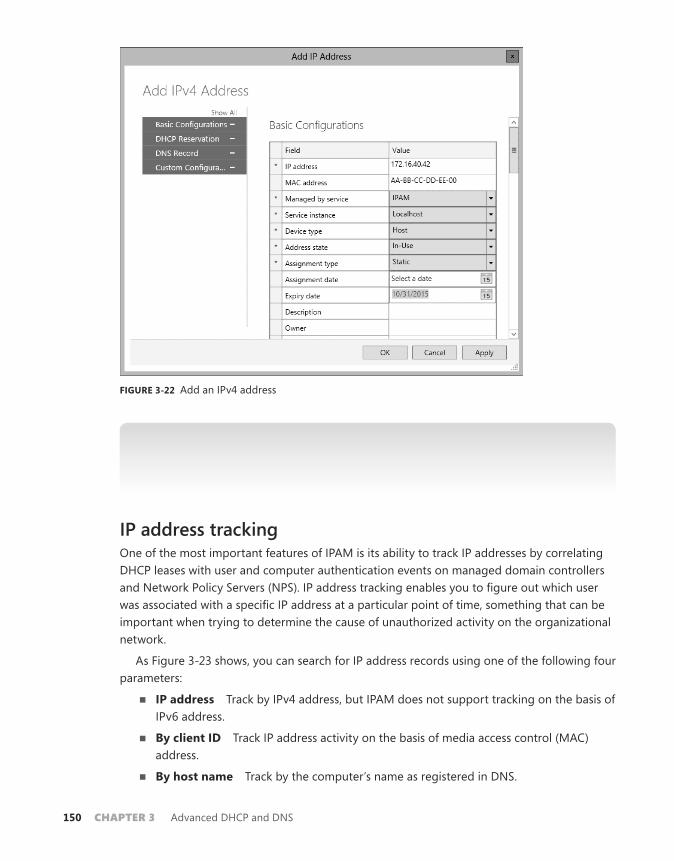
150 Chapter 3 Advanced DHCP and DNS
FIGURE 3-22 Add an IPv4 address
MORE INFO MANAGING IP ADDRESS SPACE
To learn more about managing IP address space, consult the following article: http://technet.microsoft.com/en-us/library/jj878303.aspx.
IP address trackingOne of the most important features of IPAM is its ability to track IP addresses by correlating DHCP leases with user and computer authentication events on managed domain controllers and Network Policy Servers (NPS). IP address tracking enables you to figure out which user was associated with a specific IP address at a particular point of time, something that can be important when trying to determine the cause of unauthorized activity on the organizational network.
As Figure 3-23 shows, you can search for IP address records using one of the following four parameters:
■■ IP address Track by IPv4 address, but IPAM does not support tracking on the basis of IPv6 address.
■■ By client ID Track IP address activity on the basis of media access control (MAC) address.
■■ By host name Track by the computer’s name as registered in DNS.
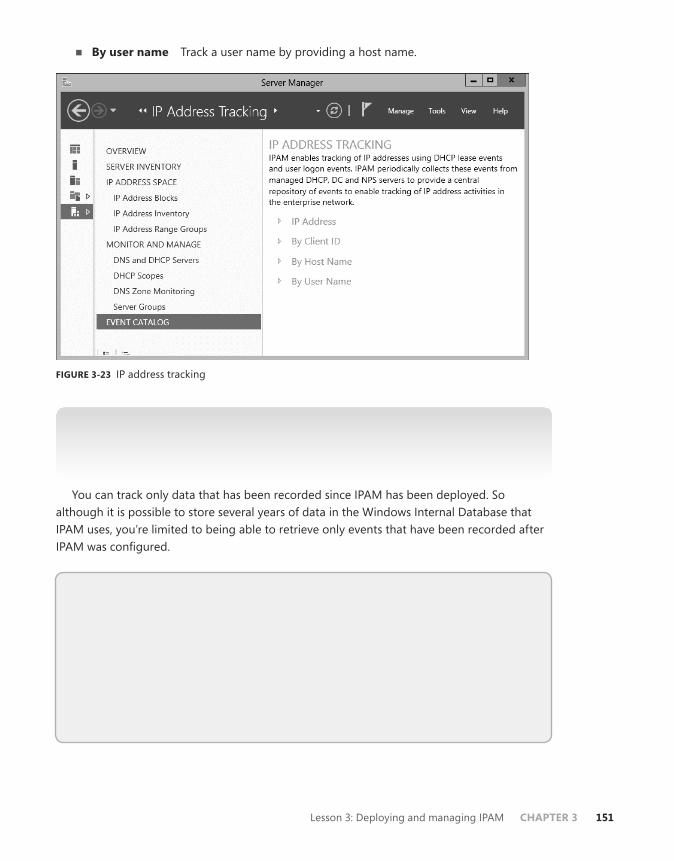
Lesson 3: Deploying and managing IPAM CHAPTER 3 151
■■ By user name Track a user name by providing a host name.
FIGURE 3-23 IP address tracking
MORE INFO IP ADDRESS TRACKING
To learn more about IP address tracking, consult the following article: http://technet.microsoft.com/en-us/library/jj878332.aspx.
You can track only data that has been recorded since IPAM has been deployed. So although it is possible to store several years of data in the Windows Internal Database that IPAM uses, you’re limited to being able to retrieve only events that have been recorded after IPAM was configured.
Quick check■■ You want to determine which IP addresses a computer with a particular MAC address
was assigned to over a specific period. What IP address tracking category would you use to determine this information?
Quick check answer■■ You would track by client ID when you have a computer’s MAC address and want to
extract additional information from IPAM address tracking.
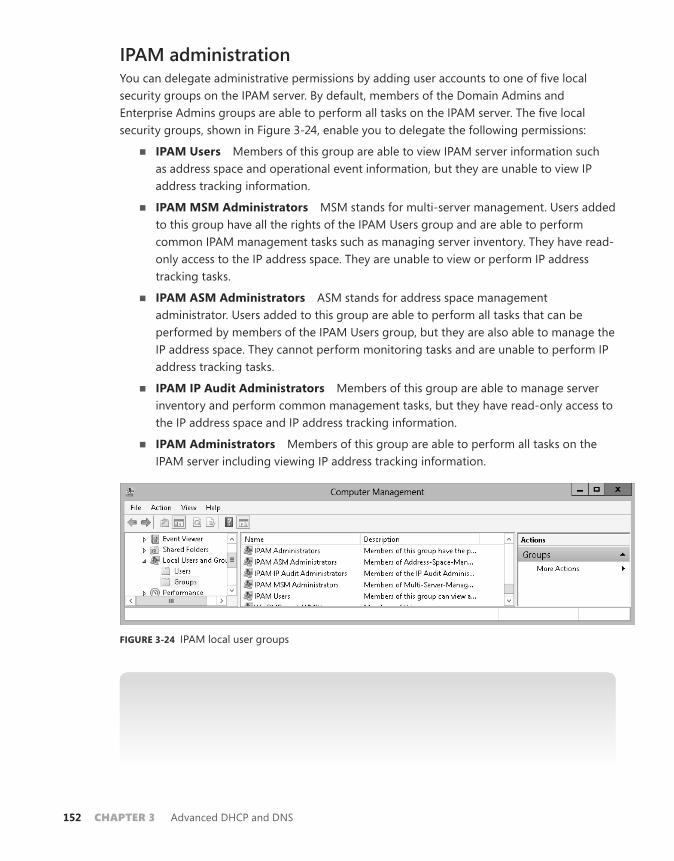
152 Chapter 3 Advanced DHCP and DNS
IPAM administrationYou can delegate administrative permissions by adding user accounts to one of five local security groups on the IPAM server. By default, members of the Domain Admins and Enterprise Admins groups are able to perform all tasks on the IPAM server. The five local security groups, shown in Figure 3-24, enable you to delegate the following permissions:
■■ IPAM Users Members of this group are able to view IPAM server information such as address space and operational event information, but they are unable to view IP address tracking information.
■■ IPAM MSM Administrators MSM stands for multi-server management. Users added to this group have all the rights of the IPAM Users group and are able to perform common IPAM management tasks such as managing server inventory. They have read-only access to the IP address space. They are unable to view or perform IP address tracking tasks.
■■ IPAM ASM Administrators ASM stands for address space management administrator. Users added to this group are able to perform all tasks that can be performed by members of the IPAM Users group, but they are also able to manage the IP address space. They cannot perform monitoring tasks and are unable to perform IP address tracking tasks.
■■ IPAM IP Audit Administrators Members of this group are able to manage server inventory and perform common management tasks, but they have read-only access to the IP address space and IP address tracking information.
■■ IPAM Administrators Members of this group are able to perform all tasks on the IPAM server including viewing IP address tracking information.
FIGURE 3-24 IPAM local user groups
MORE INFO IPAM ADMINISTRATION
To learn more about IPAM administration, consult the following article: http://technet.microsoft.com/en-us/library/jj878348.aspx.
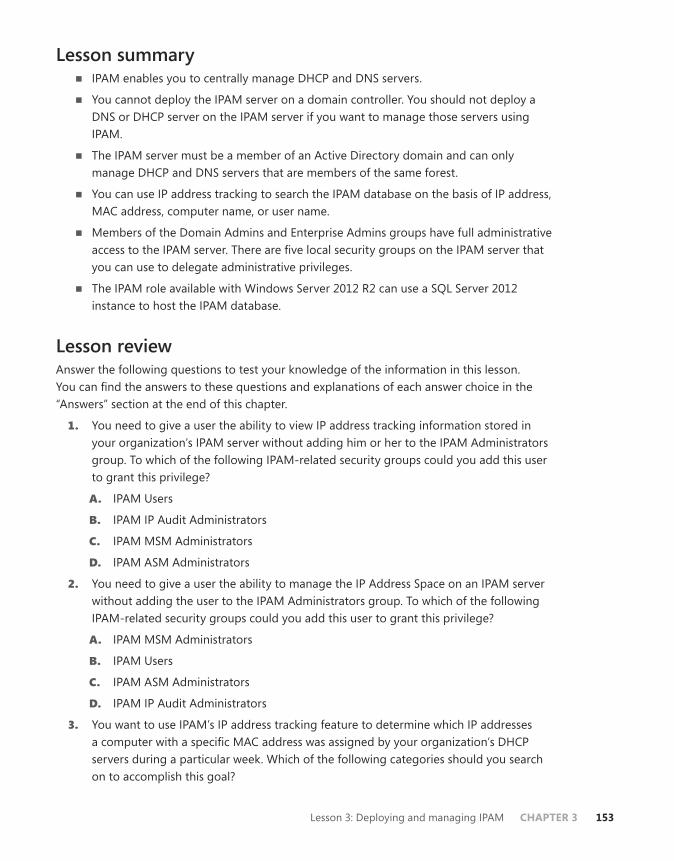
Lesson 3: Deploying and managing IPAM CHAPTER 3 153
Lesson summary■■ IPAM enables you to centrally manage DHCP and DNS servers.
■■ You cannot deploy the IPAM server on a domain controller. You should not deploy a DNS or DHCP server on the IPAM server if you want to manage those servers using IPAM.
■■ The IPAM server must be a member of an Active Directory domain and can only manage DHCP and DNS servers that are members of the same forest.
■■ You can use IP address tracking to search the IPAM database on the basis of IP address, MAC address, computer name, or user name.
■■ Members of the Domain Admins and Enterprise Admins groups have full administrative access to the IPAM server. There are five local security groups on the IPAM server that you can use to delegate administrative privileges.
■■ The IPAM role available with Windows Server 2012 R2 can use a SQL Server 2012 instance to host the IPAM database.
Lesson reviewAnswer the following questions to test your knowledge of the information in this lesson. You can find the answers to these questions and explanations of each answer choice in the “Answers” section at the end of this chapter.
1. You need to give a user the ability to view IP address tracking information stored in your organization’s IPAM server without adding him or her to the IPAM Administrators group. To which of the following IPAM-related security groups could you add this user to grant this privilege?
a. IPAM Users
B. IPAM IP Audit Administrators
C. IPAM MSM Administrators
D. IPAM ASM Administrators
2. You need to give a user the ability to manage the IP Address Space on an IPAM server without adding the user to the IPAM Administrators group. To which of the following IPAM-related security groups could you add this user to grant this privilege?
a. IPAM MSM Administrators
B. IPAM Users
C. IPAM ASM Administrators
D. IPAM IP Audit Administrators
3. You want to use IPAM’s IP address tracking feature to determine which IP addresses a computer with a specific MAC address was assigned by your organization’s DHCP servers during a particular week. Which of the following categories should you search on to accomplish this goal?
154 Chapter 3 Advanced DHCP and DNS
a. IP address
B. Client ID
C. Host name
D. User name
4. You are in the process of configuring IPAM. You have run the discovery process and discovered three servers that host the DHCP server role. The server’s IPAM Access Status is listed in the IPAM Server Inventory as Blocked. Which of the following steps should you take so that this status changes to unblocked? (Choose two.)
a. Ensure that you have provisioned the GPOs using the Invoke-IpamGPOProvisioning cmdlet.
B. Verify that Group Policy is applied correctly to the server hosting the IPAM server role.
C. Verify that Group Policy is applied correctly to the three servers hosing the DHCP server role.
D. Restart the IPAM server.
Practice exercises
The goal of this section is to provide you with hands-on practice with the following:
■■ Configuring DNSSEC
■■ Configuring NRPT
■■ Creating GlobalNames zone
■■ Configuring advanced DNS server options
■■ Configuring a DHCP superscope
■■ Deploying a split scope
■■ Configuring DHCP Name Protection
■■ Setting up a multicast scope
■■ Enabling DHCP failover
■■ Configuring and deploying IPAM
To perform the exercises in this section, you need access to an evaluation version of Windows Server 2012 R2. You should also have access to virtual machines SYD-DC, MEL-DC, CBR-DC, and ADL-DC, the setup instructions for which are described in the Introduction. You should ensure that you have a checkpoint of these virtual machines that you can revert to at the end of the practice exercises. You should revert the virtual machines to this initial state prior to beginning these exercises.
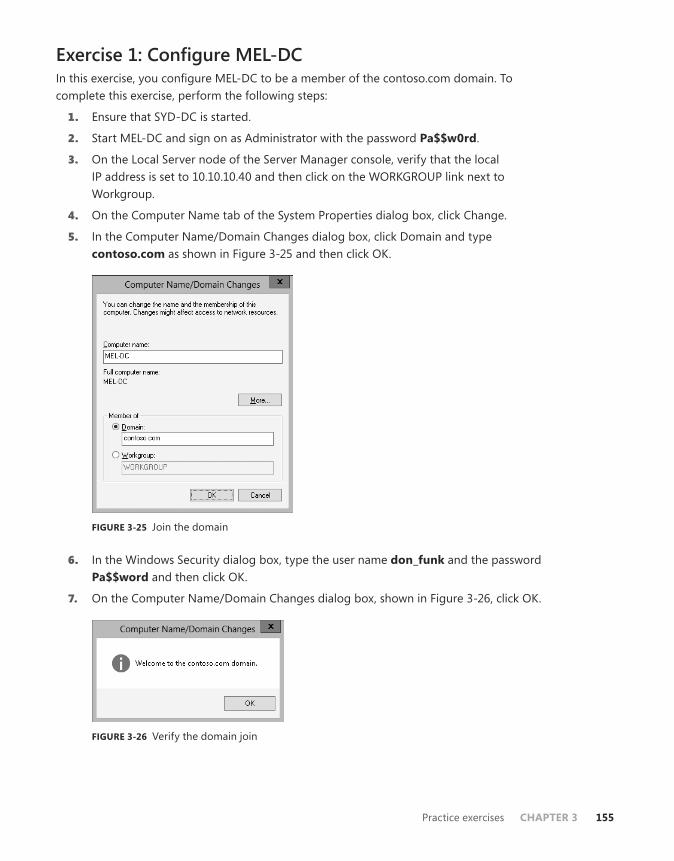
Practice exercises CHAPTER 3 155
Exercise 1: Configure MEL-DCIn this exercise, you configure MEL-DC to be a member of the contoso.com domain. To complete this exercise, perform the following steps:
1. Ensure that SYD-DC is started.
2. Start MEL-DC and sign on as Administrator with the password Pa$$w0rd.
3. On the Local Server node of the Server Manager console, verify that the local IP address is set to 10.10.10.40 and then click on the WORKGROUP link next to Workgroup.
4. On the Computer Name tab of the System Properties dialog box, click Change.
5. In the Computer Name/Domain Changes dialog box, click Domain and type contoso.com as shown in Figure 3-25 and then click OK.
FIGURE 3-25 Join the domain
6. In the Windows Security dialog box, type the user name don_funk and the password Pa$$word and then click OK.
7. On the Computer Name/Domain Changes dialog box, shown in Figure 3-26, click OK.
FIGURE 3-26 Verify the domain join
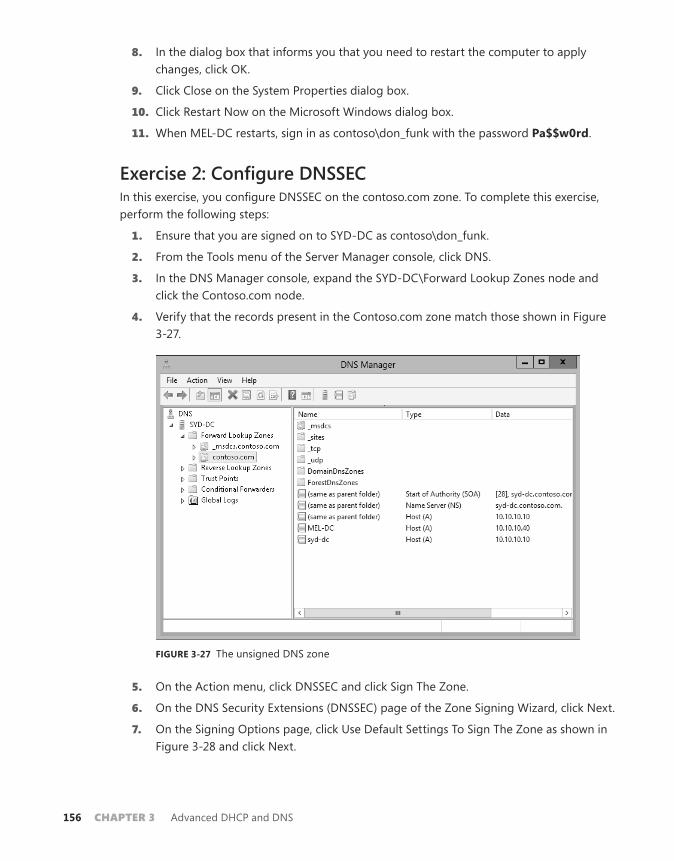
156 Chapter 3 Advanced DHCP and DNS
8. In the dialog box that informs you that you need to restart the computer to apply changes, click OK.
9. Click Close on the System Properties dialog box.
10. Click Restart Now on the Microsoft Windows dialog box.
11. When MEL-DC restarts, sign in as contoso\don_funk with the password Pa$$w0rd.
Exercise 2: Configure DNSSECIn this exercise, you configure DNSSEC on the contoso.com zone. To complete this exercise, perform the following steps:
1. Ensure that you are signed on to SYD-DC as contoso\don_funk.
2. From the Tools menu of the Server Manager console, click DNS.
3. In the DNS Manager console, expand the SYD-DC\Forward Lookup Zones node and click the Contoso.com node.
4. Verify that the records present in the Contoso.com zone match those shown in Figure 3-27.
FIGURE 3-27 The unsigned DNS zone
5. On the Action menu, click DNSSEC and click Sign The Zone.
6. On the DNS Security Extensions (DNSSEC) page of the Zone Signing Wizard, click Next.
7. On the Signing Options page, click Use Default Settings To Sign The Zone as shown in Figure 3-28 and click Next.
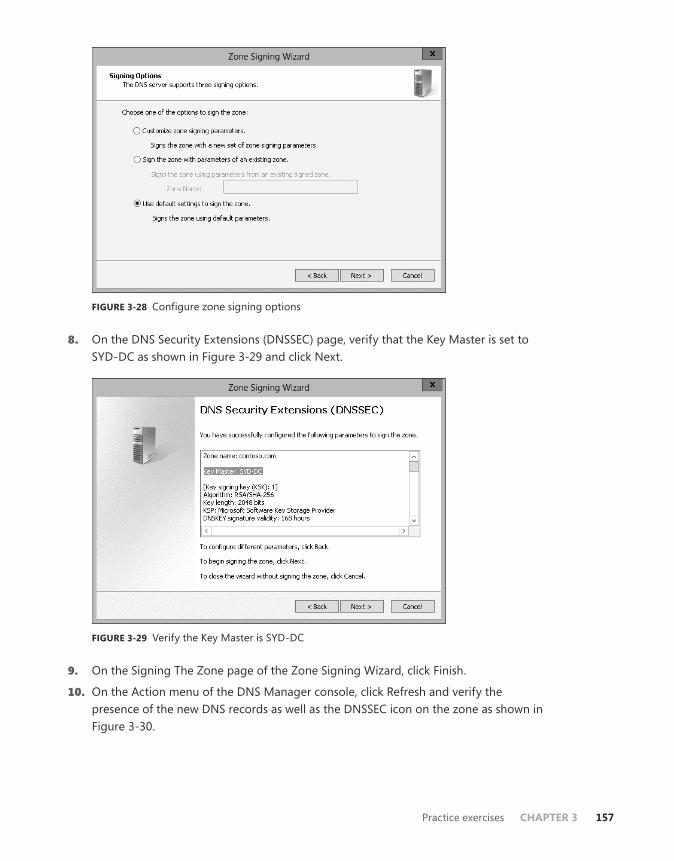
Practice exercises CHAPTER 3 157
FIGURE 3-28 Configure zone signing options
8. On the DNS Security Extensions (DNSSEC) page, verify that the Key Master is set to SYD-DC as shown in Figure 3-29 and click Next.
FIGURE 3-29 Verify the Key Master is SYD-DC
9. On the Signing The Zone page of the Zone Signing Wizard, click Finish.
10. On the Action menu of the DNS Manager console, click Refresh and verify the presence of the new DNS records as well as the DNSSEC icon on the zone as shown in Figure 3-30.
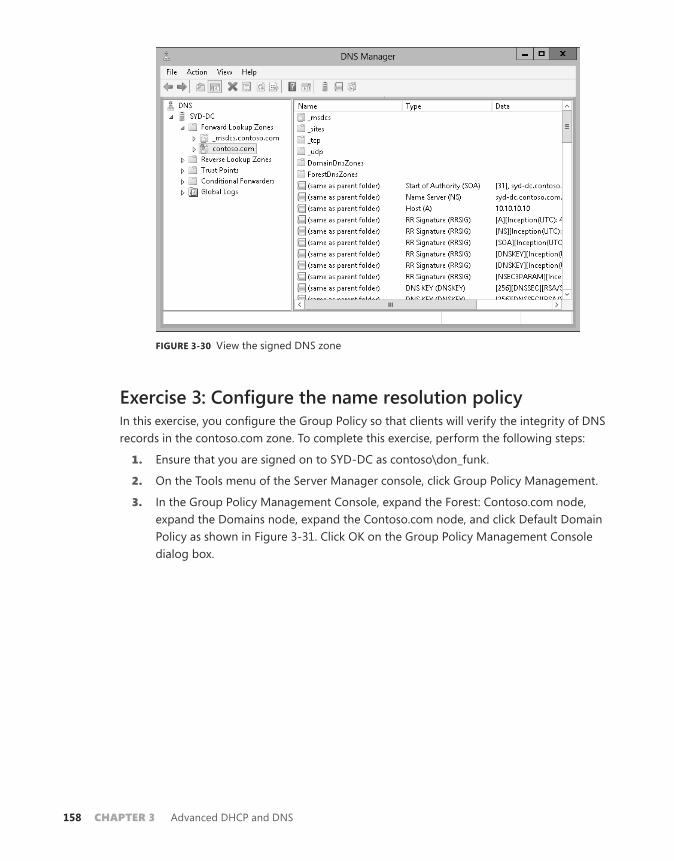
158 Chapter 3 Advanced DHCP and DNS
FIGURE 3-30 View the signed DNS zone
Exercise 3: Configure the name resolution policyIn this exercise, you configure the Group Policy so that clients will verify the integrity of DNS records in the contoso.com zone. To complete this exercise, perform the following steps:
1. Ensure that you are signed on to SYD-DC as contoso\don_funk.
2. On the Tools menu of the Server Manager console, click Group Policy Management.
3. In the Group Policy Management Console, expand the Forest: Contoso.com node, expand the Domains node, expand the Contoso.com node, and click Default Domain Policy as shown in Figure 3-31. Click OK on the Group Policy Management Console dialog box.
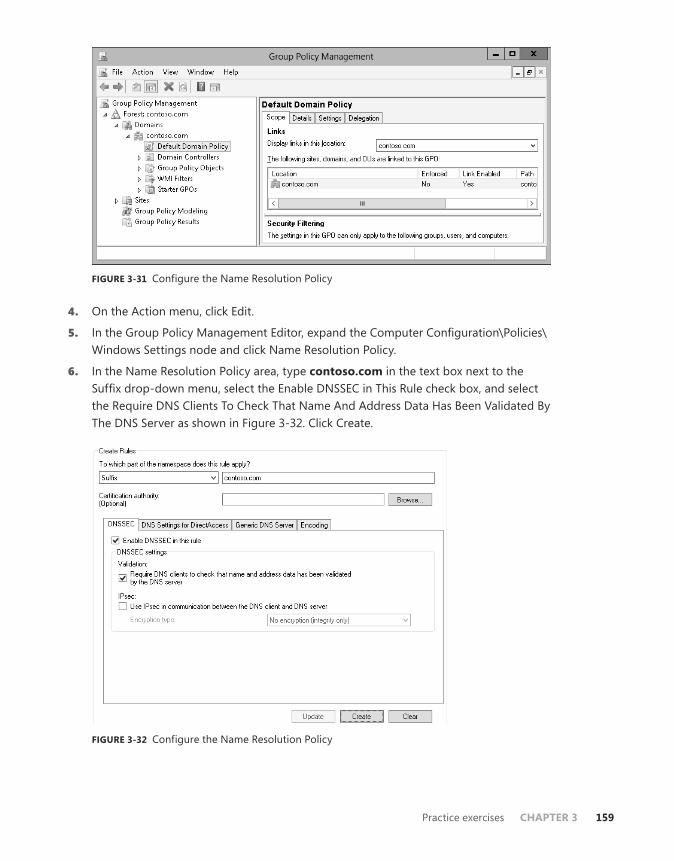
Practice exercises CHAPTER 3 159
FIGURE 3-31 Configure the Name Resolution Policy
4. On the Action menu, click Edit.
5. In the Group Policy Management Editor, expand the Computer Configuration\Policies\Windows Settings node and click Name Resolution Policy.
6. In the Name Resolution Policy area, type contoso.com in the text box next to the Suffix drop-down menu, select the Enable DNSSEC in This Rule check box, and select the Require DNS Clients To Check That Name And Address Data Has Been Validated By The DNS Server as shown in Figure 3-32. Click Create.
FIGURE 3-32 Configure the Name Resolution Policy

160 Chapter 3 Advanced DHCP and DNS
7. In the Group Policy Management Editor, scroll down to view the Name Resolution Policy Table and verify that the settings match those shown in Figure 3-33. Click Apply.
FIGURE 3-33 Verify the Name Resolution Policy
8. Close the Group Policy Management Editor and the Group Policy Management Console.
9. On the taskbar, click the Windows PowerShell icon.
10. Type the following command and press Enter to force a Group Policy update
Gpupdate /force
11. Type the following command and press Enter to verify that an RRSIG record exists for mel-dc.contoso.com as shown in Figure 3-34:
resolve-dnsname mel-dc.contoso.com –server syd-dc -dnssecok
FIGURE 3-34 Verify the DNS record
12. Close the Windows PowerShell window.
Practice exercises CHAPTER 3 161
Exercise 4: Increase the size of the DNS socket poolIn this exercise, you increase the size of the DNS socket pool. To complete this exercise, perform the following steps:
1. When signed on to SYD-DC as contoso\don_funk, right-click the Windows PowerShell icon on the taskbar and click Run As Administrator. Click Yes in the User Account Control dialog box.
2. Type the following command and press Enter to view the currently configured DNS socket pool site:
(Get-DNSServer).ServerSetting.SocketPoolSize
3. Type the following command and press Enter to change the DNS socket pool size to 4,000:
Dnscmd /config /socketpoolsize 4000
4. Type the following command and press Enter:
Restart-Service DNS
5. Type the following command and press Enter to verify the new DNS socket pool size:
(Get-DNSServer).ServerSetting.SocketPoolSize
Exercise 5: Modify DNS Cache LockingIn this exercise, you verify the current DNS Cache Locking setting, change this setting, and then verify the change. To complete this exercise, perform the following steps:
1. Ensure that you are signed on to SYD-DC as contoso\don_funk and have an elevated Windows PowerShell window open.
2. Type the following command and press Enter to verify the size of the current DNS cache locking setting as shown in Figure 3-35:
get-DNSServerCache
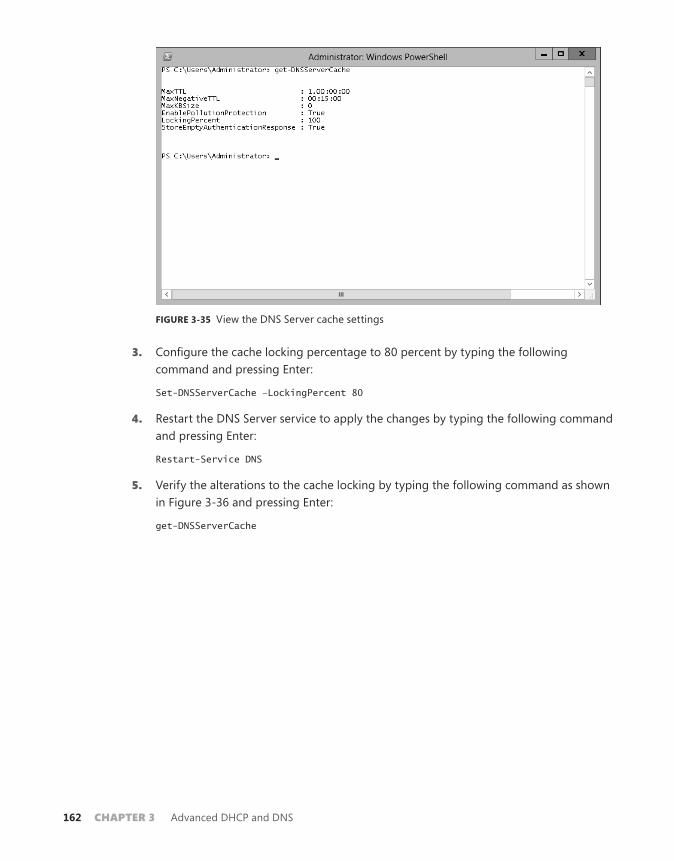
162 Chapter 3 Advanced DHCP and DNS
FIGURE 3-35 View the DNS Server cache settings
3. Configure the cache locking percentage to 80 percent by typing the following command and pressing Enter:
Set-DNSServerCache –LockingPercent 80
4. Restart the DNS Server service to apply the changes by typing the following command and pressing Enter:
Restart-Service DNS
5. Verify the alterations to the cache locking by typing the following command as shown in Figure 3-36 and pressing Enter:
get-DNSServerCache
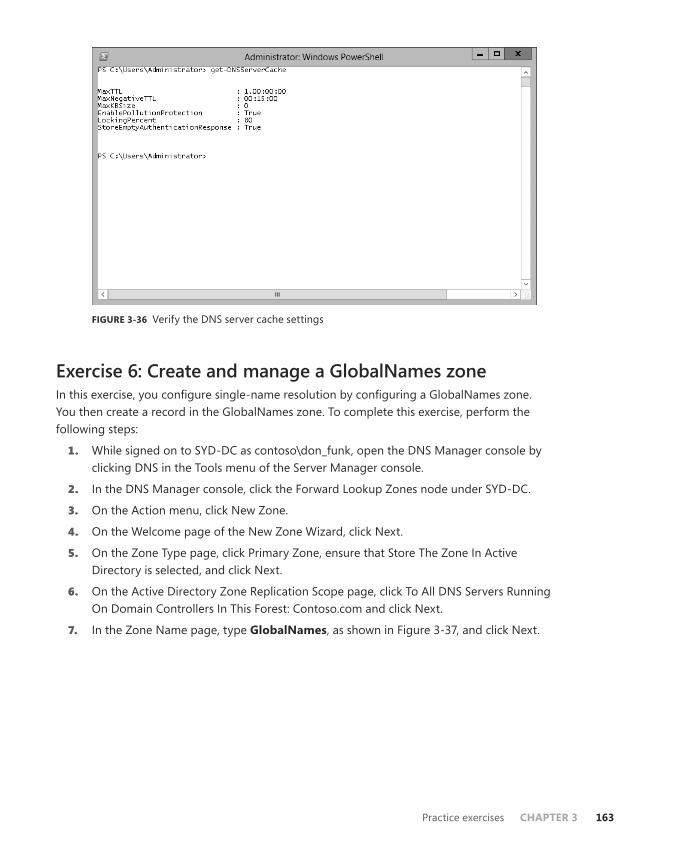
Practice exercises CHAPTER 3 163
FIGURE 3-36 Verify the DNS server cache settings
Exercise 6: Create and manage a GlobalNames zoneIn this exercise, you configure single-name resolution by configuring a GlobalNames zone. You then create a record in the GlobalNames zone. To complete this exercise, perform the following steps:
1. While signed on to SYD-DC as contoso\don_funk, open the DNS Manager console by clicking DNS in the Tools menu of the Server Manager console.
2. In the DNS Manager console, click the Forward Lookup Zones node under SYD-DC.
3. On the Action menu, click New Zone.
4. On the Welcome page of the New Zone Wizard, click Next.
5. On the Zone Type page, click Primary Zone, ensure that Store The Zone In Active Directory is selected, and click Next.
6. On the Active Directory Zone Replication Scope page, click To All DNS Servers Running On Domain Controllers In This Forest: Contoso.com and click Next.
7. In the Zone Name page, type GlobalNames, as shown in Figure 3-37, and click Next.
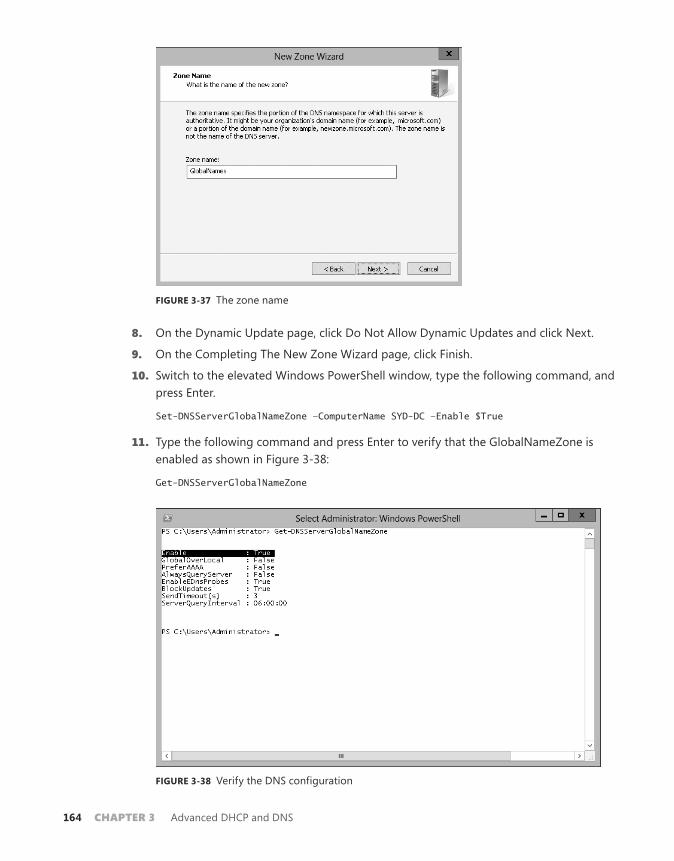
164 Chapter 3 Advanced DHCP and DNS
FIGURE 3-37 The zone name
8. On the Dynamic Update page, click Do Not Allow Dynamic Updates and click Next.
9. On the Completing The New Zone Wizard page, click Finish.
10. Switch to the elevated Windows PowerShell window, type the following command, and press Enter.
Set-DNSServerGlobalNameZone –ComputerName SYD-DC –Enable $True
11. Type the following command and press Enter to verify that the GlobalNameZone is enabled as shown in Figure 3-38:
Get-DNSServerGlobalNameZone
FIGURE 3-38 Verify the DNS configuration
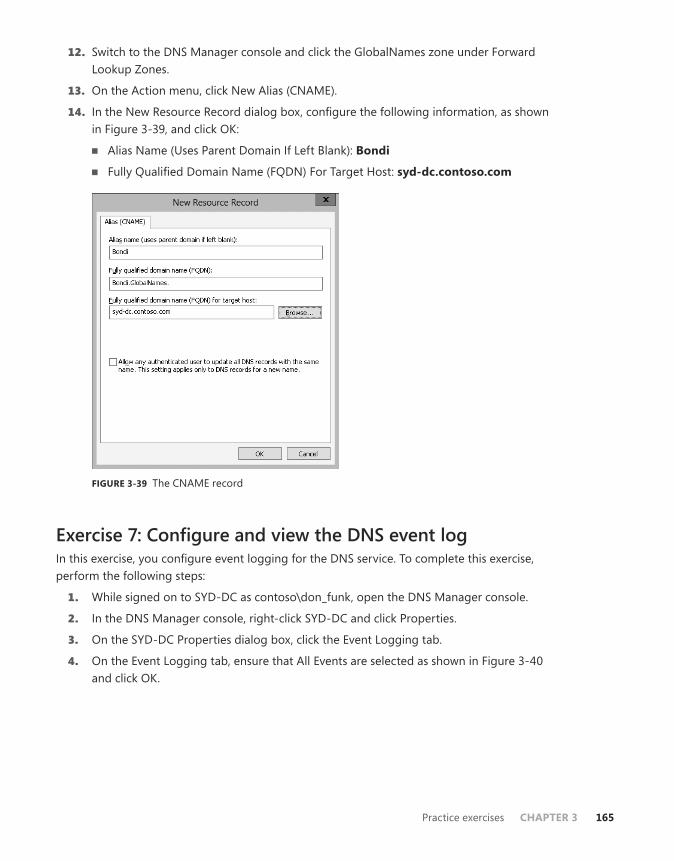
Practice exercises CHAPTER 3 165
12. Switch to the DNS Manager console and click the GlobalNames zone under Forward Lookup Zones.
13. On the Action menu, click New Alias (CNAME).
14. In the New Resource Record dialog box, configure the following information, as shown in Figure 3-39, and click OK:
■■ Alias Name (Uses Parent Domain If Left Blank): Bondi
■■ Fully Qualified Domain Name (FQDN) For Target Host: syd-dc.contoso.com
FIGURE 3-39 The CNAME record
Exercise 7: Configure and view the DNS event logIn this exercise, you configure event logging for the DNS service. To complete this exercise, perform the following steps:
1. While signed on to SYD-DC as contoso\don_funk, open the DNS Manager console.
2. In the DNS Manager console, right-click SYD-DC and click Properties.
3. On the SYD-DC Properties dialog box, click the Event Logging tab.
4. On the Event Logging tab, ensure that All Events are selected as shown in Figure 3-40 and click OK.
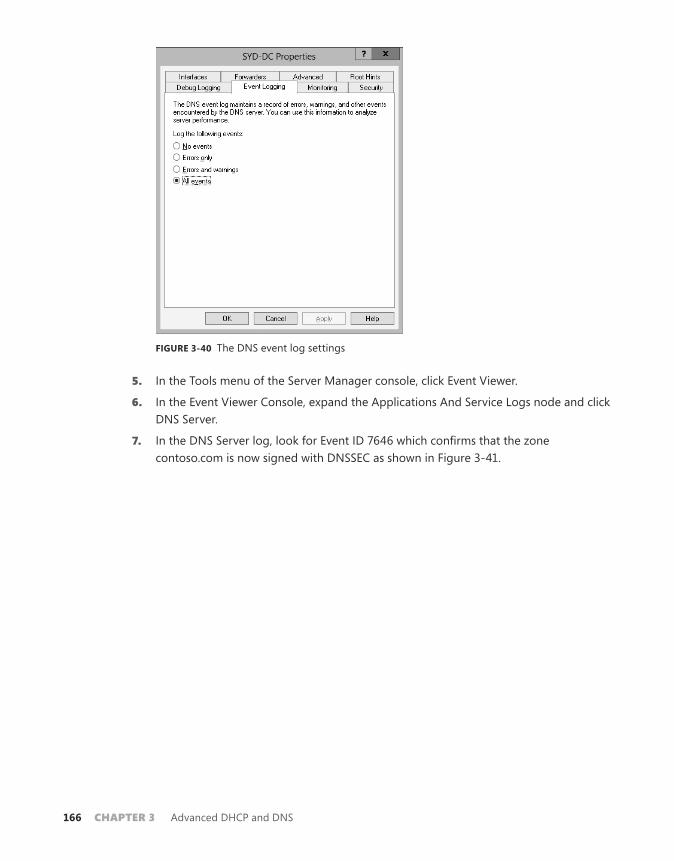
166 Chapter 3 Advanced DHCP and DNS
FIGURE 3-40 The DNS event log settings
5. In the Tools menu of the Server Manager console, click Event Viewer.
6. In the Event Viewer Console, expand the Applications And Service Logs node and click DNS Server.
7. In the DNS Server log, look for Event ID 7646 which confirms that the zone contoso.com is now signed with DNSSEC as shown in Figure 3-41.
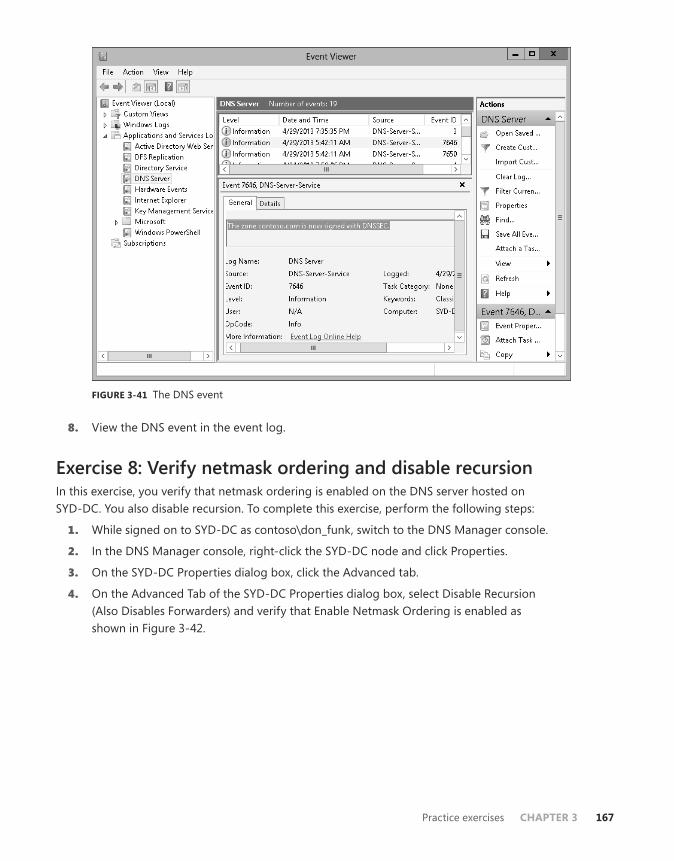
Practice exercises CHAPTER 3 167
FIGURE 3-41 The DNS event
8. View the DNS event in the event log.
Exercise 8: Verify netmask ordering and disable recursionIn this exercise, you verify that netmask ordering is enabled on the DNS server hosted on SYD-DC. You also disable recursion. To complete this exercise, perform the following steps:
1. While signed on to SYD-DC as contoso\don_funk, switch to the DNS Manager console.
2. In the DNS Manager console, right-click the SYD-DC node and click Properties.
3. On the SYD-DC Properties dialog box, click the Advanced tab.
4. On the Advanced Tab of the SYD-DC Properties dialog box, select Disable Recursion (Also Disables Forwarders) and verify that Enable Netmask Ordering is enabled as shown in Figure 3-42.
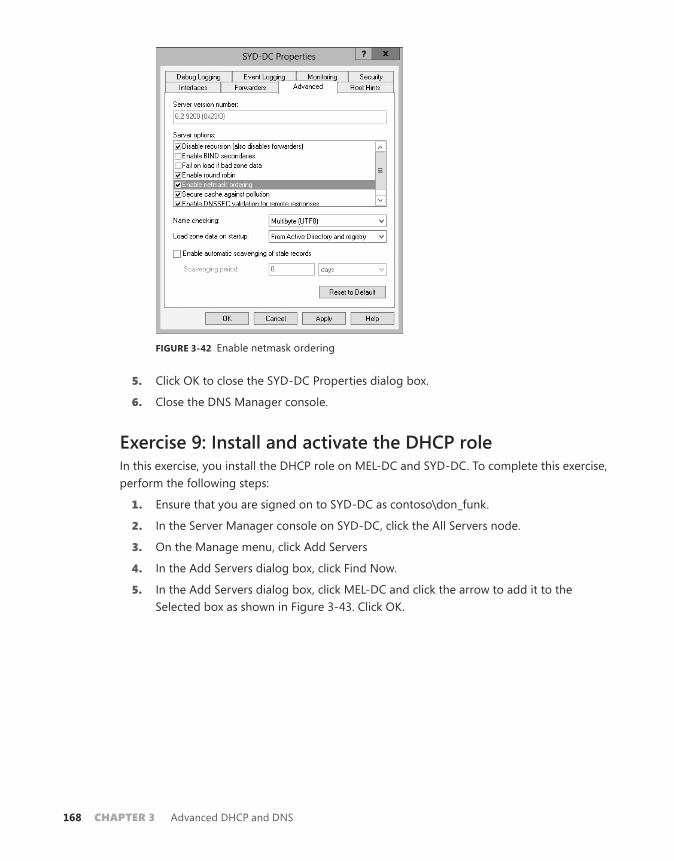
168 Chapter 3 Advanced DHCP and DNS
FIGURE 3-42 Enable netmask ordering
5. Click OK to close the SYD-DC Properties dialog box.
6. Close the DNS Manager console.
Exercise 9: Install and activate the DHCP roleIn this exercise, you install the DHCP role on MEL-DC and SYD-DC. To complete this exercise, perform the following steps:
1. Ensure that you are signed on to SYD-DC as contoso\don_funk.
2. In the Server Manager console on SYD-DC, click the All Servers node.
3. On the Manage menu, click Add Servers
4. In the Add Servers dialog box, click Find Now.
5. In the Add Servers dialog box, click MEL-DC and click the arrow to add it to the Selected box as shown in Figure 3-43. Click OK.

Practice exercises CHAPTER 3 169
FIGURE 3-43 Add servers
6. Right-click SYD-DC and click Start Performance Counters.
7. Right-click MEL-DC and click Start Performance Counters.
8. In the Manage menu of the Server Manager console, click Add Roles And Features.
9. On the Before You Begin page of the Add Roles And Features Wizard, click Next.
10. On the Select Installation Type Page, click Role-Based or Feature-Based Installation and click Next.
11. On the Select Destination Server page, click MEL-DC.contoso.com as shown in Figure 3-44 and click Next.
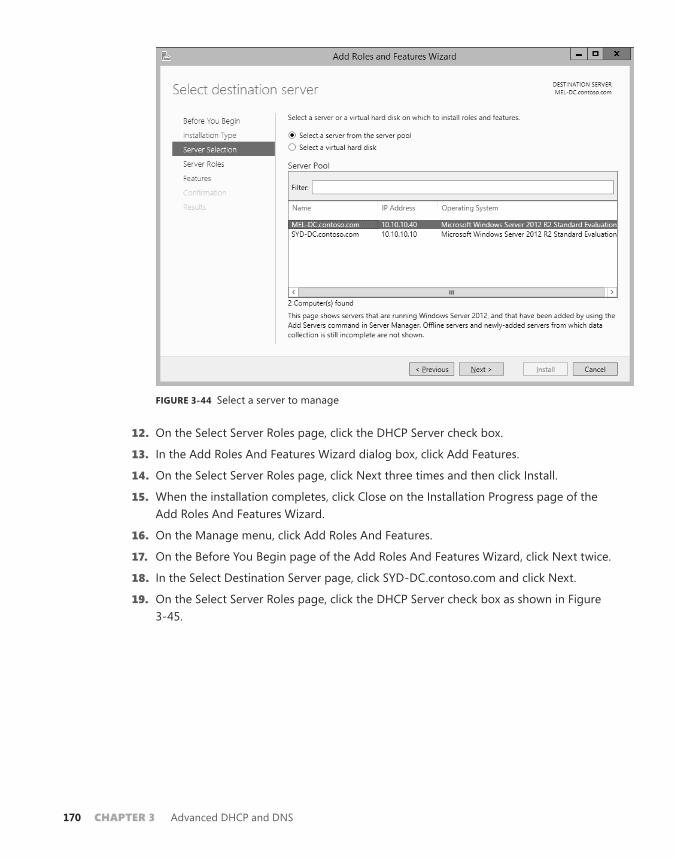
170 Chapter 3 Advanced DHCP and DNS
FIGURE 3-44 Select a server to manage
12. On the Select Server Roles page, click the DHCP Server check box.
13. In the Add Roles And Features Wizard dialog box, click Add Features.
14. On the Select Server Roles page, click Next three times and then click Install.
15. When the installation completes, click Close on the Installation Progress page of the Add Roles And Features Wizard.
16. On the Manage menu, click Add Roles And Features.
17. On the Before You Begin page of the Add Roles And Features Wizard, click Next twice.
18. In the Select Destination Server page, click SYD-DC.contoso.com and click Next.
19. On the Select Server Roles page, click the DHCP Server check box as shown in Figure 3-45.
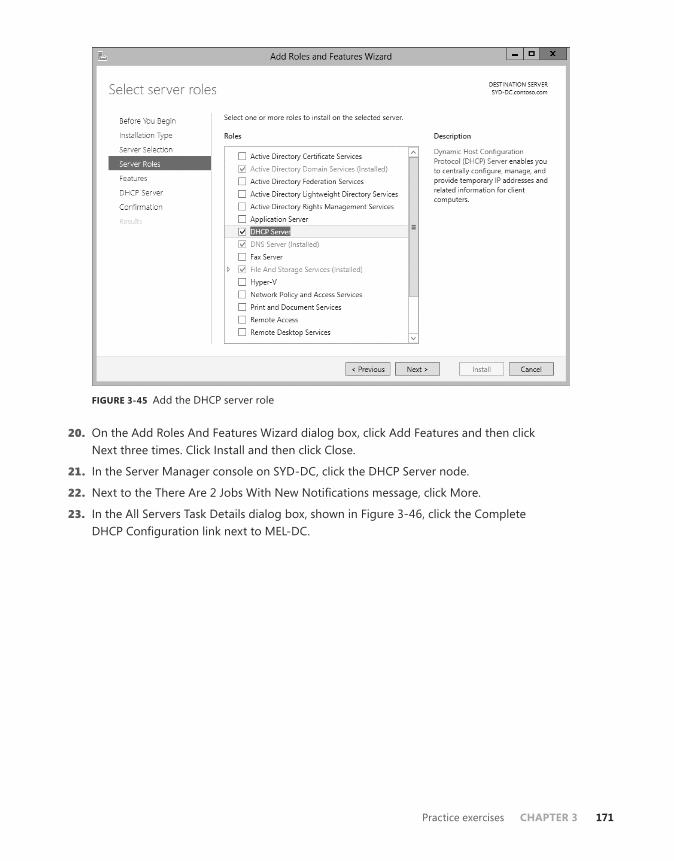
Practice exercises CHAPTER 3 171
FIGURE 3-45 Add the DHCP server role
20. On the Add Roles And Features Wizard dialog box, click Add Features and then click Next three times. Click Install and then click Close.
21. In the Server Manager console on SYD-DC, click the DHCP Server node.
22. Next to the There Are 2 Jobs With New Notifications message, click More.
23. In the All Servers Task Details dialog box, shown in Figure 3-46, click the Complete DHCP Configuration link next to MEL-DC.
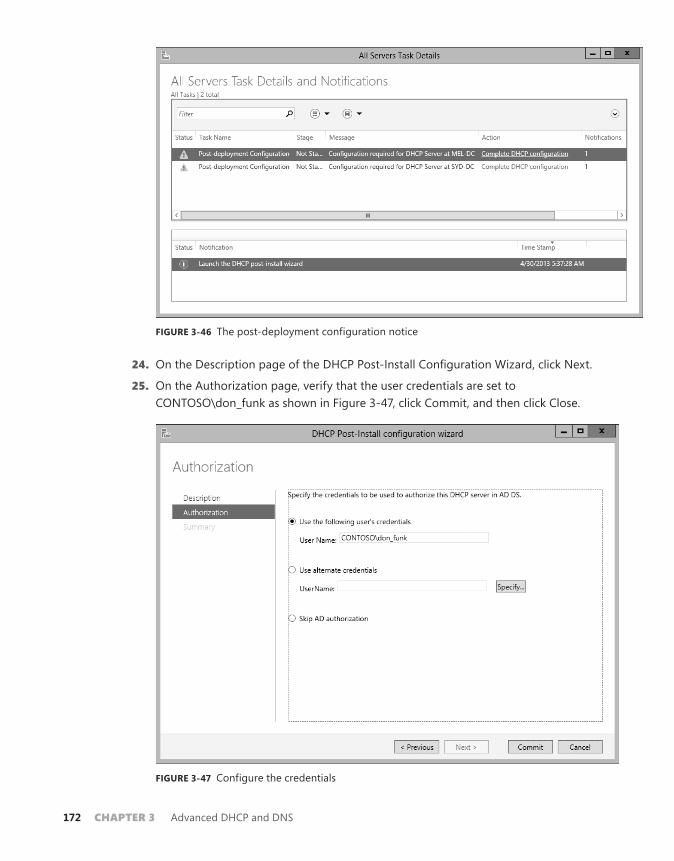
172 Chapter 3 Advanced DHCP and DNS
FIGURE 3-46 The post-deployment configuration notice
24. On the Description page of the DHCP Post-Install Configuration Wizard, click Next.
25. On the Authorization page, verify that the user credentials are set to CONTOSO\don_funk as shown in Figure 3-47, click Commit, and then click Close.
FIGURE 3-47 Configure the credentials
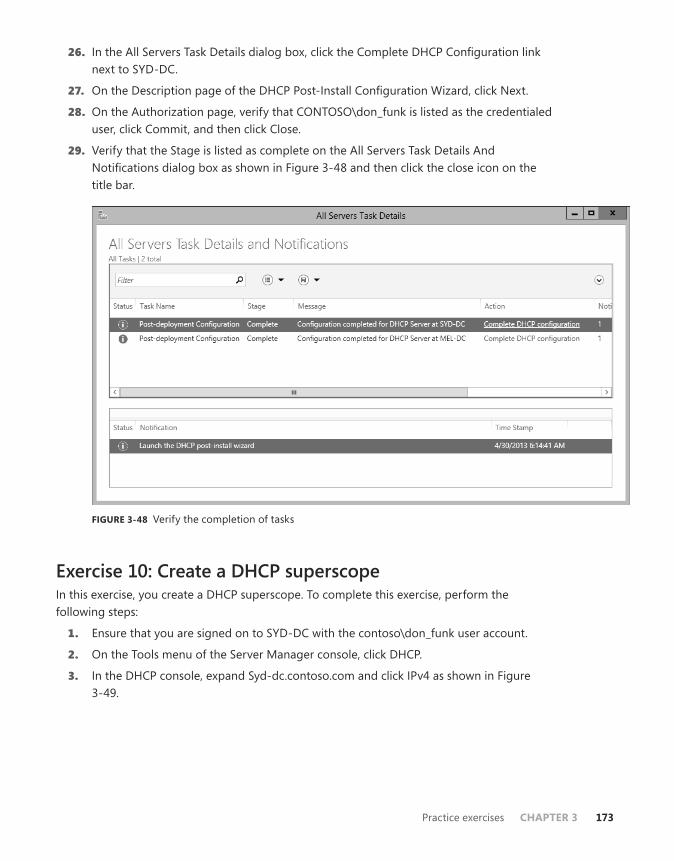
Practice exercises CHAPTER 3 173
26. In the All Servers Task Details dialog box, click the Complete DHCP Configuration link next to SYD-DC.
27. On the Description page of the DHCP Post-Install Configuration Wizard, click Next.
28. On the Authorization page, verify that CONTOSO\don_funk is listed as the credentialed user, click Commit, and then click Close.
29. Verify that the Stage is listed as complete on the All Servers Task Details And Notifications dialog box as shown in Figure 3-48 and then click the close icon on the title bar.
FIGURE 3-48 Verify the completion of tasks
Exercise 10: Create a DHCP superscopeIn this exercise, you create a DHCP superscope. To complete this exercise, perform the following steps:
1. Ensure that you are signed on to SYD-DC with the contoso\don_funk user account.
2. On the Tools menu of the Server Manager console, click DHCP.
3. In the DHCP console, expand Syd-dc.contoso.com and click IPv4 as shown in Figure 3-49.

174 Chapter 3 Advanced DHCP and DNS
FIGURE 3-49 The DHCP console
4. On the Action menu, click New Scope.
5. On the Welcome To The New Scope Wizard page, click Next.
6. On the Scope Name page, in the Name text box, type Scope-A and click Next.
7. On the IP Address Range page, in the Start IP Address text box, enter the following information as shown in Figure 3-50 and click Next three times:
■■ Start IP Address: 192.168.200.10
■■ End IP Address: 192.168.200.230
■■ Length: 24
■■ Subnet Mask: 255.255.255.0
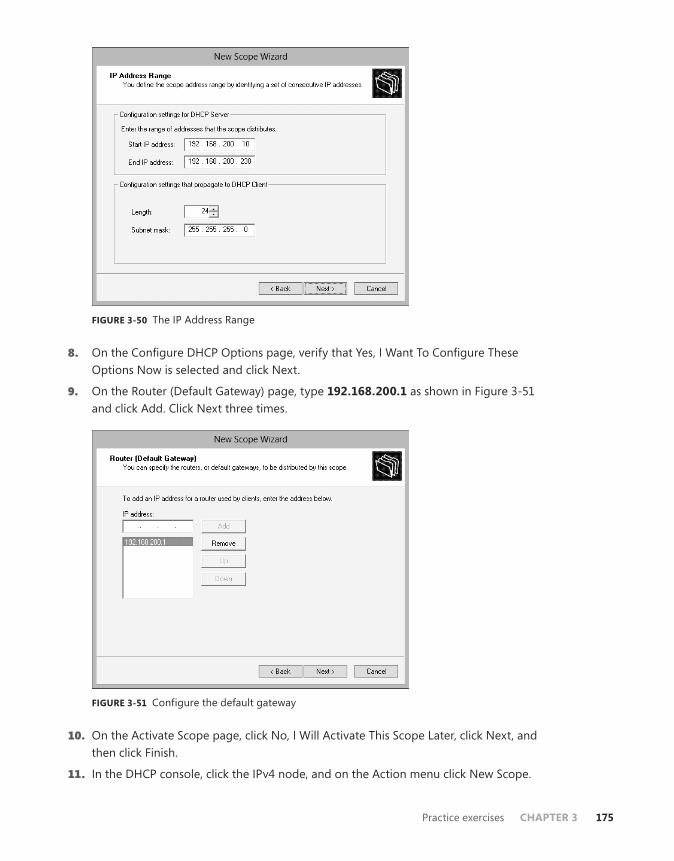
Practice exercises CHAPTER 3 175
FIGURE 3-50 The IP Address Range
8. On the Configure DHCP Options page, verify that Yes, I Want To Configure These Options Now is selected and click Next.
9. On the Router (Default Gateway) page, type 192.168.200.1 as shown in Figure 3-51 and click Add. Click Next three times.
FIGURE 3-51 Configure the default gateway
10. On the Activate Scope page, click No, I Will Activate This Scope Later, click Next, and then click Finish.
11. In the DHCP console, click the IPv4 node, and on the Action menu click New Scope.
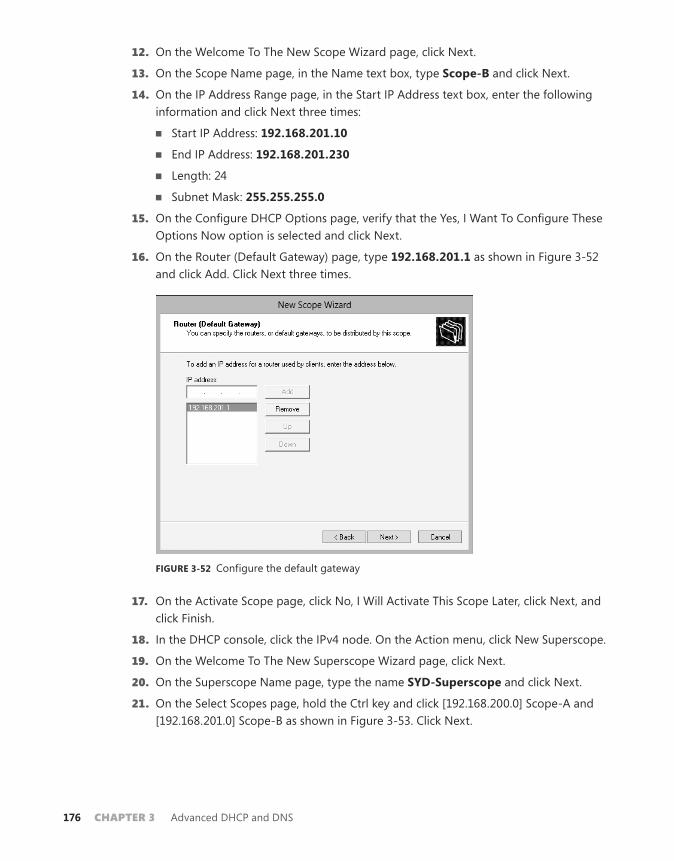
176 Chapter 3 Advanced DHCP and DNS
12. On the Welcome To The New Scope Wizard page, click Next.
13. On the Scope Name page, in the Name text box, type Scope-B and click Next.
14. On the IP Address Range page, in the Start IP Address text box, enter the following information and click Next three times:
■■ Start IP Address: 192.168.201.10
■■ End IP Address: 192.168.201.230
■■ Length: 24
■■ Subnet Mask: 255.255.255.0
15. On the Configure DHCP Options page, verify that the Yes, I Want To Configure These Options Now option is selected and click Next.
16. On the Router (Default Gateway) page, type 192.168.201.1 as shown in Figure 3-52 and click Add. Click Next three times.
FIGURE 3-52 Configure the default gateway
17. On the Activate Scope page, click No, I Will Activate This Scope Later, click Next, and click Finish.
18. In the DHCP console, click the IPv4 node. On the Action menu, click New Superscope.
19. On the Welcome To The New Superscope Wizard page, click Next.
20. On the Superscope Name page, type the name SYD-Superscope and click Next.
21. On the Select Scopes page, hold the Ctrl key and click [192.168.200.0] Scope-A and [192.168.201.0] Scope-B as shown in Figure 3-53. Click Next.
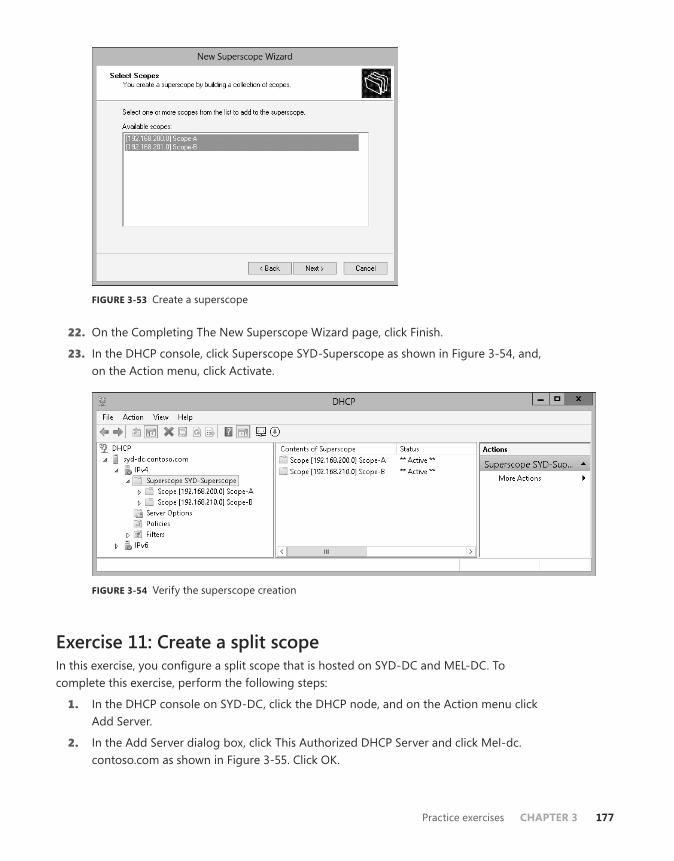
Practice exercises CHAPTER 3 177
FIGURE 3-53 Create a superscope
22. On the Completing The New Superscope Wizard page, click Finish.
23. In the DHCP console, click Superscope SYD-Superscope as shown in Figure 3-54, and, on the Action menu, click Activate.
FIGURE 3-54 Verify the superscope creation
Exercise 11: Create a split scopeIn this exercise, you configure a split scope that is hosted on SYD-DC and MEL-DC. To complete this exercise, perform the following steps:
1. In the DHCP console on SYD-DC, click the DHCP node, and on the Action menu click Add Server.
2. In the Add Server dialog box, click This Authorized DHCP Server and click Mel-dc.contoso.com as shown in Figure 3-55. Click OK.
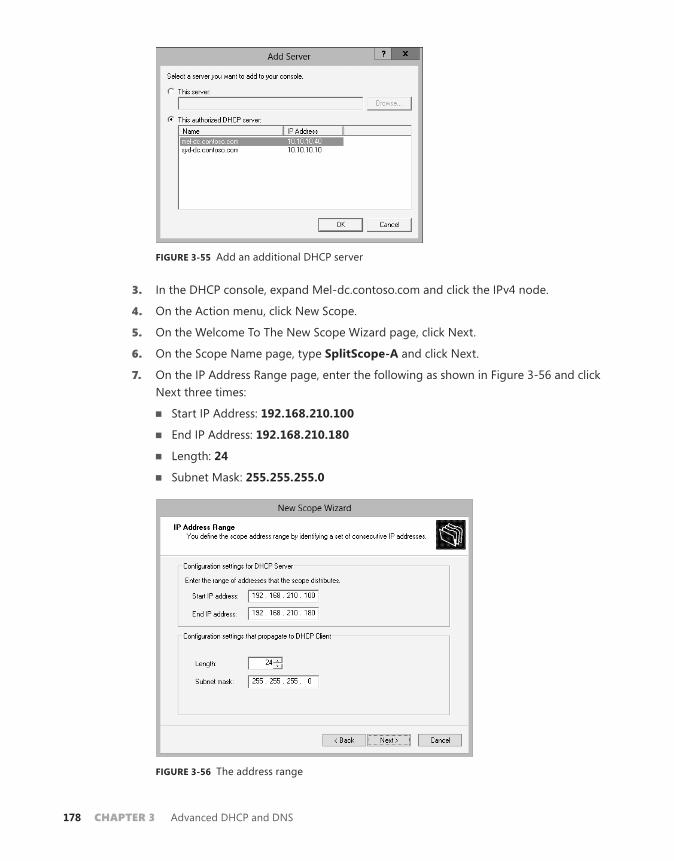
178 Chapter 3 Advanced DHCP and DNS
FIGURE 3-55 Add an additional DHCP server
3. In the DHCP console, expand Mel-dc.contoso.com and click the IPv4 node.
4. On the Action menu, click New Scope.
5. On the Welcome To The New Scope Wizard page, click Next.
6. On the Scope Name page, type SplitScope-A and click Next.
7. On the IP Address Range page, enter the following as shown in Figure 3-56 and click Next three times:
■■ Start IP Address: 192.168.210.100
■■ End IP Address: 192.168.210.180
■■ Length: 24
■■ Subnet Mask: 255.255.255.0
FIGURE 3-56 The address range
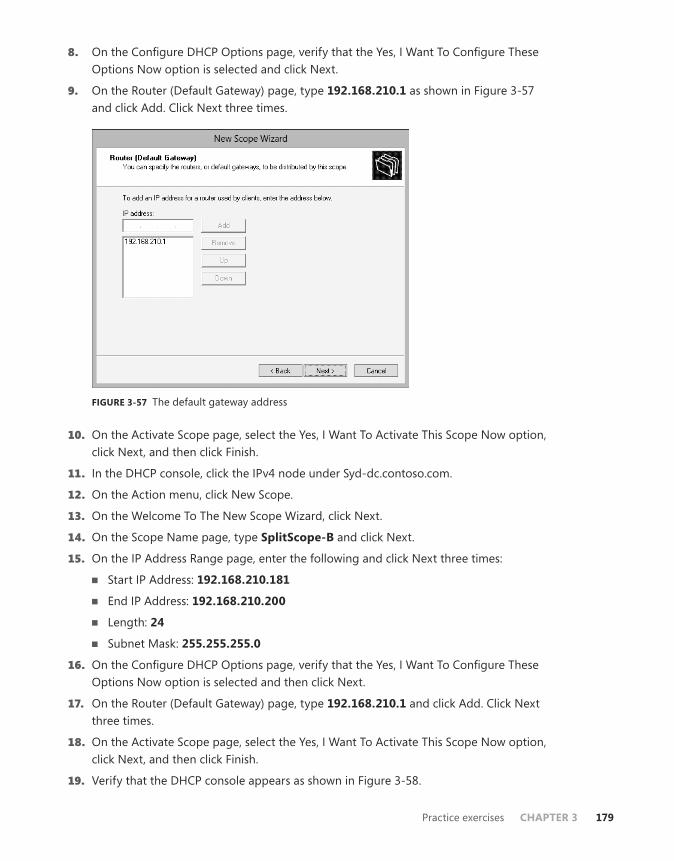
Practice exercises CHAPTER 3 179
8. On the Configure DHCP Options page, verify that the Yes, I Want To Configure These Options Now option is selected and click Next.
9. On the Router (Default Gateway) page, type 192.168.210.1 as shown in Figure 3-57 and click Add. Click Next three times.
FIGURE 3-57 The default gateway address
10. On the Activate Scope page, select the Yes, I Want To Activate This Scope Now option, click Next, and then click Finish.
11. In the DHCP console, click the IPv4 node under Syd-dc.contoso.com.
12. On the Action menu, click New Scope.
13. On the Welcome To The New Scope Wizard, click Next.
14. On the Scope Name page, type SplitScope-B and click Next.
15. On the IP Address Range page, enter the following and click Next three times:
■■ Start IP Address: 192.168.210.181
■■ End IP Address: 192.168.210.200
■■ Length: 24
■■ Subnet Mask: 255.255.255.0
16. On the Configure DHCP Options page, verify that the Yes, I Want To Configure These Options Now option is selected and then click Next.
17. On the Router (Default Gateway) page, type 192.168.210.1 and click Add. Click Next three times.
18. On the Activate Scope page, select the Yes, I Want To Activate This Scope Now option, click Next, and then click Finish.
19. Verify that the DHCP console appears as shown in Figure 3-58.
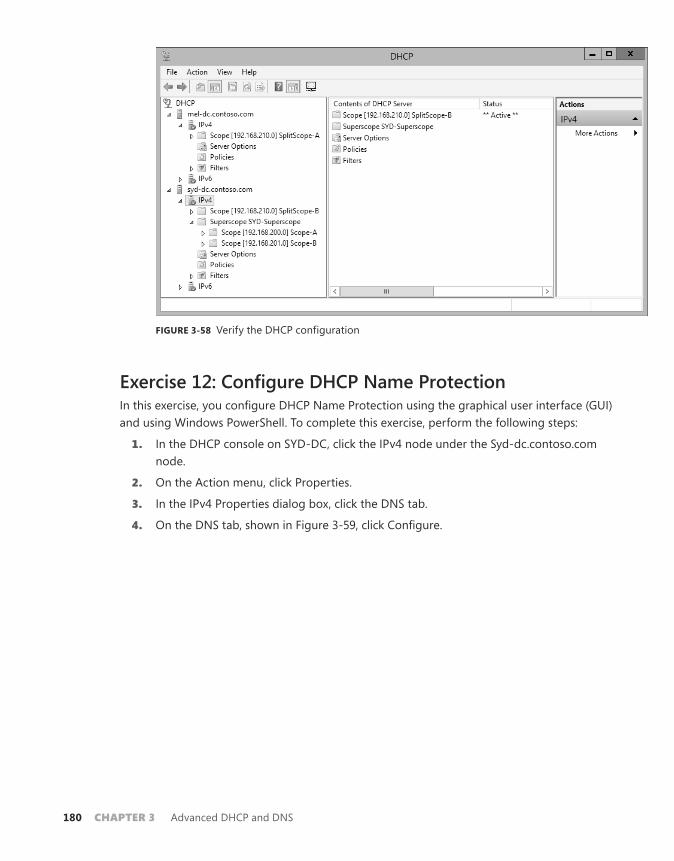
180 Chapter 3 Advanced DHCP and DNS
FIGURE 3-58 Verify the DHCP configuration
Exercise 12: Configure DHCP Name ProtectionIn this exercise, you configure DHCP Name Protection using the graphical user interface (GUI) and using Windows PowerShell. To complete this exercise, perform the following steps:
1. In the DHCP console on SYD-DC, click the IPv4 node under the Syd-dc.contoso.com node.
2. On the Action menu, click Properties.
3. In the IPv4 Properties dialog box, click the DNS tab.
4. On the DNS tab, shown in Figure 3-59, click Configure.
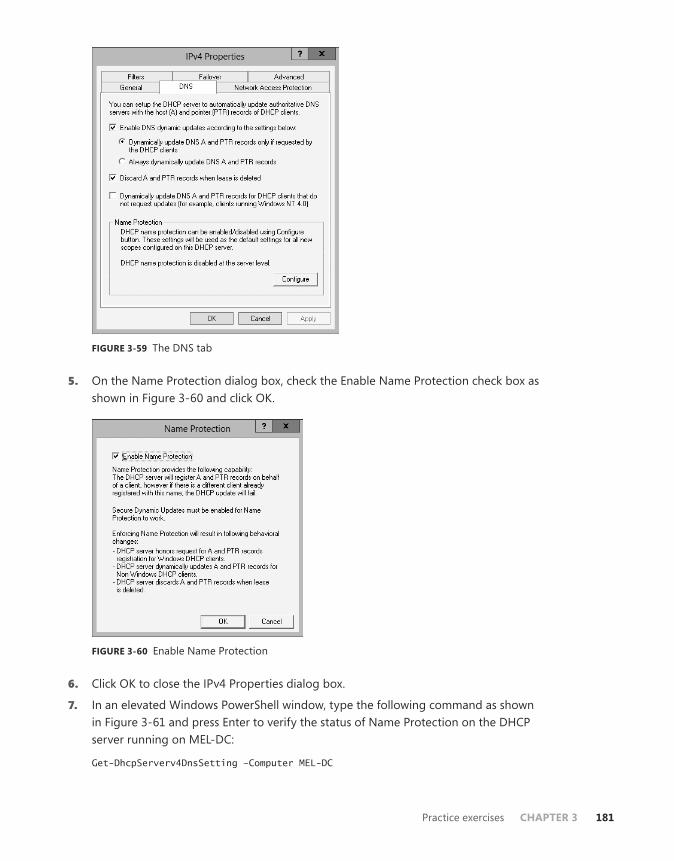
Practice exercises CHAPTER 3 181
FIGURE 3-59 The DNS tab
5. On the Name Protection dialog box, check the Enable Name Protection check box as shown in Figure 3-60 and click OK.
FIGURE 3-60 Enable Name Protection
6. Click OK to close the IPv4 Properties dialog box.
7. In an elevated Windows PowerShell window, type the following command as shown in Figure 3-61 and press Enter to verify the status of Name Protection on the DHCP server running on MEL-DC:
Get-DhcpServerv4DnsSetting –Computer MEL-DC

182 Chapter 3 Advanced DHCP and DNS
FIGURE 3-61 Verify the Name Protection status
8. In a Windows PowerShell window, type the following command and press Enter to enable Name Protection on the DHCP server hosted on mel-dc.contoso.com:
Set-DhcpServerv4DnsSetting –Computer MEL-DC –NameProtection $true
9. Verify that Name Protection is now enabled on MEL-DC by reissuing the following command as shown in Figure 3-62:
Get-DhcpServerv4DnsSetting –Computer MEL-DC
FIGURE 3-62 Verify Name Protection is enabled
Exercise 13: Create new multicast scopesIn this exercise, you create a new multicast scope that will be hosted on the DHCP server SYD-DC. To complete this exercise, perform the following steps:
1. In the DHCP console on SYD-DC, click the IPv4 node under Syd-dc.contoso.com.
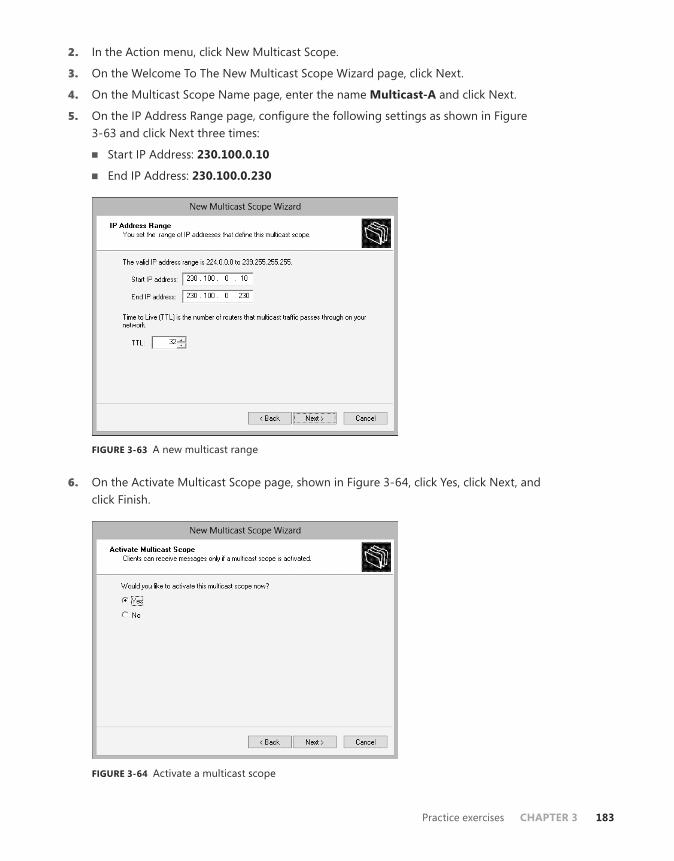
Practice exercises CHAPTER 3 183
2. In the Action menu, click New Multicast Scope.
3. On the Welcome To The New Multicast Scope Wizard page, click Next.
4. On the Multicast Scope Name page, enter the name Multicast-A and click Next.
5. On the IP Address Range page, configure the following settings as shown in Figure 3-63 and click Next three times:
■■ Start IP Address: 230.100.0.10
■■ End IP Address: 230.100.0.230
FIGURE 3-63 A new multicast range
6. On the Activate Multicast Scope page, shown in Figure 3-64, click Yes, click Next, and click Finish.
FIGURE 3-64 Activate a multicast scope
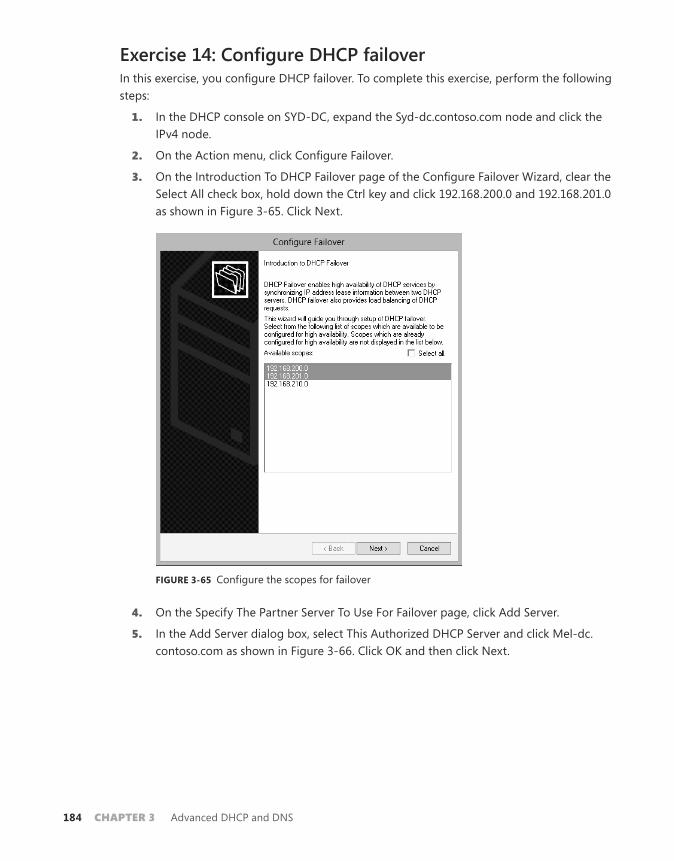
184 Chapter 3 Advanced DHCP and DNS
Exercise 14: Configure DHCP failoverIn this exercise, you configure DHCP failover. To complete this exercise, perform the following steps:
1. In the DHCP console on SYD-DC, expand the Syd-dc.contoso.com node and click the IPv4 node.
2. On the Action menu, click Configure Failover.
3. On the Introduction To DHCP Failover page of the Configure Failover Wizard, clear the Select All check box, hold down the Ctrl key and click 192.168.200.0 and 192.168.201.0 as shown in Figure 3-65. Click Next.
FIGURE 3-65 Configure the scopes for failover
4. On the Specify The Partner Server To Use For Failover page, click Add Server.
5. In the Add Server dialog box, select This Authorized DHCP Server and click Mel-dc.contoso.com as shown in Figure 3-66. Click OK and then click Next.
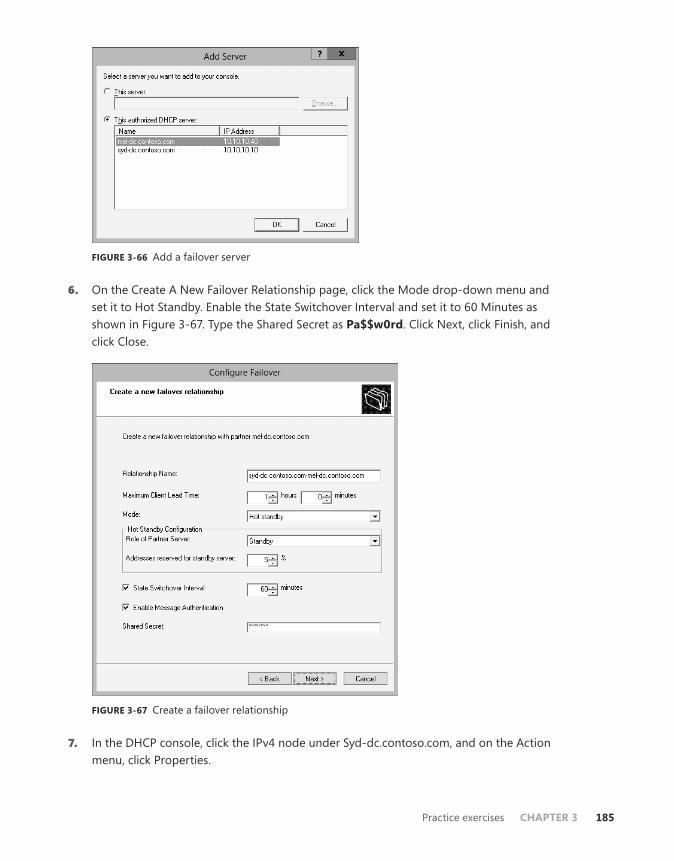
Practice exercises CHAPTER 3 185
FIGURE 3-66 Add a failover server
6. On the Create A New Failover Relationship page, click the Mode drop-down menu and set it to Hot Standby. Enable the State Switchover Interval and set it to 60 Minutes as shown in Figure 3-67. Type the Shared Secret as Pa$$w0rd. Click Next, click Finish, and click Close.
FIGURE 3-67 Create a failover relationship
7. In the DHCP console, click the IPv4 node under Syd-dc.contoso.com, and on the Action menu, click Properties.

186 Chapter 3 Advanced DHCP and DNS
8. On the Failover tab, verify that the settings listed match Figure 3-68 and click Delete.
FIGURE 3-68 Delete a failover relationship
9. On the Delete Failover Relationship dialog box, click OK and click Close.
10. Click OK to close the IPv4 Properties dialog box.
Exercise 15: Install the IPAM featureIn this exercise, you join server ADL-DC to the domain and install the IPAM feature. To complete this exercise, perform the following steps:
1. Ensure that SYD-DC and MEL-DC remain powered on.
2. Turn on ADL-DC and sign on as Administrator with the password Pa$$w0rd.
3. Open a Windows PowerShell window by clicking the Windows PowerShell icon on the Desktop taskbar.
4. Type the following command and press Enter to join ADL-DC to the contoso.com domain.
Netdom join ADL-DC /domain:contoso.com
5. Restart ADL-DC and sign on as contoso\don_funk.
6. Click on Add Roles And Features on the Manage menu of the Server Manager console.
7. On the Before You Begin page of the Add Roles And Features Wizard, click Next twice.
8. On the Select Destination Server page, ensure that ADL-DC.contoso.com is selected and click Next twice.

Practice exercises CHAPTER 3 187
9. On the Select Features page, click IP Address Management (IPAM) Server as shown in Figure 3-69.
FIGURE 3-69 Add the IPAM feature
10. On the Add Roles And Features Wizard dialog box, click Add Features, click Next, and then click Install. When the installation completes, click Close.
Exercise 16: Configure IPAM GPOs and server discoveryIn this exercise, you configure IPAM-related GPOs. To complete this exercise, perform the following steps:
1. While signed on to ADL-DC, click the IPAM node in the Server Manager console.
2. On the IPAM Server Tasks section, click Provision The IPAM Server.
3. On the Before You Begin page of the Provision IPAM Wizard, click Next.
4. On the Select Provisioning Method page, click Group Policy Based, and in the GPO Name Prefix box type IPAM as shown in Figure 3-70. Click Next.
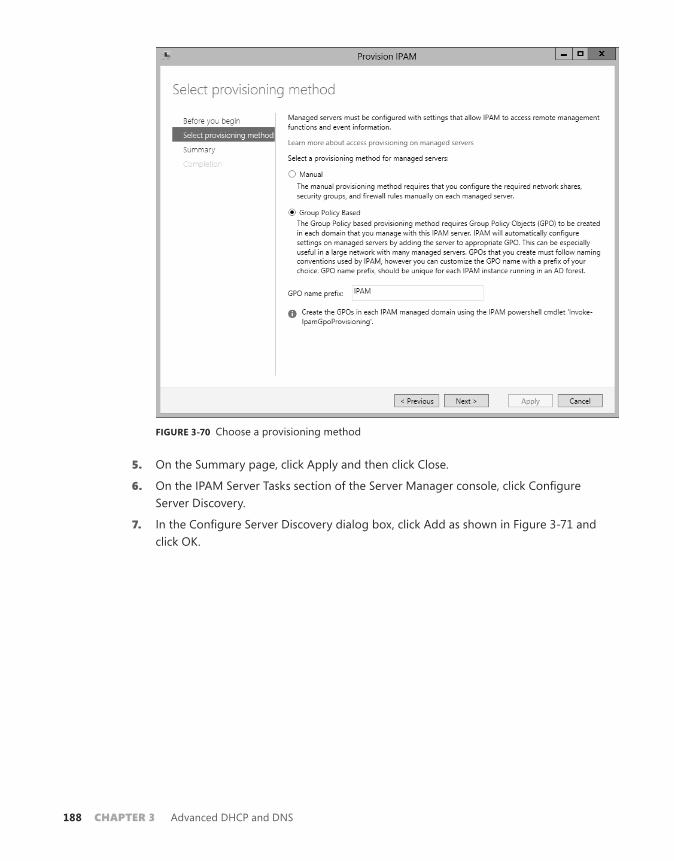
188 Chapter 3 Advanced DHCP and DNS
FIGURE 3-70 Choose a provisioning method
5. On the Summary page, click Apply and then click Close.
6. On the IPAM Server Tasks section of the Server Manager console, click Configure Server Discovery.
7. In the Configure Server Discovery dialog box, click Add as shown in Figure 3-71 and click OK.

Practice exercises CHAPTER 3 189
FIGURE 3-71 Configure discovery
8. On the IPAM Server Tasks section of the Server Manager console, click Start Server Discovery.
9. Wait 15 minutes for server discovery to complete before starting Exercise 17.
Exercise 17: Configure servers to be managed by IPAMIn this exercise, you configure servers so that they can be managed centrally by IPAM. To complete this exercise, perform the following steps:
1. On the IPAM Server Tasks section, click Select Or Add Servers To Manage And Verify IPAM Access.
2. Both SYD-DC and MEL-DC should be present as shown in Figure 3-72.
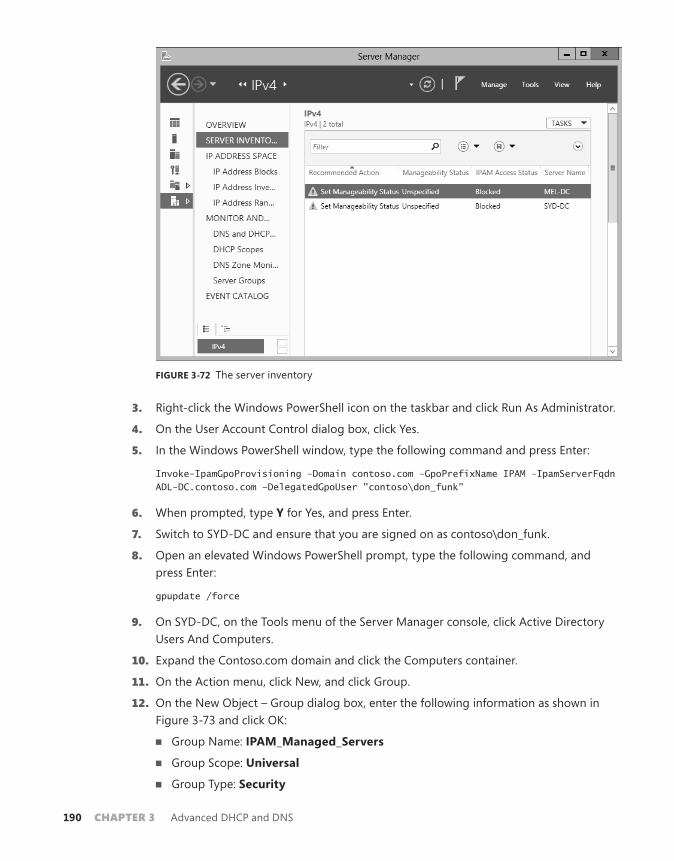
190 Chapter 3 Advanced DHCP and DNS
FIGURE 3-72 The server inventory
3. Right-click the Windows PowerShell icon on the taskbar and click Run As Administrator.
4. On the User Account Control dialog box, click Yes.
5. In the Windows PowerShell window, type the following command and press Enter:
Invoke-IpamGpoProvisioning –Domain contoso.com –GpoPrefixName IPAM –IpamServerFqdn ADL-DC.contoso.com –DelegatedGpoUser "contoso\don_funk"
6. When prompted, type Y for Yes, and press Enter.
7. Switch to SYD-DC and ensure that you are signed on as contoso\don_funk.
8. Open an elevated Windows PowerShell prompt, type the following command, and press Enter:
gpupdate /force
9. On SYD-DC, on the Tools menu of the Server Manager console, click Active Directory Users And Computers.
10. Expand the Contoso.com domain and click the Computers container.
11. On the Action menu, click New, and click Group.
12. On the New Object – Group dialog box, enter the following information as shown in Figure 3-73 and click OK:
■■ Group Name: IPAM_Managed_Servers
■■ Group Scope: Universal
■■ Group Type: Security
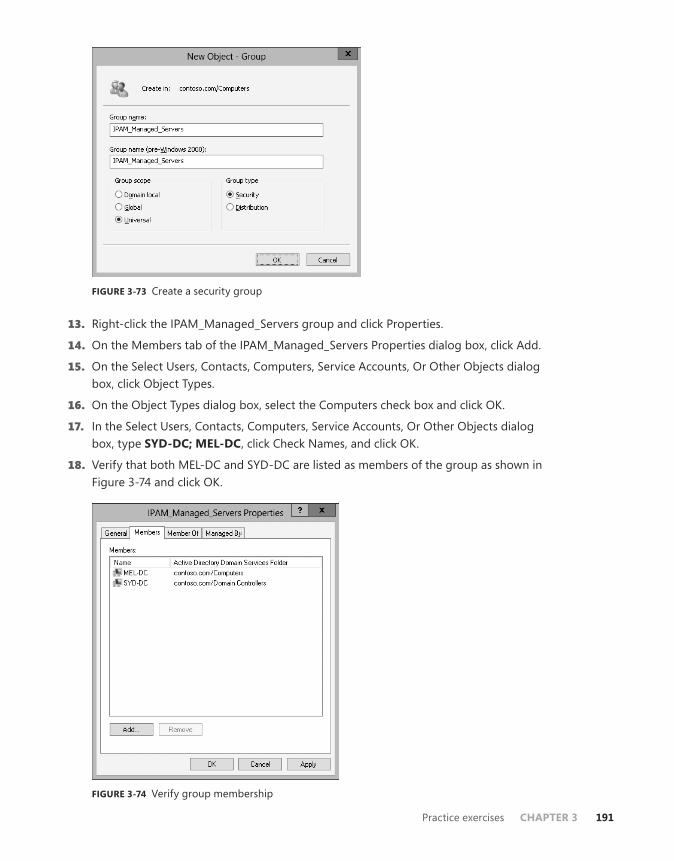
Practice exercises CHAPTER 3 191
FIGURE 3-73 Create a security group
13. Right-click the IPAM_Managed_Servers group and click Properties.
14. On the Members tab of the IPAM_Managed_Servers Properties dialog box, click Add.
15. On the Select Users, Contacts, Computers, Service Accounts, Or Other Objects dialog box, click Object Types.
16. On the Object Types dialog box, select the Computers check box and click OK.
17. In the Select Users, Contacts, Computers, Service Accounts, Or Other Objects dialog box, type SYD-DC; MEL-DC, click Check Names, and click OK.
18. Verify that both MEL-DC and SYD-DC are listed as members of the group as shown in Figure 3-74 and click OK.
FIGURE 3-74 Verify group membership
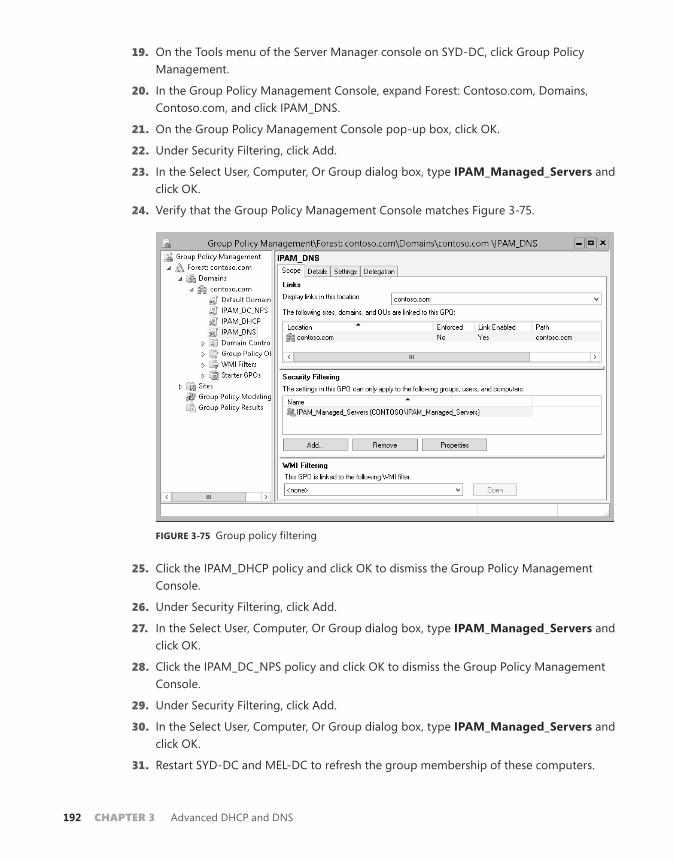
192 Chapter 3 Advanced DHCP and DNS
19. On the Tools menu of the Server Manager console on SYD-DC, click Group Policy Management.
20. In the Group Policy Management Console, expand Forest: Contoso.com, Domains, Contoso.com, and click IPAM_DNS.
21. On the Group Policy Management Console pop-up box, click OK.
22. Under Security Filtering, click Add.
23. In the Select User, Computer, Or Group dialog box, type IPAM_Managed_Servers and click OK.
24. Verify that the Group Policy Management Console matches Figure 3-75.
FIGURE 3-75 Group policy filtering
25. Click the IPAM_DHCP policy and click OK to dismiss the Group Policy Management Console.
26. Under Security Filtering, click Add.
27. In the Select User, Computer, Or Group dialog box, type IPAM_Managed_Servers and click OK.
28. Click the IPAM_DC_NPS policy and click OK to dismiss the Group Policy Management Console.
29. Under Security Filtering, click Add.
30. In the Select User, Computer, Or Group dialog box, type IPAM_Managed_Servers and click OK.
31. Restart SYD-DC and MEL-DC to refresh the group membership of these computers.
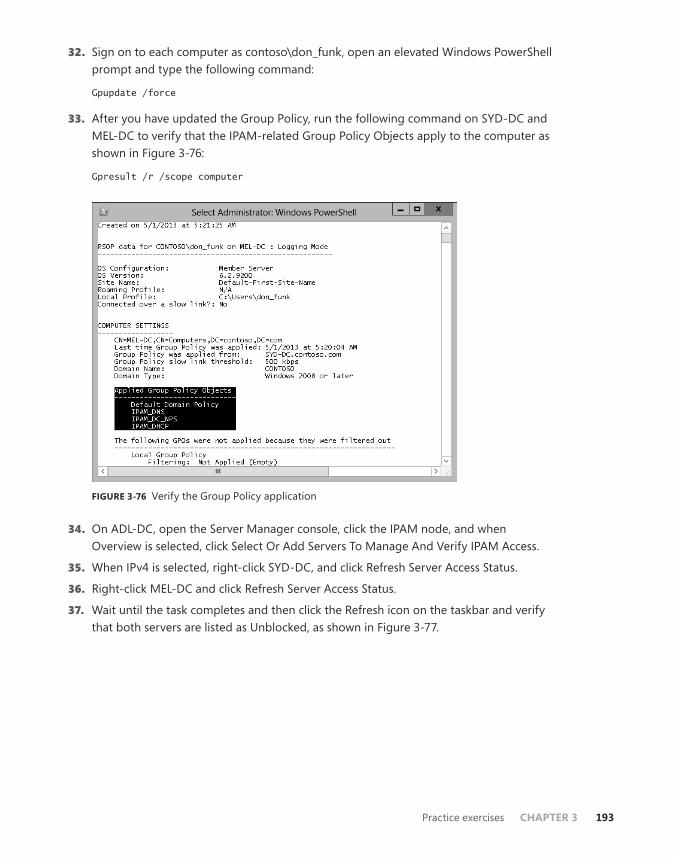
Practice exercises CHAPTER 3 193
32. Sign on to each computer as contoso\don_funk, open an elevated Windows PowerShell prompt and type the following command:
Gpupdate /force
33. After you have updated the Group Policy, run the following command on SYD-DC and MEL-DC to verify that the IPAM-related Group Policy Objects apply to the computer as shown in Figure 3-76:
Gpresult /r /scope computer
FIGURE 3-76 Verify the Group Policy application
34. On ADL-DC, open the Server Manager console, click the IPAM node, and when Overview is selected, click Select Or Add Servers To Manage And Verify IPAM Access.
35. When IPv4 is selected, right-click SYD-DC, and click Refresh Server Access Status.
36. Right-click MEL-DC and click Refresh Server Access Status.
37. Wait until the task completes and then click the Refresh icon on the taskbar and verify that both servers are listed as Unblocked, as shown in Figure 3-77.
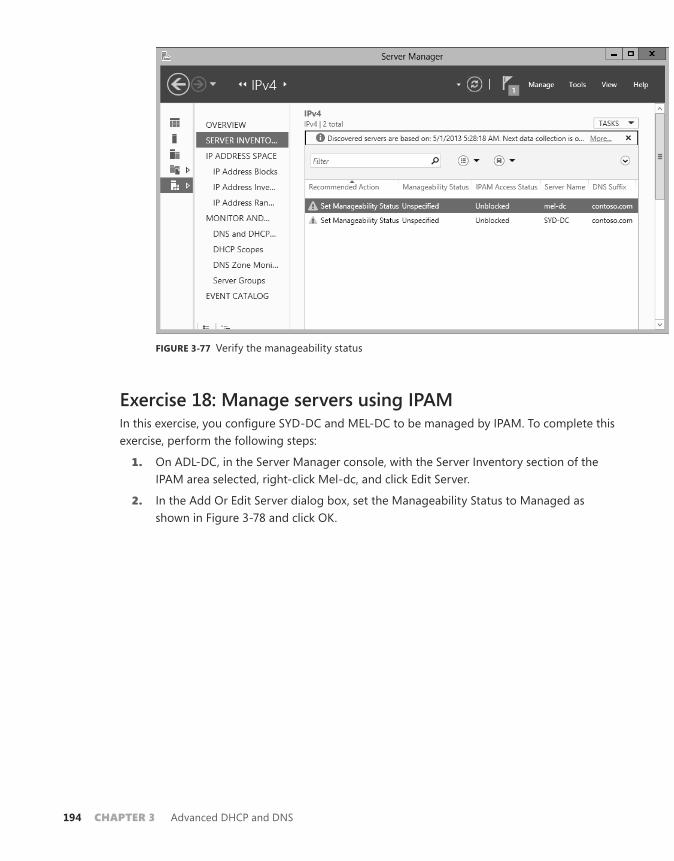
194 Chapter 3 Advanced DHCP and DNS
FIGURE 3-77 Verify the manageability status
Exercise 18: Manage servers using IPAMIn this exercise, you configure SYD-DC and MEL-DC to be managed by IPAM. To complete this exercise, perform the following steps:
1. On ADL-DC, in the Server Manager console, with the Server Inventory section of the IPAM area selected, right-click Mel-dc, and click Edit Server.
2. In the Add Or Edit Server dialog box, set the Manageability Status to Managed as shown in Figure 3-78 and click OK.
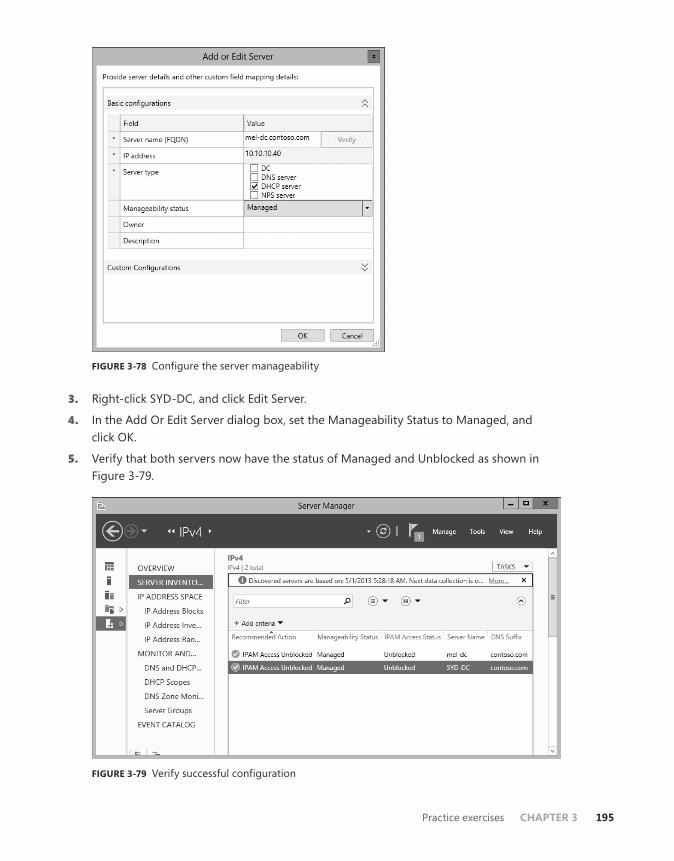
Practice exercises CHAPTER 3 195
FIGURE 3-78 Configure the server manageability
3. Right-click SYD-DC, and click Edit Server.
4. In the Add Or Edit Server dialog box, set the Manageability Status to Managed, and click OK.
5. Verify that both servers now have the status of Managed and Unblocked as shown in Figure 3-79.
FIGURE 3-79 Verify successful configuration
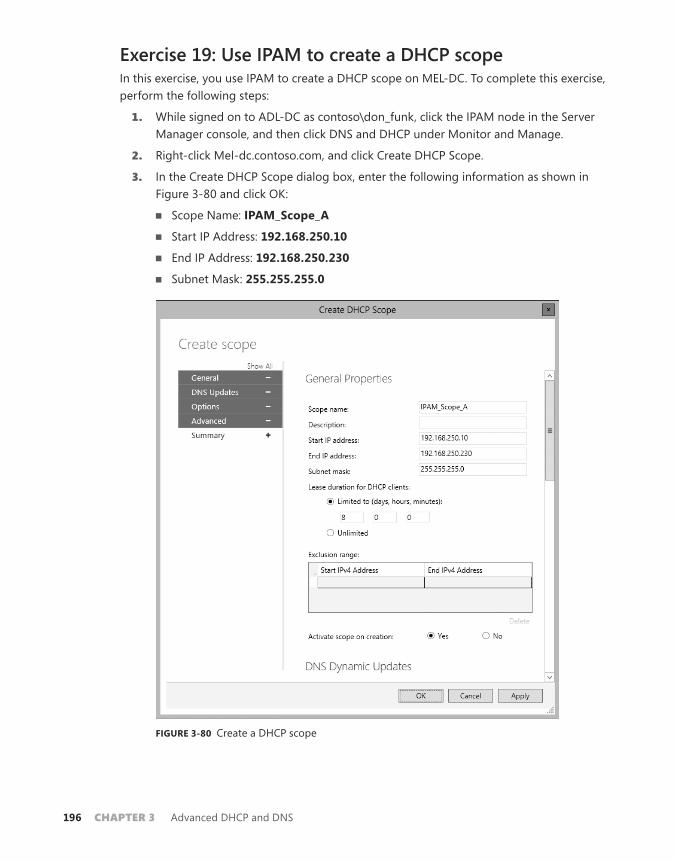
196 Chapter 3 Advanced DHCP and DNS
Exercise 19: Use IPAM to create a DHCP scopeIn this exercise, you use IPAM to create a DHCP scope on MEL-DC. To complete this exercise, perform the following steps:
1. While signed on to ADL-DC as contoso\don_funk, click the IPAM node in the Server Manager console, and then click DNS and DHCP under Monitor and Manage.
2. Right-click Mel-dc.contoso.com, and click Create DHCP Scope.
3. In the Create DHCP Scope dialog box, enter the following information as shown in Figure 3-80 and click OK:
■■ Scope Name: IPAM_Scope_A
■■ Start IP Address: 192.168.250.10
■■ End IP Address: 192.168.250.230
■■ Subnet Mask: 255.255.255.0
FIGURE 3-80 Create a DHCP scope
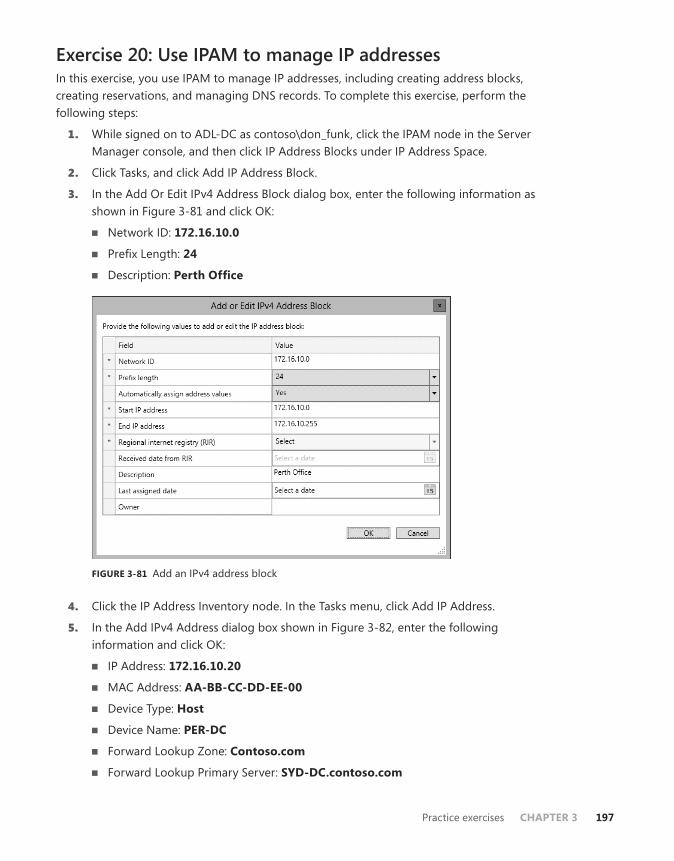
Practice exercises CHAPTER 3 197
Exercise 20: Use IPAM to manage IP addressesIn this exercise, you use IPAM to manage IP addresses, including creating address blocks, creating reservations, and managing DNS records. To complete this exercise, perform the following steps:
1. While signed on to ADL-DC as contoso\don_funk, click the IPAM node in the Server Manager console, and then click IP Address Blocks under IP Address Space.
2. Click Tasks, and click Add IP Address Block.
3. In the Add Or Edit IPv4 Address Block dialog box, enter the following information as shown in Figure 3-81 and click OK:
■■ Network ID: 172.16.10.0
■■ Prefix Length: 24
■■ Description: Perth Office
FIGURE 3-81 Add an IPv4 address block
4. Click the IP Address Inventory node. In the Tasks menu, click Add IP Address.
5. In the Add IPv4 Address dialog box shown in Figure 3-82, enter the following information and click OK:
■■ IP Address: 172.16.10.20
■■ MAC Address: AA-BB-CC-DD-EE-00
■■ Device Type: Host
■■ Device Name: PER-DC
■■ Forward Lookup Zone: Contoso.com
■■ Forward Lookup Primary Server: SYD-DC.contoso.com
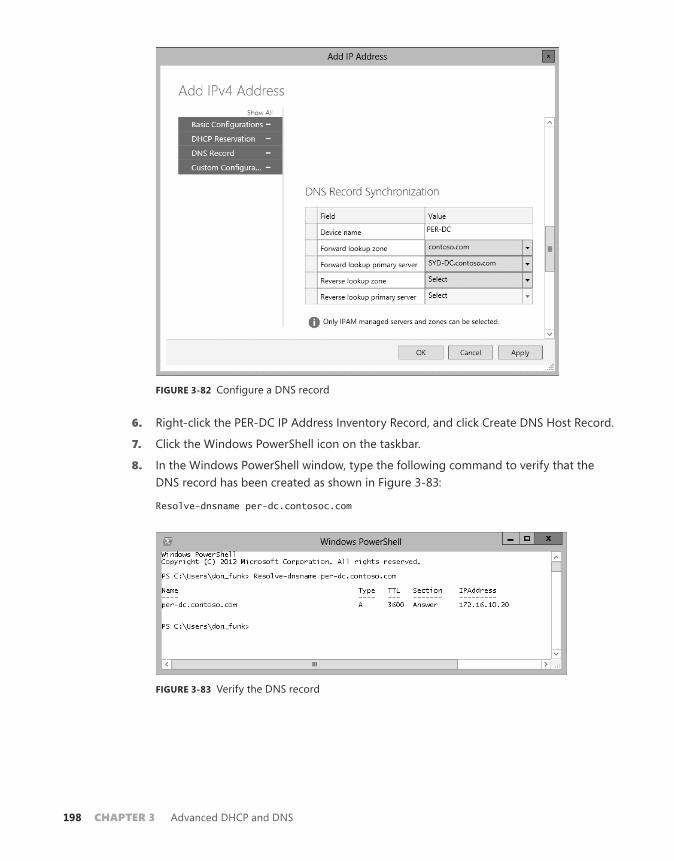
198 Chapter 3 Advanced DHCP and DNS
FIGURE 3-82 Configure a DNS record
6. Right-click the PER-DC IP Address Inventory Record, and click Create DNS Host Record.
7. Click the Windows PowerShell icon on the taskbar.
8. In the Windows PowerShell window, type the following command to verify that the DNS record has been created as shown in Figure 3-83:
Resolve-dnsname per-dc.contosoc.com
FIGURE 3-83 Verify the DNS record
Suggested practice exercises CHAPTER 3 199
Suggested practice exercises
The following additional practice exercises are designed to give you more opportunities to practice what you’ve learned and to help you successfully master the lessons presented in this chapter.
■■ Exercise 1 Use IPAM to create a DHCP scope on SYD-DC for the 172.16.10.0 /24 IP Address Range.
■■ Exercise 2 Reset the DNS socket pool on SYD-DC to its original value.
■■ Exercise 3 Create a new DNS zone named Margiestravel.com and configure it to use DNSSEC.
200 CHAPTER 3 Advanced DHCP and DNS
Answers
This section contains the answers to the lesson review questions in this chapter.
Lesson 11. Correct answer: C
a. Incorrect. This method cannot be used with a DHCP server hosted on the Windows Server 2008 R2 operating system. Hot standby mode has the primary DHCP server respond to DHCP clients except in the case when the primary server is unavailable, at which point the hot standby server begins leasing addresses.
B. Incorrect. This method cannot be used with a DHCP server hosted on the Windows Server 2008 R2 operating system. Load sharing has each partner DHCP server lease addresses from the scope to DHCP clients. In the event that one DHCP server fails, the other DHCP server utilizes the whole scope after the maximum client lead time period has elapsed.
C. Correct. In a split scope, part of the scope is hosted on one DHCP server, and a smaller part is hosted on a second DHCP server. Traditionally the split between the first and second DHCP servers is 80/20. Use this option when one or both DHCP servers are not running the Windows Server 2012 operating system.
D. Incorrect. Superscopes enable you to combine existing scopes for administrative purposes. They are often implemented when there are multiple logical subnets used on the same physical network. Superscopes do not provide high availability.
2. Correct answer: C
a. Incorrect. Load sharing has each partner DHCP server lease addresses from the scope to DHCP clients. In the event that one DHCP server fails, the other DHCP server utilizes the whole scope after the maximum client lead time period has elapsed. This does not meet the requirement that the second server not lease addresses unless the first is unavailable.
B. Incorrect. In a split scope, part of the scope is hosted on one DHCP server, and a smaller part is hosted on a second DHCP server. Traditionally the split between the first and second DHCP servers is 80/20. Use this option when one or both DHCP servers are not running the Windows Server 2012 operating system. This does not meet the requirement that the second server be able to lease addresses from the entire scope if necessary.
C. Correct. Hot standby mode has the primary DHCP server respond to DHCP clients except in the case when the primary server is unavailable, at which point the hot standby server begins leasing addresses.
Answers CHAPTER 3 201
D. Incorrect. Superscopes enable you to combine existing scopes for administrative purposes. They are often implemented when there are multiple logical subnets used on the same physical network. Superscopes do not provide high availability.
3. Correct answer: A
a. Correct. Superscopes enable you to combine existing scopes for administrative purposes. They are often implemented when there are multiple logical subnets used on the same physical network. Superscopes do not provide high availability.
B. Incorrect. Split scopes are high-availability solutions. In a split scope, part of the scope is hosted on one DHCP server, and a smaller part is hosted on a second DHCP server. Traditionally, the split between the first and second DHCP servers is 80/20. Use this option when one or both DHCP servers are not running the Windows Server 2012 operating system.
C. Incorrect. Load sharing mode is a high-availability solution. Load sharing has each partner DHCP server lease addresses from the scope to DHCP clients. In the event that one DHCP server fails, the other DHCP server utilizes the whole scope after the maximum client lead time period has elapsed.
D. Incorrect. Hot standby mode is a high-availability solution. Hot standby mode has the primary DHCP server respond to DHCP clients except in the case when the primary is unavailable at which point the hot standby server begins leasing addresses.
4. Correct answer: B
a. Incorrect. In a split scope, part of the scope is hosted on one DHCP server, and a smaller part is hosted on a second DHCP server. Traditionally the split between the first and second DHCP servers is 80/20. Use this option when one or both DHCP servers are not running the Windows Server 2012 operating system. This solution does not distribute IP addresses in a load-balanced manner.
B. Correct. Load sharing has each partner DHCP server lease addresses from the scope to DHCP clients. In the event that one DHCP server fails, the other DHCP server utilizes the whole scope after the maximum client lead time period has elapsed.
C. Incorrect. Hot standby mode has the primary DHCP server respond to DHCP clients except in the case when the primary server is unavailable, at which point the hot standby server begins leasing addresses. This solution does not distribute IP addresses in a load-balanced manner.
D. Incorrect. Superscopes enable you to combine existing scopes for administrative purposes. They are often implemented when there are multiple logical subnets used on the same physical network. Superscopes do not provide high availability.
202 CHAPTER 3 Advanced DHCP and DNS
Lesson 21. Correct answer: B
a. Incorrect. Members of the IPAM Users group are unable to view IP address tracking information. This information can only be viewed by users that are members of the IPAM IP Audit Administrators and IPAM Administrators local groups.
B. Correct. This information can only be viewed by users that are members of the IPAM IP Audit Administrators and IPAM Administrators local groups.
C. Incorrect. Members of the IPAM MSM Administrators group are unable to view IP address tracking information. This information can only be viewed by users that are members of the IPAM IP Audit Administrators and IPAM Administrators local groups.
D. Incorrect. Members of the IPAM ASM Administrators group are unable to view IP address tracking information. This information can only be viewed by users that are members of the IPAM IP Audit Administrators and IPAM Administrators local groups.
2. Correct answer: C
a. Incorrect. Only members of the IPAM ASM Administrators group and the IPAM Administrators group are able to manage the IP address space on an IPAM server.
B. Incorrect. Only members of the IPAM ASM Administrators group and the IPAM Administrators group are able to manage the IP address space on an IPAM server.
C. Correct. Members of the IPAM ASM Administrators group are able to manage the IP address space on an IPAM server.
D. Incorrect. Only members of the IPAM ASM Administrators group and the IPAM Administrators group are able to manage the IP address space on an IPAM server.
3. Correct answer: B
a. Incorrect. You track by client ID when you know a computer’s MAC address to determine which IP addresses the computer was assigned.
B. Correct. You track by client ID when you know a computer’s MAC address to determine which IP addresses the computer was assigned.
C. Incorrect. You track by client ID when you know a computer’s MAC address to determine which IP addresses the computer was assigned.
D. Incorrect. You track by client ID when you know a computer’s MAC address to determine which IP addresses the computer was assigned.
4. Correct answers: A and C
a. Correct. These servers need to have the appropriate IPAM-related GPOs apply to them before their status can change to unblocked. This involves creating the GPOs
Answers CHAPTER 3 203
using the Invoke-IpamGPOProvisioning cmdlet and then ensuring that they apply to the servers that host the services that IPAM will manage.
B. Incorrect. These servers need to have the appropriate IPAM-related GPOs apply to them before their status can change to unblocked. This involves creating the GPOs using the Invoke-IpamGPOProvisioning cmdlet and then ensuring that they apply to the servers that host the services that IPAM will manage.
C. Correct. These servers need to have the appropriate IPAM-related GPOs apply to them before their status can change to unblocked. This involves creating the GPOs using the Invoke-IpamGPOPRovisioning cmdlet and then ensuring that they apply to the servers that host the services that IPAM will manage.
D. Incorrect. Restarting the IPAM server does not alter the blocked status of the servers that you want to manage. These servers need to have the appropriate IPAM-related GPOs apply to them. This involves creating the GPOs using the Invoke-IpamGPOPRovisioning cmdlet and then ensuring that they apply to the servers that host the services that IPAM will manage.
Lesson 31. Correct answer: B
a. Incorrect. Members of the IPAM Users group are unable to view IP address tracking information. This information can only be viewed by users that are members of the IPAM IP Audit Administrators and IPAM Administrators local groups.
B. Correct. This information can only be viewed by users that are members of the IPAM IP Audit Administrators and IPAM Administrators local groups.
C. Incorrect. Members of the IPAM MSM Administrators group are unable to view IP address tracking information. This information can only be viewed by users that are members of the IPAM IP Audit Administrators and IPAM Administrators local groups.
D. Incorrect. Members of the IPAM ASM Administrators group are unable to view IP address tracking information. This information can only be viewed by users that are members of the IPAM IP Audit Administrators and IPAM Administrators local groups.
2. Correct answer: C
a. Incorrect. Only members of the IPAM ASM Administrators group and the IPAM Administrators group are able to manage the IP Address space on an IPAM server.
B. Incorrect. Only members of the IPAM ASM Administrators group and the IPAM Administrators group are able to manage the IP Address space on an IPAM server.
C. Correct. Members of the IPAM ASM Administrators group are able to manage the IP address space on an IPAM server.
204 CHAPTER 3 Advanced DHCP and DNS
D. Incorrect. Only members of the IPAM ASM Administrators group and the IPAM Administrators group are able to manage the IP address space on an IPAM server.
3. Correct answer: B
a. Incorrect. You track by client ID when you know a computer’s MAC address to determine which IP addresses the computer was assigned.
B. Correct. You track by client ID when you know a computer’s MAC address to determine which IP addresses the computer was assigned.
C. Incorrect. You track by client ID when you know a computer’s MAC address to determine which IP addresses the computer was assigned.
D. Incorrect. You track by client ID when you know a computer’s MAC address to determine which IP addresses the computer was assigned.
4. Correct answers: A and C
a. Correct. These servers need to have the appropriate IPAM-related GPOs applied to them before their status can change to unblocked. This involves creating the GPOs using the Invoke-IpamGPOProvisioning cmdlet and then ensuring that they apply to the servers that host the services that IPAM will manage.
B. Incorrect. These servers need to have the appropriate IPAM-related GPOs applied to them before their status can change to unblocked. This involves creating the GPOs using the Invoke-IpamGPOProvisioning cmdlet and then ensuring that they apply to the servers that host the services that IPAM will manage.
C. Correct. These servers need to have the appropriate IPAM-related GPOs applied to them before their status can change to unblocked. This involves creating the GPOs using the Invoke-IpamGPOPRovisioning cmdlet and then ensuring that they apply to the servers that host the services that IPAM will manage.
D. Incorrect. Restarting the IPAM server does not alter the blocked status of the servers that you want to manage. These servers need to have the appropriate IPAM-related GPOs applied to them. This involves creating the GPOs using the Invoke-IpamGPOPRovisioning cmdlet and then ensuring that they apply to the servers that host the services that IPAM will manage.
715
Index
multi-factor authentication 671relying party 660relying party trust 660Workplace Join 669–670
AD LDS (Active Directory Lightweight Directory Ser-vices) 663
administrative role separationcertificate permissions and 215configuring 264–268
adprep.exe 9AD RMS (Active Directory Rights Management Ser-
vices) 580–591Administrators 586apply templates automatically 590–591backing up 591certificates and licenses 582–583configuration database 591Exclusion policies 589–590installing and configuring 580–581Super Users 586–587templates 583–585Trusted publishing domains (TPDs) 588–589Trusted user domains (TUDs) 587–588
advanced DHCP solution implementation 134–135DHCP failover 139–140DNS registration 137–138Multicast scopes 135–136Name Protection 138–139Split scopes 136–137Superscopes 134–135
Advanced DNS options 126–129DNS cache locking 126DNS recursion 127DNS socket pool 126Netmask ordering 128
Advanced Encryption Services (AES) . See AESAES (Advanced Encryption Services) 6
AAccess Denied Assistance 577–578Active Directory And Trusts console 13Active Directory Application Mode (ADAM) 663Active Directory Certificate Services 205–300
installing and configuring 205–218Active Directory detached clusters 454–455Active Directory Domains And Trusts console 4, 10Active Directory Federation Services . See AD FSActive Directory Lightweight Directory Services (AD LDS)
663Active Directory Recycle Bin 6
forest functional levels and 8Active Directory Rights Management Services . See AD
RMS (Active Directory Rights Management Services)
Active Directory Sites And Services console 92Active Directory Users And Computers console 4
selective authentication and 17UPN suffixes and 10
ADAM (Active Directory Application Mode) 663AD CS Configuration Wizard 234address block 148address range 135, 139, 143, 148, 149address space 119, 133, 136, 148, 150, 152address tracking 150–153Add Roles And Features Wizard dialog box 97, 243AD FS 657–665
attribute store 659claim 658claim rules 658claims provider 659claims provider trust 661claims rules 664–665configuring certificate relationship 662–663configuring Web Application Proxy 666–667
716
affinity 463–464AIA (Authority Information Access) distribution points
211Allow Private Key To Be Exported (certificate template
settings) 221application partitions 73Archive subject’s encryption private key 228Archive Subject’s Encryption Private Key (certificate tem-
plate settings) 221@ symbol, using UPN suffixes and 10attribute-level replication 73attribute store, AD FS 659authentication
forest-wide 16intraforest 4policy silos 7selective 16
Authentication Type for CES page (AD CS ConfigurationWizard) 239autoenrollment, certificate management 225–226Autoenroll permission (certificates) 226Automatic certificate renewal 224–225
Bbacking up AD RMS . See AD RMS (Active Directory
Rights Management Services)backup, CAs (certificate authorities) 216–218bidirectional trust 14Branch Cache
Client configurationHosted Cache Server (Uses HTTPS) 384Peer Discovery (Uses WSD) 384
BranchCache 61, 380–384BranchCache for Network File Server 381–382Client configuration 382–384
Configure Hosted Cache Servers 383Content Retrieval (Uses HTTP) 383Set BranchCache Hosted Cache Mode 383Enable Automatic Hosted Cache Discovery By
Service Connection Point 383Hosted Cache Server Configuration 380–381
CCA Compromise issue, revoking a certificate, 231CA for CES page (AD CS Configuration Wizard) 239CAs (certificate authorities)
backup and recovery 216–218
CA Type page (AD CS Configuration Wizard) 236CDPs (CRL Distribution Points) 212–213central access policies, (DAC) 575–576central access rules, (DAC) 573Certificate Enrollment Policy Web Service 207–208Certificate Enrollment Web Service 208Certificate Hold issue, revoking a certificate 231Certificate Revocation List (CRL)
Distribution Points 212certificates
managementautoenrollment 225–226key archiving and recovery 227–229renewal 224–225
recovery, performing 292–296revocation 223, 288–292templates 221, 224, 287
Certificate Services 205–300CA backup and recovery 216–218CDPs (CRL Distribution Points) 212–213certificate authority 206–208installing and configuring 205–218
administrative role separation 215–216online responders 214–215
management 224autoenrollment 227key archiving and recovery 227renewal 224–225
Certificate Services Client-Auto-Enrollment grouppolicy 226Certification authority 207Certification Authority Backup Wizard 216Certification Authority Web Enrollment 207Certutil-backup c:\backup command 217Change of Affiliation issue, revoking a certificate 231checkpoints 512child domains 3claim rules, AD FS 658claims, AD FS 658claims-based authentication 658claims provider, AD FS 659claims provider trust, AD FS 661claims rules, AD FS 664–665Cluster-Aware Updating (CAU) 449–451Cluster networks 448–449Cluster quorum modes 443–445
Node and disk majority 443Node and file share majority 443Node majority 443No Majority: Disk Only 443
affinity
717
Cluster Shared Volumes 446–447, 506–510Cluster Shared Volumes (CSVs) 506Cluster storage and cluster shared volumes 445–446Compatibility (certificate template settings) 221Configure file access auditing
Configure file access auditing 414–417Configuring advanced file services 373–387Configuring and managing backups 301–318Configuring and managing failover clustering 441–455Configuring and optimizing storage 388–397Confirmation page (AD CS Configuration Wizard) 238conflict resolutions 75Constrained delegation 5Continuously available file shares 454Credential page (AD CS Configuration Wizard) 234Credential Security Support Provider (CredSSP) 510CRL (Certifcate Revocation List) 212
CRL Distribution Points (CDPs) and, 212–213Cryptography for CA page (AD CS Configuration Wizard)
237
DDAC (Dynamic Access Control) 567–579
central access policies 575–577central access rules 573–574configuring
Group Policy support 569resource properties 571–573user and device claims 569–570
staging 576–577Data Protection Manager 316–317Delegated administration 129–130Delta CRL list 212device claims (DAC), configuring 570DFS (Distributed File System) 61, 85
replicating 5DHCP failover 139–143
Hot standby mode 139Load sharing mode 140
Distributed File System (DFS) 61, 85replicating 5
DNS cache locking 126–127, 132DNS (Domain Name System)
SRV record registration, managing 68zones, storing 5
DNS event logs 122–123DNSKEY 121DNS registration 134, 137, 141
DNSSEC 119–122, 126, 131–132DNS socket pool 120, 126, 132domain controllers
functional levels 6Domain Name System (DNS) . See DNSdomain quarantine 21domains
configuring 1–11controllers, moving 69functional levels 4–8partitions 73trees 3trustiong 14upgrading 9
Domains And Trusts (Active Directory) console 10Dynamic Access Control . See DAC (Dynamic Access
Control)dynamic witness 527
EEnroll permission (certificates) 226Enterprise Admins group 7enterprise root CA
deploying and configuring 232–241enterprise root CAs (certificate authorities) 209–212, 218enterprise subordinate CA 210, 219
deploying 241enterprise subordinate CAs deployment 241–246Exclusion policies . See AD RMS (Active Directory Rights
Management Services)external trusts 13, 17
FFailover and preference settings 452–453Failover clustering 442–443Features on Demand 396–397Federation server role 658File access auditing 385–387File classification 384–385File Replication Service (FRS) 85File screens 374–377File Server Resource Manager (FSRM) 374Filtering 463–464Filtering and affinity 463–464
Disable The Port Range 464Multiple Host 464
Filtering and affinity

718
Network 464None 464Single 464
Single Host 464fine-grained password policies 6force quorum resiliency 527forests
configuring 1–11functional levels 7trusts 14, 16upgrading 9
forest-wide authentication 16FQDN (full qualified domain name) 3FRS (File Replication Service) 85fully qualified domain name (FQDN) 3functional levels
domain 4–7forest 7
GGet-ADTrust cmdlet 21GlobalNames zones 124–125group managed service accounts 6
Hhardware security module (HSM) 212hared Nothing Hyper-V live migration 509hierarchies, CA 208–209Hot standby mode (DHCP failover) 139Hyper-V 6Hyper-V hosting 518Hyper-V Replica 518–526Hyper-V Replica Broker 525–526
Iinstallation
AD RMS 581–582Internet Protocol (IP) addresses 60intraforest authentication 4IPAM Administrators permissions 152IPAM ASM Administrators permissions 152IPAM (IP Address Management) 143–152
Configure IPAM database storage 144–145Configure server discovery . See also Server discoveryDeploy IPAM 144
Introduction to IPAM 144IPAM administration 152Managing the IP address space 148
IPAM IP Audit Administrators 152IPAM MSM Administrators permissions 152IPAM Users permissions 152IP (Internet Protocol) addresses 60iSCSI initiator 392–394iSCSI target and initiator 389–392iSCSI targets 388–390iSNS server 392–394iSNS Server Properties dialog box 392, 428–429, 429issuing CAs (certificate authorities) 208
J
KKCC (knowledge consistency checker) 74/kcc switch (repadmin) 84KDC (key distribution center) 6_kerberos record 68Kerberos V5
authentication protocol 13realm 20
key distribution center (KDC) 6key recovery agent (KRA) certificate 229–231, 277
configuring 268–273requesting 273–277
Key Signing Key (KSK) 121knowledge consistency checker (KCC) 74
LLastLogonTimestamp attribute 5_ldap SRV record 68Load sharing mode (DHCP failover) 140
MManaging cluster hosts 461–462
Drainstop 461Resume 462Start 461Stop 461Suspend 462
Migrating and upgrading clusters 451–452
fine-grained password policies
719
practice exercises
Move Server dialog box 70multicast address 135, 141Multicast scopes 135, 136, 141multidomain environments 1–8multi-factor authentication, AD FS 671–672multiforest environments 1, 8
multidomain enviroments and 2multi-master replication 73Multisite clustering, site-level fault tolerance 526–527
NName Protection 134, 138, 139, 142name suffix routing 22netdom.exe 13, 20Netlogon service on domain controllers 69Netmask ordering 128, 132, 133Network Device Enrollment Service 207–209Network Load Balancing (NLB) 457–458Network Load Balancing prerequisites 458–459New-ADReplicationSite Windows PowerShell cmdlet 62New NLB PowerShell cmdlets 465–466New Technology File System (NTFS) 568Next Secure (NSEC/NSEC3) record 121NLB cluster operation modes 459–460
IGMP multicast 460Multicast mode 460Unicast mode 459
NLB clusters, upgrading 465
OOCSP (Online Certificate Status Protocol) Response
Signing Certificate template 214offline root CA 211Online Responder role service 207
certificate revocation 214–215configuring 257–264
Ppartitions, replicating 72password policies 6Password Replication Policy tab 77passwords
replacated ADL-DC, viewing 107RODC replication, configuring 77
perimeter networks, standalone subordinate CAs 211
policy silos 7Port rules 462–463practice exercises
acquiring certificates for each server 691–694Add a cluster node 486–488apply RMS templates using file classification 649–651Backup data to Windows Azure Backup 362–367Begin creating a forest trust relationship 37–40Boot into Safe Mode 348–350Change the quorum configuration 488–489Cluster-Aware Updating 496–500Complete the creation of the forest trust relationship
between contoso.com and margiestravel.com 40–42
configure Access Denied Assistance 627–629Configure a certificate template for autoenrollment
and key recovery 279–282Configure a certificate template to support private key
archival and recovery and reenroll all certificate holders 287–288
Configure a CRL distribution point 253–257Configure additional UPN suffixes 50Configure ADL-DC as an RODC 102–105Configure administrative role separation 264–268Configure a highly available file share 491–493Configure a key recovery agent certificate template
268–273Configure and view the DNS event log 165–166Configure an Online Responder 257–264configure application exclusions 648Configure a shortcut trust 50–53Configure a standalone CA 250–253Configure a standalone computer for use with Win-
dows Azure Backup 354–358Configure BranchCache policies 431–435Configure CBR-DC for local backup 330–334Configure DHCP failover 184–186Configure DHCP Name Protection 180Configure DNSSEC 156–158Configure failover settings, failback settings, and move
node 493–495Configure file classification 410–411Configure Groupt Policy to support autoenrollment,
credential roaming, and automatic renewal 282–286
Configure Hyper-V to support live migration 552–553Configure identical virtual switches on MEL-HV-1 and
MEL-HV-2 536–538
720
practice exercises
Configure IPAM GPOs and server discovery 187–189Configure key recovery 277–278Configure MEL-DC 155–156Configure MEL-DC as an additional domain controller
96–100Configure name suffix routing 43–45Configure port rules and affinity 473–475Configure quota templates and quotas 402–407configure resource properties for DAC 607–608Configure RODC replication 105–107Configure selective authentication 45–49configure staging 629–631configure template distribution 647–648Configure TEST-ONE for replication 547–550Configure the name resolution policy 158–160configure user and device claims for DAC 602–607Configure Windows Azure Backup 358–362configuring a claims provider trust 702–703configuring CA trust in each forest 689–691configuring claim rules 705–714configuring DNS forwarding 675–677configuring relying party trust 699–701Connect to an iSCSI target 421–423create a central access policy 624–626Create a child domain with a contiguous namespace
27–30Create a copy of a running virtual machine 558–559Create Active Directory sites 89–90Create Active Directory subnets 91–92Create a DHCP superscope 173–177create AD RMS templates 642–646create a file classification rule 611–618Create and assign an iSCSI target 417–421Create and manage a GlobalNames zone 163–165Create a new storage pool and thin provisioned virtual
disk 423–426Create a split scope 177–180Create a three-node NLB cluster 470–473Create a two-node failover cluster 485–486create central access rules 621–624Create file groups, file screen templates, apply file
screens, and apply file screen exceptions 407–410
Create new forest 33Create new multicast scopes 182–183Create shared storage for failover clustering 477–478Create site links 93–94create the AD RMS Super Users group 641–642
Create two virtual machines on MEL-HV-1 544–547create users and groups for DAC 598–602Deploy and configure an enterprise root CA 232–241Deploy an enterprise subordinate CA 241–246Deploy BranchCache on Windows Server 2012 R2
435–437Deploy FSRM 401–402deploying AD CS in each forest 678–680deploying AD FS in each forest 694–699Enable reverse replication 559–561enabling Groupt Policy support for DAC 595–598Increase the size of the DNS socket pool 161Install and activate the DHCP role 168–173Install and configure a highly available file server
489–491install and configure the AD RMS server role 635–641Install a standalone subordinate CA 246–250Install failover cluster features 483–485Install the Hyper-V role on MEL-HV-1 and MEL-HV-2
531–535Install the IPAM feature 186–187Install the iSNS server and register the initiator
426–429Install Windows Server Backup 327–330Manage servers using IPAM 194–195Modify Boot Configuration Data store 350–354Modify DNS Cache Locking 161–163Modify site link cost and replication schedule 94–95Monitor replication with repadmin 110–112nstall the Network Load Balancing feature on ADL-DC,
CBR-DC, and MEL-DC 469–470onnect potential cluster nodes to shared storage
479–483Perform a backup over the network 336–338Perform a backup to a local volume 334–335Perform a full volume recovery using Windows Server
Backup 341–345Perform an unplanned failover 561Perform a virtual machine export 558Perform certificate recovery 292–296Perform certificate revocation 288–291Perform full server recovery over the network 345–348Perform live migration of TEST-TWO 553–556Perform storage migration 556–557Prepare ADL-DC, MEL-DC, and CBR-DC for exercises
468–469Prepare a domain controller to host a child domain
with a contiguous namespace 25
721
Rsers And Computers (Active Directory) console
Prepare a domain controller to host a new forest 32–33
Prepare domain controller to host the wingtiptoys.com tree in the contoso.com forest 30
Prepare for Windows Recovery Environment 344prepare infrastructure for an AD RMS deployment
632–635Prepare MEL-DC and ADL-DC 400–401Prepare MEL-DC and CBR-DC for exercises 326–327prepare separate forests 673–675Prepare servers for live migration 538–541Prepare servers for replication 541–544Prepare to configure a forest trust relationship 34–37preparing claim data 703–705preparing MEL-DC and ADL-DC 594–596preparing MEL-DC for certificate publication 684–688preparing SYD-DC for certificate publication 680–684preparing the server for file classification for DAC 609Promote domain controller for new tree in contoso.
com forest 31–32Remove an NLB cluster 475–476Remove feature files 429–431Remove the RODC and reset accounts 113–114Request a key recovery agent certificate 273–276Restore data from Windows Azure Backup 367–369run and verify the file classification 619Simulate unplanned failure 495–496Use IPAM to create a DHCP scope 196Use IPAM to manage IP addresses 197–198Use Vssadmin 338–340Verify netmask ordering and disable recursion 167Verify site placement and trigger replication 101Verify the classification 413–414View account passwords replicated to ADL-DC
107–110View replication health and perform planned failover
of TEST-ONE to MEL-HV-2 550–552preferred owner 452–453Private Key 217Private Key page (AD CS Configuration Wizard) 237private keys 287Publish Certificate In Active Directory (certificate tem-
plate settings) 221
Q/queue switch (repadmin) 85Quotas 377–379
Hard Quota 377Soft Quota 378
RRDS (Remote Desktop Services) 6, 17read only domain controllers (RODC) 61, 76
replication, configuring 105realm trusts 13, 20Recovering servers 318–324
BCD (Boot Configuration Data store) 324BCDEdit 324
Restore from backups 318–319Restore from Windows Azure Backup 320–321Restore to an alternative location 320Safe mode, data recovery 322–323Windows Recovery Environment 321–322
recovery, certificate management 216–218Recycle Bin (Active Directory) 6
forest functional levels and 8relative identifiers (RIDs) 2relying party server, AD FS 660relying party trust, AD FS 660RemoteApp 6Remote Desktop Services . See RDSrenewal, certificate management 224–225Renewal Period (certificate template settings) 221Repadmin tool 83–85Replicate Now dialog box 101/replicate switch (repadmin) 85replication 59–118, 72–88
monitoring and managing 81multi-master 73
Resource Record Signature (RRSIG) record 120/replsingobj switch (repadmin) 85revocation, certificate management, 223–225Revoked Certificates Properties, 257Revoked Certificates Properties dialog box 223RIDs (relative identifiers) 2/rodcpwdrepl option (repadmin) 85RODC (read only domain controllers) 61, 76
replication, configuring 105Role specifc backups 312–313root CAs (certificate authority) 208
enterprise root CA 232–241offline root CAs 211
root domain names 3Rsers And Computers (Active Directory) console
selective authentication, configuring 17
722
SSafe mode, data recovery 322–323
Safe mode 323Safe mode with command prompt 323Safe mode with networking 323
schemasmulitforest environments and 8partitions 73
Security (certificate template settings) 221selective authentication 5
configuring 16Select Role Services to Configure page (AD CS Configu-
rationWizard) 234Server discovery 145–148Server for NFS 379–380
Server for NFS Data Store 379SetADDomainMOde Windows PowerShell cmdlet 4Set-ADForestMode Window PowerShell cmdlet 7Setup Type page (AD CS Configuration Wizard) 236Shared virtual hard disks 447–448shortcut trusts 13, 18/showutdvec switch (repadmin) 85SID filtering 21silos (policy) 7site-level fault tolerance 518–529
dynamic witness 527Force quorum resiliency 527Hyper-V Replica 518–526
planned failover 523–524unplanned failover 524–525
Hyper-V Replica Broker 525–526multisite clustering 526–527tie breaker for 50% node split 527virtual machine network health detection 528
site links 64bridges 66
sites 59–118configuring 60–68
Split scopes 136, 137, 141SRV records registration 68staging (DAC) 576–577standalone root CAs 210–211
configuring 250subordinates 246
Storage tiers 398–399subnets
configuring 60–68Superscopes 134, 135, 141Superseded reason, revoking a certificate (certificate
template settings) 231Superseded Templates 221System Center 2012 R2 Configuration Manager, Ex-
change Server 61SYSVOL replication, upgrading 85
Ttemplates, AD RMS 583–584thin provisioned virtual disk 396Thin provisioning and trim 394–396tie breaker for 50% node split 527Tiered storage 398–399token-decrypting certificates, AD FS 663token-signing certificates, AD FS 663transtitve trust 14trigger replication 101Trim 396Trust anchor 121Trusted publishing domains (TPDs) . See AD RMS (Active
Directory Rights Management Services)Trusted user domains (TUDs) . See AD RMS (Active Direc-
tory Rights Management Services)trusting domains/forests 14trust relationships 4trusts 13–21two-way trust 14
Safe mode, data recovery
723
UUnderstanding Network Load Balancing 456–466unidirectional trust 14update sequence numbers (USNs) 75Upgrading an NLB cluster 464–465UPN (user principal names) suffixes 10USB (Universal Serial Bus) ports 212
hardware security module (HSM) 212user claims (DAC), configuring 570user principal names (UPN) suffixes 10Users And Computers (Active Directory) console 4
selective authentication and 17UPN suffixes and 10
USNs (update sequence numbers) 75
VValidity Period (certificate template settings) 221Validity Period page (AD CS Configuration Wizard) 220virtual desktops 6virtual machine network health detection 528virtual machines
movement 505–516failover clustering 506–508Hyper-V live migration 509–511import/export 515–516storage migration 512–514
Vssadmin 313–316
WWAN (wide-area network) 61Web Application Proxy 658Web Application Proxy server 667–668wide-area network (WAN) 61Windows Azure Backup 306–315
Backing up data 310Preparing 308Recovery Services 312Restore from 320–321
Windows PowerShell Credential pop-up 241Windows Server 2003 domain functional level 5Windows Server 2008 domain functional level 5Windows Server 2008 R2 domain functional level 5, 6Windows Server Backup 302–306
Backing up data 306Backup locations 304
PowerShell cmdlets 305–306Workplace Join, AD FS 669–670
ZZone level statistics 131
Cache statistics 131DNSSEC statistics 131Error statistics 131Master statistics 131Query statistics 131Record statistics 131Recursion statistics 131
Zone level statistics