Trade the facts: consider price action -...
54
Brought to you by A04 Chapter 04 Trade the facts: consider price action 1. Supply and demand - still abstract for you? 2. Identify support and resistance on a chart 3. Trends, pullbacks, breakouts, ranges: how the market expresses itself 4. Measuring the movement ahead Topics covered in this chapter: • Get a deeper level of understanding by learning how to look beyond the charts and understand the supply, the demand and the order flow responsible for the creation of price action. • How to look at charts without indicators. • How to maximize gains and reduce risk with the precise identification of recurring price action patterns. • More than 30 illustrations to help you recognize breakouts, reversals, pullbacks and gaps . • Stop chasing the market and learn to anticipate the movements in the exchange rates with a proactive attitude. • The most frequent mistakes aspiring traders do when supply, demand and order flow are not well understood concepts.
Transcript of Trade the facts: consider price action -...

Brought to you by
A04 Chapter 04Trade the facts: consider price action
1. Supply and demand - still abstract for you?
2. Identify support and resistance on a chart
3. Trends, pullbacks, breakouts, ranges: how the market expresses itself
4. Measuring the movement ahead
Topics covered in this chapter:
• Get a deeper level of understanding by learning how to look beyond the charts and understand the supply, the demand and the order flow responsible for the creation of price action.
• How to look at charts without indicators. • How to maximize gains and reduce risk with the precise
identification of recurring price action patterns. • More than 30 illustrations to help you recognize breakouts,
reversals, pullbacks and gaps. • Stop chasing the market and learn to anticipate the movements in
the exchange rates with a proactive attitude. • The most frequent mistakes aspiring traders do when supply,
demand and order flow are not well understood concepts.

Brought to you by
Understanding what is happening behind the scenes is the key to develop any trading method. Don't look at candles on your screen as just red and green pictures and patterns as they are the expression of supply and demand. Understanding these concepts will make all the difference in your Forex trading career. It will give you the ability to trade based on what the market is expressing through price action. This resource can be useful to shift through the mountain of news and information that is produced every day and trade what you really see on the charts.
"What is Price Action?" is a question frequently asked by aspiring traders. This chapter attempts to explain that there are no secrets when it comes to exploring the foot print of exchange rates across a chart. Nevertheless price action is more than just swing highs and swing lows. Rest assured this chapter will not leave you in the dark.
It’s easy to brush support and resistance analysis off as not important. Although obvious, this concept is rather abstract and requires some practice to be effectively used. Understanding a concept from a theoretical point of view is not synonymous with having integrated it into the practice. This section breaks down the dynamics of price action, and with the help of lots of charts, you will thoroughly understand this concept and learn how to trade with it. This new knowledge will make you see the charts with a new sense of objectivity and trade in a much more relaxed and proactive manner.
© Learning Center – Unit A – Chapter 4– p.2/54
Brought to you by
1. Supply and demand - still abstract for you?
The reactions of traders towards the market is what moves the exchange rates. These, in turn, reflect all the information: generally speaking, prices fall when most participants think they are too high and rise when they are considered too low. There is no inherent logic to the market nor a higher intelligence that can be decoded. It is rather the opposite: the market consists of a mass of rational individuals whose reactions are certainly not always driven by rational logic. They are more likely to vacillate between periods of greed and periods of fear. There are so many market participants and so many reasons why each one of them decides to buy or sell at a given moment that no system would be capable of decoding this mass behavior considering all its variables.
Commonly, it is said that chartism, by its very nature, is more an art than a science. This is a correct postulate if we consider that markets are made by human beings and not by analytical methods. All traders, in some way, pay attention to price levels but the way they react to them is never exactly the same.
Becoming a trader requires you to learn how to behave in such an unpredictable environment. It's essential to create a strategic framework with which identify the behavior patterns made by market participants. This knowledge will give the trader a statistical advantage to act upon the market.
To start developing your analytical skills, it is essential to be able to identify supply and demand levels and to measure their strength. One of the advantages of supply and demand levels is their consistency and the fact that they remain visible in a chart for days, weeks, and in some cases for months and years.
Not surprisingly, most trading manuals start by shedding light on this issue as it's one of the pillars of technical analysis. By its logic, it's a simple concept to understand, however, it's also where most inexperienced traders fail. Who has not opened a position and seen how the market immediately turned in the opposite direction to finally liquidate it at the stop loss? To compound the problem: how many times has the market turned to your original direction after the position has been closed for a loss?
The PFX Team invites you to take a step back to economics 101 to make sure you understand the subject:
Supply is the measure of how much of a particular commodity is available at any one time. As the supply of a currency increases, the currency becomes less valuable. Conversely, as the supply of a currency
© Learning Center – Unit A – Chapter 4– p.3/54

Brought to you by
decreases, the currency becomes more valuable.
On the other side of the economic equation, we find demand. Demand is the measure of how much of a particular commodity people want at any one time. Demand for a currency has the opposite effect on the value of a currency than does supply. As the demand for a currency increases, the currency becomes more valuable. Conversely, as the demand for a currency decreases, the currency becomes less valuable. To illustrate how supply and demand interact to determine an ideal exchange rate in the Forex market, we are going to use a standard supply and demand graph. Supply is represented by a diagonal line that is sloping up from a low point at the left end of the line to a high point at the right end of the line. Demand is represented by a diagonal line that is sloping down from a high point at the left end of the line to a low point at the right end of the line. Finally, the ideal exchange rate is represented by the point where the two diagonal lines intersect.
Continue Reading...
Next, Sam Seiden recalls what are the basic conditions in a free floating currency market:
The foreign currency (Forex) market is where global exchange rates are derived for everyone including market speculators and end users of currency. People and companies buy and sell currency much like you would buy and sell anything else. Strong economies have strong currencies. When we trade the Forex markets, we are trading economies. Therefore, supply and demand for currency depends on the current and expected perceived health of a country's economy. [...]
Restrictions on capital flows have been removed in most countries, leaving the market forces free to adjust foreign exchange rates according to their perceived values based on pure supply and demand for currency.
Continue Reading...
In another article, Sam Seiden resumes the main principles which characterize today's financial markets.
The first principle states that "Price movement in any free market is a function of an ongoing supply and demand relationship within that market". The second law states that "Any and all influences on price are
© Learning Center – Unit A – Chapter 4– p.4/54

Brought to you by
reflected in price." Lastly, the third law says that "The origin of motion/change in price is an equation where one of two competing forces (buyers and sellers) becomes zero at a specific price." First, understand that there are always two competing forces at work in the market, buyers and sellers. Our goal is to quantify those forces and identify price levels where the imbalance is greatest as this creates change, or movement in price.
Continue Reading...
What is a support?
A support level is a price level below the current one, where the demand was stronger than supply, driving the price upwards. Demand is synonymous with bullish, bulls and buying.
At a support level, general expectation dictates that demand will outstrip supply, so a fall in price would be slowed down by the time price reaches that level. Consequently the price is expected to bounce back upward because support is the price level at which demand is thought to be strong enough to prevent the price from declining further.
The market, understood as the will of millions of investors, considers a price level low enough and acceptable to purchase, so when the price reaches that value, purchases
© Learning Center – Unit A – Chapter 4– p.5/54

Brought to you by
soar. The logic dictates that as the price declines towards support and gets cheaper, buyers become more inclined to buy. As demand increases, prices advance higher.
What is a resistance?
On a chart, a resistance level is an identified maximum level where the supply has exceeded the demand, stopping the upward momentum in the exchange rate, and eventually making it drop from there.
Supply is synonymous with bearish, bears and selling.
If the market believes that a price level is very high, sales soar at the time price reaches that value.
In other words, a resistance level is a reference price where selling pressure is greater than the demand. In many cases this pressure is so great it can halt the rapid escalation of prices.
The levels of support and resistance are detected primarily by analyzing the evolution of price action on a chart and identifying where prices halted after a rising or falling period.
© Learning Center – Unit A – Chapter 4– p.6/54

Brought to you by
Resistance thus is the price level at which selling pressure is expected to be strong enough to prevent the price from rising further. The logic dictates that as the price rises towards resistance, sellers become more inclined to sell and buyers become less inclined to buy. When the price reaches the resistance level, it is believed that supply will overcome demand and prevent the price from rising above it.
In this lesson and adjacent video of the Forex Essentials Course, the PFX team shows different chart types by looking at support and resistance levels.
Additionally, James Chen provides us with valuable information about another type of charts, the Point and Figure, to visualize price action:
In short, some may characterize point & figure charting as trading based upon pure price action. This is because only price, which is undeniably the most important aspect of technical analysis, is customarily included on this type of chart (in the form of X's and O's). Other data that can readily be found on bar and candlestick charts, like time and period opens/closes, are generally excluded on point & figure charts. This leaves only the uncluttered purity of price action.
Continue reading...
In another blog post James also speaks about a variation of the Japaneese Candlestick charts, the Heikin Ashi:
The distinct look of Heikin Ashi charts is noticeable on the very first glance. During trending periods, virtually uninterrupted series of solid or hollow candles are the rule. This means that even during minor retracements in a strong trend, Heikin Ashi charts will essentially show a one-directional run. Therefore, during these trending periods, Heikin Ashi charts work their best in indicating whether a trend has ended or is still intact.
Continue reading...
As you notice, there are different ways to visualize price action. Important for you to know is that all price actions as you see on the charts are derived from market participants buying and selling currencies. Despite the fact there are several ways to
© Learning Center – Unit A – Chapter 4– p.7/54

Brought to you by
capture price action on a chart, we make use of Japanese candlesticks throughout the chapters of the Learning Center.
What happens at support and resistance levels?
If you have read texts on chartism, then you already know the saying: "When a resistance is broken up, we are in an uptrend and resistance becomes support. And vice versa, when support is broken down, we are in a down trend and support becomes resistance.” Despite being true, this theory does not explain what really happens behind the charts.
A simplistic explanation such as: "Who cares how it works? The truth is that it works" or "This works because everyone uses it" should not suffice when seeking to understand the dynamics of supply and demand.
The concept of support and resistance is quite easy to understand, and it has some components which will improve your chart analysis: the relation between supply and demand which exists at any price level can be measured using several procedures as you will learn here. Also the time factor is an important ingredient in the analysis and should be also considered. This Unit and the Practice Chapter A thoroughly deal with both aspects.
Let's start to visualize the potential amount of supply and demand on a chart.
In this EUR/USD 4HR chart you can see how the supply is running out as the price moves away from the resistance area at the initial high of 0.9080, from where it trends downwards. At 0.9080 is where most of the supply is concentrated until it gets exhausted at the low level around 0.8750.
© Learning Center – Unit A – Chapter 4– p.8/54

Brought to you by
Similarly, we see from the chart below that demand decreases as the price rises after bouncing at the low level of 0.8750, when the demand was at its highest.
A support level is a price level considered attractive by a large number of buyers. If the demand to buy a given currency is high enough (higher than the willingness to sell), a downward move in the exchange rate will eventually slow down and even reverse. This is what happened around the 0.8750 level: the strength of the buyers was able to stop the pressure from the sellers. Does this happen always? Well, not
© Learning Center – Unit A – Chapter 4– p.9/54

Brought to you by
always but it happens with an astonishing high frequency.
James Chen tells us more about what is usually called a self-fulfilling prophecy:
A quick note about the important role of the "self-fulfilling prophecy" in Forex trading and technical analysis. One of the key reasons that many aspects of technical analysis, especially such important concepts as support and resistance, often seem to work remarkably well has to do with this phenomenon. A self-fulfilling prophecy is a forecast that causes itself to become true. In the case of Forex trading and technical analysis, a certain support/resistance level may be valid and respected to a significant extent simply because that level is well-known, and is therefore watched and acted upon by a critical mass of traders. So, for example, a 38.2% Fibonacci level, an R1 pivot point, and a key uptrend support line do not in themselves really have magical predictive properties. It is more the fact these these levels are so universally accepted and therefore so closely watched and traded by so many traders, that they often take on considerable price action significance. The role of the self-fulfilling prophecy is one of the keys to effective technical analysis in the Forex market as well as all other financial trading markets.
Continue reading...
Good observation! We will soon clarify this for you, but don't underestimate James Chen's words because more than often they will provide you with an advantage in the market.
In fact, supply and demand are two forces that coexist in the market at any given time. As shown in the picture below where the two forces are exposed, price action speed slowed down in the middle of the chart and consolidated temporarily at a level where the two forces were fairly equal. When supply and demand are equal, prices move sideways as bulls and bears slug it out for control.
© Learning Center – Unit A – Chapter 4– p.10/54

Brought to you by
Buyers and sellers create two opposing forces that move prices. Buyers want to buy cheap and then sell more expensive. And sellers, conversely, are always looking to sell expensive to buy cheaper afterwards. So each pip that the exchange rate moves shows the game of power between the two sides: if the exchange rate rises by only one pip, it means that buyers are winning, and a pip down move shows that sellers, for that instant, have imposed their willingness to sell.
A level of support or resistance is a level at which a critical mass of traders (or capital) coincide in their aim to buy or sell a certain currency. These levels are identified by the way traders react to them and because they show a tendency to reoccur. It's not that market participants agree on what to do at a certain price level, they just coincide on their assessment that the exchange rate is too high to buy (resistance) or too low to sell (support). So it's not even a question of the quantity of traders deciding how to react to a certain level, but the imbalance between buyers and sellers at a certain price level.
The fact that certain price levels have been significant in the past is telling us that they may have sufficient impact on price movements in the future. Sometimes, levels of support and resistance are very clear on the charts and remain intact for a long time. This phenomenon is called the "memory" of the market.
When the price reaches a new low and then rises significantly, both the buyers who bought at that low and the ones who lost the opportunity to buy will be willing to enter long when the price reaches that level again. Following this dynamic, the phenomenon can be repeated until the balance of buyers
© Learning Center – Unit A – Chapter 4– p.11/54
Brought to you by
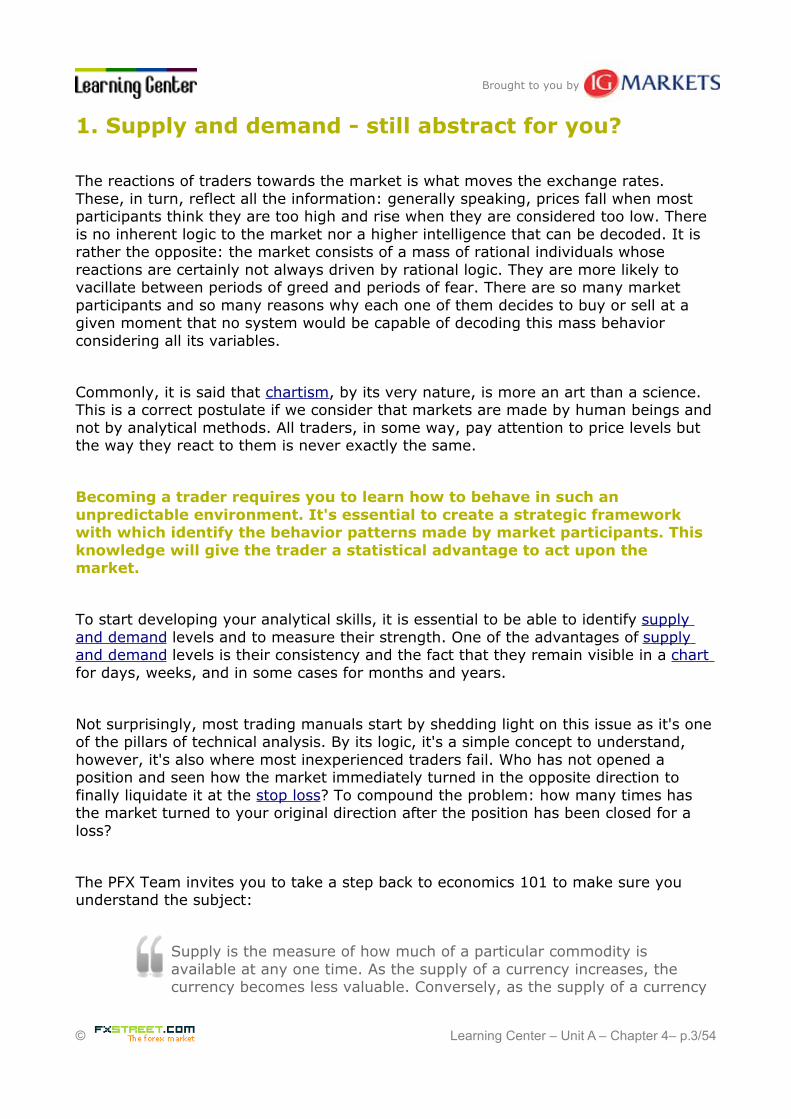
and sellers changes. This is what ultimately happens, otherwise price action would take place between two price levels only and the market would be ranging endlessly. But the market is rather complex and many variables can affect price action. The general belief of what was a good price to buy (a support) may weaken until the price finally breaks down.
Take a look at the chart below: support did not hold and the break below support signals that no more buyers were willing to buy at that level (green line). So a break below a support level indicates a new willingness to sell as sellers have reduced their expectations and are willing to sell at even lower prices. But equally, the break signals a lack of incentive to buy.
Similarly, a supply level does not hold indefinitely and a break above the resistance level is a sign that supply is exhausted and the demand exceeded it. A break of a resistance is not necessarily indicating a huge demand, it's just that demand is considerably higher than supply, or that supply is inexistent.
Observe the chart below: a break out above resistance proves a new willingness to buy and/or a lack of incentive to sell. When price breaks a resistance level and reaches new peaks, this means that buyers have increased their expectations and are now willing to buy at higher prices. It also means, and this is equally important, that sellers don't feel coerced to sell at that level and prefer to wait until prices rise above the resistance level.
© Learning Center – Unit A – Chapter 4– p.12/54

Brought to you by
When a resistance level is broken, we need to identify another resistance at a higher price level. As price approaches that higher level, sellers will be gaining strength again as buyers will tend to stop buying at higher prices. At this stage, pay special attention to the fact that price action is something that always happens between levels of maximum supply and demand. As a trader, you want to train your analytic eye to identify those areas between maximum supply and demand levels, which price can recover when breaking one level to reach the next one.
Don't think of market participants as two opposed groups of well defined buyers and sellers. Remember the Forex is a double direction market, where each buyer turns into a seller when he or she closes his or her positions. To liquidate a position in the Forex means to invert the action you initially did to enter the market. If you bought low and the price went higher, you will be a seller by closing the position for a profit.
When the supply is exhausted, as shown on the right side of the previous chart, the resistance is broken and the price continues its ascending move. Usually, when a resistance is broken, it becomes a support, should price return to this level again as there is likely to be an increase in demand.
© Learning Center – Unit A – Chapter 4– p.13/54

Brought to you by
Each moment in the market is unique and many factors and reasons can motivate traders to open and close positions. But one of the factors which may have contributed to accelerate the rapid rise in the price as seen in the chart above is the activation of stop loss orders from short positions. Each stop loss order in a short position is in fact an active buy limit order and can thus accelerate an upward move.
More information about types of orders, can be found in the Chapter 3 of this Unit.
By now you should have at least a basic understanding of how support and resistance works in the markets. It's always important to visualize support and resistance as an imbalance between supply and demand forces where demand creates support when traders show willingness to buy or readjust their expectations and start to buy at higher prices. But a weak demand also contributes to create resistance when traders disagree in buying at higher prices.
On the other hand, supply creates resistance when traders are ready to sell and it also contributes to form support when traders stop to sell lower. This means that support and resistance are not to be seen as a battle between bulls and bears, but rather as an imbalance of two forces. And ultimately price moves stronger precisely when one of the forces ceases to exist. If supply decreases, it will be overwhelmed by forces of demand. The greater this imbalance is, the faster the price will rise.
In an uptrend, for example, demand is not the only cause of the increase. For prices to rise, sellers have to absorb that demand. In the market there is always a counterpart for each position, that is why the two forces are always present, but representing opposite intentions. Remember that the exchange rate you see on your platform is the most recent traded price, a price on which a buyer and a seller agreed to do an exchange.
Sam Seiden simplifies the above theory and explains price action as being characterized by 3 main principles:
Principle 1: Price movement in any free market is a function of an ongoing supply and demand relationship within that market.
[...]
A market is always in one of three states:
© Learning Center – Unit A – Chapter 4– p.14/54

Brought to you by
First, it can be in a state where demand exceeds supply which means there is competition to buy and that leads to higher prices. What does this look like on a price chart? A "pivot low" is a perfect example.
Second, it can be in a state where supply exceeds demand which means there is competition to sell and this leads to declining prices. What does this look like on a price chart? A "pivot high" is a perfect example.
Third, it can be in a state of equilibrium. At equilibrium, there is no competition to buy or sell because the market is at a price where everyone can buy or sell as much as they want. However, as the market moves away from equilibrium, competition increases which forces price back to equilibrium. In other words, competition eliminates itself by forcing markets back to equilibrium. Even though equilibrium is where the majority of candles are, we don't necessarily want to trade in that area.
[...]
Principle 2: Any and all influences on price are reflected in price.
At any given moment, there is tons of financial information being created and passed on around the planet. This information can be in the form of an earnings report, news, income statement, analyst opinion, economic report, terrorist attack, and so on. All this information creates thoughts and perceptions that are different for everyone depending on their individual BELIEF system. Be careful to notice that most humans assume others' belief systems are the same as their own. This, of course, is simply not true.
[...]
Principle 3: The origin of motion/change in price is an equation where one of two competing forces (buyers and sellers) becomes zero at a specific price.
Let's now put numbers to the simple supply and demand I keep mentioning. Here, we have 300 buyers and 200 sellers at $20.50. Price will remain stable, meaning supply and demand will appear to be in equilibrium until the 200th seller sells. Price will begin to increase or CHANGE when the last seller has sold. It is when the last seller sells that we are left with 100 buyers and no sellers. One of the two competing forces has exhausted itself. In this case, it was the sellers. What appeared to be supply/demand equilibrium was actually disequilibrium or imbalance. It just took a certain amount of time for this unbalanced equation to play out.
In other words, motion (of price) occurs when one of the two competing forces becomes zero. The two competing forces are, again, supply and demand. The time it took for that imbalanced relationship to produce movement is purely a function of the actions of the two competing forces.
Read full article and continue reading...
© Learning Center – Unit A – Chapter 4– p.15/54

Brought to you by
The above reasoning explains why markets don't remain stuck between two horizontal extremes when supply and demand interact. If support and resistance held forever, then trading would be easy indeed. We could simply enter and exit as the price seesaws up and down between support and resistance levels. But the fact is that active markets dissipate directional forces because every buyer must eventually sell and every seller must eventually buy in order to cash profits. This induces to price action reversals and the whole process can be seen as a cycle that equalizes trader's action and reactions over time.
As you will see later, a chart may print a strong downtrend on the daily chart, a rally on the 60 minute chart, and sideways congestion on the 5-minute chart, all at the same time. While this cycle process may seem chaotic, it actually reflects the dissipation of the supply and demand polarity.
Derek Frey clearly defines what is a resistance and what is a support from his perspective:
One of the most basic things about trading is support and resistance. Yet many do not fully understand how to find what is a "good" or "true" support or resist level. I will attempt to clear this up once and for all. The chart above is a current daily chart of the Eur/USD on it you can see a red line that i drew to indicate where the strongest level of support is. So how was able to find that? Simply by finding what the last most significant resistance level is. And that is the "secret". Real support was formally a resistance level and real resistance was formally a support level. This works in all markets and time frames but is most relevant on the Daily time frame. The only exception is if it is making an all time new high or low. So if you want to find support look for resistance and if you want to find resistance look for support.
Continue reading...
© Learning Center – Unit A – Chapter 4– p.16/54

Brought to you by
2. Identify support and resistance on a chart
In this section we are going through the basics of S&R (Support and Resistance) lines. S&R lines conform the most basic analytical tools and are commonly used as visual markers to trace the levels where the price found a temporary barrier. In other words, where price had trouble crossing. These levels can be found on any chart and any time frame either 1 minute or 1 month. Some of these lines remain valid for years.
Lines are very powerful tools for the analysis because they trace significant price levels at which traders will take action. This increases the probability of anticipating the course of the exchange rate. Usually, the higher the time frame where a line is displayed the stronger it will be in terms of capitalizations and impact. But even on a 1 minute chart you can find and act upon them.
Horizontal support and resistance lines
To draw a line you need at least two contact points where price has bounced. These points are highs or lows registered on the chart. The more contact points a line has, the more traders will be watching it and the greater the impact and reaction will be. If a line has solely two points of contact, or if these are not really bounces, the majority may not take it into consideration and the breaking of the line will not have a big impact.
As you see on the chart below, some lines have acted as a temporary barrier where price came to touch it, even pierced it, and eventually crossed it, whereas other lines acted as a more permanent barrier where price always got rejected. Candlesticks already evidence those levels with their bodies and wicks, but lines make it even easier to see.
© Learning Center – Unit A – Chapter 4– p.17/54

Brought to you by
Some lines can last for years and remain active in the present, even when most of today's market participants didn't contribute to form that line in the past. Prepare yourself to identify lines from the 80's and 90's when charting in longer time frames!
The chart below is a monthly chart showing the price action on the USD/JPY. As you can see, many levels hold for several years, therefore we can expect that they will remain active in the future. The best you can do when starting to draw lines is to color code them as all-time highs and lows, as well as primary and secondary S&R levels.
© Learning Center – Unit A – Chapter 4– p.18/54

Brought to you by
Higher time frames offer a good perspective on the most relevant S&R levels, because they show the main barriers. But you still have to do the same on lower time frames to find more accurate levels. From the chart above you can already notice that some recent high and low swings have slightly migrated in comparison to the earlier ones. You can solve this by zooming at lower time frames. Ideally you should switch to the weekly time frame, but we are jumping straight to the daily so that you can see a complete new world.
Do you see all these intermediate levels shown by the blue lines and circles? Note the above chart is a daily chart. These intermediate levels were barely visible on the monthly chart before because of the time compression. When switching to lower timeframes, secondary support and resistance levels which were not visible on the higher timeframe appear.
The conclusions we arrive from this top-down approach in timeframes is that higher timeframes offer a general view on the most important S&R levels, while lower timeframes show intermediate levels more appropriate to trading. Remember: lines on a chart are just interpretations of what is going on in the market. The market is not composed by lines, they are therefore reductions of all the information the market contains. A reduction so that we can read and interpret the reality without going mad.
To draw and work effectively with S&R lines, there are no generic nor 100% objective rules. In trading, it's useless to strive for certainty all the time - in fact, it's not even necessary as you will understand during this course. Knowing that you can't be right all the time, the best you can do is to establish certain rules in order to reduce the impact of your mistakes. As to how develop such rules you will be geared with some guidelines during this chapter.
© Learning Center – Unit A – Chapter 4– p.19/54

Brought to you by
The only secret to identify and draw S&R lines is to accumulate hours of practice. Only through practice - watching experienced traders tracing their lines and following analysts using them - you will be able to see the lines in formation and even anticipate some price movements with their help. At first it's a daunting task but with time you'll see that it is very simple.
Lines migrate all the time and must be therefore adjusted on the chart. They move slightly some pips up or down. If a group of participants, representing enough supply or demand, decides to open or close their positions some pips above or below compared to what other players did in the past, that line will migrate some points on the chart. You will notice that these movements are not huge. If there is a completely new level where price got rejected, then you are probably witnessing the birth of a new S&R level, but this is not usual. What happens is that S&R levels become more or less important as market swings.
It is also common sense that S&R lines should show some distance between them. There is no rule as for the distance between two lines, but you should let some decent room between them, otherwise it would negate the whole purpose of their use.
Shall I use lines to spot breakouts or trade reversals instead? Great question indeed! You may use them as you prefer. Entering the market after a breakout is probably a more reactive attitude, while expecting a bounce at a significant level is more a proactive attitude. Both strategies can be very accurate and effective if well developed into a trading method. You can also use S&R lines as targets for your trades, while the entry signals are given by a technical indicator, for instance. Using them as targets is one of the reasons why price reacts to them. Remember: to exit a position is technically also an execution order. The market will react to it, be the exit made of a market order, a limit order or a stop loss order - the market doesn't care.
Finding turning points
The contact points between price and S&R lines are often formed by swing lows (for an uptrend) or swing highs (for a downtrend), often called reversal points. When using Japanese candlestick charts, you can use the wick or the body of the candle as a guide to trace your lines. There is really no fixed rule how to draw lines. Some analysts sustain a rebound at the wick is usually more valid because it corresponds to
© Learning Center – Unit A – Chapter 4– p.20/54

Brought to you by
an actual swing high or swing low on the chart. Others prefer drawing trendlines using the closing prices arguing that these hold more significance than intraday spikes as observed on candlestick charts. In a 24hr market such as the Forex, closing prices (on daily time frames) lose a bit of interest thought, as there are several closing prices depending on the geographical trading session.
A correct identification of a contact point indicates the strength that the line has at that level, given primarily by the size of the rebound. If there is a clear trend in the price movement before the price touches the line, this becomes more notable and consequently the support or resistance level it represents too. What's more, if the price action shows a trend after the contact, the S&R level deserves a special attention as it is showing a clear rejection of that level. By the way, a trend is made by a series of candles showing directional price momentum. This is clearly seen when price makes successively higher highs or lower lows.
The picture below shows two interpretations of the same support level with clear trends before and after the reversal.
The next example shows a support level confirmed by wicks, also called "shadows" AND bodies of a series of candles. Notice how sometimes the price reversed exactly at the support line, touching the line with the candle wick, while in other occasions the price penetrated the level but retraced in order to close the candle precisely at the support level.
© Learning Center – Unit A – Chapter 4– p.21/54

Brought to you by
The Forex market is known to have long lasting trends. But even so, trends are not always evident from the beginning. It's obvious traders want gratification when they buy or sell. This is something a shallow trend can never fulfill because price always corrects itself before ramping to new swing highs or lows, apparently never gathering enough momentum to accelerate the trend. This less attractive price action makes traders lose interest and jump ship in search of a more exciting trading pair. As a result, market loses broad sponsorship and price action shows a reversal in the exchange rate or a stagnation.
When you develop a trading method, it's important to formulate your own definition of what is a trend. This will depend on the timeframes you use, the tools used to confirm price action, and definitely your trading style. At this stage, when approaching price action and learning how to read it, it's convenient to start differentiating analysis from trading. Your goal is to become a trader, and the analysis is going to be just one of your resources. Amongst the tons of analytical tools and methods available out there, first you have to be selective with the tools you choose and second you should go beyond the chart interpretation in order to develop a trading method.
Valeria Bednarik shares with us her proceedings when identifying trends:
Primary trend, Secondary trend and Correction movements
Generally, inside the same chart, you can see different trendlines. One of them will probably define primary trend, others the secondary and so on.
In any big chart, daily or weekly, we see there are corrective movements that in fact are small descendant trends of a minor range. In smaller charts, like one hour ones, we will find out that there are small bearish trends against the bullish major one. So how can we solve and understand all these lines? Well the answer here is to use one basic rule: we set our primary trend in the following bigger chart than the one we use to trade, meaning that if for example we trade 1 hour charts, we will set our trendlines in a 4 hours chart.
In the case we are daily traders, meaning we use daily charts to analyze a buy or sell signal, then we will have to define our primary trend in a weekly chart. If the weekly trend is bullish, we should try to trade buying, taking advantage of valleys or corrections we can see in daily
© Learning Center – Unit A – Chapter 4– p.22/54

Brought to you by
charts. If we work with one hour charts, then we must look for the primary trend at daily or 4 hours charts, and use valleys and corrections of one hour to trade.
Continue reading...
What is the best way to identify a possible bottom for a downtrend in terms of a daily chart or an hourly chart?
Alberto Muñoz, aka FXWizard, answers in FXstreet.com forum:
Here's my counter-attack: "never try to pick tops or bottoms in any financial market"
Anyway I'll tell you what it works for me...
Never use RSI or Stochastic to pick market top/bottom, those indicators don't work because everybody know them. I found that StoRSI, and its derivative, the DT Oscillator (created by Robert Miner) work smoothly so could use it instead.
Also you can use the ADX as I have suggested in another post (it's a good reference) or even the mass media headlines: as I have read the papers this morning I thought that today we would see a strong rebound in the equity markets as well as in the USD, in spite of the opening panic (if you don't believe it, why did the GBP rally against USD today?)
Finally one of my favorites is candlestick patterns: when you see a black candle, and after that, a doji or a spinning top and then, a big white candle whose close is clearly above the first black candle, you can bet it's likely that we have made a bottom.
Of course there are a lot of other techniques that may catch the turning point of the markets, but the ones above are the best for me.
Anyway remember I don't believe in picking extreme values, you have to play other cards to win in the trading game.
Continue reading...
Dynamic S&R trendlines
The so-called "trendlines" or "dynamic“ S&R lines are also essential tools in the analysis of charts. Unlike the horizontal lines, which are identified with a certain quotation, the dynamic lines contain a range of quotations. It's not so much the price level which is here considered as relevant, but rather the line itself.
© Learning Center – Unit A – Chapter 4– p.23/54

Brought to you by
They are as easy to spot and draw as horizontal lines: at least two contact points are needed to form a dynamic line. The first contact point should be an obvious support or resistance level and act as a hinge. By identifying a second rebound in price, we have the second point of contact and we can draw the line.
During a trend, the exchange rate registers new lows or new highs. In a bearish trend, for example, the price reaches new lower highs and lower lows. This downward movement can be visually tracked with a sloping resistance line on the chart, which we call trendline.
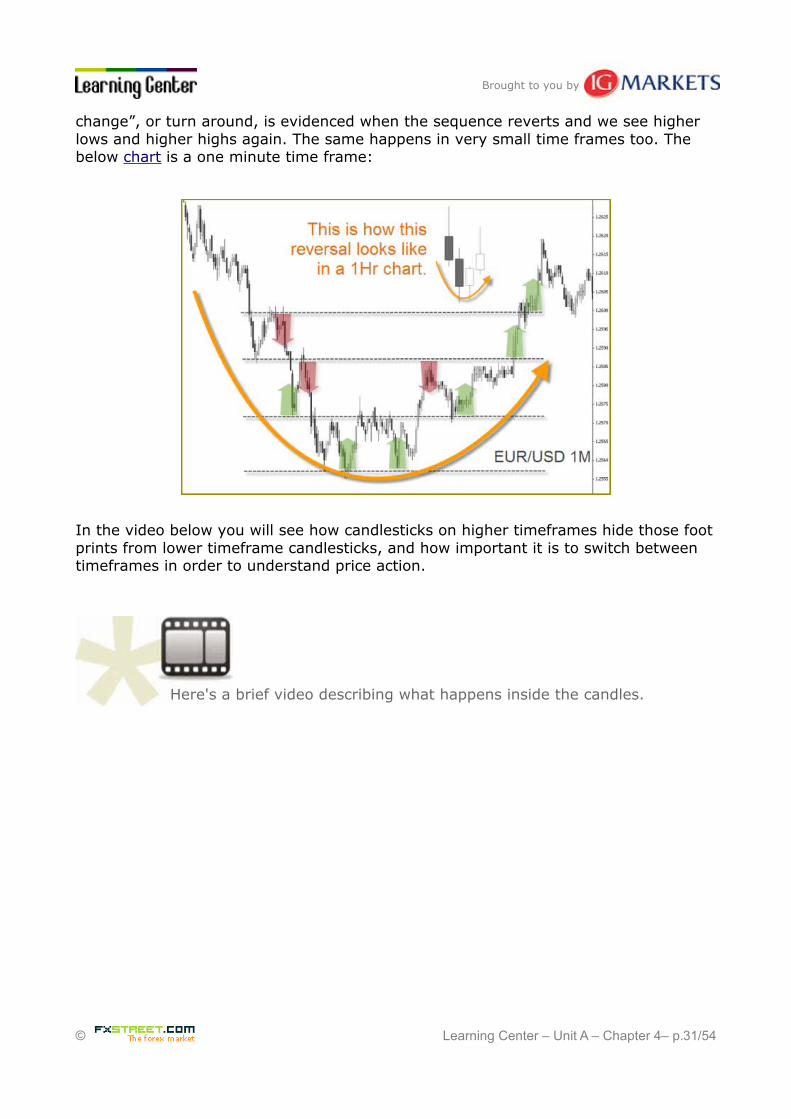
In the weekly chart below, two trendlines are clearly acting as resistance. The upper line remained untouched for more than 6 years, and yet it was called to live when price finally broke the lower resistance trendline and rose all the way up to meet the next barrier. This explains why some lines should remain on your charts forever from the first day you draw them.
Only 2 contact points are needed to draw a line but in the example above, both trendlines show 3 contact points. What does it mean? This means the area between both descending trendlines was already visible on the chart in April 2007 , whereas the breakout occurred in late August 2008. This is a long time of preparation for a great trade of more than 2,000 pips!
© Learning Center – Unit A – Chapter 4– p.24/54

Brought to you by
As you see from the above illustration, while trendlines are a basic and simple tool, they can also be one of the most powerful forms of price action analysis and order flow quantification.
This is one of the many recorded webinars on support and resistance trading given by Rob Booker: Longer-term Support and Resistance Trading: Setups and Rules
For your further study, you can watch the complete series called "Longer-term Support and resistance Trading: Setups and Rules"
The excellent contributions of Ross Yamashita on his blog will provide you with a deeper understanding on the market cycles. Check out his Elliot Wave analysis from time to time and contrast your own charts with the levels he draws: The Trader's Edge blog
© Learning Center – Unit A – Chapter 4– p.25/54

Brought to you by
3. Trends, pullbacks, breakouts, ranges: how the market expresses itself
Support And Resistance Zones
If you already started to draw a few S&R lines on your charts and see live how price reacts to them, you probably noticed these tools are far from being accurate: they constantly migrate a few pips up and down, they get pierced by the candles, and even some times price crosses the lines back and forth as if there was no line at all!
Let's face reality: lines only exist on your chart, there is no hidden place in the interbank market where lines are fabricated. They are just a tool to interpret price action and does not pretend to be more than that. What happens is that novice traders often confound reality with interpretation and expect price to respect and interact with a S&R level in a certain way.
Mark Douglas, in is book "Trading In The Zone" makes an important point about price action and trader's beliefs systems. When looking at price action, he explains, as a function of traders who are willing to bid prices up or offer them lower, then we can say that any price action is a function of what traders believe about the future. In other words, any price movement is a function of what individual traders believe about what is high and what is low.
The underlying dynamics of price action could be resumed saying that only three primary forces exist in any market: traders who believe the price is low, traders who believe the price is high, and traders who are watching and waiting to make up their minds about whether the price is low or high. Technically, the third group constitutes a potential force.
Following Douglas's argument, the reasons why traders believe a price is high or low are usually irrelevant. Moreover, you don't need to know the reasons as they wouldn't necessary help you gain a better understanding of what is going on in the market. Instead, as a trader you should take into consideration that any price action (or lack of action) is a function of the relative imbalance between traders who believe the price is too low and traders who believe the price is too high. As long as there is an imbalance, prices will move in the direction of the greater force. Conversely, if the two groups are balanced, prices will stagnate, because each group will absorb the force of the other group's actions. In words of the author:
© Learning Center – Unit A – Chapter 4– p.26/54

Brought to you by
Now, I want you to ask yourself, what's going to stop virtually anything from happening at any time, other than exchange-imposed limits on price movement. There's nothing to stop the price of an issue from going as high or low as whatever some trader in the world believes is possible – if, of course, the trader is willing to act on that belief. So the range of the market's behavior in its collective form is limited only by the most extreme beliefs about what is high and what is low held by any given individual participating in that market. I think the implications are self-evident: There can be an extreme diversity of beliefs present in any given market in any given moment, making virtually anything possible. When we look at the market from this perspective, it's easy to see that every potential trader who is willing to express his belief about the future becomes a market variable. On a more personal level, this means that it only takes one other trader, anywhere in the world, to negate the positive potential of your trade. Put another way, it takes only one other trader to negate what you believe about what is high or what is low. That's all, only one!
Source: “Trading In The Zone” by Mark Douglas, Prentice Hall Press, 2001, p.94-95
Price Ranges
Don't be disappointed if S&R lines haven't worked for you until now. You see, in reality, support and resistance are price ranges, not exact numbers. This is clearly visible when switching from a higher timeframe to a lower one: an horizontal line on a weekly chart can perfectly be made by an horizontal price channel on a one hour chart.
This is why it often what appears to be a break of a support or resistance level is just the market testing it. These 'tests' of support and resistance are usually represented by the candlestick shadows piercing the S&R levels.
If the market were made by S&R lines and not by people, then the exchange rate would always rise and fall to the same exact price points, over and over again. But because that rarely happens it's important to think of support and resistance as zones on the chart where people buy and sell.
One way to induce the habit to treat S&R lines as zones is drawing them with fat lines, avoiding a fine-point trace. That way you won't fool yourself into believing you have identified the exact price at which a currency pair is going to turn around and start moving in the opposite direction. And even better: draw the lines, especially the
© Learning Center – Unit A – Chapter 4– p.27/54

Brought to you by
horizontal ones using two lines, an upper and a lower one, or use rectangles to mark the zones. Your chart platform has all these fancy tools for sure.
The chart above shows how differentiated S&R lines on a 4 hour chart form a price zone on a daily chart.
An exception to the zones are round numbers. All pairs, but especially the yen pairs, react to round numbers as S&R levels. Remember, round numbers are those that end by 00, 50 or 000. But even in those cases it is advisable to consider the area above and below that price as a S&R zone, because price action may well violate a round number and reverse. A round number is usually a cluster of thousands of market orders, whether it be limit orders to buy or sell, or stop loss orders. This clustering of orders around a same place is what gives a unique shape to the S&R level each time prices approach it and activates those others. Ultimately this is the reason why S&R zones are formed: when the price pierces a line and starts swinging around it. A S&R zone may, after some time, re-define itself as a line, but while it exists as a zone, the price may rebound at any point of it.
The concept of support and resistance zones follows the same logic as the horizontal lines, but while lines point to an exact price on the right side of the chart, the zones are represented by price ranges.
© Learning Center – Unit A – Chapter 4– p.28/54

Brought to you by
Like S&R lines, the higher the time frame the more extended and meaningful is the zone. Depending on the time frame, S&R zones can cover a range from 10 to 500 pips on the exchange rate scale.
Within an area of support or resistance, we are in no man's land and it is therefore difficult to take a position. In order to effectively trade within a S&R zone, you need to clearly differentiate the included sub-zones, and by going into lower timeframes, recognize the areas in-between the S&R levels. Those areas show the potential movement price can cover from one level to the other. This is only possible by submerging in deeper time frames, usually 3 or 4 stages below the time frame used to spot the zone. The previous chart is a clear example: it would be very difficult to trade within the marked zone based on the daily chart – ideally, in this case, you should find trading opportunities to trade between the levels on a 60 minute chart or below.
Another important aspect is to differentiate what are the upper and lower borders of the zone. Those levels are usually those where the price had most trouble crossing and the reversal move is more evident.
A channel is somewhat of a dynamic S&R zone: if S&R lines are not always horizontal, neither are the S&R zones. There are times when the trendlines connecting the swing highs and swing lows create a diagonal channel and price behaves similarly to an horizontal zone.
The support and resistance zones work the same way in a trend than in a range market. The only difference is that supply and demand forces adjust themselves to higher or lower price levels.
© Learning Center – Unit A – Chapter 4– p.29/54

Brought to you by
Identifying Breakouts
Resistances becoming support and vice versa is a dynamics clearly seen during a trend. This is due to levels being broken and crossed by price. Once again the USD/CAD on a weekly chart shows you the dynamic trendlines within a context of a down trend with successive breakouts:
When the trend is bearish, as in the above chart, supports are broken and become resistance when price retests those broken levels. This price action will be called a trend as long as the swing lows and swing highs are successive. A so called “bias
© Learning Center – Unit A – Chapter 4– p.30/54
Brought to you by
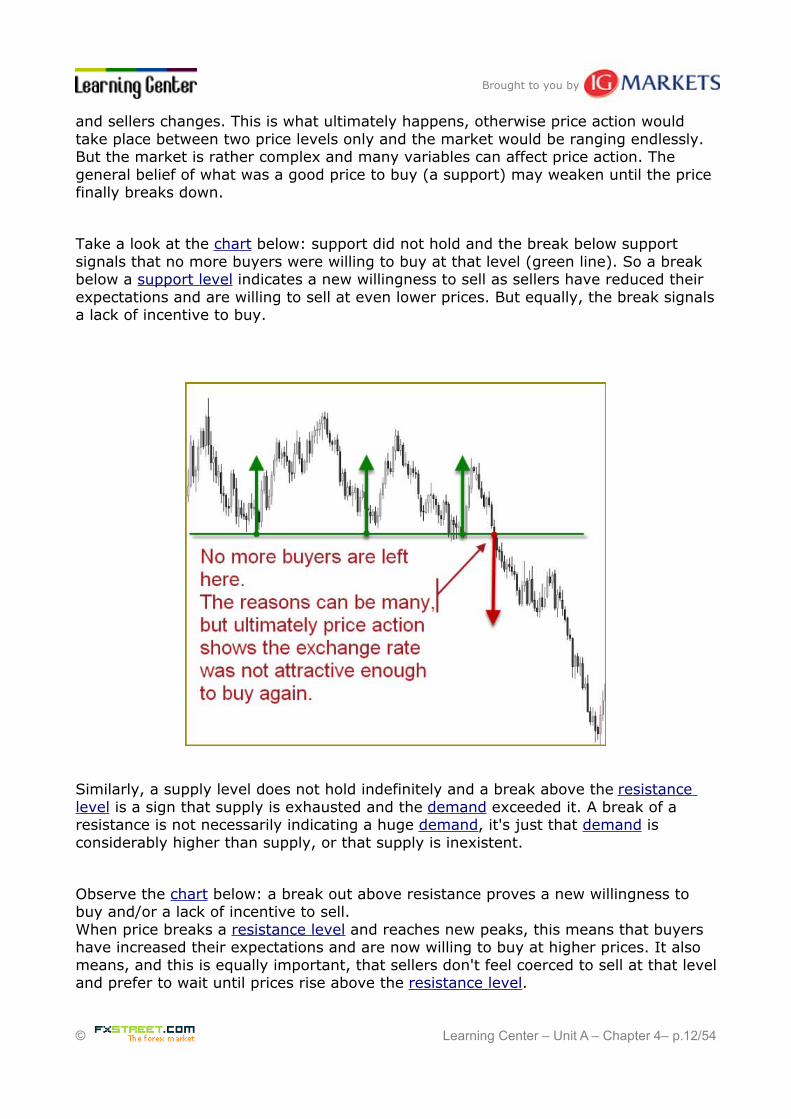
change”, or turn around, is evidenced when the sequence reverts and we see higher lows and higher highs again. The same happens in very small time frames too. The below chart is a one minute time frame:
In the video below you will see how candlesticks on higher timeframes hide those foot prints from lower timeframe candlesticks, and how important it is to switch between timeframes in order to understand price action.
Here's a brief video describing what happens inside the candles.
© Learning Center – Unit A – Chapter 4– p.31/54

Brought to you by
For a fine understanding of price action and an accurate trading method with breakouts please watch the different webinar recordings with Phill Newton
You can also download Phil Newton's presentation from the ITC 2008 about “Breakout Trading”.
Observing S&R levels on charts we notice it's easier for rates to rise or fall across a territory with less barriers. That is why price can usually trend freely through areas where there has been no recent congestion. Remember, a congestion, or range, corresponds to a price zone where many orders were taking place. This shows the kind of market activity where buyers and sellers exchange currencies and agree on the current prices. But what happens when the exchange rate enters a territory where it has never been before? The answer is, the currency pair starts a "free rise", or a "free fall".
© Learning Center – Unit A – Chapter 4– p.32/54

Brought to you by
Back in 2007 it was impossible to determine, based on the EUR/USD price action, at which supply level the ascending move would eventually stop, since there was no historical resistance level above the most recent all time high.
Breakouts are one of the most popular concepts in trading the financial markets. You can notice this fact when searching our trading strategies resources in the Education Section many of them are based on breakout ideas and each strategy can lead to a different trading approach while exploring the same core concept. In the next units we will cover trading strategies in more detail.
Would it be safe to say then that a breakout occurring at 5 pm Eastern time should fail at a major support or resistance level,
© Learning Center – Unit A – Chapter 4– p.33/54

Brought to you by
and one appearing at a key time like 3 am Eastern time should plow through most support and resistance levels? In an edition of the Lessons From The Pros of the OTA, Ed Ponsi answers:
Thank you for your email, you're definitely on the right track. Not only do breakouts that occur at or around 5 pm Eastern time tend to fail, they usually fizzle out before they reach any significant support or resistance levels. Because of this, moves that occur at this time of day make excellent candidates for "fade" techniques, which is a type of trade that goes against a breakout because of the assumption that the move will not follow through. On the other hand, moves that occur after 3 am Eastern time have a better chance of success. In cases such as this, an opening range breakout strategy would be more appropriate. It's not unusual to see strong breakouts early in the London session, due to an increase in volume and the increased possibility of major economic news releases, so a fade strategy would be less likely to work at that time.
Continue Reading...
Identifying Pullbacks And Throwbacks
In the Forex market, trading breakouts can be tricky because very often momentum on a breakout will wane shortly after the break, resulting in an interesting phenomenon: a retracement of the exchange rate to the vicinity of the rupture. Only then, the price eventually resumes the direction started with the breakout. This retracement to a previous S&R level is known as "pullback" or "throwback" and is considered an opportunity to open positions with a minimal risk. In order to simplify the explnatation from here on, we will refer to both using the term pullback.
In terms of S&R, when we are in presence of an uptrend, a pullback is a descending movement of the exchange rate to the vicinity of the last broken resistance level. Conversely, in a downtrend a pullback is an ascending movement of the exchange rate to the vicinity of the last broken support level.
A pullback can consist of one candle (bar) or multiple candles (bars) depending on the time frame you are using. For strategic purposes it has to be clear where price is at the moment of a pullback and what is happening on higher timeframes.
During the early phases of a new trend, it seems like a certain inertia tends to slow down price action. A clear directional momentum which characterizes a trend is only evidenced when the trend already started. This is why new
© Learning Center – Unit A – Chapter 4– p.34/54

Brought to you by
trends awaken usually from a choppy market situation and are very difficult to pick from the beginning.
If you are thinking of a solution to profit from trends, you better watch for pullbacks when price action is still under the influence of the old range: this new imbalance between bulls and bears often generates a series of tests or small congestion patterns while price tries to escape from the bigger congestion. Pullbacks are one of those small nuances in price action you definitely want to become a specialist at.
Once price action takes on a more vertical appearance and overcomes the inertia from an old S&R sequencing, meaning when either buyers or sellers assume control, it's usually too risky to enter a trade.
The accompanying diagram illustrates the phenomenon:
The pullback is usually a brief movement but that is still relative because it depends on the time frame. In the illustration above, price took over 70 hours to revisit the broken resistance level, converted in a support once broken. Notice how during the breakout the S&R level was blurred with price swinging back and forth. Indeed the pullback, afterwards, evidenced the support level very well. In other words, the pullback is the price action confirming a level has turned from support into resistance or vice versa, a resistance into support.
It is common among retail traders to enter and exit positions all at once. But this is not the way institutional traders usually place their orders - they do it gradually. On
© Learning Center – Unit A – Chapter 4– p.35/54

Brought to you by
the one hand, they have to due to their large position sizes. Concerned that their orders might move the market, they avoid exerting too much buying or selling pressure at one time. On the other hand, they are much more careful with their capital and do not enter positions when the price is entering a support or resistance area. As for the breakouts, they probably never trade the breakouts as such, and leave that risky task to other participants.
Trend following is therefore not synonym of chasing the market. Institutional traders know that waiting for the price to come back to their desired entry level represents a less risky and better rewarded chance than entering a position when price has already moved considerably.
Entering all positions at once could be even detrimental for the institutional player because an entry would inadvertently move price away from the entry point by driving the exchange rate higher in a large buy order or smashing the exchange rate lower with a large sell order.
The illustration below shows an unexperienced approach, with emotions leading to wrong decision taking:
Emotions are surely one of the underlying forces during the processes of breakouts and pullbacks. Imagine a resistance level withstanding numerous rebounds, showing the exchange rate repeatedly rising to the same price zone and bouncing back down every time. The reason why the price bounces back is because there is supply made of traders selling at that level on repeated occasions. They probably repeat their
© Learning Center – Unit A – Chapter 4– p.36/54

Brought to you by
actions because the market has rewarded them with profits the first time they sold at that level.
This can be repeated so many times until the level is tested again but only few traders are still interested in selling. By this time, some of those who were acting as sellers before show instead more interest in buying and start entering long positions. As soon as the last seller enters the market, the first buyers will drive prices up, breaking the resistance level.
Only this time the price breaks through and now more traders follow the herd and enter long after the breakout. As soon as the first few buyers cash profits for their short term positions, price loses its momentum and retraces. This is when some of the participants who went long after the breakout begin to experience some serious anxiety and panic and close their positions. By closing long positions, they are selling to vigilant and experienced traders who buy knowing that a support level protects their stops placed just below.
Other buyers, ignorant of the pullback dynamic, are hoping and wishing for the exchange rate to rise to get out at or near the breakeven point. Afraid that they may have a big losing trade in their hands, they sell to the market as soon as their positions rise to the entry level. This bail out is driven by a different emotion: a feeling of relief. Guess whom they are selling to? To experienced traders adding up to their long positions.
Always remember that if at any point during a trade you find yourself hoping or wishing, you are probably following the herd instead of following a plan.
As a retail trader, you can use the pullback and throwback phenomenon to your advantage by entering short positions at levels where the big traders are selling and entering long positions at the levels where the big traders are buying. By the same token, you can exit short positions at points where there is evidence of institutional demand, and exit long positions at points where there is evidence of institutional supply.
Pullbacks can also occur in conjunction with all types of S&R measuring instruments like Fibonacci levels, Pivot Points, chart figures, and technical indicators such as Moving Averages. A Fibonacci pullback, for instance, is literally a pullback that
© Learning Center – Unit A – Chapter 4– p.37/54

Brought to you by
retraces to a Fibonacci level. There will be more in Unit B on how to use these tools as S&R.
It's important here to notice that it's not as simple as placing a trade when you see a pullback develop. There are several procedures and a clear checklist should be elaborated to assess what the market is doing, where the pullback is developing, and so on. Further in the Learning Center we will cover solutions about how to effectively develop trading techniques to use once we've identified a price action pattern.
While blogging at FXStreet.com, Pierre Charlebois offered his particular view on charts with a combination of price action and trading psychology, The Disciplined Trader. For Elliot Waves interpretation it's a great resource as well.
Gaps
Gaps are a less frequent phenomena in the Forex market than pullbacks but still, they are part of price action. Why do prices gap? The answer is simple: they gap up because sometimes there is such a drastic imbalance between supply and demand that the exchange rate jumps many pips from one price to another.
It can happen during less liquid times such as bank holidays or over the weekend, between Friday's close and Monday's open. When there is more demand than supply at the Friday's closing price, the market will gap higher on Monday's open. Conversely, when supply exceeds demand at the Friday’s closing price, the market will gap down on Monday's open. In volatile market conditions, gaps happen more frequently but typically, it is at the open of the market when the biggest imbalances in supply and demand occur.
© Learning Center – Unit A – Chapter 4– p.38/54

Brought to you by
A successful trader is always searching for market situations where price is at levels where supply and demand are out of balance. He/she trades the exchange rate back to price levels where supply and demand is balanced again. As gaps are a well defined footprint of an out of balance condition, they can represent an opportunity as well to spot low risk, high reward, and high probability trades.
The advantage of understanding what is happening behind the scenes gears you with a certain objectivity and allows you to look beyond the candles and their patterns. You can then plan your trades in advance and avoid emotion related to mistakes.
Depending on the direction of the trend and the direction of the gap, the message can vary and so the way the opportunity can be traded. There are basically four combinations leading to a different interpretation and action each. The four possible set-ups will help you determine the probabilities, the risk and the reward.
The Currencies At A Glance tool has, among other indicators, a use full gap detector.
Gaps in a downtrend:
1) A gap up in price into an objective supply (resistance) level is a high probability shorting opportunity in the context of a downtrend.
The chart bellow shows a short position taking advantage of the gap up in price at the market open on 9th November 2008. In a downtrend, the idea herewith exposed is to sell short on a gap higher into a recent supply area - we want to sell to a buyer who is buying into a supply area in order to increase the odds in our favor. This type of gap is likely to get filled very quickly as we see in the five candles after the resistance has been touched.
© Learning Center – Unit A – Chapter 4– p.39/54

Brought to you by
And yet another example with profit target included:
2) Gap down into an objective demand (support) level. A gap down in price, in the context of a downtrend, can be a very high odds selling opportunity.
© Learning Center – Unit A – Chapter 4– p.40/54

Brought to you by
A gap down into a demand zone might be seen as a buying opportunity. However, when we consider that the main trend is bearish, the best set-up derives from identifying the next supply zone and enter short from there. This idea has a higher probability of success because the gap almost always get filled.
Gaps in an uptrend:
1) Gap up in price into an objective supply (resistance) level in the context of an uptrend can actually be a buying opportunity.
© Learning Center – Unit A – Chapter 4– p.41/54

Brought to you by
Notice how this gap up was the expression of buyers buying at a resistance (supply) level. This strong willingness to drive prices higher caused a breakout and a gap up in the exchange rate which was later filled by the pullback down to the same level, considered now a support.
2) A gap down into an objective demand (support) level during an uptrend indicates a buying opportunity.
Buying on a gap down into demand is a great opportunity, specially in an uptrend. Think whom you are buying from at the demand (resistance) level: from inexperienced traders who sell after a gap down in price into a level where buy orders are sitting.
The Online trading Academy enters into much details about how to classify gaps and trade with them in his articles and webinars:
• Professional Gaps vs Novice Gaps in the Forex Markets - Webinar recording
• Gaps, The Novice Trader Exposed • Gaps, Pro versus Novice • Trends, Gaps, and Probabilities • The Morning Gap, Part 2 • The Morning Gap, Part 3
© Learning Center – Unit A – Chapter 4– p.42/54

Brought to you by
This is a brief excerpt from one of the articles, written by Sam Seiden:
While there is much more on gaps than one can write about in a short piece such as this one, keep in mind that the picture of the ultimate supply and demand imbalance is a gap. When you are ready to take a trade, simply ask yourself "who is on the other side of my trade?" and make sure you are trading with someone who is making a big mistake according to the laws of supply and demand, motion into mass, or whatever version of this basic governing dynamic you want to call it.
Instead of looking at red and green candles on a chart and following a conventional Technical Analysis book, start looking a little deeper and begin to understand the order flow that is responsible for the creation of those candles. These basic thoughts will likely give you an edge over those who are on the other side of your trades and having that edge is the key to trading anything. If you are tired of transferring your account into someone else's, stop looking at the market the same way everyone else does.
Continue reading...
Chart patterns as the ones disclosed here have true predictive power and emit an evidence that you can detect and measure. Each independent pattern is different but, approached with a certain methodology, it can raise the odds that a trade set-up will produce a valid result. In the following section we are going to converge diverse elements so you can start developing an efficient trading methodology.
The contents herewith provided will enable any trader to minimize questionable entries and improve exits. By objectively identifying support and demand levels on a chart, trading positions can be taken with a much favorable risk to reward ratio.
© Learning Center – Unit A – Chapter 4– p.43/54

Brought to you by
4. Measuring The Movement Ahead
The following lesson is another building block on how to quantify demand and supply levels on a chart and find conditions of a big imbalance between those forces. Before you can move into rule-based strategy lessons in the next units it's important that you understand that to be a consistently profitable trader you don't have to collect tons of information about the market and search for that magic indicator to analyze it. It should suffice to focus on a few clear and objective price action patterns and start to think about applying rules to capitalize on them.
The Most Common Mistakes
The novice trader usually follows the price movement and ends up buying at resistance and selling at support. Selling into an objective supply level or buying into an objective demand levels ensures a consistently losing outcome. It's like trying to cross a wall by running against it.
The image below illustrates this unhappy outcome for someone who probably trades without the knowledge of price dynamics.
© Learning Center – Unit A – Chapter 4– p.44/54

Brought to you by
The above chart shows the EUR/CHF in 30M around July 2008. Clear trading opportunities can be seen here: just do the opposite the novice trader is doing. The first pullback on the right side of the chart shows a clear opportunity to enter short the market and target the support zone on the bottom of the chart. The second pullback after the crossing of the supply zone, now converted into demand, is another low risk entry for a long trade.
This is a list of webinars where price action is the main focus. Take the time to review them as the material is of excelent quality:
• Drilling down, Support and Resistance series, by Triffany Hammond • How Support and Resistance is one of the Important keys to Safer
Trading, by James Weegen • An introduction to Price Behaviour: Part 1 , by Mike Baghdady • An introduction to Price Behaviour: Part 2 , by Mike Baghdady • An introduction to Price Behaviour: Part 3 , by Mike Baghdady • An introduction to Price Behaviour: Part 4 , by Mike Baghdady • Low Risk Breakout Trading in Forex , Sam Seiden
© Learning Center – Unit A – Chapter 4– p.45/54

Brought to you by
Define Your Edge
The concept of support/resistance is undoubtedly among the most important and most followed aspects of chart analysis and trading in general. Whether you are shaping a technical or fundamental profile, or mixing both approaches, chances are that you follow support/resistance principles at least to some degree in your trading.
There are many different methods of denoting support and resistance levels besides the horizontal levels, diagonal trendlines and trend channels, like pivot points, Fibonacci levels, moving averages, among others. Which one is best is a question of personal preference. But the fact is that the same principles apply to all of them. This common principles, if well understood, will give you an excellent ground on which to build your trading knowledge and will represent an ever accompanying edge for your trading. To attain an edge in a trading career constitutes the difference between success and failure.
To own an edge is to know objectively that there are likely more chances to win than to lose. But watch out, because having the odds in your favor is not the same as knowing or believing that you will win. Let the market do what it wants, knowing that it can do anything. And when the market does what you expected then you have an edge because you know you have a statistical advantage in your favor.
An edge can therefore be a favorable pattern in market behavior that you've seen multiple times and from which you can quantify the outcome. This means that you can try out a particular set-up repeated times and witness a certain outcome in the majority of the occurrences. This testing of ideas is of utmost importance for the development of your trading because it provides objectivity based on historical evidence.
If at this stage of your training you don't have any edge, then consider it to be your next target while developing your personal trading system. Perhaps you don't see the importance of having an edge for the moment, but without this element it will be impossible to win consistently.
In this chapter, the concepts you can take as an edge are based on the principles of S&R, being the most basic aspect of price action and technical analysis in general. Although an edge can be based on any idea or concept, adopting S&R principles, is providing your analysis with a logic applicable to any instrument and at any market condition.
These principles are the backbone of a contrarian attitude in trading. In the chart below you can see what is meant by contrarian: while the crowd sees a selling
© Learning Center – Unit A – Chapter 4– p.46/54

Brought to you by
opportunity when price drops heavily, the astute contrarian trader sees buying power increasing due to the proximity of new group of buyers at a demand level (green zone). This type of counterintuitive logic, generated by recognition of the underlying forces in market dynamics, can make a big difference in your trading.
Locate these great opportunities in the convergence of specific imbalances in supply and demand by using recurring price action patterns such as the pullbacks and throwbacks. By interpreting these price footprints correctly, you will find low risk trading opportunities with a measurable outcome and book consistent profits as a trader.
On Raghee Horner's blog (in the "Price Action" category), you will find a good examples on how price action can be used as an edge to trading.
Hi Ed, I was wondering if you would do the honor of providing a brief description - maybe 2 or 3 paragraphs - describing your
© Learning Center – Unit A – Chapter 4– p.47/54

Brought to you by
primary approach to foreign exchange trading from a strategy perspective.
Ed Ponsi answers:
Thank you for your question. Regarding technique, I'm primarily a trend trader. I look for situations where the technicals mesh with the fundamentals - if there is a clear trend in place, and if the fundamentals confirm what I see on the chart, I'm going to try to grab a chunk of that trend. One thing I'm very cautious about is trading the breakout - if the trend is moving upwards, I want to go long but I don't want to buy into a currency as it's hitting new highs. Because there are so many false breakouts in Forex trading, my strategy is to try to catch the pullbacks. That way, even if the currency pair fails to break through, there is still some potential for profit when the pair reaches resistance. One of my favorite situations is a false breakout that moves against the trend. These types of breakouts have a high failure rate, and they also set the stage for a "slingshot" trade in the opposite direction. It's a great setup, and I'm constantly looking for it. If the trend is strong enough, I might not use a target at all; instead, I'll trail a stop. I like to trail stops manually, moving them strategically instead of automatically. That way, I can keep my stop beneath a trendline or a moving average, instead of moving it to an arbitrary location - which is often exactly what happens when we use automatic trailing stops."
Continue reading...
Measuring S&R Levels
Many aspiring traders have great difficulty organizing price action into a manageable execution system. Too often they ignore important chart data because it doesn't fit into a convenient technical system. This obsession with simple-minded pattern recognition or pure technical signal trading prevents the trader from grasping the most powerful mechanics of price prediction.
Concentrating on a narrow execution strategy is like using a broken watch- it will be right two times per day but still useless the rest of the day. This explains the frustrating path many novice traders experience in their search for the holy grail. Despite their vast knowledge on complicated technical analysis, they are unable to grasp the underlying mechanics.
© Learning Center – Unit A – Chapter 4– p.48/54

Brought to you by
Expand your trading knowledge through the observation and application of the herewith mentioned principles. By integrating S&R analysis in your charting you will expand your ability to profit from subtle aspects of crowd behavior. Keep in mind that market forces of supply and demand rely upon mechanics that many traders will overlook. This lets you gain an important edge on the path to successful trading. It might take a lifetime to explore the most fine nuances and complex interactions between evolving price and the emotional crowd. But rest assured, the principles you are learning in this chapter will gear you with a finer look into price action.
Here you have some quick tips to assess the significance or validity of support and resistance levels, whether it be in the form of drawn lines or zones:
1. Number of contact points
A level that has been touched or tested more times is considered to be more significant than one that has been tested less times. The more times the exchange rate has been halted by a support or resistance level, the bigger is the expectation on the eventual breakout movement. In terms of order flow, the more times price reacts to a support level, the less buy orders will be kept active at that price level. The same is valid for a resistance: the best time to profit from selling at a resistance level, is the first time the price comes back to it after manifesting a strong imbalance at that price level.
In the Practice Chapter A the learner can find an Extra Chapter with a few straightforward rules about how to find strong S&R levels and how to prepare high probability trades. Besides, there are two test modules with a pool of over 250 questions. This is how the test module looks like with an example of a question type to click on the chart:
© Learning Center – Unit A – Chapter 4– p.49/54

Brought to you by
2. Length of time
It’s common interpretation that the higher the time frame (days, weeks, months), the more powerful the level becomes.
It is said that trendlines that develop on a monthly, weekly or daily chart are more significant than those that develop on intraday charts because higher time frames are used by higher capitalized market participants.
This doesn't mean smaller time frames don't have support or resistance levels which can be used to trade. The below EUR/USD chart could be easily tagged as a 60 minute chart, but in fact it is a 1 minute chart! Recall that this pair is the most liquid one in the Forex market, which makes smaller time frames technically very accurate.
© Learning Center – Unit A – Chapter 4– p.50/54

Brought to you by
3. Shape of the rebounds at the contact points
You should not be guided solely by the number of times the level acts as S&R, but also by the quality of the reaction. A level of support or resistance indicates strength depending on the magnitude of the bounce. Clearly visible reversals in price action (in "V" form) establishing new highs or lows on a chart are valid as support or resistance levels and can thus be used as contact points to draw trend- or horizontal lines.
4. Angle of the trendline
The sharper inclined the line is, the easier it will be for price to cross it- it only has to move sideways to break the line. As a rule, every trendline will be broken at some point in the future, and as such, trendlines with steeper angles are more likely to be crossed than the ones with angles inferior to 45 degrees. This happens because trends with gradual price increases or decreases are more likely to last than those rapid price movements which usually call for a correction. The penetration of a steep trendline does not necessarily indicate the reversal of a trend, it can just be a retracement to a more gradual price movement.
© Learning Center – Unit A – Chapter 4– p.51/54
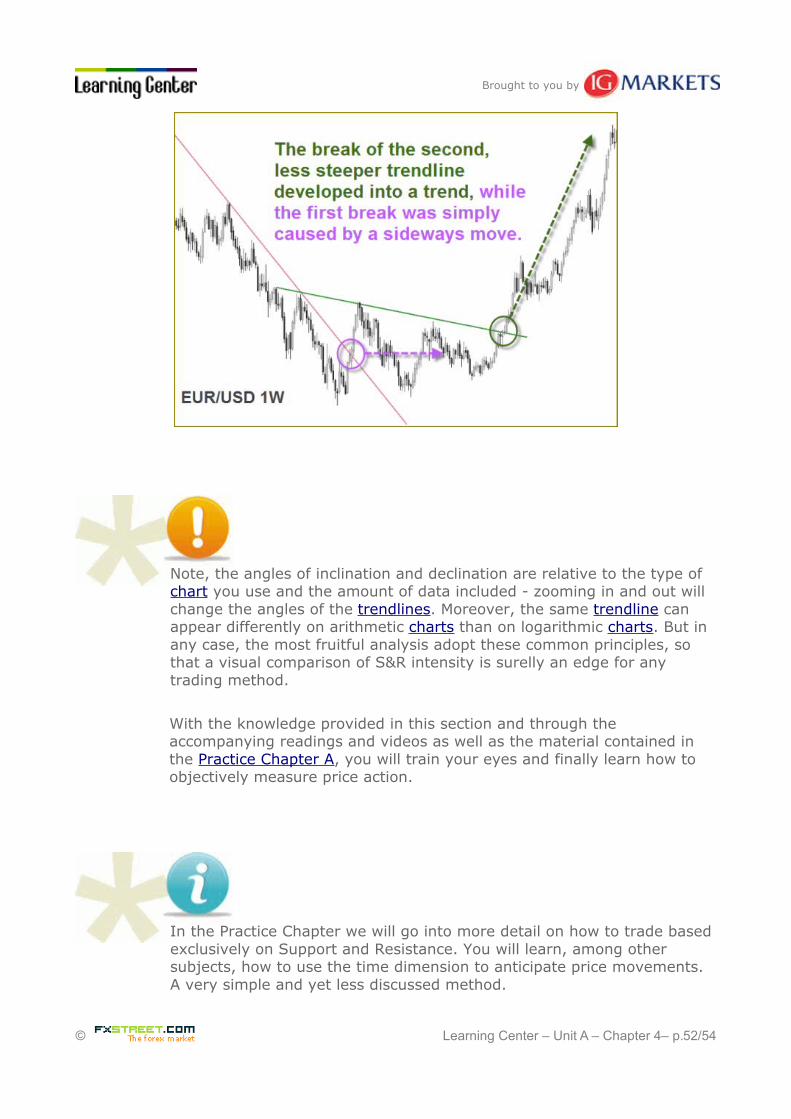
Brought to you by
Note, the angles of inclination and declination are relative to the type of chart you use and the amount of data included - zooming in and out will change the angles of the trendlines. Moreover, the same trendline can appear differently on arithmetic charts than on logarithmic charts. But in any case, the most fruitful analysis adopt these common principles, so that a visual comparison of S&R intensity is surelly an edge for any trading method.
With the knowledge provided in this section and through the accompanying readings and videos as well as the material contained in the Practice Chapter A, you will train your eyes and finally learn how to objectively measure price action.
In the Practice Chapter we will go into more detail on how to trade based exclusively on Support and Resistance. You will learn, among other subjects, how to use the time dimension to anticipate price movements. A very simple and yet less discussed method.
© Learning Center – Unit A – Chapter 4– p.52/54

Brought to you by
What you have learned from this chapter:
• Support and resistance represent key junctures where the forces of supply and demand meet. In the financial markets, prices are driven by excessive supply (down) and demand (up).
• Price action tells us that only the facts matter and price is the utmost “fact”. It also tells us that the facts happen for the purpose of achieving equilibrium between supply and demand. Finally, the outcome of this endless quest for equilibrium can be seen as chaos.
• Price action, that is the "attitude" of the price at key support and resistance levels can betray the next directional move. That is why a set of simple rules is needed.
• Gaps in price are useful because they are the picture of the ultimate supply and demand imbalance.
• Identification of key S&R levels is an essential ingredient of a successful price chart analysis. Even though it is sometimes difficult to establish exact support and resistance levels, being aware of their magnitude, location and shape can greatly enhance analysis and forecasting abilities.
• Price action is an extremely valuable resource in bringing many technical traders, who are often enamored of the latest indicator or technique, back to the basics.
• Price acction limits data intake such as news or signals from technical indicators to specific price action patterns thus filtering out those noise levels that can defeat profits.
FXstreet.com contents:
• Gaps, The Novice Trader Exposed… by Online Trading Academy • Trends, Gaps, and Probabilities... by Online Trading Academy • Three Simple Principles by Online Trading Academy • Using Non−Time Based Charts for Short−Term Forex Trading by
Dr. John Clayburg in The Forex Journal • Pivot Point Analysis by Online Trading Academy • Support and Resistance, a Deeper Understanding by Online Trading
Academy • Reports by Phil Newton • Longer-term Support and Resistance Trading: Setups and Rules –
Webinar Recording
© Learning Center – Unit A – Chapter 4– p.53/54

Brought to you by
External Links:
• The Ultimate Technical Indicator - Tradingmarkets.com • The Objective Filter for an Oscillator - Trade2Win.com • Exploring Market Physics - Tradingday.com
© Learning Center – Unit A – Chapter 4– p.54/54