TrackIR 4 Manual - NaturalPoint
30
TrackIR 4 Manual Version 4.1.028
Transcript of TrackIR 4 Manual - NaturalPoint
TrackIR 4 ManualVersion 4.1.028

Table of Contents
1. Introduction1. Forward2. About NaturalPoint
2. How to use the Manual1. Quick Start2. Further Reading
3. Getting Started1. Minimum Requirements2. What's Included3. Hardware Compatibility4. Software and Hardware Installation
1. Hints for XP users2. Software Installation3. Hardware Installation
5. Hardware Placement1. Desktop Placement2. Using The Mounting Clip3. Laptop Placement
4. Using the TrackIR1. Getting Started
1. About to TrackIR Enhanced2. About the Vector Expansion
2. Tracking Modes1. Dot Tracking mode2. Vector Tracking mode
3. Other Modes1. Third Party utilities2. Mouse Emulation
4. Status LED indicators5. Using the TrackIR Software
1. Overview2. Using the TrackIR with Games3. Using Profiles
1. Associating Profiles with Games2. Exclusively Loading a Profile3. Creating, Copying and Deleting Profiles4. Editing Profiles
1. Selecting the Tracking mode2. Editing Acceleration Curves (Adjusting Speed)3. Changing Hotkeys
5. Organizing Profiles with Filters4. Preview Windows
1. Heads Window2. Gauges Window3. Tracking Window
5. Description of the Software1. Overview2. Main Window
1. Main Tab

2. Profiles Tab3. News Tab
3. Gauges Window4. Heads Window5. Tracking Window
1. Tracking Settings6. Edit Profiles Window
1. General2. Motion3. Curve Editor4. Hotkeys
6. Using the Mouse Emulation utility1. Overview2. Main Window3. Using Mouse Emulation in Games
6. Tips and Tricks7. Accessories8. Software Updates9. Limited Warranty
10. Trouble Shooting
1. Introduction
1.1 Forward
Information in this Users Manual is subject to change without notice and does not represent a commitment on the part of NaturalPoint. The software described in this Users Manual is furnished under a license agreement and may be used only in accordance with the terms of said license agreement.
This document is copyright 2005 NaturalPoint Inc. All rights reserved. No part of this publication may be reproduced in any form, by any means, without express written permission.
TrackIR and NaturalPoint are trademarks of Eye Control Technologies Inc. Windows is a trademark of Microsoft. All other trademarks are property of their respective companies.
TrackIR, TrackIR 4 & TrackIR 4-Pro, Vector and NaturalPoint are trademarks of NaturalPoint Inc. Windows is a trademark of Microsoft. All other trademarks are property of their respective companies.
1.2 About NaturalPoint
NaturalPoint Inc. is pleased to provide you with superior optical tracking devices, we hope that you enjoy using your NaturalPoint TrackIR.
NaturalPoint 33872 SE Eastgate Circle Corvallis, OR 97333 Telephone: 541-753-6645 Fax: 541-753-6689 www.naturalpoint.com
2. How to use the Manual
Quick Start
We strongly recommend reading this manual before using your TrackIR gaming and simulation controller. Of course,

we know that many of you want to jump in and start experimenting as soon as possible. If that describes you, then you can get going by doing the following:
Read the Installation section thoroughly and follow the instructions described there, otherwise your TrackIR may not work.Once the software is installed, connect the TrackIR directly to one of the free USB ports of your computer.Launch the TrackIR software. There will be a shortcut for it on your desktop.Launch the supported game of your choice.Start enjoying the added dimension TrackIR brings to your gaming!
Further Reading
It will quickly become evident that the TrackIR software is a powerful gaming and simulation tool with a number of options designed to help you get the most out of your TrackIR device. It is recommended that you read Section 4 ("Using TrackIR") and Section 5.2 ("Using the TrackIR software with Games") for a better understanding of how the product works. If you decide to learn more about customizing game presets, we also recommend the Section 5.3 ("Customizing Game Profiles").
3. Getting Started
3.1 Minimum System Requirements
Windows 2000, or Windows XPPentium 800Five (5) megabytes of free hard disk space128 megabytes of RAMFree USB Port on computerMicrosoft DirectX 8.0 or higher
3.2 What's Included
1 TrackIR 1 Quickstart guide
1 Software CD
1 Vector Clip

3.3 Hardware Compatibility
The TrackIR version 4.0 software can only be used with the TrackIR 3, TrackIR 4, TrackIR 3-Pro and TrackIR 4-Pro hardware. Older versions of the TrackIR are not compatible, and will not work with this software. The software will present a warning if incompatible hardware is detected.
3.4 Software and Hardware Installation
For best results, we recommend installing the TrackIR Software before you connect the TrackIR hardware.
3.4.1 Tip for Windows XP users It is recommended that before installing any new hardware or software program that you set a system restore point. XP provides this feature to allow you to reset your system to a previous state very easily. After the software is installed and everything is working fine, set another restore point. Users that get into the habit of using this feature find they have fewer problems on their computers. The System Restore program can be found by clicking: Start/Programs/Accessories/System Tools/System Restore
3.4.2 Software Installation NOTE: Windows 2000 and XP users must be logged in as an administrator. If you only have one user set up on your computer, you most likely already have administrator privileges.
1. Insert the included NaturalPoint software CD into your CD drive. Wait for the install program to start. If the install program does not start within a few minutes, open "My Computer" then double click on the CD drive icon, and double click again on the Setup file.
2. Follow the software installation instructions on the screen. Note:(Windows may display a warning message about the drivers not being signed. Click YES to accept the drivers, the drivers WILL NOT harm your system.)
3. A new TrackIR icon will appear on your desktop.
4. Connect the TrackIR device to the USB port of your computer and place the unit on top of your monitor with the front facing the same direction as the monitor screen.
5. The following are special steps for Windows XP users, if you have Windows 2000 skip to section 3.4.3
6. The Windows XP Found New hardware Wizard should appear once you plug in your TrackIR. (The Wizard will indicate that is has found the NaturalPoint TrackIR, and ask if you would like Windows to install drivers for the hardware automatically, or choose from a list of drivers in a specific location.)
7. Select Install Automatically.
8. NOTE: A Hardware Driver Install Warning message will appear after you have selected Install Automatically. Click on the button labeled "Continue Anyway" and Finish. (This WILL NOT harm your computer).
9. Windows XP will now display a message indicating that it has finished installing the NaturalPoint TrackIR.
10. It is recommended that you restart your computer after installation.
11. If you encounter further problems with this procedure, please consult the trouble-shooting guide at the end of this manual.
3.4.3 Hardware Installation, Windows 2000 Continued
1. Plug the TrackIR into a USB port on your computer. For best results, directly connect the TrackIR into a USB port on your computer. We do not recommend using a USB hub of any kind.
2. Your computer may briefly display a message indicating that it is installing the drivers for the TrackIR.
3. Double click on the newly created TrackIR icon on your desktop to open the TrackIR software program.
4. Hold up the vector clip included with your TrackIR unit. With the reflective areas facing the TrackIR unit, slowly move the vector clip back and forth in front of the TrackIR unit from about an arms length away. If the green indicator light comes on, you have installed the TrackIR unit and software correctly. If the green indicator light does not come on, please consult the trouble shooting guide at the back of this manual.
3.5 Desktop, flatpanel and laptop hardware placement
Setting up the TrackIR unit on either a desktop or laptop is quick and easy.
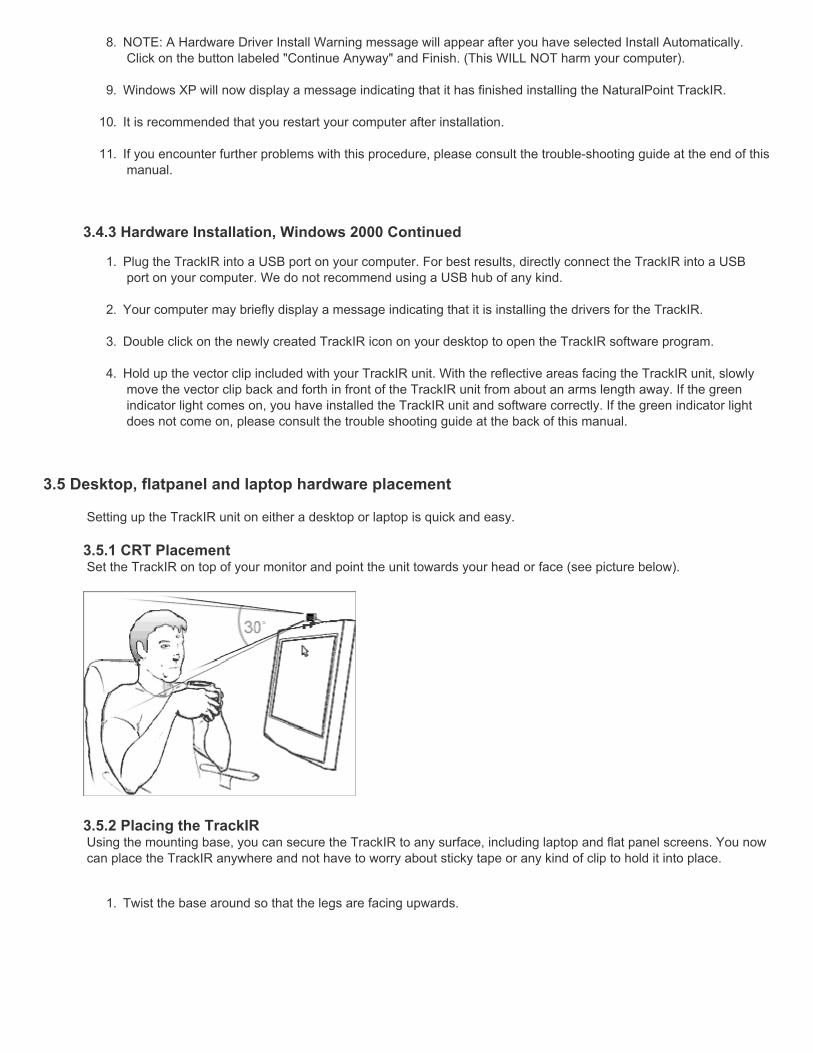
3.5.1 CRT Placement Set the TrackIR on top of your monitor and point the unit towards your head or face (see picture below).
3.5.2 Placing the TrackIR Using the mounting base, you can secure the TrackIR to any surface, including laptop and flat panel screens. You now can place the TrackIR anywhere and not have to worry about sticky tape or any kind of clip to hold it into place.
1. Twist the base around so that the legs are facing upwards.

2. Turn the base so that the legs are in front of the device with 1 stable leg in the back, it will look like a 'T' shape.
:
3. Now Position the TrackIR where you want it to stay, and your done!
NOTE : It is best to fully install the software and test the TrackIR a bit before deciding where to place the TrackIR. This way, you can see your position in the TrackIR's tracking window while positioning the device.
3.5.3 Alternative Laptop Placement The TrackIR can be easily and securely placed onto most standard laptop screens without any additional equipment.
1. Grasp the plastic base and use your other hand to rotate the TrackIR legs so that the feet face down. Then turn the base so that the front legs are shown as in step 2.
2. Spread the front feet open to about a 45 degree angle. Bend the back leg down a bit.

3. Now place the unit on top of your LCD screen as shown below.
4. Pivot the TrackIR unit on its hinges so it's lined up properly with your head. Now you are ready for a new dimension in gaming!
4. Using the TrackIR The TrackIR is a unique gaming controller that lets you use your head as a gaming and simulation input device. It uses infrared technology to bounce an invisible beam of light off of reflective material mounted on or near the user's head, and translates this information to viewing and motion commands on screen. With the TrackIR properly installed and calibrated for your individual gaming preferences, you will be pleased to see that the same small head motions you were already performing, while using your computer, are all you need to completely control your view. It is easy to use and quick to learn, and many users can get up and running without ever opening the manual. However, the information provided below can insure that you get the most out of your investment in the TrackIR.
4.1 Getting StartedBefore using your TrackIR gaming controller you should make sure to have all software and hardware properly installed as described in chapter 3. Once the software is installed, you can begin using your TrackIR by doing the following :
Place the TrackIR on a surface directly in front of your face, and as close to level with the top of your head as possible. This is usually accomplished best by placing the unit on top of your computer monitor. If using a laptop, the TrackIR can be clipped to the top of your screen. Plug the TrackIR's USB cable into any available USB port on your computer. Attach the vector clip to your hat, headset or mic. Launch the TrackIR software.
4.1.1 Introduction to TrackIR Enhanced To get the best experience, the TrackIR should be used with games which are TrackIR Enhanced. This brings a far

more powerful set of controls to the user, turning the TrackIR into a game controller that works separately from the mouse. In many games the TrackIR can be used alongside a mouse, the TrackIR will be used for view control, while a mouse provides other input functionality. For example, in a flight simulation, the TrackIR can change your view while the mouse operates controls on the instrument panel However, for these types of features to function, a game must specifically enable TrackIR Enhanced. A list of Titles (games and simulations) which are TrackIR Enhanced can be found on the Profiles tab of the TrackIR version 4.0 software.
New Titles are frequently being added, so check www.trackir.com for updates.
4.1.2 Introduction to the Vector Expansion (Vector Tracking Mode) The Vector Expansion for the TrackIR 4 and TrackIR 4-Pro brings an even greater level of immersion to the TrackIR experience. The Vector Expansion allows you to pan side to side, look around and even zoom - with full 3-dimensional tracking! Combined with the TrackIR, you get the most realistic head tracking experience possible. Vector allows you to expand your view control to a full range of motion, from 2 Degrees (2DOF pitch/yaw) with a TrackIR, to all six degrees of freedom (6DOF).
NOTE: Vector Activation is not needed on the TrackIR 4 as it is built in to the hardware directly.
4.2 Modes of Operation (Tracking Modes)There are two modes of tracking available in the TrackIR software. For information about how to switch the Tracking mode, please see Section 5.5.6.2.
4.2.1 Dot Tracking mode Dot Tracking is available for all TrackIR-3 and TrackIR-4 models, it tracks a single dot and converts your head movement into view control. This mode of tracking allows you to control two axes (2DOF), Pitch and Yaw. Yaw refers to the view change of turning your head left and right, while Pitch refers to looking up and down. Because it tracks a single dot as it moves left, right and up, down, it is not able to distinguish between rotation (turning your head) and translation (moving your head).
The available Axes of movement in Dot Tracking mode are :
Rotation : Pitch, Yaw (Translation is treated as rotation in Dot Tracking mode)
4.2.2 Vector Tracking mode Vector tracking utilizes 3 dots instead of a single dot in order to precisely track your head motion. Vector allows you to expand your view control to a full range of motion, from 2 Degrees (2DOF pitch/yaw) with a TrackIR, to all six degrees of freedom (6DOF). Vector, unlike Dot tracking, is able to distinguish between rotation and translation. With Vector you can translate (move) side to side and the view will not rotate, this means that even for games which do not support 6DOF, Vector tracking delivers a better 2DOF experience. For games and simulations that implement full 6DOF, you'll be able to move around inside the cockpit of your plane or car as well as turn to look at things.
The available Axes of movement in Vector Tracking mode are :
Rotation : Pitch, Yaw, RollTranslation : X, Y, Z
In order to use Vector Tracking, you must use the Vector clip.
4.3 Other modes of operation
4.3.1 Third party utilities There are a number of third party utilities that work with the TrackIR to bring TrackIR support to non-TrackIR Enhanced

games and simulations. These utilities are produced and maintained by parties which are not affiliated with NaturalPoint, and no warranty or performance level is guaranteed. You can find out more about these utilities by visiting the following page on our website at http://www.naturalpoint.com/trackir/04-community/community-free-game-demos-and-utilities.html 4.3.2 Mouse Emulation Mouse emulation mode is used when there is no direct TrackIR support for the game you would like to play. You can attempt to configure the game as long as it has a mouse look option. For more details and information on mouse emulation please see section 5.6 in the manual.
4.4 Status LED indicatorsThe TrackIR camera has status LEDs which give the user visual cues about the status of the TrackIR software. There are two Status LEDs, one is located on the front directly above the infrared shield, and the other is on the underside of the TrackIR camera which will cause the case to "glow" blue when it is illuminated. Use the following key to interpret what the state and color of the status LEDs mean. Front Status LED
Off : NO reflective surface is being tracked, and TrackIR Enhanced output is NOT paused.Green : A reflective surface IS being tracked, and TrackIR Enhanced output is NOT paused.Orange : A reflective surface IS being tracked, and TrackIR Enhanced output IS paused.Red : NO reflective surface is being tracked, and TrackIR Enhanced output IS paused.
Blue Case LED
Off : There is NO TrackIR Enhanced Title (game or simulation) running.Glowing Blue : A TrackIR Enhanced Title IS running and has registered with the TrackIR software to receive tracking data. Note : If the Case LED has been disabled in the Tracking -> Settings window, it will not turn on.
5. The TrackIR software
5.1 OverviewThe TrackIR software is the interface between the TrackIR, games and simulations, and you. In order to use your TrackIR, the software must be running. It is recommended that you minimize the software while playing games and simulations, this will consume the the fewest system resources (less than 2% on most PCs). To run TrackIR minimized click "Options" then click "Run minimized".
5.2 Using the TrackIR with Games (basic operation)
In order to use the TrackIR with a game or simulation, the game must be TrackIR Enhanced. A list of games that are TrackIR Enhanced can be found in the "Profiles" panel of the software. Once you have determined that a game is TrackIR Enhanced, you can continue to the next step. Verify that the TrackIR software is running before starting the simulation that you wish to use with TrackIR. Once the game is running and the virtual cockpit is activated, it should be possible to control the view by moving your head. Some games may require you to turn on support for the TrackIR in the game. If the TrackIR it does not work immediately, please consult the game's manual or manufacturer support for more details.
For information about using the TrackIR with games which are not TrackIR-Enhanced please see Section 4.3.
5.3 Using Profiles (advanced operation)
Note : Naming Conventions. Games and simulations are referred to as "Titles" in the TrackIR version 4.0 software.
Profiles are a collection of settings (motion, hot keys, etc.) that optimize the response of the TrackIR for different game conditions and user preferences. Primarily, profiles control how real head movement of the user is converted into view control. It is possible to increase or decrease the speed and precision of the view movement by editing profiles. It is also possible to inver and disable each individual Axis.
The default installation of the TrackIR software includes several sample profiles which have been tuned to perform well for a wide variety of games and simulations. The sample profiles provide a good starting point for customizing the motion to suit your needs as you become more familiar with using the TrackIR.
Profiles can be loaded manually (with Exclusive-load), or they can be associated with a particular game to be loaded automatically when it runs. The following section describes how to work with profiles and adjust them to best suit your needs.
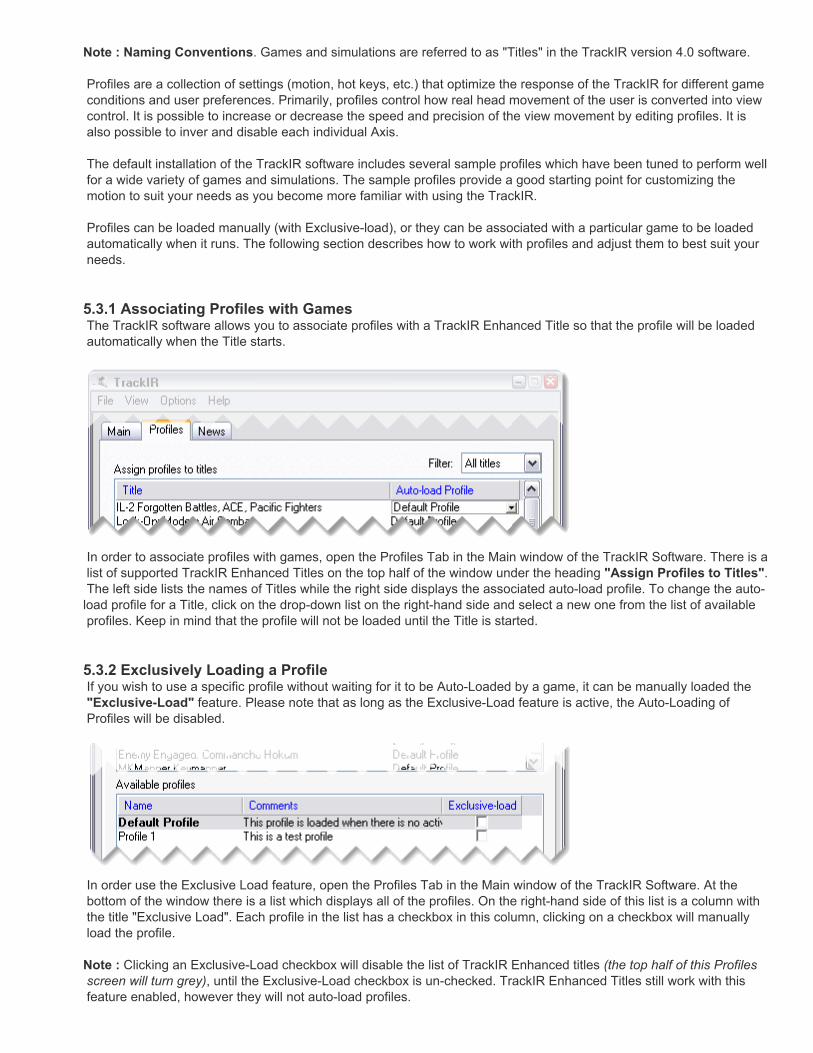
5.3.1 Associating Profiles with Games The TrackIR software allows you to associate profiles with a TrackIR Enhanced Title so that the profile will be loaded automatically when the Title starts.
In order to associate profiles with games, open the Profiles Tab in the Main window of the TrackIR Software. There is a list of supported TrackIR Enhanced Titles on the top half of the window under the heading "Assign Profiles to Titles". The left side lists the names of Titles while the right side displays the associated auto-load profile. To change the auto-load profile for a Title, click on the drop-down list on the right-hand side and select a new one from the list of available profiles. Keep in mind that the profile will not be loaded until the Title is started.
5.3.2 Exclusively Loading a Profile If you wish to use a specific profile without waiting for it to be Auto-Loaded by a game, it can be manually loaded the "Exclusive-Load" feature. Please note that as long as the Exclusive-Load feature is active, the Auto-Loading of Profiles will be disabled.
In order use the Exclusive Load feature, open the Profiles Tab in the Main window of the TrackIR Software. At the bottom of the window there is a list which displays all of the profiles. On the right-hand side of this list is a column with the title "Exclusive Load". Each profile in the list has a checkbox in this column, clicking on a checkbox will manually load the profile.
Note : Clicking an Exclusive-Load checkbox will disable the list of TrackIR Enhanced titles (the top half of this Profiles screen will turn grey), until the Exclusive-Load checkbox is un-checked. TrackIR Enhanced Titles still work with this feature enabled, however they will not auto-load profiles.
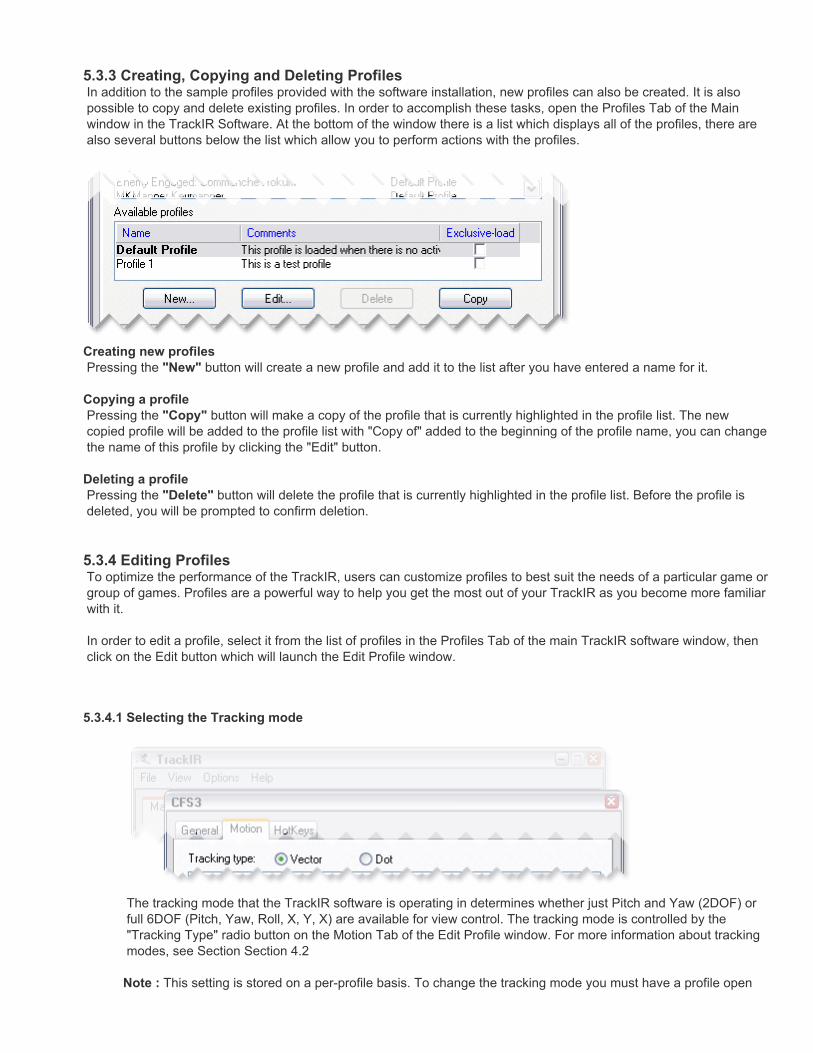
5.3.3 Creating, Copying and Deleting Profiles In addition to the sample profiles provided with the software installation, new profiles can also be created. It is also possible to copy and delete existing profiles. In order to accomplish these tasks, open the Profiles Tab of the Main window in the TrackIR Software. At the bottom of the window there is a list which displays all of the profiles, there are also several buttons below the list which allow you to perform actions with the profiles.
Creating new profiles Pressing the "New" button will create a new profile and add it to the list after you have entered a name for it.
Copying a profile Pressing the "Copy" button will make a copy of the profile that is currently highlighted in the profile list. The new copied profile will be added to the profile list with "Copy of" added to the beginning of the profile name, you can change the name of this profile by clicking the "Edit" button.
Deleting a profile Pressing the "Delete" button will delete the profile that is currently highlighted in the profile list. Before the profile is deleted, you will be prompted to confirm deletion.
5.3.4 Editing Profiles To optimize the performance of the TrackIR, users can customize profiles to best suit the needs of a particular game or group of games. Profiles are a powerful way to help you get the most out of your TrackIR as you become more familiar with it.
In order to edit a profile, select it from the list of profiles in the Profiles Tab of the main TrackIR software window, then click on the Edit button which will launch the Edit Profile window.
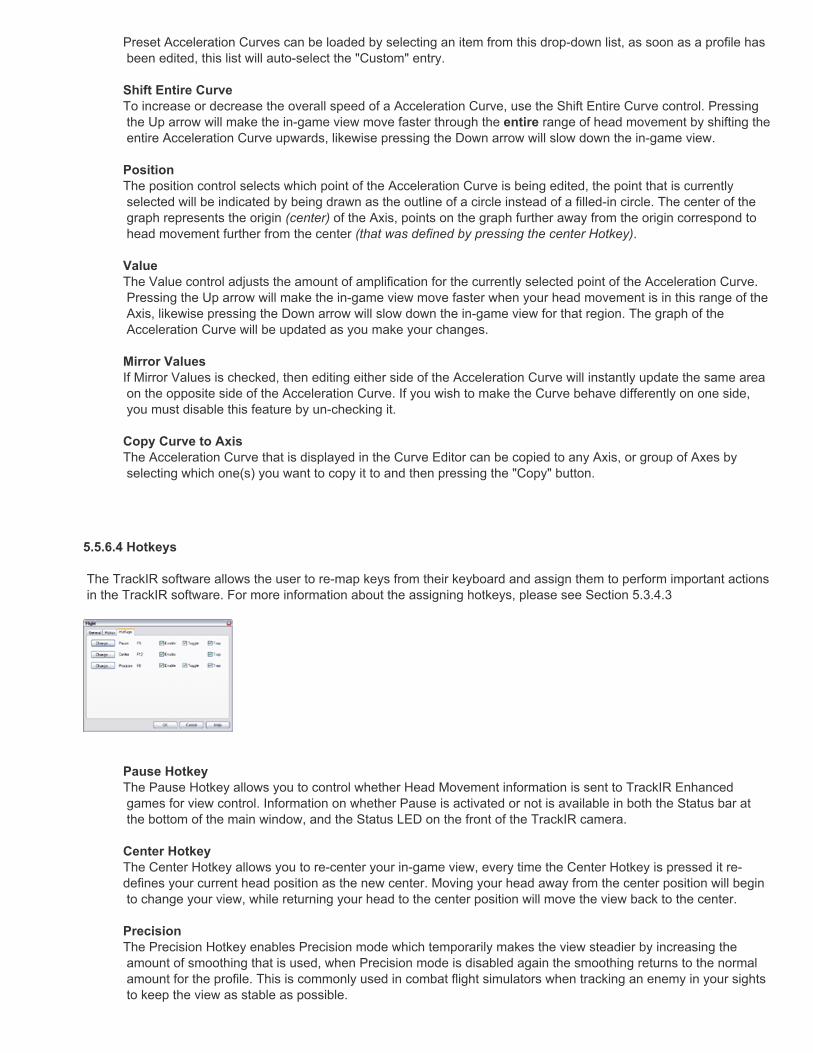
5.3.4.1 Selecting the Tracking mode
The tracking mode that the TrackIR software is operating in determines whether just Pitch and Yaw (2DOF) or full 6DOF (Pitch, Yaw, Roll, X, Y, X) are available for view control. The tracking mode is controlled by the "Tracking Type" radio button on the Motion Tab of the Edit Profile window. For more information about tracking modes, see Section Section 4.2
Note : This setting is stored on a per-profile basis. To change the tracking mode you must have a profile open

for edit. For details on how to edit a profile, please see Section 5.3.3
5.3.4.2 Editing Acceleration Curves (Adjusting Speed)
Each Axis of head movement that the TrackIR software is able to track can be adjusted to have a faster and slower response to your real head movement. The TrackIR software uses an Acceleration Curve to amplify your real head movement, this allows complete control of the in-game view with only a few degrees of head movement. Changing the Acceleration Curve for an Axis allows you to fine-tune the amount of head movement used to control your view, it also be used to create Dead-Zones which help keep the view stable for types of use like Flight Simulation combat.
Hint : You can preview the effects of your changes in both the "Heads" and "Gauges" pop-up windows while you are using the Curve Editor. This will help you understand the how the changes affect your view control motion. You can find out more about these windows in Section 5.5.3 and Section 5.5.4
In order change an Acceleration Curve, you need to open the Acceleration Curve editor. This is done by selecting (clicking once) the Axis you wish to edit from the Axis list and pressing the "Edit" button in the Motion Tab of the Edit Profile Window (you must have a profile open for edit).
The Acceleration Curve editor has a graph which displays how much the motion for the Axis is amplified. The horizontal center of the graph is the origin of the Axis, this corresponds to the "Center" of your head movement that is set by pressing the Center Hotkey. Head movement away from the center of the Axis is represented as moving left or right from the origin on the graph.
The control points on the graph allow you to edit the curve by clicking and dragging the points, or by using the Position and Value controls to select and change the values of individual edit points. Moving a point "up" on the graph will increase the amount of amplification for head movement. Moving a point "down" on the graph will reduce the amount of amplification, moving a point to the bottom of the graph (zero) will prevent head movement from being sent to the TrackIR Enhanced Title while your head is within that area of the Axis.
Presets, which can be loaded using the Acceleration drop-down list, should cover basic tracking needs.
The Copy button and drop-down list can be used to copy your Acceleration curve to other Axes.
Note : As the speed of view control is increased or decreased, you may wish to adjust the amount of smoothing that is used. Increasing the speed will often require an increase in the amount of smoothing to ensure that the view control remains stable and smooth. For details on how to change the smoothing amount, see Section 5.5.6.2
5.3.4.3 Changing Hotkeys

The TrackIR software allows the user to re-map keys from their keyboard and assign them to perform important actions in the TrackIR software. Our software allows you to select the key used to perform these actions, as well as turning the hotkey on or off, and other features. In order to change the settings for a hotkey, open the Hotkeys tab of the Edit Profile window, there is a list of all the available hotkeys and their settings. For more information about the specific hotkey settings, please see Section 5.5.6.4
Note : When a hotkey is enabled and the Trap setting is checked, the keyboard key assigned to that hotkey action will not be available to any other windows program. If you wish for that keyboard key to be used by other programs, you will need to either re-assign the hotkey to a new keyboard key or disable the Trap setting for it (which means that the key will still perform the hotkey action but will be then passed on to other windows programs).
Note : These settings are stored on a per-profile basis. To change hotkey settings you must have a profile open for edit. For details on how to edit a profile. please see Section 5.3.3
5.3.5 Organizing Profiles with Filters
There are a large number of titles which feature TrackIR Enhanced support. For this reason it is sometimes useful to reduce the number of titles that are displayed at a time in the TrackIR Enhanced Title list.
The Filter feature for Titles allows you to display either all Titles, or just the Titles associated with a particular category (for example "Flight", "Racing", etc). The category that a Title is grouped under is pre-determined by NaturalPoint and cannot be changed, however there is one extra category that is customizable called "Favorites". You can add Titles into the Favorites category by right clicking on the Title and selecting "Add to Favorites".
5.4 Using the Motion Preview and Tracking Windows
There are a number of utilities built into the TrackIR4 software to help you get the most of your experience, as well as to help you easily resolve any tracking or motion problems that you may encounter. Each of the following windows can be launched from either the "View" menu in the main TrackIR software window, or from checkboxes found in the Edit Profiles, Motion tab.
5.4.1 Heads Window
The Heads window allows you to see the movement of your real head alongside a preview of the amplified head movement that is sent to TrackIR Enhanced Titles (games and simulations) for view control. While editing a profile, this window will provide instant feedback about how the changes you make will affect in-game view control.

For more details on using this window, please see Section 5.5.4
5.4.2 Gauges Window
The Gauges window displays each Axis that the TrackIR is capable of tracking, depending on the current Tracking mode it will update either 2 or all 6 Axes. The gauges window displays a graph of the Acceleration Curve for each Axis along with lines representing the current tracking information. This can be useful while editing Acceleration Curves for getting an idea of what part of the Curve that your head movement is in, as well as how that movement is amplified using the curve.
For more details on using this window, please see Section 5.5.3
5.4.3 Tracking Window
The Tracking window provides instant feedback about what the TrackIR camera is tracking, and what is in it's field of view. This helps you adjust the position of yourself and the TrackIR camera to get the best range of motion and tracking results.
For more details on using this window, please see Section 5.5.5
5.5 Description of the Software
5.5.1 Overview The TrackIR software has been optimized to provide you with the best experience possible, it gives you a simple, yet powerful and highly customizable way to use TrackIR device for in-game view control.
For most users, the default configuration and settings should provide a good starting point for enjoying the TrackIR experience with their favorite games and simulations. The powerful Profile system allows users to customize the behavior of the TrackIR to best suit their needs. For more information on how to work with profiles, please see Section 5.3 5.5.2 Main Window

This window displays basic status information and serves as a gateway to the other features in the TrackIR software. There are additional features on individual tabs which control how the software works, the features on each of these tabs will be explained further below in detail.
MainProfilesNews
File menu
Exit : Clicking this menu item will close the TrackIR software.
View menu
Tracking : This menu item controls whether the Tracking Window is visible or not, clicking it will display or hide the Tracking window depending on whether it is already visible or not. Heads : This menu item controls whether the Heads Window is visible or not, clicking it will display or hide the Heads window depending on whether it is already visible or not. Gauges : This menu item controls whether the Gauges Window is visible or not, clicking it will display or hide the Gauges window depending on whether it is already visible or not.
Options menu
Run at Startup : When checked, the TrackIR software will automatically start as soon as Windows loads, every time you turn on or restart your computer. Run Minimized : When checked, the TrackIR Software will run in a minimized state when it is started. Close to Tray : When checked, this option places the TrackIR software into the System Tray when the application is minimized. Periodic News Check : When checked, the TrackIR software will check the NaturalPoint website for any current news and developments.
Help menu
Contents : This menu item launches the TrackIR users manual that you are reading! Activate Vector... : This menu item launches the TrackIR Vector registration window so you can activate 6 degrees of freedom. Activation is not required for TrackIR 4 hardware. Check for Game Updates : Clicking this menu item will check to see if there is support for new games available.

Check for Software Updates : Clicking this menu item will launch a NaturalPoint web page that allows you to check if new updates are available for the TrackIR software. About TrackIR : This menu item launches a window with information about the version of the software you are using, and contains a link to the NaturalPoint website.
Status bar
Status : Information about whether a reflective object is being tracked will be displayed here. If no objects is found to track, or no TrackIR camera is connected, then it will display "No Data" Tracking : The current tracking mode is shown here, it will indicate either "Vector" or "Dot". Center : This displays the keyboard key that is currently assigned to the Center hotkey action. Enable : This displays the keyboard key that is currently assigned to the Enable hotkey action.
5.5.2.1 Main Tab
The Main Tab provides basic information about the status of the software, the TrackIR hardware and the Vector Expansion.
Device Info Information about the TrackIR hardware that is connected to your computer is displayed here, it will indicate the Model type and Serial number of your device.
Current Game If a TrackIR Enhanced game is running and has connected to the TrackIR software, then the name of the game will be displayed here.
Current Profile The name of the Profile (settings) that is currently loaded will be displayed here, this will be updated when a profile is loaded manually or auto-loaded by a TrackIR enhanced Title (game or simulation).
Expansion This area displays the status of the Vector Expansion for the TrackIR, there are 4 different states that can be shown. A link under the graphic can be clicked to launch a NaturalPoint web page with more detailed information.
No Device Detected : No TrackIR was found Vector Expansion not Activated : No License for the Vector Expansion was found License file is not valid : A License was found for the Vector Expansion, but it is not valid for the

TrackIR that is connected Vector is active : A TrackIR is connected and a valid License for the Vector Expansion is installed
For details about the Vector Expansionm see Section 4.1.2 and Section 3.3
5.5.2.2 Profiles Tab
The Profiles Tab allows you to organize, create, edit, load, and assign profiles to a particular Title (game or simulation) is started.
For details about how to work with profiles and the TrackIR Enhanced Title list, please see Section 5.3
Assign Profiles to Titles (TrackIR Enhanced Title list) This list contains all of the Titles that have implemented TrackIR Enhanced support. It allows you to assign a profile to each title to be auto-loaded using the drop-down list in the right-hand column, basic information about the title can be found by double clicking on the name in the list. For more details about how to use these features, please see section 5.3.1
Filter The Filter drop-down list allows you to customize which games show up in the TrackIR Enhanced Title list. For more details about how to use this feature, please see section 5.3.5
Available Profiles This list contains all of the Profiles that are available to be used. Profiles can be added, copied and deleted from this list using the buttons below it. It is also possible to manually load a single profile and prevent other profiles from being auto-loaded by using the Exclusive Load checkbox in the right-hand column. For more details about how to use these features, please see Section 5.3.2, Section 5.3.3, Section 5.3.4
5.5.2.3 News Tab
The News Tab allows you view any special deals or information regarding TrackIR games and devices.

5.5.3 Gauges
The Gauges window displays each Axis that the TrackIR is capable of tracking, it provides valuable feedback about your head movement, and is especially useful when editing Acceleration Curves to tune the performance of the TrackIR. This window can be launched from the View menu of the main window, or from the Motion Tab of the Edit Profile window.
Graphs The gauges window displays a graph of the Acceleration Curve for each Axis along with lines representing the current tracking information. On each graph a vertical blue line is shown indicating the origin (center) of the Axis, a vertical red line represents your Real head position and a vertical yellow line represents the amplified head position which is sent to TrackIR Enhanced Titles (games and simulations) for view control. These lines update on the graphs as you move your head while it is being tracked by the TrackIR.
Double clicking on a graph will open that Axis of the current profile for editing.
Now Previewing The profile that is currently loaded or being edited will be displayed here, the Acceleration Curves displayed in the gauges window will be updated to reflect the Acceleration Curves if they are being edited.
MainProfiles
5.5.4 Heads
The Heads window shows the movement of your real head alongside a preview of the amplified head movement based on the settings of the current profile. While editing a profile, this window will provide instant feedback about how the changes you make will affect in-game view control. This window can be launched from the View menu of the main window, or from the Motion Tab of the Edit Profile window.
Your Head This head displays the movement of your real head as it is tracked by the TrackIR
In-game Head

This head displays a preview of the amplified head movement that is sent to TrackIR Enhanced Titles (games and simulations) for view control.
Now Previewing The profile that is currently loaded or being edited will be displayed here, the motion shown in the Heads window will be based on the settings for that profile.
View This drop-down list allows you to select between previewing your real head motion (Mirror), and a demonstration of what each axis is and what kind of movement it tracks (Pitch, Yaw, Roll, X, Y, X).
5.5.5 Tracking
This window displays a video image which shows what the TrackIR camera is currently seeing, and is useful for solving any tracking problems that may occur. Use this window to make sure that you are centered within the TrackIR camera's field of view, which will give you the best range of motion. This window can be launched from the View menu of the main window, or from the Motion Tab of the Edit Profile window.
Camera View The color of the objects in the window indicates what they mean.
A Green object indicates that the object is active and being used for view control.Grey to White objects are colored based on priority of the next best active object with white being the highest priority and grey being the lowest.Red objects have been filtered out and will not be tracked.
Settings The button launches the Tracking Settings window which has additional controls for adjusting the tracking.
5.5.5.1 Tracking Settings
Settings that affect how the TrackIR detects and tracks your motion are found in this window, they allow you to fine tune the tracking and are useful in resolving tracking problems that may occur. It is recommended that they are used in conjunction with the Camera View video in the Tracking Window.
Camera LED's On This checkbox turns on or off the TrackIR camera's internal Infrared LEDs. This box is checked by default and

must be checked when you are using reflective material to have your head movement tracked. If you are using battery powered LEDs for tracking instead of reflective material, you will want to turn the TrackIR Infrared LEds off.
Camera Rotation This feature allows you to choose the correct rotation of the TrackIR unit if you have clipped the unit to any part of your laptop screen. To ensure that the proper rotation has been selected, compare the angle of your TrackIR unit to the graphic shown in this menu.
If the TrackIR is upright (sitting on its stand), then the rotation should be set to 0. If the unit is positioned on its left or right side or is upside down, then the Camera Rotation should be set to 90, 270 or 180 degrees respectively.
Light Filtering Use this Checkbox to enable or disable the slider bar which controls the Light Filtering.
This slider bar is used to control the light filtering of the TrackIR camera. A higher setting will result in more light being filtered. If used in areas where there are strong lights shining, the slider may need to be set to a higher value to filter out the reflections caused by these lights. When used inside, a value of 130 should produce good results (or just un-check the Light Filtering checkbox). Increasing this setting above 200 may reduce the precision of your TrackIR device.
Dot Tracking This group of controls allows you to adjust the type of object that the TrackIR will track when it is operating in Dot tracking mode, the settings have no effect when when operating in Vector Tracking mode.
Object Type There are two filter buttons which select the type of reflective target that the TrackIR will prefer to track. Selecting the type that matches the reflective target you are using will make your tracking experience more reliable.
Dot The TrackIR looks for a reflective area that is approximately the same height and width. The Object Size slider is set to 100 by default and is designed to track objects that have a rounded or dot like appearance.
TrackHAT When using the NaturalPoint TrackHAT or other narrow strips of reflective material, the Object Size slider is set to 200 and tells the software to look for objects that are long and narrow.
Preferred Object Size This slider bar determines the preferred size (in pixels) of the reflective target for the TrackIR to track. The larger your dot, the greater the setting needs to be set to.
Use blue LED for TrackIR Enhanced When this checkbox is checked, the Blue Case LED turns on whenever a TrackIR Enhanced Title (game or simulation) starts and connects to the TrackIR software.
5.5.6 Edit Profiles Window
Profiles are a collection of settings (motion, hot keys, etc.) that optimize the response of the TrackIR for different game conditions and user preferences. The profiles window has several tabs with pages which have features that allow you

to work with profiles, each page is explained further below in detail.
GeneralMotionHotkeys
To edit a profile, select a profile from the Profiles list in the Profiles Tab of the main TrackIR software window and either press the "Edit button" or double click on it. For more information on working with profiles, please see Section 5.3
5.5.6.1 General
The General Tab of the Edit Profile window allows you to view and edit the basic information for a profile.
Name You can specify the name of the profile by entering it in this edit box, changing the name shown will rename the profile when the "OK" button is pressed. Renaming the profile here will also change the filename that is is saved under in the Profiles directory.
Notes You can store your notes for the profile in this area.
5.5.6.2 Motion
The Motion Tab of the Edit Profile window contains settings which control how head movement is converted into in-game view control. Adjusting the Profile settings contained in this Tab allow you to adjust the sensitivity of your view (faster or slower) and turn on and off each individual axis. For more information on working with profiles, please see Section 5.3
Tracking Type The tracking type determines which Tracking mode the TrackIR software should operate in, this affects how many Axes of view control are available for in-game view control (6DOF for Vector, 2DOF for Dot). Changing the Tracking mode is only possible when a valid Vector License is installed and a TrackIR camera is connected to the computer, otherwise the selector will be hidden from view. For more information on Tracking modes, please see Section 4.2

Axis list Every axis that is available for the currently selected Tracking mode is listed here, each axis has a number of settings and a Acceleration Curve that can be adjusted. When Vector tracking is activated all 6 Axes will be listed (Pitch, Yaw, Roll, X, Y, Z), when Dot tracking is activated only 2 Axes will be listed (Pitch, Yaw).
Enabled When a checkbox in this column is checked for an Axis in the Axis list, tracking information for that Axis is sent to games or simulations. When it is not checked, no information about that Axis will be sent and it will remain centered in the game.
Invert When a checkbox in this column is checked for an Axis in the Axis list, the tracking information for that Axis will be reversed. For example, checking the invert box for Pitch will make your in-game view turn to the right when you turn your head to the left.
Acceleration Presets The Acceleration Curve for an Axis can easily be changed by using the drop-down box in this column, it will load a preset Acceleration Curve for that Axis. The change will be displayed in the Gauges window if it is open.
Edit button This button allows you to edit the Axis that is currently selected in the Axis list, as soon as an Axis is selected the button's text will change to include the name of the Axis. It is also possible to edit an Axis by double clicking on it's name in the Axis list. Editing an Axis will launch the Curve Editor window. Edit button
Smoothing The Smoothing is used to stabilize head movement as it is converted into in-game view control. Increasing the amount of smoothing will provide a steadier view, while decreasing the smoothing will make panning the view more responsive
Preview Windows These checkboxes control whether the Motion Preview windows are visible or not, these windows provide useful feedback when customizing profiles.
5.5.6.3 Curve Editor
The curve editor allows you to edit the Acceleration Curves that convert your Real head movement into in-game view control. For more information on editing curves, please see Section 5.3.4.2
Acceleration Curve graph The graph in this window shows the Acceleration Curve for the Axis that is being edited. Clicking on points in the graph allows them to be dragged up and down, which changes the speed of the in-game view for the associated range of head movement. It is very useful to have the Heads and Gauges window open when editing a Acceleration Curve.
Axis This drop-down menu selects the Axis that to edit, changing it will load a new Axis for editing.
Acceleration
Preset Acceleration Curves can be loaded by selecting an item from this drop-down list, as soon as a profile has been edited, this list will auto-select the "Custom" entry.
Shift Entire Curve To increase or decrease the overall speed of a Acceleration Curve, use the Shift Entire Curve control. Pressing the Up arrow will make the in-game view move faster through the entire range of head movement by shifting the entire Acceleration Curve upwards, likewise pressing the Down arrow will slow down the in-game view.
Position The position control selects which point of the Acceleration Curve is being edited, the point that is currently selected will be indicated by being drawn as the outline of a circle instead of a filled-in circle. The center of the graph represents the origin (center) of the Axis, points on the graph further away from the origin correspond to head movement further from the center (that was defined by pressing the center Hotkey).
Value The Value control adjusts the amount of amplification for the currently selected point of the Acceleration Curve. Pressing the Up arrow will make the in-game view move faster when your head movement is in this range of the Axis, likewise pressing the Down arrow will slow down the in-game view for that region. The graph of the Acceleration Curve will be updated as you make your changes.
Mirror Values If Mirror Values is checked, then editing either side of the Acceleration Curve will instantly update the same area on the opposite side of the Acceleration Curve. If you wish to make the Curve behave differently on one side, you must disable this feature by un-checking it.
Copy Curve to Axis The Acceleration Curve that is displayed in the Curve Editor can be copied to any Axis, or group of Axes by selecting which one(s) you want to copy it to and then pressing the "Copy" button.
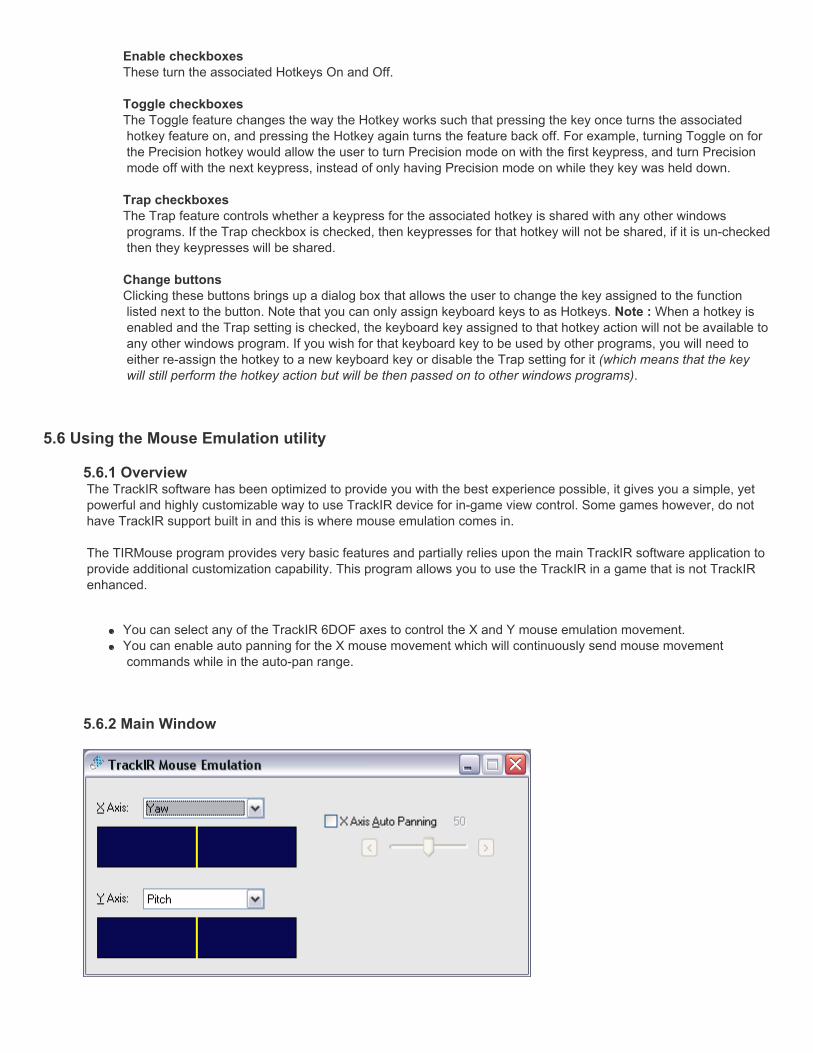
5.5.6.4 Hotkeys
The TrackIR software allows the user to re-map keys from their keyboard and assign them to perform important actions in the TrackIR software. For more information about the assigning hotkeys, please see Section 5.3.4.3
Pause Hotkey The Pause Hotkey allows you to control whether Head Movement information is sent to TrackIR Enhanced games for view control. Information on whether Pause is activated or not is available in both the Status bar at the bottom of the main window, and the Status LED on the front of the TrackIR camera.
Center Hotkey The Center Hotkey allows you to re-center your in-game view, every time the Center Hotkey is pressed it re-defines your current head position as the new center. Moving your head away from the center position will begin to change your view, while returning your head to the center position will move the view back to the center.
Precision The Precision Hotkey enables Precision mode which temporarily makes the view steadier by increasing the amount of smoothing that is used, when Precision mode is disabled again the smoothing returns to the normal amount for the profile. This is commonly used in combat flight simulators when tracking an enemy in your sights to keep the view as stable as possible.
Enable checkboxes These turn the associated Hotkeys On and Off.
Toggle checkboxes The Toggle feature changes the way the Hotkey works such that pressing the key once turns the associated hotkey feature on, and pressing the Hotkey again turns the feature back off. For example, turning Toggle on for the Precision hotkey would allow the user to turn Precision mode on with the first keypress, and turn Precision mode off with the next keypress, instead of only having Precision mode on while they key was held down.
Trap checkboxes The Trap feature controls whether a keypress for the associated hotkey is shared with any other windows programs. If the Trap checkbox is checked, then keypresses for that hotkey will not be shared, if it is un-checked then they keypresses will be shared.
Change buttons Clicking these buttons brings up a dialog box that allows the user to change the key assigned to the function listed next to the button. Note that you can only assign keyboard keys to as Hotkeys. Note : When a hotkey is enabled and the Trap setting is checked, the keyboard key assigned to that hotkey action will not be available to any other windows program. If you wish for that keyboard key to be used by other programs, you will need to either re-assign the hotkey to a new keyboard key or disable the Trap setting for it (which means that the key will still perform the hotkey action but will be then passed on to other windows programs).
5.6 Using the Mouse Emulation utility 5.6.1 Overview The TrackIR software has been optimized to provide you with the best experience possible, it gives you a simple, yet powerful and highly customizable way to use TrackIR device for in-game view control. Some games however, do not have TrackIR support built in and this is where mouse emulation comes in.
The TIRMouse program provides very basic features and partially relies upon the main TrackIR software application to provide additional customization capability. This program allows you to use the TrackIR in a game that is not TrackIR enhanced.
You can select any of the TrackIR 6DOF axes to control the X and Y mouse emulation movement.You can enable auto panning for the X mouse movement which will continuously send mouse movement commands while in the auto-pan range.
5.6.2 Main Window
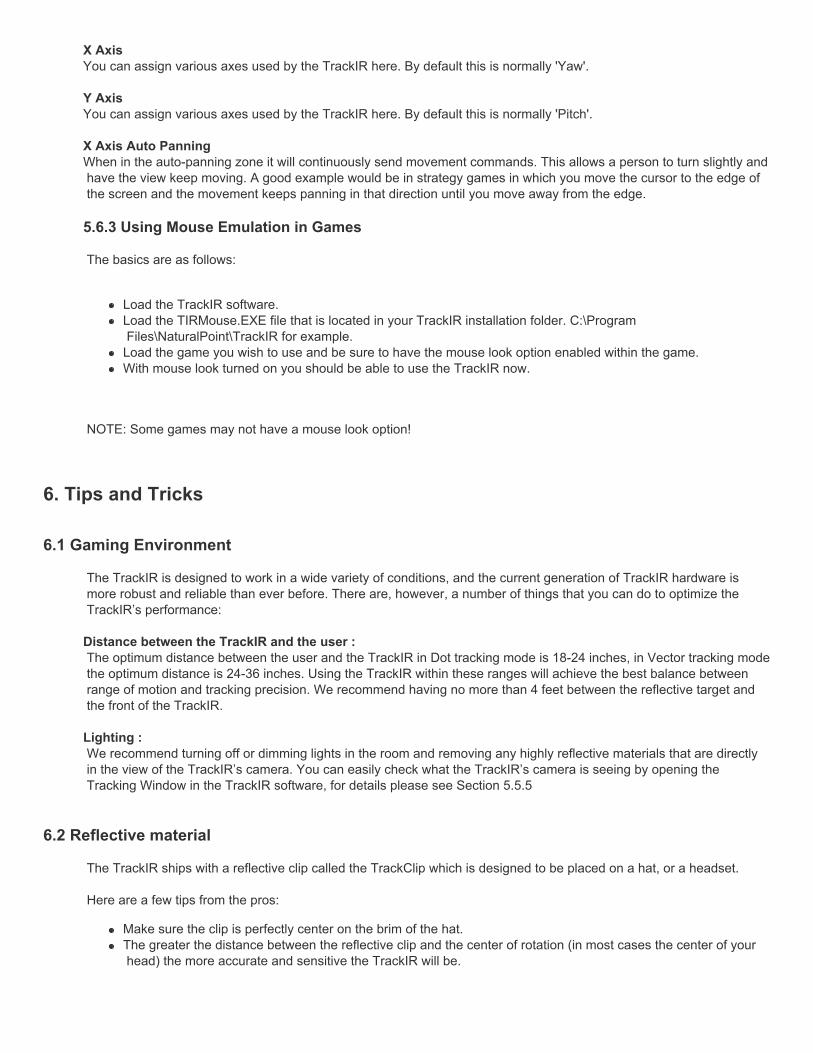
X Axis You can assign various axes used by the TrackIR here. By default this is normally 'Yaw'.
Y Axis You can assign various axes used by the TrackIR here. By default this is normally 'Pitch'.
X Axis Auto Panning When in the auto-panning zone it will continuously send movement commands. This allows a person to turn slightly and have the view keep moving. A good example would be in strategy games in which you move the cursor to the edge of the screen and the movement keeps panning in that direction until you move away from the edge.
5.6.3 Using Mouse Emulation in Games
The basics are as follows:
Load the TrackIR software.Load the TIRMouse.EXE file that is located in your TrackIR installation folder. C:\Program Files\NaturalPoint\TrackIR for example.Load the game you wish to use and be sure to have the mouse look option enabled within the game.With mouse look turned on you should be able to use the TrackIR now.
NOTE: Some games may not have a mouse look option!
6. Tips and Tricks
6.1 Gaming Environment
The TrackIR is designed to work in a wide variety of conditions, and the current generation of TrackIR hardware is more robust and reliable than ever before. There are, however, a number of things that you can do to optimize the TrackIR’s performance:
Distance between the TrackIR and the user : The optimum distance between the user and the TrackIR in Dot tracking mode is 18-24 inches, in Vector tracking mode the optimum distance is 24-36 inches. Using the TrackIR within these ranges will achieve the best balance between range of motion and tracking precision. We recommend having no more than 4 feet between the reflective target and the front of the TrackIR.
Lighting : We recommend turning off or dimming lights in the room and removing any highly reflective materials that are directly in the view of the TrackIR’s camera. You can easily check what the TrackIR’s camera is seeing by opening the Tracking Window in the TrackIR software, for details please see Section 5.5.5
6.2 Reflective material
The TrackIR ships with a reflective clip called the TrackClip which is designed to be placed on a hat, or a headset.
Here are a few tips from the pros:
Make sure the clip is perfectly center on the brim of the hat.The greater the distance between the reflective clip and the center of rotation (in most cases the center of your head) the more accurate and sensitive the TrackIR will be.

Additional dots, TrackHats and raw Reflective Material can from our web site at www.trackir.com
7. Accessories
We offer a complete line of accessories to complement your TrackIR, our high quality accessories can be purchased from our web site at : Accessories Link
TrackHat Our stylish and functional flight-style hat removes the need for reflective targets. With built-in tracking surfaces on the brim and back, the TrackHat improves the ease-of-use and accuracy of your TrackIR™. Most people really like using this high quality hat to carry their reflective material. Hats put the reflective material a couple of inches in front of your forehead, which accentuates the movements of your head. The hat comes in black with light grey trim and tracking surfaces on both the front and the back. One size fits all, adjustable.
Raw material Three 1" x 4" long strips of raw material which can be fashioned into a variety of custom shapes to meet your individual needs. You can create custom hats or headbands to use instead of the dot by simply cutting out the proper shape and sticking it to a headset or other objects. Wrapping the material around a small ball works well in many situations.
Dots Each sheet of dots includes twenty 1/3 inch (7.5 mm) diameter dots and six 1/2 by 1/2 inch squares. When you order targets separately, two sheets are included and cost 6 dollars total. Extra dots are useful for attaching to other items like glasses, hats, microphone booms or even your forehead. They do tend to get used up so ordering some extra is always a good idea.
8 Software Updates
In order to better serve your needs we continually update the TrackIR software package, you may download these updates free of charge from www.trackir.com. Software updates frequently include support for new games, so we recommend checking on a regular basis. It is also possible to check for updates by clicking on the "Check for updates" item under the Help Menu in the TrackIR4 software, this will take you to the Product Update section of our website.
To download and install new software, please follow these steps
1. Go to www.trackir.com and click on the Support link at the top of the page, then go down to the download section.
2. If the version of software listed for your product is more recent than the version of the software installed on your computer (use the Help Menu : About menu item to check your version), then download and save the updated installer file to your desktop or temp folder. If a newer version is not available, then there is no need to update your software.
3. Disconnect your TrackIR unit from your computer.
4. Use the "Add and Remove Programs" feature of the Windows Control Panel to un-install your existing TrackIR software.
5. Double click on the downloaded installer .exe file to install the new software. After the program icon reappears on your desktop, you may reconnect the TrackIR to your computer and run the updated software.
9 Limited warranty

NaturalPoint warrants to the original consumer or other end user that this product, the NaturalPoint TrackIR, is free from defects in materials and workmanship for a period of one year from the date of purchase. During the limited warranty period, and upon proof of purchase (in the form of product registration) this product will be repaired or replaced at our option, without charge.
This warranty shall be voided if the product is modified, tampered with, misused, or subjected to abnormal working conditions. This warranty does not cover physical damage to the surface of this product. This warranty does not apply when the malfunction results from the use of this product in conjunction with accessories, other products, or peripheral equipment.
Repair or replacement as provided under this warranty is the exclusive remedy of the purchaser. THIS WARRANTY IS IN LIEU OF ALL OTHER WARRANTIES, EXPRESS OR IMPLIED, INCLUDING ANY IMPLIED WARRANTY OF FITNESS OR SUITABILITY FOR A PARTICUALR USE OR PURPOSE, AND EYE CONTROL TECHNOLOGIES SHALL IN NO EVENT BE LIABLE TO PURCHASER FOR INDIRECT OR CONSEQUENTIAL DAMAGES OF ANY KIND OR CHARACTER.
Some states do not allow the exclusion or limitation or incidental or consequential damages or allow limitations on how long an implied warranty lasts, so the above limitations and exclusions may not apply to you.
In order for NaturalPoint to honor your return, you MUST receive an RMA number by calling or emailing NaturalPoint, and the return the entire TrackIR package, including all accessories and software to:
NaturalPoint Attn: RMA #####-#### 33872 SE Eastgate Circle Corvallis, OR 97333
10 Trouble Shooting If you are still experiencing difficulty after trying the suggestions in this trouble shooting guide, call 1-541-753-6645 or visit our main website at www.naturalpoint.com or our online forums at forums.naturalpoint.com for advanced customer support.
10.1 Problem : Software loads and runs, but LED indicator light on unit does not come on. OR you receive a message saying: The system cannot find the file specified or the software could not connect with the TrackIR device
Possible Causes 1. Improper software/ hardware installation. 2. Improper unit alignment.
Solutions (2000, XP) If you connected the TrackIR unit before installing the software, do this:
1a. Shut down the software and wait 30 seconds. Unplug the TrackIR unit from your USB port. Then plug the TrackIR back into your USB port, wait another 30 seconds and restart the software.
1b. Right click on My Computer. Go to Properties. Go to the Device Manager. Double click on USB devices. If you see a device listed as TrackIR or TrackIR then this is not the problem.
1c. If you see a device listed as unknown or has a yellow and black "?" next to it, remove/uninstall that device. Disconnect the TrackIR unit and reboot. After system restarts, unplug all extraneous USB devices except the keyboard and mouse. Uninstall the NaturalPoint software.
Reboot two times. When the system restarts the second time, install the software again. Reboot. After the system comes up, reconnect the TrackIR unit. The camera should now be recognized and the Found New Hardware Wizard should start. Install the software drivers accordingly
Additional Solutions (XP systems only - System Restore)
If step (1c.) did not work, then you can try restoring your system to an earlier time period. If there are no unknown USB devices in the device manager, unplug the camera and then uninstall the software; otherwise, remove the unknown USB device first, then unplug the camera and uninstall the software.
Click on start/programs/accessories/system tools and click on system restore. Check the box next to restoring to an earlier point then click next. This will bring up a calendar and a list of restore points. Go to the day before you had your problems and see if there is a checkpoint to restore to. If not, then you will have to back up a day at a time until you find one then restore to that day. This will clear your registry and reset your system to that day. Any installations of software or hardware since this date will need to be reinstalled again. Once the restore is done and system reboots, unplug all extraneous USB devices. Joysticks, etc... Leave Mouse and Keyboard plugged in.
Reboot a second time. Now begin the installation of the TrackIR from scratch. Install the software first. Use the latest version from the download section of our website. Plug in the TrackIR unit. The found new hardware wizard should start. Follow the Special Windows XP Instructions at the beginning of the manual.
10.2 Problem : Erratic tracking, the in-game view "jumps" instead of panning smoothly.
Possible Causes Interference from another light source.
Solutions 1. Click 'View' then 'Tracking'.
2. Click 'Settings'. You should see a green dot in the Data Window. If you see more than one object in this window, or the focus on the green dot jumps from one dot to another, check for mislaid dots in the TrackIR's 30 degree field of view. If there are no other dots in the field of view and the problem persists, check for highly reflective items or direct light sources in the background. Move these objects, move the camera a bit, adjust the light filtering on the Tracking tab or reposition your computer.
10.3 Problem : All or some of my Hot Keys will not work.
Possible Causes Conflict between selected key function and other system properties, or key already selected as a different Hot Key.
Solution Select a different key for this function.
10.4 Problem : None of the speed settings for view control feel right.
Possible Cause Incorrect speed settings.
Solution See Section 5.3.4.2 for information about how to adjust the speed for a profile
10.5 Problem : When I move my head, the in-game view moves in a different direction than I do.
Possible Cause Incorrect Rotation setting.
Solution See Section 5.5.5.1 for details about how to change the camera rotation setting.

10.6 Problem : In-game view control feels mushy.
Possible Cause Incorrect Smoothing setting.
Solution Adjust the Smoothing slider bar in the Motion Tab of the Edit Profiles window.