Tracheostomy & Stoma Management 35 BARNES JEWISH … · The inner cannula should be inspected and...
35
Tracheostomy & Stoma Management Page 1 of 35 *** Controlled Document *** This document is maintained electronically on the BJHnet Policies and Procedures website. It is the responsibility of the user to verify that any hard copy is of the latest revision by checking the website. BARNES JEWISH HOSPITAL ORGANIZATIONAL POLICIES/PROCEDURES TITLE: Tracheostomy & Stoma Management SUBMITTED/REVIEWED BY: M. Darnetta Clinkscale, MBA, RRT Director, Respiratory Care Services LAST REVIEWED/REVISION DATE: 05/2014 Index General Information Page 1 Policy Statements Page 1 Definitions Page 3 Hazards & Complications Page 4 Equipment Page 4 Routine Maintenance Daily Care Page 6 Inner Cannula Care and Mucous Plugging Page 7 Cuff Maintenance & Monitoring Page 8 PMSV / Capping / Decannulation Passy-Muir Speaking Valve Page 11 Downsizing and Decannulation Page 15 Capping Page 16 Emergency Care Tube Displacement Management Page 17 Evaluation & Documentation Page 17 Patient & Family Teaching Page 18 Appendix A: Rescue Breathing Signs – Green, Yellow, Red Pages 20-22 Appendix B: Emergency Management Algorithms – Green, Yellow, Red Pages 23-25 Appendix C: Screening Criteria and Admission/Transfer Placement Page 26 Appendix D: Trach Tube Size, Type and Application Comparison Chart Page 27-29 Appendix E: Back Up Tracheostomy Tube Chart Pages 30-34 Appendix F: Otolaryngology Policy for Plugging Trachs Page 35 Appendix G: Tracheostomy & Stoma Management Skills Checklist: See Competency Webpage General Information The main goal of tracheostomy and stoma management is to provide safe and effective tracheostomy care so as to prevent airway, secretion, and stoma complications. When short-term use is expected the multidisciplinary team can provide secretion management, timely downsizing, and decannulation per physician order. Education of the patient and family is required if the patient will need to maintain the tracheostomy tube or stoma long-term. Policy Statements A. All tracheostomy patients will have the appropriately colored Trach Identifier Rescue Breathing Sign (See Appendix A: Green, Yellow or Red) detailing the type of airway and early airway management information placed:
Transcript of Tracheostomy & Stoma Management 35 BARNES JEWISH … · The inner cannula should be inspected and...

Tracheostomy & Stoma ManagementPage 1 of 35
*** Controlled Document ***This document is maintained electronically on the BJHnet Policies and Procedures website.
It is the responsibility of the user to verify that any hard copy is of the latest revision by checking the website.
BARNES JEWISH HOSPITALORGANIZATIONAL POLICIES/PROCEDURES
TITLE: Tracheostomy & Stoma Management
SUBMITTED/REVIEWED BY: M. Darnetta Clinkscale, MBA, RRTDirector, Respiratory Care Services
LAST REVIEWED/REVISION DATE: 05/2014Index
General Information Page 1Policy Statements Page 1Definitions Page 3Hazards & Complications Page 4Equipment Page 4
Routine MaintenanceDaily Care Page 6Inner Cannula Care and Mucous Plugging Page 7Cuff Maintenance & Monitoring Page 8
PMSV / Capping / DecannulationPassy-Muir Speaking Valve Page 11Downsizing and Decannulation Page 15Capping Page 16
Emergency CareTube Displacement Management Page 17
Evaluation & Documentation Page 17Patient & Family Teaching Page 18Appendix A: Rescue Breathing Signs – Green, Yellow, Red Pages 20-22Appendix B: Emergency Management Algorithms – Green, Yellow, Red Pages 23-25Appendix C: Screening Criteria and Admission/Transfer Placement Page 26Appendix D: Trach Tube Size, Type and Application Comparison Chart Page 27-29Appendix E: Back Up Tracheostomy Tube Chart Pages 30-34Appendix F: Otolaryngology Policy for Plugging Trachs Page 35Appendix G: Tracheostomy & Stoma Management Skills Checklist: See Competency Webpage
General InformationThe main goal of tracheostomy and stoma management is to provide safe and effective tracheostomy care so as to prevent airway, secretion, and stoma complications. When short-term use is expected the multidisciplinary team can provide secretion management, timely downsizing, and decannulation per physician order. Education of the patient and family is required if the patient will need to maintain the tracheostomy tube or stoma long-term.
Policy StatementsA. All tracheostomy patients will have the appropriately colored Trach Identifier Rescue Breathing Sign
(See Appendix A: Green, Yellow or Red) detailing the type of airway and early airway management information placed:
Tracheostomy & Stoma ManagementPage 2 of 35
*** Controlled Document ***This document is maintained electronically on the BJHnet Policies and Procedures website.
It is the responsibility of the user to verify that any hard copy is of the latest revision by checking the website.
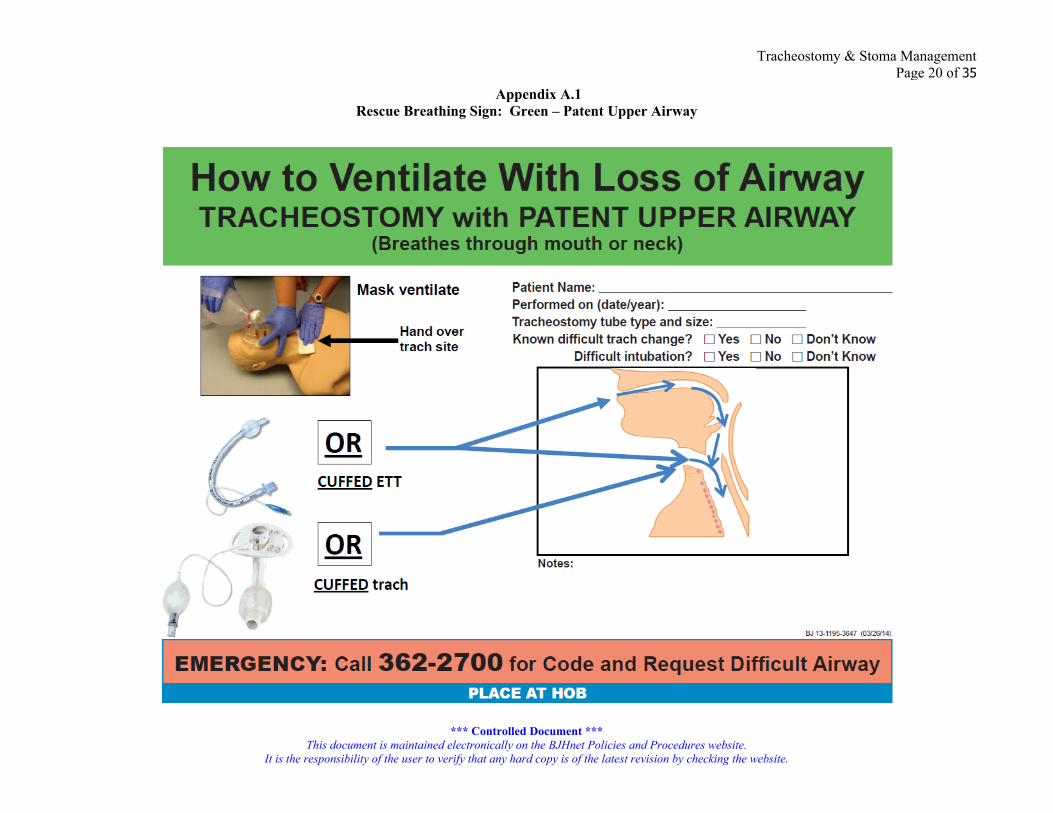
At the HOB easily viewed by care providers, and In the medical record in front of the notes section, and In the trach travel kit. The Rescue Breathing sign denotes the patency of the upper airway (e.g., laryngectomy). The appropriately matched colored Emergency Management algorithm (Appendix B: green, yellow, or red) should be at the bedside in a location conducive to reading such as clipboard on high humidity trach stand. If unsure which type of upper airway patency the patient has, use the green sign until more information can be gathered from the patient and medical records.
B. All tracheostomy patients will have Centralized Telemetry with pulse oximetry adaptor for telemetry for at least 48 hours after admission to general division.
C. Tracheostomy and stoma care will be performed by licensed registered nurses (RNs) licensed practical nurses (LPNs), respiratory therapists (RTs), and speech pathologists (SLP) who have been oriented and trained in these techniques and have demonstrated competency. Tracheostomy care may also be performed by patient care technicians (PCTs) and Student Nurse Technicians (SNTs) who are permanently assigned to work in an area where this has been designated as a unit-specific skill and have received unit specific training & competency verified. These areas are listed in the screening criteria on Appendix C. The RN, LPN, RT, and SLP provide care for patients with disposable/non-disposable inner cannulas.
D. An order from a physician or APN must be obtained for implementation of a Passy-Muir Speaking Valve (PMSV). The RN, RT, SLP, APN or physician may apply a PMSV only after Speech Therapy has evaluated the patient for use of the PMSV. The trach tube cuff must be deflated before the PMSV can be applied. Patients on the trach designated floors must have a cuffless trach before using a PMSV.
E. An order from a physician or APN must be obtained for capping a tracheostomy tube. The RN, RT, APN or physician may cap a tracheostomy tube. The trach tube cuff must be deflated before the cap can be applied. Patients on the trach designated floors must have a cuffless trach before using a trach cap.
F. Emergency Airway Supplies: 1. Patients with a cuffed tracheostomy tubes should be transported with and have at the bedside, in a
designated area, a cuffed replacement tracheostomy tube of the same type and size as well as a cuffed trach tube that is one size smaller.
2. Patients with a cuffless trach tube should also have a replacement tracheostomy tube of the same type and size, a cuffed trach tube of the same size and a cuffed tube that is one size smaller at the bedside and during transport at all times.
3. Patients with a tracheostomy stoma should have a 6 Shiley cuffed tube with disposable inner cannula available at bedside and 6 ETT available from red airway box on crash cart. Patients with a total laryngectomy stoma should have a 6 and 8 Shiley cuffed tube with disposable inner cannula available at bedside and 6 ETT available from red airway box on crash cart.
4. The replacement tubes are kept in a double bagged Ziploc bag and can be placed in the Trach Travel Kit kept at bedside & taken with the patient any time he/she leaves the nursing division. Follow Transport Stability Assessment guideline for transporting tracheostomy patients.
5. For traveling to peri-operative areas, the trach travel kit, spare trach tubes and ambu bag will travel with the patient to the pre-op holding or operating room and then taken back to patient room. A travel kit will be obtained in PACU for travel from PACU to nursing division. Endotracheal tubes will be placed in travel kit as replacement tubes. If not used, the travel kit will be taken back to PACU. Obturator of tracheostomy tube placed in OR will travel with patient to PACU/ICU and subsequent nursing division until a backup trach tube is available at the patient bedside.
6. Appendix D is a chart indicating the size, length and indications for various trach tubes that we currently stock at BJH
7. Appendix E is a chart with recommended replacement trach tubes to be kept at bedside based on current trach tube in place.
8. Manual resuscitation bag should also accompany patient and be kept at the bedside when patient is in room.

Tracheostomy & Stoma ManagementPage 3 of 35
*** Controlled Document ***This document is maintained electronically on the BJHnet Policies and Procedures website.
It is the responsibility of the user to verify that any hard copy is of the latest revision by checking the website.
G. Patients with tracheostomy tubes and stomas should have supplemental heated humidification unless the physician orders otherwise. When transferring the patient to another division, take the heated humidification stand with the patient. Heat/Moisture Exchange (HME) devices or oxygen via a Venturi trach collar should be used when on lengthy transports or transfers.
H. A tracheostomy tube with an inner cannula (including the Shiley percutaneous tubes) should always have the inner cannula in place. It should be removed for cleaning purposes only, unless otherwise ordered. The inner cannula should be inspected and cleaned (for metal cannulas) or changed (plastic cannulas) TID or more often if the patient has a large amount of secretions or thick secretions. If patients are refusing inner cannula care, notify charge RN and respiratory therapy.
I. Inner cannulas are not to be used on the blue flanged (blue line) Portex tracheostomy tubes, such as the Portex Talk Trach.
J. The first tracheostomy tube change and suture removal of a surgically placed tracheostomy tube is performed by the team who originally placed the tracheostomy tube typically greater than 5 days after initial placement. The first tracheostomy change and suture removal on percutaneously placed tracheostomy tube is performed by the team that originally placed the tracheostomy tube typically greater than 7 days after initial placement. Further downsizing or trach tube changes (after the initial tracheostomy change has been performed without difficulty) may be performed by an MD, APN or designee with documented competency. Metal tracheostomy tubes are generally changed every 2 weeks by the physician (MD) or Advanced Practice Nurse (APN) or designee with documented competency. Other tracheostomy tubes are typically changed monthly or prn.
K. Dislodged tracheostomy tubes may be reinserted by the Respiratory Therapist or RN with documented competency by making one quick attempt and then proceeding according to the attached Rescue Breathing Signs (green, yellow, or red) and Emergency Management Algorithms (green, yellow, or red). If competency documentation does not exist then the services of a physician, Advanced Practice Nurse (APN), or Certified Registered Nurse Anesthetist (CRNA) are required.1. In the event of an airway emergency for a patient who is unstable and/or in respiratory distress, call
Code 2-2700 from the patient’s room and ask the paging operator to call a code and to also request Difficult Airway. The operator will then call the Ear, Nose, & Throat (ENT) physician airway number STAT 536-6655 and the trauma attending STAT at 218-0089. By calling from the patient’s room, the operator can verify the correct room number to send the physicians.
2. For stable patients in no respiratory distress, call the patient’s House Officer and the team that placed the tracheostomy tube.
L. A cap or PMSV should never be placed on a Bivona Fome cuffed tube.M. Patients followed by the otolaryngology service should follow the otolaryngology policy for capping a
tracheostomy tube. See Appendix F. Strict adherence to Universal Standard Precautions (USP) regarding the handling of blood/body fluid is mandatory.
N. Competency checklist, see Tracheostomy Skills Checklist located on Competency website. DefinitionsAspiration: inhalation of any foreign matter, such as food, drink, saliva, or stomach contents (as after
vomiting) into the airway below the level of the vocal cords.Capping: the placement of a protective cover over the end of the tracheostomy tube; this procedure is
performed during the weaning process. Ideally the cap is used on a cuffless tube. If the cap is used on a cuffed tube the tracheostomy tube cuff must be fully deflated and the patient should be monitored closely in an ICU or PCU.
Cuff Deflation: the act of removing air from the cuff of a tracheostomy tube.Decannulation: removal of a tracheostomy tube.Humidifier: a device that provides moisture to inspired air.Inner Cannula: can be disposable or non-disposable; a tube inserted into the lumen of the tracheostomy tube.Laryngectomy: surgical removal of the larynx and tissues around it with creation of a tracheal opening or
stoma for breathing.

Tracheostomy & Stoma ManagementPage 4 of 35
*** Controlled Document ***This document is maintained electronically on the BJHnet Policies and Procedures website.
It is the responsibility of the user to verify that any hard copy is of the latest revision by checking the website.
Lower Airway: that portion of the respiratory tract beginning at the larynx (voice box) and ending at the smallest units in the lungs.
Minimal Occlusive Volume Pressure: the pressure at which the cuff on a tracheostomy tube is sealed within the trachea just enough to remove the leak.
Partial Laryngectomy: surgical removal of part of the larynx, patient maintains ability to talk.Passy-Muir Speaking Valve (PMSV): device used for communication by tracheostomized and ventilated
patients. Ideally the PMSV is used on a cuffless tube. If the PMSV is used on a cuffed tube, the tracheostomy tube cuff must be fully deflated and the patient should be observed closely in an ICU or PCU.
Percutaneous Trach: a minimally invasive alternative to conventional open surgical tracheostomy; the trachea is dilated gradually using guide wires and dilators and the tracheostomy tube is then inserted into the opening made in the trachea.
Phonation: the utterance of vocal sound.Pilot Balloon: plastic sac-like component connected to the inflation line and luer valve of the tracheostomy
tube which allows for inflation and deflation of the cuff. Can be placed more proximal or more distal depending on the type and length of tube.
Tracheostomy: surgical procedure performed on the neck to open a direct airway through an incision in the trachea; performed when the need for an artificial airway is long-term.
Tracheostomy Tube: a tube inserted through the tracheostomy stoma into the trachea in order to provide and secure an open airway and allow for mechanical ventilation.
Tracheal Stoma: an opening into the trachea through the neck; facilitates the passage of air and the removal of secretions.
Upper Airway: that portion of the respiratory tract beginning at the mouth and nose and ending at the larynx (voice box).
Hazards/ComplicationsA. Mucous PluggingB. Infection, signs and symptoms include:
1. Change in color, consistency, and/or amount of secretions2. Redness of the skin around the tracheostomy tube, skin breakdown, cellulitis, or skin erosions3. Shortness of breath4. Fever
C. Early bleeding and late bleedingD. Hypoxia/hypoxemiaE. HypotensionF. Subcutaneous emphysema/pneumothoraxG. Chest PainH. Excessive choking, gagging, or coughingI. Difficulty in replacing tracheostomy tube or inner cannulaJ. Difficulty in passing a suction catheterK. Leaking cuffsL. Displacement of tracheostomy tube completely or into a false passage (subcutaneous tissue).M. Airway injury secondary to cuff over-inflation or excessive torque on the tracheostomy tubeN. Tracheoesophageal fistulaO. Tracheomalacia which is destruction of the tracheal rings which causes collapse of the trachea during
exhalation and coughing. P. TrachealStenosis which is a narrowing of the trachea, usually after injuryQ. Innominate artery rupture
EquipmentA. Suggested bedside trach care supplies:
1. Suction canister (1 ea)
Tracheostomy & Stoma ManagementPage 5 of 35
*** Controlled Document ***This document is maintained electronically on the BJHnet Policies and Procedures website.
It is the responsibility of the user to verify that any hard copy is of the latest revision by checking the website.
2. 10 ml luer-lok syringe (2 ea)3. Cotton tip applicators (6 pks)4. Yankauer suction (1)5. 14 French suction catheter (4 ea)6. Drain sponges (4 pks)7. All purpose sponges (2 pks)8. Suction tubing (1 ea)9. Sterile exam gloves (4 pks)10. Clean gloves11. Velcro™ trach tube holder (1 ea)12. Wound Cleanser (1 ea)13. Water Soluble Lubricant (2 packets)14. Saline Flush Syringes (2)15. Towel roll
B. Travel Kit Supplies1. 14 French suction catheter (2 ea)2. Saline Flush Syringes (1)3. Syringe 10 ml Luer Lok (1)4. Water Soluble Lubricant (2 packets)5. Drain sponges (1)6. Velcro™ trach tube holder (1 ea)7. Clean gloves8. Sterile exam gloves (4 pks)
C. Red Airway Box Supplies1. Upper Tray
a. Laryngoscope (1) b. #2 and #3 Miller blade (1 each)c. #3 and #4 Macintosh blade (1 each)d. Extra battery for scope (2)e. 1” cloth tape (1)f. Oral airway, sizes 80 and 90 (1 each)g. Nasal airway, size 28.0 (1)h. 10 ml syringe (1)i. Benzoin swabs (2)j. Plastic bags for used blades (2)k. K-Y jelly (2)l. Oxygen flow meter (1)m. O2 tubing connector (1)n. EtCO2 sample line (1)o. Peep valvep. Anchor-fast ET tube holder
2. Lower Traya. Nasal cannula (1)b. Stylet (1)c. Ambu bag with mask (1)d. E.T. tube, sizes 6.0 and 9 (1 each)e. E.T. tube, sizes 7, 7.5 and 8 (2 each)f. Suction catheter, 14” (2)g. Yankauer (1)h. Non-rebreather mask (1)i. FEF CO2 detector (1)j. Magil forceps (1)
Tracheostomy & Stoma ManagementPage 6 of 35
*** Controlled Document ***This document is maintained electronically on the BJHnet Policies and Procedures website.
It is the responsibility of the user to verify that any hard copy is of the latest revision by checking the website.
k. Extension tubing (2)l. Laryngeal mask airway (LMA), size 4 (1)m. LMA, size 5 (1)n. Cricothyrotomy catheter set (1)
D. General1. Swivel adaptors2. Oxygen (O2) set up with high humidity stand and manual resuscitation bag and mask at patient’s
bedside at all times. NOTE: a pediatric sized mask or LMA mask can give a better seal over a stoma. LMA can be found in the Red Airway Box
3. Tracheostomy tray and trach dilator (on ICU crash carts)4. Disposable carbon dioxide (CO2) detector EtCO2 sample line. 5. Sterile, disposable inner cannulas.6. Tracheostomy tube of same size and brand as previously inserted. This tube should be at patient’s
bedside at all times along with a tube one size smaller. (NOTE: If the tracheostomy tube is cuffless, there should be a duplicate tracheostomy tube available along with an additional tracheostomy tube of the same size and one smaller with a cuff).
7. Suction set up should be connected to the vacuum line & checked to make sure it is functioning properly
8. Cuff pressure manometer (for RT use only).E. Additional Supplies for Stoma Care and Mouth Care
1. Toothbrush / toothpaste2. Small basin3. Chlorhexidine gluconate (Peridex)4. Yankauer
F. Additional Supplies For Tracheostomy Tube Capping/Decannulation1. Mirror (if needed as a teaching aid)2. Pulse Oximeter, for at least the first trial3. Tracheostomy tube cap or plug of appropriate size4. O2 setup for oxygen by nasal cannula if necessary5. 6-inch flexible ventilator tubing (for use with PMSV in-line with the home ventilator; cannot be used
with hospital ventilator)6. Passy-Muir Speaking Valve kit
a. Purple Valve – use with 15 mm hubb. Aqua Blue Valve – use with the ventilatorc. Gray Valve – use with tracheostomies without a hub; metal trachs size 4-6 only
ProceduresRoutine Maintenance: Daily Trach and Stoma Assessment and Care, Cleaning of Stoma Site, changing and cleaning of inner cannula & Mouth Care – to be done TID and PRNA. Assessment
1. Assess skin around tracheostomy site for erythema, skin integrity, skin erosion, and purulent or bloody drainage. Apply foam tracheal dressing beneath tracheal flange at first sign of erythema or alteration in skin integrity.
2. Evaluate tracheal stoma and if erythema exceeds 2 cms from edge of stoma or if there is stoma breakdown with purulent drainage, call the wound care team and medical team that placed the tracheostomy tube.
3. Observe for airflow through tracheostomy tube and signs/symptoms of airway obstruction by placing hand in front of tube to check airflow movement. If the patient is on a continuous ventilator check for increased airway pressures that may indicate the patient needs to be suctioned or consistently lower than set tidal volume that may indicate a tracheostomy cuff leak.
4. Assess stress/traction on connector between tracheostomy tube and ventilator circuit or T-piece tubing. Use a swivel adaptor. If using ventilator tubing use an arm to prevent the ventilator tubing

Tracheostomy & Stoma ManagementPage 7 of 35
*** Controlled Document ***This document is maintained electronically on the BJHnet Policies and Procedures website.
It is the responsibility of the user to verify that any hard copy is of the latest revision by checking the website.
from pulling on the trach tube.5. Assess patient for any pain associated with tracheostomy care.6. Assess patient/care giver’s understanding of and ability to perform own tracheostomy care to
determine possible discharge planning and teaching needs.B. Planning
1. Explain purpose of tracheostomy stoma care to patient/caregiver.2. Assemble equipment on clean surface at bedside. Review care plan to identify correct cleaning
solutions and dressings. C. Implementation
1. Use universal standard precautions, perform hand hygiene if needed per Hand Hygiene policy, apply clean gloves.
2. Set up supplies. 3. Remove soiled dressings. Secretions should be removed around tracheostomy stoma by cleansing
the site with wound cleanser soaked gauze. 4. Clean stoma site with sterile cotton tipped applicators and 4 x 4’s soaked in wound cleanser.
Remove excess solution with dry applicator or 4 x 4. KEEP STOMA SITE CLEAN AND DRY. 5. Typically the first trach tie change is made per physician discretion and prn after that. Use Velcro
trach holder to stabilize trach. Assess Velcro holder daily and change PRN if soiled. Attach and secure clean Velcro holder, then remove dirty holder. Or use the 2 person method and have one person hold the tracheostomy tube in place while the other person changes the Velcro trach holder. Follow manufacturer’s guidelines to apply Velcro tube holders. KEY POINT: Surgical trach ties may be changed based upon physician orders only.
6. Remove gloves and perform hand hygiene.7. Apply clean gloves.8. Apply sterile precut drain sponge or other dressings as ordered. KEY POINT: During the initial 7-
10 days post tracheostomy, it may be difficult to apply/change precut drain sponges until surgeon removes sutures. Thoroughly clean the suture site with wound cleanser tid and PRN
9. Brush teeth thoroughly for two minutes.10. Rinse mouth well and suction using a Yankauer.11. Apply Chlorhexidine gluconate as ordered.12. Remove gloves and discard in trash. 13. Perform hand hygiene. 14. Clean area and replace supplies needed for next cleaning. 15. Instruct patient and significant other about stoma care at home and have them return demonstrate
proper technique.Inner Cannula CareKEY POINT: If there is a trach without an inner cannula, special care needs to be taken to ensure adequate maintenance and care of tracheostomy tube; ensure patency by providing adequate suctioning. An increased need for suctioning and difficulty passing the suction catheter may be indications that mucous plugging is occurring.A. Assessment
1. Assess the amount, color, consistency, and odor of secretions. Dry, thick, bloody, or copious amounts of secretions require frequent assessment because of the potential for partial or total tube occlusion.
2. Assess airflow through the tracheostomy tube for signs/symptoms of airway obstruction or mucous plugging. Reduced airflow may be caused by secretions around the outer cannula or inside the tube. A displaced tube will also cause obstruction to air flow. Place hand lightly in front of tracheostomy tube to feel air exchange. If placement is uncertain or there is an obstruction to airflow, attempt to pass suction catheter to verify placement. The suction catheter should pass easily through the trach and beyond the carina to elicit a cough reflex. (Refer to BJH Organizational Policy: Suction – Oral / Nasopharyngeal and Tracheal).
3. Assess adequacy of heated humidification via high humidity trach collar
Tracheostomy & Stoma ManagementPage 8 of 35
*** Controlled Document ***This document is maintained electronically on the BJHnet Policies and Procedures website.
It is the responsibility of the user to verify that any hard copy is of the latest revision by checking the website.
4. Assess patient/caregiver’s understanding and ability to change the inner cannula and suction the trach tube.
5. Assess discharge teaching needs for patient/caregiver. B. Plan
1. Suction tracheostomy before changing inner cannula. 2. Place equipment on clean surface at bedside.3. Explain procedure and purpose of replacing inner cannula. 4. Position patient for comfort and ease of inner cannula removal and reinsertion (bed elevated,
head/neck slightly extended with chin up to promote comfort and ease of ventilation). C. Implementation
Disposable Inner Cannula1. Perform hand hygiene if needed per Hand Hygiene policy, apply clean gloves. 2. Open package with disposable inner cannula and keep area sterile.3. Remove soiled inner cannula with gloved hand. Dispose of soiled cannula inside glove. Place in
proper receptacle. KEY POINT: Make sure that inner cannula type is disposable and not reusable. Tube label should indicate DCT (Disposable Cannula Tube) or DIC (Disposable Inner Cannula). The tracheostomy tubes that have disposable inner cannulas are: DIC Portex, DCT Shiley, DCFS (Disposable Cuffless Shiley), Shiley extra length tubes, and Shiley percutaneous tubes. (NOTE: Non-disposable types include: Jackson metal, Shiley FEN, Shiley LPC, Shiley CFS, and Shiley CFN. Do not discard the inner cannulas from these types of tracheostomy tubes).
4. Perform hand hygiene and apply clean gloves. 5. Insert sterile inner cannula and secure in place. KEY POINT: Do not touch shaft of sterile inner
cannula. Inner cannula should be “locked” in place. For patients on mechanical ventilator, a modified technique that maintains sterility of inner cannula may be done.
Non-Disposable Inner Cannula1. Perform hand hygiene if needed per Hand Hygiene policy, apply clean gloves. 2. Remove inner cannula and place in container of trach cleaning kit. Remember to use a new kit or
trach brush with each cleaning. (Exception ENT patients only, the use of trach brushes without the complete kit is acceptable because this will be their practice at home.)
3. Add sterile normal saline and clean inner cannula with a new trach brush. (Exception ENT patients only will use tap water because this will be their practice at home.)
4. Discard contaminated saline solution, and rinse inner cannula with sterile normal saline. (Exception ENT patients only will use tap water to rinse the inner cannula)
5. Dry cannula with sterile 4 x 4’s from trach tray (or packaged 4x4’s). 6. Reinsert inner cannula and secure. 7. Discard brush and tray. Trays are single-use only. Discard any open saline bottle after 24 hours of
use.Mucous Plugging1. If mucous plug is suspected, when meeting resistance during the suctioning of the patient or when
noting decreased airflow, remove and clean or replace inner cannula.2. If plug beyond tip of trach tube, instill 5 ml’s preservative free sterile normal saline (can obtain from
RT department or use saline flush syringe).3. Bag and suction patient, ideally with cuff inflated.4. If unable to remove mucous plug, call Code at 362-2700 and request Difficult Airway. They will call
ENT emergency airway physician at 536-6655 and trauma attending physician. At 218-0089. 5. If tube does not have an inner cannula and if unable to remove plug using suction and lavage,
remove entire tracheostomy tube and bag per tube Emergency Management algorithms. (Appendix B Emergency Management Algorithms – green, yellow, or red)
Procedure for Cuff Maintenance/MonitoringA. Assessment
1. Cuff inflation is needed for the following reasons:

Tracheostomy & Stoma ManagementPage 9 of 35
*** Controlled Document ***This document is maintained electronically on the BJHnet Policies and Procedures website.
It is the responsibility of the user to verify that any hard copy is of the latest revision by checking the website.
a. Per physician orderb. Need for mechanical ventilation
2. To limit (but does not fully prevent) aspiration into the tracheaB. Plan
1. Patients may be evaluated by SLP prior to cuff deflation in order to assess for aspiration, which may be silent. The SLP may perform a FEES study or modified barium swallow.
2. Patients can be extremely sensitive to changes in cuff pressure. A little coughing is not unusual during manipulation. Take care to explain the procedure to the patient and to inflate / deflate the cuff slowly.
3. In order to limit the damage that can be done to the tracheal mucosa by the inflated cuff it is important to conduct a trial of cuff deflation as soon as possible.
4. Prolonged cuff inflation should only occur in patients who are ventilator-dependent or in whom airway protection is poor due to upper airway compromise e.g., head & neck surgery, neurological impairment, altered mental status, excessive oral secretions, poor swallowing ability or ineffective cough.
5. Once the cuff is deflated successfully with no sign of compromise then it should remain deflated – there is little benefit to the patient of intermittent cuff inflation/deflation.
C. ImplementationCuff Inflation: Ventilated patients1. As tracheal capillary occlusion occurs at 30 cm H2O use the minimal occlusion volume (MOV) or
“no-leak” technique. This involves auscultating the trachea with a stethoscope while slowly releasing pressure from the cuff. Once air movement is heard around the cuff a small amount of air is re-inserted into the cuff until the leak is just sealed.
2. Aim to achieve zero leak around the cuff with adequate volume but maintaining a cuff pressure <25cmH2O. Many patients will have zero leak at pressures <20cmH2O — do not inflate any more than is necessary
3. Cuff pressure should be checked using a hand-held cuff manometer by RTs only. Cuff pressure should be assessed upon insertion, whenever the tube is repositioned, or whenever cuff integrity is questioned. It is recommended that tube cuff pressures be maintained at a minimum amount of pressure to ensure adequate seal, typically no more than 25 cm water pressure to minimize the risks for both tracheal wall injury and aspiration.
4. If a cuff leak persists and pressures exceed 25cmH2O the physician should be notified.Cuff Inflation: Non-ventilated patients1. Cuff pressure should be assessed upon trach tube insertion, whenever the trach tube is repositioned
or whenever cuff integrity is questioned. 2. Signs of a cuff leak are difficult to detect in these patients but a persistent cough may be a sign that
aspiration of oral secretions is occurring. However a patient may be silently aspirating.KEY POINT: This procedure does not apply to Bivona Fome cuffs. Bivona cuffs are self-inflating. Air should never be added to a Bivona Fome cuff and the cuff tubing should always be open to the air. Bivona Fome cuffs should be deflated with 60 ml syringe every 8 hours. Bivona TTS (tight-to-shaft) cuffs are inflated with sterile water (do not use normal saline). If air is used, the cuff will not remain inflated because air will leak out through the silicone cuff. Cuff Deflation1. Suction the oropharynx to remove any secretions that may have pooled on top of the inflated cuff. 2. Using a syringe, slowly aspirate air from the cuff pilot balloon. 3. Once deflated, expiratory noises may be heard as air passes up around the tracheostomy tube.
Reassure the patient that these are normal. 4. Perform tracheal suction while removing air from the pilot balloon during cuff deflation.

Tracheostomy & Stoma ManagementPage 10 of 35
*** Controlled Document ***This document is maintained electronically on the BJHnet Policies and Procedures website.
It is the responsibility of the user to verify that any hard copy is of the latest revision by checking the website.
Tracheostomy Tube ChangeKey Point:
1. Tracheostomy procedures and trach tube changes are not benign procedures. All necessary precautions and back-up emergency supplies and equipment need to be available at the bedside as well as at least one nursing or RT staff member to assist.
2. Frequency of trach changes depends on type of trach tube, physician preferences and the needs of each individual patient.
Assessment1. Determine reason for needing trach change and the current indications for needing the trach. 2. Determine service that performed trach and collaborate with them and the primary provider as
needed prior to trach change. 3. Review appropriate labs, x-rays and procedures that would indicate precautions or contraindications
for trach change such as PTT, PT, Platelets, ABG, SpO2, chest X-ray etc. If a difficult change is anticipated in a fully anticogulated patient, it may be helpful to reverse the anticoagulation and a highly skilled provider in airway management and intubation should be present.
4. Assess for contraindications which include:a. Full stomach ( Usually wait 1-2 hours after a meal or bolus tube feeding or 30 minutes after
continuous tube feedings are stopped)b. Significant coagulopathy or bleedingc. Known or suspected difficult trach change requiring need for trach change in OR or with
bronchoscopy.5. Identify need to use trach tube exchanger rather than obturator, especially if the trach was done less
than 7 to 10 days prior or if patient is high risk for having a false passage. If a tract has not formed, there is increased risk of creating a false passage especially if the patient is obese with a thick neck.
6. Review tracheostomy operative note for any indications of a difficult airway such as tracheal stenosis, tracheal malacia, upper airway tumor, etc. Determine if tracheostomy was done surgically or percutaneously. Percutaneous trachs can be more difficult to change. Also, identify the date of tracheostomy to determine if there has been enough time for a tract to form. Determine reasons for trach and any risks involved in performing the trach change such as unstable cardiopulmonary status, high degree of ventilator support, high FIO2 needs, difficult airway issues, inability to hyperextend the neck, inability to lay flat in bed and pain, infection or erosion of the trach site.
Plan1. Gather all needed supplies for a safe trach change.
a. Appropriate size and type of replacement trach and a trach tube that is one size smaller if patient needs a cuffed trach.
b. Telemetry, pulse oximetry and vital sign monitor.c. Water soluble lubricantd. 4x4 se. Wound cleanserf. Drain spongeg. Trach tube Velcro tiesh. Trach tube changer as neededi. Ambu bagj. Towel rollk. Suction set up l. Clean gloves m. Mask
2. Explain procedure to patient and answer any concerns or questions. Many patients will ask if they will have any pain with the procedure. Provide local or systemic pain medications per MD order if appropriate. If patient has severe cough that may interfere with trach reinsertion, consider administration of transtracheal lidocaine.

Tracheostomy & Stoma ManagementPage 11 of 35
*** Controlled Document ***This document is maintained electronically on the BJHnet Policies and Procedures website.
It is the responsibility of the user to verify that any hard copy is of the latest revision by checking the website.
3. Discuss role of assistant including helping with patient positioning, suctioning and assisting with oxygen therapy, monitoring and ventilation as needed.
4. Do a Time Out prior to performing the trach change by verifying the following with the assistant: right patient, right size and type of trach tube, cuff checked and right precautions.
Implementation1. Use universal precautions when doing a trach change. 2. Perform hand hygiene and apply clean gloves. 3. Prepare trach tube for insertion by checking for cuff leak, lubricating the outer cannula, inserting
obturator or trach tube exchanger and applying trach ties and drain sponge to the trach tube.4. Position patient flat on back with towel roll at base of neck with neck hyperextended.
Key Point: When tracheostomy procedure is performed, patient is usually positioned flat on back with neck hyperextended. This position brings the trachea forward and lines up the tissue planes in the neck so that trach tube insertion is easier. If opening in skin stoma does not line up with opening in the trachea, it is more difficult to re-insert trach tube. By positioning patient on back with neck hyperextended, the tissue planes line up between the stoma and the trachea.
5. Check SpO2 and pre-oxygenate as needed to keep SpO2 greater than 92%.6. Quickly remove trach ties from current trach 7. Use of obturator technique:
a. Remove trach tube from stoma.b. Quickly clean stoma with 4x4 and wound cleanser and assess stoma site for infection, bleeding,
erosion, rash, granulation tissue or any other abnormal skin changes. c. Insert trach tube in stoma starting at 90 degree angle and rotating tube in a gentle downward
motion. d. Remove obturator
8. Use of trach tube exchanger technique: a. Insert trach tube exchanger into existing tracheostomy tube in the tracheab. Remove trach tube from stoma with one hand while other hand secures the tube exchangerc. Pass the new trach tube over the trach tube exchanger until in final positiond. Remove trach tube exchangere. Secure trach in airway with the trach ties.
9. Immediately assess for correct tube placement by feeling for air flowing through trach tube, checking for ability to deep suction to elicit a cough reflex and by assessing for ETCO2.
10. Inflate trach tube cuff if needed and have RT verify correct cuff inflation and pressures. Notify RT of all trach tube changes.
11. If unable to replace trach tube, begin measures as described on the appropriate Rescue Breathing sign and Emergency airway algorithm.
Documentation1. Document trach change procedure in compass on the ‘tracheostomy change procedure note.”2. Modify the “trach and stoma management order set” if there has been a change in trach tube size
and type. This change will auto populate the nursing assessment flow sheet with the new trach tube size and type.
Passy-Muir Speaking Valve (PMSV) / Capping / DecannulationImplementation of the Passy-Muir Speaking Valve (PMSV)A. Assessment
1. The SLP will assess whether the patient is awake, responsive, and attempting to communicate. 2. The SLP will assess for patient anxiety or concern and reassure patient, if necessary. 3. The RT, SLP, RN, APN or MD will assess patient’s ability to tolerate cuff deflation through
assessment of respiratory status, including: a. Heart rate b. Respiratory ratec. Oxygen saturation

Tracheostomy & Stoma ManagementPage 12 of 35
*** Controlled Document ***This document is maintained electronically on the BJHnet Policies and Procedures website.
It is the responsibility of the user to verify that any hard copy is of the latest revision by checking the website.
d. Color of skine. Work of breathing f. Airway patency g. Breath sounds h. Patient’s secretions, noting color, consistency and amounti. Persistent coughing and choking with cuff deflationj. Signs that patient is having difficulty swallowing his/her own secretions
4. The SLP will assess upper airway function by deflating the cuff, having the patient inhale then the SLP will place a gloved finger (finger occlusion) over the tracheostomy tube during exhalation and observe breathing for the following: a. Oral airflow b. Phonation ability. If the patient is unable to achieve oral airflow and/or phonation, this may
represent obstruction to airflow at or above the level of the tracheostomy tube. Additionally, the size of the tracheostomy tube may also affect adequate airflow.
5. The SLP will explain the procedure and the mechanics of the PMSV to the patient. 6. The SLP will assess for the patient’s willingness to proceed with PMSV placement. 7. Contraindications include:
a. Altered level of consciousnessb. Inflated tracheostomy tube cuff c. Foam-filled tracheostomy tube d. Severe airway obstruction e. Thick and copious secretions f. Severely reduced lung elasticity g. Patients with endotracheal tubes h. Laryngectomized patients i. Respiratory distress or oxygenation problems
B. Plan1. The SLP will check the patient’s chart for the PMSV order.2. The SLP will coordinate the date and time for PMSV placement with nursing and respiratory therapy
for all ventilator dependent patients and will allow 10-15 minutes of uninterrupted time with the patient during the first three trials. For ventilator dependent patients, placement of PMSV is best done after pulmonary hygiene and prior to physical therapy.
3. The SLP will arrange for the RT to be present for ventilator adjustments that may be needed to compensate for leaks around the tracheostomy tube when using the in-line PMSV with a ventilated patient.
4. The SLP and RT will prepare the equipment and the patient as follows: a. Attach the pulse oximeter sensor for each trial. b. For spontaneously breathing patients, attach a high humidity trach collar at FIO2ordered by a
physician. c. For ventilator dependent patients, attach an aqua-blue colored PMSV to one, six-inch, reusable
flexible tubing (for use with home ventilator). 5. The SLP will position the patient. The ideal position is sitting in a chair. If in bed, elevate the head of
the bed as tolerated, with a goal of greater than or equal to 45 degrees. 6. The nurse will place the yankauer suction at the patient’s bedside.7. The nurse will complete daily cleaning and storage of the PMSV, as follows:
a. Place the PMSV in warm, soapy water. b. Swish the valve around in the soapy water.c. Rinse thoroughly with warm water. d. Let PMSV dry thoroughly and then place in storage container. e. Do not apply heat to valve and do not use hot water, peroxide, bleach, vinegar, alcohol, brushes,
or Q-tips to clean. Do not autoclave. C. Implementation
Tracheostomy & Stoma ManagementPage 13 of 35
*** Controlled Document ***This document is maintained electronically on the BJHnet Policies and Procedures website.
It is the responsibility of the user to verify that any hard copy is of the latest revision by checking the website.
Spontaneously Breathing Patients 1. The SLP will verify identification of the patient using two patient identifiers.2. The SLP will suction the patient via trach tube and orally prior to cuff deflation. 3. The SLP will deflate the cuff slowly.4. The SLP will suction the patient via trach tube and orally. 5. The SLP will evaluate the patient’s upper airway function, including airflow and phonation.6. The SLP will place the PMSV on the patient’s tracheal hub.7. The SLP will tell the patient to begin normal vocalization. 8. The SLP will increase the time tolerance of PMSV based on the patient’s vital signs. If the patient is
able to tolerate the PMSV and sustain appropriate level of alertness, the patient may wear the PMSV unsupervised. If the patient is unable to tolerate the PMSV, the SLP will establish the maximum wearing time, the required supervision, and will post the recommendations at the head of the bed in the patient’s room. PMSV weaning time will be assessed on a case by case basis.
9. The SLP will attach a caution label to the pilot cuff of the tracheostomy tube, if it is performed on a cuffed tracheostomy tube, place precautions over patient’s bed, and notify nursing of PMSV placement and tolerance.
10. After removal of the PMSV, when the patient requires re-inflation of the cuff, RT will be notified and will check the cuff pressure using a manometer or minimal occlusive volume. (Refer to Procedure for Cuff Maintenance / Monitoring in this policy).
11. PMSV is to be removed when patient is sleeping or if any respiratory distress. It may need to be removed during physical exertion or therapy.
Ventilator Dependent Patients on a Home Ventilator1. The SLP will verify the identification of the patient using two patient identifiers.2. The RT will suction the patient via trach tube and orally. 3. The RT will deflate the cuff slowly. 4. The RT will suction the patient via trach tube and orally. 5. The SLP will evaluate the patient’s upper airway function, including airflow and phonation. 6. The RT will adjust the ventilator with a physician or APN order to compensate for leakage around
the tracheostomy tube.a. Increase tidal volume 50-300 ml or 5-20 cm H
2O pressure.
b. May need to adjust the ventilator rate.c. Record changes on the ventilator flow sheet in Compass for future reference.
7. The RT will disconnect the swivel elbow from ventilator circuit.8. The RT will connect a standard flexible ventilator tubing (4-6 inches) to the valve. 9. The RT will attach a flexible tube to the ventilator “Y” connector with a ¼ turn twist to the hub of
the tracheostomy tube. Excessive twisting may occlude valve. 10. The RT will attach the other end of the flexible tube containing the PMSV to the tracheostomy hub.11. The SLP will ask the patient to begin normal vocalization. 12. The SLP will increase the time tolerance of the PMSV based upon the patient’s vital signs. If the
patient is able to tolerate the PMSV and sustain appropriate level of alertness, the patient may wear the PMSV unsupervised. If the patient is unable to tolerate the PMSV the SLP will establish the maximum wearing time, the required supervision, and post the recommendations in the patient’s room. PMSV weaning time will be assessed on a case by case basis.
13. The SLP will attach a caution label to the pilot cuff, place precautions over the patient’s bed, and notify nursing of the PMSV placement.
14. After removing the PMSV, the RT will reinflate the cuff, check the cuff pressure using a manometer, and return the ventilator to the original settings.
Management and Care of Specialized Tracheostomy TubesI. NOTE: Appropriate replacement trachs should always be proximate to the patient

Tracheostomy & Stoma ManagementPage 14 of 35
*** Controlled Document ***This document is maintained electronically on the BJHnet Policies and Procedures website.
It is the responsibility of the user to verify that any hard copy is of the latest revision by checking the website.
II. Technique for proper inflation of specialty cuffed trach tubes should be noted on the Rescue Breathing Signs (i.e. inflate with water, do not add air, etc.) in the Notes section
III. Jackson Metal TubeA. Used for downsizing and long term use to avoid the expense of disposable tubes.B. Special care involves cleaning of inner cannula every eight hours and as needed. Use a new trach
care kit with sterile saline and sterile brush for each cleaning. C. Comes with and without 15 mm hub. Hub is needed for use of cap and PMSV.D. If the patient requires ventilation, the tube needs to be changed to a cuffed tube. E. The entire tube should be changed every two weeks and as needed by the physician (MD) or APN, or
designee with documented competency.IV. Shiley Extra Length Tube (XLT)
A. Comes in two main types:1. XLT proximal with extra length on the proximal end for patients with a thick neck. Comes in
both cuffed and cuff-less models.2. XLT distal with extra length on the distal end for tall patients that need the tube placed to bypass
a tracheal narrowing or an area of tracheal malasia. Comes in both cuffed and cuff-less models.B. Helpful in decreasing air leaks in tall patients since they have large cuffs.C. Has disposable inner cannula which should be changed every 8 hours and as needed. Has a blue hub
that twist-locks in place and is different from other Shiley inner cannulas.V. Bivona TTS Tube
A. Has a cuff that is tight to the outer shaft of the trach tube and looks like a cuff-less tube when the cuff is deflated.
B. The cuff should be inflated with sterile water instead of air, since air will diffuse out of the cuff over a few hours. The cuff can be filled with air for short-term use of the cuff, such as hyperinflation with an Ambu bag. The cuff can be filled with sterile water when the patient requires mechanical ventilation.
C. The main uses for this trach are to downsize the patient (for use of a speaking valve or cap) and when the cuff is needed for intermittent use (for hyperinflation for administration of inhaled bronchodilators).
VI. Bivona Fome Cuff Trach TubeA. Used for reducing air leaks and/or aspirationB. If patient is on the ventilator with high airway pressures and a large cuff leak, the Bivona Fome cuff
can sometimes get a better seal and reduce the leak. In some cases the pilot balloon is connected to an adapter in the inspiratory line of the ventilator so that the air leak is reduced during inspiration. This adapter needs to be set up by RT.
C. There are 2 main precautions when using this trach:1. Never put air in this cuff because it is designed to self-inflate at atmospheric pressure. RT is
required to deflate the cuff with a 60-ml syringe every 8 to 12 hours. The syringe is removed and the pilot balloon is left open to air so that the cuff can self-inflate at atmospheric pressure.
2. Never use a PMSV or cap on this trach tube because the patient will not be able to ventilate around the large Fome cuff.
D. This trach tube should be changed every 2 weeksVII. Bivona Hyperflex Adjustable
A. Used for patients with thick necks until a custom trach is ordered.B. This is an unstable airway since the outer cannula can slip out of the flange. These patients should
remain in an ICU or specially designated area only with MD approval (see admission Screening criteria) until custom tracheostomy is placed.
C. Mark the level with a permanent magic marker and document the level under the tracheostomy assessment and on a sign at patient’s HOB.
D. If the trach slips out, deflate the cuff and advance the outer cannula into the trachea back to the marked level and then re-inflate the cuff.

Tracheostomy & Stoma ManagementPage 15 of 35
*** Controlled Document ***This document is maintained electronically on the BJHnet Policies and Procedures website.
It is the responsibility of the user to verify that any hard copy is of the latest revision by checking the website.
E. This trach comes both cuffed and cuff-less. If cuffed, fill the blue pilot balloon with air only and the clear pilot balloon can be filled with either water or air.
VIII. Custom Tracheostomy TubesA. Should be ordered by the team that placed them.B. If custom tracheostomy is in place obtain specific trach care orders from team that placed trach or
contact tracheostomy care team.IX. APRNs listed below or RT supervisor can be paged with any questions/concerns.
Rene’ Hofstetter: 593-8109; Jill Malen: 262-2595
Tracheostomy Change
Tracheostomy Downsizing and DecannulationA. Assessment to be done prior to downsizing of the tracheostomy tube.
1. Assess for contraindications which include:a. Need for continuous or intermittent mechanical ventilationb. Copious secretionsc. Severe dysphasia with silent aspiration of saliva and/or refluxed gastric contentd. Obstructive sleep apnea with failed CPAP and BIPAP. Do not place tube smaller than a size 7
inner diameter if the patient is relying on the tube as sole management of obstructive sleep apnea.
e. No communication between upper and lower airwayf. Anatomic narrowing or obstruction of upper airwayg. Inability to tolerate cuff deflation because of aspiration of secretions and/or gastric reflux.
2. An endoscopic exam may be performed at physician discretion to evaluate secretion management and upper airway patency prior to the decision to downsize. Silent aspiration is the most worrisome complication and it usually requires the long term use of a cuffed tube in order to decrease the quantity of saliva aspirated and reduce the frequency of tracheal suctioning.
3. Discuss with the attending physician and the surgeon who placed the trach what their plans are for its use and if they would recommend that the trach be downsized.
B. Plan1. Select the appropriate size tube. Once the patient can breathe spontaneously and swallow safely
and has none of the above contraindications, a smaller cuffless tube can be placed. A metal tube, cuffless Shiley, or Bivona TTS are most commonly used when downsizing. Please refer to the attached Adult Tracheostomy Tube Size Comparison Chart in order to select the appropriate tube to use as the sizing of the tubes is different for each type. When downsizing, the goal is to select a tube with a smaller outer diameter while maintaining an inner diameter that is large enough to pass a size 14 or 16 French suction catheter.
2. The team who performed the tracheostomy should perform the initial tracheostomy change (first tracheostomy change or a difficult airway). The time for first tracheostomy tube change and suture removal varies with type of procedure performed.
3. A surgically placed tracheostomy tube change is performed by the team who originally placed the tracheostomy tube typically greater than 5 days after initial placement.
4. Percutaneously placed tracheostomy tube is performed by the team that originally placed the tracheostomy tube typically greater than 7 days after initial placement.
5. Prepare the patient. The tube is usually changed when the patient is in bed and before a feeding as the head of the bed usually needs to be laid flat with the patient on his back with head and neck hyperextended.
C. Implementation1. The decision to proceed with decannulation is based upon a detailed assessment of anatomic and
pathophysiologic factors that impact each individual patient. Because of the large number of variables that can impact on the decision to decannulate a patient’s tracheostomy, it is recommended

Tracheostomy & Stoma ManagementPage 16 of 35
*** Controlled Document ***This document is maintained electronically on the BJHnet Policies and Procedures website.
It is the responsibility of the user to verify that any hard copy is of the latest revision by checking the website.
that the attending physician make this decision on a case by case basis. Decannulation may be contraindicated in the following situations:a. Upper airway obstructionb. No open passageway between upper and lower airwayc. Severe sleep apnea with failed attempt at CPAP or BiPAPd. Inability to tolerate PMSV and/or capping, or other evidence of tracheal stenosis.e. Patient unable to cough up all of his own secretions and still needs deep suctioning.f. Silent aspiration noted on Fiberoptic Endoscopic Evaluation of Swallowing (FEES) or Modified
Barium Swallow (MBS).g. Patient has an altered level of consciousness.h. Patient scheduled for surgery soon.
2. If decannulation is ordered it should be carried out in the following manner:a. Gather supplies: wound cleanser, 4x4 dressings, basic set (if any sutures are still in place),
petroleum jelly, iodiform gauze dressing, gloves, 3-inch silk tape.b. Perform hand hygiene per hand hygiene policy and apply clean gloves.c. Remove trachd. Clean stoma with wound cleanser and remove any remaining sutures.e. Wipe dry with 4x4 and apply petroleum gauze dressing over stoma. f. Cover with dry 4x4 and tape in place with at least 3 strips of 3-inch tape to cover entire dressing.g. Instruct patient to apply pressure over stoma dressing with fingers when coughing and talking in
order to decrease air leak.
Tracheostomy Tube CappingA. Assessment
1. Clarify that an order for capping has been written. Order should include: special monitoring needs, supplemental oxygen needs, and length of time for capping trial.
2. Assess if patient has been using a PMSV; tolerance of the valve for at least 3 consecutive days for 12-hour periods while involved in all communicative and physical activities indicates plugging should be tolerated. KEY POINT: Initial evaluation should be done by MD, or Pulmonary APN.
3. Assess for any anxiety or concern regarding the capping procedure, and provide reassurance. 4. Assess patient’s respiratory status and need for suctioning. Airway must be clear of secretions.
Patient should be breathing comfortably with an oxygen saturation (SpO2) ≥ 92% or baseline approved by MD. Do not cap tracheostomy if patient complains of dyspnea, or shortness of breath (SOB), or if wheezing, gurgling or increased work of breathing are noted
5. Assess tracheostomy tube type. Ideally trach tube should be changed to a cuffless tube prior to capping.
6. Assess for stridor by placing stethoscope over trachea above level of the tube while capping tracheostomy with gloved hand. Stridor represents obstruction to air flow above the level of the tracheostomy tube.
7. Assess for shortness of breath, dyspnea, diaphoresis, desaturation, changes in heart rate and/or blood pressure.
B. Plan 1. Explain procedure, show cap to patient. Capping is best done after pulmonary hygiene and
suctioning. 2. Plan capping trials with team members while working with the patient’s schedule. Plan for RN and
RT schedule to allow 10-15 minutes of uninterrupted time with patient during first few trials. 3. Contact the RT to request participation (i.e., set up O2 delivery equipment, assist with patient
observation).4. Prepare equipment and patient. Attach pulse oximeter sensor for first trial and as ordered. 5. Apply oxygen as ordered (usually O2 by regular or high flow nasal cannula).6. Suction the patient, if needed.
Tracheostomy & Stoma ManagementPage 17 of 35
*** Controlled Document ***This document is maintained electronically on the BJHnet Policies and Procedures website.
It is the responsibility of the user to verify that any hard copy is of the latest revision by checking the website.
7. Position the patient, preferably while patient is sitting in a chair. If in bed, head of bed (HOB) should be a 30 degrees or higher.
C. Implementation 1. Review procedure with patient and family. 2. Monitor the SpO2 reading for 2 minutes in order to obtain baseline before capping.3. If cuff present, have MD or APN change to cuffless trach or TTS tube and suction as needed. 4. Apply oxygen delivery device at the prescribed level.5. Place the cap and encourage the patient in conversation for 1-2 minutes, if appropriate. First capping
trial is usually 10 minutes in duration. 6. Assess the physical aspects of the patient: color, respiration rate, use of accessory muscles, stridor,
dyspnea, dizziness, SpO2, cough expiration, and ability to vocalize, as capping may result in respiratory distress and mucus plugging.
7. If patient tolerates capping, increase capping trials intervals as tolerated. Provide patient with positive reinforcement.
8. Encourage/instruct patient in coughing and deep breathing with use of incentive spirometry.D. Emergeny Management Algorithms (Refer to Appendix B - green, yellow, or red).
NOTE: All tracheostomy patients should have the Emergency Management Algorithm of appropriate color at the bedside where it can be read. (Red algorithm for laryngectomy patient, Yellow algorithm for obstructed upper airway patient and Green algorithm for patent upper airway patient)1. Assessment
a. Assess patient’s respiratory status (i.e., respiratory rate, quality, SpO2, use of accessory muscles).b. Determine need for mechanical ventilation.
2. Plan a. If necessary, prepare for oral intubation if patient has a patent upper airway, or replacement of
tracheostomy tube.3. Implementation (Emergency Management Algorithms, see Appendix B – green, yellow, or red)
Evaluation and DocumentationA. Nursing
1. Document presence of tracheostomy tube or history of laryngectomy on patient profile2. For patients with a new tracheostomy, assess and document type, size etc. on the assessment
flowsheet. Key Point: Use of Tracheostomy and Stoma Management order set will carry forward the
tracheostomy type and size information to the nursing assessment flowsheet. If orders not completed, encourage MD/NP to enter order set.
3. Update Goals of Care and include “to provide trach care” in approaches to care.4. Assess and document the patient’s tolerance and frequency of the procedure and associated
patient/caregiver discharge teaching.5. Evaluate discharge teaching; validating patient’s understanding and ability to perform skills on
education flow sheet.6. Communicate plan for subsequent capping trials on the plan of care to show progress. 7. Complete assessment flowsheet. Document vital signs and respiratory status in the EMR:
a. Oxygen requirements, Sp02 respiratory rate, dyspnea, accessory muscle useb. Ability to cough and expectoratec. Descriptions or changes in color, amount, consistency of secretions, need for suctioning d. Voice quality and strengthe. Patient’s mental statusf. Skin condition at stoma site g. Frequency of trach care (competent PCT or SNT to document care they provide on
VSFS)h. Pain intensity, location, duration, and interventions taken. i. Patient teaching referrals for stoma care.

Tracheostomy & Stoma ManagementPage 18 of 35
*** Controlled Document ***This document is maintained electronically on the BJHnet Policies and Procedures website.
It is the responsibility of the user to verify that any hard copy is of the latest revision by checking the website.
8. Document trach care interventions on the vital sign flowsheet by adding parameter for pulmonary intervention. a. Document trach stoma care and inner cannula cleaning or changing TID on the section marked
pulmonary event.b. Document each suctioning on the section marked pulmonary event
B. Speech Pathologist1. The SLP will document patient’s ability to tolerate PMSV with statement regarding vocal quality
and length of time.2. The SLP will document patient/caregiver education regarding use and care of PMSV with a
statement of patient understanding of instructions. 3. The SLP will document patient education regarding placement/removal of PMSV. 4. The SLP will document patient’s ability to achieve voicing for effective communication and
tolerance of PMSV. 5. The nurse will chart patient’s vital signs while the PMSV is on the patient.
Patient/Family TeachingA. Nursing
1. Obtain tracheostomy teaching booklet that is available on all trach designated floors. 2. Instruct patient/family on purpose and/or procedure.3. Review all applicable components of tracheostomy teaching booklet.4. Complete the tracheostomy teaching checklist as skills are demonstrated and content verbalized by
patient or home care provider.5. Document teaching and patient and/or care giver understanding on the Education flow sheet in EMR.
B. Speech Pathology1. The SLP will explain to patient/caregiver the anatomy and the impact of open tracheostomy on
voicing and the role of the team members in PMSV placement. 2. The SLP will explain to patient/caregiver how the PMSV allows patient to achieve voicing and, if
voicing cannot be achieved, explain why.3. The SLP will explain to patient/caregiver the appropriate use and care of PMSV, including removal
and placement. 4. The SLP will educate patient/caregiver regarding the following:
a. Importance of cuff deflation with cuffed tracheostomy.b. Removal of PMSV while sleeping. c. Positive impact of PMSV on swallowing. d. Placement of PMSV with supervision, when appropriate. e. Placement of PMSV for specific amount of time, when appropriate.
5. The SLP will educate patient/caregiver regarding the following signs/symptoms of poor tolerance while wearing PMSV: a. Decreased oxygen saturation b. Increase in respiratory rate c. Patient report of respiratory distress and/or discomfort
6. The SLP will return for a follow up visit within 72 hours of the initial patient education session to address patient/caregiver questions and reinforce the previous teaching session.
7. The SLP will instruct the patient and/or caregiver to demonstrate: cuff deflation, when necessary, PMSV placement and removal and, when appropriate, the cleaning and storage of the PMSV.
Resources/ReferencesJeff Edmiaston, SLP, Barnes Jewish Hospital Rehabilitation ServicesJill Malen RN, APRN-BC, MS, NS, ANP, Barnes-Jewish Hospital, Advanced Practice NurseRene’ Hofstetter, RN, MSN, ANP-BC Barnes Jewish Hospital, Advanced Practice NurseAnn Petlin, RN, MSN, CCNS Barnes Jewish Hospital, Clinical Nurse Specialist Lynn Schallom, RN, PhD, CCNS Barnes Jewish Hospital, Clinical Nurse Specialist

Tracheostomy & Stoma ManagementPage 19 of 35
*** Controlled Document ***This document is maintained electronically on the BJHnet Policies and Procedures website.
It is the responsibility of the user to verify that any hard copy is of the latest revision by checking the website.
Beverly Dressel, RN, MSN, ACNS Barnes Jewish Hospital, Nurse EducatorTeresa Halloran, RN, PhD, Barnes Jewish Hospital, Director Medicine ServiceLisa Cracchiolo, RRT, BA, AE-C, Supervisor Respiratory Care ServicesKathleen Spihlman, RRT, Supervisor Respiratory Care ServicesPeggy Watts, RRT, MS Manager Respiratory Care ServicesCarrie Sona, RN, MSN, CCNS Barnes-Jewish Hospital, Clinical Nurse SpecialistBradley D. Freeman, MD, Washington University School of Medicine, Department of Surgery, Professor,
Surgery Division of Acute and Critical Care SurgeryBrian Nussenbaum, M.D., Washington University School of Medicine, Professor, Otolaryngology – Head
and Neck, Patient Safety OfficerJohn E Mazuski, MD, PhD, Washington University School of Medicine, Department of Surgery, Professor
Surgery, Acute and Critical Care SurgeryDaniel B Rosenbluth, MD, Washington University School of Medicine, Professor Pulmonary and Critical
Care MedicineAdult Tracheostomy Management – Guidelines for Best Practice, Oxford Radcliffe NHS Hospitals Trust,
January 2005.Boyce J, Bolton J, McCarrick J. (2011) The tracheostomy time-out: First change, every change. Crit Care
Nurse, 31, e52.McGrath B.A., Bates, L., Atkinson D., Moore J. A., (2012) Multidisciplinary guidelines for the
management of tracheostomy and laryngectomy airway emergencies. Anaesthesia, 67, 1025-1041.Mitchell R. B, Hussey H. M, Setzer G., Jacobs I. N., Nussenbaum B, Dawson, C.,…Merati A. (2012).
Clinical consensus statement: Tracheostomy Care. Otolaryngology—Head and Neck Surgery, 148,6-20. Morris L. L., Whnitmer A., McIntosh E., (2013). Tracheostomy care and complications in the intensive care
unit. Critical Care Nurse, 33, 18-30.Passy-Muir Inc. Passy-Muir Tracheostomy Speaking Valves: http://www.passy-
muir.com/sites/default/files/pdf/instructbklt.pdf: PASSY-MUIR®
TRACHEOSTOMY & VENTILATOR SWALLOWING AND SPEAKING VALVES INSTRUCTION BOOKLET, Pages 1-16
White AC, Kher S, O’Connor HH. (2010). When to change a tracheostomy tube. Respiratory Care, 55, 1069-1075.
Critical Care Committee – Approved February 27, 2014Tracheostomy Committee-Approved February 7, 2014
ApprovalCoreen Vlodarchyk, RN, BSN, MSA; Chief Nursing Officer Date of Approval 05/2014
Tracheostomy & Stoma ManagementPage 20 of 35
*** Controlled Document ***This document is maintained electronically on the BJHnet Policies and Procedures website.
It is the responsibility of the user to verify that any hard copy is of the latest revision by checking the website.
Appendix A.1Rescue Breathing Sign: Green – Patent Upper Airway

Tracheostomy & Stoma ManagementPage 21 of 35
*** Controlled Document ***This document is maintained electronically on the BJHnet Policies and Procedures website.
It is the responsibility of the user to verify that any hard copy is of the latest revision by checking the website.
Appendix A.2Rescue Breathing Sign: Yellow- Obstructed Upper Airway
Tracheostomy & Stoma ManagementPage 22 of 35
*** Controlled Document ***This document is maintained electronically on the BJHnet Policies and Procedures website.
It is the responsibility of the user to verify that any hard copy is of the latest revision by checking the website.
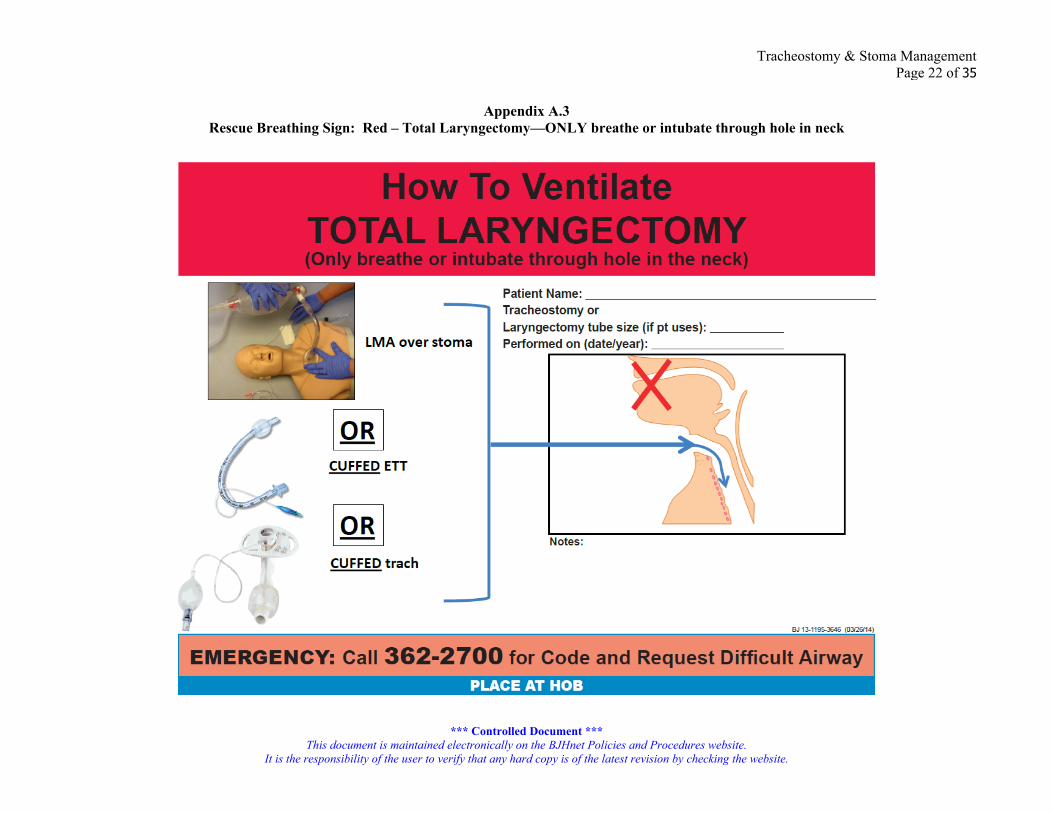
Appendix A.3Rescue Breathing Sign: Red – Total Laryngectomy—ONLY breathe or intubate through hole in neck
Tracheostomy & Stoma ManagementPage 23 of 35
*** Controlled Document ***This document is maintained electronically on the BJHnet Policies and Procedures website.
It is the responsibility of the user to verify that any hard copy is of the latest revision by checking the website.
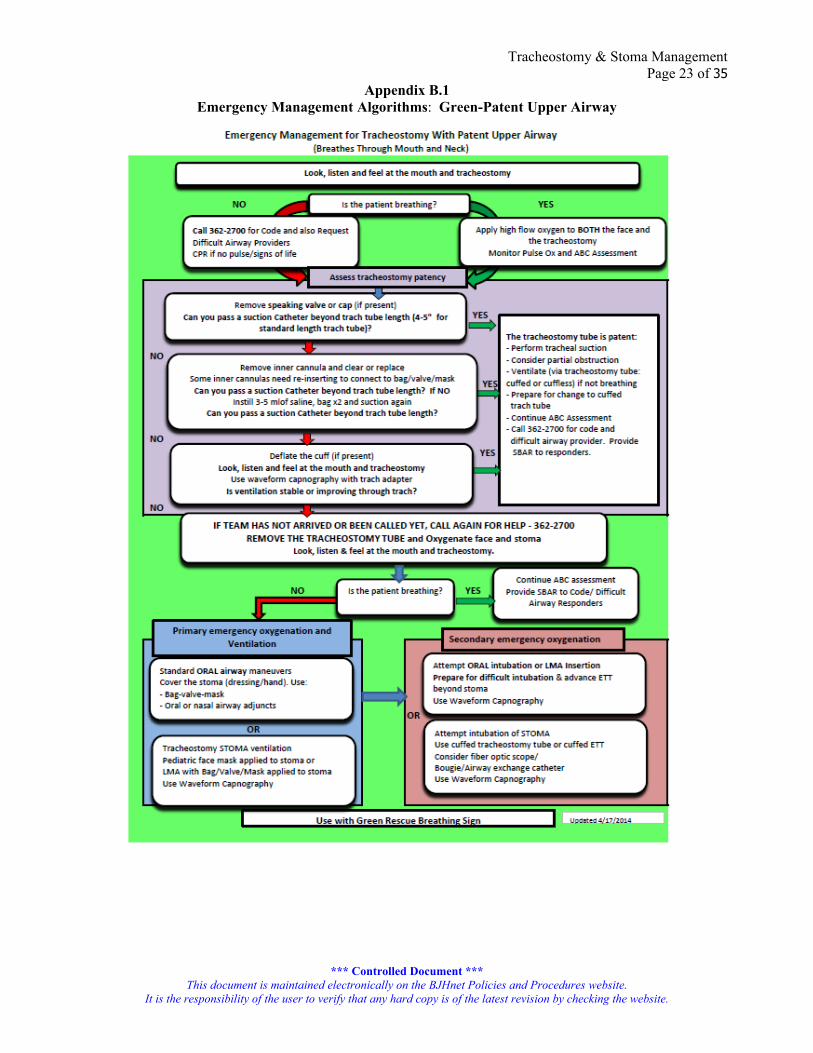
Appendix B.1Emergency Management Algorithms: Green-Patent Upper Airway
Tracheostomy & Stoma ManagementPage 24 of 35
*** Controlled Document ***This document is maintained electronically on the BJHnet Policies and Procedures website.
It is the responsibility of the user to verify that any hard copy is of the latest revision by checking the website.
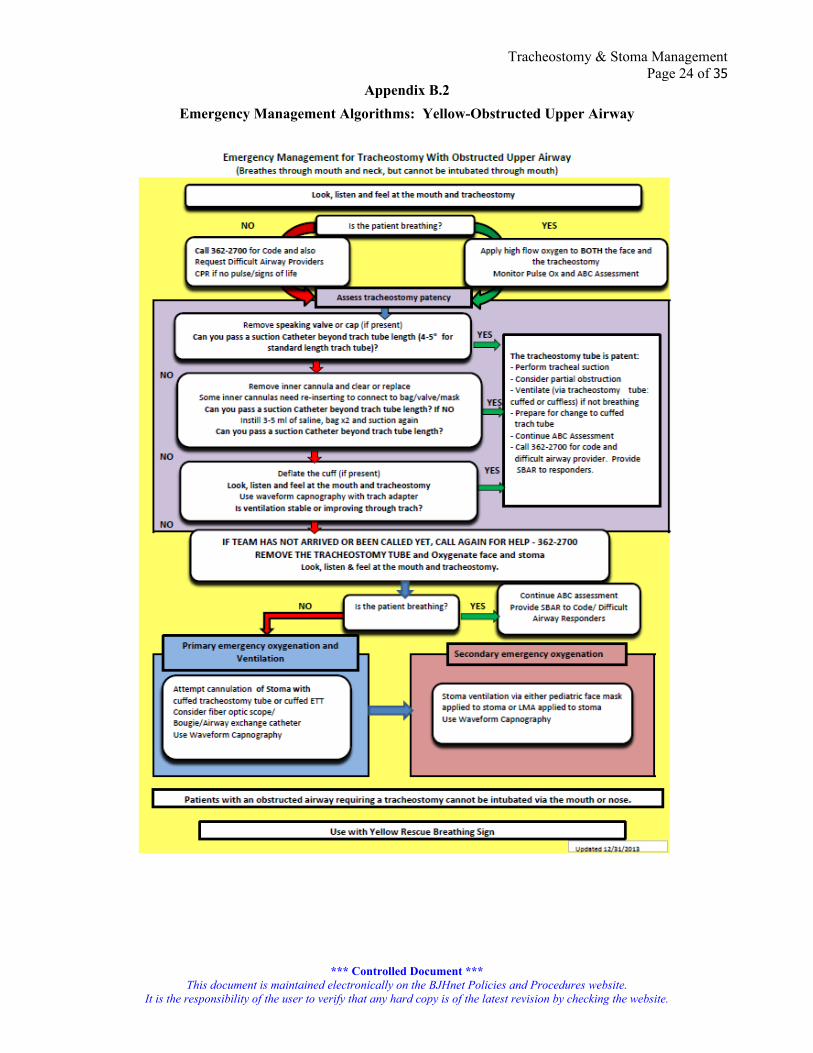
Appendix B.2Emergency Management Algorithms: Yellow-Obstructed Upper Airway

Tracheostomy & Stoma ManagementPage 25 of 35
*** Controlled Document ***This document is maintained electronically on the BJHnet Policies and Procedures website.
It is the responsibility of the user to verify that any hard copy is of the latest revision by checking the website.
Appendix B.3
Emergency Management Algorithms: Red-Total Laryngectomy
Tracheostomy & Stoma ManagementPage 26 of 35
*** Controlled Document ***This document is maintained electronically on the BJHnet Policies and Procedures website.
It is the responsibility of the user to verify that any hard copy is of the latest revision by checking the website.
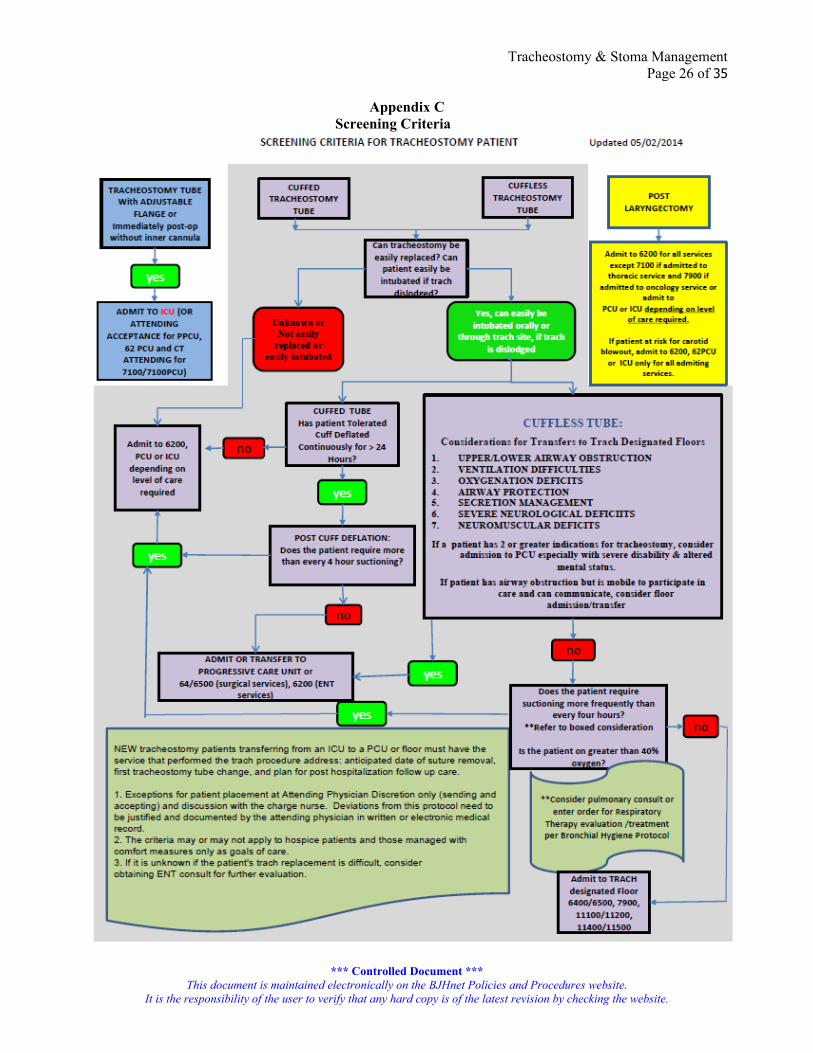
Appendix CScreening Criteria

Tracheostomy & Stoma ManagementPage 27 of 35
*** Controlled Document ***This document is maintained electronically on the BJHnet Policies and Procedures website.
It is the responsibility of the user to verify that any hard copy is of the latest revision by checking the website.
Appendix D (3 pages)Adult Tracheostomy Tube Size, Type and Application Chart
Tube sizes should be compared based on the following: Inner diameter (with the inner cannula in place if it has one)-ID Outer diameter-OD Length-lgth Shape Cuff type (LP-low pressure, HV-high volume, TTS-tight to shaft)
Type ID OD LGTH (mm)
Shape Cuff Type Inner Cannula Application
4.0 Shiley DCT* 5.0 9.4 62 arc LP/HV/ or cuffless
yes 15 mm Hub Cuff inflated if Ventilated
6.0 Shiley DCT* 6.4 10.8 74 arc LP/HV/or cuffless
yes 15 mm Hub Cuffed inflated if Ventilated
8.0 Shiley DCT* 7.6 12.2 79 arc LP/HV or cuffless
yes15 mm Hub Ventilator if cuffed
10.0 Shiley DCT* 8.9 13.8 79 arc LP/HV or cuffless
yes 15 mm Hub Ventilator if cuffed
6.0 Shiley DCFS 6.4 10.8 74 arc cuffless Yes Patency of airway
8.0 Shiley DCFS 7.6 12.2 79 arc cuffless Yes Patency of airway
6.0 Shiley DFEN 6.4 10.8 74 arc cuffed Yes Translaryngeal airflow possible
6.0 Shiley Perc 6.4 10.8 74 arc LP/HV or cuffless
yes 15 mm Hub Cuffed inflated if Ventilated
8.0 Shiley Perc 7.6 12.2 79 arc LP/HV or cuffless
yes 15 mm Hub Cuffed inflated if Ventilated
5.0 Shiley XLT Prox 5.0 9.6 90 90o
angleLP/HV or cuffless
Yes Large neck, cuffed if Ventilated
5.0 Shiley XLT DIST 5.0 9.6 90 90o
angleLP/HV or cuffless
Yes Tracheal stenosis or malacia, cuffed if ventilated
6.0 Shiley XLT Prox 6.0 11.0 95 90o
angleLP/HV or cuffless
Yes Obese Ventilator if cuffed
6.0 Shiley XLT DIST 6.0 11.0 95 90o
angleLP/Hvor cuffless
Yes Stenosis/Malacia Ventilator if cuffed
7.0 Shiley XLT Prox 7.0 12.3 100 90o
angleLP/HV” Yes Obese Ventilator
if cuffed7.0 Shiley XLT DIST 7.0 12.3 100 90o
angleLP/HV” Yes Stenosis/Malacia
Ventilator if cuffed
8.0 Shiley XLT Prox 8.0 13.3 105 90o
angleLP/HV” Yes Obese/Ventilator
if cuffed8.0 Shiley XLT DIST 8.0 13.3 105 90o
angleLP/HV” Yes stenosis/malacia/
cuffed if Ventilated
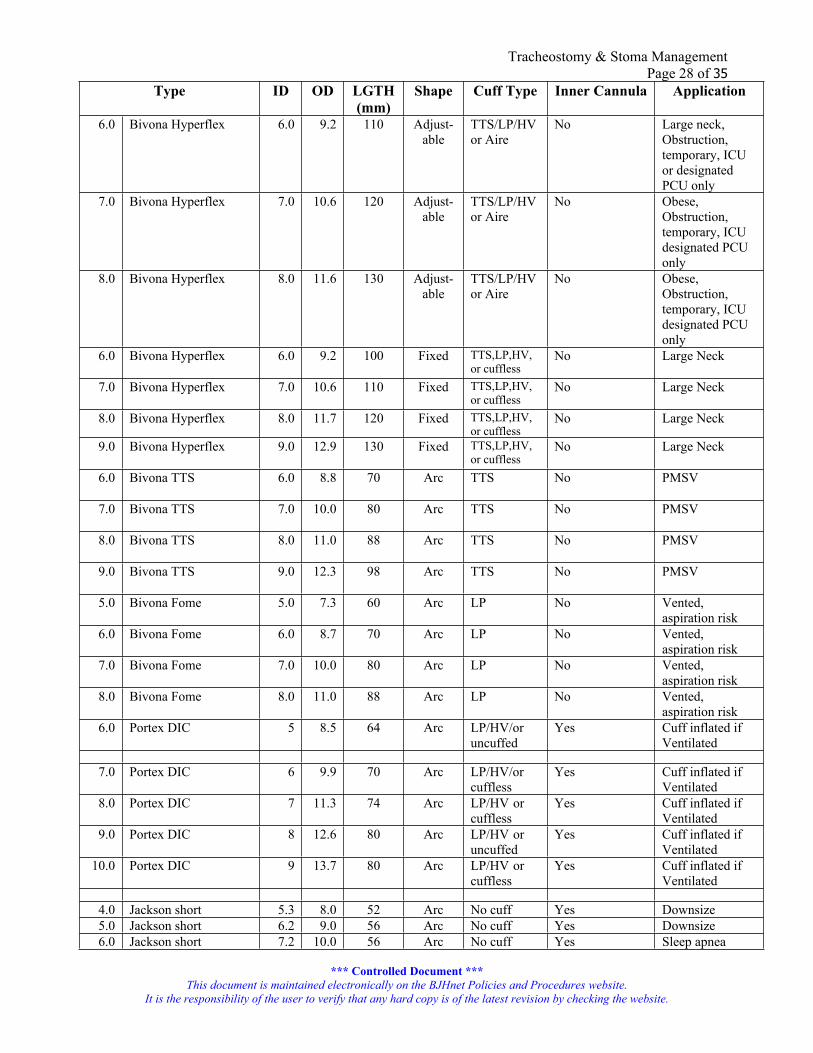
Tracheostomy & Stoma ManagementPage 28 of 35
*** Controlled Document ***This document is maintained electronically on the BJHnet Policies and Procedures website.
It is the responsibility of the user to verify that any hard copy is of the latest revision by checking the website.
Type ID OD LGTH (mm)
Shape Cuff Type Inner Cannula Application
6.0 Bivona Hyperflex 6.0 9.2 110 Adjust-able
TTS/LP/HV or Aire
No Large neck, Obstruction, temporary, ICU or designated PCU only
7.0 Bivona Hyperflex 7.0 10.6 120 Adjust-able
TTS/LP/HVor Aire
No Obese, Obstruction, temporary, ICU designated PCU only
8.0 Bivona Hyperflex 8.0 11.6 130 Adjust-able
TTS/LP/HV or Aire
No Obese, Obstruction, temporary, ICU designated PCU only
6.0 Bivona Hyperflex 6.0 9.2 100 Fixed TTS,LP,HV,or cuffless
No Large Neck
7.0 Bivona Hyperflex 7.0 10.6 110 Fixed TTS,LP,HV,or cuffless
No Large Neck
8.0 Bivona Hyperflex 8.0 11.7 120 Fixed TTS,LP,HV,or cuffless
No Large Neck
9.0 Bivona Hyperflex 9.0 12.9 130 Fixed TTS,LP,HV,or cuffless
No Large Neck
6.0 Bivona TTS 6.0 8.8 70 Arc TTS No PMSV
7.0 Bivona TTS 7.0 10.0 80 Arc TTS No PMSV
8.0 Bivona TTS 8.0 11.0 88 Arc TTS No PMSV
9.0 Bivona TTS 9.0 12.3 98 Arc TTS No PMSV
5.0 Bivona Fome 5.0 7.3 60 Arc LP No Vented, aspiration risk
6.0 Bivona Fome 6.0 8.7 70 Arc LP No Vented, aspiration risk
7.0 Bivona Fome 7.0 10.0 80 Arc LP No Vented, aspiration risk
8.0 Bivona Fome 8.0 11.0 88 Arc LP No Vented, aspiration risk
6.0 Portex DIC 5 8.5 64 Arc LP/HV/or uncuffed
Yes Cuff inflated if Ventilated
7.0 Portex DIC 6 9.9 70 Arc LP/HV/or cuffless
Yes Cuff inflated if Ventilated
8.0 Portex DIC 7 11.3 74 Arc LP/HV or cuffless
Yes Cuff inflated if Ventilated
9.0 Portex DIC 8 12.6 80 Arc LP/HV or uncuffed
Yes Cuff inflated if Ventilated
10.0 Portex DIC 9 13.7 80 Arc LP/HV or cuffless
Yes Cuff inflated if Ventilated
4.0 Jackson short 5.3 8.0 52 Arc No cuff Yes Downsize5.0 Jackson short 6.2 9.0 56 Arc No cuff Yes Downsize6.0 Jackson short 7.2 10.0 56 Arc No cuff Yes Sleep apnea

Tracheostomy & Stoma ManagementPage 29 of 35
*** Controlled Document ***This document is maintained electronically on the BJHnet Policies and Procedures website.
It is the responsibility of the user to verify that any hard copy is of the latest revision by checking the website.
Type ID OD LGTH (mm)
Shape Cuff Type Inner Cannula Application
7.0 Jackson short 8.3 11.0 56 Arc No cuff Yes Sleep apnea8.0 Jackson short 9.2 12.0 56 Arc No cuff Yes Sleep apnea
4.0 Jackson regular/long 5.3 8.0 62 Arc No cuff Yes Downsize5.0 Jackson regular/long 6.2 9.0 68 Arc No cuff Yes Downsize6.0 Jackson regular/long 7.2 10.0 69 Arc No cuff Yes Sleep apnea7.0 Jackson regular/long 8.3 11.0 69 Arc No cuff Yes Sleep apnea8.0 Jackson regular/long 9.2 12.0 69 Arc No cuff Yes Sleep apnea
4.0 Jackson XL 5.3 8.0 84 Arc No cuff Yes Large Neck5.0 Jackson XL 6.2 9.0 85 Arc No cuff Yes Large Neck6.0 Jackson XL 7.2 10.0 85 Arc No cuff Yes Large Neck7.0 Jackson XL 8.3 11.0 85 Arc No cuff Yes Large Neck8.0 Jackson XL 9.2 12.0 85 Arc No cuff Yes Large Neck
7.0 Cook VersaTube 7.0 10.0 78 Arc Yes Yes Perc kit8.0 Cook VersaTube 8.0 11.0 86 Arc Yes Yes Perc kit9.0 Cook VersaTube 9.0 12.0 98 Arc Yes Yes Perc kit
*The sizing for the Disposable Cannula Cuffed (DCT) tube is the same as the sizing for many of the other Shiley tubes including the following designations:
Disposable Inner Cannula (DIC) Disposable Cannula Fenestrated (DFEN) Disposable Cannula Cuffless (DCFS) Disposable Cannula Cuffless Fenestrated (DCFN) Low Pressure Cuffed (LPC) Fenestrated Low Pressure Cuffed (FEN) Cuffless Tracheostomy Tube (CFS) Cuffless Fenestrated Tube (CFN)Disposable Cannula Cuffed Percutaneous(Perc) Trach Tube Ventilator (vent)Severe Aspiration (Sev Aspir)
Different length tubes may be custom ordered, but the standard tracheostomy with an inner cannula should be used whenever possible.

Tracheostomy & Stoma ManagementPage 30 of 35
*** Controlled Document ***This document is maintained electronically on the BJHnet Policies and Procedures website.
It is the responsibility of the user to verify that any hard copy is of the latest revision by checking the website.
Appendix E (5 pages)Back Up Tracheostomy Tube Chart
In Sequence per Compass OrdersCurrent Trach Tube Replacement Trach Tubes
(OD mm)Size Comparison
7 Trach Bivona Fome Cuff 7 Trach Bivona Fome Cuff (10)6 ETT (8.2) Smaller size cuffed, in red airway
box on crash cart9 Trach Bivona Fome Cuff 9 Trach Bivona Fome Cuff
(12.3)7 Trach Bivona Fome Cuff (10) Smaller size cuffed
6 Bivona TTS (Cuff) 6 Bivona TTS (Cuff) (8.8)5 ETT (6.9) Smaller size cuffed-obtain from RT
7 Bivona TTS (Cuff) 7 Bivona TTS (Cuff) (10)6 Bivona TTS (Cuff) (8.8) Smaller size cuffed
8 Bivona TTS (Cuff) 8 Bivona TTS (Cuff) (11)7 Bivona TTS (Cuff) (10) Smaller size cuffed
9 Bivona TTS (Cuff) 9 Bivona TTS (Cuff) (12.3)8 Bivona TTS (Cuff) (11) Smaller size cuffed
Size 4 Jackson Plain Long-Regular 4 Jackson Plain Long (8)6 Bivona TTS (8.8) Same size cuffed5 ETT (6.9) Smaller size cuffed-obtain from RT
Size 4 Jackson Plain Short 4 Jackson Plain Short (8)6 Portex DIC (8.5) Same size cuffed5 ETT (6.9) Smaller size cuffed-obtain from RT
Size 5 Jackson Plain Long (Regular) 5Jackson Plain Long (9)6 Bivona TTS (8.8) Same size cuffed5 ETT (6.9) Smaller size cuffed-obtain from RT
Size 5 Jackson Plain Short 5Jackson Plain Short (9)6 Bivona TTS (8.8) Same size cuffed6 ETT (8.2) Smaller size cuffed
Size 6 Jackson Plain Long (Regular) 6 Jackson Plain Long (10)7 Bivona TTS (10) Same size cuffed6 Bivona TTS (8.8) or Smaller cuffed orChoose 16 Portex DIC (8.5) Smaller cuffed
Size 6 Jackson Plain Short 6 Jackson Plain Short (10)7 Bivona TTS (10) Same size cuffed6 Bivona TTS (8.8) or Smaller cuffed orChoose 16 Portex DIC (8.5) Smaller cuffed
Size 7 Jackson Plain Long-Regular 7 Jackson Plain Long (11)8 Bivona TTS (11) Same size cuffed7 Bivona TTS (10) or Smaller cuffed orChoose 17 Portex DIC (9.9) Smaller cuffed
Size 7 Jackson Plain Short 7 Jackson Plain Short (11)8 Bivona TTS (11) Same size cuffed7 Bivona TTS (10) or Smaller cuffed orChoose 17 Portex DIC (9.9) Smaller cuffed
Size 8 Jackson Plain Long(Regular)
8 Jackson Plain Long (12)
8 Shiley Cuffed DIC (12.2) Same size cuffed

Tracheostomy & Stoma ManagementPage 31 of 35
*** Controlled Document ***This document is maintained electronically on the BJHnet Policies and Procedures website.
It is the responsibility of the user to verify that any hard copy is of the latest revision by checking the website.
Current Trach Tube Replacement Trach Tubes (OD mm)
Size Comparison
8 Bivona TTS (11) or Smaller cuffed orChoose 17 Portex DIC (9.9) Smaller cuffed
Size 8 Jackson Plain Short 8 Jackson Plain Short (12)8 Shiley Cuffed DIC (12.2) Same size cuffed8 Bivona TTS (11) or Smaller cuffed or Choose 17 Portex DIC (9.9) Smaller cuffed
Size 9 Jackson Plain Long(Regular)
9 Jackson Plain Long (13)
9 Portex DIC (12.6) Same size cuffed8 Bivona TTS (11) Smaller size cuffed or6 Shiley cuffed DIC (10.8 Smaller cuffed or
Choose 1
8 Portex DIC (11.3) Smaller cuffed Size 9 Jackson Plain Short 9 Jackson Plain Short (13)
9 Portex DIC (12.6) Same size cuffed8 Bivona TTS (11) Smaller cuffed or6 Shiley cuffed DIC (10.8) Smaller cuffed or
Choose 1
8 Portex DIC (11.3) Smaller cuffed or
6 Portex DIC 6 Portex DIC (8.5)5 ETT Smaller size cuffed-obtain from RT
7 Portex DIC 7 Portex DIC (9.9)6 Portex DIC (8.5) Smaller size cuffed
8 Portex DIC 8 Portex DIC (11.3)7 Portex DIC (9.9) Smaller size cuffed
9 Portex DIC 9 Portex DIC (12.6)8 Portex DIC (11.3) Smaller size cuffed
8 Portex Talking 8 Portex talking (11)7 Portex DIC (9.9) Smaller size cuffed
6 Bivona Hyperflex 6 Bivona Hyperflex (8.7)6 ETT (8.2) or Smaller size cuffed, in red airway
box on crash cart orChoose 1
5 ETT (6.9) Smaller size cuffed, obtain from RT
7 Bivona Hyperflex 7 Bivona Hyperflex (10)6 Bivona Hyperflex (8.7) Smaller size cuffed
7 Bivona Hyperflex Long 7 Bivona Hyperflex Long (10)6 ETT (8.2) Smaller size cuffed, in red airway
box on crash cart8 Bivona Hyperflex 8 Bivona Hyperflex (11)
7 ETT (9.5) Smaller size cuffed, in red airway box on crash cart
8 Bivona Hyperflex Long 8 Bivona Hyperflex Long (11)

Tracheostomy & Stoma ManagementPage 32 of 35
*** Controlled Document ***This document is maintained electronically on the BJHnet Policies and Procedures website.
It is the responsibility of the user to verify that any hard copy is of the latest revision by checking the website.
Current Trach Tube Replacement Trach Tubes (OD mm)
Size Comparison
7 ETT (9.5) Smaller size cuffed, in red airway box on crash cart
9 Bivona Hyperflex 9 Bivona Hyperflex (12.3)8 ETT (10.8) Smaller size cuffed, in red airway
box on crash cart6 Shiley DCFS Cuffless 6 Shiley DCFS Cuffless (10.8)
6 Shiley DCT cuffed (10.8) Same size cuffed7 Bivona TTS (10) Smaller size cuffed
8 Shiley DCFS Cuffless 8 Shiley DCFS Cuffless (12.2)8 Shiley DCT cuffed (12.2) Same size cuffed6 Shiley DCT cuffed (10.8) Smaller size cuffed
6 Shiley Fenestrated Cuffed CFN 6 Shiley Fenestrated Cuffed CFN (10.8)4 Shiley Cuffed DEC (9.4) Smaller size cuffed
6 Shiley Fenestrated Cuffed DFEN
6 Shiley Fenestrated Cuffed DFEN (10.8)4 Shiley Cuffed DIC (9.4) Smaller size cuffed
4 Shiley w DIC Cuffed 4 Shiley DIC Cuffed (9.4)6 Bivona TTS (8.8) or Smaller size cuffed orChoose 16 ETT (8.2) Smaller cuffed
6 Shiley w DIC Cuffed 6 Shiley DIC Cuffed (10.8)7 Bivona TTS (10.0) Smaller size cuffed
8 Shiley w DIC Cuffed 8 Shiley DIC Cuffed (12.2)6 Shiley DIC Cuffed (10.8) Smaller size cuffed
10 Shiley w DIC Cuffed 10 Shiley DIC Cuffed (13.8)8 Shiley DIC Cuffed (12.2) Smaller Cuffed
5 XLT Distal Cuff (Shiley) 5 XLT Distal Cuff (9.6)6 ETT (8.2) Smaller size cuffed, in red airway
box on crash cart6 XLT Distal Cuff 6 XLT Distal Cuff (11)
7 ETT (9.5) Smaller size cuffed, in red airway box on crash cart
7 LXT Distal Cuff 7 XLT Distal Cuff (12.3)8 ETT (10.8) Smaller size cuffed, in red airway
box on crash cart8 XLT Distal Cuff 8 XLT Distal Cuff (13.3)
8 ETT (10.8) Smaller size cuffed, in red airway box on crash cart
5 XLT Distal Un Cuff (Shiley) 5 XLT Distal Un Cuff (9.6)5 XLT Distal Cuff (9.6) Same size cuffed6 ETT (8.2) Smaller size cuffed
6 XLT Shiley Distal Un Cuff 6 XLT Distal Un Cuff (11)6 XLT Distal Cuff (11) Same size cuffed5 XLT Distal Cuff (9.6) Smaller size cuffed
7 XLT Shiley Distal Un Cuff 7 XLT Distal Un Cuff (12.3)7 XLT Distal Cuff (12.3) Same size cuffed6 XLT Distal Cuff (11) Smaller cuffed
8 XLT Shiley Distal Un Cuff 8 XLT Distal Un Cuff (13.3)
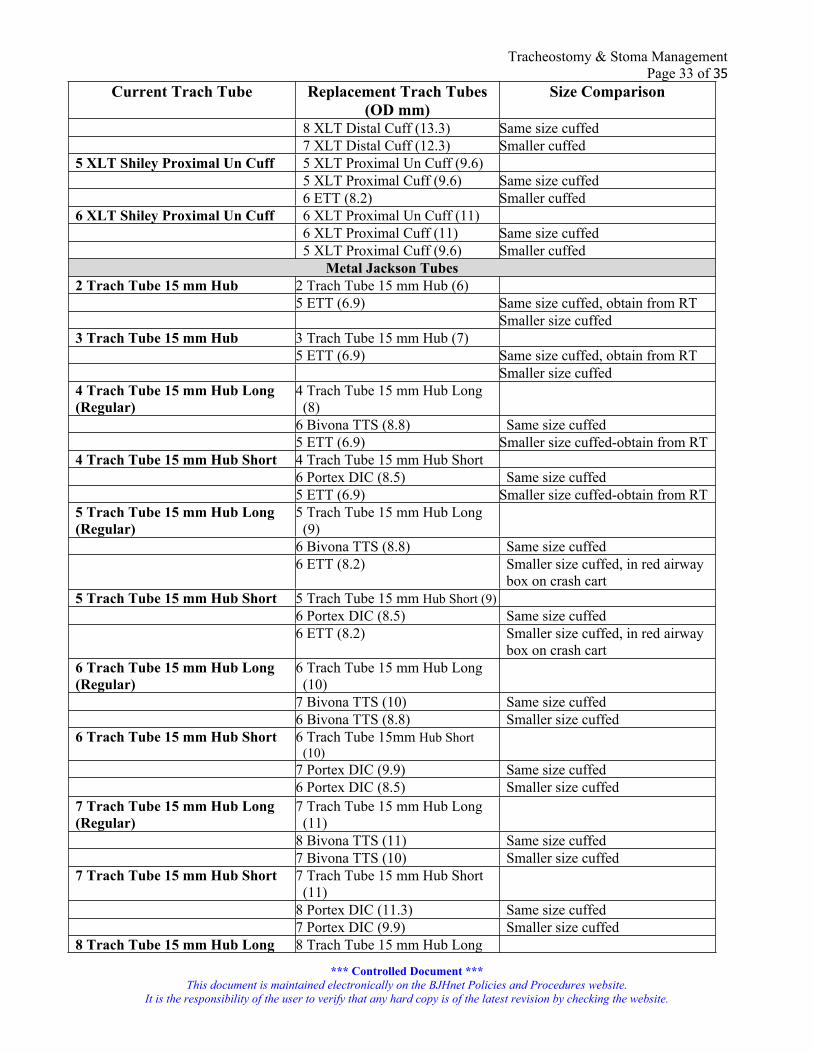
Tracheostomy & Stoma ManagementPage 33 of 35
*** Controlled Document ***This document is maintained electronically on the BJHnet Policies and Procedures website.
It is the responsibility of the user to verify that any hard copy is of the latest revision by checking the website.
Current Trach Tube Replacement Trach Tubes (OD mm)
Size Comparison
8 XLT Distal Cuff (13.3) Same size cuffed7 XLT Distal Cuff (12.3) Smaller cuffed
5 XLT Shiley Proximal Un Cuff 5 XLT Proximal Un Cuff (9.6)5 XLT Proximal Cuff (9.6) Same size cuffed6 ETT (8.2) Smaller cuffed
6 XLT Shiley Proximal Un Cuff 6 XLT Proximal Un Cuff (11)6 XLT Proximal Cuff (11) Same size cuffed5 XLT Proximal Cuff (9.6) Smaller cuffed
Metal Jackson Tubes2 Trach Tube 15 mm Hub 2 Trach Tube 15 mm Hub (6)
5 ETT (6.9) Same size cuffed, obtain from RTSmaller size cuffed
3 Trach Tube 15 mm Hub 3 Trach Tube 15 mm Hub (7)5 ETT (6.9) Same size cuffed, obtain from RT
Smaller size cuffed4 Trach Tube 15 mm Hub Long (Regular)
4 Trach Tube 15 mm Hub Long (8)
6 Bivona TTS (8.8) Same size cuffed5 ETT (6.9) Smaller size cuffed-obtain from RT
4 Trach Tube 15 mm Hub Short 4 Trach Tube 15 mm Hub Short6 Portex DIC (8.5) Same size cuffed5 ETT (6.9) Smaller size cuffed-obtain from RT
5 Trach Tube 15 mm Hub Long (Regular)
5 Trach Tube 15 mm Hub Long (9)
6 Bivona TTS (8.8) Same size cuffed6 ETT (8.2) Smaller size cuffed, in red airway
box on crash cart5 Trach Tube 15 mm Hub Short 5 Trach Tube 15 mm Hub Short (9)
6 Portex DIC (8.5) Same size cuffed6 ETT (8.2) Smaller size cuffed, in red airway
box on crash cart6 Trach Tube 15 mm Hub Long (Regular)
6 Trach Tube 15 mm Hub Long (10)
7 Bivona TTS (10) Same size cuffed6 Bivona TTS (8.8) Smaller size cuffed
6 Trach Tube 15 mm Hub Short 6 Trach Tube 15mm Hub Short (10)
7 Portex DIC (9.9) Same size cuffed6 Portex DIC (8.5) Smaller size cuffed
7 Trach Tube 15 mm Hub Long (Regular)
7 Trach Tube 15 mm Hub Long (11)
8 Bivona TTS (11) Same size cuffed7 Bivona TTS (10) Smaller size cuffed
7 Trach Tube 15 mm Hub Short 7 Trach Tube 15 mm Hub Short (11)
8 Portex DIC (11.3) Same size cuffed7 Portex DIC (9.9) Smaller size cuffed
8 Trach Tube 15 mm Hub Long 8 Trach Tube 15 mm Hub Long
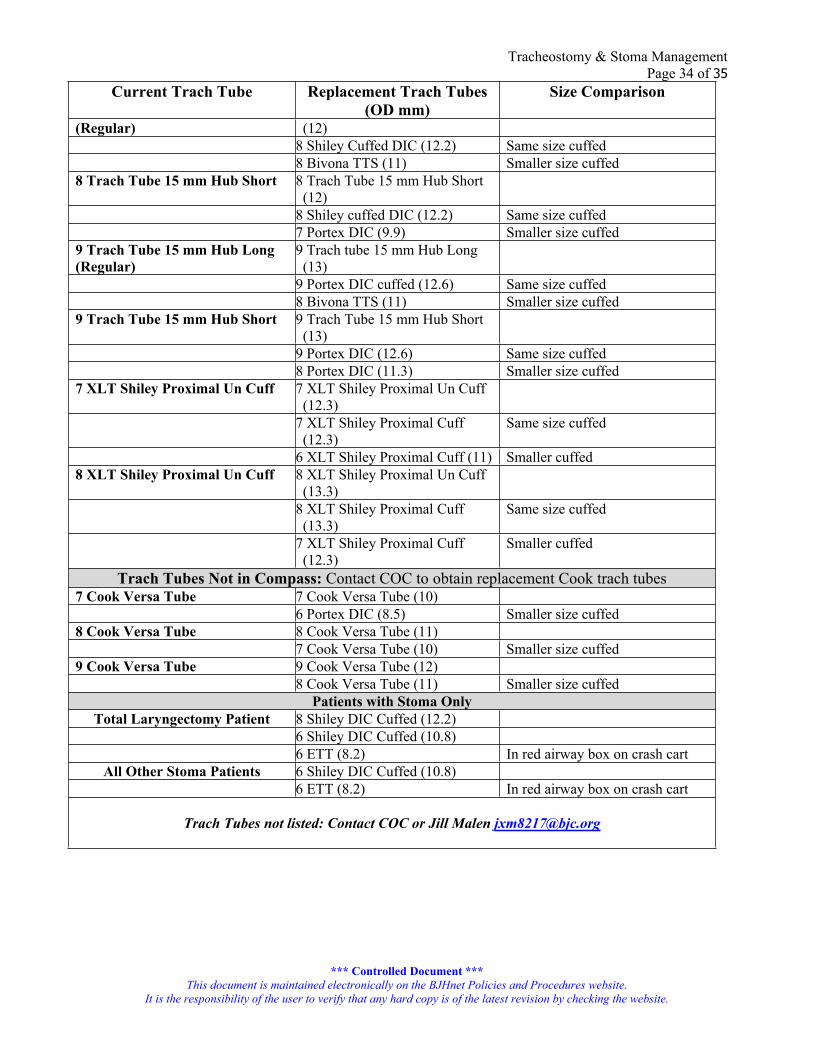
Tracheostomy & Stoma ManagementPage 34 of 35
*** Controlled Document ***This document is maintained electronically on the BJHnet Policies and Procedures website.
It is the responsibility of the user to verify that any hard copy is of the latest revision by checking the website.
Current Trach Tube Replacement Trach Tubes (OD mm)
Size Comparison
(Regular) (12)8 Shiley Cuffed DIC (12.2) Same size cuffed8 Bivona TTS (11) Smaller size cuffed
8 Trach Tube 15 mm Hub Short 8 Trach Tube 15 mm Hub Short (12)
8 Shiley cuffed DIC (12.2) Same size cuffed7 Portex DIC (9.9) Smaller size cuffed
9 Trach Tube 15 mm Hub Long (Regular)
9 Trach tube 15 mm Hub Long (13)
9 Portex DIC cuffed (12.6) Same size cuffed8 Bivona TTS (11) Smaller size cuffed
9 Trach Tube 15 mm Hub Short 9 Trach Tube 15 mm Hub Short (13)
9 Portex DIC (12.6) Same size cuffed8 Portex DIC (11.3) Smaller size cuffed
7 XLT Shiley Proximal Un Cuff 7 XLT Shiley Proximal Un Cuff (12.3)
7 XLT Shiley Proximal Cuff (12.3)
Same size cuffed
6 XLT Shiley Proximal Cuff (11) Smaller cuffed8 XLT Shiley Proximal Un Cuff 8 XLT Shiley Proximal Un Cuff
(13.3)8 XLT Shiley Proximal Cuff (13.3)
Same size cuffed
7 XLT Shiley Proximal Cuff (12.3)
Smaller cuffed
Trach Tubes Not in Compass: Contact COC to obtain replacement Cook trach tubes7 Cook Versa Tube 7 Cook Versa Tube (10)
6 Portex DIC (8.5) Smaller size cuffed8 Cook Versa Tube 8 Cook Versa Tube (11)
7 Cook Versa Tube (10) Smaller size cuffed9 Cook Versa Tube 9 Cook Versa Tube (12)
8 Cook Versa Tube (11) Smaller size cuffedPatients with Stoma Only
Total Laryngectomy Patient 8 Shiley DIC Cuffed (12.2)6 Shiley DIC Cuffed (10.8)6 ETT (8.2) In red airway box on crash cart
All Other Stoma Patients 6 Shiley DIC Cuffed (10.8)6 ETT (8.2) In red airway box on crash cart
Trach Tubes not listed: Contact COC or Jill Malen [email protected]
Tracheostomy & Stoma ManagementPage 35 of 35
*** Controlled Document ***This document is maintained electronically on the BJHnet Policies and Procedures website.
It is the responsibility of the user to verify that any hard copy is of the latest revision by checking the website.
Appendix FOtolaryngology Policy for Capping Tracheostomies
A. Assessment1. Clarify that an order for capping has been written. Order should include: special monitoring needs,
supplemental oxygen needs, and length of time for capping trial. The physician will write an order for continuous pulse oximetry and to “cap trach”.
2. Assess tracheostomy tube type. The type of cap needed is dependent on the type and size of the tracheostomy tube. The caps are kept on a par on the floor.
B. Plan 1. The nurse then assures that the patient is close enough to the nurse’s station for the pulse ox alarm to
be heard and waits for the continuous pulse ox to be supplied.2. Explain procedure, show cap to patient. Capping is best done after pulmonary hygiene and
suctioning. 3. Assess for any anxiety or concern regarding the capping procedure, and provide reassurance. Teach
the patient to call out for any difficulty breathing or shortness of breath. Ensure that patient has a mirror and knows the proper technique for uncapping their trach.
4. Prepare equipment and patient. Attach pulse oximeter for first trial and as ordered. 5. Apply oxygen as ordered (usually O2 by regular or high flow nasal cannula).6. Suction the patient, if needed.7. Position the patient, preferably while patient is sitting in a chair. If in bed, head of bed (HOB)
should be a minimum of 30 degrees or higher.C. Implementation
1. The first thing in the morning the RN reviews the procedure with patient and family and then proceeds to cap the trach.
2. Monitor the SpO2 reading for 2 minutes in order to obtain baseline before capping.3. Apply oxygen delivery device at the prescribed level.4. Assess the physical aspects of the patient: color, respiration rate, use of accessory muscles, stridor,
dyspnea, dizziness, SpO2, cough expiration, and ability to vocalize, as capping may result in respiratory distress and mucous plugging.
5. The patient usually stays overnight with continuous pulse oximetry monitoring.6. The trach will be discontinued according to the physician’s plan of care.