Tow Bar Kit Fitting Instructions
9
KLUGER GRANDE VEHICLES PZQ64-48065-FINS - Issue 1 - 16/08/16 Tow Bar Kit Fitting Instructions Fitting Time: 90 minutes Accessory Part No: PZQ64-48065 NOVEMBER 2016 PRODUCTION ONWARDS GARNISH KIT SOLD SEPARATELY
Transcript of Tow Bar Kit Fitting Instructions

KLUGERGRANDE VEHICLES
9PZQ64-48065-FINS - Issue 1 - 16/08/16
Tow Bar Kit
Fitting Instructions
Fitting Time: 90 minutes
Accessory Part No: PZQ64-48065
NOVEMBER 2016 PRODUCTION ONWARDS
GARNISH KIT SOLD SEPARATELY

KLUGERGRANDE VEHICLES
9PZQ64-48065-FINS - Issue 1 - 16/08/16 Page 2 of
-
Tow Bar P/No: PZQ6448065,
Tongue P/No: PZQ6348065,
ADR Label
- Check that all work practices comply with safety standards.
Please wear appropriate clothing and use safety equipment.
Check Tow bar Compliance Plate, Tongue Label and ADR Label to ensure correct Part numbers:
General Notes
Safety Notes
Socket Extension
Tools Required
Metal Primer
Metric Spanner Set Cutting KnifeTorque Wrench11Nm - 130Nm
Read through the fitting instructions before installation of accessory. Install tow bar as described. Do not use any other mounting location/method other than described in this instruction. Failure to do so may cause damage to the vehicle or the accessory.
• It is advisable to seek assistance of another person when installing this product.
• Do not repair or modify the tow bar and/or its mounting bracket in any way. Repairs or modifications may affect the operation of the tow bar which may result in serious injury or death.
• Do not remove the label from the tow bar or tongue.
• If the Tongue is removed from the tow bar, ensure that it is stored securely within the vehicle. Injury and or damage may result if the Tongue is free to move about within the vehicle.
Before refitting the Garnish, fit the trailer wiring harness (needs to occur after towbar is installed).
• It is always recommended that this accessory is fitted by a qualified Toyota Technician.
• Safely store and protect any removed vehicle components.
• Ensure all discarded recyclables (vehicle accessory components and packaging) follow local recycling regulations.
• Ensure all bare metal surfaces are protected using Automotive Bare Metal Primer and touch-up paint.
• Remove all metal swarf and dust from all vehicle surfaces if surface is used for accessory installation.
Ratchet
Socket Set10mm, 13mm, 17mm,
18mm,
KLUGERGRANDE VEHICLES
9PZQ64-48065-FINS - Issue 1 - 16/08/16 Page 3 of
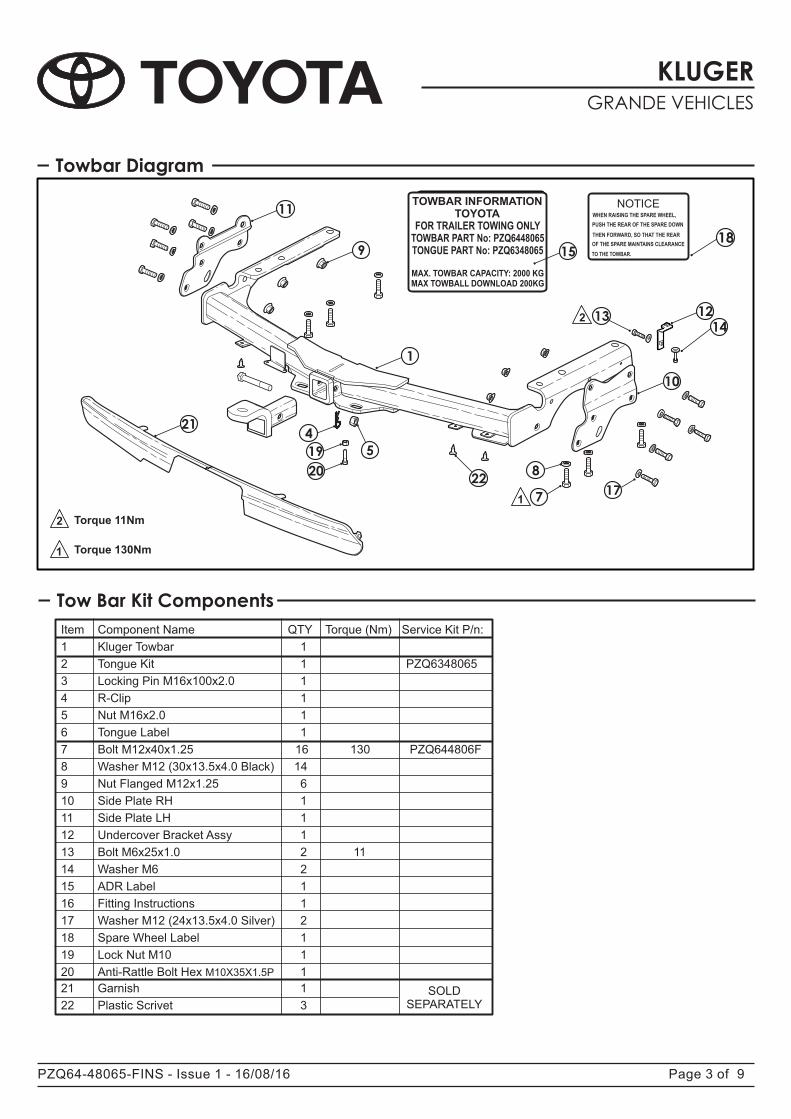
Towbar Diagram
TOWBAR INFORMATIONTOYOTA
FOR TRAILER TOWING ONLYTOWBAR PART No: PZQ6448065TONGUE PART No: PZQ6348065
MAX. TOWBAR CAPACITY: 2000 KGMAX TOWBALL DOWNLOAD 200KG
NOTICEWHEN RAISING THE SPARE WHEEL,
PUSH THE REAR OF THE SPARE DOWN
THEN FORWARD, SO THAT THE REAR
OF THE SPARE MAINTAINS CLEARANCE
TO THE TOWBAR.
Torque 130Nm
Tow Bar Kit Components
Item Component Name QTY Torque (Nm) Service Kit P/n:
1 Kluger Towbar 1
2 Tongue Kit 1 PZQ6348065
3 Locking Pin M16x100x2.0 1
4 R-Clip 1
5 Nut M16x2.0 1
6 Tongue Label 1
7 Bolt M12x40x1.25 16 130 PZQ644806F
8 Washer M12 (30x13.5x4.0 Black) 14
9 Nut Flanged M12x1.25 6
10 Side Plate RH 1
11 Side Plate LH 1
12 Undercover Bracket Assy 1
13 Bolt M6x25x1.0 2 11
14 Washer M6 2
15 ADR Label 1
16 Fitting Instructions 1
17 Washer M12 (24x13.5x4.0 Silver) 2
18 Spare Wheel Label 1
19 Lock Nut M10 1
20 Anti-Rattle Bolt Hex M10X35X1.5P 1
15
13
10
228
717
1412
Torque 11Nm
1
2
1
2
18
21 Garnish 1
22 Plastic Scrivet 3SOLD
SEPARATELY
1
4
5
9
11
21
20
19

KLUGERGRANDE VEHICLES
9PZQ64-48065-FINS - Issue 1 - 16/08/16
Step 1
Step 3
Page 4 of
Step 2
ImportantAlways refer to the vehicle’s Workshop Manual when removing vehicle components.
1
1
1
4
3• Remove both the RHS and LHS undercovers (1).
- LHS - screws x3, clips x3, nuts x2 (use a 13mm socket).
- RHS - screws x3, clipx1 and nut x1.
• Remove the OE undercover bracket (2) RHS (use 10 and 17mm sockets). Discard the bracket.
• Remove the OE lower garnish (3) from the rear bumper (4):
- Remove the clips x5, bolt x1 (use a 10mm socket) and discard.
- Remove the garnish - To remove the garnish push the top end of the garnish in and at the same time pull the bottom end of the garnish out. Start removing from left to right.
2
3
2 2
112
1
10mm 13mm 17mm
17mm
• Remove the rear LHS & RHS tie down hooks (1) and retaining bolts (use M17 socket) from underneath the vehicle and discard.
• Remove the vehicle grommets (1) and the plugs (2) from the RHS & LHS chassis rails.
- LHS - 3 plastic plugs + 2 rubber grommets (shown).
- RHS - 2 plastic plugs + 2 rubber grommets (not shown).
Note: Discard the garnish after removal.
• Retain all plastic clips and fasteners for future use unless otherwise specified.

KLUGERGRANDE VEHICLES
9PZQ64-48065-FINS - Issue 1 - 16/08/16
Step 4
Step 5
Page 5 of
Step 6
• Remove the body sealer as shown in diagram (A).
• Coat any bare metal exposed when removing the body sealer with zinc rich metal primer.
Important
Take care, the chassis may be damaged if too much body sealant is removed.
• Lower the spare wheel to allow Tow Bar Fitment.
• Apply adhesive notice label for spare tyre (1) into the vehicle tool compartment area located in the rear cabin onto the area shown (2) in the diagram.
• Clean the area (2) with isopropyl alcohol or similar.1
2
NOTICEWHEN RAISING THE SPARE WHEEL,
PUSH THE REAR OF THE SPARE DOWN
THEN FORWARD, SO THAT THE REAR
OF THE SPARE MAINTAINS CLEARANCE
TO THE TOWBAR.
1
A
• Fit the Garnish (1) onto the rear bumper fascia (2) and secure with the supplied clips x2 (1 on each side) (3).
1
3
1
12

KLUGERGRANDE VEHICLES
9PZQ64-48065-FINS - Issue 1 - 16/08/16
Step 7
Step 8
Step 9
Page 6 of
• Fit the LHS side plate (1) into position and loosely tighten the M12 Hex Bolt x5 (2), M12 Flat silver washer x2 (6), M12 Black washer x3 (3) and the M12 Flanged Nut x3 (4) to the chassis rail holes and the tow bar (5) as shown. Refer to diagram.
Note: Use Silver Washers (24x13.5x4.0) with the LH Plate .
Repeat for the RH Plate, using M12 Black Washers only (30x13.5x4.0).
• Once all fasteners have been located in place on the towbar (1) and side plates (2), tighten all fasteners so the towbar and side plates are ush with the vehicle body.
• Torque the M12 fasteners to 130Nm.
• Raise the spare wheel (3) and push it towards the front of the vehicle to maximise the gap to towbar.
1 5
4
4
3
3
2
2
1
2
2
3
Caution
Make sure the spare wheel is installed in the correct position.
•
6
3
18mm
18mm
• Raise the tow bar (1) into position and loosely hand tighten the M12 Hex Bolts x6 (2), use 6x M12 x black washers 30x13.5x4.0 (3).
1
2 2
3
3
Caution
Use the correct washers to tighten up the tow bar.

KLUGERGRANDE VEHICLES
9PZQ64-48065-FINS - Issue 1 - 16/08/16 Page 7 of
Step 10
Step 11• Secure the Towbar Garnish (1) lower end to the Tow Bar with
scrivets (2).
Note: The Towbar Garnish (1) is sold separately to the Towbar.
1
13
5
4
2
• Attach the tow bar tongue (1) to the tow bar (2). By locating the locking pin (3) through the tow bar and secure it with the M16 Nut (4) and R Clip (5).
Bumper Bar
Garnish
Scrivet x3
Towbar
GARNISH / TOWBAR CROSS SECTION
Important
Tongue to be installed in up position only.
Step 12
2
2 2
2
Fit the Trailer Wiring Harness.
This box is intentionally blank.

KLUGERGRANDE VEHICLES
9PZQ64-48065-FINS - Issue 1 - 16/08/16
Step 13
Step 14
Step 15
Page 8 of
• Mark up the vehicle LHS undercover section (1) and section (2) and cut out the marked areas. 1
2
2
83.052.7
45.5 56.6
1
29 72.4
109.1
• Mark up the vehicle RHS undercover section (1) and section (2) and cut out the marked areas.
1
2
2 1
81
115
44
33
35
23
20
39
RH
• If the Tongue (1) is installed but not towing, fit the M10x35x1.5 Anti-Rattle Bolt (2) and M10x1.5 Locking Nut (3).
• Fasten the supplied M10 Anti-Rattle Bolt (2) to remove any free play and rattle and tighten Lock Nut (3).
1
Important
Anti-Rattle Bolt (2) and Lock Nut (3) should only be used when not towing to remove free play and rattle.
2
3
KLUGERGRANDE VEHICLES
9PZQ64-48065-FINS - Issue 1 - 16/08/16
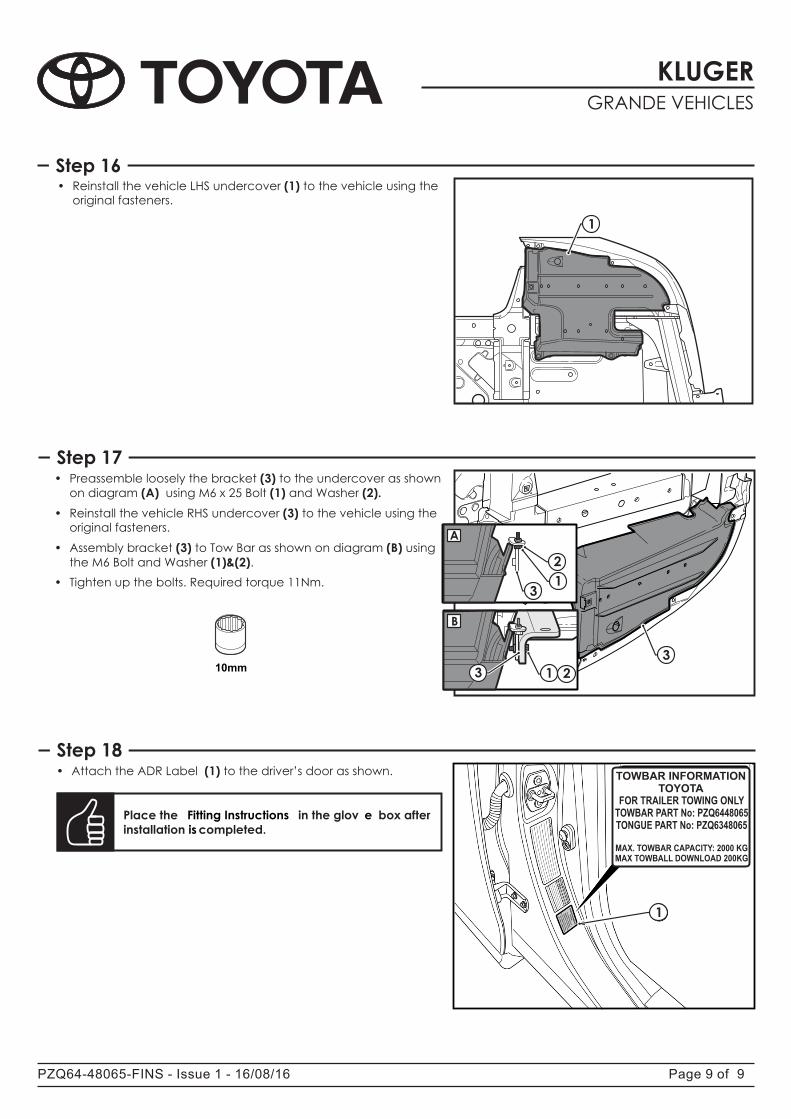
Step 16
Step 17
Page 9 of
3
• Preassemble loosely the bracket (3) to the undercover as shown on diagram (A) using M6 x 25 Bolt (1) and Washer (2).
• Reinstall the vehicle RHS undercover (3) to the vehicle using the original fasteners.
• Assembly bracket (3) to Tow Bar as shown on diagram (B) using the M6 Bolt and Washer (1)&(2).
• Tighten up the bolts. Required torque 11Nm.
2
1
A
13
B
2
3
10mm
Place the in the glov box after installation completed.
Fitting Instructions e is
• Attach the ADR Label (1) to the driver’s door as shown.
1
TOWBAR INFORMATIONTOYOTA
FOR TRAILER TOWING ONLYTOWBAR PART No: PZQ6448065TONGUE PART No: PZQ6348065
MAX. TOWBAR CAPACITY: 2000 KGMAX TOWBALL DOWNLOAD 200KG
Step 18
• Reinstall the vehicle LHS undercover (1) to the vehicle using the original fasteners.
1