TOPAZ Service Guide - DVO Suspensiontech.dvosuspension.com/.../2018/01/topaz_fullservicev2.pdf ·...
31
TOPAZ Service Guide Full Service
Transcript of TOPAZ Service Guide - DVO Suspensiontech.dvosuspension.com/.../2018/01/topaz_fullservicev2.pdf ·...

TOPAZ Service GuideFull Service

2 TOPAZ FULL SERVICE
SERVICE OVERVIEW
This manual will guide you step by step performing an air service to your Topaz. Please follow each instruction carefully to achieve the best and safest results.
*Always wear your safety gear while working on suspension products. We care about you, make sure you wear your safety glasses and protective gloves while servicing DVO Suspension Products.
WARNING: We recommend that you have your DVO suspension serviced by a qualified bicycle mechanic. Servicing DVO
suspension requires knowledge of suspension components, as well as the use of specialized tools and lubricants/fluids.
Failure to follow the procedures outlined in this service manual may cause damage to your component and void the
warranty.
WARNING: Always use genuine DVO parts and proper service methods when maintaining your DVO Suspension product.
Improper service, or use of after-market replacement parts with DVO Suspension may cause the product to malfunction,
resulting in SERIOUS INJURY OR DEATH.
WARNING: Modification, improper service, or use of after-market replacement parts with DVO Suspension may cause the
product to malfunction, resulting in SERIOUS INJURY OR DEATH. DO NOT modify any part of a fork or shock, including the
fork brace (lower leg cross brace), crown, steerer, upper and lower leg tubes, or internal parts, except as instructed herein.
Any unauthorized modification may void the warranty, and may cause failure or the fork or shock, resulting in SERIOUS
INJURY OR DEATH.
WEAR SAFETY GEAR!

3 TOPAZ FULL SERVICE
Tools Needed For Service:• Rebuild Kit part #1569010• Valve Core Remover• Valve Puller• Oil Drain Pan• Bleed Syringe• 11mm, 18mm Wrench• Crescent Wrench• Flathead Screwdriver• Vice• 10mm shaft clamps• Pick• Shock Pump• 3mm, 4mm Allen Key
Contents:
pg. 4-10 ...................................
pg. 11- 27 ................................
pg. 28-29 .................................
pg. 30-31 .................................
Air Service
Damper Rebuild
Bleed
Assembly
Fluids & Cleaner Needed For Service:• Safety Glasses • Clean, Lint Free Rag• Suspension Cleaner or Alcohol• Blue Loctite• 2.5 wt oil. No Maxima• Slickoleum Grease
Recommended Service Interval:• Full Service .......................100 Hours of Ride Time

4 TOPAZ FULL SERVICE TOPAZ FULL SERVICE
CAUTION - EYE HAZARD
Firmly grasp the upper eyelet of the shock with one hand, and twist the entire air canister counter-clockwise to un-thread it from the body.
Remove the o-ring below the outer air sleeve. Then remove the air sleeve.
Remove the air cap. Depress the valve to release the air pressure.
A Air Service
3.
2.
1.

TOPAZ FULL SERVICE TOPAZ FULL SERVICE
Remove the main seal and white bushing from the body.
Remove the upper o-ring from the body. Then remove the dust seal.
5
Remove the lower and middle o-ring from the body.
4.
5.
6.

6 TOPAZ FULL SERVICE TOPAZ FULL SERVICE
9.
8.
7.
Apply a thin layer of grease to the new main seal. Install your new seal into the body.
Slightly stretch the bushing as shown. Place the new bushing back onto the groove.
Get your rebuild kit, part#1569010 Clean the inside of the shock body with suspension clean. Make sure it is free of any dirt or debris.

TOPAZ FULL SERVICE TOPAZ FULL SERVICE 7
10.
11.
12.
Make sure the main seal is sitting flush with no gaps. Get the second white bushing and slightly stretch it as shown.
Install the second bushing above the main seal. The right image shows incorrect installation. It needs to sit flush with the main seal.
This is image demonstrates correct installation with no gaps.
X
8 TOPAZ FULL SERVICE TOPAZ FULL SERVICE
13.
14.
15.
Apply a thin layer of grease to the new seals and bushings. Then remove the bumper. Depending on the disassem-bly, the bumper may be on the shaft or inside the air can shown on step 15.
If it is in the air can, remove the bumper and set aside. Then remove the first bushing from the air piston.
Apply a thin layer of grease to the new dust seal. Install the new dust seal above the second bushing.

TOPAZ FULL SERVICE TOPAZ FULL SERVICE
18.
17.
16.
9
Remove the second bushing and main seal from the air piston.
Remove the o-ring located above the threads of the housing and thoroughly clean the housing with suspension cleaner.
Apply a thin layer of grease to the new o-ring and install it in the housing.

10 TOPAZ FULL SERVICE TOPAZ FULL SERVICE
20.
19.1
19.2
Slightly stretch the new white bushing as shown and install it on the air piston.
Apply a thin layer of grease to the new main seal and install it on the air piston.
Slightly stretch the second white bushing and install it above the main seal.

TOPAZ FULL SERVICE TOPAZ FULL SERVICE 11
23.
22.
21.
Apply a thin layer of grease to the main seal and bushings.
Use the 18mm wrench to un-thread the damper from the stanchion. Separate the damper and stanchion and drain the oil into a catch pan.
Use a crescent wrench to loosen the reservoir. You do not need to remove it completely. Thread on a valve puller to the bladder air valve.
Damper Rebuild B

12 TOPAZ FULL SERVICE TOPAZ FULL SERVICE
24.
25.
26.
Push downward on the valve puller to lower the bladder. Use a flat head screwdriver to remove the retaining clip.
Remove the bladder from the reservoir. Then un-thread the reservoir from the housing.
Place your thumb into the open end of the reservoir and push on the compression loader to remove it.

TOPAZ FULL SERVICE TOPAZ FULL SERVICE 13
29.
28.
27.
Remove the metal washer and o-ring.
Remove the air piston. This may be difficult, but remove the white washer from the inside of the shaft. To make it easier, you can spray a suspension cleaner inside the shaft to push the washer out.
Clamp the damper shaft in 10mm shaft clamps as shown then un-thread the housing from the damper shaft.

14 TOPAZ FULL SERVICE TOPAZ FULL SERVICE
30.
31.
32.
Remove the o-ring above the reservoir threads. Then remove the valve core.
Remove the o-ring and main seal located in the air piston.
Use a suspension cleaner to clean the inside of the damper shaft.
TOPAZ FULL SERVICE TOPAZ FULL SERVICE 15
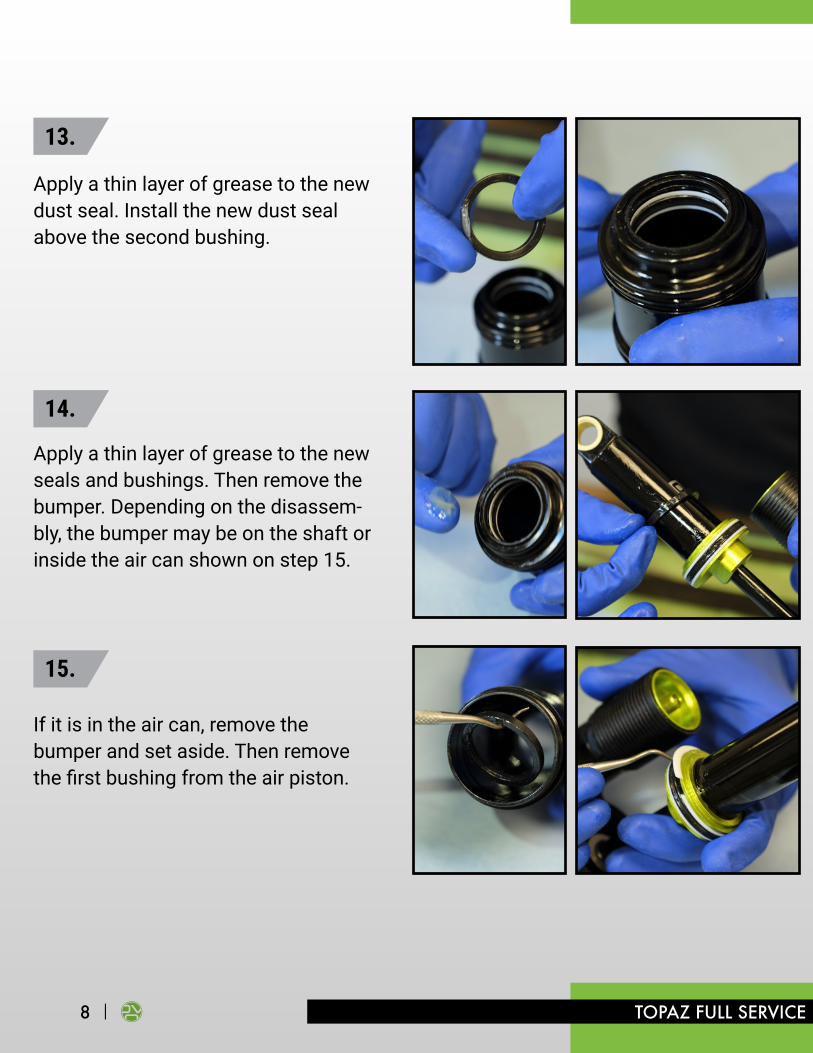
35.
34.
33.
Use a 3mm allen key to remove the air valve from the housing. Then use a 2mm allen key to remove the rebound adjuster set screw.
Remove the rebound adjuster unit. Then remove the white washer at the end of the adjuster.
Remove the metal washer and lower o-ring.
TOPAZ FULL SERVICE TOPAZ FULL SERVICE 16
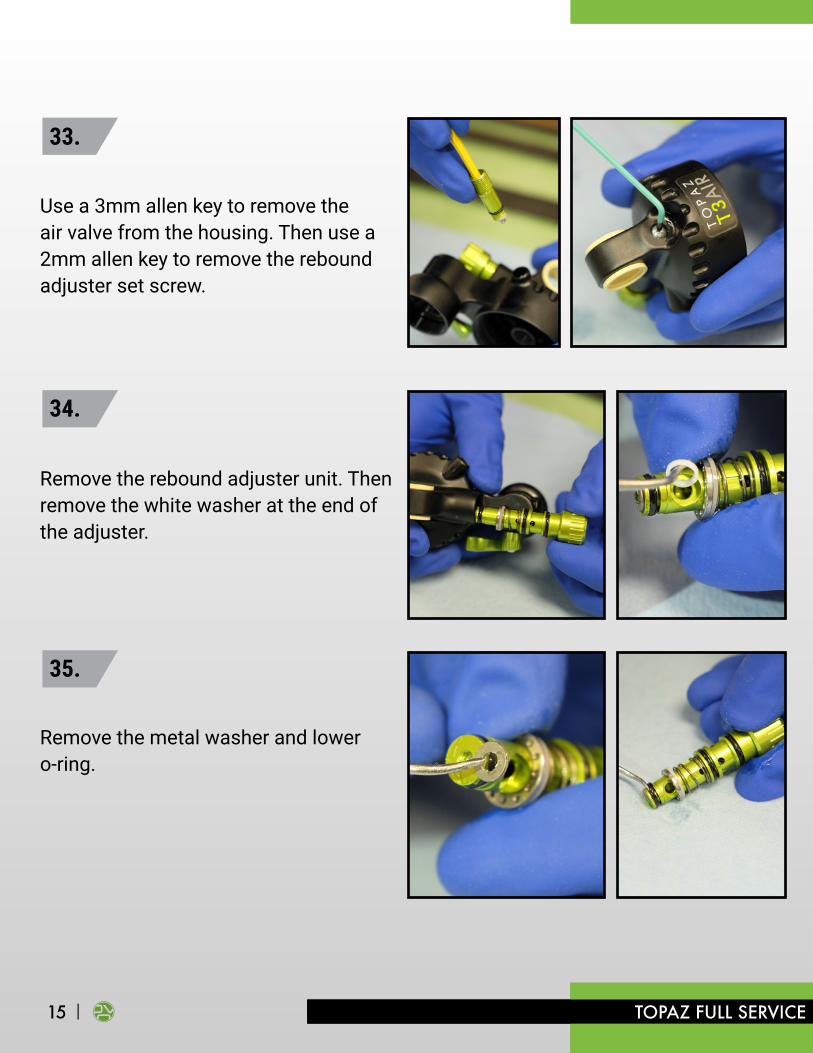
36.
37.
38.
Install the new o-ring, then apply a thin layer of grease to the new main seal.
Remove the upper o-ring. Then apply a thin layer of grease to the new o-ring for the air piston.
Remove the pressure spring and washer. Then remove the middle o-ring.

TOPAZ FULL SERVICE TOPAZ FULL SERVICE 17
39.
40.
41.
Install the main seal. Make sure both of the new seals are sitting flush with no gaps.
Apply a thin layer of grease to the threads of the damper shaft. Slide the air piston back onto the shaft in the direction shown.
Install the o-ring on the damper shaft then the metal washer.

18 TOPAZ FULL SERVICE TOPAZ FULL SERVICE
42.
43.
44.
Install the rebound needle in the direction shown.
Remove the small o-ring located in the center of the housing.
Apply a small amount of grease to the tip of the rebound needle. Then put the white washer on top. The grease will hold it in place.
Slide them both upwards.

TOPAZ FULL SERVICE 19 TOPAZ FULL SERVICE
47.
46.
45.
Apply grease to the new o-ring and place it back in the groove.
Get your new o-rings for your rebound adjuster and apply a thin layer of grease to them. Install the upper o-ring.
Install the middle o-ring. Then install the pressure spring and washer.

20 TOPAZ FULL SERVICE TOPAZ FULL SERVICE
48.
49.
50.
Install the metal washer, the grease will hold it in place. Slide the rebound adjuster back into the housing.
Install the new white washer. The grease will hold it in place. Apply a small amount of grease to the tip of the rebound adjuster.
Install the lower o-ring. Apply a thin layer of grease to the rebound needle seat.

TOPAZ FULL SERVICE 21 TOPAZ FULL SERVICE
53.
52.
51.
Double check to make sure the holes line up and are pointing straight up inside the housing.
Apply a small amount of blue loctite to the threads of the rebound adjuster set screw. Then re-install the set screw to secure the adjuster.
Apply a thin layer of blue loctite to the threads of the damper shaft. Thread the shaft into the housing.

22 TOPAZ FULL SERVICE TOPAZ FULL SERVICE
54.
55.
56.
Install the air valve and tighten with a 3mm allen key.
Replace the o-ring on the air valve and apply a small amount of blue loctite to the threads.
Use the 11mm wrench to firmly tighten the damper shaft to the housing. Then remove the o-ring on the air valve.

TOPAZ FULL SERVICE 23 TOPAZ FULL SERVICE
59.
58.
57.
Reinstall the valve core.
Grease the new o-ring for the top of the reservoir threads and place it above the reservoir threads in the housing.
Place a 3mm allen key into the nut end of the compression loader. You want to push the needle out.

24 TOPAZ FULL SERVICE TOPAZ FULL SERVICE
60.
61.
62.
Apply a thin layer of grease to the o-rings on the loader and the inside of the reservoir.
Apply a generous amount of grease to the end of the loader as shown.
Replace the o-ring on the compression needle and place it back into the loader. The pointed end of the needle goes in first.

TOPAZ FULL SERVICE 25 TOPAZ FULL SERVICE
65.
64.
63.
Re-install the compression loader into the reservoir. Then thread on the reservoir back into the housing.
Tighten firmly with a crescent wrench.
Use the small pick to remove the filling on the bleed screw. Then use a 2mm allen key to remove the screw.

26 TOPAZ FULL SERVICE TOPAZ FULL SERVICE
66.
67.
68.
Move the compression switch to the closed position.
Insert a 3mm allen key into the compression loader and push down-ward. You should feel a “click”.
Fill the stanchion to the top with 2.5wt suspension oil.
Remove and replace the o-ring on the bleed screw. Move the compression switch to the open position as shown.

TOPAZ FULL SERVICE 27 TOPAZ FULL SERVICE
71.
70.
69.
Place the housing back on the stanchion and thread on. Some oil will drain out as you thread it on.
Firmly tighten with an 18mm wrench.
Fill the reservoir with 2.5 wt oil. Move the compression switch to the open position.
Place the 3mm allen key back into the loader. Push down until you hear a “click”.

28 TOPAZ FULL SERVICE TOPAZ FULL SERVICE
72.
73.
74.
Thread in the valve core and tighten. Apply grease to the outside rim of the bladder.
Apply a thin layer of grease to the inside of the bladder. Install the bladder back onto the end cap.
Remove the bleed screw with a 2mm allen key. Thread on the bleeding syringe.
C Bleed

TOPAZ FULL SERVICE 29 TOPAZ FULL SERVICE
77.
76.
75.
Install the bladder and press down ward to lower it into the reservoir. Oil will drain over the edge.
Install the bladder retainer clip. Thread on the valve puller and pull the bladder up so it rests against the retainer clip.
Slightly tilt the shock to side so the bleed valve is at the highest point. Begin to cycle the shock through the stroke to remove any air bubbles.

30 TOPAZ FULL SERVICE TOPAZ FULL SERVICE
78.
79.
80.
Install the lower and middle o-rings into the groove.
Slide the air canister body back onto the damper and thread into the housing. Apply a small amount of grease to the 3 o-rings for the outside of the air canister body.
Make sure the oil level in the cylinder never drops below 10cc’s. This will ensure no air gets re-introduced into the shock. Once you have cycled the shock repeatedly, remove the bleed syringe and re-install the bleed screw with a 2mm allen key.
D Rebuild

TOPAZ FULL SERVICE 31 TOPAZ FULL SERVICE
83.
82.
81.
Install the upper o-ring into the groove. Apply a thin layer of grease to the inside of the air sleeve.
Slide the air sleeve onto the body. Be cautious not to damage the three o-rings.Install the o-ring back in the groove below the air sleeve.
Inflate the shock to the desired pressure. Install the air cap and you’re good to go!