Top Rope Climbing Handbook · The Pirate, Wire Eye Carabina with Auto lock has a spring loaded...
12
19/11/2015 Climbing Handbook Daradgee Environmental Education Centre Top Rope Climbing Handbook Contents 1. What to expect 2. Equipment 3. Knots 4. Positions and equipment used by the climbing team 5. How the climbing session runs 6. Ascending the wall 7. Descending the wall 8. Helpful tips for a successful climbing session
Transcript of Top Rope Climbing Handbook · The Pirate, Wire Eye Carabina with Auto lock has a spring loaded...

19/11/2015 Climbing Handbook Daradgee Environmental Education Centre
Top Rope Climbing Handbook
Contents 1. What to expect
2. Equipment
3. Knots
4. Positions and equipment used by the climbing team
5. How the climbing session runs
6. Ascending the wall
7. Descending the wall
8. Helpful tips for a successful climbing session
19/11/2015 Climbing Handbook Daradgee Environmental Education Centre
Top Rope Climbing at Daradgee
At the Daradgee Environmental Education Centre we encourage accompanying adults to
become involved in all activities. By training as a belay you can ensure the optimal student
outcomes for the climbing sessions. This includes:
Developing and applying challenging, new skills.
Maximising climber participation by operating more climbing stations.
Helping climbers develop their personal and social capabilities and physical skills
through challenge
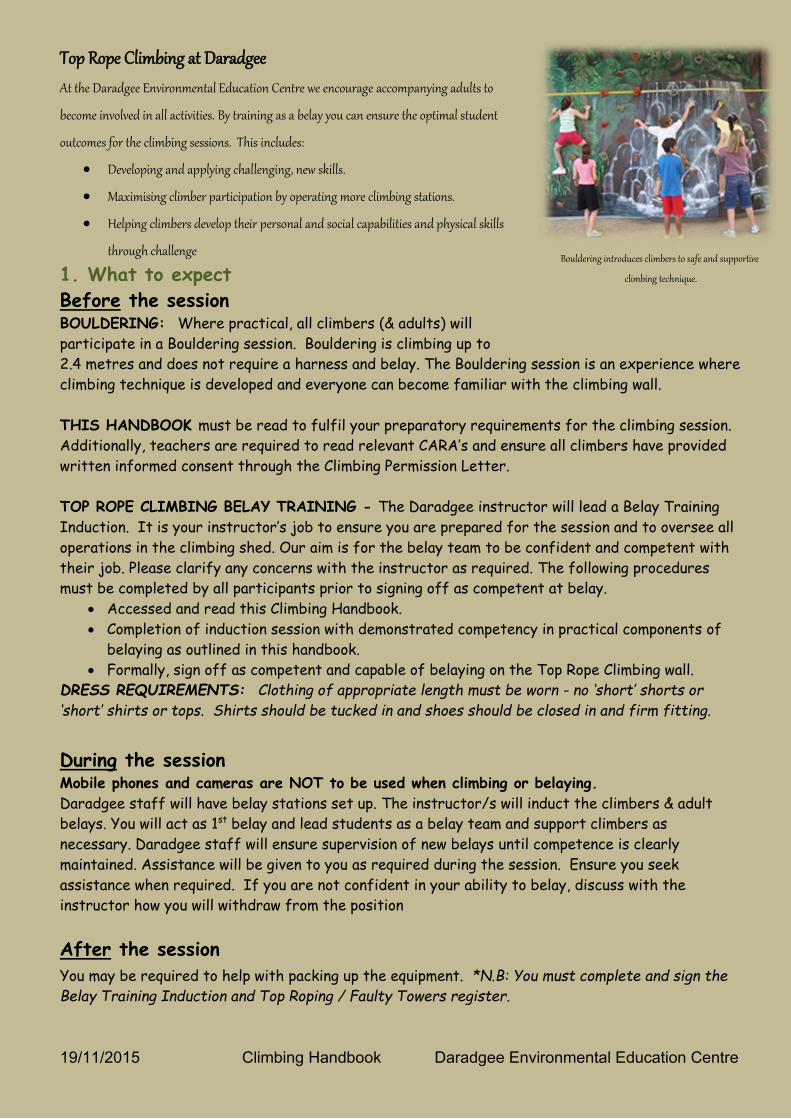
1. What to expect
Before the session BOULDERING: Where practical, all climbers (& adults) will
participate in a Bouldering session. Bouldering is climbing up to
2.4 metres and does not require a harness and belay. The Bouldering session is an experience where
climbing technique is developed and everyone can become familiar with the climbing wall.
THIS HANDBOOK must be read to fulfil your preparatory requirements for the climbing session.
Additionally, teachers are required to read relevant CARA’s and ensure all climbers have provided
written informed consent through the Climbing Permission Letter.
TOP ROPE CLIMBING BELAY TRAINING - The Daradgee instructor will lead a Belay Training
Induction. It is your instructor’s job to ensure you are prepared for the session and to oversee all
operations in the climbing shed. Our aim is for the belay team to be confident and competent with
their job. Please clarify any concerns with the instructor as required. The following procedures
must be completed by all participants prior to signing off as competent at belay.
Accessed and read this Climbing Handbook.
Completion of induction session with demonstrated competency in practical components of
belaying as outlined in this handbook.
Formally, sign off as competent and capable of belaying on the Top Rope Climbing wall.
DRESS REQUIREMENTS: Clothing of appropriate length must be worn - no ‘short’ shorts or
‘short’ shirts or tops. Shirts should be tucked in and shoes should be closed in and firm fitting.
During the session Mobile phones and cameras are NOT to be used when climbing or belaying.
Daradgee staff will have belay stations set up. The instructor/s will induct the climbers & adult
belays. You will act as 1st belay and lead students as a belay team and support climbers as
necessary. Daradgee staff will ensure supervision of new belays until competence is clearly
maintained. Assistance will be given to you as required during the session. Ensure you seek
assistance when required. If you are not confident in your ability to belay, discuss with the
instructor how you will withdraw from the position
After the session
You may be required to help with packing up the equipment. *N.B: You must complete and sign the
Belay Training Induction and Top Roping / Faulty Towers register.
Bouldering introduces climbers to safe and supportive
climbing technique.

19/11/2015 Climbing Handbook Daradgee Environmental Education Centre
2. Equipment The care of all climbing equipment is imperative
The Swivel eye, Auto lock, Alloy
Carabina MUST always be first to
lock into black attachment point of
harness
The Pirate, Wire Eye Carabina
with Auto lock has a spring loaded
lockable gate
The Alloy, Screw gate Carabina
with spring loaded lockable gate
Your harness/belt attaches to
climbing rope using two carabinas.
Note the black attachment point
An Anchor Strap attaches the
climbing rope to the anchor chain
and footing
The Stitch Plate is a friction
braking device
A Double Figure of 8 Knot is used
to attach two captive eye
carabinas to the climbing rope.
6-10 cm tail end must be visible at
all times
The Prusik Knot is tied to the
climbing rope and used as a backup
friction braking device
A Thumb Knot is used at ends of
the climbing rope where the third
belay is positioned.
Please keep climbing equipment out of the sand wherever practical.
Climbing equipment must never be mistreated.
Please report any damages of defects immediately
19/11/2015 Climbing Handbook Daradgee Environmental Education Centre
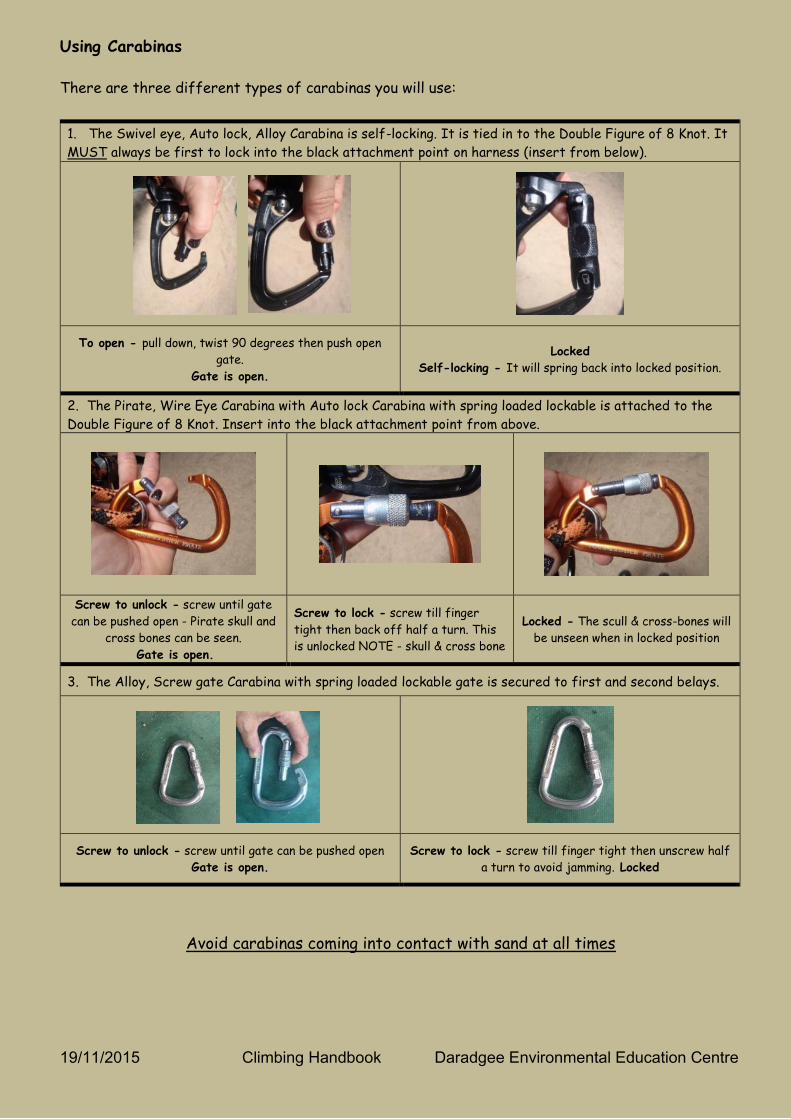
Using Carabinas
There are three different types of carabinas you will use:
1. The Swivel eye, Auto lock, Alloy Carabina is self-locking. It is tied in to the Double Figure of 8 Knot. It
MUST always be first to lock into the black attachment point on harness (insert from below).
To open - pull down, twist 90 degrees then push open
gate.
Gate is open.
Locked
Self-locking - It will spring back into locked position.
2. The Pirate, Wire Eye Carabina with Auto lock Carabina with spring loaded lockable is attached to the
Double Figure of 8 Knot. Insert into the black attachment point from above.
Screw to unlock - screw until gate
can be pushed open - Pirate skull and
cross bones can be seen.
Gate is open.
Screw to lock - screw till finger
tight then back off half a turn. This
is unlocked NOTE - skull & cross bone
Locked - The scull & cross-bones will
be unseen when in locked position
3. The Alloy, Screw gate Carabina with spring loaded lockable gate is secured to first and second belays.
Screw to unlock - screw until gate can be pushed open
Gate is open.
Screw to lock - screw till finger tight then unscrew half a turn to avoid jamming. Locked
Avoid carabinas coming into contact with sand at all times

19/11/2015 Climbing Handbook Daradgee Environmental Education Centre
Using a Stitch Plate
A stitch plate is a braking device used to create
friction on a climbing rope. It operates best when the
slots of the plate are at 90 degree angle to the wall and
the rope runs in a direct line into and out of the stitch
plate and carabina. This ensures smooth operation.
Twisting the stitch plate and rope will increase friction
and make ease of operation difficult.
3. Knots
THUMB KNOT
This is already done for you. The third belay has an end knot.
On the climbers end, the tag end is taped down above the
climber’s Double Figure of 8 loop.
PRUSIK KNOT
As a beginner belay, you will not be required to tie this knot. This description is for your
information only. The Prusik Knot is a braking device used by the 2nd Belay. Leaving the knot a little
loose it can be slid up and down the rope. Weight the knot and it will ‘bite’ the rope and lock off.
A DOUBLE FIGURE OF 8 KNOT
You will not be required to tie this knot. It is used to
attach captive eye carabinas to the climbing rope. It
is important that a 6-10 cm tail end is be visible at all
times.
Stitch Plate
Carabina
Harness Loop

19/11/2015 Climbing Handbook Daradgee Environmental Education Centre
4. Positions and equipment used by the climbing team
CLIMBER 1st BELAY 2nd BELAY 3rd BELAY
Personal Safety
Equipment
Helmet
Harness
Helmet
Harness
Helmet
Harness
Helmet
Harness
(optional)
Specialised
equipment, knots &
connections
Carabina x 2
Carabina x 2
Stich plate
Anchor Strap
Prusik knot
Carabina End knot
2.4m
No.1 Belay No.2 Belay No.3 Belay
Smiley face or Big W
19/11/2015 Climbing Handbook Daradgee Environmental Education Centre
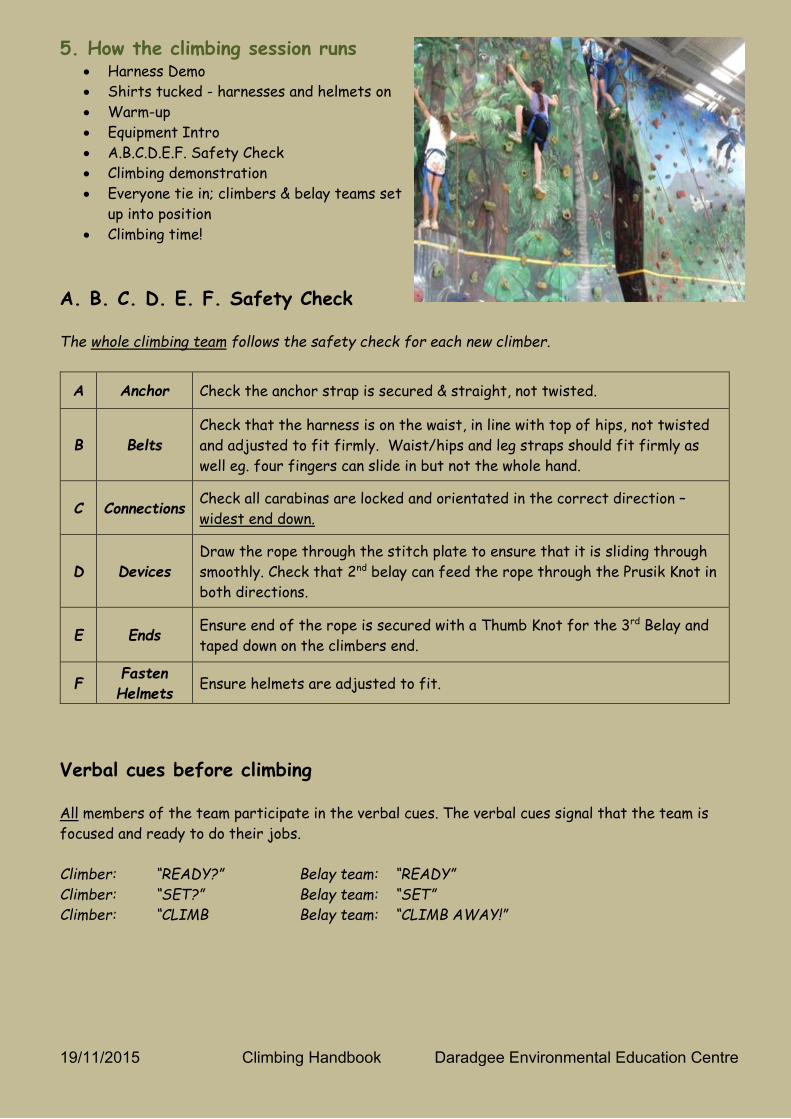
5. How the climbing session runs Harness Demo
Shirts tucked - harnesses and helmets on
Warm-up
Equipment Intro
A.B.C.D.E.F. Safety Check
Climbing demonstration
Everyone tie in; climbers & belay teams set
up into position
Climbing time!
A. B. C. D. E. F. Safety Check
The whole climbing team follows the safety check for each new climber.
A Anchor Check the anchor strap is secured & straight, not twisted.
B Belts
Check that the harness is on the waist, in line with top of hips, not twisted
and adjusted to fit firmly. Waist/hips and leg straps should fit firmly as
well eg. four fingers can slide in but not the whole hand.
C Connections Check all carabinas are locked and orientated in the correct direction –
widest end down.
D Devices
Draw the rope through the stitch plate to ensure that it is sliding through
smoothly. Check that 2nd belay can feed the rope through the Prusik Knot in
both directions.
E Ends Ensure end of the rope is secured with a Thumb Knot for the 3rd Belay and
taped down on the climbers end.
F Fasten
Helmets Ensure helmets are adjusted to fit.
Verbal cues before climbing
All members of the team participate in the verbal cues. The verbal cues signal that the team is
focused and ready to do their jobs.
Climber: “READY?” Belay team: “READY”
Climber: “SET?” Belay team: “SET”
Climber: “CLIMB Belay team: “CLIMB AWAY!”
19/11/2015 Climbing Handbook Daradgee Environmental Education Centre
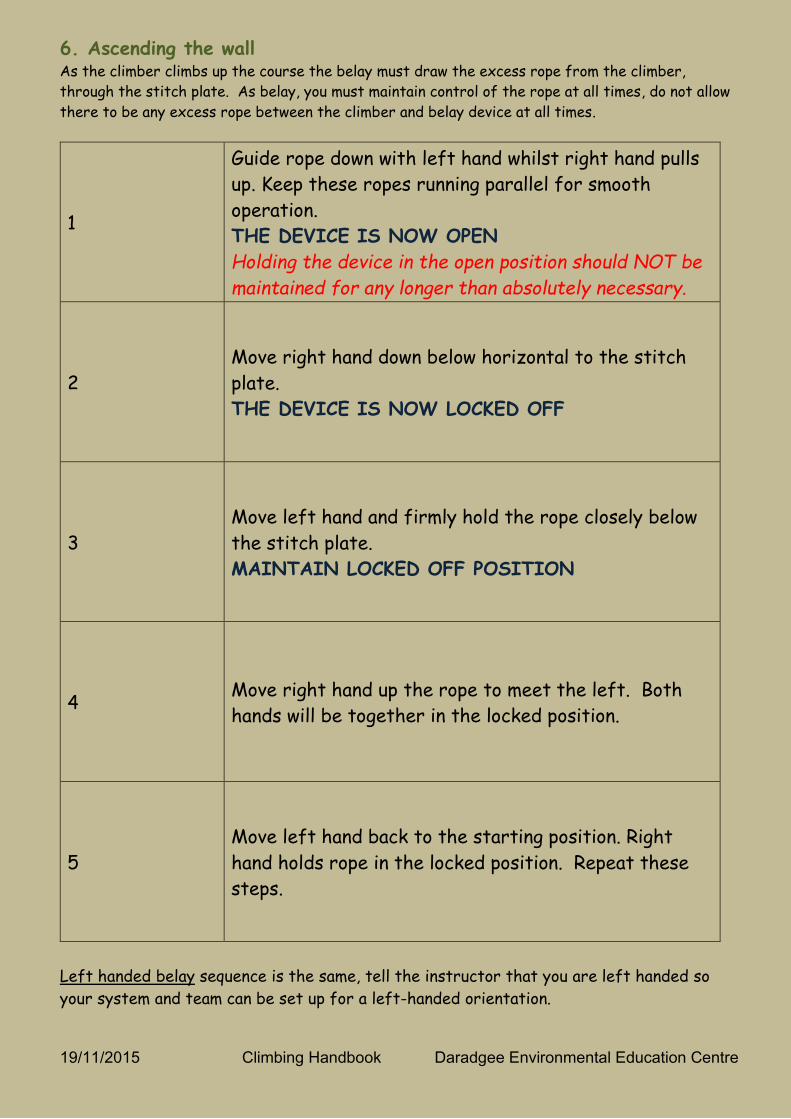
6. Ascending the wall As the climber climbs up the course the belay must draw the excess rope from the climber,
through the stitch plate. As belay, you must maintain control of the rope at all times, do not allow
there to be any excess rope between the climber and belay device at all times.
1
Guide rope down with left hand whilst right hand pulls
up. Keep these ropes running parallel for smooth
operation.
THE DEVICE IS NOW OPEN
Holding the device in the open position should NOT be
maintained for any longer than absolutely necessary.
2
Move right hand down below horizontal to the stitch
plate.
THE DEVICE IS NOW LOCKED OFF
3
Move left hand and firmly hold the rope closely below
the stitch plate.
MAINTAIN LOCKED OFF POSITION
4 Move right hand up the rope to meet the left. Both
hands will be together in the locked position.
5
Move left hand back to the starting position. Right
hand holds rope in the locked position. Repeat these
steps.
Left handed belay sequence is the same, tell the instructor that you are left handed so
your system and team can be set up for a left-handed orientation.

19/11/2015 Climbing Handbook Daradgee Environmental Education Centre
7. Descending the wall
1. Take in all excess rope from the system. Ensure the rope is locked off in belay position 3.
2. On the climbers initial climb (at a height of 2.4m) they are required to do a practice
descent. Belay (locked off in position 3) should ensure the weight of the climber is
supported by the anchor. Belays should not carry or support the weight of the climber with
their own body. Descent will begin with the climber bouncing off the wall approximately 4
times while maintaining correct descent posture as follows. Inform the climber they are
about to descend and will need to sit in the harness.
a. “Sit comfortably in the harness, let go of the wall, hold
rope at chest height with both hands”.
b. “Place balls of feet flat on wall at approx. waist height
and shoulder width apart.
c. Using even pressure bend both legs and push off the wall,
return to above position and continue this evenly for the
duration of decent.
3. Belay maintains lock off position, while smoothly releasing rope through both hands and
stitch plate in an even, comfortable speed.
4. Following the initial climb the climber does 3 full climbs (to the top or otherwise). On
completion, climbers progress to another position, ie. Climber goes to No. 3 Belay at another
station. No. 3 moves to No. 2 Belay position. No. 2 Belay attaches into the climber position.
Supporting the Climber
Climbers are presented with a variety of challenges. Some may have difficulty
with issues around height and personal safety.
While we work to reinforce the quality and integrity of our equipment, our
belays play a critical role in supporting climbers’ wellbeing.
Climbing to the top of the wall is a goal for most people but it may not always be
achievable.
As first belay you are the leader of the team. It is your responsibility to instil
correct procedures and safe practices in your team. Please assist students to
develop their skills as both belays & climbers.
Hands slightly too high

19/11/2015 Climbing Handbook Daradgee Environmental Education Centre
Helpful tips for a successful climbing session
Belaying is voluntary – belays need to be competent
and confident with the equipment and procedures –
if you’re not – don’t do it!
Avoid stress to back, hips etc. by ensuring the
floor anchor takes the weight of the climber
If any climber or belay is experiencing any pain or
discomfort ie. sore hands or back pain, ensure
climbers are safe, inform supervisor, review
posture and technique.
Maintain the rope in a locked position as
consistently as possible.
Encourage the climber to stay in control and show
confidence.
Maintain a “smiley face” or “Big W” in the rope between 1st & 2nd Belay and 2nd and
3rd Belay.
If in doubt, ask the Daradgee instructor.
Climbers need to use basic skills when climbing
Stand upright and use your legs, don’t hang back on your arms. Get on your tip toes
to reach a good hold.
Plan your climb – identify problems and be prepared to go around them.
Choose a climb that is best suited to the climber. Some climbers will do better by
starting with their class teacher.
Success breeds success – fear will diminish with every bit of success. Often the
most scared, doubtful and apparently least likely, get the most out of climbing.
As a climber finishes their climb at one station they then move to the end of
another climbing team. Engage in the experience; those that challenge themselves,
actively participate and work in well with other teams experience the most success.

19/11/2015 Climbing Handbook Daradgee Environmental Education Centre
CLIMBING PERMISSION LETTER Daradgee Environmental Education Centre https://daradgeeec.eq.edu.au PH: 07 40 633 858
Dear Parent/Guardian,
The Daradgee EEC is continuing to develop and present unique activities for your students. The existing
indoor climbing facility which includes Top Roping and Bouldering now incorporates the new Milk Crate
Tower Stack – The Faulty Towers Challenge. Please consider the following:
Bouldering (all years) – low level climbing up to 2.4 metres(m). Students attempt paths along the wall
under supervision and with a spotter. This is done without personal climbing safety gear.
Top roping (year 5+)– climbing the wall’s full height, up to 6m. Students attempt mostly vertical paths
under individual adult supervision. Safety harnesses, ropes and belaying equipment are utilized for a
supported upward climb and safe lowering to the ground. Any person moving above a height of 2.4m
must be wearing appropriate personal safety equipment and on belay.
The Faulty Towers Challenge (year 6+)– Teams of approximately 12 students plan, design, build and
have two climbers on belay climb atop a milk crate tower stack. This is a two team competitive situation.
Safety harnesses, ropes, belaying equipment and helmets are utilized for a supported upward climb and
safe lowering to the ground.
Daradgee has in place these facilities, equipment and procedures to ensure safe participation in climbing
activities:
The construction of all structures and materials as well as all safety equipment being used
conform to appropriate safety standards, are in good working order and subject to regular
inspection.
Climbing activities are conducted and managed by experienced/qualified staff.
All DEEC trained belays ie. Visiting teachers, parents and high school students participate in and
sign off to a thorough induction process.
All stages of the activities are continually monitored.
Risk Management Procedures and Assessments are in place.
In multi-aged classes and small school situations some younger students (ie. approximately one
year below) are permitted to participate in the Top Roping and Faulty Towers Challenge,
providing the safety equipment fits appropriately and parents provide informed consent.
Participants need close fitting rubber soled shoes, for example, joggers and appropriate clothing (Shorts
and t-shirts). Alternatives may be discussed with DEEC staff.
Bouldering, Top Roping and the Faulty Towers Challenge activities provide a fun, personal challenge and
will also help promote team-building skills. We are looking forward to bringing these challenges to our
visitors.
Please complete the permission form below and return it to school by the required date.
I understand the activities being conducted by the DEEC and give permission for ___________________ Full Name of Child here please
to participate in Bouldering, Top Roping and/or the Milk Crate Stack.
Name ___________________________ Signed________________________ Date ______________ Parent/Guardian

19/11/2015 Climbing Handbook Daradgee Environmental Education Centre
Thank you for reading this Climbing Handbook