Tomcat/Java Solution in Windows Azure - Microsoft · o Please use ZIP based deployment instead of...
65
Tomcat/Java Solution in Windows Azure 1 | Windows Azure Learning Series 2010 Tomcat/Java Solution in Windows Azure Version 1.0 Date: 10.04.2010 Avkash Chauhan [email protected]
-
Upload
truongdung -
Category
Documents
-
view
218 -
download
2
Transcript of Tomcat/Java Solution in Windows Azure - Microsoft · o Please use ZIP based deployment instead of...

Tomcat/Java Solution in Windows Azure
1 | W i n d o w s A z u r e L e a r n i n g S e r i e s 2 0 1 0
Tomcat/Java Solution in Windows Azure
Version 1.0
Date: 10.04.2010
Avkash Chauhan [email protected]
Tomcat/Java Solution in Windows Azure
2 | W i n d o w s A z u r e L e a r n i n g S e r i e s 2 0 1 0
Contents
1. Tomcat, Java and Tomcat Azure Solution Installation
a. Tomcat
b. Java
c. Tomcat Solution Accelerator
2. Understanding Tomcat Solution Accelerator Source
3. Building Tomcat Azure Solution
a. Build Details
b. A very common error
4. Tomcat Azure Solution Execution
a. Development Fabric
b. Windows Azure
5. Making modification in the Tomcat code
6. Tomcat Solution Diagnostics
a. Error Logging
b. Viewing Log Files
7. Adding Java/JSP Solution to Tomcat
8. Adding SSL Security to Tomcat Solution (HTTPS)
9. Individualize the Tomcat Solution

Tomcat/Java Solution in Windows Azure
3 | W i n d o w s A z u r e L e a r n i n g S e r i e s 2 0 1 0
a. Tomcat We will be using version 6.0
http://tomcat.apache.org/download-60.cgi
o Please use ZIP based deployment instead of MSI Installation version of Tomcat (This is
because the installer is missing a bunch of files in BIN folder which can cause problem during building the TOMCAT solution)
In this case I used either 32bit or 64bit Windows Zip o Now verify by opening ZIP that you have these files in the BIN folder
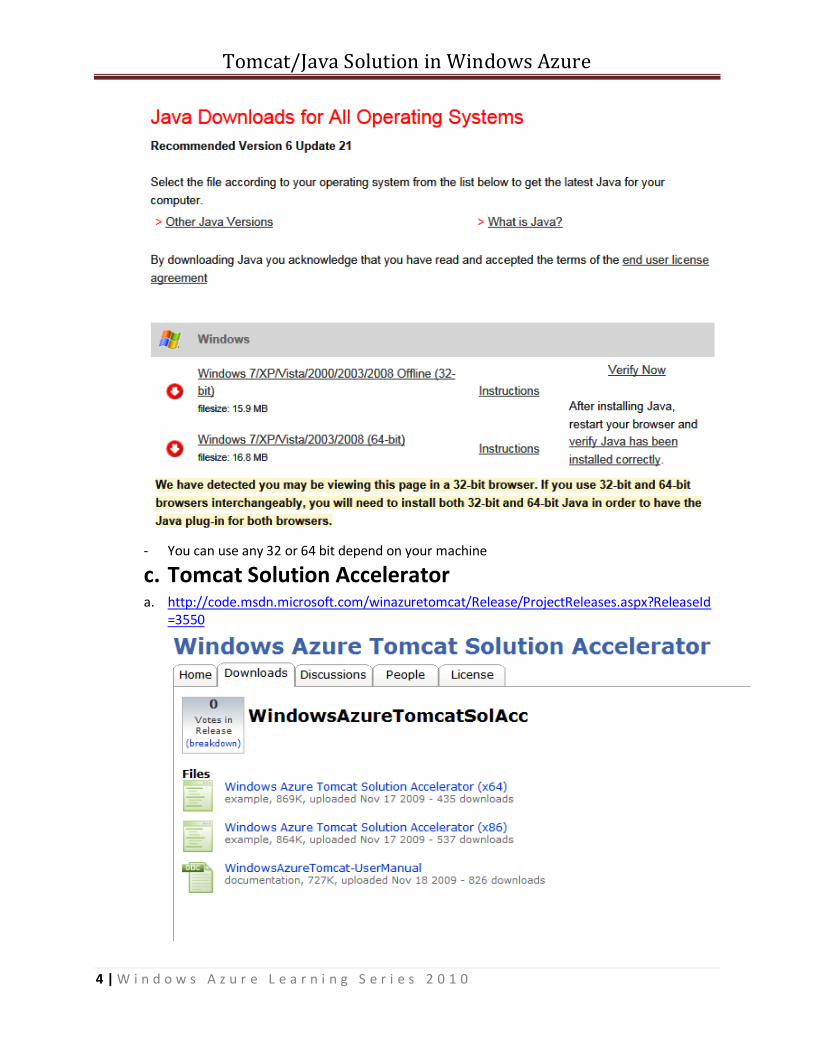
b. JAVA Runtime http://www.java.com/en/download/manual.jsp
Tomcat/Java Solution in Windows Azure
4 | W i n d o w s A z u r e L e a r n i n g S e r i e s 2 0 1 0
- You can use any 32 or 64 bit depend on your machine
c. Tomcat Solution Accelerator a. http://code.msdn.microsoft.com/winazuretomcat/Release/ProjectReleases.aspx?ReleaseId
=3550

Tomcat/Java Solution in Windows Azure
5 | W i n d o w s A z u r e L e a r n i n g S e r i e s 2 0 1 0
You can choose 32 or 64 bit depend on your choice.
Checkpoint:
Now we will have these 3 files:
Tomcat/Java Solution in Windows Azure
6 | W i n d o w s A z u r e L e a r n i n g S e r i e s 2 0 1 0
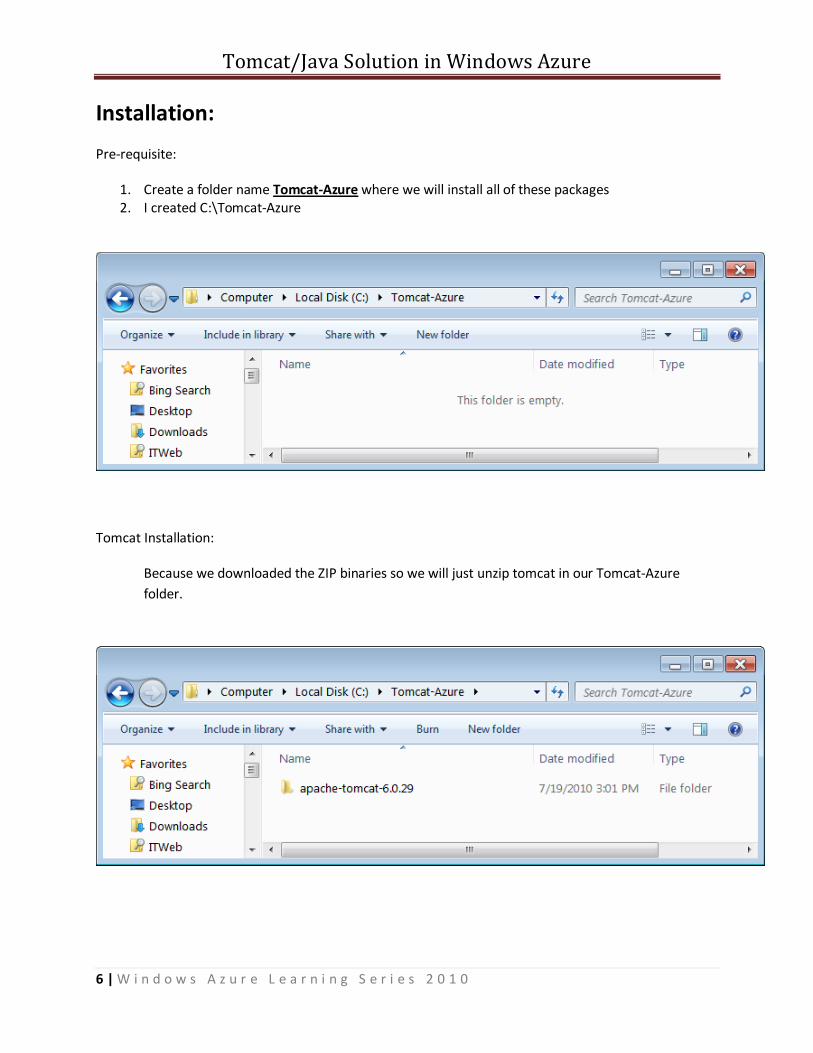
Installation:
Pre-requisite:
1. Create a folder name Tomcat-Azure where we will install all of these packages 2. I created C:\Tomcat-Azure
Tomcat Installation:
Because we downloaded the ZIP binaries so we will just unzip tomcat in our Tomcat-Azure
folder.
Tomcat/Java Solution in Windows Azure
7 | W i n d o w s A z u r e L e a r n i n g S e r i e s 2 0 1 0
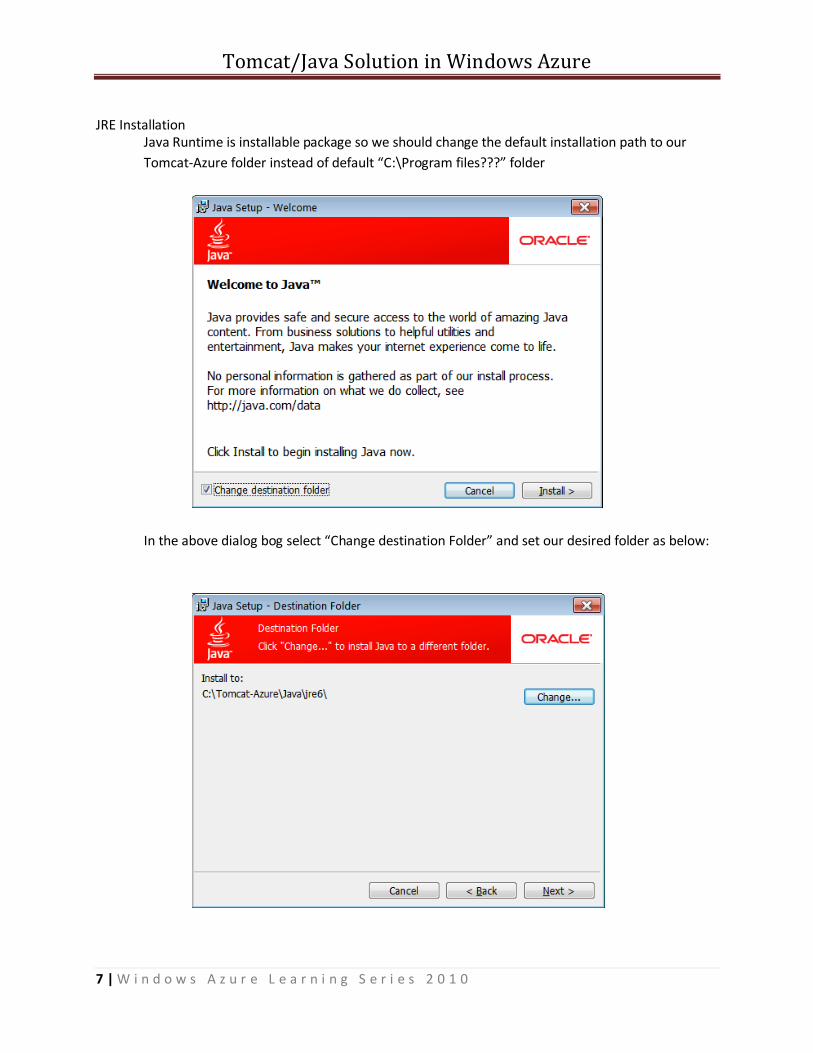
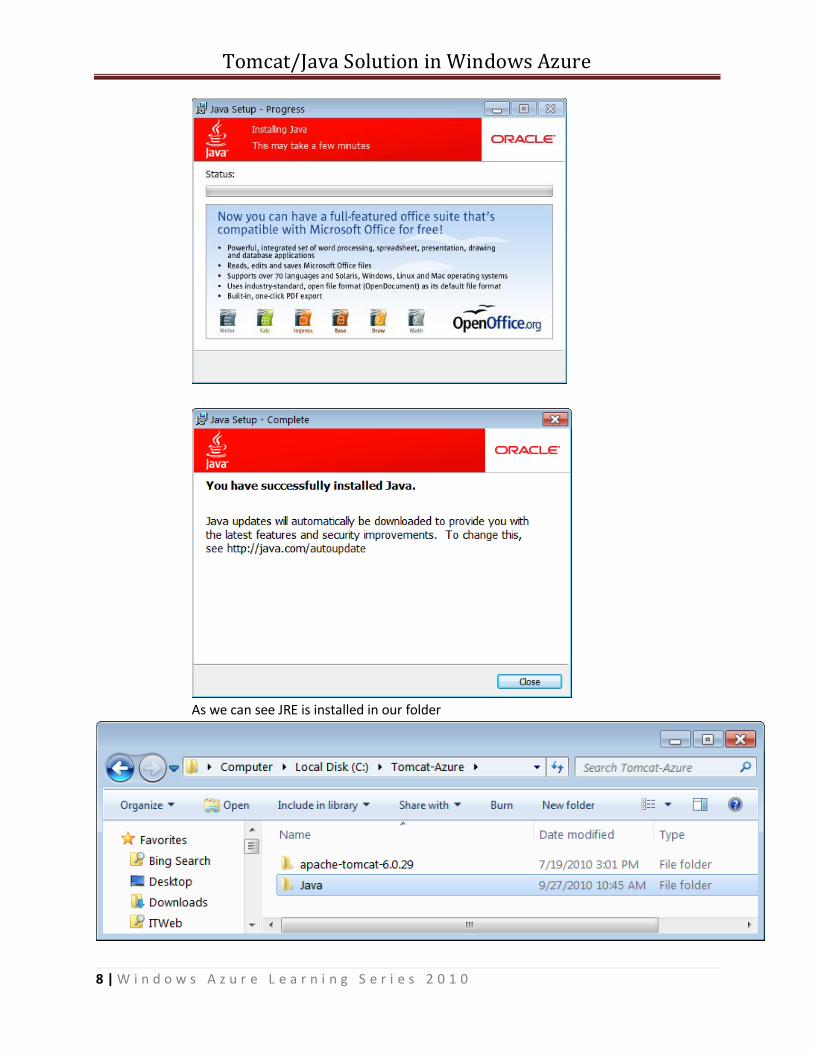
JRE Installation
Java Runtime is installable package so we should change the default installation path to our
Tomcat-Azure folder instead of default “C:\Program files???” folder
In the above dialog bog select “Change destination Folder” and set our desired folder as below:
Tomcat/Java Solution in Windows Azure
8 | W i n d o w s A z u r e L e a r n i n g S e r i e s 2 0 1 0
As we can see JRE is installed in our folder

Tomcat/Java Solution in Windows Azure
9 | W i n d o w s A z u r e L e a r n i n g S e r i e s 2 0 1 0
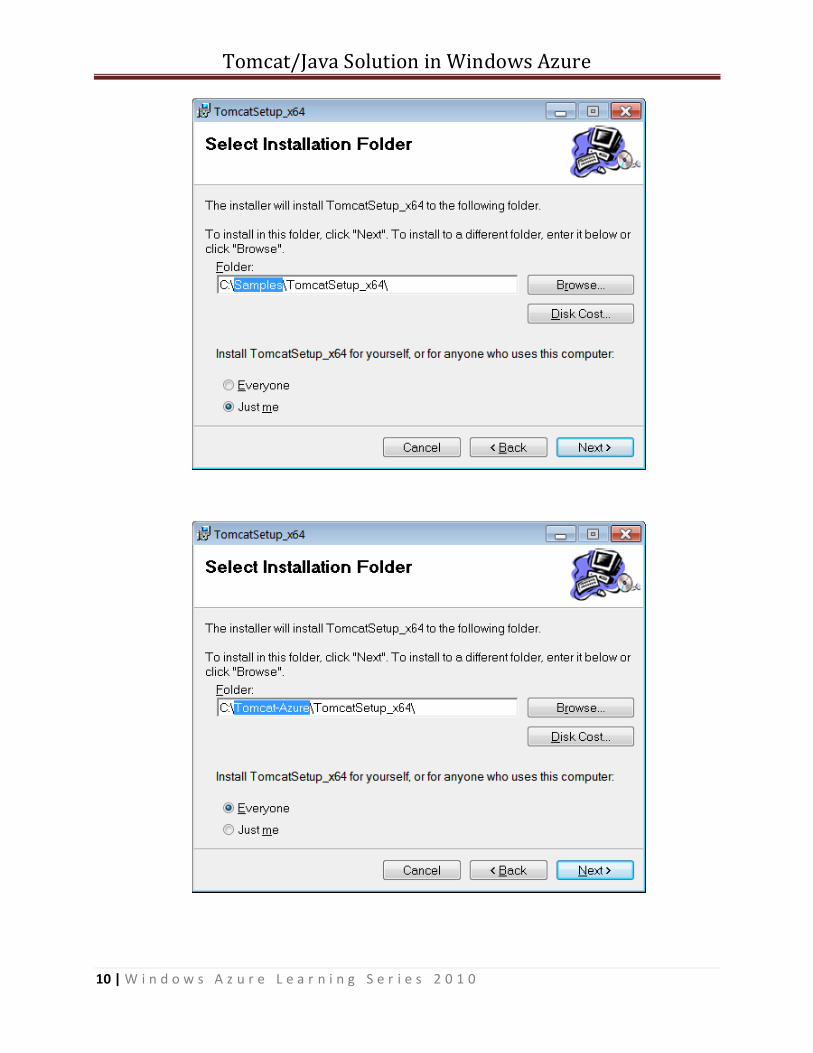
Tomcat Solution Accelerator Installation: Now let’s start Tomcat Solution Accelerator installation:
Tomcat/Java Solution in Windows Azure
10 | W i n d o w s A z u r e L e a r n i n g S e r i e s 2 0 1 0
Tomcat/Java Solution in Windows Azure
11 | W i n d o w s A z u r e L e a r n i n g S e r i e s 2 0 1 0
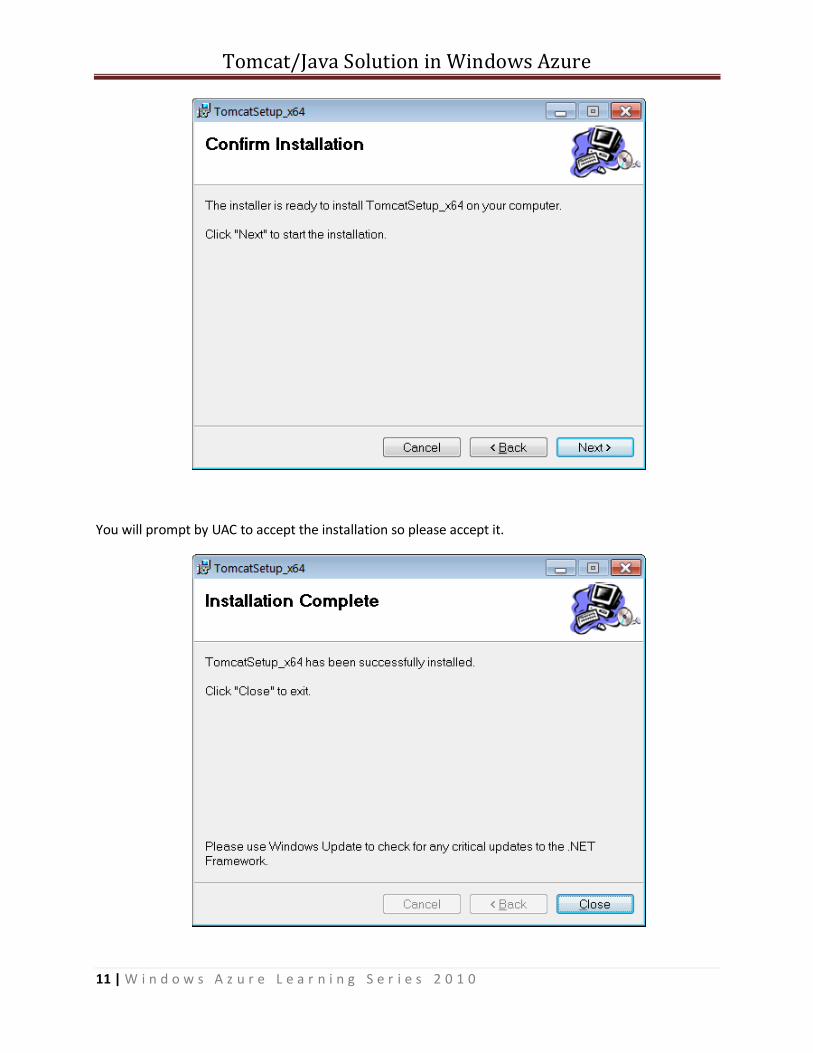
You will prompt by UAC to accept the installation so please accept it.

Tomcat/Java Solution in Windows Azure
12 | W i n d o w s A z u r e L e a r n i n g S e r i e s 2 0 1 0
As you see the Tomcat solution accelerator is installed successfully.
Based on above you can verify that all of our 3 components are successfully installed.
Tomcat/Java Solution in Windows Azure
13 | W i n d o w s A z u r e L e a r n i n g S e r i e s 2 0 1 0
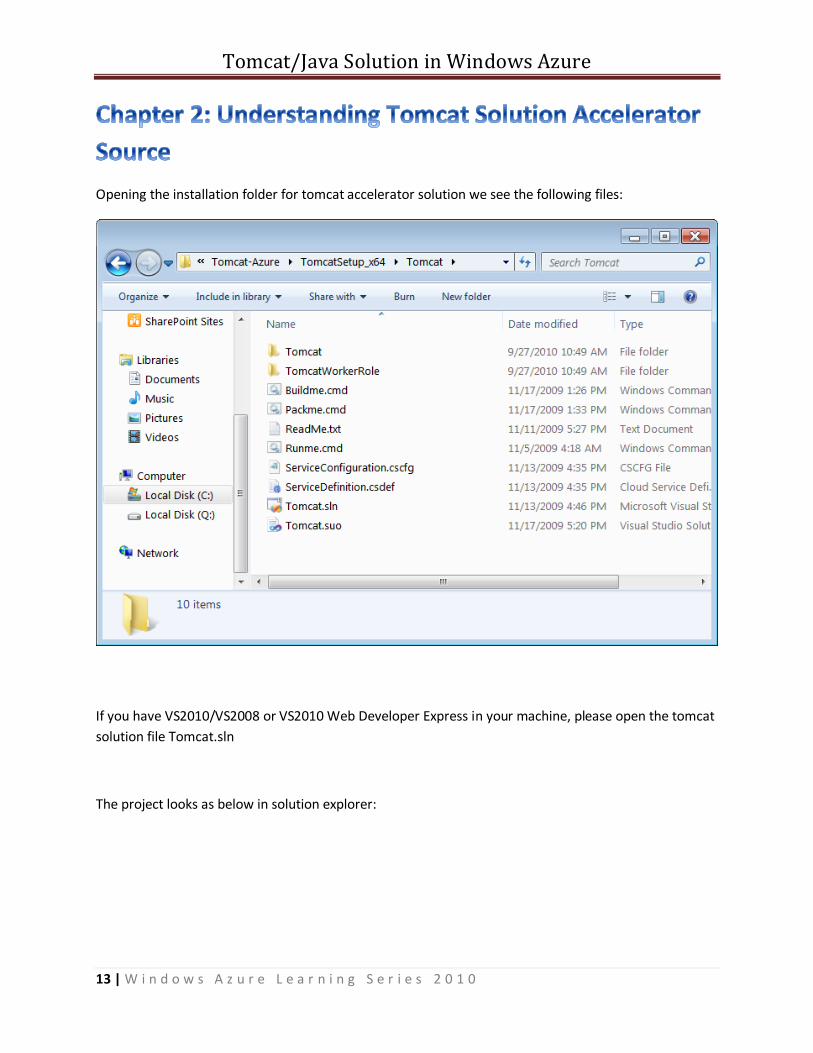
Opening the installation folder for tomcat accelerator solution we see the following files:
If you have VS2010/VS2008 or VS2010 Web Developer Express in your machine, please open the tomcat
solution file Tomcat.sln
The project looks as below in solution explorer:

Tomcat/Java Solution in Windows Azure
14 | W i n d o w s A z u r e L e a r n i n g S e r i e s 2 0 1 0
Opening ServiceConfiguration.cscfg we see the following:
1. We have only one worker role in this project 2. Service Configuration:
o Only one instance o Worker role name is “TomcatWorkerRole”
<?xml version="1.0"?>
<ServiceConfiguration serviceName="TomcatRole"
xmlns="http://schemas.microsoft.com/ServiceHosting/2008/10/ServiceConfiguration">
<Role name="TomcatWorKerRole">
<Instances count="1" />
<ConfigurationSettings>
<Setting name="DiagnosticsConnectionString"
value="UseDevelopmentStorage=true" />
</ConfigurationSettings>
</Role>
</ServiceConfiguration>
Tomcat/Java Solution in Windows Azure
15 | W i n d o w s A z u r e L e a r n i n g S e r i e s 2 0 1 0
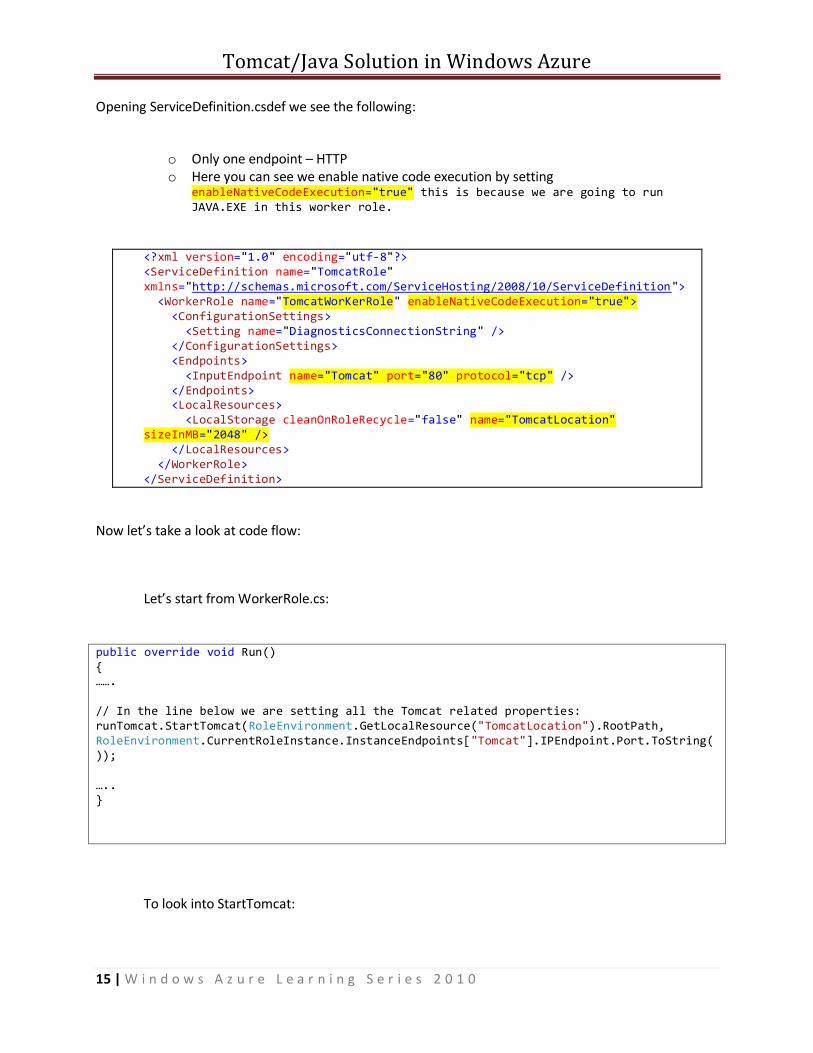
Opening ServiceDefinition.csdef we see the following:
o Only one endpoint – HTTP o Here you can see we enable native code execution by setting
enableNativeCodeExecution="true" this is because we are going to run JAVA.EXE in this worker role.
<?xml version="1.0" encoding="utf-8"?> <ServiceDefinition name="TomcatRole" xmlns="http://schemas.microsoft.com/ServiceHosting/2008/10/ServiceDefinition"> <WorkerRole name="TomcatWorKerRole" enableNativeCodeExecution="true"> <ConfigurationSettings> <Setting name="DiagnosticsConnectionString" /> </ConfigurationSettings> <Endpoints> <InputEndpoint name="Tomcat" port="80" protocol="tcp" /> </Endpoints> <LocalResources> <LocalStorage cleanOnRoleRecycle="false" name="TomcatLocation" sizeInMB="2048" /> </LocalResources> </WorkerRole> </ServiceDefinition>
Now let’s take a look at code flow:
Let’s start from WorkerRole.cs:
public override void Run() { ……. // In the line below we are setting all the Tomcat related properties: runTomcat.StartTomcat(RoleEnvironment.GetLocalResource("TomcatLocation").RootPath, RoleEnvironment.CurrentRoleInstance.InstanceEndpoints["Tomcat"].IPEndpoint.Port.ToString()); ….. }
To look into StartTomcat:

Tomcat/Java Solution in Windows Azure
16 | W i n d o w s A z u r e L e a r n i n g S e r i e s 2 0 1 0
public void StartTomcat(string tomcatLocation, string tomcatPort) { ………… // In the line below we are setting variables for TOMCAT response = RunCommand(Environment.GetEnvironmentVariable("RoleRoot") + @"\approot\setupTomcat.bat", tomcatLocation, tomcatPort, Environment.GetEnvironmentVariable("RoleRoot") + @"\approot"); // In the line below we are actually launching the JAVA.EXE process to kickstart the TOMCAT response = StartTomcatProcess(tomcatLocation); }
If we dig into StartTomcat we learn the following:
1. In this function as you can see setupTomcat.bat is called. This file actually copy all the Tomcat Binaries from E:\approot to C:\Resources\Directory\<Tomcat_workerrole_folder_on_Cloud>
@echo off
robocopy %3\tomcat %catalina_home% /E
%3\TomcatConfigManager.exe %catalina_home%\conf\server.xml %2
2. As you can see in this batch file, tomcat is copying from E:\ to C:\<Azure runtime folder for roles>
3. This is the function responsible for tomcat config as well using the CONF\server.xml (in Tomcat server.xml is equivalent to IIS web.config)
If we dig into StartTomcatProcess we learn the following:
1. First it calls startup.bat which is located at Tomcat’s BIN folder 2. The Startup.bat actually calls catalina.bat which is also located at Tomcat’s
BIN folder (Please look this batch file for more info) 3. Catalina.bat file actually setup everything needed for tomcat to run and
finally calls JAVA.EXE along with all the tomcat azure project settings
Tomcat/Java Solution in Windows Azure
17 | W i n d o w s A z u r e L e a r n i n g S e r i e s 2 0 1 0
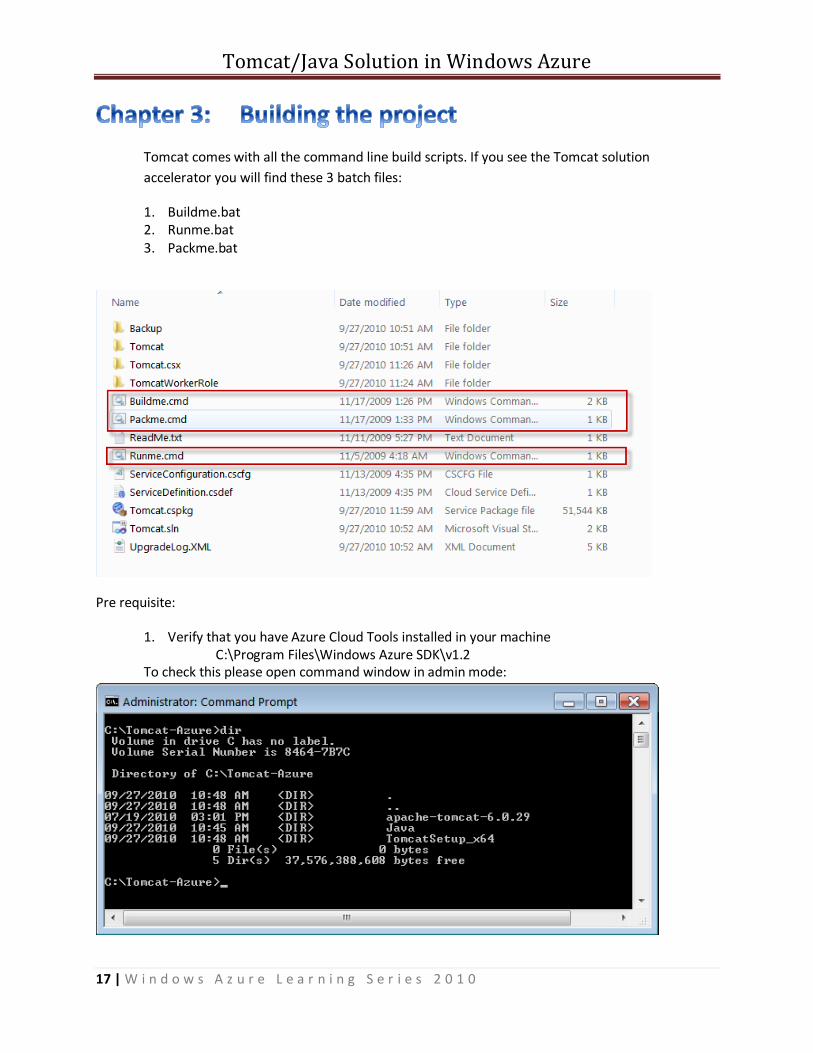
Tomcat comes with all the command line build scripts. If you see the Tomcat solution
accelerator you will find these 3 batch files:
1. Buildme.bat 2. Runme.bat 3. Packme.bat
Pre requisite:
1. Verify that you have Azure Cloud Tools installed in your machine C:\Program Files\Windows Azure SDK\v1.2
To check this please open command window in admin mode:
Tomcat/Java Solution in Windows Azure
18 | W i n d o w s A z u r e L e a r n i n g S e r i e s 2 0 1 0
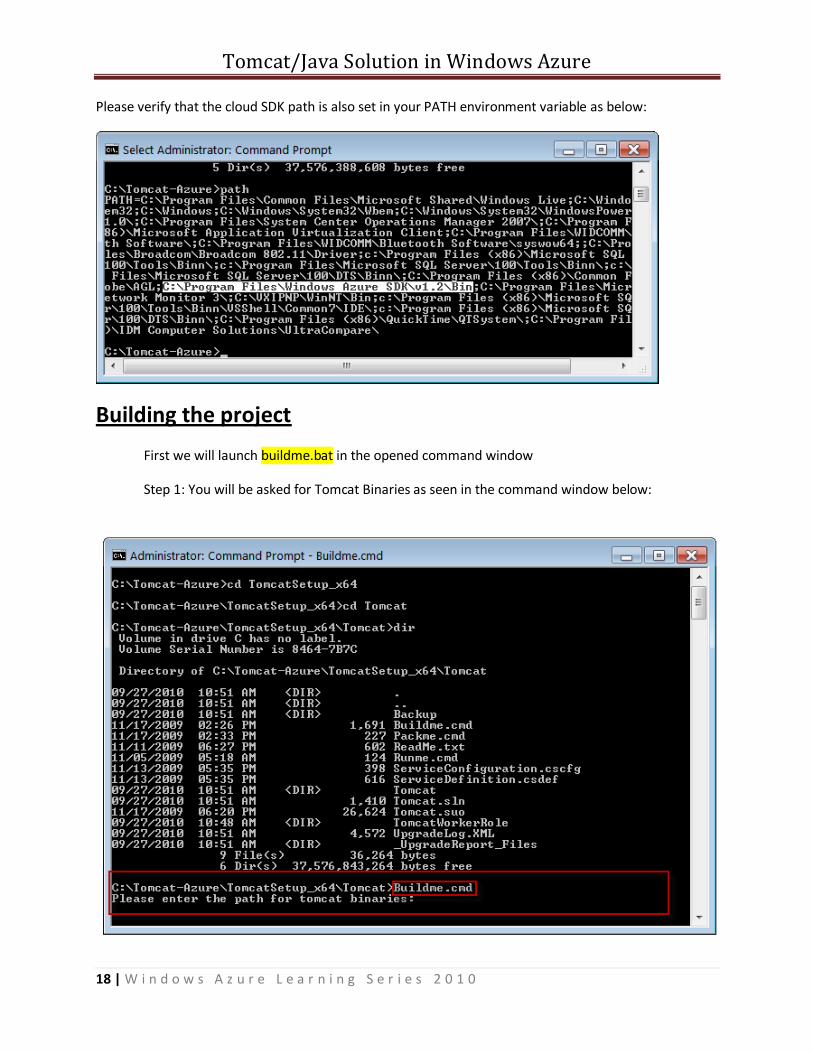
Please verify that the cloud SDK path is also set in your PATH environment variable as below:
Building the project
First we will launch buildme.bat in the opened command window
Step 1: You will be asked for Tomcat Binaries as seen in the command window below:
Tomcat/Java Solution in Windows Azure
19 | W i n d o w s A z u r e L e a r n i n g S e r i e s 2 0 1 0
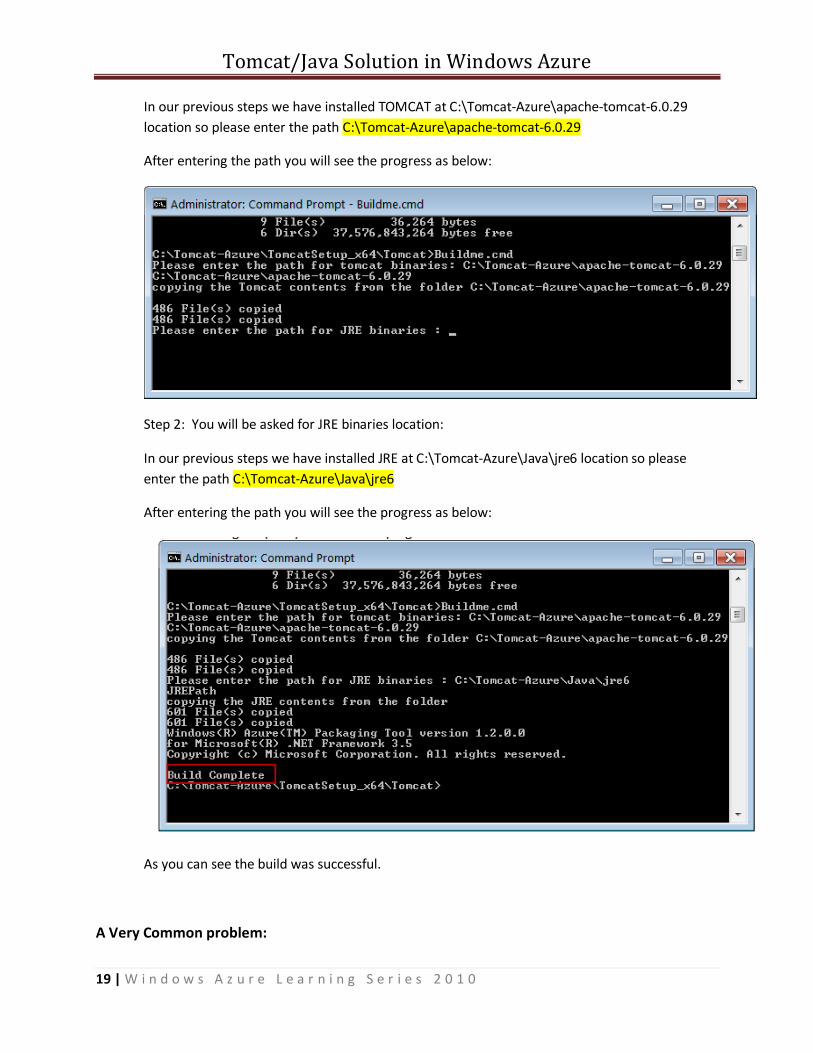
In our previous steps we have installed TOMCAT at C:\Tomcat-Azure\apache-tomcat-6.0.29
location so please enter the path C:\Tomcat-Azure\apache-tomcat-6.0.29
After entering the path you will see the progress as below:
Step 2: You will be asked for JRE binaries location:
In our previous steps we have installed JRE at C:\Tomcat-Azure\Java\jre6 location so please
enter the path C:\Tomcat-Azure\Java\jre6
After entering the path you will see the progress as below:
As you can see the build was successful.
A Very Common problem:

Tomcat/Java Solution in Windows Azure
20 | W i n d o w s A z u r e L e a r n i n g S e r i e s 2 0 1 0
In some cases you may receive the following error during build:
The error message is very much distracting. This error is caused because you do not have all files in your
Tomcat BIN folder. If you look your Tomcat BIN folder you will that there are only 4 files as below:
And you have only 4 files because you have used Tomcat installation from the link below instead of
xcopy deployment which I mentioned earlier.
To solve this problem you must have all the required files in your bin folder and this will occur only when
you have deployed Tomcat form the 32-bit Windows zip or 64-bit Windows zip from the link above.
Now you can actually look into the tomcat folder for new created files and folders and understand what
the buildme.bat actually did.
Tomcat/Java Solution in Windows Azure
21 | W i n d o w s A z u r e L e a r n i n g S e r i e s 2 0 1 0
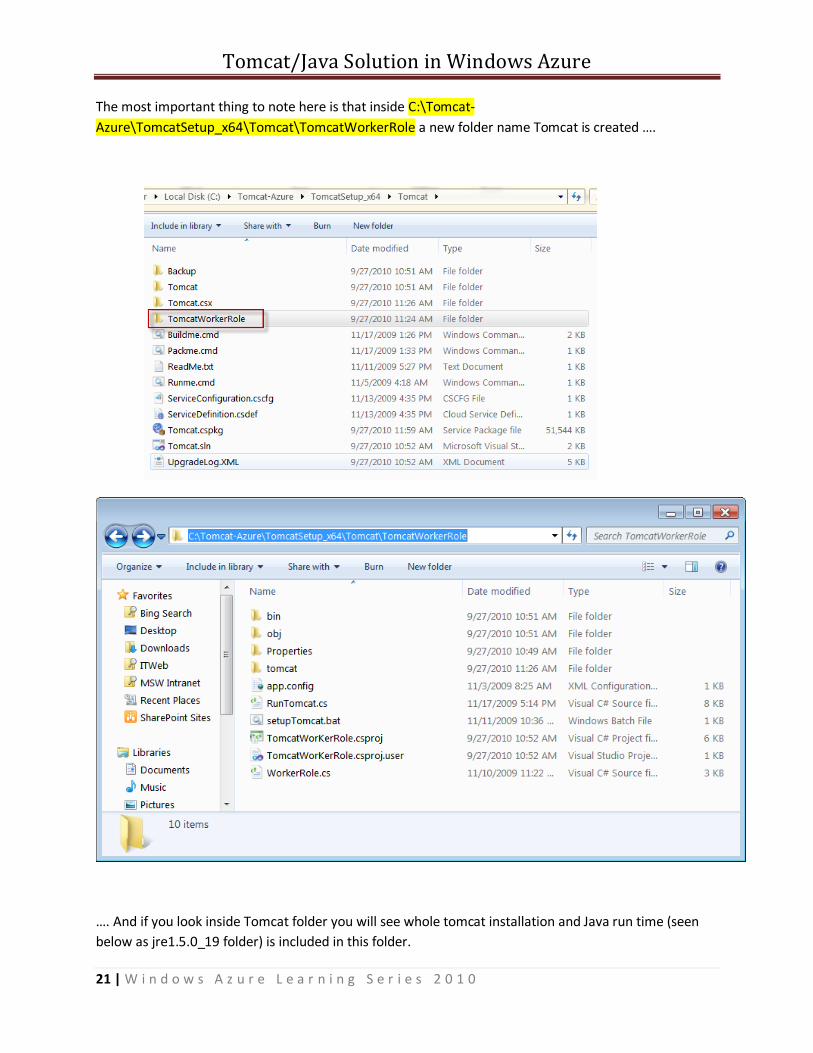
The most important thing to note here is that inside C:\Tomcat-
Azure\TomcatSetup_x64\Tomcat\TomcatWorkerRole a new folder name Tomcat is created ….
…. And if you look inside Tomcat folder you will see whole tomcat installation and Java run time (seen
below as jre1.5.0_19 folder) is included in this folder.

Tomcat/Java Solution in Windows Azure
22 | W i n d o w s A z u r e L e a r n i n g S e r i e s 2 0 1 0
You actual build folder however is as below:
During Buildme.cmd execution here is what happens:
Tomcat/Java Solution in Windows Azure
23 | W i n d o w s A z u r e L e a r n i n g S e r i e s 2 0 1 0
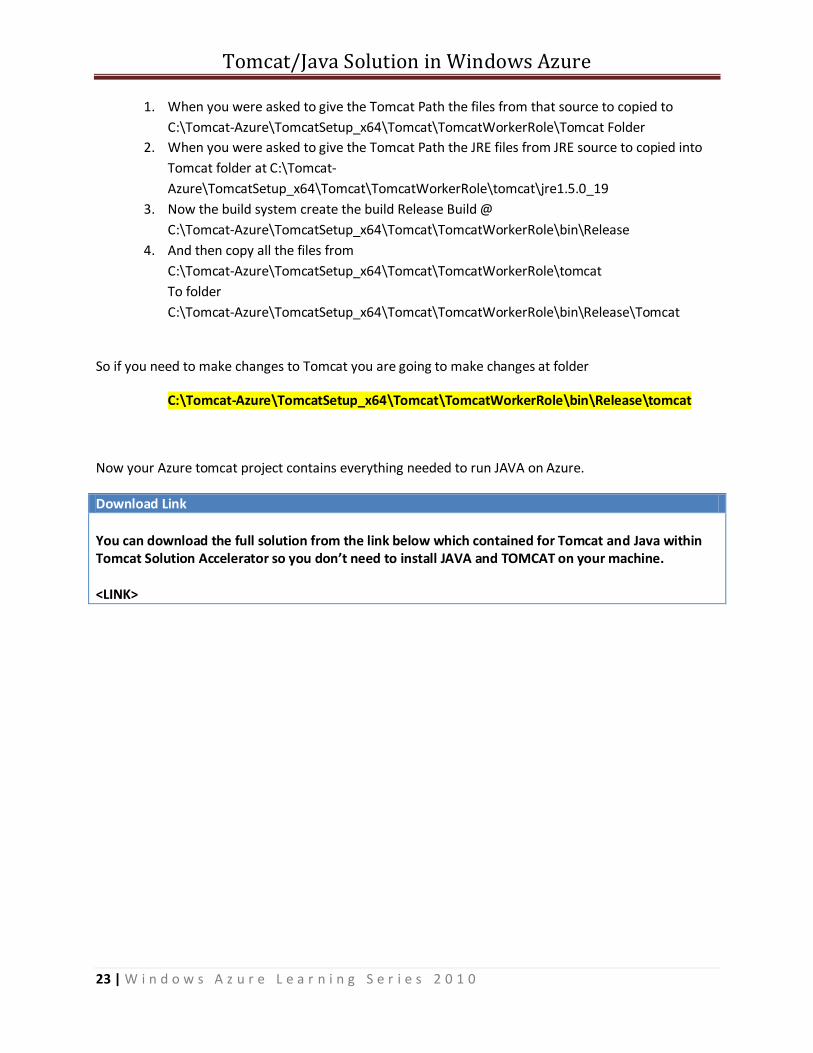
1. When you were asked to give the Tomcat Path the files from that source to copied to
C:\Tomcat-Azure\TomcatSetup_x64\Tomcat\TomcatWorkerRole\Tomcat Folder
2. When you were asked to give the Tomcat Path the JRE files from JRE source to copied into
Tomcat folder at C:\Tomcat-
Azure\TomcatSetup_x64\Tomcat\TomcatWorkerRole\tomcat\jre1.5.0_19
3. Now the build system create the build Release Build @
C:\Tomcat-Azure\TomcatSetup_x64\Tomcat\TomcatWorkerRole\bin\Release
4. And then copy all the files from
C:\Tomcat-Azure\TomcatSetup_x64\Tomcat\TomcatWorkerRole\tomcat
To folder
C:\Tomcat-Azure\TomcatSetup_x64\Tomcat\TomcatWorkerRole\bin\Release\Tomcat
So if you need to make changes to Tomcat you are going to make changes at folder
C:\Tomcat-Azure\TomcatSetup_x64\Tomcat\TomcatWorkerRole\bin\Release\tomcat
Now your Azure tomcat project contains everything needed to run JAVA on Azure.
Download Link
You can download the full solution from the link below which contained for Tomcat and Java within Tomcat Solution Accelerator so you don’t need to install JAVA and TOMCAT on your machine. <LINK>
Tomcat/Java Solution in Windows Azure
24 | W i n d o w s A z u r e L e a r n i n g S e r i e s 2 0 1 0
The solution execution is distributed into two parts. First we will run the Tomcat solution in
Development Fabric mode and once all if working well we will publish the solution to Windows
Azure portal so we can test on cloud. Let’s start with the first one.
Running the project in development fabric:
Let’s try to run Tomcat Solution Accelerator in development fabric:
Pre-requisite:
1. Please be sure that you do not have Tomcat running in local machine. If Tomcat is running in local machine, you will not see any error while running tomcat Azure however you will not see any results as well.
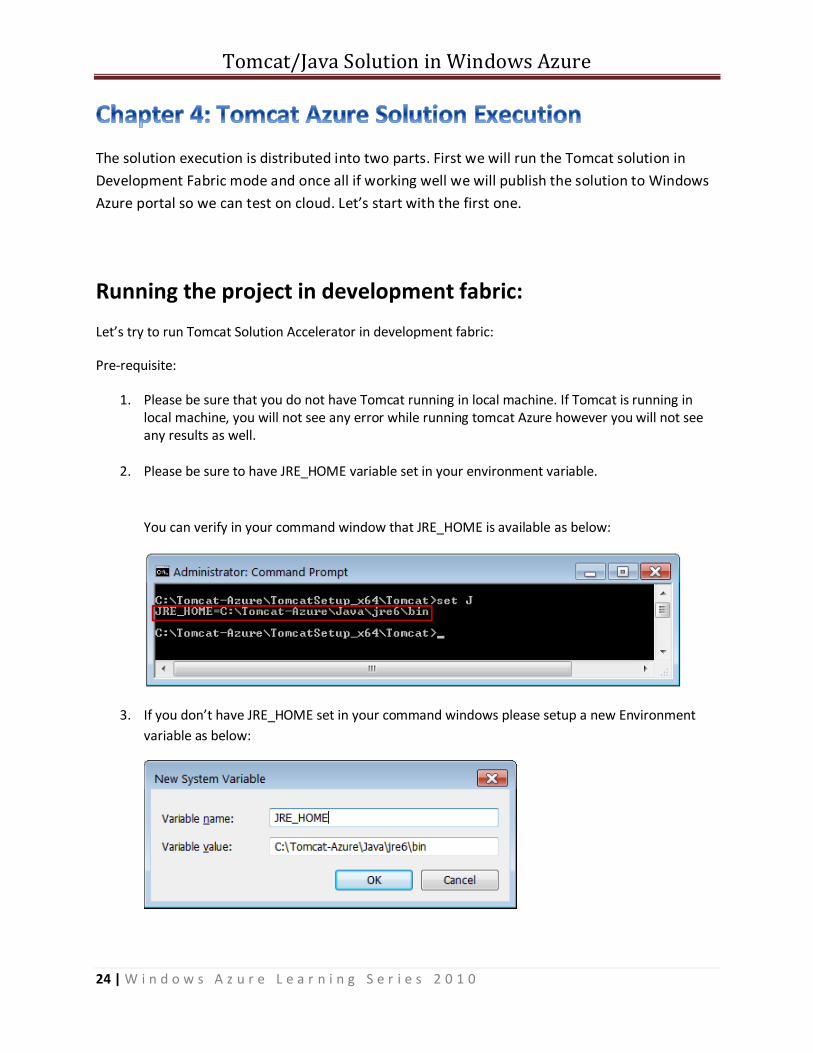
2. Please be sure to have JRE_HOME variable set in your environment variable.
You can verify in your command window that JRE_HOME is available as below:
3. If you don’t have JRE_HOME set in your command windows please setup a new Environment
variable as below:
Tomcat/Java Solution in Windows Azure
25 | W i n d o w s A z u r e L e a r n i n g S e r i e s 2 0 1 0
Note: Because you have just created a new Environment variable you may need to close the
previous opened command window and open new command window in administrator mode to
have this variable set for you.
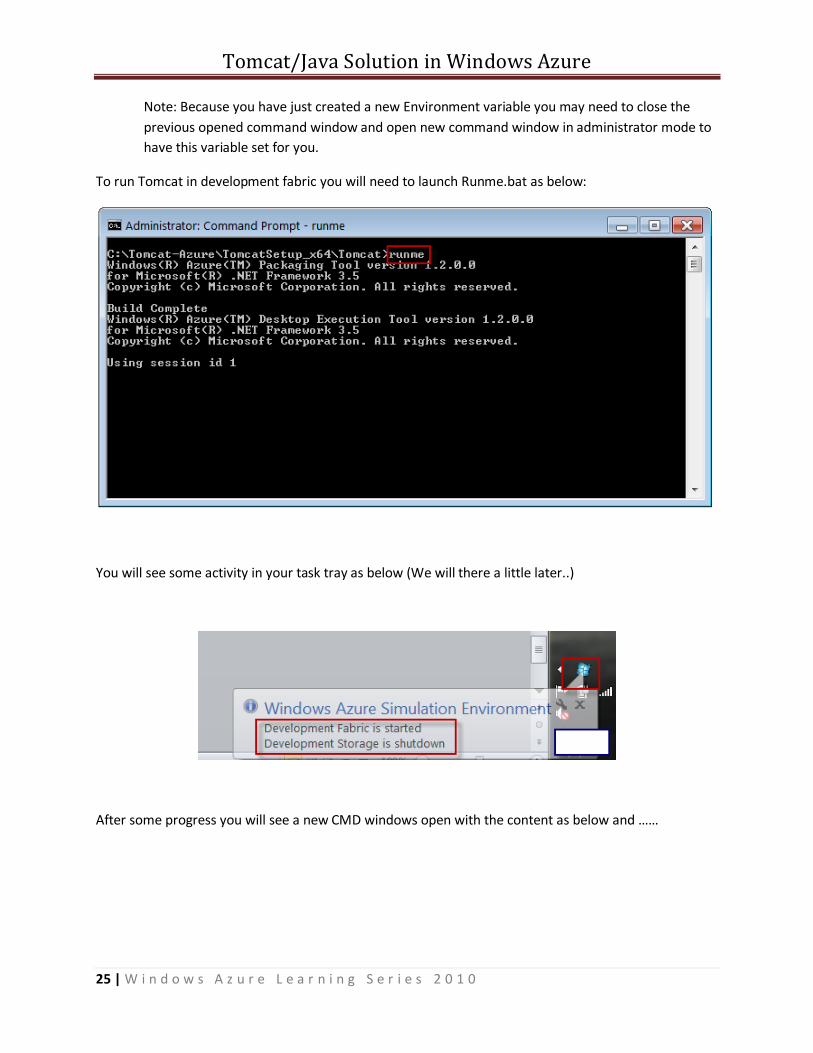
To run Tomcat in development fabric you will need to launch Runme.bat as below:
You will see some activity in your task tray as below (We will there a little later..)
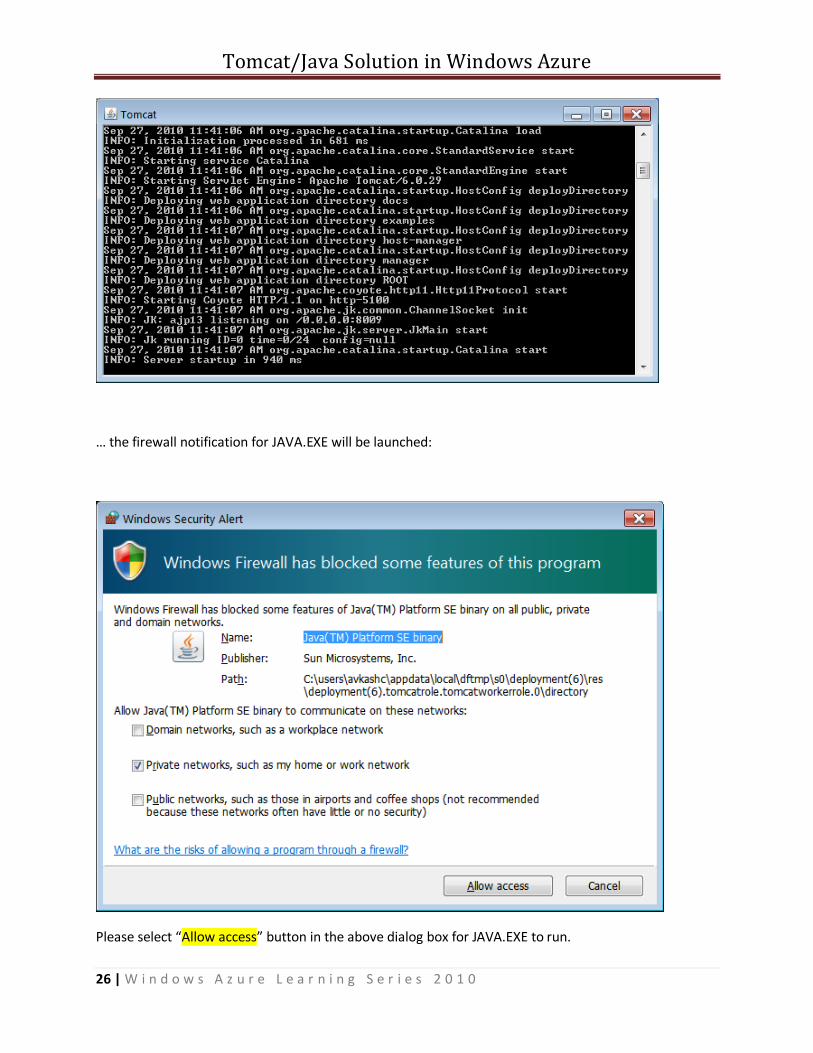
After some progress you will see a new CMD windows open with the content as below and ……
Tomcat/Java Solution in Windows Azure
26 | W i n d o w s A z u r e L e a r n i n g S e r i e s 2 0 1 0
… the firewall notification for JAVA.EXE will be launched:
Please select “Allow access” button in the above dialog box for JAVA.EXE to run.
Tomcat/Java Solution in Windows Azure
27 | W i n d o w s A z u r e L e a r n i n g S e r i e s 2 0 1 0
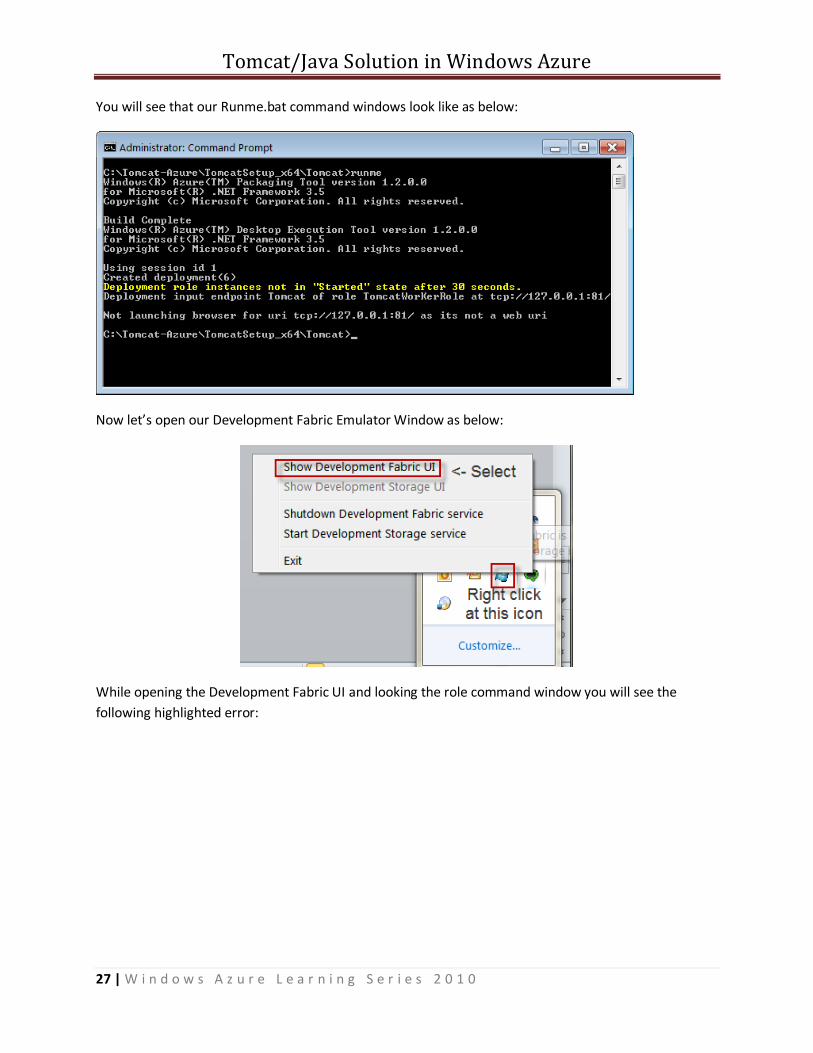
You will see that our Runme.bat command windows look like as below:
Now let’s open our Development Fabric Emulator Window as below:
While opening the Development Fabric UI and looking the role command window you will see the
following highlighted error:
Tomcat/Java Solution in Windows Azure
28 | W i n d o w s A z u r e L e a r n i n g S e r i e s 2 0 1 0
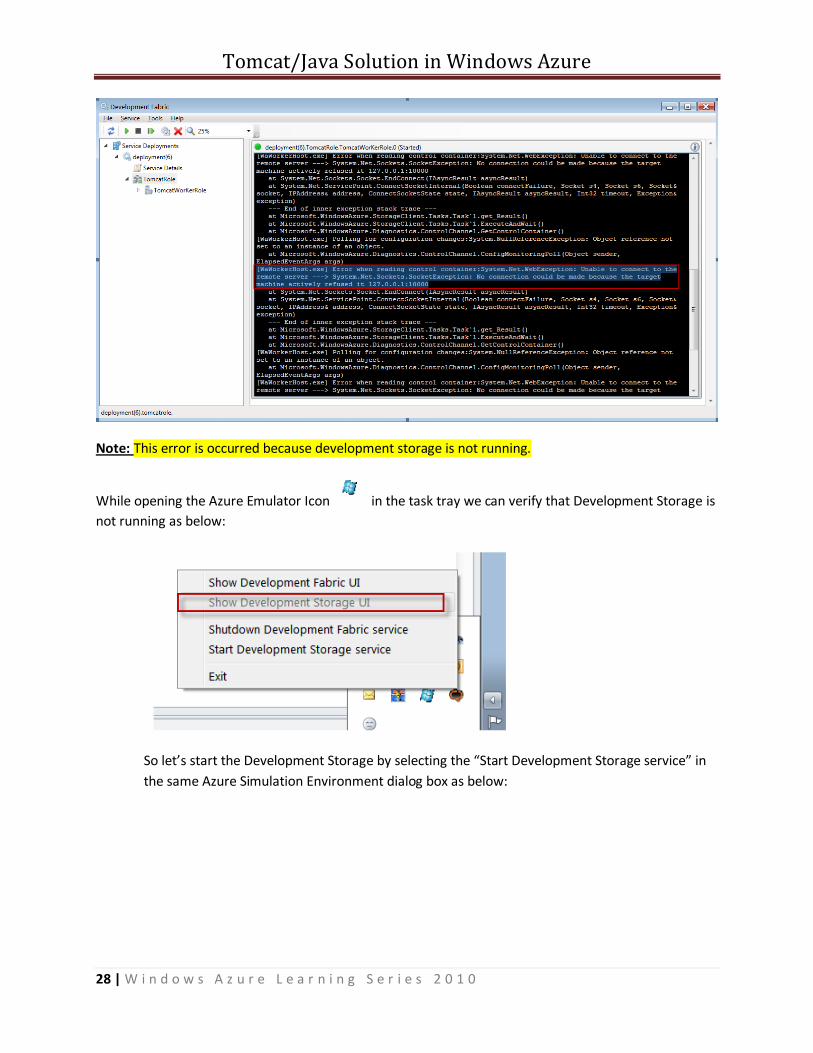
Note: This error is occurred because development storage is not running.
While opening the Azure Emulator Icon in the task tray we can verify that Development Storage is
not running as below:
So let’s start the Development Storage by selecting the “Start Development Storage service” in
the same Azure Simulation Environment dialog box as below:
Tomcat/Java Solution in Windows Azure
29 | W i n d o w s A z u r e L e a r n i n g S e r i e s 2 0 1 0
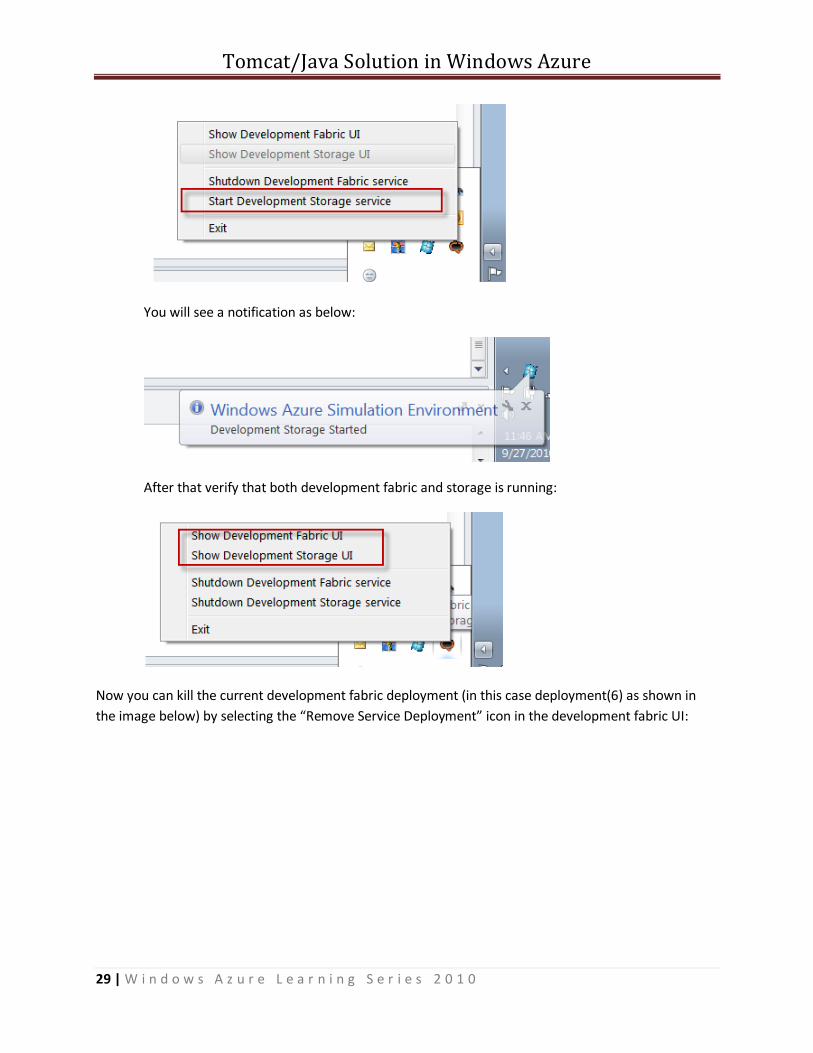
You will see a notification as below:
After that verify that both development fabric and storage is running:
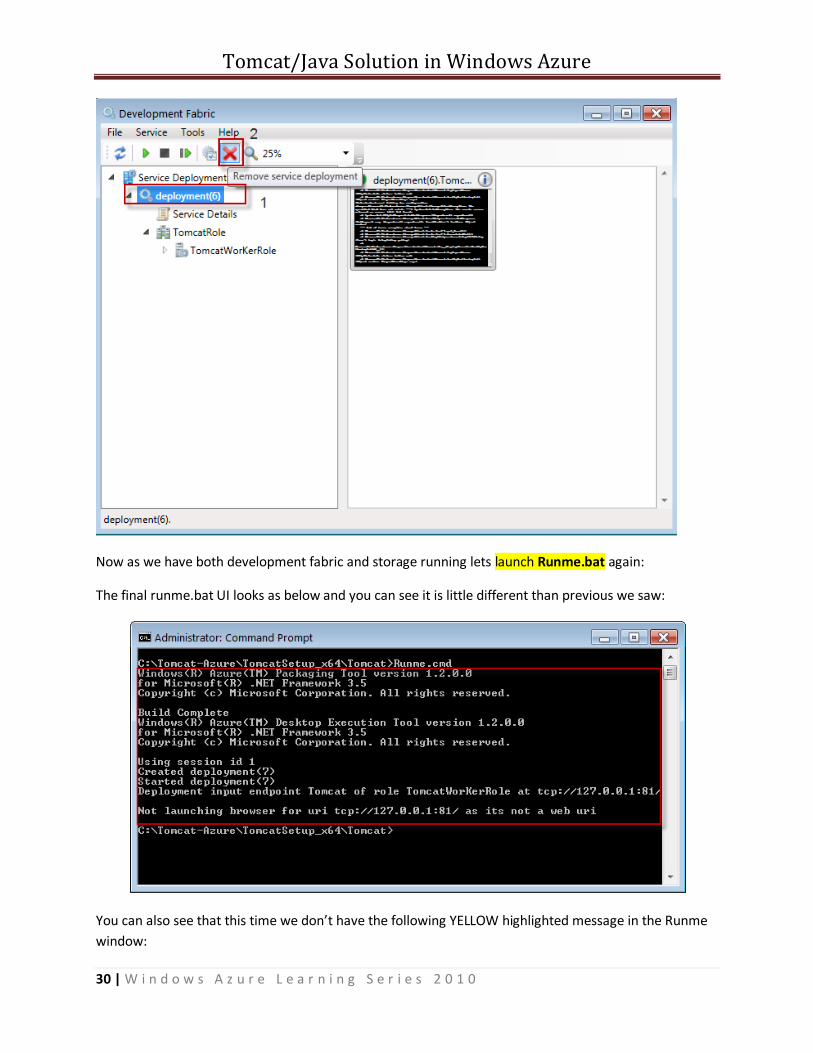
Now you can kill the current development fabric deployment (in this case deployment(6) as shown in
the image below) by selecting the “Remove Service Deployment” icon in the development fabric UI:
Tomcat/Java Solution in Windows Azure
30 | W i n d o w s A z u r e L e a r n i n g S e r i e s 2 0 1 0
Now as we have both development fabric and storage running lets launch Runme.bat again:
The final runme.bat UI looks as below and you can see it is little different than previous we saw:
You can also see that this time we don’t have the following YELLOW highlighted message in the Runme
window:

Tomcat/Java Solution in Windows Azure
31 | W i n d o w s A z u r e L e a r n i n g S e r i e s 2 0 1 0
Let’s launch the Development fabric UI now:
Above you can see that there is no error in the role command window. Now you can launch the Tomcat
in your IE windows as there were no errors.
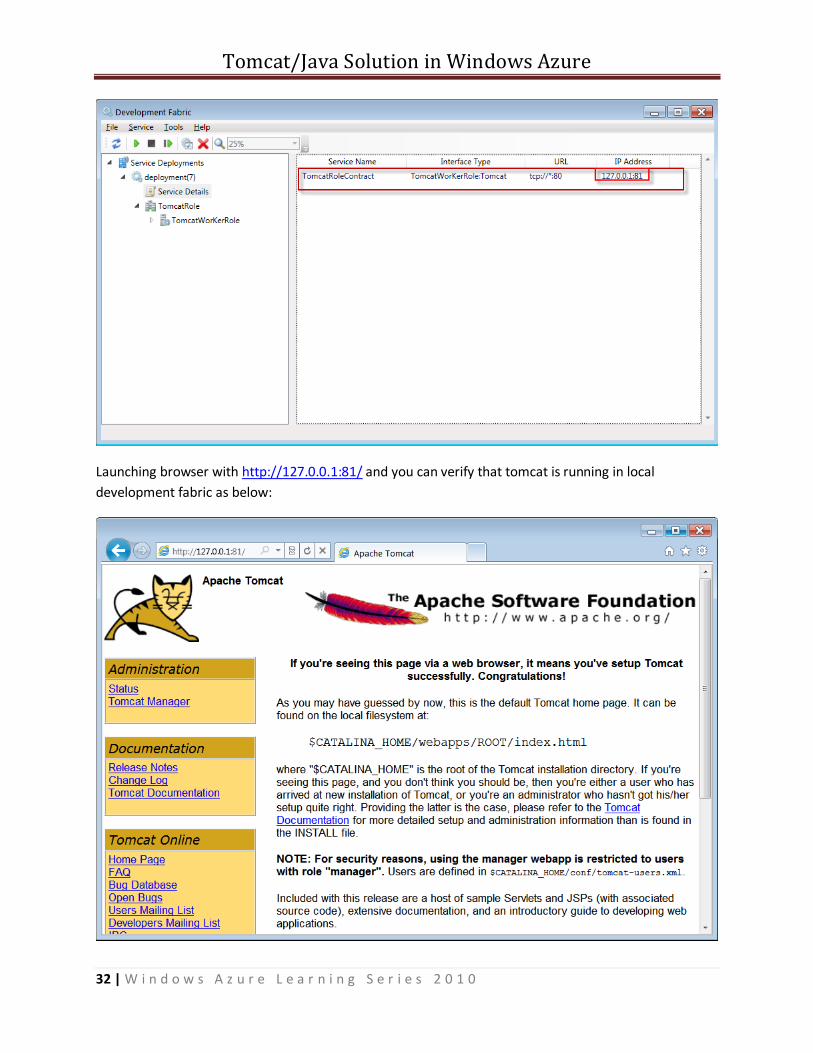
Selecting Service details will give the list of roles and there IP address and port number to test the
service locally. In this case we will open browser with 127.0.0.1:81 to check the Tomcat:
Tomcat web Address: http://127.0.0.1:81
Tomcat/Java Solution in Windows Azure
32 | W i n d o w s A z u r e L e a r n i n g S e r i e s 2 0 1 0
Launching browser with http://127.0.0.1:81/ and you can verify that tomcat is running in local
development fabric as below:
Tomcat/Java Solution in Windows Azure
33 | W i n d o w s A z u r e L e a r n i n g S e r i e s 2 0 1 0
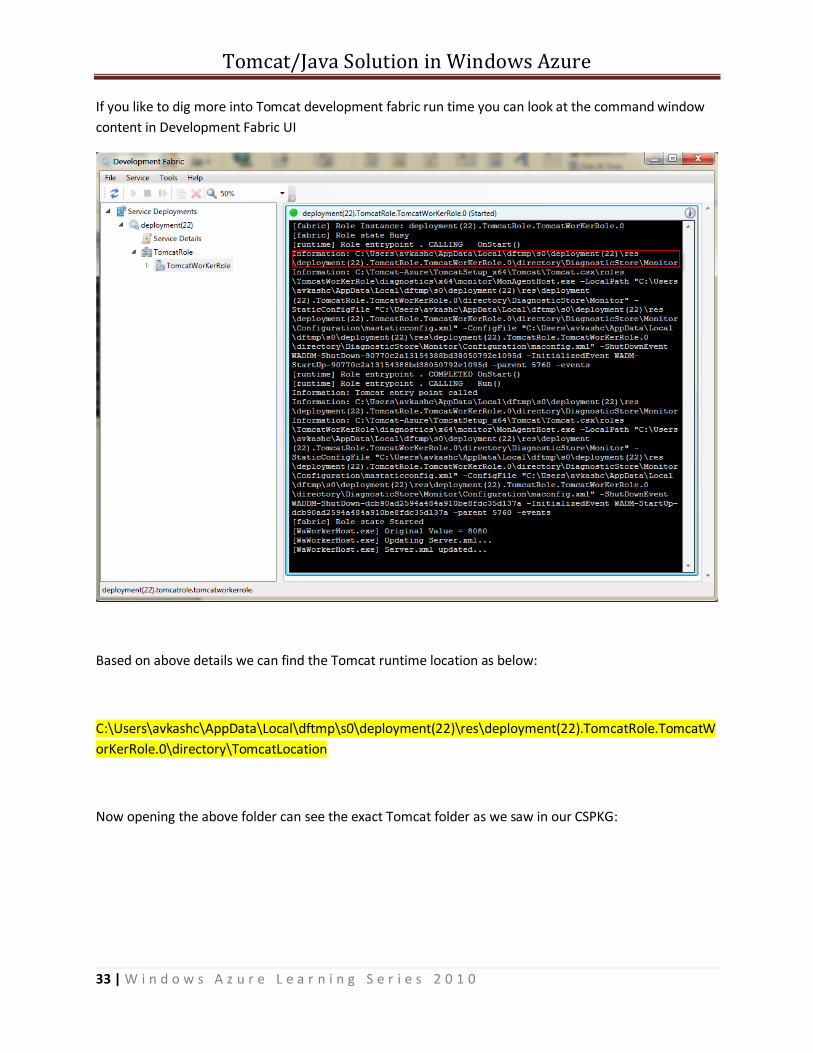
If you like to dig more into Tomcat development fabric run time you can look at the command window
content in Development Fabric UI
Based on above details we can find the Tomcat runtime location as below:
C:\Users\avkashc\AppData\Local\dftmp\s0\deployment(22)\res\deployment(22).TomcatRole.TomcatW
orKerRole.0\directory\TomcatLocation
Now opening the above folder can see the exact Tomcat folder as we saw in our CSPKG:

Tomcat/Java Solution in Windows Azure
34 | W i n d o w s A z u r e L e a r n i n g S e r i e s 2 0 1 0
So when you add more code to your Tomcat service or setup logging or do anything with Tomcat you
will be looking at the folder above for the logs or results.
Tomcat/Java Solution in Windows Azure
35 | W i n d o w s A z u r e L e a r n i n g S e r i e s 2 0 1 0
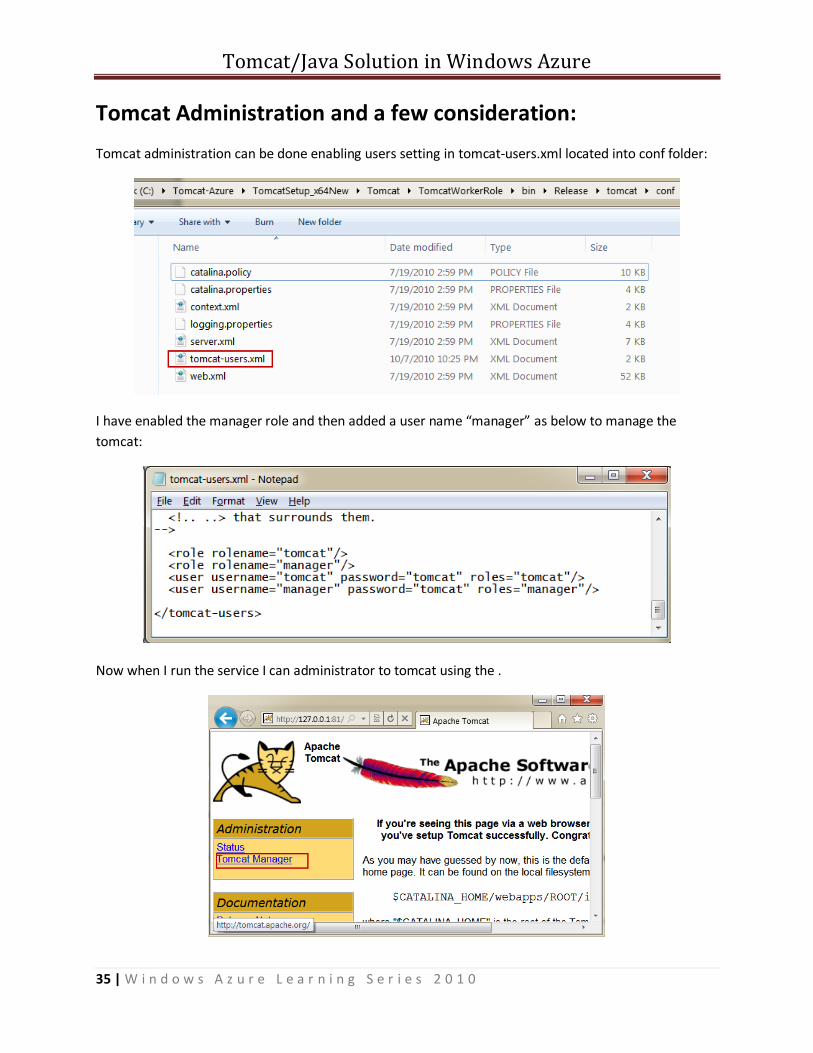
Tomcat Administration and a few consideration:
Tomcat administration can be done enabling users setting in tomcat-users.xml located into conf folder:
I have enabled the manager role and then added a user name “manager” as below to manage the
tomcat:
Now when I run the service I can administrator to tomcat using the .

Tomcat/Java Solution in Windows Azure
36 | W i n d o w s A z u r e L e a r n i n g S e r i e s 2 0 1 0
The management console looks like as below:
And you can deploy Java solution in the form of JAR or WAR using the Deploy section of the
management windows:
When you try to deploy a JAR file here the only issue I will see is that this deployment will be done on a
location which will be active only during the life of Azure instance running. If by any ready Azure
instance rebooted or you have suspended and then restarted you will need to redeploy it.
In Development Fabric the JAR or WAR deployment will occur as below:

Tomcat/Java Solution in Windows Azure
37 | W i n d o w s A z u r e L e a r n i n g S e r i e s 2 0 1 0
We can find the JAR or WAR deployment location from the above Development Fabric UI window:
C:\Users\avkashc\AppData\Local\dftmp\s0\deployment(39)\res\deployment(39).TomcatRole.TomcatW
orKerRole.0\directory\TomcatLocation\webapps
On Azure service the same deployment will be done on location:
C:\Resources\Directory\<Your_Deployment_ID>.TomcatWorKerRole.TomcatLocation\webapps
That’s why it is best to have your target Java solution already in webapps folder ready and tested so
when you deploy on Azure it just runs over there.
Tomcat/Java Solution in Windows Azure
38 | W i n d o w s A z u r e L e a r n i n g S e r i e s 2 0 1 0
Creating the Tomcat Service package for the cloud:
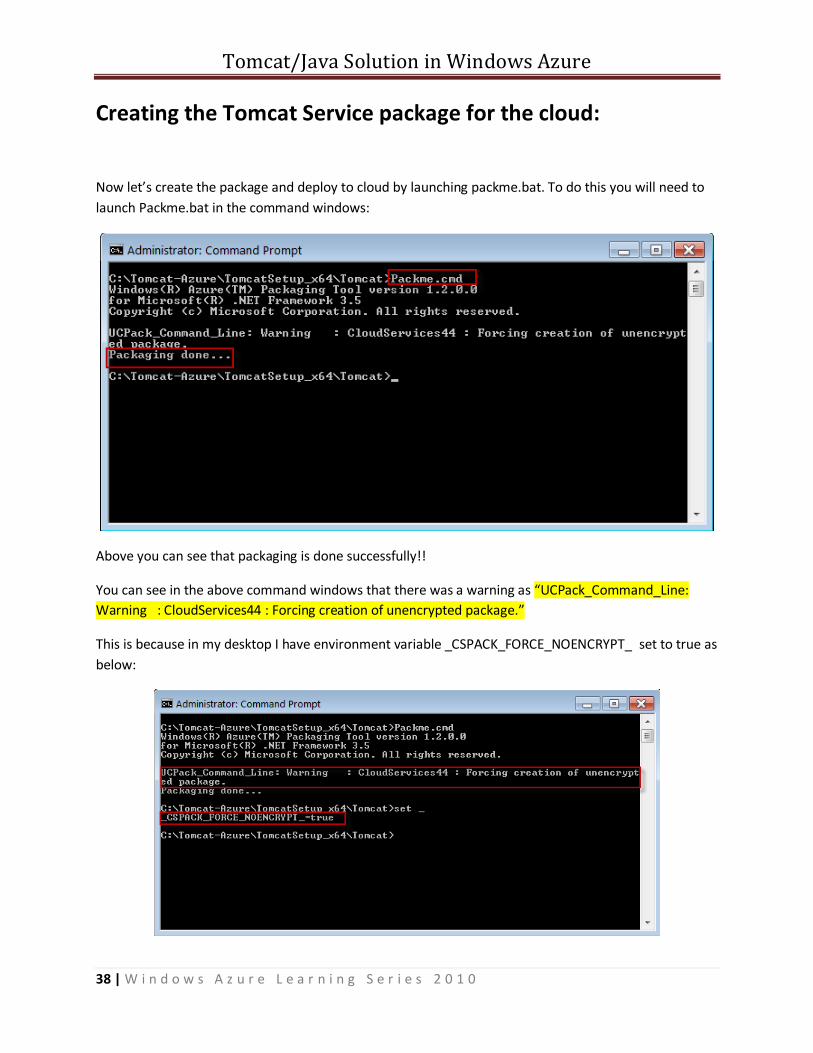
Now let’s create the package and deploy to cloud by launching packme.bat. To do this you will need to
launch Packme.bat in the command windows:
Above you can see that packaging is done successfully!!
You can see in the above command windows that there was a warning as “UCPack_Command_Line:
Warning : CloudServices44 : Forcing creation of unencrypted package.”
This is because in my desktop I have environment variable _CSPACK_FORCE_NOENCRYPT_ set to true as
below:
Tomcat/Java Solution in Windows Azure
39 | W i n d o w s A z u r e L e a r n i n g S e r i e s 2 0 1 0
You can learn more about what is the use of this environment variable at the following blog:
Digging in to the Windows Azure Service Package http://azurefeeds.com/post/592/Digging_in_to_the_Windows_Azure_Service_Package.aspx
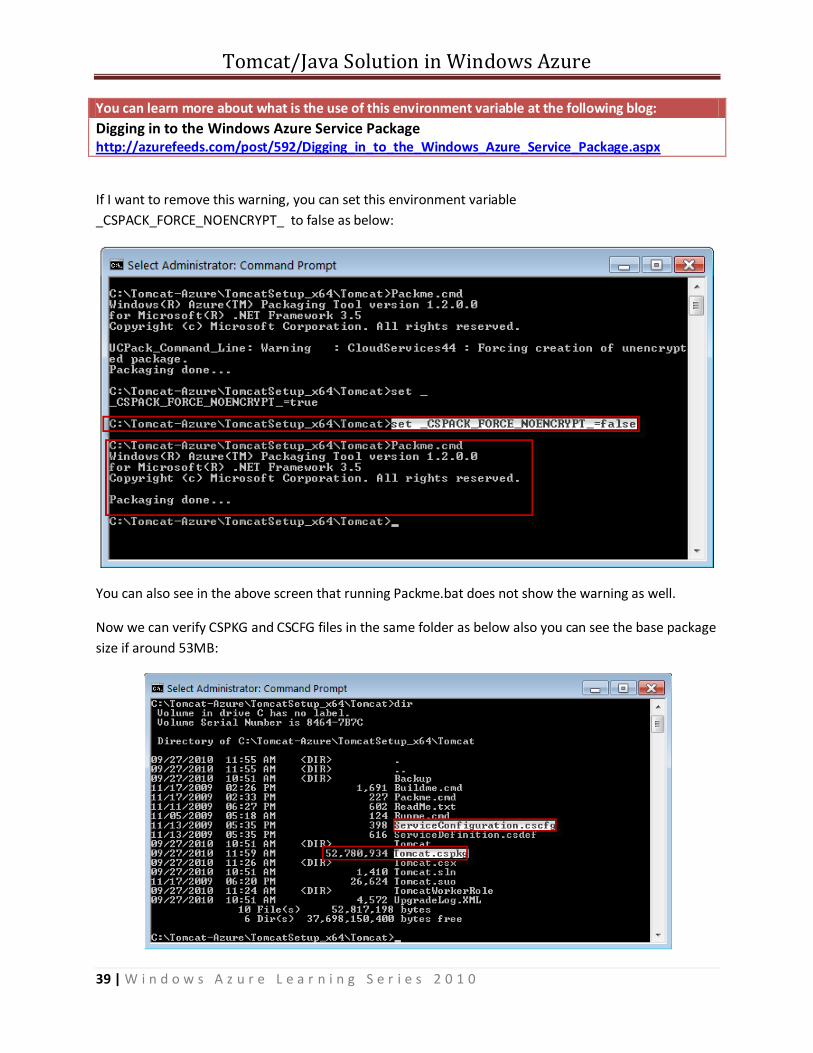
If I want to remove this warning, you can set this environment variable
_CSPACK_FORCE_NOENCRYPT_ to false as below:
You can also see in the above screen that running Packme.bat does not show the warning as well.
Now we can verify CSPKG and CSCFG files in the same folder as below also you can see the base package
size if around 53MB:
Tomcat/Java Solution in Windows Azure
40 | W i n d o w s A z u r e L e a r n i n g S e r i e s 2 0 1 0
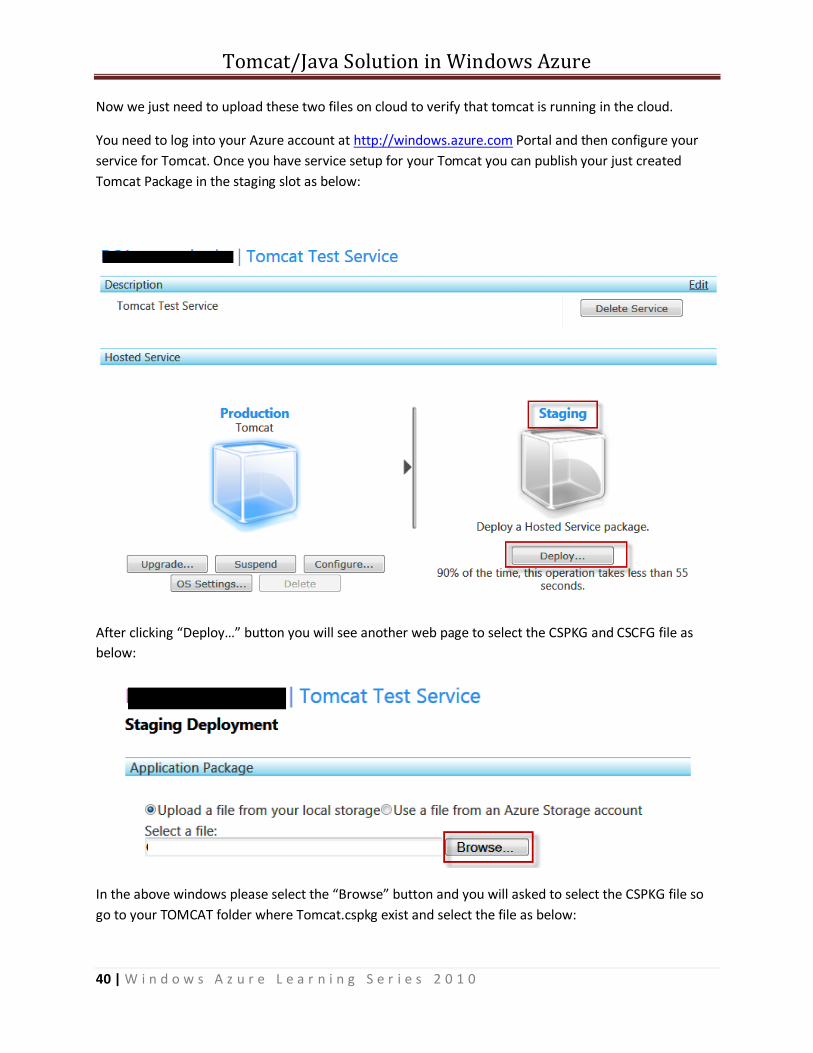
Now we just need to upload these two files on cloud to verify that tomcat is running in the cloud.
You need to log into your Azure account at http://windows.azure.com Portal and then configure your
service for Tomcat. Once you have service setup for your Tomcat you can publish your just created
Tomcat Package in the staging slot as below:
After clicking “Deploy…” button you will see another web page to select the CSPKG and CSCFG file as
below:
In the above windows please select the “Browse” button and you will asked to select the CSPKG file so
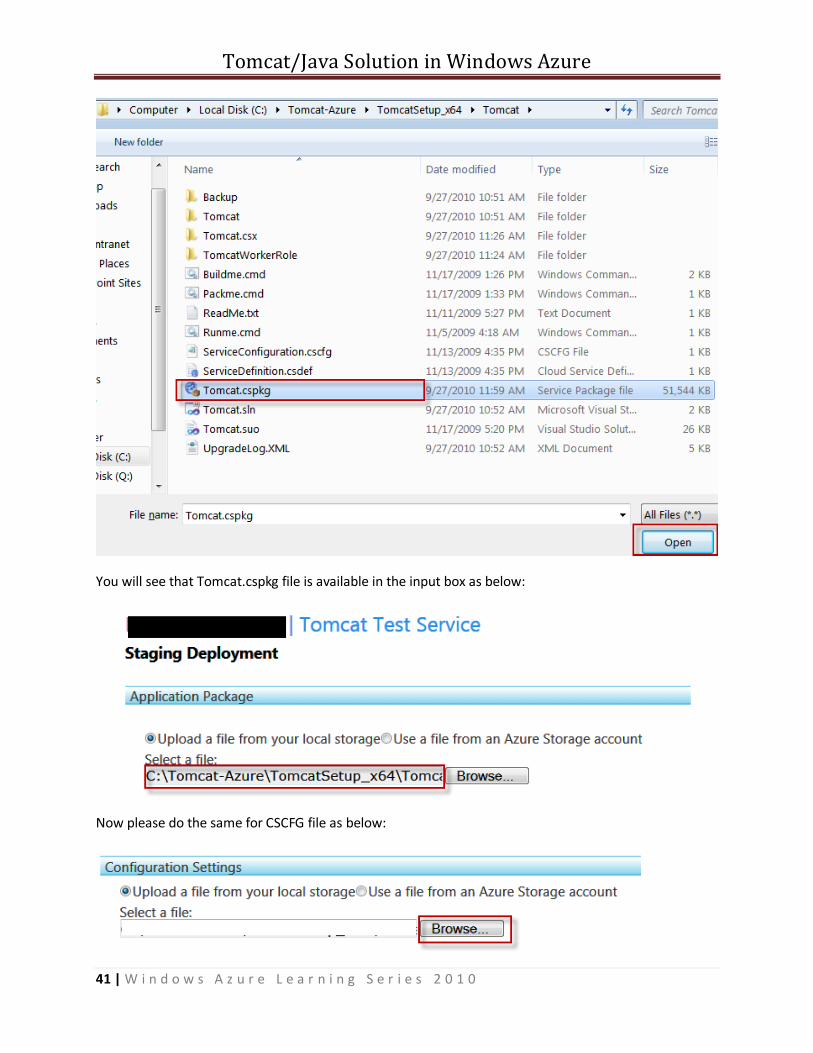
go to your TOMCAT folder where Tomcat.cspkg exist and select the file as below:
Tomcat/Java Solution in Windows Azure
41 | W i n d o w s A z u r e L e a r n i n g S e r i e s 2 0 1 0
You will see that Tomcat.cspkg file is available in the input box as below:
Now please do the same for CSCFG file as below:
Tomcat/Java Solution in Windows Azure
42 | W i n d o w s A z u r e L e a r n i n g S e r i e s 2 0 1 0
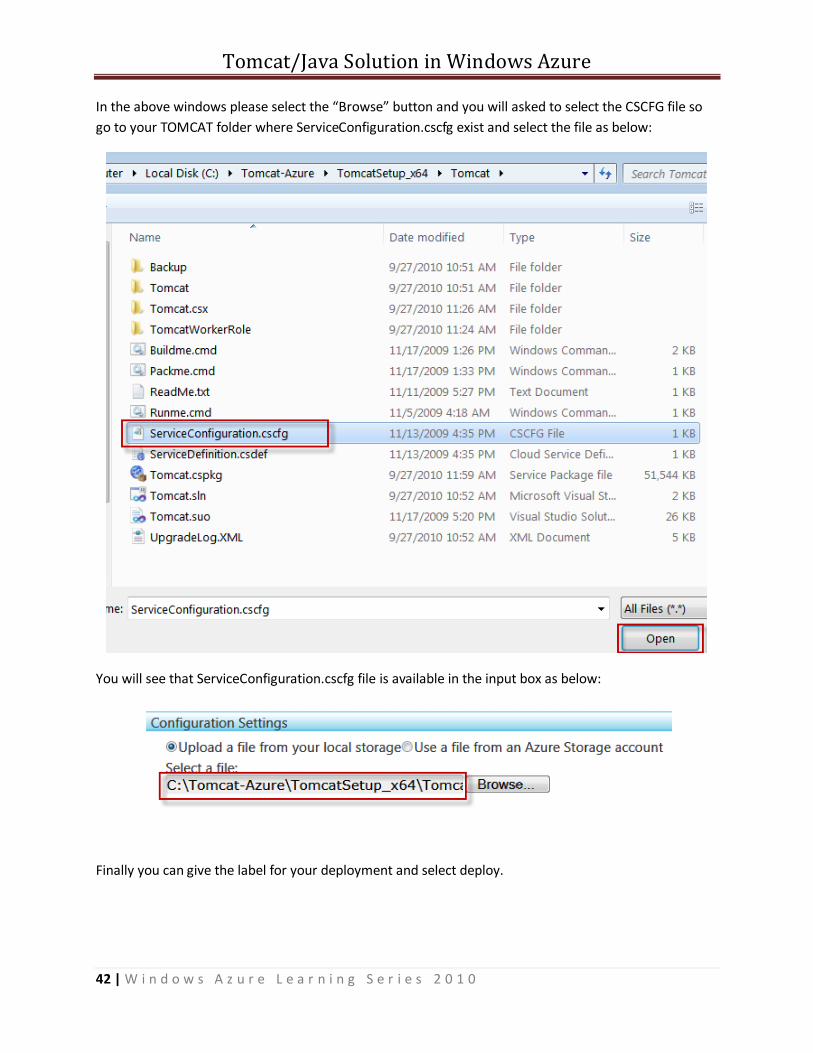
In the above windows please select the “Browse” button and you will asked to select the CSCFG file so
go to your TOMCAT folder where ServiceConfiguration.cscfg exist and select the file as below:
You will see that ServiceConfiguration.cscfg file is available in the input box as below:
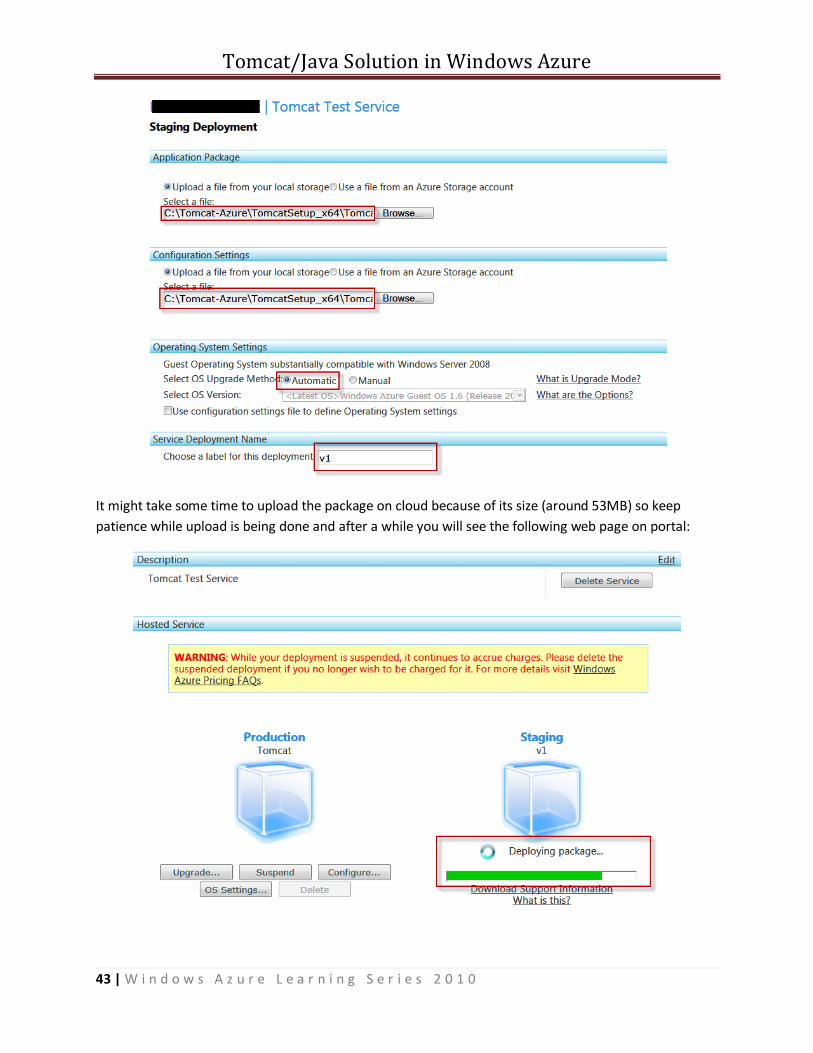
Finally you can give the label for your deployment and select deploy.
Tomcat/Java Solution in Windows Azure
43 | W i n d o w s A z u r e L e a r n i n g S e r i e s 2 0 1 0
It might take some time to upload the package on cloud because of its size (around 53MB) so keep
patience while upload is being done and after a while you will see the following web page on portal:

Tomcat/Java Solution in Windows Azure
44 | W i n d o w s A z u r e L e a r n i n g S e r i e s 2 0 1 0
Once initial deployment is done you will see the following progress on portal:
Please Select “Run” on above windows to start the Service you will see the progress as below:

Tomcat/Java Solution in Windows Azure
45 | W i n d o w s A z u r e L e a r n i n g S e r i e s 2 0 1 0
After the Enabling deployment is done you will that your Tomcat Worker Role is in initializing stage at
this time:
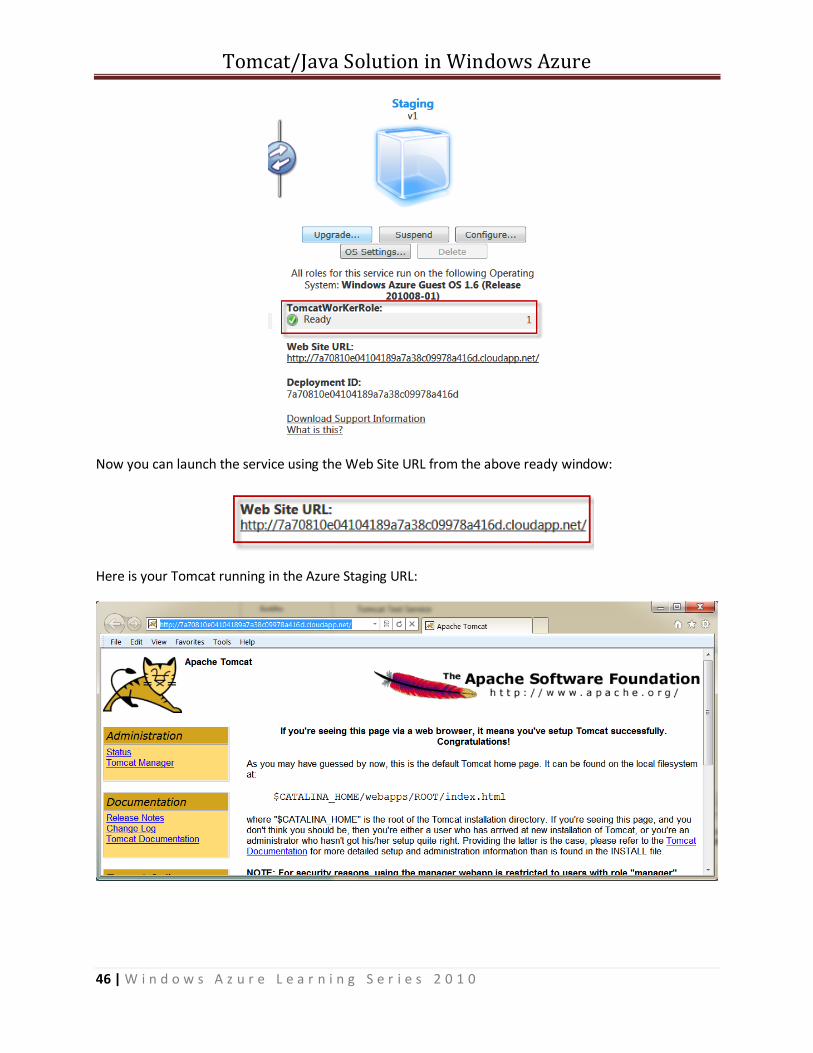
Now after a little while you will see that your service is ready as below:
Tomcat/Java Solution in Windows Azure
46 | W i n d o w s A z u r e L e a r n i n g S e r i e s 2 0 1 0
Now you can launch the service using the Web Site URL from the above ready window:
Here is your Tomcat running in the Azure Staging URL:

Tomcat/Java Solution in Windows Azure
47 | W i n d o w s A z u r e L e a r n i n g S e r i e s 2 0 1 0
You will make changes in the code existed at:
C:\Tomcat-Azure\TomcatSetup_x64\Tomcat\TomcatWorkerRole\bin\Release\tomcat
To make changes in your Tomcat code you will do the following:
1. Make changes in the file & folders at the
C:\Tomcat-Azure\TomcatSetup_x64\Tomcat\TomcatWorkerRole\bin\Release\tomcat
2. Now delete Tomcat.csx folder located at C:\Tomcat-Azure\TomcatSetup_x64\Tomcat
3. Call Buildme.cmd
4. Verify that your changes are available at
C:\Tomcat-
Azure\TomcatSetup_x64\Tomcat\Tomcat.csx\roles\TomcatWorKerRole\approot\tomcat

Tomcat/Java Solution in Windows Azure
48 | W i n d o w s A z u r e L e a r n i n g S e r i e s 2 0 1 0
The diagnostics is divided into two sections: Error logging and the log visualization. Let’s start with the
first one:
Error Logging:
In Tomcat you can do two types of logging:
1. JDL Logging (Described here)
2. Log4J custom logging – (Please visit the link below to setup)
For more info please visit:
http://tomcat.apache.org/tomcat-5.5-doc/logging.html
I will give you quick details about JDK logging here which just needs to make modification into your
logging configuration file.
The default logging.properties specifies a ConsoleHandler for routing logging to stdout and also a
FileHandler. A handler's log level threshold can be set using SEVERE, WARNING, INFO, CONFIG, FINE,
FINER, FINEST or ALL. The logging.properties shipped with JDK is set to INFO.
Open logging.properties located @
C:\Tomcat-Azure\TomcatSetup_x64\Tomcat\TomcatWorkerRole\bin\Release\tomcat\conf
Original looks likes as below:
1catalina.org.apache.juli.FileHandler.level = FINE 1catalina.org.apache.juli.FileHandler.directory = ${catalina.base}/logs 1catalina.org.apache.juli.FileHandler.prefix = catalina. 2localhost.org.apache.juli.FileHandler.level = FINE 2localhost.org.apache.juli.FileHandler.directory = ${catalina.base}/logs 2localhost.org.apache.juli.FileHandler.prefix = localhost. 3manager.org.apache.juli.FileHandler.level = FINE 3manager.org.apache.juli.FileHandler.directory = ${catalina.base}/logs 3manager.org.apache.juli.FileHandler.prefix = manager. 4host-manager.org.apache.juli.FileHandler.level = FINE 4host-manager.org.apache.juli.FileHandler.directory = ${catalina.base}/logs 4host-manager.org.apache.juli.FileHandler.prefix = host-manager. java.util.logging.ConsoleHandler.level = FINE java.util.logging.ConsoleHandler.formatter = java.util.logging.SimpleFormatter
Tomcat/Java Solution in Windows Azure
49 | W i n d o w s A z u r e L e a r n i n g S e r i e s 2 0 1 0
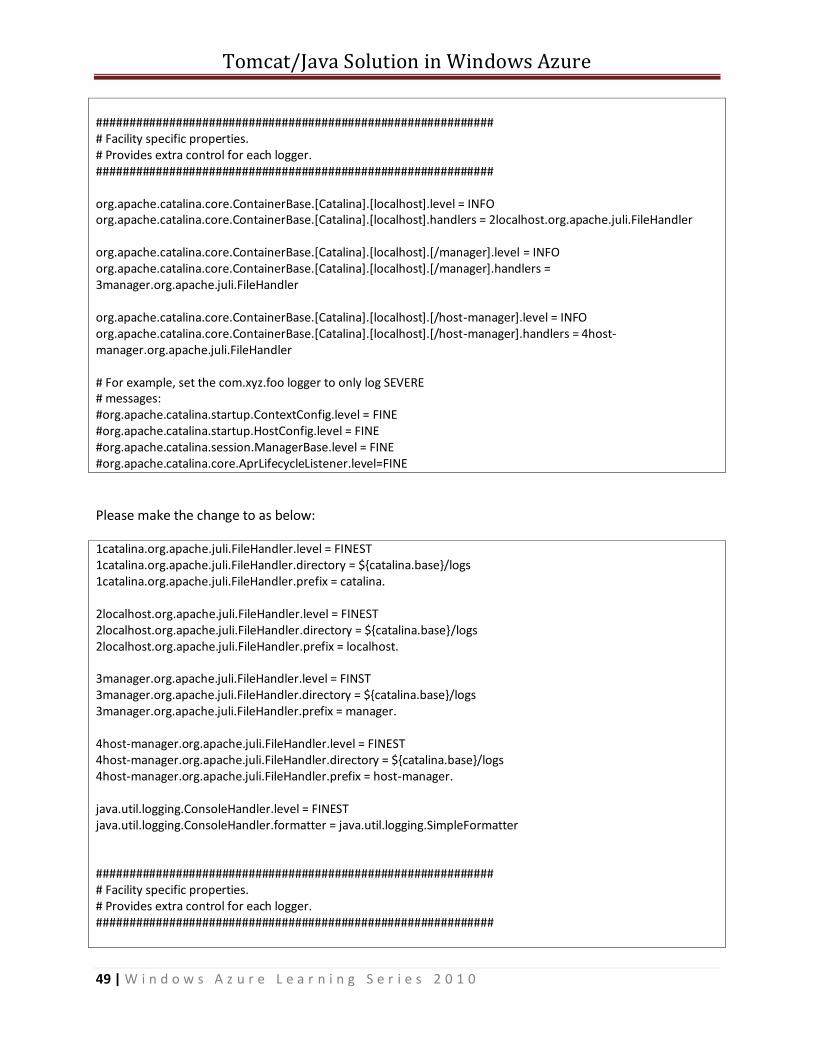
############################################################ # Facility specific properties. # Provides extra control for each logger. ############################################################ org.apache.catalina.core.ContainerBase.[Catalina].[localhost].level = INFO org.apache.catalina.core.ContainerBase.[Catalina].[localhost].handlers = 2localhost.org.apache.juli.FileHandler org.apache.catalina.core.ContainerBase.[Catalina].[localhost].[/manager].level = INFO org.apache.catalina.core.ContainerBase.[Catalina].[localhost].[/manager].handlers = 3manager.org.apache.juli.FileHandler org.apache.catalina.core.ContainerBase.[Catalina].[localhost].[/host-manager].level = INFO org.apache.catalina.core.ContainerBase.[Catalina].[localhost].[/host-manager].handlers = 4host-manager.org.apache.juli.FileHandler # For example, set the com.xyz.foo logger to only log SEVERE # messages: #org.apache.catalina.startup.ContextConfig.level = FINE #org.apache.catalina.startup.HostConfig.level = FINE #org.apache.catalina.session.ManagerBase.level = FINE #org.apache.catalina.core.AprLifecycleListener.level=FINE
Please make the change to as below:
1catalina.org.apache.juli.FileHandler.level = FINEST 1catalina.org.apache.juli.FileHandler.directory = ${catalina.base}/logs 1catalina.org.apache.juli.FileHandler.prefix = catalina. 2localhost.org.apache.juli.FileHandler.level = FINEST 2localhost.org.apache.juli.FileHandler.directory = ${catalina.base}/logs 2localhost.org.apache.juli.FileHandler.prefix = localhost. 3manager.org.apache.juli.FileHandler.level = FINST 3manager.org.apache.juli.FileHandler.directory = ${catalina.base}/logs 3manager.org.apache.juli.FileHandler.prefix = manager. 4host-manager.org.apache.juli.FileHandler.level = FINEST 4host-manager.org.apache.juli.FileHandler.directory = ${catalina.base}/logs 4host-manager.org.apache.juli.FileHandler.prefix = host-manager. java.util.logging.ConsoleHandler.level = FINEST java.util.logging.ConsoleHandler.formatter = java.util.logging.SimpleFormatter ############################################################ # Facility specific properties. # Provides extra control for each logger. ############################################################
Tomcat/Java Solution in Windows Azure
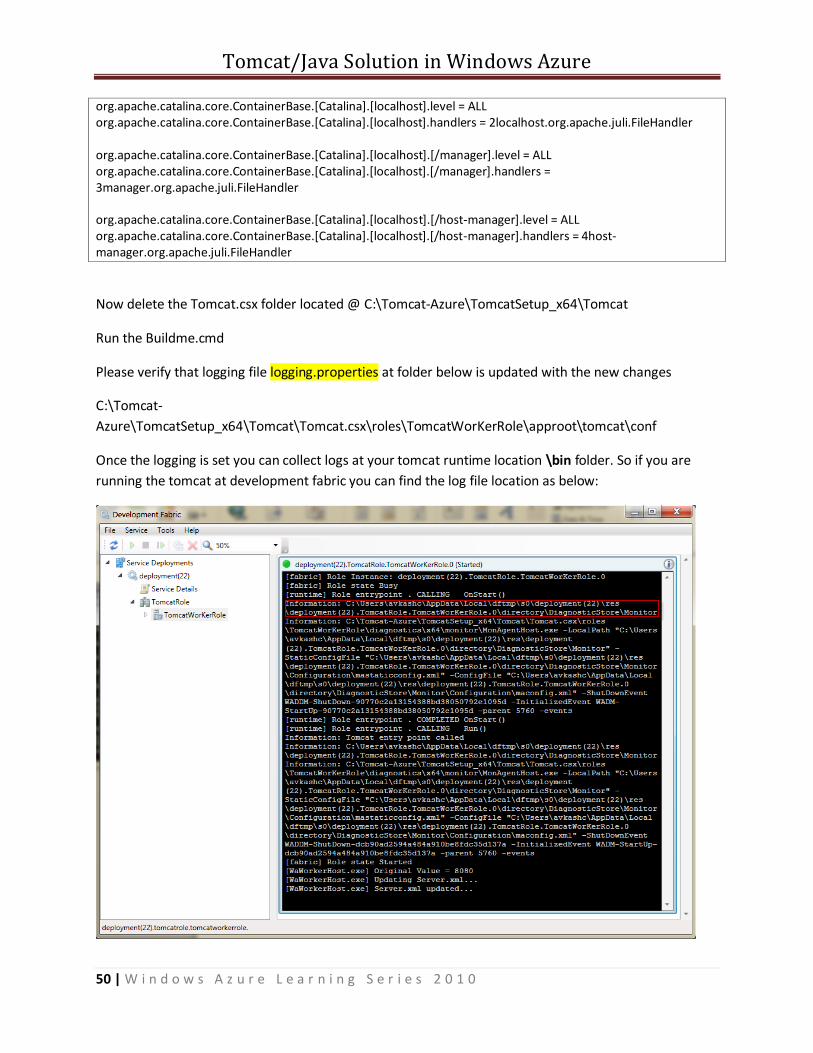
50 | W i n d o w s A z u r e L e a r n i n g S e r i e s 2 0 1 0
org.apache.catalina.core.ContainerBase.[Catalina].[localhost].level = ALL org.apache.catalina.core.ContainerBase.[Catalina].[localhost].handlers = 2localhost.org.apache.juli.FileHandler org.apache.catalina.core.ContainerBase.[Catalina].[localhost].[/manager].level = ALL org.apache.catalina.core.ContainerBase.[Catalina].[localhost].[/manager].handlers = 3manager.org.apache.juli.FileHandler org.apache.catalina.core.ContainerBase.[Catalina].[localhost].[/host-manager].level = ALL org.apache.catalina.core.ContainerBase.[Catalina].[localhost].[/host-manager].handlers = 4host-manager.org.apache.juli.FileHandler
Now delete the Tomcat.csx folder located @ C:\Tomcat-Azure\TomcatSetup_x64\Tomcat
Run the Buildme.cmd
Please verify that logging file logging.properties at folder below is updated with the new changes
C:\Tomcat-
Azure\TomcatSetup_x64\Tomcat\Tomcat.csx\roles\TomcatWorKerRole\approot\tomcat\conf
Once the logging is set you can collect logs at your tomcat runtime location \bin folder. So if you are
running the tomcat at development fabric you can find the log file location as below:

Tomcat/Java Solution in Windows Azure
51 | W i n d o w s A z u r e L e a r n i n g S e r i e s 2 0 1 0
Based on above Development Fabric UI details we can find the location for Tomcat log are as below:
C:\Users\avkashc\AppData\Local\dftmp\s0\deployment(22)\res\deployment(22).TomcatRole.TomcatW
orKerRole.0\directory\TomcatLocation\logs
And when looking the content at the logs folder we will see the following:
Now you can open catalina.YYYY-MM-DD.log file to verify the logging details based on the configuration
we have just set. For example:
While running Tomcat on Azure you may want to collect these logs as well. Here is the information you
could use to collect the Tomcat logs and a method you can try:
Location for the Log:
Tomcat/Java Solution in Windows Azure
52 | W i n d o w s A z u r e L e a r n i n g S e r i e s 2 0 1 0
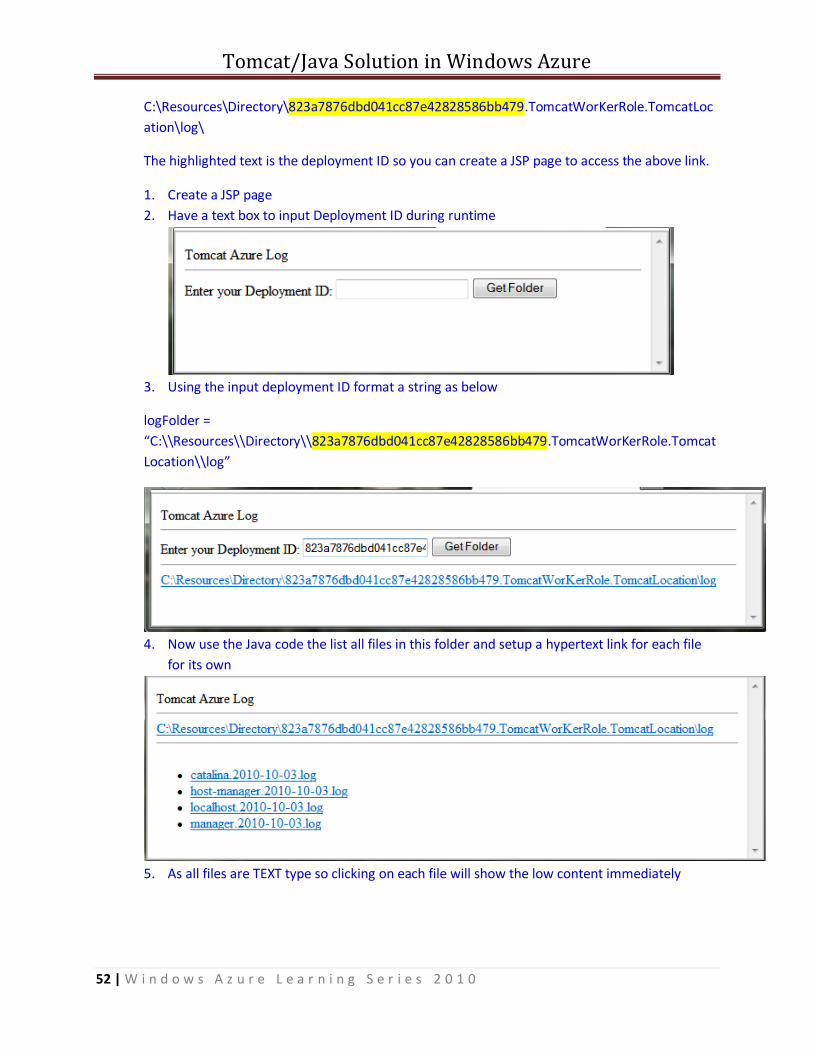
C:\Resources\Directory\823a7876dbd041cc87e42828586bb479.TomcatWorKerRole.TomcatLoc
ation\log\
The highlighted text is the deployment ID so you can create a JSP page to access the above link.
1. Create a JSP page
2. Have a text box to input Deployment ID during runtime
3. Using the input deployment ID format a string as below
logFolder =
“C:\\Resources\\Directory\\823a7876dbd041cc87e42828586bb479.TomcatWorKerRole.Tomcat
Location\\log”
4. Now use the Java code the list all files in this folder and setup a hypertext link for each file
for its own
5. As all files are TEXT type so clicking on each file will show the low content immediately

Tomcat/Java Solution in Windows Azure
53 | W i n d o w s A z u r e L e a r n i n g S e r i e s 2 0 1 0
Mostly JAVA solution are deployed as JAR/WAR files which are compressed zip file containing full
solution in it or solution distributed in multiple folders within Tomcat solution folder. The solutions are
mostly existed at webapps folder as below:
In the image below you can see I have added a solution name TestDates within webapps folder
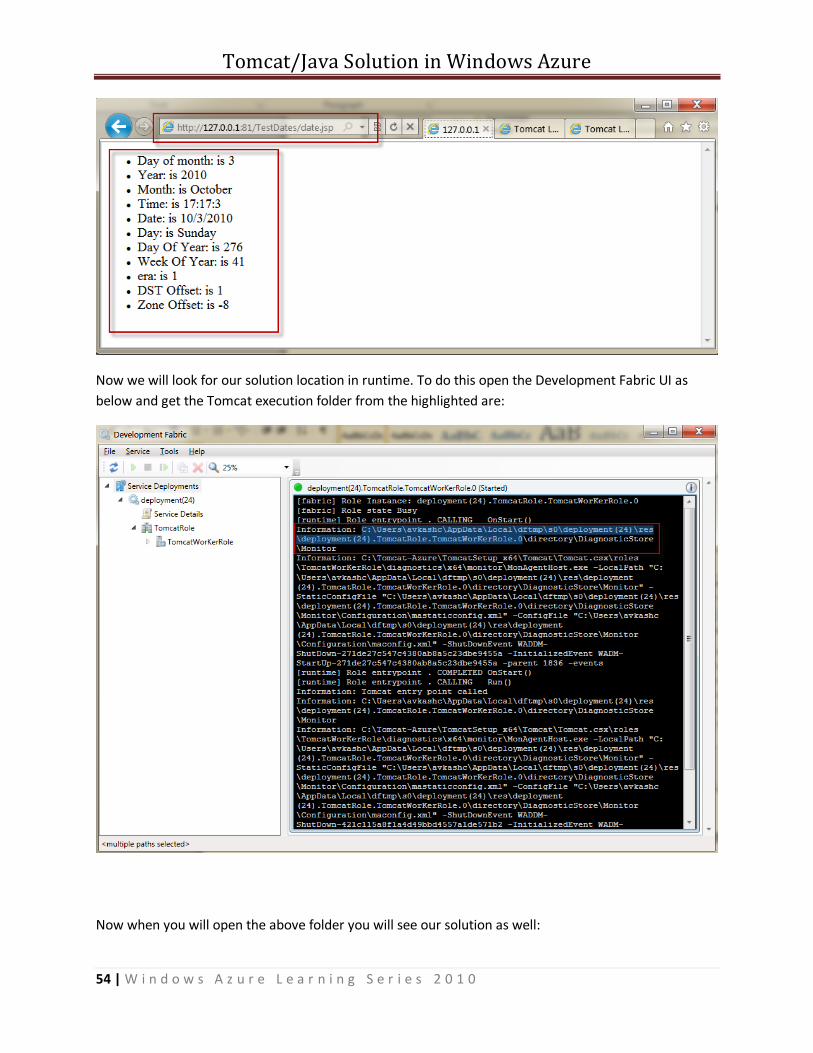
Now we will run the Tomcat using Runme.cmd:
We will run our test app at:
http://127.0.0.1/TestDates/dates.jsp
Tomcat/Java Solution in Windows Azure
54 | W i n d o w s A z u r e L e a r n i n g S e r i e s 2 0 1 0
Now we will look for our solution location in runtime. To do this open the Development Fabric UI as
below and get the Tomcat execution folder from the highlighted are:
Now when you will open the above folder you will see our solution as well:
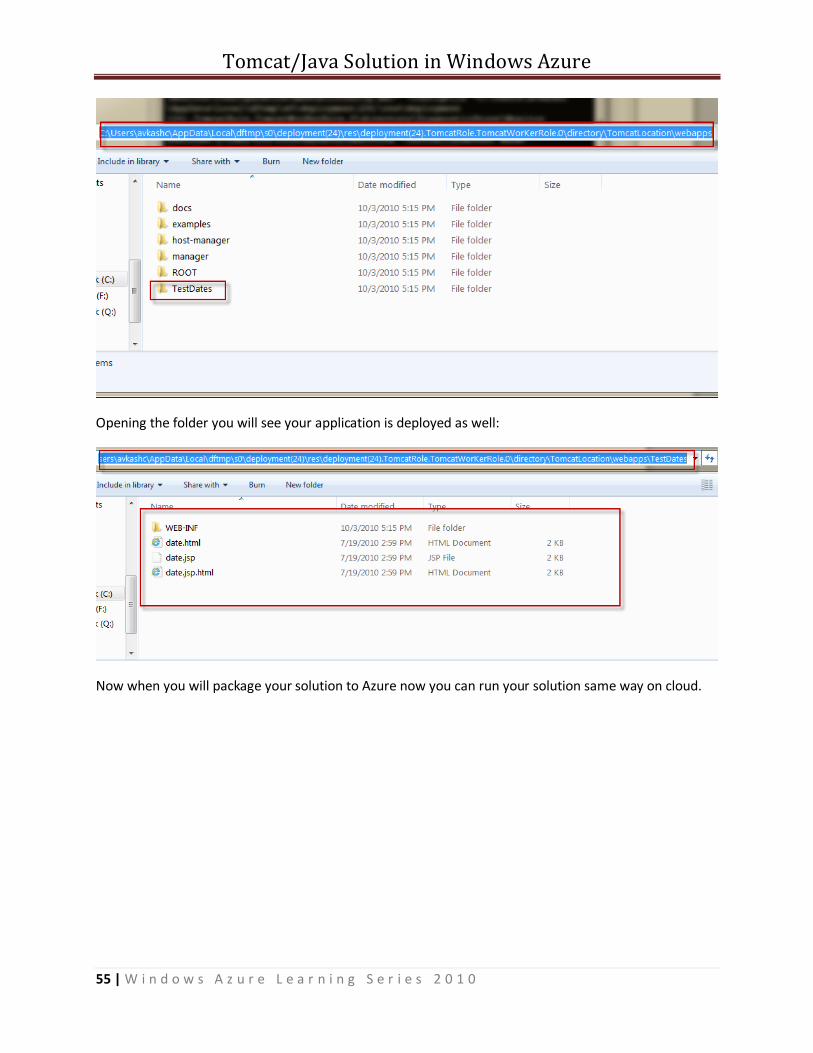
Tomcat/Java Solution in Windows Azure
55 | W i n d o w s A z u r e L e a r n i n g S e r i e s 2 0 1 0
Opening the folder you will see your application is deployed as well:
Now when you will package your solution to Azure now you can run your solution same way on cloud.
Tomcat/Java Solution in Windows Azure
56 | W i n d o w s A z u r e L e a r n i n g S e r i e s 2 0 1 0
Based on above details you could run Tomcat on Window Azure over HTTP (port 80), what if you decide
to run it on port HTTPS (port 443) as more security to it as other websites.
Adding HTTPS security to any website is basically a certificate based security based on PKI security
concept and to start with you first need to obtain a valid certificate for “client and server validation”
from a Certificate Authority i.e. “Verisign” or “Go Daddy” or “Thawte” etc. I will not be discussing here
who you will choose and how you will get this certificate. I would assume that you know the concepts
and have certificate ready to add HTTPS security to your Tomcat service.
You will be given a Certificate to verify your domain name such as www.yourdomain.com so the
certificate will be linked to your domain this way.
The process of adding SSL to tomcat is defined in the following steps:
1. Getting certificates from CA and then creating keystore.bin file
2. Adding keystore.bin file to tomcat
3. Adding HTTPS endpoint to your tomcat solution
4. Adding certificate to your Tomcat service at Windows Azure Portal
Here is the description of each above steps:
Getting certificates from CA and then creating keystore.bin file
To get these certificates you will need to create a CSR request from your tomcat/apache server so you
can create a folder name keystore and create and save the CSR request contents there.
C:\Tomcat-Azure\TomcatSetup_x64\Tomcat\keystore
Most of the time you will get a certificate chain which includes your certificate, intermediate certificate
and root certificate so essentially you will have 3 certificates:
1. RootCertFileName.crt
2. IntermediateCertFileName.crt
3. PrimaryCertFileName.crt
Now once you received the certificate please save all 3 certificates in the keystore folder.
Tomcat/Java Solution in Windows Azure
57 | W i n d o w s A z u r e L e a r n i n g S e r i e s 2 0 1 0
C:\Tomcat-Azure\TomcatSetup_x64\Tomcat\keystore
The certificate will only work with the same keystore that you initially created the CSR with. The
certificates must be installed to your keystore in the correct order.
We will be using Keytool.exe a JAVA tool to link these certificates with Tomcat. To tool is located at:
C:\Tomcat-Azure\Java\jre6\bin\keytool.exe
Every time you install a certificate to the keystore you must enter the keystore password that you chose
when you generated it so you will keep using the same password.
Now open a command window and use the keytool binary to run the following commands.
Installing Root Certificate in keystore:
keytool -import -trustcacerts -alias root -file RootCertFileName.crt -keystore keystore.key
There are two possibilities:
1. You may receive a successful message as then we are good.
"Certificate was added to keystore".
2. You may also receive a message that says
"Certificate already exists in system-wide CA keystore under alias <...> Do you still want to
add it to your own keystore? [no]:
This is because the certificate may already stored in keystroke so select “Yes”
You will see the message”
"Certificate was added to keystore".
Now we have added our Root certificate in the keystore.
Installing Intermediate Certificate in keystore:
keytool -import -trustcacerts -alias intermediate -file IntermediateCertFileName.crt -keystore
keystore.key
You will see a message as:
"Certificate was added to keystore".
We are good now.
Note if you don’t have an intermediate certificate not a problem and you can skip this step.
Installing Primary Certificate in keystore:
Tomcat/Java Solution in Windows Azure
58 | W i n d o w s A z u r e L e a r n i n g S e r i e s 2 0 1 0
keytool -import -trustcacerts -alias tomcat -file PrimaryCertFileName.crt -keystore keystore.key
You will see a message as:
"Certificate was added to keystore".
We are good now.
After it we can be sure that we have all certificates installed in keystore file.
Note you can actually see the contents of keystore.bin
Most of the time if you following above stpes the keystore contains 4 entries: root, Oct 1, 2010, trustedCertEntry, Certificate fingerprint (MD5): F9:FF:FF:FF:FF:22:44:44:22:22:22:22:RR:66:%%:66 intermed, Oct 1, 2010, trustedCertEntry, Certificate fingerprint (MD5): F9:FF:FF:FF:FF:22:44:44:22:22:22:22:RR:66:%%:66 Your_domain_name, Oct 1, 2010, PrivateKeyEntry, Certificate fingerprint (MD5): F9:FF:FF:FF:FF:22:44:44:22:22:22:22:RR:66:%%:66 cross, Oct 1, 2010, trustedCertEntry, Certificate fingerprint (MD5): F9:FF:FF:FF:FF:22:44:44:22:22:22:22:RR:66:%%:66
Adding keystore.bin file to tomcat:
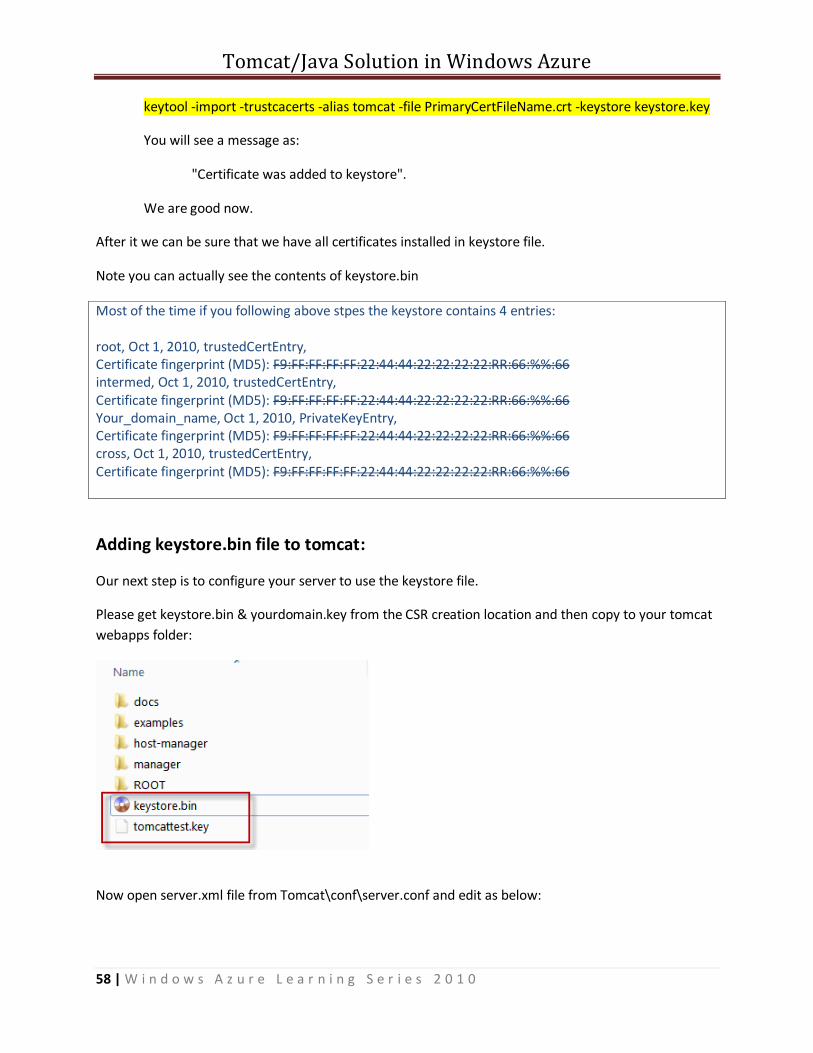
Our next step is to configure your server to use the keystore file.
Please get keystore.bin & yourdomain.key from the CSR creation location and then copy to your tomcat
webapps folder:
Now open server.xml file from Tomcat\conf\server.conf and edit as below:

Tomcat/Java Solution in Windows Azure
59 | W i n d o w s A z u r e L e a r n i n g S e r i e s 2 0 1 0
<Connector port="443" protocol="HTTP/1.1" SSLEnabled="true" maxThreads="150" scheme="https" secure="true" clientAuth="false" sslProtocol="TLS" /> <Connector className="org.apache.catalina.connector.http.HttpConnector" port="443" minProcessors="5" maxProcessors="75" enableLookups="true" acceptCount="10" debug="0" scheme="https" secure="true"> <Factory className="org.apache.catalina.net.SSLServerSocketFactory" clientAuth="false" protocol="TLS" keystoreFile="/webapps/mykeystore.bin" keystorePass="password"/>
Note:
1. Please be sure to have the same password as you had after CSR creation and used with keytool
application.
2. There are other methods to add keystore to tomcat so please look around on internet if you decided
to prefer other methods.
Verify that you have SSL working in Development Fabric.
https://127.0.0.1:81
Adding HTTPS endpoint to your tomcat solution
Our next step is to add HTTP endpoint to Tomcat solution. Please open the tomcat solution in visual
studio which is located at:
C:\Tomcat-Azure\TomcatSetup_x64\Tomcat\Tomcat.sln
Once the solution is open please select the TomcatWorkerRole and open its properties dialog box as
below:

Tomcat/Java Solution in Windows Azure
60 | W i n d o w s A z u r e L e a r n i n g S e r i e s 2 0 1 0
Now please select “Endpoints” tab and you will see the windows as below:
In the “Endpoints” tab please select “Add Endpoint” button and add TCP endpoint with port 443.
For Tomcat the HTTPS endpoint defined as a “tcp” endpoint like HTTP. Setting protocol to “http” or
“https” means that Azure will perform an http.sys reservation for that endpoint on the appropriate port.
Since Tomcat does not use http.sys internally, we needed to make sure to model tomcat HTTPS
endpoints as “tcp”.

Tomcat/Java Solution in Windows Azure
61 | W i n d o w s A z u r e L e a r n i n g S e r i e s 2 0 1 0
You will also see that setting up tomcatSSL endpoint to TCP with port 443 then the SSL Certificate field
get disabled so regular certificate cannot be used as below:
Now to make things in full perspective, we already know that Tomcat already has SSL certificates in its
keystore.bin, so using TCP endpoint with port 443 will work even there is no certificate associated with
it.
Now please save the project and verify that ServiceDefinition.cdef have the following data:

Tomcat/Java Solution in Windows Azure
62 | W i n d o w s A z u r e L e a r n i n g S e r i e s 2 0 1 0
Now if you build your package using Packme.cmd these new changes will be in effect.
Adding certificate to your Tomcat service at Windows Azure Portal
Our next step is to add certificates in the Azure portal.
You need to get the Windows Azure Portal and your Tomcat Service page where you have your
production and staging slots and go the “Certificates – Manage” section as below:
Now please select Manage and you will see the following screen:
Tomcat/Java Solution in Windows Azure
63 | W i n d o w s A z u r e L e a r n i n g S e r i e s 2 0 1 0
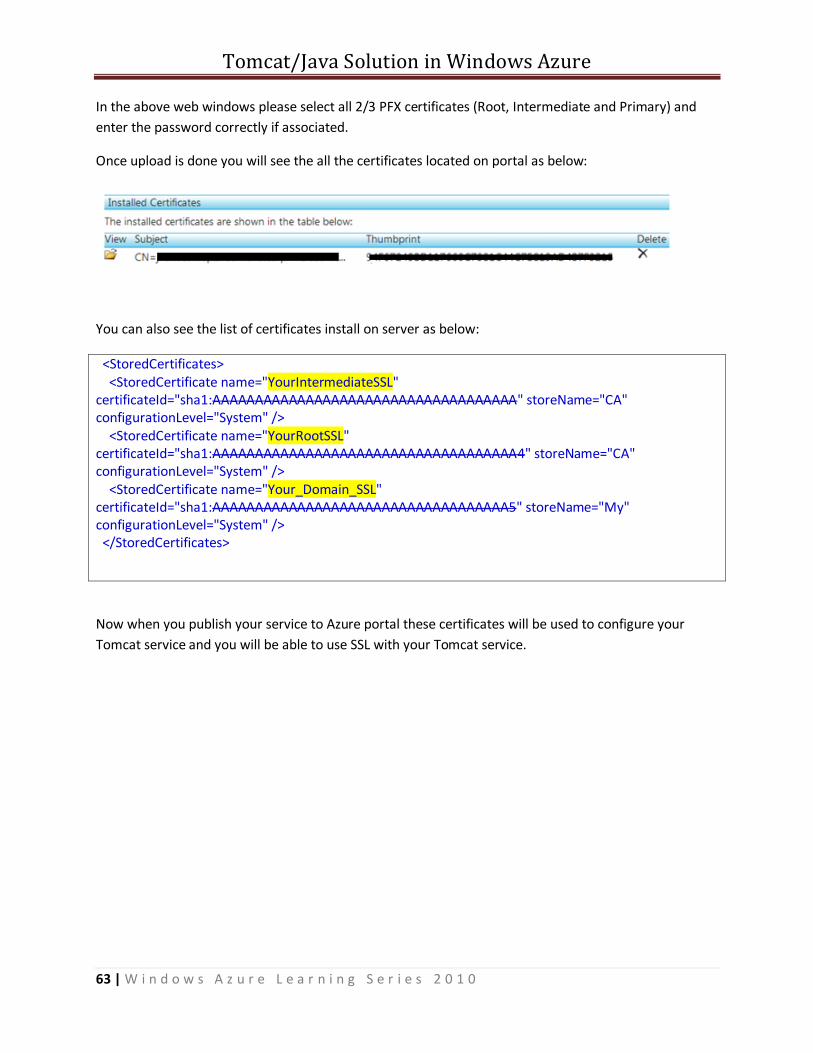
In the above web windows please select all 2/3 PFX certificates (Root, Intermediate and Primary) and
enter the password correctly if associated.
Once upload is done you will see the all the certificates located on portal as below:
You can also see the list of certificates install on server as below:
<StoredCertificates> <StoredCertificate name="YourIntermediateSSL" certificateId="sha1:AAAAAAAAAAAAAAAAAAAAAAAAAAAAAAAAAAAA" storeName="CA" configurationLevel="System" /> <StoredCertificate name="YourRootSSL" certificateId="sha1:AAAAAAAAAAAAAAAAAAAAAAAAAAAAAAAAAAAA4" storeName="CA" configurationLevel="System" /> <StoredCertificate name="Your_Domain_SSL" certificateId="sha1:AAAAAAAAAAAAAAAAAAAAAAAAAAAAAAAAAAA5" storeName="My" configurationLevel="System" /> </StoredCertificates>
Now when you publish your service to Azure portal these certificates will be used to configure your
Tomcat service and you will be able to use SSL with your Tomcat service.
Tomcat/Java Solution in Windows Azure
64 | W i n d o w s A z u r e L e a r n i n g S e r i e s 2 0 1 0
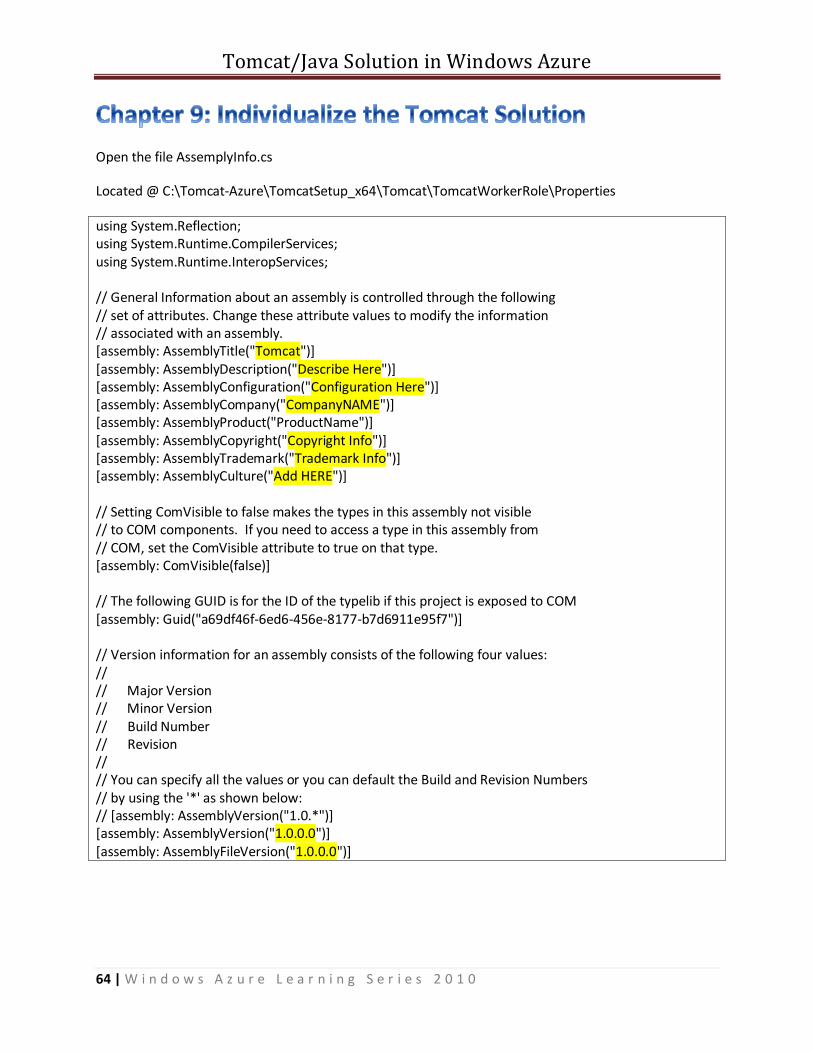
Open the file AssemplyInfo.cs
Located @ C:\Tomcat-Azure\TomcatSetup_x64\Tomcat\TomcatWorkerRole\Properties
using System.Reflection; using System.Runtime.CompilerServices; using System.Runtime.InteropServices; // General Information about an assembly is controlled through the following // set of attributes. Change these attribute values to modify the information // associated with an assembly. [assembly: AssemblyTitle("Tomcat")] [assembly: AssemblyDescription("Describe Here")] [assembly: AssemblyConfiguration("Configuration Here")] [assembly: AssemblyCompany("CompanyNAME")] [assembly: AssemblyProduct("ProductName")] [assembly: AssemblyCopyright("Copyright Info")] [assembly: AssemblyTrademark("Trademark Info")] [assembly: AssemblyCulture("Add HERE")] // Setting ComVisible to false makes the types in this assembly not visible // to COM components. If you need to access a type in this assembly from // COM, set the ComVisible attribute to true on that type. [assembly: ComVisible(false)] // The following GUID is for the ID of the typelib if this project is exposed to COM [assembly: Guid("a69df46f-6ed6-456e-8177-b7d6911e95f7")] // Version information for an assembly consists of the following four values: // // Major Version // Minor Version // Build Number // Revision // // You can specify all the values or you can default the Build and Revision Numbers // by using the '*' as shown below: // [assembly: AssemblyVersion("1.0.*")] [assembly: AssemblyVersion("1.0.0.0")] [assembly: AssemblyFileVersion("1.0.0.0")]
Tomcat/Java Solution in Windows Azure
65 | W i n d o w s A z u r e L e a r n i n g S e r i e s 2 0 1 0
Running Tomcat in Windows Azure