TO THE L ST - nutspublishing.com · L ST MAN! TO THE core rulebook the great war in the west a game...
16
L ST MAN! TO THE core rulebook the great war in the west a game by Tim Taylor
Transcript of TO THE L ST - nutspublishing.com · L ST MAN! TO THE core rulebook the great war in the west a game...

L ST MAN!
TO THE
core rulebook
the great warin the westa game byTim Taylor

1.0 GAME COMPONENTS1.1 GAMEBOARD
The Gameboard has two main components: the Map and the Season and Year Tracks. The Season & Year Tracks allow players to keep track of the current Game Turn. The Map is divided up into separate Areas in order to facilitate combat and movement.
1.2 PLAYING PIECESThe playing pieces (also called units) represent frontline mili-
tary forces. There are many kinds of pieces, but one type stands out - Armies. An Army acts like a container, holding other pieces within itself. Although it can contain many pieces, an Army and all its con-tents count as only one playing piece for stacking purposes.
1.2.1 MILITARY UNIT TYPESUnits represent front-line military forces of the major combat-
ants of World War 1. The unit counters included are the maximum number available to each player. There are four different basic types of military units:
• Armies• Infantry type units• Auxiliary type units• Forts
Armies contain other units, such as Infantry and Auxiliary pieces. Infantry comprise the main force in Armies, while Auxiliary units support the Infantry. Unlike other units, Forts represent installations and cannot move nor attack. Each type of unit is sum-marized in the Playing Pieces Characteristics Chart. For a detailed description of each unit type see section 8.0 Unit Manifest.
1.2.2 AREA STACKING LIMITA maximum of three (3) Friendly units, regardless of type or
size, can be in an area. Forts and empty armies do not count toward stacking limits. Stacking applies at all times even during move-ment. A unit may not move through an area that is already at its stacking limit.
1.2.3 GAME MARKERSDifferent types of markers are included to assist in play. Some
markers are printed with different backs.
CORE RULEBOOK This booklet contains all basic rules necessary to play this game. For set-up information as well as Advanced, Historical, and other Optional rules please see the THEATRE RULEBOOK.
France U.K. Belgium U.S. Germany
Armies - mobile side
Armies - entrenched side
Infantry type units - mobile side
Infantry type units - entrenched side
Auxiliary type units - samples
Forts
Season marker: used to keep track of current turn
VP marker: used to track Victory Points.
Counter-attack markers: see optional rule 15.2.2.b
Rail markers: place on units which use Rail Movement.
Strategic Movement markers: indicate units so moved.
2
Phase marker: used to keep track of current phase.

1.3 CARDSCards are the heart of TO THE LAST
MAN! The majority of actions can only be performed as the result of card play. Playing cards represents the logistical wherewithal needed to conduct military campaigns: ammunition, fuel, transport, and even reserves.
After playing a card, it is placed face up on the Discard Pile. Players draw any new cards from the unused portion of the deck, called the Draw Pile. The deck is reshuffled whenever the Draw Pile runs out of cards as well as at the end of every WINTER Seasonal Turn.
Players without the right cards are in trouble, and an empty hand usually indicates a retreat will soon follow. A player seeks to bankrupt his opponent’s hand while maintaining his own hand with as many cards as he can. Players must purchase new cards for their next turn during the Production Phase. As a general rule-of-thumb, players should buy as many cards as they can - one less card means one less opportunity. Each type of card is described in section 9.0 Card Manifest.
1.4 ARMY TEMPLATESArmy Templates are off-map placeholders for holding all of the
units contained within Armies. It’s important not to confuse the contents of one Army with another.
Army Templates have two sections, Infantry rondels on the bot-tom and Auxiliary squares on top. Only Infantry and Stoßtruppen units may be placed in the Infantry section. Only Auxiliary units may be placed in the Auxiliary section.
The number of each type of unit permitted in an Army is limited to the number of spaces available on the template. These unit limi-tations simulate the differences between each nations’ Armies.
2.0 SEQUENCE OF PLAY I PLACE REINFORCEMENTS II FIRST PLAYER TURN 1. Play “offensive” or “pass” 2. Movement phase 3. Declare battles 4. Combat phase III SECOND PLAYER TURN IV REPEAT TURNS II & III V PRODUCTION PHASE 1. Check supply status 2. Spend build points 3. Discard excess cards 4. Check for eft box losses VI ADVANCE SEASON MARKER
I – PLACE REINFORCEMENTS
Both players check the Game Events Chart to see if they get any Reinforcements, i.e., new units to place on the map. Arriving Reinforcements are placed in any Supplied Friendly or Disputed Areas within Stacking Limits.
II – FIRST PLAYER TURNThe First Player is always the German player unless advanced
rule 14.2 Bidding for Initiative is in effect. Player Turns are sub-divided into phases:
1. PLAY “OFFENSIVE” OR “PASS” In this phase, the player indicates whether or not he will
conduct offensive operations, by playing an Offensive card of one of the various types.
Offensive: Playing an Offensive type card allows the player to move any or all Friendly units on the map or Army Templates subject to movement rules and restrictions. He may also initiate new battle(s) and conduct Combat rounds therein.
Passing: Not playing an Offensive card means there will be no Battles nor Combat Phases for the player that Turn. Not playing an Offensive card is called “Passing.”
• The phasing player may move one unit only. This unit may not move into an Enemy Area even if that Area is empty; no Combat Phase occurs.
• Even though he doesn’t play an Offensive card, the Passing player may play a …Crisis! card.
• A Strategic Reserves! card may be played, allowing a sec-ond unit to be moved.
• If the player plays no cards at all, he has the option to dis-card one or more unwanted card(s) and draw new card(s) from the deck to replace them. Any cards so drawn cannot be played until the next player turn.
TO THE LAST MAN! - CORE RULEBOOK
Out of Supply markers: place on any unit that is not in supply in the Check Supply Status phase.
Retreat markers: place on any units that retreat to an area with an unresolved battle to indicate that such units may not participate in this battle and may not retreat again this combat phase. Remove at the end of combat.
Antwerp supply markers: In rare cases, Antwerp can be a supply source. Please see historical rules 14.2.3 and 14.2.5.
Placeholder for Auxiliary unit
Placeholder for Infantry unit
3
Fortify markers: placed on Armies that are Fortified.

2. MOVEMENT PHASEWhen an Offensive card is played, the Attacker (or Offensive)
player may move any or all units. Otherwise, the player Passes and is still allowed to move one unit (some restrictions apply).
A unit may move up to its normal movement allotment (usually one Area except for Cavalry, Biplanes, and Rail Moves). Units are moved one at a time and must always obey Stacking Limits (1.2.2).
When moving from a Friendly area, a unit may move into any adjacent Friendly, Disputed, or Enemy area. When moving from a Disputed area, a unit may never move into an Enemy area. When a Friendly unit moves into an Enemy Area, that area becomes Disputed as well as a Battle Area.
3. DECLARE BATTLESThis phase is only used when an Offensive type card has been
played. Newly initiated battles must be fought. That is, Enemy Areas which have just become Disputed this Player Turn must have a Combat round conducted. Whether there is Combat in any other Disputed Area is for the Offensive player to decide.
a– Announce Battle Areas. The Offensive player announces all Disputed Areas where he intends to battle. Players will fight one round of Combat in all such designated Battle Areas.
b– Play Cards. The Offensive player plays any combat enhancement cards (like Poison Gas! or Surprise Attack!) and designates which Battle Areas are affected by these played cards. The Defensive player may now also play any combat enhancement cards he wishes (e.g., Bad Weather or Poison Gas!), designating which Battle Areas are so affected.
4. COMBAT PHASEAll designated Battle Areas go through a separate Combat phase.
In a designated Battle Area, units fire at the opposing units by rolling dice, one die for each unit.
Any Hits a player rolls indicates the number of units (or other equivalents) the opposing player must lose. Losses can be satisfied in three ways: units, cards, or both.
NOTE: In all cases, the Attacker (or Offensive player) is the one whose Turn it currently is. The Defender (or Defensive player) is the other person.
Each Battle Area is resolved individually. Within a Battle Area each players’ units fire in a strict order:
NOTE: Before any dice are rolled, Cavalry units from either side may retreat before combat (the Offensive player chooses first).
a– Dogfight Phase. When both players have Biplanes involved in the same Battle Area, all Biplane fire is resolved during the Dogfight phase. Opposing Biplanes in the same Battle Area must fire exclusively at each other. Dogfight fire is resolved simultaneously; both sides take any losses immediately.
NOTE: Losses inflicted by Dogfighting Biplanes target only enemy Biplanes and can never affect other units (see 5.3.4 Annihilation for further ramifications).
NOTE: Dogfighting Biplanes may not fire again later in this Combat phase, even if all opposing Biplanes are eliminated.
If neither player, or only one player, has Biplanes in the Battle Area, skip the Dogfight phase and move on directly to the next phase.
b– Offensive Player’s Artillery Fire Phase. The Attacker’s Artillery units fire. The Defender takes any losses incurred, by removing units or playing Ersatz card(s).
c– Defensive Player’s Fire Phase. All of the Defender’s units fire (except Dogfighters). Attacker takes any losses incurred, by removing units or playing Ersatz card(s).
Retreat instead of Firing: Defending units may Retreat into adjacent Friendly or Disputed Areas instead of Firing. Some units may Retreat while others stay to fight. Place a Retreat marker on retreating units to show they have retreated this Combat phase. A unit which retreats loses all firepower and may not contribute to battle for the remainder of that Combat phase. Units forced to Retreat twice in the same Combat phase are eliminated instead. See 5.4.4 Retreat Into Combat for more information.
d– Offensive Player’s Fire Phase. All of the Attacker’s units fire (except Dogfighters). Defender takes any losses incurred, by removing units or playing Ersatz card(s).
e– Retreat Phase. Either player may retreat any or all units from the Battle Area into one adjacent Friendly or Disputed Area (Attacker chooses first).
4a. “SURPRISE ATTACK!” COMBATNOTE: When a Surprise Attack! card is played, the Attacker specifies one Battle Area where a special Combat Phase is con-ducted. Below, you will find the sequence of play for this special Surprise Attack! Combat Phase:
a– Dogfight Phaseb– Offensive Player’s Fire Phasec– Defensive Player’s Fire Phased– Retreat Phase
III – SECOND PLAYER TURNThe Second Player is always the Entente player unless advanced
rule 14.2 Bidding for Initiative is in effect.Repeat Player Turn Phases 1–4 above for the Second Player,
i.e., the Entente player is now the Attacker.
IV – REPEAT TURNS II & III Repeat Player Turns II and III, one after the other, until both sides “Pass” consecutively. Only after both sides Pass in turn, do you go on to the Production phase below.
V – PRODUCTION PHASEIn the Production Phase, players spend their allotment of
Build Points (BPs) to buy new units, more cards, and/or Entrench units. Players must first ascertain whether any of their units are unsupplied.
1. CHECK SUPPLY STATUSUnits are said to be “in Supply” when they can draw a line
from Friendly Area to Friendly Area, no matter how long, to a Friendly Supply Source. Units that are not in Supply at this time are considered to be “Unsupplied.”
4

YM
NOTE: Disputed Supply Source Areas (i.e., Supply Source Areas occupied by both Friendly and Enemy forces) function as Supply Sources only for units in that Area.
• Unsupplied Forts are reduced by one• Unsupplied Forts at one strength are eliminated• Unsupplied Armies lose one unit of the player’s choice• Unsupplied Armies at one or zero strength are eliminated• Unsupplied individual pieces are eliminated
2. SPEND BUILD POINTSPlayers consult the Build Points Chart (see map/Player Aid)
for how many Build Points (BPs) they can spend this Production Phase. Players may replenish their hands with new cards or Entrench Armies and Infantry units. Players may also build new units in any Supplied Friendly or Disputed Area, even adding them to Armies however they want.
3. DISCARD EXCESS CARDSEvery once in a while a player spends too much on cards and
ends up with more cards than he can legally hold (please see Maximum # of Held Cards Chart). In these cases, he must discard any cards in excess of this maximum (his choice).
4. CHECK FOR EFT BOX LOSSESThe EASTERN FRONT TRANSIT BOX represents the Russian
Front in World War I. The German player may move his units into the EFT BOX in order to get a boost in Victory Points (see 3.0 Winning The Game).
However, units in the EASTERN FRONT TRANSIT BOX are subject to removal. Roll one die for every 5 BPs of units (or fraction thereof ) in the EFT BOX. For every die roll of “1” the German player must eliminate one unit.
IMPORTANT: Do not use this phase if you are also playing with AT ALL COSTS!—the Great War in the East.
VI – ADVANCE SEASON MARKERAdvance the Season marker to the next season. Reshuffle the
deck at the end of every WINTER season. New Seasonal Turns begin all over again with Game Phase I – PLACE REINFORCEMENTS. Check for Game Events in the upcoming Season.
NOTE: The 23rd Turn, WINTER 1919-20, is the last Seasonal Turn of TO THE LAST MAN! You will almost never see it, someone will usually have won before then.
3.0 WINNING THE GAME3.1 VICTORY POINTS (VPs)
Victory Points may be totaled at any time. Add together all Victory Points from German-Friendly Areas. VPs in Disputed and Enemy Areas are not counted. To this base VP total, add or substract the Victory Point Modifications listed below. Reference this Modified VP total to the Victory Chart (located on the player’s aid card) to determine the current Level of Victory.
VICTORY POINT MODIFICATIONS+ 1VP for every currently eliminated Entente Army.- 1VP for every currently eliminated German Army.+ 1VP for failing to remove Infantry required by an Entente
Military Crisis! (for each occurrence).- 1VP for failing to remove Infantry required by a
German Military Crisis! (for each occurrence).
+ 1VP for every 5 BPs worth of units in the EFT Box (1914-1917 only).*
* This 5BPs = 1VP modification is only used when playing solely with TTLM! Do not use this modification when linked with AT ALL COSTS! since events on the Russian front are directly represented there.
Total Blockade Effects on VPs by year-1 VP SPRING 1916 to WINTER 1916-17-2 VPs SPRING 1917 to WINTER 1917-18-3 VPs SPRING 1918 to WINTER 1918-19-4 VPs SPRING 1919 to WINTER 1919-20
3.2 ARMISTICE - CEASEFIREPlayers can try to end the game at any time. Either player may
request Armistice at any time, and if the other player agrees the game ends at the current Level of Victory. It’s more likely that the other player will want to continue playing, striving for a better Victory. Regardless, the game ends when a Decisive Victory has been achieved.
3.3 ARMISTICE - SURRENDER (player resignation)A player may resign the game at any time, except when he is
winning. This indicates a humiliating surrender and so the Level of Victory is considered one level worse for him. For example, if the German player resigns during a Stalemate it’s considered a Marginal Entente Victory.
4.0 MOVEMENT4.1 PROCEDURE
When an Offensive type card is played, the Attacker may move any or all units.
Otherwise, the player Passes and is still allowed to move one unit (but not into an Enemy Area, even if empty). Although moving into or out of armies within in the same area counts as zero areas moved, it still counts as having moved a unit.
Movement must be from area to adjacent area, or into and out of an Army. A unit may move up to its normal movement point allotment (usually one Area except for Cavalry, Biplanes, and Rail Moves). Units are moved one at a time and must always obey Stacking Limits (1.2.2).
There are four kinds of Area status, based on who controls the Area in question:
• Friendly Area: Your units were the last ones to occupy or move through this Area. All Areas in your country are Friendly in Summer 1914. All Areas on your side of the frontline are Friendly when a scenario begins.
5
TO THE LAST MAN! - CORE RULEBOOK
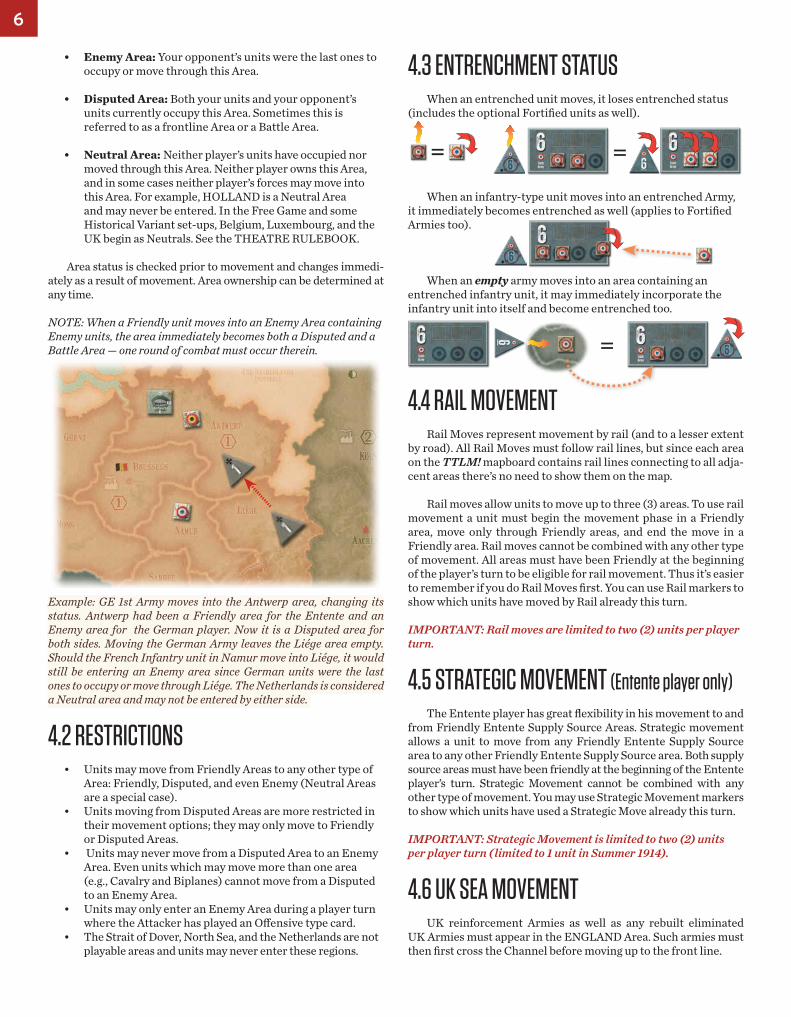
• Enemy Area: Your opponent’s units were the last ones to occupy or move through this Area.
• Disputed Area: Both your units and your opponent’s units currently occupy this Area. Sometimes this is referred to as a frontline Area or a Battle Area.
• Neutral Area: Neither player’s units have occupied nor moved through this Area. Neither player owns this Area, and in some cases neither player’s forces may move into this Area. For example, HOLLAND is a Neutral Area and may never be entered. In the Free Game and some Historical Variant set-ups, Belgium, Luxembourg, and the UK begin as Neutrals. See the THEATRE RULEBOOK.
Area status is checked prior to movement and changes immedi-ately as a result of movement. Area ownership can be determined at any time.
NOTE: When a Friendly unit moves into an Enemy Area containing Enemy units, the area immediately becomes both a Disputed and a Battle Area — one round of combat must occur therein.
Example: GE 1st Army moves into the Antwerp area, changing its status. Antwerp had been a Friendly area for the Entente and an Enemy area for the German player. Now it is a Disputed area for both sides. Moving the German Army leaves the Liége area empty. Should the French Infantry unit in Namur move into Liége, it would still be entering an Enemy area since German units were the last ones to occupy or move through Liége. The Netherlands is considered a Neutral area and may not be entered by either side.
4.2 RESTRICTIONS• Units may move from Friendly Areas to any other type of
Area: Friendly, Disputed, and even Enemy (Neutral Areas are a special case).
• Units moving from Disputed Areas are more restricted in their movement options; they may only move to Friendly or Disputed Areas.
• Units may never move from a Disputed Area to an Enemy Area. Even units which may move more than one area (e.g., Cavalry and Biplanes) cannot move from a Disputed to an Enemy Area.
• Units may only enter an Enemy Area during a player turn where the Attacker has played an Offensive type card.
• The Strait of Dover, North Sea, and the Netherlands are not playable areas and units may never enter these regions.
4.3 ENTRENCHMENT STATUSWhen an entrenched unit moves, it loses entrenched status
(includes the optional Fortified units as well).
When an infantry-type unit moves into an entrenched Army, it immediately becomes entrenched as well (applies to Fortified Armies too).
When an empty army moves into an area containing an entrenched infantry unit, it may immediately incorporate the infantry unit into itself and become entrenched too.
4.4 RAIL MOVEMENTRail Moves represent movement by rail (and to a lesser extent
by road). All Rail Moves must follow rail lines, but since each area on the TTLM! mapboard contains rail lines connecting to all adja-cent areas there’s no need to show them on the map.
Rail moves allow units to move up to three (3) areas. To use rail movement a unit must begin the movement phase in a Friendly area, move only through Friendly areas, and end the move in a Friendly area. Rail moves cannot be combined with any other type of movement. All areas must have been Friendly at the beginning of the player’s turn to be eligible for rail movement. Thus it’s easier to remember if you do Rail Moves first. You can use Rail markers to show which units have moved by Rail already this turn.
IMPORTANT: Rail moves are limited to two (2) units per player turn.
4.5 STRATEGIC MOVEMENT (Entente player only)The Entente player has great flexibility in his movement to and
from Friendly Entente Supply Source Areas. Strategic movement allows a unit to move from any Friendly Entente Supply Source area to any other Friendly Entente Supply Source area. Both supply source areas must have been friendly at the beginning of the Entente player’s turn. Strategic Movement cannot be combined with any other type of movement. You may use Strategic Movement markers to show which units have used a Strategic Move already this turn.
IMPORTANT: Strategic Movement is limited to two (2) units per player turn ( limited to 1 unit in Summer 1914).
4.6 UK SEA MOVEMENT UK reinforcement Armies as well as any rebuilt eliminated
UK Armies must appear in the ENGLAND Area. Such armies must then first cross the Channel before moving up to the front line.
6
= =
=

UK units (only) can use sea movement at a rate of one unit per movement phase. Whether moved as part of an Offensive or as the Pass Move, one (1) UK army or unit can move from the ENGLAND area to any coastal Friendly or Disputed Entente Supply Source area. UK units may instead move from any coastal Friendly or Disputed Entente Supply source area back to the ENGLAND area. Sea move-ment cannot be combined with any other type of movement.
UK forces may never sea move into an Enemy-controlled Entente Supply Source Area (i.e., there are no invasions to the French or Belgian coasts).
IMPORTANT: Units cannot use Sea Movement to retreat during the combat phase.
NOTE: In the Campaign Game, the two units which begin set up in ENGLAND (1st UK Army and an infantry unit), must be kept separate while they remain in the ENGLAND Area. That is, while in ENGLAND, the infantry may not move into the 1st UK Army.
5.0 COMBAT5.1 BATTLE AREAS
5.1.1 CREATING DISPUTED AREASDisputed Areas are created when a Friendly unit is moved
into an Enemy Area. Disputed Areas can only be created during an Offensive. Battles must be declared in newly created Disputed areas, and a round of Combat must be fought therein. Thus newly created Disputed Areas automatically become Battle Areas.
5.1.2 DECLARING BATTLESA player may announce as many battles as he wishes during
the Declare Battles phase (exception: Limited Offensive cards which allow at most one Battle Area to be declared). Once a battle has been declared it must be resolved during the Combat Phase. A player cannot change his mind after other battles have gone badly for him — he must still fight all declared battles. As stated above, Battles must be declared in newly created Disputed areas.
All designated Battle Areas go through a separate Combat Phase. In a designated Battle Area, units fire at the opposing units by rolling dice. Any Hits a player rolls indicates the number of units (or other equivalents) which the opposing player must lose.
5.2 FIRE RESOLUTION5.2.1 FIRING
Each Battle Area is resolved individually. Before any dice are rolled, Cavalry units from either side may retreat before combat (Attacker chooses first). Please see section 5.4.3 Cavalry Retreat for more details.
Each players’ units fire (i.e., roll dice) in a strict order:
a– Dogfight Phaseb– Offensive Player’s ArtilleryFire Phasec– Defensive Player’s Fire Phased– Offensive Player’s Fire Phase
NOTE: The Surprise Attack! order is somewhat different:
a– Dogfight Phaseb– Offensive Player’s Fire Phasec– Defensive Player’s Fire Phase
NOTE: In all cases, the Attacker or Offensive Player is the one whose Turn it currently is, i.e., the one who played the Offensive card. The Defender or Defensive Player is the other person.
If there are multiple Battle Areas, the Offensive player decides the order in which combats are resolved. Combat in an area is always completely resolved before beginning with another area.
Units fire at each other by rolling one (1) six sided die for each unit in the Battle Area, in the order dictated by the Combat Sequence. Certain conditions may cause some units not to fire (e.g., a Siege Gun unit in a Battle where there are no Forts present).
5.2.2 FIREPOWERA unit’s Firepower — F followed by a number — indicates what it needs to roll in order to Hit.
• F1 means that a Hit occurs on a die roll of “1.”• F2 means a Hit occurs on a die roll of “1” or “2.”• F3 a Hit occurs on a die roll of “1” or “2” or “3.”• [F#] means that the player rolls a die for that unit only in
certain circumstances. Please see 8.0 Unit Manifest, as well as the Unit Capabilities Chart for further details.
5.2.3 HITSHits cause Enemy losses which must be removed immediately.
Hits can be paid for by eliminating units and/or cards as detailed below.
5.3 TAKING LOSSESWhen a player rolls a hit during combat his opponent must
satisfy the hit by taking a loss. Losses can be taken in the form of units, cards, or a combination thereof.
5.3.1 UNIT LOSSESOne unit may be removed from the mapboard to pay for each Hit
taken. Any units removed from the board are placed in the player’s force pool. Unit losses are removed one at a time. Any unit losses must come from the strongest unit in that Battle Area (usually an Army or Fort). When units are of equal strength the player taking the loss decides which unit is removed.
Armies have a strength equal to the number of units on its army template. For example, an army with 3 infantry and 2 cavalry has 5 strength. Forts have a strength equal to the number on the fort counter on the map (e.g., the Verdun 4 counter has 4 strength). All other individual units on the map have a strength of 1.
Losses applied to an Army must come from the most numerous or prevalent type of unit in the Army. When units are of equal strength the player taking the loss decides which unit is removed. For example, if an Army containing 3 Infantry, 2 Artillery, and 1 Cavalry were forced to take 1 Hit it would have to lose 1 Infantry piece (the most numerous type).
NOTE: An Army that loses its last unit in Combat is eliminated.
7
TO THE LAST MAN! - CORE RULEBOOK

Losses applied to a Fort reduce it by that number of Hits. For example, if the Antwerp Area Fort were forced to take a Hit, rotate the Antwerp 3 Fort marker so that the number 2 faces the owning player. If forced to take another Hit, rotate the Fort marker again so that the 1 faces the player. When a fort reaches zero (0) strength, it is removed from the game (except: see Sedan).
Example: The Entente player suffers 3 hits during a battle in the Verdun area. His forces consist of three units: an individual cavalry unit, an entrenched army (containing 3 infantry and 2 artillery), and the Verdun fort at 4. The first hit must come from the army since it has the largest strength of 5. Infantry units are the most numerous component of that army so an infantry unit must be taken as the first loss. The second loss can be taken from either the 4 fort or the army as it now has 4 units. The Entente player decides to reduce the 4 fort to a 3 fort satisfying the second loss. The third loss must now come from the army as it is once again the strongest unit. The player now has a choice of taking either an infantry unit or artillery unit for the loss since there are two of each. Because the army is entrenched (and he’s on the defensive) the player elects to take an artillery unit for his third loss.
5.3.2 CARD LOSSESErsatz cards can cover losses too. Playing an Ersatz 3 card is equal to taking up to 3 Hits. Likewise, an Ersatz 2 card equals up to 2 Hits. All other cards may be used as an Ersatz 1 to take a single hit. A player can use multiple cards to absorb losses. Any excess Ersatz left over is lost; it cannot be carried over into other battles or phases.
Example: If you use an Ersatz 3 to absorb two (2) hits in the Artillery Fire Phase the one (1) remaining Ersatz is lost and cannot be used.
5.3.3 UNIT AND CARD LOSSESAny combination of units and cards can be used to satisfy losses;
all rules concerning Losses apply.
5.3.4 ANNIHILATIONPlayers are never forced to play cards to satisfy remaining
losses when all Friendly units are eliminated from a Battle Area. In other words, a player is never compelled to take losses in excess of the number of his pieces he has in the Battle - he can completely eliminate all his units in the Area, instead. This is a good way to cut losses.
Example: suppose the German 1st Army containing 5I and 2A, causes 3 Hits to a single French Infantry unit. The French player has the option to lose 3 Hits of Ersatz cards, thus allowing the unit to continue to exist. On the other hand, he can also choose to eliminate that one Infantry unit from the Battle and so not suffer the additional 2 Hits loss.
5.4 RETREATSThere are three kinds of retreat in TO THE LAST MAN!
- Retreat Instead of Firing, Retreat After Combat, and Cavalry Retreat. Place a Retreat marker on each unit that retreats; these are removed at the end of the Combat phase. A unit which retreats loses all firepower and has no effect on battles for the remainder of that Combat phase. Units may never retreat into an Enemy area.
5.4.1 RETREAT INSTEAD OF FIRINGThe Defending player may retreat any number of units from a
Battle Area instead of firing them (i.e., rolling dice). The defender can retreat any number of units and leave any number behind to fight normally. Retreating units can move to any adjacent Friendly or Disputed area, and such units may retreat separately into dif-ferent areas.
NOTE: If all units retreat and the opposing player has cavalry in the area, the retreating units may be subject to Pursuit Fire (see 8.3.1 Cavalry as well as the Cavalry section of the Unit Capabilities Chart).
5.4.2 RETREAT AFTER COMBATEither player may retreat any number of surviving units from a
Battle Area at the end of combat. Players can retreat any number of units and leave any number behind. The Attacking player chooses first whether to retreat.
Retreating after combat is more restricted than other types of retreat. All units in a single Battle Area which retreat after combat must be moved to the same adjacent Friendly or Disputed area.
5.4.3 CAVALRY RETREATCavalry units can retreat before combat occurs. Before any dice
are rolled, Cavalry units from either side may retreat (Attacker chooses first). Retreating units can move to any adjacent Friendly or Disputed area, and multiple units may retreat separately to different areas.
NOTE: Cavalry retreats are not subject to Pursuit Fire.
5.4.4 RETREAT INTO COMBATIt is possible for units to retreat into an area where combat has
not yet been resolved. Retreated units do not participate in combat nor can they take losses in this subsequent battle. Units forced to retreat twice in the same player turn are eliminated. This might occur in two ways:
• Retreated units left with no Friendly non-retreated forces in the area after Combat is resolved.
• Force-retreat for Empty Armies.
6.0 SUPPLYMilitary forces require supplies to function - they need ammu-
nition, food, fuel and other equipment. If an army’s supplies cannot reach it, the army will lose the ability to fight effectively. Units inde-pendent of armies will dissolve even more quickly without supplies.
6.1 SUPPLY SOURCESSupply Sources are the colored half filled-in circles along the
Map edge. In TTLM!, Green Supply Sources are used by the German player while the Blue Supply Sources are for the Entente.
8
k1
k2
k3

Areas containing sources are called Supply Source Areas. Supply Source Areas represent rail links to the player’s off-map Industrial Production Centers.
6.2 CHECKING SUPPLYSupply is checked once each turn during the Supply Phase.
Units are in supply when they can draw a line of any length from area to area, solely through adjacent Friendly areas to a Friendly Supply Source Area. If a unit cannot do this, then it is considered to be Out of Supply (OoS).
6.3 DISPUTED SUPPLY SOURCESSupply sources in a Disputed area can only supply Friendly
units in that area.
6.4 IN SUPPLY EFFECTSArmies and Infantry units that are in supply are eligible to
Entrench. Areas that are in supply may receive newly built units during the Production Phase.
6.5 OUT OF SUPPLY EFFECTSIn the Production Phase, if a unit is found to be Out of Supply,
place an OoS marker on the unit and it suffers the following attri-tion results.
• Forts are reduced by one (1) strength. Out of Supply Forts at 1 strength are eliminated.
• Armies lose one (1) unit of the owning player’s choice. An Army that loses its last unit due to being Out of Supply is eliminated. Empty Armies are likewise eliminated.
• Individual units on the map are eliminated.• Cannot receive reinforcements or newly built units.
NOTE: However, Out of Supply units can still entrench.
7.0 PRODUCTIONPlayers consult the Build Point Chart to see how many Build
Points (BPs) they can spend during the Production Phase. BPs may be spent on any combination of new units, entrenching, or more cards. Both players expend BPs at the same time. BPs must be used during the current Production Phase or they are lost.
7.1 BUYING CARDSThe Production Phase is your only opportunity to add cards
to your hand. Players must announce how many cards are being bought before drawing them face down from the top of the draw pile. Only the announced number of cards can be drawn. Drawn cards cannot be viewed until all of a player’s BPs are spent (this prevents players from continuing to draw cards until they get the card they want).
Players may not hold more cards than the maximum specified on the Card Limit Chart. If a player is found to have more than the limit, he must immediately discard any excess cards and place
them face up on the discard pile. Any BPs expended on the extra cards are lost.
7.2 BUYING UNITSUnits built during the Production Phase may be placed in any
army or individually in any Friendly or Disputed area (must be in supply). Eliminated armies that get rebuilt are treated differently.
7.3 REBUILDING ARMIESArmies ordinarily enter play as reinforcements according to
the Turn Record Track. On the other hand, eliminated armies can only be rebuilt during the Production Phase. Rebuilt armies must be placed on the map in a Supplied, Friendly area within their home country.
EXCEPTION: US Armies, like all US units, are a special case; they treat France as if it were their home country.
Example: Since the Belgian army can only be rebuilt in a Supplied Friendly Belgian area, should no Belgian areas qualify, the Belgian Army may not be rebuilt.
7.4 ENTRENCHINGA player may entrench up to four (4) units on the mapboard
by expending one (1) BP during Production - flip these counters to their entrenched side.
IMPORTANT: Each player may spend only 1 BP on entrench-ments in Seasonal Turns 1 and 2 (SUMMER 1914 & AUTUMN 1914) . Seasonal Turn 3 (WINTER 1914-15) and thereafter have no such limitations on entrenching.
7.5 UPGRADING INFANTRY TO STOßTRUPPENWhen upgrading an Infantry unit to a Stoßtruppen unit, remove
the infantry piece and replace it with a Stoßtruppen unit in the same area or Army Template where it came from. Put the infantry unit back in the German force pool.
7.6 BUILD POINT COSTSOne Build Point (1 BP) will purchase: • 1 Card or• 1 Army (Empty) or• 1 Infantry unit or• 1 Cavalry unit or• 1 Artillery unit or• 1 Biplane unit or• 1 Siege Gun unit (German only) or• 1 Paris Gun unit (German only) or• Entrench 4 units (an Army equals 1 unit) or• Upgrade 1 German Infantry into Stoßtruppen• Fortify an Entrenched Army (optional).
Two Build Points (2 BPs) can buy: • 1 Tank unit or• 1 Stoßtruppen unit (German player only).• Rebuild 1 Commonwealth Infantry (UK only).
9
$TO THE LAST MAN! - CORE RULEBOOK

8.0 UNIT MANIFESTThe letters or symbols in parentheses below indicate the
abbreviations used for these unit types on scenario sheets.
8.1 ARMY UNITS (�)Armies act as containers, holding other units within their
command and control structure. Although many units may be contained within an Army, it only counts as one unit for Stacking Limit purposes. A single Army unit on the map represents all units placed on its off-map Army Template. An Army may only contain units of its own color or nationality (except US Infantry may be placed in any Entente Army).
Infantry and auxiliary type units may move freely into or out of Armies during the Movement Phase or when Retreating. In addition, Army contents may be altered during Production and Reinforcement Phases but no movement from area to area is allowed at this time.
Armies may move one Area in the Movement Phase. Armies have no intrinsic Firepower apart from their contents, and roll no dice in battle. The strength of an Army is the sum of the number of all units it contains.
Example: An Army containing 3 Infantry, 1 Cavalry, and 2 Artillery pieces has a strength of 6.
EMPTY ARMIES: An Army containing no units is consid-ered to be “Empty.” An Empty Army has a strength of zero and no Firepower. Empty Armies do not count toward area stacking limits.
Empty Armies, even when accompanied by other Friendly units, must always retreat from Disputed Areas by the end of the Movement (or as soon as possible when not occur-ring in the Movement phase).
Example: During the Production phase the Entente player reorgan-izes his armies in the Artois area, leaving the UK 2nd Army Empty and the British 1st Army with three Infantry units. Artois is also occupied by the German 4th Army and the German player declares Artois a Battle Area in his player turn. The UK 2nd army must be retreated during the Defensive Player’s Fire Phase.
Should an Empty Army ever be in a Disputed Area without the presence of any Friendly Infantry type units, it is immediately eliminated.
IMPORTANT: An Army that loses its last unit (that is, becomes Empty), either due to Combat losses or from being Out of Supply, is eliminated.
ELIMINATED ARMIES: Eliminated Armies count toward Victory (see Victory Point Modifications in section 3.1). Eliminated Armies cost one Build Point (1 BP) to re-build. Unlike other units, an eliminated Army may only be brought back in Friendly Areas within its home country (except US builds in Friendly areas in France). Rebuilt armies are Empty.
ENTRENCHMENT: In the Production Phase, Armies may be Entrenched by expending BPs. All Infantry pieces
contained within an Entrenched Army are considered Entrenched as well, even recently moved units. Auxiliary units get no benefit from being in an Entrenched Army.
To Entrench an Army, flip the counter to its Entrenched side. Entrenched Armies that move lose their Entrenched status - flip the counter back to its mobile (i.e., not Entrenched) side.
NOTE: In the special case where an empty Army moves into an Area containing independent Entrenched Infantry unit(s), and takes in at least one of them, the Army also becomes Entrenched.
8.2 INFANTRY TYPE UNITSInfantry type units are the basic ingredient of all Armies.
Without Infantry as a backbone, an Army is fragile and can actu-ally become something of a liability.
8.2.1 INFANTRY ( I )HISTORY: An Infantry piece represents from 1 to 3 Corps (2 to 6+ divi-sions), depending on quality, nationality, as well as how far advanced the war is. As the war progressed all units were worn down and dissipated, while certain nationalities fought better than others.
Infantry units may move one Area during the Movement Phase. Infantry pieces have an F1 Firepower, which means they inflict an Enemy loss on a die roll of “1.” Infantry units cost 1 Build Point each to produce (in the Production phase).
IMPORTANT: Only removing Infantry type unit(s) will satisfy ...Military Crisis! cards, when played. Failure to remove Infantry unit(s) from the mapboard or an Army Template in response to your opponent’s playing a …Military Crisis! card results in a VP adjustment (see section 3.1 Victory Points).
ENTRENCHMENT: Infantry units have the ability to Entrench. In the Production Phase, Infantry units may Entrench by expending Build Points (BPs) — flip the unit to its entrenched side. Infantry pieces within an Entrenched Army are automatically Entrenched too. Entrenched pieces that move lose their Entrenched status - flip the unit back to its mobile (i.e., not Entrenched) side.
Entrenched Infantry units have an enhanced Defensive Firepower (i.e., Firepower when it’s not the player’s turn). Entrenched Infantry Fire Defensively at F2, that is they inflict a hit on a die roll of “1” or “2.” Offensively, Entrenched Infantry still have a Firepower of F1.
8.2.2 STOßTRUPPEN (S)NOTE: Stoßtruppen units are available only to the German player.
HISTORY: Stoßtruppen were troops specially trained to infiltrate front-line trenches. Their extensive training emphasized personal initiative in order to advance as far and as fast as possible. Taking full advantage of terrain and surprise, small formations of Stoßtruppen would avoid enemy strong-points, opting instead to infiltrate into the enemy’s rear areas — leading to disruption, panic, and sometimes even to a break-through. Created by the nation bearing the brunt of fighting, the con-cept of German Stoßtruppen reflects a doctrinal approach to solving the problem of breaching the enemy’s trenches. Stoßtruppen introduce the infantry tactics used 20 years later, in World War 2. Stoßtruppen units represent about 2 Corps (4 divisions).
10

Stoßtruppen units are treated like Infantry in all respects except Firepower, BP cost, and the ability to force defenders to retreat.
Stoßtruppen units have F2 Firepower, which means they inflict a Hit on a die roll of “1” or “2.” Stoßtruppen units may move one Area during the Movement Phase.
Stoßtruppen units do not Entrench and receive no benefit from being part of an Entrenched Army (they don’t need it any-way). Stoßtruppen also do not get the benefit of being within a Fortified Army.
Starting in the SUMMER 1917 Production Phase and thereafter, Stoßtruppen units may be built by the German player at a cost of 2 BPs each to produce. In addition, each Production phase the German player may opt to “upgrade” one standard Infantry piece into a Stoßtruppen unit at a cost of 1 BP. When upgrading, simply replace the infantry unit with a Stoßtruppen unit. The infantry unit is placed back in the German force pool.
NOTE: There are 10 Stoßtruppen units that enter the game as rein-forcements in 1918. If there are less than ten available in the German Force Pool, then Infantry units may be substituted on a one-to-one basis. If there are not enough Infantry available then the shortfall is lost.
FORCED RETREAT: For every attacking Stoßtruppen unit that scores a Hit in a Battle Area, one of the Defender’s Armies must Retreat After Combat (if not beforehand), regardless of how that Hit is paid for.
8.2.3 COMMONWEALTH INFANTRY ( I )NOTE: Commonwealth Infantry units are available only to the Entente (UK) player.
HISTORY: Commonwealth forces served with distinction in WW1. To illustrate this, Commonwealth infantry units are differentiated from other UK infantry. These two units represent Canadian troops as well as ANZAC forces (Australian and New Zealand Army Corps).
Commonwealth infantry units are treated just like other UK infantry units except for Firepower and rebuild cost. Commonwealth units have an F2 Firepower (Offense and Defense) and cost 2 BPs to rebuild after being eliminated.
INITIAL PLACEMENT: The Canadian and ANZAC Infantry units enter play in a unique way. Rather than initially appearing as reinforcements or getting built in Production, instead they are substituted for UK infantry units already on the mapboard. Commonwralth units are swapped for an on-map UK infantry unit during the Reinforcement Phase of the Seasonal Turn below:
Canadian unit • AUTUMN 1915 (Turn 6)ANZAC unit • SPRING 1917 (Turn 12)
NOTE: When setting up scenarios set later in the war, the Entente player may set up Commonwealth units just like any other UK Infantry.
8.3 AUXILIARY TYPE UNITS8.3.1 CAVALRY (C)
HISTORY: By World War I, Cavalry’s usefulness had been greatly diminished by the advent of machine-guns, barbed wire, and trenches. Accordingly, Cavalry units in this game usually have no Offensive Firepower. A Cavalry unit represents approximately 1 Cavalry Corps (3+ divisions).
Cavalry has no Offensive Firepower except as specified below. However, riders can dismount and deploy their weapons effec-tively in defense. So Cavalry has F1 Defensive Firepower. Cavalry units cost 1 BP to produce.
Cavalry units may move up to two Areas during the Movement Phase. When moving from the first Area to the second Area, they may not move from a Disputed Area to an Enemy Area.
CAVALRY RETREAT: Only Cavalry units have the capa-bility to retreat before combat. Cavalry may retreat before any combat dice are rolled (Attacker retreats first). See section 5.4.3 Cavalry Retreat.
RAIDING FIRE: Cavalry units may attack at F1 when in a Battle Area containing no enemy Infantry type units.
PURSUIT FIRE: Cavalry may fire F1 against Retreating units. This is known as Pursuit Fire and can only be per-formed when enemy units retreat instead of firing in the Combat Phase. This die roll is in addition to any other Combat dice rolling and occurs immediately following your opponent’s declaration to retreat his units from Battle.
IMPORTANT: If any enemy Infantry type units remain in the Battle Area or if there is Cavalry present in the retreating force, Pursuit Fire is not possible.
8.3.2 ARTILLERY (A)HISTORY: Heralding every battle, artillery barrages played a funda-mental rôle in World War 1. While smaller guns are subsumed within infantry units, Artillery units comprise much heavier guns of 210mm or larger. An Artillery unit represents 2 or more Artillery regiments.
Artillery units normally have a Firepower of F1, which means they inflict a hit on a die roll of “1.” Card play may increase this Firepower. Artillery units fire twice Offensively, once during the Offensive Player’s Artillery Fire Phase and a second time during the Offensive Player’s Fire Phase. The play of a Surprise Attack! card reduces this to only one attack.
Artillery units may move one Area during the Movement Phase. Artillery units, moving by themselves, cannot change Area ownership. That is, an Artillery piece cannot conquer or hold an Area all by itself. Artillery units each cost 1Build Point to produce.
IMPORTANT: Artillery units unaccompanied by Friendly Infantry type units, when caught in an Area with Enemy Infantry type units, are eliminated at the end of the Movement or Combat phases.
11
TO THE LAST MAN! - CORE RULEBOOK

DEPLOYMENT LIMITATIONS: To reflect a more historical artillery doctrine and usage, the number of artillery units each army can hold is limited:
1918 UK MATÉRIEL SUPERIORITY: (historical option) By 1918, UK armies enjoyed the most lavishly supplied heavy artillery formations of any nationality. To reflect this matériel superiority, beginning with the SPRING 1918 turn, all UK Artillery units fire F2 for their Defensive Fire. Poison Gas! cards increase UK Artillery Defensive Fire to F3. UK Artillery Offensive Fire remains unaffected.
NOTE: Flip UK Artillery units over in SPRING 1918.
8.3.3 SIEGE GUNS (G)NOTE: Siege Guns are available only to the German player
HISTORY: Siege Gun units represent super-heavy howitzers firing 305mm or 420mm shells. Products of Krupp craftsmanship, even small numbers of these mammoth guns can pulverize stationary targets - like immobile Forts, for instance.
Siege Gun units may only roll dice during Offensive Fire in a Battle Area containing an Enemy Fort, otherwise they have no Firepower at all. When attacking Enemy Forts, Siege Guns have an F3 Firepower, which means they inflict a hit on a die roll of “1”, “2”, or “3”.
NOTE: Siege Guns never fire Defensively.
Whenever a Siege Gun rolls a Hit, the Entente player must allocate that Hit to the Fort. Of course, Ersatz cards may be used to absorb these losses, just like any other Hits. However, if the Entente player does not have an Ersatz card to cover the hit delivered by the Siege Gun, then the Fort unit gets reduced a step (even if it ordi-narily would not qualify as the strongest Entente unit in the area).
Siege Gun units fire twice Offensively, once during the Offensive Player’s Artillery Fire Phase and once during the Offensive Player’s Fire Phase, when Artillery fires. However, Siege Guns are not con-sidered Artillery units and cards like Poison Gas! do not affect them.
Siege Gun units may move one Area during the Movement Phase. Siege Gun units each cost 1 BP to produce.
IMPORTANT: Siege Guns can never retreat and are eliminated if they are part of an army that does retreat.
IMPORTANT: Siege Guns, moving by themselves, cannot change Area ownership. That is, a Siege Gun unit cannot conquer or hold an Area all by itself.
IMPORTANT: Siege Gun units unaccompanied by Friendly Infantry type units, when caught in an Area with any Enemy units (except Forts), are eliminated at the end of the Movement or Combat phases.
8.3.4 BIPLANES (B)HISTORY: Used initially only for observation, biplanes (as well as mono planes and tri-planes) eventually towered over all major battles on the western front. A Biplane unit represents 750–1000 Biplanes (depending on nationality) deployed in a supporting rôle.
Biplane pieces have an F1 Firepower, which means they inflict an Enemy loss on a die roll of “1.” Biplane units may participate in combat in one of three ways, but only one method per battle may be used (see below).
Biplanes may move up to two Areas during the Movement Phase. When moving from the first Area to the second Area, they may not move from a Disputed Area to an Enemy Area.
Biplanes each cost 1BP to produce. Biplanes may only be built in 1916 and thereafter. Individual Biplane counters are marked with the year they become available.
IMPORTANT: Biplanes may not participate in the Combat phase after a Bad Weather card has been played.
IMPORTANT: Biplanes, by themselves, cannot change Area ownership. That is, a Biplane piece cannot conquer or hold an Area all by itself.
IMPORTANT: Biplane units unaccompanied by Friendly Infantry type units, when caught in an Area with Enemy Infantry type units, are eliminated at the end of the Movement or Combat phases.
DEPLOYMENT LIMITATIONS: Each Army can hold a maximum of one (1) Biplane unit (doctrinal limitations).
BIPLANE BATTLE METHODS
1. DOGFIGHTS: When Friendly Biplanes are in a Battle Area with Enemy Biplanes, a “Dogfight” must occur. When this happens all Biplanes fire only at each other during the Dogfight Phase. All Biplanes in the area must participate in this Dogfight even if players don’t have an equal number of planes. Both players roll attack dice and resolve combat losses simultaneously in the Dogfight Phase. All Hits rolled apply only to Biplane units; other units remain unaffected by the Dogfight. Any Dogfighting Biplanes that survive may not fire again later during the Player’s Fire phase.
2. GROUND ATTACK: When Friendly Biplanes are in a Battle Area and are unopposed by Enemy Biplanes, they may fire F1 normally in the appropriate Fire Phase.
3. DEFENSIVE REACTION: When Biplanes are defending in an area without any attacking Enemy Biplanes (i.e., there is no Dogfight), they can react to the attack. Each Reacting Biplane forces the attacker to re-roll one successful hit by an Infantry type unit. Reacting Biplanes cannot also engage in Ground Attack.
DEFENDER SCRAMBLE: (Advanced rule 13.7)Defender’s Biplane units in an area adjacent to a Battle Area (and not already embattled) may shift such Biplanes into that
12
Max. # of Artillery units per Army by year & nationYear GE UK FR US
1914 1 1 1 -
1915 2 1 1 -
1916 3 2 2 -
1917 3 2 2 -
1918 3 2 2 1
1919 3 2 2 2

Battle Area to lend support (if Stacking Limits allow). This occurs just before a battle is resolved and can prove to be a very nasty surprise.
• If Enemy Biplanes are present, Dogfight ensues.• Otherwise, all Biplanes which have scrambled into battle
must use Defensive Reaction, Ground Attack is not allowed.
8.3.5 TANKS (T)HISTORY: Tanks were a product of late-war desperation to pierce the front-line by any means possible. Created by nations with the greatest access to natural resources, Tanks reflect a mechanistic, industrial approach to solving the problems of breaching the enemy’s trench-lines. A Tank unit represents 350-500 tanks (depending on nationality) employed in a supporting rôle.
Tank units attack with F2 Firepower, which means they inflict a hit on a die roll of “1” or “2” when firing in the Offensive Player’s Fire Phase. Tank units firing defensively have a Firepower of F1, which demonstrates their limited defensive capabilities.
Tank units may move one Area during Movement. Tank units each cost 2 Build Points to produce.
Tanks may first be built by the UK and France starting in the SUMMER 1917 Production Phase. German Tanks may be built in Production of SPRING 1918 and thereafter. Finally, US Tanks become available in SUMMER 1918.
NOTE: Tank units cannot fire when in a Rough terrain area, al-though they may be taken as a loss.
IMPORTANT: Tank units unaccompanied by Friendly Infantry type units, when caught in an Area with Enemy Infantry type units, are eliminated at the end of the Movement or Combat phases.
FORCED RETREAT: For each attacking Tank unit that scores a Hit in a Battle Area, one of the Defender’s Armies must Retreat After Combat (if not beforehand), regardless of how that Hit is paid for.
8.3.6 THE “PARIS GUN”NOTE: The Paris Gun is available only to the German player
HISTORY: The Paris Gun unit represents a single giant howitzer, the largest piece of ordinance to ever see action. Capable of firing shells up to 75 miles away, the Paris Gun became one of the first modern terror weapons when it targeted the French capital.
The Paris Gun unit has no Firepower — it’s just one gun, after all. Its insidious effect is on civilian morale. The Paris Gun is not considered Artillery, and combat enhancing cards do not affect it. The Paris Gun unit may move one Area during the Movement Phase. It costs 1 BP to produce. The Paris Gun becomes an allowa-ble build in SPRING 1918 and thereafter.
TERROR WEAPON: As long as the Paris Gun unit is in or adja-cent to the Paris Area, add +1 VP to the German VP total. This is not cumulative, and only provides a total bonus of +1 VP for as long as the above conditions apply.
NOTE: The Paris Gun cannot be taken as a unit loss.
IMPORTANT: The Paris Gun can never retreat and is eliminated if it is part of an army that does retreat.
IMPORTANT: The Paris Gun, moving by itself, cannot change Area ownership. That is, the Paris Gun unit cannot conquer or hold an Area all by itself. It’s just one gun.
IMPORTANT: The Paris Gun unit when unaccompanied by Friendly Infantry type units, and when caught in a Disputed Area with any Enemy units (except Forts), is eliminated at the end of the Movement or Combat phases.
8.4 FORTS (F)HISTORY: Fort counters represent extensive pre-war fortifications and other installations. Forts are special units, unlike any other units in the game.
• Forts may never move and may never join Armies. • Forts do not count against the Area Stacking Limit.• Forts are never forced to retreat.• Forts may never be built up when damaged nor rebuilt if
destroyed. Eliminated Forts are removed from the game and placed back in the box.
• Forts may never attack, they only roll defensive fire.
In Combat, Forts roll a number of dice equal to the current number on the Fort marker. Forts have an F2 Defensive Firepower, meaning they inflict a hit for every die roll of “1” or “2” in the Defensive Player’s Fire Phase.
NOTE: The strength of a Fort equals its current number. For example, the Nancy 5 Fort marker is a 5 strength unit.
NOTE: The Paris and Nancy Fort markers are double-sided since they both have a strength greater than 4.
Forts lose strength by rotating the Fort marker to the next smaller Fort number. For example, when the Fort Nancy 5 takes 1 hit, it is rotated so the Nancy 4 side is now facing the player. If it were to take 3 more hits, then it would be flipped over to its Nancy 1 side. Of course, Ersatz cards can be used to satisfy losses, instead.
SINGLE STRENGTH FORTS: Fort markers when they are at one (1) strength do not, in and of themselves, control an Area. In other words, when a single strength Fort is the sole Enemy unit in an Area containing Friendly units, that Area is not considered Disputed, but instead Friendly. A Cavalry unit can even pass through such an Area to an adjacent Enemy Area, since this would not be movement from a Disputed to an Enemy Area (which is prohibited), but rather from a Friendly to an Enemy Area.
NOTE: Supply may not be drawn through a Friendly Area which contains a 1 strength Enemy Fort. That is, Supply cannot flow through an Area containing an Enemy unit.
THE “SEDAN 0” ZERO STRENGTH FORT: This unit represents a handful of forts which acted as a supply
hindrance to invading German forces during SUMMER 1914. Treat the Sedan 0 Fort marker as a Single Strength Fort (see above), except that it has no Firepower and rolls no dice. It is still considered a unit, but it’s the last to be taken as a loss since it has a strength of zero (0)
13
TO THE LAST MAN! - CORE RULEBOOK
14
Numbers in parentheses show the copies of this card in the deck. There are 55 cards in the TO THE LAST MAN! deck.9.0 CARD MANIFEST (55)
9.1 OFFENSIVE TYPE CARDSThis is the most common type of card found in the deck (26 cards). There are several varieties, each is listed below.
9.1.1 OFFENSIVE (x16)Offensive cards represent your ability to battle and maneuver
to attack. Playing an Offensive card allows the player to move any number of his units and to conduct offensive operations. Since Combat only occurs when an Offensive has been played, this is the only way units may be moved into Enemy Areas, which then immediately become Disputed Areas.
Offensives allow a player to fight battles as well. Without playing an Offensive card, a player may not designate any battles
in which to fight. Not playing an Offensive in your Turn is called “Passing.”
Only the Attacker (Offensive player) may play an Offensive card. Otherwise, this card may be used as an Ersatz 1 by either player at any time.
NOTE: Bad Weather downgrades this to Limited Offensive.
9.1.2 LIMITED OFFENSIVE (x6)Playing a Limited Offensive has the same effect as an
Offensive card, with one major difference - only one Battle Area may be declared during the player’s turn. That is, combat may occur only in one area.
IMPORTANT: Since newly created Disputed Areas must be designated as Battle Areas, when playing a Limited Offensive the player’s units may only enter one Enemy
Area (converting it to Disputed) - if more than one Enemy Area were entered, then this would necessitate multiple battles must take place, which is not allowed.
NOTE: Bad Weather downgrades this to Pass, plus move.
9.1.3 “THE BIG PUSH” (x1)Only the Entente (UK) player may play “The Big Push.”
The German player treats it as an ordinary Offensive card.
HISTORY: The first large-scale UK offensive of the war, the Somme battle in summer 1916, saw the most massive concentrations of artillery up to that point in the war. The British generals called it “The Big Push.”
Playing “The Big Push” card is the same as playing an Offensive, with a bonus for an attacking Entente player. The Entente player adds one (1) extra die of Artillery Firepower
at F2 to the combat rolls of both his Offensive Player’s Artillery Fire Phase and Offensive Player’s Fire Phase in one designated Battle Area where a UK Army unit is present. IMPORTANT: “The Big Push” card may only be played start-ing with the 1916 scenario (SPRING 1916) and thereafter. Before 1916, it’s treated as a normal Offensive. NOTE: Extra dice are added to the battle as a whole, not to each individual army in the battle.NOTE: Bad Weather changes this to an Offensive card.
9.1.4 “GERICHT” (x1)Only the German player may play the “Gericht” card. The
Entente player treats it as an ordinary Offensive card.
HISTORY: “Gericht” in this case means “place of execution” as well as “tribunal.” Operation “Gericht” was devised by von Falkenhayn as a way to bleed the French army white while they were defending Verdun. His plan was to rain artillery fire down upon the fortress defenders - actually capturing the objective was not seriously contemplated as it would push French forces out of the “Fleischhackmaschine” (meat grinder)!
Playing the “Gericht” card is the same as playing an Offensive, with a bonus for an attacking German player.
The German player adds one (1) extra die of Artillery Firepower at F2 to the combat rolls of both his Offensive Player’s Artillery Fire Phase and Offensive Player’s Fire Phase in one designated Battle Area where a German Army unit is present.
IMPORTANT: The “Gericht” card may only be played begin-ning with the 1916 scenario (SPRING 1916) and thereafter. Before 1916, it’s treated as a normal Offensive.
NOTE: Extra dice are added to the battle as a whole, not to each individual army in the battle.
NOTE: Bad Weather changes this to an Offensive card.
9.1.5 “TOUT LE MONDE À LA BATAILLE!” (x1)Only the Entente (French) player may play “Tout Le Monde
À La Bataille!” Otherwise it’s an Offensive card.
HISTORY: “Everyone to battle!” That was Foch’s rallying cry. He intuited that after months of offensives, the German army was in actuality a spent force. He would mount an all-out attack to roll back the German line - in itself an uncanny reprise of four summers earlier…
Playing the “Tout Le Monde À La Bataille!” card is the same as playing an Offensive, with an added bonus for an attacking Entente player. The Entente (French) player adds two (2) extra dice of Tank Firepower at F2 to the combat rolls of his Offensive
Player’s Fire Phase in one or two designated Battle Area(s), usable only wherever a French Army unit is located. Being Tank fire, each Hit inflicted will cause a German Army to retreat by the end of Battle.
IMPORTANT: “Tout Le Monde À La Bataille!” card may only be played starting with the 1918 scenario (SPRING 1918) and thereaf-ter. Before 1918, it’s treated exactly like an ordinary Offensive card.
NOTE: Extra dice are added to each battle as a whole, not to every individual army in the battle.
NOTE: Bad Weather changes this to an Offensive card.

15
TO THE LAST MAN! - CORE RULEBOOK
9.1.6 “FRIEDENSTURM” (x1)Only the German player may play the “Friedensturm” card.
To the Entente player it’s just an ordinary Offensive.
HISTORY: “Friedensturm,” otherwise known as the oxymoronically named “Peace Offensive,” was a surprise attack launched in mid-July 1918 under the command of Hindenburg-Ludendorff. This card represents these final reserves thrown in during the last Kaiserschlacht battles.
Playing the “Friedensturm” card is the same as playing an Offensive, with a bonus for an attacking German player. The German player adds two (2) extra dice of Stoßtruppen Firepower at F2 to the combat rolls of his Offensive Player’s Fire Phase in
one or two designated Battle area(s), usable only wherever a German Army unit is located. Being Stoßtruppen Firepower, each Hit inflicted will cause an Entente Army to Retreat After Combat.
IMPORTANT: “Friedensturm” card may only be played start-ing with the 1918 scenario (SPRING 1918) and thereafter. Before 1918, it’s treated exactly like an ordinary Offensive card.
NOTE: Extra dice are added to each battle as a whole.
NOTE: Bad Weather changes this to an Offensive card.
9.2 ERSATZ CARDSHISTORY: “Ersatz” is the German word for “substitute” or “replacement.” These cards represent reserves behind the lines used to fill in any gaps. Playing Ersatz cards allows a player to take combat losses in terms of cards lost, rather than losing units from armies on the map.
9.2.1 EVERY CARD IS ERSATZ 1While there are no cards entitled “Ersatz 1,” any card can be used as an Ersatz 1 - and thus absorb one Hit instead of losing one
unit. Either player may use cards to satisfy losses during combat in this fashion.
9.2.2 ERSATZ 2 (x10)Playing an Ersatz 2 card counts as taking two (2) Hits.
NOTE: Unused Ersatz points are lost. For example, if an Ersatz 2 card is used to satisfy a 1 Hit loss, the extra point is lost and cannot be saved for later.
9.2.3 ERSATZ 3 (x2)As Ersatz 2, except this card satisfies up to 3 Hits loss.
9.3 POISON GAS! (x6)HISTORY: Whether the chemical agent was chlorine, phosgene, or mustard gas the idea was the same - to exterminate enemy soldiers as if they were vermin.
In the Declare Battles part of each Combat phase, both players may play one (1) Poison Gas! card per Battle Area. Playing this card allows the player to designate one Battle Area as being sup-plied with gas shells. The player’s Artillery Firepower in that Battle area then becomes F2 for the entirety of that one Combat
round. Otherwise this card may be used as an Ersatz 1 by either player at any time.
IMPORTANT: Poison Gas! is playable starting in SPRING 1915. A Poison Gas! card cannot be combined with an Advanced Artillery Barrage! card.
IMPORTANT: Play of a Bad Weather card neutralizes all Poison Gas cards played this turn.
9.4 ADVANCED ARTILLERY BARRAGE!(x2)HISTORY: In the early stages of trench warfare, artillery fire patterns were plotted according to pre-arranged patterns, and not known enemy positions. Then when the offensive came, the guns would ‘soften up’ the front line for many days, sometimes even weeks on end. Inevitably, not only tactical but sometimes even operational surprise was forfeited during this extended barrage. Bruchmüller’s artillery tactics pioneered on the eastern front emphasized short sharp attacks on targets previously registered. This allowed for tactical surprise to actually be exploited.
In the Declare Battles part of each Combat phase, either player may play one (1) Advanced Artillery Barrage! card per Battle area. Playing this card allows the player to designate one Battle Area where his Artillery Firepower is increased to F3 for that one round of Combat. Otherwise this card may be used as an Ersatz 1.
IMPORTANT: Advanced Artillery Barrage! is playable only in SPRING 1917 and thereafter. Advanced Artillery Barrages cannot be combined with Poison Gas! cards.
9.5 BAD WEATHER CARDS (x3)Played by the Defensive player in the Declare Battles phase,
Bad Weather affects Biplanes, Offensives, and Poison Gas! cards. The Special Offensive cards (e.g., Gericht) become merely Offensive cards. An ordinary Offensive card becomes a Limited Offensive. A Limited Offensive card becomes a forced “Pass” with two important differences: 1– allows an unlimited number of units to be moved by the Offensive player instead of one, and 2– it does not contribute to ending the turn.
Bad Weather also negates all Poison Gas! cards the Attacker may have played. Finally, Biplanes never participate in combat when a Bad Weather card is in effect. Otherwise this card may be used as an Ersatz 1.
IMPORTANT: Bad Weather cannot be played on Turn 1.

To The Last Man! © Tim Taylor 2013 - All reproduction rights reserved to Nuts! Publishing - Bourgbarré -FranceGame Design: Tim Taylor - Graphic Design: Christophe Sancy - Project Leader: Thomas Pouchin
Find additional resources and discover our other fine games at www.nutspublishing.com
16
9.6 STRATEGIC RESERVES! (x2)HISTORY: Railroads crisscross each area on the map. Supplied with sufficient rolling-stock, an army can be railed to any distant area, providing a rather nasty shock.
A Strategic Reserves! card can be played by the Attacker either as part of a Pass Move or during the Movement phase of
an Offensive. Playing a Strategic Reserves! card allows the player to move one (1) unit any distance — from a Friendly or Disputed Area, through Friendly Areas, to another Friendly or Disputed Area. Otherwise this card may be used as an Ersatz 1.
9.7 SURPRISE ATTACK! (x2) HISTORY: Occasionally the element of surprise was not entirely lost in days of artillery barrages. The preliminary bombardment in these battles was limited to only a handful of hours. This allowed less time for the enemy to reinforce the sector. A whole new dynamic was thereby introduced.
Playing this card allows the Attacker to designate one Battle Area as a “Surprise Attack” for this Combat round. The Surprise Attack Combat Turn Order is used for this Battle. Otherwise this card may be used as an Ersatz 1.
9.8 ENTENTE MILITARY CRISIS! (x1)HISTORY: An Entente Military Crisis! card represents disasters off-map, elsewhere in Europe or the Middle East.
When this card is played by the German player, the Entente player must immediately remove the specified num-ber of infantry units from the map, placing them back in his force pool. Infantry units removed must be of the nationality specified on the card. Failure to remove the Infantry required results in a +1 Victory Point adjustment (see 3.1 Victory Points), representing serious Entente setbacks in this other theatre of war. The Entente Military Crisis! card can be played at any time during the German player’s turn, provided the cur-rent game year corresponds with an event year on the card.
• 1915 - Crisis in Gallipoli: remove 1 UK infantry.• 1917 - Crisis in Italy (Caporetto): remove 3 UK or FR infantry.• 1918 - Crisis in the Middle East: remove 2 UK or FR infantry. Example: In 1917, the German player can only play this card as a Crisis in Italy, the Gallipoli Crisis can no longer be played. In 1914 or 1916, he cannot immediately play it as any sort of Crisis! - he must hold onto the card and wait until the appropriate year to play it.
The German Player may also use this card as an Ersatz 1, and in 1914 and 1916 it may only be played as an Ersatz 1. The Entente player can only use it as an Ersatz 1.
NOTE: After the 1918 crisis has been played, this card is perma-nently removed from play. Remove this card from play during the 1919 scenario.
9.9 GERMAN MILITARY CRISIS! (x1)HISTORY: A German Military Crisis! card represents disasters off-map, elsewhere in eastern Europe.
When this card is played by the Entente player, the German player must immediately remove two infantry units (or Stoßtruppen) from the map, placing them back in his force pool. Failure to remove the required infantry type units results in a –1 Victory Point adjustment (see 3.1 Victory Points), repre-senting serious German setbacks in another theatre of war. The German Military Crisis! card can be played at any time during the Entente player’s turn, provided the current game year cor-responds with an event year on the card.
• 1914 - Crisis in the East (East Prussia): remove 2 GE Infantry.• 1916 - Crisis in Austria-Hungary (Galicia): remove 2 GE Inf.• 1918 - Crisis in the Balkans: remove 2 GE Inf. or Stoßtruppen.
IMPORTANT: Infantry type units removed due to play of a German Military Crisis! card are not placed in the EFT Box; they are placed in the German force pool instead.
Example: In 1916, the Entente player can only play this card as a Crisis in Austria-Hungary, the Crisis in the East can no longer be played. In 1915 or 1917, he cannot immediately play it as any sort of Crisis! — he must wait until the appropriate year to play it.
The Entente Player may also use this card as an Ersatz 1, and in 1915 and 1917 it may only be played as an Ersatz 1. The German player can only use it as an Ersatz 1.
NOTE: After the 1918 crisis has been played the card is perma-nently removed from play. Remove this card from play during the 1919 scenario.
ICONOGRAPHY: CREDITSBox & Rulebooks’ covers: JOB(Jacques Onfroy de Bréville)Cards:1, 2, 3: Guy Arnoux4, 5: Georges Bruyer6: Eugène-Louis Gillot7 to13: Ernest Gabard14, 15, 16: Ernst Vollbehr17, 18: Paul Iribe19: André Devambez
20: Sauvage21,22: Sem (Georges Goursat)23, 24: Paul Nash25: Jacques Nam
26: Mathurin Méheut27: Louis Caujolle28: Christopher Nevinson29: Montague Dawson
30: Lucien Jonas31: John Singer Sargent32: Walter Trier33, 34: François Flameng
35: Jan Wiegman36: J.-J. Berne-BellecourThe other artists have not been identified.
1 2 3 4 5 6 7 8 9 10 11 12 13 14 15 16 17 18
19 20 21 22 23 24 25 26 27 28 29 30 31 32 33 34 35 36