to Podcasting and Video Podcasting Jimmy D. Clark ... › jdclark › podcasting.pdfPodcasting is a...
23
Introduction to Podcasting and Video Podcasting Jimmy D. Clark, Instructional Design Specialist Austin Community College April 4, 2008 Introduction Podcasting is a new communications phenomenon that began about four years ago. It refers to publishing audio and video files to the Internet that users can play back at their convenience. This workshop consists of an informational component that will be based on Educause Learning Initiative’s “7 Things You Should Know About Podcasting” and a hands‐on exercise in which you will set up a free podcasting account and record, edit, and publish your own podcast. You will also learn what video podcasting is and watch a demonstration that will cover the basics of filming and editing a brief video podcast. Goals and Objectives for the Workshop Part I – 7 Things You Should Know about Podcasting 1. What podcasting is 2. Who is doing it? 3. How does it work? 4. Why is it significant? 5. What are the downsides of podcasting? 6. Where is it going? 7. What are the implications? (from Educause Learning Initiative, online at: http://connect.educause.edu/Library/ELI/7ThingsYouShouldKnowAbout/39380 . 1
Transcript of to Podcasting and Video Podcasting Jimmy D. Clark ... › jdclark › podcasting.pdfPodcasting is a...
Introduction to Podcasting and Video Podcasting Jimmy D. Clark, Instructional Design Specialist Austin Community College April 4, 2008
Introduction
Podcasting is a new communications phenomenon that began about four years ago. It refers to publishing audio and video files to the Internet that users can play back at their convenience. This workshop consists of an informational component that will be based on Educause Learning Initiative’s “7 Things You Should Know About Podcasting” and a hands‐on exercise in which you will set up a free podcasting account and record, edit, and publish your own podcast. You will also learn what video podcasting is and watch a demonstration that will cover the basics of filming and editing a brief video podcast.
Goals and Objectives for the Workshop
Part I – 7 Things You Should Know about Podcasting
1. What podcasting is
2. Who is doing it?
3. How does it work?
4. Why is it significant?
5. What are the downsides of podcasting?
6. Where is it going?
7. What are the implications? (from Educause Learning Initiative, online at: http://connect.educause.edu/Library/ELI/7ThingsYouShouldKnowAbout/39380 .
1
2
Part II – Creating Your Own Audio Podcast
Introduction to the Podcasting Process
We may divide the podcasting process into the following steps:
1. Plan your podcast
2. Assemble the hardware and software needed to create your podcast
3. Set up a podcasting account at a website that hosts podcasts
4. Record your podcast
5. Edit your podcast
6. Convert your podcast to MP3 format
7. Publish and publicize your podcast
We will now look at these steps in more detail.
1. Planning Your Podcast
According to Garrick Chow of Lynda.com (http://movielibrary.lynda.com/html/modpage.asp?ID=214 ), when planning a podcast you should consider the following factors:
Why am I doing this?
What topics can I speak on authoritatively?
Narrow down the scope of the podcast.
How often will I produce episodes?
Next, we should think about the format or structure for our podcast. Some issues we might wish to consider are:
Keep the format consistent for each episode.
Include a beginning, middle, and end in each episode.
Start strong and end strong.
Lead off each episode with your strongest topic.
It is always a good idea to begin each podcast episode with a short musical intro and end it with a short musical outro. Don’t even think about using copyrighted music without permission. The Recording Industry of America is extremely zealous in finding and suing individuals they think might be in violation of copyright protection. Fortunately there is a lot of music on the Web that was published under a Creative Commons license. Three good places to look for it are: Music Podshow
3
(http://music.podshow.com), Music Podcasting (http://musicpodcasting.org), and the Internet Archive (http://www.archive.org/index.php).
2. Assembling the Hardware and Software for Your Podcast
Your level of interest in and commitment to podcasting will determine the software and hardware you will need for your podcast. The person who wishes to record an occasional episode will probably not wish to spend very much on software and hardware, and you can download free software that will meet your needs. The only hardware you will probably need is a fairly new computer with speakers and a $10 computer microphone. You can use the free Audacity audio recording and editing program and a free MP3 encoder. If you purchased an Apple computer within the past couple of years it came with all the software you need for producing pretty sophisticated podcasts. If you are a serious amateur podcaster who records an episode every week you will probably spend several hundred dollars on equipment. If you are a professional podcaster you will probably spend a few thousand dollars. I am assuming you are not a professional. If you are, I suggest you buy a book such as the Podcasting Bible, by Steve Mack and Mitch Ratcliffe (Wiley Publishing, 2007) to learn about the hardware and software you will need and what it will cost.
Podcasting Tools for the Occasional Podcaster
The following hardware and software will probably be sufficient for the person who wants to produce an occasional podcast:
1. Computer requirements
A computer that is no more than 2‐3 years old
Windows XP or Vista operating system or OS 10.x for a Macintosh
4GB of free hard drive space
At least 1GB of RAM
Line in, line out jack for the microphone
2. Microphone – You can buy a desk microphone for $10. Mine is a Logitech mic that cost $30 and the recording quality is pretty good. You can buy inexpensive headset microphones for as little as $20. If you want to use a Lavaliere or lapel mic you can buy one for less than $50. You can also buy headphones for less than $20.
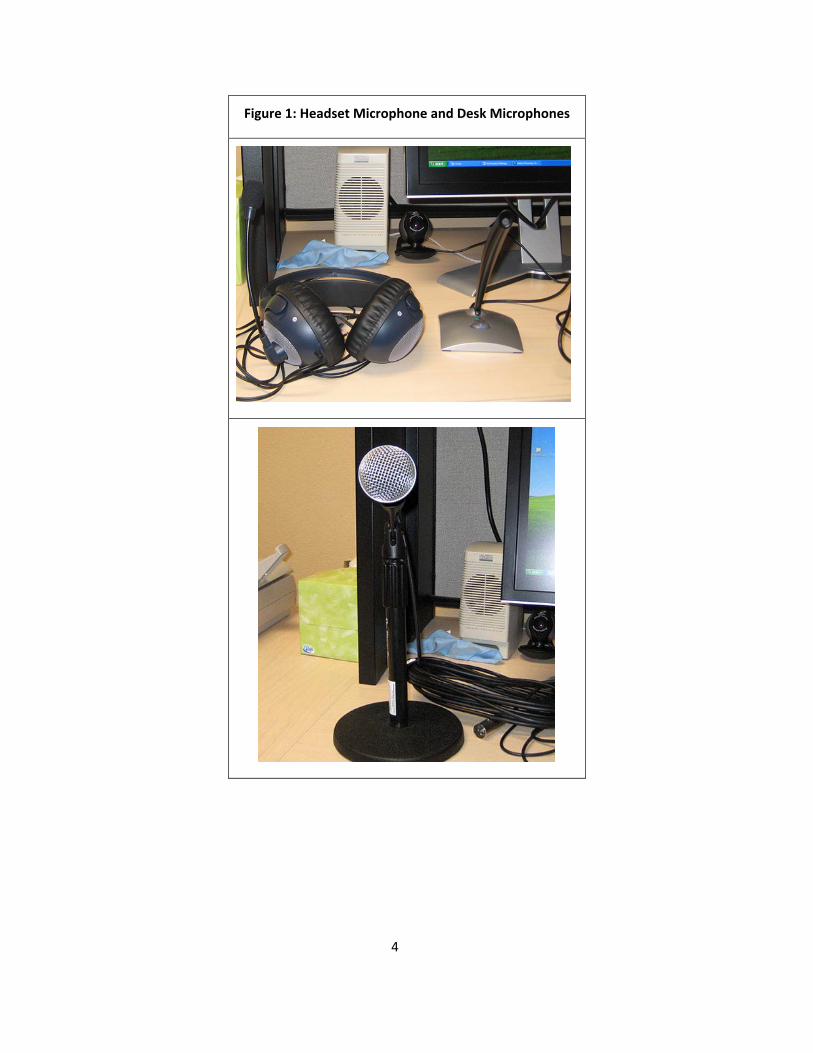
Figure 1: Headset Microphone and Desk Microphones
4
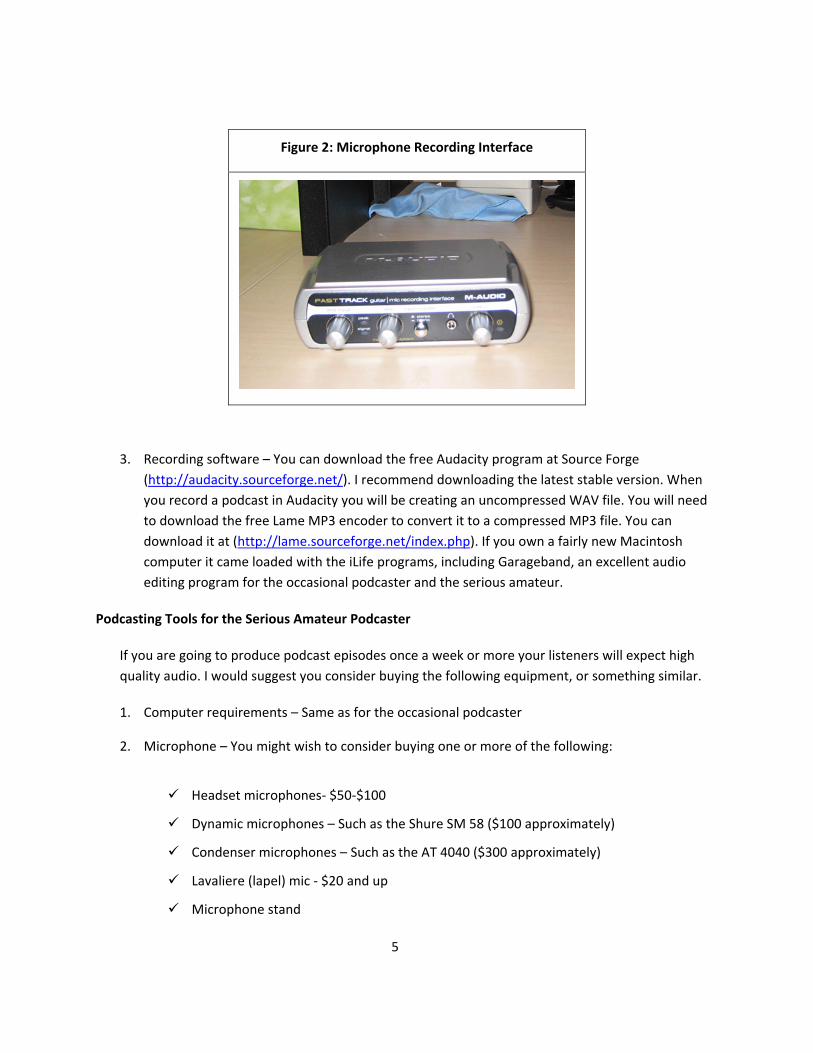
Figure 2: Microphone Recording Interface
3. Recording software – You can download the free Audacity program at Source Forge (http://audacity.sourceforge.net/). I recommend downloading the latest stable version. When you record a podcast in Audacity you will be creating an uncompressed WAV file. You will need to download the free Lame MP3 encoder to convert it to a compressed MP3 file. You can download it at (http://lame.sourceforge.net/index.php). If you own a fairly new Macintosh computer it came loaded with the iLife programs, including Garageband, an excellent audio editing program for the occasional podcaster and the serious amateur.
Podcasting Tools for the Serious Amateur Podcaster
If you are going to produce podcast episodes once a week or more your listeners will expect high quality audio. I would suggest you consider buying the following equipment, or something similar.
1. Computer requirements – Same as for the occasional podcaster
2. Microphone – You might wish to consider buying one or more of the following:
Headset microphones‐ $50‐$100
Dynamic microphones – Such as the Shure SM 58 ($100 approximately)
Condenser microphones – Such as the AT 4040 ($300 approximately)
Lavaliere (lapel) mic ‐ $20 and up
Microphone stand
5
6
Wind screen
Pop filter
Microphone cable
XLR connector
USB adapter
3. If you use a heavy dynamic microphone such as the Shure SM 58 and plug a cable into it, then attach a XLR connector to the cable and plug it into your computer, the weight of all this equipment might ruin your computer’s sound card. It would be a good idea to buy an audio mixer or preamp and plug it into your computer, then plug the mic into the box. If you buy a condenser mic you will have to have a preamp anyway. Check out these devices on the Web. They cost approximately $100 and up. The mixer or preamp will greatly improve the quality of your recording and you will have to do less editing to amplify and improve it.
4. Headphones – You can purchase a good pair for around $100.
5. Optional equipment – You might want to consider buying some or all of the following:
MP3 player – iPod, Zune, Creative Zen, SanDisk, etc.
iPod recording attachment ‐ $50
Digital voice recorder
6. Audio recording and editing software
Adobe Soundbooth ($100 from JourneyEd Software) or Audition ($150)
Camtasia Studio ($180 from JourneyEd) – You can produce audio and video podcasts with Camtasia.
3. Setting Up a Podcasting Account
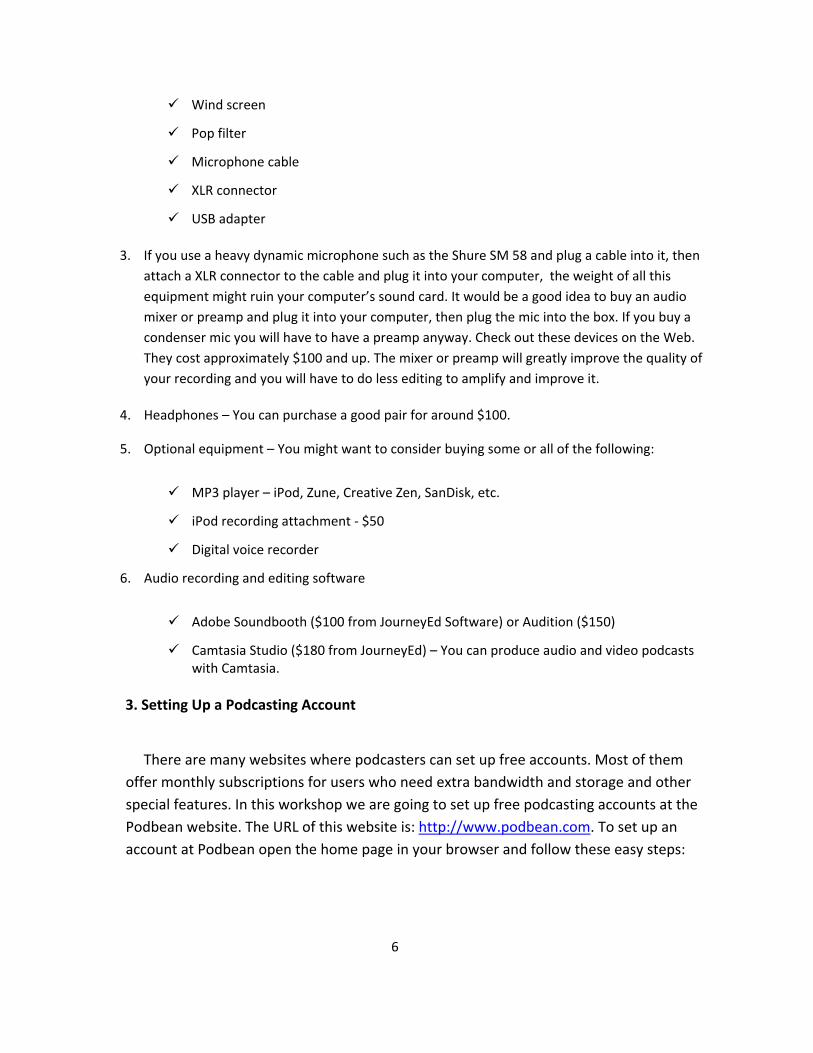
There are many websites where podcasters can set up free accounts. Most of them offer monthly subscriptions for users who need extra bandwidth and storage and other special features. In this workshop we are going to set up free podcasting accounts at the Podbean website. The URL of this website is: http://www.podbean.com. To set up an account at Podbean open the home page in your browser and follow these easy steps:
Figure 3: Opening Screen at Podbean
1. Click the Sign Up button at the top of Podbean’s home page.
2. The next page offers two plans, a basic free plan and an advanced plan that costs $4.95 a month. Click the Sign Up Now button under the basic free plan.
7
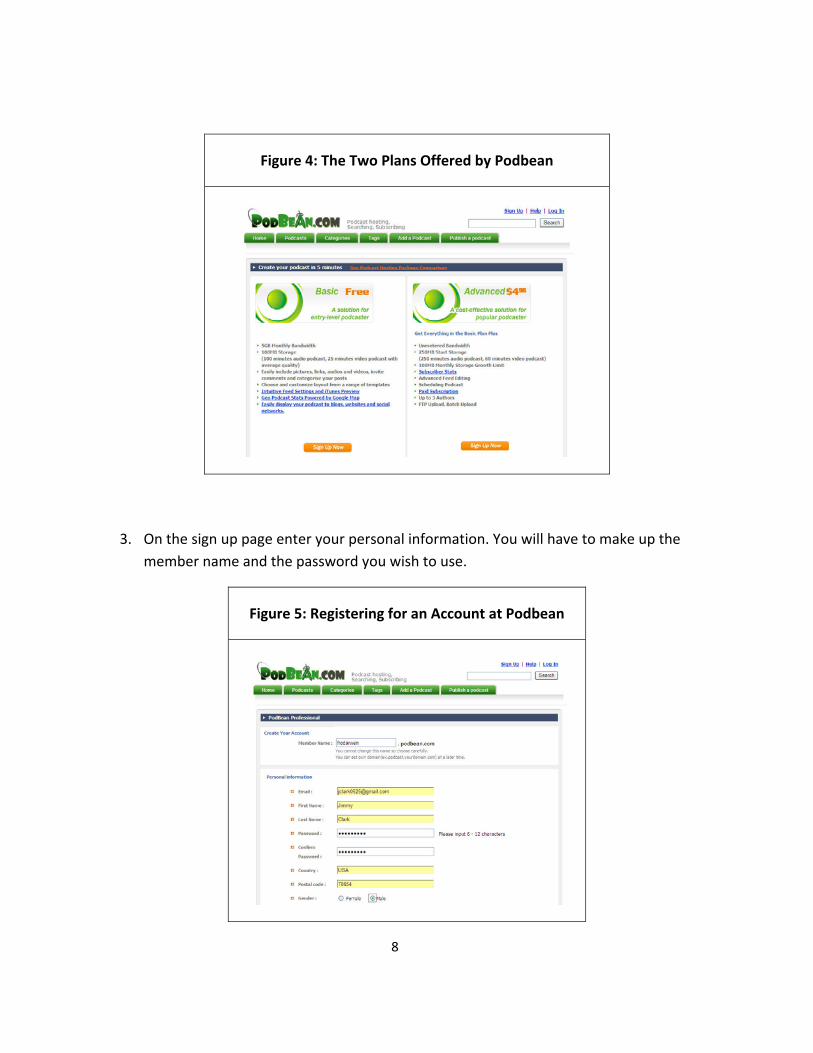
Figure 4: The Two Plans Offered by Podbean
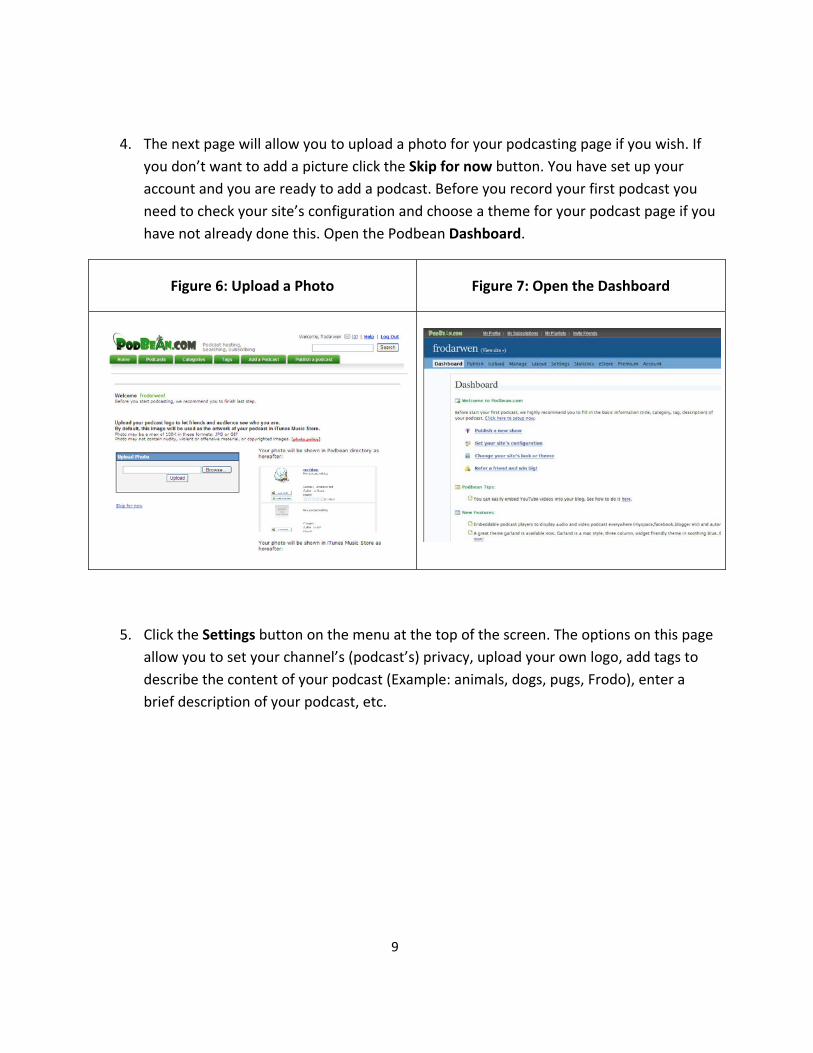
3. On the sign up page enter your personal information. You will have to make up the member name and the password you wish to use.
Figure 5: Registering for an Account at Podbean
8
4. The next page will allow you to upload a photo for your podcasting page if you wish. If you don’t want to add a picture click the Skip for now button. You have set up your account and you are ready to add a podcast. Before you record your first podcast you need to check your site’s configuration and choose a theme for your podcast page if you have not already done this. Open the Podbean Dashboard.
Figure 6: Upload a Photo Figure 7: Open the Dashboard
5. Click the Settings button on the menu at the top of the screen. The options on this page allow you to set your channel’s (podcast’s) privacy, upload your own logo, add tags to describe the content of your podcast (Example: animals, dogs, pugs, Frodo), enter a brief description of your podcast, etc.
9
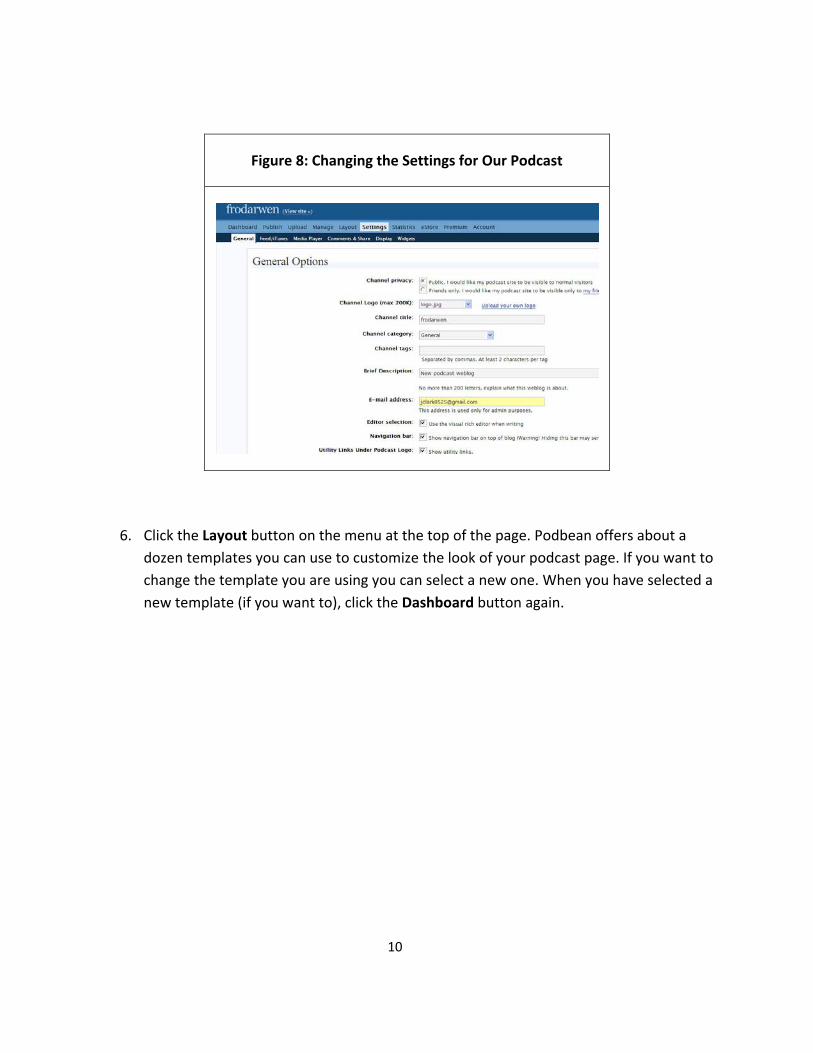
Figure 8: Changing the Settings for Our Podcast
6. Click the Layout button on the menu at the top of the page. Podbean offers about a dozen templates you can use to customize the look of your podcast page. If you want to change the template you are using you can select a new one. When you have selected a new template (if you want to), click the Dashboard button again.
10
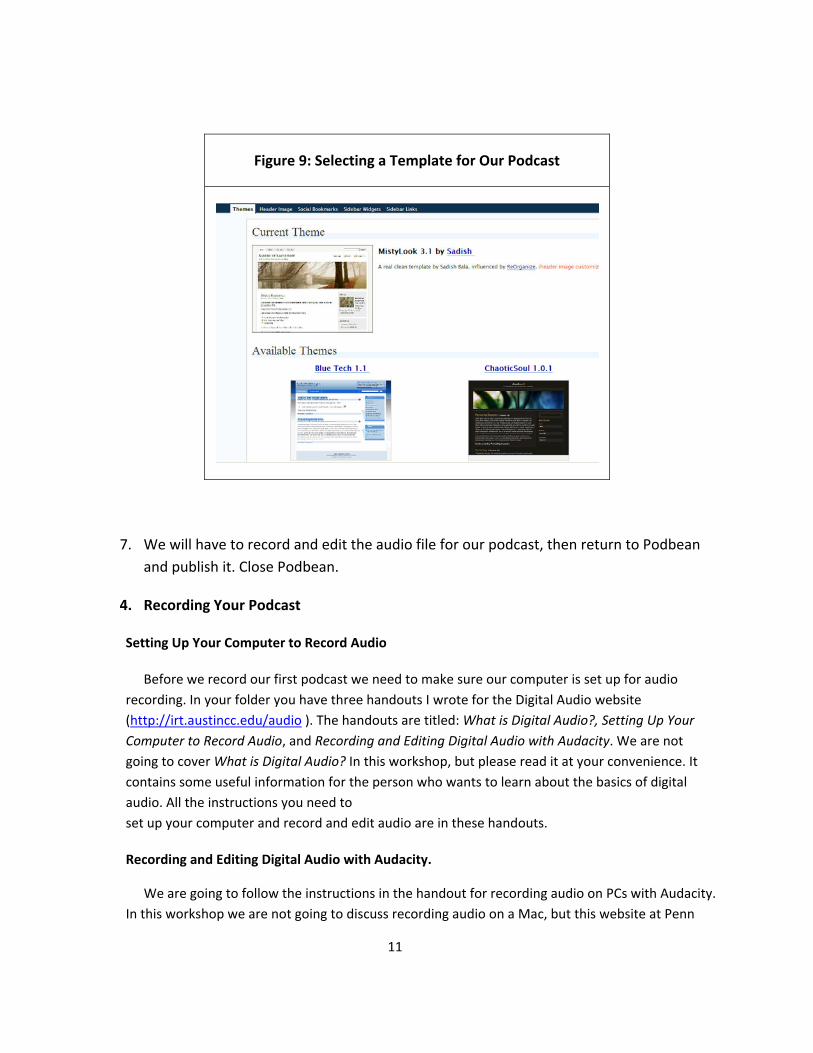
Figure 9: Selecting a Template for Our Podcast
7. We will have to record and edit the audio file for our podcast, then return to Podbean and publish it. Close Podbean.
4. Recording Your Podcast
Setting Up Your Computer to Record Audio
Before we record our first podcast we need to make sure our computer is set up for audio recording. In your folder you have three handouts I wrote for the Digital Audio website (http://irt.austincc.edu/audio ). The handouts are titled: What is Digital Audio?, Setting Up Your Computer to Record Audio, and Recording and Editing Digital Audio with Audacity. We are not going to cover What is Digital Audio? In this workshop, but please read it at your convenience. It contains some useful information for the person who wants to learn about the basics of digital audio. All the instructions you need to set up your computer and record and edit audio are in these handouts.
Recording and Editing Digital Audio with Audacity.
We are going to follow the instructions in the handout for recording audio on PCs with Audacity. In this workshop we are not going to discuss recording audio on a Mac, but this website at Penn
11
Penn State University contains a tutorial on creating a podcast in Garageband (http://podcasts.psu.edu/garageband.
5. Editing Your Podcast
We will again follow the handout Recording and Editing Digital Audio with Audacity.
6. Converting the Podcast to an MP3 File
Step 9 of the handout on recording and editing digital audio with Audacity covers how to convert our WAV recording to an MP3 file. Audacity calls this process exporting the file. Now we are ready to upload our audio recording to Podbean. This is covered under step 7, Publish and Publicize Our Podcast.
7. Publishing Our Podcast
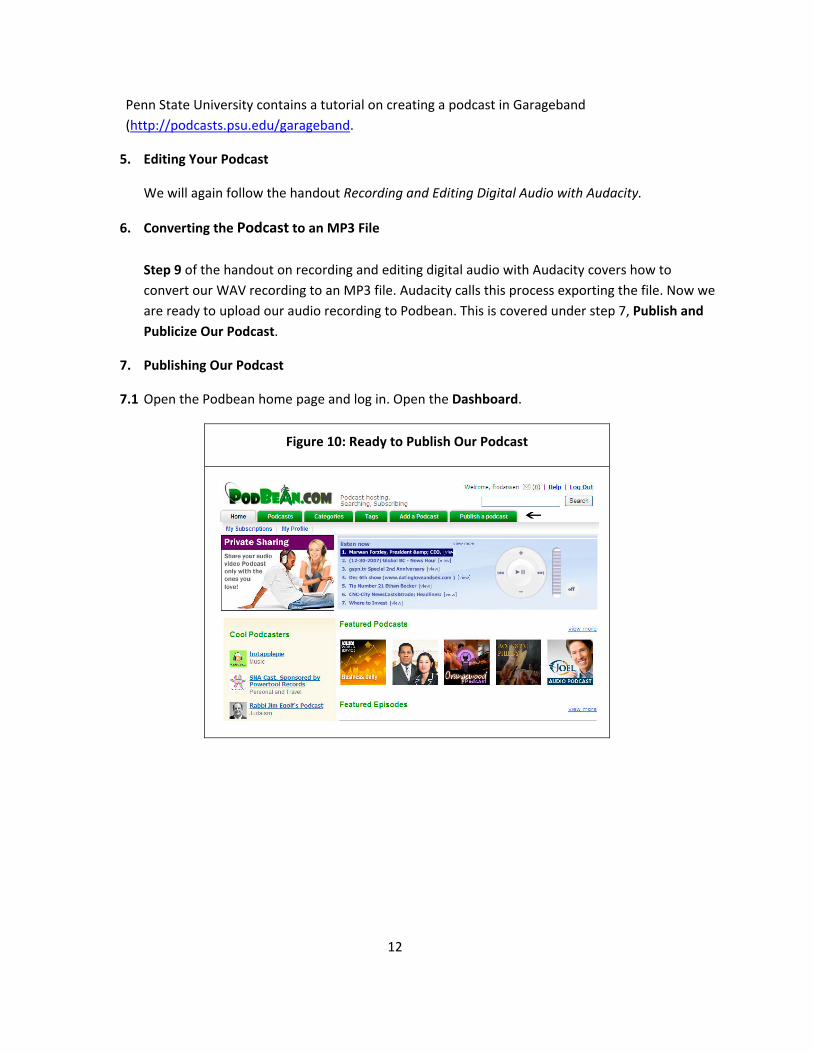
7.1 Open the Podbean home page and log in. Open the Dashboard.
Figure 10: Ready to Publish Our Podcast
12
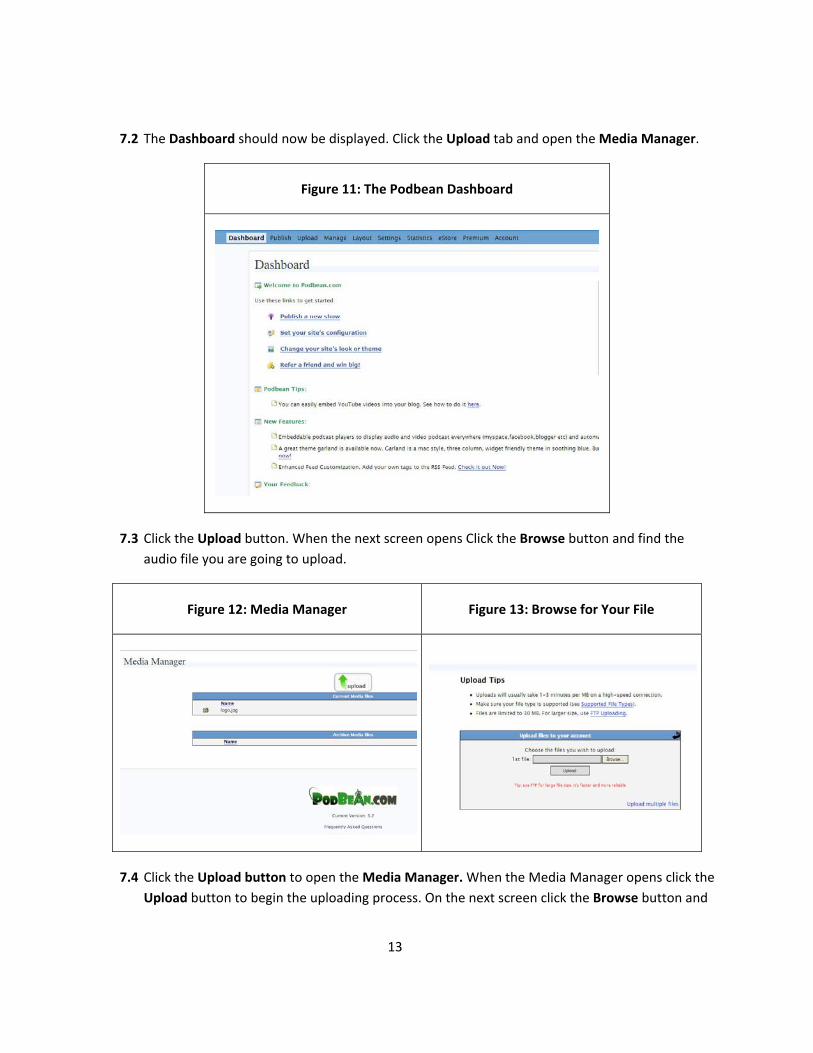
7.2 The Dashboard should now be displayed. Click the Upload tab and open the Media Manager.
Figure 11: The Podbean Dashboard
7.3 Click the Upload button. When the next screen opens Click the Browse button and find the audio file you are going to upload.
Figure 12: Media Manager Figure 13: Browse for Your File
7.4 Click the Upload button to open the Media Manager. When the Media Manager opens click the Upload button to begin the uploading process. On the next screen click the Browse button and
13
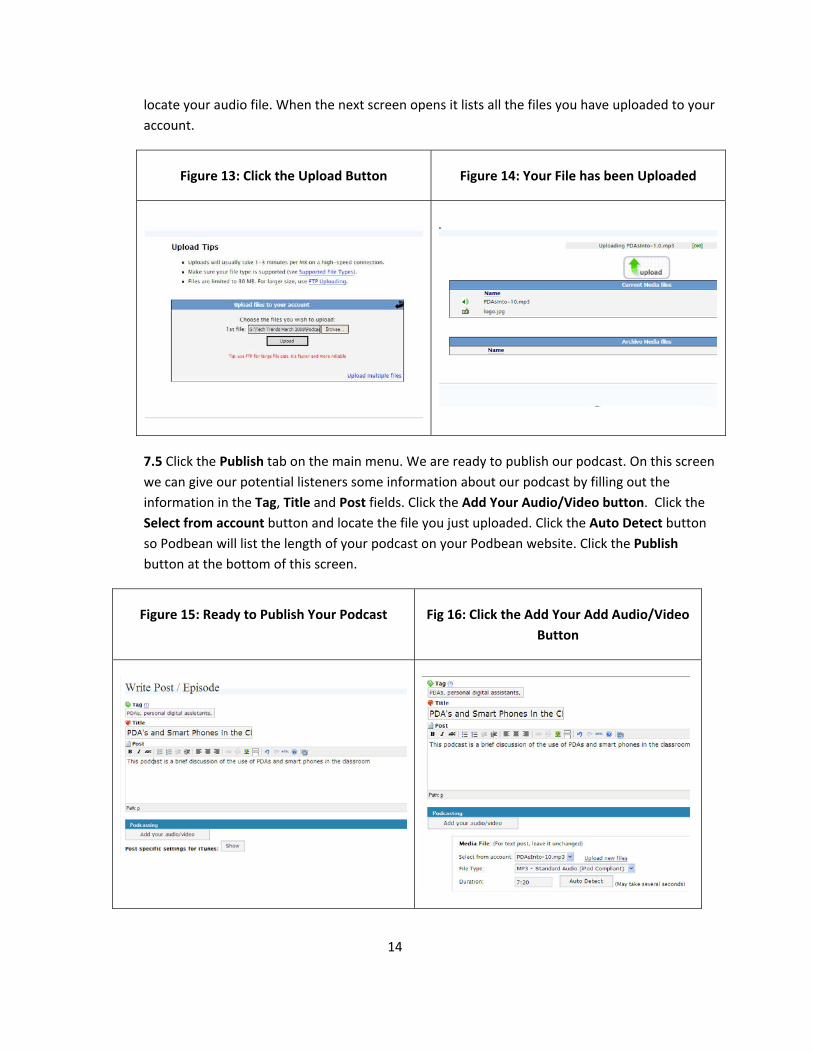
locate your audio file. When the next screen opens it lists all the files you have uploaded to your account.
Figure 13: Click the Upload Button Figure 14: Your File has been Uploaded
7.5 Click the Publish tab on the main menu. We are ready to publish our podcast. On this screen we can give our potential listeners some information about our podcast by filling out the information in the Tag, Title and Post fields. Click the Add Your Audio/Video button. Click the Select from account button and locate the file you just uploaded. Click the Auto Detect button so Podbean will list the length of your podcast on your Podbean website. Click the Publish button at the bottom of this screen.
Figure 15: Ready to Publish Your Podcast Fig 16: Click the Add Your Add Audio/Video Button
14
7.6 Return to the Dashboard and click View Site to open your website at Podbean. Click the Listen Now button if you would like to hear your podcast.
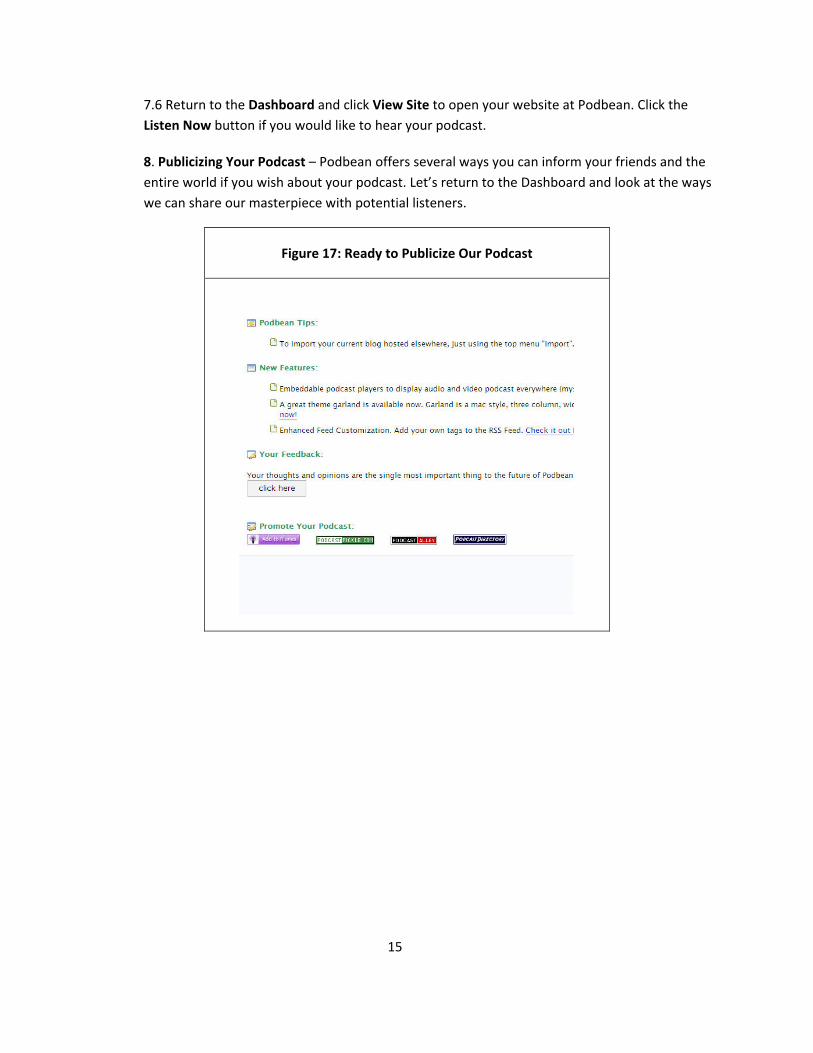
8. Publicizing Your Podcast – Podbean offers several ways you can inform your friends and the entire world if you wish about your podcast. Let’s return to the Dashboard and look at the ways we can share our masterpiece with potential listeners.
Figure 17: Ready to Publicize Our Podcast
15
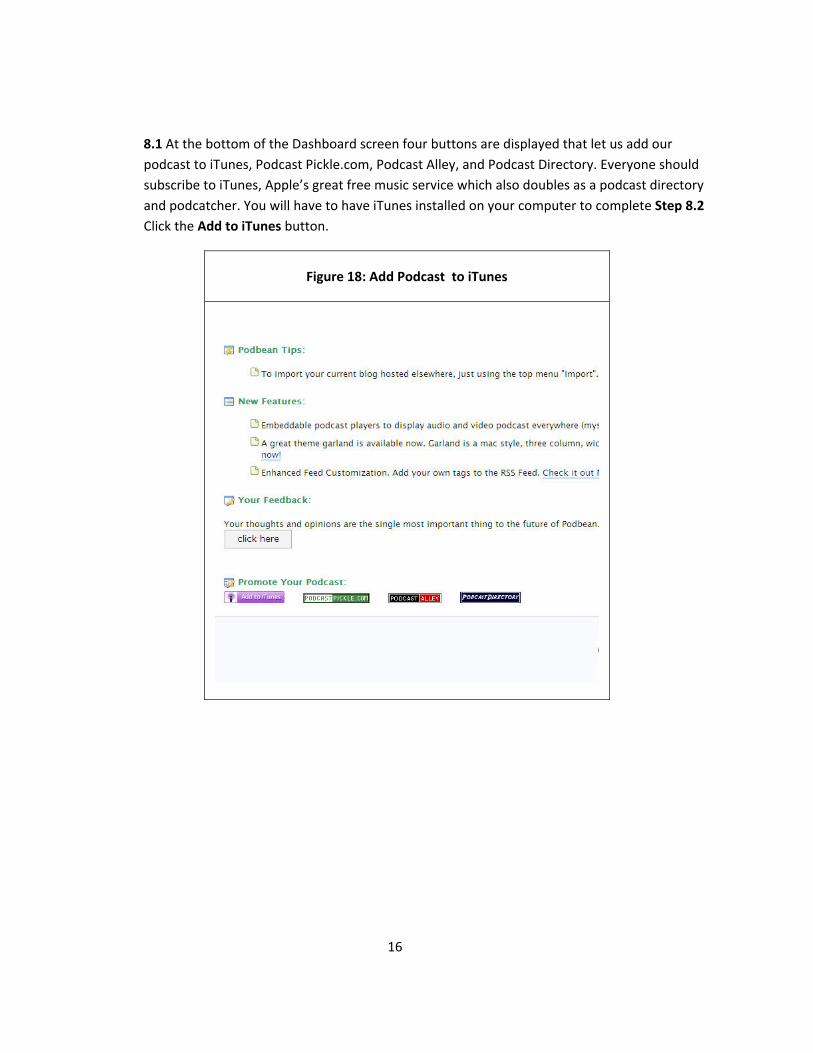
8.1 At the bottom of the Dashboard screen four buttons are displayed that let us add our podcast to iTunes, Podcast Pickle.com, Podcast Alley, and Podcast Directory. Everyone should subscribe to iTunes, Apple’s great free music service which also doubles as a podcast directory and podcatcher. You will have to have iTunes installed on your computer to complete Step 8.2 Click the Add to iTunes button.
Figure 18: Add Podcast to iTunes
16
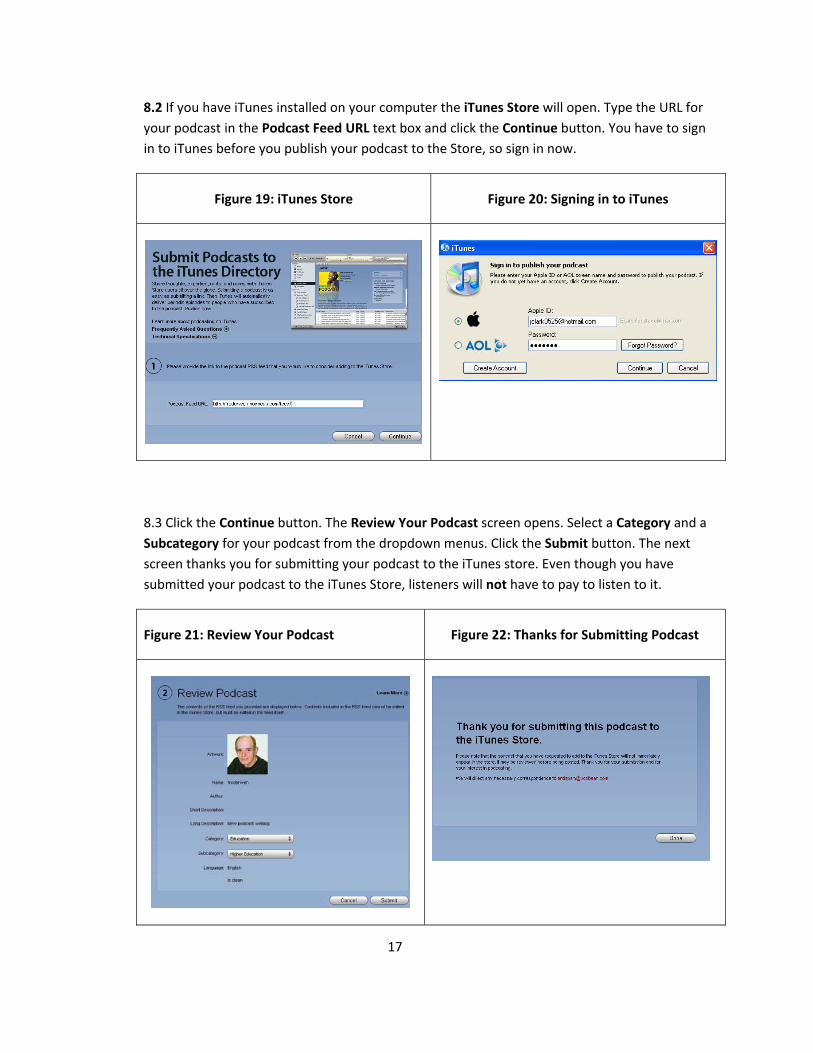
8.2 If you have iTunes installed on your computer the iTunes Store will open. Type the URL for your podcast in the Podcast Feed URL text box and click the Continue button. You have to sign in to iTunes before you publish your podcast to the Store, so sign in now.
Figure 19: iTunes Store Figure 20: Signing in to iTunes
8.3 Click the Continue button. The Review Your Podcast screen opens. Select a Category and a Subcategory for your podcast from the dropdown menus. Click the Submit button. The next screen thanks you for submitting your podcast to the iTunes store. Even though you have submitted your podcast to the iTunes Store, listeners will not have to pay to listen to it.
Figure 21: Review Your Podcast Figure 22: Thanks for Submitting Podcast
17
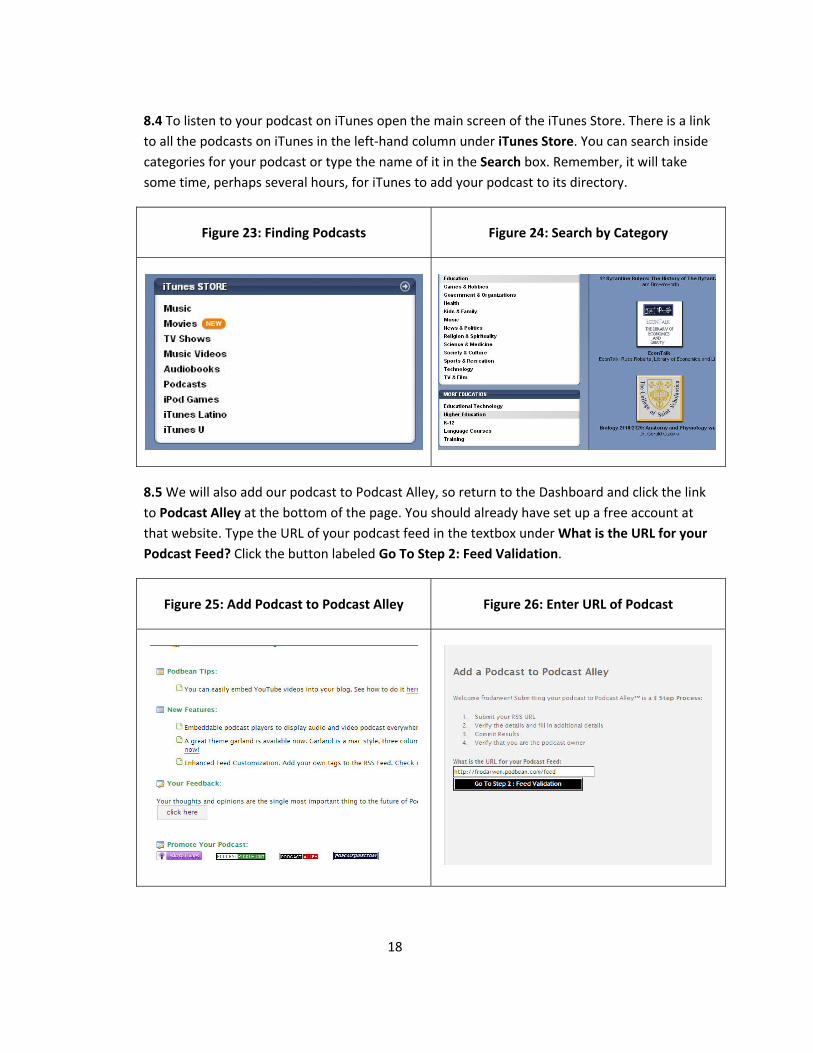
8.4 To listen to your podcast on iTunes open the main screen of the iTunes Store. There is a link to all the podcasts on iTunes in the left‐hand column under iTunes Store. You can search inside categories for your podcast or type the name of it in the Search box. Remember, it will take some time, perhaps several hours, for iTunes to add your podcast to its directory.
Figure 23: Finding Podcasts Figure 24: Search by Category
8.5 We will also add our podcast to Podcast Alley, so return to the Dashboard and click the link to Podcast Alley at the bottom of the page. You should already have set up a free account at that website. Type the URL of your podcast feed in the textbox under What is the URL for your Podcast Feed? Click the button labeled Go To Step 2: Feed Validation.
Figure 25: Add Podcast to Podcast Alley Figure 26: Enter URL of Podcast
18
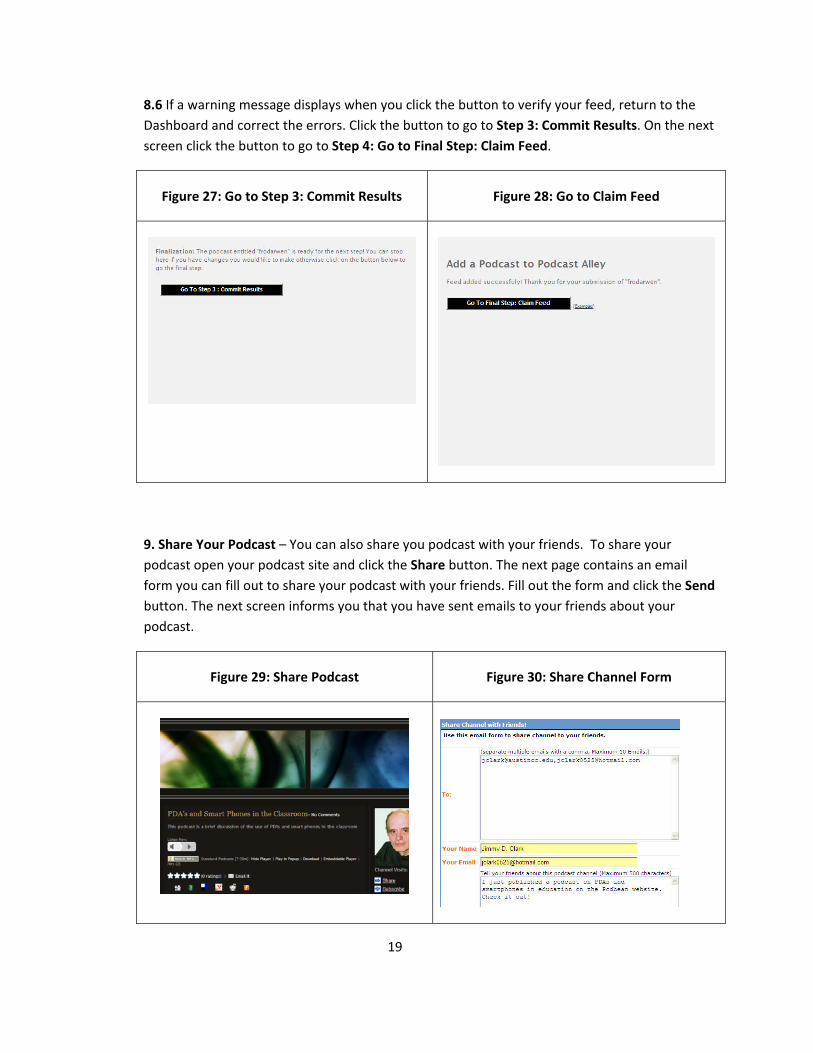
8.6 If a warning message displays when you click the button to verify your feed, return to the Dashboard and correct the errors. Click the button to go to Step 3: Commit Results. On the next screen click the button to go to Step 4: Go to Final Step: Claim Feed.
Figure 27: Go to Step 3: Commit Results Figure 28: Go to Claim Feed
9. Share Your Podcast – You can also share you podcast with your friends. To share your podcast open your podcast site and click the Share button. The next page contains an email form you can fill out to share your podcast with your friends. Fill out the form and click the Send button. The next screen informs you that you have sent emails to your friends about your podcast.
Figure 29: Share Podcast Figure 30: Share Channel Form
19
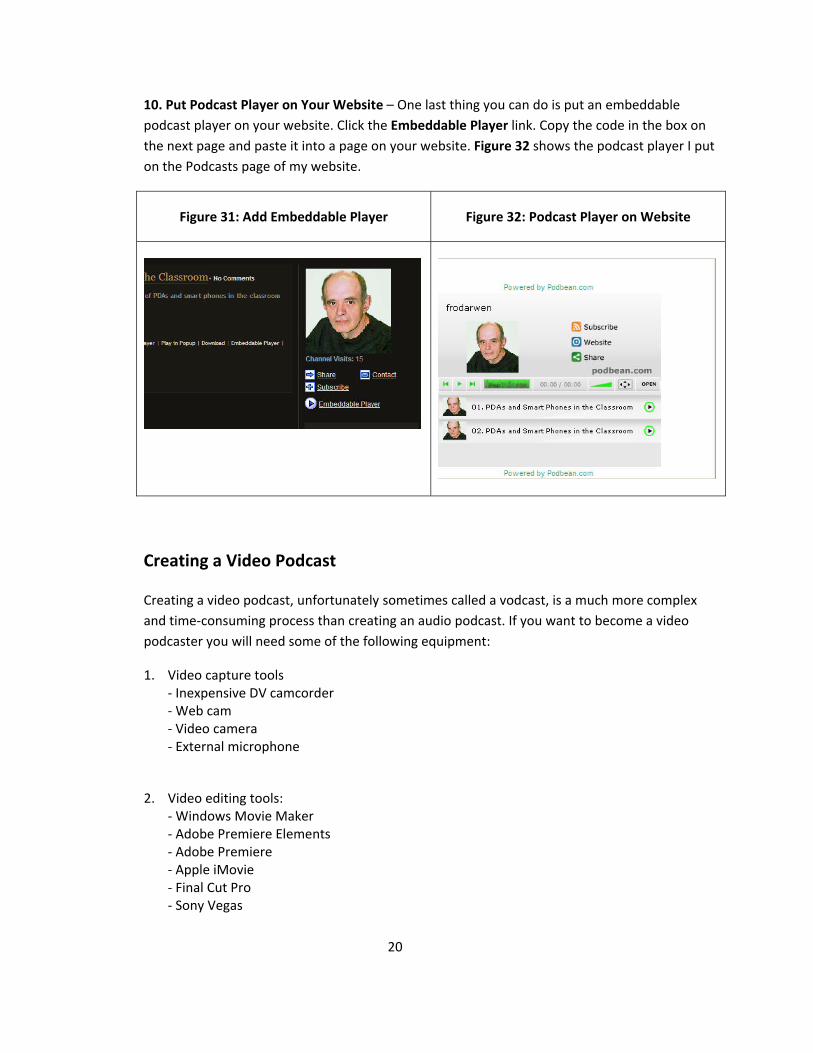
10. Put Podcast Player on Your Website – One last thing you can do is put an embeddable podcast player on your website. Click the Embeddable Player link. Copy the code in the box on the next page and paste it into a page on your website. Figure 32 shows the podcast player I put on the Podcasts page of my website.
Figure 31: Add Embeddable Player Figure 32: Podcast Player on Website
Creating a Video Podcast
Creating a video podcast, unfortunately sometimes called a vodcast, is a much more complex and time‐consuming process than creating an audio podcast. If you want to become a video podcaster you will need some of the following equipment:
1. Video capture tools ‐ Inexpensive DV camcorder ‐ Web cam ‐ Video camera ‐ External microphone
2. Video editing tools: ‐ Windows Movie Maker ‐ Adobe Premiere Elements ‐ Adobe Premiere ‐ Apple iMovie ‐ Final Cut Pro ‐ Sony Vegas
20
21
The learning curve is also considerably steeper than that involved with audio podcasting. Time constraints do not permit us to shoot and edit a video podcast in this workshop, so we will view one I created entitled Customizing Your Blackboard Coursesite. I will describe the process I followed to produce this video.
1. Planning the Video Podcast
My video podcast is composed of screenshots I captured from my Blackboard site and audio recordings. I used these five software programs to create this movie:
Blackboard – I made a screenshot of each step in the tutorial and saved them as JPEGs. Adobe Photoshop – I opened the screenshots and saved them for the Web. I printed each screenshot and numbered each one. Microsoft Word – I typed a script for each separate recording. Scripts always make the recording go much smoother and faster. Audacity – Audacity is a free audio recording and editing program that will probably meet most video podcaster’s needs. Adobe Captivate – Captivate is a great program for creating interactive slide presentations which can be either demonstrations or simulations.
When you are working with several software programs it is always a good idea to think about your workflow, or how you will organize your resources. For this project I knew I needed to open all five programs and keep them open until I finished the movie. I used lots of keyboard shortcuts to save time. For instance, to print an image in Photoshop I pressed these keys: Crtl + P > Enter > Enter > Enter.
2. Creating the Movie
a. I opened Blackboard and performed each step in the tutorial on customizing your Blackboard coursesite. I used a screen capture program to make a screenshot of each step and saved it as a JPEG.
b. I opened each JPEG in Photoshop and adjusted the quality a bit. I chose File > Save for Web and Devices and saved each image as a high quality JPEG image. I printed and numbered each image.
c. I opened Microsoft Word and typed a brief description of each step. For example, “Open Blackboard and sign in.” I printed each script.
d. I opened Audacity and set it up for recording. I recorded each script and listened to it. I did some basic editing to improve the quality of the recordings. I normalized each sound bite to
make the audio as loud as possible without distorting it. I exported, or saved, each recording as an MP3 (compressed) file.
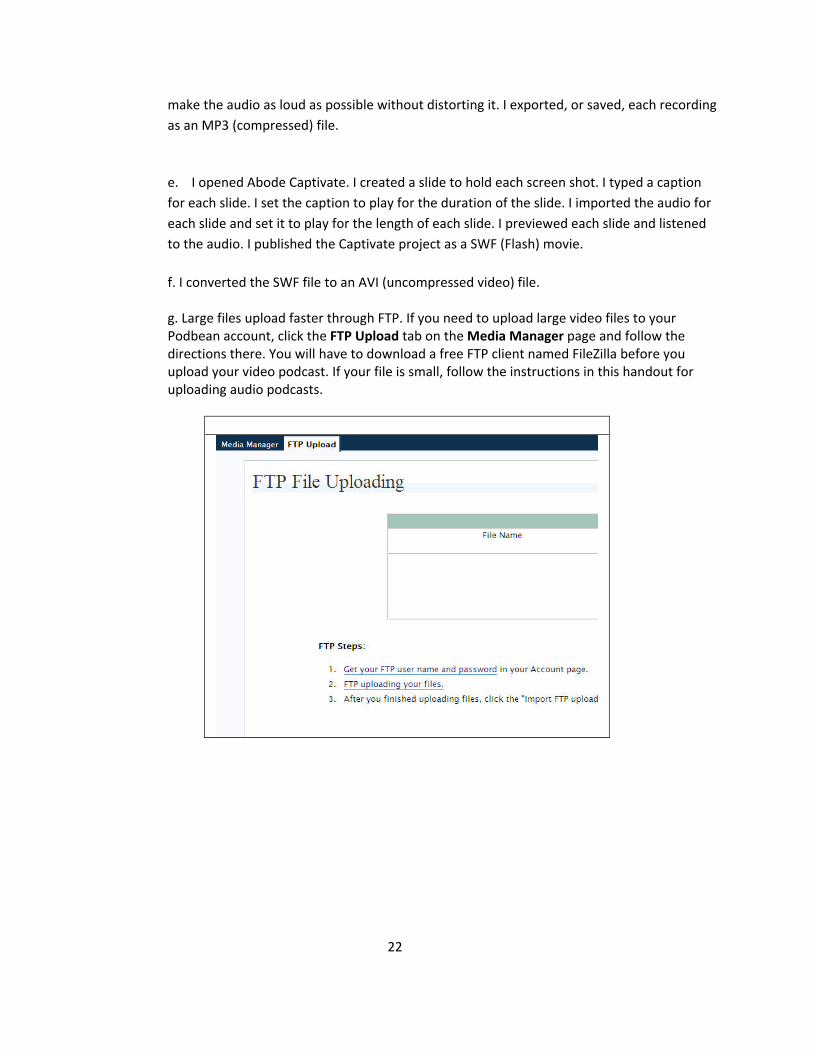
e. I opened Abode Captivate. I created a slide to hold each screen shot. I typed a caption for each slide. I set the caption to play for the duration of the slide. I imported the audio for each slide and set it to play for the length of each slide. I previewed each slide and listened to the audio. I published the Captivate project as a SWF (Flash) movie. f. I converted the SWF file to an AVI (uncompressed video) file. g. Large files upload faster through FTP. If you need to upload large video files to your Podbean account, click the FTP Upload tab on the Media Manager page and follow the directions there. You will have to download a free FTP client named FileZilla before you upload your video podcast. If your file is small, follow the instructions in this handout for uploading audio podcasts.
22

23