TM1000A NTP TIME SERVER QUICK SETUP GUIDE · TM1000A NTP TIME SERVER QUICK SETUP GUIDE Visit...
1
TM1000A NTP TIME SERVER QUICK SETUP GUIDE Visit TimeMachinesCorp.com for more downloads and info. Jumper J8 Position: A: Reset to Factory B: Normal Operation 1. Connect the GPS antenna to the back side of the time server via the gold SMA connector. Connect the power plug into the back of the time server then into any standard electrical outlet. Connect the network cable into the port of the desired network for the time server. On the front panel of the time server are 3 LEDs that help you monitor the status of the unit. 1. POW is a GREEN LED that indicates power. 2. LOCK is a YELLOW LED that indicates GPS satellite acquisition. 3. SEC is a YELLOW LED that indicates every second the unit receives an update from the GPS Satellite. NOTE: If the LOCK LED doesn’t turn on and the SEC LED doesn’t flash each second, there are likely issues getting a GPS lock that is required for the function of the TM2000. Adjusting the location of your antenna, or changing to an outdoor antenna may be required. 2. Using a web interface (Chrome and Firefox are recommended), type in the default IP address of the time server to access the configuration web page as follows: http://192.168.1.15. Make sure the IP address of the computer being used to do the configuration is on the same subnet (like 192.168.1.10 for example). 3. Enter default password: “tmachine” on the configuration web page and proceed to change time server parameters as desired. 4. Resetting to Factory Defaults: Jumper J8 on the inside of the TM1000A is used to reset the units software settings to factory default. This is useful when a password is forgotten or the IP address of the unit cannot be determined. To do this, remove the 4 front panel screws on the unit. With care, the jumper J8 can be reached from the front of the unit without removing the PCB. Move J8 to the “A” position and apply power. After a few seconds, remove power connection, move J8 to the “B” position and reassemble the unit. The unit should now be set to factory default password and IP address.
Transcript of TM1000A NTP TIME SERVER QUICK SETUP GUIDE · TM1000A NTP TIME SERVER QUICK SETUP GUIDE Visit...
TM1000ANTP TIME SERVERQUICK SETUP GUIDE
Vis i t T imeMach inesCorp .com fo r more downloads and in fo .
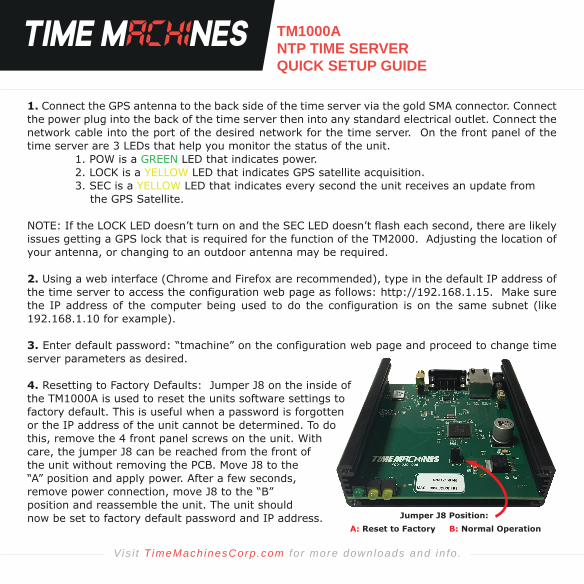
Jumper J8 Position: A: Reset to Factory B: Normal Operation
1. Connect the GPS antenna to the back side of the time server via the gold SMA connector. Connect the power plug into the back of the time server then into any standard electrical outlet. Connect the network cable into the port of the desired network for the time server. On the front panel of the time server are 3 LEDs that help you monitor the status of the unit. 1. POW is a GREEN LED that indicates power. 2. LOCK is a YELLOW LED that indicates GPS satellite acquisition. 3. SEC is a YELLOW LED that indicates every second the unit receives an update from the GPS Satellite.
NOTE: If the LOCK LED doesn’t turn on and the SEC LED doesn’t flash each second, there are likely issues getting a GPS lock that is required for the function of the TM2000. Adjusting the location of your antenna, or changing to an outdoor antenna may be required.
2. Using a web interface (Chrome and Firefox are recommended), type in the default IP address of the time server to access the configuration web page as follows: http://192.168.1.15. Make sure the IP address of the computer being used to do the configuration is on the same subnet (like 192.168.1.10 for example).
3. Enter default password: “tmachine” on the configuration web page and proceed to change time server parameters as desired.
4. Resetting to Factory Defaults: Jumper J8 on the inside of the TM1000A is used to reset the units software settings tofactory default. This is useful when a password is forgotten or the IP address of the unit cannot be determined. To do this, remove the 4 front panel screws on the unit. With care, the jumper J8 can be reached from the front of the unit without removing the PCB. Move J8 to the “A” position and apply power. After a few seconds, remove power connection, move J8 to the “B” position and reassemble the unit. The unit should now be set to factory default password and IP address.