Title: Measuring the Speed of Light
13
Center for Nanoscale Systems Institute for Physics Teachers (CIPT) 632 Clark Hall, Cornell University, Ithaca, NY 14853 www.cns.cornell.edu/cipt/ [email protected] Title: Measuring the Speed of Light Original: Revision: 1 February 2008 3 July 2010 Authors: David Tanenbaum, Bob Proctor, and Gordy Stecklein Appropriate Level: Regents and AP Physics Abstract: Students will measure the speed of light while developing familiarity with some basic optics and electronics components such as a beam-splitter, photodiode, Fresnel lens, and oscilloscope. Special Notes: *This lab write-up uses Tektronix TDS series oscilloscopes. If other oscilloscopes are used, the instructor must provide appropriate information on settings and making measurements. *Do this lab in a large space (e.g. a gymnasium or long hallway) so students can measure over a range of distances. *This lab can be done in a small room, but pay particular attention to safety with all of the laser beams in a smaller space. Make the measurements by alternately blocking the long and short beam paths so that the two pulses do not overlap on the oscilloscope. Safety: Teachers should review laser safety rules with their students. Set the equipment up on the floor, rather than on tables, so the laser beams are farther from eye level. Time Required: If the teacher sets up the equipment, but leaves focusing, collecting, graphing, and analyzing the data to the students, then the lab can be completed in a double-period with a short time left over to compare student results. Standards Met:
Transcript of Title: Measuring the Speed of Light

Center for Nanoscale Systems Institute for Physics Teachers (CIPT)
632 Clark Hall, Cornell University, Ithaca, NY 14853
www.cns.cornell.edu/cipt/
Title: Measuring the Speed of Light
Original:
Revision:
1 February 2008
3 July 2010
Authors: David Tanenbaum, Bob Proctor, and Gordy Stecklein
Appropriate Level: Regents and AP Physics
Abstract: Students will measure the speed of light while developing
familiarity with some basic optics and electronics components
such as a beam-splitter, photodiode, Fresnel lens, and
oscilloscope.
Special Notes: *This lab write-up uses Tektronix TDS series oscilloscopes. If
other oscilloscopes are used, the instructor must provide
appropriate information on settings and making measurements.
*Do this lab in a large space (e.g. a gymnasium or long
hallway) so students can measure over a range of distances.
*This lab can be done in a small room, but pay particular
attention to safety with all of the laser beams in a smaller
space. Make the measurements by alternately blocking the
long and short beam paths so that the two pulses do not overlap
on the oscilloscope.
Safety: Teachers should review laser safety rules with their students.
Set the equipment up on the floor, rather than on tables, so the
laser beams are farther from eye level.
Time Required: If the teacher sets up the equipment, but leaves focusing,
collecting, graphing, and analyzing the data to the students,
then the lab can be completed in a double-period with a short
time left over to compare student results.
Standards Met:

Page 2
Teacher Section – Measuring the Speed of Light
Behavioral Objectives:
Upon completion of this lab a student should be able to:
Identify the parameters used in this approach to measuring the speed of light.
Explain the role of the oscilloscope, the Fresnel lens, and the beam splitter in this lab.
Explain the reason pulsed light is used in this lab.
Explain the value of LASER light in this lab.
Class Time Required: Two class periods
Teacher Preparation Time: ~45 minutes
The initial equipment set-up is a little confusing, a little time-consuming, and quite ‘fussy’. The
teacher should do all of the initial set-up of the scopes and the components on the base plates,
and then leave the alignment, data acquisition, and analysis to the students. (See ‘Teacher’s Lab
Station Set-up’)
Materials Needed:
The kit from the CIPT Equipment Lending Library contains:
Iron Baseplate with height adjuster screws
Handi-Lens (Ultra-Optix) Fresnel Lens with magnetic mount
Keychain Laser
Beam-splitter (~ 70/30, Edmund Scientifics)
Fast Photodiode with Integrated Lens & external circuit (Hamamatsu model S10784)
Posts for the Laser, Detector, and Beam-splitter with magnets and mounts
Far Mirror (Plexi Mirror, American Science & Surplus ) on mount with adjustable tilt
Driver Circuit for laser based on a 555 chip (CMOS) that pulses light (<50 ns,MHz rep)
Oscilloscope (preferably digital with cursors such as Tektronix TDS series)
Long (at least 10m) tape measure (a fibertape with a reel can be shared by groups)
Note: Do not touch the working surfaces of the Fresnel lens, the beam-splitter, or the far
mirror. These items should only be handled by their mounts.
Assumed Prior Knowledge of Students: The students should be able to solve simple motion problems. They should also be able to use
their knowledge of reflection of light to align optical elements.

Page 3
Teacher Section – Measuring the Speed of Light
Teacher’s lab station Set-up:
Carefully unpack the materials. Do not touch the working surfaces of the Fresnel lens, the
beam-splitter, or the far mirror. These items should only be handled by their mounts.
Connect the laser module, photodiode, Fresnel lens, and beam-splitter to magnetic posts as
seen in the photographs in this lab.
Connect the photodiode detector to channel 1 (CH 1) on the oscilloscope. Plug-in and turn on
the oscilloscope.
Plug the 9 volt battery onto the LASER pulse generator first, and then connect the BNC
‘T’ connector to the laser and to the EXT TRIG input on the oscilloscope.
Place the laser mounting rod near the back of the baseplate and the Fresnel lens near the front
of the plate (see student section figure 2). Adjust the position of the laser and the Fresnel
lens so the beam goes though the small hole punched near the center of the Fresnel lens
Place the beam-splitter between the laser and the Fresnel lens, in the path of the beam, and
close to the hole in the Fresnel lens.
Place the detector in line with the center of the lens, and just to the side of the laser beam as
shown in student section figure 2. Make sure the laser beam is not blocked by the detector’s
post or its cable.
Angle the beam-splitter so some of the laser light reflects back into the detector. This signal
is visible as a peak on the oscilloscope. The detector is very sensitive to the position of the
beam-splitter, so the students will have to adjust the beam splitter to obtain the largest peak
possible.
Verify that the scope settings match those in the appendix of this lab.
Tips for Teacher:
This experiment depends heavily on the set-up. Students usually have difficulty aligning the
optics to obtain good signals on the scope. They frequently have trouble interpreting the
signals on the oscilloscope, as well. A brief introduction to the use of an oscilloscope and/or
a pre-lab demonstration of a complete set-up can remedy most of these problems.
Students must not obstruct the laser beam with the posts or the Fresnel lens frame.
The photodiode is very sensitive to small adjustments. A laser beam that appears to cover
the diode will often result in a weak signal. Minute readjustment of the detector/lens/beam-
splitter will yield a noticeably stronger signal.
Light from the far path can be focused too much by the Fresnel lens making it difficult to
place the beam on the detector. Moving the detector slightly forward or back will defocus the
beam slightly and make alignment easier.
A piece of frosted glass, scotch tape, or a white card makes a useful alignment tool. Move
the card along the beam path when attempting the alignment. It is easier to see the laser
beams if you can dim the room lights.

Page 4
Teacher Section – Measuring the Speed of Light
DO NOT connect or remove the pulse generator battery while the laser
is connected to it. Doing so can damage the LASER.
Connect the battery to the pulse generator before connecting the
generator to the LASER.
Disconnect the pulse generator from the LASER before removing
the pulse generator battery.
Measurements and Analysis
The signals should be on the order of 50mV and separated by tens or hundreds of nanoseconds
(depending on the distance from the far mirror).
Figure T-1: Sample data for ~16 m separation.
The far mirror to beam-splitter distance must be at least 4 meters to obtain a distinguishable
pulse separation on the oscilloscope. A far mirror to beam-splitter distance greater than 8
meters is preferable. Have students measure the distance with the tape measure or meter
stick carefully but quickly. The uncertainty in the measurement of ∆t of the signals will
dominate the ~2% error expected from measuring ∆L by hand.
Questions on the
Lmeasurement are common. The two paths of light become distinct at
the beam-splitter. The pulse taking the short path goes directly from the beam-splitter to the
detector and arrives first. The pulse taking the long path must also go to the far mirror and
then back to the detector.
o Method #1: Measure the long path and the short path distances and subtract to obtain
L .

Page 5
Teacher Section – Measuring the Speed of Light
o Method #2 (Easier): The distances between the laser and the beam-splitter and between
the beam-splitter and the detector are the same for both beam paths, and ‘drop out’ of the
L calculation. Therefore the round trip distance from the beam-splitter to the far mirror
is
L .
Oscilloscope ‘tricks’ (not all can be done at once)
This whole experiment happens in less than 1 microsecond, so the signal from the fast photo
detector is connected directly to the CH 1 input BNC jack on a very fast scope. The
experiment can be done with just this one connection to the scope, but it is better to have a
trigger signal to reset the time axis to zero when the system should expect the data (laser
pulse) to arrive. The electronic pulse generator which drives the laser can provide just such a
trigger signal. A BNC ‘T’ connector on the pulse generator sends the signal to the EXT
TRIG (external trigger) input on the scope and to the laser at the same time.
The oscilloscope settings found in Appendix A work well for this experiment. The Tektronix
TDS series scope provided by the CIPT, should come up with these pre-set. If they are not,
try the ‘SAVE/RECALL’ button near the upper left corner of the front controls. Use the soft
buttons along the side of the display to ‘Recall Settings’, ‘1’ and then select ‘Recall’. If that
doesn’t work, the settings will have to be entered manually.
Use the ‘store’ function of the oscilloscope to freeze the screen, making it easier to place the
cursors, ignoring some of the noise. Use the halfway point of the falling-off side of the peaks
instead of the peaks themselves when measuring ∆ t to obtain more consistent results.
One can set the oscilloscope to average several scans to reduce noise.
Perform a sequence of measurements on single scans.
Figure T-2: The oscilloscope and pulse generator w/ the beam-splitter, Fresnel lens, photo
detector and laser mounted on the base plate. (Note: The system works better with the beam-
splitter on the other side of the Fresnel lens as described in the lab.)
Answers to questions: send email to [email protected] to request answers
Page 1
Equipment List – Measuring the Speed of Light
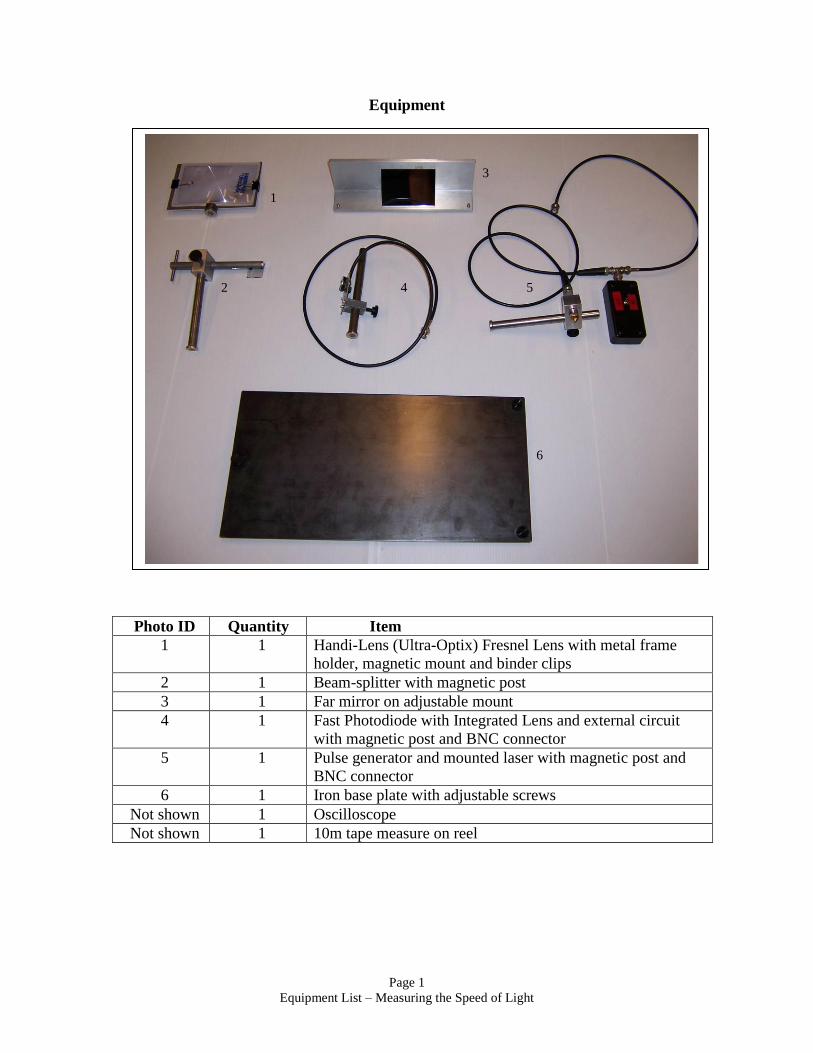
Equipment
Photo ID Quantity Item
1 1 Handi-Lens (Ultra-Optix) Fresnel Lens with metal
frame holder, magnetic mount and binder clips
2 1 Beam-splitter with magnetic post
3 1 Far mirror on adjustable mount
4 1 Fast Photodiode with Integrated Lens and external
circuit with magnetic post and BNC connector
5 1 Pulse generator and mounted laser with magnetic post
and BNC connector
6 1 Iron base plate with adjustable screws
Not shown 1 Oscilloscope
Not shown 1 10m tape measure on reel
Photo ID Quantity Item
1 1 Handi-Lens (Ultra-Optix) Fresnel Lens with metal frame
holder, magnetic mount and binder clips
2 1 Beam-splitter with magnetic post
3 1 Far mirror on adjustable mount
4 1 Fast Photodiode with Integrated Lens and external circuit
with magnetic post and BNC connector
5 1 Pulse generator and mounted laser with magnetic post and
BNC connector
6 1 Iron base plate with adjustable screws
Not shown 1 Oscilloscope
Not shown 1 10m tape measure on reel
2
3
1
6
5 4
Page 1
Student Section – Measuring the Speed of Light
MEASURING THE SPEED OF LIGHT
Pre-Lab Reading (pages 1 & 2) Introduction
As you know, the speed of light is very, very fast and nothing can go faster than light goes in a
vacuum. People have been measuring the speed of light, or at least trying to, since Galileo’s
time in the early 1600’s. Until very recently, the methods have involved ‘time-of-flight’. These
are methods that use the distance traveled divided by the time it takes to travel that distance.
Since light travels so fast, one must either use extremely large measurable distances or find a
way to measure extremely short time intervals (or both!). You will determine the speed of light
in this lab by measuring manageable distances right in the lab room, and measuring extremely
short time intervals using an oscilloscope.
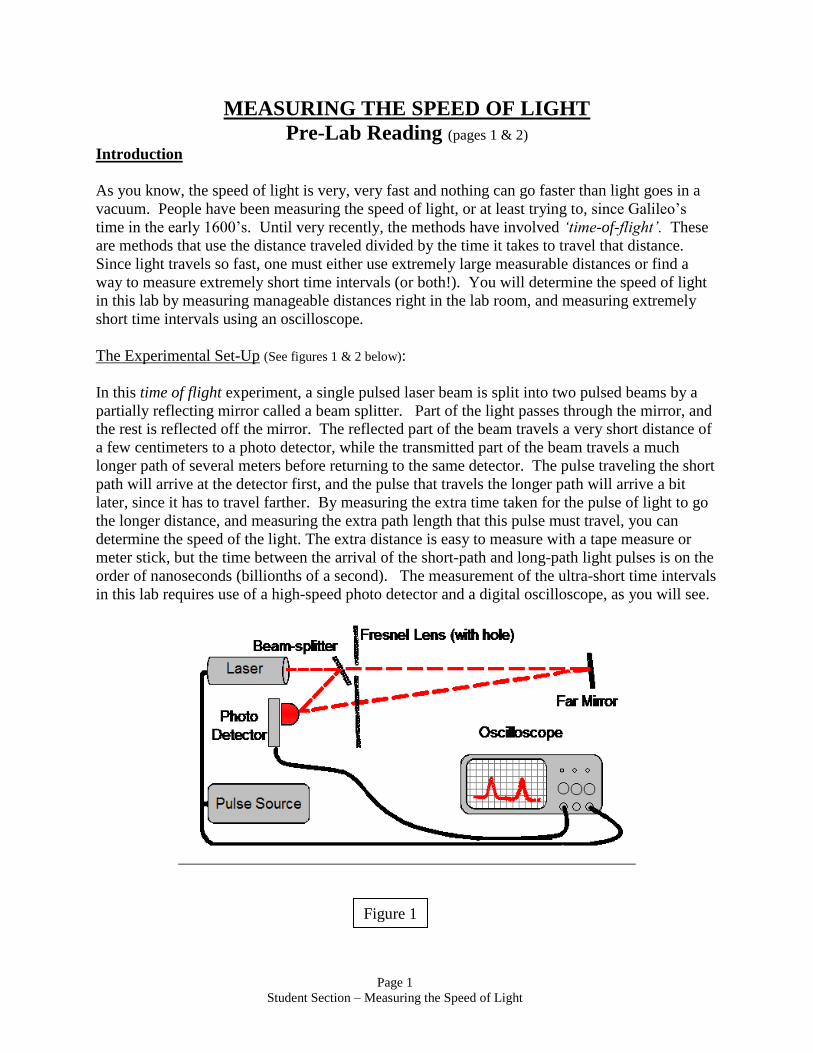
The Experimental Set-Up (See figures 1 & 2 below):
In this time of flight experiment, a single pulsed laser beam is split into two pulsed beams by a
partially reflecting mirror called a beam splitter. Part of the light passes through the mirror, and
the rest is reflected off the mirror. The reflected part of the beam travels a very short distance of
a few centimeters to a photo detector, while the transmitted part of the beam travels a much
longer path of several meters before returning to the same detector. The pulse traveling the short
path will arrive at the detector first, and the pulse that travels the longer path will arrive a bit
later, since it has to travel farther. By measuring the extra time taken for the pulse of light to go
the longer distance, and measuring the extra path length that this pulse must travel, you can
determine the speed of the light. The extra distance is easy to measure with a tape measure or
meter stick, but the time between the arrival of the short-path and long-path light pulses is on the
order of nanoseconds (billionths of a second). The measurement of the ultra-short time intervals
in this lab requires use of a high-speed photo detector and a digital oscilloscope, as you will see.
Figure 1

Page 2
Student Section – Measuring the Speed of Light
The laser, beam-splitter, Fresnel lens, and
photo detector are all mounted on a large iron
baseplate with magnetic bases as shown in the
top view in Figure 2. This keeps the short
path parts aligned with each other. The
baseplate, with screws to adjust its tilt, is set
on the floor and adjusted to aim the laser at
the far mirror placed 4-10 meters away. The
far mirror is then adjusted to reflect the laser
beam back and into the detector. Careful
alignment of the parts provides a strong signal
on both light paths, and strong signals make
the analysis much easier and results superior.
Warning! Do not touch the surfaces of
the Fresnel lens, the beam-splitter, or
the far mirror. These items can all be
handled by their mounts.
Warning! Never look into a LASER
beam path. Even laser pointers can cause
eye damage. We will minimize the risk that
an errant laser beam could hit anyone in the
eye by doing the experiment near the floor.
Remember that reflected laser light is also a
risk!
The oscilloscope (or ‘scope’ among friends) is one of the most important tools in physics
laboratories. Its main purpose is to display graphs of voltage as a function of time. If a voltage
changes very slowly, you can measure it with a voltmeter at regular time intervals (say every 5
seconds) and draw a graph of the data. But what if the voltage changes measurably in
milliseconds, microseconds, or even nanoseconds? Oscilloscopes are important because they
measure and graph voltages in otherwise immeasurable time scales like those in this lab.
Like a cell phone, a scope has one main purpose which is rather simple; but it has plenty of
buttons and menu options that tweak the way it works and make it much more useful (and
complex). For example, most scopes can display 2 independent channels (voltages) on the
vertical axis versus the time on the horizontal axis. You can learn about the ‘tweaks’ later.
Figure 2
Page 3
Student Section – Measuring the Speed of Light
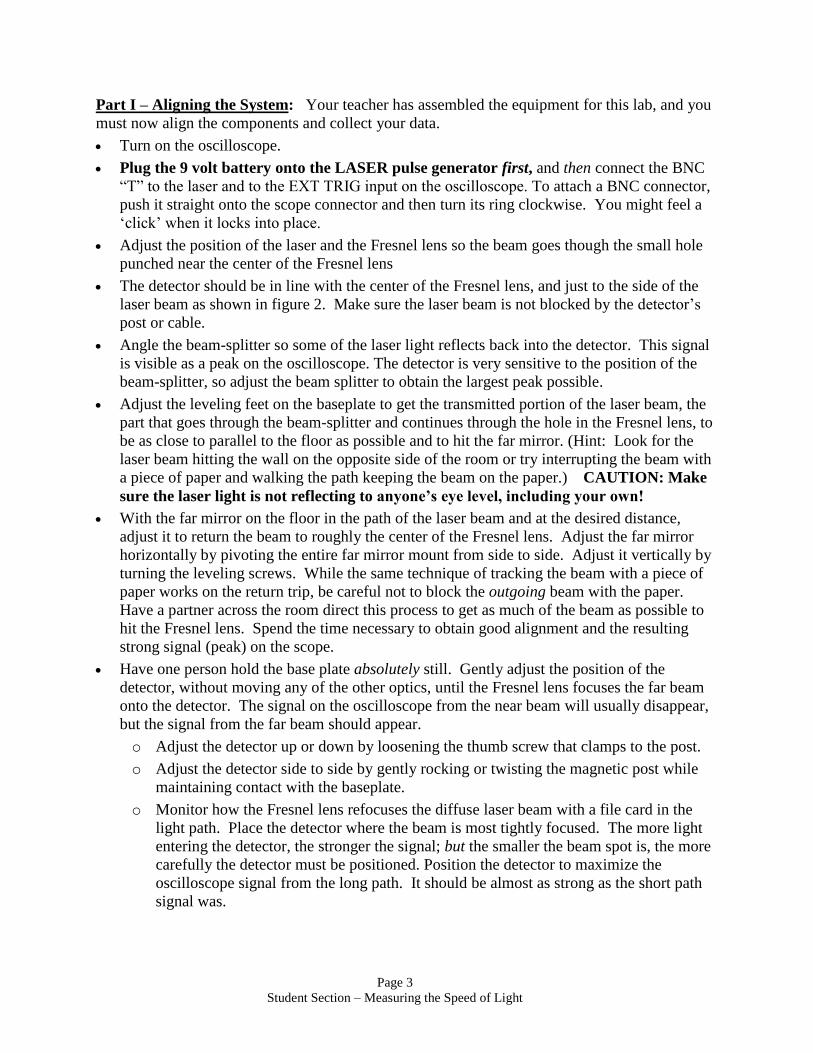
Part I – Aligning the System: Your teacher has assembled the equipment for this lab, and you
must now align the components and collect your data.
Turn on the oscilloscope.
Plug the 9 volt battery onto the LASER pulse generator first, and then connect the BNC
“T” to the laser and to the EXT TRIG input on the oscilloscope. To attach a BNC connector,
push it straight onto the scope connector and then turn its ring clockwise. You might feel a
‘click’ when it locks into place.
Adjust the position of the laser and the Fresnel lens so the beam goes though the small hole
punched near the center of the Fresnel lens
The detector should be in line with the center of the Fresnel lens, and just to the side of the
laser beam as shown in figure 2. Make sure the laser beam is not blocked by the detector’s
post or cable.
Angle the beam-splitter so some of the laser light reflects back into the detector. This signal
is visible as a peak on the oscilloscope. The detector is very sensitive to the position of the
beam-splitter, so adjust the beam splitter to obtain the largest peak possible.
Adjust the leveling feet on the baseplate to get the transmitted portion of the laser beam, the
part that goes through the beam-splitter and continues through the hole in the Fresnel lens, to
be as close to parallel to the floor as possible and to hit the far mirror. (Hint: Look for the
laser beam hitting the wall on the opposite side of the room or try interrupting the beam with
a piece of paper and walking the path keeping the beam on the paper.) CAUTION: Make
sure the laser light is not reflecting to anyone’s eye level, including your own!
With the far mirror on the floor in the path of the laser beam and at the desired distance,
adjust it to return the beam to roughly the center of the Fresnel lens. Adjust the far mirror
horizontally by pivoting the entire far mirror mount from side to side. Adjust it vertically by
turning the leveling screws. While the same technique of tracking the beam with a piece of
paper works on the return trip, be careful not to block the outgoing beam with the paper.
Have a partner across the room direct this process to get as much of the beam as possible to
hit the Fresnel lens. Spend the time necessary to obtain good alignment and the resulting
strong signal (peak) on the scope.
Have one person hold the base plate absolutely still. Gently adjust the position of the
detector, without moving any of the other optics, until the Fresnel lens focuses the far beam
onto the detector. The signal on the oscilloscope from the near beam will usually disappear,
but the signal from the far beam should appear.
o Adjust the detector up or down by loosening the thumb screw that clamps to the post.
o Adjust the detector side to side by gently rocking or twisting the magnetic post while
maintaining contact with the baseplate.
o Monitor how the Fresnel lens refocuses the diffuse laser beam with a file card in the
light path. Place the detector where the beam is most tightly focused. The more light
entering the detector, the stronger the signal; but the smaller the beam spot is, the more
carefully the detector must be positioned. Position the detector to maximize the
oscilloscope signal from the long path. It should be almost as strong as the short path
signal was.

Page 4
Student Section – Measuring the Speed of Light
With the long path signal displayed on the oscilloscope, a slight readjustment of the beam-
splitter will return the short path beam to the detector and cause it to reappear on the scope as
well.
With both peaks displayed on the oscilloscope, separated slightly on the horizontal (time)
axis, block each beam individually to identify the peaks.
Part II – Collecting the Data
Now that the equipment is set-up and aligned (congratulations), you can make the necessary
measurements very quickly. The oscilloscope will display the time (
t ) it takes the pulse of
light to travel the distance to the mirror and back. The distance (
L ) can be measured with a
tape measure or meter stick.
1. The difference in path length between the short and long paths is simply the round trip
distance from the beam splitter to the far mirror. Why is it not necessary to include the
distance between the laser and the beam-splitter and the distance between the beam-splitter
and the detector?
Measure the distance from the beam-splitter to the far mirror with a tape measure. Double
this measurement to obtain the round trip distance. Record this as ‘
L ’ in the data table
below.
Use the digital oscilloscope to measure the time.
Adjust the CH 1 VOLTS/DIV to get the peaks to fill most of the height of the display area.
Adjust the SEC/DIV to get the two peaks to fill most of the width of the display area.
Tektronix TDS series scopes have a cursor function to make reading data from the scope
easier.
o Press the CURSOR menu button
o Set the Type to ‘Time’ and the Source to ‘CH1’ using the softkeys next to the display
screen.
o Move the vertical lines to mark the midpoints on the downward slopes of the two
peaks by pressing the softkey for ‘Cursor 1’ or ‘Cursor 2’ and turning the knob at the
top center of the scope with the green LED lit near it. The position of each cursor is
displayed next to a lower softkey on the screen. The time between the cursor
positions is labeled ‘delta’ and appears next to the middle softkey as in Figure 3.
Record this number under ‘
t ’ in the data table below.
If the scope does not have cursors, estimate the time delay by counting the divisions between
the peaks and multiplying by the SEC/DIV number on the horizontal (time) axis.
2. Calculate the speed of light (c) using c L
t Show your work. Find percent error.

Page 5
Student Section – Measuring the Speed of Light
Figure 3: Sample Oscilloscope Screen with far mirror 13.1 meters from beam-splitter.
(Note the positions of the vertical cursors and the display of their positions on the screen.)
Disconnect the pulse generator from the LASER and the scope before
removing the pulse generator battery.
Part III – Group Results
Pool your results with those of the other lab groups in the table below in order to examine the
effect of varying distances of the far mirror.
Team #
L (meters)
t (seconds)
Speed of Light (c)
(meters/second)
1
2
3
4
5
6
7
8
9
10

Page 6
Student Section – Measuring the Speed of Light
Graph
L vs.
t
Draw in the best fit line, but force it to include the origin.
Find the slope of the best fit line on the graph, including units.
3. Slope = ___________ ___________
4. Why is the origin included in the best-fit line on the graph even though it is not actually a
measured data point?
5. What is the meaning of the slope of this graph?
6. What was the class group result for the speed of light?
c = ___________ ___________
7. How did you determine which light pulse displayed on the oscilloscope was from the short
path and which one was from the long path?

Page 7
Student Section – Measuring the Speed of Light
APPENDIX A: Typical Oscilloscope Settings
PARAMETER VALUE LOCATION ON FRONT PANEL
CH 1 Sensitivity 10 mV/div VOLTS/DIV Knob above CH 1 input BNC jack
CH 1 Coupling DC Soft button on CH 1 Menu
CH 1 BW limit Off Soft button on CH 1 Menu
CH 1 Probe 1 X Soft button on CH 1 Menu
CH1 Invert Off Soft button on CH 1 Menu
Horizontal Axis 25 nsec/div SEC/DIV Knob above EXT TRIG input BNC jack
Trigger Type Edge Soft button on TRIGGER Menu
Trigger Source Ext Soft button on TRIGGER Menu
Trigger Slope Falling Soft button on TRIGGER Menu
Trigger Mode Normal Soft button on TRIGGER Menu
Trigger Coupling DC Soft button on TRIGGER Menu
Trigger Level ~ -500 mV TRIGGER LEVEL small knob in upper right corner
Middle Position 100 nsec HORIZONTAL POSITION small knob 2nd
from right
Averaging Average: 4 Soft buttons on ACQUIRE Menu (top center button)