TITLE Industrial Education Safety Instructional Guide ...
200
DOCUMENT RESUME BD 084 408 CE 000 579 TITLE Industrial Education Safety Instructional Guide. INSTITUTION Hawaii State Dept. of Education, Honolulu. REPORT NO TAC-73-5890 PUB DATE . [73] NOTE 200p. EDRS PRICE DESCRIPTORS ABSTRACT MF-$0.65 HC-$6.58 *Accident Prevention; *Industrial Education; Laboratory Safety; *Safety; *Safety Education; Safety Equipment; School Safety; State Programs The guide was designed to provide basic information for administrators, teachers, students, and related personnel to develop new safety programs and to improve existing programs in Hawaii public schools. The loose-leaf format permits later upgrading and changes. The basic components of the program are the teacher, student, facility, and equipment. The guide is illustrated with diagrams, drawings, and photographs throughout and is primarily arranged in outline form. A bibliography and appendices of policies, forms, films, and Red Cross visualizations are added. (MS)
Transcript of TITLE Industrial Education Safety Instructional Guide ...
DOCUMENT RESUME
BD 084 408 CE 000 579
TITLE Industrial Education Safety Instructional Guide.INSTITUTION Hawaii State Dept. of Education, Honolulu.REPORT NO TAC-73-5890PUB DATE . [73]NOTE 200p.
EDRS PRICEDESCRIPTORS
ABSTRACT
MF-$0.65 HC-$6.58*Accident Prevention; *Industrial Education;Laboratory Safety; *Safety; *Safety Education; SafetyEquipment; School Safety; State Programs
The guide was designed to provide basic informationfor administrators, teachers, students, and related personnel todevelop new safety programs and to improve existing programs inHawaii public schools. The loose-leaf format permits later upgradingand changes. The basic components of the program are the teacher,student, facility, and equipment. The guide is illustrated withdiagrams, drawings, and photographs throughout and is primarilyarranged in outline form. A bibliography and appendices of policies,forms, films, and Red Cross visualizations are added. (MS)

OFFICIAL
INDUSTRIALEDUCATION
SAFETYINSTRUCTIONAL
GUIDE
STATE OF HAWAII DEPARTMENT OF EDUCATION HONOLULU
PRINTED BY THE OFFICE OF LIBRARY SERVICES/TAC PUBLICATION NO. TAC 73-5890
FILMED FROM BEST AVAILABLE COPY

The Honorable John A BurnsGovernor. Stale of Hawaii
BOARD OF EDUCATION
Hiroshi Yamashita. Chairman
C Ronald Harker, Vice ChairmanGeorge S. AdachiDr Richard E. AndoMyrtle K KaapuRobort N. Kumasaka
Marvin C. MidkillAnn NakagawaRuth TabrahKiyoto TsubakiTommy Wong
Dr Shiro Amioka, Superintendent of EducationTeichiro Hirata, Deputy Suporintondent
James G. Igoe, Assistant SuperintendentOffice of Library Services
Dr. Philip Igo, Assistant SuperintendentOffice of Instructional Sorvicos
George D. L. Mau, Assistant SuporintandentOffice of Personnel Services
Koichi H Tokushige, Assistant SuporintendentOffice of Businoss Services
Lows Yamauchl, Assistant SuporintendentOffice of Research and Planning
Harry C. Chuck, District SuponntendentHawaii District 01 lice
William M Araki, Acting District SuperintendentCentral District Office
William A. Waters, District SuperintendentWindward District Office
Domingo Los Banos, Jr., District SuperintendentLeeward District Office
Dr. Albert Miyasato, District SuperintendentHonolulu District Office
Barton H. Nagals, District SuperintondentKauai District 01 lice
Darrell Oishi, Acting District SuperintendentMaul District 011ice

Cr)
a)
EMERGENCY ACTIONN.1711.,I1
I. PROCEDURES FOR SERIOUS INJURY
A. Stop the Bleeding
I. Use compress.
2. Do not use tourniquet unless qualified.
B. Treat for Shock
I. Keep victim warm.
2. Do not move victim if major bonefracture is likely (falls, collisions, etc. ).
C. Call for Professional Aid or Ambulance, asappropriate. If situation cannot be controlleduntil professional arrives, call ambulancefirst.
II. NOTIFY SCHOOL OFFICE IMMEDIATELY
Communications sequence should be prearranged.
13*%INSTRUCTIONS FOR TEACHER:
1. This poster should be posted in a conspicuous place inall Industrial Education work areas where it will notbe hidden or obstructed frai view.
.YOut, students should be aware of this poster and under-std, all' 'the instructions thereon.

EMERGENCY ACTION
I. PROCEDURES FOR SERIOUS INJURY
A. Stop the Bleedin9
I. Use compress.
2. Do not use tourniquet unless qualified.
B. Treat for Shock
I. Keep victim warm.
2. Do not move victim if major bonefracture is likely (falls, collisions, etc.).
C. Call for Professional Aid or Ambulance, asappropriate. If situation cannot be controlleduntil professional arrives, call ambulancefirst.
I I. NOTIFY SCHOOL OFFICE IMMEDIATELY
Communications sequence should be prearranged.
* * * *
INSTRUCTIONS FOR TEACHER:
1. This poster should be posted in a conspicuous place inall Industrial Education work areas where it will notbe hidden or obstructed from view.
2. Your studenti should be are of this poster and under-stand:all:the. instructions thereon.
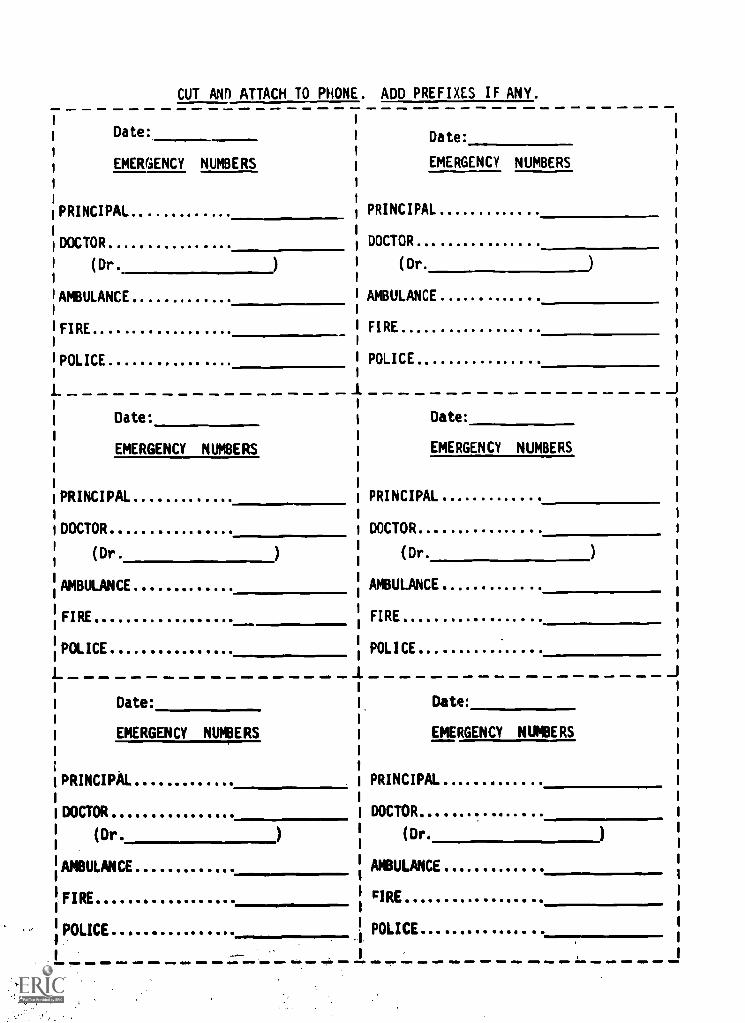
CUT AN!) ATTACH TO PHONE. ADD PREFIXES IF ANY.
Date:
EMERGENCY NUMBERS
PRINCIPAL.
DOCTOR.
(Dr.
AMBULANCE
FIRE
POLICE
L
)
Date:
EMERGENCY NUMBERS
PRINCIPAL
DOCTOR
(Dr.
AMBULANCE
FIRE
POLICE
)
Date:
EMERGENCY NUMBERS
PRINCIPAL
DOCTOR
(Dr.
AMBULANCE
FIRE
POLICE
Date:
EMERGENCY NUMBERS
PRINCIPAL ..
DOCTOR... .
(Dr.
I AMBULANCE..I FIRE
POLICE
Date:
EMERGENCY NUMBERS
PRINCIPAL
DOCTOR
(Dr.
AMBULANCE
FIRE
POLICE
Date:
EMERGENCY NUMBERS
PRINCIPAL
DOCTOR
(Dr.
AMBULANCE
cIRE
POLICE

FOREWORD
The safety of the individual is a responsibility that must be shared byall members of this society. A safe environment requires individuals tobe totally involved and consciously committed to safe practices in ourdaily lives. The Industrial Arts and Industrial-Technical Occupationsteachers play a vital role in cultivating safe work habits and attitudesdue to the very nature of the mode of their instruction.
The purpose of this publication is to provide administrators, teachersand students with a basic guide for safety education in our schools.Specifically, this guide will:
1) Provide teachers with information on appropriatereference forms.
2) Serve as a catalyst in organizing safety programs.
3) Allow for active participation by students intheir safety program.
4) Allow for new input from concerned individuals tomeet the needs of a dynamic student population.
This publication should not be construed as an all-encompassing safetyprogram in itself; moreover, it should be recognized as a vehicle forbringing about improvements in our safety education programs. Theloose-leaf format of this guide allows for active involvement by person-nel at all levels to keep it current and sensitive to the needs of thestudents.
SHIRO AMIOKASuperintendent of Education

ACKNOWLEDGEMENT
This Industrial Education Safety Instructional Guide is the result ofthe cooperative efforts of many people, firms and agencies in the Stateof Hawaii in its planning, researching and development.
Deepest appreciation is expressed to Robert Takasaki, Industrial Artsteacher at Stevenson Intermediate School and Robert Okuda, teacher atthe Curriculum Development Services Section of the Curriculum Develop-ment and Technology Branch, Office of Instructional Services, for thetime and effort given to the development of the guide.
Gratitude is expressed to the following persons, firms and agencies fortheir assistance in the preparation of this guide.
Mr. Edward Danzinger, President, 1971, American Society ofSafety Engineers, Hawaii Chapter
Mr. Edward R. Turner, Administrator, andMr. Joseph H. Maney, Industrial Safety Education, Departmentof Labor and Industrial Relations, Industrial Safety Division
Mr. Paul Haygood, Hawaii Area Director, Occupational Safetyand Health Administration
Mrs. Christine Ling, Health Education Officer, Department ofHealth
Mrs. Emiko Kudo, Administrator, Vocational-Technical CurriculaSection, Office of Instructional Services, Department ofEducation
Dr. Lawrence Inaba, Program Specialist, Industrial-TechnicalEducation, Vocational- Technical Curricula Section, Office ofInstructional Services, Department of Education
Mr. Frank N. Kanzaki, Program Specialist, Industrial Arts Edu-cation, Vocational-Technical Curricula Section, Office ofInstructional Services, Department of Education
Division of Traffic Education and Safety, Department of Trans-portation Services, City and County of Honolulu, City HallAnnex, Honolulu, HI 96813
Health Education Office, Department of Health, Kinau Hale,1250 Punchbowl Street, Honolulu, HI 96813
Industrial Safety Division, Department of Labor and IndustrialRelations, Room 203, 825 Mililani Street, Honolulu, HI 96813
ii

Audiovisual Services Section, School Libraries and InstructionalMateria],7 Branch, Department of Education, 4"11 Waialae Avenue,Honolulu, HI 96816
Hawaii State Chapter, American Re'l Cross, 1270 Ala MoanaBoulevard, Honolulu, HI 9014
Castle and Cooke, Inc., 130 Merchant Street, Honolulu, HI96813
Dole Corporation, 650 Iwilei Road, Honolulu, HI 96817
Hawaiian Airlines, Honolulu International Airport,Honolulu, HI 96819
Hawaiian Electric Company, Inc., 820 Ward Avenue,Honolulu, HI 96814
Hawaiian Sugar Planters Association, 1527 Keeaumoku Street,Honolulu, HI 96822
Hawaiian Telephone Company, 1130 Alakea Street,Honolulu, HI 96813
Lewers and Cooke, Inc., 550 Paiea Street, Honolulu, HI 96819
Mr. Tom Carmichael and Mr. Ben Okudara, FullerO'BrienCorporation, 770 Ala Moana Boulevard, Honolulu, HI 96813
Mr. Harry Albright, Board of Underwriters of Hawaii,700 Bishop Street, Honolulu, HI 96813
Mrs. Sharon Gau, U. S. Department of Labor, Room 505, MelimBuilding, 333 Queen Street, Honolulu, HI 96813
iii

TABLE OF CONTENTS
Foreword
Acknowledgement ii
Introduction
a.o. Objectives
0.1. Statement
0.2. Performance Requirements
1.0. The Teacher
1.1. Emergency Procedures
1.1.1. Communications1.1.2. First Aid1.1.3. Transportation1.1.4. Accident Reports
1.2. The Role of School Safety Programs
1.3. Supervising for Safety
1.3.1. Planning1.3.2. Job Instruction1.3.3. Morale1.3.4. Production
1.4. Factors and Responsibilities
1.4.1. Personnel1.4.2. Facility1.4.3. Equipment1.4.4. Pledge and Permission Cards
1.5. Liability
1.5.1. Extent of Liability1.5.2. Negligence
1.6. Prevention
1.6.1. Accident Factors
iv

1.0. The Teacher (Cont'd)
1.7. Standards
1.7.1. General1.7.2. Definition1.7.3. Sources of Standards
1.8. Characteristics of a Safety Program
1.8.1. Organization1.8.2. Discipline1.8.3. Practical1.8.4. Involvement and Interest1.8.5. Relevant Information1.8.6. Performance
1.9. The School Safety Program
1.9.1. Safety Inspections1.9.2. Accident Reports1.9.3. Instructional Techniques1.9.4. Equipment Safety1.9.5. Housekeeping Practices1.9.6. Electrical Safety1.9.7. Fire Safety1.9.8. First Aid Practices1.9.9. Personal Protection1.9.10. General Practices
2.0. The Student
2.1. A Message to Students
2.1.1. Student Responsibility
2.2. Safety Practices for All Areas
2.2.1. General Safety Rules2.2.2. Safety Rules for All Students2.2.3. Hand Tools2.2.4. Machine Tools
2.3. General Safety Rules Exam
2.4. Qualifying on Machines
2.4.1. Initial Orientation2.4.2. Demonstration2.4.3. Safety Check2.4.4. Student Performance2.4.5. Qualification Completed
V

2.0. The Studen+ (Contld)
2.5. Operation Procedures for Machines
2.5.1. Preparation2.5.2. Operation2.5.3. Shut Down
2.6. Protective Gear
2.6.1. Eye/Face Protective Gear2.6.2. Head Protective Gear2.6.3. Hand Protective Gear2.6.4. Foot Protective Gear2.6.5. Respiratory Protection
3.0. The Facility
3.1. Safety Inspections
3.1.1. Daily Inspections3.1.2. Preventive Maintenance Inspection
3.2. Fire Prevention
3.2.1. Causes of Fire3.2.2. Safety Check3.2.3. Classification of Fires and Types of Extinguishers
3.3. Color Engineering for the School Shop
3.3.1. Color Engineering Requirements for Public School Shops
4.0. The Equipment
4.1. Daily Equipment Checks
4.2. Qualifications and Operating Procedures
4.3. Safety Instructions for Operating Equipment
4.4. Woodworking Technology
4.4.1. Band Saw4.4.2. Scroll Saw (Jig Saw)4.4.3. Radial Arm Saw4.4.4. Table Saw4.4.5. 'Sander (Disc & Belt Types)4.4.6. Drill Press4.4.7. Mortiser4.4.8. Jointer4.4.9. Planer (Surfacer)
vi

4.0. The Equipment (Cont'd)
4.4. Woodworking Technology (Cont'd)
4.4.10. Lathe (Woodturning)4.4.11. Portable Electric Drill4.4.12. Portable Router
4.5. Metalworking Technology
4.5.1. Bar Folder4.5.2. Shear4.5.3. Bow and Pan Brake4.5.4. Grii.der
4.5.5. Buffer4.5.6. Lathe (Metalworking)4.5.7. Power Hack Saw4.5.8. Shaper (Metalworking)4.5.9. Planer (Metalworking)4.5.10. Milling Machine4.5.11. Forge
4.5.12. Furnace4.5.13. Welder (Electric)
4.6. Power Mechanics Technology
4.6.1. Car Lifts, Hoists, and Cranes4.6.2. Engine4.6.3. Storage Battery Charger4.6.4. Welder (Oxygen - Acetylene)
4.7. Graphic Arts Technology
4.7.1. Motorized Paper Cutter4.7.2. Platen Press
4.8. Electricity/Electronics Technology
4.8.1. Circuits4.8.2. Electronic Devices4.8.3. Electrical Equipment
4.9. Design/Drafting Technology
(Note: This zee-U..0n Lz to be developed at a tateA date.)
vii

5.0. Bibliography
5.1. Selected References
5.2. The Teacher
5.3. The Student
5.4. The Facility
5.5. The Equipment
6.0. Appendices
6.1. Policies, Regulations and Acts
6.1.1. Emergency Care for Sick or Injured Students (Policy)6.1.2. Emergency Care for Sick or Injured Students (Regulations)6.1.3. Safety Policy - Practical Arts and Vocational-Technical
Education (Policy)6.1.4. Safety Regulations - Practical Arts and Vocational-
Technical Education (Regulations)6.1.5. Student Safety (Policy)6.1.6. Student Safety (Regulations)6.1.7. Student Accident Insurance (Regulations)6.1.8. Act 107 (To Require Government Agencies to Provide Safety
Equipment to Public EMployees When Required in treeLine of Duty)
6.2. Forms and Check Lists
6.2.1. Accident Report Form (Form No. 411)6.2.2. Planning Worksheet for Improvements to Room6.2.3. National Standard School Shop Safety Inspection Check List6.2.4. Acknowledgement of Safety Instruction
6.3. Safety Tips and Equipment
6.3.1. Know Your Fire Extinguishers6.3.1.1. Use the Right Type of Fire Extinguishers for the Different
Classes of Fires -- Let This Chart Be Your PermanentReference
6.3.2. Inspection Tips - Inspecting for Safe Use of PortableElectric Equipment
6.4. Films
6.4.1.
6.4.2.
Film SourcesSafety Films
viii

6.0. Appendices (Cont'd)
6.5. Miscellaneous
6.5.1. General Directions for Giving First Aid6.5.2. First Aid Training Means Accident Prevention
(Bathroom Cabinet)6.5.3. First Aid Training Means Accident Prevention
(Solvents, Petroleum Distillatel, Insecticides,Pesticides)
6.5.4. First Aid Training Means Saving Lives (Poisoning)6.5.5. First Aid Training Means Saving Lives (Artificial
Respiration and Clearing Air Passageway)6.5.6. First Aid Training Means Accident Prevention
(Infant's Toys)6.5.7. First Aid Training Means Accident Prevention
(Sharp Knives and Toots)6.5.8. First Aid Training Means Saving Lives (Pressure, Bandage,
Elevate)6.5.9. How You Can Prevent Accidents6.5.10. Be Sure You Can See Where You're Going When You Push,
Pun, or Carry Any Load
ix

INTRODUCTION
Rapid socio-economic changes and technological advancements in societyhave brought about substantially increased demands on various institu-tions to focus upon the world in which we live and to put forth energiesto preserve the balance in our ecosystems. For example, the populationis being concentrated in relatively limited land areas, this congestionin turn creates psychological and physical hazards and therefore, indi-viduals run higher risks of becoming victims of accidents.
The constant interface of activities between man and technology deservesmuch consideration. As responsible agents in our society we nee:! to fo-cus on safety not only in terms of the classroom, school or district,but as being a part of an entire system.
The purpose of this guide is to provide all personnel involved andcharged with the responsibility of providing a safety program in ourschools with statewide delivery system for basic kinds of safety infor-mation. The loose-leaf format of this guide was designed with constantupgrading in m,ad.
Successful programs require active participation by all concerned per-sons. All too often major contributions are overlooked for the lack ofappropriate communication devices. Therefore, new input is solicited asthere will always be a need for upgrading safety programs..
The scope of this guide includes the four basic components of the pro-gram, which are: the teacher, student, facility, and equipment. How-ever, it should not be construed to be limited to these areas. Thisbasic structure shall serve as the core from which branching systemsshall be derived. The intent was not to build an awesome, all-encompassing framework but to allow for the incorporation of changes tomeet the changing needs.
As professionals, contributions must be made on the policy-making level.All timid verbal activity within the field should cease to embark upona venture to stimulate positive actions to meet, if not exceed, theneeds of the learner.
X


0.0. OBJECTIVES
Teachers in Industrial Education or other laboratory-oriented programs shouldbe totally committed to the concept of safety not only within the laboratorybut also off campus as well. The main objective, therefore, lies in the rlom-mitment to provide for and maintain conditions pertinent to the safety andwelfare of every student and teacher in Industrial Education.
0.1. STATEMENT
The guide herein was designed to provide basic information for adminis-trators, teachers, students and related personnel to develop new andimprOve existing safety programs in Hawaii public schools.
0.2. PERFORMANCE REQUIREMENTS
0.2.1. To help plan, organize and implement an effective safety program.
0.2.2. To provide the foundation for revisions and updating.
0.2.3. To assist teachers in locating resource materials.

TEACHER1.0

1.0. THE TEACHER
The teacher, as a supervisor of industrial activities within the school,should take the initiative to install and maintain a comprehensive safety pro-gram for the benefit of his students and in turn, himself. There is no singleapproach to safety programs. Each individual teacher is expected to determinewhat needs to be done to maintain a balanced program in his own schoolsituation.
This section was organized primarily as a briefing on particular pointswith which teachers should be familiar. The authors realize that there aremany excellent safety programs in existence and those teachers who wish tocontribute to this guide may do so by mailing suggestions to:
MR. FRANK N. KANZAKIProgram SpecialistIndustrial Arts EducationDepartment of EducationP. 0. Box 2360Honolulu, Hawaii 96804
Some of.the points covered in this. section are: major responsibilities,emergency procedures, liability, accident factors, accident reports, and asuggested safety program.

1.1. EMERGENCY PROCEDURES
The following arrangements should be made before school opens every year.See 6.1.1., 6.1.2., and 6.1.6. Appendices.
1.1.1. COMMUNICATIONS
1. Emergency procedures should be discussed with yourdepartment head, principal, school secretary and nurse. If
there are any changes in status of employment of above, be sureprocedures remain intact. The principal shall designate aresponsible agent to take action in his absence.
2. Order of notification under following conditions:
1. If serious injury (uncontrollable situation)1. Ambulance (for the best interest of student)2. Principal and/or designee who will contact:3. Parents
2. If serious injury (controlled situation)1. Principal and/or designee who will contact:2. Parents
3. If minor injury teacher will notify1. Principal and/or designee who will contact:2. Parents
3. Location of telephone.
1. Each shop should have an extension phone for campusand off-campus communications.
2. It is essential for the Industrial Education departmenthead to have a telephone extension. (A direct lineis preferred.)
3. All students shall know the location of the telephone.
4. Emergency numbers should be posted properly for immediateaccess. If outside calls require "dialing 9" etc., affixinformation to prevent confusion.
4. Keep a card file of all students in your class with names andtelephone numbers of parents or guardian and family doctorto be notified in case of injury.

1.1. 2 . FIRST AID
1. General
Every teacher involved with industrial Arts or VocationalEducation should receive training in first aid procedures.Contact your local chapter of the American Red Cross formore information.
2. Administering
I. First aid should be administered by qualifiedpersonnel only.
2. "Under no circumstances may school personnel diagnoseillness, prescribe or administer medication for any sortto pupils ." See 6 .1.2 . Appendix .
3. When attending to accident victim, disperse crowd ifaccident is serious and keep surrounding area quiet toprevent further anxieties on the victim's p9rt.
4. Secure proper medical attention for individuals with cuts,punctures or serious abrasions as a result from contactwith metal.
5. Remember the basic procedures for treating seriousaccidents:
1. Stop the bleeding.
2. Treat for shock.
3. Supplies
1. Every shop shall have a first aid kit or cabinet properlymarked and its location pointed out to all students.
2. Each kit or cabinet shall be properly maintained with afull supply of compresses, bandages.
1.1. 3 . TRANSPORTATION
1. "Parents should be notiiied immediately of all cases of ill-ness or injury occurring on school premises. If the sick orinjured (pupil) is to be sent home or elsewhere, his parentsare to arrange for his transportation. If they cannot becontacted immediately, the principal may take such actionnecessary for the best interest of the (pupil).
2 . If the accident is serious and the situation cannot be

1.1.3. TRANSPORTATION (Cont'd)
controlled, the principal and/or his designee shall arrangefor immediate transportation via ambulance in the event thatthe injured student's parents cannot be contacted immediately.
3. In specific cases where the nature of the injury is serious,do not attempt to wove the student save for first aidprocedures until professional medical help arrives.
1.1.4. ACCIDENT REPORTS
1. Fill out the Department of Education accident report form 411(See 6.1.1. Appendix as soon as it becomes feasible to do so.
Details become vague after a few hours have passed and mayaffect the accuracy of your report.
2. Prepare your report in duplicate. One will be delivered tothe principal and the other shall be kept in your permanentfile. Report all accidents for your protection.
3. The teacher should include additional information on thebasis of how, where, what, who, when and why the accidenthappened in reconstructing the sequence of events on the backside of Form 411.
4. fhe U.S. Department of Labor has recommended the followingprinciples which should be observed in preparing reports:
1. Use common sense -- stick to the facts, weigh their value,reach justified conclusions.
2. Investigate each clue -- any apparently reasonable conclu-sion will often be changed by exploring factors which maynot appear to be important.
3. Check for unsafe conditions and acts -- both are presentin the great majority of accidents.
4. Make recommendations -- no investigation is completeunless corrective action is suggested (and carried out).
5. Investigate all accidents -- chance is often the soledifference between a trivial accident and a serious one.Results cannot be predicted.

1.2. THE ROLE OF SCHOOL SAFETY PP.WRAMS
The school safety program assumes an important role in our environmentand our dynamic society. All too often this role seems vague in our dailypreference for more pressing details that consumes much of our activityplans. Some of our major educational goals, however noble and sincerein its conception, may seem far-fetched and impractical at times to theteacher. Much of this kind of response is, perhaps, due to unclearrelationships between program goals, the school system and the role ofthe teacher.
Teaching safety is a very complex and difficult task. It involves thepsychomotor, cognitive and affective domains of the learner in a situationwhere it is difficult to measure and monitor his progress. How does thethe student learn to recognize unsW1e conditions or acts? How will hedo on his own afters the demonstratins, safety exams and supervision?There is no "given" situation because most accidents occur with theconvergence of several variables. How do you train a student to be awareof these variables?
The rOle'of the school safety program within the framework of practicalconcerns is,indeed overshadowed by immediate concerns within the labors-tory. The effectiveness of the school safety program is solely dependenton the teacher and his commitment to the concept of safety. The key ele-ment in any program is the Leacher who must operate within a massiveframework of variables. The other elements which influence the schoolsafety program within one environment are the community, school system,principals, teachers and students. Each element affects the school safetyprogram positively in varying degrees:
COMMUNITY SCHOOL SYSTEM
-expectations-resources
-policy decisions-facility-staff-resources
STUDENT PRINCIPAL
-accepts responsibility -school application-cooperation -support
TEACHER
-implement program-coordinator-responsible agent

1.2. THE ROLE OF SCHOOL SAFETY PROGRAMS (Cont'd)
THE ROLE OF SCHOOL SAFETY PROGRAMS
Fig. 1.2.

1.3. SUPERVISING FOR SAFETY
While there is no die-cast approach to this important aspect of thesafety program, the teacher must recognize some of the major factorswhich can cause an accident. Three major factors which must be consid-ered in the planning and implementation of safety programs are:
PERSONNEL
FACILITY & + UNSAFE ACT mg ACCIDENTEQUIPMENT OR CONDITION
MATERIALS
Any one of these factors or combinations thereof may result in an acci-dent. These are discussed further in section 1.6.1. At this point itmay seem quite logical to review your relationship as a supervisor withthe above factors. What are you consciously doing to keep these factorsin check?
The teacher, as a supervisor, shall be present at all times to managethe activities in the shop or classroom. If an emergency arises and theteacher must leave his class, another qualified teacher must be left incharge for the duration of his absence. If another teacher withoutproper qualifications is left in charge, all shop activities shall ceasewithout exceptions. Leaving the students in the shop without propersupervision is not a reasonable nor prudent course of action for theteacher to take in providing for the safety of his students. Do not makeallowances for students to come in and work without supervision duringyour preparation period or any other time when you are not in theimmediate area.
Successful teachers are usually aware of common factors and the variabi-lity among their students and carefully adjust and implement their safetyprograms on a continuing basis. Developing unique perceptions aboutsafety and his role as a supervisor does require continuing tact, psycho-logy, expert teaching, diplomacy, discipline and above all else, theteacher must set the example for his students.
Makeshift programs result from poor planning and the lack of interestand understanding of the concept of safety on the part of the teacher.Without basic plans and objectives, all good intentions about establish-ing a safety program may deteriorate into a mere formality. The followingguidelines have been recommended for supervisory personnel in e3tablishingthe basic principles of job supervision by the U.S. Department of Labor:
1.3.1. PLANNING
The supervisor must anticipate potential hazards and take preven-tive measures. He should welcome suggestions from both managementand employees. He must plan for safety the same as for any otherpart of his job.

1.3.2. JOB INSTRUCTIONJob safety instruction is one of the most important parts ofsupervision. Personal, point-by-point demonstrations of the opera-tions of machinery and tools are insurance that money cannot buy.
1.3.3. MORALEGood morale and proper attitudes on tho part of employees supportevery safety effort, even if the supervisor is busy with othermatters.
1.3.4. PRODUCTIONOrganizing the work makes it easier. Safety is a big responsibi-lity and much of It can be broken down into manageable parrs.For example:
Efficiency: An efficient operation gets the most produc-tion at the lowest cost. A safe operation is anefficient operation.
Good housekeeping: The supervisor must enlist thecooperation of all employees (students) to maintainsafe, good housekeeping.

1.4. FACTORS AND RESPONSIBILITIES
The previous guidelines (Sections 1.3.1. to 1.4.3.) can be applied tofactors such as the personnel, facility and the equipment on the schoollevel in terms of the following responsibilities.
1.4.1. PERSONNEL- comply with policies and regulations.-establisi ciergency procedures and contacts.-proper sapervision on the job.- maintaining safety program.- accident investigation and reportingproper attitudes and good morale.
1.4.2. FACILITY- proper planning.- regular inspections.
maintaining clean, organized facility.-fire safety requirements and procedures.- electrical code requirements (National Electrical Code andapolicaole local regulations).- use of accepted industry standards.- correction of unsafe conditions.
1.4.3. EQUIPMENTregular inspections and maintainance.
- electrical code compliance.- spaced for safe operation.
1.4.4. PLEDGE AND PERMISSION CARDSAlthough Fledge cards are not legally oinding, they are helpfulin securing a moral obligation from students to consciously parti-cipate in the safety programs. Permission cards signed by aparent or guardian is a form of consent or acknowledgement thattheir son/daughter is engaged in industrial-type of activities inschool. The final responsibility for the student's safety is heldby the teacher.

1.5. LIABILITY
It is quite obvious that the Industrial Education teacher assumes a
higher accident ratio per student than the conventional classroom teacher,but perhaps, what is not so obvious is that the situation requires theteacher to develop unique perceptions in the performance of his specialduties. These perceptions used in a supervisory capacity may be broughtto a test in court as a result of an accident. How does a teacher distin-guish between a safe or an unsafe act? Teachers may be held liable foraccidents which may have resulted because he was unable to spot an unsafeact or condition under his supervision.
As a responsible agent of the school, the classroom teacher shall takeall reasonable precautions to insure the safety and welfare of his pupils.In the following briefing the teacher should be able to relate1) personnel, 2) facilities, and 3) equipment.
1.5.1. EXTENT OF LIABILITYOnce the teacher has been disqualified as a reasonable and prudentindividual there are other liabilities which must be assumed thatmay be included aside from the actual physical damage:
When a teacher's negligent conduct has resulted in injury toa pupil so as to create a right of action, his liability mayhave the same far-reaching consequences as a private negligentindividual would have. Not only would the teacher be liablein damages for the actual physical harm he caused, he may alsobe liable:
1. for physical harm resulting from fright or shock or othersimilar of immediate emotional disturbances caused by theinjury or the negligent conduct causing it
2. for additional bodily harm resulting from acts done bythird persons in rendering aid irrespective of whethersuch acts are done in a proper or a negligent manner
3. for any disease which is contracted because of loweredvitality resulting from the injury caused by his negligentconduct
4. for harm sustained in a subsequent accident which wouldnot have occurred had the pupil's bodily efficiency notbeen impaired by the original negligence.
Furthermore, the teacher may be liable for injuries resultingfrom his conduct where the prior physical condition of thepupil is unknown.

1.5.2. NEGLIGENCEFormal court action may be brought against a teacher as a resultof accidents when:
- there is a breach of this duty.- there is a reasonably close causal connection between theconduct and the resulting harm.
-there is a lack of fault on the part of the pupil.-the pupil suffers actual loss or damages.
There are three basic factors which will be considered accordingly:-the nature of the conduct.-the legal cause of the injury.- the forseeability of the harm.
It takes special effort on the part of the teacher to become awareof causal relationships in the learning situation. If it can beproven that a reasonable and prudent person could have forseenthe harmful consequences of a given situation, then the teacherin parallel, shall assume all liability. The following statementshould provide a reference for the teacher as to the definition ofnegligent conduct:
In general, negligent conduct may be of two types:(a) an act which a reasonable man would have realizedinvolved an unreasonable risk of injury to others, and(b) failure to do an act which is necessary to protector assist another and which one is under a duty to do.An act of negligence may be one which involves unreasonablerisk of harm to others, even though it is done with reasonablecare, skill, preparation, and warning. The negligence is in-heront in the act. In other types of conduct the act maybecome negligent through the lack of care, skill, preparation,or warning, although the act in itself would not have consti-tuted negligent coduct had reasonable care, skill, prepara-tion, or warning been used.It is negligence to use an instrumentality, whether humanbeing or thing, which a person knows or should know to be soincompetent, inappropriate, or defective that its use involvedan unreasonable risk of harm to others. It is also negligentto permit a third person, for instance a pupil, to use a thingor to engage in an activity which is under the control of theteacher if the teacher knows or should know that the pupil in-tends to use or is likely to use the thing or to conduct him-self in the activity in such a way as to create an unreasonablerisk of harm to himself and to others. In view of the specialrelation that exists between teacher and pupils, the teacheris under a duty to control the conduct of pupils so as toprevent so far as possible any pupil causing bodily harm tohimself and to others.

1.6. PREVENTION
The teacher shall assume a matured position of responsibility in providingfor the personal safety of each student in his ci&ssroom or laboratoryper the DOE Code Policies & Regulations 4210, adopted 10/70.(See 6.1.5. Appendix.)
In compliance with this policy the teacher shall provide a continuoussafety program as related to his respective subject area and shall takethe followl ag reasonable and prudent actions.
-Reports knowledge of hazardous conditions and defects relatingto the shop, the machinery and equipment, to the proper schoolauthorities.
-Regularly inspects machinery, equipment, and environmentalfactors for safety.
-Posts in his shop conspicious notices of regulations, possiblehazards, safeguards, and precautions.
-Makes certain that appropriate safety devices and guards areavailable and used by students.
-Makes sure students know and understand pertinent safe practicesrelating to the activities in which they are engaged.
-Requires students to wear appropriate personal protective equip-ment, such as goggles, aprons, helmets, and gloves, duringhazardous activities.
-Adequately instructs and demonstrates the use of power tools orother hazardous equipment b'efore initially permitting such useby a pupil; permits initial use only under direct supervisionof the teacher.
-Shuts off power tools and lock main switch if he must leave theshop.
-Exercises continuous supervision to see that shop safety practicesare observed.
-Makes himself a model for pupils to follow by personally obeyingall safety rules and practices.
1.6.1. ACCIDENT FAgloRsThere are five basic factors which may act singly or in combina-tions thereof in causing accidents. In brief, they can be identi-fied as follows:
Teacher: Improper job supervision or instruction and overallplant management.

1.6.1. ACCIDENT FACTORS (Cont'd)
Student:
Facility:
Equipment:
Materials:
Committing unsafe acts endangering self and/or others.
Poor health conditions affecting sight, hearing,temperature, respiration and overall poorly maintainedand arranged.
Unsafe for use: defective parts, lacking properguards and adjustment.
Too small or too large for specific machine/tool, orworking materials with wrong tools.
Of the factors listed, statistics have indicated that three outof every four accidents have been caused by personnel committingunsafe acts. According to the National Safety Council, an unsafeact can be defined as "A violation of a commonly accepted safeprocedure."

1.6.1. ACCIDENT FACTORS (Cont'd)
ACCIDENT FACTORS
Fig. 1.6.1.
1.7. STANDARDS
1.7.1. GENERALStandards are useful in the laboratory in that they provide acommon basis on which to determine the relative safety of devicesand facilities according to recommendations of concerned agencies.
1.7.2. DEFINITIONAll teachers should be able to distinguish between laws, codes,and standards. The following definition was provided by the U.S.Department of Labor:
Laws, codes, regulations, statutes, ordinances, andrules affect construction accident prevention. Statutesand ordinances are laws enacted by a legislative body.Codes and rules are groups of regulations having theforce and effect of law, usually promulgated by agovernmental agency as authorized by the legislature.Standards are gauges established as a result of commonusage, custom, or general consent as being proper oradequate for a given purpose, but which do not havethe force of law.
1.7.3. SOURCES OF STANDARDSInformation regarding standards can be obtained with a schoolletterhead request from the following organizations:
American Standards Association10 East 40th StreetNew York, N.Y. 10016
National Safety Council425 North Michigan AvenueChicago, Ill. 60611
National ConstructorsAssociation
1012 14th Street, N.W.Washington, D.G. 20005
American Insurance Association85 John StreetNew York, N.Y. 10038
American Mutual InsuranceAlliance
919 North Michigan AvenueChicago, Ill. 60611
National Bureau of StandardsWashington, D.C. 20234
Associated General Contractors1957 E Street, N.W.Washington, D.C. 20006
Industrial Hygiene Foundation440 Fifth AvenuePittsburgh, Pa. 16213
National Fire ProtectionAssociation
60 Batterymarch StreetBoston, Mass. 02110
Underwriters' Laboratories207 East Ohio StreetChicago, Ill. 60611
American Society for TestingMaterials
1916 Race StreetPhiladelphia, Pa. 19103

1.8. CHARACTERISTICS OF A SAFETY PROGRAM
There are several characteristics which every safety program shouldhave in varying degrees in providing for the personal safety of eachstudent while on campus and as a member of the community. These canbe described as:
1.8.1. ORGANIZATIONEvery safety program requires organization in order to be imple-mented with some degree of success. (See sample 10point programin this section.) A periodic review is necessary to Lisure imple-mentation of the total program.
1.8.2. DISCIPLINEThe teacher should insiat on safety in the laboratory from thevery first day of activities. Reasonable and prudent actionsshould prevail in the interest of the safety and welfare of thestudents. No individual action should be allowed to infringeon the safety of others.
1.8.3. PRACTICALUse common sense. There is no "cookbook" approach to installingand maintaining a good safety program. Every teacher must adjust
to the situation within his laboratory.
1.8.4. INVOLVEMENT AND INTERESTActive involvement and enthusiasm are essential to the survivalof any program. Without these characteristics, a safety programmay deteriorate and become a mere legality. The teacher should
encourage student participation and welcome suggestions.
1.8.5. RELEVANT INFORMATIONA constant effort should be made to seek out and update audio-visual aids as an integral part of the program. Out-dated andirrelevant information is an indicator to the students aboutthe teacher's interest and involvement.
1.8.6. PERFORMANCEAccident-free activities for the benefit of all.

1.9. THE SCHOOL SAFETY PROGRAM
School shops and laboratories provide an environment for the developmentof safety concepts and safe habits that will help guide the actions ofthe individual in all life situations. Some of the benefits derivedfrom a "sound safety program" are immediate, and some are long range.Before embarking on a safety program for students, the teacher must firstcheck to see that the physical plant and equipment is satisfactory tobe conducive to an effective safety program. The following is a sampleprogram.
SAFETY PRACTICES FOR TEACHERS
1.9.1. SAFETY INSPECTIONS
1. Conduct periodic safety inspections.
2. Use shop safety inspection check list. See 6.2.3. Appendix.
1.9.2. ACCIDENT REPORTS
1. Make a report of all shop accidents resulting in injuriesto students to the school administration, regardless of natureor severity.
2. Use printed Form 411 issued by department, 6.2.1. Appendix.
3. Keep a permanent record of all shop accidents resulting ininjuries to students.
1.9.3. INSTRUCTIONAL TECHNIQUES
1. Develop safe work habits in students through teacher example.
2. Teach accident prevention with a positive approach.
3. Provide conspicuous visual aids.
4. Update information and techniques.
1.9.4. EQUIPMENT SAFETY
1. No combination machine shall be used in shop.
2. All belts and rotating gears shall be adequately guarded orbarricaded.
3. Permit students to use a machine only after passing an examin-ation on the safe operation of the machine. No age stipulationwill be imposed on a student. The student's maturity and hisability to operate the machine will be the instructor'sguidelines.

1.9.4. EQUIPMENT SAFETY (Cont'd)
4. Prohibit students from operating any machine when the instruc-tor is not present. Disconnect and lock main power switchwhen leaving for any period of time.
5. Fasten all machines sec=ely to the floor or work benches.
6. Accept personal responsibility for all students using machineor hand tools in the shop.
7. Use standardized color coding on all hazardous machines toemphasize danger areas. See Facilities Section for colorrequirements.
1.9.5. HOUSEKEEPING PRACTICES
1. Provide for daily removal of all sawdust, shavings, metalcuttings, and other waste materials.
2. Provide safety zones in maintaining required aisle space andworking space around machines.
3. Provide for cleanup of the shop equipment and floors at theend of each period depending upon the rate of scrap accumula-tion ce as required.
1.9.6. ELECTRICAL SAFETY
1. Make all equipment switches easily accessible to the operator.
2. Provide a ground on all motors, switch boxes, and other elec-trical equipment.
3. Teach students that all electrical apparatus is "hot" and mustbe utilized with precaution.
1.9.7. FIRE SAFETY
1. See that fire extinguishers are provided in the shop area andthat they are regularly inspected and tested. See 6.3.1. and6.3.1.1. Appendices for classification of fires and types ofextinguishers to be used.
2. Store flammable liquids in approved safety containers, and thatthese materials shall in no case be used near an open flame.
3. Provide metal-covered container for grease and paint rags.
4. Provide instruction and practise in the proper procedure forevacuating the shop in case of fire or other emergencies.

1.9.7. FILE SAFETY (Cont'd)
5. All students shall be familiar with fire exits and exitprocedures.
1.9.8. FIRST AID PRACTICES
1. Provide a first aid kit in the shop easily accessible to all,and properly maintained and marked.
2. Provide only emergency first aid treatment for serious injuriesand then refer to qualified medical personnel for treatment.Do not prescribe or administer any medication.
3. Enroll in and successfully complete American Red Cross firstaid course.
1.9.9. PERSONAL PROTECTION
1. Prohibit running in shop at any time.
2. Prohibit horseplay or practical jokes of any kind within theshop area.
3. Required wearing of proper eye protection when there is adanger of flying particles or chips. See 6.1.8. Appendix.
4. Provide proper respirators for student use when harmful dustsor fumes exist.
5. Require students to observe rules in regard to prc3er clothingand protective devices when operating hazardous equipment.
6. Prohibit students from wearing rings and other jewelry whenoperating hazardous equipment. Long hairstyles shall beproperly secured.
7. Require students to wear shoes at all times in the shop.
1.9.10. GENERAL PRACTICES
1. Provide for cross-ventilation of air in the shop.
2. Take precautions to keep any source of poisonous or combustiblefumes outside the shop.
3. Carry liability insurance as a protection against possiblenegligence charges.
4. Encourage all Studer is to carry accident insurance.

1.9.10. GENERAL PRACTICES (Cont'd)
5. Require students to sign an acknowledgement of safety instruc-tion or examination taken.
6. Pledge cards are helpful in securing moral obligation frcmstudents.
7. Consistently enforce all rules and regulations in the shop.Fairness and trust have much value in any safety program.

ST
UD
EN
T

<w-2.0. THE STUDENT
Sections 2.0 through 6.0 of this guide should be readily accessible toall students as active participants in the school safety program. Teachersshould encourage suggestions and contributions to this guide as an on-goingactivity to keep abreast of changing trends within the school.
2.1. A MESSAGE TO STUDENTS
You should learn about the procedures, tools and machines to use themwith coqfidence instead of being scared or being a show-off fool. Don'tfake it...learn it Horseplay in the shop is for da kine guys who nevahgrow up and with friends like dat, who need enemies?
We talk a lot about COMMON SENSE and why the other guy doesn't use it,but in the school shop the whole safety program depends on it and thatmeans everyone in the course...no exceptions. It does require involve-ment by you...the individual student. Do your thing for safety becauseyour fellow students are depending on maa.

2.1.1. STUDENT RESPONSIBILITY
As a student in Industrial Education you have a responsibility notonly to yourself but to the group for safety within the classroomand the shop areas. Selfish attitudes such as "each man for him-self" should not be part of the school shop scene. Teamwork isrequired for the safety of all members who participate. Don'twait for the next guy to correct an unsafe condition...just DO ITor call it to the attention of your teacher. The following out-line is YOUR responsibility to your team:
1. FOLLOW INSTRUCTIONS:
-observe safety rules.- no horseplay.
-operate machinery only when authorized to do so.-keep machine guards in place.-follow approved procedures.
2. KEEP WORK AREAS CLEAR:
- keep floors and benches clean.-replace tools properly.- wipe up spills.
-aisles clear.
3. DRESS PROPERLY:
-no loose clothing.-no jewelry.- secure long hair.-wear shoes.-use proper protective gear.
4. REPORT UNSAFE CONDITIONS:
-missing guards.-defective machinery or tools.-frayed electrical cords or defective switches.-dull tools or machinery.-stop unsafe act by fellow student.

2.2. SAFETY PRACTICES FOR ALL AREAS
Safety rules vary from one school system to another. However, most schoolshops have definite rules and regulations to follow and the teacher hasthe responsibility to enforce them. A successful safety program resultsfrom an understanding by the students of the reasons and the advantagesfor each rule.
2.2.1. GENERAL SAFETY RULES
1. Have teacher approve all work that you plan to do.
1. Assure the best, easiest, and safest way to do the jobsuccessfully.
2. Protect all class members from accidents caused by carelessor incompetent use of tools and machines.
2. Report all injuries, even though slight, to the teacherimmediately.
1. Teacher will determine if treatment is required for the in-jury. Immediate attention may be given by the teacher.
2. First aid treatment helps prevent minor cuts, abrasions,bruises, or burns from becoming infected.
3. Assist teacher in correcting situations to prevent furtherinjuries.
3. Observe rules concerning operator's safety zones.
1. Prevent crowding and bumping the operator.
2. Give student operator complete responsibility in the use ofthe machine.
3. Protect all class members from injuries caused by movingmachine parts and flying pieces of material.
4. Cooperate with your classmates in the student management ofshop.
1. Make sharing in the responsibilities of shop managementa satisfying experience.
2. A greater amount of time for productive shop work will re-sult from efficient handling of tools and materials.
3. Equal distribution of tasks is necessary in maintaining adesirable place to work.

2.2.1. GENERAL SAFETY RULES (Cont'd)
Obtain permission from instructor before using any powermachine.
a, Make sure that the machine selected will provide the best,easiest and safest method for doing the job.
b. Allow instructor opportunity to check the condition of themachine.
c. Provide instructor opportunity to make certain that allclass members are protected from accidents caused by care-less or improper use of equipment.
2.2.2. SAFETY RULES FOR ALL STUDENTS
General
1. Ask your teacher to approve all work you plan to do.
2. Report all injuries to your teacher immediately.
3. Wear suitable eye protection when engaged in any activitywhere eye hazards may exist.
4. Wear appropriate clothing for shop work. Remove or fastenany loose clothing or necktie. Roll sleeves above elbows.
5. Long hair should be confined to prevent becoming entangledin any moving part of a machine.
6. Wear shoes in the shop at all times to prevent foot injuries.
7. Observe rules concerning operators' safety zones.
8. Cooperate with your classmates in the management of your shop.
9. Caution any student you see violating any safety rule.
10. Horseplaying, running, and the throwing of objects in theshop are forbidden.
11. Report to the teacher any equipment or tool that does not seemto work properly. Do not force tools under any condition.
12. Keep tools 'arid materials from projecting over the edge ofbenches whenever possiblo.
13. Use a brush or a piece of wood to clear away dry chips.

2.2.2. SAFETY RULES FOR ALL STUDENTS (Cont'd)
14. Keep floor clear of scraps and litter.
15. Wipe up immediately any liquids spilled on floor. Use a ragto clean oily areas.
16. Keep bench and cabinet drawers and locker doors closed.
17. Place oily rags and other combustible materials in a coveredmetal container.
18. Exercise care in handling large, heavy, or long material.Know proper method to lift any object.
19. Practice procedure to follow in case of a fire or otherdisasters.
20. Be sure hands and floor area are completely dry before handlingany electrical equipment or receptacles.
2.2.3. HAND TOOLS
1. Do not use tools with oily, greasy, or wet hands.
2. Select the proper size and type of hand tools for the partic-ular job.
3. Keep all cutting blades sharp and in good condition and providesafe storage for them when not in use.
4. Handle edged or pointed tools with care. Pass tools to class-mates with the handles first.
5. When using sharp-edged tool, point edge away from yourself andyour classmates.
6. Clamp small work on bench or secure in vise when using gouge,wood chisel, or screw driver.
7. Control chisels, gouges, or carving tools with one hand whilethe other hand supplies the powr7.
8. Wear face shield or safety glasses when chipping or cuttingwith a cold chisel. Arrange your work so that classmates areprotected from flying chips.
2.2.4. MACHINE TOOLS
1. Do not operate any machine tool with oily, greasy or wet hands.
2. Qualify as a safe machine operator.

2.2.4. MACHINE TOOLS (Cont'd)
3. Operate only those machines for which you have received in-struction and permission to operate.
4. Check adjustments on machines before turning on the power.
Rotate machine one revolution by hand whenever possible with-out danger.
5. Keep all safety guards in place.
6. Make sure all other students are outside the operator's safetyzone before turning on the power. Safety zone shall be dryand clean.
7. Start your own machine and remain with it until it comes to acomplete stop.
8. Notify teacher, superintendent, or safety foreman when amachine is not working properly.
9. Stay clear of machines being operated by others. Do not leanon machines.
10. Wait for machine to come to a complete stop.before oiling orcleaning. Turn off power switch and remove plug from outletbefore making major adjustments or changes on machines.

2.3. GENERAL SAFETY RULES EPA
Directions: Each item has four possible answers. Only one answer iscorrect. Place the letter of the correct answer in the parenthesesto the left.
( ) 1.
( )
( )
( )
( )
( )
Report all injuries, even though slight, to: (k) an advancedstudent; (B) your conselor; (C) your teacher; (D) theprincipal.
2. Wear suitable eye protection: (A) to improve your vision;(B) to avoid myopia; (C) to improve your appearance;(D) when engaged in any activity where eye hazards may exist.
3. Fasten or remove loose clothing and rool sleeves above yourelbows: (A) before operating any machine; (B) during theoperation of the machine; (C) after operating the machine;(D) only when assisting the teacher.
4. Shoes must be worn when performing any operation: (A) thatmay result in foot injury; (B) that requires one to be welldressed; (C) only the teacher; (D) only the student operatingthe equipment.
5. The operator's safety zone around a machine is to protect:(A) the equipment; (B) all the people working in the shop;(C) only the teacher; (D) only the student operating theequipment.
6. Any liquid spilled on the floor should be wiped up immediatelybecause it: (A) looks unsightly; (B) will stain the floor;(C) causes more work during cleanup; (D) may cause someoneto slip and injure himself.
7. ,Before using any power equipment, permission should be obtainedfrom: (A) an advanced student; (B) your counFielor; (C) yourteacher; (D) the principal.
8. Any breakage or damage to a tool, instrument, or machine shouldbe reported as soon as possible to: (A) an advanced student;(B) your teacher; (C) your friend; (D) the custodian.
9. When using a chisel, you should: (A) keep both hands back ofthe cutting edge; (B) strike the chisel with a hammer;(C) hold the stock with one hand while pushing the chisel;(D) point the sharp edge toward your classmate.
10. Rags containing oil, gasoline, alcohol, shellac, paint, varnish,or lacquer must be: (A) kept in a covered metal container;(B) stored in your locker; (C) folded neatly and placed on ashelf; (D) stored in a cool, dry place.

2.3. GENERAL SAFETY RULES EXAM (Cont'd)
Answers to Questions:
1. C, 2. D, 3. A, 4. A, 5. B, 6. D, 7. C, 8. B, 9. A, 10. A.

2.4. QUALIFYING ON MACHINES
All students must be qualified before using any power machines in theshop. The amount and kind of instruction varies with the teacher, but
the process is basically the same for all machines. See Fig. 2.4 forqualifying on machines.
2.4.1. INITIAL ORIENTATIONThis is usually a briefing about the machine and its uses. Majorparts are identified and adjustments are discussed. Visual aidsmay be used during this orientation. Safety instruction is startedat this time.
2.4.2. DEMONSTRATIONSafety instruction is continued during the demonstration phase onthe machine itself. The teacher will demonstrate the use of themachine in the following cycle (see Section 2.5 for details):
a. preparationb. actual operationc. shut down
The question/answers should be continuous throughout the demonstra-tion. If a point is not clear, ask the teacher to go over thepoint until you are satisfied...don't try to guess at it later.
2.4.3. SAFETY CHECK
All students shall pass a safety exam before using any powermachinery. This exam is to check your knowledge about the machineand its safe operation. If you fail the exam, go over the ques-tions with your teacher and review the demonstration phase. If
words on the exam are confusing, perhaps you can do better bypointing out your answers on the machine to satisfy this require-ment.
2.4.4. STUDENT PERFORMANCEThe student will use the machine for the first time under thedirect supervision of the teacher. Be cool and concentrate onwhat you are doing....don't rush yourself. The teacher will guideyou through the operation and will correct your procedures untilhe is satisfied that you can do it safely. After you have success-fully completed your performance you will be qualified to use thatparticular machine as outlined in Section 2.5.
2.4.5. QUALIFICATION COMPLETEDAfter you have qualified on a machine, a note will be made onyour card or file about the kind of machine that you qualifiedon and the date.

2.4. QUALIFYING ON MACHINES (Cont'd)
START
o-
QUALIFYING ON WHINES
INITIAL ORIENTATION
BRIEFINGSAFETY
FINISH
QUALIFICATIONCOMPLETED
STUDENT PERFORMANCE
-UNDER SUPERVISIONOF TEACHER
-SAFE OPERATION
DEMONSTRATION
SAFETYOPERATION PROCEDURES
QUESTION/ANSWER
PASS
SAFETY CHECK
-EXAM
Fig. 2.4.

2.5. OPERATION PROCEDURES FOR MACHINES
The following procedures shall be used by all students for operatingmachines....without exceptions. You must be qttalified on a particularmachine before you can use it. It is importr;flt to obtain permissionfrom the teacher before using any machine bec.ivae all machines can bedangerous, some machines must be operated only under his direct super-vision and assistance. The teacher is responsible for all the studentsin the shop and your cooperation is required for an accident-free shop.
There is a basic cycle which applies to the operation of any machine.The three phases are: 1) PREPARATION, 2) OPERATION, 3) SHUT DOWN.This cycle should serve as a checklist for the student while doing hiswork. See Figure 2.5.
2.5.1. PREPARATION
1. always obtain permission from the teacher.
2. clear the area for work.
3. wear proper clothing, remove jewelry and secure long hair.
4. inspect machine-wiring, switches, guards, etc.
5. use proper protective gear.
2.5.2. OPERATION
1. checks and adjustments (disconnect power).
2. remove adjusting wrenches or keys.
3. guards in proper position.
4. secure work and maintain proper footing.
5. power on...CAUTION1
6. do not rush or force machine.
2.5.3. SHUT DOWN
I. power off.
2. all parts of machine stopped.
3. remove material from machine.
4. clean up (disconnect power when cleaning hazardous parts ofmachine).

2.5. OPERATION PROCEDURES FOR MACHINES (Coned)
OFERATICil PROCEDURES FOR MACHINES
START
FINISH
SHUT DOWN
PREPARATION
OPERATION
Fig. 2.5.

2.6. PROTECTIVE GEAR
All studeats shall wear proper protective gear while working on anymachinery in the shop for their personal safety. More than 100,000disabling eye injuries are reported every year and there are thousandsof minor injuries which are not reported but cause a great deal of discomfort. Most of the injuries could have been prevented through the useof proper protective gear.
If you have any doubts about your eyesight, a simple test at your schooldispensary might indicate a need for corrective glasses. You shouldhave your vision checked periodically to insure yourself against needlessaccidents due to poor vision...DON'T , a chance.
If you are supposed to wear correct: lasses, keep them on at all timeswhile you are in the shop. These rU,:e9 are for your own protection...don't be a loser.
This section on protective gear will cover the following:
2.6.1 Eye/face
2.6.2 Head
2.6.3 Hand
2.6.4 Foot
2.6.5 Respiratory

2.6.1. EYE/FACE PROTECTIVE GEAR*
1. TYPE OF JOBChipping, finishing or iron and steel castings and forgings,lathe work.
PROTECTION FROMLarge flying objects...rivets, nails, metal or rockchips, frag-ments from mushroomed tools.
TYPE OF EYE/FACE PROTECTIONSafety spectacles with impact-resistant lenses, lens containers,frames, side shields of maximum strength and comfort for wearer._Frames that are light in weight and not subject to corrosionunder sterilization. Heavy-duty cup goggles with impact-resistantlenses.
* Adapted from Occupational Safety and Health Standards, 1910.133 - 1971
2.6.1. EYE/FACE PROTECTIVE GEAR (Cont'd)
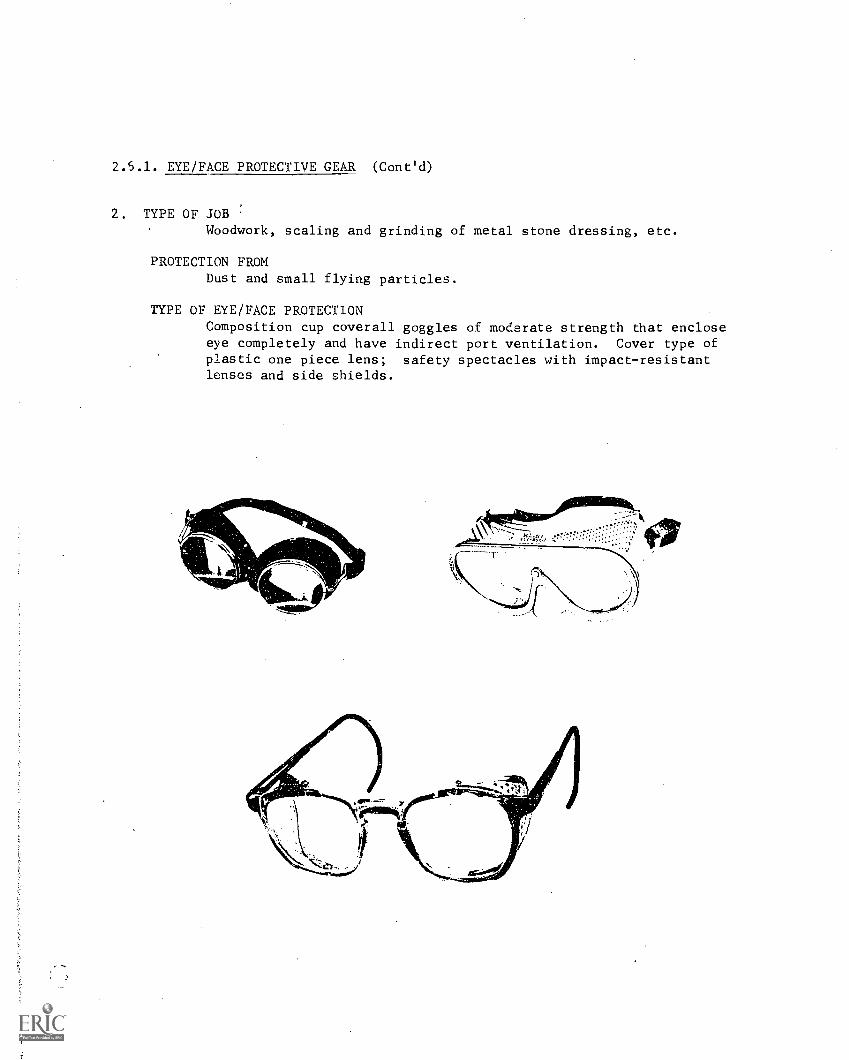
2. TYPE OF JOB :
Woodwork, scaling and grinding of metal stone dressing, etc.
PROTECTION FROMDust and small flying particles.
TYPE OF EYE/FACE PROTECTION
Composition cup coverall goggles of moderate strength that encloseeye completely and have indirect port ventilation. Cover type ofplastic one piece lens; safety spectacles with impact-resistantlenses and side shields.

2.6.1. EYE/FACE PROTECTIVE GEAR (Cont'd)
3. TYPE OF JOBElectric spot and butt welding, where there is no expos.ire toradiant energy.
PROTECTION FROMDust, wind and metal sparks.
TYPE OF EYE/FACE PROTECTIONSafety spectacles with impact resistant lenses. Full face plasticshield of moderate strength cover type of plastic one piece lens.

2.6.1. EYE/FACE PROTECTIVE GEAR (Cont'd)
4. TYPE OF JOBCasting, tinning, babbitting pouring lead joints. These operations
are serious industrial eye hazards.
PROTECTION FROMSplashing metal.
TYPE OF EYE/FACE PROTECTIONCup goggles with impact resistant lenses capable of withstandingmoderate blow of molten metal and with lens containers made tohold cracked lens in position--all materials nonflammable. Cover
type of plastic one piece lens wire screen face shield with flaresafety spectacles with side shields and impact resistant 1en5es.
2.6.1. EYE/FACE PROTECTIVE GEAR (Cont'd)
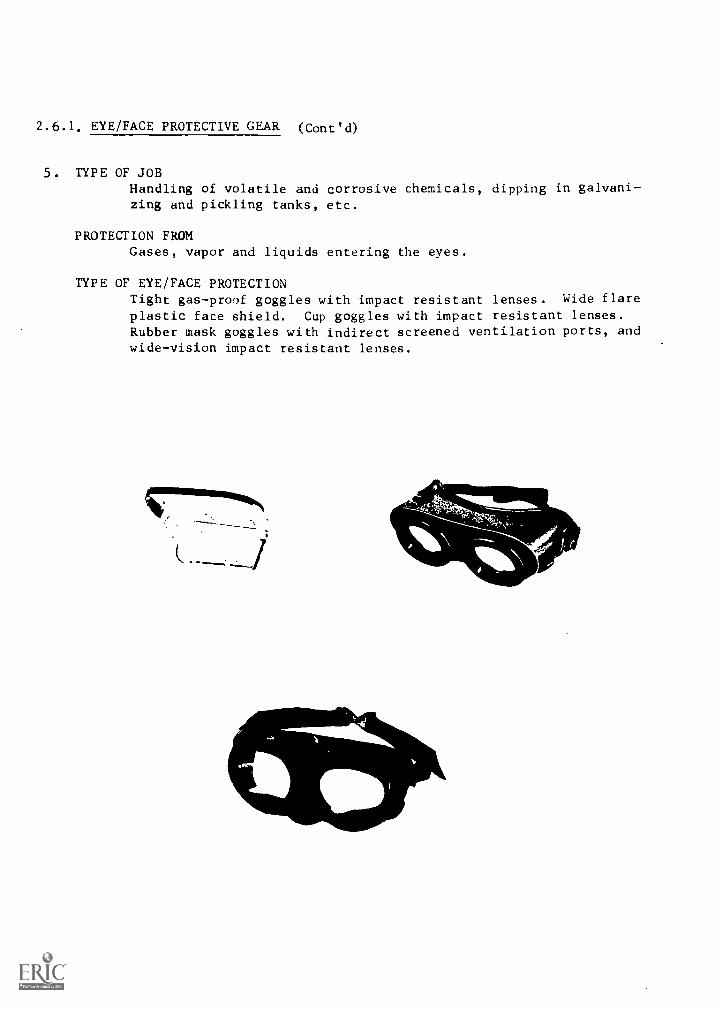
5. TYPE OF JOBHandling of volatile and corrosive chemicals, dipping in galvani-zing and pickling tanks, etc.
PROTECTION FROMGases, vapor and liquids entering the eyes.
TYPE OF EYE/FACE PROTECTIONTight gas-pro9f goggles with impact resistant lenses. Wide flare
plastic face shield. Cup goggles with impact resistant lenses.Rubber mask goggles with indirect screened ventilation ports, andwide-vision impact resistant lenses.

2.6.1. EYE/FACE PROTECTIVE GEAR (Cont'd)
6. TYPE OF JOBWorking near or adjacent to furnaces, welding operations, etc.
PROTECTION FROMReflected light and glare welding flash.
TYPE OF EYE/FACE PROTECTIONSafety spectacles with filter shade lenses with or without sideshields (with side shields and with use of helmet in gas shieldedarc welding). Cup goggles with filter lenses, retaining and opaqueside shields.

2.6.1. EYE/FACE PROTECTIVE GEAR (Cont'd)
7. TYPE OF JOBOxyacetylene, oxyhydrogen, or resistance welding and cutting,testing of lamps involving exposure to excessive brightness.
PROTECTION FROM
Injurious radiant energy when a moderate reduction of intensityof the visible radiant energy is desired.
TYPE OF EYE/FACE PROTECTIONCup goggles with impact resistant filter lenses and clear coverglass to save the welding lenses from pitting--with indirect,screened, ventilating ports to prevent fogging of lenpes and toexclude injurious flashes, hot metal and sparks.
riallailLI,, -----
V141-c_1111,
r-

2.6.1. EYE/FACE PROTECTIVE GEAR (Cont'd)
8. TYPE OF JOB
Electric arc welding and cutting, irradiation with ultravioletlight, hydrogen welding.
PROTECTION FROM
Injurious radiant energy when a large reduction of the visibleradiant energy is desired.
TYPE O.F. EYE/FACE PROTECTION
Scarfing shield with impact resistant filter lenses and clearcover glass. One piece shell welding helmet with flip front.Welding section that can be raised for quick inspection of weld,and with a stationary section fitted with clear impact resistantglass for observation of weld. Fabricated shell welding helmetwith stationary filter glass section.
2.6.2. HEAD PROTECTIVE GEAR
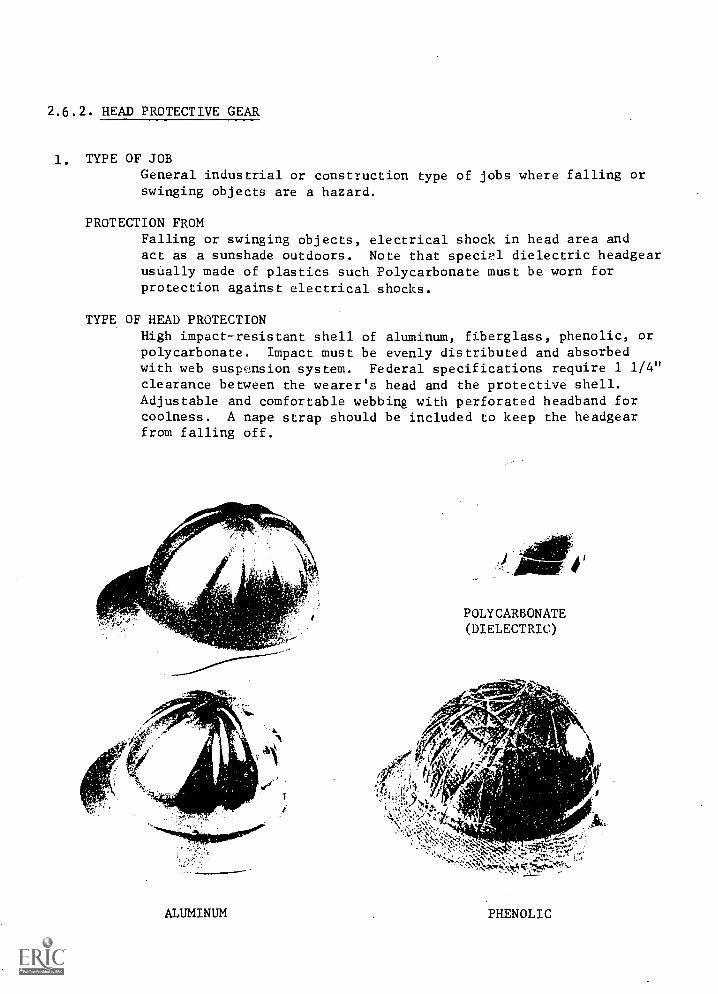
1. TYPE OF JOBGeneral industrial or construction type of jobs where falling orswinging objects are a hazard.
PROTECTION FROMFalling or swinging objects, electrical shock in head area andact as a sunshade outdoors. Note that special dielectric headgearusually made of plastics such Polycarbonate must be worn forprotection against electrical shocks.
TYPE OF HEAD PROTECTIONHigh impact-resistant shell of aluminum, fiberglass, phenolic, orpolycarbonate. Impact must be evenly distributed and absorbedwith web suspnlsion system. Federal specifications require 1 1/4"clearance between the wearer's head and the protective shell.Adjustable and comfortable webbing with perforated headband forcoolness. A nape strap should be included to keep the headgearfrom falling off.
ALUMINUM
POLY CARBONATE(DIELECTRIC)
PHENOLIC

2.6.3. HAND PROTECTIVE GEAR
1. TYPE OF JOBGeneral industrial work including the handling of wood, metal, etc.
PROTECTION FROMCuts, splinters or blistering of hands.
TYPE OF HAND PROTECTIONThere is a variety of gloves to suit various conditions. Vinyl
impregnated gloves provide a non-slip grip surface and excellentdexterity. Vinyl, rubber coated gloves also provide a non-slipsurface but are usually too bulky for fabricating or assemblingsmall parts. Flannel and leather gloves are also widely used forgeneral industrial work. However leather gloves cannot belaundered.
VINYL-IMPREGNATED
LE ATHE R FLANNEL

2.6.3. HAND PROTECTIVE GEAR (Cont'd)
2. TYPE OF JOBWorking with or handling acids, caustics, alcohol, solvents,oil and grease.
PROTECTION FROMChemical burns or skin irritation.
TYPE OF HAND PROTECTIONNeoprene gloves of various weights are widely used in this cate-gory. Lightweight neoprene gloves are used in food processingwhile heavy-duty types offer better protection for industrial work.Some types of vinyl or rubber coated gloves are also used forprotection against chemicals.
LIGHTWEIGHTNEOPRENE
VINYL-COATED
HEAVY-DUTYNEOPRENE
OMMINNIMEMIMI
RUBBER-COATED

2.6.3. HAND PROTECTIVE GEAR (Cont'd)
3. TYPE OF WORK
Grinding or sanding.
PROTECTION FROMAbrasions.
TYPE OF HAND PROTECTION
Heavy-duty polyvinylchloride (PVC) or neoprene gloves. Liquid-proof types of gloves offer protection against chemical burns.
NEOPRENE
POLYVINYLCHLORIDE (PVC)

2.6.3. HAND PROTECTIVE GEAR (Cont'd)
4. TYPE OF WORKFoundry, forging, using kilns or ovens.
PROTECTION FROMHeat.
TYPE OF PROTECTIONAsbestos impregnated, heavy cotton knits or neoprene gloves. Some
types of double-insulated neoprene gloves provide protectionagainst cold also. Mitts, pads and sleeves are convenient forbrief handling of hot objects.
*;1INSULATED NEOPRENE
,4.
PAD
MITT
HAND PAD

2.6.4. FOOT PROTECTIVE GEAR
1. TYPE OF JOBStudents shall wear shoes in the shop area at al] times withoutexception. Cuts and punctures are common hazards which could beprevented by wearing proper footwear. "Zoris" and other types ofslippers or sandals are not acceptable footwear for the shop.student who prefers to wear slippers to school should leave anold pair of shoes in his locker for shop use.
PROTECTION FROMHeavy or sharp falling objects which might injure the top side ofthe foot. Punctures, splinters and cuts on the sole of the foot.Note that cleats shall not be worn on the soles of shoes. On
smooth or wet surfaces shoes with cleats and other sole-savingdevices could be hazardous.
TYPE OF FOOT PROTECTIONShoes shall have leather or rubber type of sole with full leatheror fabric cover for the entire foot up to the ankles. Canvasdeck shoes or basketball shoes offer eery little protection forthe foot and should be limited to light work in the shop. Steel
toe boots offer the maximum protection for the foot for most shopactivities. Check with your teacher to be sure that you have theproper footwear for the job.
ZORI(Not Acceptable)
STEEL COVER STEEL TOE

2.6.5. RESPIRATORY PROTECTION
1. TYPE OF JOBSpraying, sanding, cutting, grinding or any type of job wherefumes, dust or other types of intoxicants are a hazard to yourrespiratory system.
PROTECTION FRONDamage to your respiratory system caused by dust, harmful fumesor vapors. There are some immature people who like to sniff orinhale intoxicating fumes just for kicks and permanently damagevital organs in breathing system. Wear the proper type of maskor respirator for the job.
TYPE OF PROTECTIONSynthetic rubber mask with adjustable headband and dual filterreceptacles. Filters on better models can be changed for protec-tion against various hazards such as dust, fumes, gases or paintsprays. Some simple types of masks are washable while some typesof paper-fabric masks are disposable after several uses.
DUAL-CARTRIDGE(MULTI-PURPOSE)
FABRIC
(DUST PROTECTION)
ACTIVATED CHARCOAL(PAINT SPRAY)

FACILITY3.0
11111111111111111111111i111111111ifriflino7777.771
11111111111111111111111111111

3.0. THE FACILITY
Although it is difficult to measure the effects of sound, light, tempera-ture and color variations on students within the shop, the accepted industrystandards as they are derived from long-range experimentation and experiencemust be relied upon. There is no denying that a bright, clean and organizedfacility is in fact a safe place to work in and quite obviously has a profoundeffect on the morale of students.
The National Standard School Shop Safety Inspection Check List providedin Appendix Section should be used to assess the condition of the shop at thebeginning of every school term or semester and reviewed in between for follow-up action. If an unsafe condition cannot be corrected by the Leacher, a for-mal report should be submitted with recommendations to the school principalfor action. Include pictures whenever possible to draw immediate attention tothe situation at hand.
Safety inspections, however, are not the only course of action for theteacher to follow in providing for a safe facility for his students. Long-range plans must be made for improvements which cannot be covered in the schoolbudget. Without a definite plan, only minor improvements can be brought about.Even minor improvements require some forethought and planning with limited re-sources. See 6.2.2. Appendix for planning worksheet.

3.1. SAFETY INSPECTIONS
There are two types of safety inspections which are vital to the safetyof personnel within the shop. Daily inspections should be conducted inaddition to the preventive maintenance inspection checklist which is in-cluded in this section as the National Standard School Shop SafetyInspection Check List (6.2.3. Appendix). Safety inspections provide theteacher with a systematic approach in detecting, analyzing and correctingunsr'e conditions. The teacher should be wer_ aware of the fact thatfailure to correct unsafe work methods and conditions could very well beconsidered as negligence on the part of the teacher. Conditions changeconstantly in the shop and the teacher should be able to adjust and per-ceive an unsafe condition under these circumstances.
3.1.1. DAILY INSPECTIONSThis type of inspection is usually carried on throughout theactivity period by the teacher with the help of his students whoshould receive this type of training as a part of the safety pro-gram. If an unsafe work method or condition is detected allrelated activity should cease at once. Makeshift or temporary,corrections are not acceptable under any circumstances. If thetemporary correction fails, the same unsafe condition will existand before it can be detected again, a student might be injured.
Check for the following hazards during your daily inspections:
1. Protective gear: Students should be dressed properly forthe job at hand. Protective gear should be convenientlylocated for use.
2. Building conditions: AL3les, driveways and fire .xitsshould be kept clear at all times. Floors should freefrom spills and wastes.
3. Shop layout: The general plan of the shop should notproduce congestion or "bottlenecks" during the work period.Working in crowded quarters is hazardous.
4. Housekeeping: Correct leaks, spills and unsafe waste dis-posal methods immediately. Brooms, brushes and wastecontainers should be conveniently located for use.
5. Storage: Tools and materials properly stored to facilitateusage. Neatly stored materials help prevent unncessaryrummaging through racks. Combustible materials or liquidsshould be stored to prevent ignition.
6. Equipment maintenance and guards: Check around pointsof operation for worn parts or improper adjustments andgrounding. Guards and guiths should work smoothly withoutbinding.

3.1.1. DAILY INSPECTIONS (Cont'd)
7. Ventilation: Check mechanical ventilation system as wellas natural ventilation. Dust or fumes should be treatedas a major hazard in the shop See section 2.6.5 forprotective gear.
8. Electrical: Check for glare and shadow-free lighting con-ditions. Equipment wiring, switches, motors and groundingshould be checked frequently. Use compressed air forcleaning out motors and switches. Replace worn wiring anddefective switches immediately...temporary measures arenot acceptable. Code compliance required.
9. Fire prevention: Flammable materials should be stored inproper containers and fire-proof metal cabinets. Storagearea should be clean and free from sources of ignition.All containers should be labeled. Remove all combustiblewastes daily without fail. All students shall be familiarwith fire drill procedures and the location of all fireextinguishers. See section 3.2.3 for classes of firesand extinguishers.
10. First Aid station: Check supplies at the beginning ofeach semester. Students shall be familiar with emergencyprocedures.
11. Teaching aids: Select posters and charts carefully forshop use. Change outdated materials. A suggestion boxcan prove to be useful if its use is encouraged.
.1.2. PREVENTIVE MA16TENANCE INSPECTIONThe NATIONAL STANDARD SCHOOL SHOP SAFETY INSPECTION CHECK LIST isrecommended for use at the beginning of each school semester withfrequent reviews to follow up on deficiencies detected during thenormal inspection. See 6.2.3. Appendix for sample form anddirections.

3.2. FIRE PREVENTION
Although there have been very few minor fires and explosions within thisschool system due to the precautions taken by teachers and students, itshould not be overlooked with a casual attitude. Have you reviewed yourfire drill plan and procedures recently? Have you checked your fireextinguishers for proper pressure and working condition? Some of thesechecks and inspections are easily overlooked if a systematic inspectionis not conducted.
Consult with your local fire department or fire insurance carrier forexpert help and various resources to provide training in fire preventionand extinguishment. In addition to this type of training and the requiredschool fire drills the teacher should establish emergency fire proceduresdue to the wide use of combustible materials within the shop.
3.2.1. CAUSES OF FIREThere are three elements which must be present to cause a fire:
1. OXYGEN
2. FUEL
3. IGNITION TEMPERATURE ("flash point")
These elements combine to cause fires through unsafe work methodsor conditions and careless disposal procedures which can causespontaneous combustion. See inspection instructions in section 3.1.for housekeeping checks.
3.2.2. SAFETY CHECKA periodic check by a qualified fire inspector is helpful in detec-ting probable causes of fires which may not be quite obvious tothe teacher. Constant surveillance and participation by all per-sonnel help to prevent unsafe conditions. The following itemsshould be checked continuously:
1. Oxygen: Check for open doors, windows or containersat the end of the day. Don't forget to spot checkbefore going out to lunch or recess when the shop islocked but unattended.
2. Fuel: Check all types of gases or finishing products,storage containers, gauges, valves and piping for leaks.Vapors, fumes and dust should be properly exhaustedand all combustible wastes removed from the buildingdaily. Clean up oil, gas, kerosene and other volatileliquid spills immediately. Cap-fired tools and explo-sives are strictly prohibited in schools.
3.2.2. SAFETY CHECK (Cont'd)
3. Ignition Temperature: Check the following ignitionsources...matches, arcs from faulty electrical equipmentor wiring, open flames from torches, kilns, burners orelectrical arc welding, molten metal, furnaces and hotplates which can ignite fuel or materials by contact. Rags
with oil or other combustible liquids will ignite spontane-ously when the temperature reaches the "flash point" ofthe liquid. No smoking shall be allowed in the shop areaat any time.
3.2.3. CLASSIFICATION OF FIRES AND TYPES OF EXTINGUISHERSFires are classified into different types according to the kindof fuel involved and the type of extinguishing agent requiredto control them. See 6.3.1. and 6.3.1.1. Appendices.
CLASS "A": Fires in ordinary combustible materials such as wood,paper, coal or fabrics where cooling or quenching isthe usual method of extinguishment. Type of extinguisher required: water or soda acid or foam extin-guisher. Some types of dry chemical extinguishersmay also be used...check the label.
CLASS "B": Fires in flammable liquids such as gasoline, oil,lacquer, kerosene and solvents, etc., smothering tocut off the oxygen source. Do NOT use water or sodaacid for this type of fire which will act as a carrierand spread the fire. Type of extinguisher required:carbon dioxide (CO2), foam, or dry chemical extin-guishers.
CLASS "C": Fires in or near electrical equipment or wiring wherea non-conducting type of extinguishing agent is requir-ed. Do NOT use water, soda acid or foam agents forthis type of fire...they can conduct electricity.Carbon dioxide or dry chemical extinguishers have asmothering effect on this type of fire and are consid-ered safe from electrical shock to the user.
CLASS "D": Fires in combustible metals. Special extinguishingagents approved by recognized testing laboratoriesto be used only.

3.3. COLOR ENGINEERING FOR THE SCHOOL SHOP
Although it is difficult to assess the effects of color on the eye andmind of an individual under a variety of conditions studies have showncertain color combinations are in fact, better than others. Faber Birren,a notable color expert has stated that "The eye has different sensitivityunder different conditions of illuminations". The color field has adirect relationship to the illumination which in turn affects the acuityof the eye. It is important to note that as we move away from the naturaldaylight illumination toward the red, blue and violet end of the colorspectrum, the eye, according to Ferree and Rand, has much difficulty infocusing on objects. Conflicting color combinations can also be a hazardin the work area where maximum concentration and coherence is requiredfor safe working conditions.
Color engineering in the school shop is important because it providesfor a continuous visual harmony without distracting the student at workand special markings for items which may be hazardous. While it isnot attractive by contemporary decorating standards, the color-engineeredshop is a comfortable working environment. Robert B. Lytle, Jr., whohas dune much research and design with color systems has stated that:
The basic organization of any shop, with itsstructuring of machines of various forms andcontinual operational movement, inherently establishesvisual conflicts. The minimizing of such conflictscalls for remedial reorganization in terms ofplanning, light and color."
Lighting within the shop should be glare-free and shadow-free in thetask area. Supplemental lights should be used if the ceiling lightsdo not suffice. Ceilings should be white to reflect the upward lightfound in most modern industrial fixtures.
The following color engineering guide should be used by teachers, adminis-trators and building officials for specifying colors for the school shop.Fuller O'Brien paints are usea for reference only and paints of equivalentquality and comparable color may be used.
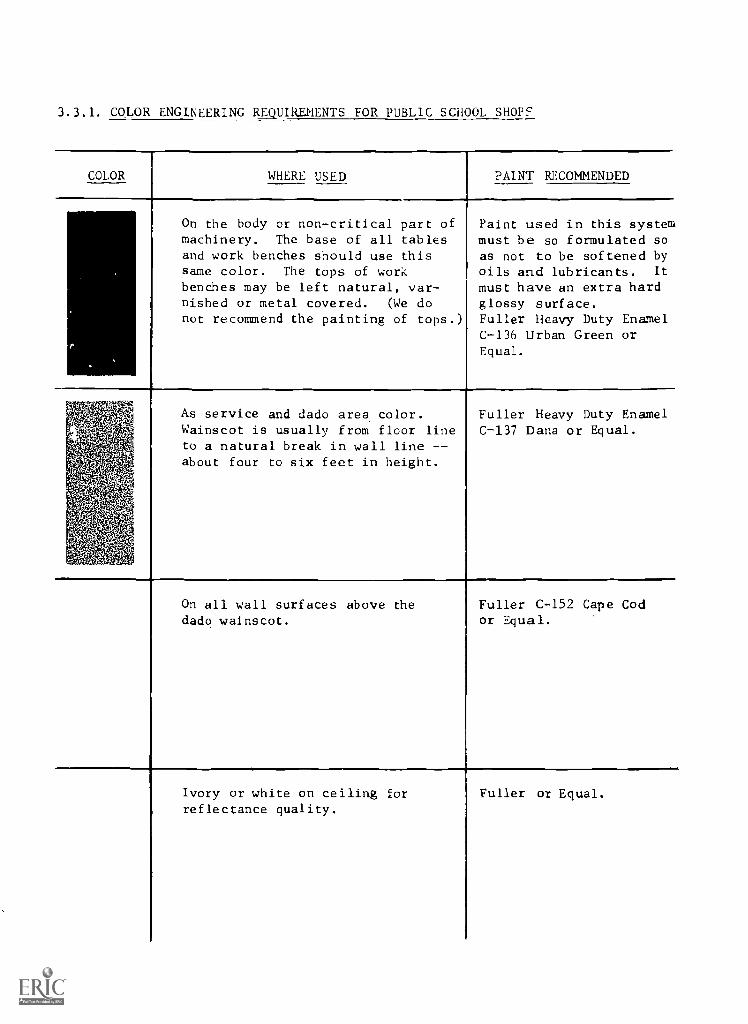
3.3.1. COLOR ENGINEERING REQUIREMENTS FOR PUBLIC SCHOOL SHOPS
COLOR WHERE USED PAINT RECOMMENDED
On the body or non-critical part ofmachinery. The base of all tablesand work benches should use thissame color. The tops of workbenches may be left natural, var-nished or metal covered. (We donot recommend the painting of tops.)
Paint used in this systemmust be so formulated soas not to be softened byoils and lubricants. It
must have an extra hardglossy surface.Fuller Heavy Duty EnamelC-136 Urban Green orEqual.
As service and dado area color.Wainscot is usually from floor lineto a natural break in wall line --about four to six feet in height.
Fuller Heavy Duty EnamelC-137 Dana or Equal.
On all wall surfaces above thedado wainscot.
Fuller C -152 Cape Codor Equal.
Ivory or white on ceiling forreflectance quality.
Fuller or Equal.

3.3.1. COLOR. ENGINEERING REQUIREMENTS FOR PUBLIC SCHOOL SHOPS (Cont'd)
COLOR WHERE USED PAINT RECOMMENDED
Warning Blue shall be used on elec-trical starting and stopping levers,on switch control boxes. Conduitlines should be banded every 15 to20 feet with 2-inch band. Do notpaint over the instructional plateson the switch boxes.
Fuller 112-22 BrightBlue or Equal.
Used to caution workers againsthazards. Inside of door only onall switch boxes to be DangerOrange. Also any dangerous andmoveable parts of machinery whereadequate safeguards cannot beprovided or where there is muchdanger where safeguards are tem-porarily removed for one reasonor another. Often used on cuttingdevices, rollers, pulleys, safetyguards, etc.
Fuller 112-18 BrightOrange or Equal.
Use Fire Red to indicate the lo-cation of extinguishers, firealarm stations, equipment, trucks,water barrels, sand buckets, etc.Do not paint polished brass orcopper extinguishers. Fire Redis to be used to indicate onlyfire prevention and controlequipment.
Yellow stripes shall be used to in-dicate traffic lines, safety andwork areas around machines. Yellowand black stripes indicate mobileequipment and shall be used ontruck tail gates, cranes, rear endof trailers and Father pieces ofequipment which in themselves maycreate a hazard unless the atten-tion of the eye is focussed uponthe possible hazard.
Fuller 112-19 Fire Redor Equal.
Fuller YellowTraffic Line Finishor Equal.

3.3.1. COLOR ENGINEERING REQUIREMENTS FOR PUBLIC SCHOOL SHOPS (Cont'd)
COLOR WHERE USED PAINT RECOMMENDED
Offers contrast. Use in workingarea of machinery to obtain propercolor relation between materialbeing fabricated and the workingsurface. To focus worker's atten-tion to the critical working or oper-ating area of the machine.Note: Polished machined surfacesNOT to be painted. They shall bemaintainers in a polished condition.
Fuller Heavy Duty B-1'2Modulation or Equal.
Where high visi,,41ity is necessary,such as on protruding objects onboth stationary and moving equipmentof where it is necessary to insureattention, such as on crane hooks,stairways, low overhead obstructions,conveyors, finger-lift trucks, un-guarded platform edges or pits.(Yellow should be striped withblack where positive attention isdemanded.) Visibility Yellowis also used for danger signals.
Fuller 112-14 BrightYellow or Equal.
To be used on all first-aid cabi-nets, stretchers, safety signs,etc. (Always use with a white back-ground.) The purpose is to identi-fy first-aid equipment, dispen-saries, medicine cabinets, etc.A darker green is also acceptable.
Fuller 112-16 JadeGreen or Equal.

E UIPMEN .4.0

4.0. THE EQUIPMENT
While hand tools can inflict injury on the students it is the power toolsand equipment that can cause serious injury and quite possibly, permanentdisabilities. The teacher shall inspect the equipment continuously for defectsor broken parts which can be hazardous to personnel. If any equipment is un-safe for operation and cannot be repaired immediately, the teacher shall shutdown the equipment by disconnecting the power, place an "OUT OF ORDER--DO NOTUSE" sign in zonspicuous place on the equipment and warning students aboutthis hazard. Portable equipment should be properly tagged and locked in theoffice cabinet to prevent further use. Some students tend to ignore obviousdefects and will use the equipment if it will run when the power is turned on
4.1. DAILY EQUIPMENT CHECKS
The teacher should train his students to assist him !II checkingthe equipment for defects daily. Although the teacher is fullyresponsible for the condition of the equipment, students can bebe very helpful in this respect while learning about equipmentsafety. The following items should be checked:
1. Cleanliness: The equipment and surrounding work areashould be clean and free from waste and spills. Safetyzones should be properly marked and non-skid grit sheetsprovided on floors to prevent slips. Use brush or com-pressed air for cleaning...do not use hands.
2. Protective Gear: All related protective. gear should beclose at hand for immediate use. A face shield that isstored in a cabinet is inconvenient and student will notuse it for :'Aist a "short job". Check the condition of theprotective gear regularly for defects. Use pushstickswhenever possible.
3. Mounts: All equipment should be securely mounted. Checkmounting bolts for tightness and possible wear. Smallblocks used to correct an uneven floor condition are notaceptable. Use the correct metal or rubber shims asrecommended by the manufacturer.
Sharpness: Keep all blades and bits sharp at all times.Lubricate with lightcoat of oil to prevent rust duringlong storate. Dull blades are extremely Jangerous and itcan "bite" unevenly or the material and cause injuryto the user. Worn belts or discs on sanders should be re-placed for similar reasons.
5. Guards: All guards sh)uld be in proper position during useand removed only for cleaning or making adjustments.Moving parts on the guards should be lubricated to worksmoothly. Check for worn parts, smashed guards or improper

4.1. DAILY EQUIPMENT CHECKS (Cont'd)
alignment. No drive belt or pulley should be left exposedduring the operation of the eqr"pment.
6. Worn Parts: Check, your equipment for worn, bent or brokenparts. Replace worn adjustment keys or wrenches to preventundue wear or major parts of the machine. Worn or frayeddrive belts are not to be used. Worn or bent shafts on theequipment shall be replaced and teachers shall shut downthe equipment until this condition is corrected. Lubricateparts according to the manufacturer's recommendations.
7. Electrical: Check equipment wiring, switches, motors andfor proper grounding. Most shops require dust-proofswitches and devices. Automotive shops and paint spraybooths require explosion-proof wiring. Your city electri-cal inspector can assist you in this area. National Elec-trical Code and local ordinances shall apply to all schoolshop electrical wiring. Check for electrical "shorts" onmotors and wiring including portable power tools.
4.2. QUALIFICATIONS AND OPERATING PROCEDURESOnly qualified personnel will be allowed to operate power equipmentwithout exceptions. In addition to the qualification and operatingprocedures described in the STUDENT SECTION of this guide, instruc-tors are advised to secure cards signed by the student to acknow-ledge the receipt of_ safety instruction. This is for your personalprotection and should not be dismissed without some consideration.See 6.1.3. Appendix for sample card.
4.3. SAFETY INSTRUCTIONS FOR OPERATING EQUIPMENTThe various equipment in the following section are listed accordingto the areas in which they most extensively usci. Some equipmentare used in more than one area but listed only once. Each set ofsafety instructions is organized according to the following format:.
1. illustration (if available)2. safety instructions3. diagram of space requirement4. safety exam (usually on back side)5. answers to safety exam

4.4. WOODWORKING TECHNOLOGY

4.4.1. BAND SAW
UPPER GUIDE
SAFETY INSTRUCTIONS
1. Obtain permission from your teacher before using band saw. .211111
2. Plan sawing procedure so there will be a maximum forward feed witha minimum of backing out of cuts.
3. Cut only stock with a flat surface.4. Make sure the proper width saw blade is on the machine for your
particular job.5. Check to see that all guards are in place.6. Set upper saw guide no higher than 1/4 inch above the stock to be cut.7. Make adjustments only when the machine is at a "dead" stop.8. Ask your teacher to approve all special setups.9. Wear face shield or safety glasses.
10. Make sure that no one but you is inside the safety zone.11. Turn "on" power.12. Keep fingers a safe distance from saw blade. Do not allow your hands
to cross the saw line when operating the saw.13. Feed material into machine at a moderate rate of speed.14. Keep saw blade from twisting or binding when cutting curves.15. Allow machine to come to a "dead" stop before backing out of a long
cut.
16. Keep waste from accumulating on the saw table.17. Step back immediately if the saw blade breaks or comes off. Shut off
power, if possible, without endangering self. Notify your teacher.18. Turn "off" power after using band saw and stand by until machine
comes to a complete stop.19. Clear away waste on the table and on floor around machine.

4.4.1. BAND SAW (Cont'd)
) 1.
( ) 2.
( ) 3.
( ) 4.
I2"
SPACE REQUIREMENTS FOR BAND SAW
14'
SAFETY EXAM
Make all adjustments on the band saw: a) only when the machine isat a dead stop; b) while the machine is coasting; c) when thepower is on; d) with the saw blade off.
Set upper saw guide of the band saw; a) no higher than 1/4 inchabove the stock; b) 1/2 inch or more above the stock: c) snugagainst the stock; d) when the power is off and the saw is coasting.
Plan your sawing procedure on the band saw so that: a) small curvescan be cut easily with a wide blade; b) there will be little scrapon the table c) there will be a maximum forward feed with a minimumof backing out of cuts; d) with a forceful twist a curve can be cut.
When the band saw blade breaks or comes off, you should:a) continue with your cutting until blade stops: b) call yourteacher to help turn the power off; c) look down into the tableinsert to see what happened; d) step back immediately and turn thepower off without endangering yourself, then notify your teacher.
'13 '17 !O .c r..e tt, :saamsuv

4.4.2. SCROLL SAW (JIG SAW)
SAFETY INSTRUCTIONS
1. Obtain permission from your teacher before using the scroll saw.2. Cut only stock with a flat surface on the bottom.3. Make adjustments only when the machine is at a "dead" stop.4. Make sure the saw blade is the proper size for the job and that it
is securely attached in the upper and lower vise jaws.5. Check correct tension for the blade.6. Adjust hold-down so it will be as close as possible to the work.7. Turn machine by hand (if possible) to make sure all parts are clear.8. Make sure that no one but you is inside the safety zone.9. Select correct machine speed for material to be cut.
10. Wear face shield or safety glasses.11. Turn "on" power.12. Hold material firmly and feed into the machine at a moderate rate
of speed.
13. Make tarns carefully. Do not twist blade.14. Keep fingers aways from path of saw blade.15. Report mechanical defects or a broken blade to your teacher.16. Turn "off" power after using scroll saw and stand by until the
machine comes to a complete stop.17, Clear away scraps of wood on the table only when the power is "off."18. Clean off machine and surrounding area.

4.4.2. SCROLL SAW (JIG SAW) (Contsd)
MINIMUM SPACE REQUIREMENTS FOR SCROLL SAW
12"
iI
1 1
i I
r-3 6" 11-1
I I
36" I
_L___1_ _l__
SAFETY EXAM
) 1. The scroll saw blade is installed to cut: a) on the up stroke;b) on th down stroke: c) on both the up and down strokes:d) at a high rate of speed.
( ) 2. Before starting the scroll saw, check the hold-down adjustment tomake sure: a) there is a 1/2 inch clearance between .:;t and thestock; b) it is as close as possible to the work; c) it is tightagainst the stock; d) there is a gap as -wide as the blade.
3. Stock to be cut on the scroll saw should be: a) soft; b) hard;c) round on the bottom: d) flat on the bottom.
E !ort z !ct T :siamsuv

4.4.3. RADIAL ARM SAW
:r.
SAFETY INSTRUCTIONS
1. 1. Obtain permission from your teacher before using saw.2. Ask your teacher to approve all special setups.3. Use guards on machine. Secure pc -rission from your reacher before
removing guards for jobs where use of guard is impractical.4. Make sure no one but you is inside the safety zone.5. Wear face shield or safety glasses.6. Hold stock firmly agaitst fence.7. Stand to one side and keep hands away from the direction of travel
of saw blade.8. Turn "on" power.9. Feed saw into material only as fast as it will easily cut.
10. Cut only one piece of stock at a time.11. Turn the power "off" and wait-until the machine has come to a com-
plete stop before attempting to pick up any stock dropped to thefloor.
12. Remove scraps from path of saw blade only when saw is at a "dead"stop.

4.4.3. RADIAL ARM SAW (Coned)
13. Turn "off" power after using saw, return saw to beginning positioncarefully, and stand by until machine comes to a compete stop.
14. Clean table and surrounding area.
SAFETY EXAM
( ) 1. Remove scraps from the path of the radial-arm saw blade with:a) your fingers; b) , steel ruler; c) a push stick; d) a pieceof wood or your finger only after the machine has come to a completestop.
( ) 2. At the completion of each cut, the radial-arm saw blade must be:a) returned to its beginning position behind the guide fence;b) stopped so operator can take another pass while pushing saw awayfrom him: c) left at a point nearest to the operator; d) loweredfor realignment.
'a .z :p T :saamsuv

4.4.4. TABLE SAW
SAFETY INSTRUCTIONS
1. Obtain permission from your teacher before using the table saw.2. Ba sure that all lumber is free from loose knots, nails, paint, or
p&lbles.
3. Select and install proper saw blade for the work tc, be done'.4. Make sure blade is sharp and free of cracks or other defects.5. Make adjustments only when the machine is at a "dead" stop.6. Limit saw blade extension to 1/8 inch or less above the stock being
cut. Opinions may differ so check with your teacher.7. See that all guards and other safety devices are in their proper
position.
8. Use ripping fence or cutoff gauge when cutting material.9. Ask your teacher to approve all special setups.10. Use clearance block when ripping fence is used as a gauge.11. Before cutting cylindrical stock, check with your teacher.12. Be certain there is an adequate number of proper push sticks avail-
able.
13. Make sure that no one but you is inside the safety zone.14. Wear face shield or safety glasses.15. Stand toitedeSide of the line of the saw blade.16. Turn "on" power.17. Keep fingers or any part of hands clear of path to the saw blade.18. Stop saw and move out of operating zone before responding to anyone
trying to attract your attention.19. Feed stock only as fast the saw will freely cut.20. Push the stock by yourself. UPe push.stick when ripping narrow
pieces of stock.

4.4.4. TABLE SAW (Cont'd)
21. Make certain that a helper tailing off only supports the material.Never carry or pass material over a running saw.
22. Turn "off" power after using table saw and stand by until themachine has come to a complete stop.
23. Clear away scraps of. wood on the table only after the saw comes toa complete stop.
24. Reset saw adjustment back to the normal position when an operationrequiring a special setup has :en completed.
25, Dust off machine and clean surrounding floor area.
( ) 1.
( ) 2.
( ) 3.
MINIMUM SPACE REQUIREMENTS MR TABLE SAW
12'
r- 36"
81
DALWAYS CLEAR
SAFETY EXAM
The saw guard must always be in place over the saw blade of the tablesaw except when: a) cutting stock more than 2 inches thick; b) usinga combination blade; c) your teacher has authorized its removalfor special setups; 4) cutting short pieces.
When using a helper on the table saw, the assistant should:a) support the stock so it is level with the table; b) hold thestock and pull; c) use % brush to clear sawdust from the blade;d) lift the piece of wood so it will slide easily.
A push stick should be used when operating the table saw to:a) lip short or narrow pieces of stock; b) adjust the saw;c) remove scraps; d) turn on the power.
8 E :v .z :siemsuy

..4.5. SANDER (DISC 5 BELT TYPES
ef'
DISC
BELT
SAFETY INSTRUCTIONS
1. Obtain permission from your teacher before using sanding me pine.2. Making adjustments only when sander is at a "dead" stop. Portable
sander electric cord should be disconnected.3. Check belt or disc for breaks or tears.4. Be surc switch is in a "off" position and machine is on its side
before plugging in electric cord on a portable sander.5. Hold work securely,6. Wear face shield or safety glasses.7. Turn."on" power.8. Keep fingers away from the abrasive surface on the sander.9. Sand on downward motion side of disc sander.
10. Use special care in sanding small or irregular pieces. Check withyour teacher.
11. Feed stock into the abrasive material at a moderate rate of speedand pressure. Do not tpply heavy, downward pressure on portablesander.
12. Turn "off" power after using sander and stand by until machine hascome to a complete stop. Rest portable sander on its side.
13. Disconnect electric cord of portable sander.14. Clean machine with a brush or airhose. RettIrn potable sander to
designated place.

4.4.5. SANDER (DISC & BELT TYPES, (Coned)
SAFETY EXAM
) 1. Make all adjustments on the portable sander: a) when the power ison; b) when another stt.dent is holding the sander; c) while it isin gear; d) while the electric cord is disconnected.
( ) 2. When operating a disc sander, you should feed your work against thedisc: a) rim; b) center: upward motion side; d) downwardmotion side.
( ) 3. When sanding small pieces of material on a sander, yuu should:a) hold it with your Unger; b) use a tweezer; c) consult withyour teacher; d) slow down the speed.
-3 "E'p
'Z .;saamsule

4.4.6. DRILL PRESS
Benchgoal
SAFELY INSTRUCTIONS
1. Obtain permission from your teacher
Floor before using the drill press.
Model 2. Shift belt and make other aduat-ments only when the power switchis turned "off." Adjust speed on-ariable speed drill press onlywith the power "on."
3. See that belt guard is in place.4. Check table and head of drill press
to make sure that thewy are secure.
5. Select prcper drill bit (be sure itis sharp) and coolant.
6. Wear face shield or safety glasses.7. Make sure that no one but you is in
the safety. zone.
8. Remove check key immediately after using it.9. Use drill press vise whenever possible. Clamp vise or work to drill
press table.
10. Turn "on" power.11. Keep hands sways from revolving spindle, chuck, drill bit, and chips.
12. Operate feed hr7Idle so that drill bit cuts evenly into work.
13. Ease up on feed pressure when drill begins to break through material.14. Back drill bit out as soon as hole.is drilled.15. Stop the drill press before attempting to remove work, chips, or
cuttings. Use P. brush to remove chips or shavings.16. Step away immediately if work comes loose and is seized by drill bit;
shut off power, if possible, without endangering self.

4.4.6. DRILL PRESS (Cont'd)
17. Turn power "off" after using drill press and stand by until machinecomes to a complete stop.
18. Clean off drill press table and surrounding area. Return drill bits,coolants, and clamping devices to designated place.
DRILL PRESS SPACE REQUIREMENTS
12"
4'
SAFETY EXAM
) 1. Drill press work should be held: a) with a pair of pliers; b) with
your hands; c) in a vise oc firmly clamped to the table; d) byyour friend at all times.
) 2. When the drill bit begins to break through the work, you should:a) maintain the same feed pressure; b) apply more pressure; c) ease
up on the feed pressure; d) stop the drill press immediately.
( ) 3 The best way to remove chips or shavings from the table is with:a) your hands; b) a small drill bit; c) a long ruler; d) a brush.
) 4. By removing the chuck key from the chuck before turning on the power,you will prevent: a) the chuck from being damaged; b) the spindlefrom becoming unbalanced; c) the drill from breaking; d) thechuck key from being thrown out at a terrific speed.
) 5. If your work is seized by the drill bit, you should: a) grab itwith your hands; b) stop the machine immediately; c) exert morefeed pressure; d) decrease the feed pressure.
cl .s tp .47 !p 'E !o to 'T :examsuy
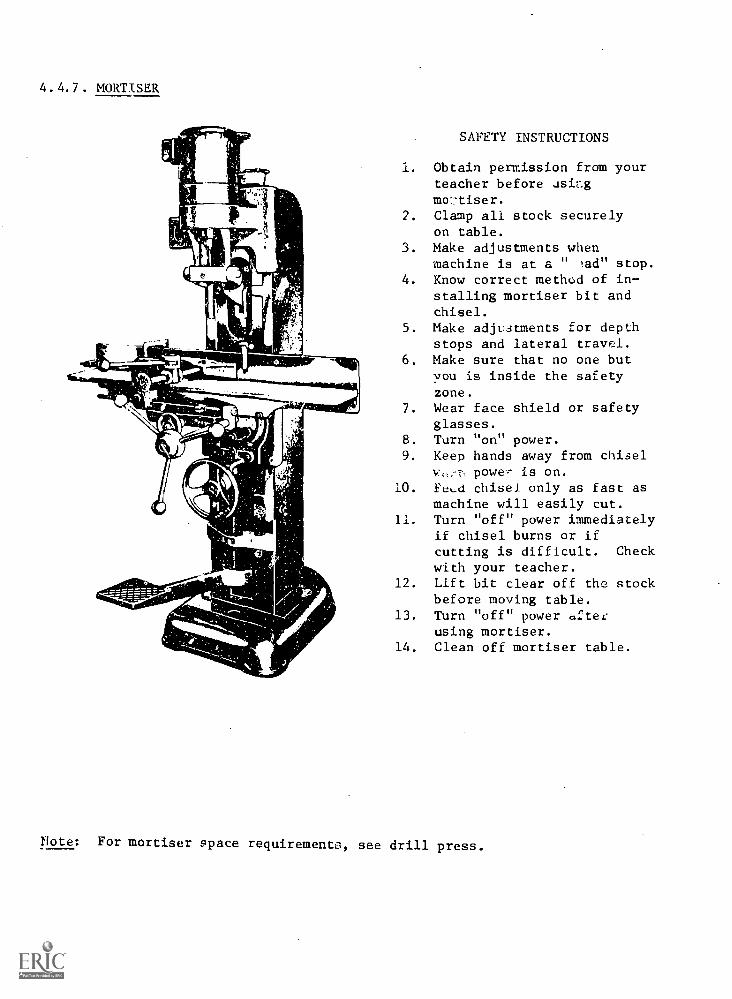
4.4.7. MORTISER
SAFETY INSTRUCTIONS
i. Obtain permission from yourteacher before using
2. Clamp all stock securelyon table.
3. Make adjustments whenmachine is at a " ild" stop.
4. Know correct method of in-stalling mortiser bit andchisel.
5. Make adjustments for depthstops and lateral travd..
6. Make sure that no one butyou is inside the safetyzone.
7. Wear face shield or safetyglasses.
8. Turn "on" power.9. Keep hands away from chisel
power is on.10. Fthd chisel only as fast as
machine will easily cut.11. Turn "off" power immediately
if chisel burns or ifcutting is difficult. Checkwith your teacher.
12. Lift bit clear off the stockbefore moving table.
13. Turn "off" power afterusing mortiser.
14. Clean off mortiser table.
Note: For mortiser space requirements, see drill press.

4.4.Y. MORTISER (Coned)
SAFETY EXAM
) 1. Make sure that th-rt chisel and bit of the mortiser are: a) Sharpe,
before and after each use; b) properly aligned; c) adjusted so
that the chisel leads the bit; d) cooled after each cut.
) 2. If cut Ong on the mortiser becomes difficult or the chisel startsto ki.1 you should; a) wax or grease chisel; b) apply oil ca thebit; --,es harder on the pedal; d) turn off the power u.:dnotify Icher.
) 3. When the mot is turned on, you should: a) adjust the depthof cut; b) :ge alignment of chisel; c) keep your hands from
bit and chief d) check the lateral adjustments.
'o E !I) 'z iq 'T :siameuV
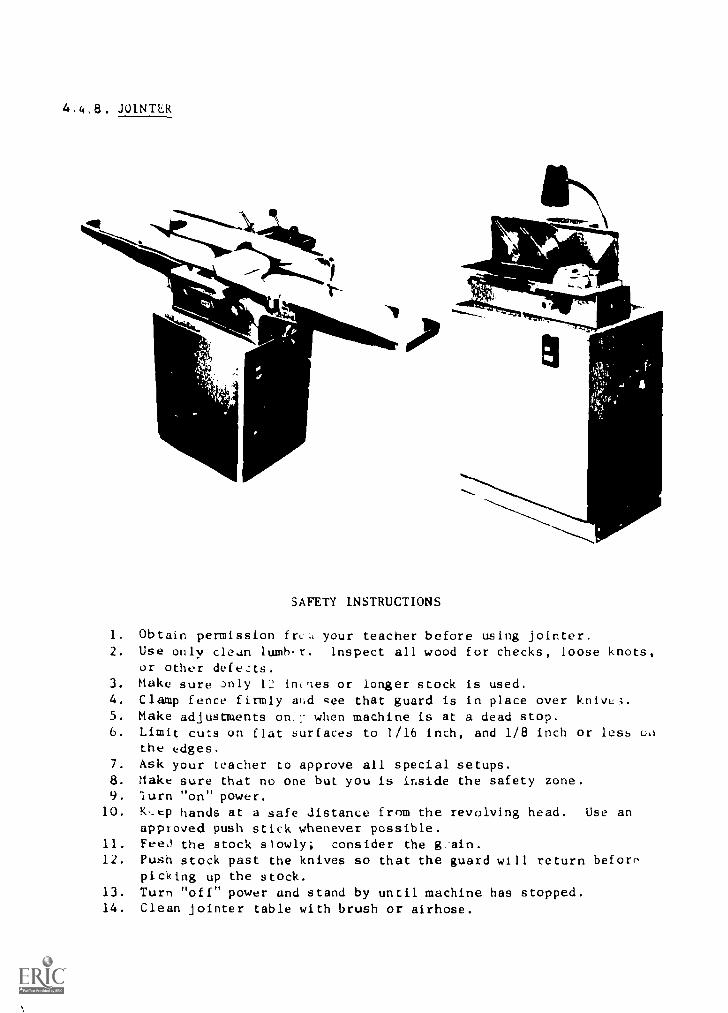
4.4.8. JUINTLR
-.Oft-741/4
SAFETY INSTRUCTIONS
1. Obtain permission frc:, your teacher before using jointer.2. Use only clean lumb.r. Inspect all wood for checks, loose knots,
or other defects.3. Make sure only 12 incnes or longer stock is used.4. Clamp fence firmly gee that guard is in place over knivc3.5. Make adjustments on:: when machine is at a dead stop.6. Limit cuts on flat surfaces to 1/16 inch, and 1/8 inch or less oil
the edges.7. Ask your teacher to approve all special setups.8. Make sure that no one but you is inside the safety zone.9. Turn "on" power.
10. K._ep hands at a safe distance from the revolving head. Use anapproved push stick whenever possible.
11. FeeJ the stock slowly; consider the gain.12. Push stock past the knives so that the guard will return beforn
picking up the stock.13. Turn "off" power and stand by until machine has stopped.14. Clean jointer table with brush or airhose.

4.4. . JOINTER (Cont'd)
SPACE REQUIREMENTS FOR JOINTER
10'
le
SAFETY EXAM
) 1. In adjusting the depth of cut on the jointer for a wide surfaceboard, limit the cut to: a) 1/16 inch; b) 1/8 inch; c) 1/4 inch;d) 3/16 inch.
( ) 2. The shortest length rf stock that can be safely cut on the jointeris: a) 4 inches; b) 8 inches; c) 10 inches; d) 12 inches.
) 3. Before picking up stock that has Leen surfaced on the jointer, makesure you have pushed the stock far enough past the cutter knivesso that the: a) stock drops clear of the table; b) push stick willhit the knives; c) outfeed table raises the material above thelevel of the knives; d) guard will return over the cutter knives.
'P 'E IP 'Z !B 'T :tuaasuv

4.4.9. PLANER (SURFACER)
fY
Fr
14
-.41MNIMIMM.""'IMMIPIMIN
I.9
SAFETY INSTRUCTIONS
1. Obtain permission from your teacher before using planer.2. Use only clean lumber. Be sure that all wood is free from loose
knots or other defects.3. See that length of stock is longer than the distance between centers
of feed roils.4. Make adjustments only when machine is at a "dead" stop.5. Adjust cut to measurements taken on thickest part of the board.6. Limit cuts to 1/8 inch or less on narrow boards; 1/16 inch or less
on wide boards.7. Run thin stock through planer on top of a thick surfaced board.8. Make sure that no one but you is inside the safety zone.9. Wear face shield or safety glasses.
10. Turn "on" power.11. Stand to one side of planer when macMne is in operation. 10 not
lower your head to look into planer.12. Keep hands away from feed rolls and away from board alreaiy gripped
by the feed rolls.13. Turn "off" power and call your teacher if machine does not seem to
operate properly.14. Allow material to travel completely through planer before making any
additional adjustment in depth of cut.15. Turn "off" power after using planer and stand by until the machine
comes to a complete stop.16. Clean machine and surrounding area.

4.4.9. PLANER (SURFACER) (Cont'd)
MINIMUM SPACE REQUIREMENTS FOR PLANER
7
12'
SAFETY EXAM
( ) 1. Minimum length stock that can be run through the planer is:
a) 6 inches; b) longer than the distance between center of feed
rolls; c) determined by the depth of cut; d) left up to the
discretion of the operator.
) 2. When operating the planer, you should stand: a) directly behind
the machine; b) slightly to one side so you could look into the
planer; c) in an upright position and to one side of the machine;d) to the left with your hand cn the planer to feel the vibrations.
( ) 3. Limit your cuts on the planer to: a) 1/2 inch; b) 1/4 inch;
c) 1/8 inch on narrow boards and 1/16 inch on wide boards;d) half the thickness of the stock.
E :3 z 'T :siamsuv

4.4.10. LATHE (WOODTURNING)
e
SAFETY INSTRUCTIONS
General Turninl Instructions Sec Metal Lathe
1. Obtain permission from your teacher efore using lathe.2. Roll loose sleeves above elbows and remove or fasten any loose
clothing.3. Make sure stock is free from checks, loose knot, or other defects.4. Make certain all glued work is properly glued and dry.5. Be sure stock is correctly mounted to lathe.6. Chimp tool rest holder firmly.7. Be certain tool rest is adjusted correctly.8. MaLe adjustments of tool rest only when lathe is at a "dead" stop.
9. Shift belt on beltdriven lathes only when lathe is at a "dead stop.Chenge speeds on variable speed lathe only with the power on.
10. Check sharpness of turning tools and condition of handles.11. Wear face shield or safety glasses.12. Start lathe at lowest speed when beginning operation.13. Make sure that no one but you is inside the safety zone.14. Stand to one side when power is first turned on,15. Grasp turning tool firmly with both hands while cutting stock.
16. Hold turning tool firmly against tool rest.17. Keep hands away from stock while it is revolving.18. Use correct amount of tool pressure against stock.19. Stop lathe when using calipers or ruler.20. Maintain tool rest as close as possible to stock by making frequent
adjustments.21. Remove tool rest when sanding and finishing.22. Shut "off" power after using lathe and stand by until the machine
comes to a complete stop.23. Clean machine with brush or airhose.

4.4.10. LATHE ( WOODTURNING) (Cont'd)
Spindle Turning Instructions
1. See that both center are properly embeddedin the stock.
2. Clamp tailstock firmly in place andtighten screw.
3. Turn spindle (rough stock) one revolutionby hand.
4. Start lathe at lowest speed.5. Turn stock down to cylindrical form before
using a higher speed. Maintain correcttool rest adjustment.
6. Regulate speed according to the diameterof the work.
Faceplate Turning Instructions
1. Rough cut stock circular on band sawor scroll saw.
2. Select proper size faceplate.3. Fasten stock or sub-base glued to
stock (through paper) to faceplate withscrews. Be sure screws are tight.
4. Have teacher check fastening andadjustments.
5. Check depth of cut in work to avoidstriking screws with turning tool.
6. Be certain tool rest adjustment iscorrect and is correctly maintained.
7. Revolve work once by hand.8. Use lowest speed when beginning operation.9. Regulate speed according to diameter
of work.10. Frequently check screws to be sure they
do not loosen.
Nrt.rr-
SPACE REQUIREMENTS FOR LATHE (WOODTURNING)
24"
2"
12"

4.4.10. LATHE (WOODTURNING) (Cont'd)
( ) 1.
( ) 2.
( ) 3.
) 4.
SAFETY EXAM
Make all adjustments on the lathe: a) while machine is slowly turn-ing; b) when machine is at a dead stop; c) after initial cuts aremade; d) when the teacher is present.
It is best to set tool rest so it is: a) in slight contact withthe stock to reduce chatter; b) the same width as the lathe toolbeing used; c) 1/4 inch or less from the rough stock; d) belowand to left of center.
When starting lathe for a beginning operation, you should use:a) the highest speed; b) the lowest speed; c) a medium speed;d) a speed of 5,000 rpm.
Hold lathe turning t000l: a) only with your fingers; b) tuckedunder your armpit; c) firmly against the tool rest; d) flat on
the holder.
0 fq E ,13 z :q -r :saemsuv

4.4.11. PORTABLE ELECTRIC DRILL
SAFETY INSTRUCTIONS
1. Obtain permission from your teacher before using drill.2. See that a grounded wire is connected to the drill and that drill,
electric cord, and plug are dry at all times.3. Select proper drill bit (be sure it is sharp) and coolant.4. Make sure switch is in an "off" position.5. Remove chuck key immediately after using it.6. Plug in electric cord and hold drill firmly.7. Turn "on" power.8. Keep hands away from revolving spindle and drill bit.9. Apply straight and strady pressure on the drill.
10. Ease up on pressure just before drill begins to break throughmaterial.
11. Back drill out as soon as hole is drilled.12. Turn "off" power and hold drill firmly until it comes to a "dead"
stop. Rest drill on its side. Return drill to designated placewhen through using it, after disconnecting cord.

4.4.11. PORTABLE ELECTRIC DRILL (Cont'd)
SAFETY EXAM
( ) 1. Select a location that is dry and not grounded for using a portable
electric tool so as to avoid: a) wetting your feet; b) soilingthe equipment; c) serious electric shock; d) discoloring the cord.
( ) 2. Before plugging in the portable electric drill, you should:a) remove the drill; b) check the outlet; c) make sure the switchis off; d) disconnect the grouni wire.
( ) 3. When you turn off the switch on the portable electric drill, youshould: a) inspect the armature; b) hold the drill firmly untilit comes to a dead stop; c) let go of the drill; d) hold thechuck to slow it down.
E to z to T :siamsuv

4.4.12. PORTABLE ROUTER
SAFETY INSTRUCTIONS
1. Obtain permission from your teacher before using the router.2. Make adjustments only when electric cord is disconnected from power
source.3. Select proper bit or cutter.4. Tighten all bits and cutters with proper wrenches.5. Fasten stock firmly with vise or clamp.6. Ask your teacher to approve setup and adjustment.7. Be sure switch is in an "off" position and machine is on its side
before plugging in electric cord.8. Wear face shield or safety glasses.9. Hold machine firmly.
10. Turn "on" power.11. Keep hands clear of revolving cutters Use both hands to operate
router.
12. Feed cutter slowly into the material.13. Turn "off" power, wait until machine comes to a complete stop, rest
machine on its side after a desired cut has been completed.14. Disconnect electric cord. Clean and return machine to its designated
place.

4.4.12. PORTABLE ROUTER (Cont'd)
SAFETY EXAM
) 1. Before changing bits or cutters or making adjustments on the router,make sure: a) the electric cord is disconnected from the powersource; b) a plier is used; c) to turn blades by hand; d) otherstudents are at a safe distance.
) 2. When cutting with th- router, you should: a) attempt to make asdeep a cut as possible; b) feed the cutter as fast as possible;c) hold the electric cord with one hand; d) keep hands clear ofthe revolving cutters.
'p 'z :v T :saamsuv

4.5. METALWORKING TECHNOLOGY

4.5.1. BAR FOLDER
SAFETY INSTRUCTIONS
1. Obtain permission from your teacher before using bar folder.2. Remove sharp burrs and edges on sheet metal.3. Fold only single thickness of sheet metal within capacity of the
folder.4. Make sure no one but you is inside the safety zone.5. Keep fingers away from the folder blade during the bending operation.6. Hold handle firmly and do not let it drop.7. Let the bar down slowly after completing a bend.
BAR FOLDER SPACE REQUIREMENTS
24"
36"
4.5.1. BAR FOLDER (Cont'd)
SAFETY EXAM
) 1. When folding metal in the bar folder, you should: a) keep yourFingers away from the folding bar; b) let the folding bar drop;c) always fold across a ham; d) feed the work as rapidly aspossible.
( ) 2. When using the bar folder, the handle should be: a) held by anotherperson at all times; b) let down slowly; c) thrown back;d) rotated.
q 'z !u 'T :siamsuv

4.5.2. SHEAR
SAFETY INSTRUCTIONS
1. Obtain permission from your teacher before using shear.2. Follow manufacturer's specifications as to gauge of sheet metal
that can be safely cut.3. Make sure that no one but you is inside the safety zone.4. Stand directly in front of machine.5. Feed piece of metal into shear from front (operator's position).
Gloves should be worn when handling sheet metal, but never aroundmoving machinery.
6. Cut narrow strips of metal crosswise only. Keep fingers away fromclamp and blade.
7. Hold stoke securely against guide.8. Make sure the foot that is not being used to operate treadle is
clear before pushing down on treadle.9. Regulate pressure on treadle according to gauge and type of stock.
Keep foot on treadle to ease its return to normal position.10. Alloy small pieces of metal being cut to drop into a container or
to the floor.
11. Clean trimmings off machine and floor when work is completed. Usecare when picking up trimmings.
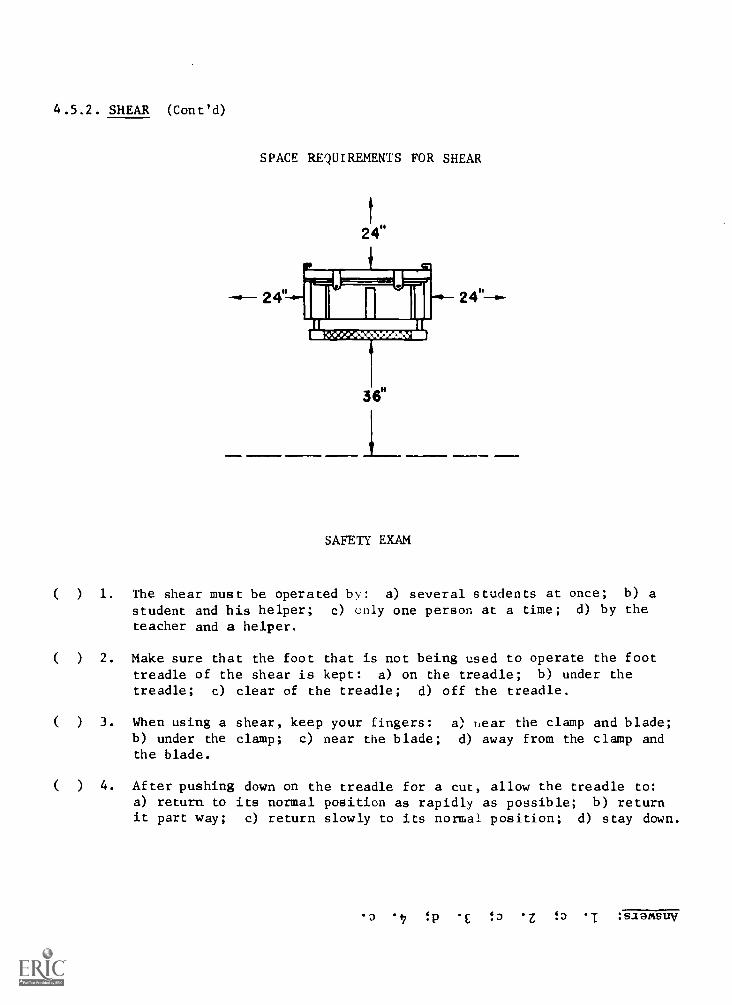
4.5.2. SHEAR (Cont'd)
SPACE REQUIREMENTS FOR SHEAR
4"
f
24"
U
36"
SAFETY EXAM
) 1. The shear must be operated by: a) several students at once; b) astudent and his helper; c) only one person at a time; d) by the
teacher and a helper.
) 2. Make sure that the foot that is not being used to operate the foottreadle of the shear is kept: a) on the treadle; b) under thetreadle; c) clear of the treadle; d) off the treadle.
) 3. When using a shear, keep your fingers: a) near the clamp and blade;b) under the clamp; c) near the blade; d) away from the clamp andthe blade.
( ) 4. After pushing down on the treadle for a cut, allow the treadle to:a) return to its normal position as rapidly as possible; b) returnit part way; c) return slowly to its normal position; d) stay down.
'D 143 E !o z !o :siemsuv
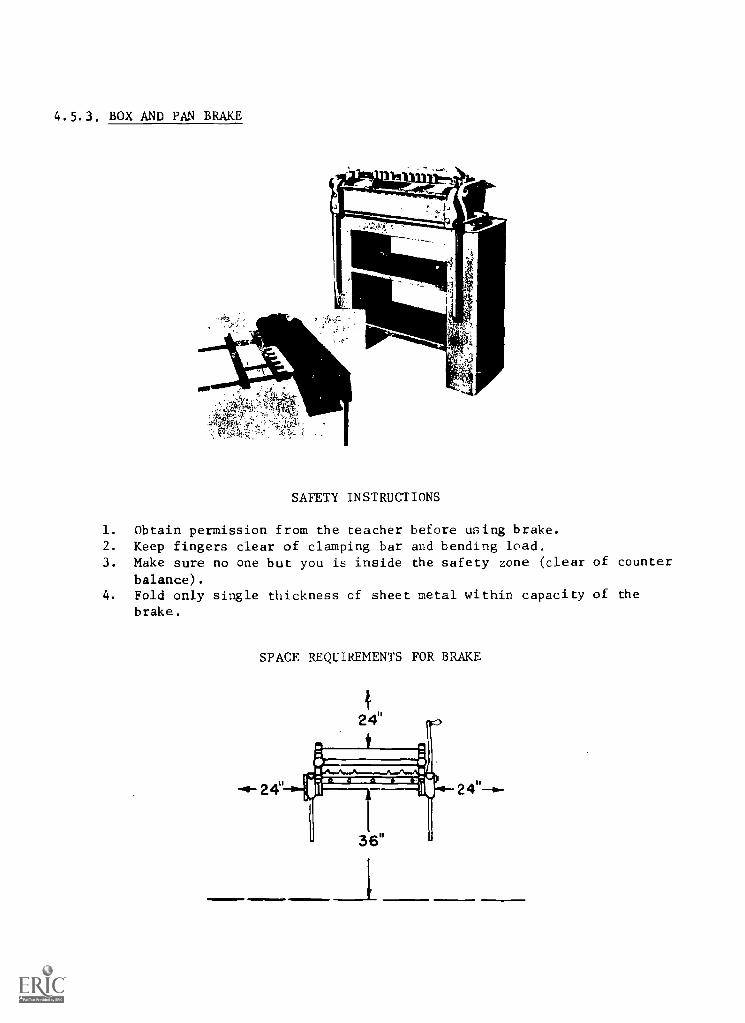
4.5.3. BOX AND PAN BRAKE
SAFETY INSTRUCTIONS
1. Obtain permission from the teacher before using brake.2. Keep fingers clear of clamping bar and bending load.3. Make sure no one but you is inside the safety zone (clear of counter
balance).4. Fold only single thickness of sheet metal within capacity of the
brake.
SPACE REQUIREMENTS FOR BRAKE
24"-s-

4.5.3. BOX AND PAN BRAKE (Cont'd)
SAFETY EXAM
( ) 1. Before operating the brake, you should: a) drop the lead; b) makesure that everyone is clear of the counter balance; c) remove thebending load; d) r move the leaf.
( ) 2. When using the bra17.e, keep your fingers: a) on the clamping bar;b) on the bending leaf; c) on the counter balance; d) clear ofthe clamping bar.
13 Z !q T : Sial4SUV

4.5.4. GRINDER
PEDESTAL-MOUNTEDGRINDER
SAFETY INSTRUCTIONS
Iti
BENCH-MOUNTEDGRINDER
1. Obtain permission from your teacher before using grinder.2. Check gap between tool rest and wheel to see that it is not more than
1/8 inch.
3. Dress wheel when necessary... See that guard ii in place.5. Wear face shield or safety glasses and use glass safety shield on
grinder.6. Make sure that no one but you is in the safety zone.7. Stand to on side of wheel.8. Turn "on" power. Keep fingers away from wheel while it is in motion.9. Hold work with hands. Ask teacher for special instruction and
permission to grind small pieces.10. Do not grind soft metals such as lead, copper, or brass.11. Use the face of the wheel only. Avoid excessive pressure against
wheel.12. Keep work in motion across face of wheel.13. Turn "off" power after using grinder.14. Clean grinder and area with a brush or an air-gun.

4.5.4. GRINDER (Cont'd)
) 1.
) 2.
) 3.
SPACE REQUIREMENTS FOR GRINDER
24"
6"
4'
SAFETY EXAM
-24"
The grinder tool rest must be securely fastened: a) 1" away fromthe wheel; b) when the grinder is on; c) when wheel is not inmotion; d) after the power is turned off and the wheel is coasting.
Set grinder tool rest: a) 1/4" away from the wheel; b) 1/2" awayfrom the wheel; c) no more than 1/8" away from the wheel; d) sowheel rubs lightly against tool rest.
To grind small pieces of stock, you should: a) hold them with yourbare hands; b) hold them using a glove; c) receive special instruc-tion and permission from your teacher; d) use a very fine wheel.
.3 E t3 Z T SI aittry

4.5.5. BUFFER
SAFETY INSTRUCTIONS
1. Obtain permission from your teacher before using buffer.2. Wear face shield or safety glasses.3. Make sure that no one but you is inside the safety zone.4. Hold work with both hands. Ask teacher for special instruction and
permission to buff small pieces.5. Turn "on" power.6. Keep hands away from the wheel while it is in motion.7. Apply compound sparingly.8. Hold work below center (approximately 1/2 inch) as wheel revolves
toward you.9. Buff flat surfaces from center toward lower edge. Sharp edges
should point downward.10. Press material against wheel with correct amount of pressure.11. Turn "off" power after using.12. Clean buffer and area with a brush or an air-gun.

4.5.5. BUFFER (Cont'd)
SPACE REQUIREMENTS FOR BUFFER
244
6"
SAFETY EXAM
24"
( ) 1. When buffing, hold your work: a) on top of wheel; b) below center
of wheel; c) above center of wheel; d) on bottom of wheel.
2. Fi..!rmission to buff small pieces must be obtained from: a) foreman;
b) teacher; c) principal; d) counselor.
) 3. Goggles or a face shield must be worn when using the buffer becauseit will: a) magnify your work; b) remove glare; c) help avoid
distraction; d) protect your eyes from flying particles.
) 4. When using the buffer, you should point the sharp edges of yourwork: a) upward; b) sideways; c) horizontal; d) downward.
13 :p E z tcl T :siamsuv

4.5.6. LATHE (METALWORKING)
SAFETY INSTRUCTIONS
General Turning Instructions
1. Obtain permission from your teacher before using lathe.2. Roll sleeves above elbows and remove or fasten any loose clothing.3. Make all adjustments only when machine is at a dead stop.4. Make sure all guards are in place.5. Be sure that all parts of the carriage will clear any rotating part
during full length of cut.6. Remove chuck key or wrench immediately after using.7. Set tool on center of work to be turned.8. Wear face shield or safety glasses.9. Make sure that no one but you is inside the safety zone.
10. Turn "on" power. Place your hands or the controls or at your sidesexcept when filing or polishing.
11. Keep hands away from chips. Remove chips with brush, pliers, or apiece of wood.
12. Stop the machine before attempting to measure the job.13. Finish cuts that are close to chuck or against a shoulder by hand
feed.14. Bring lathe to a complete stop before reversing.15. Remove tool holder and tool post before filing or polishing.16. Shut "off" power after using lathe. Stand by until machine comes
to a complete stop.17. Clean machine and area.

4.5.6. LATHE (METALWORKING) (Cont'd)
BetweenCenters Turning Instructions
1. Use safety dog to drive work.2. Clamp tailstock securely.3. Adjust and lubricate the tailstock center.4. Regulate depth of cut according to size and type of metal.5. Use tools that are properly ground for the particular job.
Chuck and Faceplate Turning Instructions
1. Place a piece of board under chuck when treading it on or off spindle.2. Secure work firmly in chuck.3. Remove chuck key or wrench immediately after using it4. Counterbalance work on the faceplate if it is irregular in shape.5. Turn chuck or faceplate by hand one complete turn to make sure work
is clear.6. Regulate depth of cut according to size and type of metal.7. Stand to one side of revolving faceplate.8. Stop power feed before tool reaches jaws of chuck.
SPACE REQUIREMENTS FOR LATHE (METAL)
2"
36"
12"

4.5.6. LATHE (METALWORKING) (Cont'd)
SAFETY EXAM
( ) 1. All measurements should be taken when the lathe is at a lead stopso as to: a) avoid damaging measuring tool; b) keep chuck tight;L) make faster measurements; d) prevent measuring instrumentstrom getting caught and flying out.
) 2. When the chuck or faceplate has been removed from the lathe, youShould place it: a) on the carriage; b) in the chip pan; c) insch a manner that it will not roll and fall onto the floor; d) onshe ways.
) 3. Before cleaning your work with a rag, be sure the lathe is: a) ata dead stop; b) turning slowly; c) rotating in reverse; d) revolv-ing at full speed.
a £ 'Z T :siamsuV

4.5.7. POWER HACK SAW
SAFETY INSTRUCTIONS
1 Obtain permissicn from your teacher before using power hack saw.2. Mount work only when the power is turned "off" and the machine is
at a dead stop.3. Never attempt to saw short pieces of stock unless you have another
piece of the same diameter in the opposite side of the jaws. Piecessmaller than 1/4 inch should be cut manually.
4. Measure correctly. Double check after tightening the vise.5. Turn "on" power. Stand to one side of saw frame when you turn on
the power.6. Do not bend over saw while it is in operation.7. Keep hands away from blade and line of travel of moving parts.8. When cutting long stock, be sure to support protruding end. Provide
protection against someone walking into the protruding stock.9. Turn "off" power after using the power hack saw and stand by until
the machine has stopped.10. Clean machine and area with a brush.
SAFETY EXAM
( ) 1. When using the power hack saw, it is unsafe to cut: a) flat stock;b) cylindrical stock; c) pieces smaller than 1/4 inch; d) longstock.
( ) 2. Work should be mounted when: a) the machine is at a dead stop;b) the power is turned on; c) the blade is moving at a slow rateof speed; dl the teacher is helping you.
'z 'o :slamsuV

4.5.8. SHAPER (METALWORKING)
SAFETY INSTRUCTIONS
1. Obtain permission from your teacher before using shaper.2. Make adjustments or setup only when machine is at a dead stop.3. Use soft hammer or mallet to set work on the parallels.4. Secure work firmly in the machine.5. Select proper tool for the job.6. Set machine for proper depth of rn...t.
7. Be sure that ram and head will clear your work and any holding device.8. Protect your eyes with a face shield or safety glasses.9. Make sure no one but you is inside the safety zone.
10. Check to see that lever is in neutral position before starting themotor.
11. Turn "on" power. Stand to one side of machine.12. Keep your hands away from cutting tool and line of travel of all
moving parts.13. Turn "off" power after using shaper, and stand by until the machine
has stopped.14. Clean machine and area with a brush.
SAFETY EXAM
( ) 1. Before starting the shaper, make sure the ram and head will clearthe: a) ram clamp; b) starting lever; c) operator; d) work andholding device.
( ) 2. When operating the shaper, you should: a) wear a face shield orsafety glasses; b) increase the cutting speed; c) oil the machine;d) sweep the chips from the floor immediately.
( ) 3. When the shaper is in motion, you should: a) lean on the ram; b) siton the ram; c) raise the tool holder on each back stroke; d) keepyour hands away from the work.
'P 'E 'Z 'T. :siamsuy

4.5.9. PLANER (METALWORKING)
SAFETY INSTRUCTIONS
1. Obtain permission from your teacher before using planer.2. Make adjustments or setup only when machine is a dead stop.3. Secure work firmly in the machine.4. Select proper tool for the job.5. Set machine for proper depth of cut.6. Make sure that work clears cross rail and sides of machine.7. See that stops are set for controlling the movement of table.8. Protect your eyes with a face shield or safety glasses.9. Check to see that lever is in neutral position before starting the
motor.
10. Make sure no one but you is inside the safety zone.11. Turn "on" power. Keep hands away from cutting tool and line of
travel of moving parts of machine.12. Turn "off" power after using planer and stand by until the machine
has come to a complete stop.13. Clean machine and area with a brush.
SAFETY EXAM
( ) 1. When setting up your work on the planer, be certain: a) there areno chips on the table; b) the platen travels at least 6 inches;c) the machine is in gear; d) your work is securely fastened onthe table.
( ) 2. Before starting the planer, make usre the work will clear the:a) starting lever; b) operator; c) table; d) cross rails andsides of the machine.
( ) 3. Use a file to remove sharp burrs and corners from your work to:a) avoid tearing your clothes; b) prevent your fingers from beingcut; c) speed up production; d) prevent your work from beingscratched.
( ) 4. When the planer is in motion, you should: a) sit nearby and watch;b) lean on the cross rail; c) keep your hands away from the work;d) stop the table each time it returns.
0 47 q E 4p 'z 4p 'T : Slet4STIV

4.5.10. MILLING MACHINE
SAFETY INSTRUCTIONS
1. Obtain permission from your teacher before using milling machine.2. Make all adjustments or setups only when the machine is at a dead,
stop.
3. Use correct fitting wrenches on machine parts.4. Handle all cutters carefully.5. Select proper cutter; be sure it is sharp.6. Use only a soft hammer or mallet tc seat work against the parallels
or bottom of vise.7. Be sure that the job is securely fastened.8. Make certain that the work, the milling machine table, and any hold-
ing device will clear arbor and support during cut.9. Set machine for proper depth of cut.
10. Select correct feed.11. Disengage handles when automatic feed is to be used or when table is
to be locked.12. Make sure no one but you is in safety zone.13. Stand to one side of machine.14. Turn "on" power. Be sure that cutter is turning in proper direction.15. Feed against or opposite to direction of rotation of cutter.16. Use a brush to remove chips from work when machine is at rest.17. Turn "off" power after using and stand by until machine comes to
a complete stop.18. Release all automat_ feeds.19. Clean machine and area with a brush.
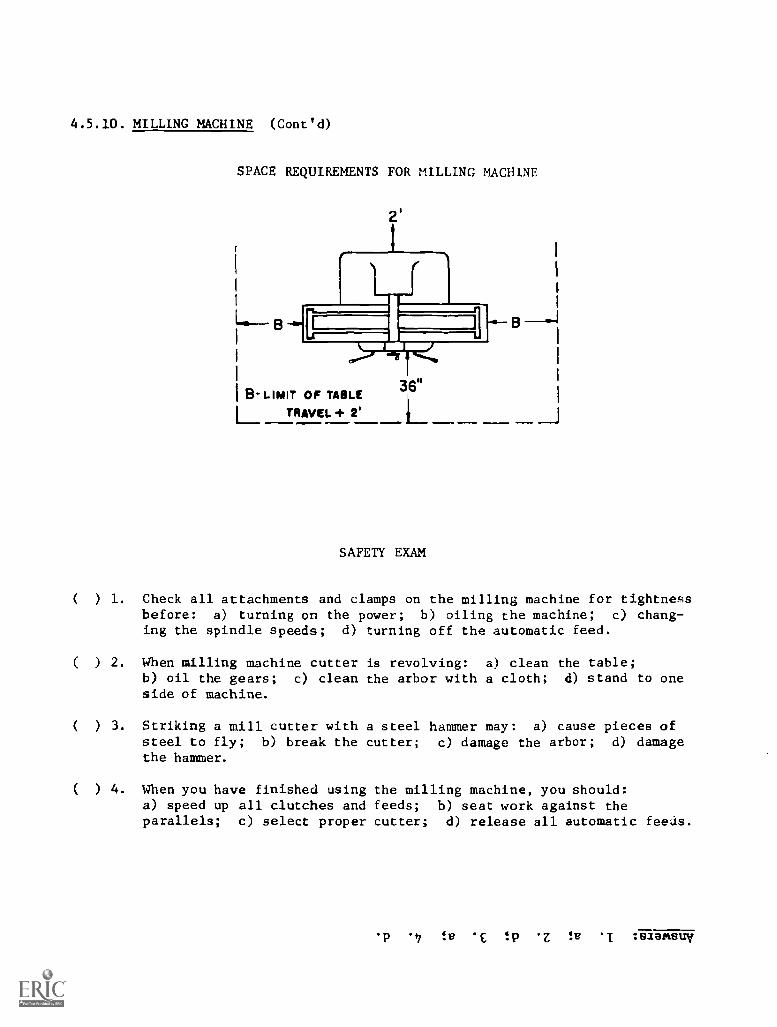
4.5.10. MILLING MACHINE (Cont'd)
SPACE REQUIREMENTS FOR MILLING MACHINE
2'
( ) 1.
( ) 2.
( ) 3.
( ) 4.
B
B- LIMIT OF TABLETRAVEL+ 21
36"
SAFETY EXAM
B-1
Check all attachments and clamps on the milling machine for tightnessbefore: a) turning on the power; b) oiling the machine; c) chang-ing the spindle speeds; d) turning off the automatic feed.
When milling machine cutter is revolving: a) clean the table;b) oil the gears; c) clean the arbor with a cloth; d) stand to oneside of machine.
Striking a mill cutter with a steel hammer may: a) cause pieces ofsteel to fly; b) break the cutter; c) damage the arbor; d) damagethe hammer.
When you have finished using the milling machine, you should:a) speed up all clutches and feeds; b) seat work against theparallels; c) select proper cutter; d) release all automatic feeds.
'P i =v 'E =P 'Z =u '1 :siamsuv

4.5.11. FORGE
SAFETY INSTRUCTIONS
1. Obtain permission from your teacher before lighting gas forge.
2. Clear area of all flammable material.3. Keep area well ventilated.4. Wear face shield or safety glasses.
5. Make sure that no one but you is in the safety zone.
6. Light forge by following this procedure:a. Run air for two minutes in unlighted forge.
b. Turn air off.
c. Place a lighted piece of paper in the forge.
d. Create draft by turning on air slowly.
e. Turn oa the gas slowly.f. Adjust flame so that all fire is confined within forge.
7. Handle long and heavy pieces of steel with care.
8. Use tongs or pliers to handle hot metal.
9. Be careful when carrying hot metal. Warn all students who may be in
the way. Do not leave hot metal unattended.
10. Use only tools with safe handles and properly dressed heads.
11. Keep anvil face clear of scraps and flakes of metal.
12. Hammer metal being forged only. Striking hammer on face of anvil may
cause chips of steel to fly.13. Stand so that your face is protected when quenching metal.
14. Shut off gas first and then air when you have finished using the forge
15. Quench hot tongs before putting them away.16. Clean up working area.

4.5.11. FORGE (Cont'd)
( ) 1.-
( ) 2.
( ) 3.
SPACE REQUIREMENTS FOR FORGE
SAFETY EXAM
You must wear a face, shield or a safety glass when using the forgeor hammering on metal because it: a) magnifies the work; b) pro-tects your eyes from bright light; c) protects your eyes fromflying particles; d) makes you look nice.
When lighting the gas forge, you should first: a) turn on the gas;b) run air through the forge; c) place a lighted piece of paper inthe forge; d) close all vents.
You must cool tongs before placing them on the tool rack to prevent:a) burning someone; b) heating the tool rack;- c) warping the tongs;d) disorganizing the tool rack.
E' E Z to : saamsav

4.5.12. FURNACE
SAFETY INSTRUCTIONS
1 Obtain permission from your teacher before lighting furnace forsoldering.
2 See that area is properly ventilated.3 Select correct flux for soldering job you are planning to do.4. Light furnace by following this procedure:
a. Stand to one side of furnace.b. Turn on the gas slowly. Strike friction lighter to light gas
if furnace does not have pilot light.c. Adjust flame so that the fire is confined within the furnace.
5. Place soldering copper on the prescribed rest when not in use.6 Determine heated readiness of a soldering copper by testing it with
a piece of solder. Use care in handling heated soldering copper.7. Stand so that you will be protected from any fumes while tinning a
copper or when soldering.8 Use care when wiping off excess solder.9 Wipe up immediately any spilled flux.
10. Shut "off" gas when you have finished using soldering furnace.11. Clean area when you have completed your soldering.
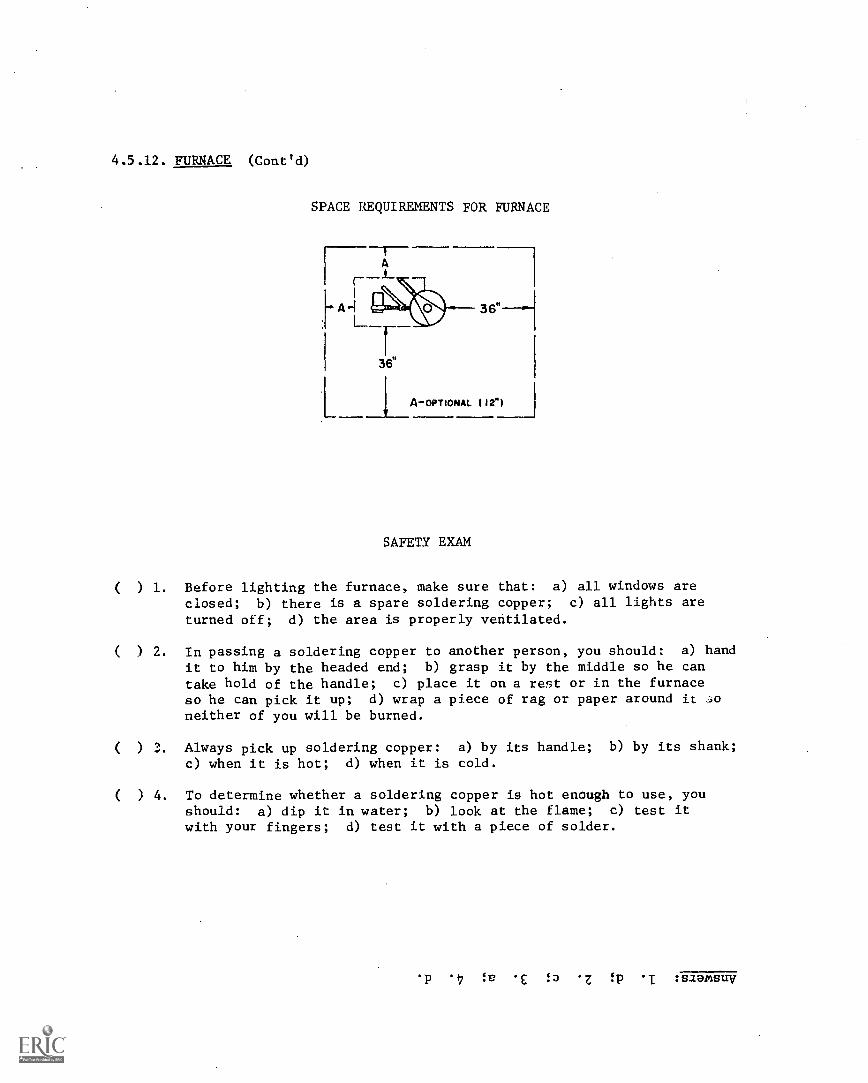
4.5.12. FURNACE (Contvd)
SPACE REQUIREMENTS FOR FURNACE
3e.
36"
A-OPTIONAL ( 12")
SAFETY EXAM
( ) 1. Before lighting the furnace, make sure that: a) all windows are
closed; b) there is a spare soldering copper; c) all lights are
turned off; d) the area is properly ventilated.
( ) 2. In passing a soldering copper to another person, you should: a) hand
it to him by the headed end; b) grasp it by the middle so he can
take hold of the handle; c) place it on a rest or in the furnaceso he can pick it up; d) wrap a piece of rag or paper around it ,oneither of you will be burned.
( ) 3. Always pick up soldering copper: a) by its handle; b) by its shank;c) when it is hot; d) when it is cold.
( ) 4. To determine whether a soldering copper is hot enough to use, youshould: a) dip it in water; b) look at the flame; c) test itwith your fingers; d) test it with a piece of solder.
13 17 :e c :D z : siamsuy

(
4.5.13. WELDER (ELECTRIC)
01.4:1
741
IDEALARC
SAFETY INSTRUCTIONS
1. Obtain permission from your teacher before using welding equipment.2. Wear a helmet with proper observation window, treated gauntlet gloves
and treated leather apron. All assistants and observers must alsowear the equipment.
3. Keep sleeves and pants cuffs rolled down. Wear leather jacket.4. Do electric welding only in a correctly constructed booth or room or
behind proper screens.5. Be sure there is ample ventilation.6. Keep all flammable material away from working area.7. See that floor area is clear of all obstructions.8. Report to your teacher, at once, if electrode holder, holder cable
connection, cable or cable terminals at the welding machine, groundclamp, lugs, or cable get hot.
9. Hang up electrode holder and turn off welder when work is beingchanged or when work is completed.
10. Clean area.
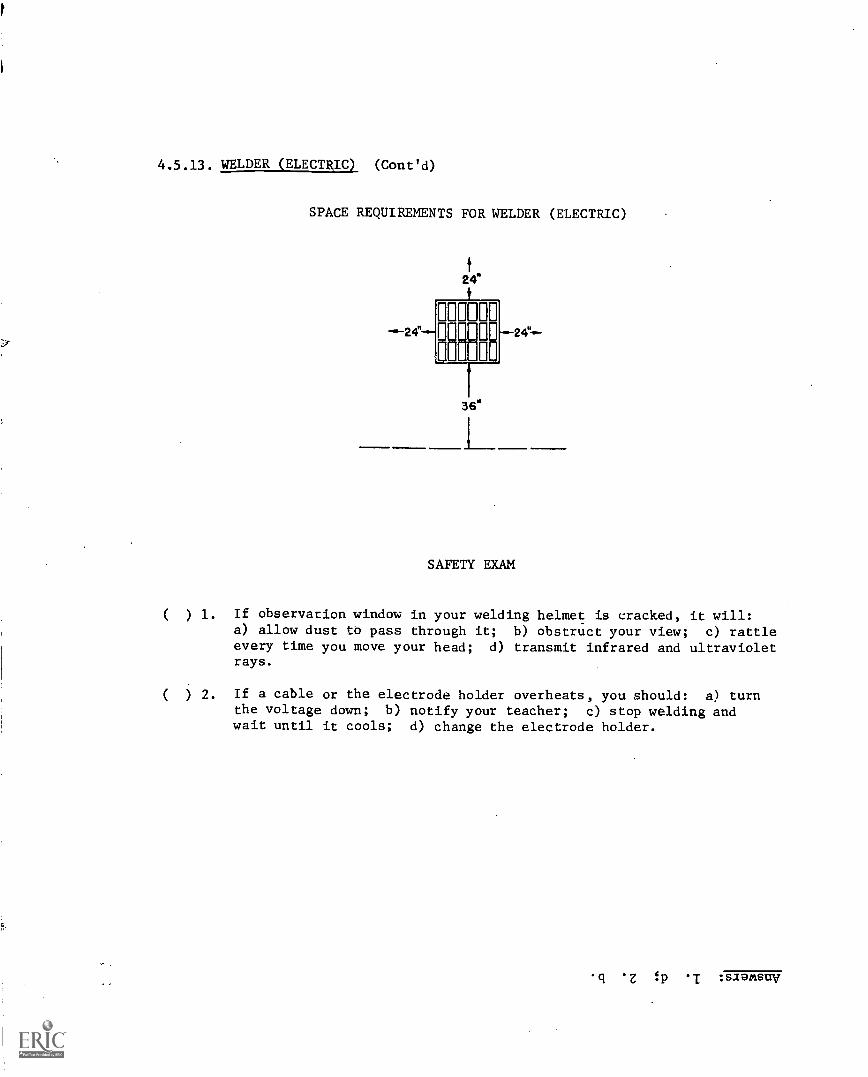
4.5.13. WELDER (ELECTRICL (Coned)
SPACE REQUIREMENTS FOR WELDER (ELECTRIC)
-0-24"
24"
00000
BEIH
36.
24
SAFETY EXAM
1. If observation window in your welding helmet is cracked, it will:a) allow dust to pass through it; b) obstruct your view; c) rattleevery time you move your head; d) transmit infrared and ultravioletrays.
2. If a cable or the electrode holder overheats, you should: a) turnthe voltage down; b) notify your teacher; c) stop welding andwait until it cools; d) change the electrode holder.
'z !P 'I :siamsuV

4.6. POWER MECHANICS TECHNOLOGY
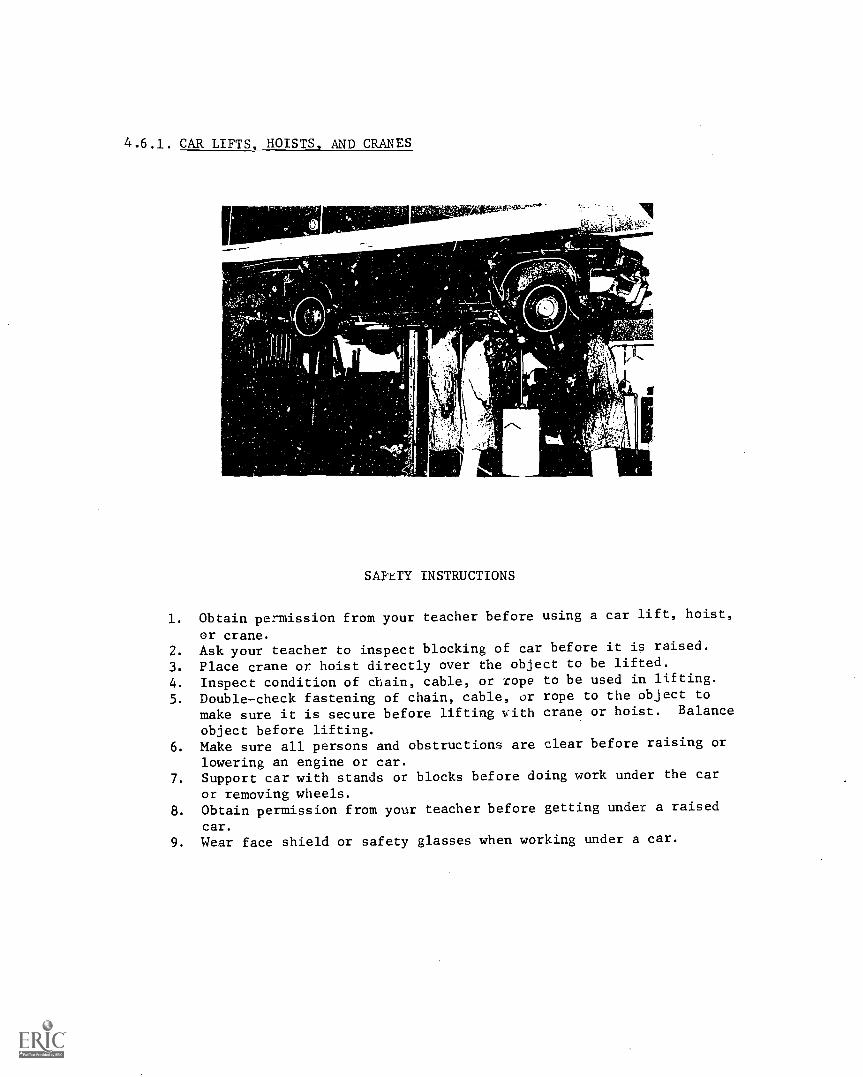
4.6.1. CAR LIFTS, HOISTS, AND CRANES
SAFETY INSTRUCTIONS
1. Obtain permission from your teacher before using a car lift, hoist,
or crane.
2. Ask your teacher to inspect blocking of car before it is raised.
3. Place crane or hoist directly over the object to be lifted.
4. Inspect condition of chain, cable, or rope to be used in lifting.
5. Doublecheck fastening of chain, cable, or rope to the object tomake sure it is secure before lifting with crane or hoist. Balance
object before lifting.6. Make sure all persons and obstructions are clear before raising or
lowering an engine or car.
7. Support car with stands or blocks before doing work under the car
or removing wheels.
8. Obtain permission from your teacher before getting under a raised
car.
9. Wear face shield or safety glasses when working under a car.

4.6.1. CAR LIFTS, HOISTS, AND CRANES (Cont'd)
( ) 1.
( ) 2.
( ) 3.
SPACE REQUIREMENTS FOR CAR LIFTS, HOISTS, AND CRANES
61
6'
SAFETY EXAM
Before working under a car that has been raised, or removing itswheels, make sure the: a) hand brake is applied; b) car is adequate-ly supported; c) transmission is in park; d) engine is not running.
Place crane or hoist directly over the object to be lifted so:a) weight may be raised faster; b) there will be less wear and tearon tlie chain or rope; c) less room will be needed; d) crane, hoist,or object will not tip over.
After you have raised a car by crane or hoist, sufficient supportmust be placed under the car to be sure that: E) the car will notroll away; b) there will be less strain on the springs and shockabsorbers; c) the hoist will last longer; d) the car will remainin the raised position.
P C P 'Z =q :sJartsuv

4.6.2. ENGINE
SAFETY INSTRUCTIONS
1. Obtain permission from your teacher before starting an engine whetherengine is on a test stan0 or in a car.
2. Check fuel line for possible leaks.3. Vent exhaust to the outside of building and provide adequate ventila-
tion whenever running an engine.4. Keep head and hands away from revolving fan.5. Be sure to block wheels of any mobile engine test stand you may use.6. Use, when neccessary, 8 carbon dioxide (CO2) extinguishes for
flammable liquid fires.

4.6.2. ENGINE (Cont'd)
SPACE REQUIREMENTS FOR ENGINE STAND
L_ 36'
SAFETY EXAM
( ) 1. Vent exhaust to the outside of building and provide adequate ventila-tion whenever running an engine because: a) carburetor needs thisair .co produce a proper mixture; b) noise pollution will be reduced;c) back pressure on the manifold will be reduced; d) it will preventthe release of cxhaust gas in the shop.
( ) 2. When working on an engine that is running, you should: a) keep thecar in gear; b) wake sure gas tank is full; c) keep head and handsaway from revolving fan; d) plug the exhaust pipe.
'3 'Z !po :saartsuw

4.6.3. STORAGE BATTERY CHARGER
SAFETY INSTRUCTIONS
Servicing
1. Obtain permission from your teacher before servicing or charging astorage battery.
2. Use proper instruments for testing a storage battery.3. Avoid overfilling a battery, especially if it is to be charged.4. Use water and baking soda to clean off the top of a battery.5. Remove and transport a battery with a battery lifter.6. Handle battery or acid with care. Immediately wash any part of your
body or clothing that comes in contact with acid.7. Wash hands immediately after handling a battery.
Charging
1. Wear goggles when using a charger.2. Provide ample ventilation when using a charger.3. Remove cell covers before charging a battery (unless the covers have
other instructions on them).4. Keep open flames and sparks away from a battery being charged.
SAFETY EXAM
( ) 1. Test a storage battery with: a) a pair of pliers; b) a screw driver;c) a piece of wire; d) an analyzer or tester.
( ) 2. A good neutralizer for cleaning off the top of a storage battery iswater and: a) borax; b) lye; c) soap; d) baking soda.
( ) 3. Storage batteries should be charged in a well-ventilated room becausethe gas given off during charging is: a) corrosive; b) explosive;c) carbon dioxide; d) not dangerous.
*rt T fp *z fP .T :siamsuv

4.6.4. WELDER (OXYGEN - ACETYLENE)
SAFETY INSTRUCTIONS
1. Obtain permission from your teacher before using welding equipment.2. Fasten cylinders with a chain or other suitable device as a protec-
tion against falling or rolling. Close valves and replace protectivecovers before moving blinders.
3. Keep welding equipment free of oil and grease. Use only clean ragsfor wiping off welding equipment.
4. Inspect hose before using.5. Make sure that hose is properly connected and that all connections
are tight.6. Report any leaking of cylinders or con lections to teacher immediately.7. Make sure you have proper ventilation.8. Keep all flammable material away from working area.9. Wear welding goggles. All assistants and observers must also wear
welding goggles.10. Release regulator pressure screw. Open cylinder vables gradually.11. Open acetylene cylinder valve one and one-fourth turns or less.
Keep wrench in place so that ve.lve may be shut off quickly, ifnecessary.
12. Keep acetylene pressure in the hose below 15 pounds per square inch.13. Use a friction torch lighter to ignite torch.14. Close acetylene valve first if torch backfires.15. Make sure that lighted torch always points away from yourself and
other students.16. Keep sparks and flame away from cylinders.17. Close cylinder valves when you have finished your welding job.18. Quench section of metal that has been welded or mark with chalk or
soapstone the word "hot" on the metal if it is necessary for you toleave your work.
19. Clean area and store hose rolled neatly on proper rack.
SAFETY EXAM
( ) 1. Make sure welding equipment is: a) lubricated with oil; b) keptfree of oil and grease; c) tightened with a plier; (:) cleaned with
kerosene.
( ) 2. Welding goggles are worn because they: a) magnify the work; b) help
protect your eyees from dust; c) help you to avoid distractions fromthe sides; d) protect your eyes against heat, rays, and sparks.
( ) 3. When lighting a welding torch, use a: a) match; b) piece of lightedrag soaked in kerosene; c) friction torch lighter; d) match.
3 c p .z tq -T :sialsisny
4.7. GRAPHIC ARTS TECHNOLOGY

4.7.1. MOTORIZED PAPER CUTTER
SAFETY INSTRUCTIONS
1. Obtain permission from your teacher before using the paper cutter.2. Make sure that no one but you is inside the safety zone.3. Be certain the handle controlling blade is in its proper position and
the safety lock is engaged before setting back gauge.4. Keep hands clear of blade at all times.5. Limit amount of stock to be cut at any one time.6. Use care when jogging stock against back guage and side so as to
avoid being cut by the paper cutter.7. Keep both hands on the handle controlling blade during cut and return
to proper position.8. Be sure handle controlling blade is returned to its proper position
before reaching for cut stock,9. Check to see that safety lock engages after using cutter..
SPACE REQUIREMENTS FOR MOTORIZED PAPER CUTTER
24"
36"

4.7.1. MOTORIZED PAPER CUTTER (Cont'd)
SAFETY EXAM
( ) 1. Before adjusting the paper cutter, be sure that the handle controlling the blade: a) is locked in its proper position; b) is in adownward position; c) and the clamp is down; d) and the knife isdown.
( ) 2. You should reach for the cut stock when: a) blade is on the upwardstroke; b) blade is on the downward stroke; c) handle controllingblade is returned to its proper position; d) clamp is down.
'3 'Z T :siamsuv

4.7.2. PLATEN PRESS
SAFETY INSTRUCTIONS
1. Olitain permission from your teacher before using the press.2. Oil press only when the power is off and the machine is at a "dead"
stop.3. Be sure form is locked securely in bed.4. Apply ink to disc only when press is at a "dead" stop.5. Make sure that no one but you is in the safety zone.6. Turn "on" power.7. Gauge speed of press according to your ability to feed.8. Use throw-off lever and wait for platen to open before adjusting
misfed stock.9. Stop press before attempting to remove paper picked up by the ink
rollers.10. Stop press before retrieving stock that has fallen between the platen
and delivery board or under the press.11. Turn "off" power after using press and stand by until the machine
has come to a complete stop.12. Check with your teacher to find out whether you should clean ink
rollers and disc.
SPACE REQUIREMENTS FOR PLATEN PRESS
24

4.7.2. PLATEN PRESS (Cont'd)
SAFETY EXAM
1. Press should be oiled only when: a) the power is off and the machineis at a dead stop; b) the machine is running; c) it breaks down;d) it becomes too noisy.
2. The disc is to be inked when the press is: a) running slowly;b) coasting; c) at a dead stop; d) running at full speed.
3. Gauge the speed of the press according to: a) the amount of work tobe done; b) how fast your friend can feed it; c) how much timeyou have left; d) your ability to fec,d.
"z :v 'T :siamsuv

4.8. ELECTRICITYJELECTRONICS TECHNOLOGY

4.8.1. CIRCUITS
SAFETY INSTRUCTIONS
1. Consider all wires and other conductors in a circuit live untilproved dead by a safe method of testing.
2. Use test lamp or suitable meter for testing a circuit.3. Turn "on" switch only when you know what it operates.4. Turn "off" power before replacing a fuse.5. Locate and correct fault that caused circuit breaker to open or fuse
to blow before turning on power.6. Be sure circuit is protected against overload by a fuse or circuit
breaker of correct current-carrying capacity.7. Make changes in the wiring of a circuit only when power is turned off.8. Select and use wire of correct current carrying capacity.
SAFETY EXAM
( ) 1. All electrical circuits must be protected from overload damagethrough the use of: a) fuses or circuit breakers; b) copper wires;c) solenoid; d) a junction box.
( ) 2. When testing for live wires, a suitable device to use would be a:a) piece of wood; b) copper wire; c) screwdriver; d) test lamp.
( ) 3. Until definitely known, all wires in a circuit must be consideredto be: a) live; b) dead; c) safe; d) harmless.
13 c p 'z T :slemsuy
4.8.2. ELECTRONIC DEVICES
SAFETY INSTRUCTIONS
1. Keep chassis of an AC-DC radio clear of ground wires and othergrounded conductors.
2. Avoid coming in contact with grounded objects when making adjustmentson an AC-DC radio connected to a power source.
3. Be sure capacitor is discharged before touching its terminals orconnections.
4. Disconnect electric cord from power before touching anything behindtransmitter panel.
5. Remove headphones while working on a transmitter or receiver.6. Keep one hand behind your back or in your pocket when testing high
voltage circuits.7. Be sure power is "off" before using an ohmmeter; use highest range
available in using a voltmeter or ammeter, then reduce the rangewhen approximate reading is determined.
8. Make certain chassis, cabinet, and cable shields of a transmitter orreceiver are grounded.
9. Wear gloves and a face shield when handling a cathode-ray tube.
SAFETY EXAM
( ) 1. When repairing a transmitter or receiver, the line should always be:a) plugged in; b) unplugged; c) raised off the ground; d) wrappedaround a metal post.
. Chassis, cabinet, and cable shields of a transmitter or receivermust be: a) taped; b) bolted; c) grounded; d) tied together.
'z 'T :saamsuV

4.8.3. ELECTRICAL EQUIPMENT
SAFETY INSTRUCTIONS
1. Disconnect portable, electrically powered equipment from power sourcebefore servicing or repairing the equipment.
2. Examine electric cord for possible defects and correct any defectsbefore using.
3. Properly ground electrically powered equipment before operating it.4. Connect to power source and turn on your own equipment.
SAFETY EXAM
) 1. Make certain that the frame or housing of electrically operateequipment is: a) bolted; b) painted red; c) grounded; d) nottarnished.
( ) 2. Before servicing or repairing electrical equipment, be sure that:a) armature has been checked; b) electric cord has been disconnectedfrom power source; c) fuse has been changed; d) switch is workingproperly.
0 T :siamsuv

4.9. DESIGN/DRAFTING TECHNOLOGY
(Note: This section isto be developedat a later date.)

BIB
LIOG
RA
PH
Y

5.0. BIBLIOGRAPHY

5.1. SELECTED REFERENCES
Board of Education of the City of New York. School Shop. Safety Manual, 1965.
California State Department of Education. Industrial Arts Safety Instruction,Sacramento: California State Department of Education, 1966.
San Diego City Schools. Safety Guide for Industrial Arts, 1957.
U.S. Department of Labor. Safety In Industry. Safety Training Proi,rams,Bulletin 276, Washington D.C.: U.S. Government Printing Office, 1967.
U. S. Department of Labor. Occupational Safety and Health Standards -Part 1910, Federal Register, Vol. 36, No. 105, Washington, D. C.,U. S. Government Printing Office, 1971.

5.2. THE TEACHER
Esposito, Gerard. "Teacher Liability For Accidents In The School Shop,"Industrial Arts and Vocational Education. Vol. 57, No. 8 (October, 1968)63 65.
National Comission on Safety Education. Who Is Liable For Pupil In uries?Washington: National Education Assoication, 1963.
Rose, Homer C. The Development And Supervision Of TrarLRiin Programs.Chicago: American Technical Society, 1964. 345 pages.
U. S. Department of Labor. The Consultative Approach to Safety. Organizatiorand Administration Series Bulletin 223. Washington: Government PrintingOfficio, 1969.
U. S. Department of Labor. Elements Of A Safety Program. OccupationalSafety Aid 0-354-649. Washington: Government Printing Office, 1969.
U. S. Department of Labor. How To Investigate Accidents. Occupant SafetyAdi 0-273-319. Washington: Government Printing Office, 1967.
U. S. Department of Labor. Inspecting For Safety. Occupant Safety Aid0-273-542. Washington: Government Printing Office, 1967.
U. S. Department of Labor. Planning. For Safety On The Jobsite. ConstructionIndustry Series Bulletin 275. Washington: Government Printing Office..1966.
U. S. Department of Labor. Promoting Worker interest. Occupational SafetyAid 0-275-195. Washington: Government Printing Office, 1967.
U. S. Department of Labor. Safety Committee Activities. Occupational SafetyAid 0-273-357. Washington: Government Printing, 1967.
U. S. Department of Labor. Supervisory Responsibility For Safety. Occupa-tional Safety Aid 0-354-997. Washington: Government Printing Office,1969.
Williams, William A. (ed.). Accident Prevention Manual For Shop Teachers.National Association of Industrial Teacher Educators. Chicago: Ameri-can Technical Society, 1963.

5.3. THE STUDENT
Doolin, Michael J. "Eye Safety In The Schools," Industrial Arts And Voca-tional Education. Vol. 57, No. 8 (October, 1968), 67-74.
Los Angeles, City Schools. Safety Manual For Industrial Education. Divisionof Instructional Services Publication No. SC-601. Los Angeles: LosAngeles City Schools, 1964.
New Mexico State Department of Education. Industrial Education Safety Guide.Division of Vocational Education. Santa Fe: State Department of Educa-tion, 1970.
Woodward, Robert L. Industrial Arts Safety Education. California StateDepartment of Education. Sacramento: California Office of State Print-ing, 1966.

5.4. THE FACILITY
Birren, Faber. Color, Form And Space.ation, 1961. 128 pages.
U. S. Department of Labor. The Controlmental and Chemical Hazards SeriesGovernment Printing Office, 1969.
New York: Reinhold Publishing Corpor-
Of The Physical Environment. Environ-Bulle,tin 211. Washington D.C.:
5.5. THE EQUIPMENT
Fryklund, Verne C. and Armand J. LaBerge. General Shop Woodworking. Bloom-ington: McKnight and McKnight Publishing Company, 1965, 6th edition.
Groneman, Chris H. General Woodworking. San Francisco: McGraw-Hill Company,1971, 4th edition.
Groneman, Chris H. and John L. Feirer. General Shop. San Francisco: McGraw-Hill Company, 1969, 4th edition.
Groneman, Chris H. and Everett R. Glazener. Technical Woodworking. San Fran-cisco: McGraw-Hill Company, 1966.
Olson, Delman W. Woods And Woodworking For Industrial Arts. EnglewoodCliffs: Prentice-Hall Company, 1965, 2nd edition.
United States Department of L.:4)0r. The Principles avid Techniques of Mech-anical Guarding. Bulletin No. 197. Washington D.C.: Government Print-ing Office, 1959.
Wagner, Willis H. Modern Carpentry. Homewood: Goodheart-Wilcox Company,1969.
Woodward, Robert L. Industrial Arts Safety Education. California StateDepartment of Education. Sacramento: California Office of State Print-ing, 1966.

AP
PE
ND
IX
itt
PoLtcle51 Re-4 oi-A--11 oNs -AG-15 6.1.1.
EMERGENCY CARE FCR SICK OR INJURED STUDENTS
POLICY
The school is responsible for providing immediate and temporary care forstudents who become ill or are injured on school premises. Theadministering of first aid is the responsibility of the principal or thepersons designated by him.
DE Code Policies & Regulations 1710-14
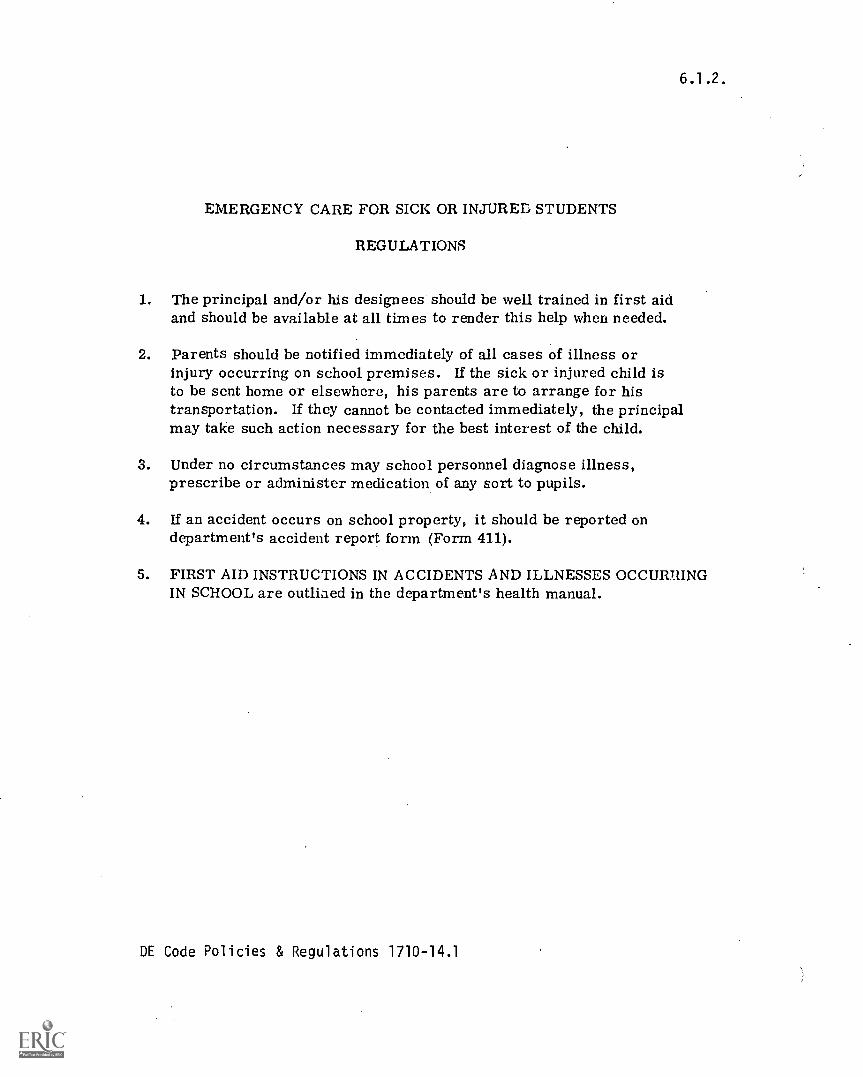
6.1.2.
EMERGENCY CARE FOR SICK OR INJURED STUDENTS
REGULATIONS
1. The principal and/or his designees should be well trained in first aidand should be available at all times to render this help when needed.
2. Parents should be notified immediately of all cases of illness orinjury occurring on school premises. If the sick or injured child isto be sent home or elsewhere, his parents are to arrange for histransportation. If they cannot be contacted immediately, the principalmay take such action necessary for the best interest of the child.
3. Under no circumstances may school personnel diagnose illness,prescribe or administer medication of any sort to pupils.
4. If an accident occurs on school property, it should be reported ondepartment's accident report form (Form 411).
5. FIRST AID INSTRUCTIONS IN ACCIDENTS AND ILLNESSES OCCURRINGIN SCHOOL are outlined in the department's health manual.
DE Code Policies & Regulations 1710-14.1

6.1.3.
SAFETY POLICYPRACTICAL AR TS AND VOCATIONAL - TECHNICAL EDUCATION
POLICY
Teachers of practical arts and vocational-technical subjects shall complywith all prescribed safety standards and regulations. All students enrolledin these subjects shall abide by the standards and regulations establishedfor their own safety and that of other students.
DE Code Policies & Regulations 2130.2.1
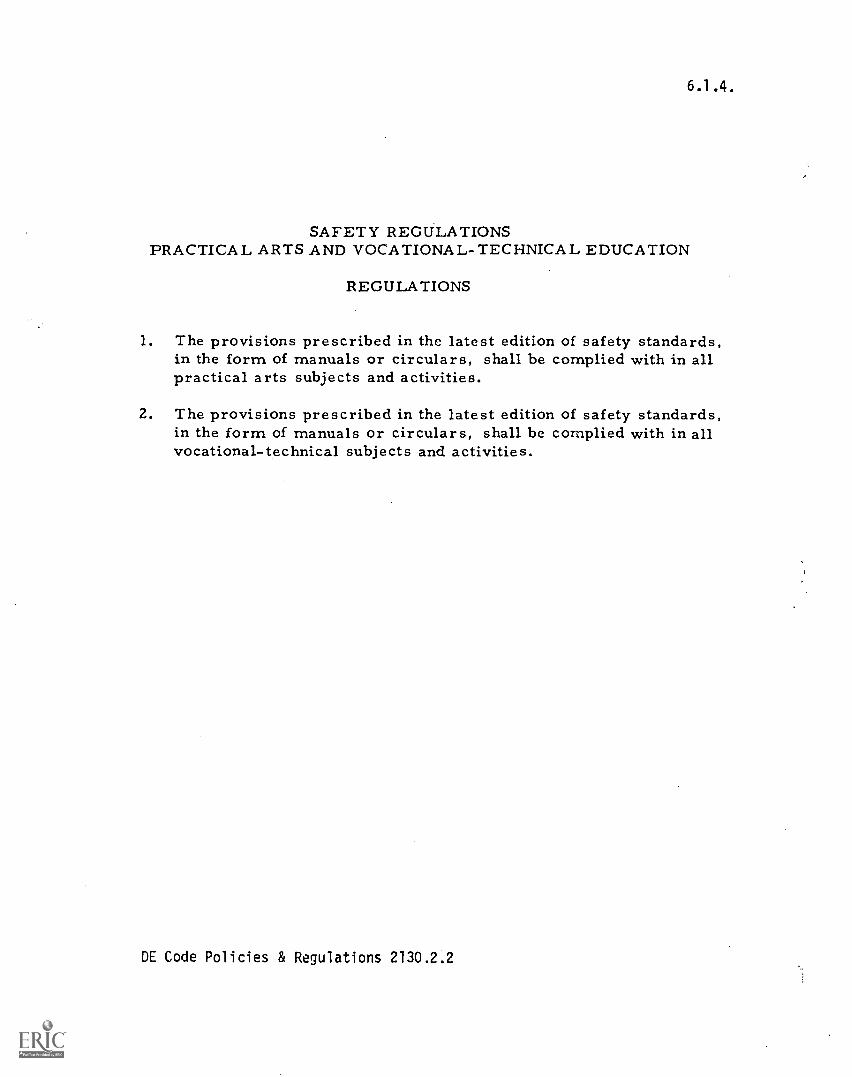
6.1.4.
SAFETY REGULATIONSPRACTICAL ARTS AND VOCATIONAL-TECHNICAL EDUCATION
REGULATIONS
1. The provisions prescribed in the latest edition of safety standards,in the form of manuals or circulars, shall be complied with in allpractical arts subjects and activities.
2. The provisions prescribed in the latest edition of safety standards,in the form of manuals or circulars, shall be complied with in allvocational-technical subjects and activities.
DE Code Policies & Regulations 2130.2.2

6.1.5.
STUDENT SAFETY
POLICY
Attention of the Department of Education shall be given to the personalsafety of each student while on campus or engaged in school-connectedactivities off-campus. Such attention shall include instruction insafety habits and attitudes; proper maintenance of buildings, grounds,and equipment; establishment and enforcement of proper rules of conductat each school; and provision of services to safeguard students from thedeviant behavior of those who fail to conform to standards of conductcompatible with the best interests of all.
DE Code Policies & Regulations 4210

6.1.6.
STUDENT SAFETY
REGULATIONS
1. Instruction in safety habits and attitudes shall be assumed by allschool staff members.
2. The principal shall inspect or cause to be inspected all buildings,grounds, and equipment to which students have access, recommendingproper measures for the maintenance of adequate safety.
3. Involving the students, teachers, and parents to the extent which theymay contribute their ideas and support, the principal shall establishnecessary rules of conduct to goverp behavior and safety on thecampus and at school-related activities tiff-campus.
4. The principal shall deploy his staff members in such a manner thattheir supervisory responsibilities shall include the personal safetyof all students.
5. The principal shall seek additional resources, outside his immediatestaff, to prevent physical harm to the students under his supervision.
6. District Superintendents shall take into consideration the behavioralcharacteristics and special needs of students in their all ocations ofpersonnel to schools.
DE Code Policies & Regulations 4210.1

6.1.7.
STUDENT ACCIDENT INSURANCE
REGULATIONS
1. Student accident insurance may be carried with the company thathas been approved by the Department of Education to offer low costaccident insurance for students. The Office of Business Serviceswill make a determination of company proposals and submit them tothe Board of Education when an existing agreement expires or isterminated.
2. The school is not to collect premiums. This responsibility mustbe accepted by the insurance company. It is permissible for theschool to allow the company to have an agent at the school onspecified days to receive premiums from the students.
3. The school is to inform parents at the beginning of the school year'of the availability of student accident insurance, provide them withapplication forms and other information about the policy offered,and assist parents with the preparation of claims whf-n necessary.It shall be made clear to parents that this is a voluntary plan andenrollment is entirely the choice of the parent.
4. Students participating in competitive athletics must be covered byaccident insurance. Since some athletes are covered by policiescarried by the family or by the company where the parent works,the school should have a check made to determine if such policiesprovide coverage for accidents while away from home on inter-island trips.
5. The term competitive athletics shall be defined as any scheduledathletic contest outside the physical education program conductedduring the regular school day. This includes an intramural, extra-mural and interhcl)lastic competition.
DE Code Policies & Regulations 4220
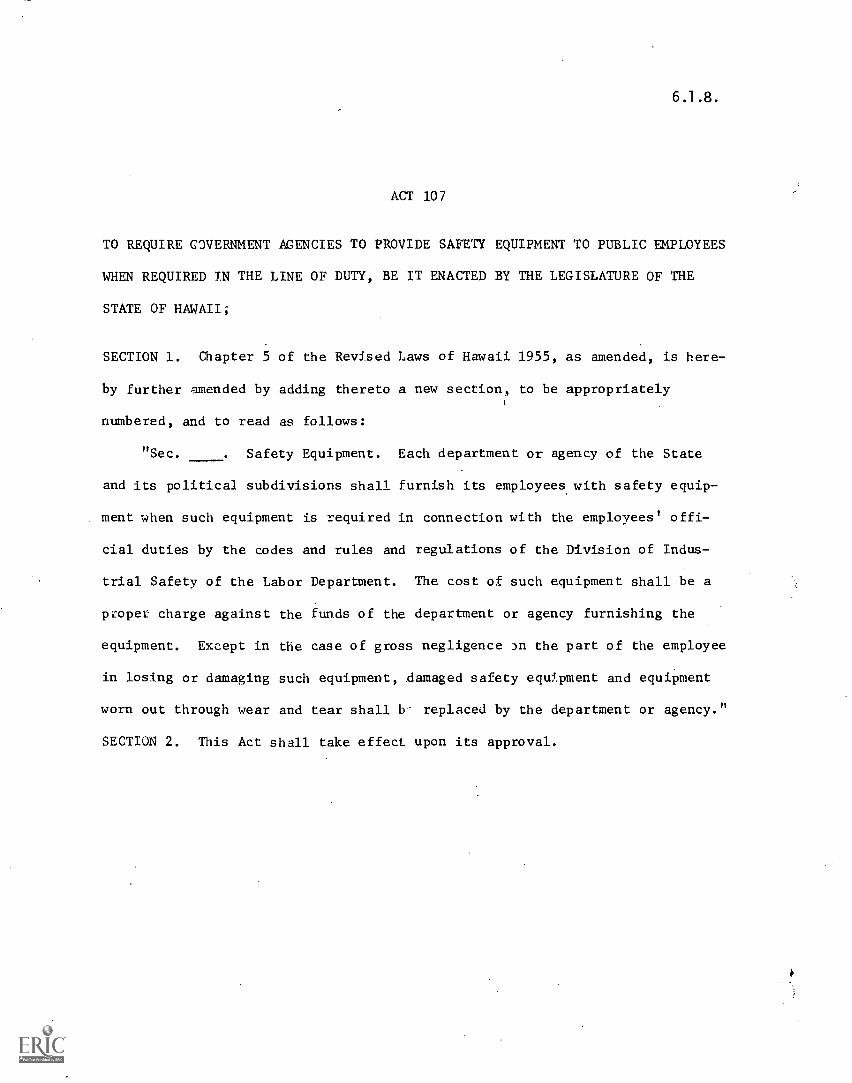
6.1.8.
ACT 107
TO REQUIRE GOVERNMENT AGENCIES TO PROVIDE SAFETY EQUIPMENT TO PUBLIC EMPLOYEES
WHEN REQUIRED IN THE LINE OF DUTY, BE IT ENACTED BY THE LEGISLATURE OF THE
STATE OF HAWAII;
SECTION 1. Chapter 5 of the Revised Laws of Hawaii 1955, as amended, is here-
by further amended by adding thereto a new section, to be appropriately
numbered, and to read as follows:
"Sec. . Safety Equipment. Each department or agency of the State
and its political subdivisions shall furnish its employees with safety equip-
ment when such equipment is required in connection with the employees' offi-
cial duties by the codes and rules and regulations of the Division of Indus-
trial Safety of the Labor Department. The cost of such equipment shall be a
proper charge against the funds of the department or agency furnishing the
equipment. Except in the case of gross negligence jn the part of the employee
in losing or damaging such equipment, damaged safety equipment and equipment
worn out through wear and tear shall b- replaced by the department or agency."
SECTION 2. This Act shall take effect upon its approval.

Form No. 411Rev. 9/71, TAC 71-3518
STATE OF HAWAiiDEPARTMENT OF EDUCATION
6.2.1.
1. NAME
ACCIDENT REPORT FORM
(Last) (First) (Initials)
2. AODRLSS3. GRADE 4. AGE _ 5 MALE_ 6. FEMALE7. STUDENT__ 8. PARENT_ 9
10. SCHOOL _11. DISTRICT12. COMPLEX13. DATE OF ACCIDENT
(Month) (Day) (Year)
14. LOCATION OF ACCIDENTATHLETIC FIELD PARKING LCTAUDITORIUM PLAYGROUND11A1IMOOM SCHOOL GROUNDCAFETERIA SWIMMING POOLCLASSROOM SHOPGYMNASIUM SHOWERHALLWAY STAIRSHOME ECON ROOM TO/FROM SCHOOLLABORATORY WASHROOMLOCKER AREA
15. ACTIVITY INVOLVEDATHLETICS-INTRA baseballATHLETICS-INTER basketballATHLETICS-P. E. dodgeballATHLETICS-REC. footballCLASS EXPERIMENT soccer
CLASS PROJECT track & fieldHORSEPLAY volleyball
t6. PERIOD OF THE DAYBEFORE SCHOOLMORNING HOURSMORNING RECESS
17. APPARENT NATURE OF INJURYABRASION FRACTUREAMPUTATION POISONINGASPHYXIATION PUNCTUREBITE SCALDINGBRUISE SCRATCHESBUMP SHOCK (electric)BURN SPLINTERCONCUSSION SPRAINCUT-LACERATION STINGDISLOCATION
LUNCH/FREE TIME _AFTE RNOON HOURS _AFTER SCHOOL _
18. PART OF BODY INJUREDABDOMEN EYE NECKANKLE FACE NOSEARM FINGER RIBSBACK FOOT SCALP _BUTTOCKS HAND STOMACH_CHEST HEAD THROAT_COLLAR-BONE KNEE TEETH _EAR LEG WRIST _I LBOW MOUTH
19. REFERRALS & WITNESSES
STAFF RELATED TO ACCIDENT:Present _ Absent _ Old not See _ No one
WITNESSES:1. Name
Address2. Name
Address
20. IMMEDIATE ACTION TAKENFIRST AID BYSENT TO:
School Nurse ___ ByHome_ ByPhysician Dr.
ByHospital Name
ByNOTIFIED:
Parent _ Guardian F r iendByHowWhen
'NameINSURANCE: Yes No Don't Know
Plan/Firm
21. NARRATIVE (How? What happened? Why? Unsafe conditions,action, tool, machine, equipment, etc. involved?)
22. SUGGESTED PREVENTIVE MEASURES (Your recommendationsfor preventing future accidents of this type)
23. DEGREE OF INJURY (Fill in after return)NON-DISABLING ___ PERMANENT__TEMPORARY DISABILITY _ DEATHNUMBER OF SCHOOL DAYS LOST
24. REPORTED BY (Signature, please)
DATE
25. PRINCIPAL (Signature, please)
DATE
WHITE Retain; CANARY District; PINK - Attorney General; GOLDENROD Student Safety, OIS

PLANNING WORKSHEET FOR
ZMPROVEMENTS TO ROOM
Instructor
Type of Shop
Item
No.
Date of
Entry
Description of Improvement
Incluct-;d
in :Ludget
(Year)
Proposal
Required
for Review
Priority___
12
3
Improvement Date
Completed
Date
Started
Yes
No
I

6.2.3.NATIONAL STANDARD SCHOOL SHOP SAFETY INS?ECTION CHECK LIST
Prepared by the Joint Safety Committee of theAMERICAN VOCATIONAL ASSOCIATION NATIONAL SAFETY COUNCIL
Date_
INTRODUCTIONA safe environment is an essential part of the school shop safety edu-cation program. The safe environment will exist only ik hazards arediscovered and corrected through regular and frequent inspections byschool personneladmi.%istrators, teachers and students. Safety inspec-tions are to determine Ueverythittg is satisfactory.Inspections may be made at the request of the board of education, theschool administration or upon the initiative of the teacher. Some
communities have drawn upon the cooperative service of professionalsafety engineers. inspectors of state labor departments, insurance:ompanies and local safety councils to supplement and confirm in-spections by school personnel.The National Standard Schc of Shop Safety Inspection Check List,recommended by the President': Conference on Industrial Safety isan objective inspection procedure for the school shop.
DIRECTIONSWHO INSPECTS?This will depend upon local policies. It is recommended, hov.ever,that shop teachers, and studentsthe student safety engineer tand/orswdent safety committeeparticipate in making regular inspection,.
WHEN TO INSPECT?Asa minimum, a safety inspection should be made at the beginningof every school term or semester. More frequent inspections may
HOW TO INSPECT?Inspections should be well planned in advance.Inspections should be systematic and thorough. No location that maycontain a hazard should be overlooked.
FOLLOW-UPThr current report should be compared with previous records to de-termine progress. The report should be studied in terms of the acci-dent situation so that special attention can be given to those condi-tions and locations which are accident producers.Each unsafe condition should be corrected as soon as possible in
Draw a circle around the
Recommendations shouldSpace is provided at thenate the items covered
This not only tends to share responsibility but stimulates a broaderinterest in the maintenance of a safe school shop.
be advisable.
Inspection reports should be clear and concise, but with sufficientexplanation to maie each recommendation for improvement under-standable.
accordance with accepted local procedures.A definite policy should be established in regard to taking materialsand equipment out of service because of unsafe conditions.The inspection report can be used to advantage as the subject forstaff and class discussion.
CHECKING PROCEDUREappropriate letter, usinC the following letter scheme:
S Satisfactory (needs no attention)A .Acceptable (needs some attention)U Unsatisfactory (needs immediate attention)
be made in all cases where a "U" is circled.end of the form fbr such comments. Desig-by the tccommendations, using the code
number applicable (as B-2).In most categories, space is provided for listing of standards, require-ments or regulations which have local application only.
A. GENERAL PHYSICAL CONDITION1. Machines, benches, and other equipment are arranged so as to 12. Proper procedures have been formulated for emptying the room of
pupils and taking adequate precautions in case of emergencies S Aconform to good safety practices S A U2. Condition of stairways S A U3. Condition of aisles S A U4. Condition of floors S A U5. Condition of walls, wiodows, and ceiling S A U6. Illumination is safe, sufficient, and well placed S A U7. Ventilation is adequate and proper for conditions S A U
13. Lockers are inspected regularly for cleanliness and fire hazards.S A U
14. Locker doors are kept dosed.
15. Walls are clear of objects that might fall
16. Utility lines are properly identified
S
S
S
A
A
A
U
U
U
17. Teachers know the procedure in the event of fire including noti-fication of the fire department and the evacuation of the building.
S A U8. Teinperature control S A U 118. Air in shop is free from excessive dust, smoke, etc....
19.
erly located and maintained S A U 20
21.
9. Fire extinguishers .ire of proper type, adequately supplied, prop-
10. Teacher and pupils know location of and how to use proper typefor various fires S A U 22
S
S
S
S
S
A
A
A
A
A
U
U
U
U
UII. Number and location of exits is adequate and properly identi- 23. Evaluation for the total rating of A. GENERAL PHYSICALFred S A U CONDITION S A U

B. HOUSEKEEPING C. EQUIPMENT Icostimrd)
1. General appearance as to orderliness S A U 5. All equipment control switches are easily available to operator.S A U
2. Adequate and proper storaze space for tools and materials.S A U 6. All machines are "locked of when instructor is out of the room.
S A U
7. Brushes are used for cleaning equipment S A U
8. Nonskid areas are provided around machines 3 A U
3. Benches are kept orderly S A U4. Corners are clean and clear S A U5. Special tool racks, in orderly condition, and provided at benchesand machines S A U 9. Machines are in safe working condition..... ......... S A U
6. Tool, supply, and/or material room is orderly S A U 10. M- achines are guarded to comply with American Standards As-sociation and local state code S A U
7. Sufficient scrap boxes are provided S A U11. Adequate supervision is maintained when students are using ma-
8. Scrap stock is put in scrap boxes promptly S A U chines and dangerous tools S A U9. Materials are stored in an orderly and safe condition.. S A U 12. Tools are kept sharp, clean and in safe working order S A U10. A spring lid metal container is provided for waste and oily rags. 13. All hoisting devices are in safe operating condition S A U
S A U14. Machines arc shut off while unattended S A U
11. All waste materials and oily rags are promptly placed in thecontainers S A U 15. Adequate storage facilities for tools, equipment, etc., not in im-
12. Containers foi oily rags and waste materials are frequently andregularly emptied S A U13. Dangerous materials are stored in metal cabinets S A U14. Machines have been color conditioned S A U15. Safety cans are provided for flammable liquids S A U16. Bulk storage of dangerous materials is provided outside of themain building S A U17. A toe-board or railing around a mezzanine used for storage orwashing facilities S A U
b. Evaluation for the total rating for B. HOUSEKEEPING S A U
18. Materials are stored in an orderly and safe condition on thismezzanine S A U19. Flammable liquids are not used for cleanin6 purposes S A U20. Floors are free of oil, water and foreign material S A U21. Floors, walls, windows, and ceilings are cleaned periodically.
S A U22 S A U23 S A U24. S A U25 S A U
C. EQUIPMENT
13111=111
1. Machines are arranged so that workers are protected from hazardsof other machines, passing students, etc. S A U2. Danger zones are properly indicated and guarded S A U3. All gears, moving belts, etc., are protected by permanent enclosureguards S A U4. All guards are used as much as possible S A U
mediate use S A US A U
17 S A U
18 S A U
19. S A U
16
20. Evaluation far the total rating for C. EQUIPMENT S A U
D. ELECTRICAL INSTALLATION1. AU switches are enclosed S A U
2. There, is a master control switch for all of the electrical installa-lions S A U
3. Electrical outlets and circuits are properly identified S A II
4. All electrical extension cords are in safe condition and are c
carrying excessive loads S A U
5. All machine switches are within easy reach of the operators.S A U
6. Electrical motors and equipment are wired to comply with theNational Electric Code S A U7. Individual cut-off switches are provided for each machine.
S A U8. Machine,, are provided with overload and underload controls '1ymagnetic pushbutton controls S A U9. No temporary wiring in evidence S A U10 a A UI. S A U12. S A U13 S, A U
14. Evaluation for the total rating for D. ELECTRICAL IN-STALLATION S A U

E. GASI. Gas flow to appliances is regul kited, so that when appliance valveis turned on full, the flames arc not too high S A U2. Gas appliances are properly insulated with asbestos or other in-sulating material from tables, benches, adjacent walls, or other flam-mable materials S A U3. No gas hose is used where pipe connections could be made.
S A U4. Gas appliances have been adjusted so that they may be lightedwithout undue hazard S A U5. Students have been instructed when lighting gas appliances toiight the match first before turning on the gas S A U6. There are no gas leaks, nor is any odor of gas detectable in anypart of the shop S A U7. Shop instruction has been given concerning the lighting of gasfurnaces operating with both air and gas under pressure S A U8. When lighting the gas forge, goggles are worn S A U9. When lighting the gas furnace, the following procedure is used:(a) light the match: (b) turn on the gas; (c) drop the match in thehole in top of the furnace S A U10. In shutting down the gas furnace, the gas valve is closed beforethe air valve S A U
11 S A U
12 S A U
13 S A U
14 S A U
15. Evaluation for the total rating for E. GAS S A U
F. PERSONAL PROTECTION
111Mmil.MilmeeMM
1. Goggles or protective shields are provided and required for allwork where eye hazards exist S A U2. If individual goggles are not provided, hoods and goggles areproperly disinfected before use S A U3. Shields and goggles are provided for electric welding S A U4. Rings and other jewelry are removed by pupils when workingin the shop S A U5. Proper kinci of weini...; apparel is worn and worn properly forthe jcb being done S A U6. Leggings, safety shoes, etc., are worn in special classes such asfoundry, etc., when needed S A U7. Respirators are provided for dusty or toxic atmospheric condi-tions such as when spraying in the finishing room S A U8. Provisions are made for cleaning and sterilizing respirators.
13.
14.
15.
F. PERSONAL PROTECTION (costissed)
S A US A US A U
16. Evaluation for the total rating for F. PERSONAL PROTECTION.S A U
G. INSTRUCTION1. Shop Safety is taught as an integral part of each teaching unit.
S A U2. Safety rules are posted particularly at each danger station.
S A U3. Printed safety rules are given each student S A U4. Pupils take a safety pledge S A U5, Use of a safety inspector S A U6. Use of a student shop safety committee S A U7. Use of safety contests S A U8. Motion and/or slide films on safety are used in the instruction.
9. Use of suggestion box
10. Use of safety tests
11. Use of safety posters
S
S
S
S
A
A
A
A
U
U
U
U
:2. Talks on safety are given to the classes by industrial men.S A U
13. Tours are taken of industrial plants as a means of studyingsafety practices S A U14. Periodic safety inspections of the shop are made by a studentcommittee S A U15. Men from industry make safety inspections of the shop S A U16. Student shop safety committee investigates all accidents S A U17. A proper record is kept of safety instructions which are given,preferably showing the signature of student on testa given in thisarea S A U18. Rotate students on the Shop Safety Committee so that as manystudents as possible have an opportunity to participate S A U19, S A U20. S A U21. S A U22. S A U23. Evaluation for the total rating of G. INSTRUCTION S A U
S A U9. Students are examined for safety knowledge ability.. S A U H. ACCIDENT10. Sleeves are rolled above elbows when operating machines.
RECORDS
1. There is a written 7tatement outlining the. proper procedure whenS A U and if a student is seriously hurt S A U
11. Clothing of students is free from loose sleeves, flopping ties, looseccats, etc. S A U12. S A U
2. Adequate accident statistics are kept S A U1 Accidents are reported to the proper admini trative authority bythe instructor S A U

H. ACCIDENT RECORD (celatImmil)
4. A copy of each accident report is filed with the State Departmentof Education
5. Accident reports are analyzed for instructional purposesfurnish the basis for elimination of hazards
6.
S A Uand to
S A US A US A US A US A U
S A U
I.
1.
2.
3.
4
3
6.
7
8.
FIRST AIDAn adequately stocked first aid cabinet is provided...
The first aid is administered by a qualified individual
The school has individuals qualified to administer first
S AS Aaid.S AS AS AS AS AS A
U
U
U
U
U
U
1.1
7
8
9.
u. .valnatIon for the total rating of N. ACCIDENT RECORDS.Evaluation for the total rating of I. FIRST AID....
RECOMMENDATIONS
Code No.
For additional copies in packets of 50 stn:1 $1.00 to National Safety Council, 425 North Michigan Avenue, Chicago, Ill, 60611
Printed in U S A Stock No 429.73

6.2.4.
NAME
SCHOOL YEAR TO
ACKNOWLEDGEMENT OF SAFETY INSTRUCTION
I have received SAFETY INSTRUCTION on the equipment listed below and Ihave passed the related SAFETY EXAM.* I fully understand the importance ofthe safety instruction and the proper operating procedures and that the viola-tion of any one of them may be dangerous to myself and others.
My teacher has demonstrated to me the proper methods and safety precau-tions regarding the equipment listed below. I have qualified as an operatorby demonstrating my ability to safely work with the equipment under the super-vision of my teacher.
I am confident that I can operate the equipment safely and that I willreport any unusual conditions or defective parts to my teacher immediately.If I am in doubt about any adjustment or operation of any equipment I willhave the teacher check it out before proceeding with any work.
DIRECTIONS:List each equipment below and include the date and your signature after
you have received safety instruction, passed your safety exam* and demonstra-ted your ability to use it.
Name of Machine Date Student's SignatureTeacher'sInitials
1.
2.
3.
4.
.
.
8.
* If you are having difficulty in understanding the safety exam and relatingit to the equipment ask your teacher if he can allow you to point out youranswers on the machine. This maybe allowed only with the teacher's permis-sion.

6. TA-f. ETV 1.1 ? Aka? Fa? V IPM T6.3.1
WAGE AND LABOR STANDARDS ADMINISTRATION
TECHNICAL REFERENCE
U. S. DEPARTMENT OF LABOR SAFETY TRAINING PROGRAMSimernmes,
TR LS-393 00S 5-68
KNOW YOURFIRE EXTINGUISHERS
ql1111111111Me
Al/

KNOW YOUR FIRE EXTINGUISHERS
WATER TYPE
C
SNT
\Vft
i
STOREDPRESSURE
itaid.FidliWWei1 1
.'.-
CARTRIDGEOPERATED
lo
.
(tea.
I
WATER PUMPTANK
:(411tisi
_ ..
.?'1
TaZ1..0,
S4TES
14.4(..)
,...
0.... _-, ,01--,..--Iliwpii
I 1 I
SODA ACID
. .
CLASS A ORDINARY
FIRES
AWOOD, PAPER, TRASH YES YES YES YESHAVING GLOWING EMBERS COMBUSTIBLES
CLASS B FLAMMABLE
N 0 N 0 N 0 N 0FIRESFLAMMABLE LIQUIDS,
GASOLINE, OIL, PAINTS,GREASE, ETC. LIQUIDS
CLASS C ELECTRICAL
FIRES ®UUIPMENTlAiiCTRICAL EQUIPMENT
N 0 N 0 N 0 N 0.
CLASS D L , 'JSTIBLE
FIRES
COMBUSTIBLE METALS METALS
SPECIAL EXTINGUISHINGAPPROVED BY
TESTING LABORATORIES
AGENTSRECOGNIZED
METHOD OF OPERATION-
PULL PIN-SQUEEZEHANDLE
TURN UPSIDEDOWN
AND BUMPPLMP HANDLE
TURN UPS:DEDOWN
RANGE 30' - 40' 30' - 40' 30' - 40' 30' - 40'
MAINTENANCE
CHECK AIRPRESSURE
GAUGEMONTHLY
WEIGH GASCARTRIDGE DISCHARGE
ADD AND FILLWATER IF WITH WATERREQUIRED ANNUALLYANNUALLY
Als,Amar
DISCHARGEANNUALLY-RECHARGE

KNOW YOUR FIRE EXTINGUISHERS
FOAMCARBONDIOXIDE
DRY CHEMICALSODIUM OR POTASSIUM
BICARBONATEMULTI-PURPOSE
ABC
iiiIN'... ,
,. ,
,
hi, I
CO2CARTRIDGEOPERATED
.
STOREDPRESSURE
,,
L
STOREDPRESSURE
CARTRIDGE
( t...1
OPERATED
ir.........
4 0110e ...:
i. _
FOAM
...,..
..
Y E SN 0(BUT WILL
CONTROL.. SMALLSURFACE FIRES)
N 0BUT WILL
CONTROL SMALLSURFACE FIRES)
N 0(BUT WILL
CONTROL SMALLSURFACE FIRES)
YES Y ES
YES YES YES Y E S YES Y E S
NO YES YES YES YES YES
APPROVEDSPECIAL
BYEXTINGUISHING
RECOGNIZEDAGENTS
TESTING LABORATORIES
TURN UPSIDEDOWN
PULL PIN-SQUEEZE
LEVER
RUPTURECARTRIDGE-
SQUEEZE LEVER
PULL PIN-SQUEEZEHANDLE
PULL PIN-SQUEEZEHANDLE
RUPTURECARTRIDGE
SQUEEZE LEVER
30' - 40' 3'- 8' 5' - 20' 5' - 20' 51- 20' 5' - 20'
DISCHARGEANNUALLY- RECHARGE
WEIGH SEMI.ANNUALLY
WEIGH GASCARTRIDGE-
CHECKCONDITION OFDRY CHEMICAL
ANNUALLY
CHECKPRESSURE
GAUGE ANDCONDITION OFDRY CHEMICAL
ANNUALLY
CHECKPRESSURE
GAUGE AND'CONDITION OFDRY CHEMICAL
ANNUALLY
WEIGH GASCARTRIDGE-
CHECKCONDITION OFDRY CHEMICAL
ANNUAL ..Y g

MISSIONS
I
For sale by the Superintendent of Documents, U.S. Government Printing OfficeWashingttr, D.C., 20402.Price 15cents
*G1-, :1968 0--31 -303

Each extinguisher bears a letterwhich indicates the class of fireit will work on successfully. fithe wrong extinguisher is used, itmay spread the fire, cause an ex-plosion, or even electrocute some-one. CLASS A fires (the symbol hasa background of metallic or green)include those involving paper,wood, rubber, cloth the ordi-nary materials used in most of-fices and classrooms. Water ex-tinguishers usually weigh over20 pounds each, but are effectiveagains' CLASS A fires. So aremultipurpose dry chemical (am-monium phosphate) extinguishers,but which leave a residue whichmust be cleaned up immediatelyto avoid affecting the sprayedmaterial. Underwriters' Labora-tories, Inc., determines the size ofthe fire if given extinguisher willhandle. This value is indicated bya numeral in front of the le`ter
for example, 2-A or 5-B:C.extinguisher labeled 10-B:C willput out a fire twice the size ofone which a 5-8:C extinguish,)rwill handle. Water works only onCLASS A.
USE THE RIGHT TYPE OFFIRE EXTINGUISHERS FOR THEDIFFERENT CLASSES OF FIRESLET THIS CHART BE YOURPERMANENT REFERENCE
Facts from U.S. General Services Administration; artwork frcin Underwriters Laboratories
The CLASS B symbol appears ondry chemical (sodium bicarbonateor Purple K potassium bicar-bonate), multipurpose, or foamextinguishers. CLASS B fires in-volve flammable liquids and gas-es, grease, oil. The symbol alwayshas a metallic or red background.Extinguishers suitable for CLASSB fires usually will fight CLASSC fires, too. A Purple K extinguish-er has the greatest initial fire-stopping power of any of theunits with the S symbol; but
as with multipurpose extinguish-ers the residue must be clean-ed up right after a fire is out, toavoid reaction with the sprayedmaterials. Automatic cart), di-oxide extinguishers often are in..staiied in kitchen hoods, to bPittlegrease fires as soon as they star%but in a smell closed area, carbr.idioxide can displace the oxygenand asphyxiate people. Be surethat any extinguishers are serv-iced regularly and are refilledpromptly after being used
6 .3.1 .1
Choose school extinguishers withthe advice of local fire authoritiesor youe insurance company. Trainteachers and staff in their useand emphasize that when a fireoccurs, an alarm should be turn-ed in at once. The CLASS C sym-bol has a metallic or blue back-ground; an extinguisher so label-ed will tight tire in live electricalequipment. But cut the currentpromptly: no extinguisher willpermanently put out an electricalfire which is being constantly fedMore juice, while cutting off thecurrent often will let the fire bu,out quickly by itself. The CLA'.:.:5C symbol always will be to,md onmultipaose, dryi chemical, andcarbon dioxide extinguishersnever on water or foam extinguish-ers. A special type of extinguish-ing agent for CLASS D fires, in-volving combustible' metals, isavailable: but it applies only tosophisticated laboratories andmetalworking shops in universi-ties.

JDSTUDENT REFERENCE
6.3.2
BUREAU OF LABOR STANDARDS
U. S. DEPARTMENT OF LABOR SAFETY TRAINING PROGRAMS
SR LS-125
INSPECTION TIPS
INSPECTING FOR SAFE USE OF PORTABLE ELECTRIC EQUIFNENT
General
00S 9.65
1. Use equipment, flexible cord, and plugs which have been approved by thesafety code enforcing authority. To satisfy the requirements for approval,most authorities specify that the equipment meet the standards of a nation-ally recognized testing laboratory, such ac Underwriters' Laboratories, Inc,and bear the laboratory's label.
2. Article 250-45 of the 1965 National Electric Code states, "It is recom-mended that the frames of all portable motors which operate at more than 50volts to ground be grounded." This section also explains under what condi-tions grounding of portable electric equipment is mandatory. Other codes,such as some State codes, make; grounding of the metal frames of all portableelectric equipment operated at more than 50 volts to ground mandatory.
Inspect
Prior to use, the equipment shall be given a careful visual inspection forthe. following:
See that the tool is clean and that the housing is not cracked or broken.
2. Make sure that the rubber sleeve, grommet, or-spring is properly sccuredaround the flexible cord to the housing in order to protect the wires Indterminals inside the handle from excessive stresses.
3. 1.1!-e sure that the metal tool housing is grounded by three-wire flexiblecord and three-prong plugs.
4. Check the flexible cord and plug for damaged or broken insulation. Agood te.t.is to draw the flexible cord through your hand. If the flexiblecord feels rough or chafed, check for breaks or cuts. If damaged, replaceit -- don't s"
Use
1. Flexible cords shall be. protected against damage and not left nn thefloor where they may present a tripping hazard.
2. When extension cords are used, all connections shall be made prior toenergizing the circuit.

-2--
3. An electric handtool shall not be suspended by its power cable, eitherin handling, use, or storage.
4. Electric handtools shall be placed in a safe location when they are putdown for short periods during a job. They nall not be in contact with anypart of the body in order to avoid a path to ground from another source ofelectricity. They shall not be placed near the edge of a table where theymay be knocked off.
5. Areas where portable electric equipment is in use shall be kept clearof waste materials and rubbish.
6. It is especially important to keel') portable electric equipment dry, andto keep flexible cords away from oil or grease.
7. If a flexible cord gets tangle/1d or caught on a fixed object, do not pullit -- free it.
Repair
1. Repairs shall be made by qualified personnel only.
2. Flexible cord and plug replacements shall be properly wired. Mistakeshave been fatal.
3. Tools shall be tested after repairs and periodically for:
(a) Circuit faults to ground.(b) Proper grounding of the metal housing.(c) Proper operation (no unusual noise., vibration, etc.,
rotation in right direction, etc.).
Special Precautions
1. Ordinary portable electric equipment shall not be used in or near aflammable atmosphere. The use of even explosion-proof portable electricequipment in flammable atmospheres is not generally recommended becauseof the hazards present by flexible cords and their connections. Safetyauthorities having jurisdiction should be consulted when portable electricequipment must be used in flammable atmospheres. Only temporary lightingand some instruments have been listed as explosion-proof by Underwriters'LaboratorieF Inc. No electric handtools are listed. (See Articles 500-51; of the 1965 National Electric Code and the Hazardous Location EquipmentList of Underwriters' Laboratories, Inc.)
2. When portable electric equipment is used in wet, damp or conductivelocations, such as boilers, tanks, underground foundation areas, marinefoundation work, it is recommended chat 32-volt equipment, but not morethan 50-volt equipment, be used. If higher voltages are used, comply withArticle 250-45(d) of the 1965 National Electric Code which makes groundingmandatory.
PROPER GROUNDING IS YOUR BEST PROTECTION

684.
FILM SOURCES
PRIVATE AGENCIES:
6.4.1
1. AMERICAN RED CROSS, Hawaii State Chapter, 1270 Ala Moana Boulevard.,Honolulu, HI 96814.
2. CASTLE AND COOKE, INC., 130 Merchant Street, Honolulu, HT 96813.
3. DOLE CORPORATION, 650 Iwilei Road, Honolulu, HI 96817.
4. HAWAIIAN AIRLINES, Honolulu International Airport, Honolulu, HI96819.
5. HAWAIIAN ELECTRIC COMPANY, INC., 820 Ward Avenue, Honolulu, HI96814.
6. HAWAIIAN SUGAR PLANTERS ASSOCIATION, 1527 Keeaumoku Street,Honolulu, HI 96822.
7. HAWAIIAN TELEPHONE COMPANY, 1130 Alakea Street, Honolulu, HI 96813.
8. LEWERS AND COOKE, INC., 550 Paiea Street, Honolulu, HI 96819.
GOVERNMENT AGENCIES:
9. DIVISION OF TRAFFIC EDUCATION AND SAFETY, DEPARTMENT OF TRANSPORTA-TION SERVICES, CITY AND COUNTY OF HONOLULU, City Hall Annex,Honolulu, HI 96813. Only general safety films are listed in thisbulletin. For information on films on traffic safety and drivereducation, see their catalog of films.
10. HEALTH EDUCATION OFFICE, DEPARTMENT OF HEALTH, Kinau Hale,1250 Punchbowl Street, Honolulu, HI 96813.
11. INDUSTRIAL SAFETY DIVISION, DEPARTMENT OF LABOR AND INDUSTRIALRELATIONS, Room 203, 825 Mililani Street, Honolulu, HI 96813.
12. AUDIOVISUAL SERVICES SECTION, SCHOOL LIBRARIES AND INSTRUCTIONALMATERIALS BRANCH, DEPARTMENT OF EDUCATION, 4211 Waialac Avenue,Honolulu, HI 96816.

6.4.2.
SAFETY FILMS
1. AMERICAN RED CROSS, Hawaii State Chapter, 39 N. King Street,Honolulu, HI 96817 (Box 3948, Honolulu, HI 96812).Reservations limited to American Red Cross trained first aidinstructors or instructor-trainers and for use in first aid classes.Approved by the Red Cross. Call 536-9621, Safety Program office, forreservations. Pick up and return it to this office.
(a'; "CHECKING FOR INJURIES"16 MM, B & W, 19 min., soundDemonstrates the correct techniques for examining a person forinjury. Designed as a training film for use in first aid classes.
2. CASTLE AND COOKE, INC., 650 Iwilei Road, Honolulu, HI 96817.Call 548-6611 and ask for the film library, or call the Safety Dept.at 548-4838,(or write Box 2990, Honolulu, HI 96802).
(a) "THE COMMUNICATIONS FOR SAFETY SERIES"This series of four films shows how lack of proper communicationand communication techniques can slo:q and stall both safetywork and production in industry. Should be shown in the orderlisted and preferably with use of the "Leaders Guide" andquizzes which it contains. All films are 16 MM, B & W, 10 min.
1. "LET'S TALK ABOUT SAFETY"Shows supervisors how talking about safety can become ahelpful habit that will pay off in improved morale andproduction.
2. "TAKE A TALKIE BREAK"Shows supervisors an easy way to partially fulfill safetyresponsibility--use 10 minutes of the day to talk toseveral employees about safety on the job.
3. "SETTING THEM STRAIGHT"Shows supervisors how to correct unsafe practices on thejob without causin6 hurt feelings or annoyance.
4. "LET EVERYBODY HELP"Shows supervisors that cooperation comes quickly whenworkers know theii ideas on job safety improvement arewanted and listened to.
(b) "FREIGHT HANDLING SAFETY"16 MM, B & W, 10 min., soundDeals with the actual handling of material including safe useof power trucks, deck plates, etc. Hazards are clearlyportrayed.

6.4.2.(Pg.2)
(c) THE KEY MAN SERIES"This of four films make up a complete presentation on howthe supervisor can work for a safety program which willbenefit his employees, his company and himself. Shows howa good safety program is the sum of "Little Things"....All 16.:1" films are 16 MM, B & W, 10 min., sound.
1. "POINT OF NO RETURN"Step by step analysis of an accident, how it happened, howit affected workers, supervisor and management, and howgood safety supervision very probably could have preventedthe accident.
2. "YOU'RE THE KEY MAN"Shows how one supervisor decided to put into practicethings he knew about safety, but had. neglected to do. It
paid off in producing an improved safety record.
3. "IT'S THE LITTLE THINGS THAT COUNT"Shows how the sum total of a lot of "little acts" by workersand supervisors add up to a safe plant safe conditionsfor all.
4. "PEOPLE ARE THE PUZZLE"Shows how a supervisor must develop an awareness andunderstanding of the people who work for him in order tohelp them work safely. Emphasis is on the importance ofthis aspect of supervisory activity in accident prevention.
(d) "MAINTAINING GOOD WORKING CONDITIONS"16 MM, B & W, 9 min., sound.Two supervisors describe how they improved working conditionsin their specific areas.
(e) "RULES FOR TOOLS"35 MM, sound film strip, 15 min.Shows the four basic rules for safe use of hand tools andapplication of rules to various tools.
(f) "THE SAFETY AND THE FOREMAN SERIES"This set of four films should be shown in order and a "LeadersGuide" which accompanies the films as well as prepared quizmaterial should be used to get the most effective use fromthis material. All films are 16 MM, B & W, 10 min., sound.
1. "NO ONE ELSE CAN DO IT"Points out clearly that the responsibility for accidentprevention is a function of supervision and that thesupervisor must recognize this fact and act upon it.

E 4.2.(Pg.3)
2. "FACT FINDING, NOT FAULT FINDING"A supervisor calls several employees "on the carpet" forwhat he terms carelessness. When he investigates and learnsthe facts, he realizes that the accident actually occurredfrom lack of supervisional follow-upOn his part.
3. "FORESIGHT, NOT HIND SIGHT"Show that what reallly counts in accident prevention isfinding out accident causes and elimihinE them beforeOe accident happens. A baSic concept that every super-visor must learn.
4. "WHAT THEY DON'T KNOW CAN HURT"Shows the importance of good job ttqining and close super-vision to prevent accidents,. Illustrates how misunderstoodjob instructions ca lead to accideaLf.
(g) "SHOP SAFETY"16 MM, B & W, 25 min., sound.A U. S. Army film stressing safety and safe work practice inautomotive maintenance and repair shops.
(h) "STOP THE FIRE THIEF"16 MM, B & W, 20 min., sound.Demostration of what happens when fire breaks out in an indus-trial plant.
"TO LIVE IN DARKNESS"16 MM, B & W, 13 min., sound.Tells the story of three men who lost their sight throughunsafe behavior.
(j) "TOOL SAFETY"35 MM, sound film strip, 15 min.Illustrates safe use of tools; filmed at Ewa Plantation.

6.4.2.(Pg.4)
3. HAWAIIAN AIRLINES, Honolulu International Airport, Honolulu, HI 96819.Call Public Relations at 842-3366, for reservations.
(a) "IT'S UP TO 70U"16 MM, color ll min., sound.Emphasizes need for eye protection by showing eye injury andthe subsequent surgical removal of the steel splinter froman eye. End of film shows types of eye protective equipmentand why it is important to use "safety" glass in this type ofprotective equipment.
4. HAWAIIAN ELECTRIC COMPANY, INC., 820 Ward Avenue, Honolulu, HI 96814.
Reservations are made by calling 548-7771, ask for the Safety Office.
(a) "ELECTRIC POWER AND COMMON SENSE"16 MM, color, 28 min., sound.Emphasis is on the basic rules of electrical accident prevention.Shows dangers associated with power transmission linesstorms, auto collisions, unsafe acts and vandalism. Also caretaken by electrical industry employees to make electricitysafe for all.
(b) "JUST PLUG IT IN",16 MM, color, 25 min., sound.Shows hazards associated with improper or nonexistent groundingin home, and other minor electrical hazards to avoid.
5. HAWAIIAN SL4AR PLANTERS ASSOCIATION, 1527 Keeaumoku Street, Honolulu,HI 96822. Call 536-2711, ask for library, for reservations. Pickup andreturn of these films is at Ideal Pictures, Film Library. Department,227 Mokauea Street, Honolulu, HI 96819.
(a) "A CLOSED BOOK"16 MM, B & W, 26 min., sound.Designed to improve community and personal attitudes towardsafe practices in traffic, in the home and in industry.
Emphasis is on community action to improve accident preventionprograms in the community.
(b) "DECIDE TO BE SAFE"16 MM, B & W, 10 min., sound.Shows how deciding to be safe and to act safely pays off incomfort, peace of mind and better safety performance.
(c) "GET A GRIP ON YOURSELF"16 MM, B & W, 10 min., sound.Tells how to control feelings so that they do not trick ,ouinto an accident.
6.4.2.
(Pg-5)
(d) "HOW TO AVOID MUSCLE STRAINS"16 MM, B & W, 15 min., sound.Shows muscular systems in body and how to get hest use fromthem Correct way to lift.
(e) "LET HABIT HELP"16 MM, B & W, 10 min., sound.Shows how to utilize habits to better safety performance.
(f) "SAFETY EVERYWHERE...ALL THE TIME"16 MM, color, 22 min., sound.Concentrates on importance of safe behavior at home, at play,as well as on the job.
(g) "SAFETY RECORD"16 MM, B & W, 10 min., sound.Story of a plant safety record, how it was made by f;ooperativeefforts of workers and management.
6. HAWAIIAY TELEPHONE COMPANY, 235 S. Beretania Street, Honolulu, HI 96813.Reservations should be made through the Safety Director, at 537-7111, orcall him directly a.. 546-2558. -Pickup and return of film is at the Plansand Training off'-:e, Shafter Flats.
(a) "KNOWING IS NOT 1.7'11GH"16 MM, color, 28 sound.Tells how four states of mind called "imps" over-ride oursafety consciousness in times of high pressure or stress andcause us to behave unsafely.
(b) "STANDARD FIRST AID" Parts I and II.16 MM, color, 15 min., sound.For use as training aid in teaching standard first aid course.Part I - Dressings, bandages, shock, artificial respiration,and burns.Part II - Control of bleeding, poisoning, broken bones,common emergencies.
7. LEWERS AND COOKE, INC., 550 Paiea Street, Honolulu, HI 96819.
Call 847-9911, reservations made with the Customer Service Desk.
(a) "GRINDING WHEEL MARKINGS"16 MM, color, 18 min., sound.Explains how to use color code and other markings on gril_ingwheels to determine the particular type, size, grade, etc:for any particular grinding use.
(b) "GRINDING WHEEL SAFETY"16 MM, color, 20 min., sound.Shows safe practice in use of grinding equipment and whatmisuse or failure to follow sa'!e practice can result in.

6.4.2.(Pg.6)
(c) .RUSE AND CARE OF CHISELS"16 MM, B & W, sound.Shows proper use of chisels.
(d) "USE AND CARE OF HACKSAWS"16 MM, B & W, 18 min., sound.Safe use and care of hacksaws.
(e) "USE AND CARE OF HAMMERS"16 MM, B & W, 11 min., sound.Safe practice and usage of hammers.
(f) "USE AND CARE OF PLIERS AND SCREWMIVERS"16 MM, B & W, 17 min., sound.Safe use and care of these tools.
(g) "USE AND CARE OF PUNCHES, DRIFTS AND BARS"16 MM, B & W, 14 min., sound.Safe practice in use of these lois.
(h) "USE AND CARE OF WRENCHES"16 MM, B & 'd, 15 min., sound.Safe practice in us:, of wrenches and what abuses can result in.
8. DIVISION OF TRAFIC EDUCATION AND SAFETY, DEPARTMENT OF TRANSPORTATIONSERVICES, CITY iND COUNTY OF HONOLULU, City Hall Annex, Honolulu, HI96813. Call 546 L730.
Only those films of general safety interest are listed in thisbulleting. In addition, the division has a catalog of ove: 100films on driver training, safe driving, traffic safety, etc.
(a) "THE SAFETY WISE SERIES"This two -film series is directed at the individual employeeand emphasizes individual responsibility for safety, individual'sstake in accident prevention and role in accident prevention.All two films are 16 MM, B & W, 10 min., sound.
1. "NOT EVEN ONE CHANCE"You meet J. T. 0.(Just This Once) Tones, who takes chancesand gets himself into trouble because he's in a hurry orfor other "good" reasons. He decides that wrong attituni.lsthat cause trouble need changing and finally changes hisname to N. E. O. (Not Even lne Chance) Jones.
2. "HELP YOURSELF TO SAFETY"Show workers how blind spots can develop in your knowledgeof your job and how thou: blind spots can lead tc accidents.Tells the story of one worker who discovered how hisblind spot led to an accident.

6.4.2.(Pg.7)
(b) "TEN LONG MINUTES"16 MM, color, 13 min., sound.A factory worker, not knowing what has lappened to his family,waits out a telephone call from a polic.. sargeant. This filmcoveLs vehicle maintenance and type,,- of hazards in the homean office. Good for g-oups interested in off-the-job safetywork.
9. HEALTH EDUCATION OFFICE, DEPARTMENT OF HEALTH, 1250 Punchbowl Street,Honolulu, HI 96813; phone 548-5885 or 548-5886 for reservations. In
addition tone films listed below, this unit offers an 89-page catalogueof films on public health, sanitation, and medical and nursing coverage.Films are offered free, subject to limitations of departmental need andon a firtA-come, first-served basis. It is advisable to make reserva-tions well in advance of showing date as these films are in heavy demand.Unless otherwise indicated, films are 16 MM.
(a) "THE GIANT STEPS"R.T., 13 min., B & W.Stresses importance of learning safe habits early in life andresponsibility of parents to teach safety even after childstarts school.
"b) "HOME SAFETY"Film strip, 35 MM, B & W, R. T.Describes possible hazards in each room and ways to preventaccidents by eliminating these hazard?.
(c) "HOW TO HAVE AN ACCIDENT IN THE HOME"R. T., 8 min., color.Donald Duck illustrates chances people take in the home andsuggestions are made on how to avoid the accidents -6.Lown.
(d) "KNOWING'S NOT ENOUGH'R. T., 27 min., color.Theme of film is that 4 "imps," improving, impunity, impatienceand impulsiveness interfere with safety knowledge and causeworkers to violate safety rules. Emphasis is on being carefulto prevent these "imps" from causing one to violate safety rules.
(e) "LET EVERYBODY HELP"R. T., 10 min., B & W.Shows supervisors that workers cooperate and they are madeaware their assi.stance is wanted and appreciated. One of fourin the "Communication for Safety" series and should be shownlast.
(f) "LET'S PLAY SAFE"R. T., 10 min., color.Shows hazards and safe actions in a s:hool setting.

6.4.2.(Pg.8)
(g) Lr.T'S TALK ABOUT SAFETY"R. T., 10 min.Shows supervisors value of talking about safety as part ofregular performance of duties. Should be shown as the firstfilm in the "Communication for Safety" series.
(h) "RESCUE BREATHING"R. T., 21 min., color.Te-aches the mouth to mouth technique and shows its use in si;_situations where this emergency method may be life saving.They are: Drawing, electrical shock, chest injury fromcompression chocking, drug induced stoppage and gas poisoning.
(i) "SAFE AT HOME"R. T., 30 min., color.Discusses the many types of a cidents which can occur in thehome and preventive measures for parents to take. Primarilyfor parent groups.
(j) "SAFETY BEGINS AT HOME"Film treats on aspects of home safety relative to chil, :en.
10. IN)USTRIAL SAFETY DIVISION, DZPAFTMENT OF LABOR AND INDUSTRIAL RELATIONS,Rocm 203, 825 Mililani Street, Honolulu, HI 96813.
Films are offered on a first-come,-first-served basis subject to thedivision's safety training class needs. Reservations are made bycalling 548-7511.
(a) "BARE MINIMUM"R. T., 10 min., B & W. #6 of "Safety Management Series."Shows supervisors the need for items like goggles, safety shoesand hard hats. Explains what supervisors can do in training andenfc-cing the uge cif these items.
(b) "DECIDE TO BE SAYE"R. T., 15 min., B & W.Shows how a positive attitude toward safety results in bettersafety performance.
(c) "DOWN AT THE OFFICE"R. T., 15 min., B & W.For line clerical and office personnel. A secretary and herboss find that some very minor matters can cause some veryE,ericus falls. Stress is laid on good hod keeping to preventoffice slips and
(d) "FACT FINDING, NOT FAULT FINDING"#2 of the "Safety and the Foreman" serieJ.R. T., 10 min., B & W.Emphasizes need for analyzing facts and determining causes ofaccidents to prevent recurrence rather than blaming someonefor what has happened--

6.4.2.(Pg.9)
(e) "FORESIGHT, NOT HINDSIGHT"# 3 of the "Safety and the Foreman" series.R. T. , 10 min., B & W.Shows how a supervisor can learn to predict and preventaccidents before they happen rather than learning only fromsad experience.
(f) "GET A GRIP ON YOURSELF"#2 of "Personal Side of Safety" series.R. T. , 15 min., B & W.Discusses simple rules for controlling feelings so thataccidents at work can be prevented from this cause.
(g) "GUARD DUTY"#7 in "Safety Management" series. (Machines and equipmentguards.)R. T., 10 min., B & W.Reviews fundamentals of guarding. Discusses the kinds ofmotion of machines and their hazards to hands and arms. Tiesin basics of guarding to the problems of guarding on actualmachines.
(h) "HELP YOURSELF TO SAFETY"#1 in "Safety Wise" series.R. T. , 15 min., B & W.Shows how blind spots can develop in your knowledge of your joband how these blind spots can lead to accidents.
(i) "IT DIDN'T HAVE TO HAPPEN"R. T. , 15 min., B & W.Shows how the unsafe work attitude and unsafe work habits ofone employee result in the death of a fellow worker. Grim,but drives home the need for safe practices and proper guardingof powered equipment.
(j) "LET HABIT HELP"#5 in the "Personal Side of Safety" series.R. T. , 15 min., B & W.Shows how to get rid of unsafe habits and to substitute safeones.
(k) "LET THEM KNOW"#3 in the "Safety Management" series. (Training Techr ".ques.)
R. T., 10 min., B & W.Covers checking for proper dress and safe equipment, how todeal with workers and how to make demonstrations.

6.4.2.(Pg.10)
(1) "MIND OVER MATTER"# 4 in "Safety Manal.;cment" series. (Materials handling)R. T., 10 min., B & W.Discusses materials handling accidents. Emphasis is on:inadequate protective equilment, improper position, oversizeloads, insecure grip and illustrates techniques for properlifting.
(m) "NO ONE ELSE CAN DO IT"#1 in "Safety and the Foreman" series.R. T., 10 min., B & W.Deals with the foreman's responsibility for the administrationof safety in the operntien ho controls and his role inaccident prevention.
(n) "NOT EVEN ONE CHANCE"#2 in the "Safety Wise" series.R. T., 10 min., B & W.Discusses how wrong attitudes can cause accidents and theneed for revision of attitudes to improve accident prevention.
(o) "PLAN FOR PREVENTION"#2 in the "Safety Management" series. (Accident reporting)R. T., 10 min., B & W.Sums up elements in a good accident report, shows how to use-er-- o determine what should be corrected and illustrates
C.2 supervisor should look for in making safetyinspections.
(p) "RUN THE TEAM"#1 in the "Safety Management" series.R. T. , 10 min., B & W (Role of Supervisor)Discusses basic functions of supervisor in safety: Knowaccident experience , inspect for hazards, insure equipmentis safeguarded and eliminate unsafe practices.
(q) "SAFE AS YOU KNOW HOW"#3 of the "Safety Wise" series.R.T., 10 min., B & W.Explains how to recognize unsafe conditions.
(r) "SAFETY IS IN ORDER"#5 in the "Safety Managemenr" series. (Housekeeping andMaintenance) R.T., 10 min., B & W.Discusses objectives in keeping things in order: accidentprevention, better attitude among employees, saving timeand materials, increasing production and points out thingssupervisors can do to carry out these aims.
(s) "SAFETY RECORD"#3 of the "Personal Side of Safety" series.R.T., 15 min., B & W.
Story of a plant safety record and how it was made.

6.4.2.(Pg.11)
(t) "SELL SAFETY"#8 in the "Safety Management" series (Communications andPromotion) R. T., 15 min., B & W.General ideas on how a s,Tervisor can "sell" safety to hisworkers and some of the techniques to use in accomplishingthis.
(u) "THE HIGH-LOW BID"R. T., 26 min., color.Construction industry centered film which depicts the fouressentials in any accident program: management responsibility,safe place to work, supervisory training and employeeparticipation.
(v) "TWO STEPS TO SAFETY"#4 in the "Personal Side of Safety" series.R. T., 15 min., B & W.Shows how things we know or don't know affect our safety atwork. Safety comes from knowing both your job and yourself.Shows how to learn about yourself.
(w) "WHAT THEY DON'T KNOW CAN HURT"#4 in the "Safety and the Foreman" series.R. T., 10 min., B & W.Stresses the importance of instructing workers in safe methodsand outlines types of workers and best approach in instructingeach type.
(x) "POINT OF NO RETURN"#1 of the "Key Man" series.R.T. 10 min., 16 MM, B & W.
The important message that the foreman's role in accidentprevention is made up of "little things" which, taken together,comprise good supervision. This film shows a step-by-stepanalysis of an acccident and how good supervision could preventit.
11. AUDIOVISUAL SERVICES SECTION, SCHOOL LIBRARIES AND INSTRUCTIONALMATERIALS BRANCH, DEPARTMENT OF EDUCATION, 4211 Waialae Avenue,Honolulu, HI 96816.Please refer to the combined listing of the Office of Library ServicesFilm Collections--16MM FILM CATALOG/1970 for films under the appro-priate subjects.

(ic.5 isFIRSTAIDTRAINING
ACCIDENTPREW7NTION
BATHROOM CABINET F))MOUTH HTOOTHY.DEODORANTS
STERILE DRESSINGSETC.
BATHROOM CABINET (BAD)PATENT MEDICINES
PRESCRIPTION DRUGSSUNDRIES
6.5.1
3 IN. 3 IN. PLAIN GAUZE PADS Pt AIN ARSORBINT GAUZE
GAUGE ROLLER RAJ-DACES 1 IN RANDAGI COMPRESSESN N, 3 P.. ,,,,,,
I IN. ADHESIVE COMPRESSESi P
PLAIN AFC, ARENT GAUZE I 40 IN VRIANCUIAR RANDACEAA I.
)!A
*ow4*,

FIRSTAIDTRAINING
ACCIDENTPREVENTION
6 .5 . i .
SOLVENTS PETROLEUM INSECTICIDESDISTILLATES PESTICIDES
SAFE STORAGE
+
VENT
PADLOCKPADLOCK

FIRSTAIDTRAINING
SAVINGLIVES
POISONING
ANTIDOTE:\READ ANDGAVE IF AVAILABLE OTHERWISE GIVE
IF VOMITING IS REQUIRED,HOLD CHILD IN THIS POSITION
TAKE TO HOSPITAL
6 . . 4 .
wateror
milk

FIRSTMDTRAINING
SAVINGLIVES
TILT
ARTIFICIAL RESPIRATION
HEAD SHARPLYBACKWARD.
COVER BOTH MOU THAND NOSE.BREATHE INTO CHILD.
LIFT JAW UPWARD ATITS ANGLES,
REMOVE MOUTH TOPERMIT EXHALATION
CLEARING AIR PASSAGEWAY
HOLD INFANT BY HEELSAND PAT ON BACK TOCLEAR AIRWAY.
HOLD CHILD WITH HEADDOWN TO CLEAR AIRWAYSTRIKE ON BACK
6.5.5.
POSTER 10238APRIL 1961

FIRSTAIDTRAININGMEANSACCIDENTPREVENTION
INFANT'S TOYS
SHOULD BE
LARGER THAN
HIS CLOSED FIST.
SMALLER OBJECTS
WILL BLOCK
AIR PASSAGEWAY.
6 .6 .6
Tim AMERICAN NA 110NAL RED CROSS

FIRSTAID(RAINING
ACCIDENTPREVENTION
SHARP KNIVES
AND
TOOLS
SHOULD
BE
PROPERLY
STORED
+
6 . 3 . 1.
\ .0
"...1

6.5.8.FIRSTAIDTRAINING
SAVINGLIVES
POSTER 1023CAPRIL 1061

t
..
.
a
Z
(
1I / I ,ley
,
/r
.16
..f
FOLLOW INSTRUCTIONS-.. ,
1 ki
e
.
*. '..
..
.'.
/
-
DRESS FOR THE JOB
1 1
i.
; °
.
.
I
I
I
: I', .
KEEP WORK STATIONS CLEAR.
p
REPORT UNSAFE CONDITIONS
AND EQUIPMENT
e
, -
OEN

BE SURE YOU
6. 5. 10 .
/CAN SEE WHERE /
YOU'RE GOING/
WHEN YOU ... /
LIBERTY MUTUAL Loss PREVENTION SERVICELP1.