Title: ECU FLASH REPROGRAMMING PROCESS Technical...
19
Page 1 of 19 Lexus Supports ASE Certification Title: ECU FLASH REPROGRAMMING PROCESS Models: Applicable Models Technical Service Information Bulletin March 9, 2001 SS001-01 TSIB REVISION NOTICE: S September 22, 2003: 2003 (and later) models added; Operation Procedures updated for CAN Interface Module with the latest Diagnostic Tester software (v. 10.1a and 10.2a), Calibration Update Wizard (v. 6.0), and calibration files. S The previous TSIB should be discarded. Electronic Control Unit (ECU) is a Lexus term used to describe integrated computerized devices responsible for managing the operation of a system or sub–system. For the purposes of this bulletin, the term “ECU” is used as a generic label for the following SAE J1930 standard references: S Powertrain Control Module (PCM) S Engine Control Module (ECM) S Transmission Control Module (TCM) S or any other Lexus specific control unit Flash reprogramming allows the ECU software to be updated for changes in vehicle calibrations without removing the ECU from the vehicle. Flash calibration updates for specific vehicle models/ECUs will be released as field fix procedures described in individual service bulletins. This bulletin details the ECU flash reprogramming process and the applications within the Technical Information System (TIS) and the Lexus Diagnostic Tester used for reprogramming. Flash calibration updates can only be applied to the vehicle/ECU combination for which they are intended. ECUs have internal security that will not allow them to be programmed with another ECU’s information. S 2001 (and later) model year GS 430/300, IS 300, LS 430 & LX 470 vehicles. S 2002 (and later) model year SC 430 vehicles. S All 2003 (and later) model year Lexus vehicles. PREVIOUS PART NUMBER CURRENT PART NUMBER PART NAME N/A 00451–00001–LBL Authorized Modifications Label NOTE: Authorized Modifications Labels may be ordered in packages of 25 from the Materials Distribution Center (MDC) through the TDN Dealer Support Materials System, or by calling the MDC at 1-800-622-2033. OP CODE DESCRIPTION TIME OFP T1 T2 N/A Not Applicable to Warranty – – – – SPECIAL SERVICE TOOLS Introduction Applicable Vehicles Parts Information Warranty Information
Transcript of Title: ECU FLASH REPROGRAMMING PROCESS Technical...

Page 1 of 19Lexus Supports ASE Certification
Title:
ECU FLASH REPROGRAMMING PROCESSModels:
Applicable ModelsTechnical Service
Information BulletinMarch 9, 2001
SS
001-01
TSIB REVISION NOTICE:� September 22, 2003: 2003 (and later) models added; Operation Procedures
updated for CAN Interface Module with the latest Diagnostic Tester software (v. 10.1a and 10.2a), Calibration Update Wizard (v. 6.0), and calibration files.
� The previous TSIB should be discarded.
Electronic Control Unit (ECU) is a Lexus term used to describe integrated computerizeddevices responsible for managing the operation of a system or sub–system. For thepurposes of this bulletin, the term “ECU” is used as a generic label for the following SAEJ1930 standard references:� Powertrain Control Module (PCM)� Engine Control Module (ECM)� Transmission Control Module (TCM)� or any other Lexus specific control unit
Flash reprogramming allows the ECU software to be updated for changes in vehiclecalibrations without removing the ECU from the vehicle. Flash calibration updates forspecific vehicle models/ECUs will be released as field fix procedures described inindividual service bulletins. This bulletin details the ECU flash reprogramming processand the applications within the Technical Information System (TIS) and the LexusDiagnostic Tester used for reprogramming.
Flash calibration updates can only be applied to the vehicle/ECU combination for whichthey are intended. ECUs have internal security that will not allow them to beprogrammed with another ECU’s information.
� 2001 (and later) model year GS 430/300, IS 300, LS 430 & LX 470 vehicles.� 2002 (and later) model year SC 430 vehicles.� All 2003 (and later) model year Lexus vehicles.
PREVIOUS PART NUMBER CURRENT PART NUMBER PART NAME
N/A 00451–00001–LBL Authorized Modifications Label
NOTE:Authorized Modifications Labels may be ordered in packages of 25 from the MaterialsDistribution Center (MDC) through the TDN Dealer Support Materials System, or bycalling the MDC at 1-800-622-2033.
OP CODE DESCRIPTION TIME OFP T1 T2
N/A Not Applicable to Warranty – – – –
SP
EC
IAL S
ER
VIC
E TO
OLS
Introduction
ApplicableVehicles
PartsInformation
WarrantyInformation

ECU FLASH REPROGRAMMING PROCESS – SS001-01 Revised March 9, 2001
Page 2 of 19
SPECIAL SERVICE TOOLS (SSTs) PART NUMBER QUANTITY
Lexus Diagnostic Tester Kit*
01001270 1
CAN Interface Module*
01002744 1
12 Megabyte Diagnostic Tester Program Cardwith version 10.2a Software (or later)* 01002593-005 1
Midtronics Battery Tester* 00002–MP815–L 1
* Essential SSTs.
NOTE:Additional Diagnostic Tester Kits, CAN Interface Modules, Program Cards or SSTs maybe ordered by calling SPX/OTC at 1-800-933-8335.
ECU Flash Reprogramming is a 4-step process:
1. Locate the desired calibration file on TIS (Technical Information System).Calibration files may be found in two areas:
a. Search by model and year for a Technical Service Information Bulletinaddressing a specific product issue.
b. Search by model under the ECU Flash Reprogramming section.
2. Download the calibration file from TIS to the Diagnostic Tester.The Calibration Update Wizard (CUW) is an application on TIS which downloadscalibration files from TIS to the Diagnostic Tester Program Card. This step is onlyrequired when the calibration file is not currently stored on the Diagnostic TesterProgram Card.
3. Reprogram the vehicle ECU with the Diagnostic Tester.Diagnostic Tester Software now incorporates a function to update a vehicle’s ECUcalibration through flash reprogramming.
4. Confirm successful flash update and affix calibration update sticker.Modifications to ECU calibration files must be recorded and properly displayed on thevehicle using the calibration update sticker.
RequiredSSTs
ProcessOverview
ECU FLASH REPROGRAMMING PROCESS – SS001-01 Revised March 9, 2001
Page 3 of 19
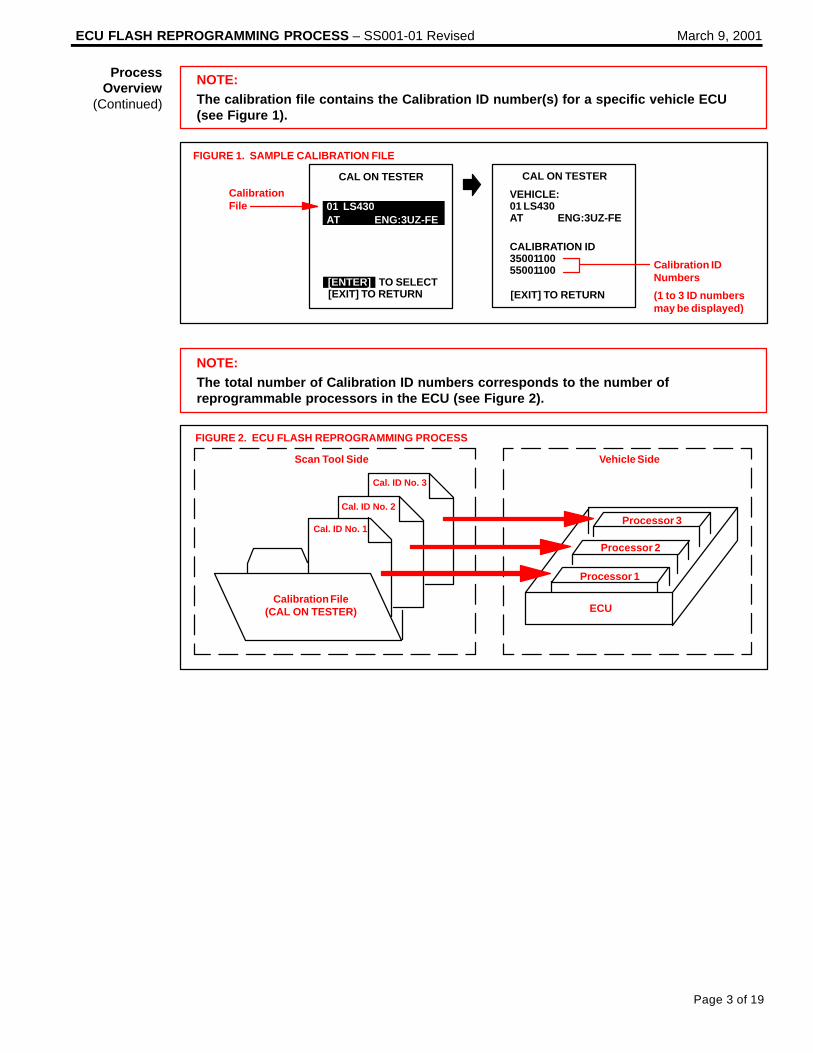
NOTE:The calibration file contains the Calibration ID number(s) for a specific vehicle ECU(see Figure 1).
CAL ON TESTER
01 LS430AT ENG:3UZ-FE
CAL ON TESTER
VEHICLE:01 LS430AT ENG:3UZ-FE
CALIBRATION ID3500110055001100
TO SELECT[EXIT] TO RETURN [EXIT] TO RETURN
CalibrationFile
FIGURE 1. SAMPLE CALIBRATION FILE
(1 to 3 ID numbersmay be displayed)
Calibration IDNumbers[ENTER]
NOTE:The total number of Calibration ID numbers corresponds to the number ofreprogrammable processors in the ECU (see Figure 2).
FIGURE 2. ECU FLASH REPROGRAMMING PROCESS
Calibration File(CAL ON TESTER)
Cal. ID No. 2
ECU
Processor 1
Processor 2
Processor 3
Vehicle SideScan Tool Side
Cal. ID No. 1
Cal. ID No. 3
ProcessOverview
(Continued)

ECU FLASH REPROGRAMMING PROCESS – SS001-01 Revised March 9, 2001
Page 4 of 19
The following steps in this bulletin describe how to properly flash reprogram an ECU.
1. Locate calibration file on TIS.Calibration files may be found in two areas (see Figure 3):
A. Search by model and year for a Technical Service Information Bulletin addressinga specific Product issue.
� Within the TSIB, click on the link for the calibration file.
B. Search by model under the ECU Flash Reprogramming Section.
� Under the ECU Flash Reprogramming section on TIS, a drop–down list of thelatest calibration files will be displayed.
C. Proceed to step 2 for instructions on how to download the calibration file from TISto the Diagnostic Tester Program Card.
FIGURE 3. LOCATING CALIBRATION FILE
A
B
OperationProcedure
LOCATECALIBRATION
FILE

ECU FLASH REPROGRAMMING PROCESS – SS001-01 Revised March 9, 2001
Page 5 of 19
2. Download the calibration file to the Diagnostic Tester.The Calibration Update Wizard (CUW) is an application on TIS which downloadscalibration files from TIS onto the Diagnostic Tester Program Card.
NOTE:Before you begin, ensure that the Diagnostic Tester is equipped with softwareversion 8.0a, or later. Only a 12 MB program card (P/N 01002593–005) may be usedfor this process.
A. Before downloading a new calibration file from TIS, check the current calibrationfiles stored on the Diagnostic Tester Program Card by following the screen flowbelow (Figure 4).
*APPLICATION SELECT*
1: DIAGNOSIS2: CUSTOMIZE3: ECU REPROGRAM
AECU REPROGRAM
MENU
B
D
2: HV ECU3: ECT ECU
ECAL ON TESTER
TO RETURN
1: ENGINE & ECT ECU
**
01 = 2001 MYAT = Automatic TransmissionMT = Manual TransmissionENG = Engine Type[EXIT]
FIGURE 4. CHECKING CALIBRATION FILES ON DIAGNOSTIC TESTER PROGRAM CARD
**
ECT ECUs (SAE: TCM)may be updated individuallyin the future when theENGINE & ECT ECU areseparate control units
*
ECU REPROGRAMMAIN MENU
C
1: GET CAL FROM PC2: CURRENT ECU CAL3: UPDATE ECU CAL
5: CLEAR CAL DATA4: CAL ON TESTER
*
CAL ON TESTER
01 LS430AT ENG:3UZ-FE01 GS430AT ENG:3UZ-FE
TO SELECT[EXIT] TO RETURN
[ENTER]
VEHICLE:01 LS430AT ENG:3UZ-FE
CALIBRATION ID3500110055001100
NOTE:� Screen D may be blank if no calibrations are stored on the Diagnostic Tester
Program Card.� If the desired calibration file is already on the Diagnostic Tester, proceed to Step 3
(page 16 of this bulletin).� A maximum of two calibration files may be loaded on the tester at one time with
Diagnostic Tester software version 10.2a and later. Prior versions may store up tofour calibration files.
OperationProcedure(Continued)
DOWNLOADFILE TO TESTER
ECU FLASH REPROGRAMMING PROCESS – SS001-01 Revised March 9, 2001
Page 6 of 19
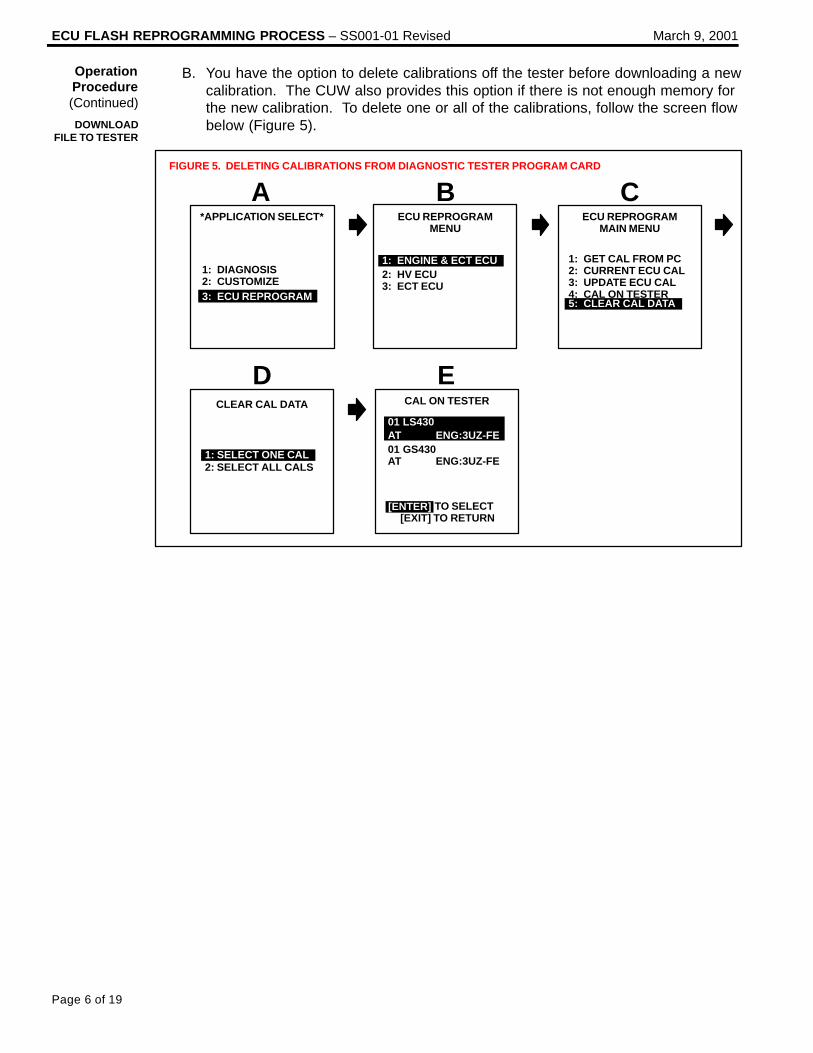
B. You have the option to delete calibrations off the tester before downloading a newcalibration. The CUW also provides this option if there is not enough memory forthe new calibration. To delete one or all of the calibrations, follow the screen flowbelow (Figure 5).
ECU REPROGRAMMENU
2: HV ECU3: ECT ECU
1: ENGINE & ECT ECU
BA CFIGURE 5. DELETING CALIBRATIONS FROM DIAGNOSTIC TESTER PROGRAM CARD
CAL ON TESTER
TO SELECT[EXIT] TO RETURN
[ENTER]
CLEAR CAL DATA
D E
2: SELECT ALL CALS1: SELECT ONE CAL
*APPLICATION SELECT*
1: DIAGNOSIS2: CUSTOMIZE3: ECU REPROGRAM
ECU REPROGRAMMAIN MENU
1: GET CAL FROM PC2: CURRENT ECU CAL3: UPDATE ECU CAL4: CAL ON TESTER5: CLEAR CAL DATA
01 LS430AT ENG:3UZ-FE01 GS430AT ENG:3UZ-FE
OperationProcedure(Continued)
DOWNLOADFILE TO TESTER

ECU FLASH REPROGRAMMING PROCESS – SS001-01 Revised March 9, 2001
Page 7 of 19
C. If this is the first time you have downloaded a calibration file from TIS to theDiagnostic Tester Program Card, you MUST first install the latest version of theCalibration Update Wizard (CUW) onto your TIS workstation PC, as shown inFigure 6. This step is also required if you are using a version of CUW earlier thanversion 6.0. CUW 6.0 is the only version compatible with Diagnostic Testersoftware version 10.2a and later. If necessary, select the link to the TISDiagnostic Applications Installer and follow the on–screen prompts to install orreinstall CUW.
FIGURE 6. INSTALLING CALIBRATION UPDATE WIZARD (CUW)
OperationProcedure(Continued)
DOWNLOADFILE TO TESTER

ECU FLASH REPROGRAMMING PROCESS – SS001-01 Revised March 9, 2001
Page 8 of 19
D. The Calibration Update Wizard (CUW) launches automatically when a calibrationfile link is selected (or clicked).Verify that the CUW version is 6.0 or higher. If not, refer to the Note below. The CUW will guide you through the steps to download the calibration file to theDiagnostic Tester Program Card. Click NEXT on the first screen (Figure 7).
NOTE:If the CUW does not launch, or the version is older than 6.0, install DiagnosticSoftware (TIS Diagnostic Applications Installer) . Specific installation instructions(Reprogramming with CUW 6.0) are located under Diagnostics → ECU FlashReprogramming (Figure 6).
FIGURE 7. LAUNCHING CALIBRATION UPDATE WIZARD
OperationProcedure(Continued)
DOWNLOADFILE TO TESTER

ECU FLASH REPROGRAMMING PROCESS – SS001-01 Revised March 9, 2001
Page 9 of 19
E. Confirm the Diagnostic Tester has the appropriate software for the type ofcalibration file that was downloaded.
FIGURE 8. CONFIRMING CALIBRATION SOFTWARE VERSION
OR
NOTE:The calibration type is specific to the software version loaded on your DiagnosticTester. If you selected the wrong version when downloading the calibration file, youwill receive an error when attempting to install the file on the Diagnostic Tester.
OperationProcedure(Continued)
DOWNLOADFILE TO TESTER

ECU FLASH REPROGRAMMING PROCESS – SS001-01 Revised March 9, 2001
Page 10 of 19
F. Confirm the Diagnostic Tester software version and connections to the TISworkstation are correct.
FIGURE 9. CONFIRMING DIAGNOSTIC TESTER CONNECTIONS
*
* NOTE:This screen displays the required version of Diagnostic Tester software that iscompatible with the selected calibration file, and the other required steps toproperly connect the Diagnostic Tester to your PC.� Type I calibration files are only compatible with software version 10.1a and
older versions.� Type II calibration files are only compatible with software version 10.2a and
newer versions.
OperationProcedure(Continued)
DOWNLOADFILE TO TESTER

ECU FLASH REPROGRAMMING PROCESS – SS001-01 Revised March 9, 2001
Page 11 of 19
G. Place the Diagnostic Tester in the “GET CAL FROM PC” mode to receive thecalibration file (Figure 10). Click NEXT on the TIS workstation. Once communications begin between the PCand the Diagnostic Tester, the Diagnostic Tester display will flash CONNECTED.
ECU REPROGRAMMENU
2: HV ECU3: ECT ECU
1: ENGINE & ECT ECU
BA C
D E
*APPLICATION SELECT*
1: DIAGNOSIS2: CUSTOMIZE3: ECU REPROGRAM
FIGURE 10. PLACING DIAGNOSTIC TESTER IN “GET CAL FROM PC” MODE
ECU REPROGRAMMAIN MENU
2: CURRENT ECU CAL3: UPDATE ECU CAL4: CAL ON TESTER5: CLEAR CAL DATA
1: GET CAL FROM PC
GET CAL FROM PC
PC COMMUNICATION
DISCONNECTED
PRESS [EXIT] WHENCOMPLETE
GET CAL FROM PC
PC COMMUNICATION
CONNECTED
PRESS [EXIT] WHENCOMPLETE
OperationProcedure(Continued)
DOWNLOADFILE TO TESTER

ECU FLASH REPROGRAMMING PROCESS – SS001-01 Revised March 9, 2001
Page 12 of 19
H. The CUW determines if there is enough memory to store the calibration file on theDiagnostic Tester Program Card. If there is insufficient memory, the CUW will askyou to select the calibration file(s) to delete from the Diagnostic Tester ProgramCard to make room for the new calibration file. If necessary, check the calibration file(s) to delete, as shown in Figure 11. Click DELETE.
NOTE:If there is adequate memory to store the calibration file, skip to Step J, page 13.
FIGURE 11. DELETING SELECTED CALIBRATION FILES
OperationProcedure(Continued)
DOWNLOADFILE TO TESTER
ECU FLASH REPROGRAMMING PROCESS – SS001-01 Revised March 9, 2001
Page 13 of 19
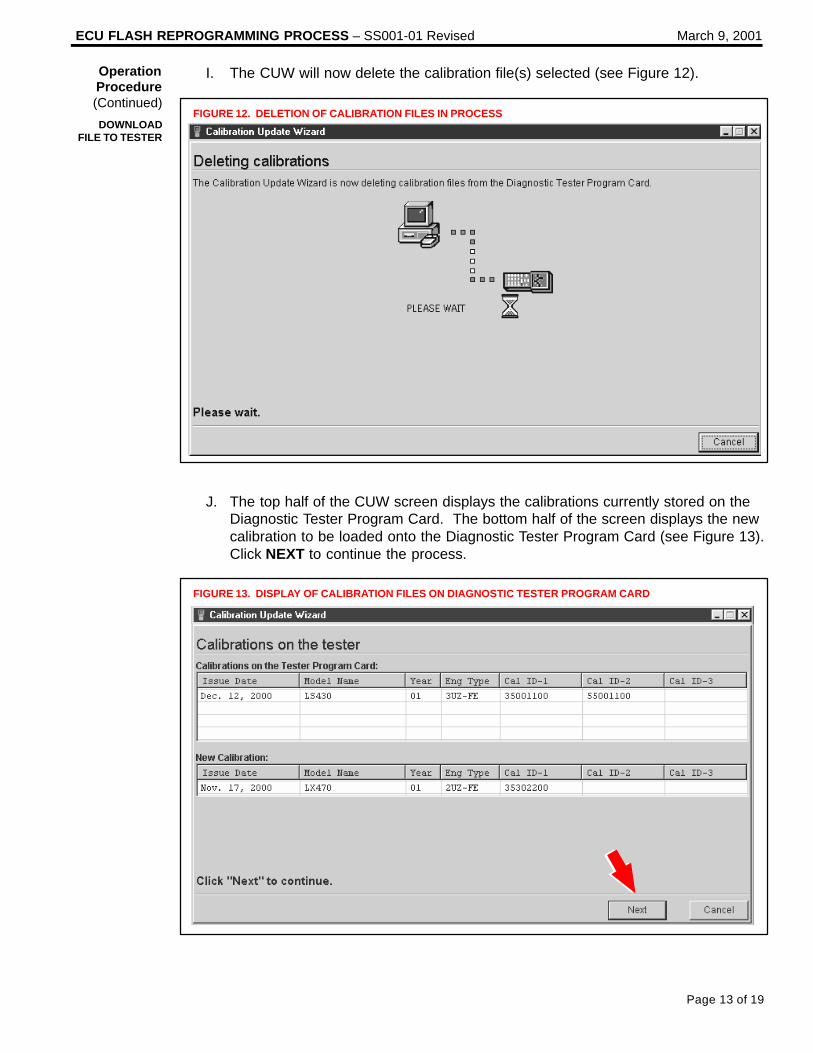
I. The CUW will now delete the calibration file(s) selected (see Figure 12).
FIGURE 12. DELETION OF CALIBRATION FILES IN PROCESS
J. The top half of the CUW screen displays the calibrations currently stored on theDiagnostic Tester Program Card. The bottom half of the screen displays the newcalibration to be loaded onto the Diagnostic Tester Program Card (see Figure 13).Click NEXT to continue the process.
FIGURE 13. DISPLAY OF CALIBRATION FILES ON DIAGNOSTIC TESTER PROGRAM CARD
OperationProcedure(Continued)
DOWNLOADFILE TO TESTER

ECU FLASH REPROGRAMMING PROCESS – SS001-01 Revised March 9, 2001
Page 14 of 19
K. Confirm the calibration file to be sent to the Diagnostic Tester Program Card(Figure 14). Click SEND.
FIGURE 14. SENDING NEW CALIBRATION FILE TO DIAGNOSTIC TESTER PROGRAM CARD
L. The calibration file will now be downloaded to the Diagnostic Tester ProgramCard. This process takes approximately 2-6 minutes (see Figure 15).
FIGURE 15. DOWNLOADING OF CALIBRATION FILE IN PROCESS
OperationProcedure(Continued)
DOWNLOADFILE TO TESTER

ECU FLASH REPROGRAMMING PROCESS – SS001-01 Revised March 9, 2001
Page 15 of 19
M. The CUW will prompt when the calibration file is completely downloaded. ClickOK to close the CUW (Figure 16).
FIGURE 16. DOWNLOAD OF CALIBRATION FILE COMPLETED
NOTE:With the calibration file loaded on the Diagnostic Tester Program Card, it is notnecessary to repeat the above steps to reprogram a different vehicle needing the samecalibration file. The steps above are only required when a new calibration file must beloaded onto the Diagnostic Tester Program Card.
The Diagnostic Tester now has the calibration file stored and you may proceed to thenext step to reprogram the vehicle ECU.
OperationProcedure(Continued)
DOWNLOADFILE TO TESTER

ECU FLASH REPROGRAMMING PROCESS – SS001-01 Revised March 9, 2001
Page 16 of 19
3. Reprogram the vehicle ECU with the Diagnostic Tester.
NOTICE:Errors during the flash reprogramming process can permanently damage the vehicleECU. Minimize the risks by following the steps below.� Battery voltage MUST NOT FALL BELOW 11.4 volts during reprogramming.� Confirm battery voltage is higher than 11.4 volts, but be sure voltage DOES NOT
RISE ABOVE 16.0 volts during reprogramming.� Turn off all electrical accessories (e.g. Audio system, A/C, interior lights, DRL, etc.).� Do not add to or significantly change the vehicle’s electrical load while reprogramming.� Confirm the hood is open and ensure under hood temperatures do not exceed 158 °F.� Confirm cable connections between the vehicle and Diagnostic Tester are secure.
(Reference TSIB No. SS003–01, “ECU Flash Reprogramming Error Message.”)� Do not disconnect or turn off the Diagnostic Tester or the vehicle ignition
during reprogramming.� Set the parking brake.� Complete ALL flash calibration updates provided for each ECU.
If the battery’s state of charge or capacity are in question, test with SST No.00002–MP815–L, “Midtronics Battery Tester,” and follow TSIB No. PG009–02, “Battery Maintenance for In–Stock Vehicles & Pre–Delivery.”
To ensure stable battery voltage, a battery charger may be connected duringreprogramming if:� Voltage does not fall below 11.4 volts.� Voltage does not rise above 16.0 volts.� Setting is on SLOW charge and not BOOST.
A. Connect the Diagnostic Tester to the vehicle and select CURRENT ECU CALfrom the ECU REPROGRAM MAIN MENU. Determine the vehicle’s current ECUcalibration. (See Figure 17.)
NOTE:The vehicle may contain up to 3 separate calibration ID numbers. In the exampleshown below, the vehicle ECU contains only 2 calibration IDs.
PRESS
1: GET CAL FROM PC
3: UPDATE ECU CAL4: CAL ON TESTER5: CLEAR CAL DATA
CURRENT ECU CAL
BECU REPROGRAM
MAIN MENU
A
2: CURRENT ECU CALCALIBRATION ID
3500100055001000
[ENTER]
FIGURE 17. DETERMINING CURRENT ECU CALIBRATION
OperationProcedure(Continued)
REPROGRAMECU WITH
TESTER

ECU FLASH REPROGRAMMING PROCESS – SS001-01 Revised March 9, 2001
Page 17 of 19
B. Continue to update the ECU calibration file following the screen flow below(Figure 18). Details for selected screens are shown in Figure 19.
1: IN-SERVICE ECU2: NEW ECU
C (NEW ECU)
TURN IG ONCAUTION!
DO NOT DO ANYTHINGTHAT WOULD CAUSE AN
ELECTRICAL LOAD TO THEVEHICLE.
D
E F G
H I J
BECU REPROGRAM
MAIN MENU
A C
UPDATE ECU CAL
1) REGISTERIMMOBILIZER KEYS
2) ENSURE AUTOREGISTRATION MODEIS CLOSED
BEFORE PROCEEDING
UPDATE ECU CAL
– SET PARKING BRAKE– IG OFF– HOOD OPEN– ALL ELECTRICAL
ACCESSORIES AREOFF
PLEASE CONFIRM
SELECT CAL TOUPDATE ECU
ALL UPDATES LISTEDABOVE MUST BE DONE
NEW CAL DONE
UPDATE NOW?
REPROGRAMMING
TIME: 00:09:18
REPROGRAM COMPLETE
PLEASE TURN IG OFF
[ENTER]
FIGURE 18. ECU REPROGRAMMING OVERVIEW
*
*
*
*
* See Figure 19 for more detail on these steps.
UPDATE ECU CAL
UPDATE ECU CAL UPDATE ECU CAL UPDATE ECU CAL
UPDATE ECU CAL
PRESS [YES] OR [NO]
PRESS [ENTER] /[EXIT]
UPDATE ECU CAL UPDATE ECU CAL
ALL UPDATES LISTEDABOVE MUST BE DONE
NEW CAL DONE
1: GET CAL FROM PC2: CURRENT ECU CAL3: UPDATE ECU CAL4: CAL ON TESTER5: CLEAR CAL DATA
PRESS [YES] OR [NO] PRESS [YES] OR [NO]
PRESS [ENTER] /[EXIT]
PRESS [ENTER] /[EXIT]
UPDATE ECU CALSELECT ECU TYPE
01 LS430AT ENG:3UZ-FE
3500110055001100
NONO
CURRENT CAL3500100055001000
SELECT MATCHING ID350010004247300056700300
3500110055001100
YESNO
NOTE: In step B above a “NEW ECU” is defined as a unit installed from parts inventory thathas not been previously installed into a vehicle and the Immobilizer Registration function hasnot been completed.
OperationProcedure(Continued)
REPROGRAMECU WITH
TESTER
ECU FLASH REPROGRAMMING PROCESS – SS001-01 Revised March 9, 2001
Page 18 of 19
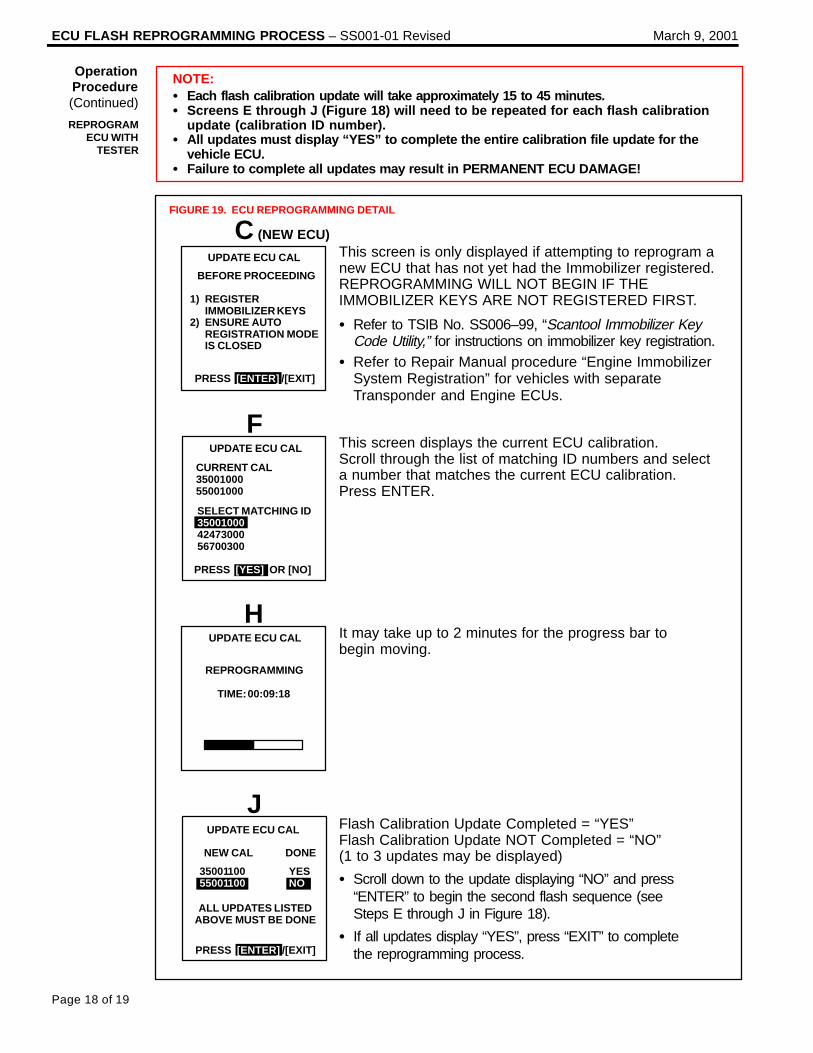
NOTE:� Each flash calibration update will take approximately 15 to 45 minutes.� Screens E through J (Figure 18) will need to be repeated for each flash calibration
update (calibration ID number).� All updates must display “YES” to complete the entire calibration file update for the
vehicle ECU.� Failure to complete all updates may result in PERMANENT ECU DAMAGE!
� Refer to TSIB No. SS006–99, “Scantool Immobilizer KeyCode Utility,” for instructions on immobilizer key registration.
� Refer to Repair Manual procedure “Engine ImmobilizerSystem Registration” for vehicles with separateTransponder and Engine ECUs.
Flash Calibration Update Completed = “YES”Flash Calibration Update NOT Completed = “NO”(1 to 3 updates may be displayed)
This screen displays the current ECU calibration.Scroll through the list of matching ID numbers and selecta number that matches the current ECU calibration.Press ENTER.
It may take up to 2 minutes for the progress bar tobegin moving.
� Scroll down to the update displaying “NO” and press“ENTER” to begin the second flash sequence (seeSteps E through J in Figure 18).
� If all updates display “YES”, press “EXIT” to completethe reprogramming process.
FIGURE 19. ECU REPROGRAMMING DETAIL
F
H
J
UPDATE ECU CAL
1) REGISTERIMMOBILIZER KEYS
2) ENSURE AUTOREGISTRATION MODEIS CLOSED
BEFORE PROCEEDING
REPROGRAMMING
TIME: 00:09:18
UPDATE ECU CAL
UPDATE ECU CAL
UPDATE ECU CAL
ALL UPDATES LISTEDABOVE MUST BE DONE
NEW CAL DONE
3500110055001100
YESNO
PRESS [YES] OR [NO]
PRESS [ENTER] /[EXIT]
PRESS [ENTER] /[EXIT]
This screen is only displayed if attempting to reprogram anew ECU that has not yet had the Immobilizer registered.REPROGRAMMING WILL NOT BEGIN IF THEIMMOBILIZER KEYS ARE NOT REGISTERED FIRST.
CURRENT CAL3500100055001000
SELECT MATCHING ID350010004247300056700300
C (NEW ECU)
OperationProcedure(Continued)
REPROGRAMECU WITH
TESTER

ECU FLASH REPROGRAMMING PROCESS – SS001-01 Revised March 9, 2001
Page 19 of 19
4. Confirm successful flash calibration update and affix calibration update sticker.Follow these steps to confirm the calibration was reprogrammed to the ECU.
A. The new calibration file should be displayed as the current ECU calibration file.
FIGURE 20. CONFIRMATION OF ECU REPROGRAMMING
PRESS
1: GET CAL FROM PC
3: UPDATE ECU CAL4: CAL ON TESTER5: CLEAR CAL DATA
CURRENT ECU CAL
BECU REPROGRAM
MAIN MENU
A
2: CURRENT ECU CALCALIBRATION ID
3500110055001100
[ENTER]
B. Using a permanent marker or ball point pen, enter the required information on theAuthorized Modifications Label (Figures 21 and 22).
THESE MODIFICATIONS HAVE BEEN APPROVEDAS APPROPRIATE BY EPA AND CARB
DATE:DEALER CODE:CHANGE AUTHORITY:
THE FOLLOWING MODIFICATIONS HAVE BEEN MADE:
FIGURE 21. AUTHORIZED MODIFICATIONS LABEL
THESE MODIFICATIONS HAVE BEEN APPROVEDAS APPROPRIATE BY EPA AND CARB
DATE:DEALER CODE:CHANGE AUTHORITY:
THE FOLLOWING MODIFICATIONS HAVE BEEN MADE:
FIGURE 22. SAMPLE OF COMPLETED AUTHORIZED MODIFICATIONS LABEL
Replacement ECU Part Number
Calibration ID(s)
TSIB or Campaign Number
Date Completed6/2/0361301TSIB EG###–03
35001100, 55001100
Dealer Code
89661–48241
C. Affix this label under the hood in the location determined by the specific vehicleTSIB or Campaign.
NOTE:Wait 60–90 seconds for ink to set before handling.
OperationProcedure(Continued)
CONFIRMUPDATE