Titan Global Media
26
Quick Start Guide Getting Started with your Social Media Management Platform
-
Upload
richie-bello -
Category
Social Media
-
view
86 -
download
1
Transcript of Titan Global Media

Quick Start Guide
Getting Started with your Social Media Management Platform
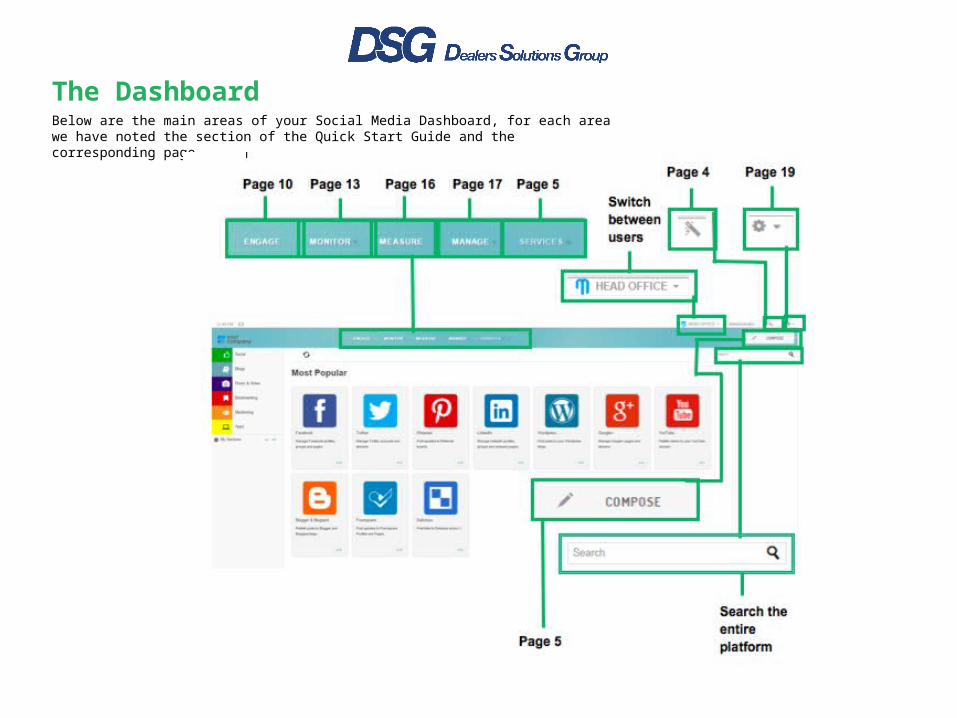
The DashboardBelow are the main areas of your Social Media Dashboard, for each area we have noted the section of the Quick Start Guide and the corresponding page.
Signing In
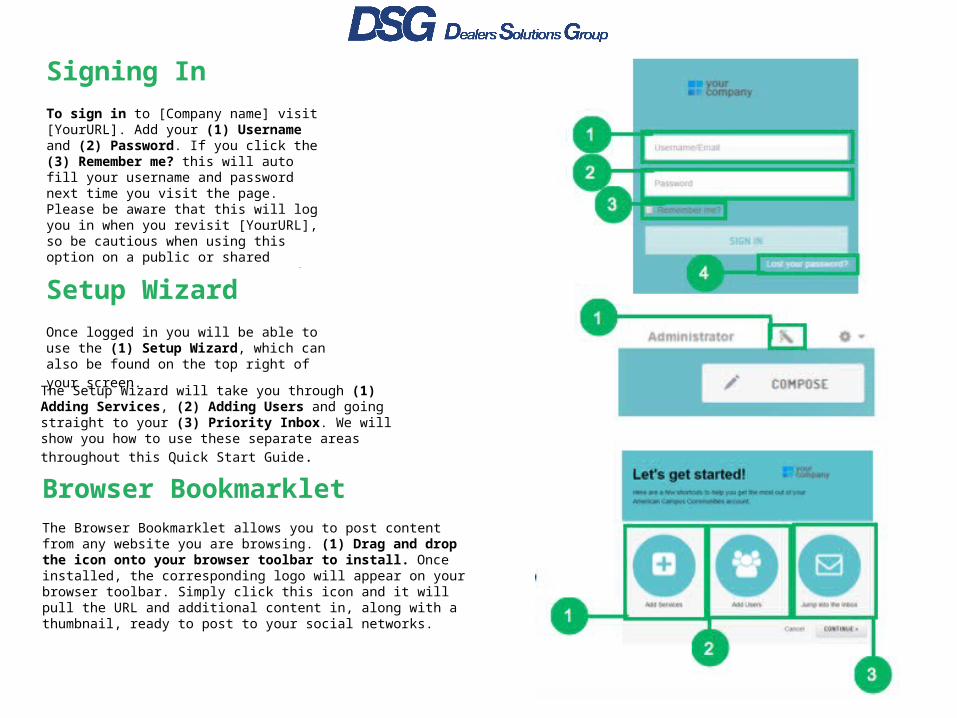
To sign in to [Company name] visit [YourURL]. Add your (1) Username and (2) Password. If you click the (3) Remember me? this will auto fill your username and password next time you visit the page. Please be aware that this will log you in when you revisit [YourURL], so be cautious when using this option on a public or shared computer. (4) Lost your Password, will enable you to reset your password via the email linked to your account.
Setup Wizard
Once logged in you will be able to use the (1) Setup Wizard, which can also be found on the
top right of your screen.
The Setup Wizard will take you through (1) Adding Services, (2) Adding Users and going straight to your (3) Priority Inbox. We will show you how to use these separate
areas throughout this Quick Start Guide.
Browser BookmarkletThe Browser Bookmarklet allows you to post content from any website you are browsing. (1) Drag and drop the icon onto your browser toolbar to install. Once installed, the corresponding logo will appear on your browser toolbar. Simply click this icon and it will pull the URL and additional content in, along with a thumbnail, ready to post to your social networks.
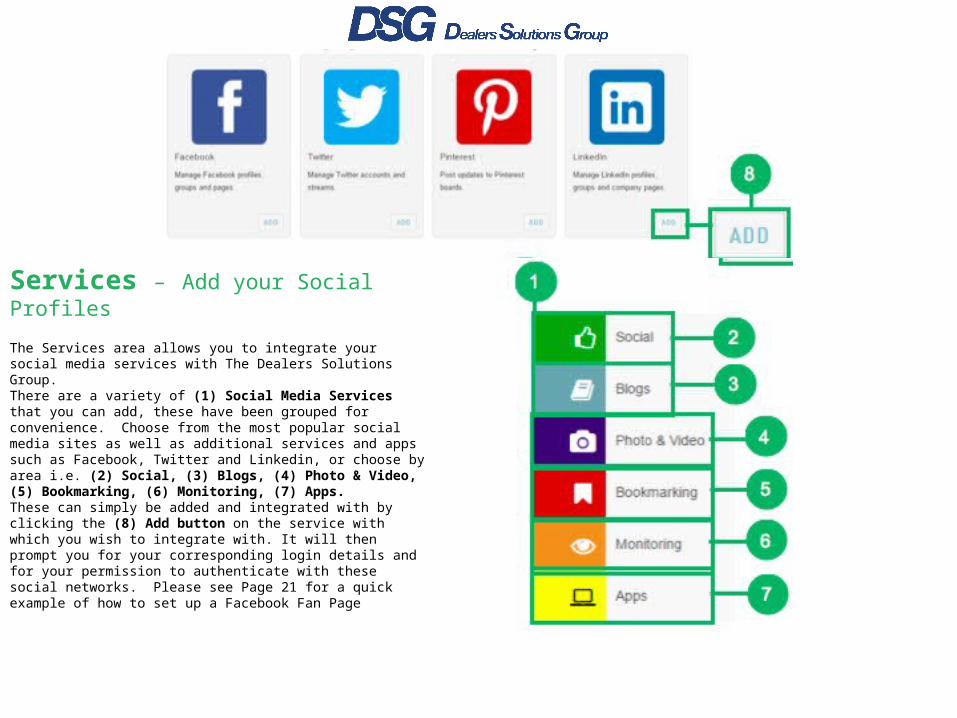
Services – Add your Social Profiles
The Services area allows you to integrate your social media services with The Dealers Solutions Group.There are a variety of (1) Social Media Services that you can add, these have been grouped for convenience. Choose from the most popular social media sites as well as additional services and apps such as Facebook, Twitter and Linkedin, or choose by area i.e. (2) Social, (3) Blogs, (4) Photo & Video, (5) Bookmarking, (6) Monitoring, (7) Apps.These can simply be added and integrated with by clicking the (8) Add button on the service with which you wish to integrate with. It will then prompt you for your corresponding login details and for your permission to authenticate with these social networks. Please see Page 21 for a quick example of how to set up a Facebook Fan Page
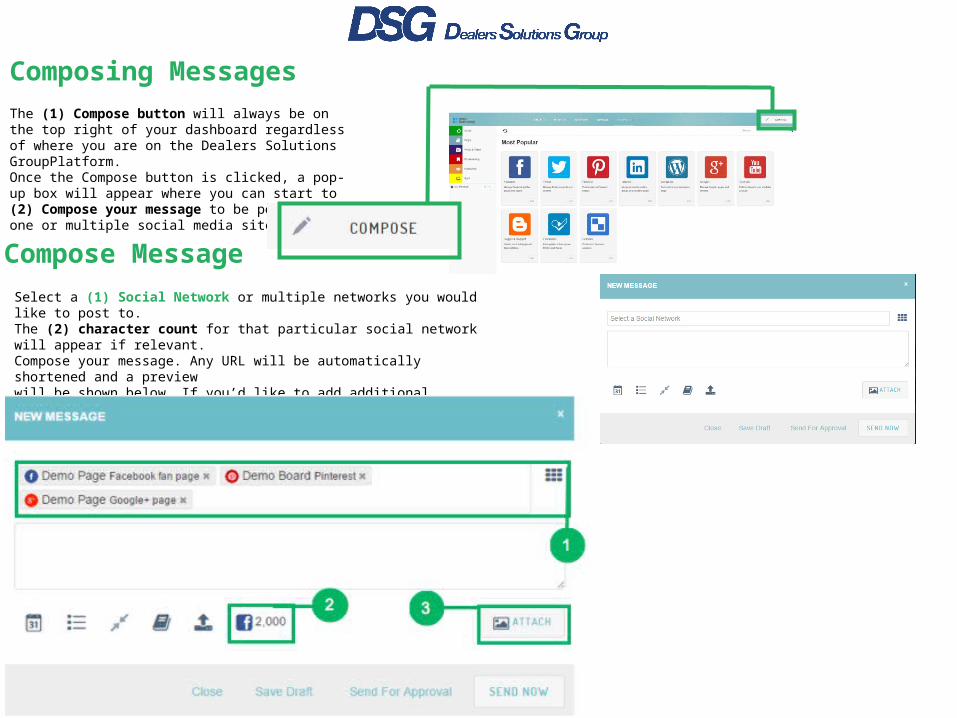
Composing Messages
The (1) Compose button will always be on the top right of your dashboard regardless of where you are on the Dealers Solutions GroupPlatform.Once the Compose button is clicked, a pop-up box will appear where you can start to (2) Compose your message to be posted on one or multiple social media sites at once.
Compose Message
Select a (1) Social Network or multiple networks you would like to post to.The (2) character count for that particular social network will appear if relevant.Compose your message. Any URL will be automatically shortened and a preview will be shown below. If you’d like to add additional content to your post, you can do so by clicking (3) Attach.

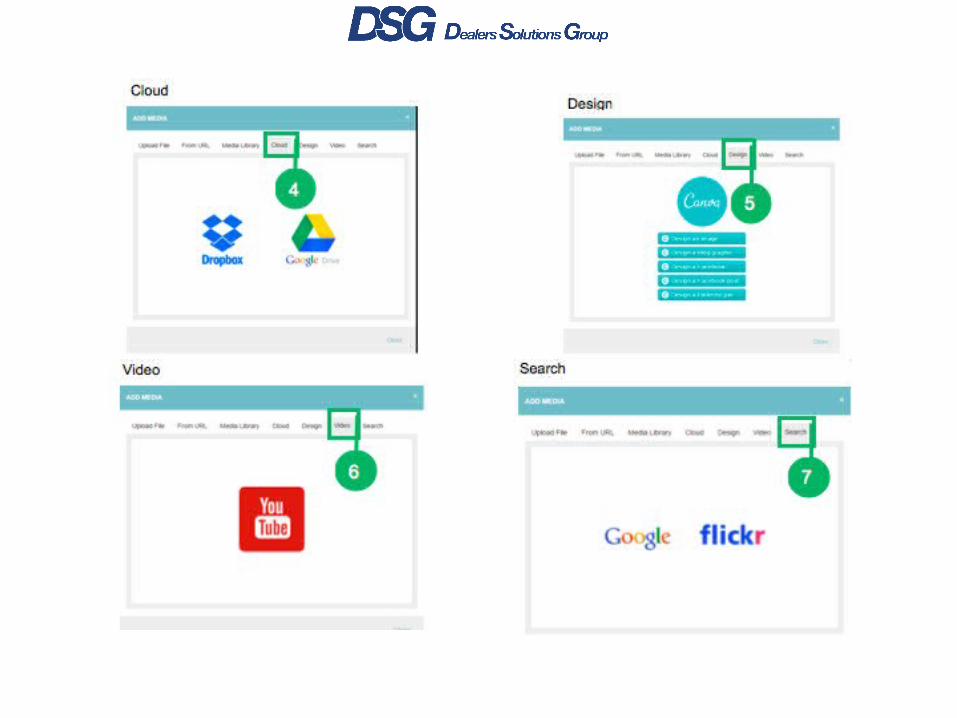
Attach – Adding images to your post
(1) Upload a file to attach, source an (2) image from a URL, choose content from your (3) Media Library, choose content from the (4) Cloud (Dropbox and Google Drive). Dealers Solutions Group also has Canva integration giving you a full (5) design suite to create a range of design assets such as Facebook covers and Pinterest posts. Attach a YouTube (6) video or (7) search for an image via Google or Flickr.
1
Upload File From URL
Manage Library
2
3

Schedule PostsSchedule your post by (1) date, (2) time, (3) set optimal time Dealers Solutions Group uses an algorithm to know when is the most optimum time to post to your networks), or (4) repeat your messages.Add your message to a (5) queue.(6) Shorten links for tracking purposes and reduce character count.(7) Add RSS Feeds, additional content, trending hashtags and place holders.(8) Bulk upload your messages.
Queues – Queue your posts
Create intelligent queues where you can add multiple posts to be delivered at set times. Setup your queues to recycle posts or just cycle through once. Select users who can act as contributors to be able to add posts to this queue.
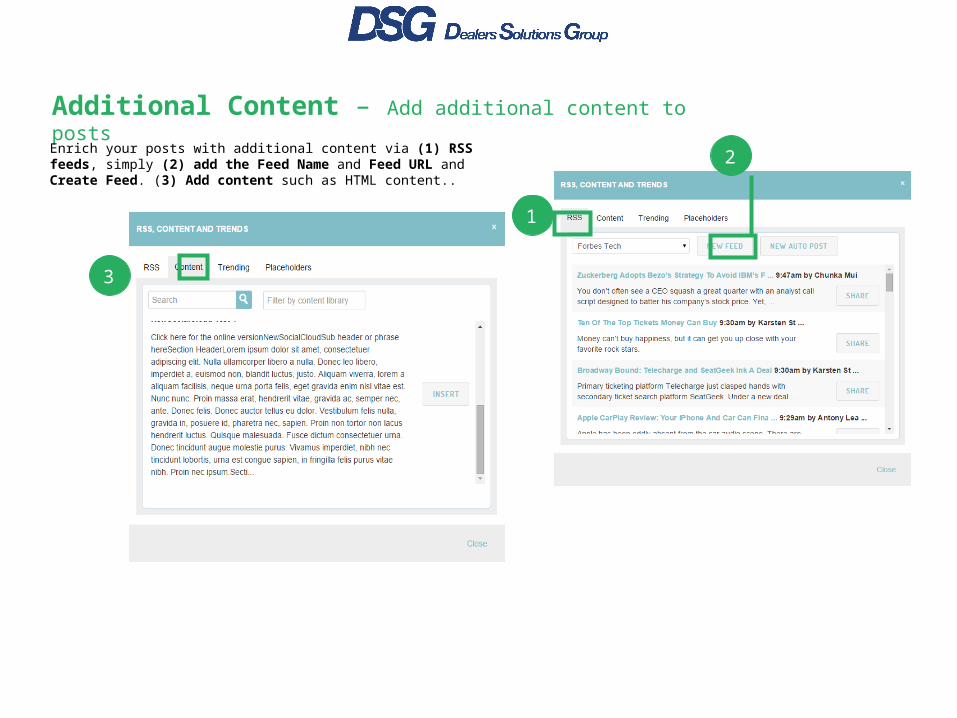
Additional Content – Add additional content to posts
Enrich your posts with additional content via (1) RSS feeds, simply (2) add the Feed Name and Feed URL and Create Feed. (3) Add content such as HTML content..
3
1
2

View what's currently (4) Trending and insert these hashtags into your post.
Insert (5) placeholders to personalize posts or email campaigns.
Sending EmailsDealers Solutions Group can also be used as an email sending platform. Upload your contacts through our (1) Bulk Uploader. Download our (2) CSV Template, add your contacts’ details and (3) upload these on mass. (4) Select the mailing list, (5) add your subject (6) add your content and (7) attach your HTML content and simply send your email. You can also (8) purchase email credits directly from the dashboard.(9) Send your post now or (10) send for approval (ideal for keeping the same tone throughout your social media). (11) Save your post as a draft or (12) close and discard it.
3
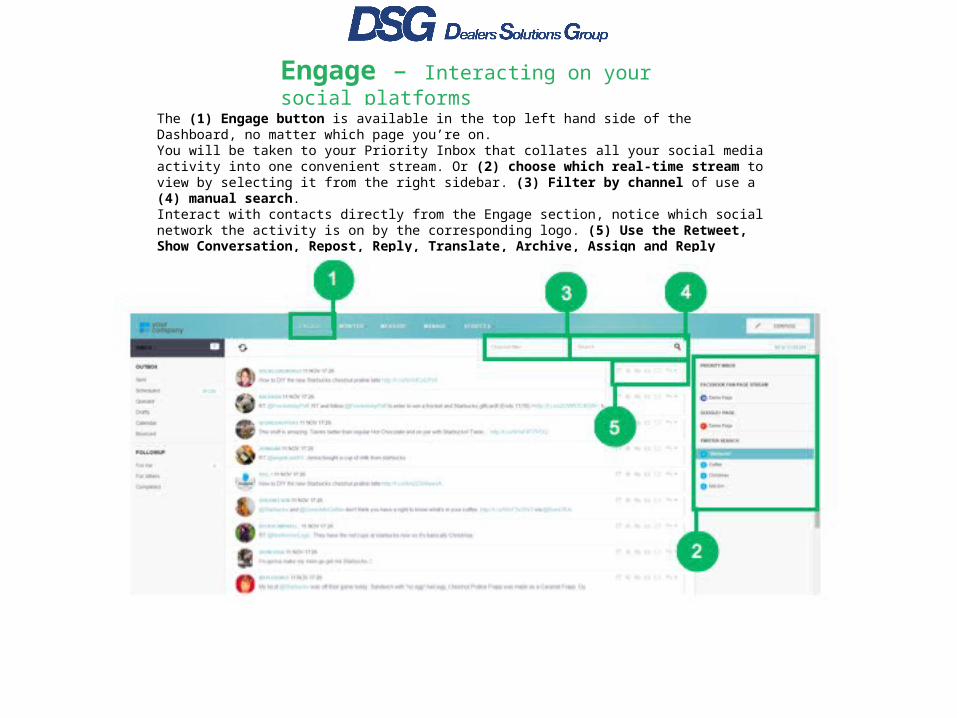
Engage – Interacting on your social platforms
The (1) Engage button is available in the top left hand side of the Dashboard, no matter which page you’re on.You will be taken to your Priority Inbox that collates all your social media activity into one convenient stream. Or (2) choose which real-time stream to view by selecting it from the right sidebar. (3) Filter by channel of use a (4) manual search.Interact with contacts directly from the Engage section, notice which social network the activity is on by the corresponding logo. (5) Use the Retweet, Show Conversation, Repost, Reply, Translate, Archive, Assign and Reply enabling you to engage on your social media profiles directly from the dashboard.
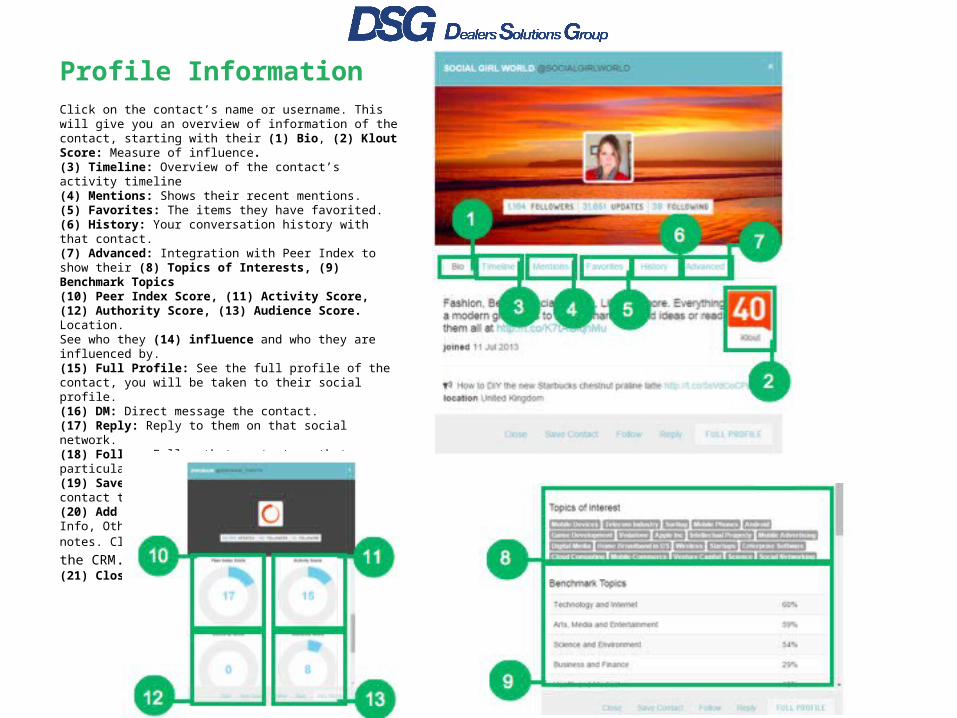
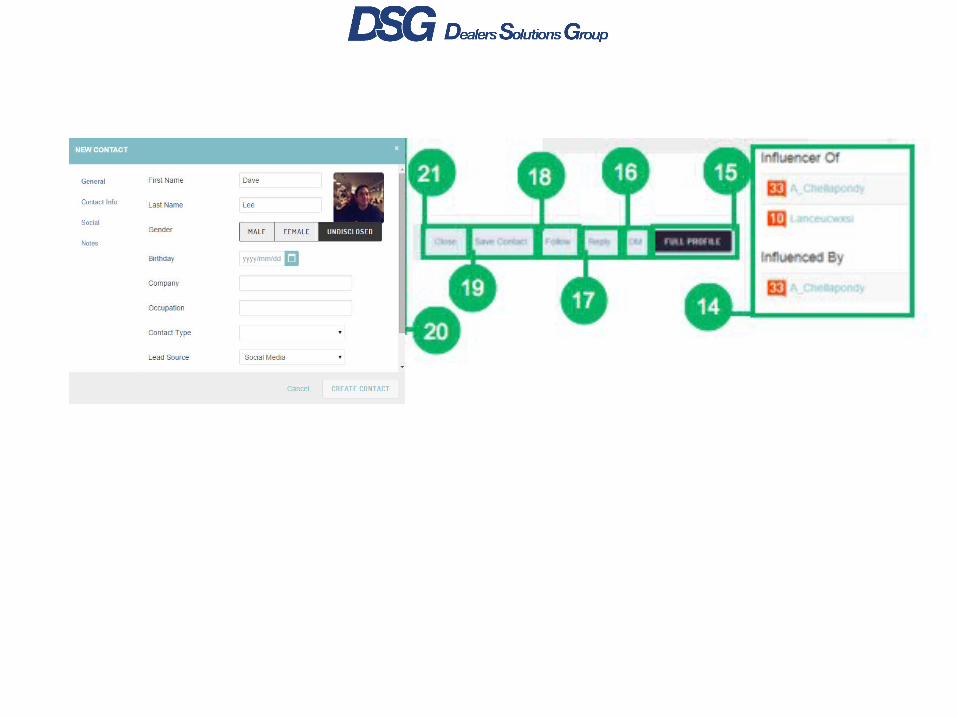
Profile InformationClick on the contact’s name or username. This will give you an overview of information of the contact, starting with their (1) Bio, (2) Klout Score: Measure of influence.(3) Timeline: Overview of the contact’s activity timeline(4) Mentions: Shows their recent mentions.(5) Favorites: The items they have favorited.(6) History: Your conversation history with that contact.(7) Advanced: Integration with Peer Index to show their (8) Topics of Interests, (9) Benchmark Topics(10) Peer Index Score, (11) Activity Score, (12) Authority Score, (13) Audience Score.Location.See who they (14) influence and who they are influenced by.(15) Full Profile: See the full profile of the contact, you will be taken to their social profile. (16) DM: Direct message the contact.(17) Reply: Reply to them on that social network.(18) Follow: Follow that contact on that particular social network.(19) Save Contact: This allows you to save that contact to your Social CRM.(20) Add their general information: Contact Info, Other Information, Social Information and notes. Click Create
Contact to save them to the CRM.(21) Close
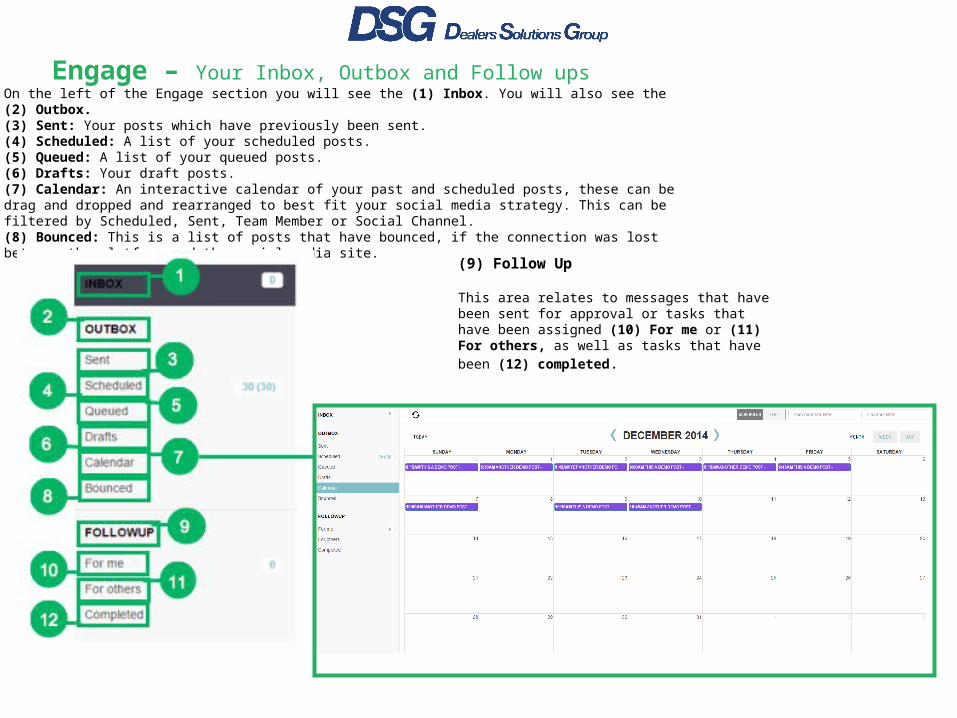
Engage – Your Inbox, Outbox and Follow upsOn the left of the Engage section you will see the (1) Inbox. You will also see the (2) Outbox.(3) Sent: Your posts which have previously been sent.(4) Scheduled: A list of your scheduled posts.(5) Queued: A list of your queued posts.(6) Drafts: Your draft posts.(7) Calendar: An interactive calendar of your past and scheduled posts, these can be drag and dropped and rearranged to best fit your social media strategy. This can be filtered by Scheduled, Sent, Team Member or Social Channel.(8) Bounced: This is a list of posts that have bounced, if the connection was lost between the platform and the social media site.
(9) Follow Up
This area relates to messages that have been sent for approval or tasks that have been assigned (10) For me or (11) For others, as well as tasks that
have been (12) completed.

Monitor – Keyword and reputation monitoring The Monitor section allows you to monitor the “Social Web” for mentions for example specific keywords, your brand, your clients, your competitors. Use the (1) Type Filter to filter results by specific social media sites, blogs, news websites, videos, comments and review sites. You can also filter results by positive, neutral or negative sentiment. 3
(2) Use the Retweet, Show Conversation, Repost, Reply, Translate, Archive, Assign and Reply enabling you to engage on your social media profiles directly from the dashboard. To create a new term or series of terms to monitor, click (3) New Monitor. This will display a box allowing you to monitor either Keywords or Review sites.
Keywords(5) Description: This is for your own reference.(6) Has all of these terms: The brand(s) or term(s) you would like to monitor. Use OR to separate multiple terms.(7) Doesn't have these words (optional): Exclude entries containing the keywords above. (Separate multiple keywords with a comma).(8) Has any of these words (optional): Only include results that contain one or more of the above keywords. (Separate multiple terms with commas).(9) Google Alerts Feed (optional): To enhance your results, create or add the URL to a Google Alerts Feed. (10) Only from this country: Choose whether to only show mentions from a specific country or location.Location: Choose the location (Longitude, Latitude, Within this distance (miles).(11) Email notifications: Choose the frequency.(12) Send email notifications to: Add which email address’ you would like to send the alerts to.(13) Save Settings.
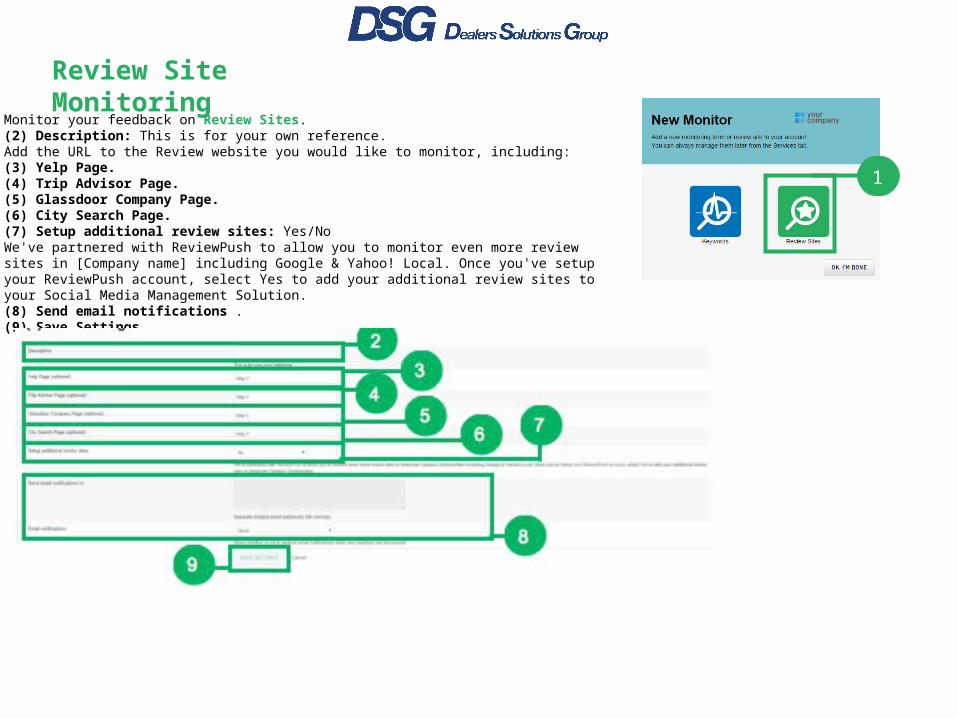
Review Site Monitoring
Monitor your feedback on Review Sites.(2) Description: This is for your own reference.Add the URL to the Review website you would like to monitor, including:(3) Yelp Page.(4) Trip Advisor Page.(5) Glassdoor Company Page.(6) City Search Page.(7) Setup additional review sites: Yes/NoWe've partnered with ReviewPush to allow you to monitor even more review sites in [Company name] including Google & Yahoo! Local. Once you've setup your ReviewPush account, select Yes to add your additional review sites to your Social Media Management Solution.(8) Send email notifications .(9) Save Settings.
1
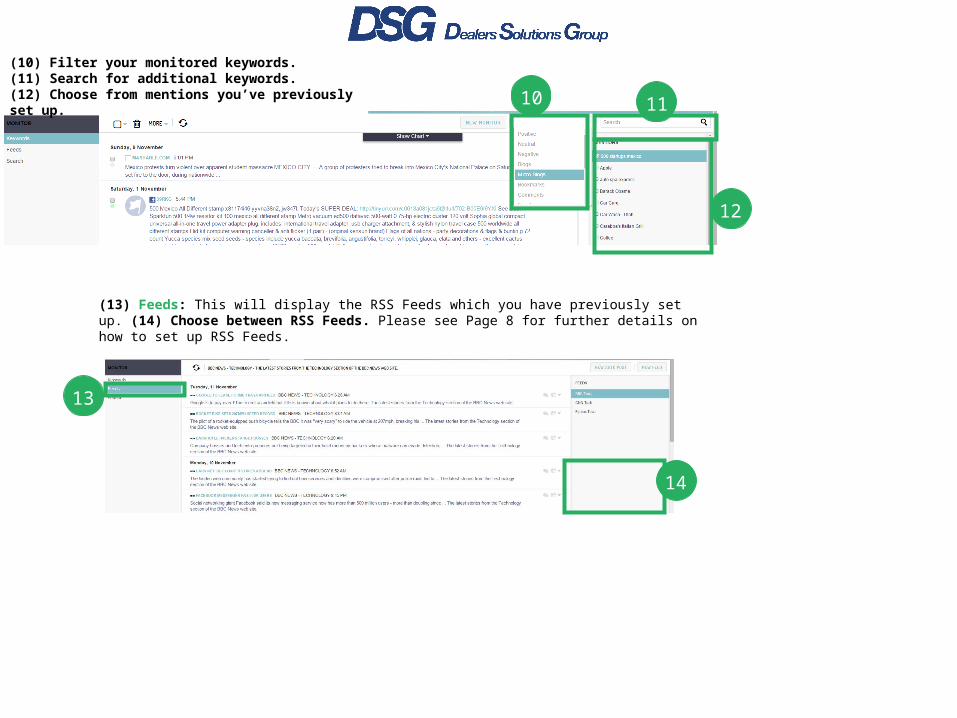
(10) Filter your monitored keywords.(11) Search for additional keywords.(12) Choose from mentions you’ve previously set up. 10 11
12
(13) Feeds: This will display the RSS Feeds which you have previously set up. (14) Choose between RSS Feeds. Please see Page 8 for further details on how to set up RSS Feeds.
13
14
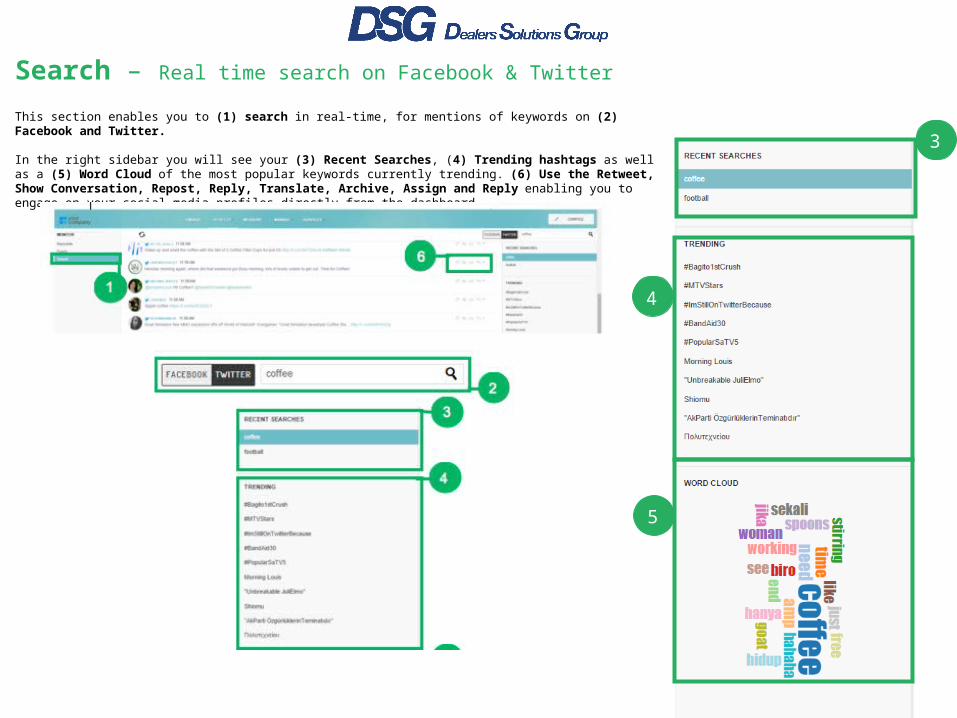
Search – Real time search on Facebook & Twitter
This section enables you to (1) search in real-time, for mentions of keywords on (2) Facebook and Twitter.
In the right sidebar you will see your (3) Recent Searches, (4) Trending hashtags as well as a (5) Word Cloud of the most popular keywords currently trending. (6) Use the Retweet, Show Conversation, Repost, Reply, Translate, Archive, Assign and Reply enabling you to engage on your social media profiles directly from the dashboard.
5
4
3

Measure
The measure section allows you to create and view bespoke reports about your social media activities.
Report Builder
(1) New Report button.(2) Select Layout.(3) Enter your Report Details.(4) Report Name.(5) Report Title.(6) Default Period: The time period in which you would like to report on (this can be edited after the report is set up).(7) Add Modules: The metrics you would like to report on.
(8) Print Report.(9) Email Report.(10) Recipients: Add the recipient(s) email address.(11) Subject: Add an email subject.(12) Message: Compose your email message.(13) Frequency: How often you would like to send the report by email.(14) Send Now: Send immediately). (15) Live Report: enabling you to share the report, via a URL.(16) Choose the date range.(17) Select Report: Choose from previous reports.(18) Add Modules: Add additional reporting metrics(19) Edit Report.(20) Share Report (with other users accounts).(21) Delete Report.(22) Add Logo to personalize (23) Add Contact Details.
20
22
16
23

Export – Export reports for further analysis
(1) Export reports on a number of different (2) metrics including (3) Campaigns, Channels, Monitoring, Contacts, Users and Other in a number of different (4) formats such as HTML and CSV for further analysis and interrogation.
1
4
3
2
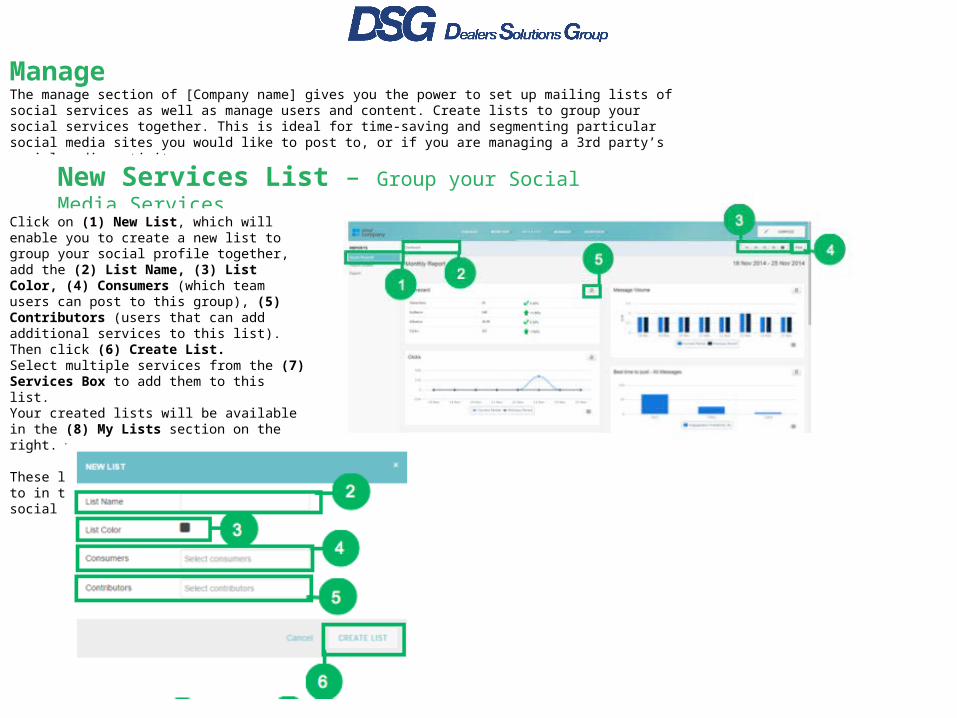
ManageThe manage section of [Company name] gives you the power to set up mailing lists of social services as well as manage users and content. Create lists to group your social services together. This is ideal for time-saving and segmenting particular social media sites you would like to post to, or if you are managing a 3rd party’s social media activity.
New Services List – Group your Social Media Services
Click on (1) New List, which will enable you to create a new list to group your social profile together, add the (2) List Name, (3) List Color, (4) Consumers (which team users can post to this group), (5) Contributors (users that can add additional services to this list). Then click (6) Create List. Select multiple services from the (7) Services Box to add them to this list.Your created lists will be available in the (8) My Lists section on the right.
These lists will be available to post to in the Compose section (select a social network).

Contacts – Manage your Social CRMThis area allows you to view all your (1) Contacts which you have acquired via the Social CRM. You can also add individual or bulk import contacts and create mailing lists. Click on the (2) contact’s name to view or edit their data or gain further information about the contact as previously shown on page 11.

Content – How to add new contentThis allows you to (1) Add Content and view the content you have previously added (see page 7).
Admin – Controlling user and admin settingsThe (2) Admin area allows you to manage User profiles. This is where you can see if users are active, as well as view and edit their permissions.Click (3) Edit and you will see their (4) Credentials, (5) Account Details (If they are a Team Member, Client or Admin). (6) Their Workflow (If their posts need approval before publishing). Other information can also be associated with their profile.You also have the option to make the user (7) Active or Inactive or to (8) Delete the User completely.

Settings – Control your Settings and PreferencesYou can also view a high level overview of your account information, (1) Settings and Preferences.Here you can view and edit your (2) Contact and Location Information. Your preferences can also be viewed and edited such as your (3) Notifications, (4) Publishing Preferences and (5) System Settings.

The Dealers Solutions Group68 South Service Road
Melville, NY [email protected]
US/Canada: (800) 782-0821 UK: 0-808-189-1371
Australia: (800) 751-818