Tips for Electronic Filing of Form 17H in EDGAR the “Attach/Remo ve/View” link to add documents,...
12
1 Tips for Filing Form 17(H) in EDGAR The following discussion represents the views of the Staff. This guidance is not a rule, regulation, or statement of the Securities and Exchange Commission. Further, the Commission has neither approved nor disapproved this information. If you have questions on the information presented in this guidance, please contact the Broker-Dealer Risk Assessment Group, Division of Trading and Markets, at [email protected] . For technical questions about filing on EDGAR, please refer to the EDGAR Filer Manual or contact the EDGAR Filer Technical Support, at (202) 551-8900.
Transcript of Tips for Electronic Filing of Form 17H in EDGAR the “Attach/Remo ve/View” link to add documents,...
1
Tips for Filing Form 17(H) in EDGAR The following discussion represents the views of the Staff. This guidance is not a rule, regulation, or statement of the Securities and Exchange Commission. Further, the Commission has neither approved nor disapproved this information. If you have questions on the information presented in this guidance, please contact the Broker-Dealer Risk Assessment Group, Division of Trading and Markets, at [email protected] . For technical questions about filing on EDGAR, please refer to the EDGAR Filer Manual or contact the EDGAR Filer Technical Support, at (202) 551-8900.
2
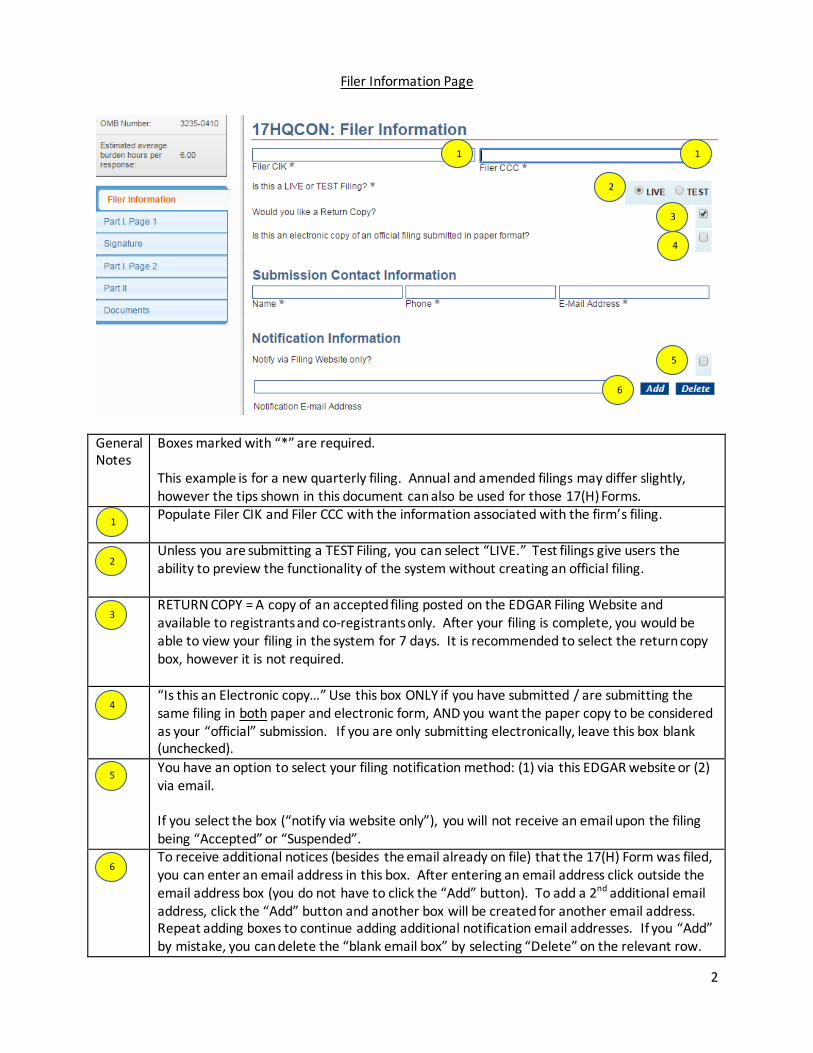
Filer Information Page
General Notes
Boxes marked with “*” are required. This example is for a new quarterly filing. Annual and amended filings may differ slightly, however the tips shown in this document can also be used for those 17(H) Forms.
Populate Filer CIK and Filer CCC with the information associated with the firm’s filing.
Unless you are submitting a TEST Filing, you can select “LIVE.” Test filings give users the ability to preview the functionality of the system without creating an official filing.
RETURN COPY = A copy of an accepted filing posted on the EDGAR Filing Website and available to registrants and co-registrants only. After your filing is complete, you would be able to view your filing in the system for 7 days. It is recommended to select the return copy box, however it is not required.
“Is this an Electronic copy…” Use this box ONLY if you have submitted / are submitting the same filing in both paper and electronic form, AND you want the paper copy to be considered as your “official” submission. If you are only submitting electronically, leave this box blank (unchecked).
You have an option to select your filing notification method: (1) via this EDGAR website or (2) via email. If you select the box (“notify via website only”), you will not receive an email upon the filing being “Accepted” or “Suspended”.
To receive additional notices (besides the email already on file) that the 17(H) Form was filed, you can enter an email address in this box. After entering an email address click outside the email address box (you do not have to click the “Add” button). To add a 2nd additional email address, click the “Add” button and another box will be created for another email address. Repeat adding boxes to continue adding additional notification email addresses. If you “Add” by mistake, you can delete the “blank email box” by selecting “Delete” on the relevant row.
1
2
3
2
3
4
5
5
6
6
1
4
1

3
Menu buttons at the top of the page: At any point in the process, a user can select the icons at the top of the page. See below for the description of each: Save – downloads a copy of the EDGAR form (*.eis) file to the user computer, which can be used later to bring up a current copy of the Form. The system will time out if not used for a period of time (60 minutes), and if the system times out, it will not save your progress. If you wish to save your progress, select the Save button (the form is saved as an “.eis” file, typically in the “Downloads” folder of your computer). To re-enter a saved filing, on the Form 17-H Initial entry page, select “Continue with Saved 17-H”, as shown below, and select the appropriate “.eis” file.
Print – Allows printing of a blank 17(H) form, or the current active form. It is recommended that before submitting the form, you either print a copy of the form or print the filing to a pdf file, and save for future reference. Also see Tip #27. Submit – Once finished, this button can be used to submit the Form 17h. The system will process the form and perform some additional validation checks on the entries, and notify a user if there are items to correct. There are two levels of validation, immediate and later after submission. Please be aware that filings could either pass or fail (i.e., Accept or Suspend) even though the initial “Submit” appeared to have gone through. Once the second level of validation finishes, an “Accepted” or “Suspended” notice will be provided (either by email or filer web). Instructions – currently shows a blank version of the 17(H) Form. Exit – will exit the 17(H) Form. Be sure to save progress of your work before exiting.
7
7
4
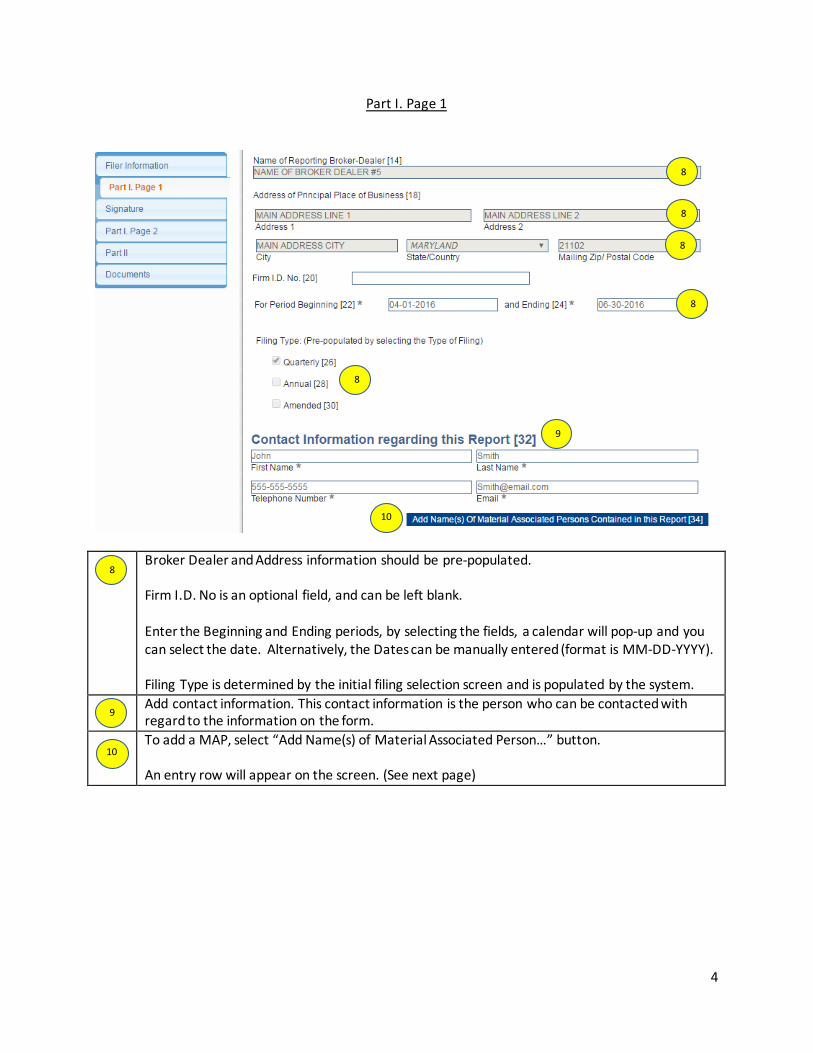
Part I. Page 1
Broker Dealer and Address information should be pre-populated. Firm I.D. No is an optional field, and can be left blank. Enter the Beginning and Ending periods, by selecting the fields, a calendar will pop-up and you can select the date. Alternatively, the Dates can be manually entered (format is MM-DD-YYYY). Filing Type is determined by the initial filing selection screen and is populated by the system.
Add contact information. This contact information is the person who can be contacted with regard to the information on the form.
To add a MAP, select “Add Name(s) of Material Associated Person…” button. An entry row will appear on the screen. (See next page)
8
9
8
9
8
8
8
8
10
10
5
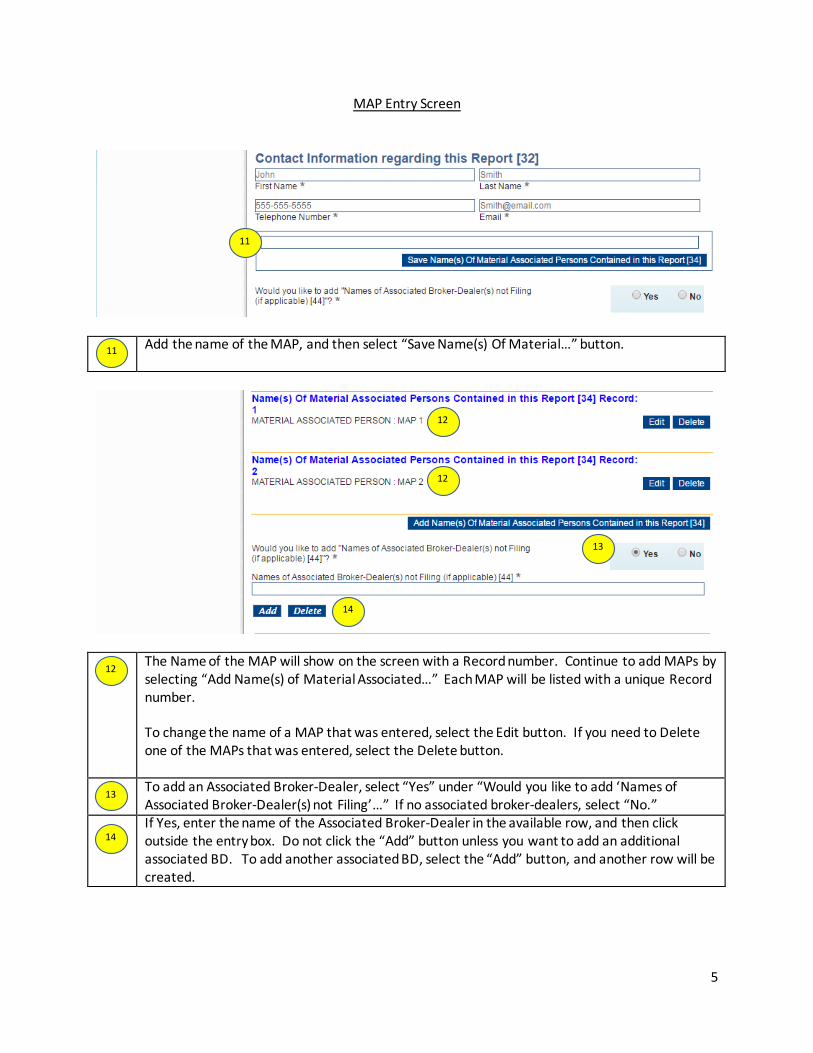
MAP Entry Screen
Add the name of the MAP, and then select “Save Name(s) Of Material…” button.
The Name of the MAP will show on the screen with a Record number. Continue to add MAPs by selecting “Add Name(s) of Material Associated…” Each MAP will be listed with a unique Record number. To change the name of a MAP that was entered, select the Edit button. If you need to Delete one of the MAPs that was entered, select the Delete button.
To add an Associated Broker-Dealer, select “Yes” under “Would you like to add ‘Names of Associated Broker-Dealer(s) not Filing’…” If no associated broker-dealers, select “No.”
If Yes, enter the name of the Associated Broker-Dealer in the available row, and then click outside the entry box. Do not click the “Add” button unless you want to add an additional associated BD. To add another associated BD, select the “Add” button, and another row will be created.
12
12
13
14
14
13
12
11
11

6
Signature Page
Enter all of the fields requested on the Signature page. * indicates a required field.
15
15

7
Part I. Page 2
Review Item 1 on Part 1.Page 2. If there are no material changes to the Org Chart since the previous filing, select the check box for Item 1. If the “no material change” box is not selected, the system will expect a document to be attached in the Document tab with the “Orgchart” Type. See Tip #23.
If there has been a material change, or at least annually for the Organization Chart, you can select the “Attach/Remove/View” link to add documents, for the various Items. For the first EDGAR filing it is recommended to attach the latest versions of Items 1-3. Alternatively, you can also add all documents at the final step (after Part II), or anytime by selecting the “Documents” navigation button on the left. Please note that if you select the “Attach / Remove / View Item” link, EDGAR will navigate to the Documents tab. To finish the form, navigate back to the Part I, Page 2.
Review Item 2 and 3 on Page 2. If there are no material changes since the previous filing, select the check box for Items 2 and 3. If the “no material change” boxes are not selected, the system will expect a document to be attached in the Document tab with RiskMgmt and LegalProc type.
Attach the consolidating Financial Statement for the relevant quarter/annual period. Select the “Attach/Remove/View” link to add document(s).
16
17
16
17
17
17
18
18
19
18
19

8
Part II
Part II (Continued)
Each MAP should have a Part II included in the 17(H) Form. To Create Part II for a MAP select “Create Part Two for a Map” button. A dropdown dialog box will appear, along with the Part II fields that can be filled out.
In the dropdown menu, select the Map name that was created in Part I, Page 1 (See Tip #10), and then fill out the relevant fields in Part II. Keep in mind that the numbers you enter should be in thousands of US dollars ($) (000’s omitted). Once complete, scroll to the bottom and select the “Save & Close this PartTwo Map” button.
20
21
20
21

9
Part II (Continued)
After saving part II, each MAP will be listed on the Part II page. Complete a Part II for each MAP.
22
22
10
Part II (Continued)
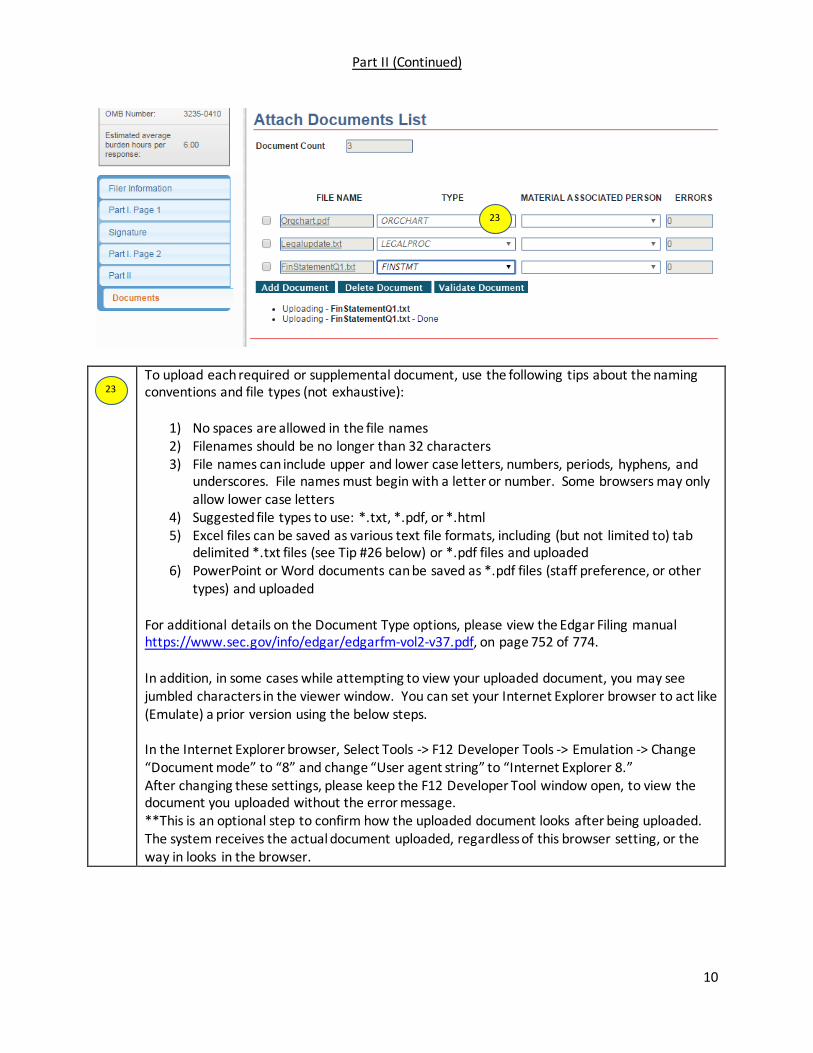
To upload each required or supplemental document, use the following tips about the naming conventions and file types (not exhaustive):
1) No spaces are allowed in the file names 2) Filenames should be no longer than 32 characters 3) File names can include upper and lower case letters, numbers, periods, hyphens, and
underscores. File names must begin with a letter or number. Some browsers may only allow lower case letters
4) Suggested file types to use: *.txt, *.pdf, or *.html 5) Excel files can be saved as various text file formats, including (but not limited to) tab
delimited *.txt files (see Tip #26 below) or *.pdf files and uploaded 6) PowerPoint or Word documents can be saved as *.pdf files (staff preference, or other
types) and uploaded
For additional details on the Document Type options, please view the Edgar Filing manual https://www.sec.gov/info/edgar/edgarfm-vol2-v37.pdf, on page 752 of 774.
In addition, in some cases while attempting to view your uploaded document, you may see jumbled characters in the viewer window. You can set your Internet Explorer browser to act like (Emulate) a prior version using the below steps. In the Internet Explorer browser, Select Tools -> F12 Developer Tools -> Emulation -> Change “Document mode” to “8” and change “User agent string” to “Internet Explorer 8.” After changing these settings, please keep the F12 Developer Tool window open, to view the document you uploaded without the error message. **This is an optional step to confirm how the uploaded document looks after being uploaded. The system receives the actual document uploaded, regardless of this browser setting, or the way in looks in the browser.
23
23
11
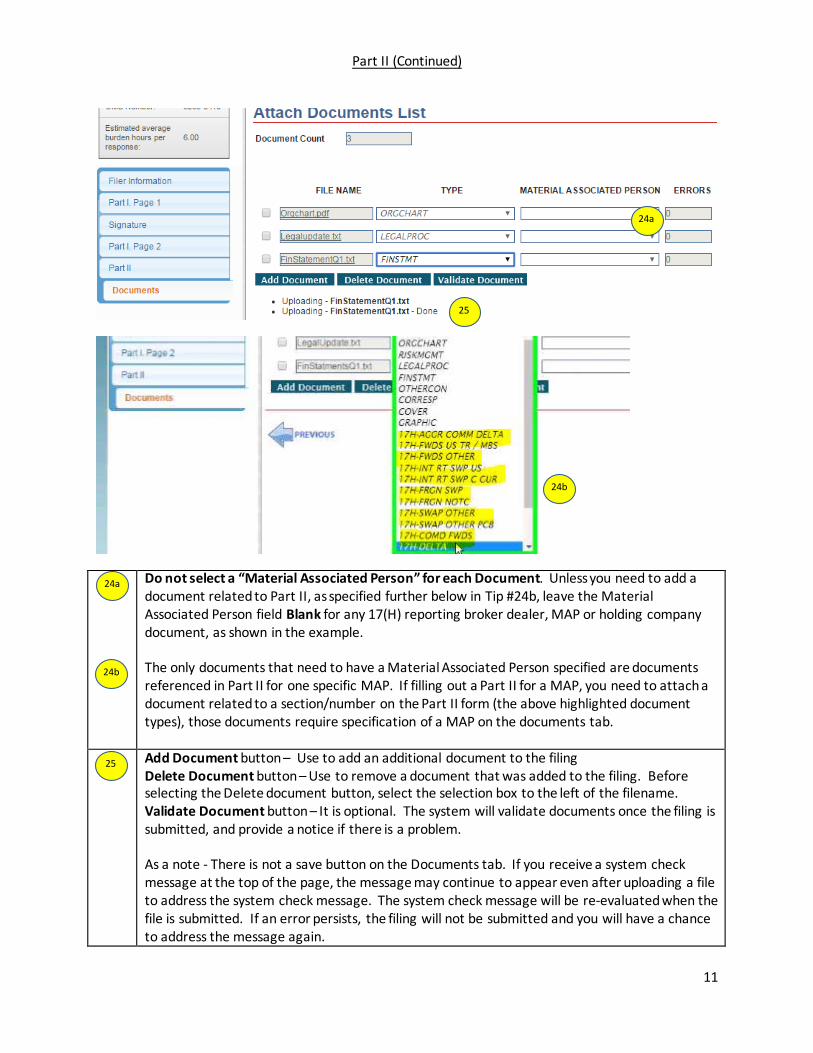
Part II (Continued)
Do not select a “Material Associated Person” for each Document. Unless you need to add a document related to Part II, as specified further below in Tip #24b, leave the Material Associated Person field Blank for any 17(H) reporting broker dealer, MAP or holding company document, as shown in the example. The only documents that need to have a Material Associated Person specified are documents referenced in Part II for one specific MAP. If filling out a Part II for a MAP, you need to attach a document related to a section/number on the Part II form (the above highlighted document types), those documents require specification of a MAP on the documents tab.
Add Document button – Use to add an additional document to the filing Delete Document button – Use to remove a document that was added to the filing. Before selecting the Delete document button, select the selection box to the left of the filename. Validate Document button – It is optional. The system will validate documents once the filing is submitted, and provide a notice if there is a problem. As a note - There is not a save button on the Documents tab. If you receive a system check message at the top of the page, the message may continue to appear even after uploading a file to address the system check message. The system check message will be re-evaluated when the file is submitted. If an error persists, the filing will not be submitted and you will have a chance to address the message again.
24a
25
24a
25
24b
24b
12
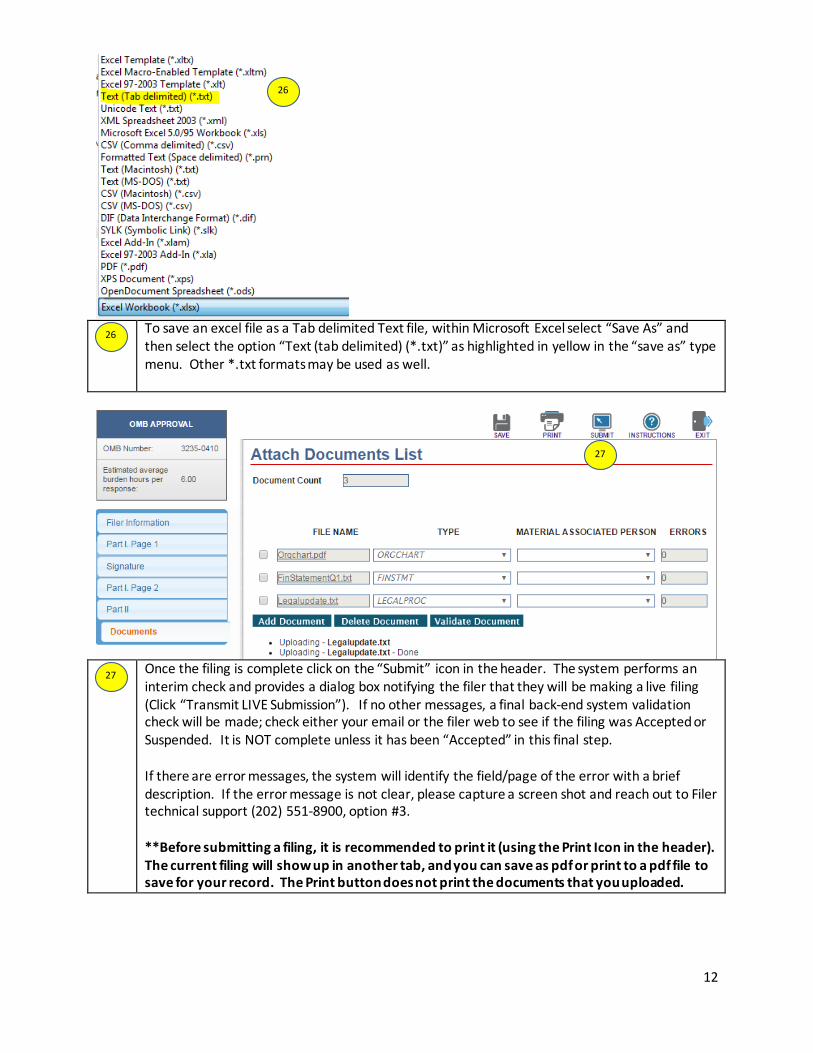
To save an excel file as a Tab delimited Text file, within Microsoft Excel select “Save As” and then select the option “Text (tab delimited) (*.txt)” as highlighted in yellow in the “save as” type menu. Other *.txt formats may be used as well.
Once the filing is complete click on the “Submit” icon in the header. The system performs an interim check and provides a dialog box notifying the filer that they will be making a live filing (Click “Transmit LIVE Submission”). If no other messages, a final back-end system validation check will be made; check either your email or the filer web to see if the filing was Accepted or Suspended. It is NOT complete unless it has been “Accepted” in this final step. If there are error messages, the system will identify the field/page of the error with a brief description. If the error message is not clear, please capture a screen shot and reach out to Filer technical support (202) 551-8900, option #3. **Before submitting a filing, it is recommended to print it (using the Print Icon in the header). The current filing will show up in another tab, and you can save as pdf or print to a pdf file to save for your record. The Print button does not print the documents that you uploaded.
27
26
27
26