TINY HOUSE - lihiwa.files.wordpress.com · 2 3 PART TYPE SKU DESC QTY DEPT UNIT PRICE TOTAL...
18
TINY HOUSE BUILDING ASSEMBLY INSTRUCTIONS
Transcript of TINY HOUSE - lihiwa.files.wordpress.com · 2 3 PART TYPE SKU DESC QTY DEPT UNIT PRICE TOTAL...
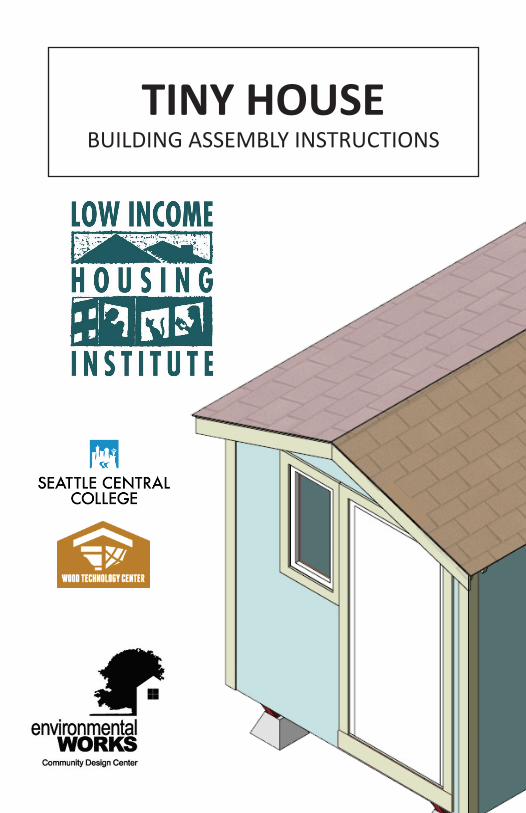
TINY HOUSEBUILDING ASSEMBLY INSTRUCTIONS
2 3
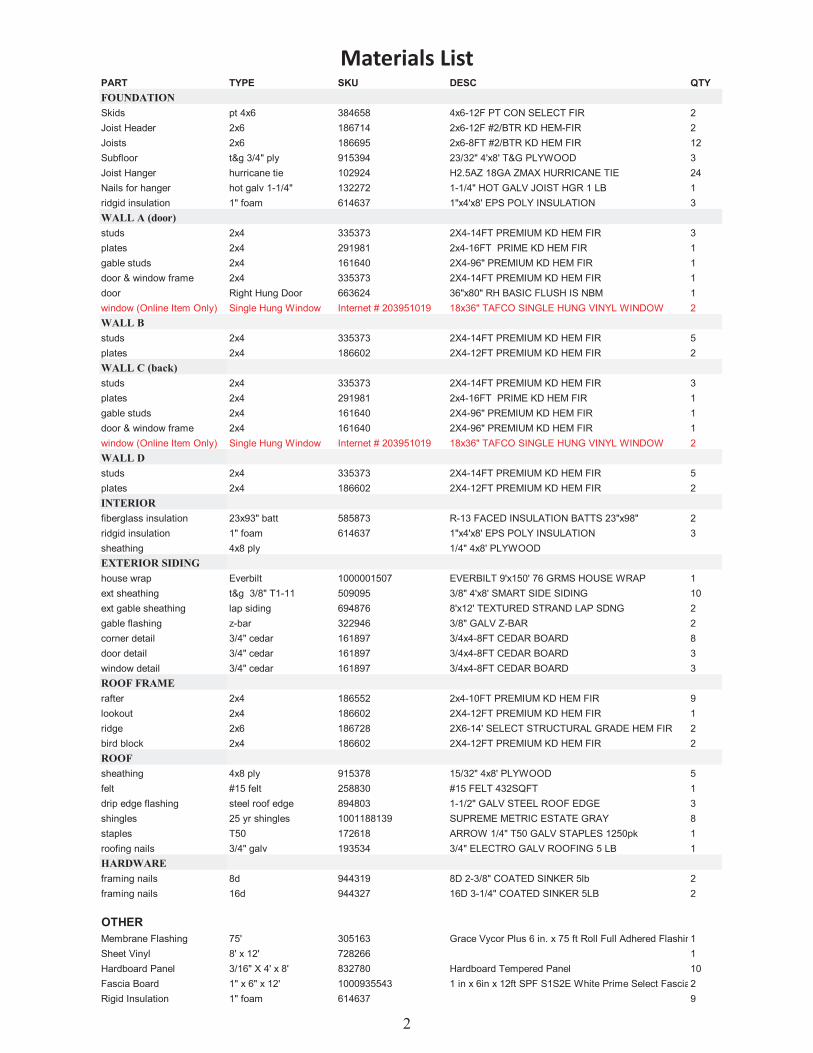
PART TYPE SKU DESC QTY DEPT UNIT PRICE TOTALFOUNDATIONSkids pt 4x6 384658 4x6-12F PT CON SELECT FIR 2 Lumber $31.97 $63.94Joist Header 2x6 186714 2x6-12F #2/BTR KD HEM-FIR 2 Lumber $5.77 $11.54Joists 2x6 186695 2x6-8FT #2/BTR KD HEM FIR 12 Lumber $3.89 $46.68Subfloor t&g 3/4" ply 915394 23/32" 4'x8' T&G PLYWOOD 3 Lumber $26.68 $80.04Joist Hanger hurricane tie 102924 H2.5AZ 18GA ZMAX HURRICANE TIE 24 Bldg Materials $0.58 $13.92Nails for hanger hot galv 1-1/4" 132272 1-1/4" HOT GALV JOIST HGR 1 LB 1 Hardware $4.78 $4.78ridgid insulation 1" foam 614637 1"x4'x8' EPS POLY INSULATION 3 Bldg Material $11.45 $34.35WALL A (door)studs 2x4 335373 2X4-14FT PREMIUM KD HEM FIR 3 Lumber $4.54 $13.62plates 2x4 291981 2x4-16FT PRIME KD HEM FIR 1 Lumber $5.19 $5.19gable studs 2x4 161640 2X4-96" PREMIUM KD HEM FIR 1 Lumber $2.12 $2.12door & window frame 2x4 335373 2X4-14FT PREMIUM KD HEM FIR 1 Lumber $4.54 $4.54door Right Hung Door 663624 36"x80" RH BASIC FLUSH IS NBM 1 Millwork $129.00 $129.00window (Online Item Only) Single Hung Window Internet # 203951019 18x36" TAFCO SINGLE HUNG VINYL WINDOW 2 Windows $79.00 $158.00WALL Bstuds 2x4 335373 2X4-14FT PREMIUM KD HEM FIR 5 Lumber $4.54 $22.70plates 2x4 186602 2X4-12FT PREMIUM KD HEM FIR 2 Lumber $3.89 $7.78WALL C (back)studs 2x4 335373 2X4-14FT PREMIUM KD HEM FIR 3 Lumber $4.54 $13.62plates 2x4 291981 2x4-16FT PRIME KD HEM FIR 1 Lumber $5.19 $5.19gable studs 2x4 161640 2X4-96" PREMIUM KD HEM FIR 1 Lumber $2.12 $2.12door & window frame 2x4 161640 2X4-96" PREMIUM KD HEM FIR 1 Lumber $2.12 $2.12window (Online Item Only) Single Hung Window Internet # 203951019 18x36" TAFCO SINGLE HUNG VINYL WINDOW 2 Windows $79.00 $158.00WALL Dstuds 2x4 335373 2X4-14FT PREMIUM KD HEM FIR 5 Lumber $4.54 $22.70plates 2x4 186602 2X4-12FT PREMIUM KD HEM FIR 2 Lumber $3.89 $7.78INTERIORfiberglass insulation 23x93" batt 585873 R-13 FACED INSULATION BATTS 23"x98" 2 Bldg Material $70.98 $141.96ridgid insulation 1" foam 614637 1"x4'x8' EPS POLY INSULATION 3 Bldg Material $11.45 $34.35sheathing 4x8 ply 1/4" 4x8' PLYWOOD LumberEXTERIOR SIDINGhouse wrap Everbilt 1000001507 EVERBILT 9'x150' 76 GRMS HOUSE WRAP 1 Bldg Materials $87.00 $87.00ext sheathing t&g 3/8" T1-11 509095 3/8" 4'x8' SMART SIDE SIDING 10 Lumber $29.16 $291.60ext gable sheathing lap siding 694876 8'x12' TEXTURED STRAND LAP SDNG 2 Lumber $8.68 $17.36gable flashing z-bar 322946 3/8" GALV Z-BAR 2 Bldg Materials $2.98 $5.96corner detail 3/4" cedar 161897 3/4x4-8FT CEDAR BOARD 8 Lumber $2.88 $23.04door detail 3/4" cedar 161897 3/4x4-8FT CEDAR BOARD 3 Lumber $2.88 $8.64window detail 3/4" cedar 161897 3/4x4-8FT CEDAR BOARD 3 Lumber $2.88 $8.64ROOF FRAMErafter 2x4 186552 2x4-10FT PREMIUM KD HEM FIR 9 Lumber $3.15 $28.35lookout 2x4 186602 2X4-12FT PREMIUM KD HEM FIR 1 Lumber $3.89 $3.89ridge 2x6 186728 2X6-14' SELECT STRUCTURAL GRADE HEM FIR 2 Lumber $6.82 $13.64bird block 2x4 186602 2X4-12FT PREMIUM KD HEM FIR 2 Lumber $3.89 $7.78ROOFsheathing 4x8 ply 915378 15/32" 4x8' PLYWOOD 5 Lumber $15.45 $77.25felt #15 felt 258830 #15 FELT 432SQFT 1 Bldg Materials $20.25 $20.25drip edge flashing steel roof edge 894803 1-1/2" GALV STEEL ROOF EDGE 3 Bldg Materials $2.65 $7.95shingles 25 yr shingles 1001188139 SUPREME METRIC ESTATE GRAY 8 Bldg Materials $24.33 $194.64staples T50 172618 ARROW 1/4" T50 GALV STAPLES 1250pk 1 Hardware $2.84 $2.84roofing nails 3/4" galv 193534 3/4" ELECTRO GALV ROOFING 5 LB 1 Hardware $10.47 $10.47HARDWAREframing nails 8d 944319 8D 2-3/8" COATED SINKER 5lb 2 Hardware $9.87 $19.74framing nails 16d 944327 16D 3-1/4" COATED SINKER 5LB 2 Hardware $9.87 $19.74
OTHER $1,834.82Membrane Flashing 75' 305163 Grace Vycor Plus 6 in. x 75 ft Roll Full Adhered Flashin1Sheet Vinyl 8' x 12' 728266 1Hardboard Panel 3/16" X 4' x 8' 832780 Hardboard Tempered Panel 10Fascia Board 1" x 6" x 12' 1000935543 1 in x 6in x 12ft SPF S1S2E White Prime Select Fascia 2Rigid Insulation 1" foam 614637 9
Materials List
2 3
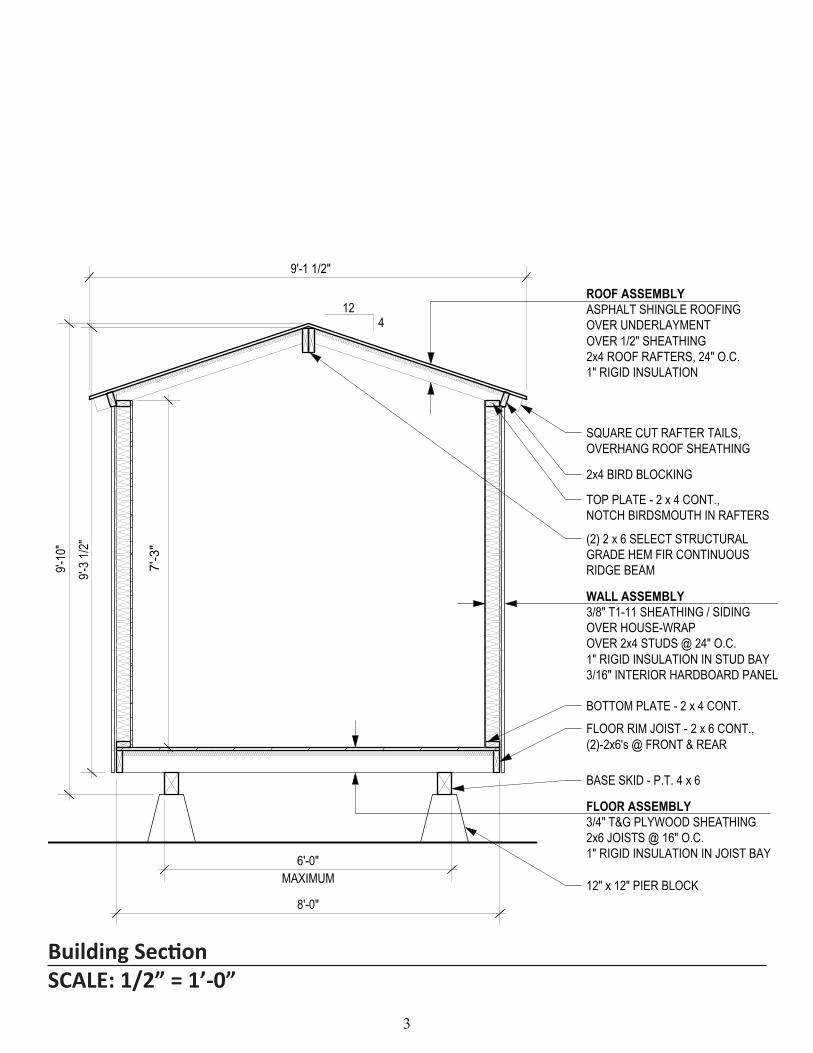
Building SectionSCALE: 1/2” = 1’-0”
4 5
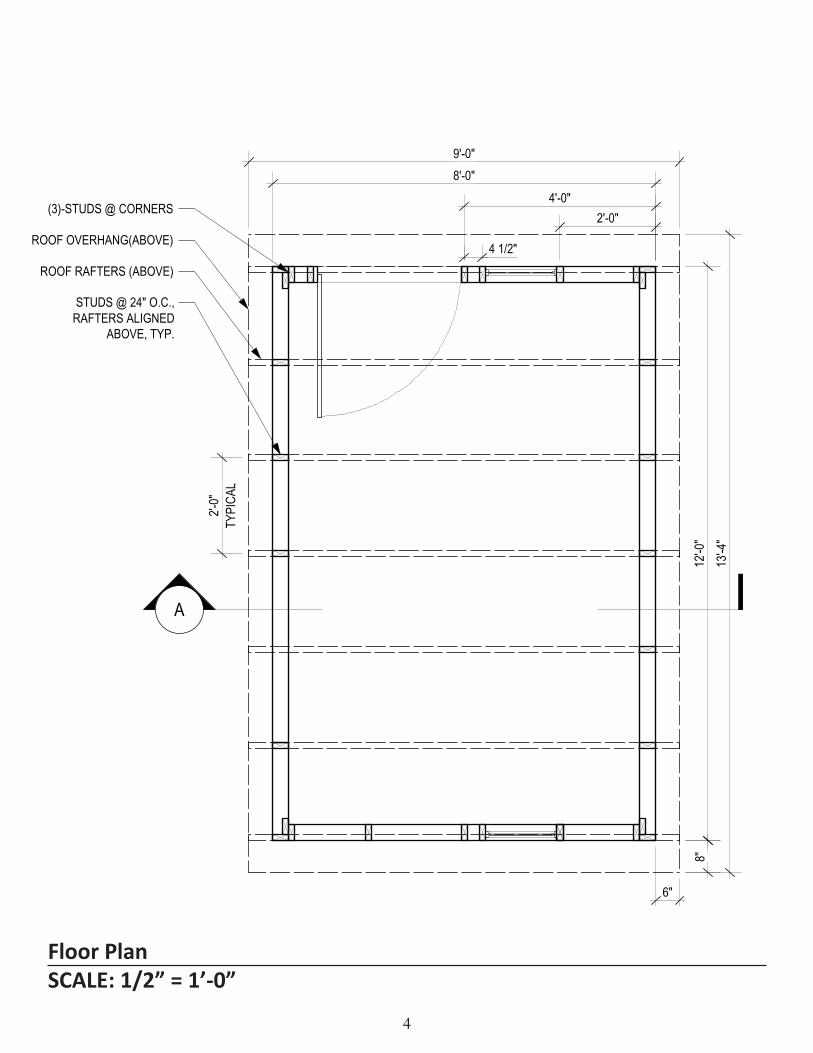
Floor PlanSCALE: 1/2” = 1’-0”

4 5
IntroductionConstruction sites can have numerous dangers. Start a project by making safety a primary concern at the job site. Recognize that safety is the responsibility of each member of the build team. Try to be conscious of the safety of others as well as yourself as you move around and work on the job site.
Be cautious in your work and ask questions of experienced build team members. Do not go ahead with a task if you are uncertain about how it is done, or if you are unable to do it. Safety is based on knowledge, skill and an attitude of care and concern. Before work starts a job supervisor should instruct each worker about the correct and proper procedures for performing each task. This should familiarize the worker with the potential hazards of doing the tasks and advise him or her as to how such hazards can be minimized or eliminated.
Guidelines for a Safe Attitude1. THINK before you do your work or task.2. If you are uncertain about how to do a task or how to operate a power tool — ASK A SUPERVISOR.3. Concentrate on your task and eliminate distractions.4. Know where the first-aid kit is located and how to get emergency help.5. Inspect all power tools, hand tools, ladders and scaffolding on a daily basis.6. Advise your supervisor IMMEDIATELY of any unsafe or hazardous tool or condition.
Proper Safety EquipmentProper clothing is as essential to safety as the proper selection and use of tools. Wear clothes and gloves that are appropriate for the work and weather conditions. Loose clothing is dangerous around power tools. Workers shall wear work boots or thick-soled shoes at all times when on a construction site. Any worker wearing sandals or other types of inappropriate footwear shall not be permitted to remain at a construction site. Hard hats are to be worn during the framing phase of construction, or when required by a supervisor, and are to be made available to workers on each job site at all times.Protective glasses will be available for every construction worker. A worker must wear protective glasses any time he or she is operating a power tool or when instructed by a supervisor.Each worker must wear a dust mask when installing insulation,
sanding or when instructed by a supervisor.Ear plugs must be worn when using a power tool for a prolonged period of time or when instructed by a supervisor. Ear plugs are to be made available to workers on each job site at all times.
Power Tools and Other Electrical EquipmentA power tool should not be used without proper instruction on its use and on what can happen if the tool is not used properly. The instruction should be done by a qualified person and should be given to all workers; even experienced do-it-yourselfers should receive instruction. The trainee should use the power tool in the presence of the instructor, until the instructor is satisfied that the trainee knows how to use the power tool properly.Never lower or carry a power tool by its cord. Clean tools daily. Power tools should be checked for defective switches, cords, plugs and proper grounding. Defective tools should not be used and should be reported to the supervisor (do not wait until the end of the day).
To avoid electrical shock, the following rules must be obeyed:1. A three-pronged plug must be used on all electric power tools.2. Extension cords must not have frayed insulation or be fastened with staples, hung from nails or suspended from wires.3. All temporary lights must be equipped with non-conductive guards.
Hand ToolsAlways select the correct type and size of tool for your work and be sure it is sharp and properly adjusted. Guard against using any tool if the handle is loose or in poor condition. Dull tools are hazardous to use because excessive force must be used to make them cut. Oil or dirt on a tool may cause it to slip and cause an injury. When using tools, hold them correctly. Most edged tools should be held in both hands with the cutting action away from yourself. Avoid using your hand or fingers as a guide to start a cut, but if it is necessary, use extreme caution.Handle and carry tools with care. Keep edged and pointed tools turned downward. Carry only a few tools at one time unless they are mounted in a special holder or carried in a tool belt. Anyone working with a hammer at a height should
Safety InformationAdapted from the Habitat for Humanity Construction and Safety Policy and Plan
http://www.habitatpgw.org/
6
wear a hammer loop or tool belt, and, when not in use, the hammer should be kept in the loop or belt and not placed on a sloping surface or in a precarious position. Do not carry sharp tools in your pockets. When not in use, tools should be kept in special boxes, chests or cabinets.
A special word on saws1. Don’t bind the blade of any saw. When cutting long panels, the blade may bind, and the saw mill will catch and kick back toward the operator. Use small wood wedges or shim shingles to spread the saw cut as you go along.2. Maintain the blade guard. A spring-actuated blade guard often can become bent and won’t slide quickly, or the spring can become stretched so the return is slow. Repair any damage to the guard as soon as it happens, and NEVER tie the guard back out of the way.3. Support what you are working on properly. Never attempt to cut something that could tilt or fall and cause the saw to slip.
LaddersInspect a ladder before you use it. If the ladder is unsafe, don’t use it. Look for wear and tear, loose rungs and defects.Use a ladder that will reach the work. An extension ladder should reach 3 feet above the work level. Move your ladder with your work. If both of your shoulders are extended outside the ladder while you are working, you are reaching too far. When using an extension ladder, use the “4-to-1” rule: For every 4 feet of height, move the bottom of the ladder 1 foot away from the wall. A ladder is pitched at the proper, safe angle if you can grasp a rung at shoulder height.Place your ladder on solid footing. If there is a danger of the ladder moving while you work, tie it down. If there is a danger that the ladder will be hit, barricade it. If the feet of the ladder are not level, dig the ground out under one foot with the claw of a hammer rather than raise one foot with blocks.Never use an aluminum ladder in the vicinity of electrical lines and never use a ladder outdoors during inclement weather or on very windy days.Carry tools and materials in proper carrying devices and keep your hands free for climbing. When climbing, always face the ladder.
Clean Work SiteA clean work place is a safe work place. This refers to the neatness and good orderof the construction site. Maintaining good housekeeping contributes to the efficiency of the worker and is important in preventing accidents.Position building materials and supplies in carefully laid out piles to allow adequate aisles and walkways. Clean up all
rubbish and scrap materials on a daily basis. Do not permit blocks of wood, nails, bolts, empty cans, pipe, wire or other materials to accumulate on the work site. They interfere with work and can constitute a hazard. Keep tools and equipment that are not being used in chests, panels or tool boxes. This protects the tools and the workers.Never leave a work site unguarded unless all tools and materials have been properly secured.
Emergency Medical CareIf someone is injured on the job, contact your supervisor immediately and summon any needed medical help. You also should use the supplies located in the first-aid kit to stabilize the injury as much as possible until medical help arrives.
6 7
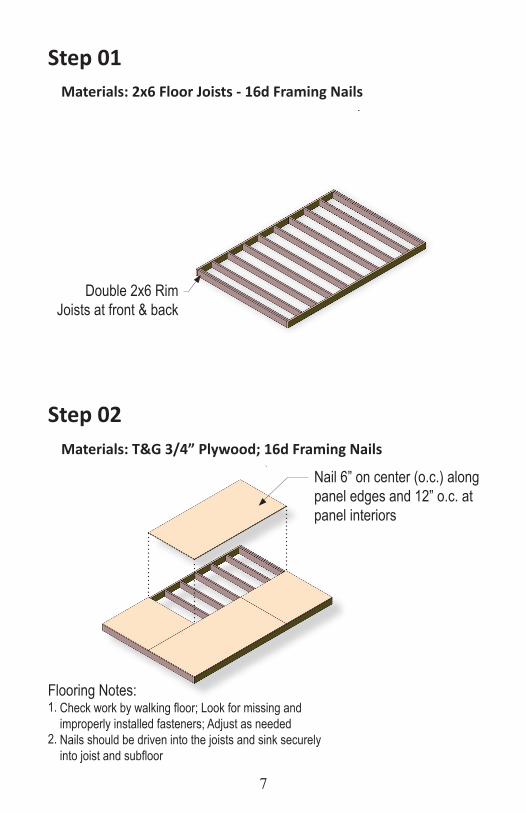
Double 2x6 Rim Joists at front & back
Nail 6” on center (o.c.) along panel edges and 12” o.c. at panel interiors
Flooring Notes:1.
2.
Check work by walking floor; Look for missing and improperly installed fasteners; Adjust as neededNails should be driven into the joists and sink securely into joist and subfloor
Step 01
Step 02
Materials: 2x6 Floor Joists - 16d Framing Nails
Materials: T&G 3/4” Plywood; 16d Framing Nails
8 9
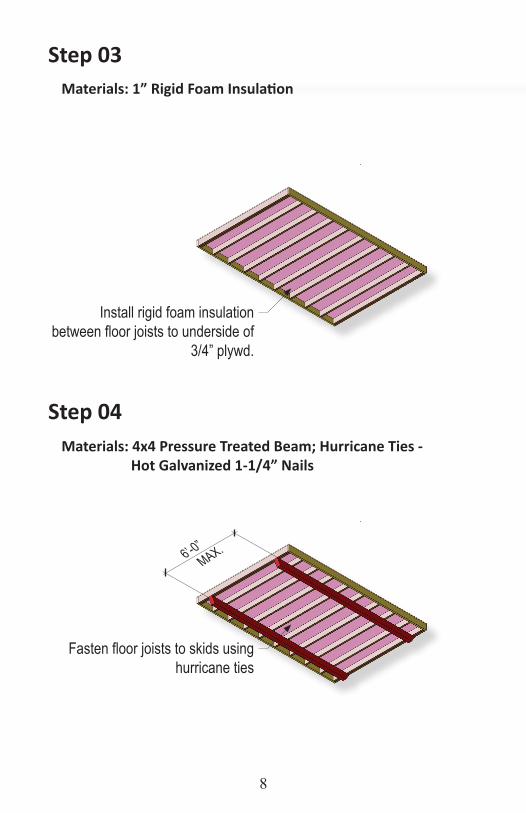
Install rigid foam insulation between floor joists to underside of
3/4” plywd.
Fasten floor joists to skids using hurricane ties
Step 03
Step 04
Materials: 1” Rigid Foam Insulation
Materials: 4x4 Pressure Treated Beam; Hurricane Ties - Hot Galvanized 1-1/4” Nails
6’-0” MAX.
8 9
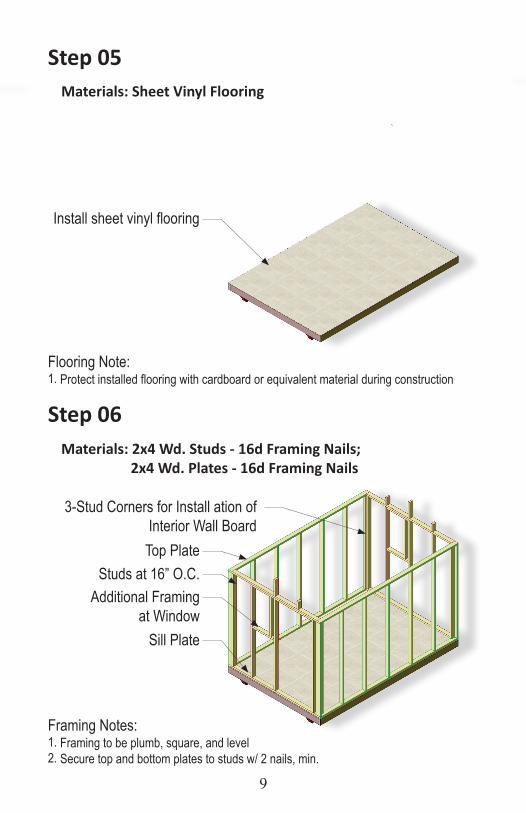
Flooring Note:1.
Framing Notes:1.2.
Protect installed flooring with cardboard or equivalent material during construction
Framing to be plumb, square, and levelSecure top and bottom plates to studs w/ 2 nails, min.
Studs at 16” O.C.Top Plate
3-Stud Corners for Install ation of Interior Wall Board
Sill Plate
Additional Framing at Window
Install sheet vinyl flooring
Step 05
Step 06
Materials: Sheet Vinyl Flooring
Materials: 2x4 Wd. Studs - 16d Framing Nails; 2x4 Wd. Plates - 16d Framing Nails
10 11
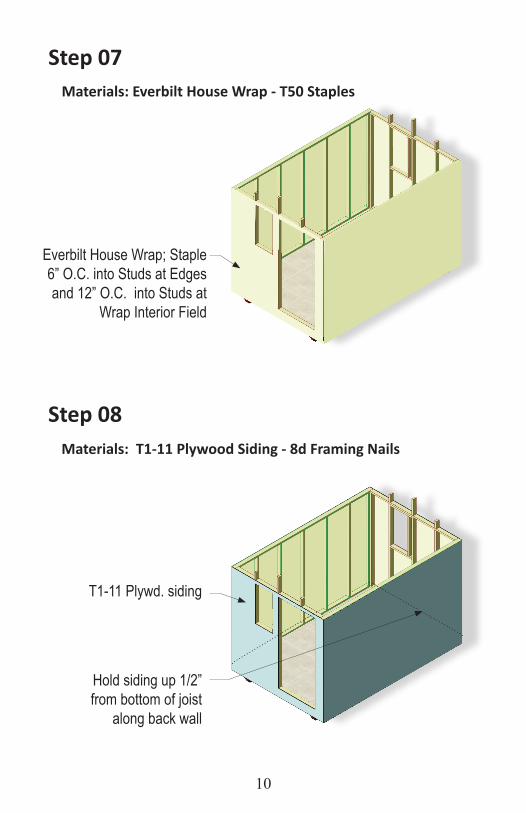
Everbilt House Wrap; Staple 6” O.C. into Studs at Edges and 12” O.C. into Studs at
Wrap Interior Field
T1-11 Plywd. siding
Hold siding up 1/2” from bottom of joist
along back wall
Step 07Materials: Everbilt House Wrap - T50 Staples
Step 08 Materials: T1-11 Plywood Siding - 8d Framing Nails
10 11
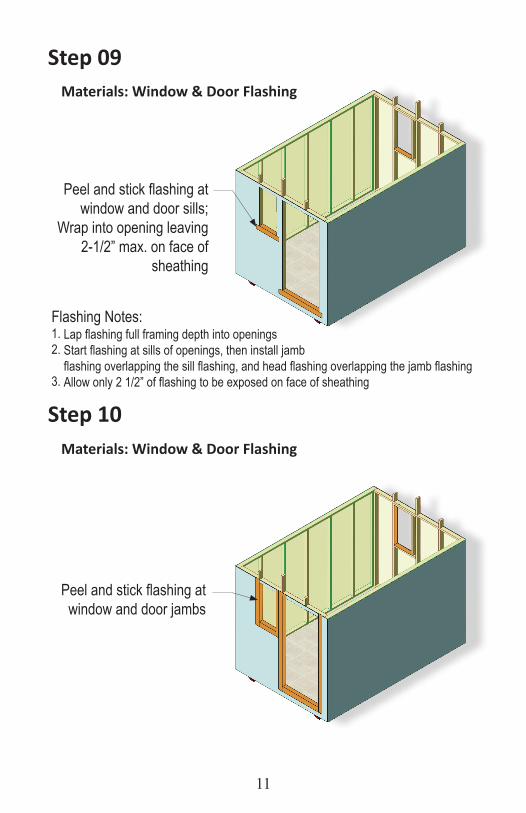
Step 09
Step 10
Materials: Window & Door Flashing
Materials: Window & Door Flashing
Peel and stick flashing at window and door jambs
Peel and stick flashing at window and door sills;
Wrap into opening leaving 2-1/2” max. on face of
sheathing
Flashing Notes:1.2.
3.
Lap flashing full framing depth into openingsStart flashing at sills of openings, then install jamb flashing overlapping the sill flashing, and head flashing overlapping the jamb flashingAllow only 2 1/2” of flashing to be exposed on face of sheathing
12 13
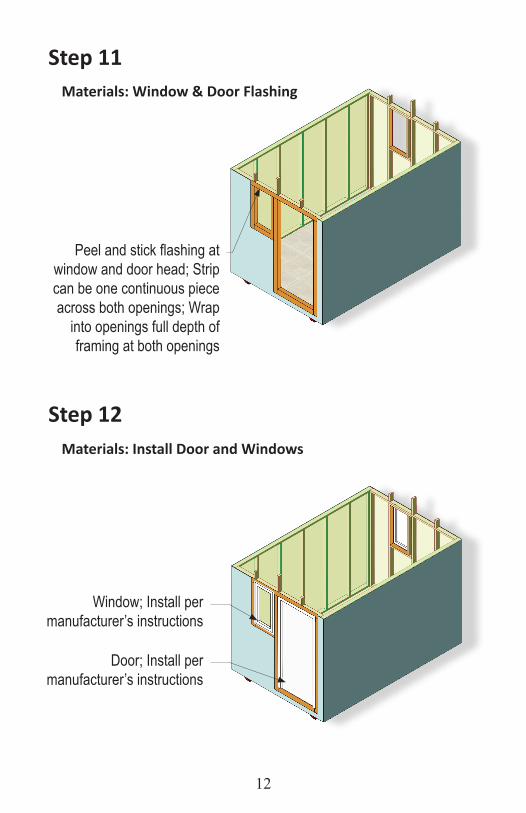
Step 11
Step 12
Materials: Window & Door Flashing
Materials: Install Door and Windows
Peel and stick flashing at window and door head; Strip can be one continuous piece across both openings; Wrap
into openings full depth of framing at both openings
Window; Install per manufacturer’s instructions
Door; Install per manufacturer’s instructions
01
12 13
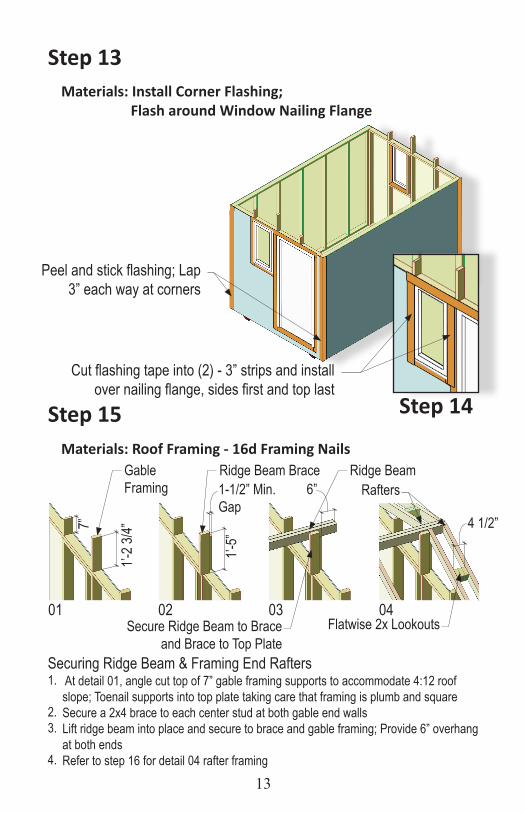
Step 13
Step 15
Materials: Install Corner Flashing; Flash around Window Nailing Flange
Materials: Roof Framing - 16d Framing Nails
At detail 01, angle cut top of 7” gable framing supports to accommodate 4:12 roof slope; Toenail supports into top plate taking care that framing is plumb and squareSecure a 2x4 brace to each center stud at both gable end wallsLift ridge beam into place and secure to brace and gable framing; Provide 6” overhang at both endsRefer to step 16 for detail 04 rafter framing
Securing Ridge Beam & Framing End Rafters1.
2.3.
4.
Gable Framing
Ridge Beam Brace Ridge Beam
Secure Ridge Beam to Brace and Brace to Top Plate
Rafters
Flatwise 2x Lookouts01 02
1-1/2” Min.Gap
4 1/2”
6”
03 04
1’-5”
1’-2 3
/4”7”
Peel and stick flashing; Lap 3” each way at corners
Cut flashing tape into (2) - 3” strips and install over nailing flange, sides first and top last
Step 14
14 15
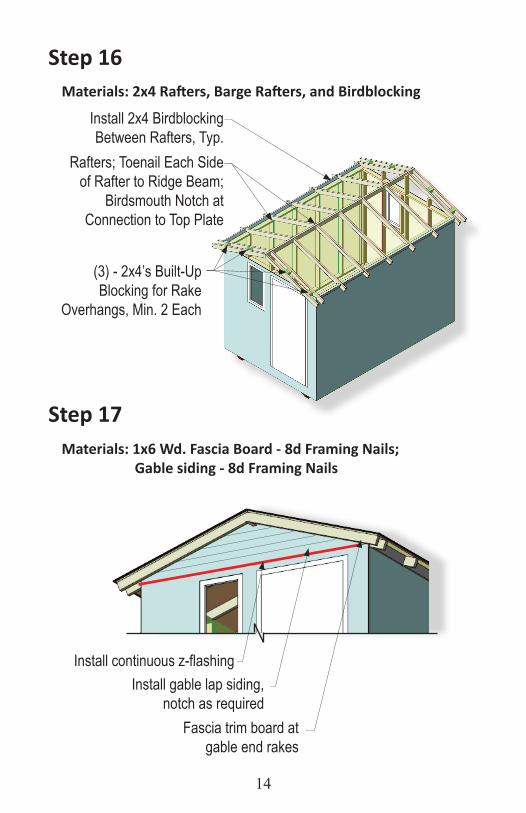
Step 16
Step 17
Materials: 2x4 Rafters, Barge Rafters, and Birdblocking
Materials: 1x6 Wd. Fascia Board - 8d Framing Nails; Gable siding - 8d Framing Nails
Rafters; Toenail Each Side of Rafter to Ridge Beam;
Birdsmouth Notch at Connection to Top Plate
(3) - 2x4’s Built-Up Blocking for Rake
Overhangs, Min. 2 Each
Install 2x4 Birdblocking Between Rafters, Typ.
Fascia trim board at gable end rakes
Install gable lap siding, notch as required
Install continuous z-flashing
14 15
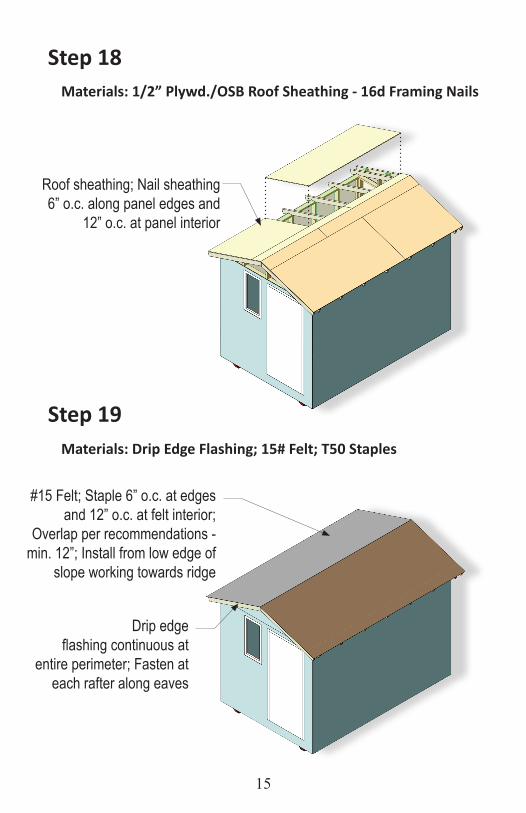
Drip edge flashing continuous at
entire perimeter; Fasten at each rafter along eaves
#15 Felt; Staple 6” o.c. at edges and 12” o.c. at felt interior;
Overlap per recommendations - min. 12”; Install from low edge of
slope working towards ridge
Step 18
Step 19
Materials: 1/2” Plywd./OSB Roof Sheathing - 16d Framing Nails
Materials: Drip Edge Flashing; 15# Felt; T50 Staples
Roof sheathing; Nail sheathing 6” o.c. along panel edges and
12” o.c. at panel interior
16 17
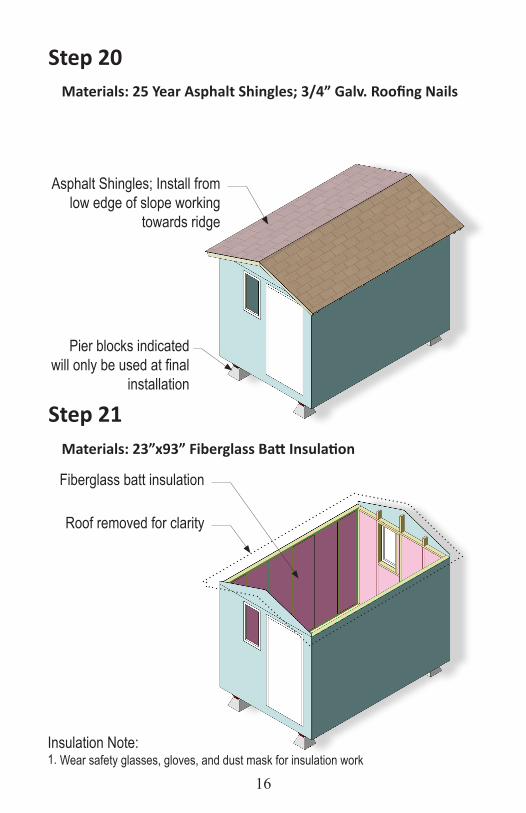
Roof removed for clarity
Fiberglass batt insulation
Insulation Note:1. Wear safety glasses, gloves, and dust mask for insulation work
Step 20
Step 21
Materials: 25 Year Asphalt Shingles; 3/4” Galv. Roofing Nails
Asphalt Shingles; Install from low edge of slope working
towards ridge
Pier blocks indicated will only be used at final
installation
Materials: 23”x93” Fiberglass Batt Insulation
16 17
Roof removed for clarity
Fiberglass batt insulation
Insulation Note:1. Wear safety glasses, gloves, and dust mask for insulation work
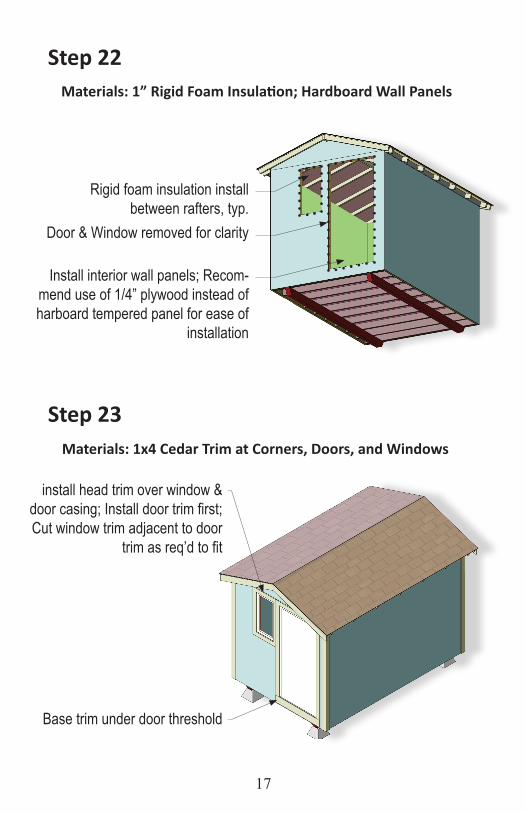
Materials: 1x4 Cedar Trim at Corners, Doors, and Windows
install head trim over window & door casing; Install door trim first; Cut window trim adjacent to door
trim as req’d to fit
Base trim under door threshold
Door & Window removed for clarity
Rigid foam insulation install between rafters, typ.
Install interior wall panels; Recom-mend use of 1/4” plywood instead of harboard tempered panel for ease of
installation
Step 22Materials: 1” Rigid Foam Insulation; Hardboard Wall Panels
Step 23