TimeClock Plus v4.0 for Windows
148
TimeClock Plus v4.0 for Windows First Edition Printed April 15, 2001, San Angelo, Texas Copyright © 2001 Data Management, Inc. All rights reserved. Data Management, Incorporated 3322 West Loop 306 San Angelo, TX 76904 (915) 223-9500 [email protected]
Transcript of TimeClock Plus v4.0 for Windows

TimeClock Plus v4.0 for Windows
First Edition Printed April 15, 2001, San Angelo, Texas Copyright © 2001 Data Management, Inc. All rights reserved. Data Management, Incorporated 3322 West Loop 306 San Angelo, TX 76904 (915) 223-9500 [email protected]


TABLE OF CONTENTS Welcome to TimeClock Plus..................................................................................................................1
Minimum Requirements.......................................................................................................................................................1 How this user manual is organized......................................................................................................................................1 Included Applications...........................................................................................................................................................1 Optional Accessories and Software .....................................................................................................................................2
What’s New in Version 4.0 .....................................................................................................................3 TimeClock Manager.............................................................................................................................................................3 Reports ................................................................................................................................................................................3 TimeClock WinRemote ........................................................................................................................................................4 AutoUpdate..........................................................................................................................................................................4 On-Screen TimeClock .........................................................................................................................................................4 Job Costing Module .............................................................................................................................................................4
Getting Started with TimeClock Plus....................................................................................................5 Installing the Single User Version of TimeClock Plus 4.0 ....................................................................................................5 Installing Multi-User Version of TimeClock Plus 4.0 ............................................................................................................6 Setting up a Serial Remote Data Terminal ........................................................................................................................11 Setting up an Ethernet Remote Data Terminal ..................................................................................................................12
TimeClock Plus Concepts....................................................................................................................13
TimeClock Manager..............................................................................................................................15 1.0 File Menu.......................................................................................................................................................................15
1.1 Import Employee Information.......................................................................................................................................15 1.2 Import Employee Job Information ................................................................................................................................19 1.3 Import Employee Hours ...............................................................................................................................................19 1.4 Login/Logout ................................................................................................................................................................19 1.5 Select Company ..........................................................................................................................................................19 1.6 Quick Setup Wizard .....................................................................................................................................................22 1.7 Close Current Week ....................................................................................................................................................23 1.8 Print Setup...................................................................................................................................................................23 1.9 Exit...............................................................................................................................................................................23
2.0 Edit Menu ......................................................................................................................................................................24 3.0 View Menu.....................................................................................................................................................................24 4.0 Employee Menu ............................................................................................................................................................24
4.1 Add/Edit Option............................................................................................................................................................24 4.2 Delete ..........................................................................................................................................................................35 4.3 Move/Renumber ..........................................................................................................................................................36 4.4 Template......................................................................................................................................................................36 4.5 Default Information ......................................................................................................................................................37 4.6 Print Information ..........................................................................................................................................................37 4.7 Export Information .......................................................................................................................................................38 4.8 Global Modification ......................................................................................................................................................39 4.9 Edit Hours ....................................................................................................................................................................40 4.10 Quick Add Hours........................................................................................................................................................45 4.11 Global Record Addition..............................................................................................................................................45 4.12 Export Raw Hours......................................................................................................................................................46 4.13 Approval Manager .....................................................................................................................................................46 4.14 Messaging .................................................................................................................................................................47
5.0 Reports Menu................................................................................................................................................................48 5.1 Pay Period ...................................................................................................................................................................48 5.2 Approaching Overtime .................................................................................................................................................51 5.3 Employee Job Information ...........................................................................................................................................52
6.0 Export Menu..................................................................................................................................................................52 6.1 Pay Period ...................................................................................................................................................................52 6.2 Employee Job Information ...........................................................................................................................................53 6.3 Job Codes ...................................................................................................................................................................54

6.4 Raw Hours ...................................................................................................................................................................54 7.0 Tools Menu....................................................................................................................................................................54
7.1 Who’s Here..................................................................................................................................................................54 7.2 Who’s Absent...............................................................................................................................................................55 7.3 Attendance Monitor......................................................................................................................................................55 7.4 Call List ........................................................................................................................................................................56 7.5 Re-index Data Files .....................................................................................................................................................57 7.6 Optimize Data Files .....................................................................................................................................................58 7.7 Display Labor Cost ......................................................................................................................................................58 7.8 View Hour Edit Log ......................................................................................................................................................60 7.9 View Override Log .......................................................................................................................................................61 7.10 Reset Tracked Fields.................................................................................................................................................62 7.11 Backup System Information.......................................................................................................................................63 7.12 Restore System Information ......................................................................................................................................63 7.13 Calculator ..................................................................................................................................................................64 7.14 Calendar ....................................................................................................................................................................64
8.0 Configuration Menu......................................................................................................................................................64 8.1 Master Job Code List...................................................................................................................................................64 8.2 Master Cost Code List .................................................................................................................................................67 8.3 Accrual Rules...............................................................................................................................................................69 8.4 Holiday Calendar .........................................................................................................................................................72 8.5 User List ......................................................................................................................................................................73 8.6 Preferences .................................................................................................................................................................75 8.7 Minor Tracking .............................................................................................................................................................81 8.8 Passwords ...................................................................................................................................................................82 8.9 Footers ........................................................................................................................................................................82
9.0 Launch Menu ................................................................................................................................................................83 10.0 Reports Appendix.......................................................................................................................................................83
10.1 Payroll Reports ..........................................................................................................................................................83 10.2 Job Code Reports......................................................................................................................................................84 10.3 Period Reports...........................................................................................................................................................84 10.4 Scheduler ..................................................................................................................................................................84 10.5 Miscellaneous ............................................................................................................................................................85 10.6 Cost Code Reports (Requires Job Cost Module).......................................................................................................85 10.7 Accruals.....................................................................................................................................................................85
11.0 Criteria Appendix........................................................................................................................................................85
TimeClock Scheduler ...........................................................................................................................87 1.0 File Menu.......................................................................................................................................................................87
1.1 Open Schedule ............................................................................................................................................................87 1.2 Import Schedule Data ..................................................................................................................................................88 1.3 Export Schedule Data..................................................................................................................................................88 1.4 Login/Logout ................................................................................................................................................................88 1.5 Preferences .................................................................................................................................................................88 1.6 Print Setup...................................................................................................................................................................89 1.7 Exit...............................................................................................................................................................................89
2.0 View Menu.....................................................................................................................................................................89 2.1 Employee Schedule.....................................................................................................................................................89 2.2 Weekly Overall Schedule.............................................................................................................................................92 2.3 Daily Overall Schedule ................................................................................................................................................93 2.4 Change Schedule Criteria............................................................................................................................................95 2.5 Tool Bar .......................................................................................................................................................................95
3.0 Reports Menu................................................................................................................................................................95 3.1 Period Reports.............................................................................................................................................................95
4.0 Tools Menu....................................................................................................................................................................97 4.1 Edit Shift Pool ..............................................................................................................................................................97 4.2 Edit Necessary Shifts...................................................................................................................................................97 4.3 Build Necessary Shifts.................................................................................................................................................98 4.4 Re-build Shift Assignments..........................................................................................................................................99

4.5 Edit Employee Availability............................................................................................................................................99 4.6 Edit Employee Schedule Requests..............................................................................................................................99 4.7 Delete Past Schedules ................................................................................................................................................99 4.8 Re-index Data Files ...................................................................................................................................................100 4.9 Optimize Data Files ...................................................................................................................................................100 4.9 Transfer Job Information............................................................................................................................................100 4.11 Calculate Scheduled Labor Cost .............................................................................................................................101
TimeClock AutoUpdate ......................................................................................................................102 1.0 Available ....................................................................................................................................................................102 2.0 Update Disk ...............................................................................................................................................................102 3.0 Installed .....................................................................................................................................................................102 4.0 Options ......................................................................................................................................................................103 5.0 Register .....................................................................................................................................................................103 6.0 Support ......................................................................................................................................................................103
TimeClock WinRemote.......................................................................................................................105 1.0 WinRemote System Configuration.............................................................................................................................105 2.0 Configure Port............................................................................................................................................................108 3.0 Start/Stop Button .......................................................................................................................................................111 4.0 Activity Button ............................................................................................................................................................111 5.0 Locate Button.............................................................................................................................................................111 6.0 Exit Button .................................................................................................................................................................112
TimeClock Time Server ......................................................................................................................113 1.0 Service Button ...........................................................................................................................................................113 2.0 Clear Button...............................................................................................................................................................113 3.0 Options Button ...........................................................................................................................................................113 4.0 Shutdown Button .......................................................................................................................................................113
On-Screen TimeClock.........................................................................................................................115 1.0 TimeClock Plus Configuration....................................................................................................................................115
Ethernet Remote Data Terminal Setup .............................................................................................119 1.0 Configuring the Ethernet Terminal .............................................................................................................................119 2.0 Configuring the WinRemote Software for the Ethernet Terminal. ..............................................................................119 3.0 Frequently Asked Questions:.....................................................................................................................................119 4.0 Trouble Shooting .......................................................................................................................................................120
Biometric Remote Data Terminal Setup ...........................................................................................121 1.0 Installing the WinRemote Biometric Module ..............................................................................................................121 2.0 Configuring the WinRemote Software........................................................................................................................121 4.0 Optimizing Fingerprint Recognition............................................................................................................................125
TimeClock Plus Fingerprint Scanner ................................................................................................129 1.0 System Requirements ...............................................................................................................................................129 2.0 Installing and Configuring Hardware..........................................................................................................................129 3.0 Installing and Configuring Software ...........................................................................................................................130 4.0 Configuring the Finger Scan Module .........................................................................................................................130 5.0 Enrolling An Employee ..............................................................................................................................................133 6.0 Fingerprint Manager ..................................................................................................................................................133 7.0 Common Errors .........................................................................................................................................................134
Glossary ..............................................................................................................................................135
Frequently Asked Questions .............................................................................................................137
Index ....................................................................................................................................................139


TimeClock Plus 4.0 1
Welcome to TimeClock Plus
Congratulations on your purchase of TimeClock Plus 4.0 for Windows. Your decision to put TimeClock Plus to work for your company will start increasing your bottom line immediately, in many cases recovering the investment in as little as one pay period. In addition to the many benefits you will gain by using TimeClock Plus, your employees will feel more secure in knowing that the hours they are working are now being tracked and totaled accurately.
Gone are the days of hassling with timecards only to find mistakes in calculating employee hours. Past time and attendance records are available at your fingertips, including verification of employee hours by the employee and by management.
With payroll being one of the highest costs of doing business today, you will find the many management tools available in TimeClock Plus invaluable. From controlling employee clock times to controlling overtime hours, you will be in control of your payroll.
Scheduling employees with TimeClock Plus Scheduler will take a fraction of the time it used to take using the manual method. Matching employees with shifts will help insure that you don’t leave yourself short at any time. Use the schedule to project your payroll costs, restrict employees from clocking in early or late, and compare actual to scheduled labor costs, helping you to find ways to trim your labor costs. Copy the current schedule, make any adjustments necessary and you now have next week’s schedule ready.
Minimum Requirements TimeClock Plus has certain software and hardware requirements to ensure proper operation of the software.
• Pentium 66 or above • Windows 95 or later / Windows NT 4.0 or later • 16MB RAM (32MB recommended) • 10 gigabytes hard disk space on server or single user install • Mouse or other pointing device • CD-ROM drive
How this user manual is organized This manual describes all of the controls and functions of the TimeClock Plus Software.
Most of the common functions in TimeClock Plus are very simple to understand. If you have trouble understanding any functions, you can access the online help by pressing F1 or, refer to the application’s section in this manual.
Included Applications TimeClock Plus for Windows version 4.0 is distributed on CD-ROM media. If you do not have a CD-ROM drive on your computer, you can create diskettes from the CD-ROM using the MAKEDISK utility located in the UTILITY directory on the CD. TimeClock Plus is a full 32-bit program compatible with Windows 95 and later, and Windows NT 4.0 and later.
The following is a list of the components that come with the TimeClock Plus installation. On Screen TimeClock: This application is used to clock in and out from the PC desktop. It is used mainly in environments that are networked, with each employee having access to a PC. TimeClock Manager: The TimeClock Manager allows management to perform all management tasks in the TimeClock Plus system. Tasks such as adding individuals to the system, editing hours, printing reports, and exporting data to payroll can all be done from the TimeClock Manager. TimeClock Scheduler: TimeClock Scheduler is used to build employee schedules. It is necessary to schedule employees in order to take advantage of absent and tardy reports as well as rounding to scheduled shifts. Time Server: Time Server is designed to run on a workstation or server. This program allows your other workstations on your network to obtain the time from the workstation running Time Server. This application is only available in the network version of TimeClock Plus. WinRemote: WinRemote is designed to run as a desktop application on Windows 95 and above or as a desktop application or service on Windows NT 4.0 and above. This program is used to control Remote Data Terminals (RDT) that are connected to a PC. AutoUpdate: AutoUpdate is designed to periodically update the TimeClock Plus applications using the Internet. This application should be run on a regular basis to ensure that you are running the latest versions of all software. The workstation using the AutoUpdate program will need Internet access.

2 TimeClock Plus 4.0
Report Printer: The report printer application is used to view reports that have been printed to a file. This application can be run from any computer, even if TimeClock Plus is not installed. Companies that must send reports to another site for viewing or printing should use this application.
Optional Accessories and Software The following is a list of optional components that can be purchased separately to enhance your TimeClock Plus purchase. Serial Remote Data Terminals: These Remote Data Terminals plug into a serial port, in the back of your PC. TimeClock Plus Remote Data Terminals allow employees to clock in and out from locations away from the PC. These Remote Data Terminals can be located up to 1000 feet away from the PC based upon the additional wiring that you order. They can be purchased with magnetic or barcode readers attached. Ethernet Remote Data Terminals: These Remote Data Terminals plug directly into a LAN drop without the need of having a PC nearby. They require a TCP/IP based network. The terminals can be purchased with magnetic or barcode readers attached. Ethernet terminals are ideal solutions for wide area networks (WAN) because of the minimal data transmitted to the device. Biometric Remote Data Terminals: The Biometric Remote Data Terminals are available with both Ethernet and Serial connectivity. Biometric terminals use fingerprint recognition to clock employees in and out instead of using barcode, magnetic, or manually entered employee numbers. Biometric identification eliminates unauthorized “buddy punching”. Payroll Interface Modules: These modules allow you to export your hourly information directly to your payroll or accounting package. This eliminates having to print out your reports and then manually enter the information into the accounting package. Hamster / Mouse Fingerprint Recognition: TimeClock Plus offers Hamster fingerprint recognition. This device is used to verify an employee’s identity when clocking in and out from the On-Screen TimeClock application. A biometric device that is integrated with a mouse or keyboard can also be purchased. Barcode Software: TimeClock Plus offers barcode-printing software. The barcode software allows you to make your own barcodes to work with your barcode reader attached to a Remote Data Terminal. Job Costing Module: The Job Costing Module is an add-on that enables tracking of time spent on projects or tasks. It adds multiple layers of detail to the job code tracking that is already included in TimeClock Plus. Auto Import: The Auto Import application is used to perform an unattended import of clock data. This is useful when using another application to collect the data for import into TimeClock Plus.

TimeClock Plus 4.0 3
What’s New in Version 4.0 TimeClock Manager
• New Edit Employee and Edit Hours window for easier editing • Multiple templates for employee information • Split Shift function which simplifies editing an employee’s hours if they forget to clock in/out – Makes adding breaks
easier • Minimum break lengths to ensure employees to take their full required breaks • Each employee in TimeClock Plus can now have up to sixty job codes. • JPEG files are now supported for employee photos as well as bitmaps • Employee e-mail addresses can now be saved with employee information • Employees that clock in with a job code configured for Auto Out will now appear in the Who’s Here list • When editing an employee, the names can now be sorted by number, first name, last name, or classification. • Ability to force overtime on shifts • Added additional overtime calculation for 7th day overtime and holiday time • Now able to calculate overtime 2 for weekly overtime (i.e. Overtime 1 for hours over 40 hours per week and Overtime 2
for hours over 60 hours) • Advanced holiday tracking which allows each employee to earn different overtime rates or premium pay for time worked
on configured holidays. • Customizable user-defined accrual rules to accrue hours into any job code. • Quick Setup Wizard • Added ability to globally add hours to a previous week. • Improved messaging capabilities allowing for multiple messages to be sent to the same employee. • Multiple Break codes (types) for better tracking (i.e. Lunch, Restroom…) • Ability to add comments about a particular shift. • Override log implemented to show when a restriction was overridden, who made the override action, who the employee
clocking in/out was, where the override was entered, and the reason for the override • More tracking added for the Edit Hour log to show where the edit transaction was made. • Break lengths can now be rounded for easier hour calculations. • Many added user restrictions for greater control of user access. • Calculator is now able to compute totals for hours in the Hours/Minutes format. • Added export capability to the Master Job Code list. • Now able to disable Auto Deduct when adding a shift in Edit Hours. • Added Approval Manager for determining shifts that have or have not been approved by employees and/or managers.
Reports • Fully customizable reports allowing each report to be customized individually, including headers which allow company
names to be entered (i.e. Complete Payroll can be changed to Joe Bob’s Payroll Report). • Any printable font can now be used for printing reports. • Reports can now be printed for an extended period of time, whereas most previously were limited to one month. • Reports can now be printed to file and can be viewed with the report printing application at another location that may or
may not have TimeClock Plus installed. • Ability to change the format of the time shown on the reports to different formats, such as military time, hours/minutes,
hours/hundredths. • Several additional reports including a long shift report, accrual history, and schedule variance.

4 TimeClock Plus 4.0
TimeClock WinRemote • Added more user level restrictions for editing hours on the Remote Data Terminal to restrict what operations can be
performed. • Ports can now be described for easier identification (e.g. Front office). • WinRemote can now be run as a service in Windows 2000 and Windows NT, which will allow it to be active even when
no user is logged into the computer.
AutoUpdate • AutoUpdate now utilizes HTTP transferring instead of FTP transferring for faster file downloads. • Added Info button to the availability list to enable viewing of the changes made to the applications being updated.
On-Screen TimeClock • Added a View button to make viewing hours and schedules possible without having to use the clock in or out buttons. • Added touch screen compatible screens to assist touch screen users in clocking in and out. • Added the ability to enter scheduling requests
Job Costing Module • Multi Layer job costing (i.e. Level 1, Level 2, Level 3) • Ability to track the status of a job costing project (i.e. Begin, Start, End) • New reports to detail the breakdown of each job costing level. • Four fields per job code that are user definable and can be used for tracking detailed information about each cost code.

TimeClock Plus 4.0 5
Getting Started with TimeClock Plus
The contents of this section will guide you through the initial setup of your TimeClock Plus software and hardware.
• Installing the TimeClock Plus Software • Adding Users • Adding Job Codes • Setting up Tracked Fields • Setting the Pay Frequency • Setting Up Accruals • Creating Templates • Adding Miscellaneous Information
Installing the Single User Version of TimeClock Plus 4.0 Note: If you are upgrading from a previous version of TimeClock Plus and wish to update your information to Version 4.0, you should make a backup of your current data directory.
The single user version of TimeClock Plus can be installed by running the setup.exe program found on the TimeClock Plus CD-ROM.
1) Insert the TimeClock Plus CD-ROM into your CD-ROM drive. 2) If auto-run is enabled a menu will appear. If it is not enabled, click on the Start menu and select Run. Enter X:\SETUP in
the program name and click the OK button (where X: is the drive letter of your CD-ROM drive).
3) Click on Install TimeClock Plus Server/Single User to launch the InstallShield Setup Wizard.
4) Enter your company information and serial number which can be located serial number 5) Select the Destination folder to which you will be installing the software. If you are upgrading from version 3.0, you can
install 4.0 into the same directory. If you are upgrading from a version prior to 4.0 or you would like to continue to use your previous version, you should install TimeClock Plus 4.0 into a different directory.
6) Select the components to install on your system. By default all items are selected for install. These are the recommended selections.
The InstallShield Wizard will complete the set up of TimeClock Plus Version 4.0 on your system.
Once the system is installed, you should launch TimeClock Manager to configure TimeClock Plus. Log into TimeClock Manager using the SUPERVISOR user ID to perform the initial configuration. After the first log in you will be prompted to run the Quick Setup Wizard. For more information on running this wizard, refer to page 6.

6 TimeClock Plus 4.0
Installing Multi-User Version of TimeClock Plus 4.0 The TimeClock Plus Version 4.0 multi-user setup is very similar to the single user setup. The location from which you will be running TimeClock Plus will be referred to as the “Server”. The client machines that will be accessing the Server will require client installs. Note: If you are upgrading from a previous version of TimeClock Plus and want to update your information to Version 4.0, you should make a backup of your current data directory.
1) Follow the Single User Install to install TimeClock Plus on the workstation that will be the Server.
To enable other users on the network to access the TimeClock Plus data, a network share must be created for the directory where TimeClock Plus is installed. If you are unsure about how to do this, please consult with your network administrator. The TimeClock Plus folder should be available to all client computers.
During the server installation a file named CLSETUP.EXE is installed in the directory you specified. This file is used by the client machines to install and update the necessary files for running TimeClock Plus.
Each client machine will require access to this file and all of the other TimeClock Plus files in this directory. If you are unsure about setting permission on files, please consult with your network administrator. Clients need “Full Control” permission to the TimeClock Plus folder on the server.
2) Run CLSETUP.EXE from each of the client workstations. For example, if you have performed the server install on a machine called “SERVER” and created a share on that machine called “TIMECLOCK” , you should run the file named \\SERVER\TIMECLOCK\CLSETUP.EXE from each of the workstations. During the installation you will be prompted to enter the directory where the server installation is located. This is the directory that you noted earlier.
3) The client install will prompt you to select the applications that will be run from the workstation. Select the applications by placing a check next to each.
4) Click Finish to complete the client installation.
Now that you have installed the software, the next step is to set up the company. Follow the Quick Start Guide as shown below. This should be done from the Server machine.
When you launch TimeClock Manager for the first time, you will be prompted to use the Quick Setup Wizard. If you decline to use the Quick Setup Wizard, you can go back and run it at a later time from the File menu and select the Quick Setup Wizard option. You must be logged in as SUPERVISOR to use the Quick Setup Wizard.
The Quick Setup Wizard will guide you through setting up: Users / Job Codes / Tracked Fields / Pay Frequency / Accruals / Templates / Miscellaneous Information.
1) Click on the Add button to add a user. This will bring up the User List screen. Users are employees that will have access
to the TimeClock Manager.

TimeClock Plus 4.0 7
2) Click on the Add button to add a user to the system. Set the user’s permissions in the right side of the window by granting
and revoking user rights.
Once you have completed adding a user and setting the user rights: 3) Click on the Save button.
Click on the Close button on the User List screen to return to the Quick Start Wizard.
4) From the Quick Start Wizard click on the Next button to proceed to the Job Codes configuration screen.
5) Click on the Add button to add Job codes. The Add Job Code screen will appear. The Master Job Code List consists of
job codes that have been added using this function.

8 TimeClock Plus 4.0
Enter the information for the job code in the fields. If you require more information about the settings in these tabs, you should consult the Master Job Code section in the Configuration Section of the manual (see pg. 64).
6) Click on the Next button when you are done with the Job Codes section to continue on to the Tracked fields section.
The Tracked Fields section will allow you to configure how tracked fields are stored in TimeClock Plus. Tracked fields can be configured to store tips, pieces, parts, or dollar amounts. Each job code in the system can be configured to require entry of a tracked amount when an employee clocks out using TimeClock Plus.
7) Click on the Next button once you have completed adding this information. The Pay Frequency screen will appear.

TimeClock Plus 4.0 9
Answer the questions regarding how often you pay and if necessary, enter the day of the month each pay period starts. The pay frequency is used only when printing reports and exporting to determine the dates of the current pay period and previous pay period. Values entered here do not affect any calculations in TimeClock Plus.
If you pay monthly or semi-monthly you will be asked to enter what date each pay period starts on. For example, if you pay semi-monthly and each pay period starts on the 1st and the 16th you would enter 1 and 16 here.
If you pay bi-weekly, you will be asked to enter the bi-weekly base date. This date is used to determine whether a particular date falls in week one or week two of any given pay period. This date must be on the same day of week as the period base date that was entered when the company was created and should represent the starting date of any two-week pay period.
8) Click on the Next button to advance to Accruals. 9) Click on the Edit Accrual Rules button to display the list of currently configured Accrual Rules.
Accruals are useful for tracking information such as the accrual of overtime hours into a “paid time off” job code to track employees paid time off.
From this screen you can add, edit, or delete accrual rules from TimeClock Plus. NOTE: Once a rule has been created in the Accrual Rules, you must assign it to individual employees from the Accrual tab while editing the employee. See page 29 for more information.
10) Click on the Close button in the Accrual Rules screen to return to the Quick Setup Wizard.
11) Click on the Next button to continue to Template configuration.

10 TimeClock Plus 4.0
12) Click on the Edit button to edit a template. The Edit Employee Templates window will appear.
Templates are used to preset common information which applies to multiple employees. To edit a template, double click on the template in the list on the left. To add a template, click on the New button. Enter the appropriate information for the template in each of the tabs.
For detailed information on creating or editing templates, refer to page 36. 13) Click on the Close button to return to the Quick Setup Wizard. 14) Click on the Next button to advance to the Miscellaneous configuration window.

TimeClock Plus 4.0 11
This section will allow you to determine what you want your individuals to be referred to throughout TimeClock Plus. If you were tracking employee hours you would want the references to be “employee”. If you were tracking students, you would want the references to be “student”, etc.
15) Click on the Finish button once you have completed this section.
16) If you would like to make any changes to the settings entered throughout the Quick Setup Wizard, click on the Back button. If the settings are correct, click Finish to close the wizard.
Setting up a Serial Remote Data Terminal Each Remote Data Terminal ships with a 6-foot serial cable, one DB9 adaptor, and 1 DB25 adaptor, and one power adaptor.
1) Connect one end of the serial cable to the RJ-11 connection on your Remote Data Terminal labeled “Comm”.
2) Connect the other end of the cable into the 9-pin or 25-pin adaptor that matches the serial port on your computer.
Refer to your computer manual for documentation on serial ports. 3) Connect the adapter to an available serial port on the back of your computer. Note that this connector should plug directly
into the system. No additional gender changers are required for connection.
4) Connect the power supply to the terminal and then plug it in to a standard 110V electrical outlet. The terminal should initialize and display “waiting for host”. The terminal is not a stand-alone device; you must run the WinRemote software to activate the terminal.
5) Launch the WinRemote program from your PC. You can launch it from the Launch Menu section in the TimeClock Manager or by selecting it from the TimeClock Plus 4.0 program group in the Start Menu.
If you do not see the following screen, look in the system tray at the bottom right hand corner of the screen for a WinRemote icon. Once you locate it, double-click the icon and the following screen will appear.
6) Click on the Locate button. The locate function will seek out any available serial Remote Data Terminals connected to
this PC.
If the Remote Data Terminal is properly connected to the workstation the WinRemote software will display a message that the terminal has been located. The message will also contain the BIOS version of the terminal.
If the terminal was not located, the system will display another message such as “Valid RDT port” or “Modem Found”. If the WinRemote software does not locate the Remote Data Terminal, check your connections and perform the locate function again.
7) To configure the port, select it from the list and click on Configure. See page 108 for more information.
8) Click Cancel to return to the main screen.

12 TimeClock Plus 4.0
9) Select the port from the list and click on the Start Button to activate the RDT.
View the Remote Data Terminal to verify that the terminal is now active. The terminal will have the clock out and in options displayed on it. You can now begin using your Remote Data Terminal for clock operations.
Setting up an Ethernet Remote Data Terminal Refer to page 119 for information on configuring an Ethernet terminal.

TimeClock Plus 4.0 13
TimeClock Plus Concepts There are many specialized functions that may need some special attention by you as the user. Below is a list of these functions that you may need to reference while configuring or using TimeClock Plus. Closing the week Every week must be closed. No matter what your pay period is, close the week every week. You should do this after editing hours so that accruals will post correctly. Closing the week archives the current week data files and moves them to the history files. For more information see page 23. Dates and Times Whenever you are prompted to enter a date or time, you may either enter it directly into the box or click on the icon next to the edit field and a window will appear allowing you to select a specific date or time.
Times can be entered in either 12 hour or 24-hour format, with or without a colon. The following entries are acceptable and all refer to the same time.
5:15PM 5.25p 515PM 17:15 1715 515p 0515p
Dates can be entered using the full year such as 1999 or they can be entered without the century information such as 99 for 1999. For entry of most dates in TimeClock Plus, values of less than 70 for the year are treated as being in the 21st century while values greater than or equal to 70 are treated as being in the 20th century. For example, if you enter 1/1/01, TimeClock Plus will assume you mean 1/1/2001. If you enter 1/1/98, TimeClock Plus will assume you mean 1/1/1998. Calculator TimeClock Manager includes a pop-up calculator that can be accessed from the Tools menu. The calculator can also perform addition and subtraction of times in hours/minutes format. For example, if you enter 1:30 + 1:40 the result is 3:10 because 1 hour and 30 minutes plus 1 hour and 40 minutes totals 3 hours and 10 minutes. Calendar TimeClock Manager includes a pop-up calendar, which can be accessed from the Tools menu. Shifts and Breaks A shift is the time between when an employee clocks in and when that employee clocks out, including any breaks taken during this time whether they are paid or unpaid.
A break is a period of time during which the employee is not clocked in, but is still part of the current workforce. Job Codes Job Codes are used to track employee hours in a specific department such as waiter, dishwasher, hostess, etc. Employees may be assigned one or more job codes and may switch between any of those job codes during the shift, allowing management to track the amount of time each employee spent in that code. Two non-clockable job codes are automatically created when you install TimeClock Plus. These job codes are sick time and vacation time and are assigned to all employees.
At least one job code that is configured as clockable must be added to the employee’s workable job codes before an employee can clock in to TimeClock Plus. Cost Codes Many businesses frequently have multiple customers or projects at any given time, and it is helpful to know how much time is being spent on each. For instance, an automobile repair shop may need to track exactly how many man-hours are being spent on each car in order to properly bill the customer. TimeClock Plus has the optional Job Cost Module to facilitate this. Employees clock in and out using cost codes. Each employee is expected to have only a few job codes, and those codes change infrequently. Conversely, there is no limit to the number of cost codes available, and those codes are easily changed. Cost codes are assigned for the company as a whole.


TimeClock Plus 4.0 15
TimeClock Manager
1.0 File Menu 1.1 Import Employee Information Note that the heading of this tab can be changed to reflect other labels such as “student” or another custom reference for the individuals being tracked. This setting can be adjusted in the Configuration, Defaults, System Tab.
The Import Employee Information function is used to import personal information for employees. This option will map and write the information imported from an external source to the TimeClock Plus database. The import mechanism is very flexible and allows importing in virtually any format including delimited text, fixed length text, and DBASE compatible files.
If you are importing files from other software applications, use the features in these applications to save the data to a format that TimeClock Plus can import such as comma delimited ASCII.
Example: If you have a payroll system that supports exporting, you may want to add an individual to the payroll system and then export his data to a file to be imported using this function. This will eliminate the need to enter the information for the individual more than once and will reduce errors.
To import employee information, click on the File menu item and then click on the Import Employee Information option.
Filename to import – This is the name of the file that you will be importing. This file can be located by clicking on the file icon to the right of the text box. Records to skip – There are some instances in which the first record in a database is a space holder or header record. This option will skip the appropriate amount of records in the data before importing. Default map file – The default map file is a mapping file created from a previous import. All of the fields have been mapped already. If you import regularly from the same file format, then you can use this map instead of creating the mappings every time. Several different map files can be created for each type of import, but only one can be set as the default map file. Note: This map will only work on files that are the same. The same meaning that the file format, spacing, and lengths are the same.
Field delimiter – In some files there are characters that separate data, these are known as field delimiters. Most often, these field delimiters are commas, pipes, spaces, or tabs. This field will allow you to specify the type of delimiter used in the file selected. If the delimiter is not listed, select other and a box will appear for you to enter the delimiter used. Treat consecutive delimiters as one. - This option treats repeated delimiters as one instead of separating them. For example, if space is the delimiter, multiple spaces will be treated as one space. File preview window. – This window previews the file that you are importing. The preview window will assist you in determining if the file specified is in the correct format.

16 TimeClock Plus 4.0
1) Enter the file name and import details for the file to import. 2) Click on the Next button once you have completed setting up the file information.
The next window to appear will be the Mappings window.
Notice that the first record located in the file will appear on the left side of the window. These are the fields to be mapped. Each record in the file is expected to have the same format as the first record, so only the first record is displayed.
3) Click on the Right Column and specify the field where the data will be stored in TimeClock Plus. Each field can be mapped only once.

TimeClock Plus 4.0 17
Notice how the fields are now matched up: Offsets - Sometimes imported files will include extraneous characters at the beginning of each field. These extra characters can be eliminated. Select the Offsets Button and the following screen will appear.
a) Select one of the fields on the Original text side. This will highlight it. Toggle the Plus and Minus buttons to see the
effect. You will notice that in the new text side characters disappear and reappear as you push those buttons. You may toggle the size of each individual field to format the data before you import it into TimeClock Plus. Reset – This option will reset the field that you have highlighted back to its original length.
Reset All – This option will reset all of the fields back to their original length.
Plus - This option will increase the offset into the field selected.
Minus - This option will decrease the offset into the field selected.

18 TimeClock Plus 4.0
Load Map – This option will load a map file that has been previously saved. Once loaded, the mappings will be reset to those contained in the map file. Save Map – This option will save the current map settings that you have just created. You can use this mapping again if you have to import the same file again or one like it. Remember that the structures have to be the same to use the same map file otherwise your data will be skewed and incorrect. Clear Map - This option button will clear out the map that you are currently working on if you need to start over. Your settings will be lost.
4) Click on the Next Button.
The next screen that will appear is the Options Window.
Modify existing data with data being imported if record already exists - If you are importing employee #1 and employee #1 already exists in the system, this will determine if the import record is used to change employee #1 information or if the record is to be rejected because it already exists. If you were adding new employees, you would not want to check this option because you would not want a new employees information to overwrite and existing employee. If you were importing updated address and phone numbers for existing employees you would want to modify existing data to reflect the changes in the import file. Add records to database if they do not already exist. - If you want to only modify information for existing employees do not check this and it will prevent records from being added to the system if they do not already exist in the system. If
TimeClock Plus 4.0 19
your import file contains data for employee #1 and #2 and #1 already exists in the system, number 2 will only be added to the system if this option is checked. Base added records on what template - The system contains many employee templates. Templates are a base from which you add an employee. If most of the settings for your employees are the same then you would set up a template that contains all of those settings and when adding a new employee you would select that template as a base so that you do not have to re-enter the default fields every time. The importing works the same way. You may not want to import all of the fields that are common to a particular template so you can just base the data being imported on a particular template in the system. When a new user is added, the import will first load the template, then import the data into the template and then save the new employee, which will consist of a merge between the template and the imported data. See page 36 for more information about using Templates.
5) Click the Next button.
A screen will be displayed showing a summary of the action that is about to take place. Look over the information and make sure it is correct. When you have verified that everything is correct, click Finish to perform the import or Cancel to cancel the operation without importing any data. If you find something wrong with the information presented, you can press the Back button to return to previous screens to correct the mistake.
1.2 Import Employee Job Information The Import Employee Job Information function is used to import job information for individual employees such as job codes, rates, etc. It operates the same as Import Employee Information. Please Refer to section 1.1 when using this function.
1.3 Import Employee Hours
Import Employee Hours function is used to import employee hours such as hours and overtime hours. It operates the same as Import Employee Information. It is used to import hours from other TimeClock Plus locations or from other devices such as cash registers or proprietary collection devices.
Please Refer to section 1.1 when using this function.
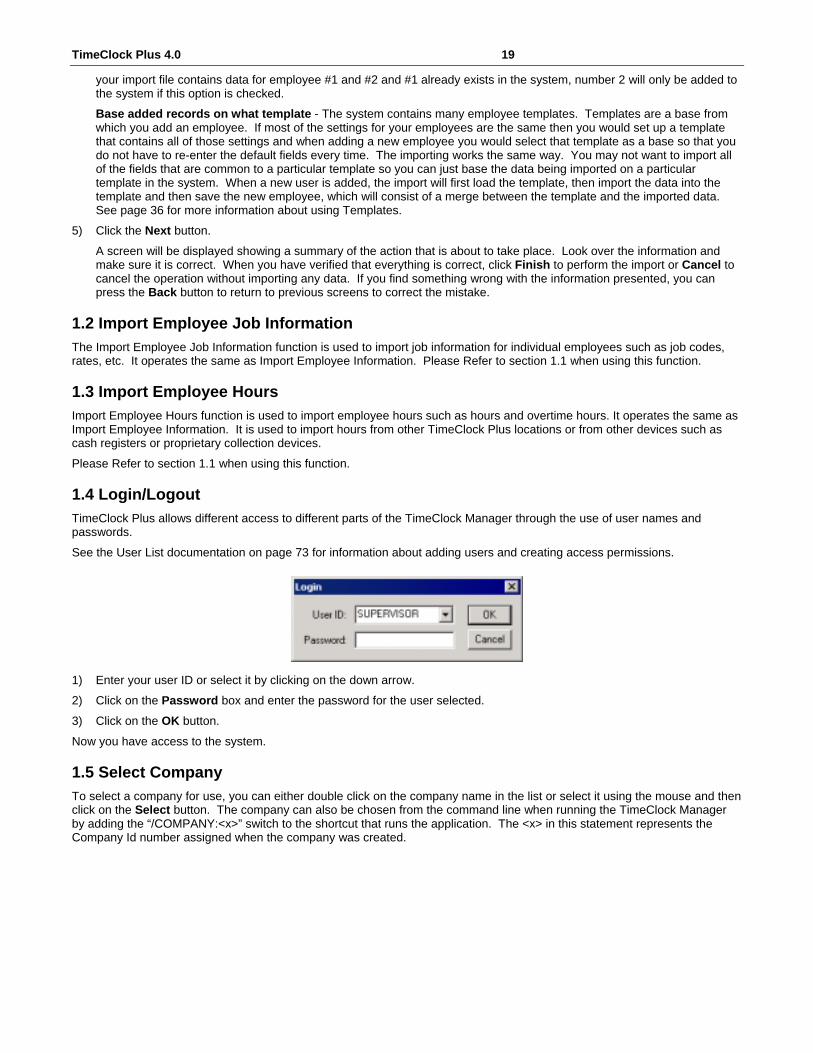
1.4 Login/Logout
TimeClock Plus allows different access to different parts of the TimeClock Manager through the use of user names and passwords.
See the User List documentation on page 73 for information about adding users and creating access permissions.
1) Enter your user ID or select it by clicking on the down arrow. 2) Click on the Password box and enter the password for the user selected.
3) Click on the OK button.
Now you have access to the system.
1.5 Select Company To select a company for use, you can either double click on the company name in the list or select it using the mouse and then click on the Select button. The company can also be chosen from the command line when running the TimeClock Manager by adding the “/COMPANY:<x>” switch to the shortcut that runs the application. The <x> in this statement represents the Company Id number assigned when the company was created.

20 TimeClock Plus 4.0
Select – This option will select the company that you have highlighted.
Delete - This option will delete a company that you have highlighted or selected. The data for the company is not deleted. The company is merely deleted from the list of available companies. Edit – This option allows you to edit the settings for data directory and company name for the company that is selected.
The Edit Company Information screen will appear.
You can select a new data directory for this company by clicking on the ellipsis (…) icon in the text box. You may also edit the name of the company if you wish to change it.
Create – This option will allow you to create a new company. If you have the multi-company module installed, any number of companies can be created. If this module is not installed, only one company can be created.
1) Enter the ID number and the name for the company in the space provided. When both fields are entered, click on Next to
proceed to the next page or Cancel to cancel the company creation.
ID Number - This is any ID number that you decide to use as long as its not being used by another company. The ID number is used to make sure you map the correct company from the client machines. Name - This is the name of the company that you are creating.

TimeClock Plus 4.0 21
2) In the data directory dialog, enter the location where you would like to store the data for this company. If previous versions of TimeClock Plus are installed on the system, you have the option to install into one of those directories or specify a new directory for the data. When complete, click on the Next button to proceed to the next step.
Note: It is recommended that when setting up your software, you create a new directory for the TimeClock Plus 4.0 data and then convert the data into it. Use Windows version 2.0 directory – Select this option if you are using data from a 2.0 version of TimeClock
Plus and wish this new company to contain that old data. You will no longer be able to access this data from TimeClock Plus V2.0 if this option is used. Use Windows version 3.0 directory - Select this option if you are using data from a 3.0 version of TimeClock Plus and wish this new company to contain that old data. You will no longer be able to access this data from TimeClock Plus V3.0 if this option is used. Specify a new directory – Select this option if you decide to create an entirely new and clean data directory for this company. Specify the drive and location in this text box. This is the recommended selection.
3) If you have chosen a directory containing data from a previous version the system will ask if you would like to convert the data that resides in the directory you entered. If you answer yes to the question, the data will be converted to 4.0 format and will no longer be usable by previous versions of TimeClock Plus.
If you have chosen to place the data in a new directory you will be given the option to convert previous data into this directory. If you choose to convert data from a previous directory you will be asked for the directory containing the previous data. When the creation of the company takes place, the previous data will be copied into the new directory and converted. This will leave the previous data intact so it can still be accessed from earlier versions of the software. This is the recommended method of installation.
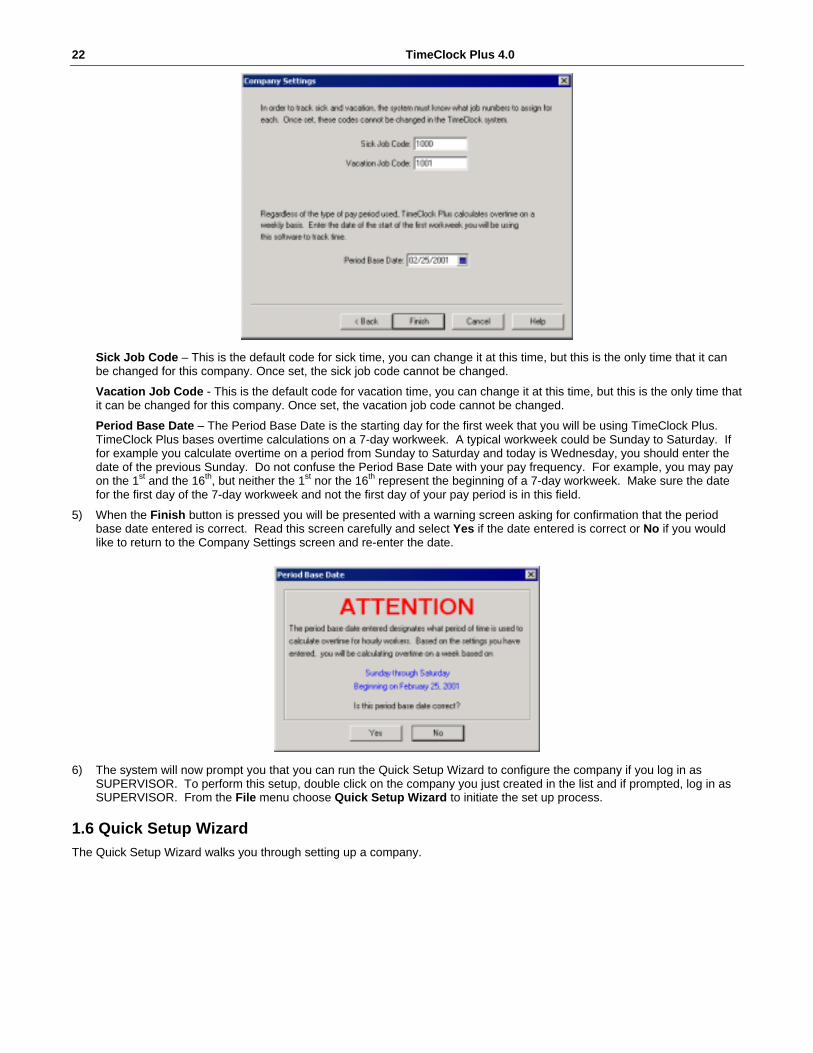
4) The Company Settings screen is the last in the sequence of company creation. Enter the fields as specified below and click on Finish to complete the company creation.
22 TimeClock Plus 4.0
Sick Job Code – This is the default code for sick time, you can change it at this time, but this is the only time that it can be changed for this company. Once set, the sick job code cannot be changed. Vacation Job Code - This is the default code for vacation time, you can change it at this time, but this is the only time that it can be changed for this company. Once set, the vacation job code cannot be changed. Period Base Date – The Period Base Date is the starting day for the first week that you will be using TimeClock Plus. TimeClock Plus bases overtime calculations on a 7-day workweek. A typical workweek could be Sunday to Saturday. If for example you calculate overtime on a period from Sunday to Saturday and today is Wednesday, you should enter the date of the previous Sunday. Do not confuse the Period Base Date with your pay frequency. For example, you may pay on the 1st and the 16th, but neither the 1st nor the 16th represent the beginning of a 7-day workweek. Make sure the date for the first day of the 7-day workweek and not the first day of your pay period is in this field.
5) When the Finish button is pressed you will be presented with a warning screen asking for confirmation that the period base date entered is correct. Read this screen carefully and select Yes if the date entered is correct or No if you would like to return to the Company Settings screen and re-enter the date.
6) The system will now prompt you that you can run the Quick Setup Wizard to configure the company if you log in as
SUPERVISOR. To perform this setup, double click on the company you just created in the list and if prompted, log in as SUPERVISOR. From the File menu choose Quick Setup Wizard to initiate the set up process.
1.6 Quick Setup Wizard The Quick Setup Wizard walks you through setting up a company.

TimeClock Plus 4.0 23
Notice that the different screens will prompt you to enter the necessary information as you follow the wizard. This wizard will guide you through adding Users, Job Codes, Tracked Fields, setting Pay Frequencies, creating Accruals, setting up Templates and other Miscellaneous information. Please refer to the Getting Started section of this manual on page 5 to walk you through the Quick Setup Wizard.
1.7 Close Current Week TimeClock Plus requires that each week be closed after all hours and information has been verified for the week. During the close operation, information for the current week is moved to history and all accruals, absent/tardy history, and cumulative totals are updated in the employee information.
The close week operation is one of the most important functions in the system. Prior to closing the week, you should verify that all hours for the period being closed are accurate by using the Edit Hours function to make any changes necessary.
Although each week in the system must be closed, you are not required to perform this operation as soon as the week is complete. The system will allow you to maintain up to several weeks of data in the system that you can close out when you are ready to do so. It is however recommended that you perform the close operation on a regular basis because information such as accruals and cumulative totals are updated at the time of close. If you have not closed for several weeks, the accrual information will only contain information up to the week that was last closed.
If you encounter any problems during a close week operation you should contact TimeClock Plus support to ensure that no data is lost.
1.8 Print Setup This option is used to set your default printer and settings through windows as with any other windows program.
1.9 Exit This option will exit you from the TimeClock Plus Manager program.

24 TimeClock Plus 4.0
2.0 Edit Menu The Edit menu allows you to cut, copy, and paste text to and from the Windows clipboard.
3.0 View Menu This option controls the visual adjustments of what users want to see as they are operating in the TimeClock Manager environment. Tool Bar – This enables and disables the tool bar viewable at the top of the screen.
Status Bar – This enables and disables the status bar viewable at the bottom of the screen. The status bar contains the current labor cost, current system date and time, and the current TimeClock workweek.
4.0 Employee Menu 4.1 Add/Edit Option This menu option is used to add an individual to TimeClock Plus or to edit information for an existing employee. To edit an employee, you can either double click on the employee’s name in the list on the left, or enter their number in the Go To box in the upper left corner of the window and press ENTER. You can traverse through the list of employees using the Prev and Next buttons located in the lower left corner of the window. The order in which the employees will be displayed directly follows the order in which they appear in the list. The list can be sorted by clicking on the header of any one of the columns.
Information about an employee is divided into several sections. To access each of the sections, click on the tabs at the top of the window after an employee has been selected.

TimeClock Plus 4.0 25
Info Tab This tab contains personal information about the selected employee.
The following fields can be specified to require data input before allowing you to continue. This option is found under the Configuration, Preferences, Defaults, Employee Entry Tab (see page 79). First - First name of the employee.
Last Name - Last name of the employee. Address - Address of the employee.
City - City where the employee lives.
State - State where the employee lives.
Zip - Zip code where the employee lives.
SSN - Social security number of the employee.
Export Code - This is an optional code to identify this employee in an export. It should correspond with the individual’s number in the payroll system that you are using. Start - The date that this employee was hired.
Termination Date - The date of the last day the employee was working for the selected company. If a termination date is entered and the date has passed, the employee will no longer be able to clock in. Phone - The phone number of the employee.
Classification - This is an optional classification of the employee. It can be used to separate groups of employees. For example, part time employees may have a classification of 1 and full time employees may have a classification of 2. This classification is useful when narrowing down employee groups using the Criteria option (see pg. 85). Race - Race of the employee. Birth date - Birthday.
E-mail - E-mail address for the employee. You will notice small mail icon in this text box. When you click on this it will activate the default e-mail program for your computer so that you may e-mail this employee from TimeClock Plus. Gender - The gender of the employee.
Suspended - The status of the employee if they are suspended or not. Suspended employees can be removed from lists by checking the option to remove them in the TimeClock Plus defaults (see page 76 ). Suspended employees will no longer be able to clock in. Job Costing - Used to determine if job costing will be enabled or disabled for this employee. If the optional Job Costing Module is installed, you can activate the module for this employee. If job costing is turned off, the employee will never be asked for a Cost Code when making clock transactions.
Jobs Tab This tab shows the employee job codes and settings for those job codes.

26 TimeClock Plus 4.0
For information on each of the fields in the job code list, refer to the adding and editing of job codes below. Job Code Dialog Use Short titles - If this option is checked, the same information will displayed in the grid columns, but the names of the columns will be abbreviated so that scrolling will not be necessary to view most of the information. Add/Edit - This option will allow you to add a new job code or edit an existing job code for this employee.
Job Code This is the job code number that you are adding or editing. This job code has to be previously
created in the Master Job Code list (see page 64) or you can add one using the New Code button. A drop down list of all available job codes is available by clicking on the ellipsis (…).
Description The description for this job code will appear in this box. The description is set from the Master Job Code list and cannot be edited here.
Rate This is the pay rate the employee will receive when working in this job code.
Clockable If this is checked, this job code is clockable by the employee meaning they can use it to clock in and out of TimeClock Plus.
Earns overtime If this is checked this job code will be eligible to earn overtime hours.
Counts overtime If this is checked, hours worked in this job code will count toward the number of hours required to earn overtime.
Track 1, 2, 3 Each job code can track three different fields on clock out. For example, you may want to track tips, parts completed, pieces, etc. Checking those when adding or modifying a job code means that job code will require data entry for those fields when the employee clocks out from that job code.
Job is Default The default job code for an employee, will always be the first job code presented when the employee is clocking in and out of the system. Several payroll interface modules also use this job code as the home department.

TimeClock Plus 4.0 27
Force Overtime Tells the system that no matter where a shift worked in this job code falls during the week it should always be treated as overtime #1 or overtime #2.
Ask Cost Code If this is checked, then the employee will be prompted for a cost code when clocking in on this code.
Remove - The remove button enables you to remove a job code from the selected employee. A job code should not be removed unless it is no longer necessary for reporting purposes. Raise - The raise button is used to give the employee an increase in the rate of pay on one or more of their job codes. When this button is clicked a raise dialog will appear allowing you to select particular job codes that are to be given a new rate of pay. All raise operations performed from this screen will be logged to the raise history located on the Cumulative tab. Overtime Tab This tab is used to configure overtime settings for the employee.
Overtime Calculations This section allows you to set how overtime is calculated for the selected individual. The overtime calculation method has nothing to do with pay frequency. For example, you may pay all of your employees weekly overtime for a semi-monthly pay frequency. The following options can be set in this section.
Weekly Overtime - Overtime is based on an X hour workweek. Any hours worked over X begin to count as overtime.
This can be adjusted per individual. Some people may be set to reach the maximum of their regular hours at 20 or 30 hours whereas others may be set to 40 hours. Bi-Weekly Overtime - Bi-weekly refers to a period consisting of two consecutive pay weeks treated as one. The overtime is calculated on a 14-day workweek instead of a 7-day workweek.
Bi-weekly overtime occurs when a company pays once every two weeks and overtime is calculated on this two-week period. For example, an employee may earn overtime for any hours over 80 worked in the 14-day workweek.
Do not confuse this overtime method with paying employees every two weeks with the overtime based on a 7-day workweek. Note: To ensure this is calculated correctly, make sure the bi-weekly base date is correct in the Quick Setup Wizard and pay rates are entered for all job codes. Best of Bi-Weekly Vs. Daily -The system will calculate bi-weekly and daily overtime for the individual and use the method that results in the highest pay. Note: To ensure this is calculated correctly, make sure the bi-weekly base date is correct in the Quick Setup Wizard and pay rates are entered for all job codes. Best of Weekly vs. Daily - The system will calculate weekly and daily overtime for the individual and will use the method that results in the highest pay.
Example: An employee is set to earn daily overtime over 8 hours per day and weekly overtime over 40 hours per week and works 3 days for 12 hours per day. The daily overtime calculation for these hours would result in 12 hours of overtime while the weekly calculation would not result in any overtime. The daily hour calculation would be used for the week.

28 TimeClock Plus 4.0
Both Daily and Weekly Overtime - Overtime is based on both daily and weekly overtime. Using this method the system will first calculate daily overtime for the week and then calculate weekly overtime on the regular hours for the week. Any overtime hours for weekly overtime will be added to those for daily overtime. Daily Overtime - Overtime is based on a daily basis.
Salaried - The employee is on salary. No overtime will be earned for the employee.
Overtime Settings Notice that overtime settings change as you toggle between overtime options. These settings allow you to enter the number of hours required to earn overtime in each of the overtime types.
If salaried is chosen, an option is available to enter the salaried amount per week. This amount will be used in calculating labor cost for a week. Other Information Use default Information – If this box is checked, the settings that have been specified earlier in Default Information section will be used (see page 37). This keeps you from having to type in the same information again and again. Advanced Button – This option allows you to be able to edit advanced overtime options.
The system gives you the option to override current overtime settings if a day is marked as a holiday or if the employee has worked seven consecutive days. If you would like to pay the employee using a different overtime calculation, select the option Override current overtime calculations. Selecting this option will enable you to use a different method of calculating overtime for the employee when they work on a holiday or the 7th consecutive day of a workweek.
Example: If you want to pay overtime all day on the holiday, you would set the option to pay overtime #1 after 0.00 hours in the day. If you want to pay overtime #2 after 8 hours you would set it for overtime 2 after 8.00 hours.
If you select to pay a shift premium, you will be able to enter a dollar amount that the employee will receive in addition to his or her regular or overtime rate when working on a holiday of 7th day. Note that this amount is in addition to their current rate of pay.
Example: If an employee is configured to earn $2.00 per hour premium pay for hours worked on holidays and the employee is clocked in under a job code that pays $8.00 per hour, the employee will earn $10.00 per hour for the hours worked.
NOTE: In order for an individual to receive holiday pay the holiday must be set up in the holiday calendar (see page 72).

TimeClock Plus 4.0 29
Accrual Tab
You can specify up to 20 accrual rules to apply to this particular employee.
Select which accruals to apply from each drop down list. Accruals must be set up in the Accrual Rules section before they can be used. See page 69 for more information on configuring accrual rules.
Restrictions Tab The restrictions tab is used to set rules for punch rounding and to limit clock in operations after a specified number of hours worked in a workweek.
Auto Rounding (No schedule required) This feature will automatically round an employee’s clock in or out time without the need for a schedule. To enable this feature place a check mark in the box for the operation to round then enter the number to minutes to round to and at what minute the round up takes place. The value entered in the To <x> mins field must divide evenly into 60 since there are 60 minutes in an hour. The number in the Round up at <y> mins field must be less than or equal to the number entered in the first field.
Example: Suppose you want to round clock in times to the nearest 15 minutes. To accomplish this you would enter 15 into the first field and 8 minutes into the “round up at” field. If the employee clocks in from 6:00 to 6:07 their time will be rounded to 6:00. If they clock in from 6:08 to 6:15 their time will be rounded to 6:15. The same would also be the case for each 15-minute segment of the hour.
Clock In Restrictions This feature allows managers to restrict employees when they reach overtime or are nearing overtime.

30 TimeClock Plus 4.0
Note: This will only restrict a clock in operation. If they reach overtime while clocked in, they can continue to work. To prevent this, use the Approaching overtime report (see page I51).
Other Settings Use Default Information - If this box is checked, the default information that you specified earlier in the Employee..Default Information section will be used instead of the information contained in this tab.
Misc Tab This tab contains miscellaneous information used for tracking fields.
Miscellaneous Fields This section contains several fields that can be used to store custom information for the employee. The descriptions for the fields can be set in the Configuration.. Preferences..Defaults..Fields Tab (see pg. 81). Options To enable the following options, place a check mark in the box next to the option. A manager must approve shifts worked before the week can be closed – If checked, all shifts for this employee must be approved by a manager using the edit hours screen (see pg. 40) or the Approval manager (see pg. 46). This individual must approve shifts worked before the week can be closed – If checked, all shifts for this employee must be approved by the employee before the week can be closed. This approval can be performed by the employee from the view hours section of the On-Screen TimeClock (see pg. 115). This approval is performed by management using the Approval Manager (see pg. 46) or the Edit Hours screen (see pg. 40).
Cumulative Tab

TimeClock Plus 4.0 31
Absences and Tardies are based on the TimeClock Scheduler. When an employee is absent or tardy based on schedules in the scheduler, this information can be viewed on the Cumulative Tab. NOTE: Information contained in the visible section of this screen is only updated when the week is closed.
Absent/Tardy Statistics Total - The total numbers of days the employee has been absent or tardy since the date shown.
Excused - The number of excused absences or tardies that the employee has accumulated. Since - This is a date that specifies the starting point of the tracking of absent and tardy information.
Detail Button - This will bring up a window displaying more detailed information about the absences that this employee has accumulated. The detail screen will also allow you to mark individual items as excused or unexcused as well as entering a description for the infraction.
The system uses user-defined values to determine when an employee is considered absent or tardy. This information can be set from the Scheduler tab in the TimeClock Plus defaults (see pg. 77) Cumulative Section Cumulative Hours These text boxes allow you to observe cumulative overtime and regular hours since a specified date. These fields are updated when the week is closed and can be reset from the Reset Tracked Fields option on the Tools menu (see pg. 62). Cumulative Sick Hours Since These text boxes allow you to observe cumulative sick hours since a specified date. These hours are also updated when the week is closed. These fields can be reset using Reset Tracked fields in the Tools menu. Cumulative Vacation Hours Since These text boxes allow you to observe cumulative vacation hours since a specified date that you have chosen. These hours are also updated when the week is closed. Job Detail This screen displays job detail information for the range of dates specified. To view information for a specific period of time, enter the date range in the From and To section and click on the Update button. The period can also be selected from the drop down list.
Once the information for the period is displayed it can be printed by clicking on the Print button.
Accrual History The accrual history is used to view, add, or edit hours that have been posted to or taken from the accruals.

32 TimeClock Plus 4.0
Each item listed represents an amount of hours that have either been accrued or taken. Each accrual lists the date the accrual was posted, job code, and the amount accrued and/or taken. A check field is also present to denote when an accrual was manually added to the system from this screen using the Add button.
A summary of this information can be found in the accrual section while editing an employee. Reports for this information can be generated from the Pay Period reports section in TimeClock Manager. Raise History The Raise History screen will allow users to view the pay rate history for the employee. A raise can be given from the Jobs tab while editing an employee.
Message History For more information on the message history, refer to the Employee Messaging section on page 47.
Reviews Tab The reviews tab is used for storing employee review information.

TimeClock Plus 4.0 33
Add - This option will add a review for the selected employee. Edit - This option will edit a review for the selected employee. Before clicking on the Edit button you must select a review from the list to edit.
When adding a review, today’s date and time are defaulted for the time that the Employee review is being conducted. The date, time and reason for the review can be overridden by typing in the appropriate fields. In addition any comments about the review can be entered in the comments section. If you would like to print the review, click on the Print button.
Delete - To delete a review, select it from the list and click Delete.
View - To view the details of a review, select it from the list and click View. Double clicking on the review in the list will also perform this action.
Photo Tab This tab contains a photo of the employee. The Photo tab supports images in bitmap (BMP) or JPEG (JPG) formats.

34 TimeClock Plus 4.0
Notes Tab This tab contains any notes that you may want to make about this particular employee. This screen functions similar to a word processor, allowing you to type text in Bold, Italics, or Underlined. The color of the text can also be changed using the button containing the red, green and blue bars. To print the notes that are entered for the employee, click on the icon containing the printer.
Scheduler Tab This tab allows managers to restrict clocking in and out for employees based on a schedule created in the Scheduling program. If an employee tries to clock in or outside of the constraints set in this tab, a manager’s approval will be required. This tab will also allow employee clock operations to be rounded to a schedule.

TimeClock Plus 4.0 35
Approval Required For (Schedule required) This section sets up restrictions to prevent employees from clocking in or out of the system too early or late based on their schedule. When an employee attempts to clock in or out of the system and is restricted because of one of these settings, a password will be required. Each user in the user list can be granted permission to override these restrictions. Early Clock In Outside <x> minutes - This will prevent an employee from clocking in too early without a manager’s approval based on their schedule in the scheduler program. Late Clock In Outside <x> minutes - This will prevent an employee from clocking in too late without a manager’s approval based on their schedule in the scheduler program. Early Clock Out Outside <x> minutes - This will prevent an employee from clocking out too early without a manager’s approval based on their schedule in the scheduler program. Late Clock Out Outside <x> minutes - This will prevent an employee form clocking out too late without a manager’s approval based on their schedule in the scheduler program. Round to Schedule This section allows managers to round an employee’s clock in or out time to their scheduled time. Note that rounding takes place before the above schedule restrictions. For example, if you round early clock in times if within 15 minutes of the scheduled time and restrict early clock in outside 10 minutes, the restriction will never be used because the time will always be rounded to the scheduled time. Round clock in time to scheduled clock in time when clocking in up to <x> minutes early or <x> minutes late - This option will round the employee’s clock in time to match the schedule if they attempt to clock in within the specified number of minutes of their scheduled time. Round clock out time to scheduled clock out time when clocking out up to x minutes early or x minutes late - This option will round the employee’s clock out time to match the schedule if they attempt to clock out within the specified number of minutes of their scheduled time.
Example: If you have set employee #101 to round to schedule if he clocks in up to 15 minutes early, and he attempts to clock in at 8:50 AM when he is scheduled at 9:00 AM, the clock in will be rounded to 9:00 AM. If however he attempts to clock in at 8:40 AM, the clock in time will remain at 8:40 AM because he was not within 15 minutes of his scheduled time.
4.2 Delete This option is used to permanently remove employees from the system. It should only be used if the employee will no longer need to be accessed for any reason. If you want to retain history information on an employee, you should suspend or terminate them instead deleting their information. There is also the option to move them to another employee number.

36 TimeClock Plus 4.0
To delete an employee: 1) Select the employee from the list. 2) Click on the Process Button.
3) Review the status of the delete to ensure there were no errors 4) To delete another employee click Ok to close the dialog click Cancel.
4.3 Move/Renumber The Move employee option is used for reassigning employee numbers. This function will reassign the employee and all information pertaining to that employee to the new number that you have specified.
This option can be used in cases in which an employee is terminated or quits and you would like to reuse his or her employee number.
To move an employee: 1) Select the employee from the list. 2) Enter a new employee number in the New number assignment field and click on the Process button to perform the
move. This will move the employee and all references to that employee throughout the program to the new employee number. Make sure that this number isn’t already in use by another employee; otherwise the system will prompt you with an error message.
3) Review the results to ensure there were no errors during the move operation. 4) To move another employee click Ok. To close the dialog click Cancel.
4.4 Template The Edit Employee Template is used to preset general information for employees.

TimeClock Plus 4.0 37
Templates are useful in setting up employees. The templates will allow you to preset information for employees that may have the same job information, overtime settings, accruals, etc. Configuring a template for each group of individuals in your company will greatly reduce the time required when entering new employees into the system.
For example, if shop workers have similar information on file in your TimeClock Plus system, it would be advantageous to setup a shop worker template to reduce the amount of time to setup new shop workers. An ideal template would include a clockable Job Code as well as the Overtime Calculation method that is used for shop workers.
The templates are used when adding a new employee to the system from the Add/Edit option in the Employee menu. To choose a template, select it from the drop down list labeled Employee Template when adding the employee.
To create a template for employees: 1) Select Template from the Employee menu in TimeClock Manager.
The template configuration is similar to adding or editing and employee. For more information on performing this task refer to page 24.
4.5 Default Information The Default Information Tab is similar to the Template Information except that any changes made in this section will affect employees that are already entered into TimeClock Plus. Information entered here represents information that is common among most employees. For each screen available in this section, there is a Use Default Information button on the equivalent screen when editing an employee. If you would like an employee to use these settings, check the Use Default Information button for each page when adding the employee to TimeClock Plus.
4.6 Print Information The Print Information option allows users to print specific information stored in the employee records.
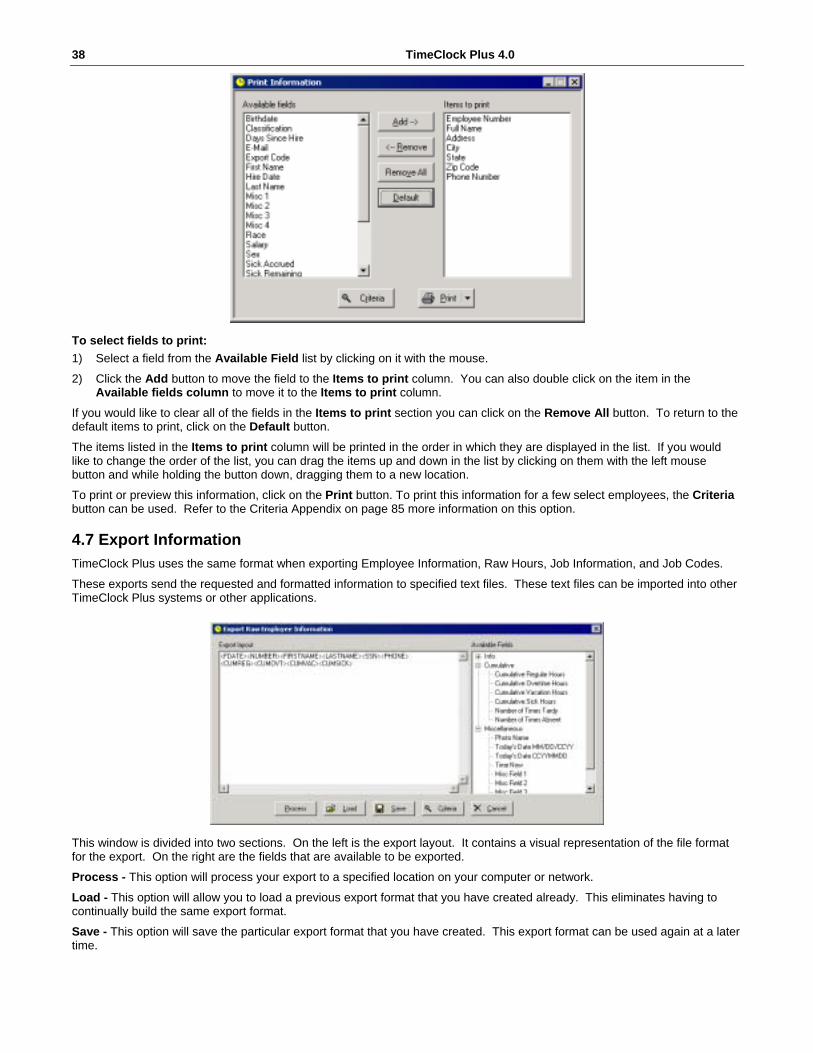
38 TimeClock Plus 4.0
To select fields to print: 1) Select a field from the Available Field list by clicking on it with the mouse.
2) Click the Add button to move the field to the Items to print column. You can also double click on the item in the Available fields column to move it to the Items to print column.
If you would like to clear all of the fields in the Items to print section you can click on the Remove All button. To return to the default items to print, click on the Default button.
The items listed in the Items to print column will be printed in the order in which they are displayed in the list. If you would like to change the order of the list, you can drag the items up and down in the list by clicking on them with the left mouse button and while holding the button down, dragging them to a new location. To print or preview this information, click on the Print button. To print this information for a few select employees, the Criteria button can be used. Refer to the Criteria Appendix on page 85 more information on this option.
4.7 Export Information TimeClock Plus uses the same format when exporting Employee Information, Raw Hours, Job Information, and Job Codes.
These exports send the requested and formatted information to specified text files. These text files can be imported into other TimeClock Plus systems or other applications.
This window is divided into two sections. On the left is the export layout. It contains a visual representation of the file format for the export. On the right are the fields that are available to be exported. Process - This option will process your export to a specified location on your computer or network.
Load - This option will allow you to load a previous export format that you have created already. This eliminates having to continually build the same export format. Save - This option will save the particular export format that you have created. This export format can be used again at a later time.

TimeClock Plus 4.0 39
Criteria - The criteria is used to specify a range of employees to include in the export. Please refer to the criteria section of this manual in setting the criteria. To create an export format you should select items from the list on the right by double clicking on the item. You can also click on the export layout section and manually type in static information for the export. For example, you may want to manually type in commas between the fields if you are exporting a comma delimited file.
Once a field is entered into the export layout you can adjust it’s formatting by double clicking on the field. For example, double click on <NUMBER> if you would like to edit the format for the number field.
From the Export Field Options you can enter a width for the field and a justification for the field. If you enter a width for the field that is less than the actual field width, the field will be truncated.
4.8 Global Modification The Global Modification option allows managers to make mass changes to employee information without having to manually make the change to each employee.
Job Code Changes This section allows users to make global changes to job code information for all or particular groups of employees based upon the criteria specified.
Notice as you toggle through the Add, Remove, Modify, and No Changes options, different parts of the screen become active and inactive. Add - Add a job code to the selected employees. Remove - Remove a job code from the selected employees.
Modify - Modify a job code that already exists globally to employees.
No Changes - This is the default setting and no changes will occur when this option is selected.
Job Code - The job code to be added, removed, or changed. It can be selected from this drop down box by selecting the down arrow. Change Rate to - If this box is checked then the rate of this job code can be changed globally.
Clockable - If this box is checked, the job code can be used by the employee to clock in.

40 TimeClock Plus 4.0
Earns overtime - If this box is checked, then the job code can earn an overtime pay rate if the overtime criteria for that employee is met. Counts overtime - If this box is checked, then the job code can count toward an overtime rate.
Track 1, 2, 3 - Each job code can track three different fields on clock out. For example, you may want to track tips, parts completed, pieces, etc. By checking these boxes, the job code will require entry of these fields when the employee clocks out. Requires cost - If this box is checked, a cost code must be entered when the employee clocks in under this job code. NOTE: All of the check boxes contain three states, checked, unchecked, and an indeterminate (grayed check) state. If the indeterminate state is selected, no changes will be made to the field for the specified code. For example, if you are modifying job code 101 for all employees but do not wish to change the earns overtime field for individuals that already have this code, you should set the earns overtime check box to the indeterminate state.
Other Changes This section allows users to make other global changes to employee information such as changing an employee classification and or adding or removing accrual rules from employees or groups of employees. Change Classification to - Select or type in a new classification change to make globally. If you would like to change classification <x> to classification <y>, you can use the criteria to only include employees with classification <x> and then enter <y> into this field. Add Accrual Rule - Select an accrual rule from the combo box to globally add an accrual rule.
Remove Accrual Rule – Select an accrual rule from the combo box to globally remove an accrual rule.
Buttons Criteria - The criteria is used to select which employees will be included in the operation. Refer to the Criteria section of this documentation for more information. Preview - This button will allow you to preview the actions that you have entered so you can see what changes will be made without actually making the changes. When you are satisfied with the results, use the Process button to actually perform the changes. Process - This option will perform the global modification based on the information entered.
4.9 Edit Hours The Edit Hours function allows managers to edit an employee’s clock in and out transactions. This is necessary for entering non-clockable job codes such as sick and vacation time and can also be used to correct inaccurate clock operations such as a forgotten clock out.

TimeClock Plus 4.0 41
This screen is divided into several sections. At the top left is the employee list. All employees accessible by the current user are displayed in this list. This list can be sorted in ascending or descending order by clicking on the column headers of the list. To select an individual to edit, you can either enter their number in the Goto section and press ENTER, or you can double click on their employee information in this list.
At the upper right is the hours window. This window contains the hours worked for the selected employee and period. It also contains special fields such as M and E, which represent Manager and Employee (M and E) approval, Note that indicates if the shift segment has a note attached, and B that displays if the shift is tied together with a break. If a shift in this window is highlighted in red, the shift contains a break. If a shift is highlighted in green, it conflicts with another shift in the list.
At the lower left is the Accrual Information window. This window lists accruals for the employee and the estimated time remaining in each accrual. Note that the Accrued value is only updated when the week is closed using the Close Week function and will only be accurate up to the date of the last week that was closed. The system will attempt to estimate the accruals that remain based on hours used during the weeks that have not been closed. At the lower right is the Schedule Information. The Schedule Information section contains information about Date, Time In, Time Out, and Job Code for the employee. When editing hours for the current week, the Schedule Information box shows this week’s schedule, plus up to 3 additional weeks of schedules. When editing hours in a previous week, the box shows the hours scheduled for that week only. Options Button The options button is used to configure display options for the edit hours screen.
Display times in list in hours: minutes format instead of hundredths – For instance if the time worked is 1 hour and 45 minutes, hours:minutes format would be displayed as 1:45 and hundredths would be displayed as 1.75. Highlight shift segments that contain breaks – Shift segments will be highlighted if the segment contains a break of at least one minute. Display the actual clock in and out times in addition to the rounded times – If you have rounding of any sort configured in the employee record, the times reported and the actual times may differ. To display both times this option should be checked. Auto open accrual window when edit hours opens – This will automatically display the accrual window when the edit hours screen is first opened. It can be toggled on/off at any time using the View button from the edit hours screen.
Auto open schedule windows when edit hours opens – This will automatically display the schedule window when the edit hours screen is first opened. It can be toggled on/off at any time using the View button from the edit hours screen. Ask for confirmation when deleting a shift from an individual – If checked a prompt will be displayed when a user attempts to delete a shift from an employee. This is to prevent accidental deleting of shifts.

42 TimeClock Plus 4.0
Warn if a shift being added / edited in current week will exceed accruals – If checked, a warning will be displayed if the shift being added or edited will cause the individual to have less than zero hours remaining in the accrual for the job code used. Note that because accruals are updated when the week is closed, it may be possible for an individual to have the required hours accrued and still get this warning message. For example, suppose an employee accrues 2 hours a week in sick time and you have not closed the week for two weeks. The employee may only show that they have 1 hour of sick time remaining when they actually have 5 hours. The solution to this problem is to perform the Close Week operation on a weekly basis so accrual information will be up to date. Shift This option allows managers to Add, Edit, Delete or Split shifts. Once you click on the Shift Button, the following drop down menu will appear as shown below. Right clicking on the list containing the hours can also access this menu.
Add Shift / Edit Shift Adding a shift and editing a shift is basically the same, the same screen is used for both functions. This allows managers to add and edit shifts for employees.
Enter the Date In, Time In, Date Out, and Time Out. If you are adding a clock in record, place a check in the Employee is clocked in box. If you are clocking an employee out, remove the check from this box and enter the date and time out.
The job code, rate, tracked fields, and cost code (requires job cost module) can also be changed from this screen.
In the upper right corner of the window, the duration of the shift you are creating is displayed. To edit or view the extra information about the shift segment, click on the Extra button.

TimeClock Plus 4.0 43
This feature allows managers to: Disable automatic deduction for this shift - If you create a job code that gets an automatic deduction and for some reason the shift should not get that deduction, you can turn it off by placing a check in this box.
Example: Job code 1 is configured to auto-deduct 30 minutes for shifts over 6 hours. Employee 1 works 7 hours in job code 1 but does not take the 30-minute break. Since the break is auto-deducted you must place a check in this box to ensure that the break is no longer deducted.
Force overtime 1 / overtime 2 for this record - Tells the system that no matter where this shift falls in the hour calculations for the week it should always be treated as overtime #1 or overtime #2. Other Information - This section will display other miscellaneous flags for the shift. If you edit the shift when it is in history or add the shift to history, it will be noted there.
Split Shift This function allows a single shift to be converted into two shifts. This is helpful when manually adding breaks. To split a shift you must first highlight it in the hours section.
1) Enter the date and time to split the shift. The date and time must be between the clock in and out time for the shift. If the
clock in and out dates are the same, the split date will default to that date and will be disabled. 2) If you are adding a lunch or break when splitting the shift, enter the number of minutes in the Minutes between resulting
shifts section.
3) Select which segment will contain the tracked information after the split. 4) If you would like it to appear as if a break were taken between the two shifts, select the break type from the Tie shifts
together drop down list, otherwise choose None.

44 TimeClock Plus 4.0
5) Click Ok to perform the split or Cancel to cancel the operation.
Example: If an employee worked from 9:00 AM to 5:00 PM with a lunch at 1:30 PM for 30 minutes but forgot to clock out for the lunch, the shift will appear in the edit hours window as 9:00 AM – 5:00 PM without a break. To split the shift and add a break, select the shift and choose Split Shift from the Shift drop down menu. In the split time field enter 1:30 PM. In the Minutes between resulting shifts edit box enter 30. Check the option to Tie shifts together as if a break were taken. After the split the shift will show as 9:00 AM – 1:30 PM, and 2:00 PM – 5:00 PM.
Toggle Break This function will tie the selected shift together with the next shift in the list as if a break were taken. If the shift was already tied to the next shift with a break, the break will be removed.
Note that this option will always use the first break type available. If you would like to use a different break type to tie the segments together, you should double click on the first segment and select the break from the edit dialog. Add/Edit/View Note This function allows a note to be added, edited, or viewed for a particular shift. Clicking on the intersection of the column containing the heading Note and the row containing the shift segment you wish to modify can also access this screen.
Enter the note and click on the OK button to save the note and return back to the Edit Hours screen or click on the Cancel button to cancel the shift note function. Shift notes cannot exceed 100 characters in length. Notice that once a note is created on a shift a small icon of a note will appear in the Note column of the hours window.
Several pay period reports including the Selected Job Codes report can print the shift note information. Toggle Management / Employee Approval This function will mark the shift as approved by management, employee, or both. Notice that a small check mark will appear under the M column for management or the E column for employee when you toggle this back and forth. Note that the employee column might display another letter if you have renamed employee to another name such as “Student”.
Manager and employee shift approvals can also be performed from the Approval Manager, and employee approvals can be performed from the view hours window of the On-Screen TimeClock. View This option controls different configurations of the Edit Hours screen.
The accrual and schedule information selections can be toggled on and off by selecting them from the drop down menu. To select whether these screens appear by default when editing hours, click on the Options button.
There is also a Visual window option in the View button. This option allows managers to view the employee shifts in a visual representation of a graph as shown below.
Shifts worked show up in red. Shifts scheduled show up in green. Shifts that are selected show up in blue. To view more information about a shift, move the mouse cursor over a shift and a popup window will appear detailing the specifics of the shift.

TimeClock Plus 4.0 45
Print This option will print the hours displayed in the list. The print button can also be used to set print settings and preview the report prior to printing. If you would like to print hours for several employees at once the Weekly Punch Report is available from the Pay Period section of the Reports menu in TimeClock Manager. History The History button allows users to edit or view the hours for previous weeks. Simply click on the plus sign next to the year, then month, then week that you wish to edit. You will have to double-click on the week that you wish to edit. Once you have done this, the shifts that the employee has worked show up in the edit hours screen. You can edit previous weeks this way. Keep in mind that once you have closed a week and go back to edit the shifts, accruals and all cumulative totals such as sick and vacation will not be updated. In order to keep posted information accurate it is recommended that you only edit hours prior to closing the week. To return to editing the current information, click on the History button and choose Current Week from the list of available weeks. WARNING: When editing shifts in history, the information already posted for accruals and cumulative totals for the week will not be updated.
4.10 Quick Add Hours The Quick Add Hours function is used for adding hours quickly to an employee or group of employees while bypassing the Edit Hours section.
To add hours to an employee or group of employees: 1) Select the employees to add the record to from the list on the left. Multiple employees can be selected by holding the
CTRL key as you click on them with the mouse.
2) Enter the date, time, and other information in the space provided. 3) If you would like to force the use of a certain rate, click the Use Rate button and enter the rate in the edit field. If this
button is not checked, the employees default rate for the job code will be used. 4) Click the Extra button and set any desired settings for disabling auto-deductions or forcing overtime.
5) If you would like to preview the addition of hours to ensure there will be no errors, click on the Preview button.
6) When you are satisfied with the settings, click Add. This will add the shift entered to the selected employees.
The Criteria button can be used to refresh the list with only selected individuals. For more information on setting criteria, see the Criteria section on page 85.
4.11 Global Record Addition The Global Record Addition function allows users to add a record or clock in to all or multiple employees. The scope of the record addition is based on the criteria. Refer to the Criteria section of this manual for more information. The most common use for global record addition is to add time for holidays or meetings that were attended.

46 TimeClock Plus 4.0
Required Fields All fields in this section must be entered before the record addition can be performed. Enter the date and time for the clock in and out of the shift to be added. If you are adding a shift that is to remain clocked in, place a check in the Leave clocked in box and only enter the date and time in. Click on the Extra button to set options to disable the auto-deduction for the shift being added or to force overtime for the shift. Optional Fields All fields in this section are optional. If you would like to add tracked information for the shift or you would like to specify a cost code for the shift (Job Costing Module required), it can be done here. Options These check boxes allow you to specify how the import is processed. Use default pay rate for the selected job code on a per employee basis If checked, the rate the employee is assigned for the job code specified will be used when adding the record. If it is not checked, the rate specified in this dialog will be used for all employees regardless of their specified rate for the selected job code. Include suspended individuals in addition This function will add the record to employees even if they are on a suspended status. If you have any questions about the suspended status, please refer to the Edit employee section of this manual. Buttons Process - This button will perform the global record addition using the data entered.
Preview - This button will allow you to preview the global record addition and show any conflicts and exceptions that may come about from the change. No changes will be made during the preview operation. Criteria - The criteria allows you select who will be included in the Global Record Addition. If you have any questions about this feature, refer to the Criteria section on page 85.
4.12 Export Raw Hours See Section 4.7 Export Information for information on this feature.
4.13 Approval Manager Each shift entered into the system from the On-Screen TimeClock or Remote Data Terminal, or shifts entered manually can be approved by a manager and/or an employee using this function.

TimeClock Plus 4.0 47
The approval manager is used to determine the approval status of shifts within a specified date range. Approval is granted to shifts that are displayed by clicking in the first or second column of the list. The first column represents manager approved. The second column represents employee approved.
Dates to examine Enter the starting and ending dates to view in the From and To sections or select the date range from the drop down list. Once the date range is selected, click the Update button to update the list with the selected date range.
Shifts to View This section allows you to specify which shifts will be included in the list. View shifts that do not have employee approval / View shifts that do not have management approval - If checked, only shifts that are not already approved by the manager or employee will be displayed. This is useful if you just want to see the shifts that remain unapproved. Show only shifts that require approval based on the employee information - If checked, only employees whose shifts are set to require approval before the week is closed will be displayed. This option is configured on a per employee basis in the edit employee screen (see pg. 30).
4.14 Messaging Employee messaging allows managers to leave messages for particular employees. The employees will see these messages when they are clocking in or out.

48 TimeClock Plus 4.0
To send a message to an employee or group of employees, select them from the list. Multiple employees can be selected by holding the CTRL key as you click on the list. Once an employee or group of employees is selected, enter a message and click the send button to place the message in the message queue for the employee to read the next time they clock in or out of the system. Management - This button is used to send a management message. A management message is a message that will be seen by all employees when they clock in and out. Criteria - The criteria button is used to specify which employees will be displayed in the employee list. Refer to the Criteria section on page 85 if you have any questions about this function. History -By clicking on one of the employees and then clicking on the History button, you can view the message history for the employee.
The message history will list the date and time the message was sent as well as the date and time the message was read by the employee. The message history can be printed using the Print button in the history dialog.
5.0 Reports Menu 5.1 Pay Period Pay period reports are the TimeClock Plus reports that are based on a period of time. These reports are categorized into several different sections depending on the type of report. Some report types include Payroll, Scheduler, Accrual, and Period. For a list of the Pay Period reports and description of each, please see the Reports Appendix on page 83.

TimeClock Plus 4.0 49
To print or preview an individual report: 1) Enter the date range you would like for the report to include or select it from the quick select drop down list. 2) Right click on the report you would like to print or preview and choose Print or Preview from the popup menu.
To print multiple reports: 1) Enter the date range you would like for the report in the date section or select it from the quick select drop down list.
2) Place a check in the gray box next to each report you would like to print by clicking on the box with the mouse. 3) Click on the Print button.
To configure the options for a particular report: 1) Select the report from the list by clicking on it with the mouse. 2) Click on the Settings button. Or
1) Right click on the report in the list. 2) Choose Change “report” settings from the popup menu. Other Buttons Criteria - The criteria is used to select employees to include in the reports. Refer to the Criteria section on page 85 if you have any questions about this feature. Options – The options screens are used to configure report options such as time formats, sorting order, and line spacing.
Formatting This tab controls formatting for time, hours, and employee names. The information set in these tabs will apply to all pay period reports.
Miscellaneous This tab configures settings for sort order, printer dialog and the default reporting period.

50 TimeClock Plus 4.0
Report Sorting – Individual reports are sorted according to this section.
Note: Not all reports provide detail employee information and therefore will not use this sort order. Printer Configuration – This option allows you to control when you want to view the Windows printer configuration. Some people may want to see this per report, never, or only once when the reports begin to print. This will allow you to specify a new printer or change a printer setting when you begin printing reports. Default Reporting Period – The default reporting period is the period that is first selected when the pay period reports screen is initially opened. You should set this to the most common period that you use so that you do not have to select it each time you open the pay period reports. Print Options This option will allow you to make custom changes to the printing of the reports.
Hide overtime #2 column in reports if none is present – To save space on reports, the overtime #2 column can be hidden if there is no overtime 2 present in the report. Use bold printing on reports to emphasize totals – If this option is checked, the totals on the reports will be in bold print. Report line spacing – This is adjustable from .5 to 3.0 to adjust the spacing of these lines in the reports.
Shading color for shaded sections on reports – If you click on the color box a palette of color will appear. Select the color that you want for highlighting on your reports. Shading can be enabled on a per-report basis, but they will always use this color.

TimeClock Plus 4.0 51
Settings – This option allows you to change the settings per report. Each of the Pay Period reports has unique settings that can be altered to meet your needs. To adjust the report settings for a report, select the report from the list and click on the Settings button or right click on the report and choose Change “report” settings from the popup menu.
From the settings screen individual items can be turned on and off for each report. In addition, the name of the report can be changed. While in the report settings, click on the Page Info button to set information about the font and orientation of the report. All printable fonts in the system can be selected for use with the report.
Preview – This option will allow you to preview an individual report. If there are any exceptions or other factors keeping the system from printing the reports, they will be displayed prior to previewing the report. While previewing, the report can be printed by clicking on the Print button.
Export – This option brings up the TimeClock Manager Payroll Export screen. Refer to the Export section of this manual for more information on this feature.
5.2 Approaching Overtime The Approaching Overtime report is used to determine if any employees are about to enter into overtime hours.
If you are only interested in determining overtime for particular overtime types, you can check or un-check the include box for each method prior to generating the report. For each box that is checked, enter the information used in determining which employees will be listed on the report. For example, if you want to see what employees earning weekly overtime will enter overtime within the next two hours, you should check the box Include individuals earning weekly overtime and enter the 120 in the edit box (120 minutes=2 hours). The system will simulate a two hour shift starting at the current time and see if the shift contains overtime. If it does, the employee will be included in the report. Criteria - The criteria are used to select which individuals will be processed for the report. Refer to the criteria section on page 85 for more information. Print - This button will allow you to print, preview, or adjust the settings for this report.

52 TimeClock Plus 4.0
5.3 Employee Job Information The Employee Job Information report is used to report what job codes an employee is currently assigned and can also include additional information about each code.
This report can be customized by checking or un-checking individual options in this dialog. Print only these codes - This option will allow you to print only a specified range of job codes to be specified in this box. Click on the ellipsis (…) icon to view a list of all available job codes. Criteria - This button will allow you to select individuals to be included in the report. Refer to the Criteria section on page 85 for more information. Print - This button will allow you to print, preview, or adjust the settings for this report.
6.0 Export Menu 6.1 Pay Period This option is used to export calculated payroll information to a file for use in another application such as a spreadsheet or payroll application. Once the file is exported you should execute the secondary application and import the file that was created. Refer to the documentation of your payroll or accounting software for instruction on importing.

TimeClock Plus 4.0 53
To export your period information to a file: 1) Select the export format to use from the Export format drop down box.
2) Enter the date range that you wish to export in the date range fields or select a period from the quick select list to the right of the date range.
3) Specify the export filename and location from the Export filename textbox. Make a note of where this file is being created so that you can locate it when you attempt to import it into another application.
4) Select the module settings you would like for the export. 5) If the Configure button is enabled, click on it and ensure that the configuration is correct. Refer to the documentation for
the specific package you are using for information on configuring. 6) Select the employees to include in the export by clicking on Criteria. Refer to the Criteria section on page 85 for more
information. 7) Click Process to perform the export using the specified settings.
Module Settings The module settings are based on the import capabilities of your accounting or payroll package. Some of the module settings will not be available for certain export formats. Split export by Job Code – If this setting is checked, each unique job code the employee has worked will export separately. For example, if an employee works 10 hours in job code 1 and 5 hours in job code 2, the hours will be reported as 10 and 5 if this option was checked or as 15 if it is not checked. Split export by Rate of Pay – This setting works similar to exporting by job code as described above but is based on unique rates of pay. Split export by Cost Code – This function is only available if the Job Costing Module is installed and the selected module supports this feature. This setting functions similarly to splitting by job code as described above but is based on unique cost codes. Export hours for salaried individuals – Each export module handles this option differently. In some instances the salaried individual will be exported using special salary codes unique to the payroll or accounting system. With other packages their hours are exported in the same manner as regular employees. Export tracked field 1,2,3 – If checked, information entered in the tracked fields will be totaled and exported according to the specification for the module selected. Export header line at top of file – For some of the generic exports this option will export a header line for each column in the export. The header line will contain a description of the column and can be useful when importing into spreadsheet applications.
Buttons Configure - This option contains extra configuration screens based on the current module selected. Consult the documentation that came with your export module for more information on configuring the module. Criteria - This button enables you to select which employees are included in the export. Refer to the Criteria section on page 85 for more information. Options - This button allows you to set default settings for the export process.
Export sort order – When the export is processed, the employees will be exported in the sort order chosen.
Default period – The default period for exporting. This option will determine what period is selected when the export screen is first opened.
6.2 Employee Job Information See Section 4.7 Export Information for information on this feature.

54 TimeClock Plus 4.0
6.3 Job Codes See Section 4.7 Export Information for information on this feature.
6.4 Raw Hours See Section 4.7 Export Information for information on this feature.
7.0 Tools Menu The Tools menu option contains certain TimeClock Manager tools used for monitoring and tracking of employees.
7.1 Who’s Here The Who’s Here option is used for viewing employees that are currently clocked in, on break, automatically clocked out, etc.
Notice the employee information presented in the grid. The Who’s Here function allows you to see every employee that is clocked in, on break, auto out (see note), not in, and the last punch of all the employees. This is possible by clicking on each tab in the screen to see the different views of data. Note: The auto out function enables an auto clock out on a particular job code. This can be used when an employee clocks in for a known number of hours and then leaves the site. It can also be used for such things as meetings where all individuals attending a meeting are paid a certain number of hours. The auto out option is configured on a per job code basis from the Master Job Code List.
Print - This option will print a Who’s Here report containing information in the selected view. It also allows you to adjust the printer settings for this report. Criteria - This button allows you to select groups of employees to include in the list. Refer to the Criteria section of the manual for more information. Clock - This option will allow you to perform clock operations on selected groups of employees. To use this function you must select at least one employee from the current list. Multiple employees can be selected by holding the CTRL key while clicking on the list. From this option employees can be clocked out or they can be mass changed to another job code. Call List – See page 56 for more information about this option.
Options - This button opens the options window for the Who’s Here list.

TimeClock Plus 4.0 55
Auto refresh interval x seconds - This option will refresh your screen to reflect new punches based on the interval that is specified. Highlight shifts over <x> and <y> hours - This will make these particular shifts show up highlighted. This can be useful in determining employees that didn’t remember to clock out. Double Clicking an item in the list performs what action - This function allows you to double click on an employee in a Who’s Here screen and perform the selected action.
Absent - This option will show you which employees are absent at this moment. See the following section for more information on this option.
7.2 Who’s Absent
A schedule is required to use this feature. NOTE: This feature works differently than other absent reports in the system. The purpose of this report is to see who is scheduled at the current time but not currently on the clock. Other absent reports in the system examine the clock in time and ensure that the employee arrived within a certain number of minutes of that time. If they did not, they will be reported as absent.
Criteria - This button will allow you to determine which employees will be included in the list. Refer to the Criteria section on page 85 for more information. Print - This button controls printer settings, print preview and printing.
Update - This button will update the information on the screen if some clock in and out transactions have occurred while you were viewing this information.
7.3 Attendance Monitor The Attendance monitor allows you to view a list of employees that worked or were scheduled during a specific time period on a specific day.

56 TimeClock Plus 4.0
To use the attendance monitor: 1) Enter the starting and ending times that you wish to view in the date and time fields or select a time from the Quick Pick
drop down list. 2) Select the filter that you want to apply from the Filter drop down list. The filter can be one of the following.
Clocked In – The employee is displayed if he clocked in during the time range specified.
Working During – The employee is displayed if he is on the clock during the specified period of time. The employee will be displayed if at any point in time he was clocked in. This is useful in determining employees who forgot to clock out. For example, you can tell the attendance monitor to list all people working at 2:00 AM. If you are not open at 2:00 AM you know that they forgot to clock out the previous day. Scheduled Clock In - The employee is displayed if he is scheduled to clock in within the given time range.
This can be useful to determine who is scheduled to come in within the next couple of hours. A schedule is required. Scheduled Working – The employee is displayed if he is scheduled to be on the clock at any time during the time range. A schedule is required.
3) Click on the Update button to refresh the list with the new data.
7.4 Call List The Call List is a utility that can be used by managers who are trying to control labor costs. When a shift needs to be filled and an employee is called in, management can use the Call List for a list of employees, their phone numbers, and the number of hours they have worked during the week. Employees who have overtime for the week are flagged in red.
If labor cost is a concern, you can use the Call List to contact an employee who is less likely to earn overtime for the shift thereby reducing labor costs.
The list can be sorted by employee number, first name, last name, number of hours worked and phone number by simply clicking on the header column of the list.

TimeClock Plus 4.0 57
Print - This button allows you to print, preview or adjust the settings of the Call List report.
Criteria - This button allows you to specify which employees are to be included in the list. Refer to the Criteria section on page 85 for more information. Update - This button will update the Call List. If any time has passed since the last update, the hours will adjust accordingly.
7.5 Re-index Data Files In order for information to be accessed rapidly in the TimeClock Plus system, indexes are kept on all of the files. Re-indexing the TimeClock Plus databases rebuilds these files. From time to time, indexes may become out of order and impede the performance of your system. Indexes can become corrupt due to network problems or loss power during a database update. If you feel that your system performance is slowing or if you are experiencing database errors, you should perform a re-index of your data files. Select the Re-Index option from the Tools menu in main TimeClock Manager.
Notice that all of the data files are checked to be re-indexed. You can re-index specific data files, but it is recommended that you re-index all of them. Click on the Process button to re-index the data files. After the re-index is complete, click on the Cancel button to return back to the main TimeClock Manager screen.

58 TimeClock Plus 4.0
7.6 Optimize Data Files For reasons dealing with the speed and efficiency, when information is deleted from the TimeClock Plus database files, it is not really deleted from the file; instead, it is marked with a special code and ignored by all operations. On installations with much activity, this can sometimes make your database files unnecessarily large, slowing down TimeClock Plus. The process of actually deleting the data is known as optimizing. When TimeClock Plus optimizes a database, it searches through and purges all the data that has been marked for deletion.
TimeClock Plus automatically optimizes the current week’s clock in and clock out records when you close the week. It also gives you the option to optimize the database files. This is not a vital procedure under normal conditions, although optimizing once every one to four month is recommended. However, if you suspect a power failure or other incident may have corrupted a database, you can optimize the databases to eliminate these errors. You should only optimize the databases when TimeClock Plus use is at a minimum.
The following screen will appear when you select the Optimize Data files option from the Tools menu in TimeClock Manager.
Once you have read and understand the warning given, click on the Continue button to perform the optimization, or click Cancel to exit without optimizing.
If there were any errors in the optimization, the system will prompt you at this time. Note: It is recommended that you perform a data backup before optimizing.
7.7 Display Labor Cost The Labor Cost analysis provides an hour-by-hour breakdown of number of hours worked, estimated wages paid, and labor as a percentage of sales for all employees. A summary at the top of the window provides total hours, wages, sales, and labor percentage. The summary can be set to display daily or weekly totals.

TimeClock Plus 4.0 59
If sales are being entered by the hour, the dollar amounts can be edited by clicking on the appropriate box in the Sales column. Update - This option will refresh the data that you are viewing. If the labor cost screen has been open for a period of time, the update button will refresh the information displayed to once again be up to the minute. Options - This button will display the Labor Cost Options.
Job Codes Section The Labor Cost Options screen will allow you to view labor costs per job code. To do this, select Include only selected job codes in labor cost and place a check mark in each of the job codes you want to include in the labor cost. The All or None buttons can be used to quick select or unselect all of the job codes in the list. Other Options Section Highlight hourly labor percentages above <x> - If checked, any labor cost percentages higher than the percentage entered will be highlighted in the labor cost screen. Edit sales by the hour – If checked, sales can be entered on an hourly basis as opposed to a daily basis. Include salaries in total wages – If checked, the total for salaried employees will be added to the labor figures when determining daily and week labor cost. Save entered sales figures – If checked, sales that have been entered will automatically be saved and recalled.

60 TimeClock Plus 4.0
Print - This button allows you to print, preview, or change report settings.
Period - This button will display a calendar and allow you to select any period to view labor cost.
7.8 View Hour Edit Log The View Hour Edit Log function allows managers to view changes made to employee hours. Detailed information about who made the change, where the change was made and on what date and time the change was made.
Each record in the change list is composed of two lines of data. Information in red indicates the changes that were made to the record. History - This option will allow managers to select other dates to view when hours were edited for previous weeks.
Filter - This option will allow a manager to view the data through filters based on certain criteria.
The Change Log Filter is similar to Criteria found throughout the TimeClock Plus applications. The following information can be adjusted to filter the edit log results. Changes to Employees – This allows managers to specify particular ranges of employees to view. If you are looking for only changes to a certain employee, you can enter his/her number here. Changes to job codes – This allows managers to specify particular ranges of job codes to view.
Changed on what date – This allows managers to specify particular days to view.
Changed by whom – This allows managers to filter records based on which user made the change.
At what location – This allows manager to view edits from by location.
Detail - This button will become enabled when you select a shift by clicking on it. This option contains more in depth information about the selected shift.

TimeClock Plus 4.0 61
Print - This option controls printing, settings and preview of the Hour Edit log report.
7.9 View Override Log When a clock restriction is overridden from the On-Screen TimeClock or WinRemote software, the override is logged. This feature allows you to view all overrides for a period of time including information on who performed the override, where it took place, and what restriction was overridden.
To view the list of overrides for a period, enter the date range in the View data from and to edit controls or select a period from the quick select drop down list. Column Information Number – The employee number of the employee who performed a restricted operation
Name – The name of the employee who performed a restricted operation
Entry Point – The location where the restriction was overridden. Some examples are WinRemote or On-Screen TimeClock.
Operation – The operation that was being performed when the restriction was flagged (i.e. Clock In, Clock Out).
Date/Time – The date and time when the restriction and override occurred.
Reason – The reason the employee was restricted from performing the operation. Overridden By – The user that performed the override. In order to perform overrides, a user must be granted permission to do so from the User List located on the Configuration menu in TimeClock Manager.
Override Method – The method used to perform the override. In most cases this is done using a password, but if a biometric unit is installed, the override may have been performed using with that unit. Buttons Update – The update button is used to update the information displayed after a change to the date range has been made.
Criteria – The criteria is used to determine which employees will be included in the view when it is updated. For more information on using the criteria, see page 85. Print – The print button allows you to print or preview the list of overrides that are currently displayed.

62 TimeClock Plus 4.0
Filter – This button allows you to determine which items are displayed in the view.
To include certain items in the list, place a check next to the item in the appropriate section. Click Ok to return to the override log and view the items matching the filter you have selected.
7.10 Reset Tracked Fields TimeClock Plus tracks several different items on a per employee basis such as tardies, absences, etc. In most instances this information at some point in time must be reset. The Reset Tracked Fields function performs the task of resetting this data.
Information in each of these fields begins accumulating the moment the employee is set up in the system. Each field on the screen can be marked for reset by placing a check in the box next to the item. In addition the Criteria can be entered to allow the reset to affect only a select few individuals.
Some fields contain date ranges. To erase all information for fields that contain date ranges, enter today’s date into the date control to ensure that all data is prior to that date.
All information reset from this screen can be found in the Edit Employee screen under the Cumulative tab.
Example: If you would like to keep a running total of sick and vacation hours for the year, you should perform the reset of sick and vacation totals at the beginning of the year. Note that resetting these totals merely resets the particular counter to zero in the employee record. No sick and vacation history is actually erased.

TimeClock Plus 4.0 63
7.11 Backup System Information Backing up the system information will provide data redundancy so that information can be restored again if something happens and you lose data. A backup of your data should be performed at regular intervals to ensure that no data will be lost in the event of a hard drive or system failure.
To select items for backup, place a check in the box next to the item by clicking on it with the mouse. All items can be selected by clicking on the TimeClock Data Directory item at the top of the list.
Quick Select - This option allows a quick selection to backup the data contained in the current month, current year, current week, last month, or last year. Start Backup - This button will start the backup process, which will backup the files selected in the list. You will be prompted for a file name before the backup begins.
7.12 Restore System Information Restore system information restores your TimeClock Plus data that was backed up using the Backup System Information option. You may have to restore data if your data is damaged or corrupted. Note: Before restoring any data, you should make a backup of your current system in case you accidentally restore an incorrect file.
To restore a backup from disk: 1) Click on Select File to select the backup file to restore.
2) When presented with the list of files contained in the backup, select each file to restore by placing a check mark next to the item in the list.

64 TimeClock Plus 4.0
3) Click on Start to restore the data.
7.13 Calculator TimeClock Manager comes with a fully functional calculator that operates on your computer screen. The calculator will appear when you select Calculator from the Tools menu in TimeClock Manager.
7.14 Calendar TimeClock Manager comes with a viewable calendar. The calendar will appear when you select Calendar from the Tools menu in TimeClock Manager.
8.0 Configuration Menu 8.1 Master Job Code List The Master Job Code List allows managers to set the defaults and add, edit, and delete job codes. The job codes listed here comprise every job code that can be used throughout the company. Any job code that is to be assigned to an employee for use when clocking in should first be added here.
Adding or Editing a Job Code To add a job code to the system click on the Add button. To edit an existing job code, double click the code in the list or select it using the mouse and click the Edit button. You will be presented with the following screen.
Information Tab This section details basic information about the job code. The fields entered here will be used as defaults when adding this job code to an employee.
Job code number - Number of the new job code, this must be unique. It can be up to 10 digits.
Description - A description of the new job code. It can be up to 20 characters long.

TimeClock Plus 4.0 65
Export As - When exporting data to a text file, this field is exported to represent the Job Code. The Export As field can contain the same information as the Job Code number or it can be an alias for the Job Code. Export Information - This is additional export information that you add to your export. It will vary depending on the payroll export module that you are using. Please refer to the documentation of your payroll export module. Note: The following settings are only defaults and can be overridden when adding the job code to an employee.
Clockable – If this is checked, this job code is clockable by the employee. A clockable job code is one that can be used by employees to clock in to the system. For example, waitress, busboy, or cashier might be an example of a clockable code while sick, vacation or comp time is an example of a non-clockable code. Earns overtime – If this is checked this job code is eligible to earn overtime hours.
Counts overtime – If this is checked, this job code will count toward the number of hours required to earn overtime pay.
Requires Entry of Cost Code – This will ask the employee for a cost code when clocking in under this job code (Job Costing Module is required). Requires Entry of Track 1, 2, 3 - Each job code can track three different fields on clock out. For example, you may want to track tips, parts completed, pieces, etc. Checking these options when adding or modifying a job code means that job code will require data entry in those fields when the employee clocks out. Force Overtime 1, 2 - Tells the system that no matter where this shift falls in the hour calculations for the week it should always be treated as overtime #1 or overtime #2. This would mainly be used for something like holiday pay where someone would get overtime for working on the holiday. Breaks Tab This section allows entry of break information for the job code. It is used to configure when automatic deductions occur and what types of breaks are paid.
Automatic Deductions – This section allows you to preset deductions in minutes for shifts for this particular job code. This is to allow for an automatic deduction of breaks for shifts that are above or equal to certain lengths. For automatic deductions to take place, it must be a shift with no clocked breaks (i.e. only one clock in and one clock out operation).
Example: Job code 100 is set to auto deduct 30 minutes for shifts above or equal to 4 hours. If employee 1 clocks in at 8:00 A.M. and out at 1:00 P.M. for break, back in at 1:30 P.M. and out at 5:00 P.M., the auto deduction rules would not apply because the shift contained a clocked break. If the employee clocks in at 8:00 A.M and out at 5:00 P.M., the auto deduction will apply because he worked a straight shift with no clocked breaks.
Automatic deductions should be used when your employees are required to take breaks after shifts of certain lengths, but you do not require them to clock in and out for those breaks. For example, suppose all shifts over 4 hours require a 15 minute unpaid break. You could configure all job codes to deduct 15 minutes for shifts over 4 hours.
If the Job Costing Module is installed and the user changes cost codes throughout the day, the auto-deduction will only be taken if the job code and pay rate for the entire shift remain unchanged. NOTE: Auto deductions do not take place at each increment of the amount entered. For example, if you entered to auto deduct 15 minutes for shifts over 4 hours, the most that could be deducted for a shift would be 15 minutes. If an employee worked 12 hours, only 15 minutes would be deducted. If you want to deduct 30 minutes for over 8 hours and 45 minutes for over 12 hours, these deductions must also be entered. Also, if multiple deductions are entered, only one will be used.

66 TimeClock Plus 4.0
Clocked Breaks (Paid/Not Paid) – Clocked breaks are breaks are performed from any of the TimeClock Plus applications using the Break key. This option determines if breaks taken while clocked in under the selected job code will be paid or not paid.
If breaks are set to be paid, a number of minutes to pay must be entered. Breaks are paid if they do not exceed the value entered in the “Clocked breaks are paid if they do not exceed <x>” field. If they do not exceed this amount, the number of minutes entered in the “A maximum of <x> minutes are paid” field are considered paid.
Example: if you pay employees for breaks of 15 minutes or less, you could set the first field to 20 minutes and the second field to 15 minutes. If the employee takes a break from 1 to 15 minutes, they will be paid for the length of the break. If they take from 16-20 minutes they will be paid for 15 minutes.
Minimums and Rounding Tab This section is used to enter break minimum lengths and break rounding settings.
Break type –This option allows you to specify which break type to edit. Break types can be defined in the defaults section (see pg. 76). You can have up to four different break types. If you wish to change the settings of a particular break time, select it from the combination box and make the necessary changes.
Break rounding as well as having multiple break types is new to 4.0. While keeping the break process simple, there are now additional options that can handle more complicated break rules. Use company wide settings for minimums and rounding - This setting refers to the company wide default settings in the TimeClock Plus defaults (see pg. 80). If all break information is the same for all job codes, the easiest method of configuration is to set the company wide settings and only override these settings when necessary. Use the following settings for this job code – If selected, the break rounding and minimum settings can be overridden from the defaults set in the TimeClock Plus defaults (see pg. 80).
Enforce minimum break length of <x> minutes - This setting will enforce a break length of a specified number of minutes. Once an employee clocks out for this type of break, management approval will be required to return from break early. Round breaks to nearest <x> minutes - This setting will round breaks on this job code to the amount of minutes you have specified. First Segment: Round up at <x> minutes - A segment refers to the period of time entered in the previous field. For example, if you round to the nearest 20 minutes, segment 1 would be the first 20 minutes and segment two would be the second 20 minutes. To disable rounding for the first segment, enter zero. Other Segments: Round up at <x> minutes – This is rounding is for all other segments excluding the first segment. To disable rounding for other segments enter zero.
Example 1: Company A has a break policy that all lunch breaks must be at least 30 minutes long, are rounded to the nearest 15 minutes, and the employees are allowed to return early from lunch.
To handle this policy, Company A designates that one of their Break Types be called “Lunch”. A minimum break length of 23 minutes is set in the minimum break length field. The value 23 is chosen for this field because it is the earliest time the employee can return and be rounded to 30 minutes. The round breaks field is set to round to 15 minutes. The first and other segments are set to round up at 8 minutes.

TimeClock Plus 4.0 67
If an employee attempts to return from a break of 0-7 minutes the break will be rounded to 0 minutes and the operation will be denied. If they attempt to return from 8-22 minutes the time length will round to 15 minutes and the operation will be denied. If they attempt to clock in from 23-37 minutes the break will round to 30 minutes and the operation will be allowed.
Example 2: Company A has a break policy that all morning breaks should round to the nearest 5 minutes.
Company A should create a Break Type called “Morning”. They should check the option to round breaks and indicate that they should be rounded to the 5-minute increments. Both the First and the Second Segment should be set to round up at 3 minutes. These settings will round a break length of 2 minutes or less down to zero and a length of 3 minutes or greater up to 5.
If you would like to force any break to round to at least five minutes you can enforce a minimum break length of 3 minutes.
Example 3: Company A has a break policy that all afternoon breaks should always be at least 15 minutes, but they do not care if the employee takes the entire 15 minutes. If the employee takes more than 15 minutes they want the exact amount of the break to be recorded.
Company A should create a Break Type called “Afternoon”. They should check the option to round breaks and enter to round to 15 minutes. For the first segment they should round up at 1 minute. For other segments the round up value should be set to 0 to disable rounding.
Using these settings, any break of 1-15 minutes will round up to 15 minutes. Any break over 15 minutes will not be rounded because rounding after the first segment has been disabled.
Auto Out This section allows configuration of automatic clock out operations.
Enable automatic clock out for this job code – If this option is checked, employees clocking in under this job code will be immediately clocked out a set number of hours later.
Example: If you pay two hours for meetings attended, create a meeting job code that auto clocks out after two hours. The individual will only need to clock in for the meeting and they will be given two hours. Other Functions Delete – This option will delete the job code that you have highlighted in the Master Job Code List screen. When a job code is deleted from the system it is automatically removed from all employees to whom it is assigned. A job code should not be deleted from the system until it is no longer needed for reporting purposes. Print – This option controls the settings, printing, and preview information for the Master job code reports.
Import – Please refer to importing on page 15 if you have any questions about this feature.
Export – Please refer to exporting on page 38 if you have any questions about this feature.
8.2 Master Cost Code List Many businesses frequently have multiple customers or projects at any given time, and it is helpful to know how much time is being spent on each. For instance, an automobile repair shop may need to track exactly how many hours are being spent on each car in order to properly bill the customer. TimeClock Plus has the optional Job Cost Module to facilitate this.

68 TimeClock Plus 4.0
The Job Cost Module is an optional product available for TimeClock Plus, which allows employees to specify a costing code when clocking into the system. The difference between job codes and cost codes is important. Each employee is expected to have only a few job codes, and those codes change infrequently. Conversely, there is no limit to the number of cost codes available, and those codes are easily changed. Also, employees are assigned job codes individually, whereas cost codes are assigned for the company as a whole. If you are interested in purchasing the Job Cost Module, contact Data Management at (800) 749-8463 or e-mail [email protected].
Delete - This option will allow you to delete the currently selected cost code. If a cost code is still needed for reporting purposes, consider marking it as inactive instead of deleting it from the system. Print - This option allows for printing, previewing, and changing report settings for the cost code list report.
Import - This option will allow you to import cost code lists from other applications or TimeClock Plus systems. If you have any questions about importing, please refer to page 15. Export -This option will allow you to export your cost code list to other TimeClock Plus installations or other applications. If you have any questions about importing, please refer to page 38. Add - This option will allow you to add a cost code.
Edit -This option will allow you to edit a cost code.
Level 1,2,3 – The cost code can be broken down into 3 levels. The total number of characters in the three levels can be no more than 45 characters.
Some examples of the use of levels are:
Franklin Yard – Mowing – Ride Mower
Franklin Yard – Mowing – Push Mower
Franklin Yard – Edging
When printing reports the subtotals can be obtained for each of the levels. In the examples above, a total time could be obtained on the Franklin Yard, or mowing on the Franklin Yard, or time spent on the Ride Mower on the Franklin Yard. Description – This is the description of the cost code.
Export as – When performing a payroll export using the Pay Period export function, all cost codes will export using this code. This code represents the code used for this cost code in your payroll or accounting system. Date Added – This is the date the cost code was created or added into the system.
Status – This is used to report the status of the cost code such as open, closed, in progress, etc. The status codes are set up in the defaults screen (See pg. 81).

TimeClock Plus 4.0 69
Cost code is currently active – If this box is checked the cost code will be active and employees will be able to use it while clocking in and out. Custom 1,2,3,4 – The custom check boxes are user definable codes used to track specific details about each cost code. The names of these fields can be defined in the TimeClock Plus defaults (see pg. 81).
8.3 Accrual Rules TimeClock Plus allows for users to create customized accruals. These accruals can be based on time worked by employee or can be routinely posted at regular intervals regardless of time worked.
The accruals that you create and setup in this option can be added individually to each employee in the system from the Accrual tab while editing an employee. They can also be set up in the Employee Default Information and shared among several or all employees.
To add or edit an accrual rule: 1) To edit, select the rule from the list and click Edit. To add, click on the Add button. This will begin the rule configuration
process.
2) If adding, enter the rule number. By default the next available rule number will be provided. There is no need to change
this default unless you want to do so.
3) Enter a description for the rule. This description should contain enough information to describe the rule so that it can easily be distinguished from other rules.
4) If you would like the rule to be active, ensure that the Accrual rule is active box is checked. If an accrual rule is assigned to an employee but it is not marked as active, it will not be posted and no time will be accrued for the rule.
5) Click on the Next button.

70 TimeClock Plus 4.0
6) Select what the rule is based on by clicking on one of the two radio buttons at the top of the dialog.
Accrual is not based on hours worked in the week being closed – An accrual that is not based on hours worked is one that is just posted on a regular basis regardless of hours worked. An example of this type of accrual would be if an employee earns 8 hours of sick time on the last day of each month. Accrual is based on hours worked in the week being closed – If this option is selected, the accrual will be based on the number of hours worked in the week being closed. The number of hours worked in the week that match the criteria selected in this dialog will be referred to as “counted hours” for the remainder of the accrual rule configuration. Regular Hours – If this box is checked, the regular hours worked in the week being closed will be included in the counted hours. Overtime 1 hours - If this box is checked, the overtime 1 hours worked in the week being closed will be included in the counted hours. Overtime 2 hours - If this box is checked, the overtime 1 hours worked in the week being closed will be included in the counted hours. Hours in non-clockable job codes – If this box is checked, hours worked in non-clockable job codes (i.e. sick and vacation) will be included in the counted hours. The inclusion of hours for non-clockable hours also depends on the check boxes to include regular, overtime 1, and overtime 2 hours. Count only selected job codes – If this box is checked, only hours worked in job codes matching the job codes entered here will be included in the counted hours total. NOTE: Each of the check boxes depends on all others. For example, if you choose to include regular hours in counted hours and do not check to include hours in non-clockable job codes, all regular hours worked in non-clockable job codes will not be included in the counted hours. Use only the hours that fall between <x> and <y> - Once the system has obtained the total number of “counted” hours for the week, you can instruct the system to use only a portion of those hours. For example, if the system calculates a total of 31 counted hours and the settings instruct to include the counted hours between 25 and 100, the total number of counted hours used would be 6 because only 6 hours fall between 25 and 100 in the calculation. For more detail on this, see the examples at the end of this section.
7) Click on the Next button to advance to the Accrual Period screen.

TimeClock Plus 4.0 71
Depending on the basis for the accrual, different selections will be enabled. Select the day on which the accrual should be posted. Daily – The accrual will be based on daily hours worked. Note that setting this option will result in the entire accrual being processed seven times for each week that is closed. Weekly – The accrual will be posted each time the week is closed.
Monthly on the <x> day of the month – The accrual will be posted on the date specified each month.
Monthly on hire date anniversary – The accrual will be posted on the same day of the month as the hire date of the employee. If the hire date falls on a day of the month that does not exist in the current month (i.e. the 31st in February), the accrual will be posted on the last day of the month. Yearly on date – The accrual will be posted once a year on the date specified.
Yearly on hire date anniversary – The accrual will be posted once a year on the employees hire date. The accrual will not be posted during the first week the individual is employed. NOTE: Accruals specifying a date will be posted when the week containing the date is closed from TimeClock Manager.
8) Click on the Next button to advance to the Accrual Hour Options.
Process this accrual only if counted hours are equal or above <x> – This accrual will only be posted if the number of “counted” hours as determined by Accrual Type settings is greater or equal to the number entered here. This option is only available if the accrual is based on hours worked. Number of hours to accrue for each counted hour –This is the amount of hours to accrue for each “counted” hour determined by the settings in the Accrual Type section. For example, if an employee accrues 15 minutes of vacation for every counted hour, you would enter 0.25 into this text box.

72 TimeClock Plus 4.0
Number of hours to accrue when accrual is posted – This is a fixed number of hours to accrue when this accrual is posted. If the accrual is based on hours worked, this amount will be added to the number of hours accrued for each counted hour. Accrual is posted to what job code – You can specify which job code by clicking on the ellipsis (…) icon in this text box. This is the job code that relates to this accrual. For example, if you are accruing sick time you would enter the sick job code in this field.
9) Click on the Next button to advance to the Accrual Summary screen.
10) Review the information presented. If you are satisfied with the Accrual Rule that you just created or edited, click on the
Finish Button. If you feel that you need to make some changes in some of the previous screens, click on the Back button to make the changes.
Example 1: Employees earn 8 hours of sick time for each month. From the Accrual Type screen, set the accrual to not be based on hours worked. From the Accrual Period screen set the accrual to accrue on the last day of the month. From the Accrual Hour Options screen set the number of hours to accrue when accrual is posted to 8 and the job code to which the accrual is posted to the sick job code.
Example 2: Employees accrue comp time 1 to 1 for each hour worked from 40-45 hours in a workweek and 1.5 to 1 for hours worked over 45 hours in a week. Non-clockable hours are not counted. This accrual requires two rules that are very similar. From the Accrual Type screen set the accrual to be based on hours worked. Check to include regular, overtime 1, and overtime 2. For the first rule enter 40 and 45 in the fields for the hours to include. For the second rule enter 45 and 100 (to ensure that all hours over 45 are included). For the Accrual Period select weekly. In the Accrual Hour Options screen set the number of hours to accrue per counted hour to 1.0 for the first rule and 1.5 for the second rule. Enter the job code for comp time in the ”job code to post to” section.
If an employee works 43 hours in a week, the first rule will accrue 3 hours into comp time because it is accruing 1 to 1 for hours from 40 to 45. Rule number two will not accrue any hours because there are no counted hours from 45-100.
Example 3: If an employee works more than 4 hours in job code 1000 during a workweek, they will accrue 2 hours of comp time. From the Accrual Type screen set the accrual to be based on hours worked. Place a check in the Regular, Overtime 1, and Overtime 2 fields. Place a check in the “Count only selected job codes” box and enter 1000 in the edit control. Ensure that the number 0 and 100 are in the hours to use boxes to include all counted hours. In the Accrual Period screen select to post weekly. In the Accrual Hour Options screen set the accrual to take place only if the counted hours are greater than or equal to 4.00. In the “Number of hours to accrue when accrual is posted” enter 2.00.
8.4 Holiday Calendar The Holiday calendar function allows users to specify certain days as holidays. Dates marked as holidays will be treated differently by showing up in the TimeClock Plus reports as holidays if the employee is configured to receive special compensation for holidays (see pg. 28).
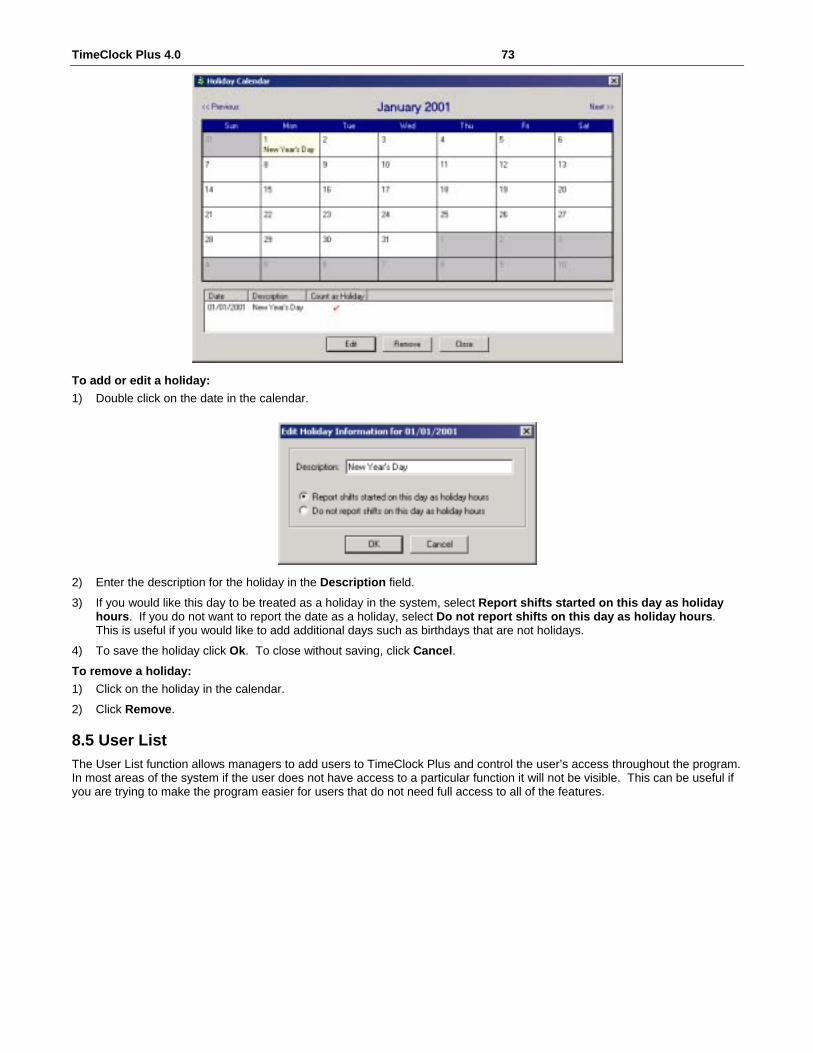
TimeClock Plus 4.0 73
To add or edit a holiday: 1) Double click on the date in the calendar.
2) Enter the description for the holiday in the Description field.
3) If you would like this day to be treated as a holiday in the system, select Report shifts started on this day as holiday hours. If you do not want to report the date as a holiday, select Do not report shifts on this day as holiday hours. This is useful if you would like to add additional days such as birthdays that are not holidays.
4) To save the holiday click Ok. To close without saving, click Cancel. To remove a holiday: 1) Click on the holiday in the calendar. 2) Click Remove.
8.5 User List The User List function allows managers to add users to TimeClock Plus and control the user’s access throughout the program. In most areas of the system if the user does not have access to a particular function it will not be visible. This can be useful if you are trying to make the program easier for users that do not need full access to all of the features.

74 TimeClock Plus 4.0
This screen is divided into two sections. On the left of the window is the list of users currently configured in the system. On the right of the window is the list of permissions that can be added or removed from each user.
The user rights section is divided into each of the applications contained within TimeClock Plus. To open the restrictions for any application, click on the plus sign next to the item. For each of the applications, the structure of the list is similar to the menu structure in the application. For example, if you are looking for restrictions to the Who’s Here list, you would click on TimeClock Manager then Tools, then Who’s Here because that is the same location where that option resides in TimeClock Manager. To add a user to the system click Add:
1) Enter a unique User Id 2) Enter the user’s name 3) If you would like to create the user with no permissions, select Blank User from the Copy settings from drop down list.
To make a clone of another user, select the user id from the drop down list. 4) Click Ok to add the user or Cancel to close the dialog without adding the user to the system
5) Once you have added the user, the user id will be included in the left column. Permission settings can be adjusted for this user by checking or un-checking the boxes in the User Rights section.
To edit the settings for an existing user: 1) Select the user from the list. 2) Click on the Edit button.

TimeClock Plus 4.0 75
3) Adjust the desired settings
Full Name – The actual name of the user attached to the selected user id.
ID number – If this user is entered into the system as an employee in addition to being a user, enter their employee ID number here. This setting is used for options that restrict a users access to their own data such as editing their own hours. Data Access – This section defines what employees this user can access when logged into the system. If limited access is desired, the data can be filtered by employee number, job codes, or classifications. An employee will be accessible by this user if their employee number is included and their classification matches, and the employee can work at least one of the job codes entered. Ranges can be entered as “1-10”, or “1,2,3,4,5”. Preview – Clicking on this button will preview the list of employees that will be accessible by this employee. If an employee does not match the access criterion, they will be shown as filtered with a description of why they were not included. Passwords – This option sets the passwords associated with this user. The System Access Password is the password the user will use to access the management applications such as TimeClock Manager and TimeClock Scheduler. The RDT Hour Edit Password is the password used to edit employee hours on the Remote Data Terminal. The user must also have permission for this option granted in the user list.
4) To save the changes made, click Ok. To cancel without saving click Cancel.
8.6 Preferences TimeClock Plus preferences are options that customize the software to your specific needs.

76 TimeClock Plus 4.0
Defaults
System This tab configures information that pertains to the entire TimeClock Plus system. RETURN/ENTER functions as TAB key in edit controls – If checked, the RETURN or ENTER will operate in the same manner as the TAB key when entering data into edit fields throughout the program. Remove suspended individuals from selection lists – If checked, employees that are suspended will no longer be displayed in selection lists throughout the software. Note that they will still appear in the edit employee screen. How do you refer to the individuals being tracked? – This field represents the name used to track individuals in TimeClock Plus. If you are operating a school you may want to enter students here. The default for this field is “Employee”. Include premium pay in base rate when calculating overtime – This option applies to a holiday or 7th day overtime situation in which a premium pay is paid. If checked, the overtime rate will be calculated using the formula (base + premium) X overtime factor. If this option is not checked the overtime rate will be calculated using the formula (base X factor) + premium. Pay multiple premiums if they occur in the same shift – This situation can occur when a holiday occurs on the 7th consecutive day of a workweek and the employee earns premium pay for both types. If checked, the employee will earn both premiums. If not checked, the employee will only earn the higher of the two premiums. Break Types – This section allows you to set up to 4 different break types. When clocking out for break from the On-Screen TimeClock or the Remote Data Terminal, the employee will be asked for the type of break he is taking. Once an item in the Break types section is set, its position in the list should not be changed. For example, if you enter Lunch as item 2 you should not remove lunch from item 2 and place it in item 3.
Break minimum lengths and rounding can be configured from the Master Job Code list on a per job code basis, or they can be configured company wide from the Break Defaults tab in this section. Manager This tab allows you to set defaults that pertain only to the TimeClock Manager application.

TimeClock Plus 4.0 77
Display current labor cost on status bar – If checked, the current labor cost will be displayed on the status bar at the bottom of the TimeClock Manager main window. The current labor cost is current cost per hour of all employees currently on the clock. Display reminder messages when time to close the current week. – This option will display a message to all users that have access to the close week function when they first log into TimeClock Manager and it is time to close the current week. Enable ability to close week from command line – This function allows the week to be closed without having to manually run TimeClock Manager and perform the close operation.
This function should be used in conjunction with a scheduling program that will carry out the command line at a preset time. When you click on this option, the following screen will appear with the format of the command line and a warning about security.
To perform the close week command from the command line or from a shortcut on the desk top, configure the command to run as “<PROGRAMDIR>\WINMG32.EXE /company:<x> /closeweek” where <x> is the company id of the company to close and <PROGRAMDIR> is the program directory where TimeClock Plus is installed. If you do not know the company I.D. number, it is displayed in the Select Company function under the File Menu option in TimeClock Manager. Make sure that this command is run in the TimeClock Plus program directory.
NOTE: If you are scheduling the command line close operation using a task scheduler, you should schedule it several days later than the last day of the week to ensure that all edits have taken place before the week is closed. Also, if there are any situations present that would normally cause the close to fail such as an employee is clocked in for the week, the close will be cancelled with no action taken. Auto copy schedules when closing the week – This function will copy the schedule for the current week to the number of future weeks specified. This feature is primarily designed for schedules that do not change.
If this option is enabled, select the option to overwrite schedules if you would like the current week’s schedule to always be copied to the future weeks when the Close Week function is performed. This will erase all data contained in the schedule that is overwritten. You should also select the number of weeks to copy forward when the week is closed. Scheduler This tab allows you to set some default settings in how the TimeClock Manager interacts with the TimeClock Scheduler program.
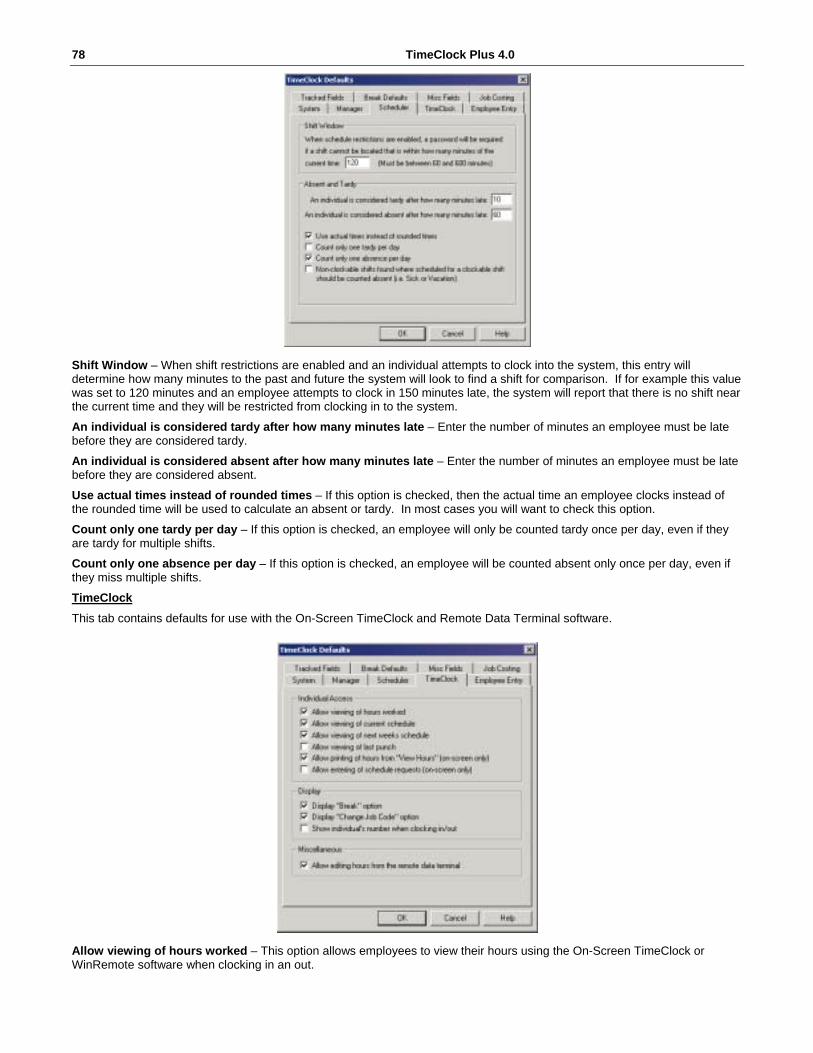
78 TimeClock Plus 4.0
Shift Window – When shift restrictions are enabled and an individual attempts to clock into the system, this entry will determine how many minutes to the past and future the system will look to find a shift for comparison. If for example this value was set to 120 minutes and an employee attempts to clock in 150 minutes late, the system will report that there is no shift near the current time and they will be restricted from clocking in to the system. An individual is considered tardy after how many minutes late – Enter the number of minutes an employee must be late before they are considered tardy. An individual is considered absent after how many minutes late – Enter the number of minutes an employee must be late before they are considered absent. Use actual times instead of rounded times – If this option is checked, then the actual time an employee clocks instead of the rounded time will be used to calculate an absent or tardy. In most cases you will want to check this option. Count only one tardy per day – If this option is checked, an employee will only be counted tardy once per day, even if they are tardy for multiple shifts. Count only one absence per day – If this option is checked, an employee will be counted absent only once per day, even if they miss multiple shifts. TimeClock This tab contains defaults for use with the On-Screen TimeClock and Remote Data Terminal software.
Allow viewing of hours worked – This option allows employees to view their hours using the On-Screen TimeClock or WinRemote software when clocking in an out.

TimeClock Plus 4.0 79
Allow viewing of current/next weeks current schedule – This option allows employees using the On-Screen TimeClock or WinRemote software to view their schedule for the current and following week. Note that the current week represents the date of the current week in the TimeClock system and not the current system date. The current week is only advanced when the week is closed. Allow viewing of last punch – This option allows employees using the On-Screen TimeClock or WinRemote software to view their last clock operation from the TimeClock. Allow printing of hours – If checked, employees are allowed to print their list of displayed hours when viewing them from the On-Screen TimeClock. Allow entering of schedule requests – If checked, employees will be able to enter schedule requests for time off or other needs when clocking in or out of TimeClock Plus. This option is only available from the On-Screen TimeClock. Display “Break” option – If checked, the break button will be enabled in the On-Screen TimeClock and WinRemote software.
Display “Change Job Code” option – If checked, the change job code function will be enabled in the On-Screen TimeClock and WinRemote software. Show Individual’s number when clocking in and out. – If this number is checked the employee’s number will be displayed as they enter it to clock in and out of the system. If this option is not checked, asterisks will be displayed as the number is entered. Allow editing hours from the Remote Data Terminal – If checked, users that are granted access can edit employee hours using the edit hours function on the Remote Data Terminal. This function can be accessed by pressing “6” on the keypad when the terminal is active. Employee Entry This tab controls which fields will require input when adding a new employee into the TimeClock Plus. To require a field, place a check in the box next to the field.
Tracked Fields Tracked fields are used to collect information from individuals when they are clocking out of a shift that has been marked for to collect these fields. For example, tips, sales, parts, or pieces.

80 TimeClock Plus 4.0
Enter the names for Field 1, 2, 3 and the decimals that you want to track. Please note that in order for these fields to be used, you must mark a particular job code to require these fields. This is done from the jobs tab while editing an individual’s information from Employee..Add/Edit in TimeClock Manager. Break Defaults The tab is used to configure the company wide break default settings. Before configuring this tab you should set the names for the break types using the System tab located in this section.
All settings found in this tab are company wide default settings. Each of the settings can be overridden on a per job code basis when editing a job code in the Master Job Code list.
Enforce minimum break length of <x> minutes - This setting will enforce a break length of a specified number of minutes. Once an employee clocks out for this type of break, management approval will be required to return from break early. Round breaks to nearest <x> minutes - This setting will round breaks on this job code to the amount of minutes you have specified. First Segment: Round up at <x> minutes - A segment refers to the period of time entered in the previous field. For example, if you round to the nearest 20 minutes, segment 1 would be the first 20 minutes and segment two would be the second 20 minutes. Entering a value of 0 will disable rounding for the first segment. Other Segments: Round up at <x> minutes – This is rounding is for all other segments excluding the first segment. Entering a value of 0 will disable rounding for other segments.

TimeClock Plus 4.0 81
Break Length – This field represents the maximum length of time that is considered a break. For example, if an employee clocks out for break and then ends up going home without clocking back in, you would not want a clock in the following day to be tied to his previous shift. Misc Fields This section is used to name the miscellaneous fields that are located on the Misc tab when editing an employee. These fields are also located on the Criteria selection dialog so that information can be filtered using these custom fields. Job Costing This tab is only present if the Job Costing Module is installed.
This section allows you to configure various information about the Job Costing Module. Various stages can be configured to assist you in the tracking of different phases of the projects entered. The names for several custom fields can also be entered in this configuration screen. These custom fields are used when entering a new cost code into the system using the Master Cost Code list.
8.7 Minor Tracking Some states have laws that do not allow minors to work past a certain time of day. The Minor Tracking option flags a minor in the Who’s Here List that is working past the time specified on each day.
If you select on the option to enable minor tracking the following minor tracking information will become enabled. Minor Age –The age that you company determines is a minor.
For each day of the week you should enter the time of day to begin flagging minors that remain on the clock. For example, if you enter 5:00 PM on Mondays and a minor is still on the clock at 5:15 PM on Monday, he will be shown in a different color in the Who’s Here list to alert you that he is still working past the allowed time.

82 TimeClock Plus 4.0
8.8 Passwords The Passwords section allows users to change the Manager passwords in the following sections of TimeClock Plus.
The following list of passwords can be set from the passwords section: Edit Hours in RDT – This password is necessary to edit hours as SUPERVISOR from the TimeClock Plus Remote Data Terminals. Remote Data Terminal Restriction – This password is used to override a restriction as SUPERVISOR from the Remote Data Terminal. Passwords to override as other users in TimeClock Plus can be set from the user list. Supervisor Password – This is the supervisor access password. It is the password used by the SUPERVISOR user to gain access to TimeClock Manager and TimeClock Scheduler. The SUPERVISOR user is a built-in account that has full access to all areas of TimeClock Plus. TimeClock Restriction – This password is used to override a restriction as SUPERVISOR from the On-Screen TimeClock.
User Password – This is the password that the current user logged into TimeClock Manager uses for access. This option is not shown when logged in as SUPERVISOR. To change or set a password: 1) Select the password that you want to change. 2) Click on the Edit button.
3) If the password is already set for the item selected, enter it in the Current Password edit box.
4) Enter the new password in the New password edit box. 5) Confirm the new password in the Re-enter new password edit box.
6) Click on the Ok button to save the changes or click Cancel to discard the changes.
8.9 Footers The Footers section of the TimeClock Manager program is used for customizing the footers that will print at the bottom of the TimeClock Plus reports.

TimeClock Plus 4.0 83
The fields on the left side of the screen are locations where the data will show up on the footer of the pages. On the right side of the screen are fields that you can place in different parts of the footer. To configure the footer: 1) Select the section of the footer to edit by clicking on the Left Edge, Center, or Right Edge edit control.
2) Enter the text you would like in the selected section of the footer. To insert a field at the current cursor location, double click on the field in the right list box.
3) Repeat steps 1 and 2 for each footer section you would like to edit. 4) Review the footer in the preview section. If it is correct, click OK to save the changes. If it is not correct, make the
necessary changes or click Cancel to exit without saving the changes.
If you would like to return to the default footer information, click on the Default button. The items will be returned to their original settings.
9.0 Launch Menu TimeClock Scheduler – Launches TimeClock Scheduler to allow you to schedule your employees.
AutoUpdate – Launches the AutoUpdate program to allow you to obtain software updates for all installed applications via the Internet. On-Screen TimeClock - Launches the On-Screen TimeClock application used to clock in and out.
WinRemote – Launches the WinRemote application witch is used to activate Remote Data Terminals.
Command Prompt – Launches a command prompt.
10.0 Reports Appendix 10.1 Payroll Reports Complete Payroll The Complete Payroll report consists of one page for each employee, detailing each shift, breakdowns into overtime, totals for each week and for the entire pay period, and (optionally) lines for the employee and manager’s signatures. Day Breakdown Report This report prints out a single line for each employee, showing the employee’s number, name, social security number, how many hours were worked for each day of the week, and how many hours were worked on holidays. It can also be configured to print multiple lines for each week in the date range. Estimated Wages Report This prints out a report broken down first by employee, then by job code. It shows the number of hours (regular and overtime), the pay rate worked for each job code, and the estimated gross wages due this employee. Individual Job Report This report is broken down first by employee, then by job code. It shows the number of hours, broken into regular and overtime, the tips, and hourly rate for the period specified.

84 TimeClock Plus 4.0
Payroll Detail This report is broken down first by employee, then by job code (with totals), then by week (with totals). It indicates the pay rate, the clock in time, the clock out time, SSN, employee number, regular hours, overtime hours, and the amount of any tracked fields (only on per job code totals). It also leaves a signature line for the employee. Payroll Summary This report shows hours worked in a summary format. Information can be summarized over a period or it can be broken down by week and by job code. Tracked information can also be included on this report. Payroll Summary (v3.0) This is broken down first by employee, then by job code (with totals), then by week (with totals). It indicates the pay rate, regular hours, overtime hours, and the number of tips (only on per job code totals). This report is structured like the version 3.0 Payroll Summary report and can only print up to six weeks of data. This report is included only for those that need summary information in pre-version 4.0 format. Supplemental Pay Report The Supplemental Pay Report adds up wages and tips, compares the sum to the appropriate minimum wage for the time accumulated, and indicates if there is any shortage. This report is used by companies that have tipped employees and would like to see if the employees are reporting enough tips to meet minimum wage. Tracked Information Summary Shows Employee Name and at least one Tracked field such as Tips. You have the option to print the Employee Number, Employee Export Code, Social Security Number, Split by Job Code, print up to 3 Tracked fields and the subtotal by Individual Employee. Weekly Punch Report This is a detailed report of each transaction, indicating date and time in and out, job code, break length (with p for paid or u for unpaid), and hours worked. A bracket marks entire shifts.
10.2 Job Code Reports Job Code Analysis (Detail) This report is broken first by job code then by employee (with totals), the number of regular and overtime hours worked, with an estimate of wages. Job Code Analysis (Summary) This report is broken down by job code only. It prints out the number of regular and overtime hours and total wages for each job code. Selected Job Codes Report This report shows Employee Number, Employee Name, Job Code, Regular Hours, Overtime 1 Hours and Overtime 2 Hours for the job code(s) that you select. This report has the option to print Employee Code, print each individual employee on a separate page, print up to three Tracked Fields, print each Individual’s hours for the period, Social Security Number and print detail information (Date In, Time In, Date Out, Time Out).
10.3 Period Reports Period Report (Summary / Detail) This report is broken down first by employee, then by week (with totals). It prints the number of total hours, regular and overtime hours, sick and vacation time, and tips.
10.4 Scheduler Absent/Tardy Report These print employees who were absent or tardy during the selected period, the dates they were absent or tardy, and the times they were scheduled to work. There must be a schedule set up before printing this report. Values for who is considered absent or tardy can be set in the TimeClock Plus defaults under the Scheduler tab (see pg. 77) Schedule Variance This report prints Employee Name, Clock Operation (In or Out), Scheduled Time, Actual Time, and Status. It shows the variance between the individual’s actual time in and time out as compared to his schedule. Schedule Vs. Actual This report calculates the scheduled time to work and the actual time worked and prints a comparison of the two for the entire period specified.

TimeClock Plus 4.0 85
Schedule Vs. Actual Breakdown This report calculates the scheduled time to work and the actual time worked and compares the two for the period specified. The report is similar to the Schedule vs. Actual report with the main difference being the additional breakdown information present in the report which details information per employee.
10.5 Miscellaneous Anniversary Report This report prints employees who have anniversaries with the company during the time requested. This report can be printed for a maximum time span of one year. Birthday Report This report prints the birthday and age of employees who have birthdays during the period specified. This report can be printed for a maximum time span of one year. Long Shift Report This report shows the abnormally long shifts that an employee works during a week. This will assist you in finding employees that have forgotten to clock out of the system.
10.6 Cost Code Reports (Requires Job Cost Module) Cost Code Summary This report is broken down by cost code (with totals), then by job code (with totals), then by employee. It displays the number of regular and overtime hours worked, and an estimate of wages paid. Cost Code Summary By Individual This report will print a summary of hours spent in each cost code on a per employee basis. Prints Cost Code Level, Description, Employee Name and Number, Regular Hours, Overtime 1 Hours and Overtime 2 Hours. Individual Cost Summary This is broken down by employee, then by cost code (with totals), then by job code. It displays the number of regular and overtime hours worked, and tracked field amounts accumulated. Individual Costing Detail This report is similar to the Complete Payroll Report but is used for job costing detail. It prints full detail including date and time in and out, job code, cost code, hour split, etc. for each employee.
10.7 Accruals Accrual Usage Information This report prints the hours each individual has used from his accrued time during the period specified. Includes Employee Name, Job Code, Date Posted, Hours Accrued, Hours Taken and Hours Remaining. The Options include print Employee Number, Employee Export Code, Social Security Number and Date Total on Report. Period Accrual Information This report will display all accruals that were posted to an individual over any period of time.
11.0 Criteria Appendix The Criteria option allows users to narrow down certain processes to specific employee numbers or ranges. By setting a certain criteria, the process that you are carrying out will only affect the employees that you have specified in this screen.

86 TimeClock Plus 4.0
Enter the information in each of the fields to determine which employees will be included in the operation being performed. For example, if you would like to only include employees 1 through 10 and number 25 in a particular operation, you would enter “1-10,25” into the Include numbers section.
To include employees that can work a particular job code, enter the job code(s) in the Have job codes section. Note that this filter is based on the job codes they can work, not the job codes they did work. If using this filter in the reports, all information will be printed for the employee if they match the criterion. It will not merely print the job codes entered here. The Miscellaneous Tracked Fields section allows you to perform criteria on the custom fields you have set up in the TimeClock Plus defaults (see pg. 81) and entered for each employee in the miscellaneous tab (see pg. 30). Once you have entered the criteria to use, you can click on the Preview button to preview the employees that match the data you have entered. If an employee is filtered for any reason the reason will be displayed.
If you have criteria sets that you use often, you can use the load and save options to memorize and recall the settings you have specified. To save the settings, click on the Save button and enter a unique name for the criteria set. To load a criteria set, click on the Load button and select the set from the list. To restore the criteria to the default, which will include all employees, click on the Default button.

TimeClock Plus 4.0 87
TimeClock Scheduler TimeClock Scheduler is used to build employee schedules. It is necessary to schedule employees in order to take advantage of absent and tardy reports as well as rounding to scheduled shifts and clock restrictions.
1.0 File Menu 1.1 Open Schedule To begin creating or editing a schedule, one must be opened first. The Open Schedule function will allow the user to select a schedule from a calendar.
To open a schedule: 1) Click on any date in the week you would like to open. As dates are selected, the New Schedule text will be updated to
reflect the schedule selected. 2) Click on the Open button to open the selected week’s schedule.
3) If the schedule exists it will be opened and you can begin editing the schedule. If it does not exist, you will be presented with a create dialog to create a new schedule or copy data from a previous schedule.
4) From the Action section select the option to perform for each week that must be created.

88 TimeClock Plus 4.0
Create schedule & shifts – A blank schedule and necessary shifts file will be created for the week.
Empty schedule & copy shifts – A blank schedule will be created, and the necessary shifts from the date specified will be copied to the new week. Copy schedule & empty shifts – The previous schedule will be copied to the new week, and the necessary shifts will be emptied. Copy schedule & shifts – The previous schedule and necessary shifts will be copied to the new week.
5) For each schedule date that requires a previous schedule, click on the drop down button for each line to select a schedule. Double click on the schedule in the list to close the window and select the schedule.
6) Click Ok to perform the requested action and open the new schedule.
1.2 Import Schedule Data Please see Section 1.1 of the TimeClock Manager section in using this function.
1.3 Export Schedule Data Please see Section 4.7 of the TimeClock Manager section in using this function.
1.4 Login/Logout Placing a password restriction on the system can restrict access to TimeClock Scheduler. Only someone with a user identity with TimeClock Scheduler permission will be allowed to use the scheduling program. The Log In/Out screen is what is used for users to log in and out of the Scheduler program.
If you have any question about this feature, please refer to the TimeClock Manager section 1.4.
1.5 Preferences The Preferences section of the TimeClock Scheduler contains System, Individual, and miscellaneous settings that affect the program.
System Wide Time Format - This section allows you to specify if you want your scheduled information to display in Full Time, Military time, Military time with colon separation, or Decimal time. Click on the option in which you want your time displayed. Weeks to schedule - This section will allow you to select how many weeks you want to edit for scheduling at one time.

TimeClock Plus 4.0 89
Allow windows to be fully maximized – If this option is checked then the individual schedule windows can be fully maximized to your screen. If this option is checked, and the current window is maximized, all other windows opened will be automatically maximized. Individual Schedule The Individual Schedule tab allows changes to be made for which information will be displayed on the Individual Schedule screens.
Show job code and description in grid – If this option is checked, the job code and job description will show up in the grid when viewing an individual schedule. If an employee can only work one job code you can turn this off so that only the scheduled time is displayed. Show shift description in grid – If this option is checked, then the description that was entered when creating the shift will show up in the individual schedule grid. Miscellaneous Auto Open the weekly overall schedule when a schedule is opened – If checked, the weekly overall schedule will be automatically opened when a schedule is opened.
1.6 Print Setup The Print Setup option allows users to set the default printer to use in TimeClock Scheduler. Any changes made to the print setup will be retained while the TimeClock Scheduler is open.
1.7 Exit This option will exit you from the TimeClock Scheduler program.
2.0 View Menu
2.1 Employee Schedule Use this option to view the Individual Schedule for an employee. Double clicking on an employee in the employee list that is displayed or by selecting this option from the menu and entering an employee number to edit can access this function.

90 TimeClock Plus 4.0
This screen is divided into four sections. At the top of the window are drop down buttons that allow you to perform copy and paste operations, select shifts from the shift pool or necessary shifts, and display detail information about the week being scheduled. The middle section of the screen contains the current schedule for the employee. The cursor keys can be used to move throughout this section. To edit or add a shift, select it and press ENTER or double click on it with the mouse. The lower left corner of the window contains a summary of information about the week or weeks being scheduled. As you schedule shifts this information is updated to reflect the new totals. The lower right section of the window contains schedule requests made by the employee. These requests can be entered from the On-Screen TimeClock or from the requests section under the Tools menu in the Scheduler application. Tool Bar
Copy Button The copy drop down button allows you to perform various copy operations for the schedule. Copy Day - This function will copy the day that is highlighted and put it on the internal clipboard. This basically works the same as copying and pasting in a word processing document. The information in the selected day can be copied and pasted into another day in the schedule using the Paste Day selection. Copy Week – This function will copy the week for this individual to the internal clipboard. You can then move to a different employee and paste the week or you can paste the week to another date in the current employee’s schedule.
The application of this function is for different employees that have identical workweeks, a schedule can be made for one of them, the week can be copied, and then the week can be pasted to the other employee. This eliminates having to build the same week all over again for the other employee(s). Copy Schedule to Template – This function will copy the current selected week of the schedule to a schedule template. This template can be recalled again if you decide to use this schedule with another employee. Schedule templates are independent of the schedule that is currently selected and once a schedule is saved as a template it can be used at any time in the future for any schedule or employee.
Delete Schedule Templates - This option will delete a schedule template that has been previously saved. To delete the template, select it from the list and click Ok.

TimeClock Plus 4.0 91
Paste Day – This selection will paste the day that was previously copied with the Copy Day function into the day that is currently selected in the grid. Paste Week – This selection will paste the day that was previously copied using the Copy Week function into the week that is currently selected in the grid.
Shift Pool Button A shift pool is a preset shift. If your business has a set and limited number of shifts, a shift pool can be created for each of these set shifts using the shift pool editor in the Tools menu of the Scheduler application. After a shift pool has been created, a shift can be added to the employee by selecting a cell in the grid and then selecting the shift from the Shift Pool drop down button. The shift pool button can also be used to add the special shifts Off, On Call, and Open. The Off and On Call shifts are used to inform an employee that they will be off or on call for the time period specified. An Open shift is used to designate a period of time that is open for the employee to clock in and out freely with no need for management approval if they are early or late. For example, if employees come to work on Saturdays at 6:00 AM, but the manager does not arrive until 8:00 AM you may want to add an open area from 6:00 AM to 8:00 AM to allow the employees to clock in even if schedule restrictions say they cannot.
Shifts Button The shifts button reflects the information that has been added into the Necessary Shifts lists. When this button is clicked it will present the user with a list of the necessary shifts for the day selected that have not yet been filled. To assign the employee to one of the shifts, select it from the list.
Detail Button The Detail option will display a screen with the hours that the employee is scheduled to work throughout the week. The cumulative totals for regular and overtime hours will show in this screen. Note: To ensure that multiple segments are treated as a shift, they must be attached with breaks.
Scheduling a Shift To schedule a shift, you can either select a base shift using the Shift Pool or Shifts drop down buttons or you can double click on any cell in the grid to display the shift edit window.

92 TimeClock Plus 4.0
Entering a shift segment: 1) Enter the start and end times for the shift
2) Select the job code for the shift by clicking on the ellipsis (…) or enter it manually in the job code edit box. 3) Enter a description for this segment. This is optional, but if entered it will appear on the schedule when printed from the
reports.
4) Check the appropriate segment flags for the shift. On break/lunch after this segment – If checked this segment will be tied to the next segment in the schedule with a break. This will cause multiple segments to be treated as one shift. When determining absent and tardy the system will look at shifts and not segments. For example, suppose you scheduled 9:00 AM – 11:00 AM and 12:00 PM – 5:00 PM. To tie these two shifts together as if a break were taken you would check this box in the 9:00 AM – 11:00 AM shift. Force Overtime #1/Overtime #2 for this segment – If checked overtime #1 or #2 will be forced on this segment. This is used for calculating labor cost for this schedule only and will not automatically be recorded as forced to overtime when an employee clocks in for this shift unless the job code used forces overtime. Disable auto deductions for this shift – If checked, automatic break deductions for the shift will be disabled for the shift being entered. This is only used for labor costing purposes in schedule and will not automatically be entered in the shift when the employee clocks in for this shift.
5) If the shift entered is correct, click OK to save the information. If you would like to cancel without saving the shift, click Cancel.
2.2 Weekly Overall Schedule The Weekly Overall schedule previews the week, employees, and the shifts that they will be working. It can be used to quickly view which employees are scheduled.
The leftmost column on this window contains the list of employees that are currently being scheduled. The right columns contain information about the current schedule for each of them. Along the top is the date represented in each column of the data.
To add a schedule for an employee contained in this list, double click on any day on the line representing data for the employee. An individual schedule will open which will allow you to make any changes necessary to the employee’s schedule. For information on adding schedules using the individual schedule, see the previous section.

TimeClock Plus 4.0 93
As shifts are added, they will appear in the weekly overall schedule.
Options The Weekly Overall Options can be accessed by clicking on the Options button from the Weekly Overall Schedule. The options are used to configure how information is displayed in the Weekly Overall Schedule.
Sort Order - This combo box will allow you to select the method used to sort the employees that are displayed in the Weekly Overall Schedule. Show individuals number in the list – If this option is checked, the employee numbers will be displayed in the Weekly Overall schedule view next to the employee’s name. Show individuals classification in the list – If this option is checked, the employee’s classification will be displayed.
Name Format - This section allows you to choose how names will be displayed in the Weekly Overall Schedule.
2.3 Daily Overall Schedule The Daily Overall schedule shows a visual representation in graph form of the shifts that employees are scheduled to work.

94 TimeClock Plus 4.0
This window is divided into three sections. In the upper section is the grid representing the shifts that are scheduled for the day selected. In the lower left is a list of employees that are currently being scheduled. In the lower right is a list of necessary shifts that are still available for the day that is selected. To assign a shift to an employee: 1) Select the day you want to schedule from the tabs at the top of the window.
2) Select the employee to schedule from the list at the lower left by clicking on the employee with the mouse. 3) Double click on the shift to assign in the window at the lower right or single click on the item and then click on the Assign
button to assign the shift. Options This function controls the different display options for viewing the daily overall schedules for the employees. To access the Daily Overall Options, click on the Options button.
Display times from/to: This option allows you display a particular time period for viewing the schedules. For example, if your business is only open from 7:00 AM to 7:00 PM, you may not want to display information before or after these times. Display open shifts: If this option is checked, then open shifts will be displayed in the graph.
Display on-call shifts: If this option is checked, then on-call shifts will be displayed in the graph.
All shifts for an individual on the same line – If this option is selected, then all of the employee’s shifts will be displayed on one line. One shift per line – If this option is selected, the different shifts that an employee works will be staggered and separated by one line.
Colors – Each type of shift can be colored to represent its information. To change the color of a specific type of shift, click on the box containing the color and select a new color from the dialog displayed. Filter The Filter option allows you to control which shifts are displayed in the grid. To access the filter options, click on the Filter button.

TimeClock Plus 4.0 95
To display all shifts that are scheduled, select Display all shifts for the selected individuals. To display shifts for selected job codes only, click on Display only shifts for the selected job codes and then select each of the job codes to include from the list of job codes. To select or unselect all of the codes, use the Mark all or Clear all buttons.
If you are displaying only selected job codes and you wish to only display necessary shifts that match the selected job codes, place a check in the Load only necessary shifts matching this criteria box.
2.4 Change Schedule Criteria This feature adjusts the Criteria for narrowing down employees or groups of employees to schedule for work. As you narrow down employees, notice that only the group that you have specified will appear in the employee selection to the left of the main screen in the Scheduler program.
If you have any questions about the Criteria, refer to the Criteria section on page 85.
2.5 Tool Bar The Tool Bar option allows you to set different views of the TimeClock Scheduler. The following objects on the main TimeClock Scheduler screen can be viewed or hidden by checking on each title. Tool Bar – If this menu item is checked then the toolbar with the icons in the TimeClock Scheduler program will appear.
Status Bar – If this menu item is checked then the status bar at the bottom of the screen of the TimeClock Scheduler program will appear. Employee List – If this menu item is checked, the selection list of employees on the left side of the screen in the TimeClock Scheduler will appear.
3.0 Reports Menu 3.1 Period Reports TimeClock Scheduler reports are contained in this section. Scheduler reports can be printed for different dates or ranges of dates.

96 TimeClock Plus 4.0
To print schedule reports: 1) Enter the date range to print in the from and to edit boxes or select a date range from the quick select drop down list.
2) Click on Criteria to set the details on which employees you would like to include in the report. 3) Place a check into the box next to each report you would like to print using the mouse and then click on the Print button to
print the selected reports. Or Right click on an individual report to print and select Print from the popup menu that is displayed.
The following reports can be printed from this screen: Daily Job Code Schedule This report will print all shift segments scheduled for the day sorted by the time the segment starts. Each day in the date range specified will be printed on a new page. Individual job codes can be selected to include in this report. Daily Schedule This report will print all shift segments scheduled for the day sorted by the time the segment starts. Each day in the date range specified will be printed on a new page. Daily Visual Schedule This report will print a visual representation of the schedule for each day in the date range specified. Estimated Scheduled Wages This report will print the estimated wages for individuals that are scheduled for the period specified. The wages are estimated and should not be used for payroll calculations. Job Code Detail Report This report prints detailed information for each job code that is selected including all shifts scheduled and subtotals for each. Necessary Shifts and Necessary Shifts w/ Assignments This report prints a list of all necessary shifts for the period and the individual that is assigned to fill the shift. Time Coverage Report This report prints a graph showing how many employees are scheduled during an increment and time range that you specify. Individual Schedules This report prints individual schedules for each employee scheduled during the period specified. If the period specified covers more than one week, multiple individual schedules will be printed for each employee. Weekly Schedule This report prints the weekly schedule that you have selected.

TimeClock Plus 4.0 97
4.0 Tools Menu 4.1 Edit Shift Pool This function is used to create or edit a shift pool. A shift pool is a list of common preset shifts that are used to schedule employees. When editing an employee’s schedule from the Individual Schedule window, shifts in the shift pool can be selected by clicking on the Shift Pool drop down button.
To add a shift to the shift pool, click Add. To edit an existing shift you can either double click on the shift in the list or select it using the mouse and then clicking Edit.
To remove a shift from the shift pool, select it from the list and click on Delete.
4.2 Edit Necessary Shifts This option allows managers to create a list of shifts that must to be filled for a week. If the shifts that are necessary for any given week do not change often, you can build a list of necessary shifts and use them to build all future schedules.
To add or edit a necessary shift: 1) Select the day for which you would like to add or edit a shift by clicking on it in the tab control at the top of the window. 2) To add a shift to the day, click Add. To edit an existing shift, select it from the list and click Edit.

98 TimeClock Plus 4.0
3) Enter the job code, shift description (optional), and the starting and ending time for the shift. 4) To save the changes click OK. To cancel without saving, click Cancel. To copy a shift or group of shifts to another day: 1) Select the day you would like to copy from by clicking on it in the tab control at the top of the window.
2) Select the shifts to copy using the mouse button. Multiple shifts can be selected by holding down the CTRL key as you select the items.
3) Click on the Copy button.
4) Place a check mark in each of the days you would like to receive a copy of the shifts. 5) Click OK to perform the copy or Cancel to close the dialog without copying any shifts.
4.3 Build Necessary Shifts This function is used to build a list of necessary shifts based on the current schedule. This is useful if you are using the scheduling system for the first time and would like to enter your schedule manually and then build a necessary shift list for future use.

TimeClock Plus 4.0 99
Place a check mark next to each week for which you would like the necessary shifts built. The number of weeks displayed here is the number you have entered in the Weeks to Schedule option in the Scheduler Preferences under the File menu. To perform the build of shifts, click Yes, to cancel without building the shifts, click No. Note: All information currently in the necessary shift files for the period will be replaced with information based on the current schedule for the period.
4.4 Re-build Shift Assignments Sometimes it may be necessary to rebuild the necessary shift assignments for a particular schedule. Re-building assignments will reset the current assignments and then traverse through the list of scheduled employees and determine which employees are filling necessary shifts in the system. Each of the shifts that are filled will be assigned to the employee who fills it.
This action works in a similar fashion to Build Necessary Shifts. For more information on this feature see the previous section in this manual.
4.5 Edit Employee Availability The Edit Employee Availability function is used to mark certain days and times that the employees are not available to work.
If an employee has been marked as unavailable, an unavailable message will appear when you try to schedule them for the shift.
The availability is divided into two sections, fixed and period. The fixed availability is used to set the employees availability for Sunday through Saturday regardless of what date the day falls on. The period availability is used to set availability for a certain date. In determining if an employee is available to work a particular day, the system will first check the fixed availability and then the period availability.
Example: If an employee cannot work Sundays, you would edit their fixed availability and block the entire day on Sunday. If an employee cannot work September 5, 2001 because of a prior commitment, you would edit the period availability for that date and block it to prevent the employee from being scheduled for that date.
To block availability for an employee: 1) Select the employee from the list on the left side of the screen. 2) Click Edit Fixed to edit their fixed availability.
3) Using the mouse, click and drag in the grid to enter times that the employee should not be scheduled. 4) Click on Period and select the date for any period that the employee cannot work.
5) Using the mouse, click and drag in the grid to enter times that the employee should not be scheduled.
6) Repeat steps 1-5 for each employee you would like to edit.
4.6 Edit Employee Schedule Requests This section allows you to add, edit, and review requests made by employees for dates throughout the year. The employees can enter these requests from the On-Screen TimeClock if clock operation confirmation screen if enabled from the TimeClock Tab in TimeClock Manager (see pg. 78).
4.7 Delete Past Schedules The Delete Past Schedules option is used to delete schedules that are no longer needed. Schedules should only be deleted if they are no longer necessary for absent/tardy, schedule vs. actual, or any other TimeClock Plus reports.
Note that when this screen is displayed, any schedules that are currently open will not be displayed.

100 TimeClock Plus 4.0
To delete schedules from the system, place a check next to the schedule in the list and then click the Delete button. Multiple schedules can be selected at once by clicking on the parent item of the schedule. For example, to select all schedules for 1999 click on the box next to 1999 in the list.
4.8 Re-index Data Files Re-indexing the TimeClock Plus databases rebuilds the indexes from scratch. From time to time, indexes may become out of order and impede the performance of your system. Indexes can become corrupt due to network problems or if you lose power during a database update. If you feel that your system performance is slowing, you may want to perform the re-index operation.
4.9 Optimize Data Files Optimizing data files actually deletes records marked for deletion in the TimeClock Plus Program. This process will also attempt to repair corruption. The Optimize Schedule screen will let you specify which data that you want to actually delete from the system.
To perform the optimization, select the actions to perform by placing a check mark next to the item and then click Process. If you would like to preview the changes that will be made without actually changing any data, you can click on the Preview button.
4.9 Transfer Job Information The Transfer Job Information function is used to copy scheduled hours directly to the TimeClock Plus databases. This function is mainly used to transfer scheduled sick and vacation hours into the hours worked, but it can be used to transfer any job code that is scheduled. Note: When you transfer job information, it is just like the employees clocked in and out in the main TimeClock Plus program, except the information is coming from a schedule.

TimeClock Plus 4.0 101
Example: If you know ahead of time that an employee is going to be on vacation for a particular week, you could schedule the individual for vacation that week and then transfer the job information (vacation week) to the main TimeClock Plus databases. In this case, a manager wouldn’t have to add the hours in manually to the employee’s hours for the week. To transfer job information: 1) From the list at the left select each of the job codes you would like to transfer. Multiple job codes can be selected by
holding the CTRL key as they are clicked in the list. 2) Enter the date range to transfer in the Transfer dates section.
NOTE: Data for any period can be transferred into TimeClock Manager as long as the data is after the start of the current TimeClock Plus week (the date displayed in the status bar in TimeClock Manager). The transfer does not care what week is open in scheduler. You will receive an error if any portion of the date range is before the current week in the TimeClock Manager.
3) Click on Criteria to select what employees will be included in the transfer of data.
4) If you would like to preview the operation, click Preview.
5) Click Process to perform the transfer or Cancel to close the Transfer Job Information window without performing the transfer.
4.11 Calculate Scheduled Labor Cost This function provides an hour-by-hour breakdown of the hours scheduled and the estimated wages paid. It will allow you to enter estimated sales on an hourly or weekly basis to generate an estimated labor cost percentage.
For more information on using the labor cost screen, refer to the labor cost section in TimeClock Manager.

102 TimeClock Plus 4.0
TimeClock AutoUpdate The AutoUpdate application is used to download updates and enhancements for the TimeClock Plus applications that you have installed. You must have Internet access to use this feature. NOTE: You must close all TimeClock Plus applications before attempting to update. This includes any applications that may be running on your network.
1.0 Available This option will display and allow installation of the latest updates available from the Internet. If there are any new revisions or updates for the software you have installed, they will appear in the Available Updates screen.
News – This option views new information about the available updates.
Info – This button is used to display information about the updates that are available. For example, if you currently have version 4.0.0a of TimeClock Manager installed, and version 4.0.0c is available, this button will list all changes and enhancements that have been made in versions 4.0.0b and 4.0.0c. Update – This option will begin the update process to download and install the new updates that you have marked into your system. To select or unselect the updates to receive, place a check next to the items to receive in the list by clicking on them with the mouse.
Once the Update is complete, the system will notify you with a list of which updates were installed successfully.
2.0 Update Disk This feature allows you to install an update or series of updates from a diskette or file obtained from the Internet or E-Mail. This is useful in circumstances in which the computer running TimeClock Plus does not have Internet access. The update will be downloaded or sent as a .TPU file. To install the update, browse to the location on the hard drive where the TPU file is saved and click Open. Once the file is open, refer to the previous section for selecting the updates to install.
3.0 Installed This function will display a list of all TimeClock Plus products installed along with their revision numbers.

TimeClock Plus 4.0 103
From this screen you have the ability to revert to a previously installed version of an application. For example, if you have installed an update to TimeClock Manager and encounter a problem with the update, you can revert to the previous version by selecting TimeClock Manager in the list of installed applications and then clicking on the Revert button.
4.0 Options This function allows you to change the AutoUpdate settings. It is not recommended that these options be changed unless instructed to do so by support personnel.
Internet Host – This is the Internet site where the updates are located.
Transfer Timeouts – These settings may be adjusted if you are receiving timeout operations due to network congestion or modem problems. Please contact TimeClock Plus technical support before adjusting these settings. Save replaced files when installing updates. – If this option is checked, the replaced files will still reside on your system. This option must be checked if you would like the ability to revert to previous versions after installing updates. Use compression when retrieving lists – If this option is checked, the system will attempt to use compression when retrieving the lists of updates. A performance increase will be notable on slow connections.
5.0 Register This option can be used to register your TimeClock Plus system after installation. It is recommended that you register so that you can be informed of future versions of the software.
An Internet connection is required to submit information. If you would like to fax the registration, you can use the print option and then fax the sheet to (915) 223-9104.
6.0 Support This option is used to send a question, suggestion, or comment to the TimeClock Plus support staff. If you would like to send questions using your standard e-mail application, you can use the e-mail address [email protected].
Please note that the Support group cannot respond to e-mail requests by phone. If you submit a question via e-mail, please include a valid e-mail address so that we can respond.


TimeClock Plus 4.0 105
TimeClock WinRemote The WinRemote application is used to control Remote Data Terminals, which are sometimes referred to as RDT. This software must be running in order for a Remote Data Terminal to function. The WinRemote software is capable of controlling multiple Ethernet and Serial connected terminals at one time.
When the application is first run you will be presented with a screen that lists all available ports in the system. By default, only serial communications ports available in the system are displayed. To add Ethernet ports refer to the configuration in the next section.
1.0 WinRemote System Configuration Clicking on the small terminal icon located in the upper left hand corner of the window and choosing Configure System from the menu accesses the WinRemote System Configuration.
Ports This tab is used to configure settings for the serial communication and Ethernet ports in a system. Highest Port to Check – This option will set the highest port for the WinRemote software to check for a Serial connection. If the highest numbered port in your system is COM3, this should be set to COM3. Setting this option will prevent the system from unnecessarily having to check ports that you know do not exist. Ports to exclude during system check – This option will set the COM ports to exclude during a system check. If you have ports in your system that will not be used for TimeClock Plus, you can exclude them in this section. For example, if you have a modem on COM3, you can block COM3 by selecting it from the list. Multiple ports can be selected by holding the CTRL key while clicking on the ports. Number of Ethernet terminals connected – This option should be set to the number of Ethernet terminals that will be controlled from this application. Once set you should exit and restart the WinRemote software to enable the Ethernet ports. Once enabled the ports can be configured from the main screen of the WinRemote application. Prompts All prompts in the WinRemote software can be adjusted to meet your needs. For example, you may want to change the phrasing on error messages so that you employees will understand them better.

106 TimeClock Plus 4.0
The prompt editor is divided into several sections. The original and new text sections at the top of the window display the default prompt and the text that the prompt now displays. Below these two windows the prompt filename you are currently editing is displayed. In the large window below the filename all prompts available in the system are displayed. Revert – This option will reset the default message for the selected prompt.
Load – This option will load a saved prompt file. You may have several prompt files representing different configurations. For example, you may have a Spanish prompt file and an English prompt file. Save – This option will save the prompts that you have set. Once saved, each port can be individually configured to use the prompt file (see pg. 110). New - This option will create a new message prompt file. If you have made changes to the current message file, the system will prompt you if you want to save the changes before creating the new file. Edit – This option will open the edit window and allow for editing of the current selected prompt.
The current text contained in the prompt will be displayed. Each line of the prompt can be edited to meet the needs of your company by typing the text in the Line 1-4 section. The alignment of each of the lines of text can also be changed by selecting the desired alignment type from the drop down list corresponding to each line of text. Requires Input – If this is set to yes, it means that when this prompt is displayed the user is required to provide some sort of input. Prompts that require input must have an asterisk somewhere in the prompt to designate where the cursor will be placed to receive the input after the prompt is displayed. For example, if you are requesting an employee number a prompt line may be “Enter number: *”. Input length – If input is required, this field will display the length of the input to be retrieved.
Substituted fields - In some prompts the system will substitute information into some of the fields in the prompt. For example, when the system displays the date and time of the clock in, the prompt might be “Date: %1 Time: %2”. The %1 and %2 fields designate that a replacement will take place when the prompt is displayed. If you change the prompt, your new prompt should also include these fields if you would like this information displayed.

TimeClock Plus 4.0 107
Other substitutions – This section describes other substitutions that can take place in a prompt. For example, if you enter %p in a prompt it will be replaced with the current “Press any Key” prompt. Time Server Tab (Network Version Only) The Remote Data Terminals have the ability to receive the time from the PC controlling the terminal or from a Time Server. If you have any questions about the Time Server program, please refer to the Time Server section of this manual. In order for the Remote Data Terminals to receive the time from Time Server, the settings in the Time Server Tab must be configured.
Enable Time Server – This option must be checked for the WinRemote program and Remote Data Terminals to receive the time from Time Server. Server Address – This is the IP address or name of the server where the time server is located. Port – The default setting for this option is 37. This should not be changed unless instructed to do so by a TimeClock Plus Support Technician. Server Type – There are 3 server types in which the WinRemote software is able to receive the time while running the Time Server program.
1) Version 4.0 Time Server (DGRAM) – This is the recommended configuration. It uses connectionless datagram sockets to obtain the time. It is the fastest and most efficient method.
2) Version 4.0 Time Server (STREAM) – Choose this method only if the server being used only supports stream sockets. This option is slower and requires a connection to the server before the time can be obtained.
3) Version 3.0 Time Server – Choose this option if you are still running the TimeClock Plus 3.0 Version of Time Server. If all clients are using 4.0 you should activate the 4.0 version of the software so that the DGRAM method can be used.
Use default operating system time zone – If this option is selected, the Remote Data Terminals will use the time zone of the client PC where the WinRemote software is running (The time is always obtained from the server in GMT). Specify a time zone for this client – If this option is selected, the WinRemote software will perform the necessary time zone conversions internally. This setting will ignore the current time zone setting on the PC. This is useful in preventing employees from tampering with the time zone of the PC to attempt to clock in late or leave early. Automatically adjust time for daylight savings (U.S. rules) – If this option is checked, then the WinRemote software and Remote Data Terminals will adjust for the daylight savings rules. Do not check this option in areas that do not implement daylight savings time. Allow operations when time server cannot be contacted – If this option is checked, employees will still be able to clock in and out on the Remote Data Terminals even if the time cannot be obtained from a the time server. The WinRemote software will receive the time from the workstation that it is running on, until the time server can be contacted. Save as default server for all clients – If this option is checked, all WinRemote and On-Screen TimeClock applications used in the selected company will share the same settings. Status - This option will display the status of the connection to the time server. This is to indicate if the connection is successful or not. Test – This option will test the connection to the time server to determine if a successful connection is possible. Once the settings are configured they should be tested using this button.

108 TimeClock Plus 4.0
Service The WinRemote software can be run as a service on Windows NT. When the WinRemote program runs as a service, it starts automatically and runs constantly in the background of your system. There is no need to log into the system to start the application.
Service Status – This option will display the current status of the WinRemote service.
Install – This button will install the WinRemote service. Once the service is installed, it must be started to become active.
Uninstall – This will uninstall the WinRemote service. This option is only available if the service is installed.
Start – This will start the WinRemote service. This option is only available if the service is installed and not already started.
Stop – This will stop the WinRemote service. This option is only available if the service is installed and not already stopped. Parameters – The parameters section allows you to specify additional command line parameters that will be used when the service is activated. In most instances nothing should be entered in this section.
2.0 Configure Port The configure button will not become enabled until one of the Remote Data Terminals is selected from the list of available ports. To configure a serial port, select one of the ports labeled COMx. To configure an Ethernet terminal, select a port labeled ETHx. Options The options dialog is used to configure basic options about how the Remote Data Terminal will operate once it is activated.
Show confirmation on non-manual entry – If checked, the employee will be required to confirm his identity when using a non-manually entered employee number to clock in. By default badge swipes to not require confirmation of identity because it is assumed that the person holding the badge is the person performing the clock operation. Display message on successful clock operations – If checked, the message “Clock In Successful”, “Clock Out Successful”, etc. will be displayed when an employee successfully completes a clock operation.

TimeClock Plus 4.0 109
Log clock in/out failures – If checked, clock in and out failures will be logged to a file. When a clock operation is started but not completed, it will be logged to this file. This file is created in the root directory of the local C: drive and is named RMT<x>.LOG where <x> is the port where the RDT is active. Ethernet ports are numbered beginning with 1000. For example, if you are logging failures on ETH1, the file created will be “C:\RMT1001.LOG”. Ask for job code on cost code change – If checked, the system will also ask you for a new job code when changing cost codes. This is useful if you routinely perform job and cost changes at the same time. Ask for cost code on job code change – If checked, the system will also ask you for a new cost code when changing job codes. This is useful if you routinely perform job and cost changes at the same time. Display shift in HH:MM format when viewing hours – If checked, the time displayed when checking hours will be shown in hours and minutes instead of hours and hundredths. For example, one and a half hours would be displayed as 1:30 instead of 1.50. Display hours worked for current day (as opposed to current shift) – If checked the employee’s hours for the current day will be displayed when checking hours. By default, the hours for the current shift are displayed. Force badge usage to enter individual’s number – If checked, employees will only be able to perform clock operations using a badge or other non-manual entry of the employee number. Beep on successful badge read – If checked, the system will beep when a badge is swiped and successfully read. Beeping on successful or failed operations can also be configured in the Terminal tab. Terminal The Terminal Tab contains information about operational features of the Remote Data Terminals.
Description – The information entered in this field will be displayed in the main WinRemote screen. Display system time - This option will display the system time on the Remote Data Terminal while it is idle at its main menu.
Auto-start this port - This option will start the port automatically when the WinRemote program is activated. You will not have to click on the Start button for this Remote Data Terminal. If you are running the WinRemote application as a service, at least one port should be configured to auto-start. Allow badge testing using 00 - This option will allow you to test your barcode or magnetic badges on the terminal badge reader. Pressing the “0” key twice when the system is idle at its main menu will put the Remote Data Terminal into a badge-testing mode. Allow id terminal using 11 – This option will allow you to id a Remote Data Terminal by pressing the “1” key twice when the system is idle at its main menu. The function will give information as to where it is connected and what computer is controlling it. Beep when a key is pressed - This option will make the Remote Data Terminal beep whenever a key is pressed. Barcode reader attached - This option should be enabled when you are using the Remote Data Terminal with a barcode reader. Use new command set - The newer Remote Data Terminals understand more commands to perform such actions as turning off the cursor and sizing the cursor. Remote Data Terminals that were bought after 1/1/2000 will include this option. If you enable this and your terminal does not support it, stray characters may be displayed. Enable QuickPunch - If this option is checked, the employees clocking in and out on the Remote Data Terminals will not have to press any buttons on the terminal prior to swiping their badge. If they are clocked in, a clock out operation will be performed. If they are clocked out, a clock in operation will be performed. During the clock in or out process the employee may still be required to enter information such as job code, cost code, or tracked fields.

110 TimeClock Plus 4.0
Number of beeps on successful/failed clock operation – This option can be configured to beep the Remote Data Terminal a set number of times when a successful or failed clock operation takes place.
Display This tab controls the idle timeout and the prompt file to use for the selected port.
Idle Release - You can set the amount of time for the terminal to wait for an action before canceling the transaction. If someone begins an operation and then walks away from the terminal, the terminal will only wait for the specified number of seconds before resetting itself to an idle state. Prompt File - This option allows you to specify which prompt file to use for the prompts on the Remote Data Terminal. Please refer to the WinRemote system configuration on page 105 for more information about prompt files for the Remote Data Terminals. Badges The badges tab controls how magnetic and barcode badges are treated in the system. This is mainly used to configure the system to use badges that you had prior to purchasing and implementing TimeClock Plus.
To configure a certain type of badge, select it from the Entry Location drop down box and then select the options for the badge type. Use all characters in badge – If selected, the entire badge will be used as the input for this item. If the length of the badge exceeds the length of necessary data, the data will be truncated to the length necessary. For example, if you have a badge containing 20 numbers and you swipe it when asked to enter an employee number, only the first 10 numbers will be used. Use portion of badge – This option allows you to use only a portion of the entire badge. For example, suppose you have a student ID that contains the student’s birthday followed by their id number. This option could be configured to determine the badge number by looking at characters 9-18 on the badge. This would ignore the first 8 characters of the birthday. Use last characters in badge – This option allows you to use only a set number of the last characters in the badge. If for example you had badges that varied in length, but always contained the employee number in the last 10 digits, you would enter 10 in this field.

TimeClock Plus 4.0 111
Communications Serial Communications Configuration The Professional Series Remote Data Terminals operate at a higher baud rate than the standard Remote Data Terminals. If you have a Professional Series (i.e. biometrics), you should set the baud rate to 19200. All standard terminals operate at 9600 baud. Ethernet Communications Configuration The Ethernet configuration requires the entry of an IP address and port number so that the WinRemote system can locate the terminal on your network. The IP address and port number should be the same as the IP address and port number entered when the hardware was configured. Startup Delay – The startup delay is used to delay the startup of the WinRemote software on a port after the connection is made on the port. This is useful in some situations where there is a brief disruption in the connection after it is made. This value is entered in milliseconds where 1000 milliseconds=1 second. For example, if you would like to pause the terminal for 2 ½ seconds after it is first connected, you would enter 2500 in the startup delay.
3.0 Start/Stop Button To activate a Remote Data Terminal for use, the WinRemote software must be started on the port where the terminal is connected. This button will start the Remote Data Terminal that you have selected. Notice that once you have selected the terminal and have started it, this button changes to a Stop button. To stop the terminal, click on the Stop button.
To prevent from having to start each terminal manually when the system if first activated, you should configure the Auto-Start this port option in the Terminal tab of the port configuration.
4.0 Activity Button This option allows you to view the different activity that has occurred on a Remote Data Terminal. For instance you will see the transactions that have occurred on the terminal such as activation or deactivation and various clock in and out operations.
5.0 Locate Button The Locate button will attempt to locate any Remote Data Terminals that are serially connected to the PC.

112 TimeClock Plus 4.0
Each port that has a Remote Data Terminal connected and not currently active will display the “<x> baud RDT found” message. Ports that appear to be valid for connecting a Remote Data Terminal will display the message “Valid RDT port”. If you would like to configure a port from this screen, select the port number from the list and click on the Configure button.
6.0 Exit Button This will exit and shut down the WinRemote program. The terminal(s) that the WinRemote is controlling will not function if the software is shut down. To minimize the WinRemote software click on the minimize button in the top right-hand corner of the main WinRemote screen. There will be a small red RDT icon in your system tray. To access the WinRemote software, double-click on the RDT icon.

TimeClock Plus 4.0 113
TimeClock Time Server The Time Server program designed to run as either an application on the desktop or as a service on Windows NT. The time server application is used to allow workstations running TimeClock Plus to obtain the system time from the server. NOTE: This program is included only in the network version of TimeClock Plus.
1.0 Service Button The Service Button allows you to install, remove, start, and stop Time Server as a service on your PC (server). When you install Time Server as a service, it will run automatically when your PC is booted which will eliminate the need to manually start it each time.
If you install Time Server as a service, make sure you have the appropriate network/user rights to do so. If you are unsure about your rights, please consult with your network administrator.
By default the application will use the SYSTEM account when it is active as a service. If you receive access denied messages when attempting to start the service, this user may not have sufficient permission on your system. To alleviate this you should go to the services applet in the control panel and choose a different account for running this service.
2.0 Clear Button This option will clear out the log of activity on the time server.
3.0 Options Button The options button is used to configure the settings for the time server. You should not change these settings unless you fully understand what they mean.
By default the time server will listen for incoming connection on stream and datagram sockets on port 37. If you are currently only using one type or the other in your client configuration, you can disable the type that is not used in this section. In addition, if the port number conflicts with another application in your system, it can be changed here. NOTE: Any changes made in this section will require you to stop and restart the time server.
4.0 Shutdown Button This option will shut down the Time Server application. When the application has been shut down, workstations will no longer be able to get the time from this computer.


TimeClock Plus 4.0 115
On-Screen TimeClock The On-Screen TimeClock allows employees to clock in and out from their computer workstations.
The On-Screen TimeClock program is very simple to use. To perform any clock operation, click on the button corresponding to that option.
The On-Screen TimeClock application can be configured to be displayed in different formats or to include or not include certain options. You may want to configure the software before you begin using it.
1.0 TimeClock Plus Configuration To access the On-Screen TimeClock configuration, click on the yellow clock in the upper left corner of the window. From the menu that appears, clock on Configure.
Window Layout Display buttons horizontally/vertically in window – Determines how the main window is displayed. If horizontal is selected the buttons will appear left to right. If vertical is selected, the buttons will appear from top to bottom.

116 TimeClock Plus 4.0
Display large/small images on screen – These options control the size of the icons on the TimeClock Plus operations buttons. If you display small icons, the window can be made much smaller and take up less screen space. Show text on buttons – If this option is checked, then the words will be displayed on the buttons, otherwise, only the icon images will be visible. Window is always on top – If this option is checked, the On-Screen TimeClock program will always be visible unless it is minimized. Show tool tips – If this option is checked a tool tip or description of the button will be displayed if the mouse is over the button for a few seconds. This is helpful to understand what the different buttons do, especially if the text is not displayed on the buttons. Minimize to system tray – If this option is checked, whenever the program is minimized, it will go down to the system tray (lower right hand corner of the screen where the clock is located), otherwise it will go down to the toolbar at the bottom of your screen. When minimized to the tray it will appear as a small yellow clock. Display as a tool window – If this option is checked, the window will be displayed with a half-height caption bar. This is useful if you are attempting to minimize the space taken up by the On-Screen TimeClock window. Note that when this option is enabled there will be no system menu or minimize button. To access the settings, right click on the caption bar and choose Configure from the menu displayed.
Display Exit button – If this option is checked, the Exit button will be displayed along with the various buttons for clocking in and out. Display View button – If this option is checked, the View button will be displayed along with the various buttons for clocking in and out. The view button is used for viewing hours, schedules, etc. Display Hot track buttons – If this is enabled, the buttons will display in black and white until the mouse hovers over them. When the mouse is over the button it will display in color. Display Clock In/Out button – In some instances you may want to disable the clock in and out buttons. For example, you may have a Biometric Remote Data Terminal that everyone uses to clock in and out of the system, but when they are at their desk you allow them to perform job code changes, go on break, etc. without the need for biometric verification. Options The options tab contains various system settings.
Use touch screen compatible dialogs – If this option is checked, large buttons will be displayed for most dialogs to make clock operations simpler with touch screen systems. Remember last number used for clocking in/out – If this option is checked the last number used for clocking in and out will be retained. This is helpful if only one person clocks in and out from this PC.

TimeClock Plus 4.0 117
Use auto-fill to complete job and cost code entry screens – Auto-fill means that the system will attempt to complete the job code or cost code as you enter it based on the codes that are in the system. If you have a code "123456" and you enter "123", it will fill in "456" for you at the end. Display totals as HH:MM when viewing hours – This will display the time as hours and minutes instead of hundredths when viewing hours. Save window placement on Exit – If this option is checked, the position and size of the window will be saved when the application is closed. Close button minimizes application – If this option is checked, the close button will only minimize the screen. It will not actually close the application. Display time on main application screen – If this option is checked the current time will be displayed at the top of the main window. Reminders This tab is used to schedule reminders that can be set to popup messages, play sounds, or execute a file. This can be used to display messages when it is time to go to lunch or to play a sound file at a certain time of day. In order for reminders to function, the On-Screen TimeClock application must be running.
To add or edit a reminder: 1) If adding, click on Add. If editing, select the reminder in the list and click Edit.
2) Enter a description for the reminder in the Description field.
3) Enter a time to activate the reminder in the time field. Clicking on the clock icon in the edit field will open the time entry dialog.
4) Select the days you would like this reminder to execute in the Days to activate section. The reminder will be activated at the time entered on the days specified.

118 TimeClock Plus 4.0
5) To activate the reminder ensure that there is a check in the Reminder is active checkbox.
6) If you want to run the reminder only one time, place a check in the Run only once checkbox.
7) Select the action to perform in the Action section. Play audio file – This option will play a WAV file at the time specified. You must have a sound card installed for this option to function. Launch File – This option will launch a file at the time specified. The browse button can be clicked to open a file browse dialog to search for a file to execute. Beep Speaker – This option will beep the speaker. It is normally used in conjunction with other options such as Display Message and Launch File. Display Message – This option will display a message to the user when the reminder is activated.
8) When configuration is complete, click OK to save the reminder or Cancel to cancel without saving the reminder.
Job Costing The Job Costing section is used to configure job costing related options for the On-Screen TimeClock. This tab is only available when the Job Costing Module is installed.
Fast Load Cost Code List –This method uses direct access to the cost code file which bypasses the database engine. This is option is recommended only if you have over 500 cost codes. Ask for Job Code when changing cost codes – If this option is checked, then the system will ask for a job code also when you change job codes. Ask for cost code when changing job codes – If this option is checked, then the system will ask for a cost code when you change cost codes. Display cost codes in a tree (as opposed to a list) – If this option is checked, the system will display the cost codes in a tree list instead of a list control. This option is useful if you are using multiple level cost codes. If you are using a single level cost code, list mode is recommended. Time Server If you have any questions about this tab, please see the Time Server configuration in the WinRemote documentation on page 107.

TimeClock Plus 4.0 119
Ethernet Remote Data Terminal Setup This documentation should be read in its entirety before you begin using or installing your Ethernet terminal and software associated with it.
The Remote Data Terminal is not a stand-alone unit. It operates exactly as the serial Remote Data Terminal does except over Ethernet. TCP/IP must be installed and configured on the computer that will be running the WinRemote software to control the Ethernet terminal.
1.0 Configuring the Ethernet Terminal Prior to using the Ethernet terminal it must be configured to use your network.
1) Connect the Ethernet terminal and the Linc Module and apply power to the Remote Data Terminal (RDT). 2) After the self-test is complete, press the Clock Out and Enter buttons on the RDT at the same time. The RDT will show
some diagnostic information on the screen. Wait for this to complete before proceeding to the next step. 3) The RDT will prompt you for a “Quick Check Mode”. Press the NO button. Quick Check Mode is a diagnostic program
and is not necessary to run at this time.
4) The RDT will prompt you for “Ethernet Setup”. Press the YES button. The Ethernet Setup screen will show the current IP configuration for your Ethernet Terminal. At the top of the screen are command prompts that will aid you in setting up the IP address. If you are unfamiliar with IP address, please contact your network administrator.
5) Enter the four numbers representing your IP address. This IP address must be accessible by the machine that will be controlling the RDT. Once you have entered the IP address, Press the Enter button. Once the last number is entered in the IP address, the RDT will prompt for a Terminal Port address.
The Terminal Port address is set to default to 3001. This default setting is acceptable for most situations and should not be changed unless instructed to do so by a TimeClock Plus Support Technician.
6) Press Enter after configuring the Terminal Port number. The RDT will prompt you to configure the Subnet Mask. You will configure the subnet mask in the same way as you configured the IP address. Press Enter to continue after you have entered the subnet mask numbers. The subnet mask used should match the subnet mask on the network where the terminal is being configured.
7) The RDT will prompt you to “Update Linc”. Press YES (Enter). This will update the Linc on the RDT. If you made a mistake during the setup process, press NO (ESC) to cancel any changes.
8) The RDT will again prompt with “Ethernet Setup”. This option will allow you to make changes to the setup that you just completed. If the settings are correct, press the NO button to proceed to the next step. If you need to make changes, press YES to return to the Ethernet step and return to step 5 to repeat the configuration.
9) The RDT will prompt you for an “Auto Test”. Press the NO button.
10) The final RDT prompt will be “Exit Offline Mode”. Press the YES button. By exiting offline mode, you place the RDT back into a network mode. The self-test will be performed and you will be returned to the “Waiting for Host” display. Once complete, the terminal is ready for use.
2.0 Configuring the WinRemote Software for the Ethernet Terminal. Once the Remote Data Terminal Ethernet settings have been configured, the WinRemote software must be configured to drive the terminal. For information on configuring the WinRemote software, refer to the WinRemote section of this manual on page 105.
3.0 Frequently Asked Questions: Where can the Ethernet cable from the terminal be plugged in? The Ethernet terminal can be plugged into any hub or switch that could host a computer, as well as a Network Interface Card (NIC). Can I plug it directly into my NIC card? Yes. Because you are not using a hub or switch to cross the send and receive, you will have to use a crossover cable to make it work properly. What is the maximum cable length? Cable length depends solely on the quality of cable that connects the terminal and the network. If distance and environment are a concern, shielded Category 5 cable can be used. The basic rule is no more than 100 meters or 300 feet from the connection location to the terminal.

120 TimeClock Plus 4.0
Can I run the Remote Data Terminal as a serial terminal if I decide that I do not want to use the Ethernet module anymore? Yes, the Ethernet module is an addition to the RDT2000. The Ethernet module can be removed and the standard serial cable can be plugged into communications port on the back of the terminal. Consult your TimeClock Plus manual for additional serial terminal instructions. How can I find out what IP the terminal is running on? When the terminal is online you can press ‘11’ to have the terminal show you the IP as well as indicating how long the device has been online. The Allow ID terminal setting must be enabled in the port configuration of the WinRemote software. Over my Wide Area Network, what is the ideal setup? The best way to run the Ethernet terminal over a WAN is to setup the software on the server or another computer that has high bandwidth access to the data files on the server. The WinRemote software is responsible for accessing the data files. If the software is run remotely across the WAN, the data files must be carried across the WAN connection, therefore slowing down the clock in operation. If the software is being executed on a computer that has speedy access to the data files there should be no delay to TimeClock Plus operations, even over dial-up connections. Place the terminal on the slower side of the WAN so that minimal data is transmitted across the WAN.
4.0 Trouble Shooting Terminal beeps when it is started and does not work This is normally due to an incorrect baud rate setup for a serial terminal. To set the baud rate to the appropriate setting, select the port and then click on Configure. From the configuration screen click on the Communications tab.
Error: “The system was unable to start the port…” The WinRemote software will report this error if it is unable to take control of the IP specified in the software. The IP address may be in use by another computer or Ethernet terminal on the network. Disconnect the Ethernet terminal from the network. Open a DOS prompt and type ping IP address, where “IP address” represents the IP that has been entered in the software. If the ping command receives a reply the IP is currently in use by another machine in the network. In this case you must choose a new IP for the terminal. If there is no reply, reconnect the terminal and attempt another ping operation. If the settings on the terminal are correct you should get a reply from the terminal. “Not connected, waiting 30 seconds” If the terminal looses connection with the network, the not connected message will appear on the WinRemote screen. This will occur if the terminal loses the physical connection with the network or if the network is not accessible. Rather that trying to connect immediately, the software will wait 30 seconds before trying to connect to the terminal. This prevents the software from creating an unnecessary amount of network traffic by repeatedly attempting to connect. “Linc not detected” This message indicates that the terminal cannot connect with the Ethernet Linc module. Verify that the 6-inch serial cable is connecting the Ethernet Module and the terminal. One end should plug into the Module in the port labeled Term Port, the other end should plug into the COMM port on the back of the terminal.

TimeClock Plus 4.0 121
Biometric Remote Data Terminal Setup The Biometric Remote Data Terminal is not a stand-alone device. A computer running the WinRemote software controls all of the terminal’s operations. The Remote Data Terminal must remain connected to the computer through an Ethernet Network or a serial port, depending on the type of terminal that you have purchased.
The Biometric Remote Data Terminal will function the same as a regular Remote Data Terminal with the exception of the biometric configuration screens and features that are provided in this documentation.
1.0 Installing the WinRemote Biometric Module TimeClock Plus must be installed in order to run the Biometric Remote Data Terminal. The installation of the Biometric terminal will initially require two installs. The first install will be the TimeClock Plus software that comes standard with WinRemote software and the second install will contain the module that is required to activate the Biometric device attached to the terminal.
1) Install the TimeClock Plus system from the CD provided to you. (Disregard this if you already have TimeClock Plus and WinRemote installed on the workstation in which you will be controlling the biometric terminal(s)).
2) Insert the TimeClock Plus CD-ROM. If the CD auto runs, select Install Module/Software Add-On from the menu. If it does not auto-run, click on the Start menu and select Run. Enter X:\MODULES\MODULES.EXE where X: is the drive letter of your CD-ROM drive.
3) From the modules application expand Software Additions and then select RDT Biometrics Update and click Install. 4) Follow the instructions in the InstallShield Wizard to install the module.
2.0 Configuring the WinRemote Software To configure the WinRemote software: 1) Launch the WinRemote software.
2) From the main screen, select the communications port or Ethernet port where the Remote Data Terminal is connected by clicking on it with the mouse.
3) Click on the Configure button.
4) Click on the Communication tab.
5) If you are configuring a serial Remote Data Terminal, ensure that the baud rate is set to 19200 by selecting it in the drop
down list. If you are configuring an Ethernet terminal, confirm that the settings for IP address and Port number are correct for the device.
6) Click on the Modules tab.

122 TimeClock Plus 4.0
7) Select the Finger Biometrics Module and then click on the Setup button. The configuration screen will appear.
Settings This screen will allow you to adjust the settings for the biometric hardware attached to the remote data terminal.
Enable biometrics finger scanner on this port -This check box enables the fingerprint scanner on the terminal; otherwise it will behave as a non-biometric Remote Data Terminal. This must be checked in order for the biometric options to work. Gain - This is the intensity gain the fingerprint scanner uses when capturing an image (1,2,4,8). Larger values will make the image being captured darker. The default value for this setting is 4. 1 to 1 Security Level -This is the security level used when matching one employee against one fingerprint. This security is used when you require the employee to enter his employee number before the verification is requested. 1 to Many Security Level -This is the security level for the identification process. This security level is used when you have the system configured to identify a user based on their fingerprint. The higher the number entered here, the more secure the system will be. Higher security means the system will require a more exact finger print match per employee. Register Quality Level - This is the quality level of the image of the fingerprint required to register an individual. The default setting for Register Quality Level is 40. The higher this number, the higher the degree of the quality of the image will be required during registration. Verify Quality Level - This is the quality level of the image of the fingerprint required to verify an individual’s fingerprint image. The default setting for Verify Quality Level is 30. As this value is increased, the image quality required for verification also increases. Fine Exposure - This is the fine exposure of the sensor.
Coarse Exposure - This is the coarse exposure value of the sensor.
High-bright Level – This setting is used to compensate for situations in which there is a lot of light in the area where the reader is located. If you are having trouble enrolling or verifying, try setting this setting to 8. The default value is 0.

TimeClock Plus 4.0 123
NOTE: In most instances the settings provided are sufficient and you should not modify them unless instructed to do so by a TimeClock Plus Support Technician.
Enrollment
What key to use to initiate enrollment - The value in this combo box will enable the corresponding key on the terminal keypad to begin the enrollment process. The default value for this option is F1. If you choose the “Disable” option on this combo box, you will disable the ability to enroll an employee from the Remote Data Terminal. Require manager print to access enrollment -This option will require a manager’s print to access the enrollment functions from the Remote Data Terminal. A manager should immediately be enrolled to prevent unauthorized use of the enrollment function. Require password to access enrollment -This option will not require a manager’s print to access the enrollment functions, but it will, however, require a password. The password can be set using the Change Password button.
Require management print or password to access enrollment - This option allows for a choice of a password or management print to access the enrollment features. Enrollment can be accessed either way. Use system to enroll management prints for overrides and access control - If this option is checked then a management print can be enrolled at the terminal otherwise there won’t be any manager’s prints and only passwords will be used. Use default method for management overrides (TimeClock Passwords) - If this option is checked, TimeClock Plus passwords will be used for management overrides. Use only management fingerprint for overrides - If this option is checked a fingerprint will be needed for a management override. If print verification fails then there will be no way to override restrictions. Attempt to use management print, then use password if verification fails - If this option is checked, a fingerprint verification will be necessary and if the fingerprint verification fails, the system will prompt the user for a password. Operating Mode The Biometric Remote Data Terminal can store prints internally or on the hard disk of the computer where TimeClock Plus Data Directory resides. If the prints are stored in the reader, one-to-many verification is possible, but there are limitations. The more employees that you have stored inside the terminal, the longer verification will take on a one-to-many setting.

124 TimeClock Plus 4.0
Store prints internally in reader - If this option is checked, the individual prints will be stored internally in the reader. Clock operations using prints stored in the reader are faster that those using prints that are not stored in the reader. The main limitation of prints stored in the reader is that only employee numbers 1-60000 can be enrolled. Use one-to-many lookup to determine employee number - The one to many lookup automatically searches for a fingerprint match by comparing the current fingerprint to all of the others stored in the database. The system will match approximately 40 prints per second. If you have 80 prints stored in the system, the lookup will take about 2 seconds. This time is added to the time required to capture the print prior to the lookup.
You can specify what actions in the system will request the one-to-many verification by placing a check next to them. For example, if you only require verification on clock in and out, you should place a check in only those boxes. Employees will be allowed to perform all other operations without one-to-many verification. Automatically retry failed one-to-many verifications - If this option is checked, then failed one-to-many verifications will be retried automatically instead of generating an error message after the first failed identification. This is useful if you have employees that have difficulty positioning their finger correctly on the terminal. Use one-to-one verification to verify identity after number is known - The one to one verification will prompt the user for an employee number and then perform verification against a single stored print. The system will only compare the print to the employee number file instead of all of the fingerprint images.
You may specify which functions that you would like to use the one to one verification by checking the appropriate box in this section. Do not perform one to one if number was determined from one to many - If this option is checked, when an employee number has been determined from one to many, then it will not verify the print again by using the one to one lookup. This is useful if you would like to configure both one-to-many and one-to-one verification for the same operation. For example, if you configured one-to-many verification for clock in and the employee was not found in the database due to high security levels or incorrect finger placement, the system can be configured to fall through to one-to-one verification. If the one-to-many identification succeeded and this option was checked, the one-to-many will be bypassed. Automatically retry failed one-to-one verifications - If this option is checked, then failed one-to-one verifications will be retried automatically instead of having to enter the employee information in again. Miscellaneous Display “Print Accepted” message if verification is successful – If checked, the Remote Data Terminal will display the Print Accepted message on the terminal when the verification is successful. Allow any operation when print is not on file - This option allows you to continue with your specified action if you do not have a fingerprint on file. This is useful in situations in which some employees are not required to have a fingerprint on file. Use this option with caution. If you add a new employee to TimeClock Plus and forget to enroll them, they will be able to freely clock in and out of the system if this option is checked. Acknowledgement – This section controls the number of beeps generated from a successful or failed verification attempt.
One to many bypass – This section allows you to configure settings that will allow individuals to bypass the one-to-many mode and proceed directly to one-to-one verification. This is useful if you have individuals that consistently fail one-to-many identification due to poor fingerprints.

TimeClock Plus 4.0 125
In order to bypass the one-to-many identification you must press the bypass key and then the operation key (i.e. clock in, clock out, etc.) within the timeout period. In order to bypass the one-to-many mode for an operation, you must have the one-to-one configured for the same operation.
Bypass Key – This option allows you to specify which key on the terminal to use as the bypass key.
Bypass timeout – This option allows you to set how long the bypass will last before the terminal goes back to one-to many mode.
Template conversion module – This section displays whether or not the conversion module is loaded. The conversion module is used to convert templates between the USB and parallel port Hamster devices and the Biometric Remote Data Terminal. If you are using both devices and sharing a database between the two, you must have the conversion module loaded. Messages The messages tab allows users to change the system prompts associated with the biometrics module. Users are allowed to view or edit the current default messages that are displayed on the Remote Data Terminal. For more assistance on editing messages, refer to the Prompt File section of the WinRemote configuration on page 105. Backup The Backup tab allows you to configure the backup and restore options of the terminal. These options allow you to perform backups on the data that is contained internally in the biometric device. It will also enable you to restore that data on other terminals, which will eliminate the need for employees to enroll on multiple terminals.
The default setting for this is “<DATADIR>\FD-COM2.FPD”. This setting will place the backup into the data directory of the currently selected company. You may also specify another directory manually if you want to save the backup somewhere else.
4.0 Optimizing Fingerprint Recognition There are several factors to be considered when using the Biometric Remote Data Terminal. Fingerprint recognition may be impossible for some people. This is due to injury to fingers, excessive dry skin, corrosive exposure, or other circumstances that have damaged or changed the individual’s fingerprints.
Fingerprint recognition will be most efficient if the following guidelines are followed:
• The finger is properly positioned on the lens. • The proper amount of pressure is applied. • The fingers are not too wet or too dry. • The operating environment is considered.

126 TimeClock Plus 4.0
Finger Placement In order for an individual’s fingerprint to register correctly for verification and enrollment, the person should place their finger on the same spot consistently so that it reads the same fingerprint image every time.
Correct positioning of the finger will be centering the fingernail over the center of the scanner lens as shown below. The fingertip should extend only a few millimeters beyond the scanner lens.
It is recommended that you use your index finger. Because of the normal size of an index finger, surface contact and light exposure are optimal with the fingerprint scanner lens. You may still use other fingers, but the index finger is recommended.
Notice the optimal surface contact with the finger. This is correct finger placement.
Notice in the image below that only a small portion of the fingerprint is in contact with the scanner lens. This is incorrect finger placement.
Pressure of Fingerprint On Fingerprint Scanner Lens If too much pressure is applied to the sensor window, the ridges in the fingerprint adhere to each other. This makes the print indistinguishable. If too little pressure is applied, the resulting image is too vague and the print will also be indistinguishable.
Pressure on the fingerprint scanner lens should be mild with good contact. Effects of Dryness or Wetness On Fingerprint Images Notice the effects of wetness or dryness on a fingerprint image as shown below.

TimeClock Plus 4.0 127
When the temperature is low, fingerprints are often dry. To correct this problem, users may moisturize their fingertips by breathing on them before applying their finger to the scanner lens.
If the fingerprint is too wet, the ridges and valleys of the fingerprint are difficult to distinguish. This can be corrected by drying the finger on a clean towel or cloth. Environmental Considerations The following environmental conditions may affect the usage of the fingerprint scanner:
• External lighting may affect the sensitivity of the optical sensor. Direct sunlight or other high-intensity lighting conditions can cause failed operations.
• Fluctuations in the power supply will affect the image quality and processing time during fingerprint capture.


TimeClock Plus 4.0 129
TimeClock Plus Fingerprint Scanner It is necessary that this documentation be read in its entirety before you begin using or installing your fingerprint scanner and software associated with it. The fingerprint scanner can be in several forms including a keyboard, mouse, stand-alone parallel port Hamster, or a USB Hamster.
1.0 System Requirements The installation of this hardware and software requires the following: USB
• Windows 98/Windows 2000 (USB is not supported on Windows 95 or NT 4.0) • USB connector on the PC where the reader will be attached • Pentium 66 or better computer system
PARALLEL • Windows 95/98/ME or NT 4.0/2000 • A parallel port that is configured for EPP or ECP mode and is working properly • Pentium 66 or better computer system
Installation The following instructions will aid you in the installation of the fingerprint scanner on your system. After physically connecting the fingerprint scanner, it will be necessary to install the software that will configure your computer system to use the scanner. It may be necessary to restart your computer several times as indicated in the following instructions. This installation is divided up into two parts, Installing and Configuring Hardware and Installing and Configuring Software. It is assumed that you have already installed and setup TimeClock Plus on your system before you begin installing the fingerprint scanner and TimeClock Plus fingerprint software.
2.0 Installing and Configuring Hardware NOTE: If you are installing USB, proceed to the next section.
To install the parallel port hamster hardware: 1) Shut your computer system off completely.
2) Connect the hardware to the system. The parallel port device will connect to the parallel port and to the keyboard connector as shown below. The USB device should plug directly into any available USB port.
3) Apply power to the computer. 4) During the initial boot process, press the DEL or F1 key to enter the CMOS setup.
WARNING: When you enter the CMOS/BIOS configuration of your system, you should only change the settings specified in these instructions, otherwise you may create system errors. If you are unfamiliar with setting CMOS/BIOS configurations, please consult with your system administrator, or the manuals that came with your computer.
5) Set the parallel port mode to EPP or ECP mode in the CMOS configuration (usually located under Integrated Peripherals Setup). The manufacturer recommends EPP mode. This is the only setting that you will change in the CMOS/ BIOS settings. If your system does not have this setting it may be too old to support this configuration.
6) Exit the CMOS/BIOS configuration screens while saving your changes.
7) Let your computer start or boot up as it normally does.

130 TimeClock Plus 4.0
3.0 Installing and Configuring Software Installing the biometric update from the TimeClock Plus CD: 1) Insert the TimeClock Plus CD into your CD-ROM drive. 2) If the CD auto starts, select Install Module/Software Add-On from the menu. If the CD does not auto start, run the
Modules application located on the CD by clicking on the Windows Start Menu, selecting Run and entering X:\Modules\Modules.exe where X: is the drive letter of your CD-ROM drive.
3) Expand the Software Additions section by clicking on the plus next to the item.
4) Select Biometrics (Secugen Parallel/USB Fingerprint) from the menu by clicking on it with the mouse.
5) Click Install to launch the installation application.
6) Once running, the InstallShield Wizard program will prompt you for an activation key. Enter the activation key that you received and click Next to complete the installation of the software.
7) Restart your computer if prompted to do so after the installation completes. Configuring the biometric software for use: 1) Launch the On-Screen TimeClock application by clicking on it in the TimeClock Plus 4.0 program group.
2) Click on the yellow clock in the upper left corner of the On-Screen TimeClock window (system menu).
3) From the drop down menu, select the configure option.
4) Enter a username and password to access the configuration screen.
5) Select the Modules tab.
6) Click on the Secugen Finger Scan Module to highlight it.
7) Click on the Configure button. This will enable options to adjust the Finger Scan module.
8) Click on the Hardware tab.
9) Select the connection location (parallel port) where the biometric device is connected. The most common setting for this will be LPT1 if using parallel or USB if using the USB model.
10) Click on the OK button. This will return you to the Modules tab of the On-Screen TimeClock configuration.
The initial configuration of the fingerprint scanner is now complete. Proceed to the next section to configure the operational settings and to enroll employees.
4.0 Configuring the Finger Scan Module This section will walk you through the configuration of the finger print module for use with your company. It is assumed that you already have the device installed and have completed the initial configuration in the previous section. To enter the configuration dialog: 1) From the main On-Screen TimeClock window, click on the yellow icon in the upper left corner of the window (system
menu)
2) Select configure from the menu

TimeClock Plus 4.0 131
3) Enter a user name and password that has access to the On-Screen TimeClock configuration. 4) Click on the Modules tab.
5) Highlight the Secugen Finger Scan Module and click Setup.
Operations The Operations tab is used to set the circumstances in which a finger print verification will be required. This allows administrators to customize verification procedures for daily clock transactions.
The administrator will customize the following operations: Clock In, Clock Out, Break, Job Code, and Cost Code. Print Verification is subdivided into three groups and is explained below. Manual - This setting requires employees to enter their employee number in manually by typing it in. This setting does not require a finger print verification for that particular option. 1: Many - This setting requires that the employee only press the desired option before being prompted by the system for a print verification. Upon a successful verification, the selected option (i.e. clocking in) will be executed.
This setting reads a fingerprint from the user and then compares it to all of the prints stored in the system. This is where the “one to many” terminology comes from. 1:1 - This setting requires that the employee press the desired option (i.e. clock in) and then enter their employee number. After entering the employee number, the system will prompt the user for fingerprint verification. Upon a successful verification, the selected option (i.e. clocking in) will be executed.
The system prompts the user for verification after entering an employee number. In fact, what is happening is the system is comparing the verification print to one piece of data that is reference by the employee number. This is where the terminology “1:1” comes from. Hardware Tab The hardware tab is used to configure the actual fingerprint verification device.
Connection Location: This combination box is set according to how you have the verification device connected to your computer (i.e. LPT1).

132 TimeClock Plus 4.0
Verification Security Level: This combination box is set according to how much security you need on the verification process. By setting this higher you reduce the odds of a false print passing verification. The print has to be closer match to the original print to pass verification as this value is increased. By setting this option lower you increase your odds of a false print being verified. Device Defaults – This option will allow you to set the defaults for the biometric device such as brightness, contrast, and gain.
Brightness - Controls the brightness of the fingerprint image. The higher the percentage of brightness, the more light will be let into the picture. Contrast - Controls the contrast in lines of the fingerprint image. The higher the percentage of contrast, the more distinct the lines of the image will be. Gain - Controls a combination of light and contrast in the image. The higher the gain setting results in less contrast and brightness. Preview - This button previews an image received from the fingerprint device. This option allows users to see the results of their changes to brightness, contrast, and gain. Auto Exposure - This button sets the brightness, contrast, and gain automatically to an optimal exposure.
Settings Enable Event Tracing - This option turns on event tracing for the module. This option is used to assist technical support in determining a solution to any problems you may be having with the biometric unit. Allow any operation if fingerprint is not on file - This option is allows a user to clock in if they do not have a fingerprint on file. The intent of this option is to eliminate verification for certain employees or managers that are not required to be verified. It is recommend that if this option is checked you use 1:1 matching because with 1:Many, the person will have to place their finger on the scanner before the system recognizes that they do not have a print on file. Attempt to auto sense when finger is on reader – When the unit is operating in a 1 to many identification mode, the software will attempt to detect when an image is available for capture. Using this option the user will only have to press the desired action button (i.e. clock in, clock out) and then place his finger on the reader for verification. This option eliminates having to press the OK button after placing your finger on the reader.
Allow manual entry of employee number if no print found - This option will prompt the user to enter their employee number manually if their fingerprint is not found during a one-to-many identification. Use fast match mode - This option turns off the screen updates during the matching process, which will result in faster matches. If you are using one-to-many mode and have a large number of employees, fast match mode is recommended. Enroll The Enroll tab is used to enroll employees into the system. Two successful fingerprint images are required for a successful enrollment. Users are prompted with enrollment instructions by the Action label that is located just above the command buttons. The system will prompt the user that enrollment was successful or unsuccessful upon completion.

TimeClock Plus 4.0 133
5.0 Enrolling An Employee To enroll an employee: 1) Enter the Enrolling Screen, which is located on the Enroll Tab. 2) Press the New button.
3) Enter the Employee Number to Enroll. Please note that the employee must be set up in TimeClock Plus prior to enrollment.
4) Have the employee place a finger on the scanner. Observe the Live Image window. This window should show a clear and distinct fingerprint. If this image is not clear and distinct, refer to the Device Defaults section of this manual to adjust the settings for the fingerprint scanner.
5) Press the Capture button. This will store the Live Image to the Capture 1 section of the window.
6) Have the employee remove the finger from the scanner. 7) Have the employee re-place the finger back on to the scanner. This is required for a second image of the fingerprint. 8) Press the Capture button. This will store the Live Image to the Capture 2 screen.
Once two valid images have been captured, the system will prompt you that the employee has been enrolled successfully.
6.0 Fingerprint Manager The Fingerprint Manager is used for viewing and organizing employees. This program allows users to view which employees have fingerprints on file and which ones do not. It also gives users the ability to reorganize the list. By reorganizing the list, the efficiency of searching through different fingerprints may be increased. Users may delete fingerprint files for certain employees from this program if necessary.
An icon will be installed in the TimeClock Plus program folder when the application is installed. This program is located inside your TimeClock Plus program directory under the filename FingerMg.exe Once you launch the Fingerprint Manager, you will be prompted to select your company if you have a multi-company module, otherwise the following screen will appear.
This screen consists of three tabs. Each of the tabs represents a different group of individuals in the system.

134 TimeClock Plus 4.0
Employees: This tab displays status of all employees in the selected company. If an employee has a fingerprint on file, “Yes” will be displayed in the Print On File column. Unassigned Prints – This tab lists all of the prints that are contained in the print file that are not currently assigned to an employee. If an employee is deleted from TimeClock Plus, their print will become unassigned. Managers – This tab lists all of the manager prints that are on file. Manager’s prints are kept by number only.
Remove - This button removes the fingerprint scans for a highlighted employee. Order - This button enables the user to change the order of an employee in the list that you have highlighted through the following screen. The order represents the order the individual is saved in the database. Employees that clock in more frequently should be assigned a lower number so they appear earlier in the database. When a one-to-many identification is initiated, the employees are searched from the lowest to the highest order, thus optimizing the lookup process.
7.0 Common Errors To avoid the most common errors, check the following.
• Verify all fingerprint scanner connections are secure. • Verify that the fingerprint scanner is on the appropriate connection as specified in the Hardware tab under Connection
Location. • Verify that your TimeClock Plus information is accurate. • If necessary, verify your CMOS/BIOS settings are accurate.

TimeClock Plus 4.0 135
Glossary AutoUpdate – This is a software utility application for updating your TimeClock Plus software to the current version or latest patch level automatically. This can be done via Internet access or through an update file. Badge – A magnetic or barcode encoded card that can be used with a Remote Data Terminal (RDT) to represent an employee number, job code, or cost code when clocking in or out. Base Pay Period Date – A date used for calculating pay period ranges in reports. For example, if you calculate overtime on periods from Sunday to Saturday, this date should be set to a date that falls on Sunday. Break – A break in TimeClock Plus is treated as a special clock out. The length of time from the clock out for break and the next clock in is the break length. Breaks can be designated as paid or unpaid on a per job code basis. Client – A computer connected to a server computer through a network. Clockable – Used when configuring a job code to determine if the job code can be used by the employee to clock in to TimeClock Plus. Certain job codes such as sick, vacation, jury duty, etc should not be clockable because the employee does not use them to clock in and out. Job codes such as mechanic or repairman should be marked clockable. Company – This is the designation for one set of TimeClock Plus databases. In most cases one company is enough, but if additional companies are needed you can use our Multi-Company Module. Communications Port (COM Port) – see Serial Port Cost Code – An alphanumeric code that allows an employee to specify what project or what client they are currently doing work for. An example would be if an employee is currently working under the job code for mechanic, then his cost code would be what car he was currently working on. The Cost Code module is necessary for the cost coding operation to be functional. Counts Toward Overtime – When configuring a job code this field determines if hours worked in the code will count toward the number of hours required to pay overtime. Most codes will count, but codes such as sick and vacation usually do not. Current version – This is the latest version of the software that includes all software enhancements and additions. To download the latest version you need to connect to the Internet and run AutoUpdate. If you do not have Internet access, you can contact a technical support representative for instructions on how to obtain an update. You can find the update level of your software by running AutoUpdate and clicking on the Installed button. Current week – The current seven-day workweek in TimeClock Plus. This seven-day period is incremented each time the Close Week operation is performed. You can find the current week by looking at the status bar located at the bottom of the window in TimeClock Manager. Once this seven-day period is over, hours should be verified and the week should be closed. Data directory – A directory or folder on the hard drive of the computer where the TimeClock Plus data resides. In the case of a network installation this is a shared directory on the network server. All information for a Company is stored in the Data directory for that company. Ethernet – Ethernet is Export – The ability to get data out of TimeClock Plus where it can be imported and used by an outside source such as a payroll package or a spreadsheet. TimeClock Plus allows the exporting of raw hours and employee information. It also allows you to export calculated payroll data. Import – The ability to bring data into TimeClock Plus from an outside source. TimeClock Plus has the ability to import raw hours, employee information, job codes, and cost codes. Internet Access – The ability to connect to the Internet through a dial-up modem connection or directly through some other connection such as DSL, cable modem, or a T1 line. You need this in order to use our AutoUpdate utility to automatically download and install any TimeClock Plus updates. Job Code – A numeric code that allows you to specify what job, department, or any other designation an employee can work. Each employee must have at least one job code that is marked as clockable in order to clock in. Labor Cost – This is an estimated figure to show you how much labor is costing you throughout the day. It totals the wages for all the employees currently working and reports them as a percentage of entered sales figures. Open Shift – A shift in any schedule that can be used to allow unrestricted clock in and out operations. By adding an open shift to an employee during a specific time range, the employee can clock in and out even if they would normally have been restricted by schedule restriction in their employee record. Pay Frequency or Pay Period – The date range by which your employees are paid. This can be set in the defaults to Weekly, Bi-Weekly, Semi-Monthly, or Monthly. Preferences – Any options that customize the software for your specific needs. Most preferences can be found in TimeClock Manager under the Configuration menu, but there are also options in On-Screen TimeClock and WinRemote. Previous Week – Any seven-day workweek that has previously been closed from TimeClock Manager using the Close Week function. The weeks can be viewed from TimeClock Manger using the edit hours function.

136 TimeClock Plus 4.0
Program Directory – The directory or folder on your computer’s hard drive where the TimeClock Plus executable programs and system files are stored. Remote Data Terminal (RDT) – A hardware addition to TimeClock Plus that can be connected to a computer through a serial or Ethernet connection to allow employees to clock in and out without having direct access to a PC. Restore - This is the act of restoring your data from a TimeClock Plus backup file (.TBK extension) in case of loss of data. This can be done from the TimeClock Manager. Serial Adapter – This is the required adapter used for connecting the Remote Data Terminal data cable into the serial port on the back of the computer. These adapters are always female and come in 9 and 25 pin configurations. Serial Port – This is the male connection on the back of the computer. There are two different sizes. One is a larger 25-pin (DB25) port and the other is a smaller 9-pin (DB9) port. The Remote Data Terminal serial adapter is plugged into this port prior to activating the WinRemote software. Server – If on a network, this computer is where the TimeClock Plus program and data files reside. TCP/IP – A networking protocol that is required if you are going to use the Time Server application or run a WinRemote Ethernet terminal. See your operation system documentation or contact your network administrator if you have any TCP/IP questions.

TimeClock Plus 4.0 137
Frequently Asked Questions
How do I add sick or vacation time to an employee? There are several methods that can be used for adding sick and vacation time. The simplest method is to add a shift using the edit hours function in TimeClock Manager (see pg 40). The data could also be added to one or more employees using the Quick Add Hours function (see pg. 45) or the Global Record Addition (see pg. 45). If you are using the scheduler and have scheduled employees for vacation hours, these hours can be transferred into TimeClock Manager using the Transfer Job Information function located on the Tools menu in TimeClock Scheduler (see pg. 100). My Employee’s wages are not showing up correctly in the reports. Why? Check that the job code for the employee is set up correctly in the Employee, Edit section. The Master Job Code section sets the defaults for job codes, but they can be set individually per employee in the Employee, Edit section. Also check the permissions of the user that is currently logged in. If the user does not have access to rate/wage information, the wages will not print. Why didn’t TimeClock Plus convert my databases from a previous version? TimeClock Plus converts databases during the company setup phase. If you specified to install TimeClock Plus into a directory other than the directory where your previous version of TimeClock Plus was installed, you received a message about converting from a previous version into the new directory. You should answer yes to this question and specify the directory where TimeClock Plus was previously installed to ensure that the data is copied into the new install. If you have accidentally created an empty company, you should enter TimeClock Manager, choose Select Company from the File menu, and delete the company. You should then recreate the company to convert previous data. How do I make TimeClock Plus obtain the time from another machine on my network? You must have the network version of TimeClock Plus installed to have access to a time server. To obtain the time from another machine in your network you must configure the Time Server application on that machine. Each of the clients that are to receive the time from that server should be configured using the Time Server tab in their configuration section. I have setup the Time Server and it seems to be functioning properly, but when I clock in the client machines report the time to be different from that of the server by X number of hours. What is wrong? The most likely problem is that your server and client machines are set to different time zones. TimeClock Plus assumes the time from the server to be the correct time in the time zone where the computer is located. To correct this problem, ensure that both machines are set on the correct time zone. Please see your system administrator if you have any questions regarding this task. Why won’t my early and late clock restrictions work? You should first ensure that you have a schedule set up for the employee that you want to restrict. This is the only way that the computer knows that the employee is early or late. If there is a schedule for the employee, make sure that you have the settings correct under the Employee information…Scheduler Tab (see pg. 34). To assist in diagnosing the problem, use the view schedule function when clocking in to TimeClock Plus using the On-Screen TimeClock. This will display the schedule that the system is looking at to perform the rounding or restriction operation. What should I do when I get a database error or power failure while closing the week? The most important thing to remember is to not try to close the week again. When the week is closed, the current week’s data is removed from the main database and backed up. Attempting to close the same week twice will overwrite this information and the data may be lost. During the close operation the system creates recovery files that can be used to return the system to the state prior to the close. You should contact support for assistance in performing a recovery to ensure that no data will be lost. When employees clock in, some are asked for their job code while others are not. Why? TimeClock Plus will only ask the employee for a job code if they have more than one code configured as clockable in their employee record. If only one clockable job code is present, the system will automatically use it without asking the employee. I receive an error “Employee Number Not Found” when clocking in. Why? The most common reason for this error is the employee is using the incorrect employee number or incorrect badge. Make sure that the employee number and/or badge have the correct number. If the employee numbers are correct, verify that you are clocking in using the correct TimeClock Plus data directory. If everything appears to be correct, re-index from the TimeClock Manager to ensure that the index files are up to date. What is Job Costing (Job Costing Module)? The Job Cost Module is an inexpensive addition to TimeClock Plus. This flexible module allows a more detailed means of tracking employee time and attendance. Along with the added tracking feature are several additional reports, which are designed to show how much time has been spent on each job.

138 TimeClock Plus 4.0
A list of cost codes can be kept for each company configured in TimeClock Plus. These cost codes will be global to all employees and when an employee clocks into TimeClock Plus, they can be required to enter one of the codes. The job cost module adds more flexibility and allows the job codes to be used in a more generic fashion (leaving the detail to the cost codes). This module is activated through an activation key. It will add new reports and some new menu items. What is the purpose of the Scheduler? TimeClock Scheduler allows a manager to use the absence and tardy functions, schedule restrictions, and schedule rounding that are available in the TimeClock Plus software. The computer must know when the employee is supposed to be at work, and it references the schedules that you have created to do this. You may also print out master schedules to post for your employees to see, or for your own use. Can I use a long telephone cable to connect a Remote Data Terminal to the computer? Although the cable connectors appear identical, the twisting of the wire is not the same. Contact your sales representative at (800) 749-8463 for replacement or additional cable.
What is the longest length of cable that my Remote Date Terminal can use? The cables have been tested to be successful up to 1000 feet. If you are using an Ethernet terminal with Category 5 cable, the recommended maximum is 100 meters (approximately 300 feet) from the connection location. The time is the only item displaying on the Remote Data Terminal. Why? If the time is actually updating on the RDT screen, then the RDT has recently lost power. Check to make sure your power connections are secure. To refresh the screen, press the period key (.) on the keypad once. The Remote Data Terminal only says “Waiting for host”. Why? The RDT is waiting for a connection with the WinRemote software. Make sure the connections between the computer and terminal are secure. Make sure that the WinRemote software is running and the COM or Ethernet port that the Remote Data Terminal is connected to has been started. I want to run several Remote Data Terminals from one computer but I do not have enough communications ports. Is there anything that I can do? Multiple terminals can be run from a single PC by adding a multi-port communications board or by using Ethernet Remote Data Terminals instead of serial terminals. There are several multi-port serial cards available for Windows operating systems. These I/O boards will add more communications (COM ) ports to your PC. Once the board is installed, the extra COM ports will show up in the WinRemote software. Another solution is to purchase a USB-to-Serial converter. These are available from several computer vendors. They provide one serial port for each adaptor purchased. The WinRemote software stops working every night at the same time. What could be causing this? The most common cause for this is a scheduled task that is interfering with the operation of the WinRemote software. In some instances the problem can be due to server maintenance such as backup that are being performed at certain times. To alleviate this problem, scan the local workstation and the server for tasks that are being performed at the time of failure. Once isolated, reconfigure or disable them to prevent the interference. Does TimeClock Plus interface with my payroll package? TimeClock Plus interfaces with many payroll systems and interfaces are being developed on a daily basis. Call our sales department at (800) 749-8463 to see if we work with your system. If we do not, we will work with you to develop a payroll interface module that will meet your needs. I would like to e-mail reports to another location for printing. How can that be accomplished? When printing a report from TimeClock Plus, choose the Print to file option in the printer dialog. TimeClock Plus intercepts the request to print to file and generates a compressed report file based on the report that was created. This file can be e-mailed to another location and viewed or printed using the Report Printer application that is included with TimeClock Plus.

TimeClock Plus 4.0 139
Index
A
Absent, 31, 55, 78 Absent detail, 31 Access control, 73 Accounting software, 52 Accrual rules
Add, 69 Adding to an employee, 29 Edit, 69
Accruals, 23, 41 Examples, 72 Globally add, 40 Globally remove, 40 History, 31 Reset, 62 Summary, 41
Actual times, 41 Add shift, 41 Always on top, 116 Approaching Overtime Report, 51 Approval Manager, 46 Attendance Monitor, 55 Auto copy schedules, 77 Auto fill, 117 Automatic break deductions, 65
Disabling, 43, 92 Automatic clock out, 67 AutoUpdate, 1, 102, 135
Options, 103 Availability, 99
B
Backup, 63, 135 Badge, 135 Badge configuration, 110 Barcode software, 2 Biometrics, 121, 122, 129 Breaks, 13, 135
Automatic deductions, 65 Clocked, 66 Defaults, 80 Disable auto deduction, 43, 92 Minimums, 66, 80 Paid, 66 Rounding, 66 Segment, 66 Type, 66, 76 Unpaid, 66
C
Cable, 119, 138 Calculator, 13, 64 Calendar, 13, 64 Call List, 54, 56 Classification, 25 Clock In, 105, 115 Clock Out, 105, 115
Clockable, 26, 65 defined, 135
Clocked Breaks, 66 Close Week, 13, 23
From command line, 77 Reminders, 77
Company Data Directory, 21 ID, 20 Name, 20
Components. See Applications Converting data, 21 Cost Code, 13
Add, 67 defined, 135 Delete, 68 Description, 68 Edit, 67
Counts toward overtime, 26, 65, 135 Create Schedule, 87 Criteria, 85
Scheduling, 95 Cumulative hours, 31 Current Week, 24, 135
D
Daily Overall Schedule, 93 Filter, 94 Options, 94
Data Directory, 21, 135 Database Error, 137 Dates, 13 Default information, 37 Default job code, 26 Defaults, 75 Delete employee, 35 Delete schedule, 99
E
Earns overtime, 26, 40, 65 Edit hours, 40
Change history, 60 RDT Password, 82 Shift approval, 44
Edit Hours From Remote Data Terminal, 79 History, 45
E-Mail, 25 Employee
Accrual history, 31 Accruals, 29 Accruals summary, 41 Add, 24 Cumulative totals, 31 Default information, 37 Delete, 35 Edit, 24 Edit hours, 40 Global modification, 39

140 TimeClock Plus 4.0
Information, 25 Job codes, 26 Job Costing, 25 Messaging, 47 Move/Renumber, 36 Notes, 34 Overtime, 27 Photo, 33 Print information, 37 Raise history, 32 Restrictions, 29 Reviews, 32 Schedule, 41, 89 Schedule restrictions, 35 Template, 36
Employee Job Information Report, 52 Enroll employee, 133 Ethernet, 119 Excused, 31 Export, 135
Employee information, 38 Employee job information, 53 Job codes, 54 Pay period, 52 Raw hours, 46, 54 Schedules, 88
Export As, 68 Export Code, 25
F
Filter, 85 Fingerprint Manager, 133 Footers, 82 Force badge, 109 Force overtime, 27, 42, 43, 65, 92 Frequently Asked Questions, 137
G
Getting Started, 5 Global Modification, 39 Global Record Addition, 45 Glossary, 135
H
Hamster, 2, 129 History
Accruals, 31 Editing, 45 Hours worked, 45 Raises, 32
Holiday Calendar, 72 Holiday pay, 28 Hour Edit Log, 60
I
Import, 135 Employee Hours, 19 Employee Information, 15 Employee Job Information, 19
Schedules, 88 Index
Databases, 57 Schedule files, 100
Individual Schedule, 89 Install
Client, 6 Quick Setup Wizard, 6 Server, 5 Single User Version, 5
Installed software, 102
J
Job Code, 13, 26, 135 Add/Edit, 64 Auto out, 67 Delete, 67 Export, 67 Import, 67
Job Costing, 2, 81, 118, 137 Miscellaneous fields, 81 Status, 81
Job detail, 31
L
Labor Cost, 58, 77, 135 Scheduled, 101
Landscape, 51 Language files, 105 Last punch, 54 Launch Menu, 83 Linc module, 119 Locate, 11 Login, 19, 88 Logout, 19, 88
M
Management message, 48 Master Cost Code List, 67 Master Job Code List, 64 Messaging, 47
History, 48 Minor Tracking, 81 Miscellaneous Fields, 30 Move employee, 36
N
Necessary Shifts, 97 Add, 97 Build from schedule, 98 Copy, 97 Edit, 97 Re-build from schedule, 99
Notes, 34
O
On-Screen TimeClock, 2, 4, 44, 76, 78, 79, 82, 83, 107, 115, 130

TimeClock Plus 4.0 141
Configuration, 115 Open Schedule, 87 Open Shift, 135 Optimize, 58, 100 Override Log, 61 Overtime Calculations, 27
P
Passwords, 19, 82 Supervisor, 82
Pay Frequency, 135 Pay Period, 135 Pay rate. See rate Payroll Interface Module, 2 Payroll packages, 52 Period base date, 22 Permissions, 19, 73 Photo, 33 Port, 107, 113 Portrait, 51 Preferences, 75 Premium pay, 28, 76 Print employee information, 37 Program Directory, 136 Prompt file, 110
Q
Quick Add Hours, 45 Quick Setup Wizard, 6, 22
Accruals, 9 Employee Template, 9 Miscellaneous, 10 Pay Frequencies, 8 Tracked Fields, 8
QuickPunch, 109
R
Raise, 27 Rate, 26 RDT. See Remote Data Terminal Register, 103 Re-Index, 57 Reminders, 117 Remote Data Terminal, 105, 136
Biometric, 2 Configure, 108 Edit hours, 79, 82 Ethernet, 2, 111, 119 Frequently asked questions, 119 Locate, 111 Serial, 2 Serial Setup, 11 Troubleshooting, 120
Report Printer, 2 Reports
Approaching Overtime, 51 Employee Job Information, 52 Footers, 82 Pay period, 48 Scheduler, 95 Sorting, 50
Requests, 99 Requirements, 1 Reset Tracked Fields, 62 Restore, 63, 136 Restrictions, 29
Password, 82 Troubleshooting, 137
Reviews, 32 Rounding
To schedule, 35 without schedule, 29
S
Sales, 58 Schedule
Auto copy, 77 Availability, 99 Copy, 90 Delete, 99 Templates, 90 Transfer to manager, 100 Weekly, 92
Schedule criteria, 95 Schedule preferences, 88 Schedule restrictions, 35 Scheduled labor cost, 101 Scheduling a shift, 91 Serial Adaptor, 136 Serial Port, 136 Server, 136 Server address, 107 Server Type, 107 Service
Time server, 113 WinRemote, 108
Seventh day overtime, 28 Shift approval, 44 Shift note, 44 Shift Pool, 91
Add, 97 Edit, 97
Shifts, 13 Sick Job Code, 22 Split shift, 43 Startup delay, 111 Status Bar, 24 Supervisor, 19 Support, 103 Suspended, 25, 76
T
Tardy, 31, 78 Tardy detail, 31 TCP/IP, 136 Template, 36 Terminal. See Remote Data Terminal Termination date, 25 Test Badge, 109 Time Server, 1, 113, 118, 137 Time zone, 107 TimeClock. See On-Screen TimeClock TimeClock Manager, 1, 15

142 TimeClock Plus 4.0
TimeClock Scheduler, 1, 87 Times, 13 Tips, 79 Tool Bar, 24 Tracked Fields, 26, 65, 79 Transfer job information, 100 Troubleshooting, 137
WinRemote, 120
U
Updates, 102 Updating from disk, 102 USB to serial convertor, 138 User List, 73
V
Vacation Job Code, 22
W
Waiting for host, 138
Weekly Schedule, 92 Options, 93
Weeks to Schedule, 88 Welcome, 1 What's New, 3 Who's Absent, 55 Who's Here, 54 Wide Area Network, 120 WinRemote, 1, 4, 11, 83, 105, 107, 108, 109, 110, 111, 112,
118, 119, 120, 121, 125, 135, 136, 138 Activity, 111 Auto start port, 109 Beep on keypress, 109 Ethernet setup, 119 Frequently asked questions, 119 Locate terminal, 111 Port configuration, 108 Prompt files, 105 Service configuration, 108 Start port, 111 Stop port, 111 System configuration, 105 Time Server, 107 Troubleshooting, 120