Time Source Master Clock Administrator Guidekifri.fri.uniza.sk/~chochlik/epodpis/nCipher...
66
CIPHER ™ Time Source Master Clock Administrator Guide
Transcript of Time Source Master Clock Administrator Guidekifri.fri.uniza.sk/~chochlik/epodpis/nCipher...

C I PH E R™
Time Source Master Clock Administrator Guide
Time Source Master Clock Administrator Guide: v 3.0 2
C I PH E R™
Version: 3.0
Date: 10 August 2007
© Copyright 2007 nCipher Corporation Limited, Cambridge, United Kingdom.
Version: 3.0
Date: 10 August 2007
2007 nCipher Corporation Limited, Cambridge, United Kingdom. and
Neither the whole nor any part of the information contained in this document may be adapted or reproducedin any material or electronic form without the prior written consent of the copyright holder.nFast® and the nCipher logo are registered trademarks of nCipher Corporation Limited.All other trademarks are the property of the respective trademark holders.Information in this document is subject to change without notice.nCipher Corporation Limited makes no warranty of any kind with regard to this information, including, butnot limited to, the implied warranties of merchantability and fitness for a particular purpose. nCipherCorporation Limited shall not be liable for errors contained herein or for incidental or consequential damagesconcerned with the furnishing, performance or use of this material.
Commercial Computer Software - proprietaryThis computer software and documentation is Commercial Computer Software and Computer SoftwareDocumentation, as defined in sub-paragraphs (a)(1) and (a)(5) of DFAR § 252.227-7014, "Rights inNoncommercial Computer Software and Noncommercial Computer Software Documentation". Use,duplication or disclosure by the Government is subject to nCipher's standard US Terms And Conditions forthe Product.
PatentsUK Patent GB9714757.3. Corresponding patents/applications in USA, Canada, South Africa, Japan andInternational Patent Application PCT/GB98/00142.Other patents pending.
EMC complianceThe use of hand held or mobile radio equipment with a rated output power of 4W or more should not bepermitted within a radius of 2m of this equipment.
FCC class A noticeThis device complies with Part 15 of the FCC rules. Operation is subject to the following two conditions:
1 This device may not cause harmful interference, and
2 this device must accept any interference received, including interference that may cause undesiredoperation.
This equipment has been tested and found to comply with the limits for a Class A digital device, pursuant toPart 15 of the FCC Rules. These limits are designed to provide reasonable protection against harmfulinterference when the equipment is operated in a commercial environment. This equipment generates, uses,and can radiate radio frequency energy and, if not installed and used in accordance with the instruction manual,may cause harmful interference to radio communications. Operation of this equipment in a residential area islikely to cause harmful interference in which case the user will be required to correct the interference at hisown expense.
European class A noticeThis device has been tested and found to comply with the requirements of the EMC directive 89/336/EEC asa Class A product to be operated in a commercial environment at least 10m away from domestic televisionor radio. In a domestic environment this product may cause radio interference in which case the user may berequired to take adequate measures.

Time Source Master Clock Administrator Guide: 3.0 3
C I PH E R™Contents
Chapter 1: Introduction 6
About this manual 6
How the manual is organized 6
Online help 7
Release notes 8
Technical support 8
nCipher security announcements 8
Further reading 8
Parts list 9
Front panel controls 9
Rear panel connectors (GPS version) 10
Rear panel connectors (IRIG-B version) 11
TSMC security features 11
Chapter 2: Technology Overview 14
Background 14
Using a National Measurement Institute 14
Ensuring accuracy and integrity 14
How the TSMC Works 15
About the HSM 15
DS/NTP 15
Security World 16
The role of the TSMC in an organization 17
Legislation and compliance 18
Chapter 3: Hardware Installation 19
Before you install 19
Electrical requirements 20
Temperature and humidity recommendations 20
Assembling the GPS antenna 20
Antenna assembling procedure 21
Positioning the GPS antenna 22
Booting the GPS receiver 22
Mounting in a rack 23
Time Source Master Clock Administrator Guide: 3.0 4
C I PH E R™
Chapter 4: Software Configuration 25
Setting network parameters 25
TSMC user accounts 26
Setting up a Security World 26
The nfast user shell menu 29
Accessing the web interface 30
Changing the administrator password 31
Chapter 5: Managing the TSMC 32
The TSMC web-based user interface 32
DS/NTP certification 32
Initiating a CSR 32
Adding the certificate to the identity CA store 33
Fulfilling the CSR 33
Managing DS/NTP system settings 33
Checking certification status 34
Lower clock audits 34
Configuring lower clock settings 36
Performing an immediate lower clock audit 36
Updating certificates 37
Upper clock audits 37
Network management 38
Security management 39
Controlling access to the web interface 39
Locking the front panel 39
Releasing USB port 40
TSMC log files 40
Managing SSH, HTTPS, and NTP keys 41
Event notification management 42
Sending test notifications 44
Saving SNMP MIB files 45
Restoring TSMC factory defaults 45
Factory reset from the web interface 45
Factory reset from the front panel 45
NTP management 46
NTP overview 46
NTP configuration 46
Autokey – Generating a new NTP public key 47

Time Source Master Clock Administrator Guide: 3.0 5
C I PH E R™
Saving the NTP drift file 47
Appendix A:Troubleshooting 49
Port mismatch 49
Invalid certificates 49
Error messages 50
Appendix B:Upgrade Instructions 51
Updating TSMC software 51
Updating the HSM firmware 51
Appendix C:TSMC Specifications 52
Appendix D:Port Settings 54
Appendix E:Example Security World Script 55
Appendix F:HSM error codes 60
Reading Morse codes 60
Runtime library errors 60
Hardware driver errors 61
Maintenance mode errors 64
Operational mode errors 64
nCipher addresses 66

Time Source Master Clock Administrator Guide: 3.0 6
C I PH E R™Chapter 1: Introduction
About this manual
This manual is a complete guide to installing, configuring and troubleshooting nCipher’s Time Source Master Clock (TSMC). The guide has been written for Network Security Officers and Network Administrators (and Operators who are familiar with network operations), and covers both GPS/1PPS and IRIG-B time code versions of the TSMC.
Figure 1 nCipher Time Source Master Clock
How the manual is organized
The manual is organized as follows:
• Technology Overview on page 14 provides background information on the TSMC and describes its role within an organization in ensuring a reliable and trustworthy source of time. You can also find details of how the TSMC works and information on Security World and the DS/NTP protocol, an authenticated and secure time distribution protocol.
• Hardware Installation on page 19, provides details of how to install the TSMC hardware, and includes information on where to locate the GPS antenna for better signal reception.
• Software Configuration on page 25, provides details on how to specify network parameters, create user accounts, and set up a Security World, nCipher's secure framework for managing and protecting cryptographic keys.
Time Source Master Clock Administrator Guide: 3.0 7
C I PH E R™ Online help
• Managing the TSMC on page 32, provides information on DS/NTP, audit, network, security, event notification and NTP management.
• Troubleshooting on page 49, provides details of issues that you might encounter and possible solutions for resolving them.
• Upgrade Instructions on page 51, provides details on how to upgrade TSMC firmware.
• TSMC Specifications on page 52, provides specification details for the TSMC.
• Port Settings on page 54, provides details of the ports used by the TSMC.
• HSM error codes on page 60, provides a list of HSM (Hardware Security Module) error codes, their meanings and the action to take to resolve the error. The HSM is a hardware component of the TSMC. Its role is to protect the encryption keys and applications running on the TSMC.
• nCipher addresses on page 66, provides contact information for nCipher.
nCipher licence information for this product is available in license.txt, which is available by clicking View Licence information on the web interface Help page.
Online help
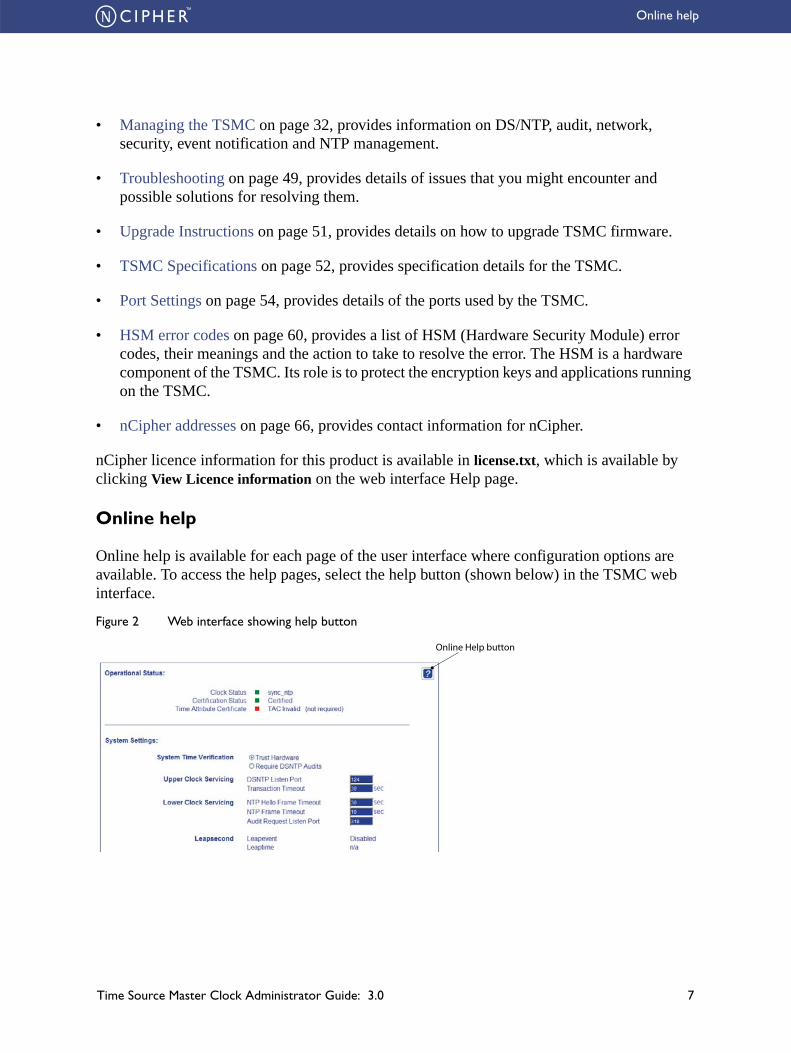
Online help is available for each page of the user interface where configuration options are available. To access the help pages, select the help button (shown below) in the TSMC web interface.
Figure 2 Web interface showing help button
Online Help button

Time Source Master Clock Administrator Guide: 3.0 8
C I PH E R™ Release notes
Release notes
Important late-breaking information that did not make it into the main TSMC manual, known issues, and details of what's new are documented in the TSMC Release Notes, available on the Help page of the web interface.
Technical support
nCipher technical support for issues relating to the TSMC is available from the following e-mail address: [email protected]. When contacting support, provide as much information about the issue as possible, including system version information and any log files which might help to diagnose the issue.
nCipher security announcements
From time to time nCipher issues security advisories for its products. If you would like to receive these security advisories, send an e-mail with the single word subscribe in the message body to [email protected].
Further reading
For more information on some of the security concepts discussed in the manual, you may wish to refer to the following guides, available from http://www.ncipher.com/resources/white_papers
Title Reference
Security World Examination of nCipher's core key management framework.
Secure Execution Engine (SEE) Protecting sensitive application code inside tamper-resistant hardware.
Protecting Electronic Documents Electronic audit trails require deployment of safeguards to preserve integrity and authenticity. This paper examines the application of technology to address these challenges.
Security in an Island World Examination of nCipher's core key management framework.

Time Source Master Clock Administrator Guide: 3.0 9
C I PH E R™ Parts list
Parts list
Front panel controls
1 Mounting holes for 19” cabinet (when rack mounting ears are attached)
2 Liquid crystal display (LCD)
3 F1: Help and additional information
4 F2: When pressed on the default display, it shows an overview of TSMC network parameters. On other screens it is used to confirm certain critical actions, such as when rebooting the server.
5 Arrow buttons: select menu item or change value of parameters
GPS satellite anten
m
e
h
c
i
j
b
d
k
al
g
f
T i m e S e r v i c e
R e f . T i m e N e t w o r k A l a r m
T e r m i n a l
U S B
F 1
F 2 O K
E S C
T i m e S o u r c e M a s t e r C l o c k
Time Source Master C
lock
Quick Start
security and speed for Internet commerce
a.
b.
c.
d.
e.
f.
g.
h.
i.
j.
k.
l.
m.
Time Source Master Clock (TSMC)
Smart card reader
Blank smart cards (5), including Activator (fet) card
Rack mounting kit
Accessories (feet etc.)
Country-specific power lead
Quick Start poster
GPS antenna
Antenna cable (~20 meters)
Antenna pole
Wall-mounting kit
Pole-mounting kit
Antenna pole clamps and fixings
GPS/IPPS unit only parts
Time ServiceRef. Time
NetworkAlarm
Terminal
USB
F1
F2
OK
ESC
Time SourceMaster Clock
1 2
3
4 5
6
7
8 9
10
Time Source Master Clock Administrator Guide: 3.0 10
C I PH E R™ Rear panel connectors (GPS version)
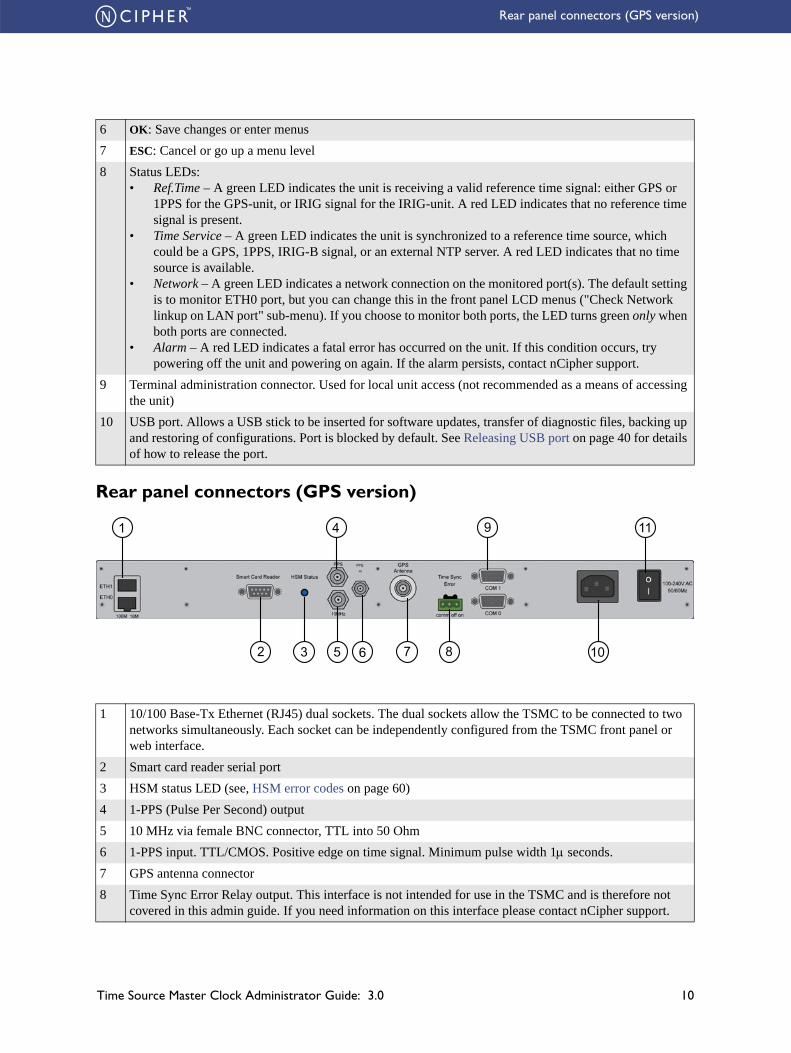
Rear panel connectors (GPS version)
6 OK: Save changes or enter menus
7 ESC: Cancel or go up a menu level
8 Status LEDs:• Ref.Time – A green LED indicates the unit is receiving a valid reference time signal: either GPS or
1PPS for the GPS-unit, or IRIG signal for the IRIG-unit. A red LED indicates that no reference time signal is present.
• Time Service – A green LED indicates the unit is synchronized to a reference time source, which could be a GPS, 1PPS, IRIG-B signal, or an external NTP server. A red LED indicates that no time source is available.
• Network – A green LED indicates a network connection on the monitored port(s). The default setting is to monitor ETH0 port, but you can change this in the front panel LCD menus ("Check Network linkup on LAN port" sub-menu). If you choose to monitor both ports, the LED turns green only when both ports are connected.
• Alarm – A red LED indicates a fatal error has occurred on the unit. If this condition occurs, try powering off the unit and powering on again. If the alarm persists, contact nCipher support.
9 Terminal administration connector. Used for local unit access (not recommended as a means of accessing the unit)
10 USB port. Allows a USB stick to be inserted for software updates, transfer of diagnostic files, backing up and restoring of configurations. Port is blocked by default. See Releasing USB port on page 40 for details of how to release the port.
1 10/100 Base-Tx Ethernet (RJ45) dual sockets. The dual sockets allow the TSMC to be connected to two networks simultaneously. Each socket can be independently configured from the TSMC front panel or web interface.
2 Smart card reader serial port
3 HSM status LED (see, HSM error codes on page 60)
4 1-PPS (Pulse Per Second) output
5 10 MHz via female BNC connector, TTL into 50 Ohm
6 1-PPS input. TTL/CMOS. Positive edge on time signal. Minimum pulse width 1µ seconds.
7 GPS antenna connector
8 Time Sync Error Relay output. This interface is not intended for use in the TSMC and is therefore not covered in this admin guide. If you need information on this interface please contact nCipher support.
1
2 3
4
5 6 7 8
9
10
11
Time Source Master Clock Administrator Guide: 3.0 11
C I PH E R™ Rear panel connectors (IRIG-B version)
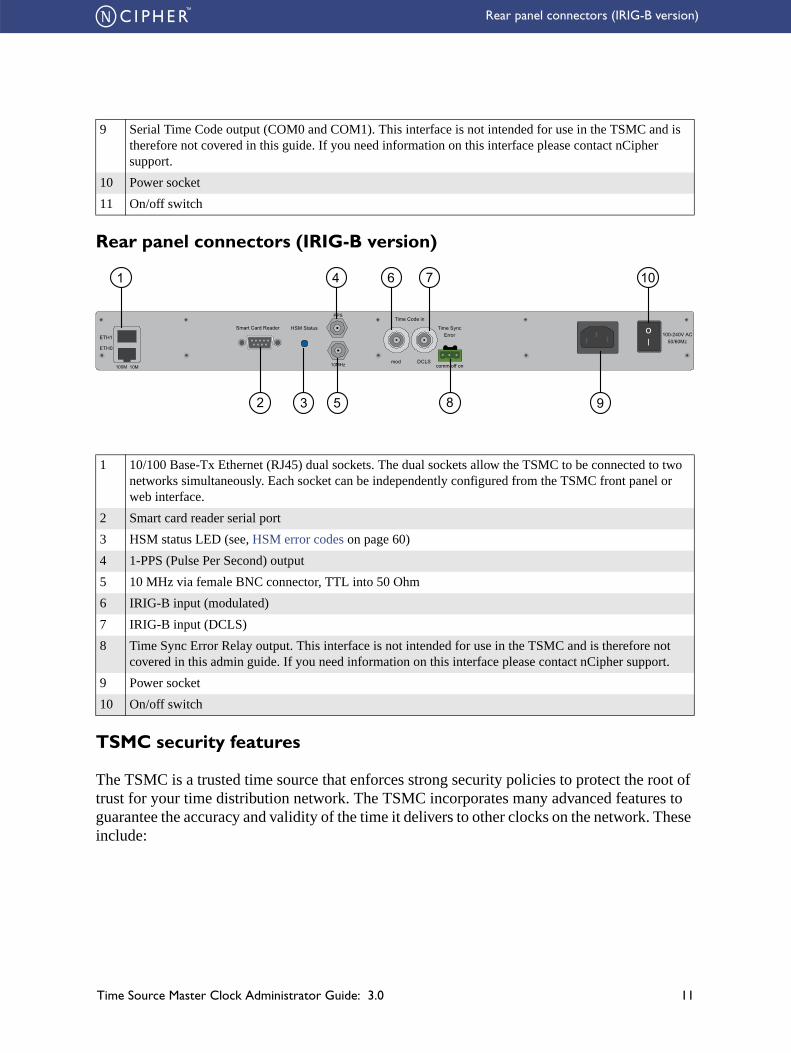
Rear panel connectors (IRIG-B version)
TSMC security features
The TSMC is a trusted time source that enforces strong security policies to protect the root of trust for your time distribution network. The TSMC incorporates many advanced features to guarantee the accuracy and validity of the time it delivers to other clocks on the network. These include:
9 Serial Time Code output (COM0 and COM1). This interface is not intended for use in the TSMC and is therefore not covered in this guide. If you need information on this interface please contact nCipher support.
10 Power socket
11 On/off switch
1 10/100 Base-Tx Ethernet (RJ45) dual sockets. The dual sockets allow the TSMC to be connected to two networks simultaneously. Each socket can be independently configured from the TSMC front panel or web interface.
2 Smart card reader serial port
3 HSM status LED (see, HSM error codes on page 60)
4 1-PPS (Pulse Per Second) output
5 10 MHz via female BNC connector, TTL into 50 Ohm
6 IRIG-B input (modulated)
7 IRIG-B input (DCLS)
8 Time Sync Error Relay output. This interface is not intended for use in the TSMC and is therefore not covered in this admin guide. If you need information on this interface please contact nCipher support.
9 Power socket
10 On/off switch
ol
Time Code in
Time SyncError
mod DCLS10MHz
PPS
HSM StatusSmart Card Reader
ETH1
ETH0
100M 10M comm off on
100-240V AC50/60Mz
1
2 3
4
5 8 9
106 7
Time Source Master Clock Administrator Guide: 3.0 12
C I PH E R™ TSMC security features
DS/NTP:
The DS/NTP protocol is an enhancement to NTP (Network Time Protocol). It provides strong levels of authentication of both parties involved in an NTP exchange by incorporating a two-way authentication process based on Public Key Infrastructure (PKI). This process is critical for maintaining a high level of integrity in the 'trusted time' environment.
Hardware Security Module (HSM):
Provides HSM hardware key management for the DS/NTP identity key, and hardware random number and key generation for cryptographic operations.
Note In the unlikely event that an error occurs on the HSM, the HSM LED on the rear of the unit will flash the Morse distress code (SOS: three short pulses, followed by three long pulses, followed by three short pulses). The Morse distress code is then followed by one of the error codes listed in the tables shown in HSM error codes on page 60.
No root login
Root login is not permitted on the TSMC. In its place the nfast user shell allows the user to configure advanced security options, such as Security World.
Tamper-evident seals
Tamper-evident seals prevent user access to the internal components of the TSMC.
Automated auditing and calibration of time synchronization:
At the end of the process, the TSMC issues a signed certificate attesting to the calibration and traceability of the time. This certificate may form part of a chain of such certificates, held by a Root Time Authority providing traceability of time used in a TSS (Time Stamp Server) time-stamp to a nationally recognized source of UTC (such as a National Measurement Institute).
Use of public certificates:
The TSMC uses public Certification Authority (CAs) certificates to authenticate master clocks, subordinate devices, and to audit records.
Web interface supporting secure connections:
The TSMC can be accessed from any computer using a web browser over a secure connection (HTTPS).
Time Source Master Clock Administrator Guide: 3.0 13
C I PH E R™ TSMC security features
Signed firmware updates:
Firmware releases for the TSMC are issued in the form of signed firmware updates. See Updating the HSM firmware on page 51 for details on how to upgrade firmware.
NTP functionality:
The TSMC can serve as a Stratum-1 clock on an NTP hierarchy when connected to a GPS, 1PPS, or IRIG-B reference time source.
Time Source Master Clock Administrator Guide: 3.0 14
C I PH E R™Chapter 2: Technology Overview
Background
nCipher’s Time Source Master Clock (TSMC) is a network appliance for securely distributing accurate time throughout an organization. The TSMC is a trusted time source that enforces strong security policy to protect the root of trust for the time distribution network. Incorporating a FIPS 140-2 Level 3 validated HSM and deploying an authenticated and secure time distribution protocol, DS/NTP, ensures the secure delivery of auditable time to multiple Time Stamp Server (TSS) devices from a single reference time source.
The TSMC also serves as an intermediate node for the acquisition and distribution of Coordinated Universal Time (UTC). This allows organizations to provide traceability to official UTC time for every time-stamp issued across the extended enterprise and beyond. The global availability and precision of UTC time makes it the ideal source of time for trustworthy time-stamps.
Note Tracing time back to a UTC time source requires a hierarchy of trusted master clock devices. Depending on the model, the TSMC can use the GPS (Global Positioning System), 1PPS (one pulse per second), IRIG-B (Inter-range instrumentation group B time code), another master clock, or another NTP server as its reference time source.
Using a National Measurement Institute
Many countries around the world set their official time to a clock or clocks operated by their own National Measurement Institute, or NMI. By international agreement, the NMIs maintain audit records of their synchronization with UTC (as regulated by the International Bureau of Weights and Measures), thus providing verifiable sources of UTC time within their countries. These clocks are calibrated to be within microseconds of UTC time.
Ensuring accuracy and integrity
Local computer time is easy to change, standard NTP communications are insecure and wireless transmissions are open to compromise. A secure and verifiable pathway to a trusted source of time is an essential prerequisite for time-stamps and business processes. To maintain the integrity of time values, the TSMC incorporates the following security mechanisms:
Country Name of NMI Abbreviation
United Kingdom National Physical Laboratory NPL
France Laboratoire Primaire du Temps et des Fréquences
LPTF
United States National Institute of Standards and Technology
NIST
Japan National Institute of Information and Communications Technology
NICT
Time Source Master Clock Administrator Guide: 3.0 15
C I PH E R™ How the TSMC Works
• A secure transport protocol, called DS/NTP, that incorporates mutual authentication to establish a secure link to a time-stamp appliance or to a secure root clock at a Root Time Authority. The cryptographic keys used in this authentication process are secured in a FIPS 140-2 Level 3 Hardware Security Module, ensuring that time values cannot be compromised in transit. FIPS is an abbreviation for Federal Information Processing Standards.
• DS/NTP incorporates an automatic process of auditing and calibration to synchronize time. At the end of the process the TSMC issues a signed certificate attesting to the calibration and traceability of the time. This certificate may form part of a chain of such certificates, held by a Root Time Authority providing traceability of time used in a TSS time-stamp to a nationally recognized source of UTC (such as a National Measurement Institute). The signing keys used in this process are protected by a FIPS 140-2 Level 3 HSM.
How the TSMC Works
The TSMC acquires time from a GPS, 1PPS, or IRIG-B reference signal. Alternatively, the TSMC can be configured to acquire time from an NTP server. After the TSMC is synchronized to the reference signal, the TSMC can audit lower clocks (Time-Stamp Servers or other TSMCs) over DS/NTP. When this lower clock measurement is complete, the TSMC can issue a Time Attribute Certificate (TAC), which attests to the measurement data and source of time. The TSMC maintains time internally to a high degree of accuracy, with a low degree of drift, using a high quality internal oscillator. This allows the TSMC to synchronize very accurately to the reference time signal and allows the TSMC to continue to audit lower clocks if the reference signal is lost for a short period of time. (If the reference signal is lost, the TSMC will continue to operate for 3 days. This “trust time period” can be configured by the TSMC administrator.)
About the HSM
At the heart of the TSMC is an nCipher Hardware Security Module, or HSM. The HSM generates and manages the DS/NTP Identity key pair, key exchange keys, and random numbers for cryptographic operations. The HSM meets internationally recognized FIPS 140-2 level 3 standards. The HSM’s FIPS validation helps deliver confidence that the HSM protects the security of your private keys.
DS/NTP
DS/NTP is an enhancement to the Network Time Protocol (NTP) [RFC 1305] that incorporates two-way PKI-based authentication and formal audit mechanisms to enable reliable measurement of remote clocks.

Time Source Master Clock Administrator Guide: 3.0 16
C I PH E R™ How the TSMC Works
The DS/NTP authentication framework is based on the Transport Layer Security (TLS) protocol [RFC-2246]. The handshake mechanism is based on the TLS handshake and the calculations that are performed to create session-keying material are almost identical.
The goal of this protocol is to provide strong levels of authentication of both parties involved in an NTP exchange. This high authentication level is critical to maintaining a high level of integrity in trusted time.
Security World
Although designing secure cryptographic algorithms and protocols is not easy, there is a large body of academic research to rely upon. Keeping the keys secret is much harder, and key management is the hardest part of cryptography. nCipher has developed a paradigm, or construct, called a Security World, that provides secure life-cycle management for keys. Key management involves the procedures and protocols, both manual and automated, that are used throughout the entire life cycle of cryptographic keys. These procedures and protocols include the generation, distribution, use, storage, destruction, and optional archiving and disaster recovery of cryptographic keys.
A Security World consists of:
• The HSM; a secure hardware component built into the TSMC.
• An Administrator Card Set, or ACS, that is used to control access to Security World configuration and recovery operations. (Security Worlds compliant with the Federal Information Processing Standards (FIPS) 140-2 at level 3 require the use of smart cards to authorize most operations). Recovery data is protected by the cryptographic keys on the ACS.
• An Operator Card Set, or OCS, that is used to control access to application keys. (Security Worlds compliant with the Federal Information Processing Standards (FIPS) 140-2 at level 3 require the use of smart cards to authorize most operations). Working data is protected by cryptographic keys on an OCS or the HSM, or both.
• Some cryptographic key and certificate data that is encrypted using the Security World key and stored in the HSM.
FIPS 140-2 level 3 compliance
The FIPS 140-2 level 3 option is included for those customers who have a regulatory requirement for compliance with FIPS 140-2 at level 3.
If you choose to create a Security World that complies with FIPS 140- 2 level 3, the module initializes in strict-FIPS mode. This option ensures that the module complies with the roles and services, key management, and self-test sections of FIPS 140-2 at level 3, as described in its
Time Source Master Clock Administrator Guide: 3.0 17
C I PH E R™ The role of the TSMC in an organization
validation certificate. Strict-FIPS also disables HSM algorithms that are not FIPS approved, such as MD5. For more details of the FIPS 140-2 validation, see http://csrc.nist.gov/cryptval/140-2.htm/.
The role of the TSMC in an organization
The validity of today's business systems and processes depends on their use of trustworthy and standardized time. In an increasingly connected world, network systems and tools must all reference a common and accurate time source if they are to interoperate successfully. For example, in the business world, discrepancies between computer clocks may lead to transactions being recorded before the start of the trading day or money being credited to an account before it is withdrawn from another. Also, on a technical level, many leading edge technologies, such as VoIP, rely upon synchronized time, and many security protocols depend on accurate time synchronization between the computers that are participating in the authentication request.
The TSMC can play a critical role in ensuring that the integrity and accuracy of time is maintained throughout the organization.
Large organizations may choose to deploy a TSMC as a central, internal time source for multiple Time Stamp Server devices. Such enterprises may already have well established procedures for the acquisition of time, and the TSMC can be configured to use an existing organizational time source as its primary reference for secure time distribution. Alternatively, some organizations may require an audit record of periodic calibration to UTC time. In this situation a DS/NTP connection from an internal TSMC to a Root Time Authority can provide a certified record of synchronization to a recognized source of UTC time.
Time Source Master Clock Administrator Guide: 3.0 18
C I PH E R™ The role of the TSMC in an organization
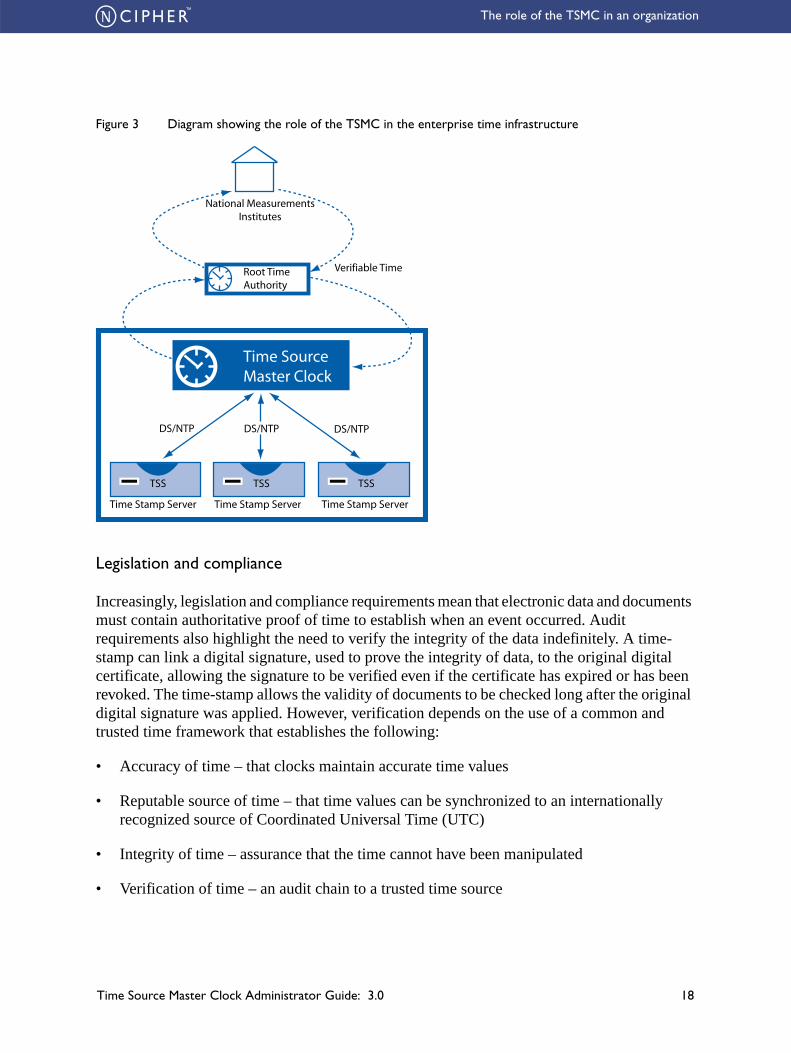
Figure 3 Diagram showing the role of the TSMC in the enterprise time infrastructure
Legislation and compliance
Increasingly, legislation and compliance requirements mean that electronic data and documents must contain authoritative proof of time to establish when an event occurred. Audit requirements also highlight the need to verify the integrity of the data indefinitely. A time-stamp can link a digital signature, used to prove the integrity of data, to the original digital certificate, allowing the signature to be verified even if the certificate has expired or has been revoked. The time-stamp allows the validity of documents to be checked long after the original digital signature was applied. However, verification depends on the use of a common and trusted time framework that establishes the following:
• Accuracy of time – that clocks maintain accurate time values
• Reputable source of time – that time values can be synchronized to an internationally recognized source of Coordinated Universal Time (UTC)
• Integrity of time – assurance that the time cannot have been manipulated
• Verification of time – an audit chain to a trusted time source
TSS TSS TSS
DS/NTP DS/NTP DS/NTP
Time Stamp Server Time Stamp Server Time Stamp Server
Time SourceMaster Clock
Root TimeAuthority
Verifiable Time
National MeasurementsInstitutes
Time Source Master Clock Administrator Guide: 3.0 19
C I PH E R™Chapter 3: Hardware Installation
Before you install
Caution! Please note the following warnings before installing the TSMC:
Warning: This product must be earthed.
Attention: Le système doit être mis à la terre conformément aux prescriptions.
Vorsicht: Das System muss stets vorschriftsmäßig geerdet sein.
To prevent electrical shock or injury, DO NOT remove the cover of the TSMC. Dangerous voltages exist within this enclosure.
There are no user-serviceable parts inside the module. Any attempt to break the seals which have been fitted to restrict access, or to dismantle the module in any way, results in any remaining warranty cover, the maintenance and support agreement, or both rendered void.
Please retain all parts of the module packaging, including the outer (brown) shipping carton. Your warranty or maintenance agreement does not cover units that are damaged because they are shipped in inadequate packaging.
Use the TSMC within the physical environment described in Temperature and humidity recommendations on page 20.
Attempting to use the TSMC in suboptimal operating environments negatively affects performance and reliability.
Connect the TSMC to an easily accessible socket outlet.
nCipher recommends that you install the TSMC in a physically secure location that has strong physical access controls, on a network that is protected by a firewall. Also, read the operating environment requirements and other specifications included with this product before installing.
Time Source Master Clock Administrator Guide: 3.0 20
C I PH E R™ Electrical requirements
Electrical requirements
The TSMC uses external AC power and uses up to 300mA at 110/230V 60/50Hz. The TSMC has a country-specific power cable supplied with a PH-386, IEC 320-C-13 three-conductor female connector on the TSMC end.
Temperature and humidity recommendations
For optimal performance nCipher recommends operating the TSMC unit within the following temperature and humidity parameters:
• Ambient operating temperature: 0°C to 50°C (32°F to 122°F), subject to sufficient airflow.
• Storage temperature: -20°C to 60°C (-4°F to 140°F)
• Operating humidity: 85% maximum.
• Storage humidity: 0% to 95% (relative) non-condensing at 35°C (95°F)
After installing the unit ensure the vent holes remain clear of obstructions.
Assembling the GPS antenna
Applicable to the GPS version of the TSMC unit only. These instructions can also be found on the Quick Start poster supplied with the TSMC.
Time Source Master Clock Administrator Guide: 3.0 21
C I PH E R™ Assembling the GPS antenna
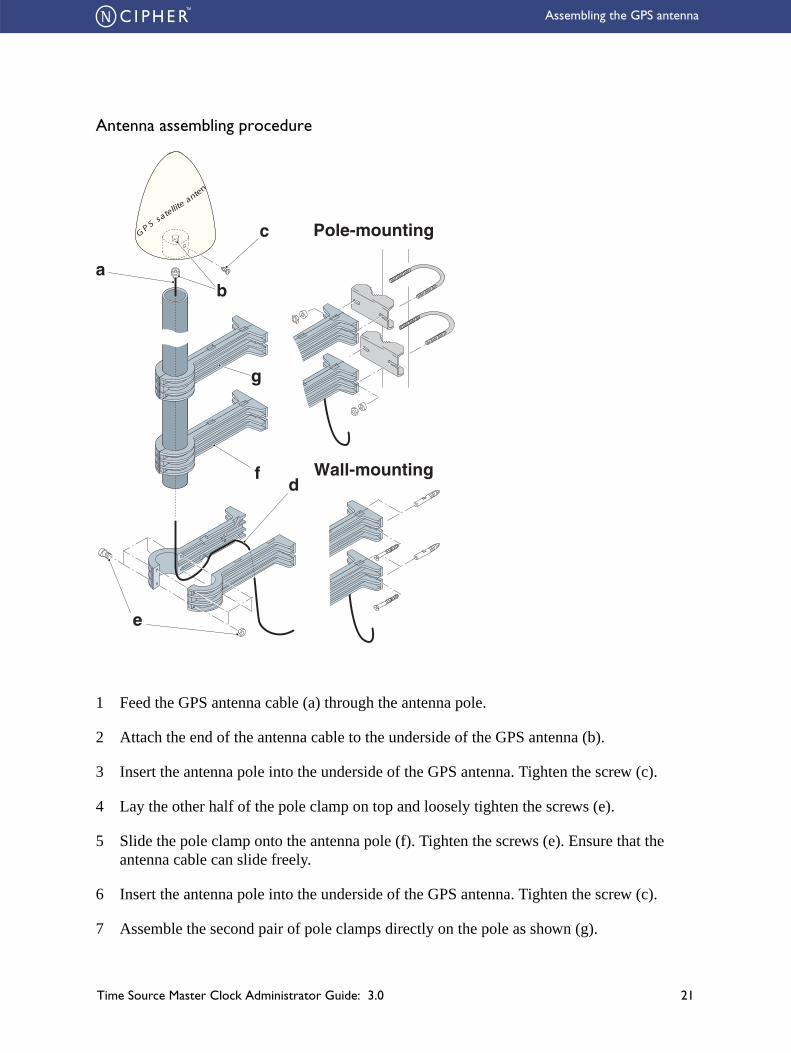
Antenna assembling procedure
1 Feed the GPS antenna cable (a) through the antenna pole.
2 Attach the end of the antenna cable to the underside of the GPS antenna (b).
3 Insert the antenna pole into the underside of the GPS antenna. Tighten the screw (c).
4 Lay the other half of the pole clamp on top and loosely tighten the screws (e).
5 Slide the pole clamp onto the antenna pole (f). Tighten the screws (e). Ensure that the antenna cable can slide freely.
6 Insert the antenna pole into the underside of the GPS antenna. Tighten the screw (c).
7 Assemble the second pair of pole clamps directly on the pole as shown (g).
GP S satellite
antne
GP S satellite
antne
GP S satellite
anten
d
e
a
Wall-mounting
b
c
f
g
Pole-mounting
Time Source Master Clock Administrator Guide: 3.0 22
C I PH E R™ Assembling the GPS antenna
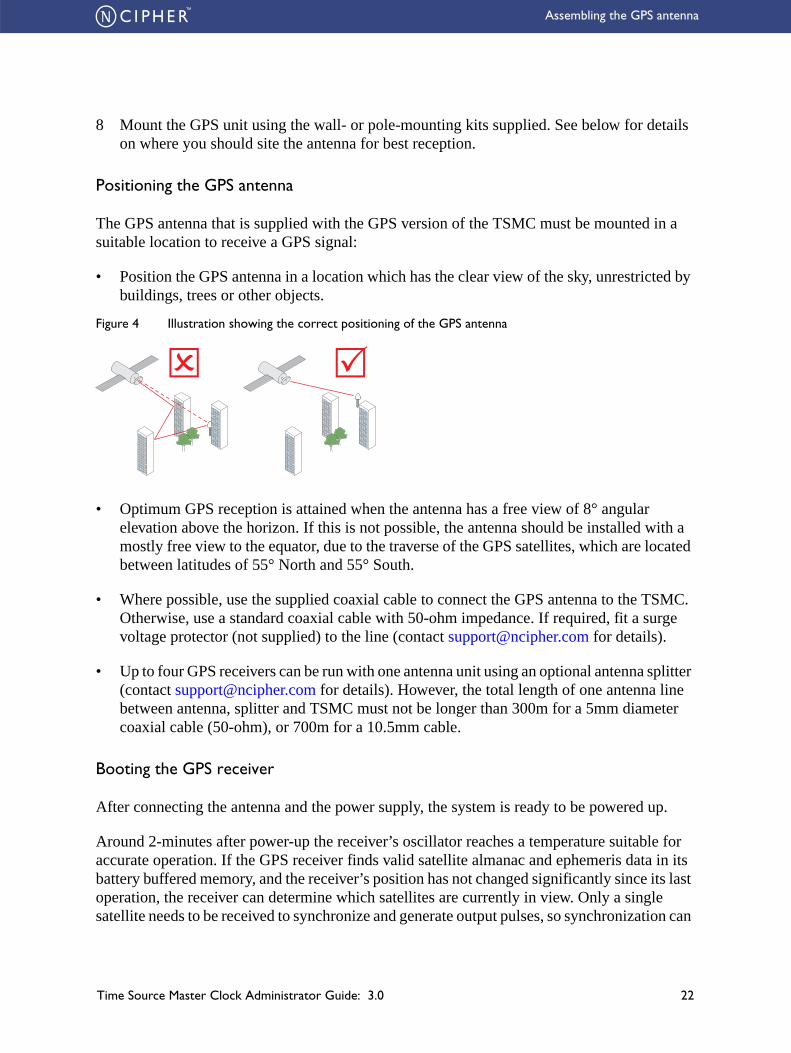
8 Mount the GPS unit using the wall- or pole-mounting kits supplied. See below for details on where you should site the antenna for best reception.
Positioning the GPS antenna
The GPS antenna that is supplied with the GPS version of the TSMC must be mounted in a suitable location to receive a GPS signal:
• Position the GPS antenna in a location which has the clear view of the sky, unrestricted by buildings, trees or other objects.
Figure 4 Illustration showing the correct positioning of the GPS antenna
• Optimum GPS reception is attained when the antenna has a free view of 8° angular elevation above the horizon. If this is not possible, the antenna should be installed with a mostly free view to the equator, due to the traverse of the GPS satellites, which are located between latitudes of 55° North and 55° South.
• Where possible, use the supplied coaxial cable to connect the GPS antenna to the TSMC. Otherwise, use a standard coaxial cable with 50-ohm impedance. If required, fit a surge voltage protector (not supplied) to the line (contact [email protected] for details).
• Up to four GPS receivers can be run with one antenna unit using an optional antenna splitter (contact [email protected] for details). However, the total length of one antenna line between antenna, splitter and TSMC must not be longer than 300m for a 5mm diameter coaxial cable (50-ohm), or 700m for a 10.5mm cable.
Booting the GPS receiver
After connecting the antenna and the power supply, the system is ready to be powered up.
Around 2-minutes after power-up the receiver’s oscillator reaches a temperature suitable for accurate operation. If the GPS receiver finds valid satellite almanac and ephemeris data in its battery buffered memory, and the receiver’s position has not changed significantly since its last operation, the receiver can determine which satellites are currently in view. Only a single satellite needs to be received to synchronize and generate output pulses, so synchronization can
� �
Time Source Master Clock Administrator Guide: 3.0 23
C I PH E R™ Mounting in a rack
be achieved a maximum of one minute after power-up if the unit has not been moved to a new location, in which case the unit might need to acquire fresh satellite data, a process known as a warm boot, and take upwards of 12 minutes to boot fully.
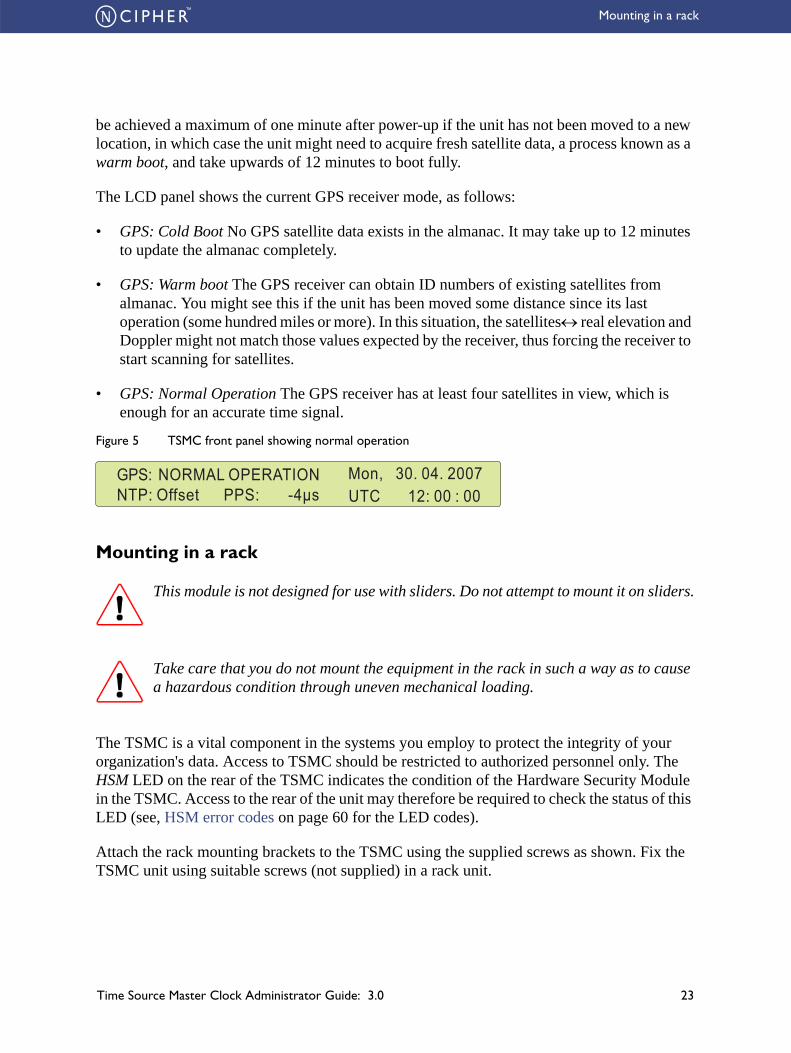
The LCD panel shows the current GPS receiver mode, as follows:
• GPS: Cold Boot No GPS satellite data exists in the almanac. It may take up to 12 minutes to update the almanac completely.
• GPS: Warm boot The GPS receiver can obtain ID numbers of existing satellites from almanac. You might see this if the unit has been moved some distance since its last operation (some hundred miles or more). In this situation, the satellites↔ real elevation and Doppler might not match those values expected by the receiver, thus forcing the receiver to start scanning for satellites.
• GPS: Normal Operation The GPS receiver has at least four satellites in view, which is enough for an accurate time signal.
Figure 5 TSMC front panel showing normal operation
Mounting in a rack
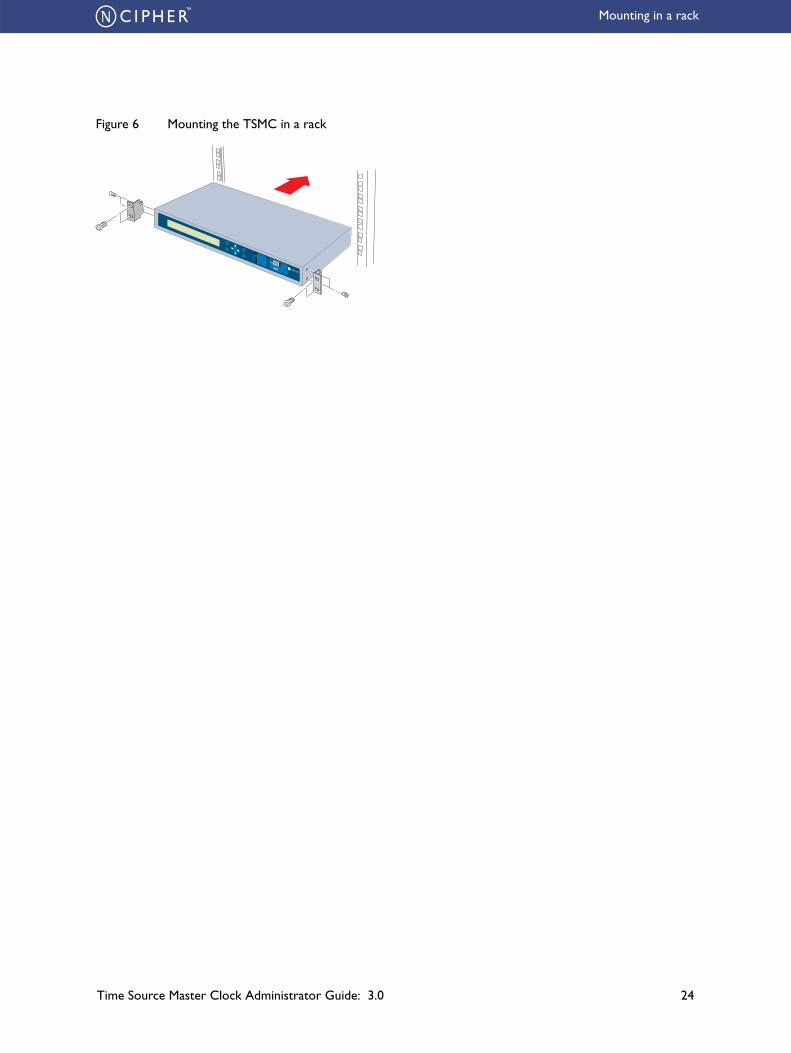
This module is not designed for use with sliders. Do not attempt to mount it on sliders.
Take care that you do not mount the equipment in the rack in such a way as to cause a hazardous condition through uneven mechanical loading.
The TSMC is a vital component in the systems you employ to protect the integrity of your organization's data. Access to TSMC should be restricted to authorized personnel only. The HSM LED on the rear of the TSMC indicates the condition of the Hardware Security Module in the TSMC. Access to the rear of the unit may therefore be required to check the status of this LED (see, HSM error codes on page 60 for the LED codes).
Attach the rack mounting brackets to the TSMC using the supplied screws as shown. Fix the TSMC unit using suitable screws (not supplied) in a rack unit.
GPS: NORMAL OPERATIONNTP: Offset PPS: -4µs UTC 12: 00 : 00
Mon, 30. 04. 2007
Time Source Master Clock Administrator Guide: 3.0 24
C I PH E R™ Mounting in a rack
Figure 6 Mounting the TSMC in a rack
Time Source Master Clock Administrator Guide: 3.0 25
C I PH E R™Chapter 4: Software Configuration
Setting network parameters
To communicate with Time Stamp Servers, PCs and workstations on a network, the TSMC must have a valid IP address and subnet mask. A gateway server address may also be required if the TSMC needs to communicate with devices on other networks.
Today it is common for networks to employ a DHCP server to automatically assign these network parameters. In this case, you can simply connect your TSMC to the network and the IP address, subnet mask and gateway will be dynamically assigned to it by the server. However, depending on how your DHCP has been configured, it should be noted that the addresses may change each time you restart the TSMC, which may not be suitable for you requirements. To set the network parameters manually, and assign a static IP address, use the front panel controls, as described below. Your network administrator will be able to advise you on what network parameters to use.
To manually assign a static IP address, subnet mask and gateway to the TSMC:
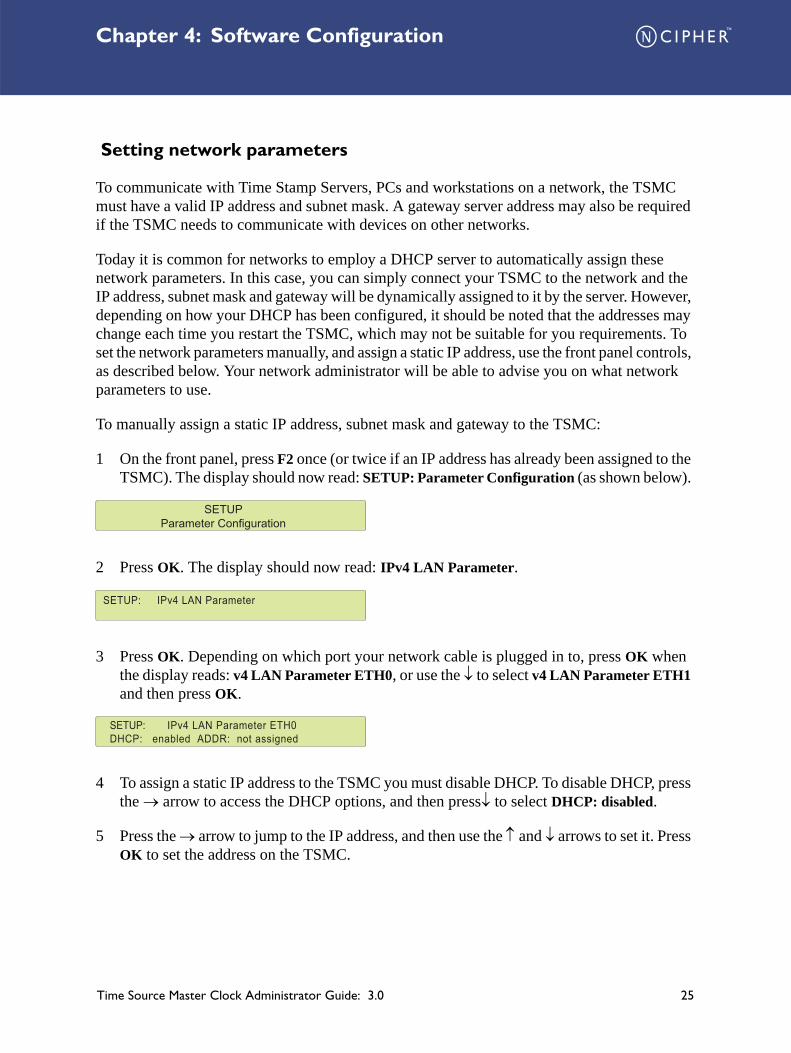
1 On the front panel, press F2 once (or twice if an IP address has already been assigned to the TSMC). The display should now read: SETUP: Parameter Configuration (as shown below).
2 Press OK. The display should now read: IPv4 LAN Parameter.
3 Press OK. Depending on which port your network cable is plugged in to, press OK when the display reads: v4 LAN Parameter ETH0, or use the ↓ to select v4 LAN Parameter ETH1 and then press OK.
4 To assign a static IP address to the TSMC you must disable DHCP. To disable DHCP, press the → arrow to access the DHCP options, and then press↓ to select DHCP: disabled.
5 Press the → arrow to jump to the IP address, and then use the ↑ and ↓ arrows to set it. Press OK to set the address on the TSMC.
SETUPParameter Configuration
SETUP: IPv4 LAN Parameter
SETUP: IPv4 LAN Parameter ETH0DHCP: enabled ADDR: not assigned
Time Source Master Clock Administrator Guide: 3.0 26
C I PH E R™ TSMC user accounts
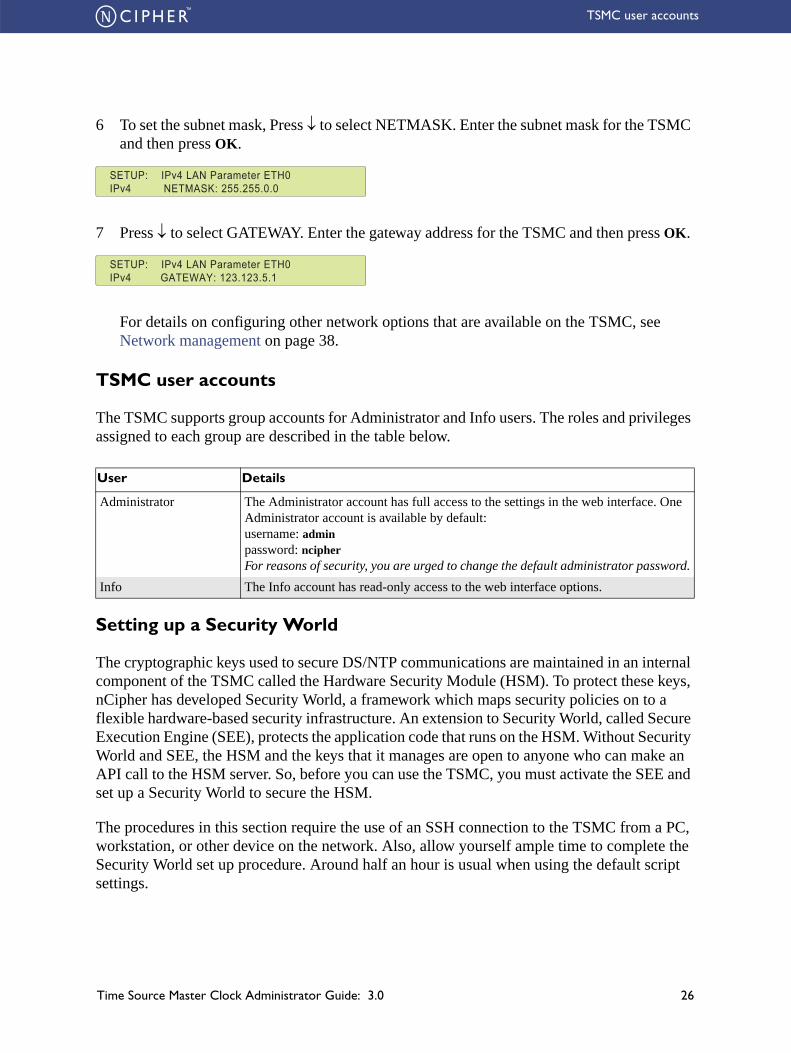
6 To set the subnet mask, Press ↓ to select NETMASK. Enter the subnet mask for the TSMC and then press OK.
7 Press ↓ to select GATEWAY. Enter the gateway address for the TSMC and then press OK.
For details on configuring other network options that are available on the TSMC, see Network management on page 38.
TSMC user accounts
The TSMC supports group accounts for Administrator and Info users. The roles and privileges assigned to each group are described in the table below.
Setting up a Security World
The cryptographic keys used to secure DS/NTP communications are maintained in an internal component of the TSMC called the Hardware Security Module (HSM). To protect these keys, nCipher has developed Security World, a framework which maps security policies on to a flexible hardware-based security infrastructure. An extension to Security World, called Secure Execution Engine (SEE), protects the application code that runs on the HSM. Without Security World and SEE, the HSM and the keys that it manages are open to anyone who can make an API call to the HSM server. So, before you can use the TSMC, you must activate the SEE and set up a Security World to secure the HSM.
The procedures in this section require the use of an SSH connection to the TSMC from a PC, workstation, or other device on the network. Also, allow yourself ample time to complete the Security World set up procedure. Around half an hour is usual when using the default script settings.
User Details
Administrator The Administrator account has full access to the settings in the web interface. One Administrator account is available by default: username: adminpassword: ncipherFor reasons of security, you are urged to change the default administrator password.
Info The Info account has read-only access to the web interface options.
SETUP: IPv4 LAN Parameter ETH0IPv4 NETMASK: 255.255.0.0
SETUP: IPv4 LAN Parameter ETH0IPv4 GATEWAY: 123.123.5.1
Time Source Master Clock Administrator Guide: 3.0 27
C I PH E R™ Setting up a Security World
Screen output from an actual Security World script execution is included in Appendix E: Example Security World Script of this manual, with comments included to show the user's inter-activity with the script.
To set up a Security World and activate the SEE:
1 Make sure the smart card reader is attached to the rear of the TSMC.
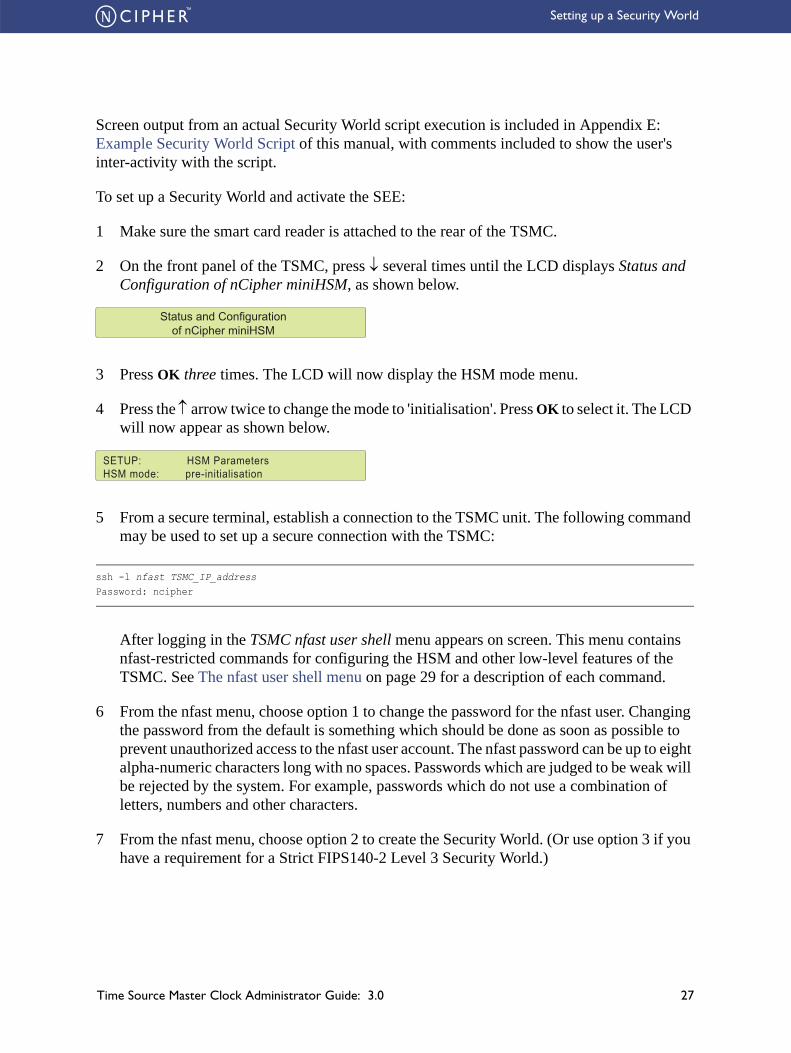
2 On the front panel of the TSMC, press ↓ several times until the LCD displays Status and Configuration of nCipher miniHSM, as shown below.
3 Press OK three times. The LCD will now display the HSM mode menu.
4 Press the ↑ arrow twice to change the mode to 'initialisation'. Press OK to select it. The LCD will now appear as shown below.
5 From a secure terminal, establish a connection to the TSMC unit. The following command may be used to set up a secure connection with the TSMC:
ssh -l nfast TSMC_IP_address Password: ncipher
After logging in the TSMC nfast user shell menu appears on screen. This menu contains nfast-restricted commands for configuring the HSM and other low-level features of the TSMC. See The nfast user shell menu on page 29 for a description of each command.
6 From the nfast menu, choose option 1 to change the password for the nfast user. Changing the password from the default is something which should be done as soon as possible to prevent unauthorized access to the nfast user account. The nfast password can be up to eight alpha-numeric characters long with no spaces. Passwords which are judged to be weak will be rejected by the system. For example, passwords which do not use a combination of letters, numbers and other characters.
7 From the nfast menu, choose option 2 to create the Security World. (Or use option 3 if you have a requirement for a Strict FIPS140-2 Level 3 Security World.)
Status and Configurationof nCipher miniHSM
SETUP: HSM ParametersHSM mode: pre-initialisation
Time Source Master Clock Administrator Guide: 3.0 28
C I PH E R™ Setting up a Security World
8 Follow the prompts in the script to create the Security World. When asked to enter k/n values for the Administrator Card Set, nCipher recommends that you choose the default setting of 2/3. This k/n value is used for the Security Officer key and for subordinate keys (ex. RTC and NVRAM). However, to rejoin the HSM to the SW, only 1/n is required.
Note Security world creation will take several minutes to complete.
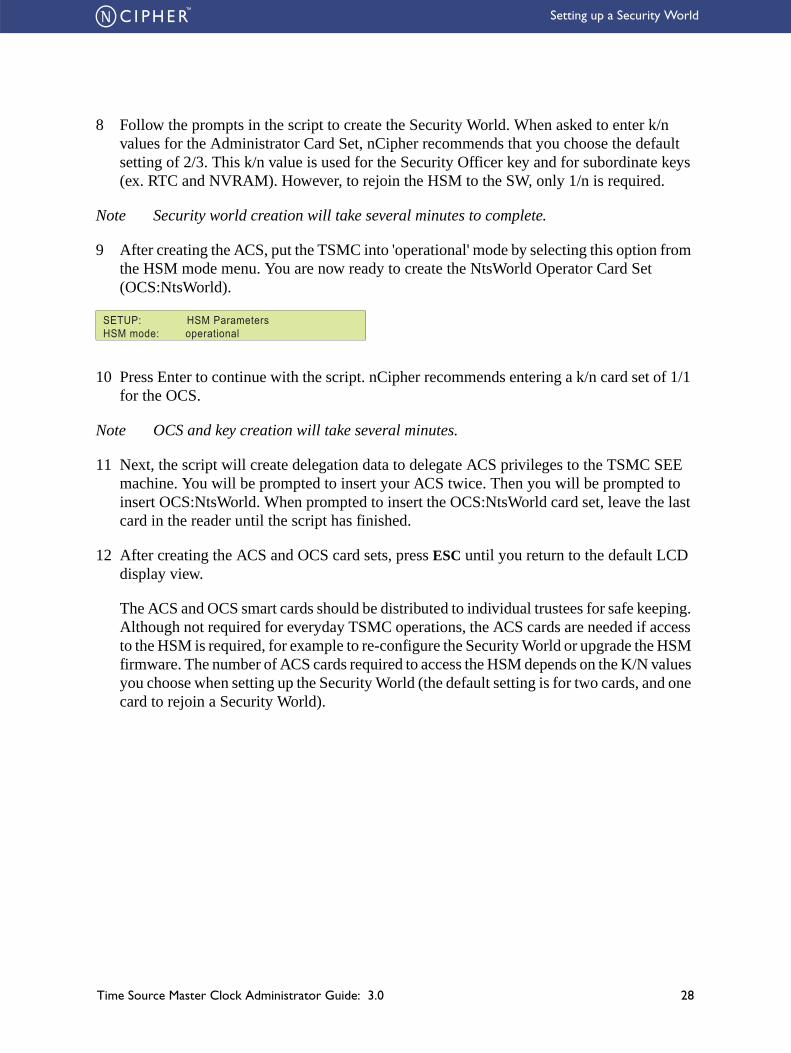
9 After creating the ACS, put the TSMC into 'operational' mode by selecting this option from the HSM mode menu. You are now ready to create the NtsWorld Operator Card Set (OCS:NtsWorld).
10 Press Enter to continue with the script. nCipher recommends entering a k/n card set of 1/1 for the OCS.
Note OCS and key creation will take several minutes.
11 Next, the script will create delegation data to delegate ACS privileges to the TSMC SEE machine. You will be prompted to insert your ACS twice. Then you will be prompted to insert OCS:NtsWorld. When prompted to insert the OCS:NtsWorld card set, leave the last card in the reader until the script has finished.
12 After creating the ACS and OCS card sets, press ESC until you return to the default LCD display view.
The ACS and OCS smart cards should be distributed to individual trustees for safe keeping. Although not required for everyday TSMC operations, the ACS cards are needed if access to the HSM is required, for example to re-configure the Security World or upgrade the HSM firmware. The number of ACS cards required to access the HSM depends on the K/N values you choose when setting up the Security World (the default setting is for two cards, and one card to rejoin a Security World).
SETUP: HSM ParametersHSM mode: operational
Time Source Master Clock Administrator Guide: 3.0 29
C I PH E R™ The nfast user shell menu
The nfast user shell menu
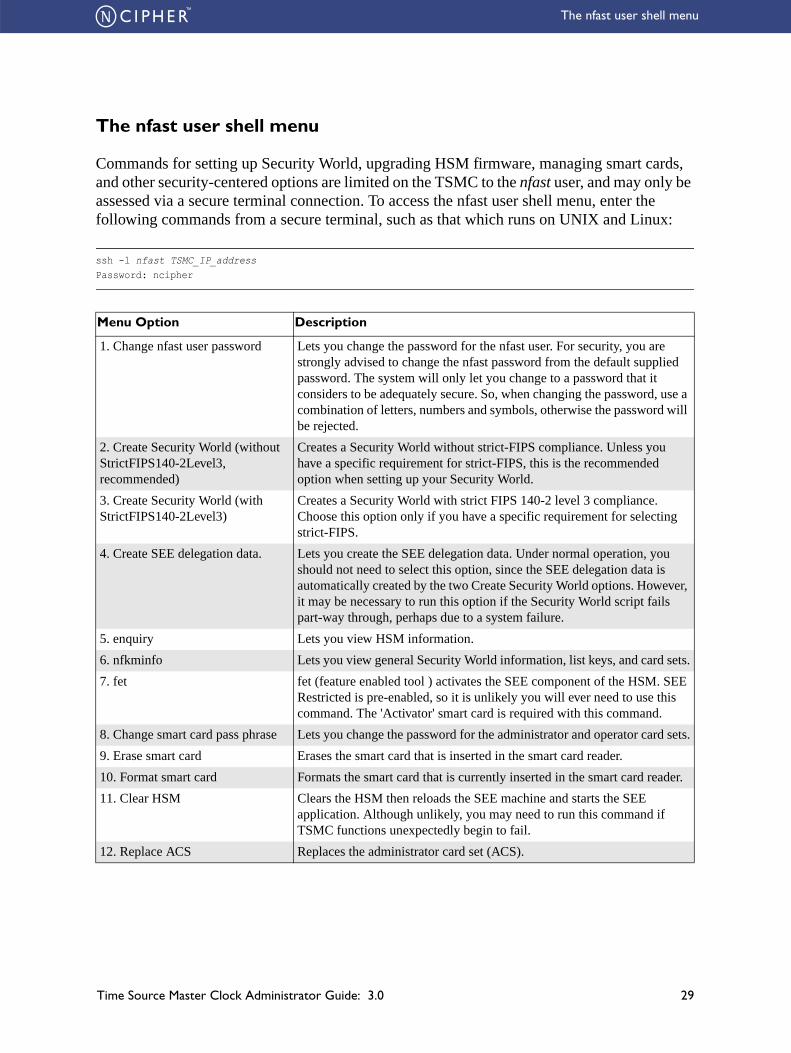
Commands for setting up Security World, upgrading HSM firmware, managing smart cards, and other security-centered options are limited on the TSMC to the nfast user, and may only be assessed via a secure terminal connection. To access the nfast user shell menu, enter the following commands from a secure terminal, such as that which runs on UNIX and Linux:
ssh -l nfast TSMC_IP_address Password: ncipher
Menu Option Description
1. Change nfast user password Lets you change the password for the nfast user. For security, you are strongly advised to change the nfast password from the default supplied password. The system will only let you change to a password that it considers to be adequately secure. So, when changing the password, use a combination of letters, numbers and symbols, otherwise the password will be rejected.
2. Create Security World (without StrictFIPS140-2Level3, recommended)
Creates a Security World without strict-FIPS compliance. Unless you have a specific requirement for strict-FIPS, this is the recommended option when setting up your Security World.
3. Create Security World (with StrictFIPS140-2Level3)
Creates a Security World with strict FIPS 140-2 level 3 compliance. Choose this option only if you have a specific requirement for selecting strict-FIPS.
4. Create SEE delegation data. Lets you create the SEE delegation data. Under normal operation, you should not need to select this option, since the SEE delegation data is automatically created by the two Create Security World options. However, it may be necessary to run this option if the Security World script fails part-way through, perhaps due to a system failure.
5. enquiry Lets you view HSM information.
6. nfkminfo Lets you view general Security World information, list keys, and card sets.
7. fet fet (feature enabled tool ) activates the SEE component of the HSM. SEE Restricted is pre-enabled, so it is unlikely you will ever need to use this command. The 'Activator' smart card is required with this command.
8. Change smart card pass phrase Lets you change the password for the administrator and operator card sets.
9. Erase smart card Erases the smart card that is inserted in the smart card reader.
10. Format smart card Formats the smart card that is currently inserted in the smart card reader.
11. Clear HSM Clears the HSM then reloads the SEE machine and starts the SEE application. Although unlikely, you may need to run this command if TSMC functions unexpectedly begin to fail.
12. Replace ACS Replaces the administrator card set (ACS).
Time Source Master Clock Administrator Guide: 3.0 30
C I PH E R™ Accessing the web interface
Accessing the web interface
TSMC management is performed through a web-based graphical user interface, which, for security, operates over secure-HTTP (HTTPS). Furthermore, you can limit access to the interface by setting up a list of IP addresses authorized to access the interface (see Controlling access to the web interface on page 39).
To connect to the TSMC web-based user interface:
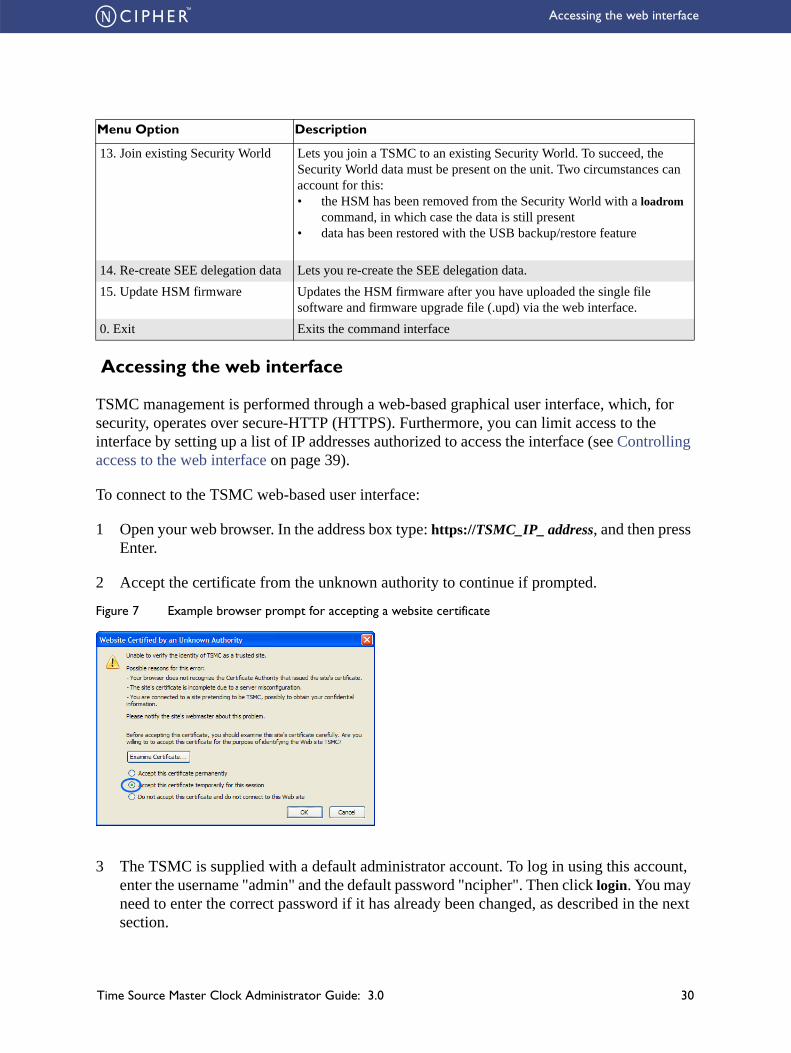
1 Open your web browser. In the address box type: https://TSMC_IP_ address, and then press Enter.
2 Accept the certificate from the unknown authority to continue if prompted.
Figure 7 Example browser prompt for accepting a website certificate
3 The TSMC is supplied with a default administrator account. To log in using this account, enter the username "admin" and the default password "ncipher". Then click login. You may need to enter the correct password if it has already been changed, as described in the next section.
13. Join existing Security World Lets you join a TSMC to an existing Security World. To succeed, the Security World data must be present on the unit. Two circumstances can account for this: • the HSM has been removed from the Security World with a loadrom
command, in which case the data is still present• data has been restored with the USB backup/restore feature
14. Re-create SEE delegation data Lets you re-create the SEE delegation data.
15. Update HSM firmware Updates the HSM firmware after you have uploaded the single file software and firmware upgrade file (.upd) via the web interface.
0. Exit Exits the command interface
Menu Option Description
Time Source Master Clock Administrator Guide: 3.0 31
C I PH E R™ Changing the administrator password
Changing the administrator password
To secure access to the administrator functions of the TSMC web user interface, you are strongly advised to change the Administrator password that is supplied with the TSMC units at the first opportunity.
To change the administrator password:
1 Open up your web browser. In the address bar type https:// followed by the IP address of the TSMC.
2 To log in, enter the username "admin" and the password "ncipher", and then click login.
3 In the web interface, click Local/NTP Management and then click User Administration.
4 In the New password box, type a new password for the admin account, using up to eight alpha-numeric characters with no spaces. Note that passwords longer than eight characters are truncated. For example, 'newtimeserverpassw0rd' is truncated to 'newtimes'.
5 In the Re-enter box, confirm the new password by re-typing it.
6 Click Change password to change the administrator password. Should you forget the new administrator password, and are therefore unable to log in to the user interface, you can retrieve the default password ("ncipher") by performing a factory reset from the front panel of the TSMC (assuming the front panel has not been locked!), as described in Factory reset from the front panel on page 45.
Time Source Master Clock Administrator Guide: 3.0 32
C I PH E R™Chapter 5: Managing the TSMC
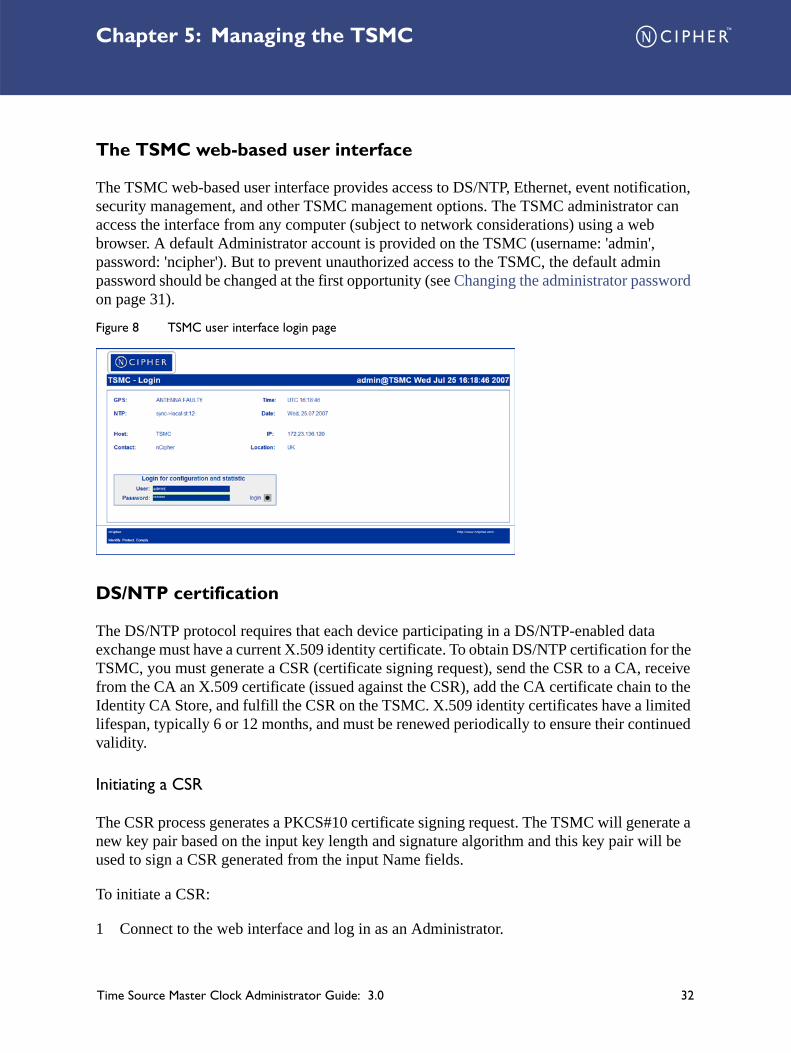
The TSMC web-based user interface
The TSMC web-based user interface provides access to DS/NTP, Ethernet, event notification, security management, and other TSMC management options. The TSMC administrator can access the interface from any computer (subject to network considerations) using a web browser. A default Administrator account is provided on the TSMC (username: 'admin', password: 'ncipher'). But to prevent unauthorized access to the TSMC, the default admin password should be changed at the first opportunity (see Changing the administrator password on page 31).
Figure 8 TSMC user interface login page
DS/NTP certification
The DS/NTP protocol requires that each device participating in a DS/NTP-enabled data exchange must have a current X.509 identity certificate. To obtain DS/NTP certification for the TSMC, you must generate a CSR (certificate signing request), send the CSR to a CA, receive from the CA an X.509 certificate (issued against the CSR), add the CA certificate chain to the Identity CA Store, and fulfill the CSR on the TSMC. X.509 identity certificates have a limited lifespan, typically 6 or 12 months, and must be renewed periodically to ensure their continued validity.
Initiating a CSR
The CSR process generates a PKCS#10 certificate signing request. The TSMC will generate a new key pair based on the input key length and signature algorithm and this key pair will be used to sign a CSR generated from the input Name fields.
To initiate a CSR:
1 Connect to the web interface and log in as an Administrator.
Time Source Master Clock Administrator Guide: 3.0 33
C I PH E R™ Managing DS/NTP system settings
2 Open the Initiate Certificate Request page. Click TSMC Management > DS/NTP Identity > Initiate CSR.
3 Enter the required details to complete the certificate request form. Fields marked '*' are mandatory fields and must be completed. For help in completing any field, click the help button.
4 Click Submit to create a CSR using the details you have provided. Send the CSR to your certification authority (CA), by e-mail or web page upload. The CA will provide the CA certificate chain and issue a X.509 certificate signed by the chain.
Adding the certificate to the identity CA store
To add the CA certificate chain and the device certificate:
1 Click TSMC Management > Certificate Stores to open the CA Store page.
2 Click Add Certificate to open a page that allows you to add a certificate.
3 Add the certificate chain by first adding the root certificate.
4 If the certificate chain contains more than one certificate, add each additional certificate until the entire certificate chain has been imported. Note: The issued certificate for the TSMC CSR does not need to be imported into the CA store.
Fulfilling the CSR
To fulfill the CSR:
1 Click TSMC Management > DS/NTP Identity > Fulfill CSR.
2 Upload the X.509 certificate that you got from your CA and click Fulfill to complete the process.
Managing DS/NTP system settings
The TSMC Management page allows you to manage your DS/NTP system settings, including the method of system time verification and clock servicing options for both upper and lower clocks.
When selecting a method for verifying the system time, you have two options. The default option is to rely on the TSMC itself; since the TSMC references a GPS, 1PPS, IRIG-B, or NTP time source, this is adequate for most users. The other option is to verify the system time by a DS/NTP audit, often from another TSMC unit acting as an upper clock. For details of setting up an upper clock audit, see Upper clock audits on page 37
Time Source Master Clock Administrator Guide: 3.0 34
C I PH E R™ Checking certification status
To manage DS/NTP system settings:
1 Connect to the web interface and log in as an Administrator.
2 Click TSMC Management from the main menu to open the TSMC Management page.
3 Specify your DS/NTP system settings as required. Refer to the online help for information on each of the options that are available.
4 Click Save settings to save your settings, or Reset changes to reset the form and clear any changes you have made.
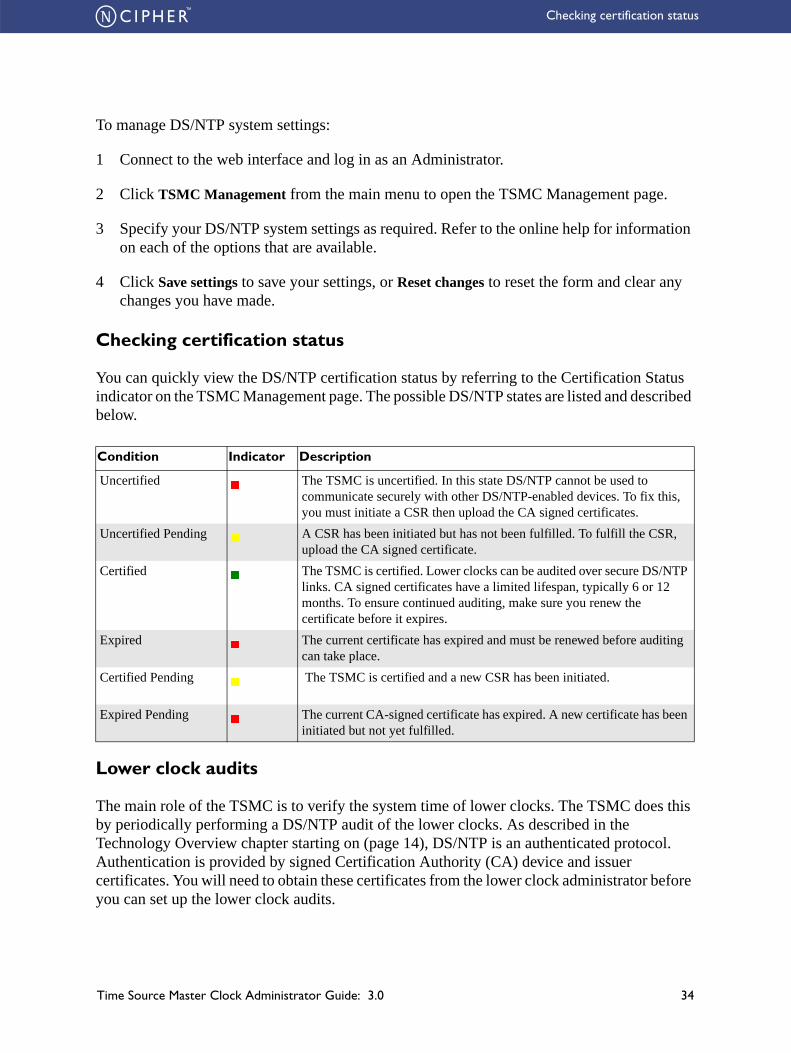
Checking certification status
You can quickly view the DS/NTP certification status by referring to the Certification Status indicator on the TSMC Management page. The possible DS/NTP states are listed and described below.
Lower clock audits
The main role of the TSMC is to verify the system time of lower clocks. The TSMC does this by periodically performing a DS/NTP audit of the lower clocks. As described in the Technology Overview chapter starting on (page 14), DS/NTP is an authenticated protocol. Authentication is provided by signed Certification Authority (CA) device and issuer certificates. You will need to obtain these certificates from the lower clock administrator before you can set up the lower clock audits.
Condition Indicator Description
Uncertified The TSMC is uncertified. In this state DS/NTP cannot be used to communicate securely with other DS/NTP-enabled devices. To fix this, you must initiate a CSR then upload the CA signed certificates.
Uncertified Pending A CSR has been initiated but has not been fulfilled. To fulfill the CSR, upload the CA signed certificate.
Certified The TSMC is certified. Lower clocks can be audited over secure DS/NTP links. CA signed certificates have a limited lifespan, typically 6 or 12 months. To ensure continued auditing, make sure you renew the certificate before it expires.
Expired The current certificate has expired and must be renewed before auditing can take place.
Certified Pending The TSMC is certified and a new CSR has been initiated.
Expired Pending The current CA-signed certificate has expired. A new certificate has been initiated but not yet fulfilled.
Time Source Master Clock Administrator Guide: 3.0 35
C I PH E R™ Lower clock audits
To set up lower clock audits:
1 Connect to the web interface and log in as an Administrator.
2 Click TSMC Management > Certificate Stores to open the Certificate Stores page.
3 In the Lower Clock CA Store section, click Add Certificate.
4 Add the certificate chain by first adding the root certificate first.
5 If the certificate chain contains more than one certificate, add each additional certificate until the entire certificate chain has been imported.
6 Navigate to the Lower Clocks page and click Add New Clock.
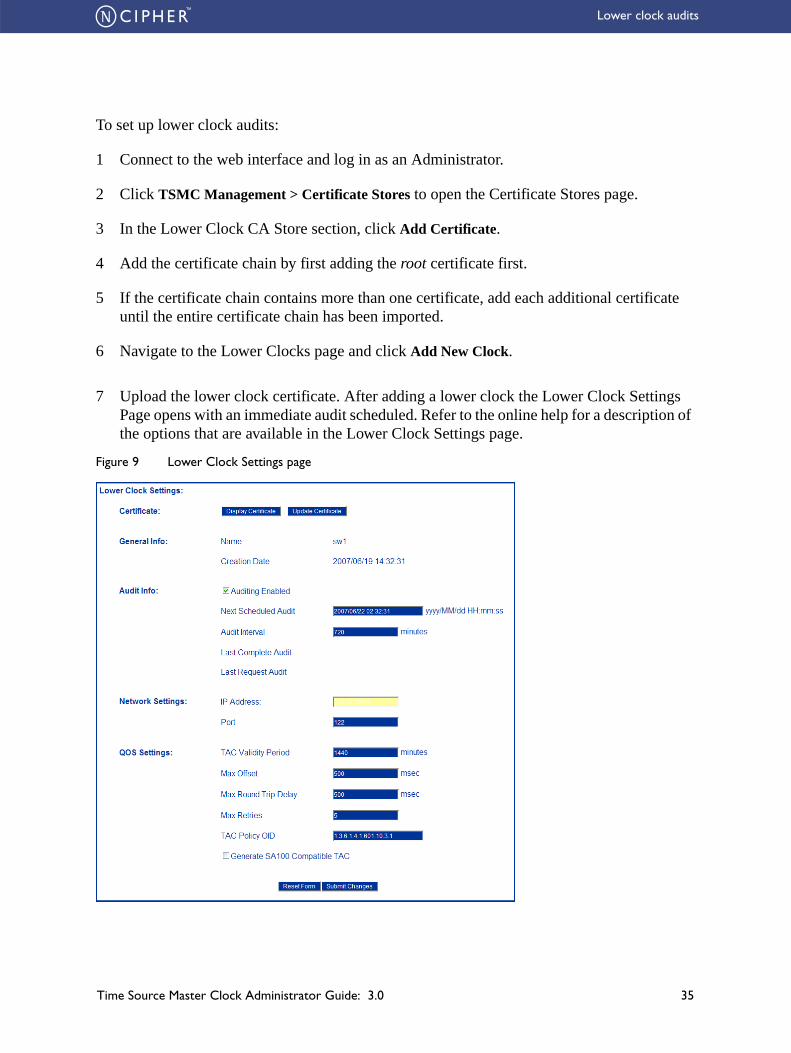
7 Upload the lower clock certificate. After adding a lower clock the Lower Clock Settings Page opens with an immediate audit scheduled. Refer to the online help for a description of the options that are available in the Lower Clock Settings page.
Figure 9 Lower Clock Settings page
Time Source Master Clock Administrator Guide: 3.0 36
C I PH E R™ Lower clock audits
Configuring lower clock settings
The Lower Clock Settings page (Figure 9) contains settings for lower clock audits, such as the audit interval (the default is 720 minutes), network settings and quality of service options, such as TAC validity period and maximum offset period. In particular, you should confirm the port setting is correct. It must match the lower clock's DS/NTP listening port setting for the audit to succeed.
To configure the lower clock settings:
1 Connect to the web interface and log in as an Administrator.
2 Click TSMC Management > Lower Clocks to open the Lower Clocks page.
3 From the list of lower clocks, select the clock you want to configure and click its name. This opens the settings page for the clock, shown below.
4 Enter your configuration options for the lower clock as required. For a full description of each of the options that are available in the Lower Clock Settings page, refer to the online help page.
5 Click Submit Changes to save your changes, or click Reset Form to discard any changes you have made.
Performing an immediate lower clock audit
You may audit a lower clock at any time by performing a manual audit. A manual audit bypasses the audit interval setting specified in the Lower Clock Settings page, and immediately schedules the lower clock for an audit. The audit will be executed by the TSMC as soon as possible.
To manually audit a lower clock:
1 Connect to the web interface and log in as an Administrator.
2 Click TSMC Management > Lower Clocks to open the Lower Clock Certificate page.
3 From the list of lower clocks, select the clock you want to audit and click the Audit Now button that appears beside it.
4 The TSMC will now perform an immediate audit on the lower clock. If the audit is successful, a message similar to the following appears at the top of the page: "Audit successfully performed on c6b4e99389..."
Time Source Master Clock Administrator Guide: 3.0 37
C I PH E R™ Upper clock audits
Updating certificates
Periodically, the operator of the lower clock will renew their device certificate and provide a new certificate to the operator of the TSMC. When this occurs you will need to update the lower clock certificate on the TSMC.
To update a lower clock certificate:
1 Connect to the web interface and log in as an Administrator.
2 Click TSMC Management > Lower Clocks to open the Lower Clock Certificate page.
3 Select the clock you want to update. lick the button in the .
4 On the Lower Clock Settings page, click Update Certificate.
5 Upload the updated certificate.
Upper clock audits
As explained in Managing DS/NTP system settings on page 33 , you can choose to verify system time by trusting the TSMC or by an audit from another DS/NTP master clock, known as an upper clock audit. This section describes how to set up upper clock audits on the TSMC.
To set up upper clock audits:
Note In the steps below, your TSMC is referred to as the 'lower clock' and the auditing device is the 'upper clock'.
On the lower clock:
1 Connect to the web interface and log in as an Administrator.
2 Click TSMC Management > Certificate Stores to open the Certificate Stores page.
3 In the Upper Clock CA Store section, click Add Certificate and then upload the upper clock's complete root certificate chain.
4 On the System Settings page, select Require DSNTP Audits. In the Upper Clock Servicing options, make a note of the DS/NTP Listen Port setting. You will need to set the lower clock port to this value when you add this clock to the upper clock.
On the upper clock (assuming you have access to it):
5 Connect to the web interface and log in as an Administrator.
Time Source Master Clock Administrator Guide: 3.0 38
C I PH E R™ Network management
6 Upload the lower clock's complete root certificate chain. Click TSMC Management > Certificate Stores to open the Certificate Stores page.
7 In the Lower Clock CA Store section, click Add Certificate and upload the CA root certificate chain.
8 Add the lower clock's CA-signed certificate. Select TSMC Management > Lower Clocks > Add New Clock and upload the lower clock certificate. After adding a lower clock the Lower Clock Settings page appears.
9 Ensure the audit settings for the lower clock are correct. In particular, the port number must match the lower clock's DS/NTP listening port, which by default is 124. On a TSMC, this setting can be found on the TSMC Management page (TSMC management > System Settings).
Network management
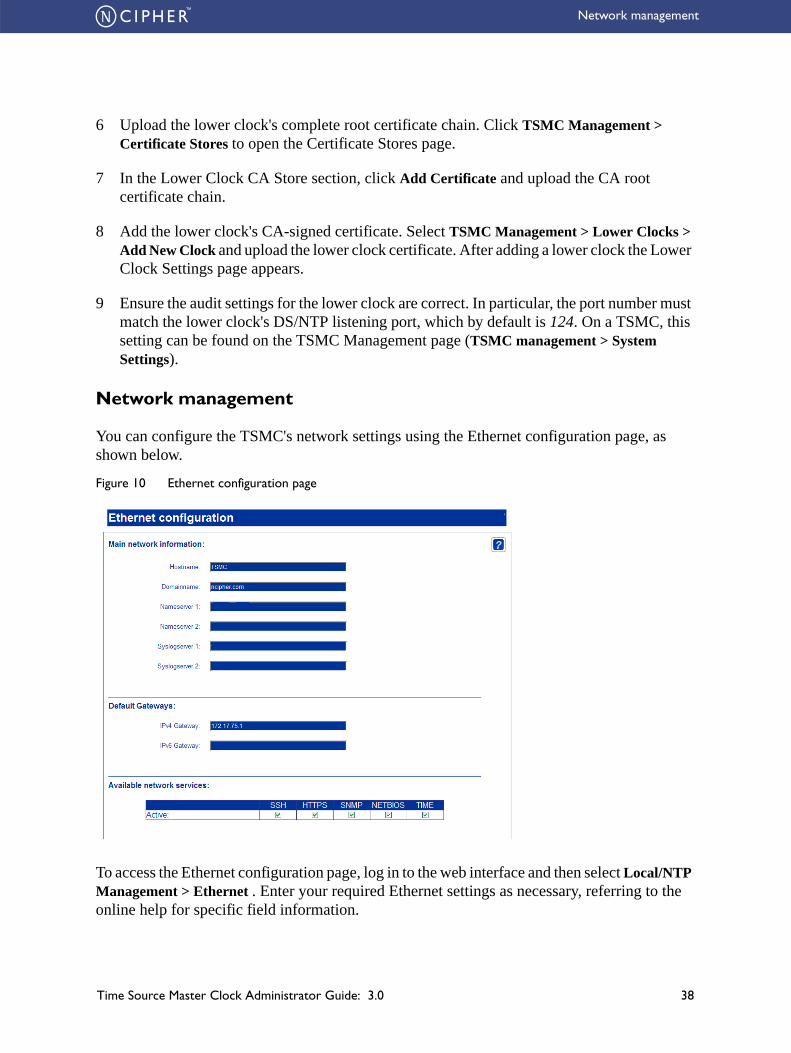
You can configure the TSMC's network settings using the Ethernet configuration page, as shown below.
Figure 10 Ethernet configuration page
To access the Ethernet configuration page, log in to the web interface and then select Local/NTP Management > Ethernet . Enter your required Ethernet settings as necessary, referring to the online help for specific field information.
Time Source Master Clock Administrator Guide: 3.0 39
C I PH E R™ Security management
Security management
As you might expect from a device as secure as the TSMC, the web interface has several security management options which enable you to control who has access to the web interface, lock the front panel so it cannot be accessed, and control access to the USB port on the front of the TSMC.
Controlling access to the web interface
You can determine who has access to the TSMC web interface by setting up a list of authorized IP addresses. If anyone attempts to log in to the interface from an IP address that is not on the list, they will be denied access to the web interface.
To set up a list of authorized IP addresses:
1 Connect to the web interface and log in as an Administrator.
2 Click Local/NTP Management > Security > Config HTTP access control to open the HTTP access control page.
3 Using the text box, enter IP addresses that you want to be able to access the web interface, and then click the Add/Remove address button to add them to the list. If required you can enter an IP address range, using the '*' key to donate a range. For example, 172.168.*.* allows all computers whose IP address begins 172.168. to access the TSMC.
4 Should it become necessary, you can regain control of access to the web interface using the command line interface that is available after logging in as the administrator over a secure terminal connection (SSH).
Locking the front panel
The front panel of the TSMC can be locked to prevent unauthorized access to the TSMC front panel menus. However, once the front panel is locked, it becomes impossible to access the factory reset option if the Administrator user forgets their password.
To lock the front panel:
1 Connect to the web interface and log in as an Administrator.
2 Click Local/NTP Management > Security to open the Security management page.
3 In the Front Panel options, click Deactivated to lock the front panel, click or Activated to unlock the front panel if it is already locked.
Time Source Master Clock Administrator Guide: 3.0 40
C I PH E R™ Security management
Releasing USB port
By default, the USB port remains blocked until it is released in the web interface. Once it has been released inserting a memory stick automatically activates the USB port memory stick options, which are described below.
To release the front panel USB port:
1 Connect to the web interface and log in as an Administrator.
2 Click Local/NTP Management > Security to open the Security management page.
3 In the Front Panel options, click Blocked to release the USB port or Release to block the USB port, depending on the current blocked/unblocked status of the port.
The port remains unblocked for one session only, and will be blocked as soon as the USB stick is removed.
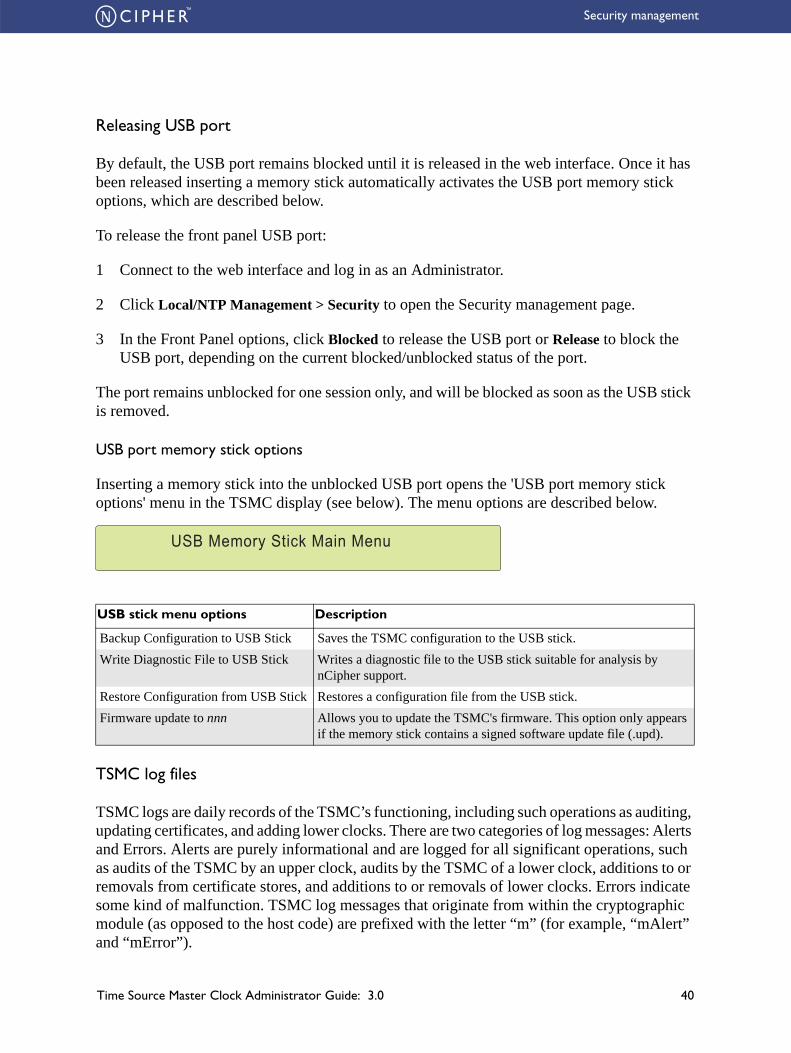
USB port memory stick options
Inserting a memory stick into the unblocked USB port opens the 'USB port memory stick options' menu in the TSMC display (see below). The menu options are described below.
TSMC log files
TSMC logs are daily records of the TSMC’s functioning, including such operations as auditing, updating certificates, and adding lower clocks. There are two categories of log messages: Alerts and Errors. Alerts are purely informational and are logged for all significant operations, such as audits of the TSMC by an upper clock, audits by the TSMC of a lower clock, additions to or removals from certificate stores, and additions to or removals of lower clocks. Errors indicate some kind of malfunction. TSMC log messages that originate from within the cryptographic module (as opposed to the host code) are prefixed with the letter “m” (for example, “mAlert” and “mError”).
USB stick menu options Description
Backup Configuration to USB Stick Saves the TSMC configuration to the USB stick.
Write Diagnostic File to USB Stick Writes a diagnostic file to the USB stick suitable for analysis by nCipher support.
Restore Configuration from USB Stick Restores a configuration file from the USB stick.
Firmware update to nnn Allows you to update the TSMC's firmware. This option only appears if the memory stick contains a signed software update file (.upd).
USB Memory Stick Main Menu
Time Source Master Clock Administrator Guide: 3.0 41
C I PH E R™ Security management
The TSMC stores up to seven days of log files in its internal volatile memory. Logs older than seven days are automatically removed by the system to make room for new logs; however, if memory capacity reaches 90% of its limit, the system will begin to delete older files as necessary. Restarting the TSMC deletes all log files, since the logs are held in volatile RAM only.
If you have a requirement to maintain a permanent record of the TSMC log files, you should set up your network syslog server to receive the TSMC log files and enter the IP address of the syslog server in the syslogserver field on the Ethernet configuration page.
To view TSMC log files:
1 Connect to the web interface and log in as Administrator, if you have not logged in already.
2 Click TSMC Management > TSMC Logs to open the TSMC Logs page.
3 From the logs that are available, select the log you want to view and click the Open button that appears beside it.
4 Click Close when you have finished viewing the log file. Below is a typical log file:
Fri May 4 15:31:46 2007: Alert: Scheduled clock 'sw1' for auditing beginning 2007/05/04 15:30:57Fri May 4 15:31:46 2007: Alert: Begin audit of clock 'sw1' (172.17.75.56) scheduled for 2007/05/04 15:30:57Fri May 4 15:31:46 2007: Alert: Audit Lower Clock, Begin 172.17.75.56:122 (0.0.0.0:4100, 12)Fri May 4 15:31:53 2007: Alert: Operational TAC Issued: C=GB;S=Cambs;L=Cambridge;O=nCipher;OU=QA;OU=nCipher DSE ESN:4113-DC9A-0B85;CN=sw1: offset=-0.026863, ntpTime=15:31:52 - 2007/05/04, expiration=15:31:52 - 2007/05/05, leapAction=0, leapTime=0, delay=0.005269Fri May 4 15:31:53 2007: TAC: MIICaTCCAdICAQEwgbehgY2kgYowgYcxC…
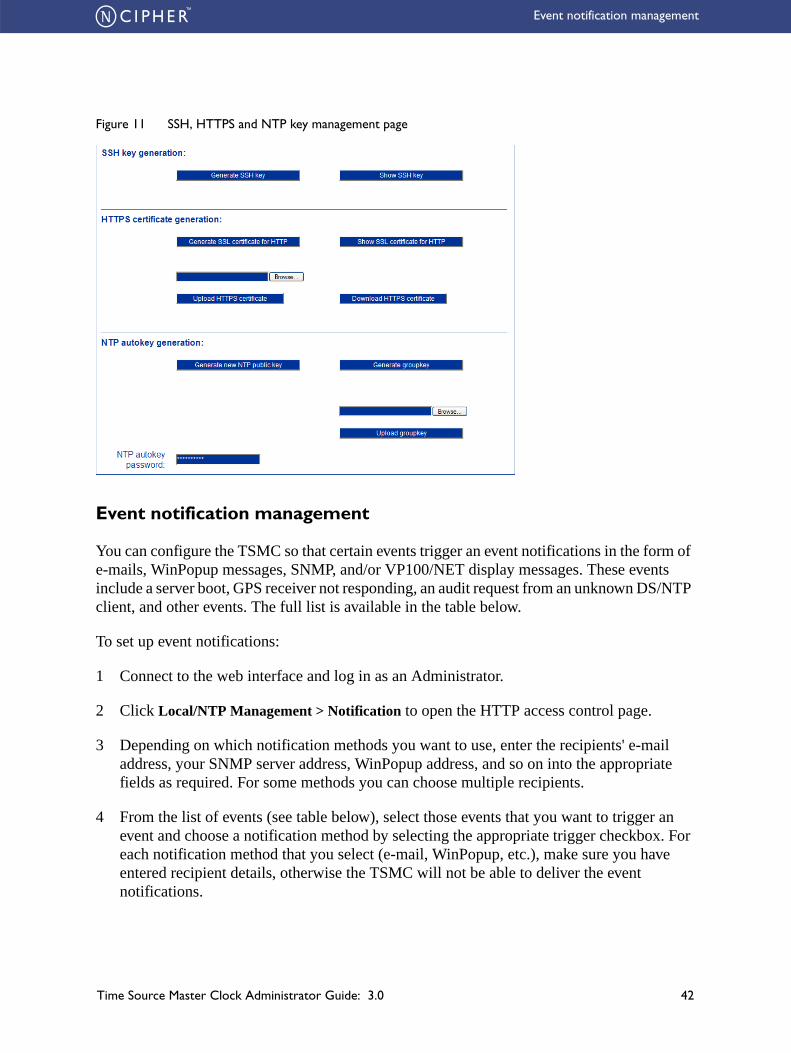
Managing SSH, HTTPS, and NTP keys
The keys and certificates used to secure SSH, HTTPS and NTP communications on the TSMC can be managed from the user interface. For example, you can upload a new HTTPS certificate, generate a new SSH key, and generate a new NTP public key or group key.
To manage your SSH, HTTPS and NTP keys:
1 Connect to the web interface and log in as Administrator, if you have not logged in already.
2 Click Local/NTP Management > Security to open the Security management page.
3 Using the options that are available, manage your keys as necessary. Refer to the online help guide for more information on the security options that are available.
Time Source Master Clock Administrator Guide: 3.0 42
C I PH E R™ Event notification management
Figure 11 SSH, HTTPS and NTP key management page
Event notification management
You can configure the TSMC so that certain events trigger an event notifications in the form of e-mails, WinPopup messages, SNMP, and/or VP100/NET display messages. These events include a server boot, GPS receiver not responding, an audit request from an unknown DS/NTP client, and other events. The full list is available in the table below.
To set up event notifications:
1 Connect to the web interface and log in as an Administrator.
2 Click Local/NTP Management > Notification to open the HTTP access control page.
3 Depending on which notification methods you want to use, enter the recipients' e-mail address, your SNMP server address, WinPopup address, and so on into the appropriate fields as required. For some methods you can choose multiple recipients.
4 From the list of events (see table below), select those events that you want to trigger an event and choose a notification method by selecting the appropriate trigger checkbox. For each notification method that you select (e-mail, WinPopup, etc.), make sure you have entered recipient details, otherwise the TSMC will not be able to deliver the event notifications.
Time Source Master Clock Administrator Guide: 3.0 43
C I PH E R™ Event notification management
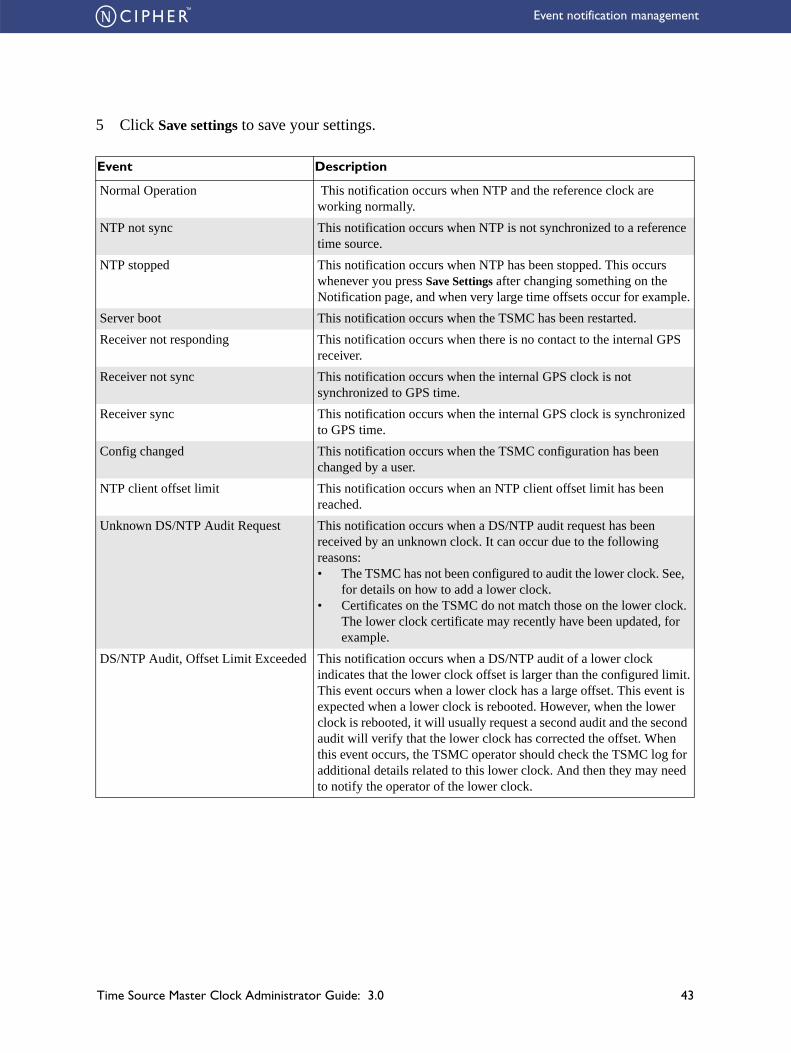
5 Click Save settings to save your settings.
Event Description
Normal Operation This notification occurs when NTP and the reference clock are working normally.
NTP not sync This notification occurs when NTP is not synchronized to a reference time source.
NTP stopped This notification occurs when NTP has been stopped. This occurs whenever you press Save Settings after changing something on the Notification page, and when very large time offsets occur for example.
Server boot This notification occurs when the TSMC has been restarted.
Receiver not responding This notification occurs when there is no contact to the internal GPS receiver.
Receiver not sync This notification occurs when the internal GPS clock is not synchronized to GPS time.
Receiver sync This notification occurs when the internal GPS clock is synchronized to GPS time.
Config changed This notification occurs when the TSMC configuration has been changed by a user.
NTP client offset limit This notification occurs when an NTP client offset limit has been reached.
Unknown DS/NTP Audit Request This notification occurs when a DS/NTP audit request has been received by an unknown clock. It can occur due to the following reasons:• The TSMC has not been configured to audit the lower clock. See,
for details on how to add a lower clock. • Certificates on the TSMC do not match those on the lower clock.
The lower clock certificate may recently have been updated, for example.
DS/NTP Audit, Offset Limit Exceeded This notification occurs when a DS/NTP audit of a lower clock indicates that the lower clock offset is larger than the configured limit.This event occurs when a lower clock has a large offset. This event is expected when a lower clock is rebooted. However, when the lower clock is rebooted, it will usually request a second audit and the second audit will verify that the lower clock has corrected the offset. When this event occurs, the TSMC operator should check the TSMC log for additional details related to this lower clock. And then they may need to notify the operator of the lower clock.
Time Source Master Clock Administrator Guide: 3.0 44
C I PH E R™ Event notification management
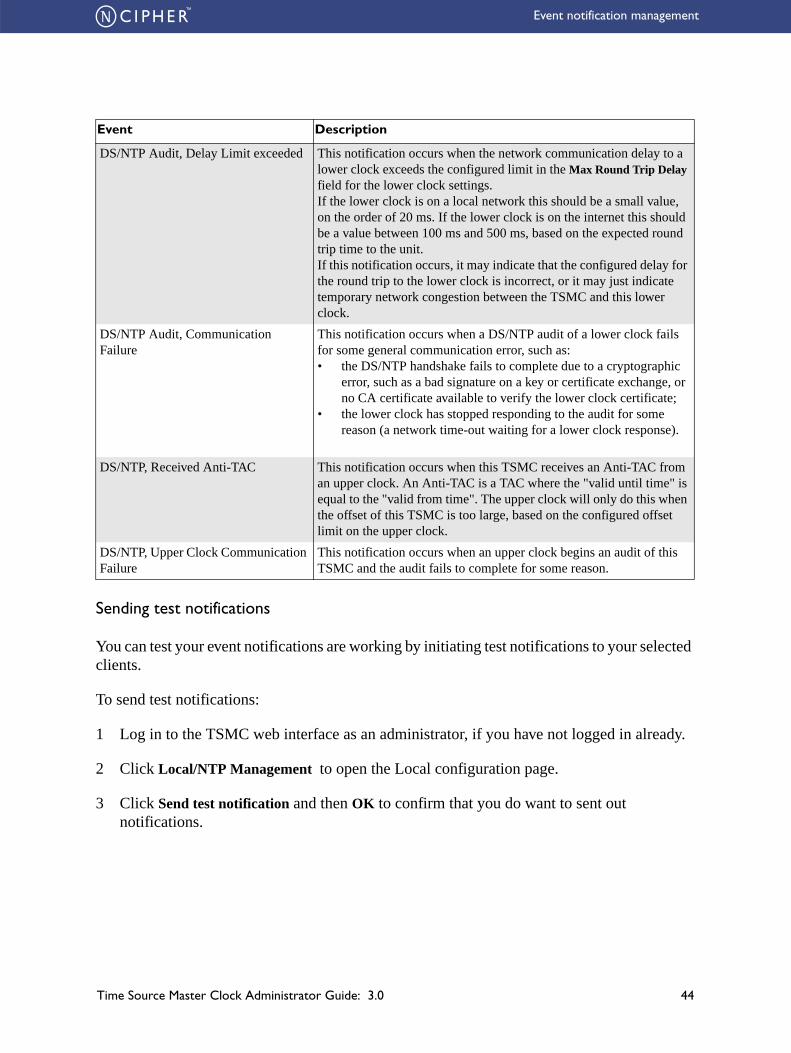
Sending test notifications
You can test your event notifications are working by initiating test notifications to your selected clients.
To send test notifications:
1 Log in to the TSMC web interface as an administrator, if you have not logged in already.
2 Click Local/NTP Management to open the Local configuration page.
3 Click Send test notification and then OK to confirm that you do want to sent out notifications.
DS/NTP Audit, Delay Limit exceeded This notification occurs when the network communication delay to a lower clock exceeds the configured limit in the Max Round Trip Delay field for the lower clock settings. If the lower clock is on a local network this should be a small value, on the order of 20 ms. If the lower clock is on the internet this should be a value between 100 ms and 500 ms, based on the expected round trip time to the unit. If this notification occurs, it may indicate that the configured delay for the round trip to the lower clock is incorrect, or it may just indicate temporary network congestion between the TSMC and this lower clock.
DS/NTP Audit, Communication Failure
This notification occurs when a DS/NTP audit of a lower clock fails for some general communication error, such as:• the DS/NTP handshake fails to complete due to a cryptographic
error, such as a bad signature on a key or certificate exchange, or no CA certificate available to verify the lower clock certificate;
• the lower clock has stopped responding to the audit for some reason (a network time-out waiting for a lower clock response).
DS/NTP, Received Anti-TAC This notification occurs when this TSMC receives an Anti-TAC from an upper clock. An Anti-TAC is a TAC where the "valid until time" is equal to the "valid from time". The upper clock will only do this when the offset of this TSMC is too large, based on the configured offset limit on the upper clock.
DS/NTP, Upper Clock Communication Failure
This notification occurs when an upper clock begins an audit of this TSMC and the audit fails to complete for some reason.
Event Description
Time Source Master Clock Administrator Guide: 3.0 45
C I PH E R™ Saving SNMP MIB files
Saving SNMP MIB files
The TSMC has an integrated SNMP agent that is designed specifically to handle SNMP requests for timeserver specific status information, including status variables for the internal reference clock. In the web interface, you can download the SNMP MIB (management information base) file so that it can be used by an SNMP manager.
To download the SNMP MIB file:
1 Connect to the web interface and log in as an Administrator.
2 Click Local/NTP Management, and then click Download SNMP MIB file.
3 Click Save to disk.
Restoring TSMC factory defaults
A factory reset restores the TSMC back to its factory default settings, resetting the administrator password and wiping the HSM module, CA Store, DS/NTP and Security World in the process. Ethernet configuration settings are left intact when the factory reset is done from the web interface, but are deleted when the factory reset is performed from the front panel.
Factory reset from the web interface
1 Connect to the web interface and log in as an Administrator, if you have not logged in already.
2 Click Local/NTP Management. and then click Download SNMP MIB file.
3 Click Reset to factory defaults.
Factory reset from the front panel
1 On the front panel of the TSMC, press F2 twice to access SETUP Parameter Configuration, and then press OK.
2 Press ↓ until you see LAN Device Parameter displayed, and then press OK.
3 Press ↓ until you see Reset factory settings to factory defaults displayed, and then press OK.
4 Finally, press F2 to confirm the reset.
Time Source Master Clock Administrator Guide: 3.0 46
C I PH E R™ NTP management
NTP management
NTP is a protocol for synchronizing and adjusting time across a hierarchy of NTP servers. The TSMC supports Network Time Protocol (NTP) version 4 and, when connected to a GPS or IRIG-B reference time source, can function as a Stratum-1 NTP server.
NTP overview
The Network Time Protocol (NTP) is a protocol for synchronizing and adjusting computer clocks across a hierarchy of NTP servers and clients. A level in the hierarchy is called a stratum, with Stratum-1 being the highest level. Stratum-1 clocks synchronize themselves to a reference time source, such as the GPS network, and distribute time to Stratum-2 clocks, which in turn distribute time to Stratum-3 clocks, and so on. Under suitable conditions, NTP clients can expect their clocks to be accurate to within 200 microseconds.
For more information on NTP, refer to the official NTP website (http://www.ntp.org).
NTP configuration
The TSMC's default NTP configuration consists of a GPS reference clock and a local clock, represented by the built-in hardware clock. The local clock is only used as the NTP time reference if GPS/IRIG synchronization is lost. The default configuration file /etc/ntp.conf is reproduced below.
# *** tsmc ***# NTP.CONF for TCR IRIG with UNI ERLANGEN String (do not modify)server 127.127.1.0 # local clockfudge 127.127.1.0 stratum 12 # local stratumserver 127.127.8.0 mode 146 prefer # UNI Erlangen with PPS binary polling disabledserver 127.127.22.0 minpoll 6 maxpoll 6 # ATOM (PPS)fudge 127.127.22.0 flag2 0 flag3 0 enable statsstatsdir /var/log/statistics loopstatsdriftfile /etc/ntp.drift
Additional parameters can be added to the default ntp.conf file using the web interface. For example, you can add up to five external NTP servers to provide a high grade of redundancy for the internal reference clock, enable or disable the local clock and set its stratum level, and enter an NTP broadcast address for messages.
To add additional parameters to ntp.conf:
1 Connect to the web interface and log in as an Administrator.
2 Click Local/NTP Management > NTP to open the NTP management page.
Time Source Master Clock Administrator Guide: 3.0 47
C I PH E R™ NTP management
3 In the NTP management page, enter your required NTP parameters. If required, refer to the online help file for details of the available settings.
4 Click Save settings to add your parameters to the configuration file.
5 To see the changes you have made to the ntp.conf file, click Show current NTP configuration.
Autokey – Generating a new NTP public key
In NTP autokey is used to prove the authenticity of data received over the network. From time to time it is advisable to update the public key certificate used by autokey, to extend the validity interval of the key (keys are valid for 12 months only before they expire) and to guard against replay attacks. You should also regenerate the key if you change the hostname of the TSMC.
To generate a new NTP public key for autokey:
1 Connect to the web interface and log in as an Administrator.
2 Click Local/NTP Management > Security to open the Security management page.
3 In the Security management page under NTP autokey generation, enter a crypto password in NTP autokey password. This password is used to generate the host parameters (such as certificates and key files) and is used for the portion of the groupkey held by that NTP host.
4 Click Generate new NTP public key, and then click OK to confirm that you want to overwrite the existing key.
Saving the NTP drift file
The NTP drift file /etc/ntp.drift records internal clock drift information. NTP uses this information, along with offset-slewing and 'deglitching', to maintain clock accuracy to milliseconds, even after extended periods when synchronization to a primary reference source has been lost.
To speed up the synchronization process of the NTPD subsystem after a restart, you can save the drift file to the TSMC internal flash disc, so that it is available following a restart. You should only do this, however, if the NTPD has been synchronized to the internal reference clock for more than one day.
To save the NTP drift file:
1 Connect to the web interface and log in as an Administrator.
2 Click Local/NTP Management to open the Local Configuration page.
Time Source Master Clock Administrator Guide: 3.0 48
C I PH E R™ NTP management
3 In the Local Configuration page, click Save NTP drift file.
4 Click OK to save the drift file to internal flash disk.
Time Source Master Clock Administrator Guide: 3.0 49
C I PH E R™Appendix A: Troubleshooting
This appendix describes a few common issues that you might encounter when using the TSMC.
Port mismatch
The TSMC can audit lower clocks, including Time Stamp Server (TSS) and other TSMC devices, only if the ports of the upper and lower clocks are the same.
You can configure the TSS to send audit requests to one or more upper clocks. The audit request reaches the TSMC only if the TSS uses the port specified in the TSMC (318 by default). If you have not set the correct port in the TSS, the audit request does not reach the TSMC. If the TSMC fails to receive a request from the TSS, check the ports and the network between the devices.
You must also use the correct DS/NTP ports when setting the TSMC to audit lower clocks. The default port number for a TSS is 123, whereas the default port number for a lower clock TSMC is 124. If you do not set the correct port numbers in the upper clock TSMC, the lower clock does not receive a UC_Hello handshake message from the TSMC, and the system returns an error as described in Error messages on page 50.
Invalid certificates
Certificates are used for authenticating devices during audit sessions. Certificates are valid only for a certain period and must be renewed before they expire. For audits to be successful, you must ensure that the certificates of the lower clocks, upper clocks, the TSMC, and the certificates in the respective CA stores are valid at all times.
The TSMC uses Root CA certificates for chain verification, and therefore, you cannot fulfil or add certificates without having the Root CA certificates in the respective CA stores.
If the certificates have expired or if there are no Root CA certificates available, the audit fails and the system returns errors as described in Error messages on page 50.
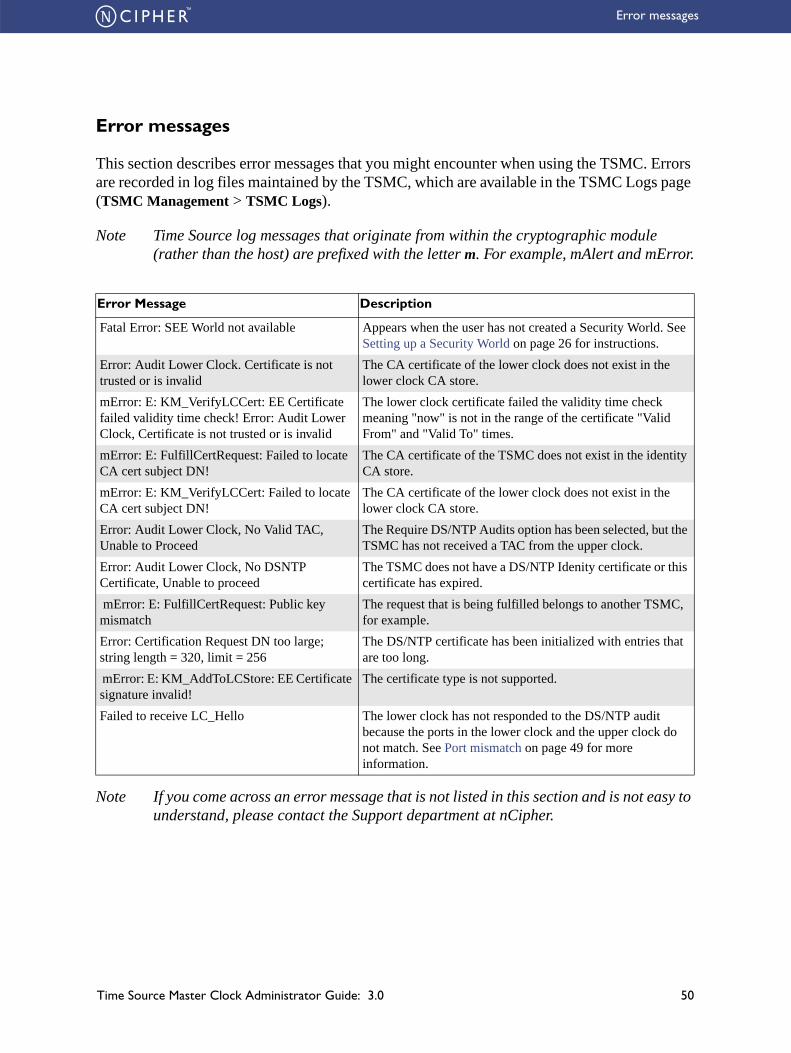
Time Source Master Clock Administrator Guide: 3.0 50
C I PH E R™ Error messages
Error messages
This section describes error messages that you might encounter when using the TSMC. Errors are recorded in log files maintained by the TSMC, which are available in the TSMC Logs page (TSMC Management > TSMC Logs).
Note Time Source log messages that originate from within the cryptographic module (rather than the host) are prefixed with the letter m. For example, mAlert and mError.
Note If you come across an error message that is not listed in this section and is not easy to understand, please contact the Support department at nCipher.
Error Message Description
Fatal Error: SEE World not available Appears when the user has not created a Security World. See Setting up a Security World on page 26 for instructions.
Error: Audit Lower Clock. Certificate is not trusted or is invalid
The CA certificate of the lower clock does not exist in the lower clock CA store.
mError: E: KM_VerifyLCCert: EE Certificate failed validity time check! Error: Audit Lower Clock, Certificate is not trusted or is invalid
The lower clock certificate failed the validity time check meaning "now" is not in the range of the certificate "Valid From" and "Valid To" times.
mError: E: FulfillCertRequest: Failed to locate CA cert subject DN!
The CA certificate of the TSMC does not exist in the identity CA store.
mError: E: KM_VerifyLCCert: Failed to locate CA cert subject DN!
The CA certificate of the lower clock does not exist in the lower clock CA store.
Error: Audit Lower Clock, No Valid TAC, Unable to Proceed
The Require DS/NTP Audits option has been selected, but the TSMC has not received a TAC from the upper clock.
Error: Audit Lower Clock, No DSNTP Certificate, Unable to proceed
The TSMC does not have a DS/NTP Idenity certificate or this certificate has expired.
mError: E: FulfillCertRequest: Public key mismatch
The request that is being fulfilled belongs to another TSMC, for example.
Error: Certification Request DN too large; string length = 320, limit = 256
The DS/NTP certificate has been initialized with entries that are too long.
mError: E: KM_AddToLCStore: EE Certificate signature invalid!
The certificate type is not supported.
Failed to receive LC_Hello The lower clock has not responded to the DS/NTP audit because the ports in the lower clock and the upper clock do not match. See Port mismatch on page 49 for more information.
Time Source Master Clock Administrator Guide: 3.0 51
C I PH E R™Appendix B: Upgrade Instructions
Updating TSMC software
As part of its commitment to quality and continual improvement of its products, nCipher may occasionally release signed software updates for the TSMC in the form of .upd files. Updating the TSMC software does not affect the Security World and should not impact the configuration settings. However, to be prudent, you may wish to backup the TSMC configuration file before you upgrade the firmware. See USB port memory stick options on page 40 for details of backing up your configuration file to a USB memory stick.
The recommended method for upgrading TSMC software is described below. You can also upgrade the software by inserting a USB memory stick after releasing the USB port, as described in Releasing USB port on page 40.
To upgrade TSMC firmware:
1 Connect to the web interface and log in as an Administrator.
2 Click Local/NTP Management.
3 In TSMC firmware update, select the firmware update file that you want to use to update the TSMC.
4 Click Start firmware update to initiate the upgrade.
Updating the HSM firmware
The HSM is at the heart of the TSMC security environment. You must only upgrade the HSM firmware if nCipher issues a security advisory.
Certificate stores and the DS/NTP private key are lost when you upgrade the firmware of the HSM in the TSMC. Before upgrading the HSM firmware, export the certificate stores and take backup copies of each certificate.
To upgrade HSM firmware, login as the nfast user and select option 15 from the nfast user shell menu. See The nfast user shell menu on page 29 for other nfast user shell options.
After upgrading the HSM firmware:
• re-import the certificates to the certificate stores from your backup copies,
• generate a new DS/NTP key pair and obtain a new certificate for this key.
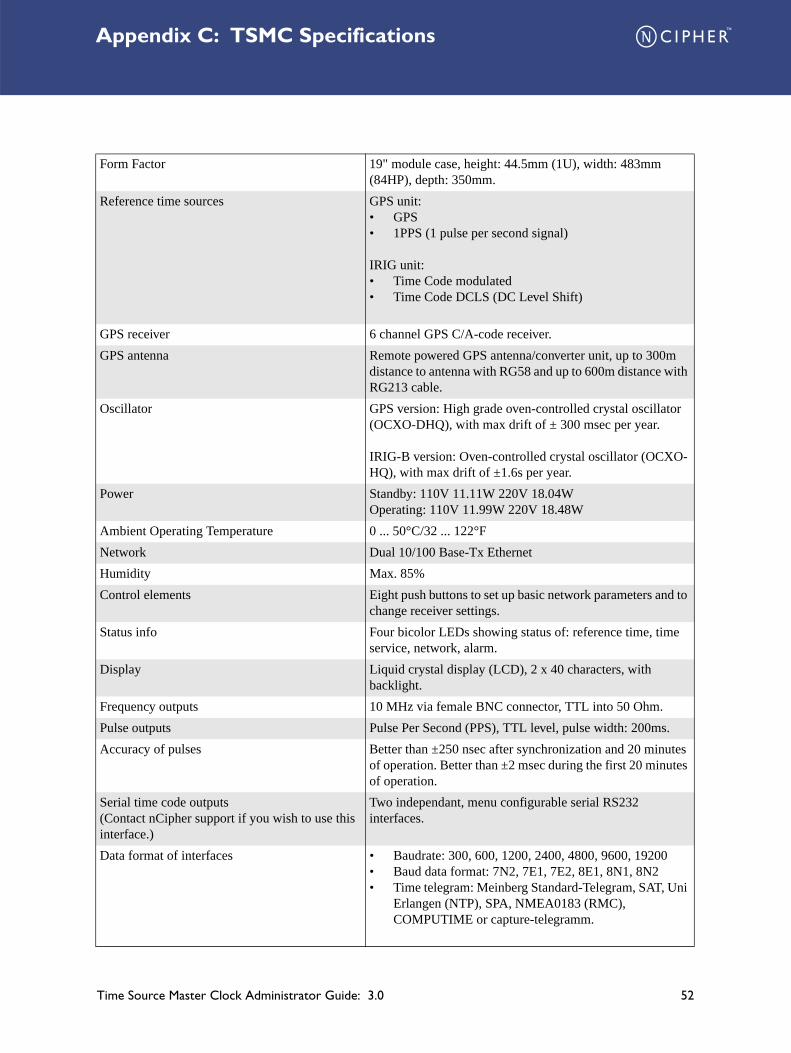
Time Source Master Clock Administrator Guide: 3.0 52
C I PH E R™Appendix C: TSMC Specifications
Form Factor 19" module case, height: 44.5mm (1U), width: 483mm (84HP), depth: 350mm.
Reference time sources GPS unit: • GPS• 1PPS (1 pulse per second signal) IRIG unit: • Time Code modulated• Time Code DCLS (DC Level Shift)
GPS receiver 6 channel GPS C/A-code receiver.
GPS antenna Remote powered GPS antenna/converter unit, up to 300m distance to antenna with RG58 and up to 600m distance with RG213 cable.
Oscillator GPS version: High grade oven-controlled crystal oscillator (OCXO-DHQ), with max drift of ± 300 msec per year. IRIG-B version: Oven-controlled crystal oscillator (OCXO-HQ), with max drift of ±1.6s per year.
Power Standby: 110V 11.11W 220V 18.04W Operating: 110V 11.99W 220V 18.48W
Ambient Operating Temperature 0 ... 50°C/32 ... 122°F
Network Dual 10/100 Base-Tx Ethernet
Humidity Max. 85%
Control elements Eight push buttons to set up basic network parameters and to change receiver settings.
Status info Four bicolor LEDs showing status of: reference time, time service, network, alarm.
Display Liquid crystal display (LCD), 2 x 40 characters, with backlight.
Frequency outputs 10 MHz via female BNC connector, TTL into 50 Ohm.
Pulse outputs Pulse Per Second (PPS), TTL level, pulse width: 200ms.
Accuracy of pulses Better than ±250 nsec after synchronization and 20 minutes of operation. Better than ±2 msec during the first 20 minutes of operation.
Serial time code outputs(Contact nCipher support if you wish to use this interface.)
Two independant, menu configurable serial RS232 interfaces.
Data format of interfaces • Baudrate: 300, 600, 1200, 2400, 4800, 9600, 19200 • Baud data format: 7N2, 7E1, 7E2, 8E1, 8N1, 8N2• Time telegram: Meinberg Standard-Telegram, SAT, Uni
Erlangen (NTP), SPA, NMEA0183 (RMC), COMPUTIME or capture-telegramm.
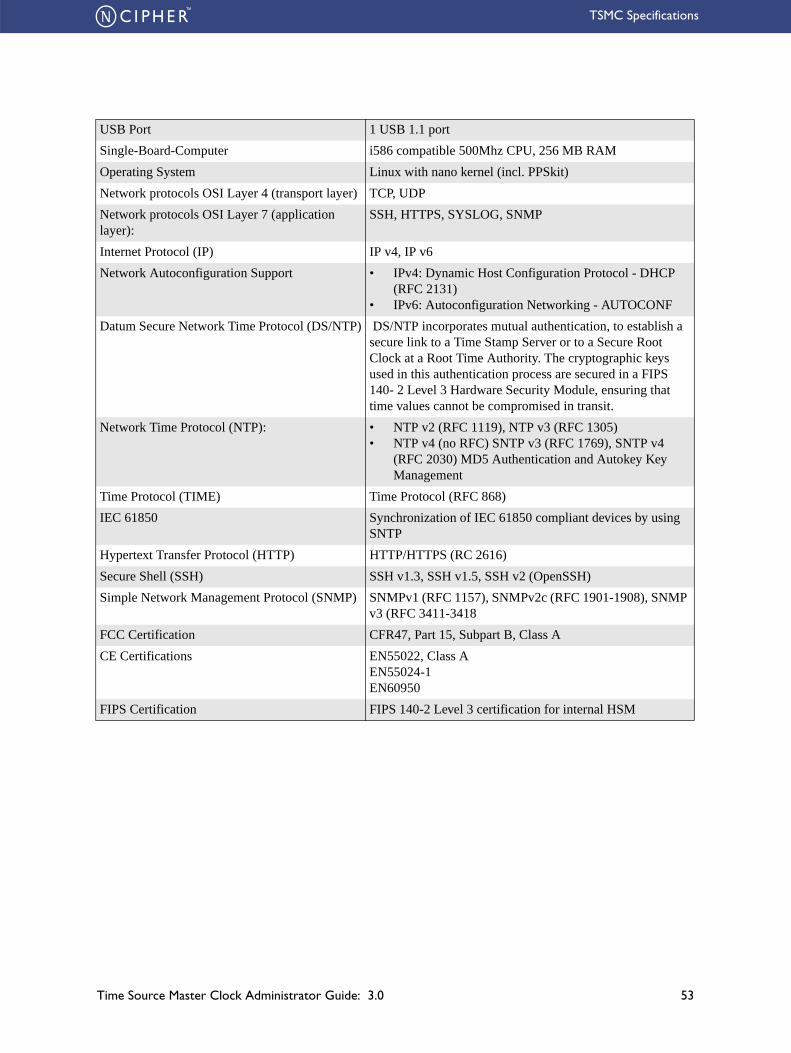
Time Source Master Clock Administrator Guide: 3.0 53
C I PH E R™ TSMC Specifications
USB Port 1 USB 1.1 port
Single-Board-Computer i586 compatible 500Mhz CPU, 256 MB RAM
Operating System Linux with nano kernel (incl. PPSkit)
Network protocols OSI Layer 4 (transport layer) TCP, UDP
Network protocols OSI Layer 7 (application layer):
SSH, HTTPS, SYSLOG, SNMP
Internet Protocol (IP) IP v4, IP v6
Network Autoconfiguration Support • IPv4: Dynamic Host Configuration Protocol - DHCP (RFC 2131)
• IPv6: Autoconfiguration Networking - AUTOCONF
Datum Secure Network Time Protocol (DS/NTP) DS/NTP incorporates mutual authentication, to establish a secure link to a Time Stamp Server or to a Secure Root Clock at a Root Time Authority. The cryptographic keys used in this authentication process are secured in a FIPS 140- 2 Level 3 Hardware Security Module, ensuring that time values cannot be compromised in transit.
Network Time Protocol (NTP): • NTP v2 (RFC 1119), NTP v3 (RFC 1305)• NTP v4 (no RFC) SNTP v3 (RFC 1769), SNTP v4
(RFC 2030) MD5 Authentication and Autokey Key Management
Time Protocol (TIME) Time Protocol (RFC 868)
IEC 61850 Synchronization of IEC 61850 compliant devices by using SNTP
Hypertext Transfer Protocol (HTTP) HTTP/HTTPS (RC 2616)
Secure Shell (SSH) SSH v1.3, SSH v1.5, SSH v2 (OpenSSH)
Simple Network Management Protocol (SNMP) SNMPv1 (RFC 1157), SNMPv2c (RFC 1901-1908), SNMP v3 (RFC 3411-3418
FCC Certification CFR47, Part 15, Subpart B, Class A
CE Certifications EN55022, Class AEN55024-1EN60950
FIPS Certification FIPS 140-2 Level 3 certification for internal HSM
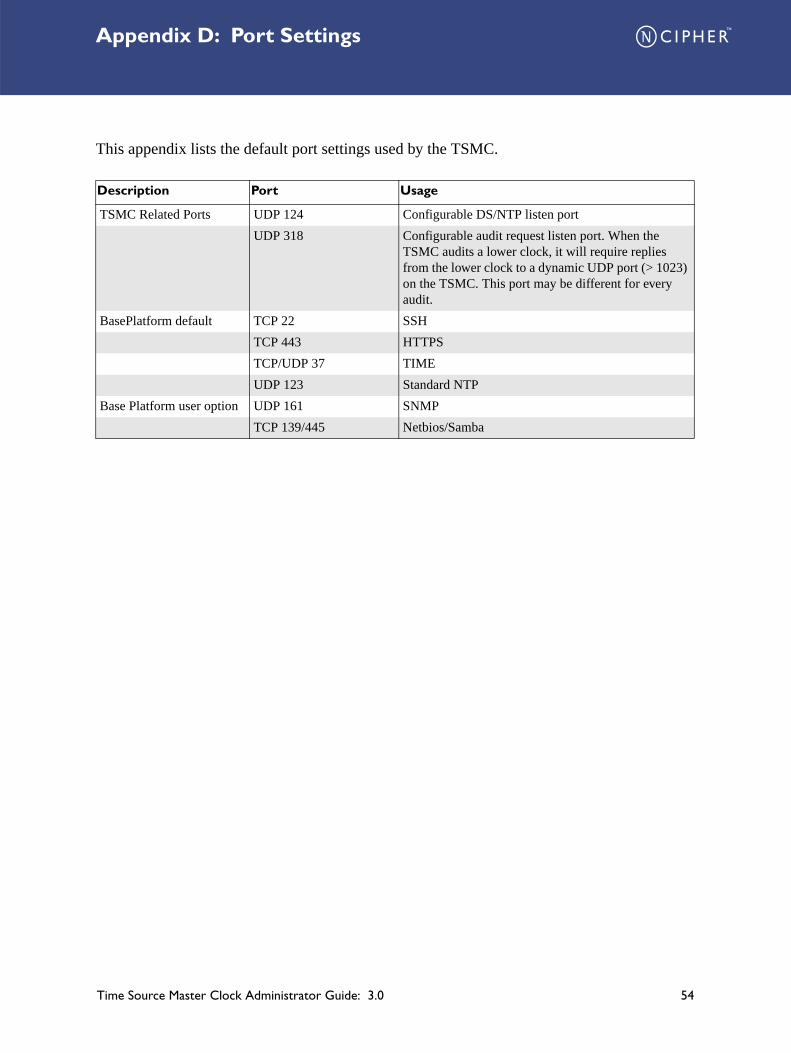
Time Source Master Clock Administrator Guide: 3.0 54
C I PH E R™Appendix D: Port Settings
This appendix lists the default port settings used by the TSMC.
Description Port Usage
TSMC Related Ports UDP 124 Configurable DS/NTP listen port
UDP 318 Configurable audit request listen port. When the TSMC audits a lower clock, it will require replies from the lower clock to a dynamic UDP port (> 1023) on the TSMC. This port may be different for every audit.
BasePlatform default TCP 22 SSH
TCP 443 HTTPS
TCP/UDP 37 TIME
UDP 123 Standard NTP
Base Platform user option UDP 161 SNMP
TCP 139/445 Netbios/Samba
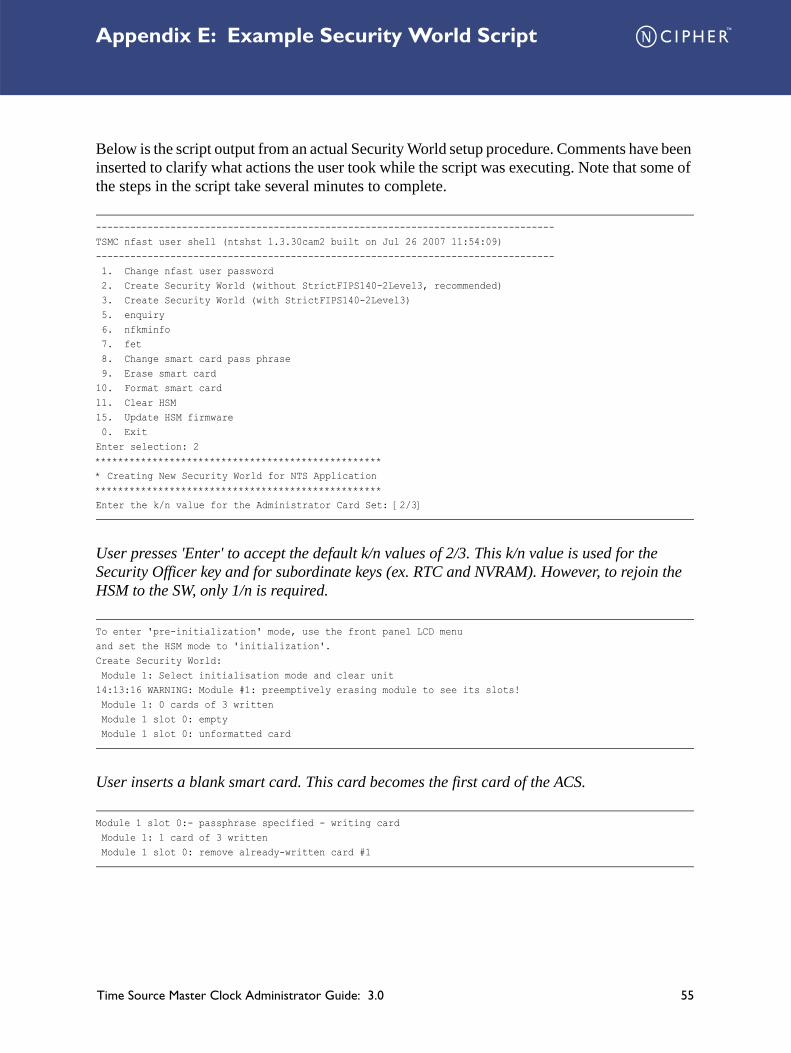
Time Source Master Clock Administrator Guide: 3.0 55
C I PH E R™Appendix E: Example Security World Script
Below is the script output from an actual Security World setup procedure. Comments have been inserted to clarify what actions the user took while the script was executing. Note that some of the steps in the script take several minutes to complete.
--------------------------------------------------------------------------------TSMC nfast user shell (ntshst 1.3.30cam2 built on Jul 26 2007 11:54:09)-------------------------------------------------------------------------------- 1. Change nfast user password 2. Create Security World (without StrictFIPS140-2Level3, recommended) 3. Create Security World (with StrictFIPS140-2Level3) 5. enquiry 6. nfkminfo 7. fet 8. Change smart card pass phrase 9. Erase smart card10. Format smart card11. Clear HSM15. Update HSM firmware 0. ExitEnter selection: 2*************************************************** Creating New Security World for NTS Application**************************************************Enter the k/n value for the Administrator Card Set: [2/3]
User presses 'Enter' to accept the default k/n values of 2/3. This k/n value is used for the Security Officer key and for subordinate keys (ex. RTC and NVRAM). However, to rejoin the HSM to the SW, only 1/n is required.
To enter 'pre-initialization' mode, use the front panel LCD menuand set the HSM mode to 'initialization'.Create Security World: Module 1: Select initialisation mode and clear unit14:13:16 WARNING: Module #1: preemptively erasing module to see its slots! Module 1: 0 cards of 3 written Module 1 slot 0: empty Module 1 slot 0: unformatted card
User inserts a blank smart card. This card becomes the first card of the ACS.
Module 1 slot 0:- passphrase specified - writing card Module 1: 1 card of 3 written Module 1 slot 0: remove already-written card #1

Time Source Master Clock Administrator Guide: 3.0 56
C I PH E R™ Example Security World Script
User removes the card.
Module 1 slot 0: empty Module 1 slot 0: unformatted card
User inserts second blank smart card (2nd card of ACS).
Module 1 slot 0:- passphrase specified - writing card Module 1: 2 cards of 3 written Module 1 slot 0: remove already-written card #2 Module 1 slot 0: empty Module 1 slot 0: unformatted card
User inserts third blank smart card (3rd card of ACS).
Module 1 slot 0:- passphrase specified - writing cardCard writing complete.security world generated on module #1; hknso = 9fa1fd2f5d5df7add073a195d57eb51346cd193cPlease set the HSM to 'operational' mode.To enter 'operational' mode, use the front panel LCD menuand set the HSM mode to 'operational'.Press Enter to continue*************************************************** Creating OCS:NtsWorld to manage delegation keys**************************************************Enter the k/n value for the Operator Card Set: [1/1]Creating Cardset: Module 1: 0 cards of 1 written Module 1 slot 0: Admin Card #3 Module 1 slot 0: empty
User removes third ACS card.
Module 1 slot 0: unformatted card
User inserts blank smart card for the OCS.
Module 1 slot 0:- passphrase specified - writing cardCard writing complete.cardset created; hkltu = 4dafc7fcd477c4cb6bde68fc4e0044bb3c524a23*************************************************** Creating delegation keys and authority**************************************************Loading tokens and/or keys on Module#1, ESN A931-7D10-D3A3 Loading cardset `NtsWorld' in module #1 ... 1 card(s) required. Insert a card (or say `q'). Enter pass phrase for card #1 (in slot #0):
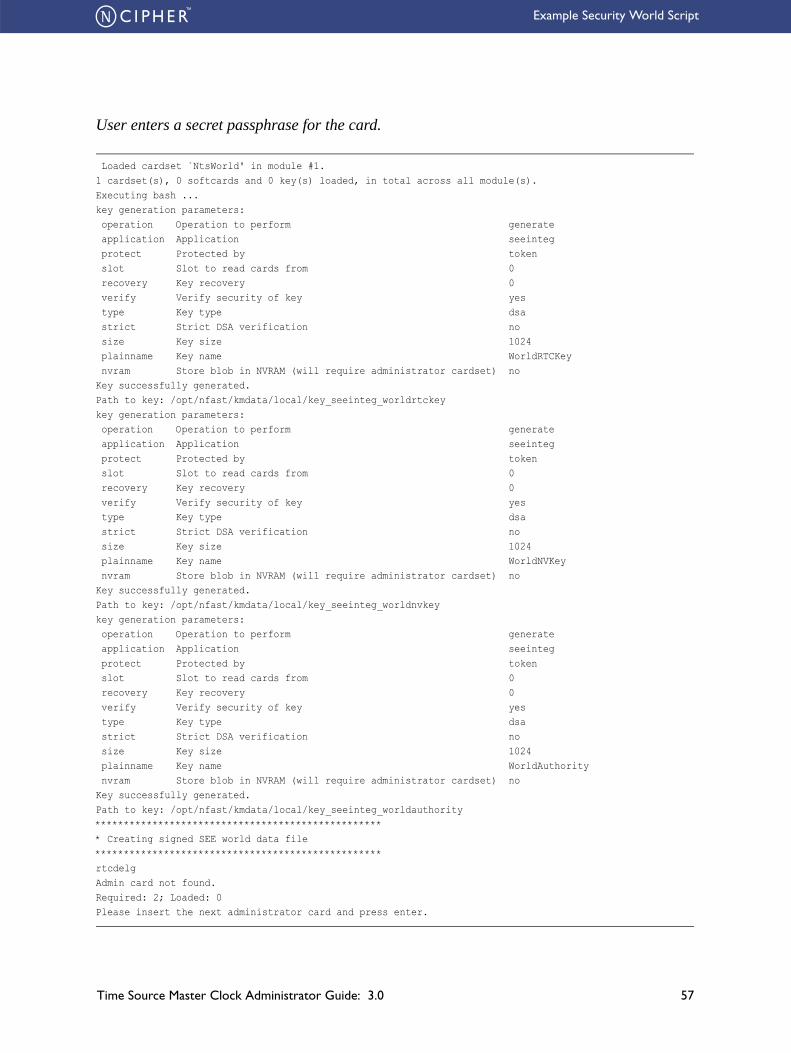
Time Source Master Clock Administrator Guide: 3.0 57
C I PH E R™ Example Security World Script
User enters a secret passphrase for the card.
Loaded cardset `NtsWorld' in module #1.1 cardset(s), 0 softcards and 0 key(s) loaded, in total across all module(s).Executing bash ...key generation parameters: operation Operation to perform generate application Application seeinteg protect Protected by token slot Slot to read cards from 0 recovery Key recovery 0 verify Verify security of key yes type Key type dsa strict Strict DSA verification no size Key size 1024 plainname Key name WorldRTCKey nvram Store blob in NVRAM (will require administrator cardset) noKey successfully generated.Path to key: /opt/nfast/kmdata/local/key_seeinteg_worldrtckeykey generation parameters: operation Operation to perform generate application Application seeinteg protect Protected by token slot Slot to read cards from 0 recovery Key recovery 0 verify Verify security of key yes type Key type dsa strict Strict DSA verification no size Key size 1024 plainname Key name WorldNVKey nvram Store blob in NVRAM (will require administrator cardset) noKey successfully generated.Path to key: /opt/nfast/kmdata/local/key_seeinteg_worldnvkeykey generation parameters: operation Operation to perform generate application Application seeinteg protect Protected by token slot Slot to read cards from 0 recovery Key recovery 0 verify Verify security of key yes type Key type dsa strict Strict DSA verification no size Key size 1024 plainname Key name WorldAuthority nvram Store blob in NVRAM (will require administrator cardset) noKey successfully generated.Path to key: /opt/nfast/kmdata/local/key_seeinteg_worldauthority*************************************************** Creating signed SEE world data file**************************************************rtcdelgAdmin card not found.Required: 2; Loaded: 0Please insert the next administrator card and press enter.
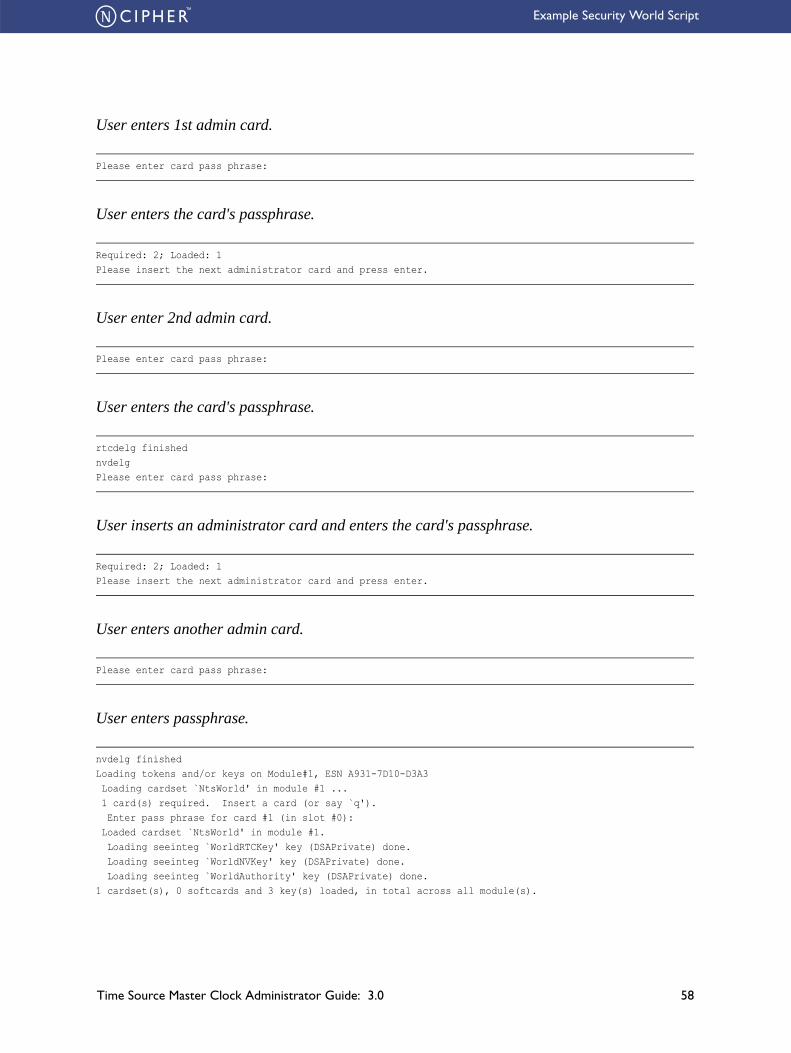
Time Source Master Clock Administrator Guide: 3.0 58
C I PH E R™ Example Security World Script
User enters 1st admin card.
Please enter card pass phrase:
User enters the card's passphrase.
Required: 2; Loaded: 1Please insert the next administrator card and press enter.
User enter 2nd admin card.
Please enter card pass phrase:
User enters the card's passphrase.
rtcdelg finishednvdelgPlease enter card pass phrase:
User inserts an administrator card and enters the card's passphrase.
Required: 2; Loaded: 1Please insert the next administrator card and press enter.
User enters another admin card.
Please enter card pass phrase:
User enters passphrase.
nvdelg finishedLoading tokens and/or keys on Module#1, ESN A931-7D10-D3A3 Loading cardset `NtsWorld' in module #1 ... 1 card(s) required. Insert a card (or say `q'). Enter pass phrase for card #1 (in slot #0): Loaded cardset `NtsWorld' in module #1. Loading seeinteg `WorldRTCKey' key (DSAPrivate) done. Loading seeinteg `WorldNVKey' key (DSAPrivate) done. Loading seeinteg `WorldAuthority' key (DSAPrivate) done.1 cardset(s), 0 softcards and 3 key(s) loaded, in total across all module(s).
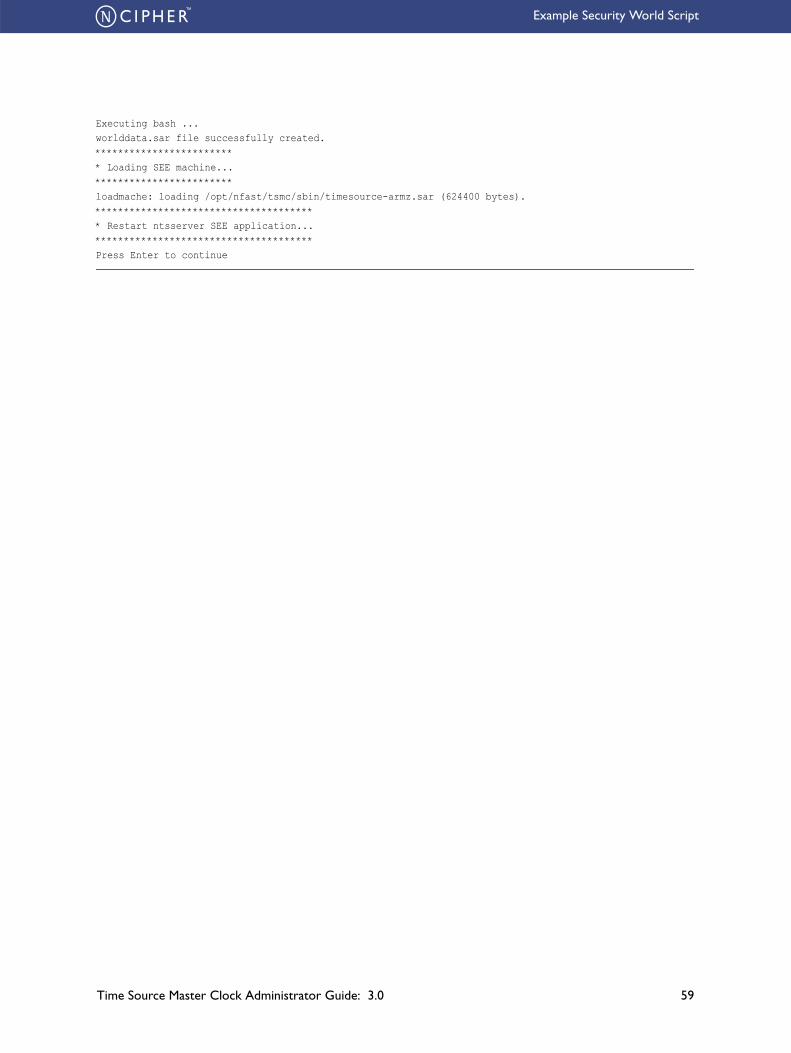
Time Source Master Clock Administrator Guide: 3.0 59
C I PH E R™ Example Security World Script
Executing bash ...worlddata.sar file successfully created.************************* Loading SEE machine...************************loadmache: loading /opt/nfast/tsmc/sbin/timesource-armz.sar (624400 bytes).*************************************** Restart ntsserver SEE application...**************************************Press Enter to continue
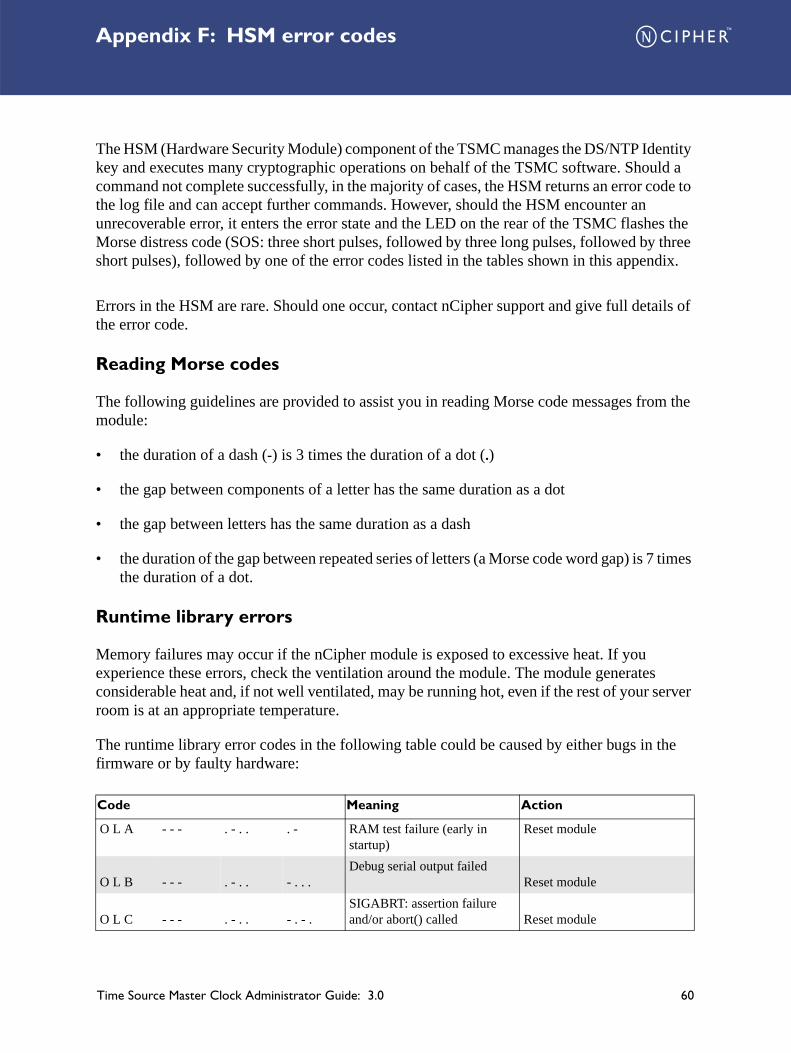
Time Source Master Clock Administrator Guide: 3.0 60
C I PH E R™Appendix F: HSM error codes
The HSM (Hardware Security Module) component of the TSMC manages the DS/NTP Identity key and executes many cryptographic operations on behalf of the TSMC software. Should a command not complete successfully, in the majority of cases, the HSM returns an error code to the log file and can accept further commands. However, should the HSM encounter an unrecoverable error, it enters the error state and the LED on the rear of the TSMC flashes the Morse distress code (SOS: three short pulses, followed by three long pulses, followed by three short pulses), followed by one of the error codes listed in the tables shown in this appendix.
Errors in the HSM are rare. Should one occur, contact nCipher support and give full details of the error code.
Reading Morse codes
The following guidelines are provided to assist you in reading Morse code messages from the module:
• the duration of a dash (-) is 3 times the duration of a dot (.)
• the gap between components of a letter has the same duration as a dot
• the gap between letters has the same duration as a dash
• the duration of the gap between repeated series of letters (a Morse code word gap) is 7 times the duration of a dot.
Runtime library errors
Memory failures may occur if the nCipher module is exposed to excessive heat. If you experience these errors, check the ventilation around the module. The module generates considerable heat and, if not well ventilated, may be running hot, even if the rest of your server room is at an appropriate temperature.
The runtime library error codes in the following table could be caused by either bugs in the firmware or by faulty hardware:
Code Meaning Action
O L A - - - . - . . . - RAM test failure (early in startup)
Reset module
O L B
- - -
. - . .
- . . .
Debug serial output failed Reset module
O L C
- - -
. - . .
- . - .
SIGABRT: assertion failure and/or abort() called
Reset module

Time Source Master Clock Administrator Guide: 3.0 61
C I PH E R™ Hardware driver errors
Codes OLA, OLB, OLD, and OLE are more likely to indicate a hardware problem than a firmware problem.
To reset a unit that is in an error state, turn off the unit and then turn it on again.
Hardware driver errors
In general, the hardware driver error codes described in the following table indicate that some form of automatic hardware detection has failed. Besides indicating simple hardware failure, one of these error codes could indicate that there is a bug in the firmware or that the wrong firmware has been loaded:
O L D
- - -
. - . .
- . .
Interrupt occurred when disabled
Reset module
O L E
- - -
. - . .
.
SIGSEGV: access violation Reset module
O L F
- - -
. - . .
. . - .
SIGSWI: illegal SWI called Reset module
O L I
- - -
. - . .
. .
SIGSTAK: out of stack space Reset module
O L J
- - -
. - . .
. - - -
SIGFPE: unsupported arithmetic exception (such as division by 0)
Reset module
O L K
- - -
. - . .
- . -
SIGOSERROR: runtime library internal error
Reset module
O L L
- - -
. - . .
. - . .
SIGUNKNOWN: invalid signal raised
Reset module
O L M
- - -
. - . .
- -
SIGILL: illegal instruction Reset module
O L N
- - -
. - . .
- .
SIGFATALPANIC: error in error handling code
Reset module
Code Meaning Action
H B . . . . - . . . Debug serial port init. failed Contact nCipher
H C . . . . - . - . Processing thread initialization failed
Contact nCipher
H D . . . . - . . Failure reading unique serial number
Contact nCipher
H E . . . . . EEPROM failed on initialization
Contact nCipher
H I . . . . . . Interrupt controller init. failed
Contact nCipher
H M . . . . - - System hardware init. failed Contact nCipher
Code Meaning Action
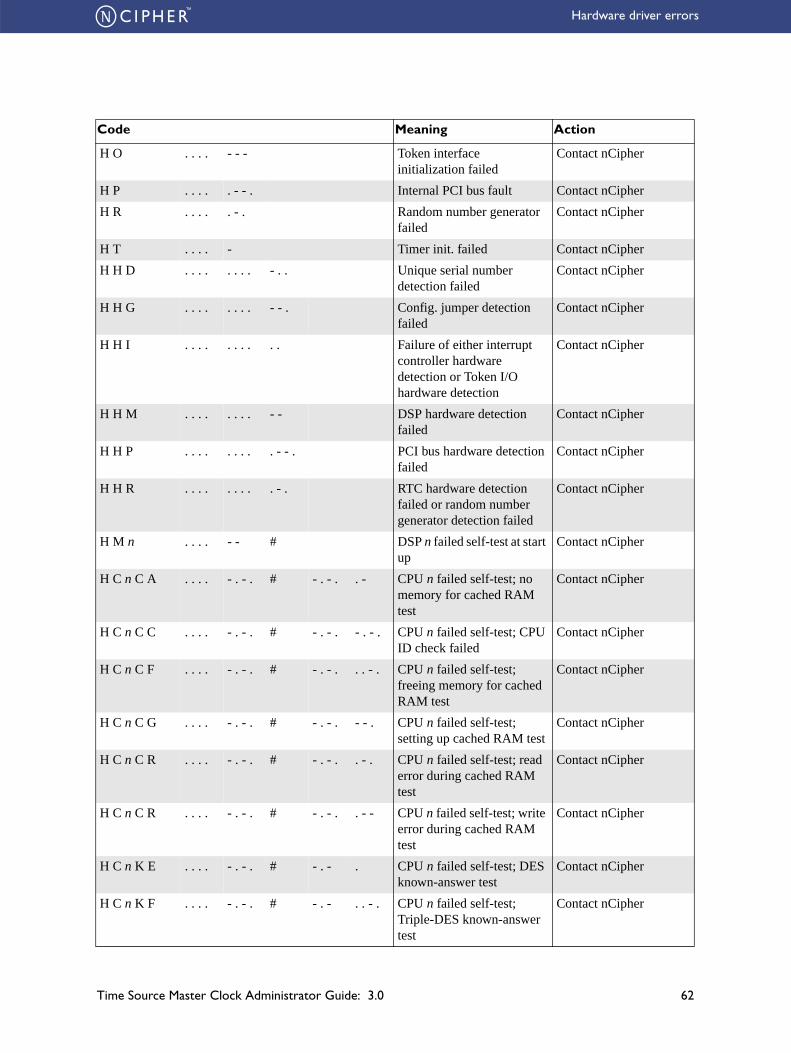
Time Source Master Clock Administrator Guide: 3.0 62
C I PH E R™ Hardware driver errors
H O . . . . - - - Token interface initialization failed
Contact nCipher
H P . . . . . - - . Internal PCI bus fault Contact nCipher
H R . . . . . - . Random number generator failed
Contact nCipher
H T . . . . - Timer init. failed Contact nCipher
H H D . . . . . . . . - . . Unique serial number detection failed
Contact nCipher
H H G . . . . . . . . - - . Config. jumper detection failed
Contact nCipher
H H I . . . . . . . . . . Failure of either interrupt controller hardware detection or Token I/O hardware detection
Contact nCipher
H H M . . . . . . . . - - DSP hardware detection failed
Contact nCipher
H H P . . . . . . . . . - - . PCI bus hardware detection failed
Contact nCipher
H H R . . . . . . . . . - . RTC hardware detection failed or random number generator detection failed
Contact nCipher
H M n . . . . - - # DSP n failed self-test at start up
Contact nCipher
H C n C A . . . . - . - . # - . - . . - CPU n failed self-test; no memory for cached RAM test
Contact nCipher
H C n C C . . . . - . - . # - . - . - . - . CPU n failed self-test; CPU ID check failed
Contact nCipher
H C n C F . . . . - . - . # - . - . . . - . CPU n failed self-test; freeing memory for cached RAM test
Contact nCipher
H C n C G . . . . - . - . # - . - . - - . CPU n failed self-test; setting up cached RAM test
Contact nCipher
H C n C R . . . . - . - . # - . - . . - . CPU n failed self-test; read error during cached RAM test
Contact nCipher
H C n C R . . . . - . - . # - . - . . - - CPU n failed self-test; write error during cached RAM test
Contact nCipher
H C n K E . . . . - . - . # - . - . CPU n failed self-test; DES known-answer test
Contact nCipher
H C n K F . . . . - . - . # - . - . . - . CPU n failed self-test; Triple-DES known-answer test
Contact nCipher
Code Meaning Action

Time Source Master Clock Administrator Guide: 3.0 63
C I PH E R™ Hardware driver errors
In the table above, the symbol "#" stands for a given numeral's Morse code representation:
H C n K H . . . . - . - . # - . - . . . . CPU n failed self-test; SHA-1 known-answer test
Contact nCipher
H C n K M . . . . - . - . # - . - - - CPU n failed self-test; HMAC-SHA1 known-answer test
Contact nCipher
H C n K S . . . . - . - . # - . - - - CPU n failed self-test; DSA known-answer test
Contact nCipher
H C n L C . . . . - . - . # . - . . - . - . CPU n failed self-test; locking check
Contact nCipher
H C n P S . . . . - . - . # . - - . . . . CPU n failed self-test; test terminated at start
Contact nCipher
H C n S A . . . . - . - . # . . . . - - . CPU n failed self-test; no memory for uncached RAM test
Contact nCipher
H C n S F . . . . - . - . # . . . . . - . CPU n failed self-test; freeing memory for uncached RAM test
Contact nCipher
H C n S R . . . . - . - . # . . . . - . CPU n failed self-test; read error during uncached RAM test
Contact nCipher
H C n S W . . . . - . - . # . . . . - - CPU n failed self-test; write error during uncached RAM test
Contact nCipher
H C n T S . . . . - . - . # - . . . CPU n failed self-test; could not start test
Contact nCipher
Numeral Morse
1 . - - - -
2 . . - - -
3 . . . - -
4 . . . . -
5 . . . . .
6 - . . . .
7 - - . . .
8 - - - . .
9 - - - - .
0 - - - - -
Code Meaning Action
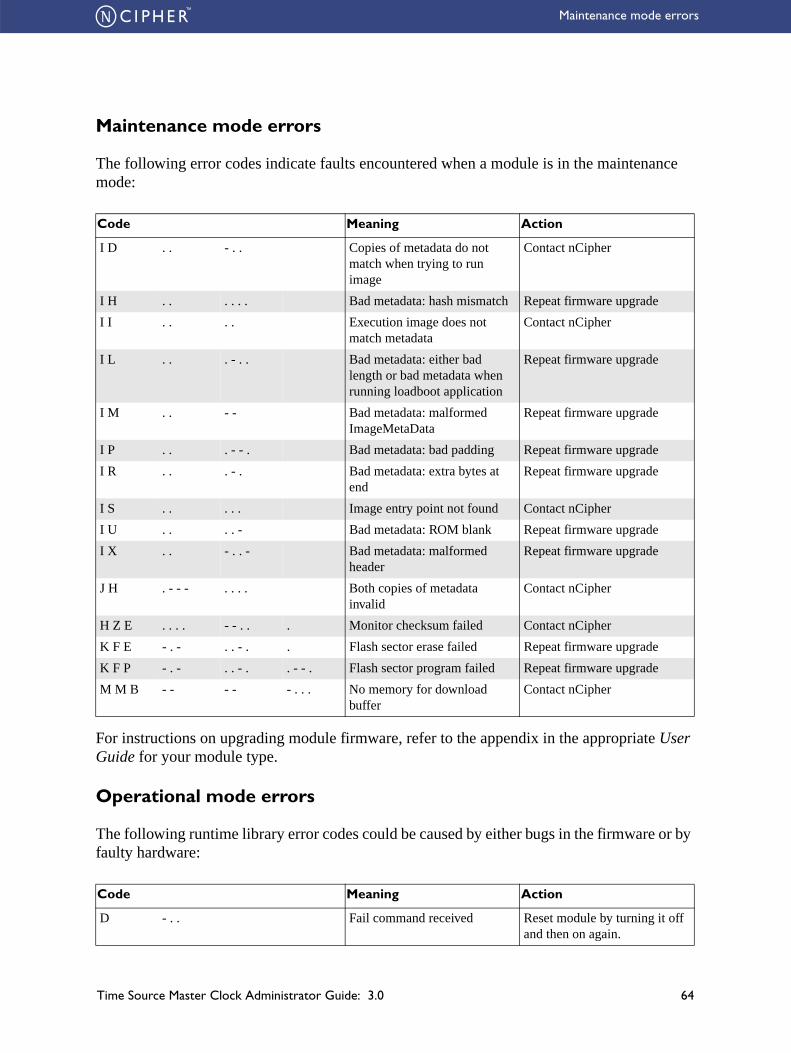
Time Source Master Clock Administrator Guide: 3.0 64
C I PH E R™ Maintenance mode errors
Maintenance mode errors
The following error codes indicate faults encountered when a module is in the maintenance mode:
For instructions on upgrading module firmware, refer to the appendix in the appropriate User Guide for your module type.
Operational mode errors
The following runtime library error codes could be caused by either bugs in the firmware or by faulty hardware:
Code Meaning Action
I D . . - . . Copies of metadata do not match when trying to run image
Contact nCipher
I H . . . . . . Bad metadata: hash mismatch Repeat firmware upgrade
I I . . . . Execution image does not match metadata
Contact nCipher
I L . . . - . . Bad metadata: either bad length or bad metadata when running loadboot application
Repeat firmware upgrade
I M . . - - Bad metadata: malformed ImageMetaData
Repeat firmware upgrade
I P . . . - - . Bad metadata: bad padding Repeat firmware upgrade
I R . . . - . Bad metadata: extra bytes at end
Repeat firmware upgrade
I S . . . . . Image entry point not found Contact nCipher
I U . . . . - Bad metadata: ROM blank Repeat firmware upgrade
I X . . - . . - Bad metadata: malformed header
Repeat firmware upgrade
J H . - - - . . . . Both copies of metadata invalid
Contact nCipher
H Z E . . . . - - . . . Monitor checksum failed Contact nCipher
K F E - . - . . - . . Flash sector erase failed Repeat firmware upgrade
K F P - . - . . - . . - - . Flash sector program failed Repeat firmware upgrade
M M B - - - - - . . . No memory for download buffer
Contact nCipher
Code Meaning Action
D - . . Fail command received Reset module by turning it off and then on again.
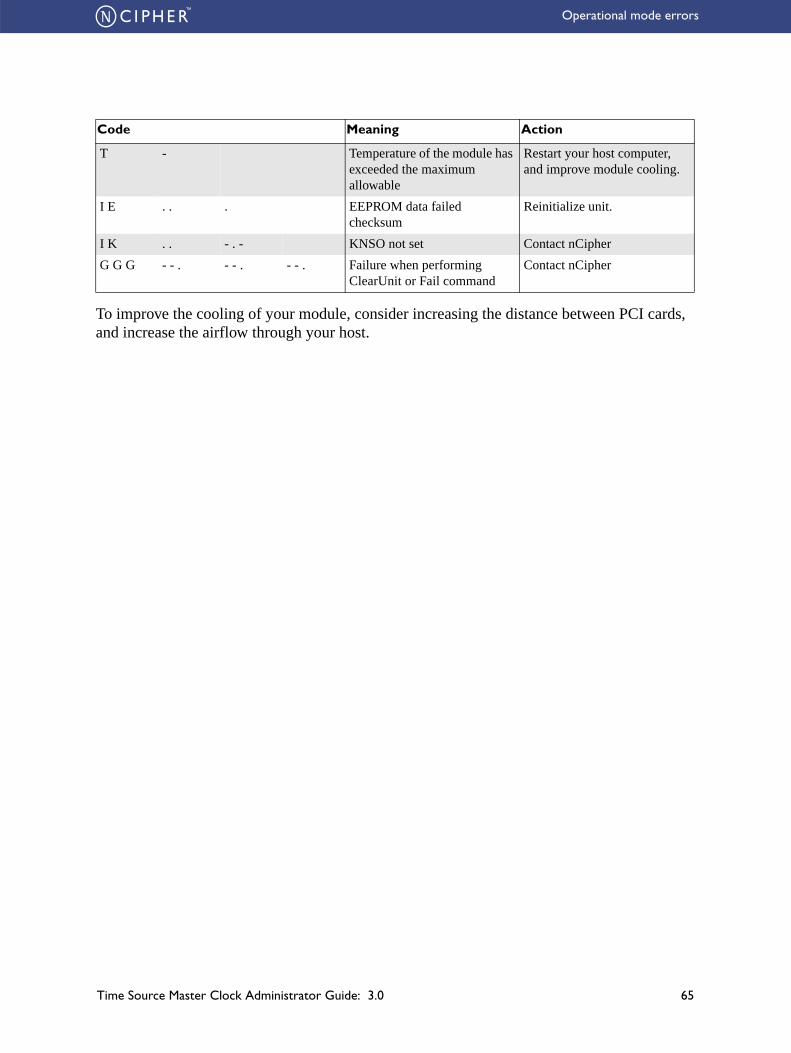
Time Source Master Clock Administrator Guide: 3.0 65
C I PH E R™ Operational mode errors
To improve the cooling of your module, consider increasing the distance between PCI cards, and increase the airflow through your host.
T - Temperature of the module has exceeded the maximum allowable
Restart your host computer, and improve module cooling.
I E . . . EEPROM data failed checksum
Reinitialize unit.
I K . . - . - KNSO not set Contact nCipher
G G G - - . - - . - - . Failure when performing ClearUnit or Fail command
Contact nCipher
Code Meaning Action
Internet addresses
Note nCipher also maintain international sales offices. Please contact the UK, or the US, head office for details of your nearest nCipher representative.
nCipher Corporation Ltd. nCipher Inc.Cambridge, UK
Jupiter HouseStation RoadCambridgeCB1 2JDUK
Boston Metro Region, USA
92 Montvale Avenue, Suite 4500Stoneham, MA 02180USA
Tel: +44 (0) 1223 723600 Tel: 800-NCIPHER800-6247437+1 (781) 994 4000
Fax: +44 (0) 1223 723601 Fax: +1 (781) 994 4001
E-mail: [email protected]@ncipher.com
E-mail: [email protected]@ncipher.com
Web Site: http://www.ncipher.com/
Online Documentation: http://active.ncipher.com/documentation/
C I PH E R™nCipher addresses