TI-SmartView™CE EmulatorSoftware fortheTI-84PlusFamily
42
TI-SmartView™ CE Emulator Software for the TI-84 Plus Family Learn more about TI Technology through the online help at education.ti.com/eguide .
Transcript of TI-SmartView™CE EmulatorSoftware fortheTI-84PlusFamily

TI-SmartView™ CEEmulator Software
for the TI-84 Plus Family
Learn more about TI Technology through the online help at education.ti.com/eguide.

ii
Legal InformationImportant InformationTexas Instruments makes no warranty, either expressed or implied, including but notlimited to any implied warranties of merchantability and fitness for a particularpurpose, regarding any programs or book materials and makes such materialsavailable solely on an “as-is” basis.
In no event shall Texas Instruments be liable to anyone for special, collateral,incidental, or consequential damages in connection with or arising out of the purchaseor use of these materials, and the sole and exclusive liability of Texas Instruments,regardless of the form of action, shall not exceed the purchase price of this product.Moreover, Texas Instruments shall not be liable for any claim of any kind whatsoeveragainst the use of these materials by any other party.
This graphing product application (APP) is licensed. See the terms of the licenseagreement.
© 2006 - 2020 Texas Instruments Incorporated
Microsoft and Vernier are trademarks of their respective owners.

Contents
What's New 1What's New in TI-SmartView™ CE Software v5.6.0 1
Introduction to TI-SmartView™ CE Software 2
Using the TI-SmartView™ CE Calculator Emulator Workspace 5Parts of the TI-SmartView™ CE Software Workspace 6Using the TI-SmartView™ CE Emulator Keyboard 7Dragging and Dropping a Screen to Another Application 8Connecting a Calculator as a Remote Keypad 9Resetting the Emulator 11Saving and Loading a CE Emulator State 12Choosing a Display Option 14Copying the Key Press History to Another Application 17Changing the Size of the TI-SmartView™ CE Screen 20Emulator and Toolbar positions 20Always in Front 21
Using Screen Capture 22Parts of the Screen Capture Workspace 23Dragging and Dropping a Screen to Another Application 23
Using TI-SmartView™ CE Emulator Explorer Workspace 24Parts of the TI-SmartView™ CE Emulator Explorer Main Workspace 25Copying Emulator Files to the Computer 25Deleting Emulator Files 26Data Import 26
Computer Keyboard Shortcuts 29Compatibility with Graphing Calculators 31
The Python Experience 32Using TI-SmartView™ CE to Demonstrate the Python Experience 32
Data Collection Using Vernier EasyData® App on the TI-84 Plus CEEmulator 34
Using Vernier Sensors with TI-SmartView™ CE and EasyData® CE App 34Using TI-SmartView™ CE to Demonstrate Data Collection 36
General Information 38Online Help 38
iii

iv
Contact TI Support 38Service and Warranty Information 38Updates 38

What's NewWhat's New in TI-SmartView™ CE Software v5.6.0TI-SmartView™ CE Software What's New
• TI-84 Plus CE default emulator state
- OS v5.6.0- Periodic Table v5.5.0 Element updates- Python App v5.5.0- Polynomial Root Finder and System Solver App v5.5.0 - minor fixes- Science Tools App v5.5.0 - constants updates- Language Localization Apps - minor fixes
Reminder: Use the latest CE Bundle at education.ti.com/84ceupdate to ensure your CEhas the latest and appropriate calculator files for your TI-84 Plus CE.
TI-SmartView™ CE for the TI-84 Plus Family
Please update the software at education.ti.com/84ceupdate to the latest version forimprovements and the CE emulator with the latest calculator files for this release.
What's New 1

2 Introduction to TI-SmartView™ CE Software
Introduction to TI-SmartView™ CE SoftwareThe TI-SmartView™ CE software allows you to display a TI graphing calculator for yourentire classroom. Two workspaces are included to help enhance your classroompresentations.
Calculator Emulator Workspace
Allows you to:
• Display a Full Emulator View or a Keypad with Large DisplayScreen View. With optional views to open or close.
• Key Press History– Displays images of keys pressed so students can follow
along with the keys pressed.• View3™
– Teacher controlled update of up to three additionalemulated screens such as Graph, Table and Equation formultiple representations.
• Calculate and Graph– Same experience as on physical graphing calculator.
• Drag and Drop any emulated screen to your class presentationsoftware.**– Build out your lessons with screens created during your
class.• Press emulator keys using a Remote Keypad!
– Run SmartPad™ CE App*** on your TI-84 Plus CE connectedto the computer with your USB cable. When the TI-SmartView™ CE window is in focus on your computer, yourcalculator becomes a Remote Keypad.
• Launch a separate Screen Capture Window– Capture and save emulator screens as computer files similar
to TI Connect™ CE Screen Capture which captures screensfrom the graphing calculator.
**Software such as Microsoft™ Office or other presentation software supported.***SmartPad™ CE App for TI-84 Plus CE comes pre-loaded on the calculator. If not onyour TI-84 Plus CE, SmartPad CE App is also available to load to your calculator ateducation.ti.com/84ceupdate.Note: The Large Display Screen is not touch enabled. Use emulator keys as on thecalculator.

Calculator Emulator screen
Introduction to TI-SmartView™ CE Software 3

4 Introduction to TI-SmartView™ CE Software
Emulator Explorer Workspace
Allows you to:
• Add single or multiple files to the emulator to set up for your classes:– Drag selected calculator files and/or your images (jpg, png, etc.)
from your computer to your emulator for quick emulator setup evenduring class instruction.
• Save files from the emulator to save or share to your studentscalculators:– Drag selected calculator files to your computer to save files from a
class presentation.– Tip: Once files are saved to your computer, you can drag those files
to multiple connected student calculators using TI Connect™ CECalculator Explorer for classroom sharing. TI Connect™ CE is free ateducation.ti.com/downloads.
Emulator Explorer default screen

Using the TI-SmartView™ CE Calculator EmulatorWorkspaceThe TI-SmartView™ CE Calculator Emulator workspace contains tools you can use toinput calculations, plot variables, and display graphs, tables, and lists.
Using the TI-SmartView™ CE Calculator EmulatorWorkspace 5

6 Using the TI-SmartView™ CE Calculator EmulatorWorkspace
Parts of the TI-SmartView™ CE Software Workspace
Menu Bar - Use these menus to perform all emulator functions, including:
• File - file management • Actions - such as screen capture• Edit - include copy key as
font • Help - Help and links
• View - change the displays
Note: You can complete most of the actions in these menus by clicking icons inthe toolbar.
Toolbar- Use these toolbar icons to:• Select a different calculator model• Toggle displays of Large Display Screen, Key Press History on or off, and,
View3™• Capture current emulator screen
Workspace Panel - Use this panel to navigate between the Calculator Emulatorworkspace and the Emulator Explorer workspace.
Choose Emulator and Tool Bar Positions
• Emulator position Left/Right - to switch between left and right handdisplay of the graphing calculator screen. This is convenient when projectingan Interactive White Board.
• Tool Bar Top/Bottom - to toggle the tool bar between the top and thebottom of the screen. This is convenient when projecting an InteractiveWhite Board.
Note: You can change the visual layout and/or position of elements to optimizeaccess especially when using an Interactive White Board.
Emulator Panel - Use this panel to use the full emulator or the emulator keypadonly view.
Large Display Screen Panel/Key Press History Panel - Use this panel to display alarge version of the calculator screen and/or to display key press history.You have the following display options:
• Large Display Screen only • Key Press History only• Large Display Screen + Key Press
History • Hide panel
View3™ Panel - Use this panel to show three additional screens simultaneously.
(This panel is hidden by default. Click to show the View3
™ Panel.)You can select any three of the following screens:

• Equation(Y= editor)
• List(Stat List editor)
• Window
• Table • Stat Plot • [Blank]• Graph
Resize Panels - Click and drag the vertical bar at the side of a panel to resize it.
Using the TI-SmartView™ CE Emulator KeyboardThe mouse takes the place of your finger pressing keys on the computer keyboard.
Click the keys on the TI-SmartView™ CE emulator as you would press the keys on thegraphing calculator.
1. Click the arrow keys on the emulator keyboard to move the cursor to thedesired setting.
2. Click to select it.
You must first place the keyboard in its alpha typing mode to type text using thecomputer keyboard.
By default, the graphing calculator keyboard is in its normal mode, in which keys aresimply shortcuts to graphing calculator keys.
For example, pressing [ A ] on your computer keyboard is the same as clickingon the graphing calculator. In this mode, you cannot enter the letters A through Z onthe graphing calculator screen by typing these letters on your computer keyboard.
To enter a letter or other alpha character, first click on the graphing calculatorkeyboard (or press [ F7 ] on your computer keyboard) to put the graphing calculator inalpha mode. For example, typing [ F7 ] [ A ] on your computer keyboard enters an A onthe graphing calculator screen. After you type the character, the keyboard returns to itsnormal mode.
You can lock the alpha key to type more than one character in succession.
To lock the alpha key:
▶ Click on the graphing calculator keyboard or press [ F6 ] [ F7 ] onyour computer keyboard.
To return to the normal mode:
▶ Click or press [ F7 ].
Using the TI-SmartView™ CE Calculator EmulatorWorkspace 7

8 Using the TI-SmartView™ CE Calculator EmulatorWorkspace
In alpha typing mode, pressing [ 0 ] through [ 9 ] on your computer keyboard act asshortcuts to the alpha functions associated with these keys on the graphing calculatorkeyboard. Pressing [ 1 ] enters Y (the alpha character associated withÀ) on thegraphing calculator screen. To type a number, be sure the keyboard is not in the alphatyping mode. These keys do enter the digits 0 through 9 in the normal mode.
You can hold down an arrow key to scroll the cursor continuously.
When you use an arrow key to move the cursor, you can hold down the key to scroll thecursor continuously, instead of having to press the key repeatedly. In the key press
history, the icon for a repeating arrow key has a clock symbol attached to it.
Pressing an arrow key multiple times in a row displays an arrow with a repeatcounter.
When you press an arrow key multiple times in a row, one arrow key is displayed in the
key press history; this arrow key has a number attached to it that shows thenumber of times the arrow key was pressed.
Tip: When tracing along graphs or using Cabri™ Jr App to draw geometric shapes, thecomputer keyboard arrows may give you smoother continual action as opposed tousing a mouse to click on the emulator arrows.
Dragging and Dropping a Screen to Another ApplicationYou can drag and drop and paste any TI-SmartView™ CE screen into anotherapplication.
The TI-SmartView™ CE screens that you can drag and paste include the following:
• The screen above the keyboard in the Emulator Panel
• Large Screen
• View3™ panel screens
Note: You can drag a View3™ screen into Screen Capture and use Screen Capture asa history of important screens during a class session.
• Saved or unsaved screen captures

Connecting a Calculator as a Remote KeypadThe SmartPad™ CE App is available for the TI-84 Plus CE. To use theTI-84 Plus CE as a remote keypad for TI-SmartView™ CE:
1. SmartPad™ CE App for TI-84 Plus CE comes pre-loaded on the calculator. If not onyour TI-84 Plus CE, SmartPad CE App is also available to load to your calculator ateducation.ti.com/84ceupdate.
2. Connect your TI-84 Plus CE to your computer using a USB Computer cable whichcame with your calculator.
3. Launch TI-SmartView™ CE. Make sure the TI-SmartView™ CE window is in focus byclicking on the TI-SmartView™ CE window.
4. Run SmartPad™ CE App on your TI-84 Plus CE. Press [apps] and select SmartPad™CE from the Apps menu. Read the information on the splash screen.
5. Press keys on the calculator's keypad which remotely press the emulator keypad onthe TI-SmartView™ CE.
6. Disconnect USB cable from calculator to stop the App and remote keypad feature.
7. Reconnecting the USB cable and running the App again may be needed if theremote keypad connectivity is no longer responding.
Notes:
• The TI-84 Plus CE running the SmartPad™ CE App will not display the calculations orgraphs. The calculator becomes a remote USB keypad for the emulator only.
• The TI-84 Plus CE will remain a remote keypad when the TI-SmartView™ CEwindow is in focus. Click on the TI-SmartView™ CE window prior to pressing keyson the calculator.
• The TI SilverLink cable is not supported in TI-SmartView™ CE.
USB Computer Cable
You must use the USB Computer Cable that comes with your TI-84 Plus CE graphingcalculator to use SmartPad™ CE App. Other TI Connectivity Cables are not supported.
Using the TI-SmartView™ CE Calculator EmulatorWorkspace 9

10 Using the TI-SmartView™ CE Calculator EmulatorWorkspace
Additional information on connectivity
• Emulator Link Menu - No Send/Receive
The Link feature,y8 on the emulators is disabled. To link files between aconnected calculator and an emulator, please use Calculator Explorer in TIConnect™ CE and Emulator Explorer in TI-SmartView™ CE.
Drag calculator or emulator files to the computer first when transferring betweenEmulator Explorer in TI-SmartView™ CE and Calculator Explorer in TI Connect™ CE.
• TI-SilverLink cable
The TI SilverLink cable is not supported in TI-SmartView™ CE.
• Bringing a calculator out of a TEST MODE setting
TI-SmartView™ CE will not transfer a file to a connected calculator.
To quit TEST MODE (EXAM MODE) setting, please use one of these methods.
- Connect a CE to the latest version of TI Connect CE. Seeeducation.ti.com/84ceupdate
- Select Actions > Quit Exam Mode on Connected CE Calculators
- Send a file between two calculators- Connect to the latest version of TI Connect CE and send a file to a connected
calculator(s)

Resetting the EmulatorTo reset the emulator:
1. Click Actions.
2. Click Reset Emulator.
3. Click Reset.
Resetting the emulator:
• Overwrites the current emulator state
• Returns the TI-SmartView™ CE Software to the factory-default setting
• Clears key press history
Update Emulator OS
In the future, if there is a CE calculator OS update but TI-SmartView™ CE emulator isnot updated, then the Emulator can be updated with Actions > Update Emulator OS….TI-SmartView™ CE will require a special emulator state file to update the Emulator OSavailable at education.ti.com/84ceupdate. This file will be different than the file youuse to update the calculator OS.
Using the TI-SmartView™ CE Calculator EmulatorWorkspace 11

12 Using the TI-SmartView™ CE Calculator EmulatorWorkspace
Saving and Loading a CE Emulator StateWhen you save the CE emulator state, a file is created that stores the emulatorsettings with all of the changes that you have made.
For example, you might want to set up a class presentation by entering functions in theY= editor and changing Window and Zoom settings. When you save your changes in anemulator state file, you simply load the file to show your presentation. If you want tocreate different presentations for different classes, you can create multiple emulatorstate files.
Note: The key press history, screen capture shots, the emulator view, and the emulatorsize are not saved in the emulator state file. Please take note the CE Emulator statefiles may be large. Contact your IT department if your storage capacity is an issue.
Saving the CE Emulator State
Managing, saving and loading an emulator state file is only available for the CEemulator. The TI-84 Plus CE Emulator State file can only be loaded on the TI-84 Plus CEemulator.
1. Click Actions > Save Emulator State....
2. In the dialog box:
a) Navigate to the folder in which you want to store the CE emulator state file.b) Type a file name. Use a name that describes the CE emulator state.

The CE emulator state files will have a pre-configured filename TI84PCE EmulatorState_OS x-x-x_date.s84 where the file extension, *.s84 indicates that the file is aTI-84 Plus CE emulator state created by the TI-SmartView™ CE software. A CEemulator state file created in TI-SmartView™ CE v5.6.0 or higher will not load onprevious versions of TI-SmartView™ CE.
c) Click Save.
Loading an CE Emulator State
Because CE emulator state files are specific to each calculator model, you can onlyload an emulator state file for the active calculator model.
1. Click Actions > Load Emulator State.
2. In the dialog box:
a) Navigate to the folder that contains the emulator state file.
Note: Only the CE emulator state files for the active calculator model will bedisplayed.
b) Click the CE emulator state name to highlight it.c) Click Open.
Using the TI-SmartView™ CE Calculator EmulatorWorkspace 13

14 Using the TI-SmartView™ CE Calculator EmulatorWorkspace
Choosing a Display OptionYou can customize your display to show or hide optional panels and change the type ofinformation displayed in each one. By default, the TI-SmartView™ CE software displaysthe calculator emulator workspace in Large Display Screen.
Displaying the Calculator Screen
1. Click to view thecalculator screen above thekeyboard in the EmulatorPanel.
2. Click again to show the Keypad + LargeDisplay Screen.
Choosing an Emulator Type
Click the down arrow on to choose an emulator type.

Each emulator type displays its relevant calculator model.
TI-84 Plus CE TI-84 Plus
Using the TI-SmartView™ CE Calculator EmulatorWorkspace 15

16 Using the TI-SmartView™ CE Calculator EmulatorWorkspace
Changing the Calculator Faceplate
To change the faceplate:
1. Click View.
2. Hover over Calculator Faceplate.
3. Click on a calculator faceplate name.
Light Outline Dark

Showing or Hiding the Key Press History
Click to show or hide key press history.Click CLEAR in the panel next to Key Press History to clear the history.
Click here and drag to resize theKey Press History panel.
Click here to clear theKey Press History.
When you press clear, you will see this information box:
Copying the Key Press History to Another ApplicationYou can copy all or only a selected portion of the key press history to another
application such as a word processor. You can copy the key graphics as they areshown in the key press history panel, or you can copy the key presses as font textcharacters·j ¸.
Note: When you copy keys as font text characters, those characters use theTI84PlusCEKeys font. This font is installed on your computer automatically when youinstall the TI-SmartView™ CE software.
Copying Keys as Graphics or Font Characters
1. Select the key(s) you want to copy.To select keys in the Key Press History Panel, use one of the following methods:
Key Method– A single key: Click on a key.
– Multiple keys: Click on a key.Press and hold Ctrl on your computerkeyboard.Click other keys to select multiple keys.
Using the TI-SmartView™ CE Calculator EmulatorWorkspace 17

18 Using the TI-SmartView™ CE Calculator EmulatorWorkspace
Key Method– Multiple keys in a sequence: Click on a key.
Press and hold Shift on your computerkeyboard.Press another key.Note: This allows you to select thosetwo keys plus all of the keys inbetween them.
– All keys: Click on a key.Right click.Click Select All.
Note: This is what a key looks like before and after you select it.
Before: After:
2. Right-click the selected key(s).
3. Click Copy (to copy keys as graphics).
-or-
Click Copy As Font (to copy keys as font characters).·j ¸
4. Switch to another application.
5. Paste the keys at the appropriate location.
Note:
• You can also drag the selected keys as graphics to the other application.
• You can re-size the key graphics after you paste them into a new application.
• In some applications, the characters pasted as a font may be shown in the fontthat is in effect at that location, so they may not look anything like graphingcalculator keys. If necessary, apply the TI84PlusCEKeys font to the characters. Seethe help file for the destination application you are using for details on how toapply a font to the characters.
Displaying the View3™ Panel
1. Click to display theView3™ panel.
2. Click the title bar of each screen to choose from these display options:

– Equation(Y=
editor)
– List(Stat List editor)
– Window
– Table – Stat Plot – [Blank]– Graph
3. Click the green teacher controlled update button in the View3™ panel to refresh theView3™ screens. This updates the view for your students during investigations.
Update detected Updating or cancel No update detected
4. View content in the selected screens, or repeat step 2 to change the screen type.
Using the TI-SmartView™ CE Calculator EmulatorWorkspace 19

20 Using the TI-SmartView™ CE Calculator EmulatorWorkspace
Changing the Size of the TI-SmartView™ CE ScreenClick and drag the edge of a panel to change the size of the Emulator Panel, the LargeDisplay Screen, or the View3™ Panel.
Note: All of these are left/right actions except the Key Press History which is pull up ordown to size.
Emulator and Toolbar positionsEmulator position Left/Right - to switch between left and right handdisplay of the graphing calculator screen. This is convenient whenprojecting an Interactive White Board.
Tool Bar Top/Bottom - to toggle the tool bar between the top and thebottom of the screen. This is convenient when projecting an InteractiveWhite Board.

Always in FrontSelect this option in the View Menu to keep the TI-SmartView™ CE windows in front ofany other computer software window open. Similar to having the calculator sitting onyour desk on top of your papers! Position the window on your computer desktop whereit is best to remain "Always in Front."
To turn off "Always in Front," deselect the menu item in the View menu. There is notoolbar icon for this feature and no indicator other than the menu check mark whenactive.
Notes:
The TI-SmartView™ CE Emulator Workspace window and Screen Capture windows willboth be "Always in Front" and toggle in front depending on their position.
"Always in Front." is not recommended when in full screen since all other windowswill be behind the full screen of TI-SmartView™ CE.
Using the TI-SmartView™ CE Calculator EmulatorWorkspace 21

22 Using Screen Capture
Using Screen CaptureYou can capture the current graphing calculator screens using the TI-SmartView™ CEscreen capture tool.
To use screen capture:
▶ Click on the toolbar.
This window appears:

Parts of the Screen Capture Workspace
Capture Click here to take an emulator screen capture.Actions > Capture ScreenNote: A border is automatically added to each image whenyou capture it, but you can remove the border by clicking View> Hide Screen Capture Borders. (If you have multiple images,this removes the border from every image.)With screen capture you can:• capture up to 44 screens at a time, (to capture additional
images, delete images from the Screen Capture window)• automatically store screen captures in memory until you
close the main TI-SmartView™ CE window.Closing Screen Capture gives a prompt to save your screencaptures. You can start a new Screen Capture session duringa TI-SmartView™ CE session.
Save Click here to save selected screen captures.File > Save As
Copy Click here to copy selected screen captures to the clipboard.Edit > Copy
Delete Click here to delete selected screen captures.Edit > Delete
Resize Slide the dot along the bar to adjust the current screencapture preview size.View > Scale Screen CapturesNote: Screens save at the percentage in view.
Rename Rename a screen capture by highlighting the title and typingin a new name.
View View screen captures here.
Dragging and Dropping a Screen to Another ApplicationYou can drag and drop and paste any TI-SmartView™ CE screen into anotherapplication.
The TI-SmartView™ CE screens that you can drag and paste include the following:
• The screen above the keyboard in the Emulator Panel
• Large Screen
• View3™ panel screens
Note: You can drag a View3™ screen into Screen Capture and use Screen Capture asa history of important screens during a class session.
• Saved or unsaved screen captures
Using Screen Capture 23

24 Using TI-SmartView™ CE Emulator ExplorerWorkspace
Using TI-SmartView™ CE Emulator Explorer WorkspaceEmulator Explorer workspace allows you to manage emulator files, add content fromyour computer to your emulator, and send selected content to your computer.

Parts of the TI-SmartView™ CE Emulator Explorer Main Workspace
Add calculator files from computer to emulator.
Send selected calculator files to computer.
Delete selected calculator files.
Refresh the view of the emulator's contents.Note: When changing the workspace to Emulator Explorer, refresh theview of the emulator files to update any changes made in the emulator.
From the Emulator Explorer workspace, you can copy emulator files to your computer,and delete data files and programs from your emulator.
Copying Emulator Files to the ComputerYou can copy most data, files, and programs from your emulator to your computer as abackup, to send to others, or to free up emulator memory.
To copy a file from the emulator to the computer
1. Click on the file name to select it.
2. Click
-or-
Drag and drop the file into a folder on your computer or onto your desktop.
To copy a file from the computer to the emulator
1. Click .2. Navigate to the desired calculator file on your computer.
Note: You can also drag your images (.jpg, .png, etc.) to convert toemulator/calculator Background Images as well.
3. Click on the file to select it.
4. Click Open.
Using TI-SmartView™ CE Emulator ExplorerWorkspace 25

26 Using TI-SmartView™ CE Emulator ExplorerWorkspace
Deleting Emulator FilesYou can delete data, files, and programs from your emulator.
To delete files from the emulator
1. Click on the file name to select it.
2. Press .
Data ImportThe Data Import feature lets you convert/send spreadsheet data saved as csv data filesto the calculator as calculator list(s) matrice(s) files.
Access the Data Import feature from the Explorer Workspace.
Highlights:
• Create (or download) a spreadsheet of data.
• Prior to import, edit data in your spreadsheet software to only allowed calculatornumeric formats (specified below) for the import to a calculator file.
About the spreadsheet
• Only one spreadsheet saved as a CSV (Comma Delimited) (*.csv) file will beimported via Explorer workspace at a time.
• Spreadsheet (.csv) file can be dragged into the Explorer Workspace or imported viaActions > Import Data (.csv) to List/Matrx... menu.
• Up to 6 calculator lists or 1 matrix from the spreadsheet data will send to theconnected calculator.
Rules for preparing the spreadsheet for import:
• All cells must contain Real Number data as experienced on the calculator and notext.
- Complex numbers are not supported for data import.- If decimal numbers are represented with the use of a comma in the *.csv file,
the file will not convert using the Data Import Wizard. Please check yourcomputer operating system number formatting and convert the *.csv to use thedecimal point representation. The CE calculator list and matrix editor use thenumber format as, for example, 12.34 and not 12,34.
• Data must start in cell A1

• List(s) Import: If calculator lists are desired:
- Only six spreadsheet columns A-F will be imported- Columns can be of length up to 999 cells.- The first empty cell in a column will be interpreted as the end of the data for
that list import
• Matrix Import: if calculator matrix is desired:
- Only one matrix can be imported from a spreadsheet file.- Up to 400 cells can be imported. (Example: row x col: 10 x 5 = 50 cells from
row range 1-10, columns A-E.)- Dimension of matrix of the form (row x column) will be requested during the
import experience in Calculator Explorer.- Any empty cell within the specified matrix dimension will be interpreted as 0.
• Do not have data in the spreadsheet outside of the allowed sizes for list(s) ormatrix as described above. Otherwise, the file will be invalid when a data importto Calculator Explorer is attempted.
Using TI-SmartView™ CE Emulator ExplorerWorkspace 27

28 Using TI-SmartView™ CE Emulator ExplorerWorkspace
To save calculator list(s) or matrix files
• To save calculator files created to the computer, after import/send to calculator,drag the list(s) or matrix file from Calculator Explorer to the desired computerlocation.

Computer Keyboard ShortcutsYou can use your computer keyboard to press a key instead of pressing that key on theTI-SmartView™ CE keyboard image.
For example:
If you want to enter the "log" function on the emulator keypad, use the table below tofind the computer key to press.
▶ Press [N] on your computer keyboard (and notice that the emulator key upper leftis the alpha letter N.)
Note: In some instances, pressing the computer keyboard key will display the keyon the emulator. The Key Press History icon may not display until the next keypress.
Computer Keyboard Shortcuts 29

30 Computer Keyboard Shortcuts

Compatibility with Graphing CalculatorsPlease refer to the TI-84 Plus CE Getting Started Guide for compatibility with graphingcalculators.
Note: In general, TI-84 Plus CE graphing calculator files are compatible with other TI-84Plus and TI-83 Plus models.
Apps, Operating Systems and some data files with unsupported numeric types do notshare between models.
TI-Basic programs may need to be modified to correctly display on the high resolutioncolor screen models.
Computer Keyboard Shortcuts 31

32 The Python Experience
The Python ExperienceUsing TI-SmartView™ CE to Demonstrate the Python Experience
• Update to the latest TI-SmartView™CE at education.ti.com/84ceupdate.
• Launch TI-SmartView™ CE v5.6.0 orhigher.
• Run the Python App on theTI-84 Plus CE emulator.
• The Python App offers– File Manager– Editor– Execution of your Python program
in the Shell• SmartPad CE App will remotely press
the keypad when the Python App isrunning.
• You can send your computer *.py filesto the Emulator Explorer workspace toconvert your programs to PY AppVars.
Hub/Rover Programs
– Create ti_hub/ti_rover Python programs in the CE emulator running the PythonApp.
*Note: There is no connectivity between TI-SmartView™ CE and TI-Innovator™Hub or TI-Innovator™ Rover. Programs can be created and then run on the CEcalculator.
– Quit the Python App to prepare to transfer the Python AppVar(s) from theemulator. The emulator should not “be busy” running an App or program forthe next step.
– Change to the Emulator Explorer workspace and send the program(s) to thecomputer.

– Use TI Connect™ CE to send the Python AppVars from the computer to the CEcalculator for the TI-Innovator™ Hub/TI-Innovator™ Rover experience.
Note: To break a running Python program in the Shell, such as if a program is in acontinuous loop, press [on]. Press [Tools] [zoom] > 6:New Shell as an alternate methodto halt a running program.
Reminder: For any computer/TI-Python experience: After creating a Python program ina Python development environment on the computer, please validate your programruns on the calculator/emulator in the TI-Python experience. Modify the program asneeded.
SmartPad CE App Remote Keypad
– When running the SmartPad CE App on your connected CE will behave as aremote keypad including the special keypad mapping offered when the PythonApp is running.
Emulator Explorer Workspace
– Please quit the Python App so the emulator is not busy when you access the fullfeatures of the Emulator Explorer workspace.
– program.py < > PY AppVar conversions are allowed. This is similar to the TIConnect™ CE experience when sending programs to the connected CEcalculator.
– When sending a program.py file created in another Python environment, yourPY AppVar will need to be edited to run as expected in TI-Python. Use thePython App Editor to modify as needed for the unique modules such asti_plotlib, ti_system, ti_hub and ti_rover.
Data Import Wizard
– *.csv files of data, formatted as stated in the wizard dialog, will convert datainto CE list variables. Methods in ti_system can then be used to share listsbetween the emulator CE OS and the Python App. This feature is similar to theData Import Wizard in TI Connect™ CE.
- If decimal numbers are represented with the use of a comma in the *.csv file,the file will not convert using the Data Import Wizard. Please check yourcomputer operating system number formatting and convert the *.csv to use thedecimal point representation. The CE calculator list and matrix editor use thenumber format as, for example, 12.34 and not 12,34.
The Python Experience 33

34 Data Collection Using Vernier EasyData® App on the TI-84 Plus CE Emulator
Data Collection Using Vernier EasyData® App on theTI-84 Plus CE EmulatorVernier EasyData® CE App allows you to use Data Collection on the TI-84 Plus CEemulator. The Vernier EasyData® CE App for TI-84 Plus CE comes pre-loaded on theemulator in TI-SmartView™ CE. This App allows you to collect single sensor datasimilar to using the App on the calculator.
Tips:
• Make sure you are familiar with collecting data using the EasyData® App on thecalculator prior to using TI-SmartView™ CE to collect data.
• Make sure you are familiar with the EasyData® CE App menu (File>New) or theScan shortcut key feature. You will use these features in the emulator to connect asensor to the emulator while the sensor is connected to the computer.
Using Vernier Sensors with TI-SmartView™ CE and EasyData® CEAppIf you already use Vernier sensors with the TI-84 Plus CE or TI-8x family calculator witha mini-USB port, the sensor connects to the mini-USB port on the calculator.
Vernier sensors used with the TI-8x family (mini-USB) need the appropriate adapter toconnect (USB) to the computer for data collections demonstrations.
Adapters
Connect Sensor Type to Computer
Name Adapter Description
Easy to Go! Use this adapter to connect an EasyTemp orEasyLink™ adapter to a computer for datacollection. See more
Go!Link Use this single-channel interface adaptor toconnect most Vernier sensors to yourcomputer. See more
Go!MotiontoComputerCable
Use this cable to connect a Go!Motion or CBR 2to a computer. It is included with Go!Motion.See more

Connect Sensor Type to Calculator
Name Adapter Description
EasyLink™ Use this adapter to link Vernier sensors to yourTI-84 Plus CE graphing calculator. EasyLink™ is asingle-channel interface that plugs into the USBport of a TI-84 Plus graphing calculator or TI-Nspire™ Handheld. See more
Go!to EasyAdapter(mini USB)
Use this adapter to connect a Go!Temp orGo!Link™* to the USB port of a TI-Nspire™handheld or TI-84 graphing calculator. See more
Go!MotiontoCalculatorMini-USBport
Use this 72" cable to connect a Go!Motion orCBR 2 to the USB port of a TI-Nspire™ handheldor TI-84 graphing calculator. The cable has a USBMini-A plug that connects to the calculator anda standard-B USB plug that connects to theGo!Motion or CBR 2. The cable is included with aCBR 2. See more
If Using for Classroom Demonstrations
Data collection using the EasyData® App is only supported on the TI-84 Plus CEemulator for classroom demonstration purposes. If your class is using any TI-8x Familycalculator running the latest Vernier EasyData® App for that calculator, thedemonstration of data collection using TI-SmartView™ CE and the TI-84 Plus CE will beparallel to the calculator experience on TI-8x Family calculators.
Single Sensors Data Collection
Single-sensor data collection is supported in the TI-84 Plus CE emulator (similar to theTI-84 Plus CE calculator).
If a sensor is supported using the EasyData® App on the calculator via mini-USB, theemulator in TI-SmartView™ CE provides a demonstration tool for data collectionsimilar to the experience on the calculator.
• CBR 2™ (Calculator-Based Ranger™) is supported with the USB cable.
• CBL 2™ (Calculator-Based Laboratory™ system) is not supported.
• The latest Vernier EasyData® CE App for TI-84 Plus CE comes pre-loaded in theemulator.
• Older versions of the App are blocked in Emulator Explorer for the best datacollection experience.
Data Collection Using Vernier EasyData® App on the TI-84 Plus CE Emulator 35

36 Data Collection Using Vernier EasyData® App on the TI-84 Plus CE Emulator
Using TI-SmartView™ CE to Demonstrate Data Collection1. Launch TI-SmartView™ CE.
Tip: If you are running any other computer software that also collects data usingVernier USB sensors, we recommend that you close all other data collectingsoftware so TI-SmartView™ CE recognizes the single sensor for your data collectionsession. Otherwise, your computer operating system will “decide” which sensors itwill recognize. You may not see your sensor connect to TI-SmartView™ CE until youclose other software.
2. Click the down arrow on to choose an emulator type.
3. Connect one sensor to your computer via standard USB.
Advanced Feature: You can have several sensors connected to your computer ports.You can use the TI-SmartView™ CE Actions menu (Actions>Select Data CollectionSensor) to switch between sensors. Use the EasyData® CE App menu (File>New) toconnect the new sensor to the emulator.
4. Run the EasyData® CE App on the TI-84 Plus CE emulator.
Note: Always update to the latest TI-SmartView™ CE ateducation.ti.com/84ceupdate. The latest EasyData App will be loaded in the latestTI-SmartView™ CE.
5. EasyData® launches on the emulator. You should see the name of the sensor (orlink connection) on the splash screen. The sensor name will then appear in themeter screen similar to the calculator experience.
If EasyData® App does not recognize the sensor connected to the computer, useeither Scan or File>New in the EasyData® App on the emulator to connect thesensor.
6. Use EasyData® App features as on the CE emulator to collect and analyze the data.
7. When data collection is complete, QUIT the EasyData® App in the emulator tocontinue to use TI-SmartView™ CE.
• Data from the data collection experiment is stored to lists in the emulatorwhen quitting the EasyData® CE App.
• You may leave the sensor plugged into your computer as needed.
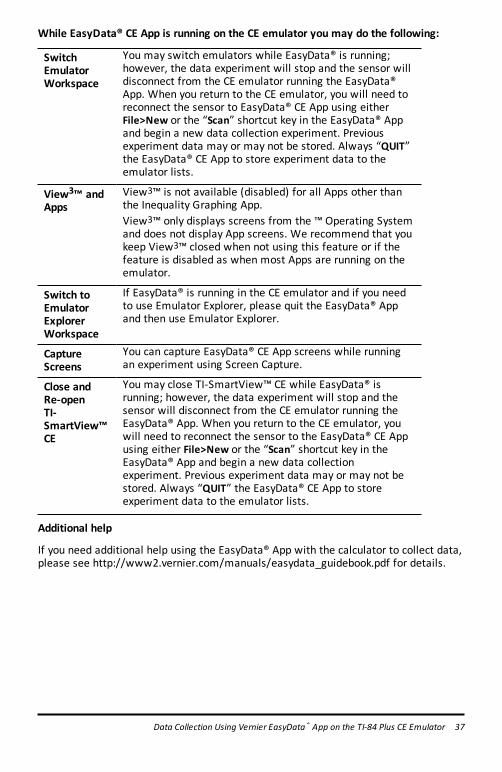
While EasyData® CE App is running on the CE emulator you may do the following:
SwitchEmulatorWorkspace
You may switch emulators while EasyData® is running;however, the data experiment will stop and the sensor willdisconnect from the CE emulator running the EasyData®App. When you return to the CE emulator, you will need toreconnect the sensor to EasyData® CE App using eitherFile>New or the “Scan” shortcut key in the EasyData® Appand begin a new data collection experiment. Previousexperiment data may or may not be stored. Always “QUIT”the EasyData® CE App to store experiment data to theemulator lists.
View3™ andApps
View3™ is not available (disabled) for all Apps other thanthe Inequality Graphing App.View3™ only displays screens from the ™ Operating Systemand does not display App screens. We recommend that youkeep View3™ closed when not using this feature or if thefeature is disabled as when most Apps are running on theemulator.
Switch toEmulatorExplorerWorkspace
If EasyData® is running in the CE emulator and if you needto use Emulator Explorer, please quit the EasyData® Appand then use Emulator Explorer.
CaptureScreens
You can capture EasyData® CE App screens while runningan experiment using Screen Capture.
Close andRe-openTI-SmartView™CE
You may close TI-SmartView™ CE while EasyData® isrunning; however, the data experiment will stop and thesensor will disconnect from the CE emulator running theEasyData® App. When you return to the CE emulator, youwill need to reconnect the sensor to the EasyData® CE Appusing either File>New or the “Scan” shortcut key in theEasyData® App and begin a new data collectionexperiment. Previous experiment data may or may not bestored. Always “QUIT” the EasyData® CE App to storeexperiment data to the emulator lists.
Additional help
If you need additional help using the EasyData® App with the calculator to collect data,please see http://www2.vernier.com/manuals/easydata_guidebook.pdf for details.
Data Collection Using Vernier EasyData® App on the TI-84 Plus CE Emulator 37

38 General Information
General InformationOnline Helpeducation.ti.com/eguide
Select your country for more product information.
Contact TI Supporteducation.ti.com/ti-cares
Select your country for technical and other support resources.
Service and Warranty Informationeducation.ti.com/warranty
Select your country for information about the length and terms of the warranty orabout product service.
Limited Warranty. This warranty does not affect your statutory rights.
Updateseducation.ti.com/84ceupdate