Thursday, July 16 th, 2015 Instructor: Craig Duckett [email protected] Intro to DOM, Intro to...
58
BIT116: Scripting Lecture 04 Thursday, July 16 th , 2015 Instructor: Craig Duckett [email protected] ro to DOM, Intro to jQuery (The Basic
-
Upload
elisabeth-webb -
Category
Documents
-
view
215 -
download
1
Transcript of Thursday, July 16 th, 2015 Instructor: Craig Duckett [email protected] Intro to DOM, Intro to...

BIT116: ScriptingLecture 04
Thursday, July 16th, 2015
Instructor: Craig Duckett
Intro to DOM, Intro to jQuery (The Basics)

2

3
The Origins of JavaScript
JavaScript was developed by Netscape, in collaboration with Sun Microsystems. Before JavaScript, web browsers were fairly basic pieces of software capable of displaying HTML documents. JavaScript was later introduced to add some extra spice to web pages and to make them more interactive. The first version, JavaScript 1.0, debuted in Netscape Navigator 2 in 1995. At the time of JavaScript 1.0's release, Netscape Navigator dominated the browser market. Microsoft was struggling to catch up with its own browser, Internet Explorer, and was quick to follow Netscape's lead by releasing its own VBScript language, along with a version of JavaScript called JScript, with the delivery of Internet Explorer 3. As a response to this, Netscape and Sun, together with the European Computer Manufacturers Association (ECMA), set about standardizing the language. The result was ECMAScript, yet another name for the same language. Though the name never really stuck, we should really be referring to JavaScript as ECMAScript. JavaScript, ECMAScript, JScript—whatever you want to call it—was gaining ground by 1996. Version 3 browsers from Netscape and Microsoft both supported the JavaScript 1.1 language to varying degrees

4
JavaScript is a Scripting Language
JavaScript is a scripting language. Unlike a program that does everything itself, the JavaScript language simply tells the web browser what to do. The web browser interprets the script and does all the work, which is why JavaScript is often compared unfavorably with compiled programming languages like Java and C++. But JavaScript's relative simplicity is also its strength. Because it has a low barrier to entry, nonprogrammers who wanted to cut and paste scripts into their existing web pages quickly adopted the language. JavaScript also offers developers the chance to manipulate aspects of the web browser.
For example, the language could be used to adjust the properties of a browser window, such as its height, width, and position. Addressing the browser's own properties in this way can be thought of as a Browser Object Model.
Early versions of JavaScript also provided a primitive sort of DOM (Document Object Model).

5
The Document Object Model
What is the DOM? In short, the DOM is a way of conceptualizing the contents of a document. In the real world, we all share something that could be called a World Object Model. We can refer to objects in our environment using terms like car, house, and tree, and be fairly certain that our terms will be understood. That's because we have mutually agreed on which objects the words refer to specifically. If you say “The car is in the garage,” it's safe to assume that the person you're talking to won't take that to mean “The dog is in the kitchen.” Our World Object Model isn't restricted to tangible objects though; it also applies to concepts. For instance, you might refer to “the third house on the left” when giving directions. For that description to make sense, the concepts of “third” and “left” must be understood. If you give that description to someone who can't count, or who can't tell left from right, then the description is essentially meaningless, whether or not the words have been understood. In reality, because people agree on a conceptual World Object Model, very brief descriptions can be full of meaning. You can be fairly sure that others share your concepts of left and third.

6
DOM and JavaScript
It's the same situation with web pages.
Early versions of JavaScript offered developers the ability to query and manipulate some of the actual contents of web documents—mostly images and forms. Because the terms images and forms had been predefined, JavaScript could be used to address the third image in the document or the form named details, as follows:
document.images[2] document.forms['details'] This first, tentative sort of DOM is often referred to as DOM Level 0. In those early, carefree days, the most common usage of DOM Level 0 was for image rollovers and some client-side form validation. But when the fourth generation of browsers from Netscape and Microsoft appeared, the DOM really hit the fan.

7
The Browser Wars
Netscape Navigator 4 was released in June 1997, and by October of that year, Internet Explorer 4 had also been released.
Both browsers promised improvements on previous versions, along with many additions to what could be accomplished with JavaScript, using a greatly expanded DOM.
Web designers were encouraged to test-drive the latest buzzword: DHTML.

8
DHTML
DHTML is short for Dynamic HTML. Not a technology in and of itself, DHTML is a shorthand term for describing the combination of HTML, CSS, and JavaScript. The thinking behind DHTML went like this: • You could use HTML to mark up your web page into elements.• You could use CSS to style and position those elements.• You could use JavaScript to manipulate and change those styles on the fly.
Using DHTML, complex animation effects suddenly became possible. Let's say you used HTML to mark up a page element like this: <div id="myElement">This is my element. Isn't it groovy?</div> You could then use CSS to apply positioning styles like this: #myElement { position: absolute; left: 50px; top: 100px; }

9
DHTML and JavaScript
Using JavaScript, you could change the left and top styles of myElement to move it around on the page.
Well, that was the theory anyway. Unfortunately for developers, the Netscape and Microsoft browsers used different, incompatible DOMs.
Although the browser manufacturers were promoting the same ends, they each approached the DOM issue in completely different ways.

10
Clash of the Browsers
The Netscape DOM made use of proprietary elements called layers. These layers were given unique IDs and then addressed through JavaScript like this: document.layers['myElement'] Meanwhile, the Microsoft DOM would address the same element like this: document.all['myElement'] The differences didn't end there. Let's say you wanted to find out the left position of myElement and assign it to the variable xpos. In Netscape Navigator 4, you would do it like this: var xpos = document.layers['myElement'].left; Here's how you would do the same thing in Internet Explorer 4: var xpos = document.all['myElement'].leftpos;

11
"Inconceivable!"
This was clearly a ridiculous situation.
Developers needed to double their code to accomplish any sort of DOM scripting.
In effect, many scripts were written twice: once for Netscape Navigator and once for Internet Explorer. Convoluted browser sniffing was often required to serve up the correct script. DHTML promised a world of possibilities, but anyone who actually attempted to use it discovered a world of pain instead.
It wasn't long before DHTML became a dirty word amongst web developers. The technology quickly gained a reputation for being both over-hyped and overly difficult to implement.

12
W3C to the Rescue!
While the browser manufacturers were busy engaging in their battle for supremacy, and using competing DOMs as weapons in their war, the W3C was quietly putting together a standardized DOM. Fortunately, the browser vendors were able to set aside their mutual animosity. Netscape, Microsoft, and other browser manufacturers worked together with the W3C on the new standard, and DOM Level 1 was completed in October 1998. Consider the example in the previous section. We have a <div> with the ID myElement, and we're trying to ascertain the value that has been applied to its left position so that we can store that value as the variable xpos. Here's the syntax we would use with the new standardized DOM: var xpos = document.getElementById('myElement').style.left At first glance, that might not appear to be an improvement over the nonstandard, proprietary DOMs. However, the standardized DOM is far more ambitious in its scope.
While the browser manufacturers simply wanted some way to manipulate web pages with JavaScript, the W3C proposed a model that could be used by any programming language to manipulate any document written in any markup language.

13
Thinking Outside the Browser
The DOM is what's known as an Application Programming Interface (API). APIs are essentially conventions that have been agreed upon by mutual consent. Real-world equivalents would be things like Morse code, international time zones, and the periodic table of the elements. All of these are standards, and they make it easier for people to communicate and cooperate. In situations where a single convention hasn't been agreed upon, the result is often disastrous.
In the world of programming, there are many different languages, but there are many similar tasks. That's why APIs are so handy. Once you know the standard, you can apply it in many different environments. The syntax may change depending on the language you're using, but the convention remains the same. So, while we focus specifically on using the DOM with JavaScript in this class, your new knowledge of the DOM will also be useful if you ever need to parse an XML document using a programming language like PHP or Python.

14
W3C Defines DOM
The W3C defines the DOM as “A platform- and language-neutral interface that will allow programs and scripts to dynamically access and update the content, structure, and style of documents.”
The independence of the standardized DOM, together with its powerful scope, places it head and shoulders above the proprietary DOMs created by the bickering browser manufacturers.

15
The End (Sort of) of the Browser Wars
Microsoft won the battle against Netscape for browser market-share supremacy. Ironically, the clash of competing DOMs and proprietary markup had little effect on the final outcome. Internet Explorer was destined to win simply by virtue of the fact that it came preinstalled on all PCs running the Windows operating system. The people who were hit hardest by the browser wars were web designers. Cross-browser development had become a nightmare. As well as the discrepancies in JavaScript implementations mentioned earlier, the two browsers also had very different levels of support for CSS. Creating style sheets and scripts that worked on both browsers became a kind of black art. A backlash began against the proprietary stance of the browser manufacturers. A group was formed, calling itself the Web Standards Project, or the WaSP for short ( http://webstandards.org/ ). The first task that the WaSP undertook was to encourage browser makers to adopt W3C recommendations—the very same recommendations that the browser manufacturers had helped draft. Whether it was due to pressure from the WaSP or the result of internal company decisions, there was far greater support for web standards in the next generation of web browsers.

16
A New Beginning (Again, Sort of)
A lot has changed since the early days of the browser wars, and things are still changing almost daily. Some browsers, such as Netscape Navigator, have vanished, and new ones have appeared on the scene. When Apple debuted its Safari web browser in 2003 (based on WebKit), there was no question that it would follow the DOM standards. Today, Firefox, Chrome, Opera, Internet Explorer, and a number of different WebKit-based browsers all have excellent support for the DOM. Many of the latest smartphone browsers and tablets are using the WebKit rendering engine, pushing browser development forward and making the browser-in-your-pocket superior to some desktop browsers. Note: WebKit ( http://webkit.org ) is the open source web browser engine use in Safari and Chrome. Open source engines such as WebKit and Gecko (used in Firefox, https://developer.mozilla.org/en/Gecko) have played a big role in pushing proprietary browser engines such as Microsoft's Trident (in Internet Explorer) to adopt more progressive web standards.

17
The DOM Today?
Today, pretty much all browsers have built-in support for the DOM. The browser wars of the late 1990s appear to be truly behind us. Now it's a race to implement the latest specification first. We've already seen an explosion of DOM scripting with the advent of asynchronous data transfers (Ajax), and the advancements in the HTML5 DOM are adding many new possibilities. HTML5 gives us vastly improved semantics, control over rich media with the <audio> and <video> elements, the capability of drawing with the <canvas> element, local browser storage for more than just cookies, built-in drag-and-drop support, and a lot more. Life has improved greatly for web designers. Although no single browser has implemented the W3C DOM perfectly, all modern browsers cover about 95% of the specification, and they are each implementing the latest features almost as fast as we can adopt them. This means there's a huge amount that we can accomplish without needing to worry about branching code. Instead of writing scripts with forked code served up with complicated browser sniffing, we are now in a position to write something once and publish it everywhere.
As long as we follow the DOM standards, we can be sure that our scripts will work almost universally.

18

19
DOM Links
• DOM (W3C)• What is the Document Object Model? (W3C)• What is the DOM (Mozilla Developer Network)• Firebug and DOM Exploration (GetFirebug)• DOM Reference (JavaScript Kits)• JavaScript and HTML DOM Reference (W3Schools)• Introduction to the DOM (Video)

20

21
JavaScript Libraries

22
Why JavaScript Libraries?
Okay, first things first.
Writing JavaScript applications from scratch can be difficult, time-consuming, frustrating, and a real pain in the, ahem, britches. They often require a great deal of knowledge of working with the DOM, CSS, JavaScript, and often server resources.
But don't fret!
Because of open source JavaScript Libraries (or "Toolkits" or "Frameworks"), you can take advantage of JavaScript features and functionalities that are already pre-written and programmed—all you have to do is know enough code to be able to insert these into your web pages.
There are many JavaScript Library collections available, and most of them are free. For this course, we'll be looking at the jQuery JavaScript library, a freely available open-source set of utilities and controls that help you to quickly build interactive web applications, or at least add cool and useful effects to your web pages.

23
JavaScript Library Links
• jQuery• jQuery UI• MooTools• YUI• DoJo• Prototype• ImpactJS (HTML5 Game Development)• GameQuery (jQuery Plug-In for Game Development)• JawsJS (2D Game Development)
• Angular (Framework)• Node (Server Side)
See Also: http://www.w3schools.com/js/js_libraries.asp

24
jQuery: Overview

25
Why Talk About jQuery Now? We've Barely Started Into Basic JavaScript!
Most JavaScript books (including our class's textbook that include chapters on JavaScript Libraries (also called 'toolboxes' or 'frameworks') and jQuery usually put these chapters at the very end of the book.
But in the real world, the professional world of production web sites, jQuery is ubiquitous, it's pervasive, it's practically everywhere! For example, of the top 100,000 visited web sites in the world, over 65% of them use jQuery.
Bottom Line: Because the goal of this class is to teach you just enough JavaScript where you will be able to 'view' web page source code and, ahem, "appropriate" it for your own use (a perfectly legitimate and expected way to learn, by the way), it makes sense to have some idea how jQuery works at the beginning rather than at the end.
This way when you do a 'view' of source code you will be able to separate the jQuery specific code from the JavaScript code, and better know you to use and tweak both types for your own nefarious ends.
26
Why jQuery Instead of Some Other JavaScript Library?
Some of jQuery's strengths are, besides being ubiquitous:
• Lightweight: It's considerably smaller than many other JavaScript libraries that are out there, which means that pages/sites using it load more quickly.
• Active Development Community: If you have a question, you can ask it in any of the several jQuery forums that are available and get a fast response, or you can search the forum archives to see if it is a FAQ.
• Plugin Architecture: If you need a feature that isn’t in jQuery, there’s a good chance that someone’s written it as a plugin. An additional benefit of plugins is that you’re only adding them to your site when they’re needed—that is, you don’t have their added weight on every page.
• Speed: jQuery utilities are often a lot faster than those of it's competitors. For example, see the following speed test: http://mootools.net/slickspeed/
• Ease of Use for Non-Geeks: Because its selection queries are based on CSS, someone who isn’t a full-time professional programmer can easily drop into jQuery, add some functionality to their site, and have it work the way they expect.
For all these reasons, jQuery has become one of the most popular JavaScript libraries available.

27
Adding jQuery to Your Web Pages/Web Site
In many cases, your first decision as a web developer using jQuery is deciding whether to download the jQuery core to make it available from your web server or use a hosted service known as a CDN (Content Delivery Network).
Both have advantages and disadvantages.
The single largest advantage of using a CDN, like Google’s, is that its distributed network almost always uses servers closest to the website visitor to deliver the jQuery library.
Once the library from a CDN is cached by the browser, it doesn’t have to be downloaded again (as long as the browser cache isn’t cleared), which makes site loading faster. Because most people use Google they will probably already have jQuery cached before accessing your web pages, which means jQuery doesn't even have to be downloaded again!
The largest disadvantage is that you’ll have to rely on a third party to be available when your site is requested by a first-time visitor.

28
Adding jQuery to Your Web Pages/Web Site CONTINUED
If you decide to host the jQuery library yourself, your biggest advantage is that you’ll be in control. If someone can reach your site, they can get all of the files needed to use your site.
Once it’s cached from your site, returning visitors gain the same advantage they’d get if you were using a CDN. You can also create jQuery applications that require no connection to the Internet if the application has no requirement for a remote data source.
The biggest disadvantage is that some browsers limit the number of connections they can make to a server simultaneously, so getting everything downloaded quickly may be difficult.
For most people in this day and age bandwidth is not a concern, but you may want to consider those do who have bandwidth limitations or who are using browsers that place low limits on connections to servers.
For a professional production web site, your best bet may be using a CDN with a "fallback" to a local (on your web server) copy of the jQuery library.
For this class, I will almost always use the current CDN from Google in the example/demo files.

29
To Download jQuery from jquery.com
1. Open a browser and visit www.jquery.com and click the Download jQuery button.

30
To Download jQuery from jquery.com CONTINUED
2. Choose the version of jQuery you’d like to download, either production or development. The production version is compressed and minified (white spaces and comments stripped out) to provide the smallest possible footprint and overhead. For this class we'll be using the uncompressed development version, 1.10.2 when using a local file.
3. The jQuery file will appear in your browser
4. Save the file to your computer and then move it to the proper place on your web site (whether your local class or development folder or a "live" production web space).

31
To Add jQuery from a CDN (Content Delivery Network) like Google
1. Google a search for "Google Host Libraries" or you can access this direct link: https://developers.google.com/speed/libraries/devguide
2. From the "Google Hosted Libraries - Developer's Guide" page, select the jQuery link
32
To Add jQuery from a CDN (Content Delivery Network) like Google CONTINUED
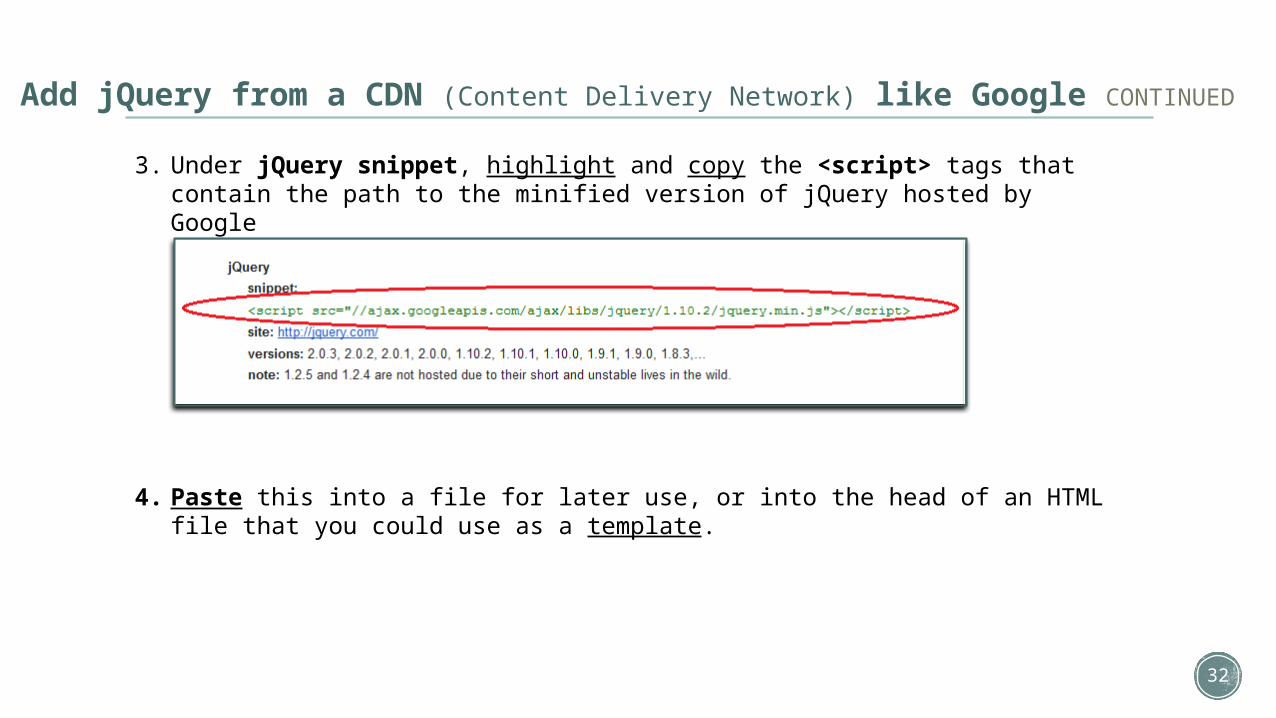
3. Under jQuery snippet, highlight and copy the <script> tags that contain the path to the minified version of jQuery hosted by Google
4. Paste this into a file for later use, or into the head of an HTML file that you could use as a template.

33
FYI: Setting Up a "Fallback" of Both Local and CDN Versions of jQuery
• Add the following code within the <head></head> tags in your web pages:
<script src="//ajax.googleapis.com/ajax/libs/jquery/1.10.2/jquery.min.js"></script></script><script type="text/javascript"> if (typeof jQuery == 'undefined') { document.write(unescape("%3Cscript src='jquery.js' type='text/javascript'%3E%3C/script%3E")); }</script>
The first script is an attempt to include the jQuery core in your web project from the CDN. The second script then tests to see if the jQuery object is available. If the jQuery object isn’t available, a line is written to the HTML file to load the jQuery file from the local source (make sure the src path points to the actual directory/name of the local jQuery file and not simply the example jquery.js file name used here). If you're using HTML5 it isn't necessary to include the type attribute in your script tags (as used in the code above).
FYI: The %3C and %3E are URL Encoded Characters. %3C represents a '<' character and %3E represents a '>' character. The reason that %3C and %3E are used instead of '<' and '>' is because browsers may have a problem parsing '<' and '>' when included in a string inside document.write() but will know how to interpret the %3C and the %3E .

34
FYI: "Minifying" Your Code
As you’re developing your markup, style sheets, and jQuery code, you’ll leave a lot of whitespace, tabs, and comments in your files to make the files easy to maintain and read. This is great during development, but for production you might consider minifying your code.
The process of minifying code removes all of the unnecessary whitespace, comments, and formatting characters, which makes the download of the code much faster. Some minifying applications will even check your code for errors and perform other actions to reduce your code to the smallest possible size without losing functionality.
Links to some online minifying/code compression tools:
• Google Closure Compiler (one of my favorites)• Online JavaScript Compression Tool• JavaScript Compressor (it can obfuscate too)

35
FYI: "Progressive Enhancement"
One of the major benefits of using the jQuery library is that you can use it on any website without having to modify any of your HTML or CSS.
Most websites are developed using a similar workflow. The HTML markup and CSS are developed first along with any artwork to give the website its look and feel. Once complete, the website may be fully functioning.
Most developers keep their style sheets separate from their markup, choosing to include the CSS in their projects via link tags in the head of HTML documents. It’s just good organization. Maintenance is easier and much more efficient.
Because jQuery has the ability to interact with the full range of CSS selectors and HTML elements, it can be kept apart from the markup, whereas many JavaScript calls have to be written inline with the HTML markup. For instance, to capture a click event from a link tag you’d have to include a call to JavaScript’s onClick() method within the anchor tag:
<a href="some.html" onClick="jsFunction">
It can be a lot of work to go back to a website you’ve developed to add JavaScript interaction.

36
FYI: "Progressive Enhancement" CONTINUED
With jQuery you’d include your jQuery file in a script tag in the head. Then you could write the click event handler into your jQuery code file:
$('a[href="some.html"]').click(...
This means you never have to touch your existing markup.
The concept of keeping everything separate is known as progressive enhancement.
The basic rules for progressive enhancement are simple:
• develop your HTML markup• add your CSS styles• enhance with jQuery
with each of those being in separate stand-alone files.

37
TIP Helpful Hint
When planning new websites and applications that you’ll be using jQuery on, be sure to add classes and IDs that will assist you in the development process (just like with CSS).
Using IDs and Classes
In HTML, an ID is an attribute that is assigned to an element by placing id="id_name" (where id_name is unique for every element assigned an ID) within the element tag. For example, you might assign an ID to a paragraph element like this: <p id="paragraph_1">. In your CSS you would refer to the ID by placing a pound sign (#) in front of the ID’s name: #paragraph_1
On the other hand, you may assign the same class to any number of elements. For instance, class="redline" can be assigned to any element. In CSS, you would address a class by placing a period in front of the name: .redline
With jQuery, you use the same syntax used in CSS, prefixing IDs with the pound sign (#) and prefixing classes with a period (.)

38
jQuery: How Does It Work?

39
Getting Started with jQuery: The Basics
A Quick Summary
Because jQuery is written with JavaScript and uses JavaScript, it might be helpful to briefly summarize what we've learned about JavaScript so far:
• JavaScript is a client-side language – The code runs on the user's system in their browser (be it Firefox, Chrome, Safari, or Internet Explorer).
• JavaScript is dynamic – We don't have static types (unlike Java, C++, or C#) or need to declare a type be an int or float or a string; we declare var variables
• JavaScript is a scripting language – We can simply add the script to our HTML pages and it will execute in the browser; no need to compile it ahead of time (unlike Java, C++, or C#)

40
Getting Started with jQuery: document.ready()
Using jQuery's ready() Handler to Check the DOM
Because jQuery typically interacts with elements in your web pages, you’ll want to make sure all of the elements are loaded into the browser before any of the jQuery methods are called.
To accomplish this, you’d use the ready() event handler to make sure all of the DOM elements are loaded.
There are a couple of ways to capture the event, and you can use either one of these methods—directly in your page’s markup or in a separate file.

41
Getting Started with jQuery: document.ready() CONTINUED
NOTE: for demonstrative purposes I will be including both JavaScript and jQuery in <script> tags in the web page's <head> because it is easier to see what is going on with the ids and classes in the <body>. Usually I would put all my JavaScript/jQuery code in separate .js files and then link to them in the <head>.
In either the head of your HTML page or a separate .js file attach the ready() handler to the document:
$(document).ready(function() { // your JavaScript/jQuery code goes here });
Or you can use:
$(function() { // your JavaScript/jQuery code goes here });
NOTE: We'll be using the first method in this class.
ALSO NOTE: the first opening curly brace '{' (or "squiggle") should be on the same line as function() as shown here. Putting it on a separate line can produce irregular behavior in some browsers.

42
Getting Started with jQuery: document.ready() CONTINUED
Let's dissect this single line of code step-by-step to see what it is doing. Similar syntax will be seen with other jQuery code, so understanding it here will carry over there.
$(document).ready(function() { // your JavaScript/jQuery code goes here });
The dollar sign '$' is the standard way to access jQuery and is a coded shortcut for 'jQuery'. It is the same as if you would have used the following (which also works and is completely interchangeable; in fact, if you are using another library that uses the dollar sign, then you can replace jQuery's dollar sign shortcut with the word 'jQuery'):
jQuery(document).ready(function() { // your JavaScript/jQuery code goes here });

43
Getting Started with jQuery: document.ready() CONTINUED
$(document).ready(function() { // your JavaScript/jQuery code goes here });
The (document) is a special case and represents an all-encompassing document object that points to the web page document loaded into the browser. Typically a selector would go here in between the two parenthesis (or parens in programmer-speak). This might be a CSS3 selector and/or some of jQuery's improvements. This is basically telling jQuery to go find something, and in this case it is looking for the web page document.

44
Getting Started with jQuery: document.ready() CONTINUED
$(document).ready(function() { // your JavaScript/jQuery code goes here });
The .ready() is an event handler that checks to see whether the document—and the DOM—is properly loaded and ready before running any more jQuery, particularly the function() code inside of the .ready's parens.

45
Getting Started with jQuery: document.ready() CONTINUED
$(document).ready(function() { // your JavaScript/jQuery code goes here });
The (function()is an inline "anonymous" function that hasn't been specifically named. It is a JavaScript shortcut that cuts down on code.
If we wanted to we could have created a named function outside of this, and called it instead of the "anonymous" function:
function someFunction(){ // your JavaScript/jQuery code goes here };
$(document).ready(someFunction);

46
Getting Started with jQuery: document.ready() CONTINUED
$(document).ready(function() { // your JavaScript/jQuery code goes here });
The opening and closing curly braces (or "squiggles" as I like to call them) { and } are going to enclose the inner working code of the function.
The )at the end closes .ready's parens, and the semicolon ; at the very end closes the entire statement (just like we've seen in Java).
Let's look at an example to see how this actually works on an HTML web page using a JavaScript alert() method (located under Lecture 5 of the BIT116 web side, by selecting the jquery02.html example link).

47
Getting Started with jQuery: click(), hide(), and show() Methods
$(document).ready(function() { $('#hideLink').click(function(){
$('#someText').hide(); });
$('#showLink').click(function(){ $('#someText').show();
}); });
Instead of a JavaScript alert(), you can nest jQuery functions() inside of document.ready().
These work by selecting named ID elements nested inside the HTML tags.
Let's look at some examples to see how these work together on an HTML web page (located under Lecture 5 of the BIT116 web side, by selecting the jquery03.html and jquery04.html example links).
See Also: http://www.w3schools.com/jquery/jquery_hide_show.asp

48
Getting Started with jQuery: slideToggle() Method and Various Filters
Let's look at some examples to see how these work together on an HTML web page (located under Lecture 5 of the BIT116 web side, by selecting the jquery05.html through jquery11.html example links).

49
jQuery Selectors

50
Getting Started with jQuery: Selectors
One of the strengths of the jQuery library is that it gives you the ability to easily select and interact with Document Object Model (DOM) elements in your web pages.
The selectors will be familiar to you if you’ve done any web development with CSS, because jQuery’s selector syntax is nearly a duplicate of the selectors you’d use when preparing style properties for your websites.
jQuery makes use of the Sizzle JavaScript CSS Selector Engine, which was developed by John Resig, the creator of jQuery.
The jQuery library also adds several specific selector extensions to enhance the library’s syntax and make the library easier to use.
In this section, we’ll learn how to choose and use jQuery’s selectors to gain control over DOM elements as well as groups of elements in your web pages. You’ll also learn how to combine selectors and then apply filters to your selectors for greater flexibility and control.

51
Getting Started with jQuery: Selectors CONTINUED
Using Basic Selectors
Although jQuery provides a host of selector options, you’ll find yourself using one of the basic selectors (element, id, or class) most of the time. Listed below are the basic selectors and what they do:

52
Getting Started with jQuery: Selectors CONTINUED
As you’re creating the HTML markup for your web pages, you should plan classes and IDs carefully. Good planning will make your life much easier when you get ready to apply jQuery to your website. It’s easy to get tripped up and wonder why your jQuery code isn’t working when you don’t keep your ids unique or you fail to define them properly.
In HTML5, most of the restrictions on IDs have been relaxed. You can use any character in an ID and it must contain at least one character, but each ID within a web page must be unique.
If you mistakenly have two elements with the same ID, you may get odd results when applying jQuery code to those elements and the results may differ from browser to browser.
When you wish to add jQuery code designed to have an effect on several or a group of elements, I recommend you use classes for those elements. First of all, it’s usually easier to remember named groups, and second, you can apply jQuery methods to all sorts of elements that have the same class.

53
Getting Started with jQuery: Selectors CONTINUED
These following examples use the jQuery css() method to apply styles to each of the selectors. The css() method is flexible and allows you to style elements on your web pages quickly and easily. You’ll learn more about CSS methods in upcoming classes.
Let's look to see how these work together on an HTML web page (located under Lecture 5 of the BIT116 web side, by selecting the selectors01.html and selectors02.html example links).

54
Getting Started with jQuery: Selector Filters
The jQuery library offers a number of filters that allow you to refine your selections while building your websites and applications. These filters can be applied directly to your selectors. For example, you may want to select a div containing some particular text. You’d write your selector like this:
$('div:contains("my text")')
Any div containing the text "my text" would be selected, allowing you to apply any of the jQuery methods to it.
For filter extensions exclusive to jQuery you’ll want to use the filter() method to gain back lost performance (see list of jQuery filter extensions on the next slide).
Let's look to see how these work together on an HTML web page (located under Lecture 5 of the BIT116 web side, by selecting the selectors03.html and selectors04.html example links).

55
jQuery Filter Extensions

56
CSS Pseudo-Class Selectors

57
jQuery Library and Assorted LinksjQuery Library• http://jquery.com/
Google jQuery CDN (Content Delivery Network)• https://developers.google.com/speed/libraries/devguide#jquery
jQuery Links/Tutorials
• Try jQuery RECOMMENDED• How jQuery Works• jQuery Learning Center• jQuery Tutorials (W3Schools)• jQuery Examples (W3Schools)• jQuery for Beginners (Impressive Webs)• jQuery (Tutorials Point)• jQuery (Code Academy)• jQuery (jQuery-Tutorial.net)• jQuery (MP3, Polymorphic Podcast)• jQuery Fundamentals (jqfundamentals)• jQuery for Absolute Beginners Video Tutorials (Lost in the Woods)
• LearningJQuery.com• jQuerify (Bookmarklet)• SelectorGadget (CSS jQuery)• Firebug and jQuery (Video Screencast)

58
Please begin working on the LECTURE 4 In-Class Exercises.
When you have completed your ICE, call the Instructor over to verify your work. If you have questions about your work, please call over the Instructor to clarify.
Once you have completed your ICEs, you are free to go for the day.
If you don't finish your ICEs by the end of class, you will still get full credit for actively doing the work, but it is greatly recommended you finish any outstanding ICEs outside of class.
ICE 04