Thule Bicycle Trailer Kit Instructions - Hitch Warehouse · C. Insert the hitch arm into the left...
9
Thule Bicycle Trailer Kit Instructions C 51100959
Transcript of Thule Bicycle Trailer Kit Instructions - Hitch Warehouse · C. Insert the hitch arm into the left...

Thule Bicycle Trailer Kit
Instructions
C51100959
2 51100959 - C
• Child's head, including helmet, must not project above the upper frame.
• Always consult your bicycle owner's manual and/or specialist retailer to find out the limitations or conditions when towing a Thule child carrier with your bicycle.
• Never leave your child unattended in the Thule child carrier.• Only park the Thule child carrier on flat surfaces and
secure it with the parking brake.• Have your bicycle checked by a qualified bicycle
mechanic before attaching it to this trailer kit.• Maximum capacity for a single Thule child carrier is
34Kg/75lb and for a double Thule child carrier it is 45Kg/100lb including children and cargo.
• Cyclist must be an experienced, strong rider.• Never ride a bicycle at night without adequate lighting.
Obey all local legal requirements for lighting.• Before each ride, ensure the attached Thule child carrier
does not interfere with braking, pedaling, or steering of the bicycle.
• When this Thule child carrier is used as a cycle trailer, the weather cover should be closed to prevent debris from entering the carrier.
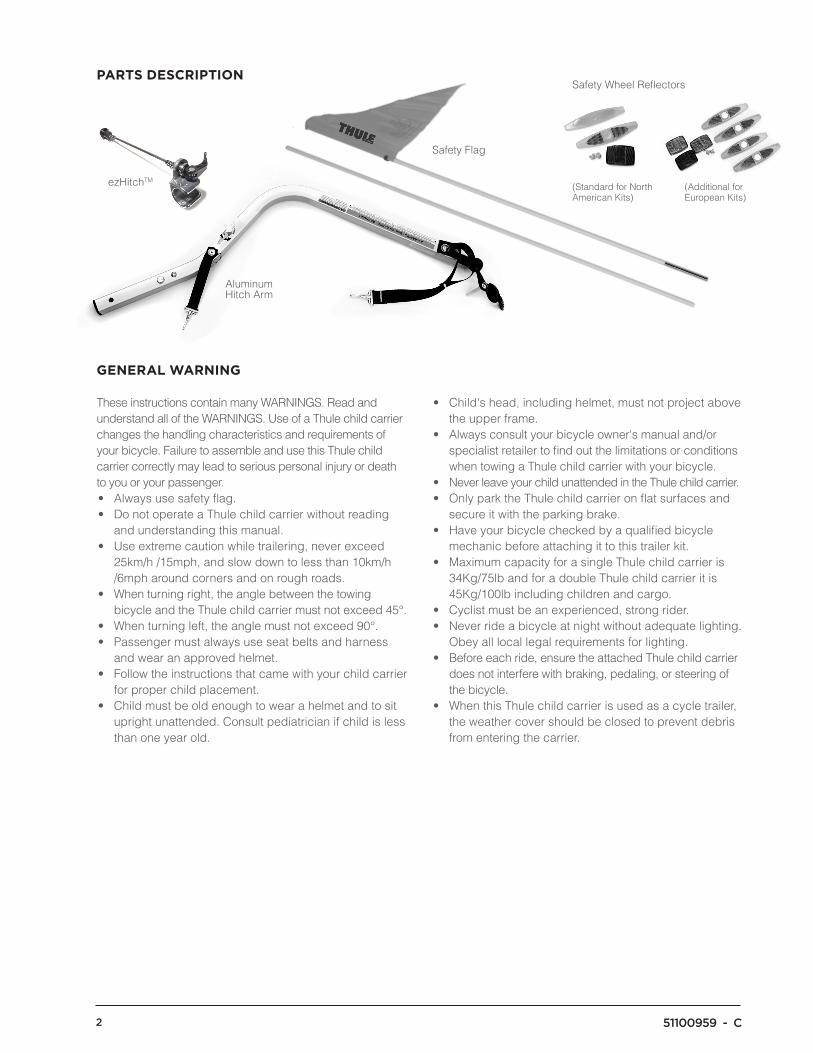
ezHitchTM
Safety Flag
Aluminum Hitch Arm
Safety Wheel Reflectors
(Standard for North American Kits)
(Additional for European Kits)
Parts DescriPtion
GeneraL WarninG
These instructions contain many WARNINGS. Read and understand all of the WARNINGS. Use of a Thule child carrier changes the handling characteristics and requirements of your bicycle. Failure to assemble and use this Thule child carrier correctly may lead to serious personal injury or death to you or your passenger.• Always use safety flag.• Do not operate a Thule child carrier without reading
and understanding this manual.• Use extreme caution while trailering, never exceed
25km/h /15mph, and slow down to less than 10km/h /6mph around corners and on rough roads.
• When turning right, the angle between the towing bicycle and the Thule child carrier must not exceed 45°.
• When turning left, the angle must not exceed 90°.• Passenger must always use seat belts and harness
and wear an approved helmet.• Follow the instructions that came with your child carrier
for proper child placement.• Child must be old enough to wear a helmet and to sit
upright unattended. Consult pediatrician if child is less than one year old.
51100959 - C 3
CT
S C
RO
SS
-CO
UN
TR
Y S
KI K
IT
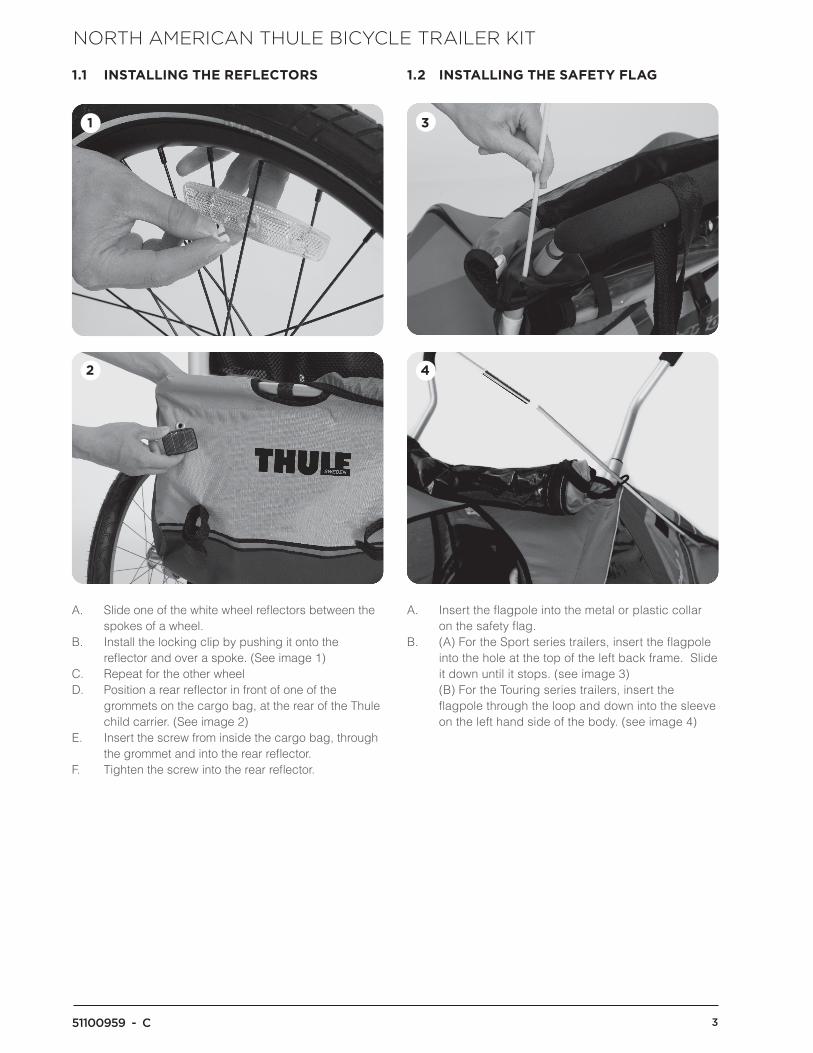
1.1 instaLLinG the refLectors
A. Slide one of the white wheel reflectors between the spokes of a wheel.
B. Install the locking clip by pushing it onto the reflector and over a spoke. (See image 1)
C. Repeat for the other wheelD. Position a rear reflector in front of one of the
grommets on the cargo bag, at the rear of the Thule child carrier. (See image 2)
E. Insert the screw from inside the cargo bag, through the grommet and into the rear reflector.
F. Tighten the screw into the rear reflector.
2
1
1.2 instaLLinG the safety fLaG
A. Insert the flagpole into the metal or plastic collar on the safety flag.
B. (A) For the Sport series trailers, insert the flagpole into the hole at the top of the left back frame. Slide it down until it stops. (see image 3)
(B) For the Touring series trailers, insert the flagpole through the loop and down into the sleeve on the left hand side of the body. (see image 4)
3
4
North AmericAN thULe BicYcLe trAiLer Kit

4 51100959 - C
1.1 instaLLinG the refLectors
A. Slide one of the amber wheel reflectors between the spokes of a wheel.
B. Install the locking clip by pushing it onto the reflector and over a spoke. (see image 1)
C. Install another wheel reflector on the same wheel at 180° such that there are two reflectors per wheel.
D. Repeat for the other wheelE. (A) For all Thule child carriers except the Captain,
position a rear (red) reflector in front of one of the grommets on the cargo bag, at the rear of the Thule child carrier. Insert the screw from inside the cargo bag, through the grommet and into the rear reflector.
(B) For the Captain, position a rear (red) reflector in front of a hole in the plastic molded base at the rear of the Thule child carrier. Insert the screw from inside the plastic molded base, through the hole and into the rear reflector.
F. Tighten the screw into the rear reflector.G. Repeat for the other rear reflector.
2
1
1.2 instaLLinG the safety fLaG
A. Insert the flagpole into the metal or plastic collar on the safety flag.
B. (A) For the Sport series trailers, insert the flagpole into the hole at the top of the left back frame. Slide it down until it stops. (See image 3)
(B) For the Touring series trailers, insert the flagpole through the loop and down into the sleeve on the left hand side of the body. (See image 4)
H. (A) For all carriers except the Captain, position a front (white) reflector in front of one of the grommets on the front of the Thule child carrier. Insert the screw from inside the child compartment, through the grommet and into the front reflector.
(B) For the Captain, position a front (white) reflector in front of a hole in the plastic molded base at the front of the Thule child carrier. Insert the screw from inside the child compartment, through the hole and into the front reflector.
I. Tighten the screw into the front reflector.
3
4
eUropeAN thULe BicYcLe trAiLer Kit

51100959 - C 5
1.3 instaLLinG the ezhitchtM With a Quick-reLease
A. Verify that the quick release skewer is compatible with your bicycle.
B. Completely unscrew and remove the quick-release knob from the quick release skewer.
C. Remove one of the springs from the quick-release skewer.D. Insert the quick-release skewer through the ezHitch™.
(See image 1)E. Insert the quick-release skewer into the bicycle axle
from the left side pointing right.F. Replace the spring back onto the quick-release
skewer, narrow end pointing inwards, towards the bicycle.
G. Close the quick-release lever.H. Replace and tighten the quick release knob until
thumb tight.I. Open the quick-release lever. (See image 2)J. Tighten the quick-release knob another full turn.K. Close the quick-release lever. (See image 3)L. Verify that the bicycle wheel is securely attached to
the bicycle by giving it a sharp Pull.
2
1
3
WARNINGThe quick-release knob must be tightened on the quick-release skewer completely with at least two screw threads showing past the end of the quick-release knob to ensure the rear wheel of the bicycle does not loosen off.
Always make sure that the quick-release is correctly attached. An incorrectly tensioned quick-release may lead to accidental loosening of the rear wheel.

6 51100959 - C
1.4 instaLLinG the ezhitch on a soLiD axLe
A. Verify that the ezHitch™ is compatible with your bicycle.B. Remove the nut and washer(s) from the left end of the
axle, the end opposite of the sprockets. C. Put the ezHitch™ on the left side of the axle.D. Reinstall the nut and washer(s) onto the axle.E. Tighten the nut to the bicycle manufacturer's
recommended torque.
WARNINGThe nut on the rear axle must be tightened by at least 5 full turns to ensure adequate clamping force. You may discard the original washer on some axles to make room for the ezHitch. Check with your bicycle retailer to be certain.
Depending on the hub type, the existing torque support washer for the hub must stay on the frame. Please follow the assembly instructions for the hub and the manufacturer’s torque specifications when fastening the axle nut.
NOTICEFor internal hubs, please reference instruction manuals supplied with the internal hub hitch adapter kit for installation details.

51100959 - C 7
1.5 instaLLinG the hitch arM
A. Inspect the hitch arm for any signs of damage or wear that could compromise the safe use of the hitch arm.
B. Position the hitch arm in front of the Thule child carrier with the hitch ball pointing forwards and to the right.
C. Insert the hitch arm into the left VersaWing™. (See image 1)
D. Press and hold the small button on the hitch arm.E. Slide the hitch arm into the VersaWing™ until the
large pin passes inside the VersaWing™.F. Release the small button on the hitch arm.
(See image 2)G. Continue to slide the hitch arm into the VersaWing™
until the large pin snaps into the hole in the VersaWing™.H. Verify that the hitch arm is securely attached to the
Thule child carrier by giving it a sharp pull away from the Thule child carrier.
I. Feed the backup tether through the loop on the top of the VersaWing™ and clip onto the D-ring. (See image 3)
J. To remove the hitch arm, unclip the backup tether, press the small button on the hitch arm and pull it out.
WARNINGThe backup tether must always be in use in addition to the large spring button in the bicycle hitch arm! A hitch arm that has not been secured properly may come loose during travel.
Make sure that the hitch arm is correctly attached and secured to the Thule child carrier. Any kind of incorrect assembly may lead to the Thule child carrier becoming separated from the bicycle.
2
1
3
8 51100959 - C
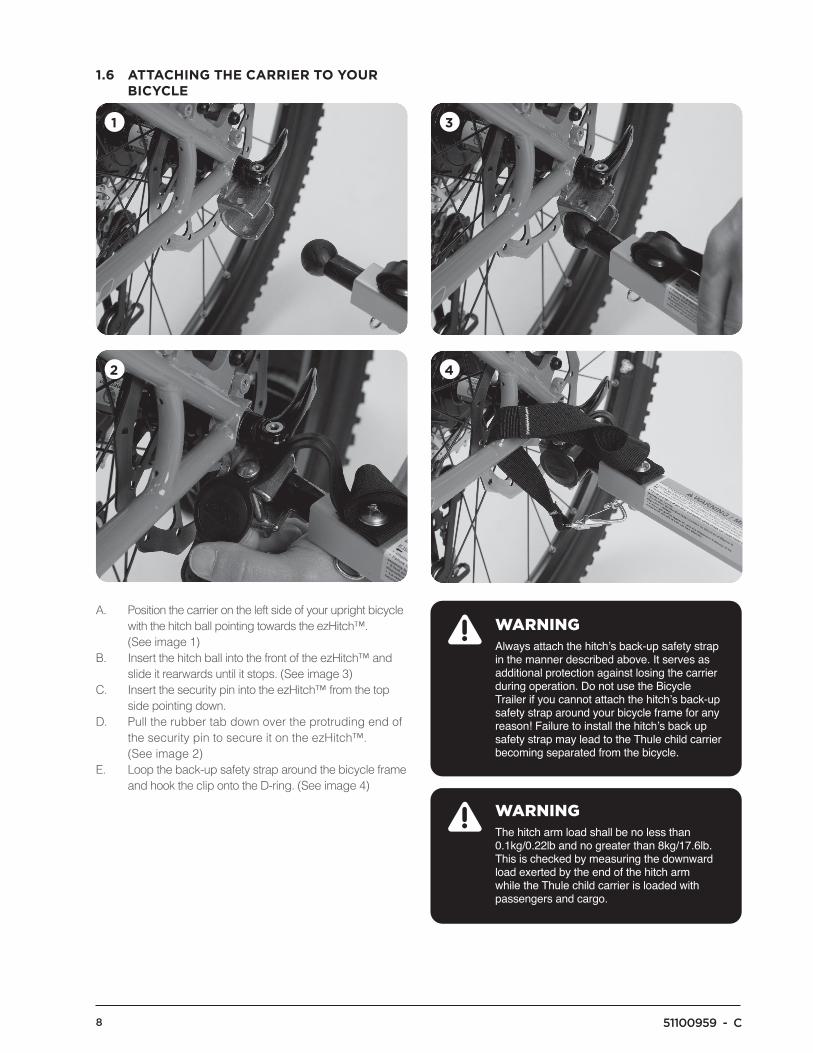
WARNINGAlways attach the hitch’s back-up safety strap in the manner described above. It serves as additional protection against losing the carrier during operation. Do not use the Bicycle Trailer if you cannot attach the hitch’s back-up safety strap around your bicycle frame for any reason! Failure to install the hitch’s back up safety strap may lead to the Thule child carrier becoming separated from the bicycle.
WARNINGThe hitch arm load shall be no less than 0.1kg/0.22lb and no greater than 8kg/17.6lb. This is checked by measuring the downward load exerted by the end of the hitch arm while the Thule child carrier is loaded with passengers and cargo.
1.6 attachinG the carrier to your BicycLe
A. Position the carrier on the left side of your upright bicycle with the hitch ball pointing towards the ezHitch™. (See image 1)
B. Insert the hitch ball into the front of the ezHitch™ and slide it rearwards until it stops. (See image 3)
C. Insert the security pin into the ezHitch™ from the top side pointing down.
D. Pull the rubber tab down over the protruding end of the security pin to secure it on the ezHitch™. (See image 2)
E. Loop the back-up safety strap around the bicycle frame and hook the clip onto the D-ring. (See image 4)
2 4
1 3

51100959 - C 9
1.7 reMovinG the carrier froM your BicycLe
A. Unlatch the back-up safety strap from the bicycle frame. (See image 1)
B. Pull the rubber tab off of the end of the security pin.C. Pull the security pin up out of the ezHitch™.D. Pull the hitch ball forward out of the ezHitch™.
1
1.8 storinG the hitch arM (sPort series onLy)
A. Place the hitch arm into the left VersaWing™ with the hitch ball pointing upwards. (See image 2)
B. Rotate the hitch arm and snap it into the left Click n' Store™ bracket.
C. Hook the latch onto the D-ring.
a
2
NOTICEArms must be removed before collapsing the Thule child carrier.
Thule Child Transport Systems Ltd.105 - 5760 9th Street SE Calgary, AB T2H 1Z9 Canada