THROUGH THE LOOKING GLASS - Homepage - Birch...
5
Finished size: 60" x 63" | Fabric: Wonderland @SuzyQuilts @BirchFabrics #ThroughTheLookingGlassQuilt #BirchFabrics #SuzyQuiltsPatterns 100% ORGANIC FABRIC MADE WITH LOVE, NOT PESTICIDES. birchfabrics.com + [email protected] Active hyperlinks, so click where you see an underline! THROUGH THE LOOKING GLASS A QUILT PATTERN BY uilts Suzy in partnership with
Transcript of THROUGH THE LOOKING GLASS - Homepage - Birch...

Finished size: 60" x 63" | Fabric: Wonderland @SuzyQuilts @BirchFabrics #ThroughTheLookingGlassQuilt #BirchFabrics #SuzyQuiltsPatterns
100% ORGANIC FABRIC MADE WITH LOVE, NOT PESTICIDES.birchfabrics.com + [email protected]
Active hyperlinks, so click where you see an underline!
THROUGH THE LOOKING GLASS
A QUILT PATTERN BY
uiltsSuzy in partnership with
uiltsSuzy SUZYQUILTS.COM | COPYRIGHT 2016 SUZY QUILTS All rights reserved. Duplication of any kind is prohibited. 2+
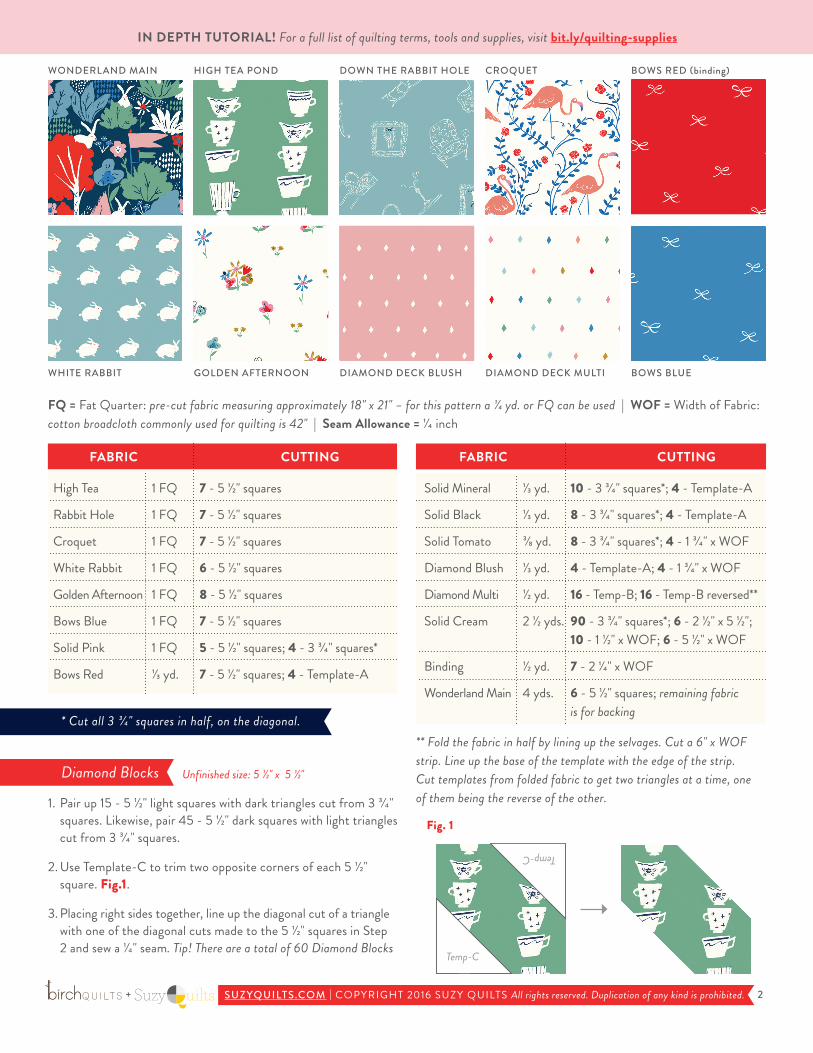
FQ = Fat Quarter: pre-cut fabric measuring approximately 18" x 21" – for this pattern a 1/4 yd. or FQ can be used | WOF = Width of Fabric: cotton broadcloth commonly used for quilting is 42" | Seam Allowance = 1/4 inch
IN DEPTH TUTORIAL! For a full list of quilting terms, tools and supplies, visit bit.ly/quilting-supplies
FABRIC High Tea 1 FQ 7 - 5 1/2" squares
Rabbit Hole 1 FQ 7 - 5 1/2" squares
Croquet 1 FQ 7 - 5 1/2" squares
White Rabbit 1 FQ 6 - 5 1/2" squares
Golden Afternoon 1 FQ 8 - 5 1/2" squares
Bows Blue 1 FQ 7 - 5 1/2" squares
Solid Pink 1 FQ 5 - 5 1/2" squares; 4 - 3 3/4" squares*
Bows Red 1/3 yd. 7 - 5 1/2" squares; 4 - Template-A
CUTTING FABRIC
Solid Mineral 1/3 yd. 10 - 3 3/4" squares*; 4 - Template-A
Solid Black 1/3 yd. 8 - 3 3/4" squares*; 4 - Template-A
Solid Tomato 3/8 yd. 8 - 3 3/4" squares*; 4 - 1 3/4" x WOF
Diamond Blush 1/3 yd. 4 - Template-A; 4 - 1 3/4" x WOF
Diamond Multi 1/2 yd. 16 - Temp-B; 16 - Temp-B reversed**
Solid Cream 2 1/2 yds. 90 - 3 3/4" squares*; 6 - 2 1/2" x 5 1/2"; 10 - 1 1/2" x WOF; 6 - 5 1/2" x WOF
Binding 1/2 yd. 7 - 2 1/4" x WOF
Wonderland Main 4 yds. 6 - 5 1/2" squares; remaining fabric is for backing
CUTTING
* Cut all 3 3/4" squares in half, on the diagonal.
BOWS RED (binding)CROQUETDOWN THE RABBIT HOLEHIGH TEA PONDWONDERLAND MAIN
BOWS BLUEDIAMOND DECK MULTIDIAMOND DECK BLUSHGOLDEN AFTERNOONWHITE RABBIT
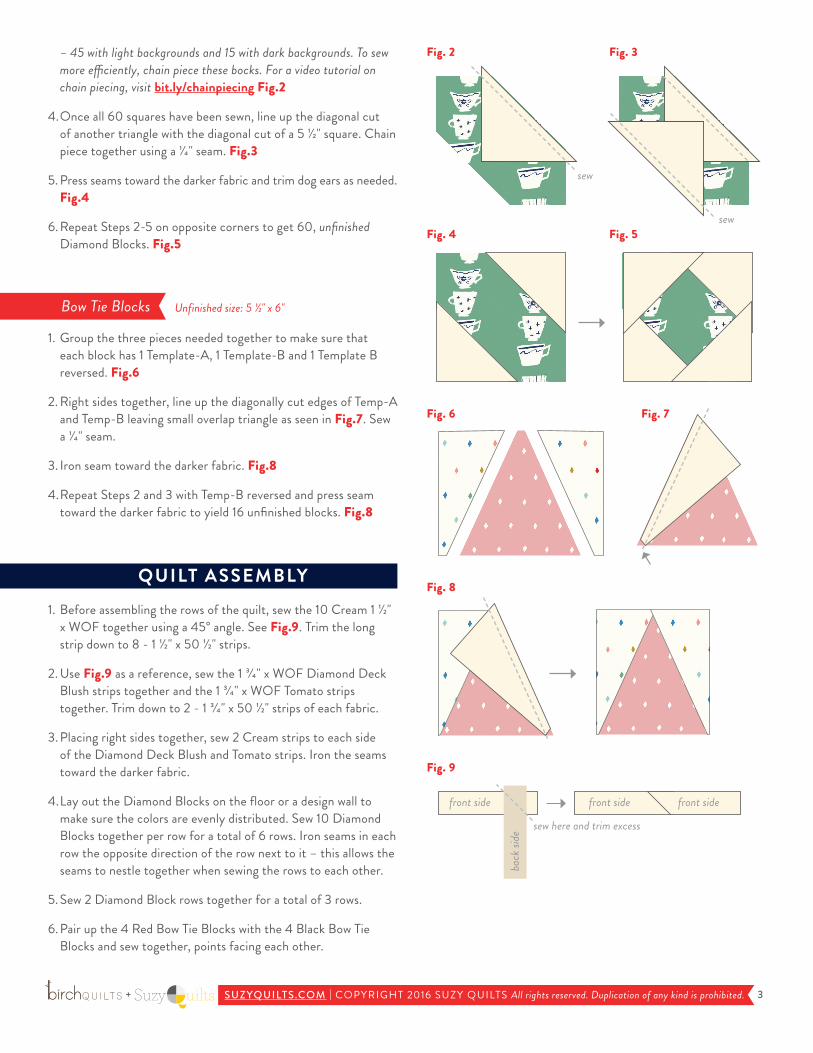
1. Pair up 15 - 5 1/2" light squares with dark triangles cut from 3 3/4" squares. Likewise, pair 45 - 5 1/2" dark squares with light triangles cut from 3 3/4" squares.
2. Use Template-C to trim two opposite corners of each 5 1/2" square. Fig.1.
3. Placing right sides together, line up the diagonal cut of a triangle with one of the diagonal cuts made to the 5 1/2" squares in Step 2 and sew a 1/4" seam. Tip! There are a total of 60 Diamond Blocks
Fig. 1
Diamond Blocks
Temp-C
Temp-C
** Fold the fabric in half by lining up the selvages. Cut a 6" x WOF strip. Line up the base of the template with the edge of the strip. Cut templates from folded fabric to get two triangles at a time, one of them being the reverse of the other.
Unfinished size: 5 1/2" x 5 1/2"
uiltsSuzy SUZYQUILTS.COM | COPYRIGHT 2016 SUZY QUILTS All rights reserved. Duplication of any kind is prohibited. 3+
– 45 with light backgrounds and 15 with dark backgrounds. To sew more efficiently, chain piece these bocks. For a video tutorial on chain piecing, visit bit.ly/chainpiecing Fig.2
4. Once all 60 squares have been sewn, line up the diagonal cut of another triangle with the diagonal cut of a 5 1/2" square. Chain piece together using a 1/4" seam. Fig.3
5. Press seams toward the darker fabric and trim dog ears as needed. Fig.4
6. Repeat Steps 2-5 on opposite corners to get 60, unfinished Diamond Blocks. Fig.5
1. Group the three pieces needed together to make sure that each block has 1 Template-A, 1 Template-B and 1 Template B reversed. Fig.6
2. Right sides together, line up the diagonally cut edges of Temp-A and Temp-B leaving small overlap triangle as seen in Fig.7. Sew a 1/4" seam.
3. Iron seam toward the darker fabric. Fig.8
4. Repeat Steps 2 and 3 with Temp-B reversed and press seam toward the darker fabric to yield 16 unfinished blocks. Fig.8
QUILT ASSEMBLY1. Before assembling the rows of the quilt, sew the 10 Cream 1 1/2"
x WOF together using a 45° angle. See Fig.9. Trim the long strip down to 8 - 1 1/2" x 50 1/2" strips.
2. Use Fig.9 as a reference, sew the 1 3/4" x WOF Diamond Deck Blush strips together and the 1 3/4" x WOF Tomato strips together. Trim down to 2 - 1 3/4" x 50 1/2" strips of each fabric.
3. Placing right sides together, sew 2 Cream strips to each side of the Diamond Deck Blush and Tomato strips. Iron the seams toward the darker fabric.
4. Lay out the Diamond Blocks on the floor or a design wall to make sure the colors are evenly distributed. Sew 10 Diamond Blocks together per row for a total of 6 rows. Iron seams in each row the opposite direction of the row next to it – this allows the seams to nestle together when sewing the rows to each other.
5. Sew 2 Diamond Block rows together for a total of 3 rows.
6. Pair up the 4 Red Bow Tie Blocks with the 4 Black Bow Tie Blocks and sew together, points facing each other.
sew here and trim excess
back
side
front side front side front side
Fig. 9
Fig. 2 Fig. 3
sew
sewFig. 4 Fig. 5
Bow Tie Blocks
Fig. 6 Fig. 7
Fig. 8
Unfinished size: 5 1/2" x 6"

uiltsSuzy SUZYQUILTS.COM | COPYRIGHT 2016 SUZY QUILTS All rights reserved. Duplication of any kind is prohibited. 4+
7. Repeat Step 6 with the 4 Mineral Bow Tie Blocks and the 4 Diamond Deck Bow Tie Blocks.
8. Sew 2 rows of 4 Bow Tie Blocks together with 2 1/2" x 5 1/2" Cream strips separating them. Fig.10
9. Above and below each Bow Tie Block row, sew the strip units created in Step 3.
10. Sew all rows together as seen in Fig.11
Fig. 10
2 1/2" x 5 1/2"
2 1/2" x 5 1/2"
2 1/2" x 5 1/2"
5 1/2"
x 53
1/2"
5 1/2"
x 53
1/2"
5 1/2" x 60 1/2"
5 1/2" x 60 1/2"
11. Once the main portion of the quilt is assembled, sew the 6 - 5 1/2" x WOF Cream strips together into one long strip. Trim that strip to 2 - 5 1/2" x 53 1/2" and 2 - 5 1/2" x 60 1/2" Tip! To save time sewing the border, you can pin the long strip to one side of the quilt. Before sewing, trim the strip with scissors an inch away from the edge. Sew the strip and press the seam. With a ruler and rotary cutter, square up the corner and trim the border strip. Continue to pin, sew and square up each corner until all border strips are sewn to the quilt top.
Fig. 11
2 1/2"
x 5
1/2"
2 1/2"
x 5
1/2"
2 1/2"
x 5
1/2"

uiltsSuzy SUZYQUILTS.COM | COPYRIGHT 2016 SUZY QUILTS All rights reserved. Duplication of any kind is prohibited. 5+
FINISHING THE QUILT
1. Layer the backing wrong side up, the batting and quilt top right side up. Baste as desired. Quilt as desired.
2. Trim the excess batting and backing and square up the quilt.
3. Join the binding strips together with a diagonal seam. Trim and press seams open. Refer to Fig.9
4. Once all of the strips are sewn together, fold in half, wrong sides together, and press flat to create the binding. Sew binding to your quilt by lining up the raw edges.
5. After binding is sewn to your quilt, fold over and either machine stitch or whip stitch the binding to finish off the edges of the quilt.
6. Post your finished quilt to Instagram and use #ThroughTheLookingGlassQuilt
Check out the Suzy Quilts YouTube channel for more tutorial videos! bit.ly/suzyquilts
IN DEPTH BINDING TUTORIAL This easy-to-follow tutorial and video will show every step in sewing binding on a quilt. Click bit.ly/quilt-binding
IN DEPTH TUTORIAL! This step-by-step tutorial and video will explain how to machine quilt. Click bit.ly/machine-quilt
1" test square
TEMPLATE - A
2 7/8"
Tip! Do not add a 1/4" to this template – it is the exact shape to cut from the fabric. When cutting templates of the same height, cut
a strip of fabric as wide as the template so the top and base of the template is already cut – that way you only need to make the
diagonal cuts using the templates.
TEMPLATE - C
TEMPL ATE IS 100% TO SCALE
TEMPLATE - B
6"
6"
3"