This camera manual library is for reference and historical ...ianbfoto.com/downloads/Mamiya...
48
This camera manual library is for reference and historical purposes, all rights reserved. This page is copyright by [email protected] M. Butkus, N.J. This page may not be sold or distributed without the expressed permission of the producer I have no connection with any camera company If you find this manual useful, how about a donation of $3 to: M. Butkus, 29 Lake Ave., High Bridge, NJ 08829-1701 and send your E-mail address too so I can thank you. Most other places would charge you $7.50 for a electronic copy or $18.00 for a hard to read Xerox copy. These donations allow me to continue to buy new manuals and maintain these pages. It'll make you feel better, won't it? If you use Pay Pal, use the link below. Use the above address for a check, M.O. or cash. Use the E-mail of [email protected] for PayPal. back to my “Orphancameras” manuals /flash and light meter site Only one “donation” needed per manual, not per multiple section of a manual ! The large manuals are split only for easy download size.
Transcript of This camera manual library is for reference and historical ...ianbfoto.com/downloads/Mamiya...

This camera manual library is for reference and historical purposes, all rights reserved. This page is copyright by [email protected] M. Butkus, N.J.
This page may not be sold or distributed without the expressed permission of the producer
I have no connection with any camera company
If you find this manual useful, how about a donation of $3 to: M. Butkus, 29 Lake Ave., High Bridge, NJ 08829-1701 and send your E-mail address too so I can thank you. Most other places would charge you $7.50 for a electronic copy or $18.00 for a
hard to read Xerox copy. These donations allow me to continue to buy new manuals and maintain these pages. It'll make you feel better, won't it?
If you use Pay Pal, use the link below. Use the above address for a check, M.O. or cash. Use the E-mail of [email protected] for PayPal.
back to my “Orphancameras” manuals /flash and light meter site Only one “donation” needed per manual, not per multiple section of a manual !
The large manuals are split only for easy download size.

Exposure Metering Modes
How to change to the Exposure Metering ModeWhile pressing the exposure metering mode selector lever lock release button in, turnthe exposure metering mode selector lever up or down.
llf a polarizing filter is necessary, use a cir-cular polarizing filter. A linear polarizing fil-ter is not compatible with the Mamiya 645AFo and its operations.
Genter Average Exposure Metering Mode (A)(Set the exposure metering mode selector lever to "A".)
The average light of the entire picture area is mea-sured, with emphasis on the center.
Spot Exposure Metering Mode (S)(Set the exposure metering mode selector lever to "S".)
The light in the circle at the center of the picturearea is measured to determine the exposure. Thismode is best suited for strongly backlit subjects,or when you desire to measure a specific area.When the spot you want to measure is not at thecenter of the picture, use the AE lock function.(See pages 59-60 AE Lock Mode.)

Exposure Metering Modes / Exposure Compensation
Average/Spot Auto Switching Exposure Metering Mode (A-S AUTO)(Set the exposure metering mode selector lever to "A-S".)
With the A-S metering mode, average or spot expo-sure metering is selected automatically and the appro-priate exposure is set accordingly.The spot mode is selected automatical ly when thebrightness within the spot metering area is lower thanthe brightness of the average metering area by about1.5 EV or greater. The average mode is selectedwhen the spot exposure metering value is the same orbrighter than the average value. When the differencebetween the spot value and average value is between0.75 and 1.5 EV, the appropriate exposure is achievedat an intermediate value.
Exposure CompensationIn some situations, such as a great dif ference between the subject and backgroundbrightness or overall subject tones that will not meter correctly because they are all blackor white, the resulting photograph may be under- or overexposed. When this occurs, usethe exposure compensation function. Exposure compensation can also be used whenyou want to intentionally create overexposed or underexposed pictures.
Turn the exposure compensation dialwhile press-ing the exposure compensation dial lock releasebut ton in @ located on the r ight s ide o f theviewfinder. The exposure can be adjusted withina range of +3 EV in 1/3 steps.Be sure to set the exposure compensation dialback to the "0" position once you are finished tak-ing photos with exposure compensation.
*the exposure compensation dial can belocked only in the "0" position.
*Exposure compensation is possible whenlocked in AE.
Display of the exposure compensation in the viewfinder's LCD panel(When a Metz f lash is not equipped.)
Exposure modeP Program AE
The se t t ing is d isp layed.Av Aperture prioritv AETv Shutter prioritv AEM Manual mode XX Svnchro mode
Not d isp layed.T Tlme mode
X The d i l fe rence be-tween the metered valueand the se t exposurevalue is displayed Theexp0sure c0mpensatr0nfunction cannot be used.
www.orphancameras.com

Auto-Bracketing Mode
When you take an object that it is difficult to determine the exposure compensation valuefor, or when you take another shot with only slightly different exposure levels, use theAuto-Bracketing f u nction. (Overexposu re, standard, and u nderexposu re).
1. Turn the shutter release mode selector leverto the "S" or "C" position.In the "S" position, the camera takes one frameeach with one press of the shutter release but-ton. In the "C" posit ion, the camera takes threeframes sequentially.
2. Keep pressing the function mode-setting but-ton @ for approximately one second to enter intothe auto-bracketing mode. The Auto-Bracketingmarkz4 and the init ialsett ing value "0.3" wi l lap-pear on the main LCD panel.
3. Turn the front or rear dial to choose units ofexposu re compensation.By turning the front or rear dial, you can choosecompensation value from 1/3, 1/2,213, or 1 (thed isp lay shows 0.3 , 0 .5 , 0 .7 and 1.0) . The cho-sen setting can be registered after 5 seconds orby pressing any another button on the camera.
4. Press the shutter release button.Select required shutter release mode, exposuremode, and exposure compensat ion un i t , andpress the shutter release button.
he vieMinder LCD read-outs displays "nl"(standard),"1)?" (under), and "o3" (over) inthe order of the frames taken, and the num-bers (1, 2, and 3) blink correspondingly.
L
/ t \Standard

Single-Frame Mode (S)Press the shutter release button for each frame shot.While taking photos, the camera does not fix the exposure value. lt meters the exposurelevelfor each shot and provides auto bracket (automatic exposure in steps). The cameramaintains the Auto-Bracketing function unti l the last shot in a rol l of f i lm.
Continuous Mode (C)By pressing the shutter release button, the camera takes three frames in series, andthen stops.By each press of the shutter release button, the camera wil l repeat three continuousshots. The standard exposure will be fixed at the first frame.
*When the number of avai lable frames of the current rol l of f i lm is less than 3whife in auto-bracketing mode, the "- nE - aJ." display wil l bl ink and automati-cally cancels Auto-Bracketing mode.
Automatic exposure shot in the Auto-Bracketing modeExposure mode Operation
P Program AEThe shut ter speed changes
Av Aperture priority AE
Tv Shutter speed priority AE Aperture changes.
M Manual mode The shutter speed changes.
*When the continuous mode "C" is selected, the camera takes three frames inseries.Take photos by securing the camera on a tripod or the like.
*To exit the auto-bracketing mode, press the function mode-setting button @three t imes, and the camera returns to normal shooting mode. You can alsorelease the auto-bracketing mode by turning the shutter release mode selectorlever to "L" (power OFF ) position. (The set values are registered.)
*When exposure compensation is chosen, the camera takes photos in the auto-bracketing mode by adding the compensation value.
*Auto bracket shooting is also available when the camera is locked in AE.*When data superimpose is specif ied, symbols "N", "U", and "O" wil l appear on
the exposure compensation value indicator. (See page 80.)
www.orphancameras.com

AE Lock Mode
The AEL button will lock the Auto-exposure value as the photo is being recomposed.
1. Turn the shutter release mode selector leverto "S" or "C".
2.Turn the exposure mode-sett ing dial and se-lect any of "P", "Av", or "Tv".
3. Focus on the object you want to take a photoof for exposure metering. Then press the AEL but-ton 6 on the rear of the grip. I J appears inthe viewfinder, indicating that the exposure valueis locked.
4. Aim the camera to take the desired composi-tion, and then release the shutter.
*Wnen you try to take another photo whileremaining in AE lock mode,1 ; display onthe viewfinder blinks to show that the cam-era is still in AE lock mode.
cancelAE lock mode, press the AEL but-ton 6 again.
*lt you turn the shutter release mode selec-tor lever to the "L" (power OFF) position, orafter elapse of one hour, the AE lock modewill automatically be cancelled"
*ln tne exposure mode "M" (manual mode),you cannot take a photo in the AE lockmode. Keep pressing the AEL button forapproximately one second while the expo-sure metering difference value is displayed,then the one-push shift mechanism is acti-vated, and the camera changes shut terspeed according to the camera's meter.(See page 53.)
t

Metered-val ue d ifference i nd icator
Press the AEL button in @ , the viewfinder LCDread-out displays the dif ference between themetered exposure value and exposure of a newcomposition. This is useful to check if an objectwith very different light level can be taken or not.
/ l / l* f tne difference between the set value and the metered value exceeds 6EV the
viewfinder LCD blinks "- u - " for underexposure and "- o - " for overexposure'
NOTE:
After specifying the AE lock mode, if you turn the front dial or rear dial, you canchange the aperture value and shutter speed without changing the exposure whenentered into AE lock mode.
When the exposure "P" mode (program AE) is selected, turning one of the dialsShiftS the program between "PH" and "PL." When the expOSure mode iS Set to "Av"(aperture priority AE) or "Tv" (shutter priority AE), turning one of the dials changesboth the shutter speed and aperture.
*Wnen taking photos in AE lock mode, normal operation mode, or mirrorup mode, exposure compensation and auto-bracketing mode can be se-lected.
www.orphancameras.com

Multiple Exposure Mode
Using the multiple exposure mode, you can expose several shots on the same frame.
1. Press the function mode-setting button in @for approximately one second, and then press itagain to enter into multiple exposure mode.
2.Turn the front or rear dial to select the numberof exposures desired. You can select from 2 to 6exposures. After an elapse of five seconds or bypressing any another button on the camera, thisselection will be registered.
3. Press the shutter release button. The camerawill not advance the film until the specified num-ber of exposures has been taken.
hen the camera is taking photos while in the multiple exposure mode, it showsthe multiple exposure mark " Er " on the main LCD panel.
check the number of shots remaining for the multiple exposure, press thefunction mode setting button 6, and the main LCD panel displays the numberof exposures remaining.
increase the number of exposures to more than six in the middle of takingthe multiple exposure, or to decrease the number of exposures, press the func-tion mode-setting button G) and turn the front or rear dial.
hen you press the shutter release button while in the shutter retease mode"C" (continuous winding mode), and if the number of exposures terminates, themain LCD panel shows "End", and the camera returns to normal mode.
cancel the multiple exposure mode before taking a photo, press the functionmode setting button @ twice.

To cancel the MultipleExposure Mode
Make sure to pull the dark slide out, and half press
the shutter release button while pressing the mid-rol l f i lm advance button in G).The camera winds on one frame and then exitsfrom the mult iple exposure mode.
*l t you removed the magazine during a mult iple exposure, the main LCD panel
bl inks "-no-E=t" and wil l then return to normal display, cancel ing the mult iple
exposure mode. However, since the magazine has not yet canceled the multiple
exposure mode, when the magazine is mounted again, the camera will resume
taking mult iple exposures. In this case the main LCD panel shows exposure
continuing mark "E=1" and the number of exposures will automatically returned
to " 1 " ,
Guideline for exposure compensation during Multiple ExposureModeAs the purpose of the mult iple exposure mode is to expose several shots on a single
frame, exposure compensation may be needed depending on the subjects being photo-
graphed and the background.
*tne optimum exposure compensation value willvary according to your actualphotographic conditions.We recommend taking test shots.
Guideline for exposure compensation in typical multiple
www.orphancameras.com

Self Timer Mode
With this function, under the default setting the shutter is released 10 seconds after theshutter release button is pressed. The self t imer lamp f lashes slowly for the f irst 7seconds, then flashes quickly for the last 3 seconds before the shutter is released. Usethis function to take Eroup photos or to photograph yourself.
1. Mount the camera to a tr ipod.
2. Press the mode setting button in 6 three timesto set the self timer mode.The self t imer mark rg and the init ial sett ing (10for 10 seconds) is displayed on the external l iq-uid crystal display panel.
3. The number of seconds before the shutter isreleased can be changed by turning the front orrear dial. The number of seconds can be set be-tween 3 and 60, in steps of 1 second from 3 to 10seconds, in steps of 10 seconds from 10 to 60.The setting is registered after 5 seconds or whenthe shutter release button is pressed.
4. Looking through the viewfinder, determine thecomposition, check that the focus is set properly,then press the shutter release button. The shut-ter is released after the set number of seconds.
*To cancel the self timer mode after pressing the shutter release button, eitherpress the mode sett ing button in @ or turn the exposure mode sett ing dial.Changing the exposure mode does not chalge the set self timer operating time.
*lf there is a bright light source behind the camera or if the shutter release buttonis pressed without looking through the viewfinder, light enters the viewfinder'seyepiece, affecting exposure metering. Turn the eyepiece shutter open/closedial to close the eyepiece shutter.
hen the shutter release mode is set to "C" (continuous advance mode), theself timer mode can be used to take photos at intervals of 3 to 60 seconds whilethe shutter release button is pressed.

Eyepiece Shutter
Use this when there is a strong l ight source behind the camera or when pressing theshutter release button without looking through the viewfinder.(This prevents exposure error due to light entering from the viewfinder.)
Turn the eyepiece shutter lever in thedirection of the arrow.ff
www.orphancameras.com
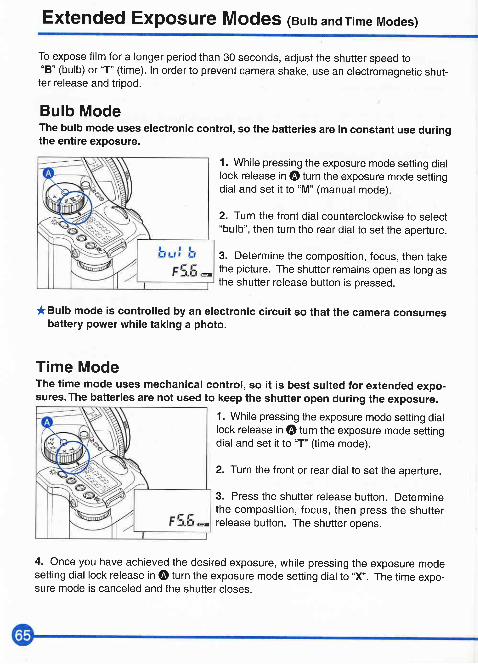
Extended Exposure Modes (Butb andrime Modes)
To expose film for a longer period than 30 seconds, adjust the shutter speed to"8" (bulb) or "T" (time). In order to prevent camera shake, use an electromagnetic shut-
ter release and tripod.
Bulb ModeThe bulb mode uses electronic control, so the batteries are in constant use duringthe entire exposure.
1. While pressing the exposure mode setting diallock release in @ turn the exposure mode settingdial and set it to "M" (manual mode).
2. Turn the front dial counterclockwise to select"bulb", then turn the rear dial to set the aperture.
3. Determine the composition, focus, then takethe picture. The shutter remains open as long asthe shutter release button is pressed.
*Bulb mode is controlled by an electronic circuit so that the camera consumesbattery power while taking a photo.
Time ModeThe time mode uses mechanical control, so it is best suited for extended expo-sures. The batteries are not used to keep the shutter open during the exposure.
1. While pressing the exposure mode setting diallock release in @ turn the exposure mode settingdial and set it to "T" (time mode).
2. Turn the front or rear dial to set the aperture.
3. Press the shutter release button. Determinethe composit ion, focus, then press the shutterrelease button. The shutter opens.
4. Once you have achieved the desired exposure, while pressing the exposure modesetting dial lock release in @ turn the exposure mode setting dial to "X,'. The time expo-sure mode is canceled and the shutter closes.

Backlight Button
To see the main panel at night or in dark places,
press the backlight button @ I ;Pl .The backl ight wi l l go off after approximately 10seconds unless there is another operation.
* When releasing the shutter, or pressing the backlight button 6 / {o..1 while the
backlight is on, the backlight will go OFF.* When operating the camera while the backlight is on, the backlight will extend
the lighting period for approximately another 10 seconds.
www.orphancameras.com

Taking Photos with the Mirror Up
Use this function when you want to avoid even slight camera movement when takingphotos under such conditions as slow shutter release using a tripod, or taking photosusing a telescopic lens, close-up shots, or shooting a printed poster or another photo-graph.With the mirror raised, neither the auto focus mechanism nor exposure metering mecha-nism can be used. Therefore, the camera instructs the operator to focus and adjust theaperture before activating the mirror up function. In order to prevent camera shake, usethe electromagnetic cable release (sold separately) and a tripod.
Using auto focus and auto exposure1. Select "S" (single focus mode) turning thefocus mode selector lever.
2. Turn the exposure mode-setting dialto chooseany of uP," "Av", or "Tv" exposure modg,Look through the viewfinder and determine focus,composition, and exposure.
3. Press the AEL button.By pressing the AEL button, the camera locks themetered exposure, and shows the AE lock indi-cator I J in tne viewfinder.
4. Turn the mirror up leverto the end of the "M.UP"side, and raise the mirror.
5. Press the shutter release button to take a photo.ffre [ ) disptay in the viewfinder blinks to showthat the AE lock is still active.

*After taking a photo with the mirror up function, return the mirror up lever to itsoriginal position, and release the currently set AE lock.
* Wtren you release the AE lock while in the mirror up mode and attempt to take aphoto, the main panel shows "-IE-FE" and locks the shutter operation. In thiscase, replace the mirror up lever to the original position.
*Wnile taking a photo in the mirror up mode, and AE lock is set, exposure com-pensation and auto-bracketing mode are available.
*Leaving the camera in the mirror up mode for a long period may cause an unex-pected exposure of the film. After completing shooting in the mirror up mode,make sure to replace the mirror up lever to its original position.
*The mirror up lever cannot be turned when the lens is not installed on the cam-era.
* You cannot remove a lens from the camera when in the$*pr up mode.
llf you direct the lens toward the sun with the mirror up function ON, the intensesunlight focused on the shutter blades may cause burning.
ln the manual mode
1. Turn the focus mode selector lever to "M"(manual focus mode) posit ion. Turn the lens-fo-cusing ring to focus. Half-press the shutter releasebutton to meter exposure.
2. Turn the exposure setting dial to "M" (manualmode) posit ion. Turn either the front or rear dialto adjust the shutter speed and aperture with themetered values.
3. Turn the mirror up lever to the end of the "M.UP"position to raise the mirror and take a photo.
www.orphancameras.com
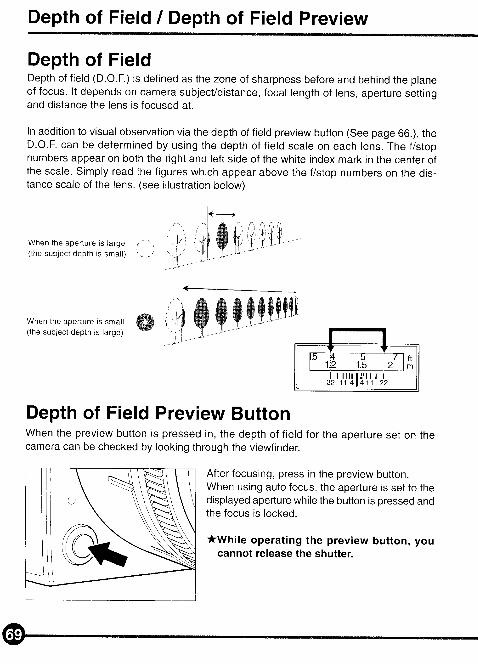
Depth of Field / Depth of Field Preview
Depth of FieldDepth of f ield (D.O.F.) is defined as the zone of sharpness before and behind the planeof focus. l t depends on camera subject/distance, focal length of lens, aperture sett ingand distance the lens is focused at.
In addition to visual observation via the depth of field preview button (See page 66.), theD.O.F. can be determined by using the depth of f ield scale on each lens. The f/stopnumbers appear on both the r ight and left side of the white index mark in the center ofthe scale. Simply read the f igures which appear above the f/stop numbers on the dis-tance scale of the lens. (see illustration below)
When the aper tu re i s la rge r " ' ' , ,
( the subject depth is small) ' . ,-- t
, ' L ' ,i .ll .rt -lr
,l:
ti.lq)q
When the aperture is smatt tr#(the subject depth is large)
Depth of Field Preview ButtonWhen the preview button is pressed in, the depth of f ield for the aperture set on thecamera can be checked by looking through the viewfinder.
After focusing, press in the preview button.When using auto focus, the aperture is set to thedisplayed apefture while the button is pressed andthe focus is locked.
*Whi le operat ing the prev iew but ton, youcannot release the shutter.
4$W @@$ry$
@a

Infrared Photography
When taking photos using infrared f i lm, the posit ion at which the subject is in focus issl ightly dif ferent than that of non-infrared sensit ive f i lms. This is because the infraredrays have a longer wavelength and the image converges further back than non-infraredsensit ive f i lms. Use the procedure described below when taking photos using infraredf i lm.
1. Set the focus as usual. Find the point on the distance scale matching the subjectdepth scale's central index.
2. Set the focus mode selector lever to "M" (manual focus mode). Turn the focusing ringclockwise and set the distance scale to the above infrared index.
*Use a red filter when taking photos using infrared film.*Be sure to read the infrared film's usage instructions.*You cannot take photos in AE mode when using an infrared film.
ftm
| i l i l t l t ' i l t I22 11 41411 22
1.2 2
www.orphancameras.com

Flash Photography
ln addi t ion to i ts standard f lash sync system, the Mamiya 645 AFo features TTL ( through thelens), of f the f i lm (OTF), e lectronic f lash exposure meter ing. A f lash sensor located inside thecamera body reads the f lash ref lected ol f the f i lm surface at the moment of exposure. Thesensor is connected via the Mamiya 645 AFo's dedicated hot-shoe to a shoe- or handle-mounrstyle Metz f lash unit via the Metz SCA 3952 TTL Adapter. Maximum f lash svnc speed is '111 25sec. , making dayt ime syncronizat ion possib ie.
The ISO of the f lash is automat ical ly set through the TTL connect ion f rom ihe camera's Fi lmMagazine; any adjustment to th is is instant ly recognized af ter the set t ing is locked and theshutter re lease is hal f -pressed. Also, when Fi lm Magazines wi th d i f ferent ISO set t ings areswitched on the camera body, the TTL flash connection instantly recognizes the change.
To util ize the TTL flash feature with all TTl-operable Metz flash units, a Metz SCA 3952 Mod-ule is required. Please see the chart below for compat ib i l i ty and/or addi t ional adapters thatmay oe necessary.
-\--\- Adapter
Metz Flas Unit -..---
,-Type of Flash
scA 3952Module
scA 3000cConverter
shoe 3007AConnecting
CableMeIz32MZ-3 and -7 -2 Shoe-mountMetz 40 MZ-3i and-1 Shoe-mount X
Meiz 54 M7-3 Shoe-mountMeiz 45 CL-3 and -4 Handle-mount X X
Meiz 50 MZ-S H a n d l e - m o u n l X
Metz 60 CT-4 H a n d l e - m o u n l X X
Metz 70 MZ-S and-4 Handle-mount X
The resu l t i ng f l ash exposureautomation determines correctf lash exposure and automat i -cal ly adjusts the output of thef lash. l t a lso automat ical ly cor-rects for exposure compensa-t i on no rma l l y requ i red whenusing f i l ters, c lose-up bel lowsor extension tubes. However,as with all TTL systems, it re-- Necessary for of { -camera and f lash bracket use
ffi .r-"*,:"rr"ffi"haracteristicsrh""':ll{i;tT;#31,::i[ffi 3".XHlmined by experimentation and is performed on the Mamiya Film Magazine ISO setting.
1. Mount the SCA3952 adapter onto the Metzflash, inseft fully into the camera's hot shoe, thentighten with the locking knob @.
2. Set the exposure mode, then check the shut-ter speed and aperture.
Exposure mode Shutter speed ApertuneP Prooram AE Automatically set by camera al11125
sec. to 1/60 sec.Automaticallv set bv camera
Av Aperture priority AE Any aperture
Tv Shutter priority AE 1/125 to 30 sec.(Be sure to set at 1/125 sec. or slower) Automatically set by camera
M Manual mode 11125 to 30 sec. - bulb(Be sure to set at 1/1 25 sec. or slower) Any aperture
x Svnchro mode 1 /125 sec .

(3)(4)
*Witn TTL flash photography, the reflection of the flash is metered and the intensity ofthe flash is adjusted automatically, soTTL flash photography is not necessarily suitedto all conditions. ln the cases described below, we recommend that you use a flashmeter to check the intensity of the flash or to use a rnanual flash setting.
For example:(1) When the size of the subject you want to l ight with the f lash is relat ively small within
the picture(2) When the background behind the subject is ext remely br ight or when there is a
strongly reflective object in the backgroundWhen the background behind the subject is extremely dark (outdoors at night, etc.)For f lash photography with a narrow f i lm lat i tude
*the shutter cannot be released until the flash's OK lamp is l it.hen using an SCA300 system flash (Metz 60CT-4, 450L-4,etc.), also use the SCA3000C
converter (sold separately).*For details, refer to the operating instructions of the flash and the SCA adapter.
use the guide number indicated on the flash fully, wait several seconds after the
charging completed indicator l ights.*Gautions on using instant fi lm
Instant fi lms (Polaroid 100-600 series and Fuji FP series), have a lower reflectivityrate than regular fi lm. Exposure compensation is necessary when using the flash intheTTL mode.In general, set the exposure compensation to about 1 or 1 1/3 EV on the minus side.
Metz Flash SCA3952 System Functions
C h a r g i n g c o m p l e t e d i n d i c a t o r i nv iewf inder
When charging of the f lash is completed, a charging com-p le ted f lash icon f w i l l i l l umina te in the v iewf inder 's l iq -u id c rys ta l d isp lay pane l .
Automat ic set t ing of f lash synchro-niz ing speed
When the exposure mode is set to "Av" (aperture priorityAE) , the shutter speed is set to 1/' l 25 sec. or less whencharging of the f lash is completed."P" mode sets the shutter speed to 1/125 or 1/60 only.
Automatic viewfinder( funct ions when the f lash mode is
set to the TTL mode/external automode)
The flash charge mark N flashes after the shutter is re-leased to indicate that the flash was emitted properly.
Auto zoom control The power zoom reflector is l inked to the lens focal length(Excluding the Metz 322-2)
Emission of AF supplemental l ightWhen the focus mode is set to "S", the autofocus mea-sur ing beam l ight is emit ted automat ical ly in low l ight .(Excluding the Metz 322-2)
Display of flash range (distance)Displayed on the flash's l iquid crystal display panel. (Excluding the Metz 32MZ-3 and Metz 322-2)
Date transferThe fi lm sensitivity data, exposure compensation data andaperture data is sent from the camera to the flash.
www.orphancameras.com

Flash Compensation Settings
By combined use of a Metz f lash and the SCA3952 adapter, the camera adjusts forflash. lt can be adjusted within + 3EV in increments of 1/3 steps.
1. Install the SCA3952 adapter on the Metz flash,and put i t on the camera then lock the f lash inplace using the locking knob on the f lash shoe6. Turn the shutter release mode selector leverto the "S" or "C" posit ion, and turn ON the f lashpower switch.
2. When the flash charge confirmation lamp lights,press tf'e @ button in to show the " pf ,'on themain LCD panel.
*FL - Ftash
3. Turn the front or rear dial to select the f lashadjustment value.

Main panel (normal display) 4. Half press the shutter release button,the "o" (when posit ive adjustment) or"u" (when negative adjustment) displayappears on the left of the shutter speedi n d i c a t o r o n t h e m a i n p a n e l a n dviewfinder LCD read-outs.
u i l \P F\.8 *.
Viewfinder LCD read-outs.
*feep pressing the @ button in to activate the flash auto adjustment mode.Youcan check the exposure compensation value.
*lf you turn the shutter release mode selector lever to the "L" (power OFF) posi-
t ion, the adjusting value wil l be canceled and i t wi l l return to init ial value " OpP ".
:,\- Flash compensation and exposure compensation can be set independently.
W +> see page 86a
4www.orphancameras.com

. ,--4-\' /
\ _YA)_
Flash Photography with electronic flash models otherthan Metz
1. Mount the flash onto a flash bracket or if it isa shoe mount style flash attach to the camera'shot shoe.Do not a t tach a dedicated f lash un i t to thecamera's hot shoe that is not designed specifi-cally for the Mamiya 645AFo. To use this type off lash, use a f lash bracket or other means, andconnect the synchro cord to the camera's syn-chro terminal.(See note below about flashes designed ex-clusively for other camera makes.)
*Remove the rubber cover when connecting the synchro cord.After shooting, be sure to attach the rubber cover in order to protect the syn-chro terminal's contacts.
2. While pressing the exposure mode sett ing dial lock release in turn the exposuremode sett ing dial and set i t to "X (11125 sec.) or,,M', (manual).When "M" (manual) is selected, turn the front dial and set the shutter speed to 1/125 sec.or slower.
3. Turn the rear dial to set the aperture, then take the picture.
*This camera's synchro contact is an X contact.*When using MF or M grade flash bulbs, set the shutter speed to 1/30 sec. or less
for MF grade f lash bulbs ,111s sec. or tess for M grade ftash bulbs.
A wanNrNGOusing flashes designed exclusively for other makes of cameras may dam-
age the camera's internal mechanisms if cbnnected to the camera's hot-shoe. In this situation, use an off-camera flash bracket and connect a pccord to the camera's synchro terminal.
Owhen using flashes with a flash duration of 1/soo sec. or longer, set theshutter speed to 1/30 sec. or less.
' t * ) -$ Selected aperture value can also be locked. + see page g3 to g4

This chapter describes other functions such as date and datasuperimposes.
www.orphancameras.com

su peri m posi ns Data ( llfigTl iffJ!:'j35i;""',ilthe )qe area t
Setting date and time (select "sEtl")
After changing batteries or using an external power supply, you have to check the camera'sdate and time indicators and adjust if needed.
1. Set the shutter release mode selector lever to"S" (to turn the power on).
2. Press the@ Key for about 2 seconds."5E11" appears on the main LCD panel.
3. Press the @ Key again, then use the front and rear dials to set the date and time.When the front dial is turned clockwise, the position switches between the month, day,year, hours and minutes (the selected posit ion f lashes). Turn the rear dial to set thevalue.
ET.-,il- E=-*f - E,l l'il day/month/yearI r , l*l t-l , l.*l til i: I
When the front dial is turned clockwiseWhen the front dial is turned counterclockwise
4. After setting the date and time, press the @ Button for about 2 seconds toregister the setting.
*lf you half press the shutter release button or other priority buttons beforeregistering the newly set date and time, the set date and time will be canceledand will not be registered.
*Press the @ button in for approximately two seconds to confirm the regis-tered date and time. Press the @ button in to confirm the index number (see
hour 'minutes"

Setting the lndex Number (select *sEI ?")
1. Set the shutter release mode selector lever to"S" (to turn the power on).
2. Press the @ Key for about 2 s, thenturn the front or rear dial to display "sEI ?" on themain LCD panel.
3. Press the @ Key again, then use the front and rear dials to set the desired indexnumber (3 digits).When the front dial is turned clockwise, the posit ion switches between the f irst digit ,second digit and third digit (the selected position flashes). Turn the rear dial to set thevalue.
uw When the front dial is turned clock-WISC
- When the front dial is turned counter-clockwise
tirirrt.'?)-t !-l
rNrfim
4. After setting the index number, press tne @ Button for about 2 seconds toregister the setting.
he index number is displayed as a 3-digit number. Data on the number ofphotos taken is stored in the camera, so the numbers of the photos continuesto increase when the magazine is removed and replaced with a differentmagazine.This function is convenient for managing large amounts of film.he starting index number can be set at will. For example, when shooting in
different places or for different purposes, you can classify the photos bychanging the starting number of any of the digits.
nce the total number of photos taken reaches 999, counting starts over from001. 000 can also be set using the index number setting procedure.
fter 60 seconds or when another priority button is pressed, the index numbersetting mode is canceled and the setting is not registered in memory.
ustom settings remain in the memory even when the shutter release modeselector lever is set to "lJ'(turning the power off).
www.orphancameras.com

Selecting the Data to be Superimposed (setect "Func'n)This function allows you to superimpose exposure or date information on the films outsideedge of the image area. When selected, the superimposing mode is displayed on the mainLCD panel.
1. Set the shutter release mode selector lever to"S" (to turn the power on).
2. Press the @ Key for about 2 seconds todisplay "Func" on the main LCD panel, then pressthe @ Key again.
3. Turn either the front or rear dial and choose the DATA or DAY to superimpose. Select"OF" to cancelthis function.
t - t f iE7 t \ -
ry ffiil il: ffitl :i :::i :i:i i: Hffi: ::""'x#in.kw seData superimpose modes
rilfll f-l- t-t t1E
* F unE
l l u tnt';ii:
DATA:The following data is superimposed; Exposure mode, aperturevalue, shutter speed, aperture compensation value, exposure me-tering mode, index number, and auto bracketing order symbol(when selecting auto bracketing function).
DAY:The date (year, month and day), time and index number are su-perimposed.
OFF:The data superimpose function is turned off.
t:a
/

I superimposed.
4. Display the desired data superimpose mode on the external l iquid crystal displaypanel, then press the @ in Button for about 2 seconds. The setting is registered andthe desired data superimpose mode is displayed on the main LCD panel.
*The data superimpose function is avai lable with f i lms having sensit ivi ty fromlSO25 to 1600. When using other f ilms, even if the data superimpose f unction isused, data will not be superimposed.
Display superimposing data details.Ex.1: When DATA mode is selected, and the fol lowing photo-graphic condit ions are set.
Exposure "Av" modeAperture value "F8"
Shulter speed "1/60"
Exposure metering "AUTO A-S" modeExposure Compensation "- 1.0 " EV
Data superimposed on the f i lm wil l bedisplayed as shown on the r ight" '
@ Exposure mode@ Aperture value@ Shutter speed@ Exposure compensation value l frame
order with auto bracketing function: N, U,and O
@ Exposure metering modex@ Index number
@ Exposure mode@ Aperture value@ Shutter speed@ Automatic exposure display@ Exposure metering difference display@ Exposure metering modex@ Index number
*Wtren manual operation is selected and when the exposure metering difference
exceeds t6EV "- o -" or "- u -" will be superimposed on @.
xwhen the exposure meter ing mode is se lected as AUTO A-S (automat ic changebetween average and spot), and i f "A" is selected, "*A" wil l be superimposed. l f "S"
is se lected, " * S" wi l l be super imposed. l f "AUTO A-S" is se lected, "As" wi l l be
D a t a s u p e r i m p o s e d w i t hmanual operation
o @ o @ @ @ o
www.orphancameras.com

Ex.2: When DAY mode is selected
lf you were to take a photo at 9:28 on August 16, 2001 , the data superimposed would beas fol lows:" '
O Year, month, and date@ Time@ Index number
How to check data that will be superimposedKeep pressing the @ Outton in for approximately two seconds, year, month, and datewil l be displayed on the main LCD panel. Each press of the @ Outton wil l show thedetai ls in order of "year, month, date" - "t ime" - " index number".
f ,', ,,t].*[E*--lI r, | | :15 |
*tne display on the main LCD panel returns to normal when the shutter releasebutton is half-pressed or when another priority button is pressed.

Changing the Viewfinder Display in the Manual Mode"M"(setect,,Fd")
When the exposure mode setting dial is set to "M", it is possible to display only the focusmarks and flash charge mark in the viewfinder's LCD panel. This is useful when expo-sure sett ings wil l not change, and this information in the viewfinder could be otherwisedistracting.
1. Set the shutter release mode selector lever to"S" (to turn the power on).
2. Press tne @ Key in for about 2 seconds todisplay "FurrE" on the external l iquid crystal dis-play panel.
3. Turn the front or rear dialto select "Fd".
4. Press tne @ key in again and turn thefront or rear dial to select "OF'.
charging is completed) are displayed on the viewfinder's liquid crystal display panel.
Returning to the normal display*Repeat steps 1 to 4 then, turn the front or rear dial to select "On", then press
the @ Button in for 2 seconds.
www.orphancameras.com

Front I Rear Dial Lock Mechanisms(setect,,dLtrtr,,)
When the Electronic Dial Lock is "On", all currently set values in "Av" (Aperture PriorityAE), "Tv" (Shutter Priority AE) and "M" (Manual mode) cannot be adjusted with the frontor rear dials. This prevents accidental adjustment of shutter speed or aperture values.
1. Set the shutter release mode selector lever to"S" (to turn the power on).
2. Press tne @ Key in for about 2 seconds."FunE" appears on the external liquid crystal dis-play panel.
3. Turn the front or rear dial and select"dLtrc".
4. Press the @ key in again, and the "OP'indicator wi l l bl ink. Turn the front or reardial to select "On".

S.Keep pressing the @ button in for approxi-mately two seconds to register the value. Whenregistered, the main panel shows "L" (dial lockindicator).
*lfter the value has been registered, the shutter speed and aperture will not
change even if you turn the front or rear dial.*Wnen you activate the electronic dial lock, and if you then operate the elec-
tronic dial, the dial lock indicator "L" on the main panel blinks for three
seconds to show that the electronic dial lock is functioning.
How to release the electronic dial lock*Follow the same steps from 1 to 4.Then, turn the front or rear dial to select "OF",
and press tne @ button in for approximately two seconds.
www.orphancameras.com

AF supplemental infrared light canceling function (setecr "HFLt"y
Specify this function when you do not want to activate the AF supplemental infrared light.
1. Turn the shutter release mode selector lever tothe "S" or "C" pos i t ion.
2. Keep pressing the @ key in for approximatelytwo seconds, and the main panel shows "Func".
3. Turn the front or rear dial to select "FFLI".
4.Again press tf '" @ key in, and turn thefront or rear dialto select "OF".
5.Keep pressing the @ buton in for approxi-mately two seconds to register the setting.
How to exit this function*Follow the same steps from 1 to 4.Then, turn the front or rear dial to select "On"
and press ttte @ bufton in for approximately two seconds.

Changing the Flash Auto Adjustment Procedure (select "FsEL")
Flash compensation and exposure compensation can be set independently, combinedwith the use of a Metz flash and SCA3952 adapter.
1. Install the SCA3952 adapter on the Metz flash,and put i t on the camera then lock the f lash inplace using the locking knob on the f lash shoe@. Turn the shutter release mode selector leverto the "S" or " C " posit ion, and turn ON the f lashpower switch.
2. Press tt ' ' " @ key in for approximatelytwo seconds, the main panel shows "Funtr".
Turn the front or rear dial to select "F5EL" .
NOTE:When f lash selection "F5EL" is set to"FSEL 0" , the exposure compensat iondial is not workable, only the f lash com-pensation is workable.
3. Again press tt ' . r" @ key in, and turn thefront or rear dial to select " 1 " Press the @button in for approximately two seconds toregister the setting. Flash compensation andexposure compensation can be set indepen-dently.
4. Turn ON the f lash unit. nnPress the @ button in to show " ?i " lflashcompensation)Turn the front or rear dial toselect the flash " r " conlpensation value.Turn the exposure compensation dial andselect the exposure compensation value (seepage 56).
www.orphancameras.com

Main LCD panel (normal display) 5. Half press the shutter release button,the "o" ( i f posit ive adjustment) or"u" ( i fnegative adjustment) display appears tothe left of the shutter speed indicator onthe main LCD panel and viewfinder LCDread-outs.
,J
Pi I \F\.8 =.
,- l ,r :5
P F\.8 -
Viewfinder LCD read-outs.
* lf you turn the shutter release mode selector lever to the " L " (power OFF)position, the flash compensation value will be canceled and return to thei n i t i a l " g p " v a l u e .
F L
How to exit this function*Follow the same steps from 1 to 4. Then, turn the front or rear dial to select
"0" and press tt'te @ button in for approximately two seconds.

www.orphancameras.com

Changing The Focusing Screen
1. Remove the lens.
2. Pull the Focusing Screen Release lever @ for-ward, as illustrated as shown, with the tweezersto release the Focusing Screen.
3. Remove the Focusing Screen from the Focus-ing Screen Frame by grasping the tab on the edgeof the screen with tweezers as illustrated.
*Do not touch the mirror or allow it to bedamaged in any way.
4. When installing the screen, pinch the protrud-ing part of the screen using the screen holder,and put the screen on the screen frame.
5. Push up the screen frame up using the twee-zers until hearing a clicking sound.The screen isnow properly instal led.
*Never press down on other parts as this willaffect the focus function.

Caution*Since the Focusing Screens'surfaces are soft and easily p"S"O, handle
them carefully.*Never touch the surface with bare fingers. Should dust settle on it, merely
blow away by using a blower.*lf the Focusing Screen needs cleaning, send it to the nearest authorized
Mamiya service center. Do not attempt to clean the surface of the FocusingScreen, as it is very delicate.
www.orphancameras.com
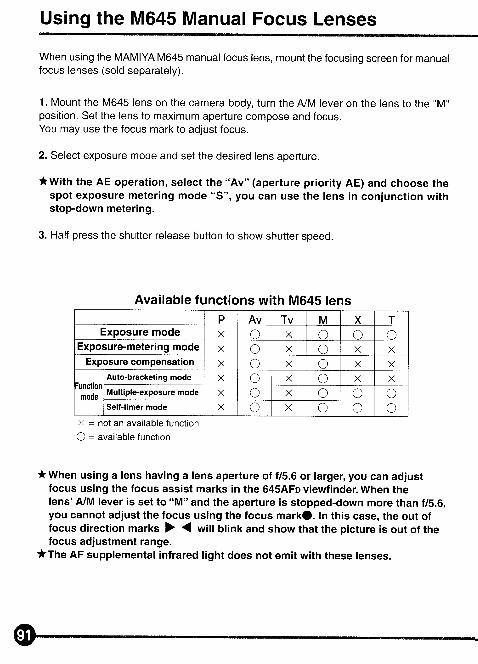
Using the M645 Manual Focus Lenses
When using the MAMIYA M645 manual focus lens, mount the focusing screen for manualfocus lenses (sold separately).
1. Mount the M645 lens on the camera body, turn the A/M lever on the lens to the "M"position. Set the lens to maximum aperture compose and focus.You may use the focus mark to adjust focus.
2. Select exposure mode and set the desired lens aperture.
*With the AE operation, select the "Av" (aperture priori ty AE) and choose thespot exposure metering mode "S", you can use the lens in conjunction withstop-down metering.
3. Half press the shutter release button to show shutter speed.
Available functions with M645 lensP Av Tv M X T
Exposure mode X o X o oExposure-meterin g mode X o X o X X
Exposure compensation X o X C x X
:unctionmode
Auto-bracketing mode X o X o X XMultiple-exposure mode X o X o o oSelf-timer mode X o X o o o
X = not an available functionC = available function
*when using a lens having a lens aperture of f/5.6 or larger, you can adjustfocus using the focus assist marks in the 645AFo viewfinder. When thelens' A"/M lever is set to "M" and the aperture is stopped-down more than f/5.6,you cannot adjust the focus using the focus markO. ln this case, the out offocus direction marksfocus adjustment range.
*The AF supplemental infrared light does not emit with these lenses.
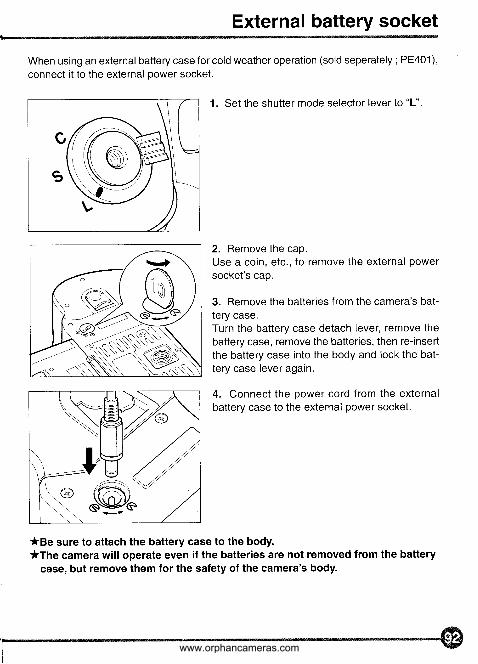
External battery socket
When using an external battery case for cold weather operation (sold seperately ; PE401),connect it to the external power socket.
1. Set the shutter mode selector lever to "L"
2. Remove the cap.Use a coin, etc., to remove the external powersocket's cap.
3. Remove the batteries from the camera's bat-tery case.Turn the battery case detach lever, remove thebattery case, remove the batteries, then re-insertthe battery case into the body and lock the bat-tery case lever again.
4. Connect the power cord from the externalbattery case to the external power socket.
*Be sure to attach the battery case to the body.*tne camera will operate even if the batteries are not removed from the battery
case, but remove them for the safety of the camera's body.
,sw(@
www.orphancameras.com

Using a Tripod/Electronic Shutter Release GontacUMemo CIip
Using a Tripod
Electronic Shutter Release Contact
When using a tr ipod with 3/B inch screw thread(instead of 114 inch screw thread) remove thesmall screw @ from the tripod screw hole on thebottom of the body using a plus screwdriver, thenuse a coin to remove the tr ipod screw adapterbushing @.
This is the Port for connecting a Mamiya electro-magnetic cable release (sold separately) helpfulwhen taking photos with the mirror up, with longexposures or with slow shutter speeds.
#BO4821#BO4822
1m (3 ' )5m (15 ' )
The Memo Clip on the Back Cover accepts thebox top of the film carton and can also be usedfor other reminders.
reD@---4
Memo Cl ip
t-Tt_| | --r)
lffiiLjI-
When you think something might be "faulty."
In the conditions below or when the LCDs display the items listed in pages95 and 96, they are not necessari ly faults. Check the camera while refer-r ing the descript ions below.
Unable to release the shutterCheck to see if the batteries are installed. Check to see if the batteries are dead.Check to see if the power is on (the shutter release selector lever should be set to "S" or"C" posit ion).Check to see i f the dark sl ide has been removed.Check to see i f the camera is set to the correct ISO sensit ivi ty ( lSO indicator bl inks).Check to see i f the camera is advancing the f i lm.Check to see i f the rear door is ooen i f f i lm is not inserted.
The viewfinder does not show LCD read-outs.Check to see if the batteries are installed. Check to see if the batteries are dead.Check to see if the power is on (the shutter release selector lever is other than in the "L"posit ion).Check to see if the camera is set not to display the viewfinder LCD read-outs (selected"M").Check to see i f the magazine is instal led.l f the camera has not operated for longer than 15 seconds, the viewfinder LCD read-outs wil l automatical ly disappear.
The dark sl ide cannot be pul led outCheck to see if the batteries are installed. Check to see if the batteries are dead.The magazine is not mounted onto the camera.
Fi lm cannot be wound.Check to see if the batteries are dead.The f i lm st i l l has some remaining frames.Check to see i f there is f i lm loaded into the camera.Check to see i t the camera is in mult iple exposure mode.
This camera employs a microcomputer. l t is possible that the camera may mal-function when exposed to stat ic electr ici ty or the l ike. ln this case, turn OFF thecamera power and then remove the batteries. Reinstal l the batteries, then turnthe power on. lf the camera does not function properly after these steps, contactour sales office or service center.
www.orphancameras.com

When any of these displays appear
LCD displayMalnLCDpanel
End
End
-no-
H E
-no-
%j
-no-
AJJ
-no-
a)J
-nB-
t-h
-no-
Fb-no-
Fb
Uo
F - -
Err-0 l
Err-0a
Err-u3
batt-no-
H E
-no-
R E
clelLCD read'outs
batt
-no-
-no-
-no-
-no-
-no-
Uo
- u -- o -
MagazineLCD
End
E n d
Problems+When operating the camera in the shutter release "C" mode (continuous
winding mode), i f the number of frames exceeds the i f the number of framespossible to exposure is reached, this indicator appears for three seconds.
*When operatrng with mult iple exposures and in shutier release "C" mode(continuous winding mode), i f you keep pressing the shutter releasebutton, and after completing the set number of frames for mult iple exposure,this indicator appears and releases the mutiple exposure mode.
+ When there are no f rames left on the f i lm and the camera has comoletedwinding of the f i lm,this indicator appears.
x This indicator appears when a rol l of f i lm is not loaded.
* This indicator appears when a rol l of f i lm is not rewound properly.
*When operating in the one shot "S" mode i{ the camera cannot adjusi focuswith the auto focus function, you cannot release the shutter.
* When a M645 lens is instal led and the aperture is less thanF5.6, this indicator appears.
x This indicator appears when the battery capacity is low.* In the exposure modes of 'P
, "Av", or "Tv", and selecting the mirror upfunction, i f you press the shutter release button, this indicator wi l l appearand you cannot take a photo.
* When using AE lock and the mirror up function, i f you releaseAE lock, and try to press the shutter release button, this indicator wi l l appearand you cannot take a photo.
x When using AE lock and the mirror up function, AE lock wil l be Automatical lyreleased after one hour. When you try to release the shutter under thesecondit ions, you cannot tr igger the camera.
* In auto-bracketing mode and exposure mode i f "X" or"T" is selected andyou try to press the shutter release button, this indicator wi l l appear andthe auto bracketing function wil l be deactivated.
+ In auto-bracketing mode and when the exposure mode is "P" "Av", Tv" or"M", and operating in continuous "C" mode, i f the number of framesremaining on a f i lm is less than three, and you try to press the shutter releasebutton, this indicator wi l l appear and the auto-bracketing function wil l be deactivated.
x When using the camera with a f lash, and the auto-bracketing funci ion isselected, and you then try to press the shutter release button, this indicatorwil l appear and the camera wil l exit the auto-bracketing function.
+ When the mult iple-exposure mode is selected i f you remove themagazine, this indicator wi l l appear and the camera wil l exit the mult iple-exposure mooe.However, the magazine does not exit from mult iple-exposure mode.
x The shutter wi l l not operate when the dark sl ide is inserted into themagazine. l f you try to pre$s the shutter release button,this indicator wi l lappear.
x The shutter wi l l not operated when the magazine is not instal led onto thecamera body. l f you try to press the shutter.
*When the f lash compensation value is negative value, "u" wi l l be displayed.When the f lash compensation value is posit ive value, "o" wi l l be displayed.
+ While in manual operation mode, and when the dif ference between the setvalue and metered value exceeds 6EV, this indicator wi l l appear.
* This wil l appear when a lens is not instal led.*When a M645 lens is instal led.
x When "Err" appears, some abnormali ty has been detected in the courseof taking photos.

" Gauses and remedies
Remedies
' lnsert f resh ro l l of f i lm.
'Take out the fi lm and the "End" indicator will disappear.' lnstall a roll of fi lm into the camera.'lnstall a roll of fi lm into the camera.
'Try to adjust focus again, or change to the focus lock mode or manual focus mode.
'Make the lens aperture larger than f/5.6.
'Reolace with new batteries.
'Exi t mirror up funct ion.
'Exi t mirror up funct ion.
'Auto bracketing is not available in this mode.
'Auto bracketing is not available in this mode.
.Auto bracketing is not available in this mode.
.Continue to shoot in the multiple-exposure mode, or pull the dark slide and simultaneouslypress the fi lm winding button and shutter release button.
'Remove the dark slide from the magazine.
'lnstall the magazine onto the camera body.
'Change aperture or shutter speed.
'lnstall a lens on the camera bodv.
.Replace with new batteries and press the shutter release button. lf the "Err" indicator sti l ldoes not disappear, put the dark slide into the magazine. While pressing the fi lm-rewindingbutton, half press the shutter release button to rewind and take out the fi lm. Then contact oursales office or service center.
6 1
3530
page
z+o
J.t
42
1 4
b d
68
57,58
58
30
74,87
52,60
9 1
94
www.orphancameras.com

Specifications of 645AFD
Camera Type :
Actual lmage SizeFilm Type :
Lens Moun :
Viewfinder :
Focusing Screen
Field of View :Viewfinderlnformation :
AF sub-beam :
AF Lock :Exposure Control Modes:
Metering method :
Setting Steps :
Light Metering :
Metering Range :Exposure compensation :Film speedAE lock
6x4.Scm format, electronically controlled focal-plane shutter, TTLmultiple mode AE, AF single lens reflex56x41.5 mm120 ro l l f i lm (16 exposures) ;22O roll film (32 exposures); Polaroid Land Pack Film(requires special HP4O2 magazine)Mamiya 645 AF Mount, compatible with M645 Mount (manualfocus confirmation, focus aid, stopped-down exposuremetering)Fixed prism viewfinder magnif icat ion x0.71; bui l t- in diopteradjustment(-2.5 to +0.5, separate diopter correction lenses provideadjustment ranges of -5 to -2 diopter and 0 to +3 diopter);built-in eye-piece shutterInterchangeable between Matte (standard) and Checker andMicroprism Type C for Non.AF M645 lenses.94o/o* of actual imageFocus mark, out-of-focus direction mark, aperture value,shutter speed, metering mode (A, S, A/S), exposure compen-sation value (difference between set value and actualvalue)and flash ready / OK lamp with TTL Metz connection.activates automatically under low light, low contrast.Range: 9m, Automatic switching to flash unit's built-in sub-beam when Metz flash unit is attached.Half-press on shutter release in S ModeAperture-priority AE, shutter-priority AE, programmed AE (pH,PL setting possible)Center-weighted average (AV), spot (S) and variable ratio(1.S-step A-S auto change by program shift setting), manualShutter speed and aperture both can be set in half-stopincrements; electronic dial lockTTL metering; center-weighted average (AV), spot (Sp), andauto A-S variable ratioEV 2 to EV 19 (with lSO100 f i lm, f /2.8 lens)=3 EV (1/3 step)lSO 25 to 6400With AEL button; released by pressing twice or shutteroperation; light metering value differentiation in viewfinderexposure compensation display when ELS button is helddown; =6EV (1/3 step)
* This information is based on a linear thorizontaUvertical.; measurement.Specifications and features are subject to change without notice.

Shutter
Shutter speed
Auto-BracketingFlash Synchronization
Flash control
Film transportFi lm loading
Mult iple Exposure
Main LCD panel
Data lmprinting :
Sync terminal :Cable release socket :Remote-control terminal :Self-Timer :
Deoth-of-field conf irmation :Tripod Socket :Power Requirements :Size :Weiqht :
: Electronically controlled vertical metal focal-plane shutter.(vertical travel)AE 30 to 1/4000 sec. (1/8 step), manual 30 to 1/4000 sec.(1/2 step), X, B (Bulb, electronical ly control led), T (t ime,mechanical ly control led), emergency shutter curtain openmechanism (open when magazine is removed, automatical lyclosed when magazine is attached)Enabled wi th Mode but ton, 0 .3 , 0 .5 ,0 .7 , 1-s tep un i ts11125 sec., automatical ly sets to 1/125 at faster speeds,synchronized to displayed speed at slower speeds (whenMetz f lash unit is used)TTL direct metering, supports Metz SCA3002 system(SCA3952 Adapter)Automatic via built-in motor, single or continuous exposuresAutomatic advance to first frame when shutter release buttonis pressed once (Easy Loading)Enabled with Mode button (2 to 6 exposures); can becancelledOn camera body; shows aperture value, shutter speed value,self-t imer, BL (Backl ight), battery check, mult iple exposure,programmed AE or programmed AE shift value, dataimprint ing Interchangeable Fi lm Magazine: ISO speed, typeof film (1201220\, exposure number7 segment dot matrix; DATA mode: exposure mode, aperturevalue, shutter speed value, exposure compensation,metering mode, lD number; DAY mode; year, month, date,t ime, lD number Switchable between enabled and disabledX contact (sync speed 1/125 sec.)On shutter buttonOn side of body; electromagnetic cable release3 to 60 sec. (standard: 10 sec., can be set in ' l sec. stepsbetween 3 and 10 sec., and in 10 sec. steps between 10 and60 sec.)Preview Button on bodyU 1/4 inch and U 3/8 included6 AA-size batteries (alkaline-magnesium, lithium)6 "(W)X5 "(H)X7.3 "(D) / 153(W)X128(H)X184(D)mm3.8pounds / 1 ,7309 (WO battery)
www.orphancameras.com

Gommon Sense Camera Care and Practice
The Mamiya 645 AFo is a precision optical/mechanical instrument, built for heavy pro-fessional use and a long service life, if properly treated and maintained. Please observethese basic caveats:
. Read instructions before using camera.
. Protect camera against shocks and falls. Use the neck strap supplied with it, when-ever possible.
. Check the battery frequently and always carry spares. The sealed battery suppliedwith the camera may have been subject to storage conditions which have reduced itsservice life.
. Be sure to wipe battery contacts before installation and watch correct polarity. i
r Batterv life differs, depending on frequency of use, type, age, storage condition, ambi-ent temperature (use External Battery Case in very cold weather), etc.
. Always remove the battery (and film) when camera is not used for a long period oft ime.
Always keep covers on lenses and camera body.
Do not store the camera at temperatures exceeding 40'C (105"F) and -10'C (15'F).Also avoid humid or sea air environment.
Prolonged disuse shortens camera life. Periodically exercise the shutter (at differentspeeds, lens diaphragms and focusing mounts.
Protect camera against rain and moisture.
Do not touch lens surfaces. Use blower or lens tissue to remove dust particles.
Always test your equipment before going on important assignments.

F
The lmportance of Proper MaintenanceYour camera has mechanisms like film transport, shutter and diaphragm blades etc.They are controlled by gears, levers, springs, and so on. All require special lubricationfrom time to time. Ambient conditions can also affect these mechanisms, as well as theelectronic components and the optical glass of your lenses. We therefore suggest thatyou have your camera and lenses checked, and if necessary serviced, periodically.
www.orphancameras.com
After-Sale Servicing l*'Be sure to read the terms and conditions in the warranty card. ;1. For inquiries, opinions or questions concerning the product, please contact your near- j
est Mamiya agent or service center. i2. Servicing after the expiration of the period specified in the warranty card will be charged ',
to the user. The freight and transport costs should always be paid by the user.3. The servicing parts for use in repair of the product will be retained at the factory for ten
years from the date of discontinuation of production.
@Tne servicing is available for the same period as the servicing part retention period. Asthe product may be serviceable even after this period, please consult your dealer ornearest Mamiya service center for the serviceability.
. .
*Servicing of malfunction or damage due to dropping, impact, fire, flood, etc.1) The degree of such a malfunction or damage will be judged by the Mamiya service
department.2) Such a malfunction or damage will be classified either non-serviceable or serviceable.
When the product is classified to be serviceable, it will be repaired at the expense ofthe user, even if the malfunction or damage occurred within the warranty period.
1


![Mamiya FAQ [2006]](https://static.fdocuments.in/doc/165x107/55cf9d2c550346d033ac89e1/mamiya-faq-2006-56327e269c581.jpg)