This booklet belongs to - bangor-p.schools.nsw.gov.au
55
| NSW Department of Education education.nsw.gov.au This booklet belongs to
Transcript of This booklet belongs to - bangor-p.schools.nsw.gov.au

| NSW Department of Education
education.nsw.gov.au
This booklet belongs to

© NSW Department of Education, Sep-21 1
Things you need
Activity You will need
Most activities workbook lead pencil and coloured pencils
paper
Physical activity
A tissue or piece of scrap paper
A small soft ball, pair of socks or mini bean bag (for throwing)
A target, such as a bucket, small toy or a hoop
Water bottle
Maths activities
A few sheets of paper Scissors
Sticky tape Pencils or markers
Creative Arts
paper or cardboard paint
textas, pencils or crayons
paintbrush or something to stamp with

2 Stage 3

© NSW Department of Education, Sep-21 3
During the day make sure you take time to
• do a care and connect
• take a brain break
• do some physical activity
Care and connect – My Favourite Place
On a piece of paper draw your favourite place or somewhere you would like to go or visit.
While you are drawing think about:
• What makes this place special?
• What makes it your favourite place?
• What can you see?
• What can you hear when you are at your favourite
place?
• What can you smell?
• What can you touch?
• Who is there with you at your favourite place?
Brain break – Paper Caterpillar Walking
Today you will make a crawling caterpillar that moves using your breath.
Cut a 4cm wide rectangular strip of paper.
Fold it in half, make a crease and open it back out again.
Fold one end into the middle crease. Leave it folded.
Fold the same end into the middle again. Leave it folded.
Repeat step 3 and 4 for the other end of the strip of paper.
Unfold it and shape it to make an arch.
Draw a face on one end.
Aim your breath at the back end to make it crawl just like a real one.

4 Stage 3
Physical activity – Throwing
Scan the QR code to watch the teaching video Throwing or read the
instructions below.
Today you are working on your throwing skills.
1. Collect the items you need (see the things you need list).
2. Warm up your body – Run on the spot for 30 seconds, star jumps for 30 seconds,
squats for 30 seconds, jumping side to side for 30 seconds. Spend 3 minutes
stretching your muscles.
3. Practise your throwing pose (see picture)
4. Using the piece of scrunched up paper or tissue and
practice your throws. Hold your item beside your ear and
do an overarm throw.
5. How many overarm throws can you do in 30 seconds?
6. Place a target away from you. Using a soft ball, throw your
ball using an overarm throw and try to hit your target (if
u ’t h ve t rget, you could throw the ball at a wall).
7. How many times can you hit your target in 30 seconds?
8. Can you beat your own score? Try again. How many times can you hit your target in
30 seconds?
9. Challenge: Move the target further away or challenge someone at home to do it too!

© NSW Department of Education, Sep-21 5
English – Activity 1 – Symbol hunt and storytelling
Sc the QR c e t liste t t ’s less or read the task below. Symbols
are everywhere! They can give us a message or tell us a story without using
words. If you are in another country, you might be able to look at symbols
and know exactly what they mean - eve if u c ’t spe k the l gu ge.
Here re s me s mb ls u m h ve see . The ’t use w r s but u
probably know what they mean.
"image" by OpenClipart-Vectors is licensed under CC BY 4.0 "image" by OpenIcons is licensed under CC BY 4.0
"image" by sasiepre is licensed under CC BY 4.0 "image" by Clkrer-Free-Vector-Images is licensed under CC BY 4.0
Go on a hunt around your home to see if you can find any symbols (you might
be able to find the recycling symbol above). A good place to start looking is on food
packaging and clothing labels. Record your symbols and their meaning in your workbook.
This is a photo of a carving. Carvings
can be used to tell stories. What symbols
can you see? Can you see people and
animals? What do you think each of the
symbols could mean? Which ones might
symbolise the landscape, like water,
plains and mountains? Why do you think
the creator of this work did it? What was
the purpose of this carving?
"Acheology petroglyph" by Max Pixel is licensed under CC
BY 4.0
In your workbook, write down in a few sentences what this carving MIGHT be telling
us.

6 Stage 3
English – Activity 2 – Symbols – School Logo
If you would like to watch the lesson, scan the QR code.
A school logo is a way of representing the identity of a school. You can
find logos on school badges, on a sign out the front of the school, or maybe on the school
uniform.
This school logo uses symbols to explain who they are.
• The tree represents lifelong learning and belonging. At this
school, curious learners thrive and grow like a tree.
• The yellow arrows are pointing north, upwards. This
shows that learning is a journey at Northbourne Public
School.
• The blue wavy lines represent the waterway Wiannamatta,
which is the Aboriginal word for mother place, where the
school is located.
Look at the logos from other schools. In your workbook, record some of the symbols
that you can see in these logos. What do you think they mean? Look carefully at the
colours, shapes and sizes. Which logo do you like the best and why?
Think now about your own school logo. What is on your logo? What colours are
used? What symbols are used? What do you think they mean? Write a short paragraph
explaining your school logo and what you think the symbols and colour choices mean.

© NSW Department of Education, Sep-21 7
English – Activity 3 – Writing about symbols
Scan the QR code if you would like to watch the lesson.
Imagine your school principal has asked you to design a new school logo
for your school. Consider the landscape around your school and the colours and shapes
that can symbolise your environment.
What symbols could you choose to represent your school’s culture? What does your
school consider to be important in your learning? Think about how can you represent
these things using symbols.
When designing your logo, think about what the shape of the logo would be. In the
previous activity, you saw logos that were shaped like shields, circles and even one that
was in the shape of a platypus. Be creative!
Draw your new logo in your workbook, on a device, or on a piece of paper.
Challenge
Write a description of your new logo and explain each of the features.
The school motto, which appears on the Harry Potter school l g is “Dr c rmie s
nunguam titill us,” which me s “Never tickle sleepi g r g .” A school motto is
usually very short and captures the spirit of the school. Think of a new school motto for
your school and explain why you chose this motto.

8 Stage 3
Maths – Activity 1 – Playing with tessellations
To begin you will need to make an equilateral triangle. The steps for how to do this are on the video which you can watch by scanning the QR code. An equilateral triangle has all three sides the same length.
Cut a section off one of your sides like they have in the picture. Your line can be
different to this one. Attach it to another side as shown. Tape this together carefully.
1. 2. 3.
Now use this shape and try to make a tessellating pattern by tracing
your template onto some plain paper on paper as shown. If you
rotate the shape, you can see there are no gaps left which is what we
need in a tessellation.
Continue and fill your page to see what your
tessellation looks like. Can you see the hexagons
hiding in here? Decorate your tessellating design
to share with your teacher.
If you have access to a device watch this MathXplosion episode '...It's a
Metamorphosis' to see some really cool ways to use tessellations.

© NSW Department of Education, Sep-21 9
Creative arts – Option 1 – Let’s B gie W gie
Music and Dance
Sc the QR c e t w tch the te chi g vi e Let’s
Boogie Woogie or read the instructions below.
Today we are learning about Boogie Woogie music.
T mm D rse w s musici wh pl e st le c lle the ‘B gie W gie’. Y u c
hear the instruments representing car horns and traffic buzzing around in his music. It is a
form of jazz. See if you can think of some jazz music you may have heard before. Think
about the instruments you might hear and the way it makes you move and feel. Jazz music
is often based on the 12-bar blues. You might like to learn to play the 12-bar blues if you
have an instrument that can play notes or chords. The notes that start each of the 12 bars
are included here: C C C C F F C C G F C C.
Liste t the ‘B gie W gie W gie W gie B gie’ s g b sc i g
QR code or going to the link https://edu.nsw.link/Byagfz
W rm up ur b b m vi g t the ‘B gie W gie W gie W gie
B gie’ s g r liste t j zz st le piece f music u k w. ve l g t the be t f
the music and pretend to play the instruments during their solos. Listen to the instruments
on their own, look at the pictures of them and think about the differences between the
ways they sound considering how the sound is produced:
• Guitar
• Tenor saxophone
• Drums
• Piano
Now that you are warmed up, see if you can make up (improvise) some movements that
you could do to dance along with boogie woogie or jazz style music. Start slowly and when
you are comfortable add these steps to the song. Jive steps were used a lot with boogie
woogie music. Do you know what the jive looks like?
This
Photo by
Unknown
Author is
licensed
under CC
BY-NC

10 Stage 3
Creative arts – Option 2 – Let’s B gie W gie
Visual Arts
Sc the QR c e t w tch the te chi g vi e Let’s B gie W gie (skip t 4:35 f r
the Art lesson) or read the instructions below.
Today we are learning about Boogie Woogie inspired art.
Artist Piet Mondrian was interested in boogie woogie music too and used it to create the
rtw rk i clu e . It is c lle the ‘Br w B gie W gie’ (1942-43).
Le r m re b ut Piet ri ’s ‘Br w B gie W gie’: https://edu.nsw.link/cjyvRD
The grid pattern in his artwork looks like the streets of New York with the effect of blinking
lights and cars.
Activity: Create your own artwork in the abstract style of Mondrian to represent a map.
Step 1 – draw some intersecting lines using a black texta,
pe cil r cr . Y ur ‘m p’ rtw rk might use curv , str ight
or even zig-zag lines depending on where you live but should
not show exact details or any words. It should have patterns of
lines and intersecting lines.
Colour or paint your artwork. Fill in your map
with the colours you think best represent
your place. You can see some examples
included.

© NSW Department of Education, Sep-21 11
Things you need
Activity You will need
Most activities
workbook
paper
lead pencil and coloured pencils
Maths activities
A piece of ribbon or string
Assorted objects to make the mandala (for example pegs, leaves, sticks, flower petals, rocks, small stones)
your mandala design
coloured markers
ruler.

12 Stage 3
During the day make sure you take time to
• do a care and connect
• take a brain break
• do some physical activity
Care and connect – Gratitude breath
Think of someone you are grateful for. It could be someone at home, a friend or even your
teacher. Think about all the things they have done that you are grateful for.
As you breathe in think of that person. As you breathe out send them a smile. You might
even smile as you are breathing out.
Brain break – Air guitar
Pretend you are holding a guitar. Play some music to air guitar to. It might even be your
favourite song.
You could even air guitar with the people in your house. Who does the best air guitar?
This Photo by Unknown Author is licensed under CC
BY-NC-ND
This Photo by Unknown Author is licensed under CC BY-NC

© NSW Department of Education, Sep-21 13
English – Activity 1 – Reading and viewing:
Symbols and symbolism in texts
Picture books can be read purely for enjoyment, however often hidden in
the beautiful stories and illustrations you may also find great symbolism. Perhaps you have
read a story with a lion. Often a lion symbolises courage or royalty. Symbols might also
symbolise mood or emotion. For example, if you see a character with a cloud over their
head, it may symbolise that they are sad.
Today we will read the story 'Where the wild things
are' by Maurice Sendak. Scan the QR code to listen to the
text. If u ’t h ve evice, u c ul re ur w
picture book and try to find symbols in the story.
In this story, think about the symbolism of the wolf, the wolf
suit, forest, crown and hot food. What ideas or qualities are
these objects representing?
‘Where the Wil Thi gs Are’ by Maurice Sendak © 2015. Used with kind permission from Penguin Random Publishing Australia
Complete the following table with your ideas.
Symbols What does it symbolise?
hot food comfort, warmth, life
wolf
wolf suit
forest
crown
Challenge
Can you think of other symbols in books that you have read? What might they symbolise?
Write why you think wolves are often used as 'bad' characters in a story. If you were to
write a story about a wolf, make the wolf a 'good' character.
Can you think of other animals that are sometimes used in books to symbolise the 'bad'
character? Write about why these animals are often chosen to be the ‘b ’ thi k
b ut the im ls th t re fte ch se t be the ‘g ’ ch r cter. Write b ut wh u
thi k these im ls fte s mb lise the ‘g ’ ch r cter.

14 Stage 3
English – Activity 2 – Create your own personal
logo (Part 1)
Scan the QR code to hear the lesson or read on for the written instructions.
We are going to create our own personal logo which tells our story.
In your workbook, put your name in the middle and complete a mind map with the
headings:
• My strengths – what are you good at? For example, dancing, running, I’m g
friend, a good listener
• My ambitions – what do you want to do in life? For example, be a teacher, travel
• Interests – What do you love to do? For example, learn about bugs, play music,
make jewellery, make videos
• Special places and people – For example, family, pets, friends, the mountains or
the creek
• Favourite Colours – blue and green
Under each heading, write or draw your ideas for each of the categories. Try to draw a
symbol which represents each of your ideas. For example:

© NSW Department of Education, Sep-21 15
English – Activity 3 – Writing and representing:
Create a personal logo (Part 2)
Scan the QR code for the lesson or read the following information.
In the previous lesson, you thought about symbols that represent who you are as a
person.
You are now going to use those symbols to create a draft logo like the example here.
Think about which symbols you would like to include. Consider what shape your logo will
be. Will it be circular? Will you use a shield shape? What is your motto?
Plan your draft in your workbook, on a piece of paper or on a digital device.
Write a short paragraph for each category explaining your choice of symbols and colours.
Challenge
Use your draft and create a final copy of your logo. You might like to paint or colour your
logo. You could use materials to create a sculpture of your logo. You could use digital
publishing tools.

16 Stage 3
Maths – Activity 1 – Making Mandalas
It is proven that a kite which is symmetrical will fly much better as it
balances. Think of the animals that fly, birds, butterflies and insects
are all symmetrical.
In this activity you are going to create symmetrical designs also
known as mandalas
Collect assorted objects from around your house and outside.
You will need to collect a pair of each object (same colour,
same size, same shape). Remember to ask permission before
using natural materials.
Select a pair of objects (two objects that are the same colour, size and shape) and place one object down as your starting point.
Here is an example of a completed mandala made with the objects from the picture. Can you see all the lines of symmetry in this design? Create your own mandala using the objects you have collected by rotating, translating and reflecting the objects.
• You can check the lines of symmetry using a ribbon to see if each side is a mirror image.
• Take a picture of it for your teacher
You will need your mandala for the next activity.

© NSW Department of Education, Sep-21 17
Maths – Activity 2 – Making Mandalas part 2
In this activity you are going to plot your mandala on the Cartesian
plane. If you have access to a device scan the QR code for a full explanation.
If not, you can work through the steps below
To plot the mandala, you will need to imagine the 4 quadrants as shown above.
Think about and imagine how your mandala would look if it was
sat on the grid. This is an image of what this mandala might look
like.
Your task is to label the cartesian plane on the grid paper on the
next page and plot some of the symmetrical components of your
mandela design.
Start by finding the centre of your grid paper to make the axis of symmetry. Label
numbers as done on the example at the top of this page. This example shows how they
have plotted the coordinates for the pebbles.
The example we saw showed the plot of two of the
pebbles. You can see they are symmetrial by looking at
the position of the plots.

18 Stage 3

© NSW Department of Education, Sep-21 19
HSIE – Local Government services and
responsibilities
Scan the QR code to watch the teaching video on
Local Government services and responsibilities or read the instructions below.
Today we are learning to distinguish the different levels of governments and their
responsibilities.
Last week you learned about the 3 levels of government in Australia. They are: federal,
state and local. The 3 levels of government work together to provide us with the services
we need.
For this activity we will be learning more about local governments. Local governments in
Australia are usually called councils, shires, or municipalities. There are more than 560
local governments across Australia.
Activity: What responsibilities do you think local governments have?
In your workbook, record what services you think local governments provide us.
Here is a list of local government services. Did you have some of these?
Local governments are responsible for providing services such as:
• local roads and footpaths
• parks and sports fields
• rubbish collection and recycling
• library services
• street signage and lighting
• pet control
• building approvals and inspections
Activity: Local Government services
These are services that are considered local services or matters.
What would happen if we did not have local governments? Here are three scenarios. Think
about what would happen if we did not have these services and record your answers in
your workbook.
1. Roads and footpaths
• What are the local roads and footpaths like in your local area? Can you name some
local roads and streets?

20 Stage 3
• Who do you think repairs them if they are damaged?
• What would happen if no-one looked after them?
2. Parks and playing fields
• Name some parks and playing fields in your local area.
• Why do we need parks and playing fields?
• What services do they provide?
• What would happen if no-one looked after them?
• How can we look after them?
3. Rubbish removal and recycling
• How do local governments dispose of rubbish and waste?
• In your local area, how many bins do local households have? What colour are the
bins and how is waste separated?
• Where does it go after it has been collected by your local council?
• How does your local council promote waste recycling?
Optional Challenge:
Do you know what concurrent powers means? Do some research and find the concurrent
powers of our 3 levels of government.

© NSW Department of Education, Sep-21 21
Things you need
Activity You will need
Most activities workbook lead pencil and coloured pencils
paper
Brain Break A deck of cards
A target (you could use a bucket, a teddy or a lego figure)
Maths activities
paper
scissors
sticky tape
rope or string
pencils or coloured markers
ruler or tape measure.
3 x 6-sided dice (you could also use playing cards A-6 or a number spinner)
2 pencils or markers
22 Stage 3
During the day make sure you take time to
• do a care and connect
• take a brain break
• do some physical activity
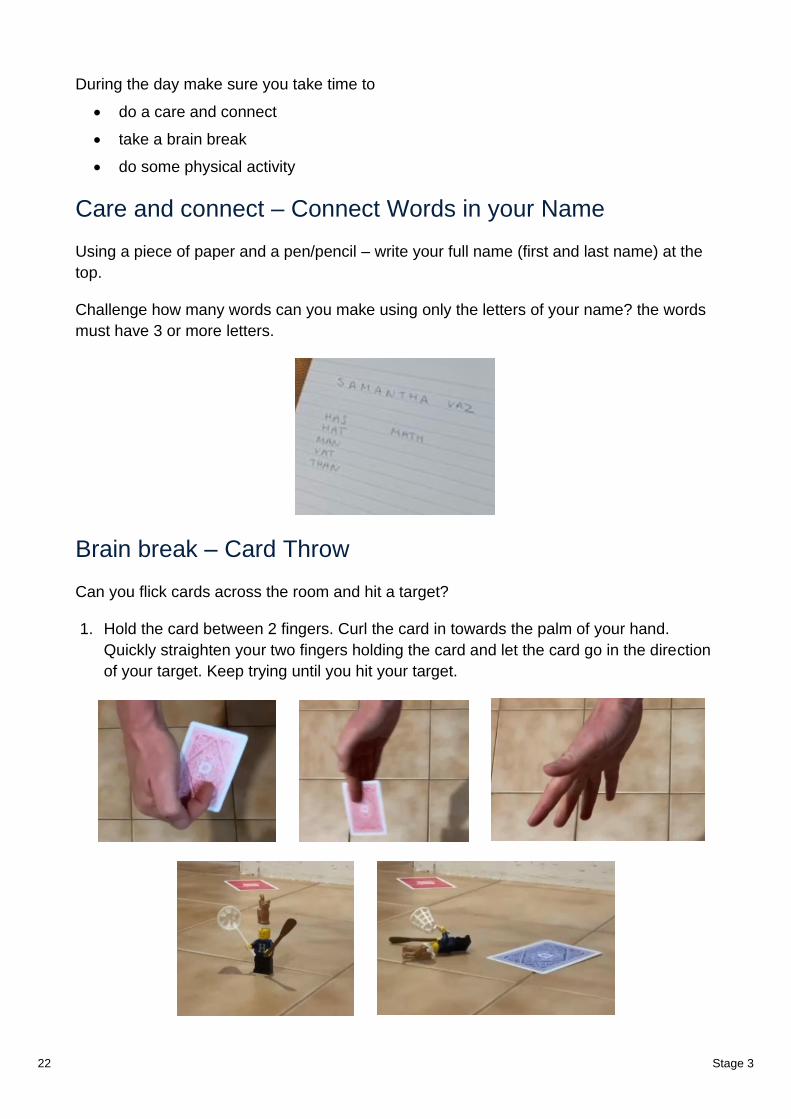
Care and connect – Connect Words in your Name
Using a piece of paper and a pen/pencil – write your full name (first and last name) at the
top.
Challenge how many words can you make using only the letters of your name? the words
must have 3 or more letters.
Brain break – Card Throw
Can you flick cards across the room and hit a target?
1. Hold the card between 2 fingers. Curl the card in towards the palm of your hand.
Quickly straighten your two fingers holding the card and let the card go in the direction
of your target. Keep trying until you hit your target.

© NSW Department of Education, Sep-21 23
English – Activity 1 – Personification
Personification is a figure of speech. It is when an author gives human or animal qualities
to things, animals or abstract nouns (for example love, power or fear). Authors use it to
help us get a picture in our minds of how an object looks, moves or sounds. We can relate
t ‘hum ise ’ bject much easier.
Examples:
The trees sighed and moaned in the wind.
A tree es ’t ctu ll sigh m . Th t is s methi g
humans do. But the author helps us to picture and hear the
sound of the tree as the wind blows.
The hen said to the fox…..
Animals don’t spe k like hum s. But this uth r helps us
picture the animals communicating.
Fear was holding me tightly by the arm.
Fear does not physically hold your arm. In this example, the
author helps us to picture a character being overcome by fear.
"Treetops" by Anastasiya Romanova is licensed under CC BY 4.0
In your workbook, write your own definition of personification. Write your definition
as a short, sharp sentence and make sure that it is clear.
Challenge
Find examples of personification in texts. Use these examples to create a definition of
personification for others to understand.
You might like to record a short video, write a definition, make a play or create an
animation to explain personification.

24 Stage 3
English – Activity 2 – Personification in Poetry
Sc the QR c e f r t ’s less r re the information below.
The Sweeper By Beverly McLoughland
Sun, with his shining broom of light,
Begins each and every day
Sweeping out the dusty dark –
Whisking all the stars away.
In this poem, the author has given the sun human characteristics. She has made the sun a
m le b usi g the pr u ‘his’. Als tice th t the su is ‘sweepi g’ ‘whiski g’.
In the poem below, highlight the noun (person, place or thing) being personified. In a
different colour, highlight the human characteristic the author uses.
The Walrus and the Carpenter by Lewis Carroll
“The su w s shi i g the se ,
Shining with all his might:
He did his very best to make
The billows smooth and bright —
And this was odd, because it was
The middle of the night.
The moon was shining sulkily,
Because she thought the sun
Had got no business to be there
After the day was done —
"It's very rude of him," she said,
"To come and spoil the fun."
Why do you think the author used personification in this poem? What effect does this
personification have on you, as you read it?

© NSW Department of Education, Sep-21 1
English – Activity 3 – Writing: Using
personification in writing
Scan the QR code if you would like to view the online lesson.
We are going to create our own examples of
personification.
F r ex mple, ‘Lightning danced across the sky.’
Light i g c ’t ce the w hum s , h wever
this example helps us to picture the light i g’s
movement.
"Lightning" by Michael Tindeil is licensed under CC BY 4.0
Complete the following table below. Write nouns in the left column, and in the right
column, give the nouns human characteristics. Two examples have been done for you.
Noun Human characteristics
The stars winked in the night sky
The wind howled
Choose one of your ideas and write a paragraph using your personification example.
For example,
The forest closed in overhead allowing only faint shafts of moonlight to reach the damp
earth below. I was all alone. Somewhere behind me a twig snapped. Fear crept over me.
Another twig snapped. My mind screamed at me to run, but I was frozen in terror.

2 Stage 3
Maths – Activity 1 – Investigating area and perimeter
To do this activity you will need to make equilateral triangles like you did in
ester ’s less . Y u will ee t cut p ste e s u i ester le ve
one whole. If you need to remember how to make a triangle you can scan the QR code
from yesterday to watch the video.
Steps Pictures
1. Draw and cut out 2 equilateral triangles 2. Draw a squiggly line from one corner to
another. 3. Cut along the squiggly line. 4. Stick the part you cut off on another side
using sticky tape to create a new shape
5. Measure the perimeter of the triangle by guiding the rope around the three edges of the triangle.
6. Make a mark on the rope to show the length of the perimeter of each using a coloured marker.
7. Measure the perimeter of the new curvy ex-triangle by guiding the rope around the edges of the shape.
8. Make a mark on the rope using a different colour to show the length of its perimeter.
9. Use a ruler or measuring tape to explore the difference.
10. Is the perimeter of your shapes the same or different?
11. If e sh pe’s perimeter is l ger th the ther, h w much l ger is it?
12. Is the area of your shape the same or is it different?
13. Cut your shape back up in its pieces and use direct comparison to see if the area changed.

© NSW Department of Education, Sep-21 3
Challenges:
Can you change a shape so that the area and perimeter stay the same?
Find some other shapes to explore. What would happen if we created a new shape out of
a square, hexagon or a different type of triangle would the perimeter change, or would it
stay the same?
4 Stage 3
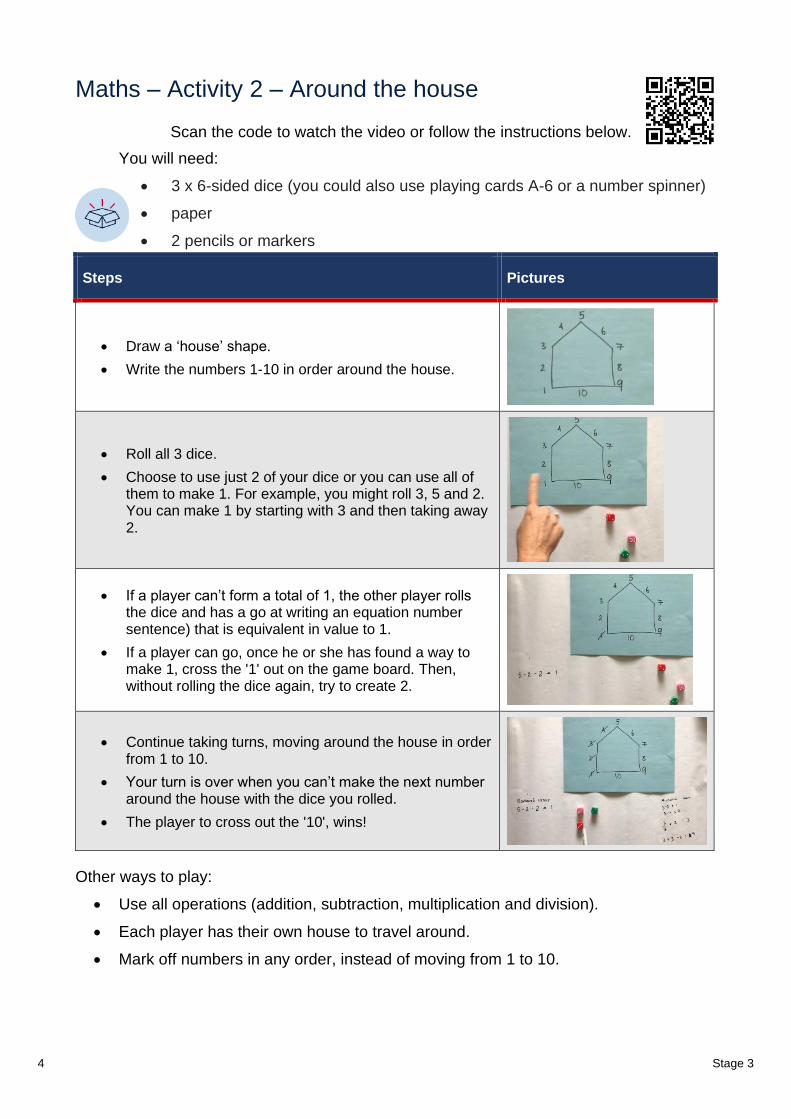
Maths – Activity 2 – Around the house
Scan the code to watch the video or follow the instructions below.
You will need:
• 3 x 6-sided dice (you could also use playing cards A-6 or a number spinner)
• paper
• 2 pencils or markers
Steps Pictures
• Draw ‘h use’ sh pe.
• Write the numbers 1-10 in order around the house.
• Roll all 3 dice.
• Choose to use just 2 of your dice or you can use all of them to make 1. For example, you might roll 3, 5 and 2. You can make 1 by starting with 3 and then taking away 2.
• If pl er c ’t f rm t t l f 1, the ther pl er r lls the dice and has a go at writing an equation number sentence) that is equivalent in value to 1.
• If a player can go, once he or she has found a way to make 1, cross the '1' out on the game board. Then, without rolling the dice again, try to create 2.
• Continue taking turns, moving around the house in order from 1 to 10.
• Y ur tur is ver whe u c ’t m ke the ext umber around the house with the dice you rolled.
• The player to cross out the '10', wins!
Other ways to play:
• Use all operations (addition, subtraction, multiplication and division).
• Each player has their own house to travel around.
• Mark off numbers in any order, instead of moving from 1 to 10.
© NSW Department of Education, Sep-21 5
PDHPE – Including everyone when we are active
Scan the QR code to watch the teaching video ‘Including everyone when we are active’ or
read the instructions below.
Today we are thinking about ways we can be more inclusive.
What does the word inclusive mean?
The w r i clusive me s rec g isi g ever e’s iffere t ee s, stre gths skills
finding ways that everyone can participate.
You might be including someone younger than you, someone older than you, someone
that has not played the game before, someone who has different skills to you or someone
with a disability.
What does the word disability mean?
A person with a disability may find it difficult or impossible to walk, see, hear, speak, learn,
or do other important things. Some disabilities are permanent, or last forever. Others are
temporary, or last for only a short time. A disability can be something a person was born
with, or it can be the result of an illness or an accident.
People with a disability might need a bit of help to be active. The Paralympics is an
example of an international sport event for athletes with a disability. There are 22 sports in
the summer and 5 in winter. Some examples of the sports include wheelchair rugby,
goalball, para-swimming and sitting volleyball; there are many sports!
What are some ways we can be inclusive of everyone when we are active?
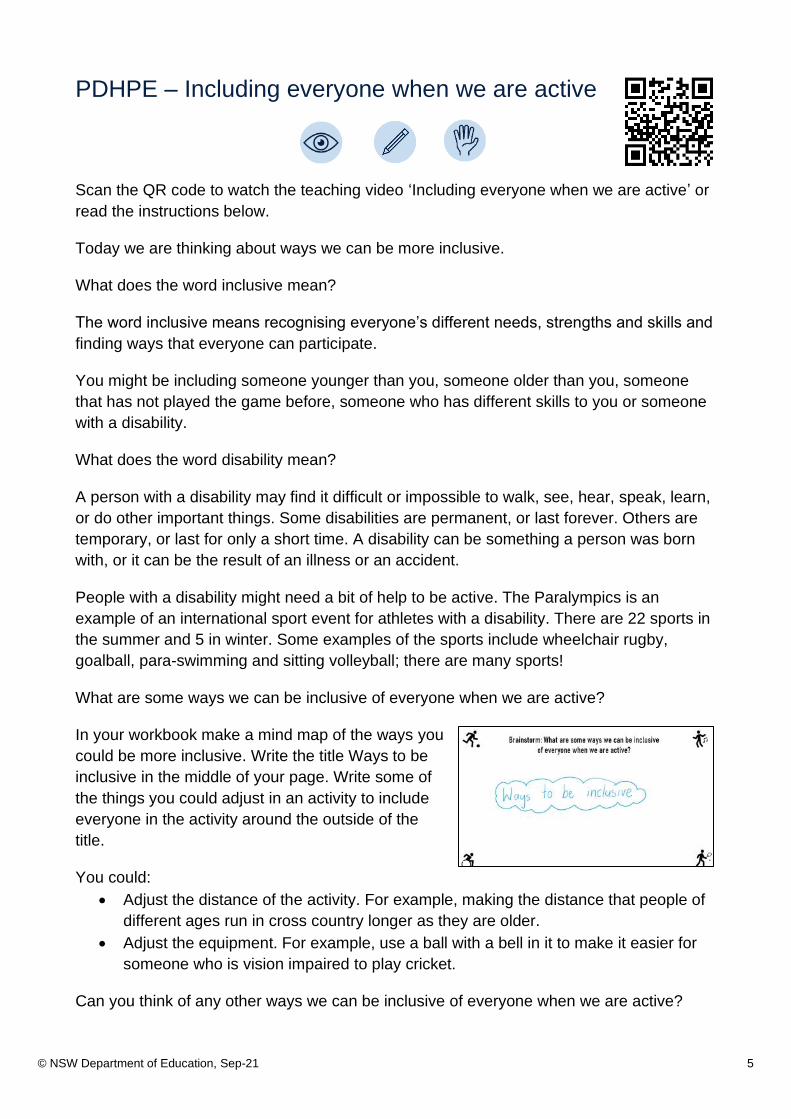
In your workbook make a mind map of the ways you
could be more inclusive. Write the title Ways to be
inclusive in the middle of your page. Write some of
the things you could adjust in an activity to include
everyone in the activity around the outside of the
title.
You could:
• Adjust the distance of the activity. For example, making the distance that people of
different ages run in cross country longer as they are older.
• Adjust the equipment. For example, use a ball with a bell in it to make it easier for
someone who is vision impaired to play cricket.
Can you think of any other ways we can be inclusive of everyone when we are active?

6 Stage 3
1. Choose an activity that you like to participate in with your friends or family.
Examples include running, dancing, basketball, handball, cricket or swimming.
2. Now think how you could adjust it so that it is inclusive for everyone. For example,
make adjustments for someone who is younger than you, someone who is older
than you, or someone who has a disability.
Activity 1:
Your task is to record the activity that you have chosen, who you are adjusting it for and
explain the ways you have made it more inclusive.
You could (choose 1):
• Record a video of yourself demonstrating the activity and showing the ways you
have made the activity more inclusive.
• Write a letter to a friend explaining the activity and the ways you have made the
activity more inclusive.
• Create a poster with pictures or diagrams demonstrating the activity and the ways
you have made the activity more inclusive.
• Design a slide show with images and record your voice explaining the activity and
the ways you have made the activity more inclusive.
Activity 2: Play the game or do the activity.
Include the people you live within the activity to test out your changes.

© NSW Department of Education, Sep-21 7
Things you need
Activity You will need
Most activities workbook paper
lead pencil and coloured pencils
Physical activity
A large ball
A small soft ball, pair of socks or mini bean bag (for throwing)
A target, such as a bucket, small toy or a hoop
Water bottle
Maths activities 9 sided dice, playing cards or a spinner
Science and Technology string Ruler Calculator
Science and Technology 6 metres of string, wool or cotton
Ruler or tape measure Tape

8 Stage 3
During the day make sure you take time to
• do a care and connect
• take a brain break
• do some physical activity
Care and connect – Stretches
Stand in open space. Make sure you have room to bend and stretch.
Stand nice and tall with your feet shoulder width apart.
Roll your shoulders back 10 times. Wiggle and shake them
out.
Roll your shoulders forward 10 times. Wiggle and shake
them out.
Hold your arms out as wide as you can to make your body a t shape. Stretch
as wide as you can and hold for 5 seconds. Wiggle and shake your shoulders
and arms. Hold your arms out and repeat for 5 seconds. Wiggle and shake
again.
Brain break – Camouflage Hide and Seek
In Normal hide and seek you hide behind things. In camouflage hide and seek you have to
be out in the open and camouflage with your surroundings. Camouflage is where you
blend in with the things around you to keep you hidden. For example: if you are wearing all
black you could sit on a black chair.
Look at what you are wearing.
What things around you house or garden are similar colours to what you are wearing.
Maybe you could hide in a garden like a plant, lay on a bed like a doona, curl up like a
cushion on the lounge or stand in between coats on a coat rack.
Check with someone at home and see if you can get changed out of what you are wearing
to do this activity. The clothes will only be on for only a short time while you play this
g me. The sh ul ’t get irt if u re c reful h pefull will t ee w shi g.
This Photo by Unknown Author is
licensed under CC BY-SA

© NSW Department of Education, Sep-21 9
Physical activity – Advanced Throwing
Scan the QR code to watch the teaching video ‘Advanced Throwing’ or
read the instructions below.
Today you are working on your throwing skills.
1. Collect the items you need (see the things you need list).
2. Warm up your body – Run on the spot for 30 seconds, star jumps for 30 seconds,
squats for 30 seconds, jumping side to side for 30 seconds. Spend 3 minutes
stretching your muscles.
3. Practice your chest pass. Hold both hand at chest height and pretend you are holding
a large ball. Push the ball away from your body. As you push the ball away step one
foot forward (whichever foot feels more comfortable).
4. Using your large ball practice your chest passes. If you have someone at home, you
could ask them to do chest passes with you.
5. How many chest passes can you do in 30 seconds? (if you have a partner – how
many chest passes can you do in a row without dropping it in 30 seconds)
6. Practise your catapult throw (see pictures). Pull your non-throwing arm towards your
body as your throwing arm catapults your soft ball over your head.
7. Using your soft ball or bean bag, practice your catapult throw.
8. How many catapult throws can you do in 30 seconds?
9. Place a target away from you. Using your small ball or bean bag, catapult throw your
object and try to hit your t rget (if u ’t h ve t rget, u c ul thr w the b ll t
a wall).
10. Challenge: Move the target further away or challenge someone at home to do it too!

10 Stage 3
English – Activity 1 – Personification in texts
Scan the QR code to listen to the extract from the vel ‘Blueb ck’, b Tim
Winton. If u c ’t liste t the extr ct, u c re it bel w.
In the text below, find the examples of personification the author uses. Highlight the
noun in one colour and the human characteristics in another colour.
Blueback by Tim Winton, 2008
Reluctantly he stuck the snorkel back in his mouth and put his head under. Near the
bottom, in the mist left from their abalone gathering, a high blue shadow twitched and
quivered. There it was, not a shark, but the biggest fish he had ever seen. It was gigantic.
It had fins like ping-pong paddles. Its tail was a blue-green rudder. It looked as big as a
horse.
'Come down,' said his mother. 'Let's look at him.'
'I-I thought it was a shark.'
'He sure took you by surprise,' she said laughing. 'That's a blue groper. Biggest I've ever
seen.'
Abel and his mother slid down into the deep again and saw the fish hovering then turning,
eyeing them cautiously as he came. It twitched a little and edged along in front of them to
keep its distance. The big gills fanned. All its armoured scales rippled in lines of green and
black blending into the dizziest blue. The groper moved without the slightest effort. It was
magnificent; the most beautiful thing Abel had ever seen.
After a few moments his mother eased forward with an abalone in one outstretched hand.
The groper watched her. It turned away for a moment, and then came round in a circle.
Abel couldn't hold his breath much longer but he didn't want to miss anything so he hung
there above his mother and the fish with his lungs nearly bursting. The groper arched
back. The mosaic of its scales
shone in the morning sun. His
mother got close enough to touch
the fish with the meat of the
abalone. The fish trembled in the
water and then froze for a
moment as though getting ready
to flee. She ran the shell meat
along its fat bottom lip and let go.
The fish powered forward,
chomped the abalone and
hurtled off into a dark, deep hole.
"Blue groper" by David Clode is licensed under CC BY 4.0

© NSW Department of Education, Sep-21 11
English – Activity 2 – Personification in texts
In the table below are some of the personification examples you may have found in
the Blueback text. Draw an illustration of what you visualise when you read the phrase.
Example of personification What I visualise
The fish powered forward, chomped the abalone and hurtled off into a dark, deep hole.
A high blue shadow twitched and quivered.
… s w the fish h veri g the tur i g, e ei g them cautiously.
The groper watched her.
The fish trembled in the water and then froze for a moment as though getting ready to flee.

12 Stage 3
English – Activity 3 – Writing: Personification
In this extract, Tim Winton uses personification to describe a setting to help the reader
create an image in their minds.
Great, round boulders and dark cracks loomed below. Thin silver fish
hung in nervous schools. Seaweed trembled in the gentle current.
(Extract from Tim Winton’s ‘Blueback’, 2008)
Using the image below for inspiration, write your own descriptive paragraph
including examples of personification. What human characteristics could you give to the
coral? How can you personify the fish? Try to use an abstract noun in your personification,
for example, joy.
"Coral" by SGR is licensed under CC BY 4.0

© NSW Department of Education, Sep-21 13
Maths – Activity 1 – Empty number chart
From Teaching Mathematics by Siemon, Warren, Beswick, Faragher, Miller, Horne, Jazby, Breed, Clarke and Brady, 2020
Normally when we look at a 100 chart, we are using the numbers from 1 to 100. We can
use our knowledge of 10 to help us fill the missing numbers in columns. The charts you
will solve today ’t st rt t 1 the ’t fi ish t 100. You can still use your
knowledge of a number chart to help you fill in the missing white boxes though.
Your challenge is to determine the number sequence through the mazes below.
▪ Use what you know to decide what numbers are missing and to justify the number you placed. ▪ You do not need to follow the maze in sequential steps if you know the value of a place on the maze. For example, using your knowledge of standard hundreds-chart, you know the number 2 boxes directly above 147 is 127. You also know the box to the left one less than 147 which is 146.
When you are feeling confident with this you can try the thousands chart on the next page.
You also have a blank chart which you can ask someone to put a mystery number in and
you can solve it from there.
If you need some more assistance scan the QR code to watch how
you might start the challenge.

14 Stage 3

© NSW Department of Education, Sep-21 15
Maths – Activity 2– Hit it From Mike Askew, A practical guide to transforming primary mathematics, 2016
To watch this game being played scan the QR code or you can read the instructions
below.
nine-sided dice or spinners (on next page)
Paperclips for spinners
This is a two-player game.
• You need to come up with a target number, which is the same number for both of
you. It needs to be a multiple of 100 (for example 200 or 500).
• Each player, on their own piece of paper, put three dashes (_ _ _). This is where
they will write their numbers on to.
• Player one will roll their dice and think about one of the dash's to put their number
into. The goal is to get as close to the target number as possible. If I roll a 7 I can
put it as 7_ _ so 7 hundreds or _ 7 _ for 7 tens or _ _ 7 for 7 ones.
• Keep rolling, filling in your dashes till you and your partner have a three-digit
number. Explain to your partner how close you are. Whoever is closest wins.
• Play again with the same target number or maybe try a bigger number (still a
multiple of 100) but with four digits like 5000.

16 Stage 3

© NSW Department of Education, Sep-21 17
• Science and Technology – Option 1 – The Solar System
Follow the link to ABC iview https://edu.nsw.link/a8D4RB or download the ABC iview App
to watch the teaching video on The Solar System (You will need an account). Search: Mini
Lessons: Science Primary Episode 1 or you can read the instructions below.
Today we are learning more about the Solar System and using our measurement skills to
create a scaled representation of the Solar System.
In our Solar System there is the Sun. The sun is a star. The 8 planets orbit around the sun
and there are asteroids, comets and dwarf planets.
What is a planet and what makes it a planet? Planets must meet these guidelines:
• All planets must orbit around the sun. We have 8 planets which orbit around the
sun.
• Planets must be rounded by their own gravity. Gravity is a force which pulls
everything towards the centre of the planet and keeps it in a round shape.
• A Planet must have cleared its orbiting space of any other objects, so its orbiting
path is clear.
The first 4 planets are known as the inner planets because they are closest to the sun.
They are also known as the rocky planets. They are made of 2 main elements, rocks and
metals, and they have a solid surface.
• Mercury: The smallest planet and closest to the sun.
• Ve us: The h ttest pl et i the S l r S stem E rth’s sister pl et (simil r
size, mass and made of similar materials.
• Earth: Known as the Goldilocks planet because, like the porridge Goldilocks ate,
Earth is not too hot it’s t t c l . It rbits the su t the perfect ist ce,
it is “just right” f r us t live .
• rs: K w s the Re pl et. The R m ’s me this pl et fter the g f
war. Mars is one of the coldest planets in the Solar System.
The next 4 planets are known as the outer planets or gas giants. A gas giant is a planet
made mostly of gases with a small rocky core.
• Jupiter: The biggest planet in the Solar System. 1 year on Jupiter takes the same
amount of time as 12 Earth years.
• Saturn: Saturn has rings around it and it is also known as the king of the moons. It
has 82 moons.
• Uranus: The second last planet is also the coldest planet in the Solar System. It
was named after the Greek god of the sky.
• Neptune: The furthest planet from the sun, is named after the Roman god of the
sea. 1 year on Neptune equals 165 Earth years.

18 Stage 3
Activity: Create a scaled version of the Solar System to represent the size of the planets.
Using the diameter (cm) measurement in the table below to work out the radius of a circle
and create circles to represent the planets. The diameter is a straight line passing through
the centre of a circle to touch both sides of the circumference (edge of the circle). The
radius is the distance from the centre of a circle to its circumference.
The radius is half the diameter. Calculate the radius of each planet by halving the (cm)
diameter.
Table 1: Diameter of planets: (Let 1cm=1000km.)
Planet Diameter
(kilometres) Diameter divided by 1000
(cm) Radius
(cm)
Mercury 2440 2.4
Venus 6052 6.1
Earth 6371 6.4
Mars 3390 3.4
Jupiter 69911 69.9
Saturn 58232 58.2
Uranus 25362 25.4
Neptune 24622 24.6
Source: NASA - https://edu.nsw.link/unKfjG
Use the radius measurement to draw circles using a compass or fold a piece of paper into
4 parts to create a centre (fold to make quarters).
• Use your compass and ruler to open the compass to the radius measurement. Put
the point of the compass onto the paper and carefully draw your circle line. Repeat
for all planets.
• Fold your paper into quarters and unfold to show the centre point. Measure the
radius length along each fold and draw a dot. Draw an arc (curved line) from each
point to the next. It will create a circle.
You may need to join multiple pieces of paper to represent the larger planets.
Once you have created the planet representations
• Arrange the planets in order so you can see all of them at once.
• Think of everyday objects that are similar in size to your representations. For
example:
What type of fruit would fill each circle? Hint: Could you represent Earth with
an orange? What fruit would you use to represent Jupiter?
What type of ball would fill each circle? Hint: Could you use a tennis ball or
cricket ball to represent Earth? What type of ball would you use to represent
Saturn?

© NSW Department of Education, Sep-21 19
• Science and Technology – Option 2 – Planets and
String
Scan the QR code to watch the teaching video on Planets and String or read the
instructions below.
Today we are learning to represent the distance of the planets. We will be representing the
distance of each planet from the sun and also representing the distances between the
planets.
Each planet orbits around the sun. The orbit is not a circle, it is an oval or ellipse. Each
planet takes a different amount of time to orbit the sun. Earth takes 1 year to orbit the sun.
Some planets take less than 1 Earth year to orbit the sun and other planets take longer
than 1 Earth year.
Materials
• 6 metres of string, wool or cotton
• Ruler or tape measure
• Tape
Instructions
• Collect your materials
• Choose a space to create your model. If you can do this outside, it would work
re ll well. If u ’t h ve l t f sp ce but u h ve w lkw r h llw i
your house, lay out the string in that space and mark the planets with some tape.
• Choose which option you will follow.
• If you have lots of space to create this, and 6 metres of string, use the
measurements in the table for option 1.
• If u ’t h ve l t f sp ce r u h ve less th 6 metres f stri g, use
the measurements in the table for option 2. It will create the same model, but
just half as big.
• Use the table on the next page for the distances. The table shows:
• e ch pl et’s ver ge ist ce.
• converted distances for us to use on the string.
• Lay out the string in a straight line. (6 metres for option 1, 3 metres for option 2)
• Choose which end will be “The Su ”.
• Use a measuring tape or ruler to measure the distance of each planet from the sun.
• Use tape, a small piece of paper or tie a knot along the string to create a marker of
where each planet will be located.
• Label the markers with the name of the planet.

20 Stage 3
Planet
Average distance from
the sun (million kms)
Option 1 (Let 1million kms = 1 mm)
Option 2 (Let 1million kms = 2mm)
Mercury 57.9 57 28.5
Venus 108.2 108 54
Earth 149.5 150 75
Mars 227.9 228 114
Jupiter 778.3 778 389
Saturn 1426.6 1427 714
Uranus 2870.6 2870 1435
Neptune 4498.4 4498 2249
When you have made the model:
In your workbook draw your model and answer the questions:
• Which planet do you think would have the shortest orbit? Why?
• Which planet do you think would have the longest orbit? Why?
• Do you think all planets travel at the same speed? Why?
• Did this help to explain why some planets take many Earth years to orbit the sun?
If you have a big space:
• Fix the sun end of the string to the ground. Hold the Neptune marker and travel the
full rbit f ur ‘su ’.
• At the same speed, hold the Earth marker and travel a full orbit.
• Which orbit took longer - Neptune or Earth?
Optional Challenge:
Research the orbit (time to travel around the sun) of each planet and explain this to a
nearby adult.
• Which planet has the longest orbit?
• Which planet has the shortest orbit?
• Describe the sh pe f e ch pl et’s rbit.

© NSW Department of Education, Sep-21 21
Things you need
Activity You will need
Most activities workbook lead pencil and coloured pencils
paper
Care and Connect A mirror (a mirror on a wall will work well)
Brain Break Sun shining on a wall, a lamp or a torch
Maths activities
a game board- you can make it from an egg carton
48 counters (or other items such as beans, dried pasta, LEGO bricks, paper clips or buttons).
paper
2 coloured markers
STEM
straws plastic cup tape
clingwrap string
container filled with water, such as a sink or bucket

22 Stage 3
During the day make sure you take time to
• do a care and connect
• take a brain break
• do some physical activity
Care and connect – Mirror Mirror
Find a mirror and look at your reflection.
Say 3 nice things to yourself. Maybe something
nice about your hair, how you make people
laugh r s methi g th t u’re g t like
swimming.
How did you feel when you said kind things to
yourself?
Now find someone to say 3 nice things to.
How did it feel when you said kind things to
someone else?
How did it make them feel?
Remember it’s imp rt t t be ki t urselves d be nice to others.
Brain break – Shadow Animals
You will need a wall with sunshine shining onto it or, a lamp or torch shining onto a wall.
Hold your hands in front of the light and make shapes with your hands. Look at the
shadow you make on the wall.
Can you make some animal shapes?
Teacher created using images from Canva

© NSW Department of Education, Sep-21 23
English – Activity 1 – Reading: Personification
in Poetry
If u w ul like t view t ’s less online, scan the QR code.
Read the following poem.
Storm by Janeen Brian
Across the sky
the grey slid and spread.
The wind whipped up
turned on its head
hammered the rain
drove each thick drop.
Lightning sparked.
Thu er b me , ‘St p!’
Branches screamed.
Umbrellas scattered.
Gutters choked.
Bridges shattered.
Wildness raged,
it ripped and tore.
The earth ran to rivers,
could swallow no more.
At last, the storm shrugged
and gave a sigh,
cleared the last of the raindrops
from off the sky.
‘J b well e,’ the storm then said.
‘G - ,’ w e the wi .
‘I’ll rest w i ste .'
"Electrical storm" by Max LaRochelle is licensed under CC BY 4.0

24 Stage 3
In the table, write two or three examples of personification you found in the poem.
Write what you believe the meaning of the personification is. Highlight the noun in one
colour and the human characteristics in another colour.
Example of personification The meaning of the personification
At last, the storm shrugged and gave a
sigh
The storm is finally almost over. Sighing is a softer
word and showed that the storm is no longer as
threatening.

© NSW Department of Education, Sep-21 25
English – Activity 2 – Personifying a character
Sc the QR c e f r t ’s less r re the f ll wi g i structi s.
Have a look around your home and select an object that you would like
to personify.
Use your imagination and create a character from your object. Brainstorm ideas about
your character.
For example:
Pete the Personification Pineapple – “The Masked
Pineapple”
Likes:
Adventure, peace and quiet, reading, jam sandwiches,
walking on the beach and dancing
Lives:
With his ginger cat
Describing words:
Adventurous, jolly, quiet, happy, waddles, avid reader of
detective novels, mystery sleuth
"Pineapple" by Pineapple Supply Co. is licensed under CC BY 4.0
Plan your character here.
• Character name:
• What does your character like to do?
• Where do they live? Who do they live with??
• What words could you use to describe your character?

26 Stage 3
English – Activity 3 – Personifying a character (Part 2)
After creating your character, write a narrative using your ideas. Before writing you need to plan your ideas. Remember that narratives include an orientation, complication and a resolution (beginning. middle, end). For example, Pete the Personification Pineapple goes undercover at a birthday party to discover the balloon thief. D ’t f rget, ur ch r cter h s to want something, even if it is just a feeling.
"Pineapple" by Pineapple Supply Co. is licensed under CC BY 4.0
In your workbook, complete a planning table with your ideas
Orientation Complication Resolution
• When (time) • Where (setting) • Who (characters)
• Event or events that start the action • Event or events that happen when the
character tries to solve the problem
• How is the problem solved?
• How does the story end?
You are now ready to write your narrative in your workbook. Remember to include:
• Different types of sentences - simple, compound and complex. Try to use a range of
sentence beginnings.
• Adjectives and similes - help your reader get a clear picture in their mind.
• Dialogue - can your characters speak? Include a little bit of interesting spoken text.
• Paragraphs – remember to group your ideas.
• Range of punctuation – full stops, exclamation marks, speech marks.
• Interesting vocabulary – use attention-grabbing words. Use a different word to
explain your character walking, for example, dawdled, sauntered, and ambled.
Re-re ur writi g t e sure u h ve i clu e et il. D ’t f rget t check ur spelling
and punctuation are correct.
Challenge
Create a poem featuring your object and using personification.

© NSW Department of Education, Sep-21 27
Maths – Activity 1 – Mathematic-tac-toe
This is a game of strategy and will need two players. It is a mathematical version of
noughts and crosses.
Player 1- defender
Player 2- attacker
The aim of the game is for the attacker to get a row, column or diagonal to add up to 15.
The defender aims to stop this.
You are only allowed to use each of the numbers 1-9 once in a game.
How to play:
1. Draw up a tic tac toe (naughts and crosses board)
2. Each player chooses a coloured marker to be.
3. The defender goes first placing a number from 1 to 9 on the playing board.
4. The attacker choses any number from (that has not already been used) and places
it on the board.
5. Turns continue until either the attacker scores a total of 15 either horizontally,
vertically or diagonally, making them the winner. The defender wins if the attacker
is unable to make 15.
In the game below the defender is using a black marker and the attacker is using a green
marker. It is the turn of the attacker to go next. If you were playing what would be your
next move and why?

28 Stage 3
Maths – Activity 2 – Play Mancala – an ancient game of
strategy
Scan the code to watch the video or follow the instructions below.
You will need:
• a game board- you can make it from an
egg carton
• 48 counters (or other items such as
beans, dried pasta, LEGO bricks, paper
clips or buttons). They do not need to be
the same object. Place 4 items in each hole
• someone to play with (you can also play this
game in teams so you can share your brainpower!)
Instructions Picture
Get ready:
• Each player sits opposite each other facing the long side of the game board (egg carton).
• Players place 4 beans into each of the cups.
• The collection cups (mancala stores), are placed at each end of the game board, and remain empty of beans.
Goal:
• Get beans into your keep tray
How to play:
• Pick up all the beans from one cup.
• Moving to the right, drop a bean into each cup (including the keep tray) until your hand is empty.
• If you finish on a keep tray, have another turn.
• The winner is the player with all beans in the keep tray.

© NSW Department of Education, Sep-21 29
STEM – Watercraft (boat) challenge
Challenge
Design and build a boat that can hold the weight of ¼ cup of water for at least 10 seconds
without sinking.
Rules
• You can only use the materials on the list, but you do not have to use all the
materials.
• Your boat needs to hold a weight of ¼ cup of water for at least 10 seconds without
sinking.
• The boat must float by itself (you cannot hold onto the boat).
Materials
• straws
• clingwrap
• tape
• string
• plastic cup
• container filled with water, such as a sink
or bucket
Instructions
• Read the rules.
• Collect materials and think about how they could be used for the challenge.
• Record your ideas and results in your workbook.
Step 1: Brainstorm and design your boat
• Test the materials by floating them in the
container of water.
• Think about how you are going to construct the
boat.
• What shape are you going to make the boat?
• How will you support the heavy weight?
• Sketch some designs in your workbook.
• Does your design meet the challenge rules?
• Which solution are you going to trial? Why did you choose that solution?
Step 2: Time to build! Make and test your boat
• Build your boat.
Tip: Shape matters! Try tying
or taping the straws together
to make a raft shape or a
boat shape and see which
one floats best.

30 Stage 3
• Make your design and test it.
• Does it float? Can it hold the weight of ¼ cup of water?
• Draw or take a photo of your design.
• Why do you think it did/did not work?
• What else could you try?
Tip: Shape matters! Try tying or taping the straws together to make a
raft shape or a boat shape and see which one floats best.
Step 3: Test, improve and present
• Redesign or make improvements to your boat.
• What improvements did you make? Note this in your workbook.
• How many times did you have to test your design before you were successful?
• Did you meet the challenge?
Tips:
If your boat sinks easily, try changing the width of the boat or the height of its sides.
If your boat tips easily, try moving the cup of water to another position.
Too easy?
• How much weight can your boat hold? Keep adding weights until it sinks!
OR
• Change the materials you make your boat out of. What is the best design?
What makes it float?
Shape matters when you want something to float. Buoyancy is a force on an object
making that object rise or move upward (float). An object will float if the volume of water it
displaces weighs more than the object. An object will sink if the volume of water it
displaces weighs less than the object.